SENA TECHNOLOGIES SP20 Motorcycle Bluetooth Communication System User Manual Manual 10C en v1 0 1 0x

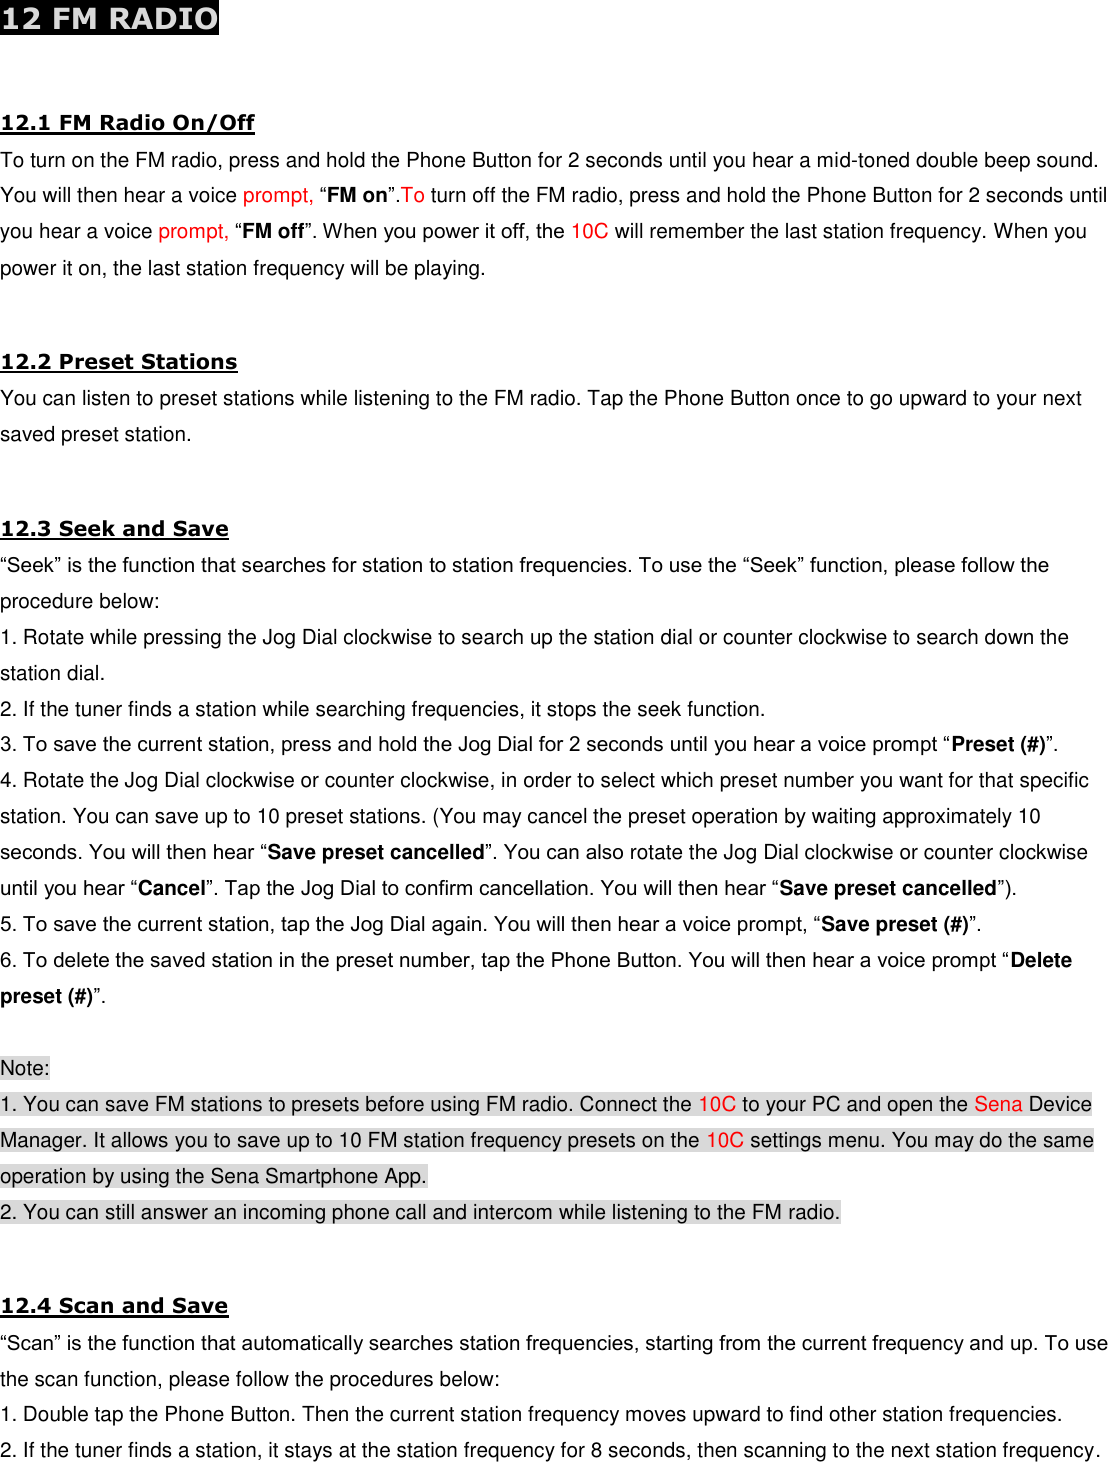
Sena Technologies,Inc. Motorcycle Bluetooth Communication System Manual 10C en v1 0 1 0x

User Manual

        10C Motorcycle Bluetooth® Camera & Communication System             SENA    www.sena.com          User’s Guide
©  1998-2015 Sena Technologies, Inc. All rights reserved. Sena Technologies, Inc reserves the right to make any changes and improvements to its product without providing prior notice.  Sena™ is a trademark of Sena Technologies, Inc. or its subsidiaries in the USA and other countries. 20S™, PRISM™, Snowtalk™, 3S™, SMH10™, SMH5™, SMH5-FM™, SPH10™, SPH10H-FM™, SMH10R™, SPH10S™, SPH10H™, SR10™, SR10i™, SMH10™, EXPAND™, Bluetooth Pack for GoPro® are trademarks of Sena Technologies, Inc. or its subsidiaries. These trademarks may not be used without the express permission of Sena.  GoPro® is a registered tradmeark of Woodman Labs of San Mateo, California. Sena Technologies Inc. (“Sena”) is not affiliated with Woodman Labs. The Sena Bluetooth Pack for GoPro®  is an after-market accessory specially designed and manufactured by Sena Technologies, Inc. for the GoPro®  Hero3 allowing for Bluetooth capabilities.  The Bluetooth®  word mark and logos are owned by the Bluetooth SIG, Inc. and any use of such marks by Sena is under license. iPhone, iPod touch are registered trademarks of Apple Inc. Zumo™ is a trademark of Garmin Ltd. or its subsidiaries. TomTom™ is the trademark or registered trademark owned by TomTom International B.V. Other trademarks and tradenames are those of their respective owners.
 CONTENTS 1 INTRODUCTION 2 PACKAGE CONTENTS 3 INSTALLING THE 10C ON YOUR HELMET 4 GETTING STARTED 4.1 Button Operation 4.2 Powering On and Off 4.3 Charging 4.4 Checking the Battery Level 4.4.1 LED Indicator 4.4.2 Voice Prompt Indicator 4.5 Volume Adjustment 4.6 Sena Softwares 4.6.1 Sena Device Manager 4.6.2 Sena Smartphone App 5 CAMERA OPERATION 5.1 Camera On or Off 5.2 Camera Modes 5.3 Video Recording 5.4 Photo Shooting 5.5 Video Tagging 5.6 Playback 6 PAIRING THE 10C WITH BLUETOOTH DEVICES 6.1 Mobile Phone Pairing - Mobile Phone, Bluetooth Stereo Device 6.2 Second Mobile Phone Pairing - Second Mobile Phone, GPS, and SR10 6.3 Intercom Pairing 6.3.1 Pairing with Other 10C Headsets for Intercom Conversation 6.3.2 Pairing with Other Sena Headset Models for Intercom Conversation 6.4 Advanced Selective Pairing: A2DP Stereo or Handsfree 6.4.1 A2DP Stereo Music Only 6.4.2 HFP for Phone Call Only 7 MOBILE PHONE, GPS, SR10 7.1 Mobile Phone Call Making and Answering 7.2 Speed Dialing 7.3 GPS Navigation 7.4 Sena SR10, Two-Way Radio Adapter 8 STEREO MUSIC 8.1 Bluetooth Stereo Music 8.2 Music Sharing 9 INTERCOM
9.1 Two-way Intercom 9.1.1 Starting Two-way Intercom 9.1.2 Ending Two-way Intercom 9.2 Three-way Intercom 9.2.1 Starting Three-way Intercom 9.2.2 Ending Three-way Intercom 9.3 Four-way Intercom 9.3.1 Starting Four-way Intercom 9.3.2 Ending Four-way Intercom 10 THREE-WAY CONFERENCE PHONE CALL WITH INTERCOM PARTICIPANT 11 UNIVERSAL INTERCOM 11.1 Universal Intercom Pairing 11.2 Two-way Universal Intercom 11.3 Three-way Universal Intercom 11.4 Four-way Universal Intercom 11.4.1 Four-way Universal Intercom Case 1 11.4.2 Four-way Universal Intercom Case 2 12 FM RADIO 12.1 FM Radio On/Off 12.2 Preset Stations 12.3 Seek and Save 12.4 Scan and Save 12.5 Temporary Preset 12.6 Region Selection 13 FUNCTION PRIORITY 14 CONFIGURATION SETTING 14.1 Headset Configuration Setting 14.1.1 Assigning Speed Dial 14.1.2 Enabling/Disabling Voice Activated Phone Answering 14.1.3 Enabling/Disabling Voice Activated Intercom 14.1.4 Enabling/Disabling Voice Prompts 14.1.5 Delete All Bluetooth Pairing Information 14.1.6 Exit Voice Configuration Menu 14.2 Camera Configuration Setting 14.2.1 Photo Mode 14.2.2 Video Mode 14.2.3 Video Resolution 14.2.4 Timelapse Interval Setting 14.2.5 Date Caption On/Off 14.2.6 Microphone On/Off 14.2.7 Auto Camera Sleep 14.2.8 SD Card Format
15 FIRMWARE UPGRADE 16 TROUBLESHOOTING 16.1 Intercom Failure 16.2 Intercom Reconnection 16.3 Fault Reset 16.4 Factory Reset 17 OPERATION QUICK REFERENCE CERTIFICATION AND SAFETY APPROVALS FCC Compliance Statement FCC RF Exposure Statement FCC Caution CE Declaration of Conformity Industry Canada Statement Bluetooth License WEEE (Waste Electrical and Electronic Equipment) SAFETY INFORMATION Product Storage and Management Product Use Battery PRODUCT WARRANTY AND DISCLAIMER Limited Warranty Warranty Exclusions Reasons for Limited Liabilities Limitation of Liability Liabilities Disclaimer Warranty Service Free-of-charge Service Charged Service Return for Full Refund
 1 INTRODUCTION  Thank you for choosing the Sena 10C, Motorcycle Bluetooth Camera & Communication System. With the 10C, you can record videos, take photos, call handsfree on your Bluetooth mobile phone, listen to stereo music or voice instructions of GPS navigations wirelessly, and have intercom conversations in full duplex with a passenger or other motorcycle riders.  The 10C is compliant with the Bluetooth 4.1 supporting the following profiles: Headset Profile, Hands-Free Profile (HFP), Advanced Audio Distribution Profile (A2DP), and Audio Video Remote Control Profile (AVRCP). Please check with the manufacturers of other device to determine their compatibility with this headset.  Please read this user’s guide carefully before using the headset. Also check www.sena.com for the latest version of the user’s guide and additional information related to Sena Bluetooth products.  The 10C features: ●  Bluetooth 4.1 ●  Unibody design for Bluetooth headset and video camera ●  1080p Full HD video with 3.5MP still shot image capture ●  Video mode: 1080p:30fps, 720p:30/60fps ●  Versatile photo mode: shot, burst and timelapse shot functions ●  Pitch angle adjustment ●  Lens rotation up to 30 degrees ●  Support Micro SD 32GB memory card (not included) ●  Bluetooth intercom up to 900 meters (980 yards) ●  Four-way intercom ●  Voice prompts ●  Voice recording with background music overlay ●  Smartphone App for iPhone and Android ● Advanced Noise Control™  ●  Universal Intercom™  ●  Music sharing ●  Built-in FM radio tuner with a station scan and save function ●  Easy operation by versatile Jog Dial ●  Water resistant for use in inclement weather ●  Can be used while charging on road trips ●  Firmware upgradeable  *in open terrain  Key Specifications: ●  Bluetooth 4.1
●  Supporting profiles: Headset Profile, Hands-Free Profile (HFP), Advanced Audio Distribution Profile (A2DP), and Audio Video Remote Control Profile (AVRCP).
 2 PACKAGE CONTENTS  10C Headset Main Unit 10C Clamp Unit 10C Glued Surface Mounting Plate Speakers Wired Boom Microphone Wired Microphone USB Power & Data Cable Microphone Sponge (2) Velcro Pad for Speaker (2) Velcro Pad for Wired Boom Microphone Velcro Pad for Wired Microphone Boom Microphone Holder Velcro Pad for Boom Microphon Holder Foam Speaker Covers (2) Speaker Pad (Thick) (2) Speaker Pad (Thin) (2) Allen Wrench Cigarette Charger
 3 INSTALLING THE 10C ON YOUR HELMET  1.  Loosen the two screws on the back plate of the clamp using the enclosed Allen Wrench. Insert the back plate of the clamp unit between the internal padding and external shell of the helmet, and tighten the two screws. 2.  Attach the headset main unit to the clamp. Insert the main unit in the clamp until you feel the click that signals a secure attachment. 3.  If you have any problem mounting the clamp unit on the helmet for any reason, you may use the glued surface mounting plate which can be attached to the external surface of the helmet. 4.  Place the helmet speakers along with the velcro pads, centered to your ear, in the ear pockets of the helmet. If the helmet has deep ear pockets, you can use the speaker pads to place the speakers closer to your ears. ●  Locate a proper surface on the helmet to attach the unit, clean the helmet surface location with a moistened towel, and allow to dry thoroughly. ●  Peel off the cover of the adhesive tape of the plate and attach the unit on the proper surface of your helmet.   Note: Sena recommends the clamp unit over the glued surface mounting plate. Even though the glued surface mounting plate is provided for convenience, Sena does not assume any responsibility for use of it. Users may have to use the glued plate at their own risk and responsibility.  5. Attach the boom microphone included in the “Basic Kit” between the internal padding and the external shell. The boom microphone should be mounted on the inside surface of the external shell so it is facing properly towards your mouth. Please make sure that the microphone is located close to your mouth when you wear the helmet. You can use the enclosed velcro pad and holder for the boom microphone to ensure secure placement. In the case of the wired microphone included in the “Full-face Helmet Kit”, attach the enclosed velcro pad for wired microphone to the inside of the chin guard for full-face helmets. Place the wired microphone on the velcro pad and attach it to the connector of the speaker cable. 6. When you use the boom microphone included in the “Basic Kit”, please make sure that the fin side of the microphone is facing outward; away from your lips. You can easily recognize it by touching the fin with your fingers. 7.  To remove the headset main unit from the clamp, please make sure to pull out the speaker cable connector from the main unit first. Then, remove the main unit from the clamp. 8.  (카메라 pitch angle 조정) 9.  (카메라 recording angle 조정)
 4 GETTING STARTED 4.1 Button Operation  Phone Button ●  Enter into mobile phone pairing mode ●  Answer and end a mobile phone call ●  Speed Dial ●  Call transfer between mobile phone and headset ●  Enter into factory reset mode ●  Turn on/off FM tuner  Jog Dial ●  Volume adjustment by rotating ●  Enter into intercom pairing mode ●  Start and end intercom conversation ●  Answer and end a mobile phone call ●  Reject an incoming mobile phone call ●  Play and pause Bluetooth stereo device ●  Track forward and track back by pressing down and rotating ●  Enter into voice configuration setting ●  Navigate through configuration menu ●  Seek FM radio station  Camera Button ●  Take photo shots ●  Record videos ●  Turn on/off camera ●  Enter into camera configuration  4.2 Powering On and Off Press the Jog Dial and the Phone Button at the same time to power the headset either on or off. To power on the headset, press the Jog Dial and the Phone Button at the same time until the blue LED appears while hearing the ascending beeps. To power off the headset, press the Jog Dial and the Phone Button at the same time until the red LED appears briefly while hearing descending beeps.  4.3 Charging You can charge the headset by connecting the supplied USB power & data cable into a computer’s USB port or USB wall charger. You can use any standard micro-USB cable to charge the headset. The LED turns red while the headset is charging and turns blue when it is fully charged. It takes about 2.5 hours to be completely charged. You can use all the functions of the headset while charging.  4.4 Checking the Battery Level You can check the battery level in two different ways when the headset is powering on.
4.4.1 LED Indicator When the headset is powering on, the red LED flashes rapidly indicating the battery level.  4 flashes = High, 70~100% 3 flashes = Medium, 30~70% 2 flashes = Low, 0~30%  4.4.2 Voice Prompt Indicator When you power on the headset, keep pressing the Jog Dial and the Phone Button simultaneously for about 3 seconds until you hear high tone triple beeps. Then you will hear a voice prompt indicating the battery level is high, medium, or low.  4.5 Volume Adjustment You can easily adjust the volume by rotating the Jog Dial. You will hear a beep when the volume reaches the maximum or minimum level. The volume is set and maintained independently at different levels for each audio source even when you reboot the headset. For example, once you set the volume for mobile phone handsfree, it will not change even if you adjust the volume for your Bluetooth MP3 music. Therefore, you can always maintain the preferred optimum volume level for each audio source.  4.6 Sena Softwares  4.6.1 Sena Device Manager The Sena Device Manager allows you to upgrade the firmware and configure the device settings directly from your PC. Using this software, you can assign speed dial presets, FM radio frequency presets and more. It is available to download for both Windows and Mac. For more information on downloading the Device Manager, please visit www.sena.com.  4.6.2 Sena Smartphone App The Sena Smartphone App allows you to configure device settings and view the Quick Start Guide. Pair your phone with your 10C headset (please refer to section 7.1, “Mobile Phone Pairing”). Run the Sena Smartphone App and you can configure its settings directly from your smartphone. You can download the Sena Smartphone App for Android or iPhone from www.sena.com/app.
 5 CAMERA OPERATION 5.1 Camera On or Off To turn on or off the camera, press the Camera Button and the Phone Button simultaneously. The green LED turns on while the camera is on. The camera goes to sleep mode after five minutes of inactivity. To wake up the camera, tap the Camera Button.  5.2 Camera Modes  Mode Application Button Video Record video Press and hold the Camera Button for 1 sec Timelapse Capture series of videos at timed intervals  Press and hold the Camera Button for 1 sec Single Shot Capture a single photo Tap the Camera Button Burst Shot Capture up to 10 photos in one second Tap the Camera Button Playback* Playback videos and photos - Settings Adjust camera settings Press and hold the Camera Button for 3 sec  Note: *Playback mode activates only if the camera is connected to a TV using a micro HDMI cable.  5.3 Video Recording Press and hold the Camera Button for 1 second to start recording. The green LED will flash and you will hear a voice prompt, “Recording”. Press and hold the Camera Button for 1 second to stop recording. You will hear a voice prompt, “Recording stopped”. To select video mode and change video resolution, please refer to section 6.2, “Video Mode” and section 6.3, “Video Resolution”.  During video recording, you can record your voice on the video through the headset microphone. Also if you are having intercom conversations during video recording, you can record your friends’ voices as well. Audio recording is not supported for timelapse mode.  Below is a table of approximate video recording times to micro SD card size in specific resolutions and frame rates.   1080P / 30FPS 720P / 60FPS 720P / 30FPS
1GB 9 min 12 min 24 min 2GB 18 min 24 min 48 min 4GB 36 min 48 min 1 h 36 min 8GB 1 h 12 min 1 h 36 min 3 h 12 min  16GB 2 h 24 min 3 h 12 min 6 h 24 min  32GB 4 h 48 min 6 h 24 min 12 h 48 min    Note: - You cannot record videos without a micro SD card. - The headset gives a warning and automatically stops recording when the micro SD card is full or the battery runs out. Your video will be saved before the headset powers off. - If the camera becomes too hot, it gives a high temperature warning. Cool down your camera before further use. - The maximum size per video is limited to 4GB. Therefore, when the video reaches the 4GB size limit during recording, it saves and creates a new video file to continue recording.  5.4 Photo Shooting Tap the Camera Button to take photos. The green LED will flash and you will hear a shutter sound. To select photo mode, please refer to section 14.2.1, “Photo Mode”. The camera resolution is fixed to 3.5MP with 3:2 aspect ratio.  5.5 Video Tagging Video Tagging allows you to save a video file 30 seconds before and 60 seconds after a selected point. This eliminates the file storage of unnecessary video content. You have to be in loop recording mode to use Video Tagging.  1. Double tap the camera button to start loop recording. Green LED will flash twice and you will hear a voice prompt, “Video tagging ready”. 2. When you encounter a situation that requires recording, press and hold the camera button for 1 second. Green LED will flash and you will hear a voice prompt, “Video tagging”.  3. When Video Tagging is completed, you will hear a voice prompt, “Tagging complete”. 4. Double tap the camera button during Video Tagging to stop loop recording. You will hear a voice prompt, “Video tagging off”.  5.6 Playback Playback videos and photos by connecting the headset to a TV (requires a micro HDMI cable sold separately).  To browse videos and photos: 1. Plug the camera into a TV/HDTV with a micro HDMI cable. 2. The TV displays previews of videos and photos stored on the micro SD card.
3. Move right and left by rotating the Jog Dial clockwise or counter clockwise. 4. Select an item or play a video by tapping the Camera Button. 5. Move back or cancel by tapping the Jog Dial.  Note: You can choose to view only videos, only photos, or all videos and pictures by tapping the Phone Button.
 6 PAIRING THE 10C WITH BLUETOOTH DEVICES  Before using the 10C Bluetooth headset with any other Bluetooth devices for the first time, you will need to pair them together. You can pair the 10C with Bluetooth mobile phones, Bluetooth stereo devices such as MP3 players, or motorcycle specific Bluetooth GPS navigation, and with other Sena Bluetooth headsets. The pairing operation is required only once for each Bluetooth device. The headset remains paired with the devices and automatically reconnects to them when they are within range. You will hear a high toned single beep and a voice prompt whenever the headset reconnects to the paired device: “Phone connected” to a mobile phone, “Media connected” to a Bluetooth stereo device.  6.1 Mobile Phone Pairing - Mobile Phone, Bluetooth Stereo Device Follow the procedure below to pair a mobile phone, or a Bluetooth stereo device such as an MP3 player with your 10C. 1. Turn on the 10C and press and hold the Phone Button for 5 seconds until the LED flashes red and blue alternately and you hear multiple beeps. You will hear a voice prompt, “Phone pairing”. 2. Search for Bluetooth devices on your mobile phone. Select the Sena 10C in the list of the devices detected on the mobile phone. 3. Enter 0000 for the PIN. Some mobile phones may not ask for the PIN. 4. The mobile phone confirms that pairing has been completed and the 10C is ready to use. You will hear a voice prompt, “Your headset is paired”. 5. If the pairing process is not completed within three minutes, the 10C will return to stand-by mode.  Note: - If the Bluetooth connection between the headset and a mobile phone is disconnected, tap the Phone Button to recover the Bluetooth connection immediately. - If the Bluetooth connection between the headset and a media player is disconnected, press the Jog Dial for 1 second to recover the Bluetooth connection and play.  6.2 Second Mobile Phone Pairing - Second Mobile Phone, GPS, and SR10 Typical Bluetooth headsets can connect with only one HFP (Hands-Free-Profile) Bluetooth device such as mobile phone,  GPS, and Sena SR10, but second mobile phone pairing pairing allows the headset to connect with two HFP devices simultaneously. So, when you already have a mobile phone connected with the 10C, you can also pair and connect a second mobile phone or other HFP devices. 1. To pair the HFP device, press and hold the Jog Dial for 5 seconds until the red LED flashes red rapidly and you hear a voice prompt, “Intercom pairing”. 2. Within 2 seconds, tap the Phone Button again, then the LED flashes blue rapidly and you will hear a voice prompt, “Second mobile phone pairing”. 3. Search for Bluetooth devices on the HFP device. Select the Sena 10C in the list of the devices detected on the HFP device. 4. Enter 0000 for the PIN. Some HFP devices may not ask for the PIN.
5. The HFP device confirms that the pairing is completed and the 10C is ready to use. You will hear a voice prompt, “Your headset is paired”.  Note: - If the GPS is also your preferred Bluetooth stereo music source, you can pair the GPS to the 10C by following the simple procedures in “6.1 Mobile Phone Pairing”. - You have to use a motorcycle specific GPS, which transmits turn-by-turn voice instructions to the headset by Bluetooth. Most automotive GPS systems do not have this feature. - The Sena SR10 is a Bluetooth two-way radio adapter for group communication, and uses Hands-Free-Profile. The incoming audio from the two-way radio via SR10 is heard in the background while having an intercom conversation or a mobile phone call. - The GPS navigation or a radar detector could be connected to the SR10 by wire. The GPS voice instruction or the radar detector alarm is also heard in the background via SR10 while having an intercom conversation or a phone call. Please refer to the SR10 User’s Guide for details.  6.3 Intercom Pairing  6.3.1 Pairing with Other 10C Headsets for Intercom Conversation The 10C can be paired with up to three other headsets for Bluetooth intercom conversation. 1. Turn on the two 10C headsets (A and B) that you would like to pair with each other. 2. Press and hold the Jog Dial of the headset A and B for 5 seconds until red LEDs of the both units start to flash rapidly. You will hear a voice prompt, “Intercom pairing”. 3. Simply tap the Jog Dial of any one of the two headsets A and B, and wait until the LEDs of both headsets turn to blue and intercom connection is automatically established. The two 10C headsets A and B are paired with each other for intercom conversation. If the pairing process is not completed within one minute, the 10C will return to stand-by mode.  Pairing A & B 4. You can make other pairings between headsets A and C, and between headsets A and D by following the same procedure as above.
                            Pairing A & C       Pairing A & D  5. The intercom pairing queue is ‘Last-Come, First-Served’. If a headset has multiple paired headsets for intercom conversations, the last paired headset is set as first intercom friend. The previous intercom friend becomes second intercom friend, and third intercom friend.  Note: For example, after the pairing procedures listed above, headset D is the first intercom friend of headset A. Headset C is the second intercom friend of headset A, and headset B is the third intercom friend of headset A.  6.3.2 Pairing with Other Sena Headset Models for Intercom Conversation The 10C can be paired with all other Sena headset models such as the 20S, SMH10 and the SMH5 for intercom conversation. Please follow the same procedure as above to pair with these headset models.  Note: The SMH5 cannot participate in three-way or four-way conference intercom with the 10C. The SMH5 has a limited capability of having two-way intercom with other Sena headsets.  6.4 Advanced Selective Pairing: A2DP Stereo or Handsfree When you are using a smartphone, sometimes you many need to selectively use the 10C for A2DP stereo music only or for mobile phone handsfree only. These instructions are for advanced users who want to pair the 10C to their smartphones with only one selective profile: A2DP for stereo music of HFP for phone calls.  If you have previously paired a mobile phone to the 10C, you must clear the previous pairing list on both devices: the mobile phone and the 10C. To clear the pairing list on the 10C, please do a factory reset or follow the pairing list clearing procedure described in section 16.4, “Factory Reset” or 14.1.5, “Delete All Bluetooth Pairing Information”. To clear the pairing list on the mobile phone, please refer to the mobile phone manual. For most smartphones, delete the Sena 10C from the list of Bluetooth devices in the settings menu.  6.4.1 A2DP Stereo Music Only 1. Turn on the headset and press the Phone Button for 5 seconds until the LED flashes red and blue alternately and you hear multiple beeps. 2. Within 2 seconds, tap the Jog Dial again, then the LED flashes red and you hear “Media selective pairing”. 3. Search for Bluetooth devices on your smartphone. Select the Sena 10C in the list of devices detected on your phone. 4. Enter 0000 for the PIN. Sometime smartphones may not ask for PIN.  6.4.2 HFP for Phone Call Only 1. Turn on the headset and press the Phone Button for 5 seconds until the LED flashes red and blue alternately and you hear multiple beeps. 2. Within 2 seconds, tap the Phone Button again, then the LED flashes blue and you hear “Phone selective pairing”.  3. Search for Bluetooth devices on your smartphone. Select the Sena 10C in the list of devices detected on your phone.
4. Enter 0000 for the PIN. Some smartphones may not ask for PIN.   7 MOBILE PHONE, GPS, SR10 7.1 Mobile Phone Call Making and Answering 1. When you have an incoming call, simply tap the Phone Button or the Jog Dial to answer the call. 2. You can also answer the incoming call by loudly speaking any word of your choice if Voice Activated Phone Answering (VOX Phone) is enabled, unless you are connected to intercom. 3. To end a call, tap the Phone Button or press the Jog Dial for 2 seconds until you hear a beep, or wait for the called person to end the call. 4. To reject a call, press the Jog Dial for 2 seconds until you hear a beep while the phone is ringing. 5. To transfer a call between the mobile phone and the headset during the phone conversation, press the Phone Button for 2 seconds until you hear a beep. 6. There are several ways to make a phone call:  - Enter numbers on your mobile phone’s keypad and make a call. Then the call is automatically transferred to the headset.  - For some older mobile phones, which do not automatically transfer calls to the headset, press the Phone Button after entering phone numbers on the mobile phone keypad.  - Tap the Phone Button in stand-by mode to activate the voice dialer of your mobile phone. For this, the voice dialing function must be available on the mobile phone. Refer to your mobile phone manual for further instruction.  Note: 1. If you have two phones connected to your headset and you have an incoming call from the second phone during the call of the first phone, then you may still receive the call from the second phone. In this case, the call from the first phone is on waiting mode. If you end a call, then it will automatically guide you to the first phone call. 2. If you have a mobile phone and a GPS connected to your headset, you may not be able to listen to the GPS voice instruction during the phone call.  7.2 Speed Dialing You can quickly make a phone call by using the voice speed dial menu. 1. To enter into the voice speed dial menu, double tap the Phone Button and you will hear a mid-toned single beep and a voice prompt, “Speed dial”. 2. Rotate the Jog Dial clockwise or counter-clockwise to navigate between the menus. You will hear prompts for each menu item. 3. Tap the Phone Button to select a voice menu among the followings:  (1) Last number redial (2) Speed dial 1 (3) Speed dial 2 (4) Speed dial 3 (5) Cancel
 4. After selecting the last number redial menu, you will hear a voice prompt, “Last number redial”. Then, to redial the last phone call number, tap the Phone Button. 5. To call one of the speed dials, rotate the Jog Dial clockwise or counter-clockwise to navigate between the menus until you hear a voice prompt, “Speed dial (#)”. Then, tap the Phone Button. 6. If you want to exit the speed dial immediately, rotate the Jog Dial until you hear a voice prompt, “Cancel”, and tap the Phone Button or the Jog Dial. If you do not press any button within 15 seconds, the 10C will exit the voice speed dial menu and go back to stand-by mode.  Note: 1. Make sure that you connect the mobile phone and the headset to use the speed dial function. 2. You need to assign speed dial numbers before using the speed dial (please refer to section 14.1.1, “Assigning Speed Dial”).  Answer  Tap Phone Button or Tap Jog Dial or Say “Hello” End Tap Phone Button or Press Jog Dial for 2” Reject  Press Jog Dial for 2” Transfer  Press Phone Button for 2” Call  Use phone keypad Speed Dial  Double tap Phone Button Voice Dial  Tap Phone Button Mobile Phone Call Button Operations 7.3 GPS Navigation If you pair a Bluetooth GPS to the 10C as described in section 7.2, “Second Mobile Phone Pairing”, you can listen to GPS instructions wirelessly. Rotate the Jog Dial to adjust volume. The GPS voice instruction interrupts intercom conversation but it is automatically reestablished after the GPS voice instruction ends.  7.4 Sena SR10, Two-Way Radio Adapter You can use a two-way radio and the 10C Bluetooth intercom simultaneously by using the Sena SR10, a Bluetooth Two-way Radio Adapter (please refer to section 6.2, “Second Mobile Phone Pairing”). Incoming audio from the two-way radio will not interrupt an intercom conversation but is heard in the background. This is useful when you have an intercom conversation with a passenger on the back seat and use a two-way radio for group communication with other motorcycle riders.
 8 STEREO MUSIC 8.1 Bluetooth Stereo Music The Bluetooth audio device must be paired with the 10C by following the “Bluetooth Stereo Device Pairing” procedures described in the section 7.1. The 10C supports the audio/Video Remote Control Profile (AVRCP), so if your Bluetooth audio device also supports the AVRCP, you can use the 10C to remotely control music playback. Not only can you adjust the volume but you can also use functions such as play, pause, next track and previous track.  1. To play or pause music, press and hold the Jog Dial for 1 second until you hear a double beep. (10C 그림으로 교체) 2. To adjust the volume, rotate the Jog Dial. (10C 그림으로 교체) 3. To track forward or track back, rotate while pressing the Jog Dial clockwise or counter clockwise. (10C 그림으로 교체) 8.2 Music Sharing You can start sharing music with an intercom friend using Bluetooth stereo music during a two-way intercom conversation (please refer to section 9.1, “Two-way Intercom”). When you terminate music sharing, you can go back to the intercom conversation. To start or terminate sharing music, press and hold the Jog Dial for 1 second during an intercom conversation until you hear a double beep. To track forward or track back, rotate while pressing down the Jog Dial clockwise or counter clockwise.  Note: 1. Both you and your intercom friend can remotely control music playback such as track forward and track back. 2. Music sharing will be paused when you are using your mobile phone or listening to GPS instructions.
9 INTERCOM  Please make sure your intercom devices are paired as described in section 6.3, “Intercom Pairing”. 9.1 Two-way Intercom 9.1.1 Starting Two-way Intercom You can start an intercom conversation with one of any intercom friends by tapping the Jog Dial: single tap to intercom with the first intercom friend, double tap to intercom with the second intercom friend, and triple tap to intercom with the third intercom friend.        Start Two-way Intercom Conversation (10C 그림으로 교체)  9.1.2 Ending Two-way Intercom To terminate an intercom conversation, single tap the Jog Dial. Any intercom connection with any intercom friend will be terminated by a single tap. A double or triple tap will do nothing in this case.   End Two-way Intercom Conversation (10C 그림으로 교체)   1st intercom friend 2nd intercom friend 3rd intercom friend Start intercom Single tap Double tap Triple tap End intercom Single tap Single tap  Single tap  Start & End Two-way Intercom  9.2 Three-way Intercom 9.2.1 Starting Three-way Intercom You (A) can have a three-way conference intercom with two other 10C friends (B & C) by establishing two intercom connections simultaneously. While a three-way conference intercom is in progress, mobile phone connection of all three participants is temporarily disconnected. However, as soon as the conference intercom terminates or one of the participants leaves the intercom, all mobile phones automatically reconnect to their headsets. If you have an incoming mobile phone call during the conference intercom, terminate the conference intercom to automatically reconnect and receive the phone call. 1. You (A) need to be paired with two other friends (B & C) for three-way conference intercom.
  2. Start an intercom conversation with one of the two friends in your intercom group. For example, you (A) may start an intercom conversation with the intercom friend (B). Or intercom friend (B) may start an intercom call with you (A).    3. The second intercom friend (C) may join the intercom by making an intercom call to you (A).   4. Now you (A) and two 10C intercom friends (B & C) are having a three-way conference intercom.  9.2.2 Ending Three-way Intercom You can completely terminate the conference intercom or just disconnect an intercom connection with one of your active intercom friends. 1. Press the Jog Dial for 1 second until you hear a beep to terminate three-way conference intercom completely. It terminates both intercom connections with (B) and (C). 2. Tap or double tap the Jog Dial to disconnect intercom connection with one of the two intercom friends accordingly. For example, by single tapping the Jog Dial, you can terminate the intercom connection with just the first intercom friend (B). However, you still have the intercom connection with your second intercom friend (C).  Jog Dial Operation Result Press for 1” Disconnect (B) & (C)
Single tap Disconnect (B) Double tap Disconnect (C) End Three-way Intercom  9.3 Four-way Intercom 9.3.1 Starting Four-way Intercom You can have four-way conference intercom with three other 10C users by adding one more intercom participant to the three-way intercom. While you are having a three-way intercom as above in section 9.2, a new participant (D), who is an intercom friend of your intercom friend (C), may join the conference intercom by making an intercom call to your intercom friend (C). Please note that in this case, the new participant (D) is an intercom friend of (C), not of you (A).  9.3.2 Ending Four-way Intercom As same in the case of three-way intercom, you can completely get out of the four-way conference intercom or just disconnect a single intercom connection. 1. Press the Jog Dial for 1 second until you hear a beep to terminate four-way conference intercom. It terminates the intercom connections between you (A), and your intercom friends (B) and (C).  2. Tap or double tap the Jog Dial to disconnect the intercom connection with one of the two intercom friends accordingly. However, when you disconnect the second friend (C) by double tapping the Jog Dial, you will be disconnected with the third participant (D) as well. This is because the third participant (D) is connected with you via the second friend (C).   Jog Dial Operation Result Press for 1” Disconnect (B), (C) & (D) Single tap Disconnect (B) Double tap Disconnect (C) & (D) End Four-way Intercom
 10  THREE-WAY  CONFERENCE  PHONE  CALL  WITH  INTERCOM PARTICIPANT  1. When you have an incoming mobile phone call during an intercom conversation, you will hear a ring tone. You can choose whether to 1) answer the mobile phone call and stop the intercom conversation, or 2) reject the phone call and stay on the intercom conversation. a.  To answer the  phone call and stop the intercom conversation, tap the Jog Dial or the Phone Button. The VOX Phone feature does not work if you are connected to intercom. When you hang up the phone call, the intercom will automatically be recovered. b.  To reject the phone call and stay on the intercom conversation, press the Jog Dial for 2 seconds until you hear a beep. Unlike other motorcycle Bluetooth headsets, this prevents a user from being dropped out of an intercom conversation by an incoming mobile call. 2. When you have an incoming intercom call during a mobile phone call, you will hear 4 high toned beeps, alerting you that there is an incoming intercom call. You will also hear a voice prompt, “Intercom requested”. In this case, the intercom call does not override the mobile call because intercom has lower priority than mobile call. You have to hang up the mobile phone call to make or receive an intercom call. 3. You can have a three-way conference phone call by adding an intercom friend to the mobile phone conversation. During a mobile phone conversation, tap the Jog Dial to invite one of the intercom friends to the mobile phone line. To disconnect the intercom first and go back to your private mobile phone call, terminate the intercom by tapping the Jog Dial. To end the mobile phone call first and maintain the intercom conversation, press the Jog Dial for 2 seconds, or tap the Phone Button, or wait for the person on the mobile phone line to end the call.  Start Tap Jog Dial while having a mobile phone call End intercom first Tap Jog Dial End phone call first Press Jog Dial for 2“             or Tap Phone Button             or Wait for the called person to end the call Start & End Three-way Conference Phone Call
 11 UNIVERSAL INTERCOM  You can have an intercom conversation with non-Sena Bluetooth headsets using the Universal Intercom function. Non-Sena Bluetooth headsets can be connected to the Sena Bluetooth headset if they support the Bluetooth Hands-Free Profile (HFP). The working distance may differ depending on the performance of Bluetooth headset that it is connected to. In general, it is shorter than normal intercom distance since it uses the Bluetooth Hands-Free Profile. The Universal Intercom affects both the phone call connection and the multipoint connection (mostly used for GPS connections for riders). You cannot use a multipoint connection device while you are using the Universal Intercom in case as below. 1. If a non-Sena headset does not support a multipoint connection, it cannot use a phone call connection while using the Universal Intercom. 2. As for Sena headsets, the Universal Intercom affects the multipoint connection. 3. If non-Sena headset (already paired as Universal Intercom with Sena) is turned on, then the multipoint connection is automatically deactivated. And the non-Sena headset is automatically connected to Sena headset as a Universal Intercom. So you cannot use multipoint connection devices such as GPS, while a non-Sena headset is turned on. 4. Even though you disconnect the non-Sena headset as a Universal Intercom, it will not automatically restore the multipoint connection. To restore the multipoint connection, you should turn off the non-Sena headset first, then try to connect to multipoint device manually from the device screen or simply reboot the device so that it automatically connects to the Sena headset.  11.1 Universal Intercom Pairing The 10C can be paired with non-Sena Bluetooth headsets for Bluetooth intercom conversation. You can pair the 10C with only one non-Sena Bluetooth headset so if you pair with a different non-Sena Bluetooth headset, the previous pairing will be removed. 1. Turn on the 10C and a non-Sena Bluetooth headset that you want to pair with. 2. Press and hold the Jog Dial on the 10C for 8 seconds until the blue LED flashes rapidly. You will hear a voice prompt,  “Universal intercom pairing”. 3. Perform the operation required for handsfree pairing on the non-Sena Bluetooth headset (refer to the user’s manual of the headsets you want to use). The 10C will automatically pair with non-Sena Bluetooth headsets in pairing mode.  11.2 Two-way Universal Intercom You can initiate the Universal Intercom connection with non-Sena Bluetooth headsets using the same intercom connection method as you would between other Sena headsets. You may single tap the Jog Dial to begin an intercom conversation with the first intercom friend, double tap with the second intercom friend, and triple tap with the third intercom friend.  Non-Sena Bluetooth headsets may initiate the Universal Intercom connection, activating the voice dialing or using the redialing operation. You may also disconnect the existing connection by ending a call operation function (refer to the user’s manual of the headsets for voice dialing, redialing, and ending a call).
11.3 Three-way Universal Intercom You may make a three-way Universal Intercom connection with two 10Cs and one non-Sena Bluetooth headset. If the intercom connection is made, all headsets connected cannot use the mobile phone call function since the connection between the headset and the phone is disconnected temporarily. If you disconnect the intercom call, the mobile phone connection is made again automatically so that you can use a mobile phone call function.  1. You (A) need to be paired with a non-Sena Bluetooth headset (B) and another 10C headset (C) for the three-way conference intercom.  2. Start an intercom conversation with non-Sena Bluetooth headset (B) in your intercom group. For example, you (A) may start an intercom conversation with non-Sena Bluetooth headset (B). The non-Sena Bluetooth headset (B) may also start an intercom call with you (A).  3. The Other 10C (C) may join the intercom by making an intercom call to you (A).  4. Now you (A), non-Sena Bluetooth headset (B), and the other 10C (C) are having a three-way conference intercom.  5. You may disconnect three-way Universal Intercom using the same way as you do in normal three-way intercom. Please refer to section 9.2.2, “End Three-way Intercom”.
11.4 Four-way Universal Intercom You may make a four-way Universal Intercom connection with a couple of different configurations, 1) three 10Cs and one non-Sena Bluetooth headset or 2) two 10Cs and two non-Sena Bluetooth headsets.  You may have a couple of other four-way Universal Intercom configurations, 1) your headset (A), a non-Sena Bluetooth headset (B), another 10C (C), and a non-Sena Bluetooth headset (D), 2) your headset (A), a non-Sena Bluetooth headset (B), and two other 10C headsets (C and D). You may make the four-way Universal Intercom call the same way as a normal four-way intercom call.  11.4.1 Four-way Universal Intercom Case 1 Two 10C headsets (A and C) and two non-Sena Bluetooth headsets (B and D) 1. You (A) may start an intercom conversation with the non-Sena Bluetooth headset (B).  2. The other 10C (C) may join the intercom by making an intercom call to you (A).  3. The non-Sena Bluetooth headset (D) may join the conference intercom by making an intercom call to the 10C (C).  4. Now two 10C headsets (A & C) and two non-Sena Bluetooth headsets (B & D) are connected with the four-way Universal Intercom.
 You may disconnect a four-way Universal Intercom using the same way as you do in a normal four-way intercom. Please refer to section 9.3.2 “End Four-way Intercom”.  11.4.2 Four-way Universal Intercom Case 2 Three 10C headsets (A, C and D) and one non-Sena Bluetooth headset (B) The procedure is the same as case 1 described in section 13.4.1.
 12 FM RADIO  12.1 FM Radio On/Off To turn on the FM radio, press and hold the Phone Button for 2 seconds until you hear a mid-toned double beep sound. You will then hear a voice prompt, “FM on”.To turn off the FM radio, press and hold the Phone Button for 2 seconds until you hear a voice prompt, “FM off”. When you power it off, the 10C will remember the last station frequency. When you power it on, the last station frequency will be playing.  12.2 Preset Stations You can listen to preset stations while listening to the FM radio. Tap the Phone Button once to go upward to your next saved preset station.  12.3 Seek and Save “Seek” is the function that searches for station to station frequencies. To use the “Seek” function, please follow the procedure below: 1. Rotate while pressing the Jog Dial clockwise to search up the station dial or counter clockwise to search down the station dial. 2. If the tuner finds a station while searching frequencies, it stops the seek function. 3. To save the current station, press and hold the Jog Dial for 2 seconds until you hear a voice prompt “Preset (#)”. 4. Rotate the Jog Dial clockwise or counter clockwise, in order to select which preset number you want for that specific station. You can save up to 10 preset stations. (You may cancel the preset operation by waiting approximately 10 seconds. You will then hear “Save preset cancelled”. You can also rotate the Jog Dial clockwise or counter clockwise until you hear “Cancel”. Tap the Jog Dial to confirm cancellation. You will then hear “Save preset cancelled”). 5. To save the current station, tap the Jog Dial again. You will then hear a voice prompt, “Save preset (#)”. 6. To delete the saved station in the preset number, tap the Phone Button. You will then hear a voice prompt “Delete preset (#)”.  Note: 1. You can save FM stations to presets before using FM radio. Connect the 10C to your PC and open the Sena Device Manager. It allows you to save up to 10 FM station frequency presets on the 10C settings menu. You may do the same operation by using the Sena Smartphone App. 2. You can still answer an incoming phone call and intercom while listening to the FM radio.  12.4 Scan and Save “Scan” is the function that automatically searches station frequencies, starting from the current frequency and up. To use the scan function, please follow the procedures below: 1. Double tap the Phone Button. Then the current station frequency moves upward to find other station frequencies. 2. If the tuner finds a station, it stays at the station frequency for 8 seconds, then scanning to the next station frequency.
3. Scan function stops when you double tap the Phone Button again. 4. To save a station while scanning frequencies, tap the Phone Button when at that station. You will hear a voice prompt from the 10C, “Save preset (#)”. The station will be saved as the next preset number. 5. All stations preset during “Scan”, will overwrite previously set stations.  12.5 Temporary Preset With the temporary preset function, you may temporarily preset stations automatically without changing the existing preset stations. Tap the Phone Button three times to automatically scan for 10 temporary preset stations. The temporary preset stations will be cleared when the system is powered off.  12.6 Region Selection You can select the proper FM frequency region from the Sena Device Manager. With the region setting, you may optimize the seek function to avoid unnecessary frequency ranges (Factory default: worldwide).  Region Frequency range Step Worldwide 76.0 ~ 108.0 MHz ± 100 kHz Americas 87.5 ~ 107.9 MHz ± 200 kHz Asia 87.5 ~ 108.0 MHz ± 100 kHz Australia 87.5 ~ 107.9 MHz ± 200 kHz Europe 87.5 ~ 108.0 MHz ± 100 kHz Japan 76.0 ~ 90.0 MHz ± 100 kHz
 13 FUNCTION PRIORITY The 10C operates in the following order of priority:  (highest)    Mobile phone         Intercom         Camera         FM Radio  (lowest)    Bluetooth stereo music  A lower priority function is always interrupted by a higher priority function. For example, stereo music is interrupted by intercom call, and an intercom conversation is interrupted by an incoming mobile phone call.  Operation temperature for Product: -10~55℃
 14 CONFIGURATION SETTING 14.1 Headset Configuration Setting You can set the configuration of the 10C by the voice menu instruction as below. 1. To enter into voice configuration menu, press and hold the Jog Dial for 12 seconds until the LED shows solid blue and you hear high toned double beeps. You will also hear a voice prompt “Configuration menu”. 2. Rotate the Jog Dial clockwise or counter clockwise to navigate between the menus. You will hear voice prompts for each menu item as below. 3. You can enable the feature or execute the command by tapping the Phone Button, or disable the feature by tapping the Jog Dial. 4. If any button is not pressed within 10 seconds, the 10C will exit the configuration and go back to stand-by mode. 5. If you want to exit the configuration immediately, rotate the Jog Dial until you hear a voice prompt, “Exit configuration”, and tap the Phone Button.  The voice prompt for each menu item is as below:  (1) Speed dial (2) VOX phone (3) VOX intercom (4) Voice prompt (5) Delete all pairings (6) Exit configuration   14.1.1 Assigning Speed Dial  Voice Prompt "Speed dial" Factory Default N/A Execute Tap the Phone Button  1. To assign a phone number as a speed dial, rotate the Jog Dial until you hear a voice prompt, “Speed dial”. 2. Tap the Phone Button, and you will hear a voice prompt, “Speed dial one” and “Phone connected”.
-  Rotate the Jog Dial to select one of three speed dial numbers by hearing voice prompts “Speed dial (#)”. 3. Call a phone number you want to assign and you will hear a voice prompt, “Save speed dial (#)”. The phone number is automatically assigned to the selected speed dial number. Then the phone call will hang up immediately. 4. To exit the menu, rotate the Jog Dial clockwise or counter clockwise until you hear a voice prompt, “Cancel”, and tap the Phone Button to confirm. You will then hear a voice prompt “Cancel”. If any button is not pressed within 1 minute, the 10C will exit the configuration menu and go back to stand-by mode.  Note: - After assinging a phone number to one of three speed dials, you can continually assign another phone number to the reset of two speed dials. -  You  can  also  assign  phone  numbers  for  speed  dialing  by  using  the  Sena  Device  Manager  software  or  the  Sena Smartphone App. Please visit the Sena Bluetooth website at www.sena.com for more information.  14.1.2 Enabling/Disabling Voice Activated Phone Answering  Voice Prompt “VOX phone” Factory Default Enable Enable Tap the Phone Button Disable Tap the Jog Dial  If this feature is enabled, you can answer incoming calls by voice. When you hear a ringtone for an incoming call, you can answer  the  phone  by  saying  a  word  such  as  “Hello”  loudly  or  by  blowing  air  into  the  microphone.  VOX  Phone  is temporarily disabled if you are connected to intercom. If this feature is disabled, you have to tap the Jog Dial or the Phone Button to answer an incoming call.  14.1.3 Enabling/Disabling Voice Activated Intercom  Voice Prompt “VOX intercom” Factory Default Disable Enable Tap the Phone Button Disable Tap the Jog Dial  If this feature is enabled, you can initiate an intercom conversation with the last connected intercom friend by voice. When you want to start intercom, say a word such as “Hello” loudly or blow air into the microphone. If you start an intercom conversation by voice, the intercom terminates automatically when you and your intercom friend remain silent for 20 seconds. However, if you manually start an intercom conversation by tapping the Jog Dial, you have to terminate the intercom conversation manually.
However, if you start intercom by voice and end it manually by tapping the Jog Dial, you will not be able to start intercom by voice temporarily. In this case, you have to tap the Jog Dial to restart the intercom. This is to prevent repeated unintentional intercom connections by strong wind noise. After rebooting the 10C, you can start intercom by voice again.  14.1.4 Enabling/Disabling Voice Prompts  Voice Prompt “Voice prompt” Factory Default Enable Enable Tap the Phone Button Disable Tap the Jog Dial  You can disable voice prompts by configuration setting, but the following voice prompts are always on. - Voice prompts for configuration setting menu - Voice prompts for battery level Indicator - Voice prompts for factory reset - Voice prompts for speed dial - Voice prompts for FM radio functions  14.1.5 Delete All Bluetooth Pairing Information  Voice Prompt “Delete all pairings” Factory Default N/A Execute Tap the Phone Button  To delete all Bluetooth pairing information of the 10C, rotate the Jog Dial until you hear a voice prompt, “Delete all pairings”, and tap the Phone Button to confirm.  14.1.6 Exit Voice Configuration Menu  Voice Prompt “Exit configuration” Factory Default N/A Execute Tap the Phone Button  To exit voice configuration menu and get back to stand-by mode, rotate the Jog Dial until you hear a voice prompt, “Exit configuration”, and tap the Phone Button to confirm.
Rotate Jog Dial  Tap Phone Button  Tap Jog Dial Speed Dial Execute  N/A VOX Phone  Enable  Disable VOX Intercom   Enable  Disable Voice Prompt  Enable  Disable Delete All Pairings  Execute  N/A Exit Configuration  Execute  N/A               Voice Configuration Menu & Button Operations   14.2 Camera Configuration Setting  You can enter into camera configuration of the 10C by following the steps below: 1.  To enter into camera configuration menu, press and hold the Camera Button for 3 seconds until you hear a voice prompt, “Camera setup”. 2.  Rotate the Jog Dial clockwise or counter clockwise to navigate between the menus. You will hear voice prompts for each menu item as below. 3.  You can enable or disable a feature, or execute a command by tapping the Phone Button. 4. If you do not press any buttons for 10 seconds, the 10C will exit the configuration and go back to stand-by mode. 5.  If you want to exit the camera configuration, tap the Jog Dial once and you will hear a voice prompt, “Exit Configuration”.  The voice prompt for each menu item is as below:  (1) Photo mode setting (2) Video mode setting (3) Video resolution setting (4) Timelapse interval setting (5) Date caption (6) Microphone (7) Auto camera sleep (8) Format SD card (9) Exit configuration
  14.2.1 Photo Mode You can select the photo mode to be either single shot or burst shot. Single shot takes a single photo while burst shot takes 10 photos in one second. When you hear the voice prompt, “Photo mode setting”, tap the Phone Button to enter. Then rotate the Jog Dial to select either single shot or burst shot. Tap the Phone Button to save the mode.  Voice Prompt “Photo mode setting” Factory Default Single Shot Select Mode Rotate Jog Dial (Single shot mode, Burst shot mode) Apply Tap the Phone Button  14.2.2 Video Mode You can select the video mode to be either video mode or timelapse mode. Video mode records a standard video while timelapse mode records series of videos at timed intervals. When you hear the voice prompt, “Video mode setting”, tap the Phone Button to enter. Then rotate the Jog Dial to select either video or timelapse. Tap the Phone Button to save the mode.  Voice Prompt “Video mode setting” Factory Default Video Mode Select Mode Rotate Jog Dial (Video mode, Timelapse mode) Apply Tap the Phone Button  14.2.3 Video Resolution You can select the video resolution to be 1080p/30fps, 720p/60fps, or 720p/30fps. When you hear the voice prompt, “Video resolution setting”, tap the Phone Button to enter. Then rotate the Jog Dial to select the resolution. Tap the Phone Button to save the resolution.  Voice Prompt “Video mode resolution”
Factory Default 1080p/30fps Select Mode Rotate Jog Dial (1080p/30fps, 720p/60fps, 720p/30fps) Apply Tap the Phone Button  14.2.4 Timelapse Interval Setting You can select the timelapse interval to be either 1 second or 10 seconds. When you hear the voice prompt, “Video mode resolution”, tap the Phone Button to enter. Then rotate the Jog Dial to select the interval. Tap the Phone Button to save the interval.  Voice Prompt “Timelapse interval setting” Factory Default 1 sec Select Mode Rotate Jog Dial (per 1 sec, per 10 sec) Apply Tap the Phone Button  14.2.5 Date Caption On/Off You can record or hide date caption during video recording. If you select on, the date caption will be displayed on top of your recorded video. If you select off, the date caption will not be shown on your recorded video. When you hear the voice prompt, “Date caption”, tap the Phone Button to either turn on or off the date caption.  Voice Prompt “Date caption” Factory Default Off On/Off Tap the Phone Button  14.2.6 Microphone On/Off You can turn on or off the internal microphone located below the camera lens. Turn on the internal microphone if you want to record ambient sound such as wind noise and exhaust sound. Turn off the internal microphone if you want to cut out ambient sound. When you hear the voice prompt, “Microphone”, tap the Phone Button to either turn on or off the internal microphone.  Voice Prompt “Microphone” Factory Default On On/Off Tap the Phone Button  14.2.7 Auto Camera Sleep
You can set the camera to automatically power off after five minutes of inactivity. This feature does not work while charging the camera. When you hear the voice prompt, “Auto camera sleep”, tap the Phone Button to either turn on or off this feature.  Voice Prompt “Auto camera sleep” Factory Default On On/Off Tap the Phone Button  14.2.8 SD Card Format SD card format will remove all files from a micro SD card. When you use a new card for the first time, always format it before using the camera. When you hear the voice prompt, “Format SD card”, tap the Phone Button to confirm.  Voice Prompt “Auto camera sleep” Factory Default N/A Execute Tap the Phone Button
 15 FIRMWARE UPGRADE  The 10C supports firmware upgrades. You can update the firmware using the Sena Device Manager (please refer to section 4.6.1, “Sena Device Manager”). Please visit Sena Bluetooth website at www.sena.com to check the latest software downloads.
 16 TROUBLESHOOTING 16.1 Intercom Failure When you try to start an intercom conversation with an intercom friend who is unavailable within range or already having a conference intercom with other riders or a mobile phone call, you will hear a low tone double beep signifying an intercom busy signal. In this case, you have to try again later.  16.2 Intercom Reconnection If your intercom friend goes out of range while having an intercom conversation, you may hear static noise and eventually the intercom will be disconnected. In this case, the 10C automatically tries to reconnect the intercom every 8 seconds and you will hear high tone double beeps until the intercom is reestablished. If you do not want to make a reconnection, tap the Jog Dial to stop the attempt.  16.3 Fault Reset When the 10C is not working properly or is in faulty status for any reason, you may reset by pushing the pin-hole reset button at the back of the headset main unit. Insert a paper clip into the reset pin-hole and press the reset button for a second with light pressure. The 10C will be switched off. Restart the system and try again. This will not restore the headset to factory default settings.  16.4 Factory Reset 1. To restore the 10C to factory default settings, press and hold the Phone Button for 12 seconds until the LED shows solid red and you hear “Factory reset”.  2. Within 5 seconds, press the Jog Dial to confirm reset. The headset will be restored to factory setting and switched off automatically. You will hear “Headset reset, good-bye”. 3. If you press the Phone Button or leave the Jog Dial for 5 seconds, the reset attempt is cancelled and the headset returns to stand-by mode. You will hear a voice prompt, “Cancelled”.
 17 OPERATION QUICK REFERENCE  Type Function Button Command LED Beep Basic Function Power on Press the Phone Button and the Jog Dial for 1 second Solid blue Ascending beeps Power off Press the Phone Button and the Jog Dial Solid red Descending beeps Volume adjustment Rotate the Jog Dial - - Camera Function Camera on/off Tap the Camera Button and the Phone Button Green Flashing - Video start/stop Press the Camera Button for 1 second Green Flashing - Photo shoot Tap the Camera Button Green Flashing - Mobile Phone Mobile phone pairing Press the Phone Button for 5 seconds Blue & red alternatively flashing High tone multiple beeps Second mobile phone pairing Press the Jog Dial for 5 seconds Red flashing Multiple beeps Tap the Phone Button within 2 seconds Call transfer Press the Phone Button for 2 seconds - High tone single beep Answer & end phone call Tap the Phone Button or the Jog Dial - - Voice dial Tap the Phone Button - - Speed dial Double Tap the Phone Button - Mid-tone single beep Reject incoming call Press the Jog Dial for 2 seconds - - Intercom Intercom pairing Press the Jog Dial for 6 seconds Red flashing Mid-tone single beep Tap the Jog Dial of any one of the two headsets Start / End each intercom Tap the Jog Dial - - End all intercoms Press the Jog Dial for 2 seconds Blue flashing Mid-tone double beeps
Music Play/Pause Bluetooth music Press the Jog Dial for 1 second - Mid-tone double beep Track forward/back Rotate the Jog Dial while pressing - - FM radio FM radio on Press the Phone Button for 2 seconds - Mid-tone double beeps FM radio off  Press the Phone Button for 2 seconds - Mid-tone double beeps Select preset  Tap the Phone Button - Mid-tone single beep Seek stations Rotate the Jog Dial while pressing - High tone triple beeps Scan up FM band Double tap the Phone Button -  Stop scanning Double tap the Phone Button - High tone double beeps Save preset while scanning Tap the Phone Button - High tone double beeps Reset Factory reset Press the Phone Button for 12 seconds Solid red High tone double beeps Tap the Jog Dial within 5 seconds Fault reset Press the Reset Button - -
 CERTIFICATION AND SAFETY APPROVALS  FCC Compliance Statement  This device complies with part 15 of the FCC rules. Operation is subject to the following two conditions:  (1) This device may not cause harmful interference, and  (2) This device must accept any interference received, including interference that may cause undesired operation.   This equipment has been tested and found to comply with the limits for a Class B digital device pursuant to part 15 of the FCC  rules.  These  limits  are  designed  to  provide  reasonable  protection  against  harmful  interference  in  a  residential installation.  This  equipment  generates,  uses  and  can  radiate  radio frequency  energy  and,  if  not installed  and used in accordance  with  the  instructions,  may  cause  harmful  interference  to  radio  communications.  However,  there  is  no guarantee that interference will not occur in a particular installation. If this equipment does cause harmful interference to radio or television reception, which can be determined by turning the equipment on and off, the user is encouraged to try to correct the interference by one or more of the following measures: ●  Reorient or relocate the receiving antennae ●  Increase the separation between the equipment and the receiver ●  Connect the equipment into an outlet on a circuit different from that to which the receiver is connected. ●  Consult the dealer or an experienced radio/TV technician for help.  FCC RF Exposure Statement  This equipment complies with FCC radiation exposure limits set forth for an uncontrolled environment. End users must follow the specific  operating  instructions  for  satisfying  RF exposure  compliance.  The  antenna used  for  this transmitter must not transmit simultaneously with any other antenna or transmitter, except in accordance with FCC multi-transmitter product procedures.  FCC Caution  Any changes or modifications to the equipment not expressly approved by the party responsible for compliance could void user’s authority to operate the equipment.   CE Declaration of Conformity   This product is CE marked according to the provisions of the R&TTE Directive (99/5/EC). Hereby, Sena declares that this product is in compliance with the essential requirements and other relevant provisions of Directive 1999/5/EC. For further information, please consult www.sena.com. Please note that this product uses radio frequency bands not harmonized within EU. Within the EU this product is intended to be used in Austria, Belgium, Denmark, Finland, France, Germany,
Greece,  Ireland,  Italy,  Luxembourg,  The  Netherlands,  Portugal,  Spain,  Sweden,  United  Kingdom  and  within  EFTA  in Iceland, Norway and Switzerland.   Industry Canada Statement   This  device  complies  with Industry Canada  license-exempt RSS  standard(s). Operation  is subject  to the  following  two conditions:  (1) This device may not cause interference.  (2) This device must accept any interference, including interference that may cause undesired operation of the device.   Bluetooth License   The Bluetooth® word mark and logos are owned by the Bluetooth SIG, Inc. and any use of such marks by Sena is under license. Other trademarks and trade names are those of their respective owners.  The product is compliant with and adopts the Bluetooth® Specification 3.0 and has successfully passed all interoperability tests  that  are  specified  in  the  Bluetooth®   specification.  However,  interoperability  between  the  device  and  other Bluetooth®-enabled products is not guaranteed.   WEEE (Waste Electrical and Electronic Equipment)  The crossed-out wheel bin symbol on the product, literature, or packaging reminds you that all electrical and electronic products, batteries, and accumulators must be taken to separate collection at the end of their working life. This requirement applies to the European Union and other locations where separate collection systems are available.  To  prevent  possible  harm  to  the  environment  or  human  health  from  uncontrolled  waste  disposal, please  do  not dispose  of  these  products  as  unsorted  municipal  waste,  but  hand  it  in  at an  official collection  point  for recycling.   SAFETY INFORMATION    Please ensure that the product is properly used by observing the warnings and cautions below to prevent any risk and/or damage to property.  Product Storage and Management  ●  Keep the product free of dust. It may damage mechanical and electronic parts of the product. ●  Do not store the product in high temperatures as this may reduce the life span of electronic devices, damage the battery, and/or melt plastic parts of the product. ●  Do  not  store  the  product  in  cold  temperatures.  Abrupt  changes  in  temperatures  may  cause  condensation  and damage electronic circuits. Do not clean the product with cleaning solvents, toxic chemicals, or strong detergents
as this may damage the product. ●  Do not paint the product. Paint may obstruct moving parts or interfere with the normal operation of the product. ●  Do not drop or otherwise shock the product. It may damage the product or its internal electronic circuits. ●  Do  not  disassemble,  repair  or  modify  the  product  as  this  may  damage  the  product  and  invalidate  the  product warranty.  Product Use  ●  In some regions, it is prohibited by law to ride motorcycles or bicycles while wearing headsets. Therefore be certain to comply with all relevant laws in the region before using the product.  ●  Use of the product at a high volume for a long period of time may damage your eardrums or hearing ability. Keep the volume at a modest level. ●  Do not cause impact to the product or touch it with sharp tools as this may damage the product. ●  Do not use the product in high-temperatures or apply heat to the product as this may cause damage, explosion, or fire. ●  Keep the product dry and away from water. It may damage the product. ●  Keep product away from pets or small children. It may damage the product or cause accidents.  ●  Do  not  use  the  product  near  a  microwave  oven  or  a  wireless  LAN  device  as  this  may  cause  malfunction  or interference with the product. ●  In any place where wireless communication is prohibited, such as hospitals or airplanes, turn off the power and refrain from using the product. In a place where wireless communication is prohibited, electromagnetic waves may cause hazards or accidents. ●  Do not use the product near hazardous explosives. When there are near any explosion hazards, turn off the power and heed any regulations, instructions, and signs in the area. ●  When using the product, drive at a low speed (slower than 35km/h) for safety. In addition, be certain to conform to laws regarding the use of communications devices while driving. ●  Do not put the product where it may hamper the driver's vision or manipulate it while driving. This may cause traffic accidents. ●  Before driving, fasten the product to the helmet, and double-check that it is fastened. Separation of the product while driving may cause damage to the product or accidents. ●  If the product is damaged, stop using it immediately. It may cause damage, explosion, or fire.  The connection to USB interfaces has to be limited to USB 2.0 version or higher.  Battery  This product has an replaceable rechargeable battery inside. Therefore, when using the product, make sure to adhere to the following: ●  The battery performance may be reduced over time with usage. ●  In recharging  the battery,  make  sure to use  an approved  charger  provided  by the manufacturer.  Use of  a non-approved  charger  may  cause  fire,  explosion,  leakage,  and  other  hazards  may  also  reduce  the  life  time  or
performance of the battery. ●  Store  the  battery  at  temperatures  of  15°C~25°C  (59°F~77°F).  Higher  or  lower  temperatures  may  reduce  the capacity  and  life  of  the  battery,  or  may  cause  temporary  non-operation.  Do  not  use  the  product  in  sub-zero temperature, because it may cause serious reduction of the battery performance. ●  If you apply heat to the battery or throw it into fire, it may explode. ●  Do not use the product with a damaged battery. It may explode and/or cause accidents. ●  Never use a damaged charger. It may explode and/or cause accidents. ●  Battery life may vary depending on conditions, environmental factors, functions of the product in use, and devices used with it.    PRODUCT WARRANTY AND DISCLAIMER  Limited Warranty  Limited Warranty Sena Technologies, Inc. (“Sena”) guarantees the product quality based on the technical specification stated in the product manual, and data regarding product warranty. Here, product warranty extends to the product only. Sena will not be liable for any loss, damage of human life, or loss of property which may result from using the product beyond defective parts or flaws that occur due to problems in manufacture.  Warranty Period Sena guarantees free-of-charge replacements of defective parts of the product or flaws that may have occurred  due to problems in manufacture for a period of 2 years from the date of initial purchase.   Termination Quality warranty of the product becomes effective on the date of initial purchase. In addition, the quality warranty of the product  expires  when  the  warranty  period  expires.  However,  in  the  following  cases,  the  warranty  will  be  terminated prematurely. ●  In the event the product has been sold or transferred to a third party. ●  In  the  event  the  manufacturer's  name,  serial  number,  product  label,  or  other  markings  have  been  modified  or removed.  ●  In the event any unauthorized person has tried to disassemble, repair, or modify the product.   Notice and Waiver By  buying  and  using  this  product,  you  relinquish  considerable  legal  rights  including  any  claim  for  compensation  for damages. Therefore, be certain to read and understand the following terms and conditions before using the product. Use
of this product will constitute consent to this agreement, and forfeiture of rights to all claims. If you do not consent to all the terms and conditions of this agreement, return the product for a refund. (Refer to the section "Return for Full Refund".) 1.  You agree that you, your descendants, legal proxies, successors, or transferees will not raise permanent volitional request for any suit, claim, implementation, redemption or similar action from Sena with regard to any occasion such as difficulty, pain, suffering, inconvenience, loss, injury, or death which may occur to you or a third party during the use of this product. 2.  You  must  completely  understand  and  accept  all  risks  (including  those  occurring  due  to  any  careless  behavior  of yours or others) which may occur during the use of this product. 3.  You  are  responsible  for  ensuring  that  your  medical  condition  permits  usage  of  the  product  and  that  you  are  in sufficient physical condition for using any device  which can be used with  it. In  addition, you must ensure that the product does not limit your abilities and that you are able to use it safely. 4.  You must be an adult who can take responsibilities for using the product. 5.  You must read and understand the following warnings and alerts: ●  Sena; together with employees, managers, partners, subsidiaries, representatives, agents, supporting firms and suppliers,  sole  sellers  of  Sena  (collectively  referred  to  as  "the  company")  recommend  that,  before  using  the product and similar devices of any brands including its derivative models, you collect any relevant information in advance and be entirely prepared in terms of weather, traffic situation, and road conditions. ●  When you use the product while you operating any vehicle or equipment such as motorcycles, scooters, mopeds, ATVs, or quad-bikes (hereinafter called as "transportation means"), you must take complete caution regardless of the location of such operation. ●  Use of the product on the road may cause such risks as fracture, serious disability, or death. ●  Risk factors, which may occur when you use the product, may be due to errors of the manufacturer, its agents, or third parties which are involved in the manufacturing. ●  Risk factors, which may occur when you use the product, may be unforeseeable. Therefore, you must take full responsibility for any damage or loss caused by all risk factors which may occur when using the product. ●  When you use the product, use good judgment; never use it under the influence of alcohol. 6.  You must read and completely understand all terms and conditions of legal rights and warnings that are involved in using  the product.  In  addition,  usage  of the  product  constitutes  acceptance  of  all terms  and conditions  regarding waiver of rights.   Warranty Exclusions  Reasons for Limited Liabilities If  you  do  not  return  the  product  after  purchasing  it,  you  relinquish  all  rights  to  liabilities,  loss,  claims,  and  claims  for reimbursement of expenses (including attorney's fees). Therefore, Sena will not be liable for physical injury, death, or any loss  or  damage  of  transportation  means,  possessions,  or  assets  which  belong  to  you  or  third  parties  that  may  have occurred  while  you  use  the  product.  Further,  Sena  will  not  be  liable  for  any  substantial  damage  not  related  to  the, condition, environment, or malfunction of the product. All risks related with the operation of the product depend entirely on the user regardless of its use by the initial purchaser of a third party. Use of this product may violate local or national laws. In addition, be aware once again that correct and safe use of the product is entirely your responsibility.
 Limitation of Liability TO THE FULL EXTENT ALLOWED BY LAW, SENA EXCLUDES FOR ITSELF AND ITS SUPPLIERS ANY LIABILITY, WHETHER  BASED  IN  CONTRACT  OR  TORT  (INCLUDING  NEGLIGENCE),  FOR  INCIDENTAL,  CONSEQUENTIAL, INDIRECT, SPECIAL, OR PUNITIVE DAMAGES OF ANY KIND, OR FOR LOSS OF REVENUE OR PROFITS, LOSS OF BUSINESS,  LOSS  OF  INFORMATION  OR  DATA,  OR  OTHER  FINANCIAL  LOSS  ARISING  OUT  OF  OR  IN CONNECTION  WITH  THE  SALE,  INSTALLATION,  MAINTENANCE,  USE,  PERFORMANCE,  FAILURE,  OR INTERRUPTION  OF  ITS PRODUCTS,  EVEN IF  SENA  OR  ITS AUTHORIZED  RESELLER HAS BEEN  ADVISED OF THE POSSIBILITY OF SUCH DAMAGES, AND LIMITS ITS LIABILITY TO REPAIR, REPLACEMENT, OR REFUND OF THE PURCHASE PRICE PAID, AT SENA’S OPTION. THIS DISCLAIMER OF LIABILITY FOR DAMAGES WILL NOT BE AFFECTED IF ANY REMEDY PROVIDED HEREIN SHALL FAIL OF ITS ESSENTIAL PURPOSE. IN ANY CASE, THE TOTAL  COMPENSATION  LIABILITIES OF  SENA OR  ITS SALES  AGENTS SHALL  NOT  EXCEED THE  PRICE PAID FOR THE PRODUCT BY THE PURCHASER.    Liabilities Disclaimer In addition to damages which may occur due to the use of the product, Sena will not be liable for damages of the product which occur due to the following events. In the event the product is misused or used for purposes other than its intended purposes. In the event the product is damaged because the user does not follow the content of the product manual. In the event the product is damaged because it has been left unattended or has undergone any other accident. In the event the  product is damaged because  the user has used any parts  or software which are  not provided by the manufacturer. In the event the product is damaged because the user has disassembled, repaired, or modified it in such way as is not explained in the product manual. In the event the product is damaged by a third party. In the event the product is damaged due to Acts of God (including fire, flood, earthquake, storm, hurricane or other natural disaster). In the event the surface of the product is damaged by use.  Warranty Service  To obtain product warranty service, send the defective product, at your expense, to the manufacturer or the seller along with proof of purchase (a receipt that shows the purchase date, a product registration certificate of the Website, and other relevant information). Take necessary measures to protect the product. In order to get a refund or replacement, you must include the whole package as it was purchased.  Free-of-charge Service Sena  will  provide  free-of-charge  repair  or  replacement  service  for  the  product  when  product  defects  occur  within  the scope of the product warranty during the warranty period.  Charged Service
Sena  will  provide  charged  repair  or  replacement  service  for  the  product  when  the  product  warranty  period  has  been expired or when the product damage is beyond the scope of the product  warranty. For  further information on charged service, you may contact the service center of Sena.  Return for Full Refund  Should you not agree to the terms and conditions explained above, you may return the product for a full refund. To get a refund, within 14 days from  the purchase date  you  must return the product to the seller  in such a  condition as it was purchased. Unless you return the product within 14 days from the purchase date, you will have read and agreed to all the terms and conditions explained above, and Sena will not be liable for any claim for damages related with the product.     Hereby, SENA TECHNOLOGIES.Inc Declares that this 10C is in compliance with the essential requirements  and other relevant provisions of directive 1999/5/EC.

Navigation menu