SHUOYING DIGITAL SCIENCE and TECHNOLOGY DVT5201 Digital Video Recorder User Manual Manual
SHUOYING DIGITAL SCIENCE&TECHNOLOGY;(CHINA)Co.,Ltd Digital Video Recorder Manual
Manual.pdf
Your camera has different modes for the various camera
functions.
You can switch modes by pressing the HOME button on
your camera after the camera has been powered ON. Use this mode to capture photos with your digital camera.
After powering on your camera, press the HOME button once to
open the home page and then tap the camera icon to open the
Photo Capture mode.
To take a photo, aim your camera as desired and press the
“Shutter” button or tap the visual area of the touch screen. The
photo will be automatically saved to the memory card.
To access the various menus for the Photo Capture mode, press
the MENU button or tap the MENU icon which is at the lower left
corner of the touch screen while in the Photo Capture mode.
For more information , please refer to the camera’s User manual in
the software or online.
Use this mode to view and manage the photos and videos on
your camera.
After powering on your camcorder, press the HOME button to
open the home page and then tap the PLAYBACK icon to open
Playback mode.
You can swipe left/right on the touch screen to scroll through
the videos and photos that you captured with your camcorder
to view or delete as desired.
To access the various menus for the Playback mode for videos
and photos, press the MENU icon and other icons which are
displayed on the LCD.
For more information, please refer to the camera’s User Manual
in the software or online.
Use this mode to capture videos with your digital camcorder.
This is the default mode when your camera is powered ON.
To take a video, aim your camera as desired and press the
“Shutter” button or tap the visual area of the touch screen to start
the recording. A red recording indicator will appear while the
recording is in progress .To stop the recording, press the “Shutter”
button or tap the visual area of the touch screen again .The video
will be automatically saved to the memory card.
To access the various menus for the Video Capture mode, press
the MENU button or tap the Menu icon which is at the lower left
corner of the touch screen while in the Video Capture mode.
For more information, please refer to the camera’s User Manual in
the software or online.
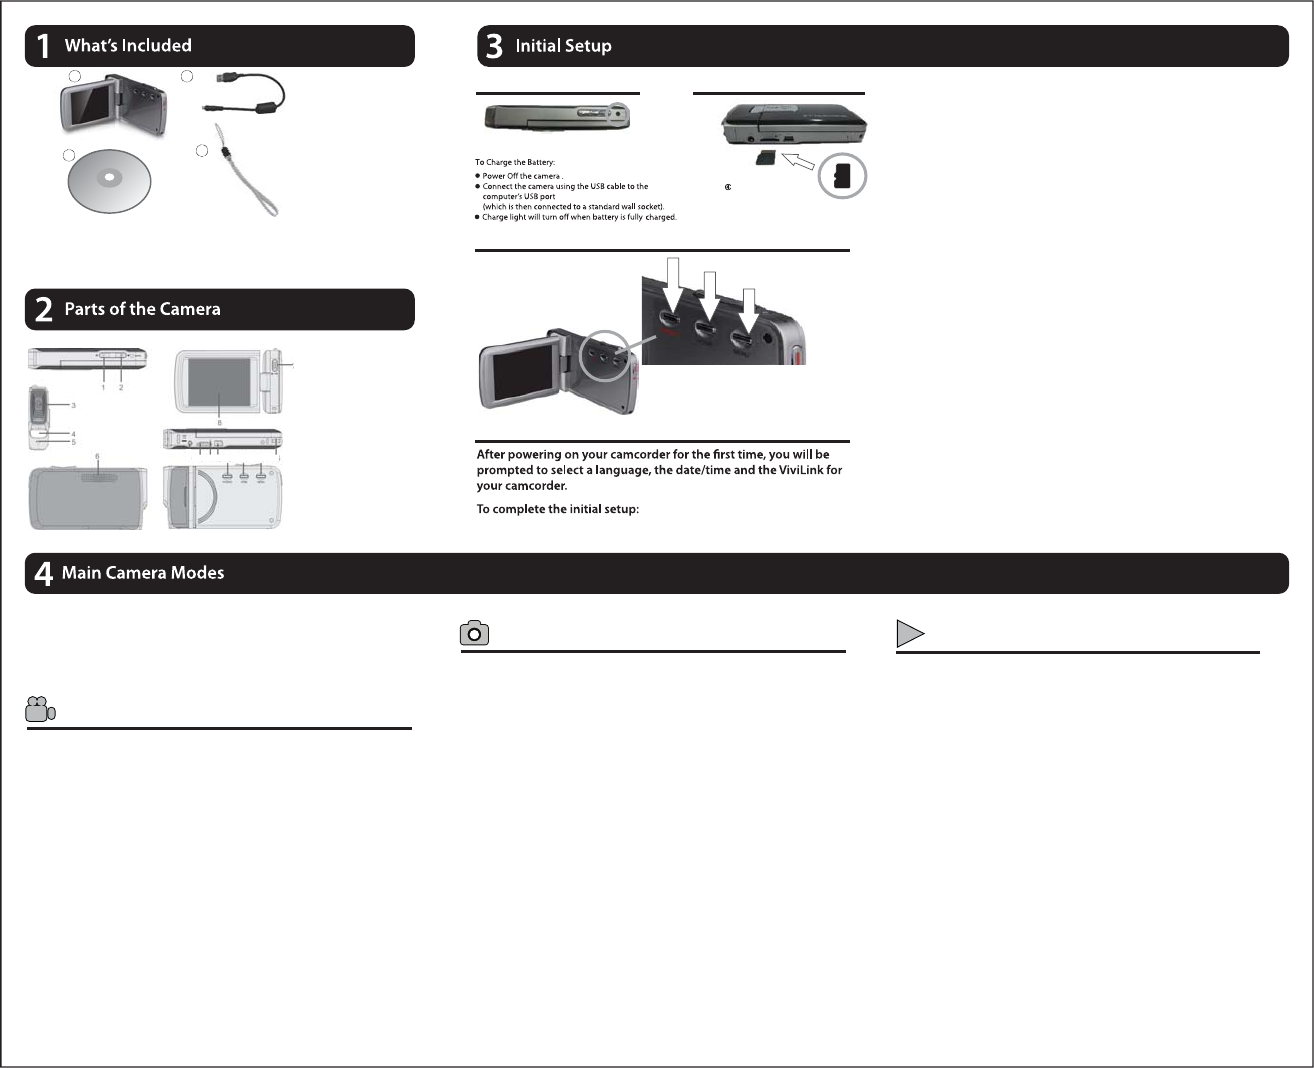
Micro SD Memory Card not included
4.Wrist Strap
5.Built-in Lithium Battery not shown
1.Digital Camcorder
2.USB Cable
3.Installation CD
Photo Capture Mode
Playback Mode (Photos & Videos)
Accessing the menu
Selecting the modes
Turning on the camera
Turning on and using the camcorder
This is a built-in lithium battery device.
Charging the batteries Installing memory card
12
3
4
1. T/Zoom in button
2. W/Zoom out button
3. Lens
4. LED Flash
5. Microphone
6. Speaker
7. Shutter photo/video button
9. Micor SD card slot
10. Reset Button
11. USB Interface
12. Power on /off button
13. HOME Button
14. Menu Button
15. Wrist strap connector
8. LCD touch screen Inital Camera Setup
2. You will first be prompted to select a language.
· Touch the LCD screen and slide your finger up or down on the screen to scroll and
select the desired language.
· Tap an option on the LCD screen to select it.
· Tap SAVE & EXIT to confirm and save your selection.
3. After selecting the language, you will be asked if you would
like to continue with the setup or exit.
· Tap ‘Yes’ if you would like to set the date, time and ViviLink option.
· Tap ‘No’ if you would like to exit the setup.
Note: If you select ‘No’ and decide to leave the setup, the settings can be adjusted at
any time by pressing the HOME button and then tapping the ‘Setup’ icon.
4. If you have chosen to continue with the setup, the next step is
to set the camcorder’s date and time.
· Tap the triangle button above or below the fields in the screen to increase or
decrease the hour, minutes, days, months, etc.
· Once you have set the date and time as desired, tap SAVE & EXIT to confirm the
setting and continue to the next part of the setup.
5. The next step is to select your default ViviLink destination.
· ViviLink enables you to select your favorite web sharing site for a one click upload.
Note: If you do not want to use this feature, you can select ‘None’ as the ViviLink option.
· First select the ViviLink social network for your photos. Touch the LCD screen and
slide your finger up or down on the screen to scroll and select the desired ViviLink
for photos. Tap SAVE & EXIT to confirm your selection and continue to the next part
of the setup.
· Then select the ViviLink social network for your videos. Touch the LCD screen and
slide your finger up or down on the screen to scroll and select the desired ViviLink
for videos. Tap SAVE & EXIT to confirm your selection.
6. Congratulations! This completes your initial setup.
Remember: This is a onetime setup and you will not be prompted to determine these
settings again. If you would like to change any of these settings you can do so by going
to HOME >> Setup.
1. Power on your camcorder (first time only).
Class 4 or higher Micro SD
Memory card (up to 32GB)
needed for normal use
9 10 11 12 13 14 15
Video Capture Mode