SHUOYING SY1310002 Digital Video Camera User Manual manual
SHUOYING INDUSTRIAL (SHENZHEN) CO., LTD. Digital Video Camera manual
SHUOYING >
User Manual
1
Foreword
Thank you for purchasing this digital video camera. Before use, please read this
user manual carefully and keep it in a safe and convenient place for future
reference where necessary.
The information contained in this manual is the latest for the camera when it is
compiled. The screen displays and illustrations in this manual are used to
specifically and vividly describe how to operate the camera. Due to technical
development and different production batch, they may be somewhat different from
the actual digital video camera you purchase.
Notice
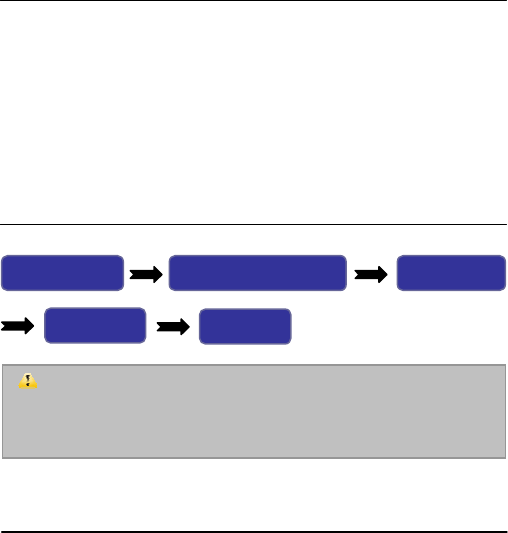
Please use this camera according to the following order:
Use Notice
This camera has no NAND FLASH internal memory. Use memory card for
actual use.
This camera can use SD memory card and MMC card (multimedia memory
card).
The SD card has write-protect switch, which can prevent deleting or formatting the
image files.
Note: The memory card newly purchased or used on other digital
cameras must be formatted before its use on this camera. Before formatting,
please back up the important data on other media such as floppy disk, HD
and CD etc.
Check power supply Insert and format memory card Record/ Capture
Install driver Connect PC

2
Push the switch on the SD memory card to the bottom, then the data on it
can be protected; push the switch on the SD memory card to the top, then
the data on it will lose protection. Before shooting, please remember push
the switch on it to the top.
Notices for memory card use
● When a newly purchased memory card is used or the camera cannot identify
the data or other images taken by other cameras on the memory card, please
firstly format it.
● Before inserting or taking out the memory card, please power off the camera.
● The memory card, after used for many times, will have lowered performance. If
the memory card has low performance, it is necessary to buy a new memory
card.
● The memory card is precise electronic device; so do not bend, fall or press it.
● Never place the memory card in the environment with strong electric field or
magnetic field, such as close to speaker or TV receiver.
● Never use or place the memory card in the too hot or cold environment.
● Please keep the memory card clean and prevent it touching with any liquid. If it
touches any liquid, please wipe it dry.
● When the memory card is not used, please place it into the sheath.
● Please note that the memory card will become hot for long use. This case is
normal.
● Do not use the memory card that has been used on other digital cameras. To
use it on this camera, please format it.
● Do not use the memory card that has been formatted on other digital cameras or
memory card readers.
● In any of the following cases, the data recorded may be damaged:
- When the memory card is not used properly;
- When the power supply is shut off or the memory card is taken out during
recording, deletion (formatting) or reading.
● It is recommended to back up important data on other media such as floppy disk,
hard disk and CD etc.
Maintenance and Care
When leaving the camera idle for long, keep the digital video camera with the
battery taken out in dry and dark place.
● In use, always wear the wrist band so as to prevent slip.
● Use proper protection sheath to avoid scratching the lens and screen.
●To clean the lens, firstly blow away the dust on its surface, then use proper cloth
or tissue for optical devices to clean the lens. If necessary, use lens cleanser.
Never use organic cleanser to clean the digital video camera.
● Do not touch the lens surface with finger.
Memory card pin
Write-protect switch

3
Table of Contents
System Requirements…………………………………………………………………4
Features…………………………………………………………………………………4
Accessories………………………………………………………………………………4
Profile…………………………………………………………………………………5
Functions of Keys and Indicator Lamps………………………………………………6
Start to Use………………………………………………………………………………6
Install Battery………………………………………………………………………6
Install SD/MMC Card………………………………………………………………7
Open Screen………………………………………………………………………8
Power on……………………………………………………………………………8
Select Focus………………………………………………………………………8
Switch Modes………………………………………………………………………8
Record………………………………………………………………………………8
Capture……………………………………………………………………………8
Playback……………………………………………………………………………8
Power off……………………………………………………………………………8
Set Date/Time……………………………………………………………………8
Menu Settings………………………………………………………………………8
Set Date/Time………………………………………………………………………9
Connect to PC……………………………………………………………………10
Operation Step by Step………………………………………………………………10
Record Mode……………………………………………………………………10
Capture Mode……………………………………………………………………14
Playback Mode…………………………………………………………………14
Connect PC to Download Photos/Videos………………………………………20
Use PC Camera Function………………………………………………………20
Install Driver and Software……………………………………………………………21
Installation Interface………………………………………………………………21
Install Driver………………………………………………………………………22
Install Software Attached free of Charge………………………………………22
Specifications…………………………………………………………………………24
Troubleshooting………………………………………………………………………25
4
System Requirements
When operating or using this digital video camera, please refer to minimum
system requirements of PC for this camera. We strongly recommend you to use
good PC to operate the camera in order to bring its performance into full play. The
minimum system requirements are as follows:
System Requirements
OS Microsoft Windows 98 SE,Me,2000,XP,VISTA
CPU Intel PIII667 above or equivalent CPU
Internal memory 128 MB above
Sound card, display
card DirectX8 or above supported
CD-ROM 4x speed above
HD 1 GB above
Others One standard USB 1.1 or USB 2.0 interface
Features
This camera has multiple characteristics and functions:
Digital video camera;
Digital camera (1.30mega pixels);
Mass Storage;
PC camera;
4x digital zoom.
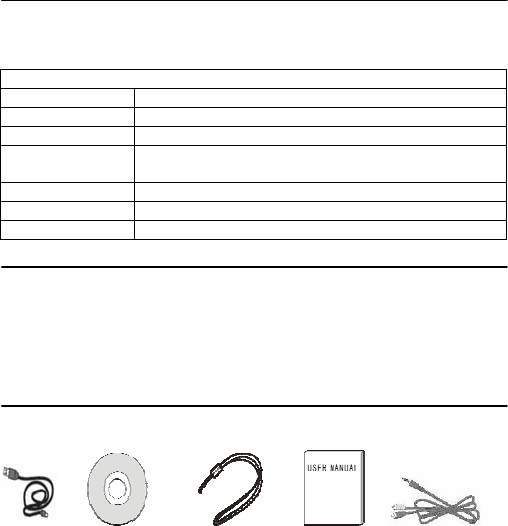
Accessories
The packing list contains the following main accessories:
USB cable Installation CD Wrist strip User manual TV cable
Note: The USB extended cable with ferrite bead and the TV cable extended
cable with ferrite ring is designed for exclusive use with this product. Don’t use
others for this product.
5
Profile
Shutter key
T key
W key
Mode key
Menu key
Playback key
Power key
USB port
AV output port
BUSY
lamp
Wrist strip sport
Macro
switch
Speaker
Battery cover
Lens
LED fill light
Self
-
timer
indicator lamp
Cover
Microphone
Tripod jack
Display
Display
Up key
OK key
Down key
Card slot

6
Functions of keys and indicator lamps:
Keys/Indicator
Lamps Functions
Power key Power on/off.
Shutter key Record, capture.
T key Digital zoom enlargement, zoom in (playback); select and
move photos rightward.
W key Digital zoom reduction, zoom out (playback); select and
move photos leftward.
Menu key Menu on/off.
Mode key Switch modes (capture/record)
Playback key Enter/exit playback mode.
Up key
Select files and menus; switch capture modes
(continuous/self-timer/single), move photos (when @
zoom-out); records/pauses.
Down key
Select files and menus; switch capture modes
(continuous/self-timer/single), move photos (when
@zoom-out); turns on/off LED fill light.
OK key Confirm, play and switch screen display states.
BUSY lamp Busy work.
Self timer
indicator lamp Flashing indication during self timer countdown.
Macro switch Switch between macro mode and normal mode.
Start to Use
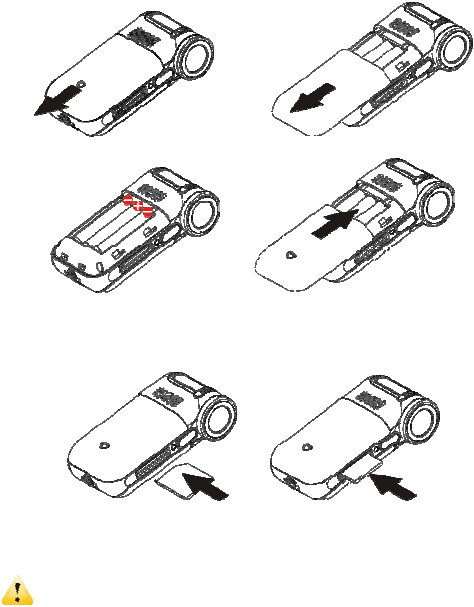
Install battery
This camera uses 3pcs of AAA battery. To replace the battery, it is necessary to
power the camera off.
As indicated in the following photos, open the battery cover, install the battery in
according to the polarity indication then restore the battery cover.
7
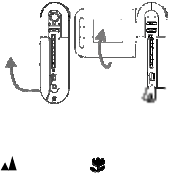
Install SD/MMC Card
As indicated in the following figure, according to the hint beside the card slot,
insert the SD/MMC card with the metal pin inward into the memory card slot.
To take out SD/MMC card, press it downward.
──────────────────────────────────────────────────
Note: Before replacing the memory card, be sure to power off the camera.
Insert the card in the direction as indicated. Do not impose much force on
it to avoid damaging the card or camera components. If it does not work,
please check if the direction is correct.
If the memory card is used for the first time or it has been used on other
cameras, it is necessary to format it.
──────────────────────────────────────────────────
8
Open Screen
Unfold the LCD screen outward and then turn it
toward the user.
Power on
Push the power key of the camera for 2s to power it
on.
Select Focus
Press the macro switch to adjust the focus as Normal ( ) or Macro ( ).
Switch Modes
After power-on, the camera can enter the record mode.
Press the mode to switch between record mode and capture mode.
Record
In record mode press the shutter key to start recording and again to stop.
During recording, press the up key to pause, again to continue.
Capture
In capture mode, press the shutter key to take photos.
Playback
In playback mode, you can browse photos and play the videos recorded with this
camera.
Browse photos: Press the up/down key to search the desired photo and press the
T key to zoom in photos. After zoom-in, press the up/down/T/W key to move the
photo; press the OK key to exit.
Play movies: Press the up/down key to search the desired movie, press the OK
key to start to play, again to stop, during play, press the up key to pause; press the
up key again to continue.
Power off
In power-on state, press the power key to power off the camera.
If the camera is in idle state for more than the set power-off time (1min/3min/5min),
the camera will automatically power off in order to save power.
Menu Settings
ᖿ䖯
ᖿ䖯ᖿ䖯
ᖿ䖯
!
!!
!
!!
!!!!
!!
᜶䖯
᜶䖯᜶䖯
᜶䖯
ˉ
ˉ
ˉ
ˉˉ
ˉ
ˉˉˉ
ˉ
ˉˉ
|
䷇䞣
䷇䞣䷇䞣
䷇䞣
ˉˉ
ˉ
ˉˉˉˉˉ
ˉ
ˉˉˉ
|
ˉ
ˉ
ˉˉˉ
ˉ
ˉˉ
9
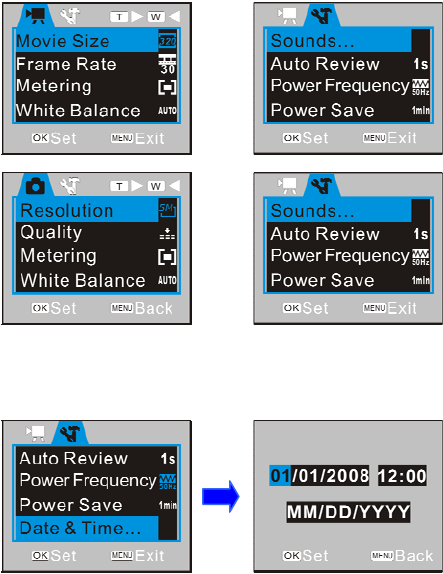
In capture, record and playback mode, press the menu key to open the desired
menu, and press T/W key to switch between Record menu and Setting menu.
Press the up/down key to choose the desired menu options and press the OK key
or T key to enter the desired submenu and then press OK key to confirm. If
selected, the menu will have a blue background.
▲Record menu ▲Setting menu
▲Capture menu ▲Playback menu
Set Date/Time
Press the menu key to open the desired menu, then press the T key to enter
menu settings. Press the down key to choose the desired "Date/Time" menu
option, press the OK key again to enter the setting window.
In the setting menu, press the T key or the W key to choose the desired option
(date, time or date format). The chosen option will have a blue background. Then
press the up or down key to adjust the chosen option. After adjustment, press the

10
OK to confirm or press the menu key to cancel setting and back. Finally, press the
menu key to exit from the setting mode.
Connect PC
Before connecting PC, please firstly install driver with the installation CD attached.
First power on the camera, enter the Setting menu and set USB mode as movable
MSDC or PCCAM. Connect the camera with the USB cable attached to the
useable USB port of PC, and then the camera will accordingly enter the
removable disk or PC camera mode.
Operation Step by Step
Record mode
After powering on the camera, enter the record mode.
Move the macro switch to Normal ( ) or Macro ( ) to choose the desired focus.
Macro switch position Focus range
Normal˄ ˅ 140cm~infinite
Macro˄ ˅ 15cm~25cm
Press the shutter key to start recording and again to stop. During record, press Up
key to pause and after pause, press Up key to continue.
Press T key of W key to have digital zoom change.
Press Down key to turn on/off the LED fill light. (After the playback mode is
entered, the fill light cannot be used.)
In idle state, press the OK key to switch between these three screen display
states among Turn off Icons, Close Screen and Normally Display.
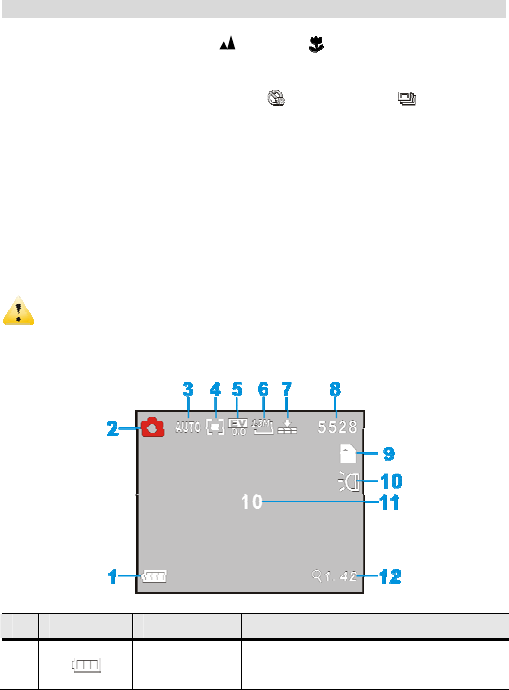
ƹScreen display information in record mode
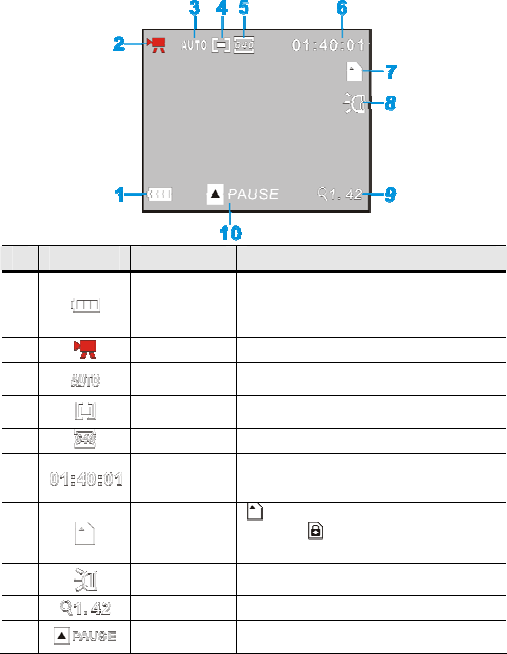
11
Icon Icon name Description
1 Battery
Indicate the current battery state. When
it is in read, it indicates the battery is
used up and the camera will power off
automatically.
2 Video Mode
Indicate that the record mode is chosen.
3White
balance Indicate the current white balance
setting.
4Metering
mode Indicate the current metering mode
5 Movie size
Indicate the video resolution at present.
6Record time
In idle state, indicate rest recordable
time; during record, indicate recorded
time.
7Card
Indicate storage card has been
inserted, Indicate the SD available
has write-protect.
8Fill light Indicate the fill light is on.
9 Digital zoom
Indicate the current digital zoom multiple
10 Pause Indicate pressing the up key to pause or
continue recording.
ƹ Menu Settings
12
Press the menu key to open the video main menu, press the up/down key to
choose the desired menu, press the right key or the OK key to enter the submenu.
In the submenu, press the menu key or the left key to back to the main menu;
press the up/down key to choose, and press the OK key. After backing to the main
menu, you can press the menu key to exit.
In menu selection, the chosen menu will have a blue background.
In record menu, you can have the following options:
Main Menu Submenu Description
640×480 High resolution
Movie Size 320×240 Low resolution
High 30 frames/s
Frame Rate Low 15 frames/s
Center Focus on the central area during light
detection.
Multi Focus on multiple points during light
detection
Metering
Spot Focus on only one point during light
detection
Auto Auto white balance, applicable for many
cases.
Daylight Applicable for the environment with
sunshine
Cloudy Applicable for the cloudy environment.
Fluorescent Applicable for the environment with
fluorescent lamp
White Balance
Tungsten Applicable for the environment with
fluorescent environment lamp.
Set Up Menu
Whether in record mode or capture mode or playback mode, press the menu to
open the desired menu, then press the T key or W key to enter the set up main
menu; press the up/down key to choose the desired menu, press the right key or
the OK key to submenu, in which, press the menu key or the left key to back to the
main menu, press the up/down key to choose the desired item and press the OK
key to confirm. After backing to the main menu, press the menu key to exit.
In menu selection, the chosen menu will have a blue background.
Main Menu Submenu Description
Sounds Shutter Open or close the shutter sound
during capture.

13
Start-up Three options for choice
Beep Set as ON/OFF
Volume Choose the volume for key tone
Off Auto off
1s 1s review after capture
Auto Review
3s 3s review after capture
50Hz Set as 50Hz frequency Power
Frequency 60Hz Set as 60Hz frequency
1min Set auto power-off after 1 minute.
3min Set auto power-off after 3 minute.
Power Save
5min Set auto power-off after 5 minute.
Date & Time / Set date/time and date format.
English Set menu language as English
S. Chinese Set menu language as simplified
Chinese
Language
T. Chinese Set menu language as traditional
Chinese
NTSC Set as NTSC TV system
TV Out PAL Set as PAL TV system
MSDC Connected and set as removable
disk mode
USB
PCCAM Connected and set as PC camera
mode
Off Close power-on image
System Use system power-on image
Start-up Image
My Image Use custom power-on image
Format Yes/No Format storage card
Reset All Yes/No Restore factory settings
In the sound submenu, press the up/down key to choose the desired option and
press the T key or W key to switch to the desired option.
When setting date/time, press the T key or the W key to switch the set options,
press the up/down key to adjust it. Press the OK key to confirm, press the menu
key to cancel the settings and back to the main menu.
When using custom power-on menu, in the playback mode, choose the desired
photo and set it as power-on menu; otherwise, “My Image” menu will be in grey
and cannot be used.
14
Capture Mode
After power-on, enter the capture Mode.
Move the macro switch to Normal ( ) or Macro ( ) to choose the desired focus.
Press the shutter key to start taking photos.
Press the T key or W key to have digital zoom.
Press the up key to switch to Self Timer ˄˅or Continuous˄ ˅.
Continuous: You can press the shutter key to take 3 photos.
Self timer: Press the shutter key to have countdown and take the first photo after
2s or 10s.
Use LED fill light: Press the up key to open or close LED fill light. (In playback
mode, the fill light cannot be used.) In idle mode, press the OK key to switch
among the three screen display modes: Turn off Screen, Turn off Icons and
Normally Display.
──────────────────────────────────────────────────
Note: Always hold the camera firmly, or place it on tripod etc in order obtain clear
photos.
Press the shutter key to take photos, and then the Busy lamp will be on. In
such case, do not move the camera; instead, after the Busy lamp is off,
move the camera in order to prevent unclear photos.
──────────────────────────────────────────────────
ƹ Screen display information in capture mode
Icon Icon name Description
1 Battery
Indicate the current battery state. When
it is in read, it indicates the battery is
used up and the camera will power off
15
automatically.
2Capture
Mode Indicate in capture mode at present
3White
balance Indicate the current white balance
setting.
4Metering Indicate the current metering mode
5Exposure
compensation Indicate exposure compensation value
6 Resolution Indicate the current photo’s resolution
7 Photo quality Indicate the current photo’s quality
8 Number left Indicate how many photos you can still
take.
9Card
indicates storage card has been
inserted, indicates the SD available
has write-protect
10 Fill light Indicate the fill light is on.
11 Self-timer
countdown Indicate self timer countdown
12 Digital zoom Indicate the current digital zoom
multiple
ƹ Menu Settings
Press the menu key to open the video main menu, press the up/down key to
choose the desired menu, press the right key or the OK key to enter the submenu,
in which you can press the left key to back to the main menu, press the up/down
key to choose the desired option, press the OK key to confirm. After backing to the
main menu, press the menu key to exit.
In menu selection, the chosen menu will have a blue background.
We can have the following menu options in capture mode:
Main Menu Submenu Description
2048×1536 3m pixels
1600×1200 2m pixels
1280×1024 1.3m pixels
Resolution
640×480 0.3m pixels

16
Super Fine Excellent photo quality
Fine Fine photo quality
Quality
Normal Normal photo quality
Center Focus on the central area during light
detection.
Multi Focus on multiple points during light
detection
Metering
Spot Focus on only one point during light
detection
Auto Auto white balance, applicable for
many cases.
Daylight Applicable for the environment with
sunshine
Cloudy Applicable for the cloudy
environment.
Fluorescent Applicable for the environment with
fluorescent lamp
White Balance
Tungsten Applicable for the environment with
fluorescent environment lamp.
Exposure /
Use the T key and W key to adjust
exposure compensation
Off Use single mode
Self-timer 2S Use 2s self timer mode
Self-timer 10S Use 10s self timer mode
Driver Mode
Burst Use continuous mode
Normal Normal photo effect
B&W Black-white photo effect
Sepia Classical photo effect
Negative Negative photo effect
Red Red photo effect
Green Green photo effect
Effect
Blue Blue photo effect
Note: When entering the exposure submenu to adjust exposure compensation,
press the T key and the W key to adjust exposure compensation value, then the
brightness of the screen will change accordingly. After the setting is over, press
the OK key to confirm and back to the main menu; press the menu key to cancel
settings.
Set Up Menu
17
The same as the record mode.
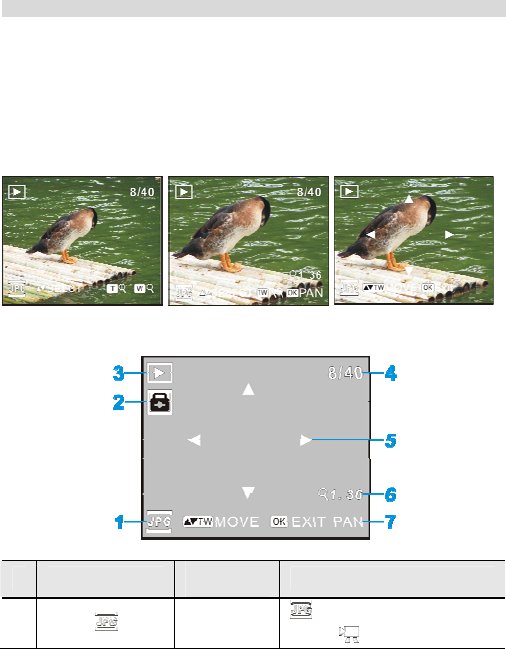
Playback Mode
You can enter the playback mode with the mode key.
In the playback mode, press the up key to choose files forward or the down key to
choose files backward.
When the desired video is chosen, press the OK key to start playing, then the right
corner of the screen will display play counter. During play, you can press the up
key to pause, press it again to continue, press the OK key to stop.
After desired photo is chosen, press the T key to zoom in the photo, press the OK
key to lock the enlarged photo, then press the up/down/T/W key to move the
photo. To exit from the zoom-in lock mode, press the OK key.
ƹ In the playback mode, you will have the following screen display options.
Icon Icon
name Description
1File type indicates the current file is
photoˈ indicates the current
18
file is video.
2File
protection
Indicate the current file is
protected.
3Playback
mode Indicate playback mode is
chosen at present
4File no.
Indicate the location of the
current file and total of files (with
timer displayed during video
play)
5Move hint Indicate the photo is zoomed in
and locked and can be moved.
6Zoom-in
multiple
Indicate the current photo
zoom-in multiple
7Key hint Indicate key operation
ƹMenu Settings
Press the menu key to open the video main menu, press the up/down key to
choose the desired menu, press the OK key to enter the submenu, in which you
can press the left key to back to the main menu, press the up/down key to choose
the desired option, press the OK key to confirm. After backing to the main menu,
press the menu key to exit.
In menu selection, the selected menu will have a blue background.
In capture mode, you will have the following options:
Main Menu Submenu Description
Lock/Unlock
One Lock/Unlock the current file
Lock All Lock all files
Lock
Unlock All Unlock all files
One Delete the current file
Delete All Delete all files
Start Start slide show
Interval Set slide show interval (1-10s)
Slide show
Repeat Set as circular play or not
Effect B&W Set photo as black and white effect
19
Sepia Set photo as classical effect
Negative Set photo as negative effect
Red Set photo as red effect
Green Set photo as green effect
Blue Set photo as blue effect
Rotate Press the OK key once to rotate
photo by 90 degrees
Save Save the rotated photo.
Rotate
Back Back to the main menu
Add Add voice memo for photos.
Voice Memo Delete Delete the voice memo in photos
Yes Confirm the current photo as start-up
image
Start-up Image
No Cancel
Note: 1. After effect or the rotated photo is saved, you will have a new photo.
2. At most, you can add 30s voice memo. To add voice memo, you can
press the shutter key to stop. In the playback mode, the photo added with voice
memo will have an icon of . Press the OK key to start playing the voice memo;
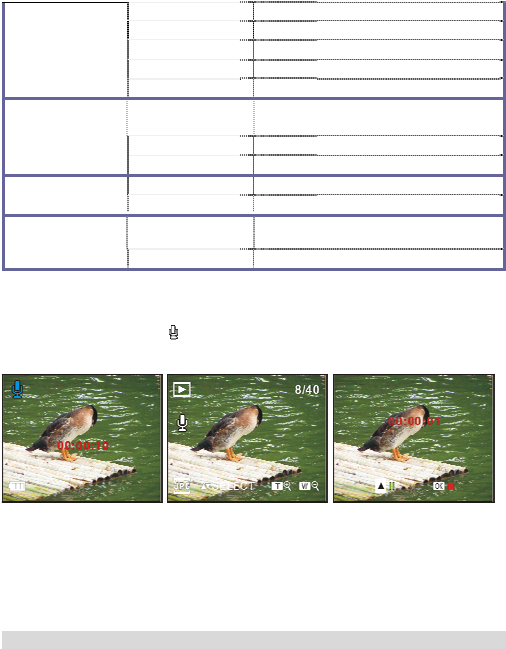
during playing, press the Up key to pause or press the OK key to stop.
▲Add voice memo ▲Photo after memo added ▲Play voice memo
Set Up Menu
The same as the record mode.
Connect PC to Download Photos/Videos
After connecting the camera to PC and entering the Mass Storage mode, in “My
Computer” window, you will see one new removable disc. The photos or videos
taken are stored under the directory “DCIM\100JLCAM” in the removable disc.
20
You can enter this directory and copy the desired file onto your PC HD.
──────────────────────────────────────────────────
Note: During file downloading, do not disconnect USB; in USB connection,
do not plug or pull the memory card in order to prevent data loss.
──────────────────────────────────────────────────
Use PC Camera Function
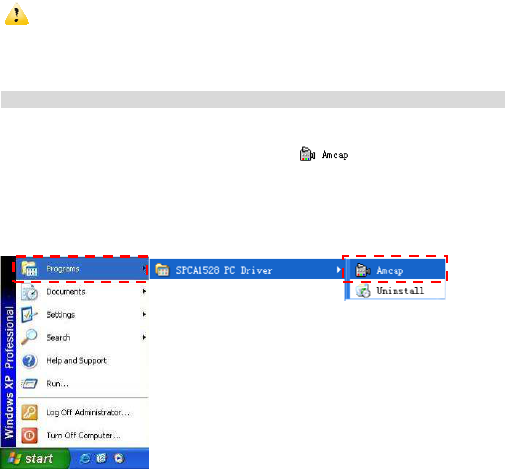
Before using PC Camera, make sure that the camera driver has been installed on
PC. After the driver is installed, add one " SPCA1528 PC Driver” menu into the
“Start→Programs” menu, then there will be one shortcut icon. After the
camera is connected with PC and enters PC camera mode, click this icon (as
indicated in the following figure) to open AMCAP window, in which, the video
corresponding to the lens will be displayed. If AMCAP software is not used, the
PC Camera function can be used for network video transmission.
21
Install Driver and Software
The attached CD contains camera driver and the software PhotoImpression and
VideoImpression free of charge (used to process photos and videos respectively).
Installation Interface
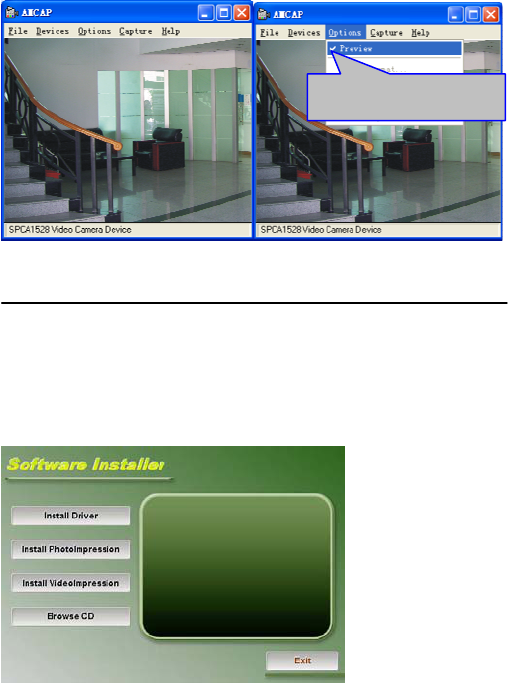
Insert the attached CD into the CD-ROM, then the system will automatically run
the software installer in the CD and the screen will have the installation direction
window as follows.
Make sure the Option has
selected Preview option
.

22
(It may take several minutes to run the program, depending on PC performance.
If there is no installation direction window occurring, please run “Windows
Explorer” and run the “SoftwareInstaller.exe” under the CD-ROM.)
Install driver
In the software direction installation window, click the “Install Driver” button, and
complete the installation step by step.
The driver is installed. Please restart the computer.
Install Software Attached free of charge
In the install direction window, click “Install PhotoImpression” button and “Install
VideoImpression” button to accomplish the installation according to the screen
hint.
Install PhotoImpression:
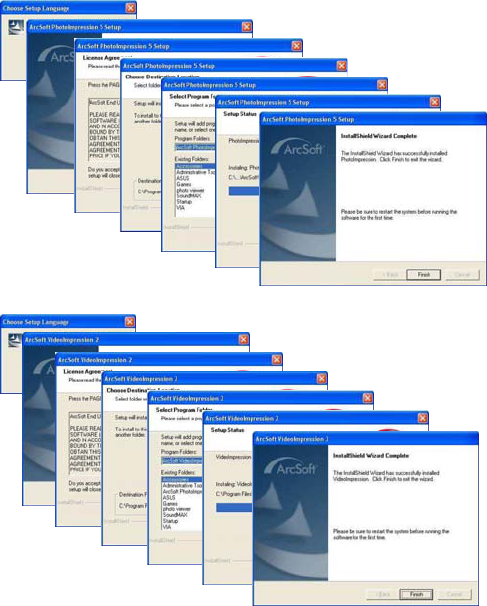
23
Install VideoImpression:
After the software is installed, before the first use, please restart the computer.
For the instructions for PhotoImpression and VideoImpression, please refer to the
Help menu.

24
Specifications
Image sensor 1.3m pixels
Main functions Record, capture, playback, removable disc, PC camera.
Lens F2.8 f=6.0mm
Focus 140cm~infinite (normal)
15cm~25cm (macro)
Digital zoom 4×
Shutter Electronic
LCD screen 1.5” TFT LCD
Photo resolution 2048×1536;1600×1200;1280×1024; 640×480
Video resolution VGA 640×480, QVGA 320×240, 30/15 frames/s
White balance Auto/manual: Daylight, cloudy, fluorescent and tungsten
Exposure Auto/manual compensation (-2.0EV̚+2.0EV, 0.3EV
step)
Self timer 2s or 10s
Video AVI
File format Photo JPEG
Storage media SD/MMC card
USB port Mini USB2.0 interface
Power supply 3 x AAA alkali battery.

25
Troubleshooting
Low battery, please replace it.
The battery is not removed of the package.
Unable to start up
after battery is
installed. The battery is installed inversely. Please check if the
battery is installed correctly.
No memory card is inserted. Please insert a proper
card for capture or record.
Unable to take
photos and record
videos when the
shutter key is
pressed.
The SD card has write-protect. Please take it out and
push this protection switch to the non-protection
position.
Wrong focus. Please move the macro switch to choose
a proper focus again.
Unclear photos The hands are shaking during capture. Please hold the
camera firmly or use other fixing objects such as tripod
etc to stabilize the camera and try not to shake the
camera.
Dark photos or
videos
Insufficient rays in the environment. Please take
photos or videos in the place with sufficient rays or use
lamp to intensify brightness.
Low battery. Please replace it.
Automatic
power-off To save power, if the camera has no operation for
more than 1min (3min or 5min, depending on setting),
it will power off automatically.
Unable to delete
the file in the
camera.
The SD card has write-protect. Please take it out and
push this protection switch to the non-protection
position.
26