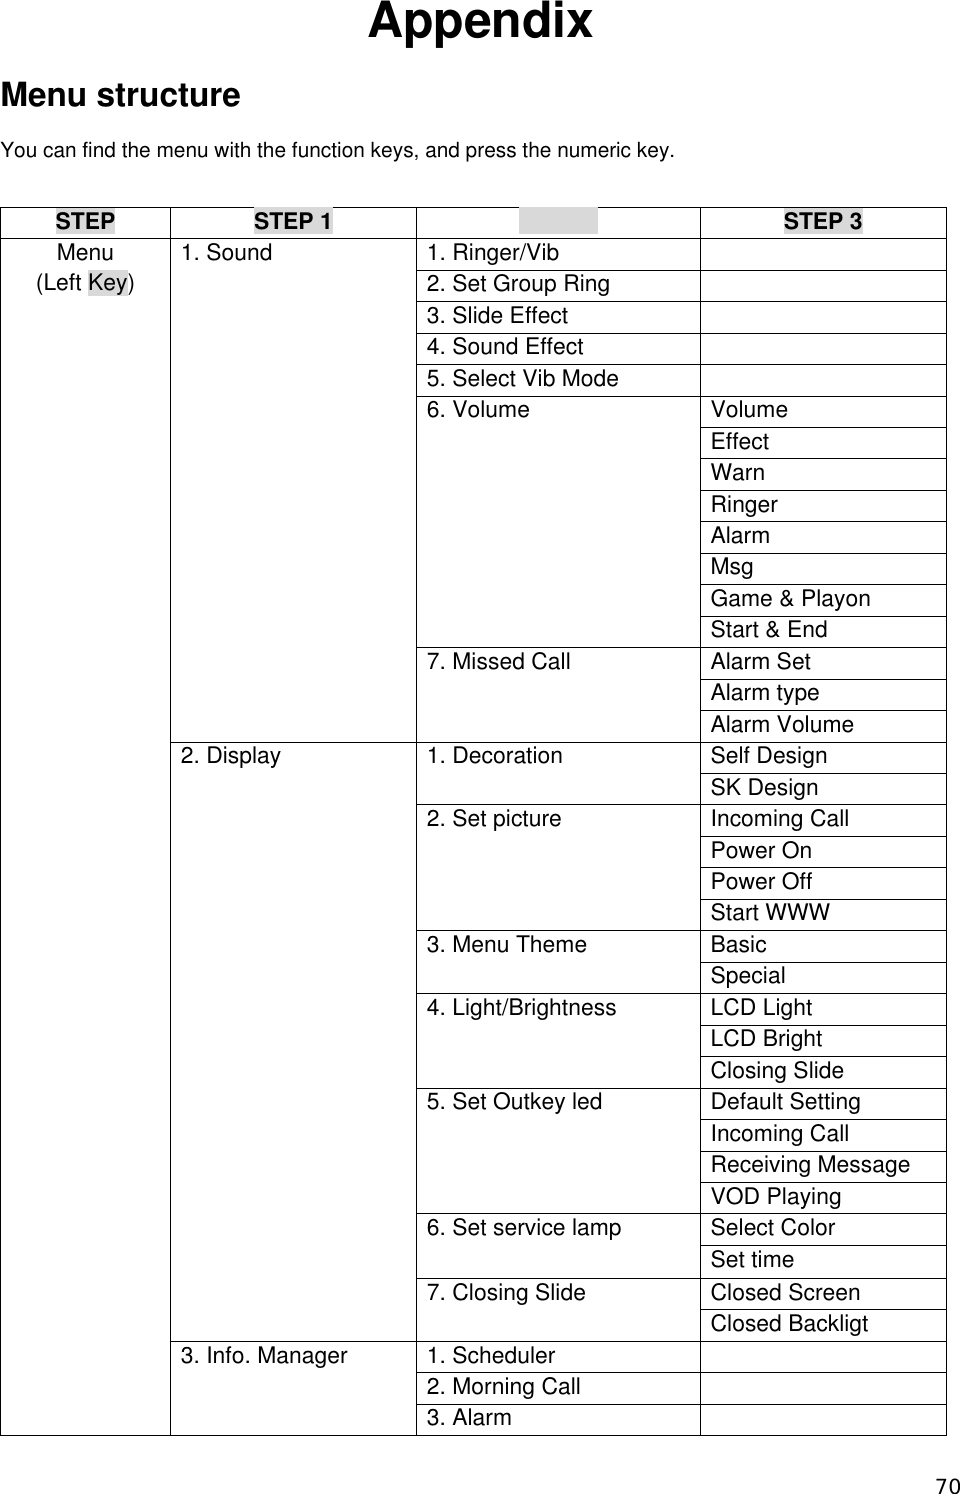
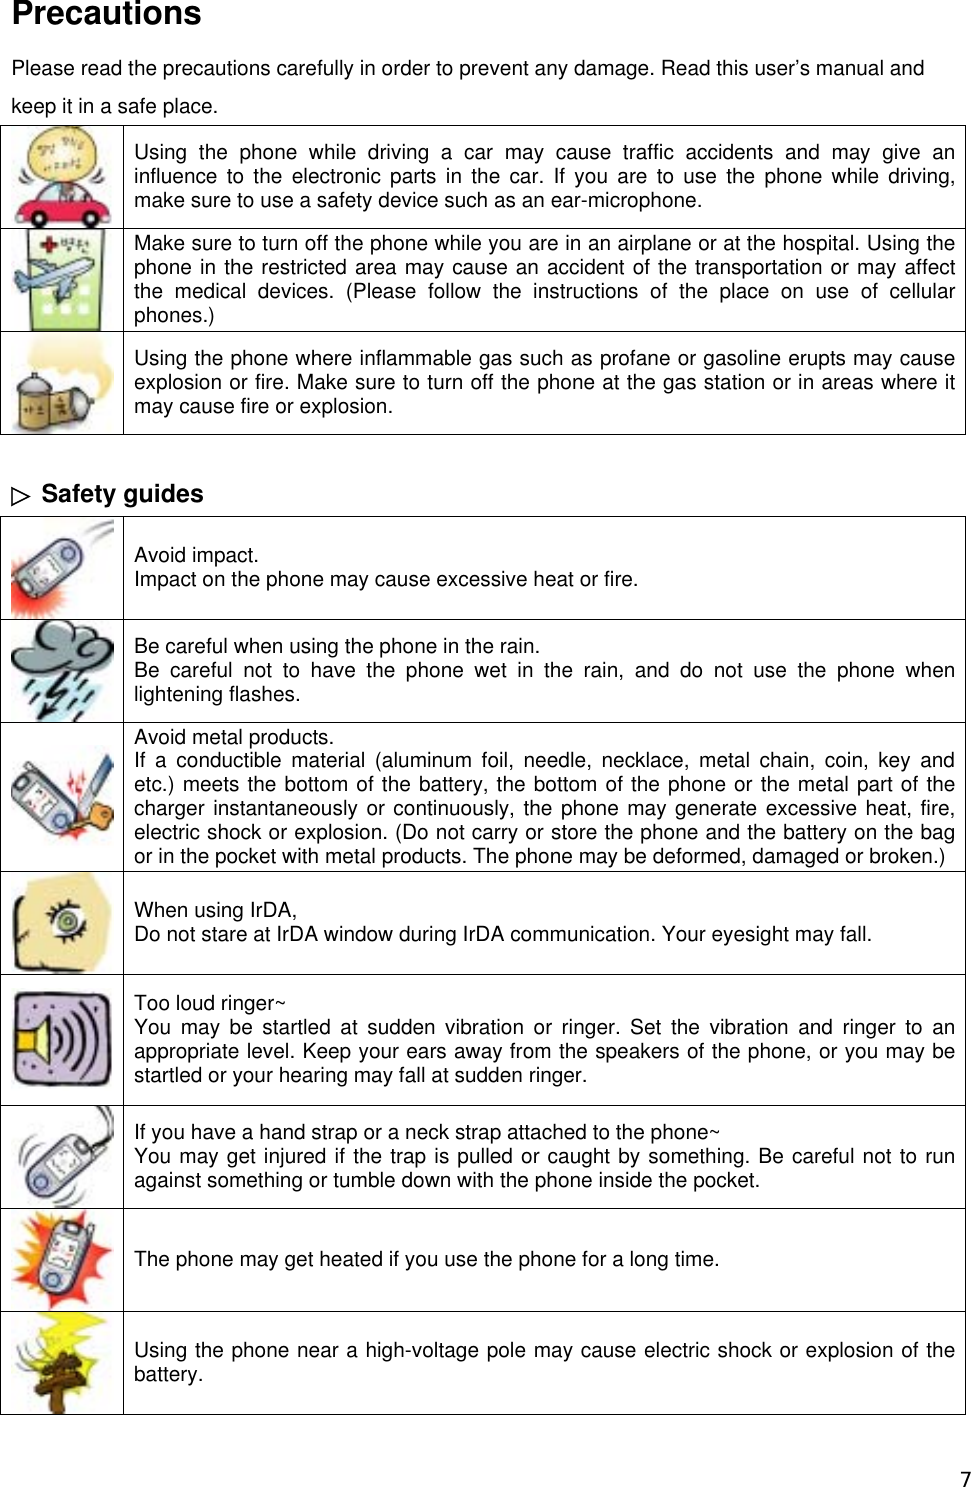
SK Teletech SK-7200 Single-Mode Cellular Phone (CDMA) User Manual IM 5000
SK Teletech Company Limited Single-Mode Cellular Phone (CDMA) IM 5000
UserManual.wiki
>
SK Teletech
>
SK 7200 User Manual
Users Manual
Navigation menu
Upload a User Manual
Namespaces
Wiki Guide
HTML
PDF
Info
Views
User Manual
Discussion / Help
Navigation
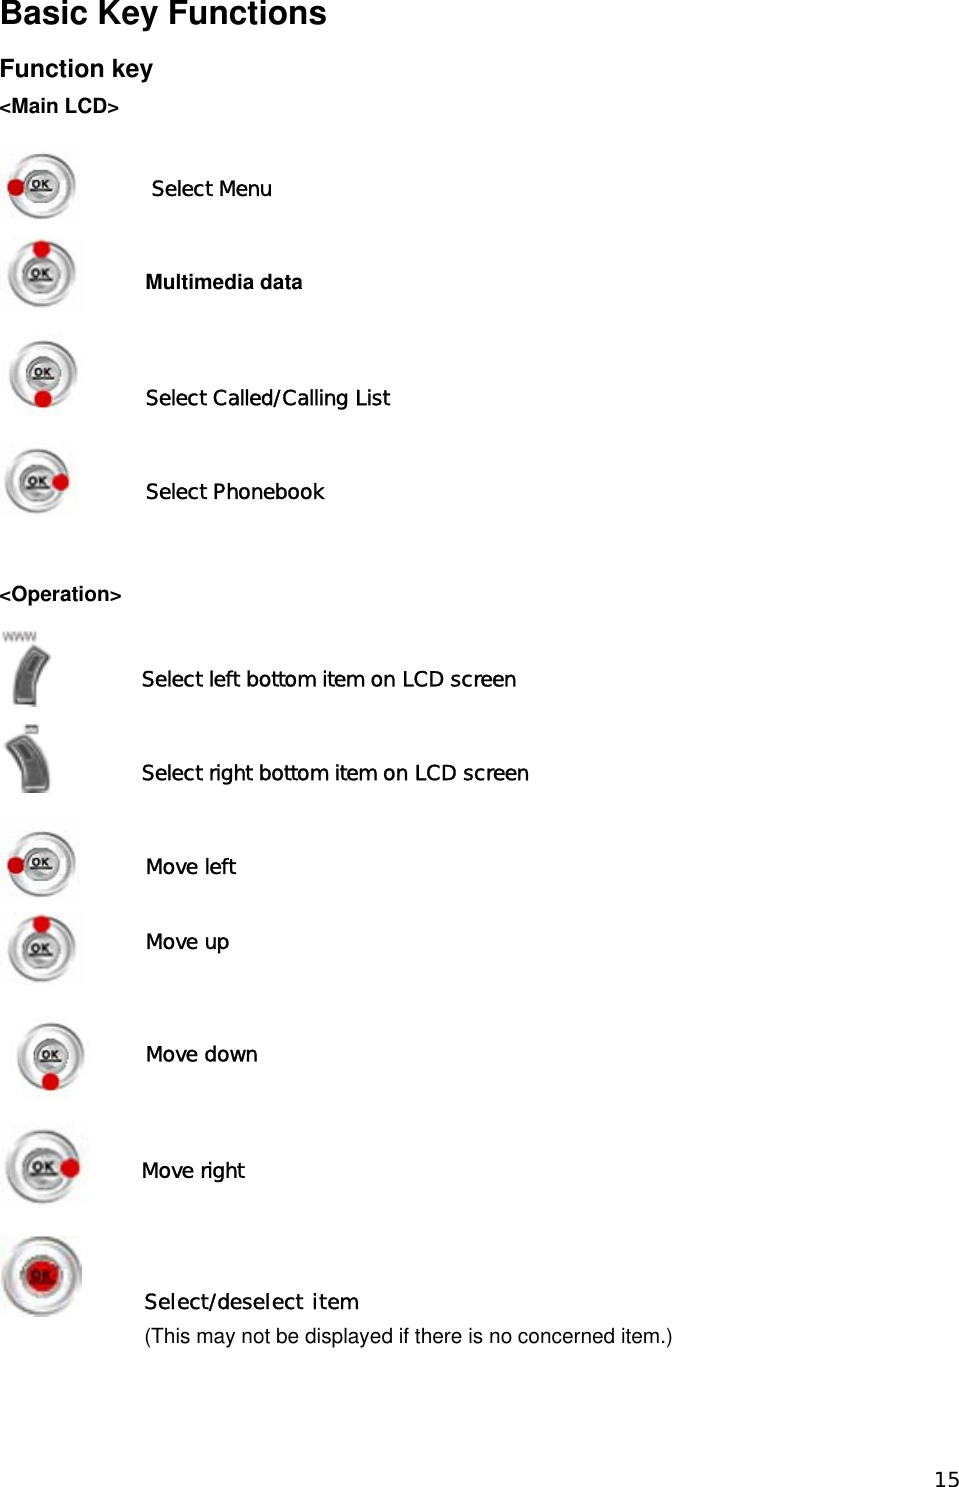
![How to Activate and Select Menu Ex) Enter a phonebook: James, Friend, Home Number 123-4567, and Memo. 1. Press (Right)[Book] and (4)[New Entry]. 2. Press (OK)[Sel]. 3. Enter Name, and press (OK)[Done]. - Press (OK)[Done] to automatically move to the next item. 4. Press (OK)[Sel] and (Up/down). - After moving to the required group, press (OK)[Sel]. 6. Press (OK)[Sel] and (Up/down). - The cursor is moved automatically to the next item. - After moving to the required icon, press (OK)[Sel]. 7. Press (OK)[Sel], enter the number and press (OK). - The cursor is moved automatically to the next item. 8. Press (OK)[Sel]. - After moving to the required icon, press (OK)[Sel]. 9. Press (OK)[Sel], enter the memo and press (OK)[Done]. 10. Press (www)[Save]. How to use the linked menus 1. You can use the linked menus if Menu is displayed on the bottom of the screen. 2. If you press (www)[Menu], the functions are displayed on the menu. 3. Menus are varied depending on where you have press (www). e.g. : Selecting linked menu of Calling List. (down), (Right) How to enter text Use this section when you enter text messages, e-mails, phonebook data, schedule items and contents. <How to enter Hebrew > e.g.) te quiero 1. (SMS)+ (2)[Out-Box] + (1)[New Msg] 2. (OK)[Enter] 3. (8) + (3) + (#) + (7) + (8) + (4) + (3) + (7) + (6) - If the character is included in the keypad, press the key once regardless of the order of the 16](https://usermanual.wiki/SK-Teletech/SK-7200/User-Guide-488673-Page-16.png)
![character. - You can change the entry mode in the order of English, Symbol, Number, and Hebrew whenever you press (SMS) * Press (#) for space. <How to enter English> e.g.) Sky~ 1. (SMS) + (2) [Out-Box]+ (1)[New Msg] 2. (OK)[Enter] 3. (7)x4 + (5)x2 + (9)x3 + (SMS) + (3) + (8) - You can change the entry mode in the order of English, Symbol, Number, and Hebrew whenever you press (SMS) * Press (#) for space. 17](https://usermanual.wiki/SK-Teletech/SK-7200/User-Guide-488673-Page-17.png)
![Redialing to the recent called/calling number “40 “of the recently called/calling numbers are displayed. You can select a number and press (Send) to make a call. <Called number> 1. Press (Down), (Left)[Called History]. - Select a required number with (Up/Down) key. - If the number is registered in Phonebook, the name and icon are displayed. 2. Press (OK). - The number and called time are displayed. 3. Press (Send). <Calling number> 1. Press (Up),(Right)[Calling History]. - Select a required number with (Up/Down) key. - If the number is registered in Phonebook, the name and icon are displayed. 2. Press (OK). * The number and called time are displayed. 3. Press (Send). * If the call history is locked, you cannot make a call by pressing the Send key. * If numbers of calls are made/received to/from the same number, the last calling/called times are displayed. If you want to check the calling/called count, press (WWW)[Menu], and then [1] [Called time / Calling time]. Speed dialing You can make a call by pressing a speed dial number without pressing the entire phone number. One digit speed dial number (1~8) 1. Press and hold one digit speed dial number. - Or you may press a speed dial number and press (Send). 2. A call is made to the number saved in the speed dial number. 22](https://usermanual.wiki/SK-Teletech/SK-7200/User-Guide-488673-Page-22.png)
![Two digit speed dial number (10~99) 1. Press the first digit, and then, press and hold the second digit. - Or you may press both digits and then press (Send). 2. A call is made to the number saved in the speed dial number. * If the phonebook is locked, you should enter the password. (See P000.) Receiving calls 1. When the phone rings or vibrates, open the slide. - If the slide is left open, press any key. 2. If the call is finished, close the slide or press (End). - The call time blinks, and the, main LCD screen is displayed. * You can receive calls in three ways (open the slide, open the slide and press any key, and press the Send key). * You can set the Ans. Machine function. (See P.00) Functions during a call Earpiece volume You can adjust the earpiece volume in 5 steps during a call and on main LCD. 1. During call (Up/Down) Adjust volume with (Up/Down). Reading messages You can read the received text message during a call. 1. Press (SMS) during the call 2. Press (1) to read the text message. * If a new message is received during a call, you can read the message by press (OK)[OK]. * You can select alarm during a call. (See P00) * After reading a text message, press (CLR) to return to the call screen. 23](https://usermanual.wiki/SK-Teletech/SK-7200/User-Guide-488673-Page-23.png)
![Mute You can mute your voice over the phone. 1. Press (SMS) during a call. 2. Press (3). - Press (WAP)[Release] to release mute function and return to the call screen. Answering Machine You can use this Ans. Machine function when you cannot receive a call. Setting Ans. Machine Select ring time and announcement. 1. (Left) + (5) + (6) 2. (1)[Set Auto Answer ] + (OK) - Select ring time with (Up/Down), and then press (OK). - Refer to the Basic Operation. (See P00~P00) 3. Press (SMS) to save setting. * Adjust ring time - The phone vibrates/rings for the selected time, and returns to Ans. Machine mode. * Select announcement - Select the announcement for Ans. Machine. -Default announcement is “General”. Recording/playing announcement You can record the announcement with your voice. 1. (Left) + (5) + (6) 2. (2)[Greeting Message] - Press (OK) to record the message, and then, press (SMS)[Save]. * You can record the message of up to 30 sec. 24](https://usermanual.wiki/SK-Teletech/SK-7200/User-Guide-488673-Page-24.png)
![* You can play the recorded message with (WWW)[Play]. Using Ans. Machine You can activate Ans. Machine by pressing a key. 1. Open the slide and press and hold (Ans. Machine Key) on the left side of the phone. 2. You can release the function by pressing and holding (Ans. Machine Key) again. - If the Ans. Machine function is released, the phone returns to main LCD. * If Ans. Machine is activated, when the caller records a message, a missed call is indicated on the LCD. * You can activate Ans. Machine by pressing and holding (Ans. Machine Key). * If a call is received, the phone vibrates/rings for the selected time, and switches into Ans. Machine mode. * The caller can record a message for 30 seconds. * Total recording time is 4 minutes (Ans Machine + Recording). * Total recording time is 4 minutes (Ans Machine + Recording). * Refer to the Basic Operation Details. (See P.000-000) Playing message 1. Open the slide, and press and hold (0). 2. Press (OK)[Play] to play the message. - If you press (WWW)[Menu] and then select (3), recorded messages are played in order. * Refer to the recording/playing guide for details. (See P.00) Recording/Playing You can make recording/playing on main LCD or during a call. Recording 1. Open the slide, and press and hold (0). 2. Press (SMS)[Record] to start recording. 3. Press (SMS) to save the recorded content. 25](https://usermanual.wiki/SK-Teletech/SK-7200/User-Guide-488673-Page-25.png)
![* You can press and hold (0) in recording list. * Press (0) to stop and save recording. * Press and hold (0) during a call to record the call. However, you cannot play or cancel recording. Recording is stopped and saved if the call is finished. * Refer to the Basic Operation Details. (See P.000-000) Playing 1. Open the slide, and press and hold (0). 2. Select a desired item with (Up/Down). * You can cancel the selected item by pressing (WWW)[Menu] and selecting (1). 3. Press (OK)[Play] to start playing. * You can select an item in the recording list with (Up/Down). * If a call is received during the playing, the playing mode is deactivated. You can answer the call by pressing any key except (End)[End]. Even if the phone is set to Ring, the phone vibrates. Viewing called/calling History You can check the missed call list and called/calling list. 1. (Down),(Right)[Calling History]/ - Press (WWW)[Menu] to display calling time, and information on phonebook and message. 2. Select an item with (Up/Down). 3. Press (OK). * If numbers of calls are made/received to/from the same number, the last calling/called times are displayed. * 40 numbers are displayed for a calling/called list respectively, and calling/called times are displayed for 15 items respectively. Etiquette You can use this function in public space or in a classroom. 26](https://usermanual.wiki/SK-Teletech/SK-7200/User-Guide-488673-Page-26.png)
![My Info Enter your information (Name, Mail Address, Photo, and etc.). 1. (Right) + (#)[My Info.] - Press (WWW)[Menu] to add or delete photos or pictures. * Enter your information right after purchasing the phone. Basic operation details ◈ Making calls - To make a call to the number in the phonebook, refer to Phonebook menu. (See P.00-00) ◈ Ans. Machine - If you press (Ans. Machine Key) after you set the Ans. Machine function, the mode changes to Normal/Conference/Class/User Defined. - Even in Ans. Machine function, you can answer the call by pressing (Send) and finish the call by pressing (End). The recording made before you answer is automatically saved. - Even in Ans. Machine function, you can answer the call by pressing (Send) and finish the call by pressing (End). The recording made before you answer is automatically saved. - You can save up to 20 recording files (Ans. Machine + Recording). ◈ Recording * If you receive a call during recording, recording is finished and is automatically saved. * If the recording time (4 minutes) is used up, you cannot save any more recording file. * The maximum recording time is 4 minutes, and recording count is 20. (You cannot save any more recording file if the number of recording files reaches 20. Delete a file if you want to make a recording file.) 28](https://usermanual.wiki/SK-Teletech/SK-7200/User-Guide-488673-Page-28.png)
![Phone Book Entering phonebook Enter phone number, e-mail address, photo, anniversary or other memo. Add data 1. (Right) + (4)[New Entry] - Enter phone book entry. Refer to Basic Operation. (See P13~P15) - Press (WWW)[Menu] to add Number, E-Mail, Memo and Anniversary, Photo, Picture. 2. Press (SMS)[Save]. Add data on main LCD You can save a phone number on main LCD. ◈ New -Make new entry. 1. Enter phone number + (OK)[Save] + (1)[New] 2. (OK)[Select] - Move to New Entry screen. - Refer to “New Entry”. (See P.00) ◈ Add number - Add a number to the existing phonebook name. 1. Enter phone number + (OK) + (2)[Add number] 2. (OK)[Select] - Select an item with (Up/Down), and press (WAP)[Save]. - Refer to “Speed Search”. (See P.00) Edit data Using the search method, edit the existing data. 1. (Right)[Book] + (1)[Speed Search] - Search name with (Up/Down). 2. (OK)[Sel] 3. (SMS)[Edit] 29](https://usermanual.wiki/SK-Teletech/SK-7200/User-Guide-488673-Page-29.png)
![* Press (WWW)[Menu] in Edit screen to add an item. Delete name Using the search method, delete the names. 1. (Right)[Book] + (1)[Speed Search] * Search name with (Up/Down). 2. (OK)[Sel] 3. Press (WWW)[Menu], select (3)[Delete Name], and then, (OK)[Sel]. Speed Search You can search phonebook data in all name list or by group name. Search in all name list Search the desired item in all name list. 1. Press (Right)[Book] and (1)[Speed Search] 2. Press (1)[All Name List]. 3. Search a name and press (OK)[Sel]. 4. (Send) * Press (SMS)[New] to move to New Entry. * You can search a secret group with “Speed Search” only. Search by group Search data by group. 1. (Right)[Book] and then (1)[Speed Search] 2. Select a group with (Up/Down), and press (OK)[Sel]. 3. (Send) * Only the group that contains the data is displayed. 30](https://usermanual.wiki/SK-Teletech/SK-7200/User-Guide-488673-Page-30.png)
![Search by name Search a phone number by name (entire or part of the name). 1. Press (Right)[Book] and (2)[Search by Name] 2. Enter part of or entire name, and press (OK)[OK]. 3. Select a name with (Up/Down) and press (OK)[Sel]. 4. (Send) * The name in the secret group is not displayed. You should release the secret group to search the name. (See P.31) Search by number Search a phone number by number (entire or part of the number). 1. Press (Right)[Book] and (3)[Search by Number] 2. Enter part of or entire number, and press (OK)[OK]. 3. Select a number with (Up/Down), and press (OK)[Sel]. 4. (Send) * The number in the secret group is not displayed. You should release the secret group to search the name. Edit speed dial You can edit the speed dial. Add speed dial You can add a frequently dialed number as a speed dial. 1. (Right)[Book] + (5)[Edit Turbo Dial] * Select a speed dial number with (Up),(Down). 3. (0K)[Sel] * This function is disabled if there is no phone number in the phonebook. 31](https://usermanual.wiki/SK-Teletech/SK-7200/User-Guide-488673-Page-31.png)
![Edit speed dial You can modify/delete the existing speed dial. 1. (Right)[Book] + (5)[Edit Turbo Dial] 2. Press (SMS)[Del] to delete a speed dial number. 3. Press (WWW)[Mod] to modify a speed dial number. * Even if a speed dial is deleted, the number on the phonebook is not deleted. If the data is deleted from the phone book, speed dial is also canceled. Edit group You can Add, Modify, Delete a Group, or Edit group data. Adding a group You can add a new group. 1. (Right)[Book]+ (6)[Memory Group] 2. Press (SMS)[New] and enter a group name. 3. (OK)[Done] - Select secret group option with (Left),(Right). ◈Setting secret group - You should enter password to search a phone number in a secret group. - You can search a number in a secret group with “Speed Search” only, and not by Name or by Number. - In order to release a secret group, select “General” as the group attribute. - You can save up to 21 groups including [No group]. If all 21 groups are created, you cannot add a group. Modifying a group You can edit name or data of the existing group. 1. (Right)[Book] + (6)[Memory Group] - Select a group with (Up/Down). 32](https://usermanual.wiki/SK-Teletech/SK-7200/User-Guide-488673-Page-32.png)
![2. (OK)[Sel] - Modify group. Refer to Basic Operation. (See P13~P15) 3. Save the change with (SMS)[Save]. * You cannot modify group name and attribute of [No group]. Deleting a group You can delete the existing group or the group name. 1. (Right)[Book] + (6)[Memory Group] * Select a group with (Up/Down). 2. (WWW)[Menu] + (1)[Del Group] 3. (OK)[Sel] * In order to delete a name of a secret group, you should enter the password. 33](https://usermanual.wiki/SK-Teletech/SK-7200/User-Guide-488673-Page-33.png)
![Message Function Reading text messages Read the text message and check the callback number. 1. Press (SMS). (1)[In-Box], (1)[Text Message] - Select a message with (Up/Down). - (Unsealed envelope Icon) indicates the message you have read and (Sealed envelope Icon) indicates the new messages. * Press (SMS) to delete the selected message. * Press (OK)[Reply] to read the message and send the reply immediately. Press (SMS) [Forward] to forward the message to a 3rd party. Select other messages with (Left), (Right). Checking voice message You can check the voice message recorded in In-Box for missed call or when the phone was off. 1. Press (SMS). (1)[In-Box], (2)[Voice Message] * Press (SMS) to delete the selected message. * Press (WWW) [Delete All] to delete all the voice messages. * Press (Up/Down) and (Send Key) to call back. Managing SPAM messages Register specific phone numbers or strings to manage SPAM messages. 1. (SMS) + (1)[In-Box] + (3)[Spam Message] 2. (1)[Reg SPAM Numer] and (OK)[Sel] 3. (SMS)[New] 4. Enter number and press (OK)[Done]. 34](https://usermanual.wiki/SK-Teletech/SK-7200/User-Guide-488673-Page-34.png)
![* You should select SPAM Block On to save the SPAM messages in the SPAM Message Box. * Reg Spam Word : Register words you want to block. * Spam Message Box : SPAM messages are saved in this box. Up to 10 SPAM messages are stored. If the storage limit is exceeded, the older messages are overwritten. * Spam Block On : You can decide whether to block Spam Messages or not. Entering text messages 1. (SMS) + (2)[Out-Box] + (1)[New Message] 2. (OK)[Input] and enter the text, or enter the text directly. * Refer to How to Enter Text. (P00~00) 3. Press (SMS) to select a language, symbols or numbers. 4. Press (OK)[Done] to forward to the next item. 5. Select the message type and press (OK). * Select the message type with (Left),(Right). 6. Press (WWW)[Menu] to select the phone number. - Press and hold (SMS) on the main LCD to display the new message screen. - Press (Delete/Previous Key) to delete a character. Press and hold the key to delete entire words. Press (Right) to enter a space. - Press the (WWW)[Menu] button to save the text during entering the text, or to display the saved text. - You can broadcast a message to up to 20 receivers at a time. - Message type indicates the importance of the message, and not the message transmission rate. - You can enter the phone number from the phonebook. (P00) Saving sentences You can save the frequently used sentences, and retrieve and paste them to new messages. 1. (SMS) + (2)[Out-Box] + (1)[New Message] * Enter the frequently used sentences. 2. (WWW)[Menu] + (1)[Save As Phrase] +(OK) * The selected sentence is saved in Quick Text. 35](https://usermanual.wiki/SK-Teletech/SK-7200/User-Guide-488673-Page-35.png)
![Retrieving sentences You can import the sentences saved in Quick Text to the message you are creating. 1. (SMS) + (2)[Out-Box] + (1)[New Message] 2. (WWW)[Menu] + (2)[Input Phrase] 3. (SMS)[Paste] * You should save sentences in Quick Text in order to use the retrieving function. Searching phone umbers You can search phone numbers easily from Phonebook or in the call history. ◈Speed Search- Other Party Number 1. (SMS) + (2)[Out-Box] + (1)[New Message] 2. (WWW)[Menu] + (3)[Search Seach] * Refer to Speed Search. (P00~00) 3. (OK)[Sel] ◈ Broadcasting - You can send a message to up to 20 receivers. - If you want to send a message to the members of a group, select a group with (SMS), (3)[Search Seach], and add the group to the sender by pressing (SMS). Only the mobile phone numbers are entered, and if a receiver has two or more mobile phone numbers, the first entered one is selected. Managing Saved Message Move the important text messages to Saved Message so that they should not be automatically deleted. 1. (SMS) + (1)[In-Box]+ (5)[Saved Message] 2. (OK)[Sel] * Up to 40 text messages are stored in Saved Message 36](https://usermanual.wiki/SK-Teletech/SK-7200/User-Guide-488673-Page-36.png)
![Managing Quick Text Save the frequently used sentences, and retrieve them when preparing a message. 1. (SMS) + (2)[Out-Box] + (4)[Phrase] 2. (OK)[Sel] * To use the saved sentence again, press (OK), and modify the sentence before sending the message. Refer to Entering Text Message. (See P.00) Managing Outgoing Message The transmission failed messages, the messages saved before transmission, and the messages not completed due to incoming calls are stored. 1. (SMS) + (2)[Out-Box] + (3)[Sent Meesage] 2. (OK)[Sel] * In case of broadcasting, the same number of messages as broadcasting is saved along with called numbers.* Up to 50 messages are stored. Managing Sent Message The successfully sent messages are stored. 1. (SMS) + (2)[Out-Box] + (4)[Phrase] 2. (OK)[Sel] MMS MMS service enables you to attach video, music and voice to the text messages, or to use various effects including color of the words and background of the messages. Entering Message 1. (SMS) + (3)[MMS] + (1)[New Message] 2. (OK)[Sel], Enter text 37](https://usermanual.wiki/SK-Teletech/SK-7200/User-Guide-488673-Page-37.png)
![- Enter the text. You can change the character mode with (SMS),and (OK)[Done] 3. (OK)[Sel]+ Select Contents - Select Photo & Sound, Video Contents attachment with (Left), (Right), and then, press (OK) [OK]. 4. (SMS)[Next] + Select the required transmission mode, Subject. Send To Number 5. (SMS)[Send] * You can save all type of contents within the storage capacity. * Image : The images downloaded with MMS or taken with the camera are listed. The available image size is [176X144] only. * Background Music : The music files exclusive for MMS are listed. * Video : The MMS contents downloaded from WAP and the moving images in Video Manager are listed. * Attach file : You can attach various sizes of image files, background, music, and voice file to the message. * Contents exclusive for MMS should be downloaded separately. Managing In-box You can save the received messages and send reply. 1. Press (SMS) + (3)[MMS] + (2)[In-Box] 2. (OK) + (OK)[Sel] + (OK)[Play] * On the new message screen press (WWW)[Reply] to send the reply. Managing Out-box You can save the sent messages, and edit the saved messages to send replies. 1. Press (SMS) + (3)[MMS] + (3)[ Out-box]. 2. (OK) + (OK)[Sel] + (OK)[Play] * In order to use the stored message, press [Send], and modify the message. (See P.00~00) Managing Draft-box The transmission failed messages and the messages entered before transmission are stored. 1. Press (SMS) + (3)[MMS] + (4)[Draft-box] 2. (OK) + (OK)[Sel] 38](https://usermanual.wiki/SK-Teletech/SK-7200/User-Guide-488673-Page-38.png)
![New message alert You can select ring/lamp for new message alert. 1. (SMS) + (4)[Set Msg Alert] + (SMS)[Save] * Mute : LCD blinks once. * 1 time : LCD blinks once and rings. * Every 2min : LCD blinks once and rings at every 2 minutes until you check the message. * Alert is off, even if new message alert is set to 1 time or every 2min, if ringer/vib is set to mute (See P.000). * You can adjust volume of alert tone at Set sound. (See P.000) * Alert in call : Select whether to activate new message alert during a call. Deleting all messages 1. (SMS) + (5)[Delete All Msg] + Password 2. Select (1)[Text Message], and press (OK)[Sel]. - Select delete or not with (Left),(Right). 39](https://usermanual.wiki/SK-Teletech/SK-7200/User-Guide-488673-Page-39.png)
![(3) Taking self-shot (Taking a photo with the slide closed) If you press (Camera Key) as the slide is closed, the phone is switched into the photo mode. Press (OK Key) to take a picture, monitoring the image displayed on the LCD. - When you take a photo with the slide closed, release the ‘outside key lock’. - If you press (Camera Key) in the photo mode as the slide is closed, the image on the LCD is reversed. - You can check the saved photo in Photo Manager. (See p00~00) Taking Photos You can take the photo of the required object with the built-in camera. 1. (Camera) + (1)[Take Photo] - You can select brightness in 9 steps with (Left)/(Right) buttons. - You can adjust zoom with (Up)/(Down) buttons. Zoom steps depends on the size 2. (OK)[Shoot] - Photos are automatically named. You can rename photos with (SMS)[NEW]. - Refer to the character input method. (P.00-00) - Press (Cancel Key) to cancel saving. 3. (OK)[Save] ◈Take Photo Menu◈ Press (www)[Menu] to use various functions while you are taking a photo. 1. (WWW)[Menu]+(1)[Reverse] - The image is reversed. 2. (WWW)[Menu]+(2)[Flash] - You can select [Flash],[Blinking] or [Auto Flash ]. 3. (WWW)[Menu]+(3)[Photo Size] - You can select the photo size from [640×480], [320×240], [176×144], [176×240] and [128×96]. 4. (WWW)[Menu]+(4)[Photo Frame] - You can take photo with a required image. Photo frame is available only if the photo size is [176×144],[176×240] or [128×96]. 41](https://usermanual.wiki/SK-Teletech/SK-7200/User-Guide-488673-Page-41.png)
![5. (WWW)[Menu]+(5)[Photo Effect On] - You can take a photo in various tones: [Gray], [Sepia], [Purple], [Blue] or [Green]. 6. (WWW)[Menu]+(6)[Multi-Shot] - Nine photos are taken in series. If you select Multi-Shot, you can select the speed of multi-shot. 7. (WWW)[Menu]+(7)[Shutter Sound] - You can select a shutter sound. 8. (WWW)[Menu]+(8)[Timer] - You can select a timer option from [Off],[2 sec],[5 sec] or[10 sec]. The default is [Off]. 9. (WWW)[Menu]+(9)[Photo Management] - You can view photos in Photo Management. * If there is an incoming call in the photo mode, LCD is switched to the answer mode. * You should select Save to save the photo. * You can save contents within the capacity regardless of content types (Photo, Video, Live Bell, Live Screen or MMS). * You can save up to 300 photos. If memory is full, you cannot save any more photos even if fewer than 300 photos are already saved. * Because the camera sensor meters light at every two seconds, LCD may blink. Wait for a few seconds before taking a photo. * Brightness and size of LCD may be different between before and after taking a photo. * Frame speed may slow down and noise may occur if you take a photo in darkness. Taking Videos You can take video with the built-in camera. 1. (Camera) + (2)[Take Video] - You can select brightness in 9 steps with (Left)/(Right) buttons. 2. (OK)[Take videos] + (OK)[Stop] + (OK)[Save] - Recording time is displayed on LCD. - You can view the saved video in Video Management. - You can rename the video already saved. 42](https://usermanual.wiki/SK-Teletech/SK-7200/User-Guide-488673-Page-42.png)
![* You can use zooming with (Up), (Down), and adjust brightness with (Left), (Right) while taking the video. (You can use digital zoom as in the photo mode.) * If [MMS] is selected, you can take and play the video for MMS. * You can use various effects when taking a video. * You can insert images with the Fun Frame function. * You can select the resolution from [HQ], [ST] and [EC]. The file size varies depending on the resolution. * You can check and manage the video files in Video Manager. Refer to Managing Video for details. (See P.108) * You can set the environments in Camera Settings. Photo manager You can manage the photos stored in the phone. Managing folder 1. (Camera) + (3)[Photo Mgmt] +(1) * The photos taken with the phone are stored in [Folder1]. * You can set Secret for other folders than [Folder1]. * If you wish to open another folder, press (WWW)[Menu] and (3)[Change Folder]. You can select a folder with (Up), (Down). * You can select a folder with (Left), (Right) when checking the photos on the list. Checking photo You can check the photos stored in the phone. 1. (Camera) + (3)[Photo Mgmt] +(OK) - Move previous/next with (Left),(Right). ◈ Photo Management ◈ Select (www)[Menu] to use the Photo Management functions. 1. (WWW)[Menu]+(1)[Picture Set] - You can set the photos for main LCD, incoming calls, power on, power off and starting WWW. 2. (WWW)[Menu]+(2)[Change Order] - You can arrange order of the photos by date, file size, name, or user. 43](https://usermanual.wiki/SK-Teletech/SK-7200/User-Guide-488673-Page-43.png)
![3. (WWW)[Menu]+(3)[Change Folder] - You can move a photo to other folders. If you wish to move numbers of photos to other folders, see P.105. 4. (WWW)[Menu]+(4)[Delete] - You can delete a photo. 5. (WWW)[Menu]+(5)[Contents MMS] - You can attach a photo to MMS message. 6. (WWW)[Menu]+(6)[Edit] - You can rename a photo. 7. (WWW)[Menu]+(7)[Security] - You can select protect/lock for the selected photo. (See P.107) 8. (WWW)[Menu]+(8)[Select All] - You can select all files. 9. (WWW)[Menu]+(9)[File Info] - You can view information on the selected photo. * Press (A) to move to the next page, and (Camera) to the previous page. Move photo You can move photos from [Folder1] to other folders. 1. (Camera) + (3)[Photo Mgmt] +(SMS)[Check] 2. Press (WWW)[Menu], (2)[Change Fol], and select the destined folder with (OK)[Sel]. * You have to check at least two photos to use the Slide Show function. You can check up to 9 photos for slide show. If you create a slide show with the checked photos, the original photos are stored separately from the slide show photos. * You can create up to 6 slide shows. An icon is marked on the photos used in a slide show. Edit photo 1. (Camera) + (3)[Photo Mgmt]+(OK)[Select] 44](https://usermanual.wiki/SK-Teletech/SK-7200/User-Guide-488673-Page-44.png)
![2. (Menu)[WWW] + (6)[Edit] - Rename : You can rename the photo. - Frame : You can select various frames if the photo is [176×240], [176×144] or [128×96]. - Effect : You can apply various effects to the photo. (It may take time to be applied depending on the effect.) Lock/protect photo 1. (Camera) + (3)[ Photo Mgmt] * Place the cursor on a photo with (Up),(Down),(Left),(Right). 2. (Menu)[WWW] + (7)[Security] + Set Protect/Lock 3. (SMS)[Save] * The lock image is displayed if the locked photo is used for incoming call, power on, power off or alarm screen. * If you select a [Slide Show] for the main LCD screen, the lock image is displayed for the locked photo. * If you use a locked photo as a P-book ID, you should enter the password. If a cropped photo is saved with ‘(2) Overwrite’, you should enter the password to check the photos in P-book. * Even when you delete all photos, the protected photos are not deleted. You should release protection before deleting photos. * Select the locked photo, and release lock with (WWW)[Menu] to release lock. Or enter password to change the items. * See P.186 on how to lock all functions. Video manager 1. (Camera) + (4)[Video Mgmt] 2. (OK) < Video Management > Select (www)[Menu] to use the Video Management functions. 1. (WWW)[메뉴]+(1)[Bell/Screen Set] - You can set the selected video sound as a ring, and set the video for main LCD, power on and power off. 2. (WWW)[ Menu]+(2)[Change Order] - You can sort the video files by date, by size, by name and by user. 3. (WWW)[Menu]+(3)[Change Folder] - Move the video file to other folder. If you wish to move numbers of video files, check the files by 45](https://usermanual.wiki/SK-Teletech/SK-7200/User-Guide-488673-Page-45.png)
![pressing (SMS), and move them to other folder. 4. (WWW)[Menu]+(4)[Delete] - You can delete a video file. 5. (WWW)[Menu]+(5)[Contents MMS] - You can attach a video file to MMS message 6. (WWW)[Menu]+(6)[Edit Name] You can rename the video file. 7. 7. (WWW)[Menu]+(7)[Security] -You cannot delete the protected video file. You should enter the password to check the locked video. 8. (WWW)[Menu]+(8)[Select All] -Select all video files in Video Manager. 9. 9. (WWW)[Menu]+(9)[file Info] -You can view information on a video file. Camera details You can set configuration for camera function. 1. (Camera)+(5)[Camera Setting]+(OK) -You can select whether to continue or stop taking photos or videos if you close the slide while taking photos or videos. ※ Icons for camera : Flash blinks : Flash always on, instant on : Multi-shot : Timer setting : Video quality : Size 46](https://usermanual.wiki/SK-Teletech/SK-7200/User-Guide-488673-Page-46.png)
![FM Radio Listening to Radio 1. Open the slide, and press and hold (#). - The ear-microphone works as an antenna. Make sure to insert the ear-microphone to listen to FM radio. - Select channel with (Left)/(Right) buttons. - You can select a preset channel with (SMS)[Fine]. * If you listen to radio through a speaker or an ear-microphone, sound quality may vary depending on the position of ear-microphone. * Some channels may not be received well if you are in the area where radio coverage is weak. Setting channels 1. Open the slide, and press and hold (#). 2. (WWW)[Menu]+(1)[Set Channel] - Select channel with (Left)/(Right) buttons. 3. (OK) - Select channel with (Up)/(Down) buttons, and press (OK)[Save]. *You can save up to 20 channels. *Do delete a channel, press and hold (#), and select (WWW)+(2)[Delete]. Setting FM radio configuration 1. Open the slide, and press and hold (#). 2. (WWW)[Menu]+(3)[Configuration] 3. (SMS)[Ok] * Slide : Select whether to continue listening to FM when you close the slide while listening. * Radio play path : Select ear-microphones or speakers. * Skin : Select a skin for FM radio. 49](https://usermanual.wiki/SK-Teletech/SK-7200/User-Guide-488673-Page-49.png)
![Setting Sound Ringer/Vibration You can select various ringers. 1. (Left)[Menu] + (1)[Sound] + (1)[Ringer/Vibrator] - Select an item with (Up/Down). - Refer to Basic Operation.(See P13~P15) 2. Press (SMS) to save the setting. * In the etiquette mode, the phone is always in the vibration mode even if you select a ring. * If you set the ring duration, the phone rings for the given seconds, and LCD blinks. In etiquette mode, or if Vibration is selected, however, the phone vibrates. Group ringer The designated ringer is on for incoming calls from the designated group. 1. (Left)[Menu] + (1)[Sound] + (2)[Set Group Ring] - Select an item with (Up/Down). - Refer to Basic Operation.(See P13~P15) 2. Press (SMS) to save the setting. - If you select <No Group>, the selected ringer is on instead of the ringer set by group. Setting effect You can set the slide open/close tone, key tone and menu tone. 1. (Left)[Menu] + (1)[Sound] + (3)[Slide Effect] - Select an item with (Up/Down). Refer to Basic Operation.(See P13~P15) 2. Press (SMS)[Save]. * Press (WWW)[Menu] and select (1)[Mute] to disable the effects. * Slide open/close tone: The sound effect for slide open/close. 50](https://usermanual.wiki/SK-Teletech/SK-7200/User-Guide-488673-Page-50.png)
![* Key tone : The sound effect for key action * Menu tone : The sound effect for selection of menu. Setting alert You can select various alerts. 1. (Left)[Menu] + (1)[Sound] + (4)[Sound Effect] * Select an item with (Up/Down). Refer to Basic Operation.(See P00~P00) * Press (WWW)[Menu] and select (1)[ Mute] to disable the effects. 1. Press (SMS)[Save] to save the setting. * Dialogbox : Alert for message box * Connect : Alert for call connection * Minute : Alert for 1minute call timer * No service : Alert for out of service area * Low battery : Alert for low battery Vibration mode You can select one of the 5 different vibration modes. 1. (Left)[Menu] + (1)[Sound] + (5)[Select Vib Mode] + (OK)[Sel] * You can activate vibration mode for incoming call if ringer is set to Ring, Vibrator than Ring or Ringer/Vibrator. Volume You can adjust volumes. 1. (Left)[Menu]+ (1)[Sound] + (6)[Volume] + (SMS)[Save] * Earpiece : You can adjust the earpiece volume. * Effect : Slide open/close tone, key tone and menu tone volume * Alert : Dialog box, Connect, Minute, No service, Low battery alert volume * Ringer : Incoming ringer volume 51](https://usermanual.wiki/SK-Teletech/SK-7200/User-Guide-488673-Page-51.png)
![* Alarm : Alarm bell volume * Message : New message alert volume * Game: Game sound volume * On & Off : Power on/off volume Setting missed call You can set the missed call function. 1. (Left)[Menu] + (1)[Sound] + (7)[Missed Call] + (SMS)[Save] * Alert duration : You can select Every 2min, After 2min or No alert. * Alert type : Select one of the four alert tones. * Alert volume : You can adjust volume. My Bell You can manage the downloaded bells and the bells received via IrDA communication. 1. (UP)[Menu] + (6)[My Bell] <My Bell menu> - Set to Ringer : Set the selected bell as the ringer. - Rename : Rename the files. - User Info : Check the capacity by contents. - You can save contents within the capacity regardless of content types. 52](https://usermanual.wiki/SK-Teletech/SK-7200/User-Guide-488673-Page-52.png)
![Setting Display Background You can select the background. Self Design You can select the self design for LCD. 1. (Left)[Menu] + (2)[Display] + (1)[Decoration]+(1)[Self Design] - Select an item with (Up/Down/Left/Right). Refer to Basic Operation.(See P13~P15) - Press (WWW)[Pew] to preview background. 2. Press (SMS) to save the setting. SK Design You can display various types of information on LCD. 1. (Left)[Menu] + (2)[Display] + (1)[Decoration]+(2)[SK Design] - Select an item with (Up/Down/Left/Right). Refer to Basic Operation.(See P13~P15) - Press (WWW)[Pew] to preview background. 2. Press (SMS) to save the setting. * If you select an animation for background, the battery operation time reduces. * You can select [No picture] for background. * If you select [Slide Show] for background, the photos selected for the slide show are displayed by turns. If you use a locked photo in the slide show, the lock image is displayed. If no photo is selected as the slide show, [Slide Show] is not displayed for Background setting. Setting picture You can set the photos for main LCD, incoming calls, power on, power off and starting WWW. 1. (Left)[Menu] + (2)[Display] + (2)[Set Picture]+(2)[Set picture] - Select an item with (Up/Down/Left/Right). 53](https://usermanual.wiki/SK-Teletech/SK-7200/User-Guide-488673-Page-53.png)
![- Refer to Basic Operation.(See P13~P15) - Press (WWW) to preview the screen. 2. Press (SMS) to save the setting. * The picture contents are [Default picture], [My picture], [My photo], [My video] and [No picture]. * If there is no content, the list is not displayed. Setting Menu Theme 1. (Left)[Menu]+ (2)[Display] +(3)[Menu Theme]+(OK) - Basic / Special styles are available. * The default is special style. Light/Brightness 1. (Left)[Menu] + (2)[Display] + (4)[ Light/Brightness] + (OK) * Select an item with (Up/Down), and press (OK). 2. Press (SMS) to save the setting. * Type of LCD backlight - Always : Backlight is on when slide is open. - 10 Sec : Backlight is on for 10 seconds when you open the slide or press any key. - 20 Sec : Backlight is on for 20 seconds when you open the slide or press any key. - 30 Sec : Backlight is on for 30 seconds when you open the slide or press any key. - Set Time : Backlight is on when you open the slide or press any key in the selected time slot. - No : Backlight is off when you open the slide or press any key. * If Backlight is set to ‘Always’, the battery operation time can be reduced. * Type of backlight for closing slide - LCD off : Backlight is off when you close the slide or press the side key. - Off in 1 sec : Backlight is on for 1 second when you close the slide or press the side key. - Off in 3 sec : Backlight is on for 3 seconds when you close the slide or press the side key. - 10sec light : Light is on for 10 sec if you close the folder or press a side key. - Step off : Light is off in two steps if you close the slide. 54](https://usermanual.wiki/SK-Teletech/SK-7200/User-Guide-488673-Page-54.png)
![Setting Outkey LED You can select LED colors for default setting, incoming calls, arrival of messages, and VOD playing. 1. (Left)[Menu]+(2)[Display]+(5)[Set Outket]+(SMS)[Save] * What is outside key LED? You can select colors of outside key LED for default setting, incoming calls, arrival of messages, and VOD playing. * Default setting : You can select LED color while LCD light is on (opening slide, pressing key, LCD light on when slide is closed). Service Lamp You can select the outside key LED color when slide is closed. 1. (Left)[Menu]+(2)[Display]+(6)[Set Service Lamp] 2. (SMS)[Save] *What is service lamp? As the outside key LED lamp, it indicates that phone power is on when LCD light is off with the slide closed. *Setting time : LED blinks at the selected interval. Closed slide setting You can set LCD screen and backlight for closed slide. 1. (Left)[Menu] + (2)[ Display] + (7)[Closing Slide] 2. (SMS)[Save] * Select an item with (Up/Down), and press (OK). 2. Press (SMS) to save the setting. *View clock : Clock image is displayed instead of the standby screen on the LCD when LCD light is off. *View main LCD : Standby screen is displayed on the LCD when LCD light is off. *Select light when slide is closed : You can switch on LCD light with front key as the slide is closed. 55](https://usermanual.wiki/SK-Teletech/SK-7200/User-Guide-488673-Page-55.png)
![My Picture You can designate a saved picture, rename files, check user info, or delete pictures. 1. (UP)[Menu] +(7)[My Picture] + (OK) * Select an item with (Up/Down), and press (OK). 2. Press (SMS) to save the setting. * You can save the contents in flexible manner within the memory capacity regardless of type of contents. * You can save up to 99 files in My Picture. 56](https://usermanual.wiki/SK-Teletech/SK-7200/User-Guide-488673-Page-56.png)
![Info. Manager Scheduler (Solar/Lunar) calendars between January, 1996 to December, 2015 are displayed. Adding schedule You can save anniversaries, reservations or schedules. 1. (Left)[Menu] + (3)[Info. Manager] + Info. Manager(1)[Scheduler] 2. (WWW) + (1) Add schedule + (1) Enter contents + (SMS)[Save] (2) Add anniversary + Enter contents + (SMS)[Save] * You can save up to 10 schedules and 5 anniversaries in a day. * Press (SMS) to change scheduler screen (by week, by day, by month). * Press (*) to go to previous month, and (#) to next month. ※ Reservations or schedules on the phonebook. Checking schedule You can save anniversary, reservation and schedule. 1. (Left)[Menu] + (3)[ Info. Manager] + (1)[Scheduler] 2. (OK)[Confi] * The anniversaries you entered for new P-book entry are saved in Scheduler. (See P.56) * You can delete the anniversaries saved on the scheduler, but cannot delete the holidays and the anniversaries saved on P-book. * If you delete anniversaries on P-book screen, they are deleted from the anniversary list in the scheduler. Setting schedule alarm You can set alarm for anniversaries, reservations and schedules at the desired time. 57](https://usermanual.wiki/SK-Teletech/SK-7200/User-Guide-488673-Page-57.png)
![1. (Left)[Menu] + (3)[Info. Manager] + (1)[Scheduler] 2. (WWW)[Menu] + (5)[Set Alarm] 4. (1) Set schedule alarm/(2) Set anniversary alarm 3. (SMS)[Save] * The default is ‘Alarm off’. * You can set alarm on/off when adding schedules. ※ Anniversary on the phonebook. : Meeting : Wedding : Birthday : Other anniversaries than birthday, meeting and wedding. Morning call Morning call rings at a given interval until you disable it by pressing a specific key. (Snooze) 1. (Left)[Menu] + (3)[Info. Manager] + (2)[Morning Call] * You can set morning call by pressing (OK). 2. (SMS)[Save] * Enter the repeat count for snooze function. If you press any key except (Send) when the alarm is on, the alarm at that stage gets off. You should press (Send) to deactivate the snooze function. * If you select Holiday Alarm Off, morning call alarm does not ring on holidays. * If both morning call and alarm are selected, the morning call rings first, and then, alarm rings when morning call is finished. Alarm You can set alarms at any required time. ◈ Setting time 1. (Left)[Menu] + (3)[Info. Manager]+ (3)[Alarm] 2. (SMS)[New] + (5)[Set time] 58](https://usermanual.wiki/SK-Teletech/SK-7200/User-Guide-488673-Page-58.png)
![3. (SMS)[Save] * For After 10min ~ After 1hour, alarm rings once at the designated time. The alarms that ring once are automatically deleted after the alarm action. * You can set up to 10 alarms. * If the phone is off at the alarm time, alarm rings right after the phone is switched on. * If you are engaged in a call at the alarm time, the alarm rings right after you finish the call. Anniversary You can set the D-day function for anniversaries or important schedules. ◈Adding D-day> 1. (Left)[Menu] + (3)[Info. Manager]+ (4)[To Do] 2. (SMS)[New] + (SMS) * If the anniversary is passed, the 100th day from the anniversary and the number of days passed are displayed. * If the anniversary is not passed yet, the 100th day to the anniversary and the number of days left are displayed. Memo You can simply make memo. Adding memo 1. (Left)[Menu] + (3)[Info. Manager]+ (5)[My Memo] 2. (SMS)[New] 3. (OK)[Done] * You can save up to 10 memos. Editing memo 1. (Left)[Menu] + (3)[Info. Manager]+](5)[My Memo] * Select the item with (Up),(Down). 2. Press (SMS)[Edit], and select (OK) after editing. * You can save up to 10 memos. 59](https://usermanual.wiki/SK-Teletech/SK-7200/User-Guide-488673-Page-59.png)
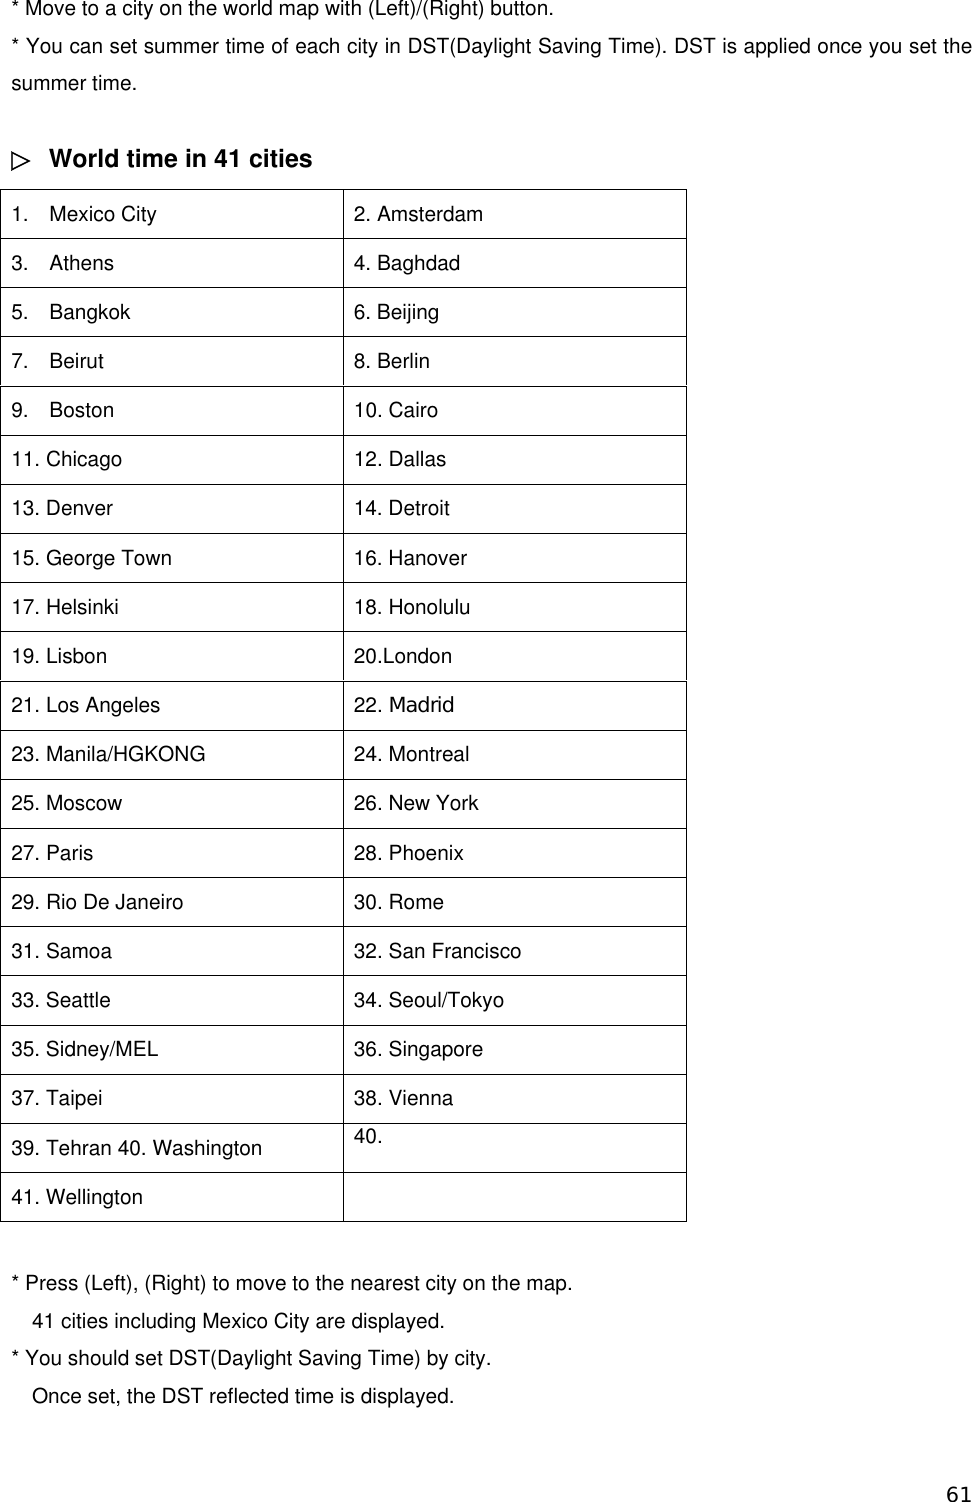
![Calculator You can use the calculator with the memory function and the total function. e.g.) <9 X 7> 1. (Left)[Menu] + (3)[[Info. Manager]+]+ (6)[Calculator] 2. (9) + (Up) + (7) + (OK) * You can use an operator repeatedly. * The answer to the calculation should be not longer than 11 digits. If the answer exceeds 11 digits, an [Error] message is displayed, and calculation function is disabled. * Press (CLR Key) to delete a character, or press and hold (CLR Key) to delete all. - Save Memory : Save the answer. - Memory Total : Add the answer to the saved memory. - Import Memory : Import the last answer (memory) to the operation answer screen. - Delete Memory : Delete the memory. The operation detail is not deleted. - Reset : All the operation details are deleted. Stopwatch You can use the stopwatch function with simple key action. 1. (Left)[Menu] + (3)[Info. Manager]+ (7)[Stop watch] 2. (OK)[Start] 3. (SMS)[Stop] * Press (OK)[Save] if you need intermediate records during operation of the stopwatch. You can check the saved time with (WWW)[View]. * If there is an incoming call during operation of stopwatch, the stopwatch operation is finished. * You can save up to 20 stopwatch records. World time You can check the world time. 1. (Left)[Menu] + (3)[Info. Manager] + (8)[World Time] * Check the world time with (Up),(Down). 60](https://usermanual.wiki/SK-Teletech/SK-7200/User-Guide-488673-Page-60.png)
![Game Game 1. (WWW)[Menu]+4+(1)[Brain Force]/(2)[PUZBUZ] - See Volume in SKY Sound (P.000) for how to adjust volume. BRAIN FORCE * Story mode : The brain force story is unfolded if you press (Under) and (OK). * Pair Match : You can select one of the five characters and play matches with other characters. The game is cleared if you win all other characters. * Survival mode : You can select one of the five characters and play matches until your energy goes down to ‘0’. The number of characters you won is displayed on the upper part of the LCD screen. If you win, energy and rage gage increase. * Options : You can set the level, time and vibration. ※ How to operate keys ※ How to operate characters Jump Jump to left Move to left Moright ve to PrSend ess tha call or7.8.9: Attack keys *To attack while jumping, press the jump key and (5). kJump to right PUZBUZUZ * Play Game : Press 1. Play Game to resume the game. * New Game : Start a new game. * Help : You can view how to play the game, and description on the characters or the items. * OPTION: You can select/deselect vibration. * SCORE : You can view scores by game. * EXIT : You can finish the game. 62](https://usermanual.wiki/SK-Teletech/SK-7200/User-Guide-488673-Page-62.png)

![Settings Option/Auto You can set the call receiving method with closed slide and the dial font size. Option 1. (Left)[Menu] + (5)[Setup] + (2)[Option/Auto] 2. (1)[Option] + (SMS)[Save] * Call receiving method with closed slide : Open Slide, Open & Press, or Press Send. * Dial font size : Select the font size of the figure displayed on the LCD screen when making a call Auto function 1. (Left)[Menu] + (5)[Setup] + (1) [Option/Auto] 2. (2)[Auto Function] + (SMS)[Save] * You can set [Auto Redial], [Hands Free] and [Ear Microphone], and enter the area code. Security Lock You can lock/unlock a specific function of the phone which requires you to enter the password. 1. (Left)[Menu] + (5)[Setup] + (2)[Security] - The default password is ‘0000’. 2. Enter password + (2)Function Lock + (SMS)[Save] (3)Info Lock + (SMS)[Save] * If you select [1.Auto Lock], all the functions are locked. * If you select [2.Function Lock] or [3.Info Lock], is displayed on the upper part of the LCD screen. * See Settings Details for further information. (See P.196) Password 1. (Left)[Menu] + (5)[ Setup] + (2)[Security] * The default password is ‘0000’. 2. (4)[Set Password] + Password + New Password + New Password 64](https://usermanual.wiki/SK-Teletech/SK-7200/User-Guide-488673-Page-64.png)
![Language You can select an appropriate language from English/Hebrew/Russian. 1. (Left)[Menu] + (5)[ Setup] + (3)[Language] 2. (OK)[Sel] Use (UP),(Down). 3. (OK)[Save] Memory Info Check general memory 1. (Left)[Menu] + (5)[Setup] + (4)[Memory Info] 2. (1)[General memory] . (2)[3G-TV Memory Info * You can check memory information on pictures, melodies, photos, moving images and MP3. Call Timer You can check Last/Total/Lifetime Call for Send Voice, Recv Voice, Use WAP, Send Data and Recv Data. 1. (Left)[Menu] + (5)[Control]+ (5)[Air Time] 2. (1) Last Call - You can check the last send/received call time. (2) Total Call - You can check the call time from the last reset. - Send Voice – Total time of calls made - Receive Voice – Total time of calls received - WWW use Time – Total time of WAP service connection - Send Data – Total time of calls made for wireless data service - Receive Data – Total time of calls received for wireless data service (3) Lifetime Call - You can check the call time from purchasing of the phone. The record is deleted with master reset (See P.194). 65](https://usermanual.wiki/SK-Teletech/SK-7200/User-Guide-488673-Page-65.png)
![Auto Answer Set Auto Answer 1. (Left)[Menu] + (5)[Setup + (6)[Auto Answer] + (1)[ Set Auto Answer] * Select the item with (Up),(Down), and press (OK). 2. (SMS)[Save] Record/Play 1. (Left)[Menu]+ (5)[Setup + (6)[Auto Answer] + (2)[Greeting Message] 2. (OK)[Rec] - Press (OK)[Record] to record a message, and press (SMS)[Save] to save the message. * The maximum recording time is 30 seconds. * If a message is already recorded, press (SMS)[Play] to check the recorded voice. S/W Version 1. (Left)[Menu] + (5)[Setup] + (7)[S/W Version] The S/W version displayed at purchasing of the phone is the release version number. Comm. Settings Data settings 1. (Left)[Menu] + (5)[Setup]+ (8)[Comm. Setup] + (1)[Data Service] 2. (SMS)[Save] WWW settings 1. (Left)[Menu] + (5)[Setup]+ (8)[Comm. Setup] + (2)[WWW Config] 2. Enter Password 3. (SMS)[Save] Ev-DO Service 1. (Left)[Menu] + (5)[Setup]+ (8)[Comm. Setup] + (3)[Ev-DO Service] 2. Enter Password 3. (SMS)[Save] 66](https://usermanual.wiki/SK-Teletech/SK-7200/User-Guide-488673-Page-66.png)
![Init by Function Initialize P-book You can reset P-book to the default status at the purchasing of the phone. 1. (Left)[Menu] + (5)[Setup] + (9)[ Init by Function] + (1)[ Initialize P-book] 2. Enter Password 3.(OK)[Sel] Initialize System If you select Master Reset, all the data (P-book, sent/received messages, memo, live bell, live screen, bell/picture/photo/video) are deleted except the default bell and picture. 1. (Left)[Menu] + (5)[Setup]+ (9) [Init by Function] + (2)[Initialize System] 2. Enter Password 3. (OK)[Sel] 67](https://usermanual.wiki/SK-Teletech/SK-7200/User-Guide-488673-Page-67.png)
![IrDA Communication Phone To Phone You can exchange data with other phone with the IrDA function. 1. (Left)[Menu] + (6)[IrDA] + (1)[Phone TO Phone] 2. (1) Receiving Mode - In order to receive bell/picture/photo/P-book from other phones, select Receive mode. Press (CLR Key) if you want to cancel receiving. (2) Send bell - You can send a bell to other phones. Select the item with (SMS)[Check], and press (OK). (3) Send picture - You can send the animation data to other phones. Select the item with (SMS)[Check], and press (OK). (4) Send Photo - You can send the photo data to other phones. Select the item with (SMS)[Check], and press (OK). (5) Send Book * You can Book data to other phones. Select the item and press (OK). (You can check the required item only in Send by Group.) Phone To PC You can perform wireless data communication with PC or use the data manager function via IrDA. Phone settings 1(Left)[Menu] + (6)[ IrDA]+ (2)[Phone To PC] + (OK) * Select the required item with (Up),(Down). * If IrDA is connected with PC, is displayed on the main LCD. * IrDA communication is available when the IrDA window of the phone is within 30˚ and 10cm from the IrDA window of the PC. * If Phone To PC communication does not function for over 10 minutes, connection is released and is disappeared. PC settings Because SK-7200 has the IrDA function built-in, you can use the data manager and the data service with the PC with the IrDA function. 68](https://usermanual.wiki/SK-Teletech/SK-7200/User-Guide-488673-Page-68.png)
![1. The PC with the IrDA communication device needs to have the IrDA communication program. 2. In “Start → Setting → Control Board”, double click the [IrDA] icon. 3. Before IrDA communication, check if “Virtual IrDA COM port” or “IrDA device connected port (COM3, COM4, and etc.)” is selected in the settings for Data Manager or Hyper Terminal. * The virtual IrDA COM port is supported in Windows 2000/XP. * The phone supports IrDA communication with PC at up to 64Kbps. * You can download the data manager program from www. skteletech. com. * Refer to the PC manual for IrDA setting in the PC. IrDA communication details Phone To Phone IrDA communication - Send Bell, Send Picture, Send Photo In order to send a locked item, enter the password. If you select to send all, all items except the locked item are sent. - Send ook * Send All : You can send the entire P-book. * Send by Group : You can send the P-book by group. * Send by Name : You can send the P-book by name. * Send Dial : You can send the speed dial numbers. * Send My Info : You can send your information. The information is stored in [No Group]. * If the same name is already in the phonebook, a message appears, asking you if you want to overwrite. If you select [Yes to all], all the data are overwritten without further confirmation messages. * When you send the P-book to another phone that does not support two phone numbers of the same kind, if two or more phone numbers of a person of the same kind are sent, only one phone number is received. For example, if you send 5 phone numbers of Hong Gil-dong from IM-7300 to U4EP, only one number is received. Call receive ratio can be lowered during IrDA communication. 69](https://usermanual.wiki/SK-Teletech/SK-7200/User-Guide-488673-Page-69.png)