SK Teletech SK-7200 Single-Mode Cellular Phone (CDMA) User Manual IM 5000
SK Teletech Company Limited Single-Mode Cellular Phone (CDMA) IM 5000
Users Manual
SK-7200
User Manual
1

SK-7200 User’s Manual Table of Contents
The contents of this user’s manual are subject to change without prior notice for enhancement of
product performance.
Introduction
SK-7200 User’s Manual Table of Contents................................................................. 2
Precautions................................................................................................................. 7
Accessories............................................................................................................... 10
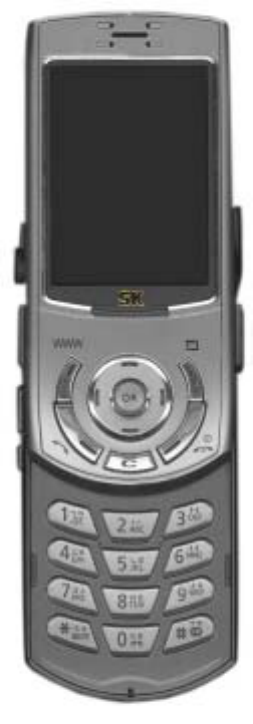
Components and Functions ...................................................................................... 10
Components and Functions ...................................................................................... 11
Components.................................................................................................................... 11
Functions......................................................................................................................... 12
Icons (Icons not settled)............................................................................................ 14
Basic Key Functions ................................................................................................. 15
Function key....................................................................................................................15
How to Activate and Select Menu ............................................................................. 16
How to use the linked menus .......................................................................................... 16
How to enter text ............................................................................................................. 16
How to Use the Battery............................................................................................. 18
Installing the battery ........................................................................................................ 18
Removing the battery ...................................................................................................... 18
Battery operating times ................................................................................................... 19
Battery charge alert......................................................................................................... 19
How to recharge the battery............................................................................................ 20
Minimum recharge time................................................................................................... 20
Basic Operation ........................................................................................................ 21
Turning the phone on................................................................................................ 21
Turning the phone off................................................................................................ 21
Making a call by entering numbers ........................................................................... 21
Redialing calls........................................................................................................... 21
Redialing to the last number............................................................................................ 21
Redialing to the recent called/calling number.................................................................. 22
Speed dialing ............................................................................................................ 22
One digit speed dial number (1~8).................................................................................. 22
Two digit speed dial number (10~99).............................................................................. 23
Receiving calls.......................................................................................................... 23
Functions during a call.............................................................................................. 23
Earpiece volume.............................................................................................................. 23
2
Reading messages.......................................................................................................... 23
Mute ................................................................................................................................ 24
Answering Machine................................................................................................... 24
Setting Ans. Machine ...................................................................................................... 24
Recording/playing announcement................................................................................... 24
Using Ans. Machine ........................................................................................................ 25
Playing message............................................................................................................. 25
Recording/Playing..................................................................................................... 25
Recording........................................................................................................................ 25
Playing............................................................................................................................. 26
Viewing called/calling History.................................................................................... 26
Etiquette.................................................................................................................... 26
Etiquette mode on main LCD .......................................................................................... 27
Etiquette mode during a call............................................................................................ 27
Hold on mode............................................................................................................ 27
My Info...................................................................................................................... 28
Basic operation details.............................................................................................. 28
Phone Book .............................................................................................................. 29
Entering phonebook.................................................................................................. 29
Add data.......................................................................................................................... 29
Add data on main LCD.................................................................................................... 29
Edit data .......................................................................................................................... 29
Delete name....................................................................................................................30
Speed Search ........................................................................................................... 30
Search in all name list ..................................................................................................... 30
Search by group.............................................................................................................. 30
Search by name........................................................................................................ 31
Search by number..................................................................................................... 31
Edit speed dial .......................................................................................................... 31
Add speed dial.................................................................................................................31
Edit speed dial.................................................................................................................32
Edit group ................................................................................................................. 32
Adding a group................................................................................................................ 32
Modifying a group............................................................................................................ 32
Deleting a group.............................................................................................................. 33
Message Function..................................................................................................... 34
Reading text messages ............................................................................................ 34
Checking voice message .......................................................................................... 34
Managing SPAM messages...................................................................................... 34
3
Entering text messages ............................................................................................ 35
Saving sentences............................................................................................................ 35
Retrieving sentences....................................................................................................... 36
Searching phone umbers ................................................................................................ 36
Managing Saved Message ....................................................................................... 36
Managing Quick Text................................................................................................ 37
Managing Outgoing Message ................................................................................... 37
Managing Sent Message .......................................................................................... 37
MMS ......................................................................................................................... 37
Entering Message ........................................................................................................... 37
Managing In-box.............................................................................................................. 38
Managing Out-box........................................................................................................... 38
Managing Draft-box......................................................................................................... 38
New message alert ................................................................................................... 39
Deleting all messages............................................................................................... 39
Camera Function ...................................................................................................... 40
Before using the camera........................................................................................... 40
Battery operation time for use of camera ........................................................................ 40
Taking Photos........................................................................................................... 41
Taking Videos ........................................................................................................... 42
Photo manager ......................................................................................................... 43
Managing folder............................................................................................................... 43
Checking photo ............................................................................................................... 43
Move photo......................................................................................................................44
Edit photo.................................................................................................................. 44
Lock/protect photo .................................................................................................... 45
Video manager.......................................................................................................... 45
Camera details.......................................................................................................... 46
WWW........................................................................................................................ 48
WWW Access ........................................................................................................... 48
Game & Apps............................................................................................................ 48
Video Clip .................................................................................................................48
Ringtones.................................................................................................................. 48
Animations ................................................................................................................ 48
Voice Portal .............................................................................................................. 48
SMS Info. .................................................................................................................. 48
What`s New? ............................................................................................................ 48
FM Radio .................................................................................................................. 49
Listening to Radio ..................................................................................................... 49
4
Setting channels ....................................................................................................... 49
Setting FM radio configuration .................................................................................. 49
Setting Sound ........................................................................................................... 50
Ringer/Vibration ........................................................................................................ 50
Group ringer.............................................................................................................. 50
Setting effect............................................................................................................. 50
Setting alert ..................................................................................................................... 51
Vibration mode.......................................................................................................... 51
Volume...................................................................................................................... 51
Setting missed call.................................................................................................... 52
My Bell...................................................................................................................... 52
Setting Display.......................................................................................................... 53
Background............................................................................................................... 53
Self Design...................................................................................................................... 53
SK Design .......................................................................................................................53
Setting picture........................................................................................................... 53
Setting Menu Theme................................................................................................. 54
Light/Brightness ........................................................................................................ 54
Setting Outkey LED .................................................................................................. 55
Service Lamp............................................................................................................ 55
Closed slide setting................................................................................................... 55
My Picture................................................................................................................. 56
Info. Manager............................................................................................................ 57
Scheduler.................................................................................................................. 57
Adding schedule.............................................................................................................. 57
Checking schedule.......................................................................................................... 57
Setting schedule alarm.................................................................................................... 57
Morning call............................................................................................................... 58
Alarm ........................................................................................................................ 58
Anniversary............................................................................................................... 59
Memo........................................................................................................................ 59
Adding memo .................................................................................................................. 59
Editing memo .................................................................................................................. 59
Calculator.................................................................................................................. 60
Stopwatch ................................................................................................................. 60
World time................................................................................................................. 60
Game........................................................................................................................ 62
Game........................................................................................................................ 62
BRAIN FORCE................................................................................................................ 62
5
PUZBUZUZ ..................................................................................................................... 62
Settings..................................................................................................................... 64
Option/Auto............................................................................................................... 64
Option.............................................................................................................................. 64
Auto function ...................................................................................................................64
Security..................................................................................................................... 64
Lock................................................................................................................................. 64
Password......................................................................................................................... 64
Language.................................................................................................................. 65
Memory Info.............................................................................................................. 65
Check general memory ................................................................................................... 65
Call Timer ................................................................................................................. 65
Auto Answer.............................................................................................................. 66
Set Auto Answer.............................................................................................................. 66
Record/Play.....................................................................................................................66
S/W Version.............................................................................................................. 66
Comm. Settings ........................................................................................................ 66
Data settings ...................................................................................................................66
WWW settings................................................................................................................. 66
Ev-DO Service................................................................................................................. 66
Init by Function.......................................................................................................... 67
Initialize P-book...............................................................................................................67
Initialize System ..............................................................................................................67
IrDA Communication................................................................................................. 68
Phone To Phone....................................................................................................... 68
Phone To PC ............................................................................................................ 68
Phone settings.................................................................................................................68
PC settings...................................................................................................................... 68
IrDA communication details ...................................................................................... 69
Appendix................................................................................................................... 70
Menu structure.......................................................................................................... 70
Option ....................................................................................................................... 73
Q & A ........................................................................................................................ 73
Spec and Features.................................................................................................... 73
Mobile Phone Data ................................................................................................... 74
Patent indication ....................................................................................................... 74
6
Precautions
Please read the precautions carefully in order to prevent any damage. Read this user’s manual and
keep it in a safe place.
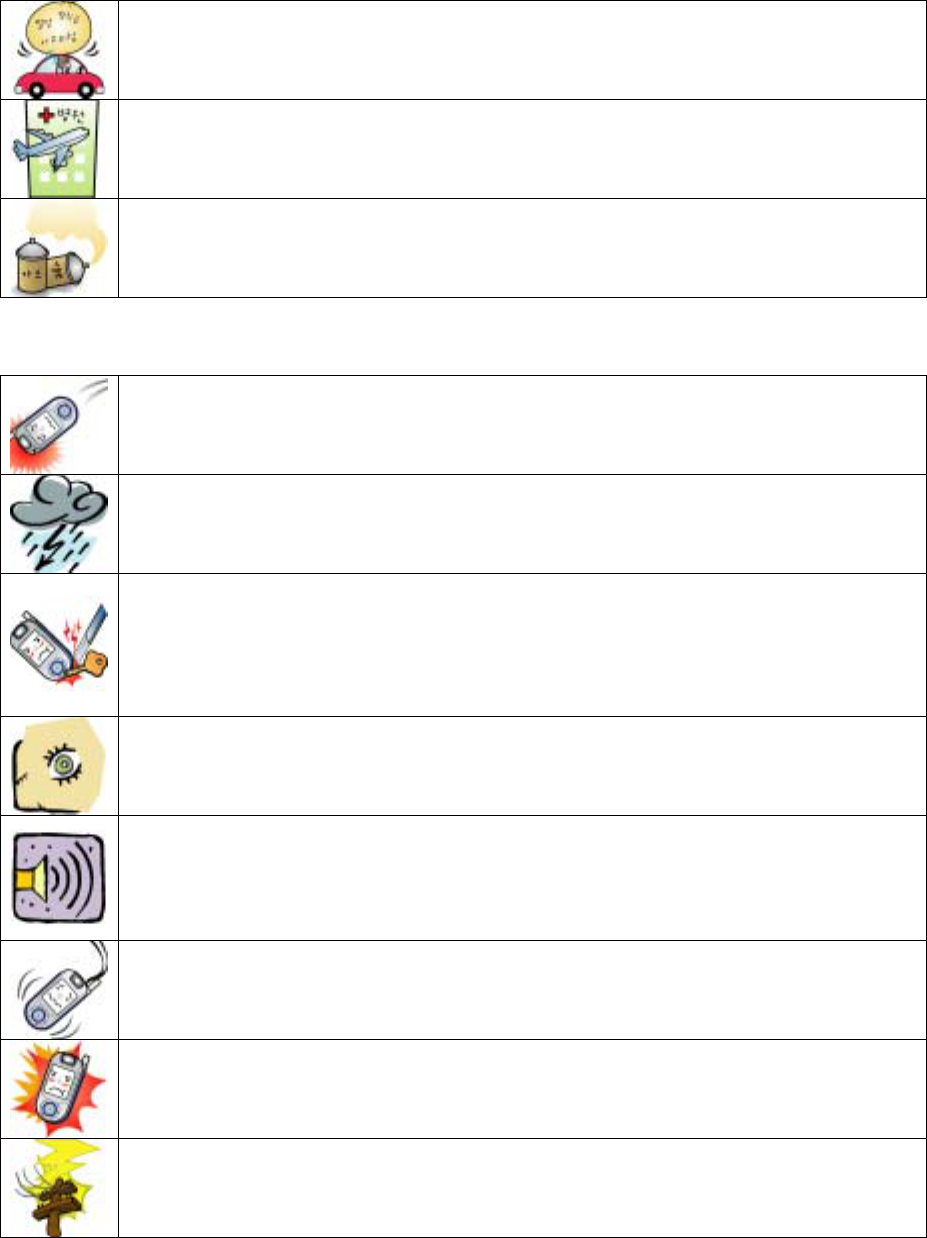
Using the phone while driving a car may cause traffic accidents and may give an
influence to the electronic parts in the car. If you are to use the phone while driving,
make sure to use a safety device such as an ear-microphone.
Make sure to turn off the phone while you are in an airplane or at the hospital. Using the
phone in the restricted area may cause an accident of the transportation or may affect
the medical devices. (Please follow the instructions of the place on use of cellular
phones.)
Using the phone where inflammable gas such as profane or gasoline erupts may cause
explosion or fire. Make sure to turn off the phone at the gas station or in areas where it
may cause fire or explosion.
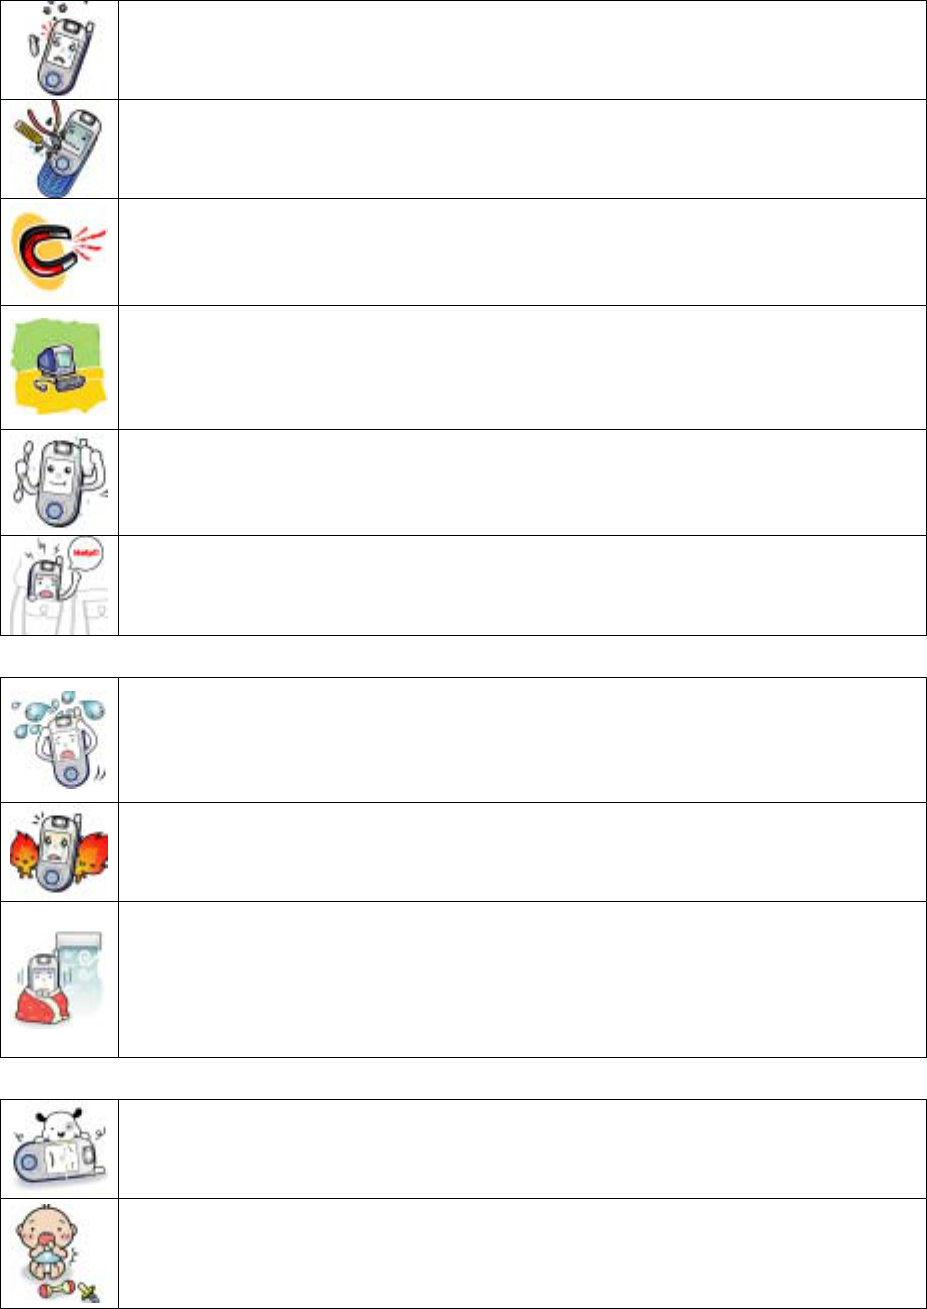
▷ Safety guides
Avoid impact.
Impact on the phone may cause excessive heat or fire.
Be careful when using the phone in the rain.
Be careful not to have the phone wet in the rain, and do not use the phone when
lightening flashes.
Avoid metal products.
If a conductible material (aluminum foil, needle, necklace, metal chain, coin, key and
etc.) meets the bottom of the battery, the bottom of the phone or the metal part of the
charger instantaneously or continuously, the phone may generate excessive heat, fire,
electric shock or explosion. (Do not carry or store the phone and the battery on the bag
or in the pocket with metal products. The phone may be deformed, damaged or broken.)
When using IrDA,
Do not stare at IrDA window during IrDA communication. Your eyesight may fall.
Too loud ringer~
You may be startled at sudden vibration or ringer. Set the vibration and ringer to an
appropriate level. Keep your ears away from the speakers of the phone, or you may be
startled or your hearing may fall at sudden ringer.
If you have a hand strap or a neck strap attached to the phone~
You may get injured if the trap is pulled or caught by something. Be careful not to run
against something or tumble down with the phone inside the pocket.
The phone may get heated if you use the phone for a long time.
Using the phone near a high-voltage pole may cause electric shock or explosion of the
battery.
7
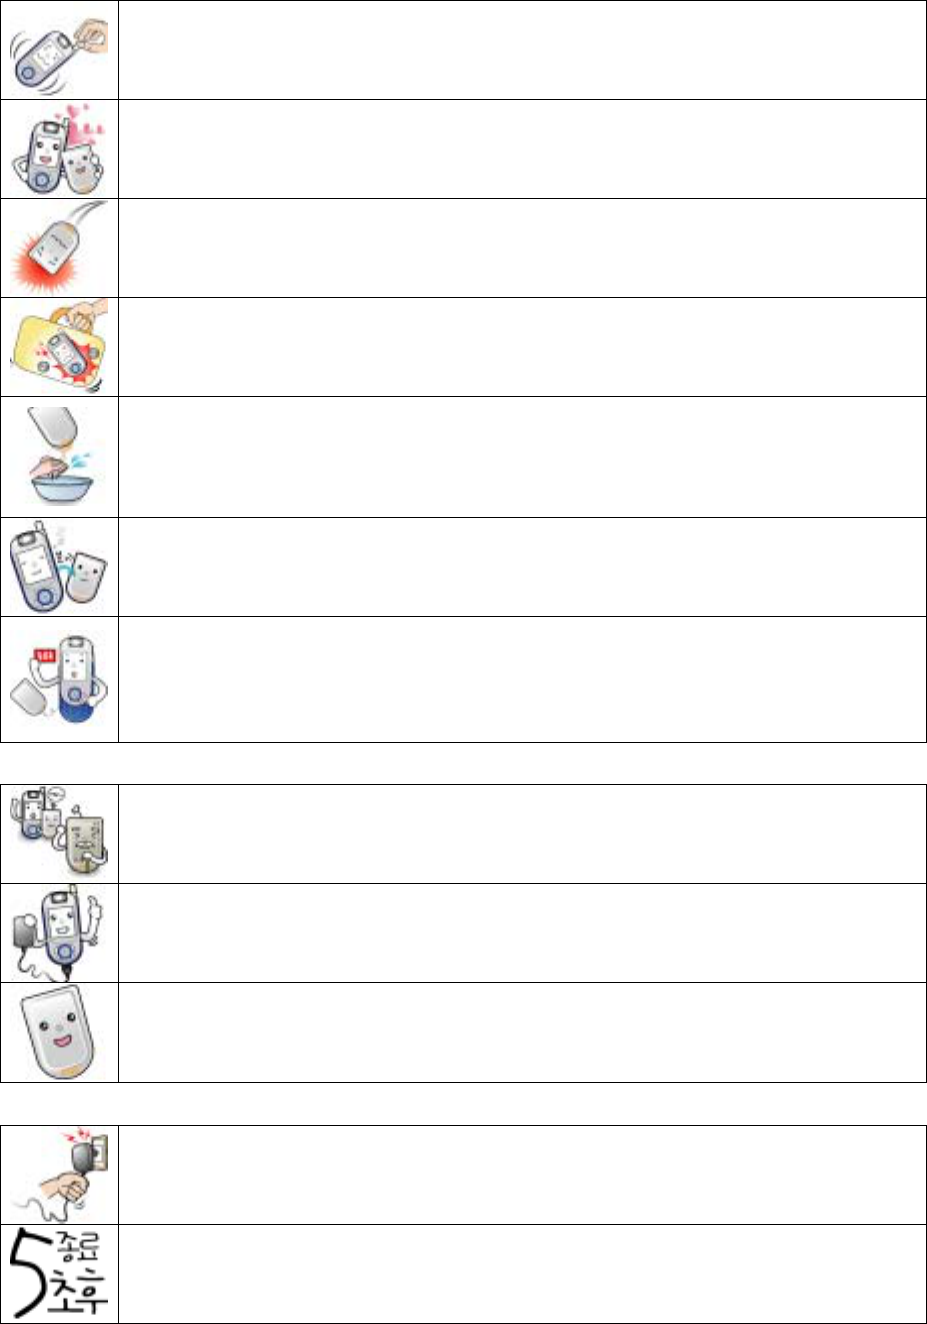
▷ In order to use the phone for a long time,
Keep the rubber caps plugged to protect the phone against foreign substance except
when you need to remove the caps for intended purpose.
Do not disassemble or remodel the phone at your own discreet.
Please contact the authorized service center for repair.
Keep the phone away from a magnet.
Carrying or storing the phone with any magnetic material may cause malfunction.
You may suffer loss of money if you lose information on the magnetic cards (credit cards,
bank cards, transportation cards).
The phone is sensitive to radio wave.
The phone performance may be deteriorated if you use an unauthorized antenna or
accessory, or if you place the phone on any material that may interrupt radio wave (steel
desk, computer, microwave range and etc.). Do not put the phone or the battery in a
microwave range. It may explode.
Keep the phone clean.
The battery may not be recharged if the metal part on the charger or the battery is
stained. Wipe out the foreign substance with soft cloth or towel, and never use a
chemical solution (thinner, solvent, and etc.).
Be careful not to drop the phone.
Do not move violently or run with the phone hung on your neck with ear microphone or
neck strap. Do not sit on with the phone put in the rear pocket. The phone may be
broken or deformed.
▷ Avoid water, fire and damp
Avoid water.
If the phone, battery, charger or other optional accessories are wet, the label inside the
product changes color, and electric shock, damage or heat may be resulted in. If the
phone is wet, leave the power off, remove the battery, and contact the nearest service
center.
Watch out of fire.
The phone and the battery may explode in the fire.
Avoid excessive heat, cold weather, or where temperature changes severely.
The phone and the battery left in severe heat, under direct sunray, or inside the car in
summer time may result in explosion or fire. Performance and durability of the phone can
be deteriorated if it is stored in low temperature. Do not place the phone in front of the air
conditioner since high humidity and sudden temperature change may result in corrosion
and damage.
▷ Keep the phone away from children or pets.
Keep the phone dry.
Foreign substance or water in the phone, battery, charger or other optional accessories
may result in mechanical trouble or injury of children.
Make sure that the children should not swallow the parts including rubber caps (in stereo
ear microphone and bottom contact of the phone).
Teach the children how to use the phone, and check if they are using the phone properly.
8
▷ Use the battery properly.
Make sure to use the genuine battery.
Using unauthorized battery may result in damage or explosion of the phone and the
battery.
Do not give impact to the battery.
Damaged battery must be repaired by the authorized service engineer only.
Disassembling or repairing the battery by unauthorized person may result in fire or
explosion.
Do not apply excessive force or give damage with a sharp tool.
Applying excessive force or boring battery with an awl or a pin may result in fire or
explosion.
If the battery leaks,
Wash your skin with running water. If the solution runs into an eye, wash the eye with
clean water and see the doctor immediately.
When not in use for a long time,
If the phone is left unused with the battery installed, although the power is off, the battery
may leak and disable the phone. If you don’t use the phone for a long time, take the
battery apart from the phone. If you use the phone again (and when you first use the
phone after purchasing), charge the battery fully.
Turn the power off first.
If you remove the battery while the phone is on, the phone or the LCD screen may be
damaged.
Replace the battery.
Purchase a new battery if running time reduces by half. Because the battery is a
consumable part, repeated charging/discharging results in reduction of running time.
Because the battery contains the recyclable metal, make sure to dispose the battery to
the designated place.
▷ Using the charger
Check the contact points before charging the battery.
If the battery is mounted on the charger with incorrect polarity, the battery can be
damaged or exploded.
Charge the battery where it is well ventilated.
Covering the charger and the battery with cloth may result in fire.
Pay attention to the power cord.
Do not pull the power cord of the charger, and do not place a heavy object on the power
cord. Damaged power cord may cause fire. Do not plug in the power with wet hands to
prevent shock.
▷ Storing the charger
Do not use the phone while recharging the battery.
Using the phone while recharging the battery may result in electric shock. Make sure to
remove the phone from the charger.
If you switch on the phone within 5 seconds after power off, the power key can be
disabled.
Wait for 5 seconds before switching on the phone.
9
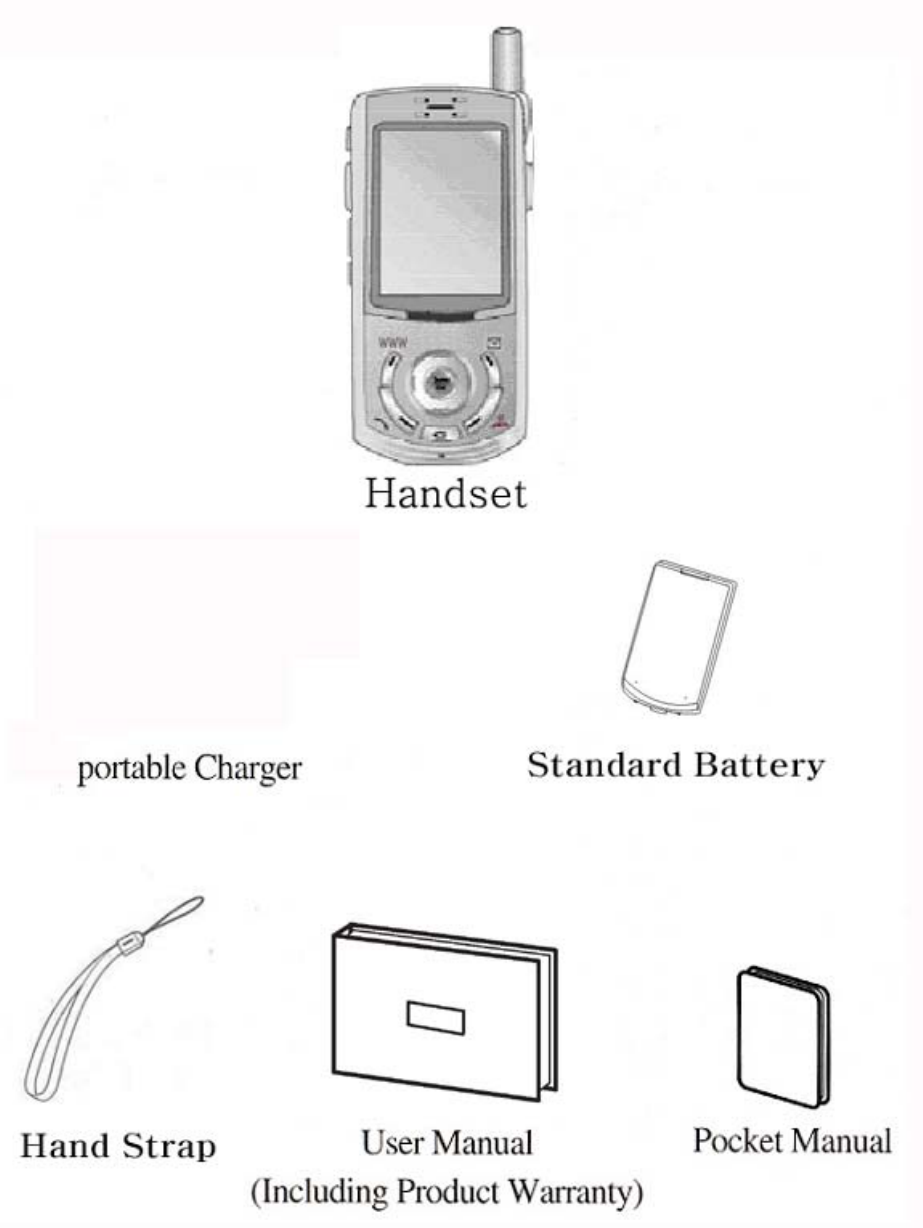
Accessories
10
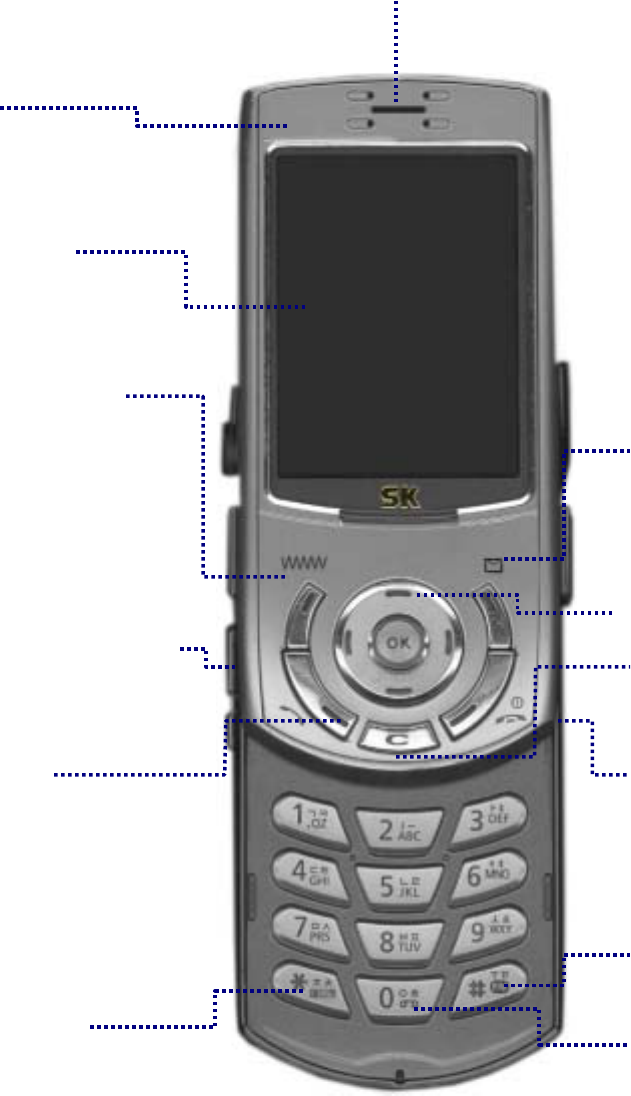
Components and Functions
Components
Earpiece
IrDA
LCD Screen.
Record/Play Ke
y
Press and hold this key
on main LCD to use
recording and playing.
Etiquette Key:
Press and hold this key on main
LCD to activate vibration, to mute
sliding tone, and to mute sound
effect. Press and hold this key
during the call to mute key tone
and to activate whisper mode.
Message/Function Ke
y
Press the key to use
voice/text message on
main LCD / to select the
left item on the bottom
line of LCD.
Camera
Press this key to use the
ain
M
camera function on m
her than m
ulti-function Key
See P16)
LCD / to select any item
ot ain LCD.
(
Clear/Cancel Ke
y
Press this key to delete
a letter or to cancel a
function.
WWW/Function Ke
y
Press this key to
activate the WAP
service on main LCD /
to select the left item
on the bottom line of
LCD.
Multi-function Key
Slide
11
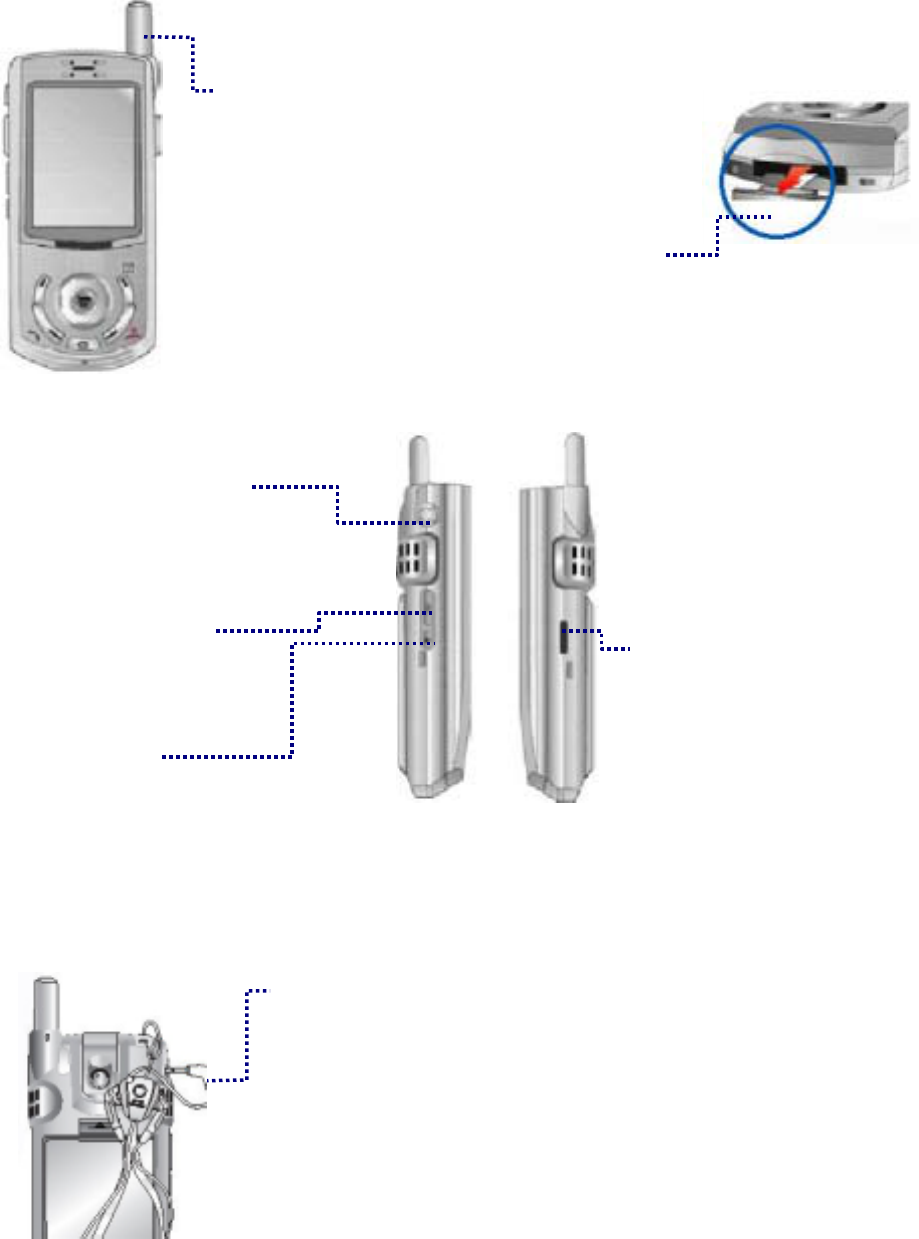
Functions
Stereo ear microphone jack
Connect the stereo ear
microphone.
Camera function key
Press this key to take a
photo or video
Ans machine
Press and hold this key to
activate/deactivate auto
answering function
24 pin connecto
r
Connect the travel charger, the handsfree kit, the
drive kit, and the data manager cable.
IrDA
Antenna
Pull out the antenna
if signal is weak.
Connect the
strap as shown
in the figure.
Stereo ear microphone
Remove the stereo ear microphone jack rubber
cover on the side of the phone, and plug in the
stereo ear microphone. Make sure to plug in tight
to prevent malfunction.
12

Camera
Flash
Flash:
Used as a flash when taking photos or videos/
If you press and hold (Cancel Key) in idle mode, it
works as a light.
Camera :
If you wish to take a self-shot, lift up the camera.
A
ntenna :
Extend the antenna vertically for best call quality.
13
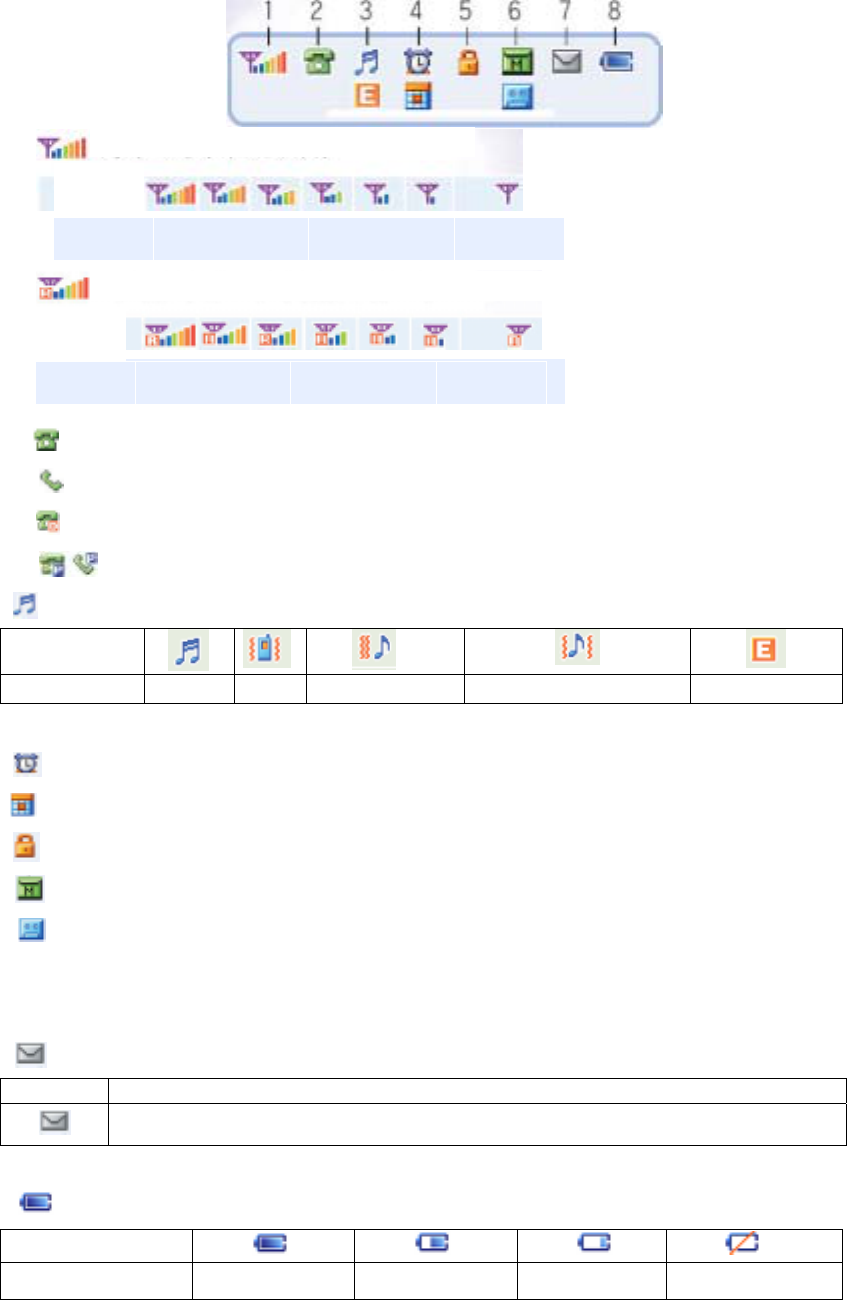
Icons (Icons not settled)
Icon
Signal strength in the service area
1.
Signal
l
e
v
e
l Good Weak
Out of
service
이동
Signal
l
e
v
e
l Good Weak
Out of
service
Icon
Signal strength in the area of other service provider
2. Standby
Attempting call / on the line
No traffic exchange during the data service
Phone and base station have been authorized
3. Icons for ringer
Icon
Meaning Ring Vib Vib then Ring Ring & Vib Etiquette
4. Icons for alarm
Displayed if a schedule / anniversary is registered with the scheduler
5. Displayed if function lock or information lock is set
6. Displayed if an MMS message is received
Displayed if an unchecked recording message is received
※ The above icons blink by turns if there are both MMS message and recorded message.
7. New text & voice message.
Icon Description
The icon blinks for a new message, and disappears if you retrieve the message.
8. The icon shows batter charge level
Icon
Battery level Full Medium Low Needs recharge
14

Basic Key Functions
Function key
<Main LCD>
Select Menu
Multimedia data
Select Called/Calling List
Select Phonebook
<Operation>
Select left bottom item on LCD screen
Select right bottom item on LCD screen
Move left
Move up
Move down
Move right
Select/deselect item
(This may not be displayed if there is no concerned item.)
15

How to Activate and Select Menu
Ex) Enter a phonebook: James, Friend, Home Number 123-4567, and Memo.
1. Press (Right)[Book] and (4)[New Entry].
2. Press (OK)[Sel].
3. Enter Name, and press (OK)[Done].
- Press (OK)[Done] to automatically move to the next item.
4. Press (OK)[Sel] and (Up/down).
- After moving to the required group, press (OK)[Sel].
6. Press (OK)[Sel] and (Up/down).
- The cursor is moved automatically to the next item.
- After moving to the required icon, press (OK)[Sel].
7. Press (OK)[Sel], enter the number and press (OK).
- The cursor is moved automatically to the next item.
8. Press (OK)[Sel].
- After moving to the required icon, press (OK)[Sel].
9. Press (OK)[Sel], enter the memo and press (OK)[Done].
10. Press (www)[Save].
How to use the linked menus
1. You can use the linked menus if Menu is displayed on the bottom of the screen.
2. If you press (www)[Menu], the functions are displayed on the menu.
3. Menus are varied depending on where you have press (www).
e.g. : Selecting linked menu of Calling List.
(down), (Right)
How to enter text
Use this section when you enter text messages, e-mails, phonebook data, schedule items and contents.
<How to enter Hebrew >
e.g.) te quiero
1. (SMS)+ (2)[Out-Box] + (1)[New Msg]
2. (OK)[Enter]
3. (8) + (3) + (#) + (7) + (8) + (4) + (3) + (7) + (6)
- If the character is included in the keypad, press the key once regardless of the order of the
16
character.
- You can change the entry mode in the order of English, Symbol, Number, and Hebrew
whenever you press (SMS)
* Press (#) for space.
<How to enter English>
e.g.) Sky~
1. (SMS) + (2) [Out-Box]+ (1)[New Msg]
2. (OK)[Enter]
3. (7)x4 + (5)x2 + (9)x3 + (SMS) + (3) + (8)
- You can change the entry mode in the order of English, Symbol, Number, and Hebrew
whenever you press (SMS)
* Press (#) for space.
17
How to Use the Battery
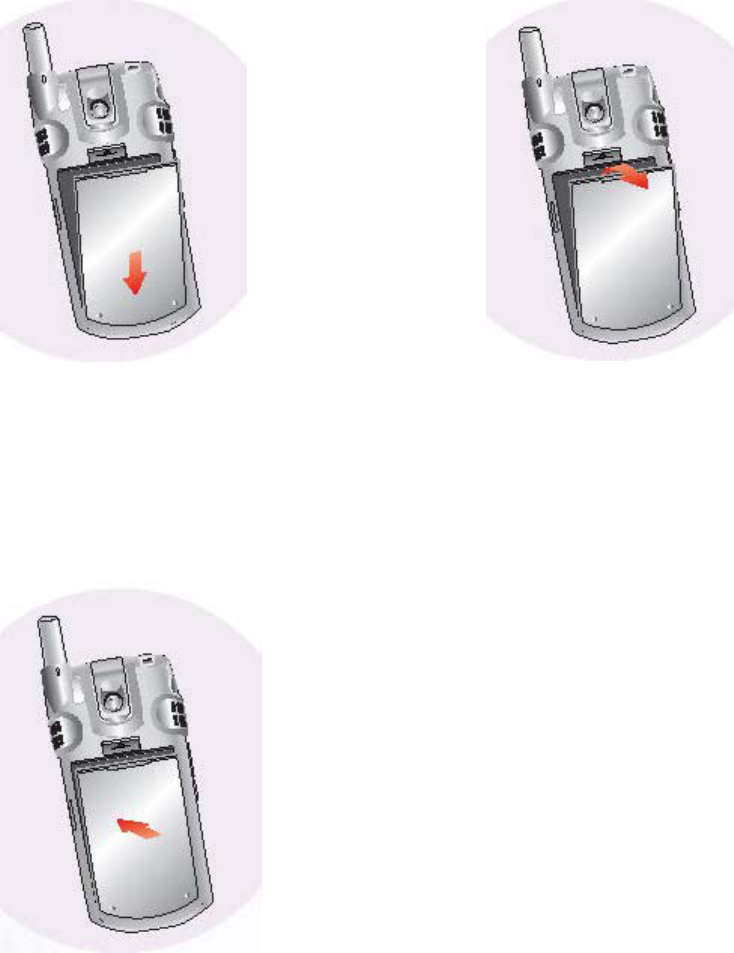
Installing the battery
▲ Push the battery down until the latch
clicks.
▲Insert the bottom of the battery
into the opening on the back of the phone.
Removing the battery
▲ Lift the release latch to detach the battery.
* Make sure to turn off the power before detaching the battery from the phone.
18

Battery operating times
<by status>
Battery type
Status Standard battery
Talk time About 169 minutes
Standby time About 85 – 176 hours*
The time marked with * is the maximum hours measured in the manufacturer’s Lab (based on slot mode
<by function>
Battery type
Status
Standard battery
Camera About 222 minutes
Game
VOD
* Power consumption for game is the average of power consumption measured with BRAIN FORCE,
PUZ BUZ.
* Measured as the slide is open and the backlight is on.
* VOD playing time is measured as the stereo ear microphone is used.
- When moving on a car or by walk, the phone stays in connection with the base stations on the area
and the adjacent areas to keep the optimum communication status depending on the signal
strength.
In this case, the phone uses more power than it stays in an area. That is why the battery operating
time can be reduced than it is described in the user’s manual.
- If you select a moving background (animation) as the wallpaper in Background, the phone uses
more power, reducing operating time by 20~30% than it is described in the user’s manual.
Battery charge alert
If the battery needs to be recharged, an empty battery icon ( ) is displayed with an alert, and the
message “Low battery warning” is displayed.
If you keep using the phone without recharging the battery, the phone gets off with the power off
message displayed on LCD. You can activate/deactivate alert (See P.38.)
- In the save mode, the low battery warning message is displayed with an alert.
19

How to recharge the battery
Plug the power cord of the charger in the outlet. (100V~240V)
< Travel Charger – TC >
You can connect the charger to the phone without using the desktop holder.
Remove the rubber cap on the bottom of the phone before recharging the battery.
< Desktop Holder – DTH >
Connect the holder with the travel charger. You can recharge the battery separately or as it is installed
on the phone. Push the battery along with the groove of the holder.
- Do not recharge the batteries on the desktop holder at the same time. Recharge the battery only or as
it is installed on the phone.
- Recharging starts as the red lamp on the upper part of the charger is on. The lamp turns into green as
the battery is fully recharged.
- The lamp blinks if the battery is not properly contacted with the charger. Pull out the charger, and
reconnect the battery.
- Use the approved charger only. Using an unapproved charger may cause malfunction or damage.
Minimum recharge time
Type of battery Battery
Minimum recharge time About 00 minutes
* When purchased, the battery is not fully charged. Make sure to charge the battery fully before use.
* Recharging batter in severe hot or cold may vary the charge time.
* If you recharge the battery with the phone switched on, although the full charge icon is displayed,
the battery may not be 100% fully charged.
20

Basic Operation
Turning the phone on
1. Press and hold (End).
The power gets on as the animation is displayed.
* If the phone is set to Vib or Etiquette mode, the phone vibrates as or is displayed.
* The main LCD screen varies by setting.
Turning the phone off
1. Press and hold (End).
* The power gets on as the animation is displayed for a few seconds.
* If the phone is turned off abruptly, an instant error may occur on LCD display. This is an instant error
and not a permanent trouble in LCD.
Making a call by entering numbers
1. Enter a phone number + (Send)
* You can correct the phone number by pressing (CLR).
2. Start conversation as you are connected to the called party.
* Adjust the earpiece volume with (Up/Down) during the call.
3. Close the slide or press (End) to finish the call.
Redialing calls
You can make a call to the last dialed number by pressing a key.
Redialing to the last number
You can make a call to the last connected number.
1. Press (Send).
21
Redialing to the recent called/calling number
“40 “of the recently called/calling numbers are displayed. You can select a number and press (Send)
to make a call.
<Called number>
1. Press (Down), (Left)[Called History].
- Select a required number with (Up/Down) key.
- If the number is registered in Phonebook, the name and icon are displayed.
2. Press (OK).
- The number and called time are displayed.
3. Press (Send).
<Calling number>
1. Press (Up),(Right)[Calling History].
- Select a required number with (Up/Down) key.
- If the number is registered in Phonebook, the name and icon are displayed.
2. Press (OK).
* The number and called time are displayed.
3. Press (Send).
* If the call history is locked, you cannot make a call by pressing the Send key.
* If numbers of calls are made/received to/from the same number, the last calling/called times are
displayed. If you want to check the calling/called count, press (WWW)[Menu], and then [1] [Called
time / Calling time].
Speed dialing
You can make a call by pressing a speed dial number without pressing the entire phone number.
One digit speed dial number (1~8)
1. Press and hold one digit speed dial number.
- Or you may press a speed dial number and press (Send).
2. A call is made to the number saved in the speed dial number.
22
Two digit speed dial number (10~99)
1. Press the first digit, and then, press and hold the second digit.
- Or you may press both digits and then press (Send).
2. A call is made to the number saved in the speed dial number.
* If the phonebook is locked, you should enter the password. (See P000.)
Receiving calls
1. When the phone rings or vibrates, open the slide.
- If the slide is left open, press any key.
2. If the call is finished, close the slide or press (End).
- The call time blinks, and the, main LCD screen is displayed.
* You can receive calls in three ways (open the slide, open the slide and press any key, and press the
Send key).
* You can set the Ans. Machine function. (See P.00)
Functions during a call
Earpiece volume
You can adjust the earpiece volume in 5 steps during a call and on main LCD.
1. During call (Up/Down)
Adjust volume with (Up/Down).
Reading messages
You can read the received text message during a call.
1. Press (SMS) during the call
2. Press (1) to read the text message.
* If a new message is received during a call, you can read the message by press (OK)[OK].
* You can select alarm during a call. (See P00)
* After reading a text message, press (CLR) to return to the call screen.
23
Mute
You can mute your voice over the phone.
1. Press (SMS) during a call.
2. Press (3).
- Press (WAP)[Release] to release mute function and return to the call screen.
Answering Machine
You can use this Ans. Machine function when you cannot receive a call.
Setting Ans. Machine
Select ring time and announcement.
1. (Left) + (5) + (6)
2. (1)[Set Auto Answer ] + (OK)
- Select ring time with (Up/Down), and then press (OK).
- Refer to the Basic Operation. (See P00~P00)
3. Press (SMS) to save setting.
* Adjust ring time
- The phone vibrates/rings for the selected time, and returns to Ans. Machine mode.
* Select announcement
- Select the announcement for Ans. Machine.
-Default announcement is “General”.
Recording/playing announcement
You can record the announcement with your voice.
1. (Left) + (5) + (6)
2. (2)[Greeting Message]
- Press (OK) to record the message, and then, press (SMS)[Save].
* You can record the message of up to 30 sec.
24
* You can play the recorded message with (WWW)[Play].
Using Ans. Machine
You can activate Ans. Machine by pressing a key.
1. Open the slide and press and hold (Ans. Machine Key) on the left side of the phone.
2. You can release the function by pressing and holding (Ans. Machine Key) again.
- If the Ans. Machine function is released, the phone returns to main LCD.
* If Ans. Machine is activated, when the caller records a message, a missed call is indicated on the
LCD.
* You can activate Ans. Machine by pressing and holding (Ans. Machine Key).
* If a call is received, the phone vibrates/rings for the selected time, and switches into Ans. Machine
mode.
* The caller can record a message for 30 seconds.
* Total recording time is 4 minutes (Ans Machine + Recording).
* Total recording time is 4 minutes (Ans Machine + Recording).
* Refer to the Basic Operation Details. (See P.000-000)
Playing message
1. Open the slide, and press and hold (0).
2. Press (OK)[Play] to play the message.
- If you press (WWW)[Menu] and then select (3), recorded messages are played in order.
* Refer to the recording/playing guide for details. (See P.00)
Recording/Playing
You can make recording/playing on main LCD or during a call.
Recording
1. Open the slide, and press and hold (0).
2. Press (SMS)[Record] to start recording.
3. Press (SMS) to save the recorded content.
25
* You can press and hold (0) in recording list.
* Press (0) to stop and save recording.
* Press and hold (0) during a call to record the call. However, you cannot play or cancel recording.
Recording is stopped and saved if the call is finished.
* Refer to the Basic Operation Details. (See P.000-000)
Playing
1. Open the slide, and press and hold (0).
2. Select a desired item with (Up/Down).
* You can cancel the selected item by pressing (WWW)[Menu] and selecting (1).
3. Press (OK)[Play] to start playing.
* You can select an item in the recording list with (Up/Down).
* If a call is received during the playing, the playing mode is deactivated. You can answer the call by
pressing any key except (End)[End]. Even if the phone is set to Ring, the phone vibrates.
Viewing called/calling History
You can check the missed call list and called/calling list.
1. (Down),(Right)[Calling History]/
- Press (WWW)[Menu] to display calling time, and information on phonebook and message.
2. Select an item with (Up/Down).
3. Press (OK).
* If numbers of calls are made/received to/from the same number, the last calling/called times are
displayed.
* 40 numbers are displayed for a calling/called list respectively, and calling/called times are displayed
for 15 items respectively.
Etiquette
You can use this function in public space or in a classroom.
26
Etiquette mode on main LCD
1. Open the slide, and press and hold (*).
- The Etiquette icon is displayed, the phone is set to Vib, and key tone, slide opening/closing tone and
menu tone are deactivated.
2. Press and hold (*) to release the Etiquette mode.
- The Etiquette icon is disappeared from the LCD screen, and the phone returns to the previous status.
Etiquette mode during a call
1. Press and hold (*) during a call.
* (Whisper icon) is displayed, the key tone is deactivated.
2. Press and hold (*) to release the Etiquette mode.
* (Whisper icon) is disappeared from the LCD screen, and the phone returns to the previous status.
* Etiquette mode is maintained even after power OFF->ON unless you release the mode.
* Whisper mode?
- The mic volume gets high so that you can speak in small voice.
* Key tone off?
- The keypad tone is off. (See P.000)
* Effect tone off?
- Sliding tone and menu tone are off. (See P.000)
* Alert off?
- Various alerts are off. (See P.000)
* See “Adjusting volume” on how to adjust volume for key tone, effect tone and alert. (See P.000-000)
Hold on mode
You can hold the call for a short time.
1. If the phone rings as the slide is open, press and hold (OK).
- If the Hold on mode is selected, the message is displayed with the announcement.
2. If you want to release the hold on mode and to answer the call, press any key.
* This function is available only when the slide is open.
* When the slide is closed, if “Open & Slide” is selected, open the slide and press & hold (OK) to
activate the hold on mode.
27
My Info
Enter your information (Name, Mail Address, Photo, and etc.).
1. (Right) + (#)[My Info.]
- Press (WWW)[Menu] to add or delete photos or pictures.
* Enter your information right after purchasing the phone.
Basic operation details
◈ Making calls
- To make a call to the number in the phonebook, refer to Phonebook menu. (See P.00-00)
◈ Ans. Machine
- If you press (Ans. Machine Key) after you set the Ans. Machine function, the mode changes to
Normal/Conference/Class/User Defined.
- Even in Ans. Machine function, you can answer the call by pressing (Send) and finish the call by
pressing (End). The recording made before you answer is automatically saved.
- Even in Ans. Machine function, you can answer the call by pressing (Send) and finish the call
by pressing (End). The recording made before you answer is automatically saved.
- You can save up to 20 recording files (Ans. Machine + Recording).
◈ Recording
* If you receive a call during recording, recording is finished and is automatically saved.
* If the recording time (4 minutes) is used up, you cannot save any more recording file.
* The maximum recording time is 4 minutes, and recording count is 20. (You cannot save any more
recording file if the number of recording files reaches 20. Delete a file if you want to make a recording
file.)
28
Phone Book
Entering phonebook
Enter phone number, e-mail address, photo, anniversary or other memo.
Add data
1. (Right) + (4)[New Entry]
- Enter phone book entry. Refer to Basic Operation. (See P13~P15)
- Press (WWW)[Menu] to add Number, E-Mail, Memo and Anniversary, Photo, Picture.
2. Press (SMS)[Save].
Add data on main LCD
You can save a phone number on main LCD.
◈ New -Make new entry.
1. Enter phone number + (OK)[Save] + (1)[New]
2. (OK)[Select]
- Move to New Entry screen.
- Refer to “New Entry”. (See P.00)
◈ Add number - Add a number to the existing phonebook name.
1. Enter phone number + (OK) + (2)[Add number]
2. (OK)[Select]
- Select an item with (Up/Down), and press (WAP)[Save].
- Refer to “Speed Search”. (See P.00)
Edit data
Using the search method, edit the existing data.
1. (Right)[Book] + (1)[Speed Search]
- Search name with (Up/Down).
2. (OK)[Sel]
3. (SMS)[Edit]
29
* Press (WWW)[Menu] in Edit screen to add an item.
Delete name
Using the search method, delete the names.
1. (Right)[Book] + (1)[Speed Search]
* Search name with (Up/Down).
2. (OK)[Sel]
3. Press (WWW)[Menu], select (3)[Delete Name], and then, (OK)[Sel].
Speed Search
You can search phonebook data in all name list or by group name.
Search in all name list
Search the desired item in all name list.
1. Press (Right)[Book] and (1)[Speed Search]
2. Press (1)[All Name List].
3. Search a name and press (OK)[Sel].
4. (Send)
* Press (SMS)[New] to move to New Entry.
* You can search a secret group with “Speed Search” only.
Search by group
Search data by group.
1. (Right)[Book] and then (1)[Speed Search]
2. Select a group with (Up/Down), and press (OK)[Sel].
3. (Send)
* Only the group that contains the data is displayed.
30
Search by name
Search a phone number by name (entire or part of the name).
1. Press (Right)[Book] and (2)[Search by Name]
2. Enter part of or entire name, and press (OK)[OK].
3. Select a name with (Up/Down) and press (OK)[Sel].
4. (Send)
* The name in the secret group is not displayed. You should release the secret group to search the
name. (See P.31)
Search by number
Search a phone number by number (entire or part of the number).
1. Press (Right)[Book] and (3)[Search by Number]
2. Enter part of or entire number, and press (OK)[OK].
3. Select a number with (Up/Down), and press (OK)[Sel].
4. (Send)
* The number in the secret group is not displayed. You should release the secret group to search the
name.
Edit speed dial
You can edit the speed dial.
Add speed dial
You can add a frequently dialed number as a speed dial.
1. (Right)[Book] + (5)[Edit Turbo Dial]
* Select a speed dial number with (Up),(Down).
3. (0K)[Sel]
* This function is disabled if there is no phone number in the phonebook.
31
Edit speed dial
You can modify/delete the existing speed dial.
1. (Right)[Book] + (5)[Edit Turbo Dial]
2. Press (SMS)[Del] to delete a speed dial number.
3. Press (WWW)[Mod] to modify a speed dial number.
* Even if a speed dial is deleted, the number on the phonebook is not deleted. If the data is deleted from
the phone book, speed dial is also canceled.
Edit group
You can Add, Modify, Delete a Group, or Edit group data.
Adding a group
You can add a new group.
1. (Right)[Book]+ (6)[Memory Group]
2. Press (SMS)[New] and enter a group name.
3. (OK)[Done]
- Select secret group option with (Left),(Right).
◈Setting secret group
- You should enter password to search a phone number in a secret group.
- You can search a number in a secret group with “Speed Search” only, and not by Name or by
Number.
- In order to release a secret group, select “General” as the group attribute.
- You can save up to 21 groups including [No group]. If all 21 groups are created, you cannot add a
group.
Modifying a group
You can edit name or data of the existing group.
1. (Right)[Book] + (6)[Memory Group]
- Select a group with (Up/Down).
32
2. (OK)[Sel]
- Modify group. Refer to Basic Operation. (See P13~P15)
3. Save the change with (SMS)[Save].
* You cannot modify group name and attribute of [No group].
Deleting a group
You can delete the existing group or the group name.
1. (Right)[Book] + (6)[Memory Group]
* Select a group with (Up/Down).
2. (WWW)[Menu] + (1)[Del Group]
3. (OK)[Sel]
* In order to delete a name of a secret group, you should enter the password.
33
Message Function
Reading text messages
Read the text message and check the callback number.
1. Press (SMS). (1)[In-Box], (1)[Text Message]
- Select a message with (Up/Down).
- (Unsealed envelope Icon) indicates the message you have read and (Sealed envelope Icon)
indicates the new messages.
* Press (SMS) to delete the selected message.
* Press (OK)[Reply] to read the message and send the reply immediately.
Press (SMS) [Forward] to forward the message to a 3rd party.
Select other messages with (Left), (Right).
Checking voice message
You can check the voice message recorded in In-Box for missed call or when the phone was off.
1. Press (SMS). (1)[In-Box], (2)[Voice Message]
* Press (SMS) to delete the selected message.
* Press (WWW) [Delete All] to delete all the voice messages.
* Press (Up/Down) and (Send Key) to call back.
Managing SPAM messages
Register specific phone numbers or strings to manage SPAM messages.
1. (SMS) + (1)[In-Box] + (3)[Spam Message]
2. (1)[Reg SPAM Numer] and (OK)[Sel]
3. (SMS)[New]
4. Enter number and press (OK)[Done].
34
* You should select SPAM Block On to save the SPAM messages in the SPAM Message Box.
* Reg Spam Word : Register words you want to block.
* Spam Message Box : SPAM messages are saved in this box. Up to 10 SPAM messages are stored.
If the storage limit is exceeded, the older messages are overwritten.
* Spam Block On : You can decide whether to block Spam Messages or not.
Entering text messages
1. (SMS) + (2)[Out-Box] + (1)[New Message]
2. (OK)[Input] and enter the text, or enter the text directly.
* Refer to How to Enter Text. (P00~00)
3. Press (SMS) to select a language, symbols or numbers.
4. Press (OK)[Done] to forward to the next item.
5. Select the message type and press (OK).
* Select the message type with (Left),(Right).
6. Press (WWW)[Menu] to select the phone number.
- Press and hold (SMS) on the main LCD to display the new message screen.
- Press (Delete/Previous Key) to delete a character. Press and hold the key to delete entire words.
Press (Right) to enter a space.
- Press the (WWW)[Menu] button to save the text during entering the text, or to display the saved text.
- You can broadcast a message to up to 20 receivers at a time.
- Message type indicates the importance of the message, and not the message transmission rate.
- You can enter the phone number from the phonebook. (P00)
Saving sentences
You can save the frequently used sentences, and retrieve and paste them to new messages.
1. (SMS) + (2)[Out-Box] + (1)[New Message]
* Enter the frequently used sentences.
2. (WWW)[Menu] + (1)[Save As Phrase] +(OK)
* The selected sentence is saved in Quick Text.
35
Retrieving sentences
You can import the sentences saved in Quick Text to the message you are creating.
1. (SMS) + (2)[Out-Box] + (1)[New Message]
2. (WWW)[Menu] + (2)[Input Phrase]
3. (SMS)[Paste]
* You should save sentences in Quick Text in order to use the retrieving function.
Searching phone umbers
You can search phone numbers easily from Phonebook or in the call history.
◈Speed Search- Other Party Number
1. (SMS) + (2)[Out-Box] + (1)[New Message]
2. (WWW)[Menu] + (3)[Search Seach]
* Refer to Speed Search. (P00~00)
3. (OK)[Sel]
◈ Broadcasting
- You can send a message to up to 20 receivers.
- If you want to send a message to the members of a group, select a group with (SMS), (3)[Search
Seach], and add the group to the sender by pressing (SMS). Only the mobile phone numbers are
entered, and if a receiver has two or more mobile phone numbers, the first entered one is selected.
Managing Saved Message
Move the important text messages to Saved Message so that they should not be automatically deleted.
1. (SMS) + (1)[In-Box]+ (5)[Saved Message]
2. (OK)[Sel]
* Up to 40 text messages are stored in Saved Message
36
Managing Quick Text
Save the frequently used sentences, and retrieve them when preparing a message.
1. (SMS) + (2)[Out-Box] + (4)[Phrase]
2. (OK)[Sel]
* To use the saved sentence again, press (OK), and modify the sentence before sending the message.
Refer to Entering Text Message. (See P.00)
Managing Outgoing Message
The transmission failed messages, the messages saved before transmission, and the messages not
completed due to incoming calls are stored.
1. (SMS) + (2)[Out-Box] + (3)[Sent Meesage]
2. (OK)[Sel]
* In case of broadcasting, the same number of messages as broadcasting is saved along with called
numbers.* Up to 50 messages are stored.
Managing Sent Message
The successfully sent messages are stored.
1. (SMS) + (2)[Out-Box] + (4)[Phrase]
2. (OK)[Sel]
MMS
MMS service enables you to attach video, music and voice to the text messages, or to use various
effects including color of the words and background of the messages.
Entering Message
1. (SMS) + (3)[MMS] + (1)[New Message]
2. (OK)[Sel], Enter text
37
- Enter the text. You can change the character mode with (SMS),and (OK)[Done]
3. (OK)[Sel]+ Select Contents
- Select Photo & Sound, Video Contents attachment with (Left), (Right), and then, press (OK) [OK].
4. (SMS)[Next] + Select the required transmission mode, Subject. Send To Number
5. (SMS)[Send]
* You can save all type of contents within the storage capacity.
* Image : The images downloaded with MMS or taken with the camera are listed. The available image
size is [176X144] only.
* Background Music : The music files exclusive for MMS are listed.
* Video : The MMS contents downloaded from WAP and the moving images in Video Manager are listed.
* Attach file : You can attach various sizes of image files, background, music, and voice file to the
message.
* Contents exclusive for MMS should be downloaded separately.
Managing In-box
You can save the received messages and send reply.
1. Press (SMS) + (3)[MMS] + (2)[In-Box]
2. (OK) + (OK)[Sel] + (OK)[Play]
* On the new message screen press (WWW)[Reply] to send the reply.
Managing Out-box
You can save the sent messages, and edit the saved messages to send replies.
1. Press (SMS) + (3)[MMS] + (3)[ Out-box].
2. (OK) + (OK)[Sel] + (OK)[Play]
* In order to use the stored message, press [Send], and modify the message. (See P.00~00)
Managing Draft-box
The transmission failed messages and the messages entered before transmission are stored.
1. Press (SMS) + (3)[MMS] + (4)[Draft-box]
2. (OK) + (OK)[Sel]
38
New message alert
You can select ring/lamp for new message alert.
1. (SMS) + (4)[Set Msg Alert] + (SMS)[Save]
* Mute : LCD blinks once.
* 1 time : LCD blinks once and rings.
* Every 2min : LCD blinks once and rings at every 2 minutes until you check the message.
* Alert is off, even if new message alert is set to 1 time or every 2min, if ringer/vib is set to mute (See
P.000).
* You can adjust volume of alert tone at Set sound. (See P.000)
* Alert in call : Select whether to activate new message alert during a call.
Deleting all messages
1. (SMS) + (5)[Delete All Msg] + Password
2. Select (1)[Text Message], and press (OK)[Sel].
- Select delete or not with (Left),(Right).
39

Camera Function
Before using the camera
The camera is suitable for portraits or objects rather than scenery.
1. In order to get a good photo, the object should receive more light than the background. Avoid direct
fluorescent light. Take the photo with the light behind your back.
2. Hold the phone tight and the subject should not move while taking a photo. It takes time for the
camera sensor to adjust exposure.
3. To get a good photo, take the photo under a bright indoor light (about 300~500Lux) or outside of a
building.
4. Aim the camera to the object, and wait for a few seconds before the camera sensor is adapted to the
environment. Especially in the dark, it takes 3~5 seconds.
5. Take the photo at the distance of 1.2m to get the best photo.
6. Hold the phone with both hands to prevent shaking of the camera.
7. Activate the shutter sound to minimize shaking when you press the shutter button.
8. Do not move the phone right after taking a photo. Hold the phone tight until the rename screen is
displayed after you take the photo.
Battery operation time for use of camera
Type of battery Standard Extended
Operation time About 000 min About 000 min
(1) Using the flash
Effect of using the flash is decreased if the object is at a distance from the phone. Therefore, keep the
object within a distance (about 20cm ~ 50cm). If the object is too close to the camera, the screen gets
too bright to display the object.
(2) Taking close object
The minimum distance between the camera and the object is 20cm. You may not get a clear photo if
you take a photo at a nearer distance.
40
(3) Taking self-shot (Taking a photo with the slide closed)
If you press (Camera Key) as the slide is closed, the phone is switched into the photo mode.
Press (OK Key) to take a picture, monitoring the image displayed on the LCD.
- When you take a photo with the slide closed, release the ‘outside key lock’.
- If you press (Camera Key) in the photo mode as the slide is closed, the image on the LCD is reversed.
- You can check the saved photo in Photo Manager. (See p00~00)
Taking Photos
You can take the photo of the required object with the built-in camera.
1. (Camera) + (1)[Take Photo]
- You can select brightness in 9 steps with (Left)/(Right) buttons.
- You can adjust zoom with (Up)/(Down) buttons. Zoom steps depends on the size
2. (OK)[Shoot]
- Photos are automatically named. You can rename photos with (SMS)[NEW].
- Refer to the character input method. (P.00-00)
- Press (Cancel Key) to cancel saving.
3. (OK)[Save]
◈Take Photo Menu◈
Press (www)[Menu] to use various functions while you are taking a photo.
1. (WWW)[Menu]+(1)[Reverse]
- The image is reversed.
2. (WWW)[Menu]+(2)[Flash]
- You can select [Flash],[Blinking] or [Auto Flash ].
3. (WWW)[Menu]+(3)[Photo Size]
- You can select the photo size from [640×480], [320×240], [176×144], [176×240] and [128×96].
4. (WWW)[Menu]+(4)[Photo Frame]
- You can take photo with a required image. Photo frame is available only if the photo size is
[176×144],[176×240] or [128×96].
41
5. (WWW)[Menu]+(5)[Photo Effect On]
- You can take a photo in various tones: [Gray], [Sepia], [Purple], [Blue] or [Green].
6. (WWW)[Menu]+(6)[Multi-Shot]
- Nine photos are taken in series. If you select Multi-Shot, you can select the speed of multi-shot.
7. (WWW)[Menu]+(7)[Shutter Sound]
- You can select a shutter sound.
8. (WWW)[Menu]+(8)[Timer]
- You can select a timer option from [Off],[2 sec],[5 sec] or[10 sec]. The default is [Off].
9. (WWW)[Menu]+(9)[Photo Management]
- You can view photos in Photo Management.
* If there is an incoming call in the photo mode, LCD is switched to the answer mode.
* You should select Save to save the photo.
* You can save contents within the capacity regardless of content types (Photo, Video, Live Bell, Live
Screen or MMS).
* You can save up to 300 photos. If memory is full, you cannot save any more photos even if fewer than
300 photos are already saved.
* Because the camera sensor meters light at every two seconds, LCD may blink. Wait for a few seconds
before taking a photo.
* Brightness and size of LCD may be different between before and after taking a photo.
* Frame speed may slow down and noise may occur if you take a photo in darkness.
Taking Videos
You can take video with the built-in camera.
1. (Camera) + (2)[Take Video]
- You can select brightness in 9 steps with (Left)/(Right) buttons.
2. (OK)[Take videos] + (OK)[Stop] + (OK)[Save]
- Recording time is displayed on LCD.
- You can view the saved video in Video Management.
- You can rename the video already saved.
42
* You can use zooming with (Up), (Down), and adjust brightness with (Left), (Right) while taking the
video. (You can use digital zoom as in the photo mode.)
* If [MMS] is selected, you can take and play the video for MMS.
* You can use various effects when taking a video.
* You can insert images with the Fun Frame function.
* You can select the resolution from [HQ], [ST] and [EC]. The file size varies depending on the resolution.
* You can check and manage the video files in Video Manager. Refer to Managing Video for details.
(See P.108)
* You can set the environments in Camera Settings.
Photo manager
You can manage the photos stored in the phone.
Managing folder
1. (Camera) + (3)[Photo Mgmt] +(1)
* The photos taken with the phone are stored in [Folder1].
* You can set Secret for other folders than [Folder1].
* If you wish to open another folder, press (WWW)[Menu] and (3)[Change Folder].
You can select a folder with (Up), (Down).
* You can select a folder with (Left), (Right) when checking the photos on the list.
Checking photo
You can check the photos stored in the phone.
1. (Camera) + (3)[Photo Mgmt] +(OK)
- Move previous/next with (Left),(Right).
◈ Photo Management ◈
Select (www)[Menu] to use the Photo Management functions.
1. (WWW)[Menu]+(1)[Picture Set]
- You can set the photos for main LCD, incoming calls, power on, power off and starting WWW.
2. (WWW)[Menu]+(2)[Change Order]
- You can arrange order of the photos by date, file size, name, or user.
43
3. (WWW)[Menu]+(3)[Change Folder]
- You can move a photo to other folders. If you wish to move numbers of photos to other folders, see
P.105.
4. (WWW)[Menu]+(4)[Delete]
- You can delete a photo.
5. (WWW)[Menu]+(5)[Contents MMS]
- You can attach a photo to MMS message.
6. (WWW)[Menu]+(6)[Edit]
- You can rename a photo.
7. (WWW)[Menu]+(7)[Security]
- You can select protect/lock for the selected photo. (See P.107)
8. (WWW)[Menu]+(8)[Select All]
- You can select all files.
9. (WWW)[Menu]+(9)[File Info]
- You can view information on the selected photo.
* Press (A) to move to the next page, and (Camera) to the previous page.
Move photo
You can move photos from [Folder1] to other folders.
1. (Camera) + (3)[Photo Mgmt] +(SMS)[Check]
2. Press (WWW)[Menu], (2)[Change Fol], and select the destined folder with (OK)[Sel].
* You have to check at least two photos to use the Slide Show function. You can check up to 9 photos
for slide show. If you create a slide show with the checked photos, the original photos are stored
separately from the slide show photos.
* You can create up to 6 slide shows. An icon is marked on the photos used in a slide show.
Edit photo
1. (Camera) + (3)[Photo Mgmt]+(OK)[Select]
44
2. (Menu)[WWW] + (6)[Edit]
- Rename : You can rename the photo.
- Frame : You can select various frames if the photo is [176×240], [176×144] or [128×96].
- Effect : You can apply various effects to the photo. (It may take time to be applied depending on the
effect.)
Lock/protect photo
1. (Camera) + (3)[ Photo Mgmt]
* Place the cursor on a photo with (Up),(Down),(Left),(Right).
2. (Menu)[WWW] + (7)[Security] + Set Protect/Lock
3. (SMS)[Save]
* The lock image is displayed if the locked photo is used for incoming call, power on, power off or alarm
screen.
* If you select a [Slide Show] for the main LCD screen, the lock image is displayed for the locked photo.
* If you use a locked photo as a P-book ID, you should enter the password. If a cropped photo is saved
with ‘(2) Overwrite’, you should enter the password to check the photos in P-book.
* Even when you delete all photos, the protected photos are not deleted. You should release protection
before deleting photos.
* Select the locked photo, and release lock with (WWW)[Menu] to release lock. Or enter password to
change the items.
* See P.186 on how to lock all functions.
Video manager
1. (Camera) + (4)[Video Mgmt]
2. (OK)
< Video Management >
Select (www)[Menu] to use the Video Management functions.
1. (WWW)[메뉴]+(1)[Bell/Screen Set]
- You can set the selected video sound as a ring, and set the video for main LCD, power on and
power off.
2. (WWW)[ Menu]+(2)[Change Order]
- You can sort the video files by date, by size, by name and by user.
3. (WWW)[Menu]+(3)[Change Folder]
- Move the video file to other folder. If you wish to move numbers of video files, check the files by
45
pressing (SMS), and move them to other folder.
4. (WWW)[Menu]+(4)[Delete]
- You can delete a video file.
5. (WWW)[Menu]+(5)[Contents MMS]
- You can attach a video file to MMS message
6. (WWW)[Menu]+(6)[Edit Name]
You can rename the video file.
7. 7. (WWW)[Menu]+(7)[Security]
-You cannot delete the protected video file. You should enter the password to check the locked video.
8. (WWW)[Menu]+(8)[Select All]
-Select all video files in Video Manager.
9. 9. (WWW)[Menu]+(9)[file Info]
-You can view information on a video file.
Camera details
You can set configuration for camera function.
1. (Camera)+(5)[Camera Setting]+(OK)
-You can select whether to continue or stop taking photos or videos if you close the slide while taking
photos or videos.
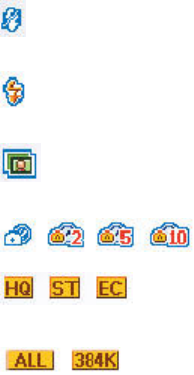
※ Icons for camera
: Flash blinks
: Flash always on, instant on
: Multi-shot
: Timer setting
: Video quality
: Size
46

※ Flashlight
You can use the phone as a flashlight.
- If you press and hold (Cancel Key) with the slide open, the flash is on. Press (Cancel Key) to turn off
the flash.
- You can use the flashlight function in the same manner when the slide is closed.
Caution
* Be careful of direct flashlight. Otherwise, it may damage eyesight.
47
WWW
WWW Access
Game & Apps
Video Clip
Ringtones
Animations
Voice Portal
SMS Info.
What`s New?
48
FM Radio
Listening to Radio
1. Open the slide, and press and hold (#).
- The ear-microphone works as an antenna. Make sure to insert the ear-microphone to listen to FM
radio.
- Select channel with (Left)/(Right) buttons.
- You can select a preset channel with (SMS)[Fine].
* If you listen to radio through a speaker or an ear-microphone, sound quality may vary depending on
the position of ear-microphone.
* Some channels may not be received well if you are in the area where radio coverage is weak.
Setting channels
1. Open the slide, and press and hold (#).
2. (WWW)[Menu]+(1)[Set Channel]
- Select channel with (Left)/(Right) buttons.
3. (OK)
- Select channel with (Up)/(Down) buttons, and press (OK)[Save].
*You can save up to 20 channels.
*Do delete a channel, press and hold (#), and select (WWW)+(2)[Delete].
Setting FM radio configuration
1. Open the slide, and press and hold (#).
2. (WWW)[Menu]+(3)[Configuration]
3. (SMS)[Ok]
* Slide : Select whether to continue listening to FM when you close the slide while listening.
* Radio play path : Select ear-microphones or speakers.
* Skin : Select a skin for FM radio.
49
Setting Sound
Ringer/Vibration
You can select various ringers.
1. (Left)[Menu] + (1)[Sound] + (1)[Ringer/Vibrator]
- Select an item with (Up/Down).
- Refer to Basic Operation.(See P13~P15)
2. Press (SMS) to save the setting.
* In the etiquette mode, the phone is always in the vibration mode even if you select a ring.
* If you set the ring duration, the phone rings for the given seconds, and LCD blinks. In etiquette mode,
or if Vibration is selected, however, the phone vibrates.
Group ringer
The designated ringer is on for incoming calls from the designated group.
1. (Left)[Menu] + (1)[Sound] + (2)[Set Group Ring]
- Select an item with (Up/Down).
- Refer to Basic Operation.(See P13~P15)
2. Press (SMS) to save the setting.
- If you select <No Group>, the selected ringer is on instead of the ringer set by group.
Setting effect
You can set the slide open/close tone, key tone and menu tone.
1. (Left)[Menu] + (1)[Sound] + (3)[Slide Effect]
- Select an item with (Up/Down). Refer to Basic Operation.(See P13~P15)
2. Press (SMS)[Save].
* Press (WWW)[Menu] and select (1)[Mute] to disable the effects.
* Slide open/close tone: The sound effect for slide open/close.
50
* Key tone : The sound effect for key action
* Menu tone : The sound effect for selection of menu.
Setting alert
You can select various alerts.
1. (Left)[Menu] + (1)[Sound] + (4)[Sound Effect]
* Select an item with (Up/Down). Refer to Basic Operation.(See P00~P00)
* Press (WWW)[Menu] and select (1)[ Mute] to disable the effects.
1. Press (SMS)[Save] to save the setting.
* Dialogbox : Alert for message box
* Connect : Alert for call connection
* Minute : Alert for 1minute call timer
* No service : Alert for out of service area
* Low battery : Alert for low battery
Vibration mode
You can select one of the 5 different vibration modes.
1. (Left)[Menu] + (1)[Sound] + (5)[Select Vib Mode] + (OK)[Sel]
* You can activate vibration mode for incoming call if ringer is set to Ring, Vibrator than Ring or
Ringer/Vibrator.
Volume
You can adjust volumes.
1. (Left)[Menu]+ (1)[Sound] + (6)[Volume] + (SMS)[Save]
* Earpiece : You can adjust the earpiece volume.
* Effect : Slide open/close tone, key tone and menu tone volume
* Alert : Dialog box, Connect, Minute, No service, Low battery alert volume
* Ringer : Incoming ringer volume
51
* Alarm : Alarm bell volume
* Message : New message alert volume
* Game: Game sound volume
* On & Off : Power on/off volume
Setting missed call
You can set the missed call function.
1. (Left)[Menu] + (1)[Sound] + (7)[Missed Call] + (SMS)[Save]
* Alert duration : You can select Every 2min, After 2min or No alert.
* Alert type : Select one of the four alert tones.
* Alert volume : You can adjust volume.
My Bell
You can manage the downloaded bells and the bells received via IrDA communication.
1. (UP)[Menu] + (6)[My Bell]
<My Bell menu>
- Set to Ringer : Set the selected bell as the ringer.
- Rename : Rename the files.
- User Info : Check the capacity by contents.
- You can save contents within the capacity regardless of content types.
52
Setting Display
Background
You can select the background.
Self Design
You can select the self design for LCD.
1. (Left)[Menu] + (2)[Display] + (1)[Decoration]+(1)[Self Design]
- Select an item with (Up/Down/Left/Right).
Refer to Basic Operation.(See P13~P15)
- Press (WWW)[Pew] to preview background.
2. Press (SMS) to save the setting.
SK Design
You can display various types of information on LCD.
1. (Left)[Menu] + (2)[Display] + (1)[Decoration]+(2)[SK Design]
- Select an item with (Up/Down/Left/Right).
Refer to Basic Operation.(See P13~P15)
- Press (WWW)[Pew] to preview background.
2. Press (SMS) to save the setting.
* If you select an animation for background, the battery operation time reduces.
* You can select [No picture] for background.
* If you select [Slide Show] for background, the photos selected for the slide show are displayed by turns.
If you use a locked photo in the slide show, the lock image is displayed. If no photo is selected as the
slide show, [Slide Show] is not displayed for Background setting.
Setting picture
You can set the photos for main LCD, incoming calls, power on, power off and starting WWW.
1. (Left)[Menu] + (2)[Display] + (2)[Set Picture]+(2)[Set picture]
- Select an item with (Up/Down/Left/Right).
53
- Refer to Basic Operation.(See P13~P15)
- Press (WWW) to preview the screen.
2. Press (SMS) to save the setting.
* The picture contents are [Default picture], [My picture], [My photo], [My video] and [No picture].
* If there is no content, the list is not displayed.
Setting Menu Theme
1. (Left)[Menu]+ (2)[Display] +(3)[Menu Theme]+(OK)
- Basic / Special styles are available.
* The default is special style.
Light/Brightness
1. (Left)[Menu] + (2)[Display] + (4)[ Light/Brightness] + (OK)
* Select an item with (Up/Down), and press (OK).
2. Press (SMS) to save the setting.
* Type of LCD backlight
- Always : Backlight is on when slide is open.
- 10 Sec : Backlight is on for 10 seconds when you open the slide or press any key.
- 20 Sec : Backlight is on for 20 seconds when you open the slide or press any key.
- 30 Sec : Backlight is on for 30 seconds when you open the slide or press any key.
- Set Time : Backlight is on when you open the slide or press any key in the selected time slot.
- No : Backlight is off when you open the slide or press any key.
* If Backlight is set to ‘Always’, the battery operation time can be reduced.
* Type of backlight for closing slide
- LCD off : Backlight is off when you close the slide or press the side key.
- Off in 1 sec : Backlight is on for 1 second when you close the slide or press the side key.
- Off in 3 sec : Backlight is on for 3 seconds when you close the slide or press the side key.
- 10sec light : Light is on for 10 sec if you close the folder or press a side key.
- Step off : Light is off in two steps if you close the slide.
54
Setting Outkey LED
You can select LED colors for default setting, incoming calls, arrival of messages, and VOD playing.
1. (Left)[Menu]+(2)[Display]+(5)[Set Outket]+(SMS)[Save]
* What is outside key LED?
You can select colors of outside key LED for default setting, incoming calls, arrival of messages, and
VOD playing.
* Default setting : You can select LED color while LCD light is on (opening slide, pressing key, LCD light
on when slide is closed).
Service Lamp
You can select the outside key LED color when slide is closed.
1. (Left)[Menu]+(2)[Display]+(6)[Set Service Lamp]
2. (SMS)[Save]
*What is service lamp?
As the outside key LED lamp, it indicates that phone power is on when LCD light is off with the slide
closed.
*Setting time : LED blinks at the selected interval.
Closed slide setting
You can set LCD screen and backlight for closed slide.
1. (Left)[Menu] + (2)[ Display] + (7)[Closing Slide]
2. (SMS)[Save]
* Select an item with (Up/Down), and press (OK).
2. Press (SMS) to save the setting.
*View clock : Clock image is displayed instead of the standby screen on the LCD when LCD light is off.
*View main LCD : Standby screen is displayed on the LCD when LCD light is off.
*Select light when slide is closed : You can switch on LCD light with front key as the slide is closed.
55
My Picture
You can designate a saved picture, rename files, check user info, or delete pictures.
1. (UP)[Menu] +(7)[My Picture] + (OK)
* Select an item with (Up/Down), and press (OK).
2. Press (SMS) to save the setting.
* You can save the contents in flexible manner within the memory capacity regardless of type of
contents.
* You can save up to 99 files in My Picture.
56

Info. Manager
Scheduler
(Solar/Lunar) calendars between January, 1996 to December, 2015 are displayed.
Adding schedule
You can save anniversaries, reservations or schedules.
1. (Left)[Menu] + (3)[Info. Manager] + Info. Manager(1)[Scheduler]
2. (WWW) + (1) Add schedule + (1) Enter contents + (SMS)[Save]
(2) Add anniversary + Enter contents + (SMS)[Save]
* You can save up to 10 schedules and 5 anniversaries in a day.
* Press (SMS) to change scheduler screen (by week, by day, by month).
* Press (*) to go to previous month, and (#) to next month.
※ Reservations or schedules on the phonebook.
Checking schedule
You can save anniversary, reservation and schedule.
1. (Left)[Menu] + (3)[ Info. Manager] + (1)[Scheduler]
2. (OK)[Confi]
* The anniversaries you entered for new P-book entry are saved in Scheduler. (See P.56)
* You can delete the anniversaries saved on the scheduler, but cannot delete the holidays and the
anniversaries saved on P-book.
* If you delete anniversaries on P-book screen, they are deleted from the anniversary list in the
scheduler.
Setting schedule alarm
You can set alarm for anniversaries, reservations and schedules at the desired time.
57

1. (Left)[Menu] + (3)[Info. Manager] + (1)[Scheduler]
2. (WWW)[Menu] + (5)[Set Alarm]
4. (1) Set schedule alarm/(2) Set anniversary alarm
3. (SMS)[Save]
* The default is ‘Alarm off’.
* You can set alarm on/off when adding schedules.
※ Anniversary on the phonebook.
: Meeting
: Wedding
: Birthday
: Other anniversaries than birthday, meeting and wedding.
Morning call
Morning call rings at a given interval until you disable it by pressing a specific key. (Snooze)
1. (Left)[Menu] + (3)[Info. Manager] + (2)[Morning Call]
* You can set morning call by pressing (OK).
2. (SMS)[Save]
* Enter the repeat count for snooze function. If you press any key except (Send) when the alarm is on,
the alarm at that stage gets off. You should press (Send) to deactivate the snooze function.
* If you select Holiday Alarm Off, morning call alarm does not ring on holidays.
* If both morning call and alarm are selected, the morning call rings first, and then, alarm rings when
morning call is finished.
Alarm
You can set alarms at any required time.
◈ Setting time
1. (Left)[Menu] + (3)[Info. Manager]+ (3)[Alarm]
2. (SMS)[New] + (5)[Set time]
58
3. (SMS)[Save]
* For After 10min ~ After 1hour, alarm rings once at the designated time. The alarms that ring once are
automatically deleted after the alarm action.
* You can set up to 10 alarms.
* If the phone is off at the alarm time, alarm rings right after the phone is switched on.
* If you are engaged in a call at the alarm time, the alarm rings right after you finish the call.
Anniversary
You can set the D-day function for anniversaries or important schedules.
◈Adding D-day>
1. (Left)[Menu] + (3)[Info. Manager]+ (4)[To Do]
2. (SMS)[New] + (SMS)
* If the anniversary is passed, the 100th day from the anniversary and the number of days passed are
displayed.
* If the anniversary is not passed yet, the 100th day to the anniversary and the number of days left are
displayed.
Memo
You can simply make memo.
Adding memo
1. (Left)[Menu] + (3)[Info. Manager]+ (5)[My Memo]
2. (SMS)[New]
3. (OK)[Done]
* You can save up to 10 memos.
Editing memo
1. (Left)[Menu] + (3)[Info. Manager]+](5)[My Memo]
* Select the item with (Up),(Down).
2. Press (SMS)[Edit], and select (OK) after editing.
* You can save up to 10 memos.
59
Calculator
You can use the calculator with the memory function and the total function.
e.g.) <9 X 7>
1. (Left)[Menu] + (3)[[Info. Manager]+]+ (6)[Calculator]
2. (9) + (Up) + (7) + (OK)
* You can use an operator repeatedly.
* The answer to the calculation should be not longer than 11 digits. If the answer exceeds 11 digits, an
[Error] message is displayed, and calculation function is disabled.
* Press (CLR Key) to delete a character, or press and hold (CLR Key) to delete all.
- Save Memory : Save the answer.
- Memory Total : Add the answer to the saved memory.
- Import Memory : Import the last answer (memory) to the operation answer screen.
- Delete Memory : Delete the memory. The operation detail is not deleted.
- Reset : All the operation details are deleted.
Stopwatch
You can use the stopwatch function with simple key action.
1. (Left)[Menu] + (3)[Info. Manager]+ (7)[Stop watch]
2. (OK)[Start]
3. (SMS)[Stop]
* Press (OK)[Save] if you need intermediate records during operation of the stopwatch. You can check
the saved time with (WWW)[View].
* If there is an incoming call during operation of stopwatch, the stopwatch operation is finished.
* You can save up to 20 stopwatch records.
World time
You can check the world time.
1. (Left)[Menu] + (3)[Info. Manager] + (8)[World Time]
* Check the world time with (Up),(Down).
60

* Move to a city on the world map with (Left)/(Right) button.
* You can set summer time of each city in DST(Daylight Saving Time). DST is applied once you set the
summer time.
▷ World time in 41 cities
1. Mexico City 2. Amsterdam
3. Athens 4. Baghdad
5. Bangkok 6. Beijing
7. Beirut 8. Berlin
9. Boston 10. Cairo
11. Chicago 12. Dallas
13. Denver 14. Detroit
15. George Town 16. Hanover
17. Helsinki 18. Honolulu
19. Lisbon 20.London
21. Los Angeles 22. Madrid
23. Manila/HGKONG 24. Montreal
25. Moscow 26. New York
27. Paris 28. Phoenix
29. Rio De Janeiro 30. Rome
31. Samoa 32. San Francisco
33. Seattle 34. Seoul/Tokyo
35. Sidney/MEL 36. Singapore
37. Taipei 38. Vienna
39. Tehran 40. Washington 40.
41. Wellington
* Press (Left), (Right) to move to the nearest city on the map.
41 cities including Mexico City are displayed.
* You should set DST(Daylight Saving Time) by city.
Once set, the DST reflected time is displayed.
61
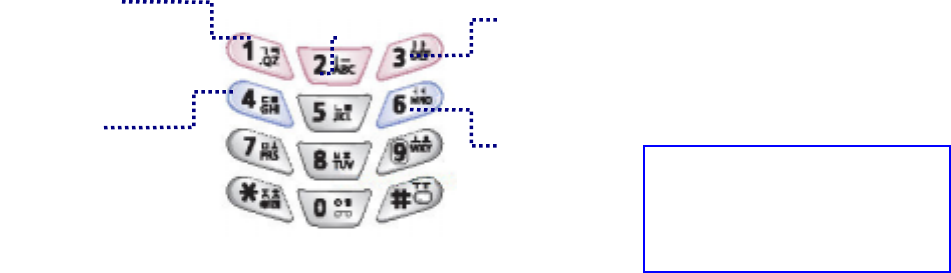
Game
Game
1. (WWW)[Menu]+4+(1)[Brain Force]/(2)[PUZBUZ]
- See Volume in SKY Sound (P.000) for how to adjust volume.
BRAIN FORCE
* Story mode : The brain force story is unfolded if you press (Under) and (OK).
* Pair Match : You can select one of the five characters and play matches with other characters. The
game is cleared if you win all other characters.
* Survival mode : You can select one of the five characters and play matches until your energy goes
down to ‘0’. The number of characters you won is displayed on the upper
part of the LCD screen. If you win, energy and rage gage increase.
* Options : You can set the level, time and vibration.
※ How to operate keys
※ How to operate characters
Jump
Jump to left
Move to
left
Mo
right
ve to
Pr
Send
ess t
h
a call o
r
7.8.9: Attack keys
*To attack while jumping,
press the jump key and (5).
k
Jump to right
PUZBUZUZ
* Play Game : Press 1. Play Game to resume the game.
* New Game : Start a new game.
* Help : You can view how to play the game, and description on the characters or the items.
* OPTION: You can select/deselect vibration.
* SCORE : You can view scores by game.
* EXIT : You can finish the game.
62
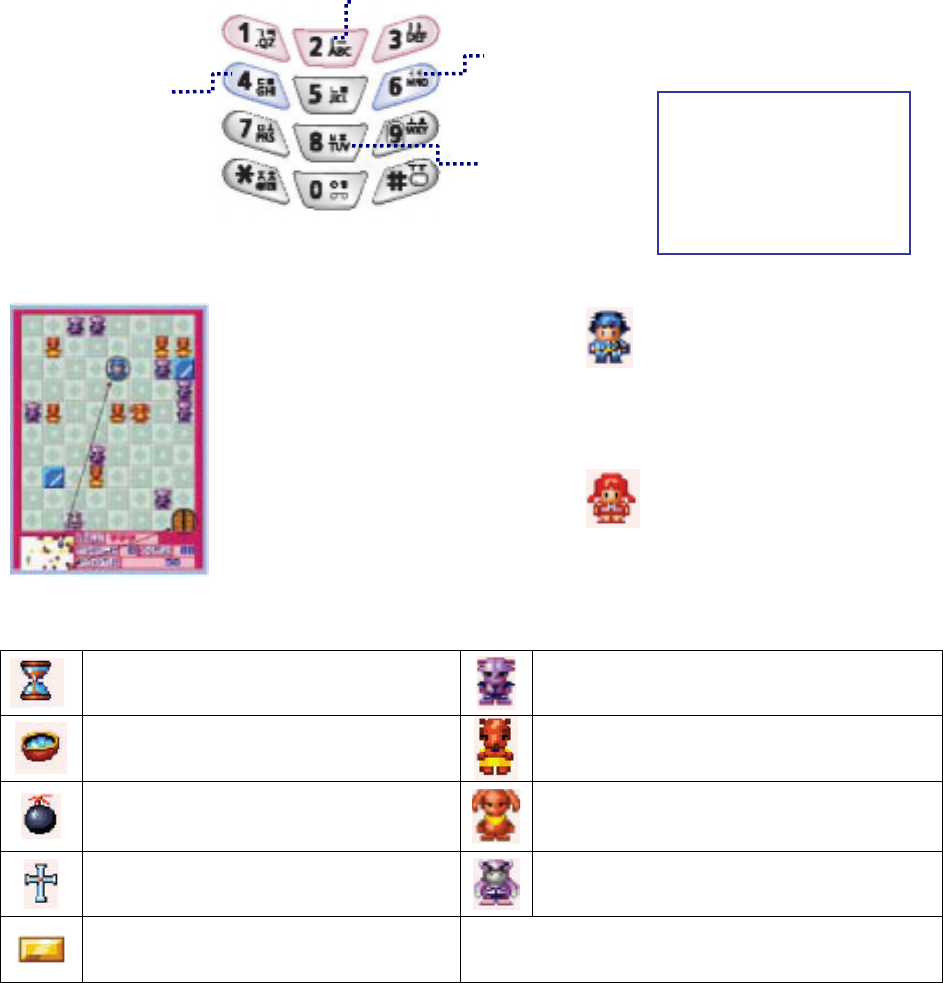
※ Basic operation Move up
(or (Up))
Move to right
(or (Right))
Move down
(or (Down))
Move to left
(or (Left))
5(pr (Ok)): change to
male or female
depending on the
monster
※ How to play game ※ Character
The hero gets away if he meets
the monster from the same
castle, and gets near if he
meets the monster from other
castles. Check the positions of
Tippo and the destination on the
mini map, dodge the monsters
with Up/Down/Left/Right keys,
and arrive at the destination
and to finish the mission of each
stage.
Name : Tippo (Male)/Age : 15
A boy who wishes to be a warrier. He
goes to the forest of darkness to go
through the ordeal of Reel.
Name : Reel (Female)/Age : 15
The female character of Tippo who
has transformed with the magic ring.
※ Items ※ Monsters
Name : Sandglass / Function : Add
10sec Name : Demon/Sex : Male
Move one square at a time
Name : Spirit water / Function : Avoid
attach for 5 squares Name : Demora/Sex : Female
Move one square at a time
Name : Bomb / Function : Terminate
monsters in one horizontal/vertical
square
Name : DemonKing/Sex : Male
Move two squares at a time
Name : Cross / Function : Add 1 to
character life Name : QueenDemora/Sex : Female
Move two squares at a time
Name : Gold bar / Function : Bonus
point
63
Settings
Option/Auto
You can set the call receiving method with closed slide and the dial font size.
Option
1. (Left)[Menu] + (5)[Setup] + (2)[Option/Auto]
2. (1)[Option] + (SMS)[Save]
* Call receiving method with closed slide : Open Slide, Open & Press, or Press Send.
* Dial font size : Select the font size of the figure displayed on the LCD screen when making a call
Auto function
1. (Left)[Menu] + (5)[Setup] + (1) [Option/Auto]
2. (2)[Auto Function] + (SMS)[Save]
* You can set [Auto Redial], [Hands Free] and [Ear Microphone], and enter the area code.
Security
Lock
You can lock/unlock a specific function of the phone which requires you to enter the password.
1. (Left)[Menu] + (5)[Setup] + (2)[Security]
- The default password is ‘0000’.
2. Enter password + (2)Function Lock + (SMS)[Save]
(3)Info Lock + (SMS)[Save]
* If you select [1.Auto Lock], all the functions are locked.
* If you select [2.Function Lock] or [3.Info Lock], is displayed on the upper part of the LCD screen.
* See Settings Details for further information. (See P.196)
Password
1. (Left)[Menu] + (5)[ Setup] + (2)[Security]
* The default password is ‘0000’.
2. (4)[Set Password] + Password + New Password + New Password
64
Language
You can select an appropriate language from English/Hebrew/Russian.
1. (Left)[Menu] + (5)[ Setup] + (3)[Language]
2. (OK)[Sel]
Use (UP),(Down).
3. (OK)[Save]
Memory Info
Check general memory
1. (Left)[Menu] + (5)[Setup] + (4)[Memory Info]
2. (1)[General memory]
. (2)[3G-TV Memory Info
* You can check memory information on pictures, melodies, photos, moving images and MP3.
Call Timer
You can check Last/Total/Lifetime Call for Send Voice, Recv Voice, Use WAP, Send Data and Recv
Data.
1. (Left)[Menu] + (5)[Control]+ (5)[Air Time]
2. (1) Last Call
- You can check the last send/received call time.
(2) Total Call
- You can check the call time from the last reset.
- Send Voice – Total time of calls made
- Receive Voice – Total time of calls received
- WWW use Time – Total time of WAP service connection
- Send Data – Total time of calls made for wireless data service
- Receive Data – Total time of calls received for wireless data service
(3) Lifetime Call
- You can check the call time from purchasing of the phone. The record is deleted with master reset
(See P.194).
65
Auto Answer
Set Auto Answer
1. (Left)[Menu] + (5)[Setup + (6)[Auto Answer] + (1)[ Set Auto Answer]
* Select the item with (Up),(Down), and press (OK).
2. (SMS)[Save]
Record/Play
1. (Left)[Menu]+ (5)[Setup + (6)[Auto Answer] + (2)[Greeting Message]
2. (OK)[Rec]
- Press (OK)[Record] to record a message, and press (SMS)[Save] to save the message.
* The maximum recording time is 30 seconds.
* If a message is already recorded, press (SMS)[Play] to check the recorded voice.
S/W Version
1. (Left)[Menu] + (5)[Setup] + (7)[S/W Version]
The S/W version displayed at purchasing of the phone is the release version number.
Comm. Settings
Data settings
1. (Left)[Menu] + (5)[Setup]+ (8)[Comm. Setup] + (1)[Data Service]
2. (SMS)[Save]
WWW settings
1. (Left)[Menu] + (5)[Setup]+ (8)[Comm. Setup] + (2)[WWW Config]
2. Enter Password
3. (SMS)[Save]
Ev-DO Service
1. (Left)[Menu] + (5)[Setup]+ (8)[Comm. Setup] + (3)[Ev-DO Service]
2. Enter Password
3. (SMS)[Save]
66
Init by Function
Initialize P-book
You can reset P-book to the default status at the purchasing of the phone.
1. (Left)[Menu] + (5)[Setup] + (9)[ Init by Function] + (1)[ Initialize P-book]
2. Enter Password
3.(OK)[Sel]
Initialize System
If you select Master Reset, all the data (P-book, sent/received messages, memo, live bell, live screen,
bell/picture/photo/video) are deleted except the default bell and picture.
1. (Left)[Menu] + (5)[Setup]+ (9) [Init by Function] + (2)[Initialize System]
2. Enter Password
3. (OK)[Sel]
67
IrDA Communication
Phone To Phone
You can exchange data with other phone with the IrDA function.
1. (Left)[Menu] + (6)[IrDA] + (1)[Phone TO Phone]
2. (1) Receiving Mode
- In order to receive bell/picture/photo/P-book from other phones, select Receive mode. Press (CLR
Key) if you want to cancel receiving.
(2) Send bell
- You can send a bell to other phones. Select the item with (SMS)[Check], and press (OK).
(3) Send picture
- You can send the animation data to other phones. Select the item with (SMS)[Check], and press
(OK).
(4) Send Photo
- You can send the photo data to other phones. Select the item with (SMS)[Check], and press (OK).
(5) Send Book
* You can Book data to other phones. Select the item and press (OK).
(You can check the required item only in Send by Group.)
Phone To PC
You can perform wireless data communication with PC or use the data manager function via IrDA.
Phone settings
1(Left)[Menu] + (6)[ IrDA]+ (2)[Phone To PC] + (OK)
* Select the required item with (Up),(Down).
* If IrDA is connected with PC, is displayed on the main LCD.
* IrDA communication is available when the IrDA window of the phone is within 30˚ and 10cm from the
IrDA window of the PC.
* If Phone To PC communication does not function for over 10 minutes, connection is released and
is disappeared.
PC settings
Because SK-7200 has the IrDA function built-in, you can use the data manager and the data service
with the PC with the IrDA function.
68

1. The PC with the IrDA communication device needs to have the IrDA communication program.
2. In “Start → Setting → Control Board”, double click the [IrDA] icon.
3. Before IrDA communication, check if “Virtual IrDA COM port” or “IrDA device connected port (COM3,
COM4, and etc.)” is selected in the settings for Data Manager or Hyper Terminal.
* The virtual IrDA COM port is supported in Windows 2000/XP.
* The phone supports IrDA communication with PC at up to 64Kbps.
* You can download the data manager program from www. skteletech. com.
* Refer to the PC manual for IrDA setting in the PC.
IrDA communication details
Phone To Phone IrDA communication
- Send Bell, Send Picture, Send Photo
In order to send a locked item, enter the password.
If you select to send all, all items except the locked item are sent.
- Send ook
* Send All : You can send the entire P-book.
* Send by Group : You can send the P-book by group.
* Send by Name : You can send the P-book by name.
* Send Dial : You can send the speed dial numbers.
* Send My Info : You can send your information. The information is stored in [No Group].
* If the same name is already in the phonebook, a message appears, asking you if you want to
overwrite. If you select [Yes to all], all the data are overwritten without further confirmation messages.
* When you send the P-book to another phone that does not support two phone numbers of the same
kind, if two or more phone numbers of a person of the same kind are sent, only one phone number is
received. For example, if you send 5 phone numbers of Hong Gil-dong from IM-7300 to U4EP, only
one number is received.
Call receive ratio can be lowered during IrDA communication.
69

Appendix
Menu structure
You can find the menu with the function keys, and press the numeric key.
STEP STEP 2 STEP 3
1. Ringer/Vib
2. Set Group Ring
3. Slide Effect
4. Sound Effect
5. Select Vib Mode
Volume
Effect
Warn
Ringer
Alarm
Msg
Game & Playon
6. Volume
Start & End
Alarm Set
Alarm type
1. Sound
7. Missed Call
Alarm Volume
Self Design 1. Decoration
SK Design
Incoming Call
Power On
Power Off
2. Set picture
Start WWW
Basic 3. Menu Theme
Special
LCD Light
LCD Bright
4. Light/Brightness
Closing Slide
Default Setting
Incoming Call
Receiving Message
5. Set Outkey led
VOD Playing
Select Color 6. Set service lamp
Set time
Closed Screen
2. Display
7. Closing Slide
Closed Backligt
1. Scheduler
2. Morning Call
Menu
(Left Key)
3. Info. Manager
3. Alarm
STEP 1
70

4. TO Do
5. My Memo
6. Calculator
7. Stop watch
8. World time
1.Brain Force 4. Game
2. Puz Buz
1. Option/Auto Option
Auto Function
2. Security Auto Lock
Function Lock
Info Lock
Set Password
Hebrew
English
3. Language
Russian
Memory Info 4. Memory Info 3G-TV Memory Info
Last call time
Lifetime call
5.Call Timers
Total call
6. Auto.Answer Set auto Answer
Greeting Message
7. S/W version
8. Comm. Setup Data Service
WWW Config
EV-DO Service
Initialize P-Book 9. Init by Function Initialize System
5. Set up
*Select System
6. IrDA 1. Phone to Phone Receiving Mode
Send Bell
Send Picture
Send Photo
Send Book
2. Phone to PC
1.Speed Search
2. Search By Name
3. Search By Number
4. New Entry
5. Edit Turbo Dial
6. Memory Group
Phone Book
(Right Key)
#. My Info
1. Text Message
2. Voice Message
3. Spam Message
4. My Bell Message
1. In-Box
5. Saved Message
Message
(SMS key)
1. New Message
71

2. Outgoing Message
3. Sent Message
2. Out-Box
4. Phrase
1. New Message
2. In-Box
3. Out-Box
4. Draft-Box
5. MMS Alert
3. MMS
(Multimedia
Messaging Service)
6. Settings
1. Alert Type
2. Alarm Tone
3. Alarm Volume
4. Set Message Alert
4. Alert in call
1. Text Message
2. Voice Message
3. My Bell Message
4. Saved Message
5. Outgoing Box
6. Sent Message
7. Phrase
8. Spam Message
5. Delete all Msg
9. All Message
1. Internet Portal
2. Game & Apps
3. Video Clip
4. Ringtones
5. Animations
6. Voice Portal
7. SMS Info.
WWW Key
8. What New?
1. Take Camera
2. Take Video
3. Photo Mgmt
4. Video Mgmt
Side Key-1
(Camera Key)
5. Camera setting
1. Video Portal
1. Download Music
2. Music
2. Play List
3. Broadcasting
1. M. Media Download
2. M. Media Setting
4. Multimedia
3. My Box
5. Video Mail
3G-TV/OK
6.Configuration
1. Photo Mgmt
2. Video Mgmt
3. Media Mgmt
4. Live Bell
5. Live Screen
Up Key
(Multimedia)
6. My Bell
72
7. My Picture
#. Memory Mgmt
Side Key-2
(Answer Key)
Auto Answer
Option
Following accessories are available for your phone.
- Stereo Earphone-MIC.
- Data Manager Cable
Q & A
Q A
Phone
I made a phone call, only to hear beep and
failed to make connection.
All the channels in the area are engaged or the
phone is not connected with the base station.
Press (End) and then (Send) to redial to the last
dialed number.
The antenna level changes severely, and even
when the antenna level is high, the phone
sometimes fails to receive the signal.
If the phone is inside a building, in an
underground area, inside a tunnel, near a high
building or mountain, the radio wave can be
interrupted.
Camera
White dots are displayed on the screen, and
the scene on the screen is not clear.
The camera lens is stained with foreign
substance. Wipe the lens with soft cloth. If the
problem still exists, contact the nearest service
center.
How can I get the better photos in the dark? You cannot take the clear view when you taking
a photo in the dark because it takes time that the
camera sensor adjusts exposure automatically. If
you are in the dark, wait for about 3~5 seconds
after switching on the camera, and take the
photo after the camera is fully adapted to the
darkness.
Taking a video is stopped even if the phone
has enough memory.
Because the video file is stored in the temporary
memory space and then converted to the
permanent memory space, the temporary
memory space after the file is moved to the
permanent memory is appeared as a remaining
memory space.
Spec and Features
Range of Frequency Used TX : 824.64 - 848.37 MHz
RX : 869.64 - 893.37 MHz
73

74
Accuracy of the frequency Within ±300 Hz of assigned frequency
Size
Weight
TX output 0.316 W
Phone -20 C ~ +50 C
Operation
Temperature Charger 0 C ~ + 40 C
Relative Humidity 5% ~ 95%
Mobile Phone Data
Model Name
Date of Purchase
Business Name
Purchased From Telephone No.
Serial No.
Phone No.
Password
Patent indication
-In accordance with Clause 7.1 of Subscriber Unit License Agreement, the following phrase should be
marked inside or outside the phone, and on the package.
“Licensed by QUALCOMM Incorporated under one or more of the following Patents”
The above phrase will be followed by the Qualcomm patent number.

FCC RF EXPOSURE INFORMATION
Read this information before using your phone
In August 1996 the Federal Communication Commission (FCC) of the United States
with its action in Report and Order FCC 96-326 adopted an updated safety standard for
human exposure to radio frequency (RF) electromagnetic energy emitted by FCC
regulated transmitters. Those guidelines are consistent with the safety standard
previously set by the both U.S. and inter national standards bodies. The design of this
phone complies with the FCC guidelines and these international standards.
Use only the supplied or an approved antenna. Unauthorized antennas, modification, or
attachments could impair call quality, damage the phone, or result in violation of FCC
regulations.
Do not use the phone with a damaged antenna. If a damaged antenna comes into
contact with the skin, a minor burn may result. Please contact your local dealer for
replacement antenna.
Body-worn Operation
This device was tested for typical body-worn operations. To maintain compliance with
FCC RF exposure requirements, use only belt-clips, holsters or similar accessories that
maintain a 0.6 inch (1.5 cm.) separation distance between the user’s body and the back
of the phone, including the antenna, whether extended or retracted. The use of
belt-clips, holsters and similar accessories should not contain metallic components in its
assembly. The use of accessories that do not satisfy these requirements may not
comply with FCC RF exposure requirements, and should be avoided.
For more information about RF exposure, please visit the FCC website at www.fcc.gov