SKSpruce Technologies WIA3200 Indoor Access Point User Manual JadeOS 1 x
Skspruce Technologies Inc. Indoor Access Point JadeOS 1 x
Users Manual

JadeOS
User Manual
SK-A2960-182 03
Copyright © 2013 Skspruce, Inc. All rights reserved.
No part of this documentation may be reproduced in any form or by any means or used to
make any derivative work (such as translation, transformation, or adaptation) without
prior, express and written permission from Skspruce, Inc.
Skspruce, Inc. reserves the right to revise this documentation and to make changes in
content from time to time without obligation on the part of Skspruce, Inc. to provide noti-
fication of such revision or changes.
Skspruce, Inc. provides this documentation without warranty of any kind, implied or ex-
pressed, including but not limited to, the implied warranties of merchantability and fit-
ness for a particular purpose. Skspruce may make improvements or changes in the prod-
uct(s) and/or the program(s) described in this documentation at any time.
UNITED STATES GOVERNMENT LEGENDS:
If you are a United States government agency, then this documentation and the software
described herein are provided to you subject to the following:
United States Government Legend: All technical data and computer software is com-
mercial in nature and developed solely at private expense. Software is delivered as
Commercial Computer Software as defined in DFARS 252.227-7014 (June 1995) or as
a commercial item as defined in FAR 2.101(a) and as such is provided with only such
rights as are provided in Skspruce's standard commercial license for the Software. Tech-
nical data is provided with limited rights only as provided in DFAR 252.227-7015 (Nov
1995) or FAR 52.227-14 (June 1987), whichever is applicable. You agree not to remove
or deface any portion of any legend provided on any licensed program or documentation
contained in, or delivered to you in conjunction with, this User Guide.
Skspruce, the Skspruce logo are registered trademarks or trademarks of Skspruce, Inc.
and its subsidiaries. Other brand and product names may be registered trademarks or
trademarks of their respective holders.
Any rights not expressly granted herein are firmly reserved.
This device complies with Part 15 of the FCC Rules. Operation is subject to the following
two conditions: (1) this device may not cause harmful interference, and (2) this device
must accept any interference received, including interference that may cause undesired
operation.
The user manual or instruction manual for an intentional or unintentional radiator shall
caution the user that changes or modifications not expressly approved by the party
responsible for compliance could void the user's authority to operate the equipment. In
cases where the manual is provided only in a form other than paper, such as on a
computer disk or over the Internet, the information required by this section may be
included in the manual in that alternative form, provided the user can reasonably be
expected to have the capability to access information in that form.
This equipment has been tested and found to comply with the limits for a Class B digital
device, pursuant to part 15 of the FCC Rules. These limits are designed to provide
reasonable protection against harmful interference in a residential installation. This
equipment generates, uses and can radiate radio frequency energy and, if not installed and
used in accordance with the instructions, may cause harmful interference to radio
communications. However, there is no guarantee that interference will not occur in a par-
ticular installation. If this equipment does cause harmful interference to radio or
television reception, which can be determined by turning the equipment off and on, the
user is encouraged to try to correct the interference by one or more of the following
measures:
—Reorient or relocate the receiving antenna.
—Increase the separation between the equipment and receiver.
—Connect the equipment into an outlet on a circuit different from that to which the
receiver is connected.
—Consult the dealer or an experienced radio/TV technician for help.
FCC Caution: Any changes or modifications not expressly approved by the party
Responsible for compliance could void the user’s authority to operate this equipment.
This equipment must be installed and operated in accordance with
provide instructions and the antenna used for this transmitter must be
installed to provide a separation distance of at least 20 cm from all
persons and must not be co‐located or operation in conjunction with
any other antenna or transmitter. End‐users and installers must be
provided with antenna installation instructions and transmitter operating
conditions for satisfying RF exposure compliance.
Important Notice on Product Safety
Elevated voltages are inevitably present at specific points in this electrical equipment.
Some of the parts may also have elevated operating temperatures.
Non-observance of these conditions and the safety instructions can result in personal injury or in
property damage.
Therefore, only trained and qualified personnel may install and maintain the system.
All equipment connected has to comply with the applicable safety standards.
Statement of compliance CE statement
The CE conformity declaration for the products is fulfilled when the system is built and cabled in
line with the information given in the manual. Deviations from the specifications or independent
modifications to the layout, such as use of cable types with lower screening values for example,
can lead to violation of the CE protection requirements. In such cases the conformity declaration is
invalidated. The responsibility for any problems which subsequently arise rests with the party re-
sponsible for deviating from the installation specifications.
VCCI statement
This is a Class A product based on the standard of the Voluntary Control Council for Interference
by Information Technology Equipment (VCCI). If this equipment is used in a domestic environment,
radio disturbance may arise. When such trouble occurs, the user may be required to take correc-
tive actions.
Content
Content..........................................................................................................................1
Chapter 1 Preface ........................................................................................................1
1.1 Intended Audience ...............................................................................................1
1.2 Structure of this Document ..................................................................................1
1.3 Symbols and Conventions....................................................................................1
1.3.1 Symbols Used ...............................................................................................2
1.3.2 Conventions Used .........................................................................................2
1.4 History of Changes ..............................................................................................2
Chapter 2 System Overview........................................................................................3
2.1 System Introductions ...........................................................................................3
2.2 Functions..............................................................................................................3
2.3 Feature Highlights................................................................................................4
2.4 Application...........................................................................................................5
Chapter 3 CLI and System Management..................................................................7
3.1 CLI Access ...........................................................................................................7
3.1.1 CLI Access via the Local Console ................................................................7
3.1.2 CLI Access via a Remote Console................................................................8
3.2 CLI Features.........................................................................................................8
3.2.1 Command mode............................................................................................9
3.2.2 Command Help .............................................................................................9
3.2.3 Command Completion................................................................................10
3.2.4 Deleting Configuration Settings .................................................................11
3.2.5 Profile Command........................................................................................11
3.3 Configuring the Management Port.....................................................................11
3.3.1 Configuring IP ............................................................................................11
3.3.2 Configuring Routing ...................................................................................11
3.4 Configuring Management ..................................................................................12
3.4.1 Inquire Configuration .................................................................................12
3.4.2 Saving Configuration Changes ...................................................................12
3.4.3 Reset JadeOS ..............................................................................................12
3.4.4 Files Import/Export.....................................................................................12
3.5 System Update ...................................................................................................13
3.6 File Operations...................................................................................................14
3.6.1 Basic Operations .........................................................................................14
3.6.2 Files Transfer by FTP and TFTP Command ...............................................14
3.6.3 JadeOS Image Image Files Transfer ...........................................................15
3.6.5 Log Files Storage ........................................................................................15
3.7 User Management ..............................................................................................15
3.8 Configuring System Settings .............................................................................16
3.8.1 Setting Hostname........................................................................................16
3.8.2 Setting Country Code..................................................................................16
3.8.3 Setting Administrator Password..................................................................16
3.8.4 Setting System Clock..................................................................................16
3.8.5 Clock Synchronization................................................................................17
3.8.6 Configuring NTP Authentication................................................................17
3.9 Ping and Traceroute ...........................................................................................18
3.10 License Management .......................................................................................18
Chapter 4 Interface Configuration...........................................................................19
4.1 Naming Ethernet Port ........................................................................................19
4.2 Configuring VLAN............................................................................................19
4.2.1 Creating VLAN...........................................................................................19
4.3 Adding Ethernet Port into VLAN ......................................................................20
4.4 Configuring VLAN Interface.............................................................................21
4.5 Configuring Port Channel ..................................................................................21
4.6 Configuring QinQ ..............................................................................................23
4.6.1 Configuring QinQ .......................................................................................23
4.7 Inquiring Interface Status and Statistics.............................................................24
Chapter 5 Layer-2 Network Service ........................................................................26
5.1 Bridge Forwarding .............................................................................................26
5.1.1 Bridge Description......................................................................................26
5.1.2 Configuring Bridge .....................................................................................26
5.1.3 Dynamic Table ............................................................................................26
5.1.4 Bridge Aging...............................................................................................27
5.1.5 Static Table..................................................................................................27
5.2 Port Mirror .........................................................................................................27
Chapter 6 Layer-3 Network Service ........................................................................28
6.1 Configuring IP Address......................................................................................28
6.1.1 Configuring IP Address...............................................................................28
6.1.2 Configuring Loopback................................................................................28
6.2 Configuring Static Routing Table ......................................................................28
6.2.2 Configuring Static Routing .........................................................................28
6.2.2 Inquiring Routing Table ..............................................................................28
6.3 Configuring ARP ...............................................................................................29
6.3.1 Configuring Static ARP Table.....................................................................29
6.3.2 Inquiring ARP Table ...................................................................................29
6.3.2 Configuring ARP Proxy..............................................................................30
6.4 Configuring MTU and TCP MSS ......................................................................30
6.5 Configuring GRE Tunnel...................................................................................31
6.6 Configuring DHCP ............................................................................................31
6.6.1 Configuring DHCP Server..........................................................................32
6.6.2 Inquiring DHCP Server Status....................................................................32
6.6.3 Configuring DHCP Relay ...........................................................................34
6.6.4 DHCP Snooping..........................................................................................35
6.6.5 ARP With DHCP.........................................................................................36
6.7 Configuring OSPF .............................................................................................37
6.7.1 OSPF Implementation.................................................................................37
6.7.2 Enabling OSPF ...........................................................................................37
6.7.3 Configuring OSPF Interface Parameters ....................................................38
6.7.4 Configuring OSPF Area..............................................................................39
6.7.5 Configuring OSPF Network Type ..............................................................40
6.7.6 OSPF Point-to-point Configuration Example.............................................40
6.8 Configuring IPv6 ...............................................................................................42
6.8.1 Address Configuration ................................................................................42
6.8.2 Routing Configuration ................................................................................42
6.8.3 Ping6 ...........................................................................................................43
Chapter 7 Network Security .....................................................................................44
7.1 Access Control List (ACL) ................................................................................44
7.1.1 Standard ACL..............................................................................................44
7.1.2 Extended ACL.............................................................................................44
7.1.3 Session ACL ...............................................................................................45
7.2 Session ...............................................................................................................45
7.3 Configuring NAT ...............................................................................................46
7.3.1 Configuring SNAT......................................................................................47
7.3.2 Configuring DNAT .....................................................................................48
7.4 Configuring DoS Anti-attack .............................................................................49
7.4.1 System Pre-defined Configuration..............................................................49
7.4.2 Configuring Anti-attack ..............................................................................49
7.5 Configuring Lawful Intercept ............................................................................50
Chapter 8 Configuring HQoS...................................................................................52
8.1 Configuring Rate Limitation on Port .................................................................52
8.2 Configuring Rate Limitation on VLAN.............................................................52
8.3 Configuring Rate Limitation on User ................................................................52
Chapter 9 Configuring AAA.....................................................................................54
9.1 The Attribute of Trust and Untrust.....................................................................54
9.2 User and User Role ............................................................................................54
9.2.1 User.............................................................................................................54
9.2.2 User Role and ACL.....................................................................................55
9.2.3 Access Policy Based on User Role .............................................................55
9.3 Connections among User, VLAN and User Role ..............................................56
9.4 Configuring AAA Profile...................................................................................56
9.4.1 Configuring ACL ........................................................................................56
9.4.2 Configuring role..........................................................................................56
9.4.3 Configuring Radius Server Group ..............................................................57
9.4.4 Configuring Authentication Way ................................................................57
9.4.5 Configuring AAA Profile............................................................................58
9.4.6 Binding VLAN............................................................................................59
9.5 MAC Authentication..........................................................................................59
9.6 802.1X Authentication .......................................................................................60
9.7 WEB Portal Authentication................................................................................60
9.7.1 Web Authentication Process........................................................................60
9.7.2 DNAT Redirect ...........................................................................................61
9.7.3 HTTP 302 Redirect .....................................................................................61
9.7.4 Configuring Portal Server...........................................................................61
9.7.5 Configuring CoA Disconnect Message.......................................................61
9.7.6 Configuring Captive-portal Authentication ................................................62
9.7.7 Customize Logout Domain.........................................................................62
9.7.8 Configuring White-list and Black-list.........................................................62
9.8 Radius Proxy......................................................................................................63
9.8.1 Configuring Radius Proxy ..........................................................................63
9.8.2 Configuring EAP-SIM................................................................................64
9.9 Rate Limit Based on User ..................................................................................65
9.10 User Accounting...............................................................................................65
9.11 Example of WEB-Portal Authentication..........................................................66
9.12 Trouble Shooting..............................................................................................68
Chapter 10 WLAN Management .............................................................................70
10.1 Wireless Network Architecture ........................................................................70
10.1.1 CAPWAP Description...............................................................................70
10.1.2 CAPWAP Control Channel.......................................................................70
10.1.3 CAPWAP Data Channel............................................................................71
10.1.4 Mirror Upgrade and Configuration Management.....................................71
10.1.5 Forwarding Mode .....................................................................................71
10.1.6 Authentication Mode.................................................................................71
10.1.7 STATION Management ............................................................................71
10.2 Forwarding Mode.............................................................................................71
10.3 Configuring Power...........................................................................................72
10.4 Configuring Radio ...........................................................................................72
10.5 DTLS and CA ..................................................................................................72
10.6 Special SSID and SSID Control ......................................................................73
10.7 ACL..................................................................................................................73
10.8 Authentication Exemption ...............................................................................75
10.9 Anti-fake and Rogue AP detect ........................................................................75
10.10 Anti-DoS ........................................................................................................75
Chapter 11 WEBUI....................................................................................................77
11.1 WEBUI Description .........................................................................................77
11.2 WEBUI Login ..................................................................................................77
Chapter 12 Configuring SNMP................................................................................78
12.1 Configuring SNMP ..........................................................................................78
Chapter 13 Maintanence and Diagnosis..................................................................79
13.1 Log System ......................................................................................................79
13.2 System Management........................................................................................79
13.3 Sniffer Tool ......................................................................................................81
Abbrviations...............................................................................................................82

JadeOSUserManual1
Chapter1 Preface
This preface describes the audience, structure, conventions and history of changes of
JadeOS User Manual. It also provides important information about safety instructions
for the JadeOS.
1.1 Intended Audience
This document is intended to the experienced network administrators who need to
configure and maintain JadeOS Multi-Service Gateway.
1.2 Structure of this Document
Chapter Title Subject
Chapter 1 Preface
This chapter provides an introduction to this docu-
ment.
Chapter 2 System Overview
This chapter gives a general introduction to the
JadeOS functionality.
Chapter 3
CLI and System
Management
This chapter describes CLI and system opera-
tions.
Chapter 4
Interface Configura-
tion
This chapter will describe how to configure
interface.
Chapter 5
Layer-2 Network Ser-
vice
This chapter describes how to configure Layer-2 net-
work service.
Chapter 6
Layer-3 network ser-
vice
This chapter describes how to configure Layer-3 net-
work service.
Chapter 7 Network Security
This chapter will describe JadeOS network se-
curity function and how to configure it.
Chapter 8 Configuring HQoS This chapter describes how to configure HQoS.
Chapter 9 Configuring AAA This chapter describes how to configure AAA.
Chapter 10 WLAN Management
This chapter gives a general introduction to the
WLAN Management.
Chapter 11 WEBUI
This chapter gives a general introduction to the
WEBUI.
Chapter 12 Configuring SNMP This chapter describes how to configure SNMP.
Chapter 13
Maintenance and Di-
agnosis
This chapter gives a general introduction to the
Maintenance and Diagnosis.
Table 1-1 Chapters in this Document
1.3 Symbols and Conventions

2JadeOSUserManual
The following symbols and conventions are used in this document:
1.3.1 Symbols Used
CAUTION: Means that the reader should be careful. In this situation, you
might do something that could result in equipment damage or loss of data.
WARNING: This warning symbol means danger. You are in a situation that
could cause bodily injury. Before you work on any equipment, be aware of the haz-
ards involved with electrical circuitry and be familiar with standard practices for pre-
venting accidents.
1.3.2 Conventions Used
Representation Meaning
Bold The CLI commands are in bold.
Italic Level 2 titles are in Italic.
Courier New
Terminal display is in Courier New.
Example: # ping -t 10.10.10.1
Table 1- 2 Conventions Used in this Document
1.4 History of Changes
Version Issue date Remarks
Draft 2013.10.11 Draft Version
01 2013.11.15
New functions added,upgraded to 01 Version
02 2013.11.30
New functions added,upgraded to 02 Version
03 2014.01.15
New functions added,upgraded to 03 Version
Table 1- 3 Histories of Changes for this Document

JadeOSUserManual3
Chapter2 System Overview
2.1 System Introductions
SKG10000 Plus is a gateway equipment of telecommunication level that integrated
with the functions of routing, switching and WLAN controller and so on.
Based on the multi-core and multi-thread processor and designed with telecom grade
ATCA standard, SKG10000 Plus is with powerful and extensible performance. With
centralized management and configuration, it gives the ability of deployment for a
large network with hundreds of gateways. At the same time, it can be operated in day
and night with high availability and help the SP to meet the huge challenge brought by
rapid development of wireless service.
Based on the advanced and extensible software architecture, JadeOS:
‐ Adopt distributed architecture with data plane and control plane separated
‐ Provide WLAN solutions that are flexible, easy management and easy deployed
‐ Manage large scale APs without configuration
‐ Strictly control user internet access and bandwidth strategy with various access
authentication
‐ Support 700 users/s per line card
‐ Provide forwarding rate of high performance
‐ Support multi-level redundancy backup for system level, service module level etc.
2.2 Functions
Layer-2
z Bridge Forwarding
z VLAN/Super VLAN
z QinQ
z Port Channel
Layer-3
z Route Forwarding
z Dynamic Routing Protocol (OSPF)
z NAT
z GRE/EtherIP Tunnel
z DHCP Server, DHCP Relay,DHCP SNOOPING
z Broadcast Suppression
z Virtual Routing Redundancy Protocol(VRRP)
z Fragmentation and Reassembly
z IPv4/IPv6

4JadeOSUserManual
Security and AAA (Authentication, Authorization, Accounting)
z Access Control List (Interface/Standard/Session ACL)
z Role-Based User Policy
z Web Portal/802.1x/PSK/MAC Authentication
z RADIUS Accounting
z RADIUS Proxy
z Black-list and whit- list authentication
z DoS anti-attacks
z Lawful Interception
QoS functionality
z Rated Limit based on interface/user/ssid (HQoS)
WLAN Controller
z CAPWAP Control Tunnel and Data Tunnel
z AP Centralized Management and Configuration
z AP Discovery AC
- Broadcast discovery mode
- DNS discovery mode
- DHCP discovery mode
z Local Forwarding, Centralized Forwarding
z Intelligent Radio /Frequency Management
z Certificate Management
z User Access Control
z L2 Roaming
z Station Anti-fake, WLAN Anti-DoS
z Performance Monitor and Data Statistics
Network Management
z Configuration based on CLI (Support console, SSH, Telnet)
z Support WebUI configuration
z SNMP v1, v2c,
z System configuration, service module monitor
z Trap alarm
z Chassis management
z Trouble shooting
z Port Mirror, Sniffer
2.3 Feature Highlights
Extensible DHCP Server
DHCP server offers 700 pps users per thread that can meet carrier-grade scenarios that
requires high performance and high availability.

5JadeOSUserManual
z Scalable performance and throughout
- Optimized database
By keeping lease information in a memory-resident database, DHCP server
offers fast response times for lease assignments and renewals.
- Multi-threaded architecture
JadeOS uses a multi-threaded architecture to deliver consistent throughput.
- Carrier level big address pool
JadeOS supports up to 1,320,000 addresses per chassis.
Broadcast Suppression
JadeOS provides broadcast suppression function to reduce the number of broadcast
packets by enabling broadcast suppression policy.
- Broadcast suppression function to greatly ease the number of broadcast mes-
sages
- DHCP snooping to suppress the DHCP broadcast packets.
- Enable DHCP unicast reply function. JadeOS reply the DHCP offer and ACK
datagram with unicast messages instead of broadcast messages to effectively
reduce the broadcast flooding.
2.4 Application
JadeOS can be deployed in the core network or access network to achieve the AP cen-
tralized management and configuration. Figure 2-3 illustrates one of the application
scenarios of

6JadeOSUserManual
JadeOS.
Figure 2-1 Application scenario of JadeOS
JadeOSUserManual7
Chapter3 CLI and System Management
JadeOS uses the command Line Interface (CLI) to implement the interaction between
users and the operating system. Users can complete a range of system configuration
and realize the management functions through the CLI.
This chapter describes CLI and system operations.
3.1 CLI Access
The console port on the equipment is Rj45 interface and located on the front panel of
each line card. You can connect to the CLI via the local console or SSH/TELNET to
obtain a remote console.
3.1.1 CLI Access via the Local Console
To connect to the CLI via the local console port, complete the following steps:
Step 1 Connect to the console port using the Rj45 cable and serial port cable.
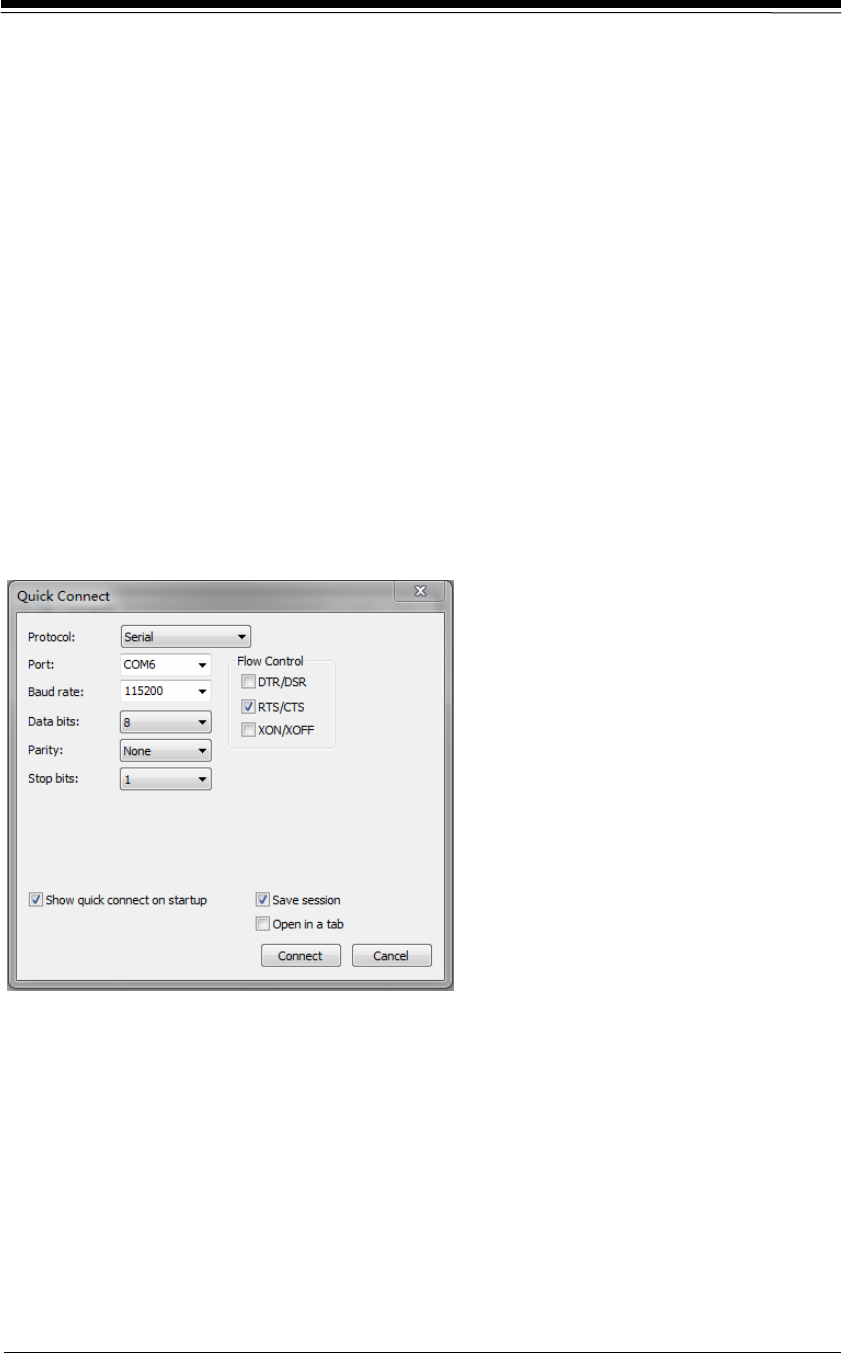
Step 2 Configure your terminal emulation program (for example: SecureCRT) is con-
figured as shown in figure 3-1:
Figure 3-1 Console port connection settings
Step 3 Enter the user name and password:
(JadeOS)
User: admin
Password: admins.
The prompt will be displayed as follows after logging in successfully.
(JadeOS) >
8JadeOSUserManual
Step 4 Enter the global mode using the following command:
(JadeOS) > enable
Password: enable
When you are in enable mode, the > prompt changes to a pound sign (#):
(JadeOS) #
Step 5 Enter the configuration mode using the following command:
(JadeOS) # configure terminal
When you are in the configuration mode, ‘config’ appears before the # prompt:
(JadeOS) (config) #
3.1.2 CLI Access via a Remote Console
Users can access JadeOS remotely using TELNET from a TCP/IP network.
To access JadeOS via telnet you need to enable telnet sessions using telnet cli com-
mand.
To connect to the CLI using TELNET, complete the following steps:
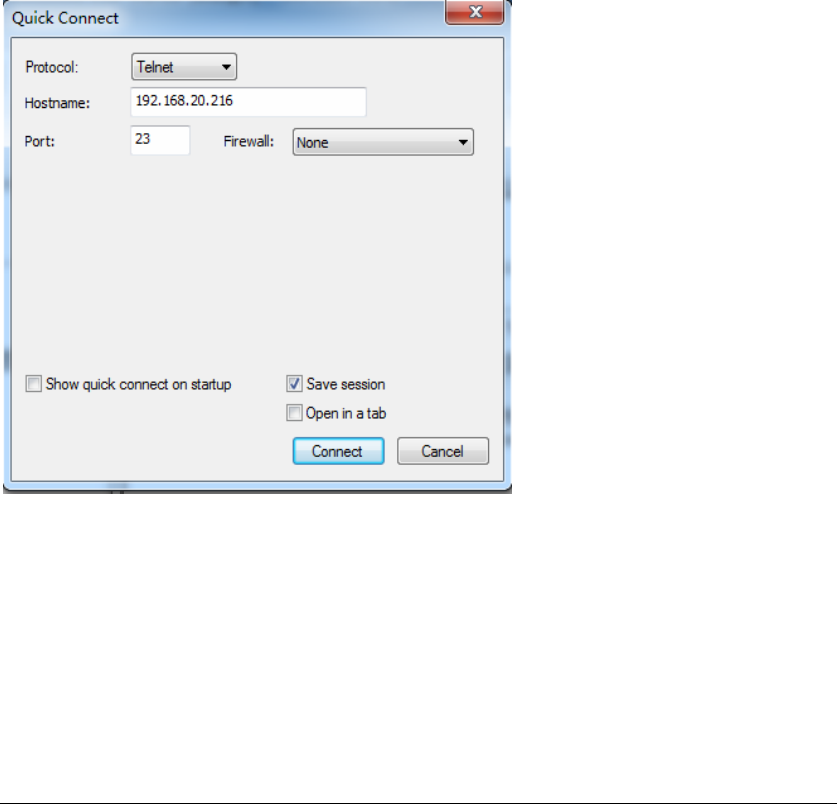
Step 1 Verify that your terminal emulation program or DOS shell interface (for
example: SecureCRT) is configured as shown in figure 3-2:
Figure 3-2 Telnet connection settings
Step 2 Enter a valid username and password as prompt.
3.2 CLI Features
This chapter will give a general introduction about the CLI commands.

9JadeOSUserManual
3.2.1 Command mode
The CLI is divided into many different modes. The commands available to you at any
given time depend on the mode that you are currently in. Entering a question mark (?)
at the CLI prompt allows you to obtain a list of commands available for each com-
mand mode.
When you log in to the CLI, you are in user mode. User mode contains only a limited
subset of commands.
To have access to all commands, you must enter enable mode normally by using a
password. From enable mode, you can issue any enable mode command.
You can enter global configuration mode by entering configure terminal command.
Configuration modes allow you to make changes to the running configuration. If you
later save the running configuration to the startup configuration, these changed com-
mands are stored when the software is rebooted. To enter specific configuration
modes, you must start at global configuration mode. From global configuration mode,
you can enter interface configuration mode and a variety of other modes.
Table 3-1 describes how to access and exit various common command modes on
JadeOS. It also shows examples of the prompts displayed for each mode.
Command Mode Access Method Prompt Exit Method
User Mode Log in (JadeOS)> Use the exit command
Enable Mode
Enter enable and
password (JadeOS)#
To return to User Mode
use exit command
Global Configura-
tion Mode
Enter configure
terminal (JadeOS)(config)#
To return to Enable Mode
from global configuration
mode, use exit com-
mand
Interface Configu-
ration
Mode
Specify an interface
using interface
command (JadeOS)(config-if)#
To return to the global
configuration mode, use
exit command.
Table 3- 1 Command Modes on JadeOS
3.2.2 Command Help
You can use the question mark (?) to view various types of command help.
When typed at the beginning of a line, the question mark lists all the commands
available in your current mode or sub-mode. A brief explanation follows each com-

10JadeOSUserManual
mand. For example:
(JadeOS) > ?
enable Turn on Privileged commands
exit Exit this session. Any unsaved changes are lost.
help Help on CLI command line processing and a
Description of the interactive help system
logout Exit this session. Any unsaved changes are lost.
ping Send ICMP echo packets to specified ip address.
traceroute Trace route to the specified ip address.
When typed at the end of a possible command or abbreviation, the question mark lists
the commands that match (if any). For example:
(JadeOS) #a?
aaa Authentication commands
ap Instruct AP
ap-leds Control AP LED behavior (11n APs only)
ap-regroup Move AP into a group
ap-rename Change an AP's name
apboot Instruct AP to reboot itself
apconnect Instruct Mesh-Point to connect new parent
apdisconnect Instruct Mesh-Point to disconnect from its parent
apflash Instruct AP to reflash itself
If more than one item is shown, type more of the keyword characters to distinguish
your choice.
However, if only one item is listed, the keyword or abbreviation is valid and you can
press tab or the spacebar to advance to the next keyword.
When typed in place of a parameter, the question mark lists the available options. For
example:
(JadeOS) #write ?
erase erase configuration from NV memory
file Write to file
memory Write to NV memory
<cr>
3.2.3 Command Completion
To make command input easier, as you type, you can press the spacebar or tab to
move to the next keyword. The system then attempts to expand the abbreviation for
you. If there is only one command keyword that matches the abbreviation, it is filled

11JadeOSUserManual
in for you automatically. If the abbreviation is too vague (too few characters), the
cursor does not advance and you must type more characters or use the help feature to
list the matching commands.
3.2.4 Deleting Configuration Settings
Use the no command to delete or negate previously-entered configurations or pa-
rameters. To view a list of no commands, type no at the enable or ‘config’ prompt
followed by the question mark.
(JadeOS) (config) # no?
3.2.5 Profile Command
JadeOS uses Profile to design some complex commands. JadeOS encapsulates a set of
configurations in Profile, and then apply the Profile to other configured object. This
will make configuration more logical.
3.3 Configuring the Management Port
3.3.1 Configuring IP
Management port is used for the network administrator to operate the equipment in
remote. To configure management port, you need to configure IP address first so that
to access the equipment in remote:
Step 1 Access management port mode:
interface mgmt <id>
step 2 Configuring Ip address:
ip address A.B.C.D/MASK-Length
Parameter Description
id Range: 1-2
Table 3-2 parameter description
Example as follows:
(JadeOS)(config)#interface mgmt 1
(JadeOS)(config)#ip address 192.168.1.254/24
3.3.2 Configuring Routing
You need to configure a static routing to access local PC of remote administrator.
To Configure static routing table, use the following command in Config mode:
ip route <dest-subnet> <gateway>

12JadeOSUserManual
For example, we configure a route to administrator subnet 192.168.0.0/24 through
next hop 192.168.1.1.
(JadeOS)(config)#ip route 192.168.0.0/24 192.168.1.1
3.4 Configuring Management
3.4.1 Inquire Configuration
To view present configuration, use the command:
(JadeOS) # show running-config
3.4.2 Saving Configuration Changes
When you make configuration changes via the CLI, those changes affect the current
running configuration only. If the changes are not saved, they will be lost after the
SKG10000 Plus reboots. To save your configuration changes, use the following
command in enable mode:
(JadeOS) # write memory
After performing the command write memory, two configuration files will be saved
in the flash:
• startup-config:Containing the startup configuration options
• running-config:Containing the configuration options during system run-
ning.
3.4.3 Reset JadeOS
You can return JadeOS to its original configuration by resetting the JadeOS to fac-
tory-default settings.
Step 1 Enter the write erase command. A prompt ‘Do you really want to delete
all the configuration(y/n):‘, write erase successful’ will be displayed.
(JadeOS) (config) #write erase
Do you really want to delete all the configuration(y/n):
Write Erase successful
Step 2 Reload the JadeOS by entering reload command. The prompt ‘do you
really want to restart the system (y/n)’ will be displayed. Enter ‘y’, the JadeOS will
reboot.
(JadeOS) (config) #reload
Do you really want to restart the system(y/n): n
3.4.4 Files Import/Export

13JadeOSUserManual
You can save configuration files into JadeOS and copy to an external server.
copy startup-config flash: <filename>
copy startup-config tftp: <tftphost> <filename>
copy running-config flash: <filename>
copy running-config ftp: <ftphost> <user> <password> <filename> [<remote-dir>]
copy running-config startup-config
copy running-config tftp: <tftphost> <filename>
3.5 System Update
The system image file is stored in the Compact Flash (CF) on each line card. Every
time you start the system, bootloader will automatically download the image to sys-
tem RAM. The CF card is divided into two partitions which both contain the system
image files. At the factory default setting, bootloader will download image files from
partition 0. After system updating, JadeOS will automatically start from the partition
which contains the updated image files. You can also spiffy which partition to start
from manually. To update the system image file, complete the following steps:
Step 1 Input the user name and password after connecting the JadeOS through
SSH, telnet or console.
Step 2 Turn into the global configuration mode by entering the command config-
ure terminal.
Step 3 Turn into the interface configuration mode by entering the command inter-
face mgmt.
Step 4 Set mgmt interface IP address and make sure the tftp or ftp server is ok.
Step 5 Copy the image file to partition 0/1 on CF card.
The system will reboot after the update complete.
Note: It’s recommended that you update the system image files from the partition
which the system is not working on to avoid that the current image files are
erased. For example: if the system is working on partition 0, please update
the system image files from partition 1.
To change boot partition, use following command in Config mode:
(JadeOS) (config)#boot system partition 0
To view image information about boot partition, use following command in enable
mode:

14JadeOSUserManual
(JadeOS) #show image version
----------------------------------
Partition : 0:0 (/dev/sda1)
Software Version : JadeOS 2.3.2.0
Built on : SMP Thu Dec 19 18:01:40 CST 2013
----------------------------------
Partition : 0:1 (/dev/sda2)
Software Version : JadeOS 2.2.6.0
Built on : SMP Mon Nov 18 14:58:24 CST 2013
3.6 File Operations
3.6.1 Basic Operations
JadeOS provide basic operations about files such as dir、copy、rename、delete and so
on, the command is as following:
Dir files:
(JadeOS) #dir
Copy files:
(JadeOS) #copy
flash: <srcfilename> {flash: <destfilename> | tftp: <tftphost> <destfilename> | ftp:<ftphost> <user>
<filename>} |
ftp: <ftphost> <user> <filename> {system: partition {0|1} |flash: <filename> }|
running-config {flash: <filename> | ftp: <ftphost> <user> <password> <filename> | tftp: <tftphost>
<filename>} |
startup-config {flash: <filename> | tftp: <tftphost> <filename>} |
system: partition {<srcpartition> 0|1}|
tftp: <tftphost> <filename> {flash: <destfilename>}|
Rename files:
(JadeOS) #rename <old> <new>
Delete files:
(JadeOS) #delete filename <file>
3.6.2 Files Transfer by FTP and TFTP Command
You can transfer the following files between JadeOS and an external server or host:
• JadeOS image files
• A specified file in JadeOS flash file system, or a compressed archive that
contains the flash file
• Configuration file, either the running configuration or a startup configura-
tion

15JadeOSUserManual
• Log files
You can use the following protocols to transfer files between JadeOS and external
server or host:
• File Transfer Protocol (FTP)
• Trivial File Transfer Protocol (TFTP)
Sever Type Configuration
Trivial File Transfer Proto-
col(TFTP)
IP address of the server
Filename
File Transfer Protocol(FTP)
IP address of the server
Username and password to log into server
Filename
Table 3- 3 Parameters of TFTP and FTP Configuration
3.6.3 JadeOS Image Image Files Transfer
You can copy JadeOS image files to JadeOS or equipment by TFTP or FTP server.
When you transfer a JadeOS image file to equipment, you must specify the partition
which the file is copied to. You have the option of rebooting JadeOS with the trans-
ferred image file.
copy tftp: <tftphost> <filename> system: partition {0|1}
copy ftp: <ftphost> <user> <filename> system: partition {0|1}
copy scp: <scphost> <username> <filename> system: partition [0|1]
3.6.5 Log Files Storage
You can save log files into a compressed archive and copy to an external TFTP server.
tar logs
copy flash: logs.tar tftp: <tftphost> <destfilename>
copy flash: logs.tar scp: <scphost> <username> <destfilename>
3.7 User Management
To create users, you can use the command:
mgmt-user <user> <password>
For example, create a user account “test” and password “123456”:
(JadeOS) (config)#mgmt-user test 123456
To inquire users in the system, you can use the command:

16JadeOSUserManual
(JadeOS) #who
vty[0] connected from 192.168.16.21
vty[1] connected from 192.168.16.22
vty[2] connected from 192.168.16.19
vty[3] connected from 192.168.16.19
3.8 Configuring System Settings
3.8.1 Setting Hostname
The factory default hostname is JadeOS. You can change the hostname using the fol-
lowing command:
hostname <hostname>
For example:
(JadeOS) (config) #hostname Gate
(Gate) (config) #
3.8.2 Setting Country Code
JadeOS are designed to manage the access points which are located in many countries
with different requirements. The radios within the access points are assigned to a spe-
cific regulatory domain at the factory. You can specify a particular country code for
each country (such as FR for France or ES for Spain). Configuring a country code
ensures that each radio’s broadcast frequency bands, interfaces, channels, and transmit
power levels which are compliant with country-specific regulations.
When the JadeOS start for the first time, the system will prompt you to enter the
country code which country the JadeOS is located and you need to confirm the coun-
try code by entering ‘yes’.
3.8.3 Setting Administrator Password
To log in JadeOS, you must enter the administrator user account and password. The
factory default user account is ‘admin’ and the password is “admins”.
A prompt ‘Enter password for admin login’ will be displayed after you enter the ad-
ministrator user account ‘admin’. You can enter the password that you want to set and
retype it to confirm. Except for the administrator user, you can set 9 users.
3.8.4 Setting System Clock
You can set the JadeOS system date and time manually using the configuration wizard
when you start the JadeOS system for the first time. Greenwich Mean Time (GMT) is
used as the standard for setting the time zone.

17JadeOSUserManual
¾ Setting the System Clock Manually
To set the date and time, enter the following command in privileged mode:
clock set <year><month><date><hour><minutes><seconds>
To set the time zone and daylight savings time adjustment, enter the following com-
mands in configure mode:
clock timezone<WORD><-23 - 23>
clock summer-time <zone> [recurring]
<1-4><start day><start month><hh:mm>
first<start day><start month><hh:mm>
last<start day><start month><hh:mm>
<1-4><end day><end month><hh:mm>
first<end day><end month><hh:mm>
last<end day><end month><hh:mm>
[<-23 - 23>]
¾ Setting the System Clock with NTP
You can use NTP (Network Time Protocol) to synchronize JadeOS to a central time
source.
3.8.5 Clock Synchronization
For each NTP server, you can optionally specify the NTP iburst mode for faster clock
synchronization. The iburst mode sends up ten queries within the first minute to the
NTP server. (When iburst mode is not enabled, only one query is sent within the first
minute to the NTP server.) After the first minute, the iburst mode typically synchro-
nizes the clock so that queries need to be sent at intervals of 64 seconds or more.
You can add a NTP server using the following command:
ntp server <ipaddr> [iburst]
3.8.6 Configuring NTP Authentication
The NTP adds security to an NTP client by authenticating the server before synchro-
nizing the local clock. NTP authentication works by using a symmetric key which is
configured by the user. The secret key is shared by both JadeOS and an external NTP
server. This helps identify secure servers from fraudulent servers.
This example enables NTP authentication, add authentication secret keys into the da-
tabase, and specifies a subset of keys which are trusted. It also enables the iburst op-
tion.
(JadeOS)(config)#ntp authenticate
(JadeOS)(config)#ntp authentication-key <key-id> md5 <key-secret>

18JadeOSUserManual
(JadeOS)(config)#ntp trusted-key <key-id>
(JadeOS)(config)#ntp server <IP> iburst
Example of configuring NTP authentication:
(JadeOS)(config)#ntp authenticate
(JadeOS)(config)#ntp authentication-key 1 md5 123
(JadeOS)(config)#ntp trusted-key 1
(JadeOS)(config)#ntp server 1.1.1.1 iburst
3.9 Ping and Traceroute
Command ping and traceroute can help to diagnose network connection status.
Command format:
ping A.B.C.D
traceroute A.B.C.D
For example, use command ping in enable mode to judge whether the internet con-
nection to IP address ‘192.168.20.1’ or not.
(JadeOS) #ping 192.168.20.1
Sending..., 100-byte ICMP Echos to 192.168.20.1, press 'q' or ESC to exit:
!!!!!
Success rate is 100 percent (5/5), round-trip min/avg/max = 0.686/0.7134/0.808 ms
3.10 License Management
License is mainly used to protect the lawful rights of authorized users. You can obtain
the authorization by input License Activation Key.
Note: please contact the vendors if you need to add APs after license is in effective.
To add License key, you can use following command in config mode:
license add <key>
Note: Key is provided by vendors, and the length is 192 characters.
After license key is in effective, you can inquiry the limit number of AP and station by
the following command:
show license limit
To display license key, you can use following command:
show license

19JadeOSUserManual
Chapter4 Interface Configuration
This chapter will describe how to configure interface.
4.1 Naming Ethernet Port
GigabitEthernet <word> is GE port, and parameter ‘word’ format is <slot/port>. ‘slot’
means slot number, ‘port’ means port number. Both start with value 0 and range de-
pends on the real number of Ethernet.
For example, gigabitEthernet 1/0, gigabitEthernet 1/1 and gigabitethernet 1/2 means
the first Ethernet port, the second Ethernet port and the third Ethernet port of the first
slot.
Ten gigabitethernet<word> is 10G port, and parameter ‘word’ format is the same as
GE port.
To inquiry present slot number, use show slot command:
(JadeOS) #show slot
Slot12
‘slot 12’ means present slot number is 12.
4.2 Configuring VLAN
JadeOS operates as a layer-2 switch that uses a VLAN as a broadcast domain. As a
layer-2 switch, JadeOS requires a layer-3 router to route traffic between VLANs.
4.2.1 Creating VLAN
You can configure Vlan in vlan mode:
Step 1 Enter vlan mode by using following command in config mode:
vlan database
Step 2 Creating vlan
vlan <id>
Note: Delete vlan by using no vlan <id> command.
For example:
(JadeOS)(config)#vlan database
(JadeOS)(config-vlan)#vlan 2
(JadeOS)(config-vlan)#vlan 3 name "VLAN3"
(JadeOS)(config-vlan)#no vlan 2

20JadeOSUserManual
Command Description
Vlan 2 Create vlan 2
vlan 3 name "VLAN3" Create vlan 3,and name as“vlan 3”
No vlan 2 delete vlan 2
Table 4-1 command descriptions
4.3 Adding Ethernet Port into VLAN
The Ethernet port can be set in access mode or trunk mode, and then added into a
VLAN. The Ethernet port is in access mode by default. If it is set in trunk mode, the
port can carry data of multi VLAN Tag.
The port channel can be set in access mode or trunk mode. By default, a port channel
is in access mode and carries traffic only for the VLAN that is assigned. In trunk
mode, a port channel can carry traffic for multiple VLANs.
¾ Configure Port in access mode
Step 1 Enter physical interface mode
interface gigaethernet <slot/port>
step 2 Configure layer-2 interface mode
switchport mode access
step 3 Add into the corresponding vlan
switch access vlan <vlan-id>
For example, add gigabitethernet 1/2 into access vlan 2
(JadeOS)(config) #interface gigabitethernet 1/2
(JadeOS)(config-if)#switchport mode access
(JadeOS)(config-if)#switchport access vlan 2
¾ Configure Port in Trunk Mode
Step 1 Entering physical interface mode
Interface gigaethernet 1/0
Step 2 Configure layer-2 interface mode
switchport mode trunk
Step 3 Specify the native vlan id and available vlan tag number respectively
switch trunk native vlan <vlan-id>
switchport trunk allowed vlan add <vlan-id-list>
Parameter Description
Vlan-id Specify native vlan id
Vlan-id-list Specify available vlan tag
Table 4-2 parameter Descriptions

21JadeOSUserManual
For example,add gigabitethernet 1/2 into access vlan 2
(JadeOS)(config) #interface gigabitethernet 1/2
(JadeOS)(config-if)#switchport mode trunk
(JadeOS)(config-if)#switchport trunk native vlan 4
(JadeOS)(config-if)#switchport trunk allowed vlan add 5-10,11,12
4.4 Configuring VLAN Interface
Command to configure VLAN Interface:
interface vlan <1-4094>
Note: you need to create VLAN first before configuring Vlan Interface.
For example:
(JadeOS) (config)#interface vlan 2
(JadeOS) (config-if)#ip address 10.0.0.1/24
4.5 Configuring Port Channel
Link aggregation provides higher total bandwidth, auto-negotiation, and recovery by
combining parallel network links between devices as a single link.
Port-Channels provide a mechanism for aggregating multiple physical Ethernet links
to a single logical Ethernet link. Port-Channels are typically used to increase availabili
ty and bandwidth, while simplifying the network topology.
Step 1 Configure port-channel in config mode:
Interface port-channel <id>
Step 2 Add Ethernet port into aggregation group in port-channel interface mode:
add [gigabitethernet <slot>/<port> | tengigabitethernet <slot>/<port>]
Note: To delete one port, use following command:
del [gigabitethernet <slot>/<port> | tengigabitethernet <slot>/<port>]
Step 3 Configure balance arithmetic, now it supports arithmetic of active-standby and
load-balance:
(JadeOS)(config-if)#balance arithmetic active-stanby
(JadeOS)(config-if)#balance arithmetic load-balance
Examples :
(JadeOS)(config)#interface port-channel 1
(JadeOS)(config-if)#add gigabitethernet 2/1
(JadeOS)(config-if)#balance arithmetic active-stanby
(JadeOS)(config-if)#balance arithmetic load-balance

22JadeOSUserManual
Inquire LAG by using show Interface port-channel <id> command:
(JadeOS)#show interface port-channel 2
Port-Channel 2 is administratively up
Hardware is Port-Channel, address is 04:8B:42:10:0D:0B (bia 04:8B:42:10:0D:0B)
Description: Link Aggregate (LACP)
Spanning Tree is disabled
VLAN membership: 190
Switchport priority: 0
Member port:
GE 4/3, Admin is up, line protocol is up
GE 4/4, Admin is up, line protocol is up
link status last changed 0 day 0 hr 16 min 46 sec
106198 packets input, 21374111 bytes
Received 124 broadcasts, 0 runts, 7483 giants, 0 throttles
11936475 input error bytes, 545 CRC, 0 frame
82048 multicast, 24026 unicast
14148 packets output, 432640 bytes
0 output errors bytes, 0 deferred
0 collisions, 0 late collisions, 0 throttles
Port-Channel 2 is TRUSTED
Delete LAG by using no interface port-channel <id> command:
(JadeOS)(config)# no interface port-channel 0
The port channel can be set in access mode or trunk mode. By default, a port channel
is in access mode and carries traffic only for the VLAN that is assigned. In trunk
mode, a port channel can carry traffic for multiple VLANs.
¾ Configure Port Channel in access mode
(JadeOS)(config)#interface port-channel 1
(JadeOS)(config-if)#switchport mode access
(JadeOS)(config-if)#switchport access vlan 2
¾ Configure Port channel in trunk mode
(JadeOS)(config) #interface port-channel 2
(JadeOS)(config-if)#description Portchannel2
(JadeOS)(config-if)#switchport mode trunk
(JadeOS)(config-if)#switchport trunk native vlan 5
(JadeOS)(config-if)#switchport trunk allowed vlan 6-9,10

23JadeOSUserManual
4.6 Configuring QinQ
4.6.1 Configuring QinQ
Defined in IEEE802.1Q, VLAN Tag domain only uses 12 bytes to indicate VLAN ID,
so equipment can support up to 4094 VLANs. Some scenarios, especially in metro-
politan area network, require a separate VLAN for customers. Therefore, 4094 VLAN
cannot meet the requirement. The 802.1QinQ expands VLAN space by using a
VLAN-in-VLAN hierarchy and tagging the tagged packets. At the same time, QinQ
makes SP use one VLAN supports the entire customer's VLANs. SP provides differ-
ent service for different customers by decapsulating inner and outer vlan tag of users’
message.
Configuring QinQ by using following command:
Step 1 Create QinQ sub-interface in physical interface:
interface gigabitethernet/tengigabitethernet <slot>/<port>.<subif>
parameter description
slot Slot number,range: 1-13
port Port number
subif Sub interface,range: 1-16760836
table 4-3 Parameter Description
For example, create QinQ sub-interface gigabitethernet 1/0.1 in Ethernet interface gi-
gabitethernet 1/0:
interface gigabitethernet 1/0.1
step 2 Specify QinQ inner and outer tag
encapsulation dot1q <outer-vlan-id> second-dot1q <vlan-id|[begin-end]>
Parameter Description
out-vlan-id Single tag number,range: 1-4094
vlan-id|[begin-end] Single tag number, range: 1-4094; or range, for example: 100-200
table 4-4 Parameter Description
For example: create a QinQ interface that outer tag is 1000 and inner tag range is
100-200, and configure IP address as a layer-3 interface.
(JadeOS)(config)#interface gigabitethernet 10/0.1
(JadeOS)(config-subif)# encapsulation dot1q 1000 second-dot1q 100-200
(JadeOS)(config-subif)#ip address 1.1.1.1/32
The sub-interface can be used as a layer-3 routing sub-interface. You can configure IP
address and routing in it. 2 QinQ Tag will be peeled when receiving data, and 2 QinQ

24JadeOSUserManual
Tag will be encapsulated when sending data.
You can configure different services (for example, different authentication policies or
bandwidth control policies) on different inner tag when data received in QinQ
sub-interface.
4.7 Inquiring Interface Status and Statistics
To view interface information, use show interface gigabitethernet <Slot/Port>
command:
(JadeOS) #show interface gigabitethernet 12/0
Interface gigabitethernet 12/0
Hardware is Ethernet
Current HW addr: 04:8b:42:10:5c:00
Physical:04:8b:42:10:0c:18
index 23 metric 1 mtu 1500 duplex-half arp ageing timeout 300
tcp4mss disable tcp6mss disable
proxy_arp disable local_proxy_arp disable
(UP,BROADCAST,RUNNING,MULTICAST,TRUST)
VRF Binding: Not bound
inet 119.6.100.5/24 broadcast 119.6.100.255
inet6 fe80::68b:42ff:fe10:5c00/64
input packets 1779, bytes 117400, dropped 0, multicast packets 0
input errors 0, length 0, overrun 0, CRC 0, frame 0, fifo 0, missed 0
output packets 8, bytes 837, dropped 0
output errors 0, aborted 0, carrier 0, fifo 0, heartbeat 0, window 0
collisions 0
To view all interfaces information, use show ip interface brief command:
(JadeOS) #show ip interface brief
Interface IP-Address / IP-Netmask Status Protocol
loopback 0 unassigned / unassigned up down
Te 12/0 unassigned / unassigned up down
vlan 1 unassigned / unassigned up down
mgmt 1 192.168.20.95 / 255.255.255.0 up up
Gi 12/0 119.6.100.5 / 255.255.255.0 up up
Gi 12/2 172.50.3.1 / 255.255.255.0 up up
Gi 12/4 unassigned / unassigned down down
Gi 12/6 unassigned / unassigned down down
Gi 12/8 unassigned / unassigned up up
Gi 12/10 unassigned / unassigned down down
Gi 12/12 unassigned / unassigned down down

25JadeOSUserManual
Gi 12/14 unassigned / unassigned down down
Gi 12/16 unassigned / unassigned down down
Gi 12/18 unassigned / unassigned down down

26JadeOSUserManual
Chapter5 Layer-2 Network Service
JadeOS provides layer-2 network service. This chapter will describe bridge forward-
ing and port mirror.
5.1 Bridge Forwarding
5.1.1 Bridge Description
Bridge is used for the interconnection among two or more Layer-2 network and data
frame forwarding based on MAC address of Layer-2 network.
Bridge supports MAC address learning. Bridge will create one bridge table based on
source MAC address when one data frame from one MAC address first going through
bridge. Bridge table is indexed by MAC address, and it will record the physical inter-
face connected to this host. Thereafter, when data frame from the same MAC address
come to this host again, it will be sent to this physical interface so that to avoid send-
ing broadcast message to all interfaces.
Bridge forwarding is based on bridge table, each MAC address is corresponding to
one table. Bridge table will be automatically deleted if there is no data frame from the
same MAC address going through this bridge table for a while. When there is data
frame coming to this bridge after a while, bridge will learn MAC address again.
Besides dynamic learning, bridge table supports static configuration, which is called
static table.
5.1.2 Configuring Bridge
Bridge configuration is to add several physical interfaces to the same VLAN. In the
same VLAN, several interfaces form a bridge, the communication among the inter-
faces is bridge forwarding.
Please refer to chapter 4.2 and chapter 4.3 for more information.
5.1.3 Dynamic Table
Dynamic table is generated by system learning. System will look up bridge table
when receiving message. If no bridge table is available, system will automatically
generate a bridge table based on the source MAC address, VLAN ID, and the inter-
face of message.
To inquiry bridge table, use show datapath bridge table command.
For example:
(JadeOS) #show datapath bridge table

27JadeOSUserManual
Datapath Bridge Table Entries
-----------------------------
Flags: P - Permanent, D - Deny, M - Mobile, L - Local
MAC VLAN Assigned VLAN Destination Flags Aging-time
-------------- ---- ------------- --------- ----- -------
04:8B:42:12:00:81 5 5 Local PL
04:8B:42:12:0A:81 85 85 Local PL
04:8B:42:12:0A:A1 86 86 Local PL
04:8B:42:12:0A:C1 87 87 Local PL
04:8B:42:12:0A:E1 88 88 Local PL
5.1.4 Bridge Aging
The bridge aging time is 15 minutes by default. If no traffic in 15 minutes, bridge ta-
ble will be aging.
5.1.5 Static Table
Static bridge table will not be aging.
To configure static table, use following command in config mode:
mac-address-table static <mac address> [discard/forward] gigabitethernet <slot/port> Vlan
<vlan-id>
For example:
(JadeOS)(config)#mac-address-table static 04:8b:42:22:05:6f discard gigabitethernet 1/0 vlan 2
Note: To delete bridge table, use following command in config mode:
no mac-address-table static <mac address> <discard/forward> <gigabitethernet> <vlan>
5.2 Port Mirror
Mirror mode enables you to duplicate to another port all of the traffic originating from
or terminating at a single client device or access point. It is useful in diagnosing spe-
cific network problems. Mirror mode should be enabled only on an unused port as any
connections to this port become unresponsive.
You can configure port mirroring using the following commands:
(config)#interface{tengigabitethernet|gigabitethernet} <slot>/<port>
(config-if)#mirror interface vlan <VLAN ID> direction {both | receive | transmit}

28JadeOSUserManual
Chapter6 Layer-3 Network Service
JadeOS provides layer-3 network service. This chapter will describe how to configure
IP address, static routing, GRE tunnel, DHCP, OSPF, and IPv6 and so on.
6.1 Configuring IP Address
6.1.1 Configuring IP Address
Use the following commands to assign a static IP address to a port on JadeOS:
interface gigabitethernet <slot>/<port>
no switchport
ip address <address><netmask>
6.1.2 Configuring Loopback
The loopback IP address is a logical IP interface that is used by JadeOS to communi-
cate with APs. The loopback address is used as JadeOS’s IP address for terminating
VPN and GRE tunnels, originating requests to RADIUS servers and accepting ad-
ministrative communications. You configure the loopback address as a host address
with a 32-bit netmask. The loopback address is not bound to any specific interface
and is operational at all times. To use this interface, ensure that the IP address is
reachable through one of the VLAN interfaces. It should be routable from all external
networks.
To configure the loopback IP address, use the following commands:
interface loopback <id>
ip address <address><mask>
6.2 Configuring Static Routing Table
6.2.2 Configuring Static Routing
To configure static routing, use following command:
ip route <subnet>/<prefix-length> <gateway>
For example:
(JadeOS) (config)#ip route 10.0.0.0/24 192.168.10.1
6.2.2 Inquiring Routing Table

29JadeOSUserManual
To inquiry system routing table, including direct routing and static configuring rout-
ing, use show ip route command.
(JadeOS) #show ip route
Codes: K - kernel, C - connected, S - static, R - RIP, B - BGP
O - OSPF, IA - OSPF inter area
N1 - OSPF NSSA external type 1, N2 - OSPF NSSA external type 2
E1 - OSPF external type 1, E2 - OSPF external type 2
i - IS-IS, L1 - IS-IS level-1, L2 - IS-IS level-2, ia - IS-IS inter area
* - candidate default
S 10.2.20.0/24 [1/0] via 192.168.20.1, mgmt 1
S 18.0.0.0/8 [1/0] via 192.168.20.1, mgmt 1
C 80.1.0.0/16 is directly connected, vlan 80
C 119.6.100.0/24 is directly connected, Gi 12/0
S 119.6.200.0/24 [1/0] via 119.6.100.1, Gi 12/0
C 172.50.3.0/24 is directly connected, Gi 12/2
S 192.168.0.0/16 [1/0] via 192.168.20.1, mgmt 1
C 192.168.20.0/24 is directly connected, mgmt 1
6.3 Configuring ARP
JadeOS supports configuring static ARP table.
Address Resolution Protocol (ARP) is a TCP/IP protocol used for resolution of net-
work layer IP address into link layer MAC address, a critical function in multi-
ple-access networks. ARP was defined by RFC 826 in 1982.
Besides the basic ARP function, JadeOS also support local proxy ARP and DHCP au-
thorized ARP. It is effectively avoided ARP cheat and attack by DHCP Snooping,
which enhances the security of public wireless LANs communication.
6.3.1 Configuring Static ARP Table
Dynamic ARP learning is enabling in JadeOS port by default.
To add static ARP table, use following command:
arp <ipaddr> <macaddr>
To delete ARP cache entry, use no arp command:
no arp <ipaddr> <macaddr>
For example:
(JadeOS) (config) #arp 10.1.2.23 00:19:87:0D:5C:2C
6.3.2 Inquiring ARP Table

30JadeOSUserManual
To view ARP table, use show arp command:
(JadeOS) #show arp
Address HWaddress Interface Type
192.168.20.1 00:13:1A:A5:CC:80 mgmt 1 Dynamic
192.168.20.15 00:15:C5:F3:35:B2 mgmt 1 Dynamic
192.168.20.152 00:14:22:19:FC:C4 mgmt 1 Dynamic
119.6.100.1 C4:64:13:D1:9A:EA Gi 12/0 Dynamic
192.168.20.226 04:8B:42:10:6C:1C mgmt 1 Dynamic
172.50.3.2 04:8B:42:20:00:F5 Gi 12/2 Dynamic
6.3.2 Configuring ARP Proxy
Proxy ARP includes local proxy ARP and proxy ARP. They both reply ARP
request with interface MAC address, no matter the request address is in existence or
not. But they have differences too. Proxy ARP will reply ARP request no matter the
request address is in the same network segment with interface or not. Local proxy
ARP will reply when ARP request’s original address, destination address and interface
address are in the same network segment.
In case of the TUNNEL broadcast message suppression and DHCP snooping is open,
client need to communicate with another client that in the same network segment but
different tunnel, so we need to continuously broadcast ARP message to look up an-
other client. In the above situation, we can open the local proxy ARP function in
JadeOS. In this way, JadeOS will act as ARP proxy to ensure the client’s data com-
munication in different tunnel, and the same time, avoid a lot of useless broadcast
message caused by repeat broadcast.
6.4 Configuring MTU and TCP MSS
Mtu and tcp mss is the attribute of interface.
When the data packet is larger than mtu value, system will fragment data packet ac-
cording to mtu value. Fragmentation will affect data performance, so you should try
to avoid fragmentation.
If the interface is the attribute of tcp mss and the tcp mss option of syn message is
larger than the tcp mss value of interface, system will modify the tcp mss option of
this syn message and update tcp checksum when tcp syn message goes through inside
interface and outside interface. You should try to avoid fragmentation for fragmenta-
tion will affect data performance
To configure mtu, use mtu <68-9216> command in config mode:
To configure tcp mss, use tcp4mss <4-65535> command in interface mode:
For example, configure the mtu and tcp4mss of interface gigaethernet 1/0 is 1460 and
31JadeOSUserManual
1440 respectively:
(JadeOS) (config)#interface gigabitethernet 10/1
(JadeOS) (config-if)#mtu 1460
(JadeOS) (config-if)#tcp4mss 1440
6.5 Configuring GRE Tunnel
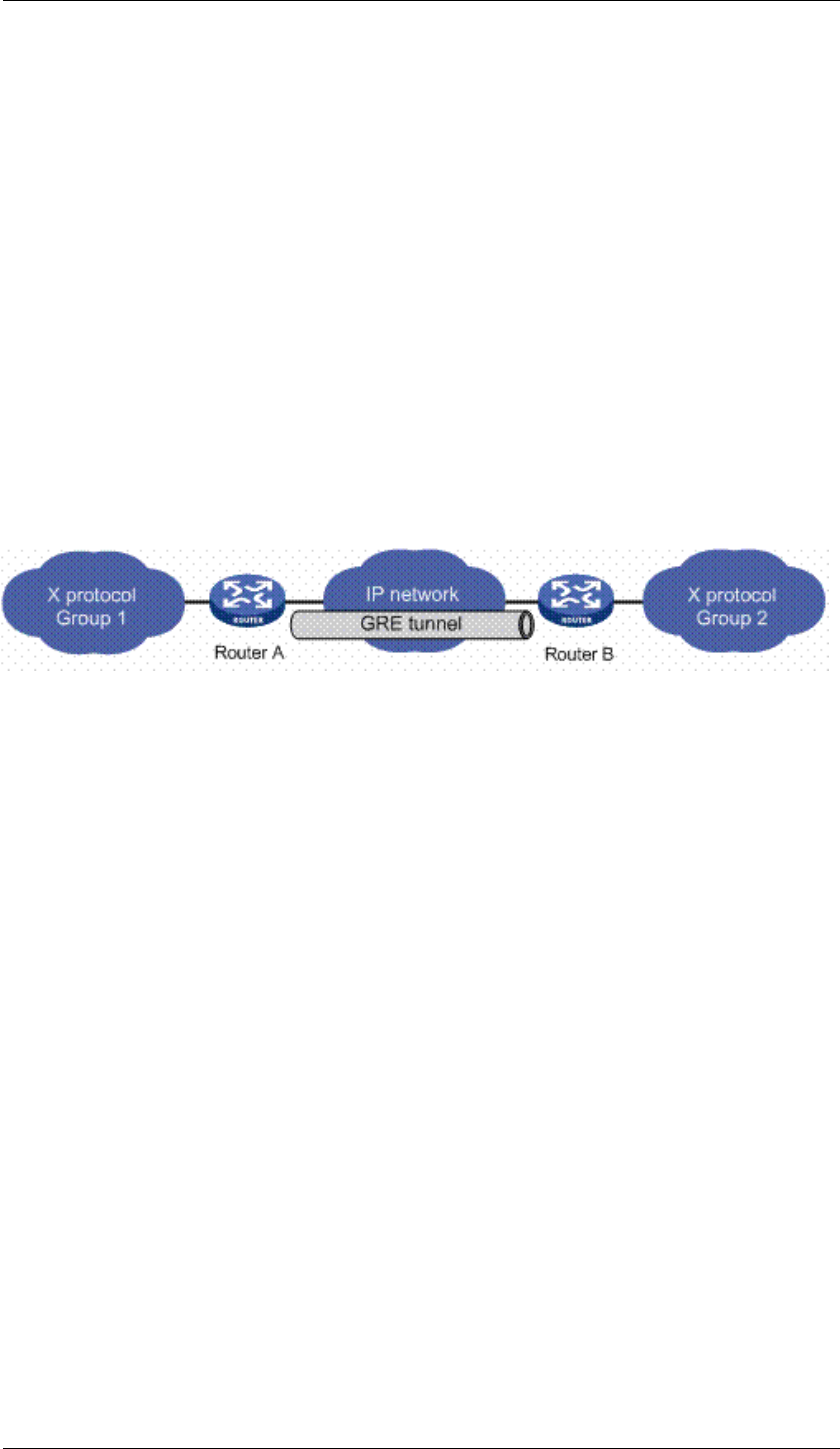
GRE (Generic Routing Encapsulation) specifies a protocol for encapsulation of an
arbitrary protocol over another arbitrary network layer protocol.
GRE defined in RFC 2784 and updated by RFC 2890.
To create a GRE tunnel interface and enter interface configuration mode on JadeOS,
use the following command:
interface tunnel <id>
tunnel mode gre
Figure 6-3 GRE tunnel
To create a GRE tunnel on JadeOS, use the following steps:
(JadeOS)(config) #interface tunnel 1
(JadeOS)(config-if) #tunnel mode gre
(JadeOS)(config-if) #ip address x.x.x.x/x
(JadeOS)(config-if) #tunnel source x.x.x.x
(JadeOS)(config-if) #tunnel destination x.x.x.x
(JadeOS)(config-if) #tunnel key <0-4294967295>
(JadeOS)(config-if) #tunnel checksum
6.6 Configuring DHCP
The Dynamic Host Configuration Protocol (DHCP) is a network configuration proto-
col for hosts on Internet Protocol (IP) networks. UDP protocol mainly has two usages:
- Reduce client’s configuration burden, used in the change of office.
- Reduce network administrator’s configuration burden. UDP achieves address
unified distribution, centralized management and DHCP Snooping rational
using, which is good for avoiding network attack and ensuring resource ra-
tionally in use.
Because of the terminal mobility, wireless network architecture has a high standard on

32JadeOSUserManual
DHCP protocol. It still has high standard on the scale of address pool and address dis-
tribution rate in SP environment.
6.6.1 Configuring DHCP Server
To configure DHCP server, use following command:
Step 1 Create one or more DHCP address pool:
ip dhcp pool <pool-name>
Step 2 Specify the gateway of DHCP client
default-router A.B.C.D
Step 3 Specify the DNS server of DHCP client
dns-server A.B.C.D
Step 4 Specify the lease time
Lease <days> <hours> <minites> <seconds>
Step 5 Specify the range of address pool
network <subnet> <mask>
Step 6 (optional) DHCP issue ARP table that combined with IP and MAC address of
client to the system.
update arp
Step 7 (optional) Specify the reserved IP address or IP range, which is the IP address
not assigned to the client.
ip dhcp excluded-address <start-address> [<end-address>]
Step 8 Enable DHCP service
service dhcp
6.6.2 Inquiring DHCP Server Status
1 Inquire DHCP Configuration
(JadeOS) #show ip dhcp database
DHCP enabled
ping-check false;
broadcast;
# vlan409
subnet 172.40.9.0 netmask 255.255.255.0 {
lease-time 1 days,0 hours, 0 minutes, 0 seconds;
option routers 172.40.9.1;
range 172.40.9.2 172.40.9.254;
}
2 Inquire DHCP lease statistics
(JadeOS) #show ip dhcp statistics

33JadeOSUserManual
Network Name 13.0.0.0/16
Total leases 65533
Free leases 64532
Active leases 1001
Abandoned leases 0
Reserved leases 0
3 Inquire DHCP lease information
(JadeOS) #show ip dhcp binding
lease 13.0.6.202 {
starts Mon Dec 23 10:41:30 2013
ends Mon Dec 23 10:42:30 2013
binding state active;
next binding state free;
hardware ethernet 00:50:ba:50:73:2b;
uid "\001\000P\272Ps+";
}
lease 13.0.6.238 {
starts Mon Dec 23 10:41:33 2013
ends Mon Dec 23 10:42:33 2013
binding state active;
next binding state free;
hardware ethernet 00:50:ba:50:75:2b;
uid "\001\000P\272Pu+";
}
lease 13.0.7.19 {
starts Mon Dec 23 10:41:28 2013
ends Mon Dec 23 10:42:28 2013
binding state active;
next binding state free;
hardware ethernet 00:50:ba:50:74:e9;
uid "\001\000P\272Pt\351";
}
lease 13.0.7.61 {
starts Mon Dec 23 10:41:33 2013
ends Mon Dec 23 10:42:33 2013
binding state active;
next binding state free;
hardware ethernet 00:50:ba:50:76:5c;
uid "\001\000P\272Pv\\";
}

34JadeOSUserManual
4 Inquire DHCP Server running status
(JadeOS) #show ip dhcp server statistics
Dhcp Server Packet Statistics:
Receive packet:
Discover 0
Request 0
Release 0
Decline 0
Inform 0
Leasequery 0
Unkown 0
Send packet:
Offer 0
Ack 0
Nak 0
Other packet:
Bootp 0
Boopreply 0
Speed:
Offer Speed 0 client/sec
6.6.3 Configuring DHCP Relay
JadeOS provides DHCP Relay function that enhances the DHCP function. A DHCP
relay agent is any host that forwards DHCP packets between clients and servers. Re-
lay agents are used to forward requests and replies between clients and servers when
they are not on the same physical subnet. Relay agent forwarding is distinct from the
normal forwarding of an IP router, where IP datagram are switched between networks
somewhat transparently. By contrast, relay agents receive DHCP messages and then
generate a new DHCP message to send on another interface.
DHCP Relay configuration as below:
Step 1 Enter “ip dhcp relay”
(JadeOS)(config)# ip dhcp relay
Step 2 Specify the interface of DHCP Client
(JadeOS)(config-dhcp-relay)# client-interface <interface-name>

35JadeOSUserManual
Step 3 Specify the IP address of DHCP Server
(JadeOS)(config-dhcp-relay)# server address A.B.C.D
Step 4 Specify the interface of DHCP Server
(JadeOS)(config-dhcp-relay)# server-interface <interface-name>
Step 5 Enable Relay
(JadeOS)(config-dhcp-relay)# enable
6.6.4 DHCP Snooping
DHCP Snooping acts as the firewall between untrust host and DHCP server, which
avoid interfere and attack to the legal user. Through DHCP snooping, you can view
the filtered illegal DHCP message.
Because DHCP message carries MAC address and IP address of user terminal, you
can obtain and record DHCP message through continuously track, which can be used
to indentify other illegal DHCP message.
Through building and maintaining DHCP snooping table (IP-MAC binding), system
can detect whether the followed communication is legal, and then reject the un-
matched data between IP and MAC.
To enable DHCP snooping, use the following command:
ip dhcp snooping enable
To display DHCP snooping binding table, use the following command:
(JadeOS) #show ip dhcp snooping binding counter
Datapath Bind Table Statistics
-------------------------------
Current Entries 1001
High Water Mark 1001
Maximum Entries 262144
Total Entries 4001
Allocation Failures 0
(JadeOS) #show ip dhcp snooping binding
DHCP Snooping State is disable
DHCP Snooping verify MAC State is disable
Datapath Binding Table Entries
-------------------------------------------------------------------
Type: D - Dynamic, S - Statically-configured
MacAddress IpAddress Lease(sec) Type Interface
------------- --------------- --------- ------ ------------

36JadeOSUserManual
00:50:ba:50:77:06 13.0.7.20 300 D Gi 6/10
00:50:ba:50:76:DA 13.0.6.242 300 D Gi 6/10
00:50:ba:50:76:D8 13.0.6.237 300 D Gi 6/10
00:50:ba:50:76:D4 13.0.6.227 300 D Gi 6/10
Security Check
Through binding table, DHCP snooping module determine whether the DHCP mes-
sage sent by user is legal or not, and then reject illegal DHCP request if illegal.
Enabling MAC address detection, DHCP snooping can avoid attack by checking
whether the MAC address of DHCP protocol match with the source MAC address of
Ethernet.
To enable MAC address detection of DHCP snooping, use the following command in
config mode:
ip dhcp snooping verify mac-address enable
Broadcast Suppression
JadeOS can automatically record DHCP request information into DHCP snooping
session table by enabling DHCP snooping. When received broadcast message from
DHCP server, JadeOS can look up the corresponding host and exit port in the DHCP
snooping table, then change the broadcast into unicast. Therefore, JadeOS achieves
broadcast suppression.
To configure the broadcast suppression in QinQ interface, use the following com-
mand:
ip dhcp snooping enable
To display the DHCP snooping session table, use the following command:
show ip dhcp snooping session
6.6.5 ARP With DHCP
Enabling ARP with DHCP, DHCP will issue ARP table that combined distributed IP
address and MAC address in client to the system, at the same time, disable the func-
tion of ARP learning in the specified interface. Therefore, ARP table is strictly
checked by DHCP snooping, which ensures the legality and avoid the ARP cheat and
interfere to the user online and communication.
For example:
¾ Enable ARP with DHCP function:
Step 1 Configure update arp in address pool
(JadeOS) (config)#ip dhcp pool ABC
(JadeOS) (config-dhcp)#update arp
Step 2 Configure ARP authorized in the interface of distributed IP, disable ARP
learning function:
(JadeOS) (config)#interface vlan 6

37JadeOSUserManual
(JadeOS) (config-if)#arp authorized
Note: ARP learning will be disabled after enabling ARP with DHCP.
¾ Disable ARP with DHCP function:
Step 1 To save client ARP information, use no update arp command to disable
ARP function:
(JadeOS) (config)#ip dhcp pool ABC
(JadeOS) (config-dhcp)#no update arp
Step 2 Enable ARP learning function
(JadeOS) (config)#interface vlan 6
(JadeOS) (config-if)#no arp authorized
You can inquiry client ARP information by show arp command.
6.7 Configuring OSPF
Open Shortest Path First (OSPF) is an adaptive routing protocol for Internet Protocol
(IP) networks. It uses a link state routing algorithm and falls into the group of interior
routing protocols, operating within a single autonomous system (AS). This allows the
JadeOS to deploy effectively in a Layer 3 topology. The JadeOS can act as default
gateway for all clients and forward user packets to the upstream router.
6.7.1 OSPF Implementation
JadeOS OSPF implementation conforms to the OSPF Version 2 specifications detailed
in the Internet RFC 2328. The list that follows outlines key OSPF features supported
on JadeOS:
z NSSA areas (RFC3101) supported.
z Route redistribution—Routes learned via any IP protocol can be redistributed in
to any other IP routing protocol.
z Authentication—Plain text authentication among neighboring routers within an
area is supported.
z Routing interface parameters—Configurable parameters supported include inter-
face output cost, retransmission interval, interface transmit delay, router priority,
router “dead” and “hello” intervals, and message digest key.
6.7.2 Enabling OSPF
OSPF is disabled by default. To enable the OSPF function on JadeOS, use the follow-
ing command in the configuration mode:
(JadeOS)(config)# router ospf

38JadeOSUserManual
Enabling OSPF requires that you create an OSPF router ID which is the only identi-
fier in an AS system and area ID which specify the range of routing process.
If the router ID is not configured, the loopback interface IP will be taken as router ID.
If there is no loopback interface, system will select a maximum IP address from all of
interface IPs.
To configure a router ID, complete the following command:
(JadeOS) (config)#router ospf
(JadeOS) (config-router)#ospf router-id <IP>
To configure a area ID, use the following command:
(JadeOS)(config)# router ospf
(JadeOS)(config-router)# area <area id> <parameter>
Note: Please refer to JadeOS Command Manual for more area configuration parameter.
6.7.3 Configuring OSPF Interface Parameters
JadeOS allows you to alter certain interface-specific OSPF parameters as needed. You
are not required to alter any of these parameters, but some interface parameters must
be consistent across all routers in an attached network. Therefore, be sure that if you
do configure any of these parameters, the configurations for all routers on your net-
work have compatible values.
To specify interface parameters as needed for your network, use the any of the com-
mands listed in table 6-1:
Command Purpose
ip ospf cost <value> Explicitly specify the cost of sending a packet on
an OSPF interface.
ip ospf dead-interval<value> Set the number of seconds that a device's hello
packets must not have been seen before its
neighbors declare the OSPF router down.
ip ospf hello-interval<value> Specify the length of time between the hello pack-
ets that the Cisco IOS software sends on an OSPF
interface.
ip ospf message-digest-key
<value> <passwd>
Enable OSPF MD5 authentication.
ip ospf priority <value> Set priority to help determine the OSPF designated
router for a network.
ip ospf retransmit-interval
<value>
Specify the number of seconds between link state
advertisement retransmissions for adjacencies be-
longing to an OSPF interface.
ip ospf transmit-delay<value> Set the estimated number of seconds it takes to

39JadeOSUserManual
transmit a link state update packet on an OSPF in-
terface.
Table 6-1 OSPF Interface Parameter
6.7.4 Configuring OSPF Area
JadeOS OSPF supports the following types of area:
z Stub area
Stub areas are areas in to which information on external routes is not sent. Instead,
there is a default external route generated by the area border router, into the stub area
for destinations outside the autonomous system. To take advantage of the OSPF stub
area support, default routing must be in the stub area, you can configure no-summary
on the ABR to prevent it from sending summary link advertisement into the stub area.
To configure a stub area on JadeOS, use the following command:
area <area-id> stub [no-summary]
For example, configure area 1.1.1.1 as stub area on JadeOS:
(JadeOS) (config) #router ospf
(JadeOS) (config-router) # area 2 stub no-summary
z NSSA(Not So Stubby Area) area
NSSA area is similar to OSPF stub area. NSSA does not flood Type 5 (External Link
State Advertisements)LSA form the core into the area, but it has the ability of import-
ing AS external routes in a limited fashion within the area. NSSA allows importing of
Type 7 AS external routes within NSSA area by redistribution. These Type 7 LSAs are
translated into Type 5 LSAs by NSSA ABR which are flooded throughout the whole
routing domain.
To configure a NSSA area on JadeOS, use the following command:
area <area-id> nssa [ no-redistribution ] [no-summary ] [default-information-originate]
Example 1, configure area 1.1.1.1 as totally NSSA area on JadeOS:
(JadeOS)(config)# router ospf
(JadeOS) (config-router) # area 1 nssa no-summary
Example 2, configure area 1.1.1.1 as non-totally NSSA area, not importing type-7 ex-
ternal routes to the area:
(JadeOS)(config)# router ospf area 1.1.1.1
(JadeOS)(config-router) # nssa no-redistribution
Example 3, configure area 1.1.1.1as non-totally NSSA area, importing a default route
to the area:
(JadeOS)(config)# router ospf
(JadeOS)(config-router) # area 1 nssa default-information-originate

40JadeOSUserManual
6.7.5 Configuring OSPF Network Type
JadeOS supports the following types of OSPF network:
• Point-to-point networks(HDLC, Token Ring, FDDI)
One point-to-point links such as HDLC and PPP, OSPF runs as a point-to-point net-
work type.
To configure an OSPF point-to-point network on JadeOS, use the following com-
mand:
(JadeOS)(config-if)#ip ospf network point-to-point
• Broadcast networks (Ethernet, Token Ring, FDDI)
On the broadcast medium such as Ethernet and Token Ring, OSPF runs as a broadcast
network type.
To configure an OSPF broadcast network on JadeOS, use the following command:
(JadeOS)(config-if)#ip ospf network broadcast
Note: The network type is broadcast by default in factory.
6.7.6 OSPF Point-to-point Configuration Example
In the following OSPF network, the autonomous system is divided into 3 areas.
JadeOS A and JadeOS B is the ABR which is responsible to announce the routes be-
tween OSPF areas.
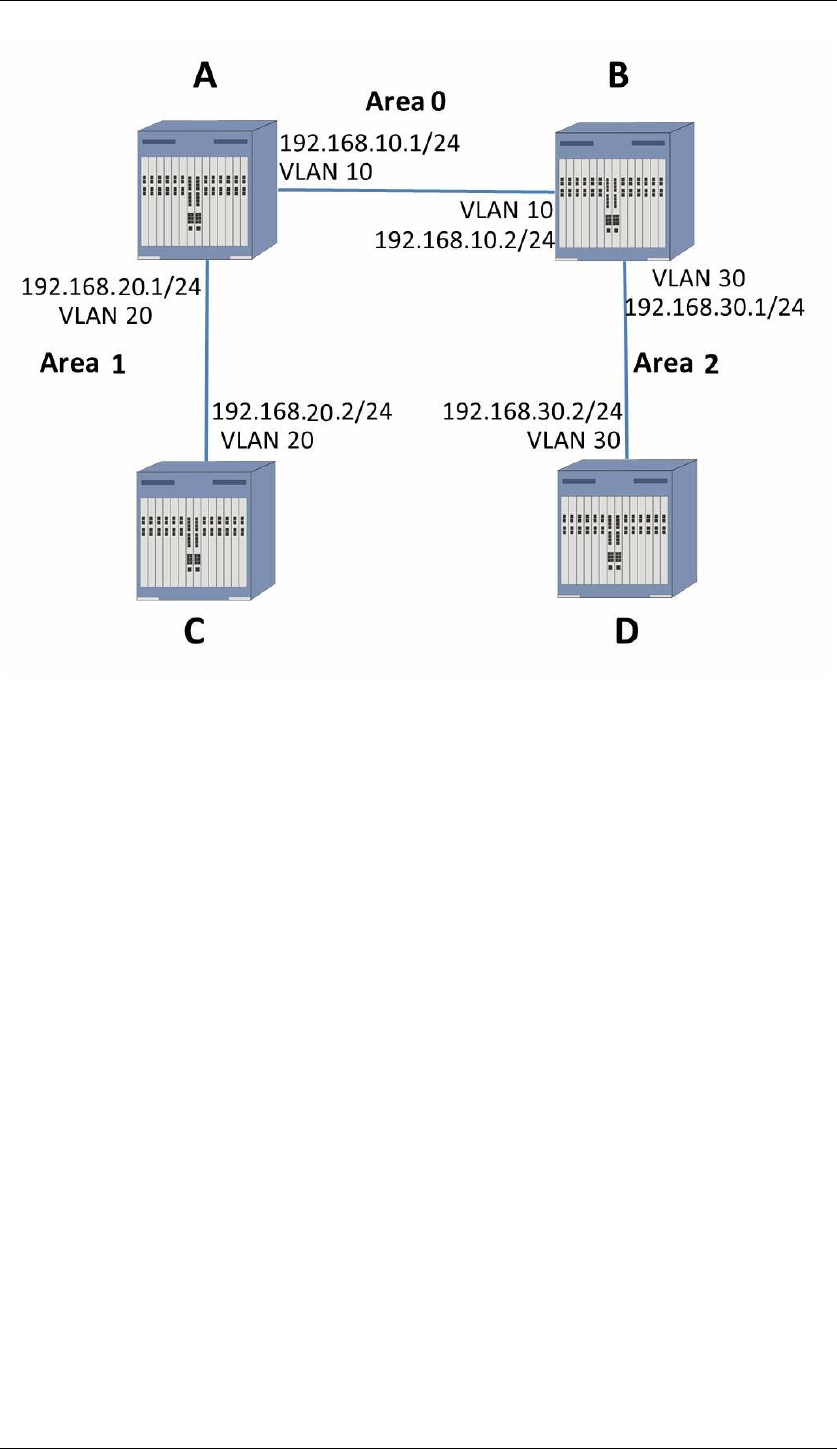
41JadeOSUserManual
Figure 6-1 OSPF configuration example
Step 1 Create VLAN and add interfaces to VLAN (Refer to chapter 4 for
VLAN configuration)
Step 2 Configure OSPF on JadeOS A
(JadeOS-A) (config) #router ospf
(JadeOS-A) (config-router) #ospf router-id 1.1.1.1
(JadeOS-A) (config-router) #network 192.168.10.0/24 area 0
(JadeOS-A) (config-router) #network 192.168.20.0/24 area 1
(JadeOS-A) (config) #interface vlan 10
(JadeOS-A) (config-if) #ip address 192.168.10.1/24
(JadeOS-A) (config-if) #ip ospf network point-to-point
(JadeOS-A) (config) #interface vlan 20
(JadeOS-A) (config-if) #ip address 192.168.20.1/24
(JadeOS-A) (config-if) #ip ospf network point-to-point
Step 3 Configure OSPF on JadeOS B
(JadeOS-B) (config) #router ospf
(JadeOS-B) (config-router) #ospf router-id 1.1.1.2
(JadeOS-B) (config-router) #network 192.168.10.0/24 area 0
(JadeOS-B) (config-router) #network 192.168.30.0/24 area 2
(JadeOS-B) (config) #interface vlan 10

42JadeOSUserManual
(JadeOS-B) (config-if) #ip address 192.168.10.2/24
(JadeOS-A) (config-if) #ip ospf network point-to-point
(JadeOS-B) (config) #interface vlan 30
(JadeOS-B) (config-if) #ip address 192.168.30.1/24
(JadeOS-A) (config-if) #ip ospf network point-to-point
Step 4 Configure OSPF on JadeOS C
(JadeOS-C) (config) #router ospf
(JadeOS-C) (config-router) #ospf router-id 1.1.1.3
(JadeOS-C) (config-router) #network 192.168.20.0/24 area 1
(JadeOS-C) (config) #interface vlan 20
(JadeOS-A) (config-if) #ip ospf network point-to-point
(JadeOS-C) (config-subif) #ip address 192.168.20.2/24
Step 5 Configure OSPF on JadeOS D
(JadeOS-D) (config) #router ospf
(JadeOS-D) (config-router) #ospf router-id 1.1.1.4
(JadeOS-D) (config-router) #network 192.168.30.0/24 area 2
(JadeOS-D) (config) #interface vlan 30
(JadeOS-D) (config-subif) #ip ospf network point-to-point
(JadeOS-D) (config-subif) #ip address 192.168.30.2/24
Note: Routing management supports OSPF dynamic routing management and static routing man-
agement.
To add static routing, use ip route A.B.C.D/<destmask> command.
To delete routing, use no ip route A.B.C.D/<destmask> command.
To display routing, use show ip route command.
6.8 Configuring IPv6
JadeOS supports IPv4/IPv6 configuration and IPv6 forwarding. IPv6 address and
routing configuration is similar to IPv4.
6.8.1 Address Configuration
To configure IPv6 address, use following command in interface mode:
(JadeOS) (config)#interface vlan 333
(JadeOS) (config-if)#ipv6 address 2011::6:31/64
6.8.2 Routing Configuration

43JadeOSUserManual
To configure IPv6 routing, use following command:
ipv6 route <subnet>/<prefix-length> <gateway>
6.8.3 Ping6
To configure ping6, use following command:
ping6 <ipv6-address>

44JadeOSUserManual
Chapter7 Network Security
JadeOS is always deployed in gateway, which much data goes through it. The network
environment of equipment is very complex and faces network security threat. This
chapter will describe JadeOS network security and how to configure it.
7.1 Access Control List (ACL)
Access Control List (ACL) defines the network access.ACL is the combination of
rules; each rule can specify one matched rule and one operation. Matched rule is
based on IP address or port number; operation is ‘permit’ or ‘deny’. The ACL is to
match rules in sequence.
JadeOS have an implicit rule of ‘deny’ for each ACL, so you should add the corre-
sponding rule and specify the operation is ‘permit’ if you want to allow one type of
traffic go through it. Through ACL, we can control users’ traffic exactly so that to en-
sure network security.
7.1.1 Standard ACL
Standard ACL rule can specify the operation is ‘deny’ or ‘permit’; the matched rule is
any, ip address and network segment.
Step 1 Create a standard ACL named test-standard
(JadeOS) (config)#ip access-list standard test-standard
Step 2 Deny all the traffic in network segment 192.168.1.0/255.255.255.0
(JadeOS) (config-std-test-standard)#deny 192.168.1.0 255.255.255.0
Step 3 Allow all the traffic in network segment 192.168.0.0/255.255.0.0
(JadeOS) (config-std-test-standard)#permit 192.168.0.0 255.255.0.0
Step 4 Deny all the other traffic.
(JadeOS) (config-std-test-standard)#deny any
7.1.2 Extended ACL
Extended ACL can specify the operation is ‘deny’ or ‘permit’; the matched rule can
specify the protocol number(any, tcp, udp, icmp, igmp), source IP address or network
segment, destination IP address or network segment, range of port number.
Step 1 Create extended ACL named test-extended
(JadeOS) (config)#ip access-list standard test-extended

45JadeOSUserManual
Step 2 Deny tcp traffic from 60.0.0.0/255.255.255.0 to 192.168.10.0/255.255.255.0
with port range 1-1023.
(JadeOS) (config-std-test-extended)# deny tcp 60.0.0.0 255.255.255.0 192.168.10.0
255.255.255.0 range 1 1023
Step 3 Permit all the tcp port 80 traffic to 192.168.10.0/255.255.255.0.
(JadeOS) (config-std-test-extended)# permit tcp any 192.168.10.0 255.255.255.0 eq
7.1.3 Session ACL
Session ACL can specify the operation is ‘deny’ or ‘drop’; the matched rule are pro-
tocol number, source IP address or network segment, destination IP address or net-
work segment and range of port number. Based on five elements (protocol, source IP
address, source port number, destination IP address), session ACL can track all the
data of this session to achieve the complex function, such as SNAT, DNAT.
Session ACL is used to control user authentication. Please refer to Chapter 9 for more
information.
Step 1 Create a session ACL named test-session
(JadeOS) (config)#ip access-list standard test-session
Step 2 All the traffic from 192.168.20.0/255.255.255.0 will be translated by SNAT
function. NAT-POOL is used by NAT pool. (Please refer to chanter 7.3 for how to
create NAT pool)
(JadeOS) (config-std-test-extended)# network 192.168.20.0 255.255.255.0 any any src-nat pool
NAT_POOL
Step 3: All the traffic from 192.168.30.0/255.255.255.0 will be translated to address
10.10.10.134 by DNAT function.
(JadeOS) (config-std-test-extended)# network 192.168.30.0 255.255.255.0 any any dst-nat ip
10.10.10.134
7.2 Session
JadeOS will maintain a session table for each session. The session table is based on
five elements (protocol, source IP address, source port number, destination IP address).
When the system receives the first data packet of the session, it will create a session
table for the session. Based on this session, the following data packet will be uni-
formly handled by JadeOS, for example, SNAT will be transferred to the same ad-
dress by NAT function. When the session is terminated (for example, monitor tcp fin
message) or timeout (no traffic for a long time), session table will be deleted.

46JadeOSUserManual
To inquire the number of present session, use show datapath session counters com-
mand.
(JadeOS) #show datapath session counters
Datapath Session Table Statistics
---------------------------------
Current Entries: 2
High Water Mark: 10
Maximum Entries: 524287
Total Entries: 185
Duplicate Entries: 0
Cross linked Entries: 0
Max link Length: 1
To view present session table, use show datapath session table command:
(JadeOS) #show datapath session table
Datapath Session Table Entries
------------------------------
Flags: F - fast age, S - src NAT, N - dest NAT
D - deny, R - redirect, Y - no syn
H - high prio, P - set prio, T - set ToS
C - client, M - mirror, V - VOIP
Q - Real-Time Quality analysis
I - Deep inspect, U - Locally destined
E - Media Deep Inspect, G - media signal
Source IP Destination IP Prot SPort DPort Cntr Prio ToS Age Destination TAge
Flags
-------------- -------------- ---- ----- ----- ---- ---- --- --- ----------- ---------- -----
172.50.3.2 172.50.3.1 17 49419 5246 0/0 0 0 0 0 0
FC
172.50.3.1 172.50.3.2 17 5246 49419 0/0 0 0 1 0 0
F
7.3 Configuring NAT
Network Address Translation (NAT) is designed for IP address conservation. It en-
ables private IP networks that use unregistered IP addresses to connect to the Internet.
NAT operates on a router, usually connecting two networks together, and translates
the private (not globally unique) addresses in the internal network into legal addresses,

47JadeOSUserManual
before packets are forwarded to another network.
As part of this capability, NAT can be configured to advertise only one address for the
entire network to the outside world. This provides additional security by effectively
hiding the entire internal network behind that address. NAT offers the dual functions
of security and address conservation and is typically implemented in remote-access
environments.
Basically, NAT allows a single device, such as a router, to act as an agent between the
Internet (or public network) and a local network (or private network), which means
that only a single unique IP address is required to represent an entire group of com-
puters to anything outside their network.
7.3.1 Configuring SNAT
Figure 7-1 source address transfer
To create NAT pool, use the following command in config mode:
ip nat pool <pool-name> <start-ip> <end-ip> <dest-ip>
To create SNAT rule in session ACL, use the following command:
network <subnet> <mask> any any src-nat pool <pool-name>
Using figure 7-1 as an example, step 1 and step 2 show how to specify the user policy
in VLAN 100. Let the traffic from users on 200.0.0.0/24 subnet be SNATed when
they access public internet server 155.0.0.150.
Step 1 Create NAT address pool
(JadeOS)(config)# ip nat pool nat_pool 150.0.0.1 150.0.0.1 160.0.0.1
Step 2 Configure session ACL, add a SNAT rules specifying what traffic is to be
translated and NAT pool
(JadeOS)(config)#ip access-list session tacl
(JadeOS)(config-sess-tacl)# network 200.0.0.0 255.255.255.0 any any src-nat pool nat_pool
Step 3 and Step 4 show how to apply ACL to VLAN 100, please refer to chapter 9.4
for more information.
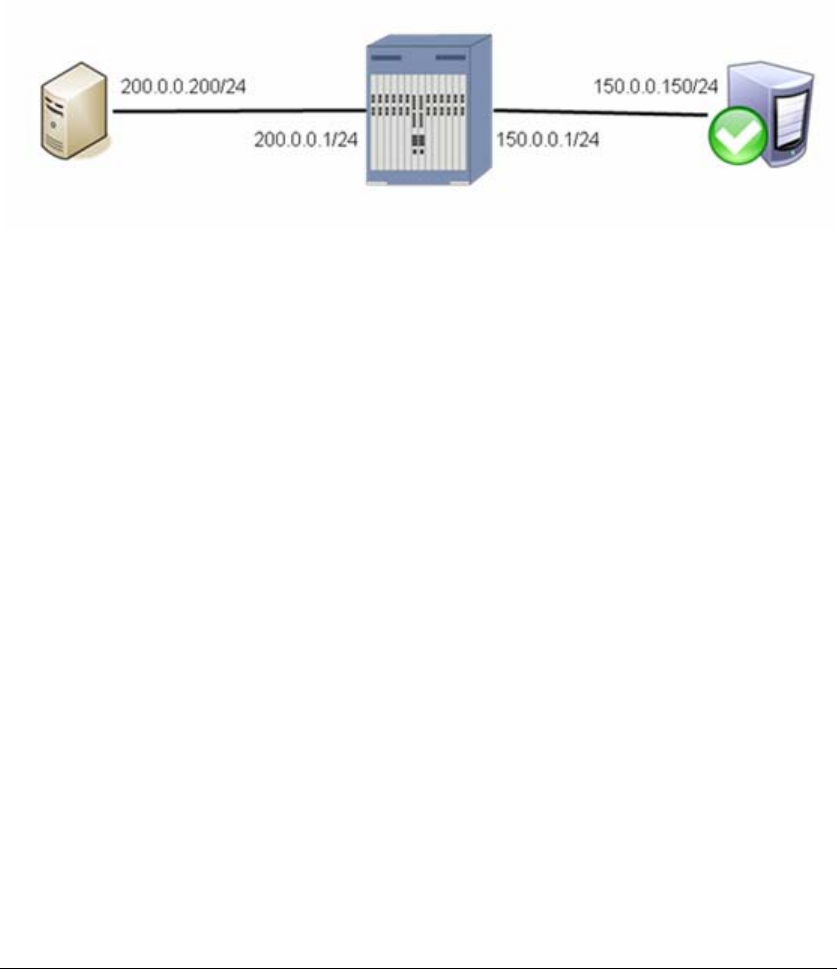
48JadeOSUserManual
Step 3 Configure user role and apply ACl
(JadeOS)(config)#user-role trole
(JadeOS)(config-trole)#access-list session tacl
Step 4 Configure AAA Profile, and specify user role
(JadeOS)(config)#aaa profile test
(JadeOS)(AAA profile “test”)#initial-role trole
Step 5 Apply AAA profile to VLAN 100
(JadeOS)(config)#vlan 100 aaa profile test
7.3.2 Configuring DNAT
Figure 7-2 Destination address transfer
To configure DNAT address transfer in session ACl, use following command:
<src-subnet> <dest-subnet> <protocol> dst-nat ip <ip-address>
Using figure 7-2 as an example, JadeOS achieves to make user that failed authentica-
tion redirect to portal server (150.0.0.150) by DNAT function. Please refer to chapter
9.4 for more information.
Step 1 To create session ACL and specify DNAT IP address and DNAT destination
IP address, use the following command:
(JadeOS) (config) #ip access-list session tacl
(JadeOS) (config-sess-tacl) # any host 150.0.0.1 any dst-nat ip 200.0.0.200
Step 2 To create user role and apply it to ACL, use the following command:
(JadeOS) (config) #user-role trole
(JadeOS) (config-trole) #access-list session tacl
Step 3 To create AAA profile and apply it to user role and authentication group, use
the following command:
(JadeOS) (config) #aaa profile test
(JadeOS) (AAA profile “test”) #http-redirection enable
(JadeOS) (AAA profile “test”) #initial-role trole

49JadeOSUserManual
Step 4 Apply AAA profile to VLAN 100
(JadeOS) (config) #vlan 100 aaa profile test
7.4 Configuring DoS Anti-attack
The main function of DoS anti-attack is to protect the operation system of control
plane, which can make JadeOS work normally in malicious attack.
DoS anti-attack will classify based on protocol first, and then limit the rate of each
protocol according to the configuration. JadeOS configure different rate limit policy
for each protocol; rate limit policy is based on traffic per second or the number of data
packet.
7.4.1 System Pre-defined Configuration
Pre-defined configuration is the best deployment configuration of JadeOS, which is
based on the hardware performance and design specification of the product. To view
system predefined configuration, use show firewall command.
(JadeOS) #show firewall
Firewall bandwidth-contract:
Firewall Rate limit Enable/Disable Rate
Rate limit CP Capwap traffic Disable 2MBps0KBps
Rate limit CP Dhcp traffic Disable 8MBps0KBps
Rate limit CP Hostapd traffic Disable 20MBps0KBps
Rate limit CP Ospf traffic Disable 2MBps0KBps
Rate limit CP trusted-mcast packet traffic Disable 20MBps0KBps
Rate limit CP trusted-ucast packet traffic Disable 40MBps0KBps
Rate limit CP untrusted-mcast packet traffic Disable 10MBps0KBps
Rate limit CP untrusted-ucast packet traffic Disable 10MBps0KBps
Rate limit CP VRRP packet traffic Disable 2MBps0KBps
Rate limit SP session miss packet traffic Disable 50000pps
Rate limit SP user miss packet traffic Disable 1000pps
Rate limit SP other excepion packet traffic Disable 2MBps0KBps
7.4.2 Configuring Anti-attack
JadeOS supports anti-attack configuration, which is convenient for configuration ad-
justment in various network scenarios.
Two configuration commands in config mode:
firewall cp-bandwidth-contract <service type> <pps number | traffic limit>
firewall sp-bandwidth-contract <service type> <pps number | traffic limit>

50JadeOSUserManual
For example:
To configure the rate limit of session creation is 50000 per second:
(JadeOS) (config)#firewall sp-bandwidth-contract session pps 50000
To configure the rate limit of new online user is 700 per second:
(JadeOS) (config)#firewall sp-bandwidth-contract user pps 700
To configure the rate of receiving DHCP message is 2000 per second:
(JadeOS) (config)#firewall cp-bandwidth-contract dhcp pps 2000
To configure the rate of receiving ARP message is 2000 per second:
(JadeOS) (config)#firewall cp-bandwidth-contract arp pps 2000
To configure the rate of receiving unicast message that failed authentication is
10Mbps:
(JadeOS) (config)#firewall cp-bandwidth-contract untrusted-ucast 10 0
7.5 Configuring Lawful Intercept
Lawful intercept is a process that enables a Law Enforcement Agency (LEA) to per-
form electronic surveillance on an individual (a target) as authorized by a judicial or
administrative order. To facilitate the lawful intercept process, certain legislation and
regulations require service providers (SPs) and Internet service providers (ISPs) to
implement their networks to explicitly support authorized electronic surveillance.
The surveillance is performed through the use of wiretaps on traditional telecommu-
nications and Internet services in voice, data, and multiservice networks. The LEA
delivers a request for a wiretap to the target's service provider, who is responsible for
intercepting data communication to and from the individual. The service provider uses
the target's IP address or session to determine which of its edge routers handles the
target's traffic (data communication). The service provider then intercepts the target's
traffic as it passes through the router, and sends a copy of the intercepted traffic to the
LEA without the target's knowledge.
Configuration Steps:
Step 1 To create LIG (LI gateway), and specify the encapsulation way of traffic sent
to LIG, use the following command in LI mode:
lig add <li-gateway-name> [mirror|udp][interface|id]
Step 2 To add LI rule, and specify LI name (based on ACL, IP, MAC, network seg-
ment) and LIG which receives the LI traffic, use the following command:
rule [acl-filter | host-filter | mac-filter | net-filter] send <lig-name>
acl-filter add lawful intercept rule, intercept data streams
host-filter add lawful intercept rule, intercept host data streams
mac-filter add lawful intercept rule, intercept ethernet data streams
net-filter add lawful intercept rule, intercept host data streams
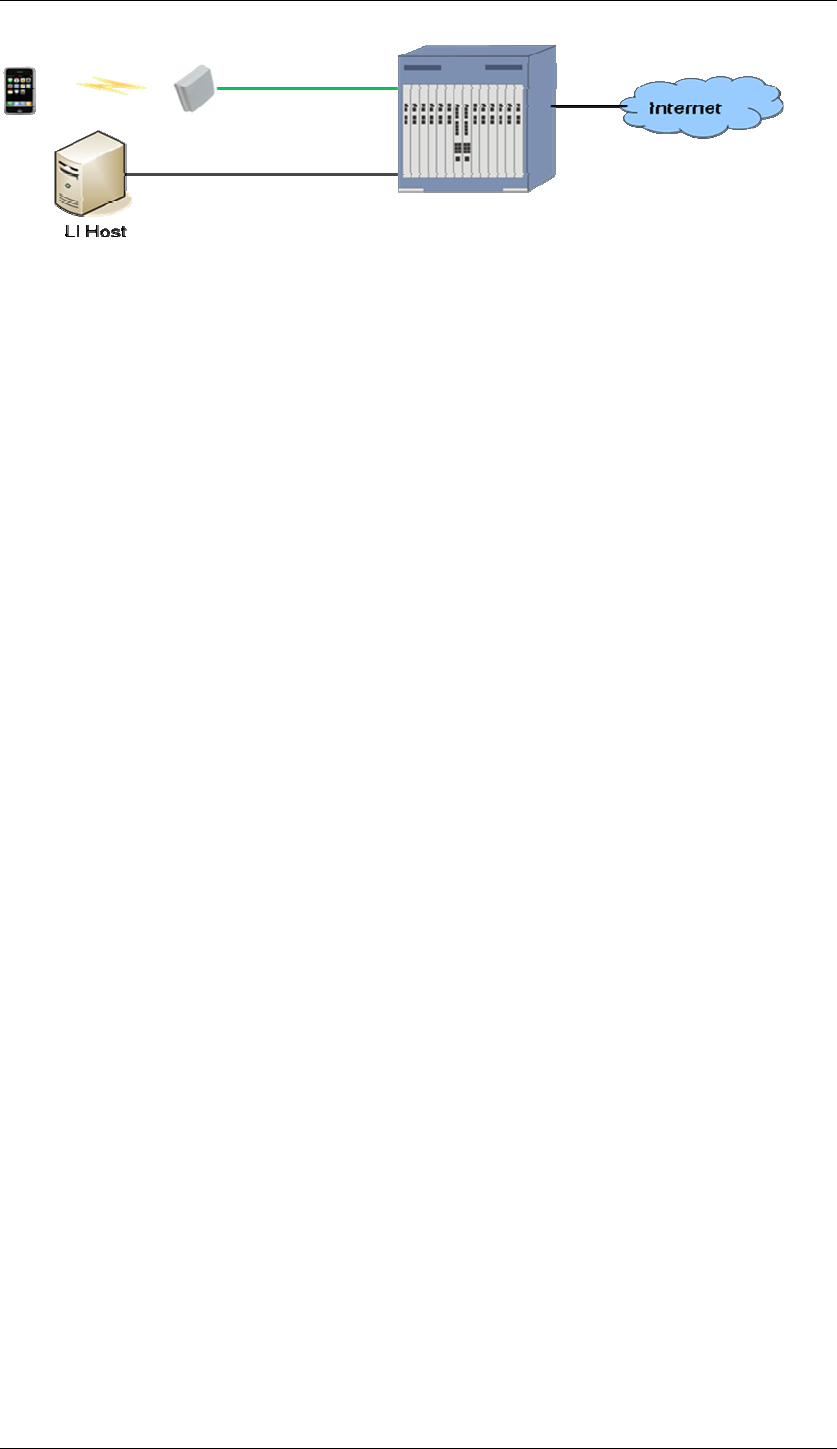
51JadeOSUserManual
Figure 6-4 Lawful interception
To create Lawful interception gateway interface and rules on JadeOS, complete the
following steps:
Step 1 Enter the LI configuration mode.
(JadeOS)(config) #li
Step 2 Configure the LI gateway on JadeOS.
(JadeOS)(config-li) #lig add test123 mirror gigabitethernet 2/1
Step 3 Configure the LI rule and enable the lawful intercept on JadeOS.
(JadeOS)(config-li) #rule host-filter 1 gigabitethernet 2/1 10.1.10.2 send test123
(JadeOS)(config-li) #li enable

52JadeOSUserManual
Chapter8 Configuring HQoS
With the rapid development of the computer network, services such as bandwidth,
delay, jitter sensitive voice and video are transferred through IP network tunnel.
JadeOS support HQoS (hierarchical QoS) technology which can classify the type of
service traffic; it can also uniformly manage and hierarchically schedule the transfer
objects, such as several users, multi-service, and several types of traffic and so on,
which ensure the quality for different data service.
To enable or disable HQoS function in JadeOS, use following command in config
mode:
hqos-switch [on|off]
8.1 Configuring Rate Limitation on Port
To configure the rate limitation for port on JadeOS, using following command:
rate-limit [down|up] (0-10240) [bps|kbps|mbps]
For example, to configure the rate limit of in direction is 200 Mbps and the rate of out
direction is 300 Mbps:
(JadeOS)(config)#interface gigabitethernet 1/0
(JadeOS)(config-if)#rate-limit up 200 mbps
(JadeOS)(config-if)#rate-limit down 300 mbps
8.2 Configuring Rate Limitation on VLAN
To configure the rate limitation for VLAN on JadeOS, using following command:
(JadeOS)(config)#interface vlan 100
(JadeOS)(config-if)#rate-limit up 200 mbps
(JadeOS)(config-if)#rate-limit down 1 mbps
8.3 Configuring Rate Limitation on User
To configure the rate limitation for user on JadeOS, using following steps:
Step 1 To configure bandwidth named ‘BW-8M’ and ‘BW-2M’, using following
command:
(JadeOS) (config)#aaa bandwidth-contract BW-8M mbits 8
(JadeOS) (config)#aaa bandwidth-contract BW-2M mbits 2
Step 2 To configure the downstream bandwidth named ‘BW-8M’ and the upstream
bandwidth named ‘BW-2M’ in user role, using following command:
(JadeOS) (config)#user-role postauth

53JadeOSUserManual
(JadeOS) (config-role)#bandwidth-contract BW-8M downstream
(JadeOS) (config-role)#bandwidth-contract BW-2M upstream

54JadeOSUserManual
Chapter9 Configuring AAA
This chapter describes AAA configuration, including user network access, bandwidth
control policy and so on.
9.1 The Attribute of Trust and Untrust
Interface means the inside interface of data packet; when the interface is the attribute
of trust, JadeOS will disable authentication function in this interface; when the inter-
face is the attribute of untrust, JadeOS will enable authentication function in this in-
terface.
To configure the attribute of trust and untrust in the interface, use the following steps:
Step 1 Enter interface config mode:
(JadeOS) (config)#interface gigabitethernet 10/1
Step 2 Configure the interface is the attribute of trust
(JadeOS) (config-if)#trusted
Step 3 Configure the interface is the attribute of untrust
(JadeOS) (config-if)#no trusted
All the layer-2 interface and layer-3 interface is with the attribute of trust and untrust;
when the data packet goes through several interfaces, JadeOS will decide whether to
authenticate according to the last interface’s attribute. For example, add the interface
gigaethernet 1/0 into vlan 10; gigaethernet 1/0 is the attribute of trust, interface vlan
10 is the attribute of untrust; data packet will authenticate according to the attribute of
the last interface vlan 10 based on the above rule.
9.2 User and User Role
9.2.1 User
In order to flexibly control the network access and traffic bandwidth in different IP
address, JadeOS will create a user table for each IP address that goes through untrust
interface. User table has its own life cycle.
Create User: when traffic of one IP address goes into system from untrust interface,
JadeOS will look up the IP address in the system; if it is not in existence, JadeOS will
trigger the authentication process and generate a user table; user table is indexed by IP
address.
Delete User: when user offline or no traffic for a long time, JadeOS will delete this

55JadeOSUserManual
user table.
9.2.2 User Role and ACL
User role defines the network access. JadeOS specifies the network access of user by
ACL. To create a user role in JadeOS, you need to create a session ACL, and then ap-
ply the ACL to the user role.
To create user role, use the following steps:
Step 1 Configure a session ACL named pre-auth-acl
(JadeOS) (config) #ip access-list session pre-auth-acl
Step 2 Configure network access.
(JadeOS) (config-sess-pre-auth-acl)#any any udp 53 permit
(JadeOS) (config-sess-pre-auth-acl)#any any tcp 0 65535 dst-nat ip 10.0.0.2 443
(JadeOS) (config-sess-pre-auth-acl)#any any ucp 0 65535 dst-nat ip 10.0.0.2 443
Step 3 Create a user role named ‘pre-auth’
(JadeOS) (config) #user-role preauth
Step 4 Apply user rule to ACL
(JadeOS) (config-role) #session-acl pre-auth-acl
Attribute Description
access-list Apply access list to user role
bandwidth-contract Set the maximum bandwidth
max-sessions Set the datapath session limit, 64k by default
reauthentication-interval Config the intervals of re-authentication
session-acl Apply session ACL
vlan Distribute VLAN
The attribute list supported by user role
9.2.3 Access Policy Based on User Role
Before a user successfully authenticate, JadeOS specifies an initial role to user (role
before authentication); after the user is successfully authenticate, JadeOS will specify
a new role to the user (role after authentication).Network administrators can flexibly
control network access through configuring ACL.
For example, configure a user role named pre-auth that permit DNS traffic, but redi-
rect all other traffic to port 443 to perform authentications by DNAT; configure a user
role named post-auth that allow all the traffic; use the following steps:

56JadeOSUserManual
(JadeOS) (config) #ip access-list session pre-auth-acl
(JadeOS) (config-sess-pre-auth-acl)#any any udp 53 permit
(JadeOS) (config-sess-pre-auth-acl)#any any tcp 0 65535 dst-nat ip 10.0.0.2 443
(JadeOS) (config-sess-pre-auth-acl)#any any ucp 0 65535 dst-nat ip 10.0.0.2 443
(JadeOS) (config-sess-pre-auth-acl)#exit
(JadeOS) (config) #ip access-list session post-auth-acl
(JadeOS) (config-sess-post-auth-acl)#any any any permit
(JadeOS) (config-sess-pre-auth-acl)#exit
(JadeOS) (config)#user-role preauth
(JadeOS) (config-role)#access-list session pre-auth-acl
(JadeOS) (config)#user-role postauth
(JadeOS) (config-role)#access-list session post-auth-acl
9.3 Connections among User, VLAN and User Role
Each user has its own VLAN ID in JadeOS.
Several ways to specify VLAN for each user, for example:
- If a user access from one VLAN interface, user’s VLAN is the interface’s
VLAN ID;
- Specify a VLAN for SSID; if a user access from this SSID, user’s VLAN is
the specified VLAN;
Each VLAN has an AAA policy; please refer to chapter 9.4 for more information.
Each AAA policy defines the user role before authentication and after authentication
(including network access and bandwidth control). User will switch user role after
authentication.
9.4 Configuring AAA Profile
AAA profile is a profile about authentication configuration. Profile specifies the
authentication ways (web portal, 802.1x, and MAC authentication), initial role (role
before authentication), default role (role after authentication), Radius Server and so
on.
Apply AAA profile to one VLAN, and then all the user in the VLAN can use AAA
profile. Before configuration, you need to configure ACL, Role, Radius server group,
authentication ways, and then apply them to the AAA profile.
9.4.1 Configuring ACL
ACL is used to specify user’s network access. Please refer to chapter 9.2 and 9.3 for
more information.
9.4.2 Configuring role

57JadeOSUserManual
Configuring AAA profile need to configure user role before authentication and after
authentication. Please refer to chapter 9.3 for more information.
9.4.3 Configuring Radius Server Group
Step 1 Configure Radius server RS1, including IP address of radius server, authen-
tication key and local IP address:
(JadeOS) (config)#aaa authentication-server radius RS1
(JadeOS) (RADIUS Server "RS1")#host 119.6.200.245
(JadeOS) (RADIUS Server "RS1")#key 123456
(JadeOS) (RADIUS Server "RS1")#ip 119.6.200.33
(JadeOS) (RADIUS Server "RS1")#exit
Step2 Configure Radius server group SG1,including several Radius Server.
(JadeOS) (config)#aaa server-group SG1
(JadeOS) (Server Group "SG1")#auth-server RS1
Commands supported by Radius Server
Attribute Description
acctport port number using to accounting; range: 1-65535; default value: 1813
authport Port number using to authentication; range: 1-65535; default value: 1812
host IP address and host name of Radius server
ip Source address of radius request
key Pre-shared key
nas-identifier nas-identifier used in RADIUS data packet
nas-ip nas-ip of RADIUS data packet
retransmit Maximum number of request; range: 0-3; default value: 3
timeout Request timeout; range: 1-30s; default value: 5s
use-md5 Encryption using MD5s
Commands supported by Radius Server Group
Attribute Description
allow-fail-through Allow traffic that failed authentication
auth-server Distribute authentication server
set Set Role/Vlan rule
9.4.4 Configuring Authentication Way
Authentications supported by JadeOS are captive-portal, dot1x, mac, open, psk, wep,

58JadeOSUserManual
and radius-proxy; usually the authentication way will specify default-role, which is
the user role after successfully authentication. This chapter will describe the configu-
ration for authentication way by using web portal as an example.
In portal authentication, you need to define a rfc-3576-client, then a profile that at
least include radius server group、default-role、rfc-3576-client. Please refer to chapter
9.7 for more information.
For example:
(JadeOS) (config)#aaa rfc-3576-client 119.6.200.203
(JadeOS) (RFC 3576 Client "119.6.200.203")#key 1234
(JadeOS) (RFC 3576 Client "119.6.200.203")#exit
(JadeOS) (config)#aaa authentication captive-portal web-portal
(JadeOS) (Portal Authentication Profile "web-portal)#server-group SG1
(JadeOS) (Portal Authentication Profile "web-portal)#default-role postauth
(JadeOS) (Portal Authentication Profile "web-portal")#rfc-3576-client 119.6.200.203
Commands supported by Portal:
Attribute Description
default-role Distribute default role
rfc-3576-client RFC-3576 client
server-group web radius server group name
welcome-page-url-id The url ID of welcome page
9.4.5 Configuring AAA Profile
To configure AAA profile, use the following steps:
Step 1 Create a aaa profile named ‘aaa’
(JadeOS) (config)#aaa profile aaa
Step 2 Specify the authentication way
(JadeOS) (AAA profile "aaa")#authentication-portal web-portal
Step 3 Specify use role before authentication
(JadeOS) (AAA profile "aaa")#initial-role preauth
Step 4 Specify the Radius Server Group, and enable accounting function
(JadeOS) (AAA profile "aaa")#radius-accounting SG1
(JadeOS) (AAA profile "aaa")#radius-accounting enable
Commands supported by AAA profile
Attribute Description
authentication-dot1x Configure 802.1X authentication profile
authentication-mac Configure MAC authentication profile
authentication-open Configure open authentication profile

59JadeOSUserManual
authentication-portal Configure Portal authentication profile
authentication-psk Configure PSK authentication profile
authentication-radius-proxy Configure radius proxy profile
authentication-wep Configure WEP authentication profile
disconnect-message-client Configure disconnect message client
http-redir-url-id Configure http redirection url ID
http-redirection Configure http-redirection
initial-role Role that is assigned to a user before authentication
takes place
post-auth Post-auth Timer
pre-auth Pre-auth Timer
radius-accounting Configure radius accounting
9.4.6 Binding VLAN
Bind the AAA profile to VLAN 100, all the user in VLAN 100 will use this AAA
profile. Configuration commands as follows:
(JadeOS) (config)#vlan 100 aaa-profile aaa
9.5 MAC Authentication
Authentication Description
MAC address authentication is an authentication way to control user network access
based on MAC address; it need not to install any client software.
MAC authentication encapsulates the MAC address into RADIUS message according
to configuration, and then authenticate in the specified RADIUS server. Therefore,
MAC authentication will be used together with other authentication ways (WPA,
web-auth) in usual, also it can be used independently. After detecting MAC address in
the first time, JadeOS will enable authentication for this user.
Configuration Management
To configure MAC address, use the following steps:
Step 1:Configure MAC authentication profile
(JadeOS) (config)#aaa authentication mac mac1
(JadeOS) (MAC Authentication Profile "mac1")#server-group sg
(JadeOS) (MAC Authentication Profile "mac1")#default-role post-auth
(JadeOS) (MAC Authentication Profile "mac1")#exit

60JadeOSUserManual
Step 2:Apply MAC authentication in AAA profile
(JadeOS) (MAC Authentication Profile "mac1")#aaa profile aaa
(JadeOS) (AAA profile "aaa")#authentication-mac mac1
9.6 802.1X Authentication
Authentication Description
802.1 x authentication is an authentication policy based on port. The purpose of
802.1x authentication is to decide whether a port is available; if successfully authen-
ticate, the port will allow all the message; if unsuccessfully authenticate, the port only
allow 802.1x message.
Configuring Steps
802.1x authentication need to specify radius server and default-role, examples as fol-
lows:
Step 1 Configure radius server
(JadeOS) (config)#aaa authentication dot1x dot1x1
(JadeOS) (802.1X Authentication Profile "dot1x1")#default-role post-auth
(JadeOS) (802.1X Authentication Profile "dot1x1")#server-group SG1
(JadeOS) (802.1X Authentication Profile "dot1x")#server-group SG1
(JadeOS) (802.1X Authentication Profile "dot1x")#default-role postauth
Step 2 Apply 802.1x authentication in AAA profile
(JadeOS) (MAC Authentication Profile "mac1")#aaa profile aaa
(JadeOS) (AAA profile "aaa")#authentication-dot1x dot1x1
9.7 WEB Portal Authentication
Web authentication is an authentication scheme based on browser. User that failed
authentication will redirect to a login page, and require to input user name and pass-
word; user can access the network only after successfully authentication. WEB redi-
rect supports DNAT redirect and HTTP 302 redirect.
9.7.1 Web Authentication Process
Web authentication is based on HTTP protocol; authentication will not pop up forci-
bly unless user send HTTP request.
The authentication process of WEB authentication is as follows:
• A user that unauthenticated begin to browser network page and send HTTP re-
quest
• HTTP request is redirect to an external portal server
• Port server send an authentication page for secure login

61JadeOSUserManual
• User input user name and password; browser will transfer it to the web portal
(authentication module in JadeOS), and then web portal send authentication re-
quest to the radius server
• JadeOS will decide whether authenticate successfully through user database in
radius server; if successfully authenticate, radius server will inform JadeOS, at
the same time, JadeOS inform portal server
• Portal server pops up welcome page; the user authentication is over
9.7.2 DNAT Redirect
The redirect operation of JadeOS is based on DNAT by default.
Before authentication, session ACL will redirect HTTP request to portal server.
The configuration command is as follows:
(JadeOS) (config) #ip access-list session pre-auth-acl
(JadeOS) (config-sess-pre-auth-acl)#any any tcp 0 65535 dst-nat ip 10.0.0.2 443
(JadeOS) (config-sess-pre-auth-acl)#any any ucp 0 65535 dst-nat ip 10.0.0.2 443
9.7.3 HTTP 302 Redirect
To configure HTTP 302 redirect, use the following steps:
Step 1 Configure URL list in config mode:
(JadeOS) (config)# aaa http-redirection-url 1 ip 10.0.0.1 url http://10.0.0.1/wlan/index.php
Step 2 Specify URL ID
(JadeOS) (AAA profile "aaa")#http-redir-url-id 1
Step 3 Enable http 302 redirect
(JadeOS) (AAA profile "aaa")#http-redirection enable
9.7.4 Configuring Portal Server
JadeOS web authentication will customize the login page through external portal
server. Portal server will configure a client according to RFC3576 definition; the cli-
ent is used for sending users’ disconnection and authorization change information to
JadeOS.
To configure RFC client, use the following command:
(JadeOS) (config)#aaa rfc-3576-client 119.6.200.203
(JadeOS) (RFC 3576 Client "119.6.200.203")#key 1234
TO configure the source port according to RFC3576 server, use the following com-
mand:
ip rfc-3576-server ip <IP> port <1-65535>
9.7.5 Configuring CoA Disconnect Message

62JadeOSUserManual
Disconnect message (DM) is user disconnect message. The AAA Service Framework
uses CoA messages to dynamically modify active subscriber sessions. For example
RADIUS attributes in CoA messages might instruct the framework to create modify
or terminate a subscriber service.
CoA Messages
Dynamic request support enables the router to receive and process unsolicited CoA
messages from external RADIUS servers. RADIUS-initiated CoA messages use the
following codes in request and response messages:
■CoA-Request (43)
■CoA-ACK (44)
■CoA-NAK (45)
To configure CoA DM server, use the following command:
ip disconnect-message-server <IP> port <1~65535>
To configure CoA DM client, use the following command:
(JadeOS) (config) #aaa profile aaa
(JadeOS) (AAA profile "aaa") #disconnect-message-client <IP>
9.7.6 Configuring Captive-portal Authentication
Step 1 Configure authentication way
(JadeOS) (config)#aaa authentication captive-portal web-portal
(JadeOS) (Portal Authentication Profile "web-portal)#server-group SG1
(JadeOS) (Portal Authentication Profile "web-portal)#default-role postauth
(JadeOS) (Portal Authentication Profile "web-portal")#rfc-3576-client 119.6.200.203
Step 2 Apply captive-portal authentication in AAA profile
(JadeOS) (AAA profile "aaa")#authentication-portal web-portal
9.7.7 Customize Logout Domain
User can use customized logout domain, such as logout.wifi; user can input log-
out.wifi in the browser, and then login logout page.
To configure logout.wifi in JadeOS, use the following command:
(JadeOS) (config)#ip domain-name logout.wifi http-redirect-url <word>
9.7.8 Configuring White-list and Black-list

63JadeOSUserManual
White-list and black-list authentication is a group of URL.
Three cases about white-list and black-list authentication as follows:
• User can access white-list URL and no need to authenticate
• User can not access black-list URL, even though successfully authenticate
• User can access URL that neither white-list nor black-list after successfully au-
thenticate
To configure domain in JadeOS, use the following command:
(JadeOS) (config) # netdestnation black-list|white-list name WORD
Configuring White-list
To configure white-list in JadeOS, use the following command:
(JadeOS) (config) #netdestination white-list name www.sina.com
(JadeOS) (config) # ip access-list session pre
(JadeOS) (config-sess-pre) # any host <DNS> any permit position 1
(JadeOS) (config-sess-pre) #any alias 123 any permit position 2
Configuring Black-list
To configure black-list in JadeOS, use the following command:
(JadeOS) (config) #netdestination black-list name www.sina.com
(JadeOS) (config) # ip access-list session post
(JadeOS)(config-sess-post) #any alias 123 any deny send-deny-response
position 2
9.8 Radius Proxy
JadeOS supports radius proxy. With proxy RADIUS, one RADIUS server receives an
authentication (or accounting) request from a RADIUS client (such as a NAS), for-
wards the request to a remote RADIUS server, receives the reply from the remote
server, and sends that reply to the client, possibly with changes to reflect local admin-
istrative policy. A common use for proxy RADIUS is roaming. Roaming permits two
or more administrative entities to allow each other's users to dial in to either entity's
network for service.
9.8.1 Configuring Radius Proxy
Step 1 Create aaa authentication radius-proxy RP
(JadeOS) (config)#aaa authentication radius-proxy RP
(JadeOS) (Radius Proxy Profile "RP")#default-role postauth
(JadeOS) (Radius Proxy Profile "RP")#server-group SG1
Step 2 Config aaa profile AAA, and specify the authentication way of Radius Proxy
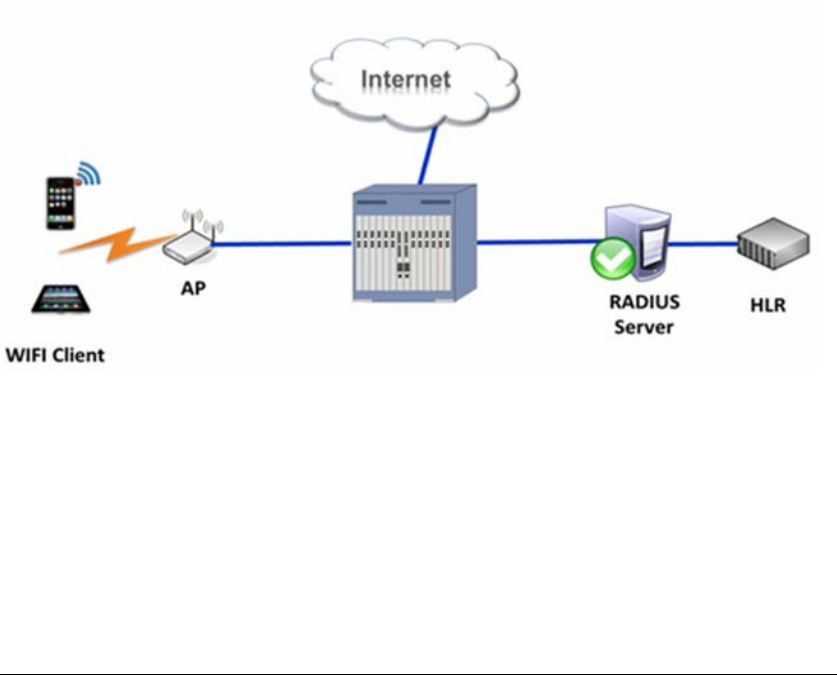
64JadeOSUserManual
is RP
(JadeOS) (AAA profile "AAA")#authentication-radius-proxy RP
Step 3 Specify the aaa profile in config mode
(JadeOS) (AAA profile "AAA")#aaa radius-proxy aaa profile AAA
Step 4 Enable Radius proxy in config mode
(JadeOS) (AAA profile "AAA")#aaa radius-proxy enable
9.8.2 Configuring EAP-SIM
EAP-SIM is one of the EAP authentication protocol based on 2G SIM card through
which users access to WLAN network.
Differed from other authentication protocol, EAM-SIM takes use of the user data and
original authentication message be stored in SIM card to authenticate user and gener-
ate session key to access WLAN. At the same time the data will be stored in the ISP’s
HLR to avoid the authentication message transfer on Internet to prevent user data
from network attack.
EAP-SIM is the authentication protocol applied in 2G networks and EAP-AKA is ap-
plied in 3G network. EAP-SIM authentication is performed when users use SIM card
and EAP-AKA authentication is performed when users use USIM card. EAP-SIM and
EAP-AKA is specified in RFC 4186 and RFC 4187 respectively.
Figure 9-1 EAP-SIM authentication
To configure EAP-SIM authentication on JadeOS, following the steps:
Step 1 Configure Radius Server and Server Group
(JadeOS) (config) # aaa authentication-server radius r1
(JadeOS) (RADIUS Server "r1") #host 1.1.1.1
(JadeOS) (RADIUS Server "r1") #key 123

65JadeOSUserManual
(JadeOS) (RADIUS Server "r1") #ip 10.1.1.10
(JadeOS) (config) #aaa server-group sg
(JadeOS) (Server Group "sg")#auth-server r1
Step 2 Configure 802.1x authentication profile
(JadeOS) (config)#aaa authentication dot1x dot1x
(JadeOS) (802.1X Authentication Profile "dot1x")#default-role postauth
(JadeOS) (802.1X Authentication Profile "dot1x")#server-group g1
Step 3 Configure AAA Profile
(JadeOS) (config)#aaa profile default
(JadeOS) (AAA profile "default")#authentication-dot1x dot1x
(JadeOS) (AAA profile "default")#radius-accounting sg
(JadeOS) (AAA profile "default")#initial-role preauth
Step 4 Configure ssid-profile
(JadeOS) (config)#wlan ssid-profile default
(JadeOS) (SSID Profile "default")#auth-mode wpa-aes
Step 5 Configure vap-profile
(JadeOS) (config)#wlan vap-profile default
(JadeOS) (VAP Profile "default")#aaa-profile default
(JadeOS) (VAP Profile "default")#ssid-profile default
Step 6 Configure ap-template
(JadeOS) (config)#ap-template default
(JadeOS) (AP template "default")#vap-profile default
9.9 Rate Limit Based on User
Step 1 Configure bandwidth named ”BW-8M” and ”BW-2M” in config mode
(JadeOS) (config)#aaa bandwidth-contract BW-8M mbits 8
(JadeOS) (config)#aaa bandwidth-contract BW-2M mbits 2
Step 2 Specify the downstream is BW-8M and the upstream is BW-2M
(JadeOS) (config)#user-role postauth
(JadeOS) (config-role)#bandwidth-contract BW-8M downstream
(JadeOS) (config-role)#bandwidth-contract BW-2M upstream
9.10 User Accounting
To configure user accounting, you need to configure a radius server group first, and
enable radius accounting in AAA profile. To enable user accounting, use the Ra-
dius-accounting <server-group> command. For example:
(JadeOS) (AAA profile "aaa")#radius-accounting SG1
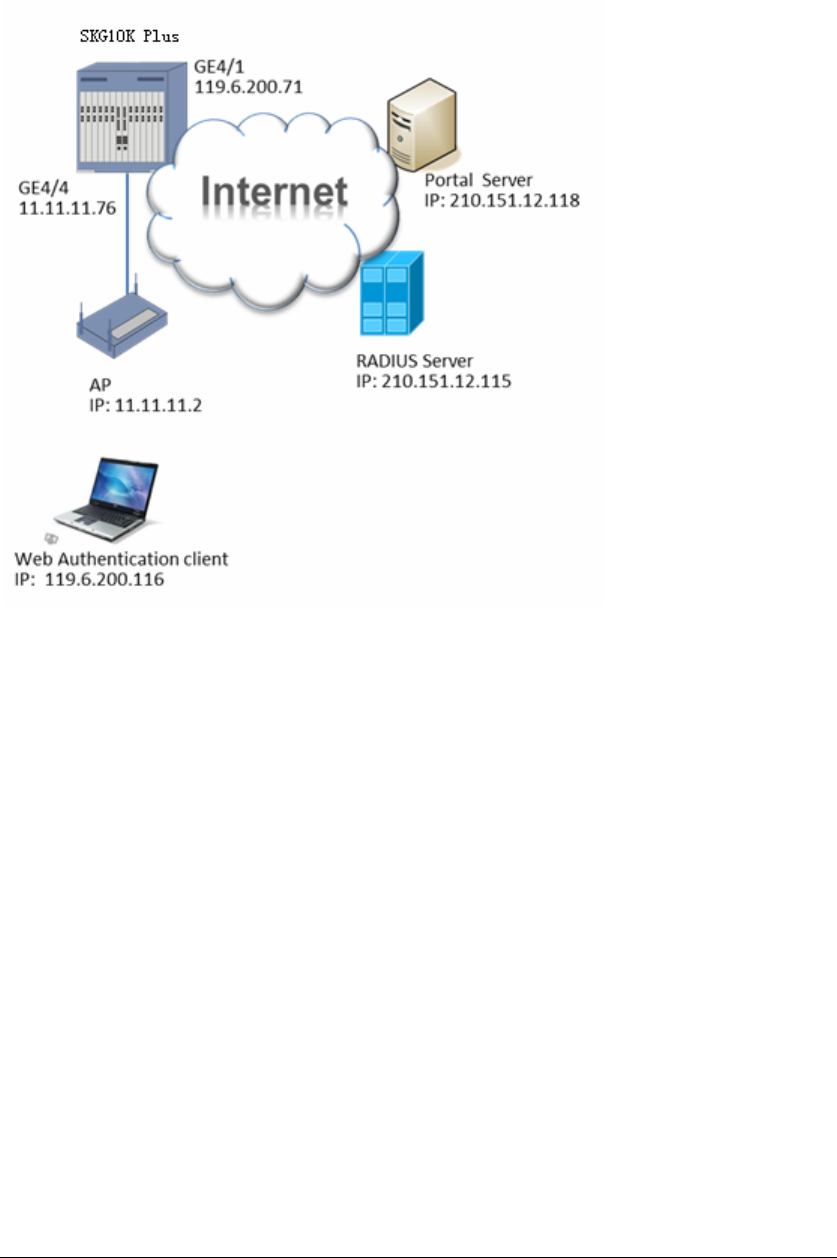
66JadeOSUserManual
9.11 Example of WEB-Portal Authentication
The following topology is taken for a web authentication configuration example:
Figure 9-2 Web authentication configuration example
Step 1 Configure VLAN and IP
(JadeOS) (config) #vlan database
(JadeOS) (config-vlan) #vlan range 11,30
(JadeOS) (config) #interface gigabitethernet 4/1
(JadeOS) (config-if)#switchport access vlan 30
(JadeOS) (config-if)#exit
(JadeOS) (config) #interface gigabitethernet 4/4
(JadeOS) (config-if)#switchport access vlan 11
(JadeOS) (config-if)#exit
(JadeOS) (config) #interface vlan 30
(JadeOS) (config-subif)#ip address 119.6.200.71/24
(JadeOS) (config-subif)#exit
(JadeOS) (config) #interface vlan 11
(JadeOS) (config-subif)#ip address 11.11.11.76/24
(JadeOS) (config-subif)#exit
(JadeOS) (config) # ip route 0.0.0.0 0.0.0.0 119.6.200.1

67JadeOSUserManual
(JadeOS) (config-subif)#end
Step 2 Create DHCP Server
(JadeOS) (config) #ip dhcp pool 119
(JadeOS) (config-dhcp)#network 119.6.200.0 255.255.255.0
(JadeOS) (config-dhcp)#default-router 119.6.200.1
(JadeOS) (config-dhcp)#dns-server 119.6.6.6
(JadeOS) (config-dhcp)#exit
(JadeOS) (config) #ip dhcp excluded-address 119.6.200.1 119.6.200.115
(JadeOS) (config) #ip dhcp excluded-address 119.6.200.117 119.6.200.254
(JadeOS) (config) #service dhcp
Step 3 Configure ACL session
(JadeOS) (config) #ip access-list session pre-auth-ctrl
(JadeOS) (config-sess-pre-auth-ctrl)# host 119.6.200.116 any tcp 80 dst-nat 8189 ip 210.151.12.118
(JadeOS) (config-sess-pre-auth-ctrl)#any any svc-dhcp permit
(JadeOS) (config-sess-pre-auth-ctrl)#any any udp 53 permit
(JadeOS) (config-sess-pre-auth-ctrl)#any host 210.151.12.118 tcp 443 permit
(JadeOS) (config-sess-pre-auth-ctrl)#exit
(JadeOS) (config) #ip access-list session post-auth-ctrl
(JadeOS) (config-sess-post-auth-ctrl)#any any any permit
(JadeOS) (config-sess-post-auth-ctrl)#exit
Step 4 Configure user role
(JadeOS) (config) #user-role pre-auth
(JadeOS) (config-role) #session-acl pre-auth-ctrl
(JadeOS) (config-role) #exit
(JadeOS) (config) #user-role role
(JadeOS) (config-role) #session-acl post-auth-ctrl
(JadeOS) (config-role) #exit
Step 5 Configure timers
(JadeOS) (config) # aaa timers dead-time 10
Step 6 Configure RFC-35756 server and RFC-3576 client
(JadeOS) (config) #ip rfc-3576-server source-interface vlan 30 port 1700 (JadeOS) (config) #aaa
rfc-3576-client 210.151.12.118
(JadeOS) (RFC 3576 Client "210.151.12.118") #key ********
Step 7 Configure radius server and add it to server group
(JadeOS) (config) #aaa authentication-server radius r1
(JadeOS) (RADIUS Server "r1") #host 210.151.12.115
(JadeOS) (RADIUS Server "r1") #key ********
(JadeOS) (RADIUS Server "r1") #nas-ip 119.6.200.71

68JadeOSUserManual
(JadeOS) (RADIUS Server "r1") #source-interface vlan 30
(JadeOS) (config) #aaa server-group g1
(JadeOS) (Server Group "g1") #auth-server r1
Step 8 Configure aaa profile
(JadeOS) (config) #aaa profile ABC
(JadeOS) (AAA Profile "ABC") #web-auth-server-group g1
(JadeOS) (AAA Profile "ABC") #rfc-3576-client 210.151.12.118
(JadeOS) (AAA Profile "ABC") #initial-role pre-auth
(JadeOS) (AAA Profile "ABC")#web-auth-default-role post-auth
(JadeOS) (AAA Profile "ABC")#post-auth idle-time 300
(JadeOS) (AAA Profile "ABC")#post-auth lifetime 300
(JadeOS) (AAA Profile "ABC")#pre-auth idle-time 300
(JadeOS) (AAA Profile "ABC")#pre-auth lifetime 300
Step 9 Apply profile to VLAN
(JadeOS) (config) #vlan 30 aaa-profile ABC
9.12 Trouble Shooting
When JadeOS is in trouble, user can locate problem by viewing user list. To view user
list, use show user-table command. For example:
(JadeOS) #show user-table
Auth User Table Entries
-----------------------
Flags: O - Post-auth, E - Pre-auth, W - Web-auth, P - RADIUS proxy,
C - Accounting, m - Pre-MAC-auth, M - Post-MAC-auth, R - L3 roaming,
o - Open, w - WEP, c - CCMP, t - TKIP, a - WPA, n - RSN, x - 802.1X, L - Station leave
No. IP-addr MAC-addr Type Flags Age(d:h:m)
User-name
--- ------- -------- ---- ----- ----------
---------
(JadeOS) #show user-table
(JadeOS) #show datapath user table
Datapath User Table Entries
---------------------------
Flags: P - Permanent, W - WEP, T- TKIP, A - AESCCM, G - AESGCM, V - ProxyArp to/for MN(Visitor),
N - VPN, L - local, Y - Any IP user, R - Routed user, M - Media Capable,

69JadeOSUserManual
S - Src NAT with VLAN IP, E - L2 Enforced, F - IPIP Force Delete, O - VOIP user
IP MAC ACLs Contract Location Sessions Flags
--------------- ----------------- ------- --------- -------- --------- -----
(JadeOS) #show datapath user coun
(JadeOS) #show datapath user counters
Datapath User Table Count is: 0

70JadeOSUserManual
WLAN Management
JadeOS provides solutions of wireless controller and FIT AP.
Wireless controller uniformly configure, manage and maintain a large quantity of APs,
which greatly reduces the maintenance of wireless network. JadeOS supports AP
without configuration, which is convenient to expand FIT AP and wireless network.
JadeOS also supports centralized authentication, which is convenient to uniformly
access and authenticate. At the same time, it is better to do the function of wireless
roaming, RF management and load balance of AP access for AP centralized manage-
ment.
With the standard CAPWAP protocol, AC manages and controls AP through
CAPWAP control channel; the data forwarding between AP and AC is through
CAPWAP data channel. For CAPWAP is transferred based on Layer-3 network, it
supports flexible network deployment in multi network; with the standard protocol, it
raises the possibility of interconnection between different products from different
manufacturers. Forwarding mode supports AC centralized forwarding and AP local
forwarding. Authentication mode supports AC centralized authentication and AP local
authentication.
10.1 Wireless Network Architecture
10.1.1 CAPWAP Description
Control and provisioning of wireless access points (CAPWAP) protocol is belonging
to IETF. It rules the interconnection between WTP and AC, which achieve the man-
agement and data forwarding for all the WTPs controlled by AC. Now CAPWAP is
classified into two types:
• CAPWAP control channel
• CAPWAP data channel
10.1.2 CAPWAP Control Channel
CAPWAP control channel is classified into two types:
Static discovery: specify the IP address of AC in AP
Dynamic discovery: configure broadcast discovery, DHCP discovery and DNS dis-
covery and so on in AP
More, AP will actively require update version and configuration, which reduce the
maintenance.

71JadeOSUserManual
10.1.3 CAPWAP Data Channel
After configuration request by AP, AC will consult with AP to enable data channel.
In centralized forwarding mode, up-link message will be encapsulated with CAPWAP
in AP, decapsulated in AC, and then forwarding; down-link message will be encapsu-
lated with CAPWAP in AC, and then arrive AP through CAPWAP tunnel; the
down-link message will be decapsulated in AP, and then arrive user terminals through
802.11 protocols.
10.1.4 Mirror Upgrade and Configuration Management
AP will automatically check for version upgrade. You just need to configure in AC for
configuration management, no need to configure a large quantity of APs. The con-
figuration will be in effective when AC receives AP request. The configuration com-
mand is as below:
copy ap-image primary-image ftp 192.168.50.222 admin AmOS-1.4.1.2 41724 WIA3200-10 A1
AmOS-1.4.1.2
10.1.5 Forwarding Mode
JadeOS achieve AC centralized forwarding and AP local forwarding in CAPWAP
standard. You can specify the forwarding mode through configuration.
10.1.6 Authentication Mode
JadeOS achieve AP centralized authentication and AP local authentication. Each SSID
can specify a VLAN, and then look for AAA profile according to VLAN; please refer
to chapter 9.3 for more information.
10.1.7 STATION Management
The authentication of Station will be handled in AC. AC will record the authentication
process of AP and the information connected AP, which is the basis of choosing
CAPWAP data channel and roaming. Station management includes 802.11 manage-
ment, STA information inquiry, log backup and recovery.
10.2 Forwarding Mode
Forwarding mode is classified into 802.11 tunnel centralized forwarding, 802.3 tunnel
centralized forwarding, AC authentication local forwarding and local authentication
local forwarding.

72JadeOSUserManual
10.3 Configuring Power
You can configure to automatically choose the power of AP and station in AC, the
configuring command is as follows:
transmit-power 0
Configuring Radio Frequency
You can manually configure radio frequency of AP, at the same time, AP can keep the
original radio frequency information when AP online again after AP offline normally.
For example:
(JadeOS) (config)#radio dot11g-profile default
(JadeOS) (802.11g radio Profile "default")#channel 149
Configuring Radio Power
• JadeOS supports manually power regulation. For example
(JadeOS) (config)#radio dot11a-profile default
(JadeOS) (802.11a radio Profile "default")#transmit-power 10
(JadeOS) (802.11a radio Profile "default")#transmit-power 20
• JadeOS supports automatically power regulation.
(JadeOS) (802.11a radio Profile "default")#transmit-power 0
10.4 Configuring Radio
You can automatically choose the working channel of AP and station. For example:
channel 0
10.5 DTLS and CA
Datagram Transport Layer Security (DTLS) is based on the standard IETF protocol in
TLS. CAPWAP control message and part of CAPWAP data message are using DTLS
encryption mechanism of UDP layer. The configuration command is as follows:
dtls
Import CA
Import CA in server into AC, which means transferring the CA format into another
format that can be recognized by DTLS control channel and remove the password.
For example:
(JadeOS) #copy ftp 1.2.3.4 user cert_file flash sc-file-1

73JadeOSUserManual
(JadeOS) #Cert import pem serverCert sc-1 sc-file-1
10.6 Special SSID and SSID Control
In EDU mode, in order to avoid AP disables all the SSIDs when AP disconnects with
AC, AC will specify a special SSID when AP connects with AC; when CAPWAP is
disconnected, AP will enable this SSID to ensure the normal service. The configuring
command is as follows:
(JadeOS) (config)#wlan ssid-profile SSID
(JadeOS) (SSID Profile "SSID")#special-ssid
Timing Shutdown
Timing shutdown supports the following functions:
¾ Support AC timing shutdown the function of radio frequency in specified AP
¾ Support AC timing shutdown the specified functions of SSID
The configuring command:
time-range default
Example:
(JadeOS) (config)#time-range-profile default
(JadeOS) (Time Range Profile "default")#range weekday 17:00 18:00
(JadeOS) (Time Range Profile "default")#range weekend 17:00 18:00
(JadeOS) (Time Range Profile "default")#range daily 17:00 18:00
(JadeOS) (Time Range Profile "default")#exit
(JadeOS) (config)#wlan vap default
(JadeOS) (Virtual AP Profile "default")#time-range default
(JadeOS) (Virtual AP Profile "default")#exit
(JadeOS) (config)#radio dot11a-profile default
(JadeOS) (802.11a radio Profile "default")#time-range default
(JadeOS) (802.11a radio Profile "default")#exit
Note: Shutdown the frequency will make the whole radio disable; shutdown SSID just disable one
SSID in radio.
10.7 ACL
User access is mainly to issue ACL based on SSID, MAC, flow threshold, bandwidth
control. ACL is important in building secure network, and mainly supports the fol-
lowing functions:
¾ ACL based on MAC address
Configure ACL based on MAC address in AC, which achieve the black-list and
white-list based on MAC address.

74JadeOSUserManual
For example:
Add mac 11:22:33:44:55:6 into black-list:
(JadeOS) (AP MAC ACL Profile “mac-acl-prof-1”)#list-type deny
(JadeOS) (AP MAC ACL Profile “mac-acl-prof-1”)#mac 11:22:33:44:55:66
Add mac 11:22:33:44:55:6 into white-list:
(JadeOS) (AP MAC ACL Profile “mac-acl-prof-1”)#list-type accept
(JadeOS) (AP MAC ACL Profile “mac-acl-prof-1”)#mac 11:22:33:44:55:66
¾ Support to disconnect network automatically based on idle traffic monitor; you
can configure time and the default value is 300s. the configuring command is as
follows:
idle-timeout <300-15300>
¾ Support ACL based on traffic threshold and the default value is 1KB:
idle-threshold <0-1048576>
Configuring ACL
Configuring ACL based on IP address in AC achieves user access control. Configur-
ing different ACls in AC can control different user access, for example: you can make
user in the specified IP segment access the specified network segment. For ACL based
on IP address is according to SSID, you can configure different ACLs in different
SSID.
Functions supported by ACL:
¾ Match source IP address and network segment
¾ Match destination IP address and network segment
¾ Match specified IP protocol and range
¾ Match source port and destination port of UDP/TCP protocol
¾ Support the operation of ‘permit’ and ‘deny’ according to the above rules
Configuration command:
any any any deny/permit
For example:
(JadeOS) (config)#ip access-list session acl1
(JadeOS) (config-sess-acl1)#host 1.1.1.1 any tcp 1 100 deny
(JadeOS) (config-sess-acl1)#exit
(JadeOS) (config)#user-role role1
(JadeOS) (config-role)#access-list session acl1
(JadeOS) (config-role)#exit
(JadeOS) (config)#aaa profile aaa1

75JadeOSUserManual
(JadeOS) (AAA profile "aaa1")#initial-role role1
(JadeOS) (AAA profile "aaa1")#exit
(JadeOS) (config)#wlan virtual-ap default
(JadeOS) (Virtual AP Profile "default")#aaa-profile aaa1
(JadeOS) (Virtual AP Profile "default")#exit
10.8 Authentication Exemption
For the special user that accounting exemption such as administrator and so on,
JadeOS supports authentication exemption, for example:
Step 1 Configure AAA profile, disable radius-accounting
(JadeOS) (config)#aaa profile a1
(JadeOS) (AAA profile "a1")#no radius-accounting enable
(JadeOS) (AAA profile "a1")#exit
Step 2 Apply AAA profile to the VLAN
(JadeOS) (config)#vlan 10 aaa profile a1
10.9 Anti-fake and Rogue AP detect
Anti-fake
To enable anti-fake function, use the following command:
validate-sta-enable
To disable anti-fake function, use the following command:
no validate-sta-enable
Rogue AP Detect
AC will configure detect rule according to the message sent by AP, that is to make a
detect policy for rogue equipment; then AC will classify the APs according to the de-
tect rule.
For example:
(JadeOS) (config)#wids ap-classification-rule
(JadeOS) (IDS AP Classification Rule )# enable
(JadeOS) (IDS AP Classification Rule )# ssid test encription open
(JadeOS) (IDS AP Classification Rule )# ap-oui 11:22:33
Note:To display rogue ap, use show rogue-ap command.
10.10 Anti-DoS
The function of WLAN Dos is to prevent DoS attack.

76JadeOSUserManual
For example:
(JadeOS) (config)#wids dos-profile default
(JadeOS) (IDS DOS-Profile "default")#dos-prevention
(JadeOS) (IDS DOS-Profile "default")#mgmt-frame-throttle-interval 10
(JadeOS) (IDS DOS-Profile "default")#mgmt-frame-throttle-limit 100
To display the attack in all the Aps, use show wlan dos command.
To display the attack in specified MAC, use show wlan dos ap <ap_ip> command.
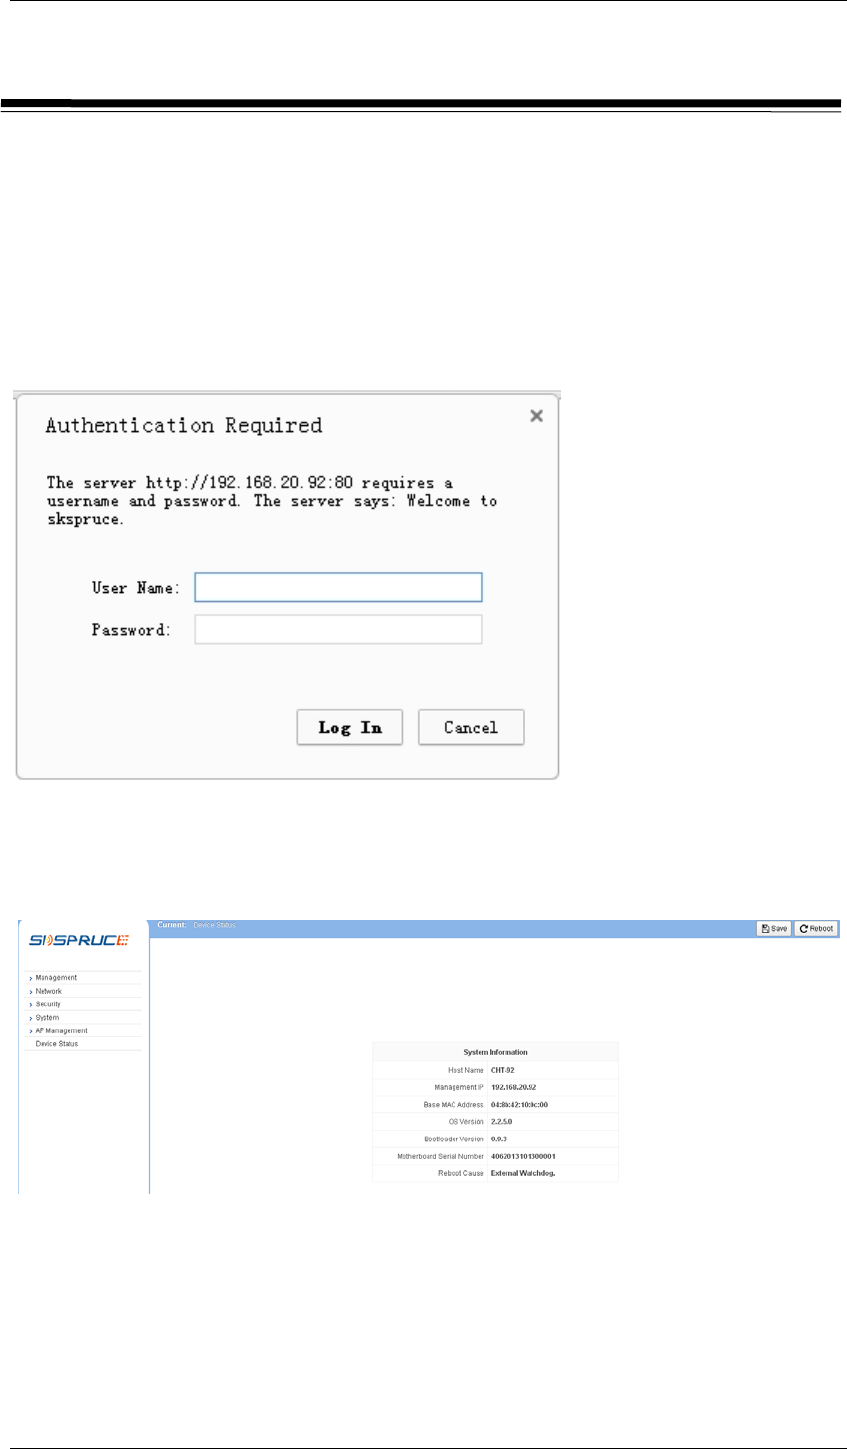
77JadeOSUserManual
Chapter10 WEBUI
11.1 WEBUI Description
JadeOS supports WEBUI configuration.
11.2 WEBUI Login
Step 1 Open IE browser and input IP address, then JadeOS will pop up the follow-
ing dialog box:
Figure 12-1 Login Dialog Box
Step 2 Input user account ‘admin’ and password ‘admins’ and click Login button,
then JadeOS will redirect to the following login page:
Figure 12-2 webUI page

78JadeOSUserManual
Chapter11 Configuring SNMP
12.1 Configuring SNMP
Simple Network Management Protocol (SNMP) is an Internet-standard protocol for
managing devices on IP networks. It is used mostly in network management systems
to monitor network-attached devices for conditions that warrant administrative atten-
tion. JadeOS support versions 1, 2c, and 3 of SNMP. You can configure SNMP using
the following commands:
snmp-server community rw|ro <WORD>
snmp-server traphost <IP> <WORD> {udp-port portno}
Parameter Description
WORD Name of Community
udp-port port no (optional) port number, default value: 162
IP IP address
Table 13- 1 Basic Parameters of SNMP
For example:
(JadeOS)#configure terminal
(JadeOS)(config)#snmp-server community ro ww 1.1.1.1

79JadeOSUserManual
Chapter12 Maintanence and Diagnosis
13.1 Log System
Log system is used to record system running status, which can be saved in local or
remote log server. Log is classified to 8 levels from emerg to debug, and the default
level is error.
To set log level, use the following command in config mode:
logging level <level> <all|category> [process app]
logging <IP> [severity level] [type category]
Note:log level: emerg , alert, crit, err, warning, notice, info, debug.
To set the log size in local server, use the command in config mode:
log size <100-102400> (unit:KB)
To recovery the log level in local to the default, use the command in config mode:
no logging level <level> <all|category> [process app]
no logging <IP> [severity level] [type category]
For example:
(JadeOS)(config)#logging level err all
(JadeOS)(config)#logging 192.168.16.84
(JadeOS)(config)#log size 102400
(JadeOS)(config)#end
To inquiry the local log, use the command in enable mode:
show log <all|category [app]> [line]
(JadeOS) #show log all
13.2 System Management
JadeOS is a unified multi-level scalable technology. It uses the active-standby mode
in control plane and active-active mode in data plane to achieve the high performance
and high availability. The distributed architecture has been extended to meet require-
ments of high performance equipment.
You can have a general view for the system management and telecommunications
among all modules in figure 14-1.
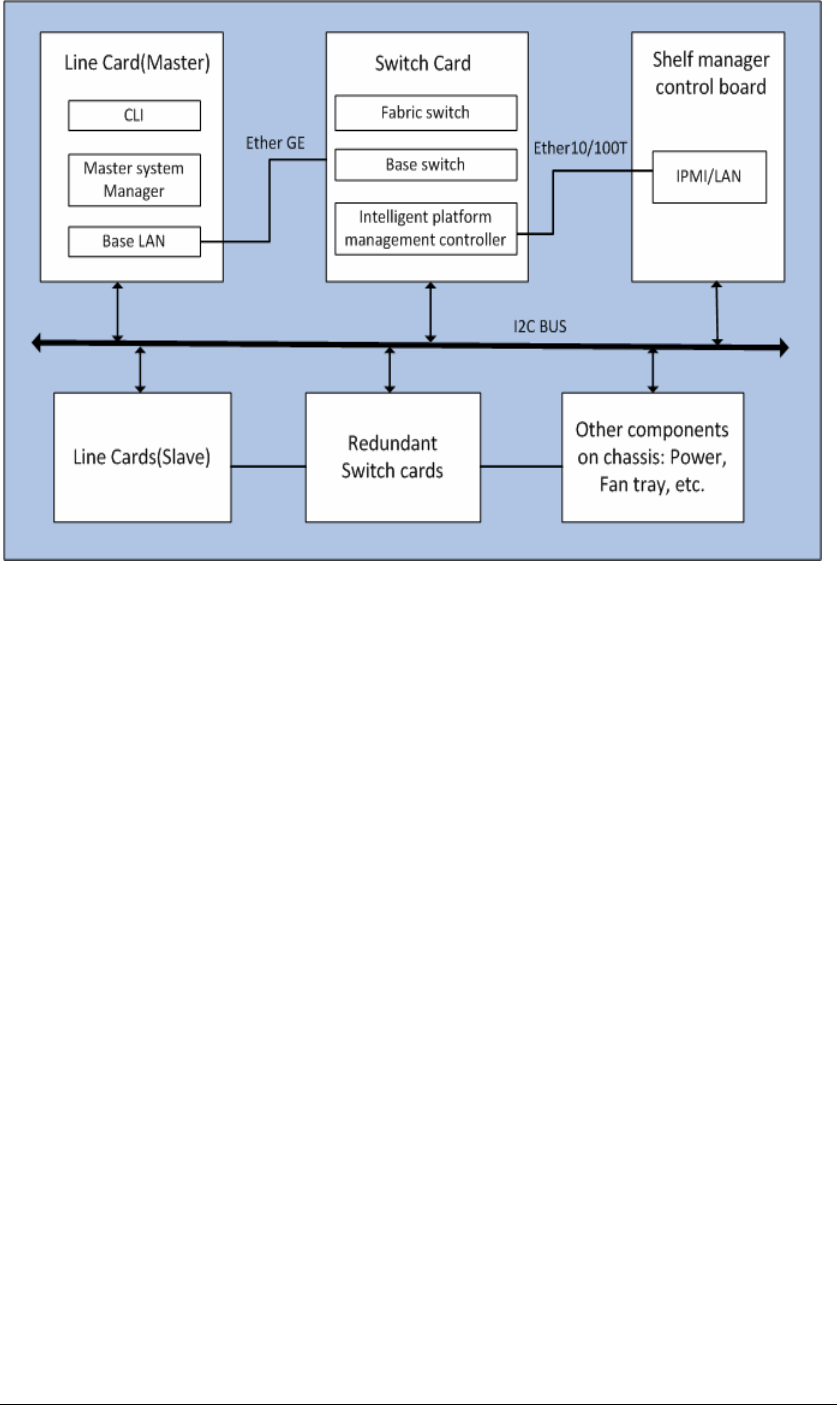
80JadeOSUserManual
Figure 14- 1 Modules Diagram for the System Management
When system powering up, a “master” system manager will be elected among all line
cards existing in the chassis to control the whole equipment. The shelf manager con-
trol board sends/receives messages from the cards and modules over I2C bus. The
elected “master” system manager on the line card get information from the shelf
manager control board across the switch board by TCP/IP to control and monitor the
whole system.
Information Inquire
To restart the system when JadeOS is in trouble, use the following command:
reload
To inquire the system information such as JadeOS version, gateway uptime, and so on,
use the following command:
show version
To inquire chassis components status such as power module connection status, fan
speed, line card temperature and so on, use the following command:
show inventory
To inquire the factory default information about chassis, use the following command:
show chassis_info
To inquire the environment temperature about the chassis, use the following com-
mand:
show temperature chassis

81JadeOSUserManual
To inquire the CPU usage percentage, use the following command:
show cpuload
To inquire the CPU memory usage information, use the following command:
show memory
To inquire system log, use the following command:
show log all
To inquire the process status, use the following command:
show process monitor statistics
Alarm
The hardware running status on JadeOS can be monitored and reported to system
manager. If the working state on each card or module, for example temperature, is
beyond the threshold, the alarms will arise and the LEDs on the card or module will
turn on.
The thresholds can be set manually using the following command:
alarmthreshold
NOTE: The alarm LED on SAD card will not turn off automatically when the alarm is relieved
until you clear the alarm manually. To clear the alarm LED on SAD card, use the fol-
lowing command on the master line card:
turn-off-led
13.3 Sniffer Tool
JadeOS provides the sniffer tools for network diagnosis; it can capture the data
packet in network interface and filter based on interface, IP address and tcp/udp port
number. The operation steps are as following:
Step 1 Configure filter conditions, and specify the capture traffic is 10M in
maximum.
(JadeOS) #packet capture interface gigaethernet 1/0 datatype all maxsize 10
Step 2 Start capture
(JadeOS) #packet capture start
Step 3 Stop capture
(JadeOS) #packet capture stop
Step 4 Display the packet capture
(JadeOS) # show packet capture

82JadeOSUserManual
Abbrviations
A
AC Alternating Current
ACC Automatic Current Control
ACL Access Control List
AS Autonomous System
ATCA Advanced Telecom Computing Architecture
AP Access Point
B
BCMC Broadcast and Multicast
C
CAPWAP Control And Provisioning of Wireless Access Points
CDP Cisco Discovery Protocol
CE Communication Edge
CLI Command Line Interface
D
DES Data Encryption Standard
DHCP Dynamic Host Configuration Protocol
DNS Domain Name Server
DOS Disk Operating System
E
EAP Enterprise Application Platform
EAPOL Extensible Authentication Protocol
ECN Engineering Change Notice
F
FRU Field Replaceable Unit
FTP File Transfer Protocol
G
GRE Generic Routing Encapsulation
GMT Greenwich Mean Time
I
IDS Intrusion Detection System
IDPS Intrusion Detection and Prevention System

83JadeOSUserManual
IETF Internet Engineering Task Force
IGP Interior Gateway Protocol
IP Internet Protocol
IPMB Intelligent Platform Management Bus
IPMC Intelligent Platform Management Controller
IPMI Intelligent Platform Management Interface
IPS Intrusion Prevention System
L
LACP Link Aggregation Control Protocol
LAG Link Aggregation Group
LDAP Lightweight Directory Access Protocol
LED Light Emitting Diode
M
MAC Multi-Access Computer
MLVDS Multipoint Low-Voltage Differential Signaling
N
NAT Network Address Translation
NTP Network Time Protocol
O
OSPF Open Shortest Path First
P
PCB Printed Circuit Board
PEM Power Entry Module
PPC
PVST Per Vlan Spanning Tree
O
OS Operation Software
OSPF Open Shortest Path First
OUI Organizationally unique identifier
Q
QOS Quality Of Service
R
RAM Random Access Memory

84JadeOSUserManual
RFC Request For Comments
RSTP Rapid Spanning Tree Protocol
RTC Real Time Clock
RTM Rear Transmission Module
S
SAD Shelf Alarm Display
SAP Shelf Alarm Panel
SHA Secure Hash Algorithm
SNMP Simple Network Management Protocol
SSID Service Set Identifier
SSL Secure Sockets Layer
SSH Secure Shell
STP Spanning Tree Protocol
T
TCA Telecommunications Computing Architecture
TCP/IP Transmission Control Protocol / Internet Protocol
TFTP Trivial File Transfer Protocol
TKIP Temporal Key Integrity Protocol
U
UDP User Datagram Protocol
V
VCCI Voluntary Control Council for Interference
VLAN Virtual Local Area Network
VPN Virtual Private Network
VRID Virtual Router ID
VRRP Virtual Router Redundancy Protocol
VTP Virtual Trunk Protocol
W
WEP Wired Equivalent Privacy
WPA Wi-Fi Protected Access