SKYPINE ELECTRONICS CES8203CL 2-DIN DVD MULTIMEDIA STATION WITH 6.2-INCH TOUCH PANEL CONTROL User Manual
SKYPINE ELECTRONICS (SHEN ZHEN) CO., LTD. 2-DIN DVD MULTIMEDIA STATION WITH 6.2-INCH TOUCH PANEL CONTROL Users Manual
UserManual.wiki
>
SKYPINE ELECTRONICS
>
CES8203CL User Manual
Users Manual
Navigation menu
Upload a User Manual
Namespaces
Wiki Guide
HTML
PDF
Info
Views
User Manual
Discussion / Help
Navigation
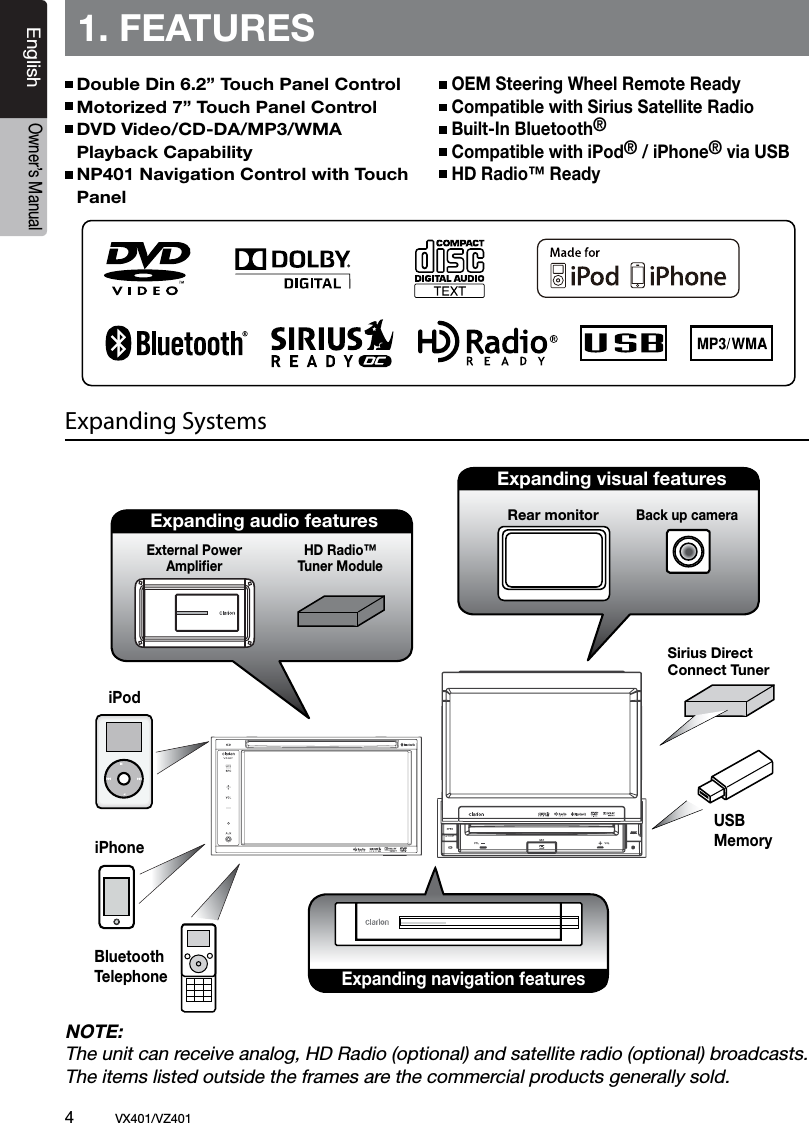
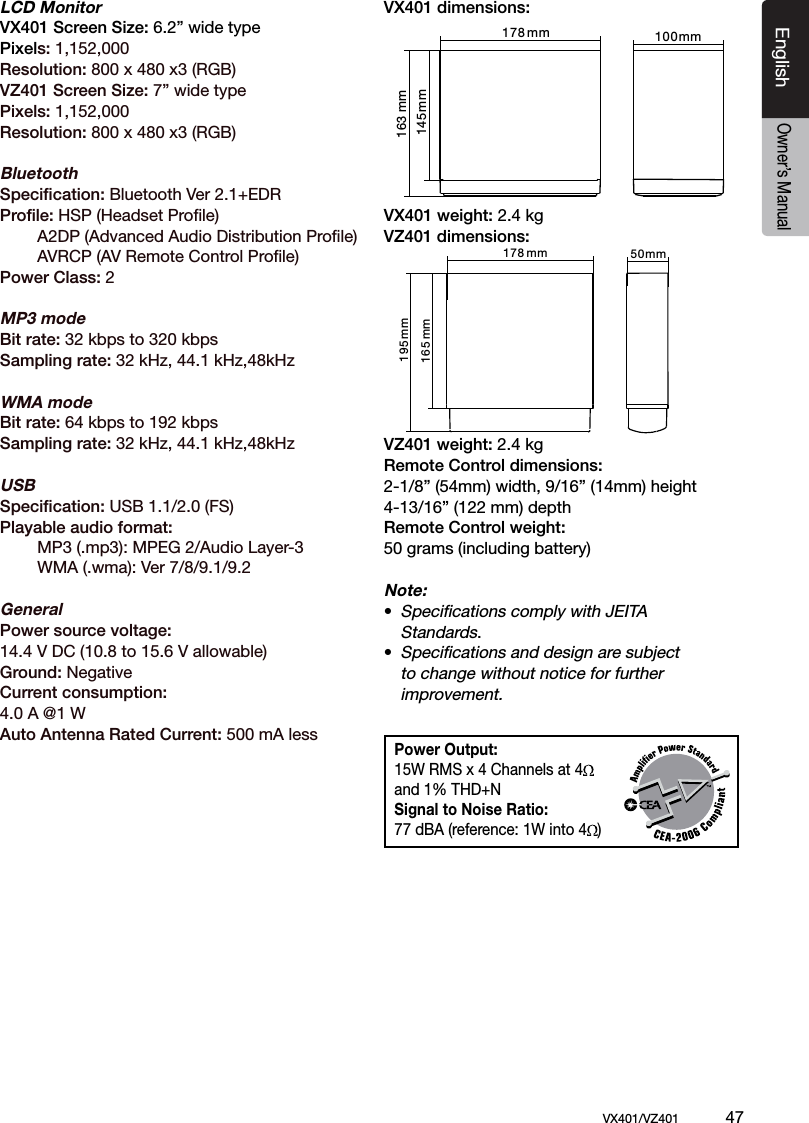
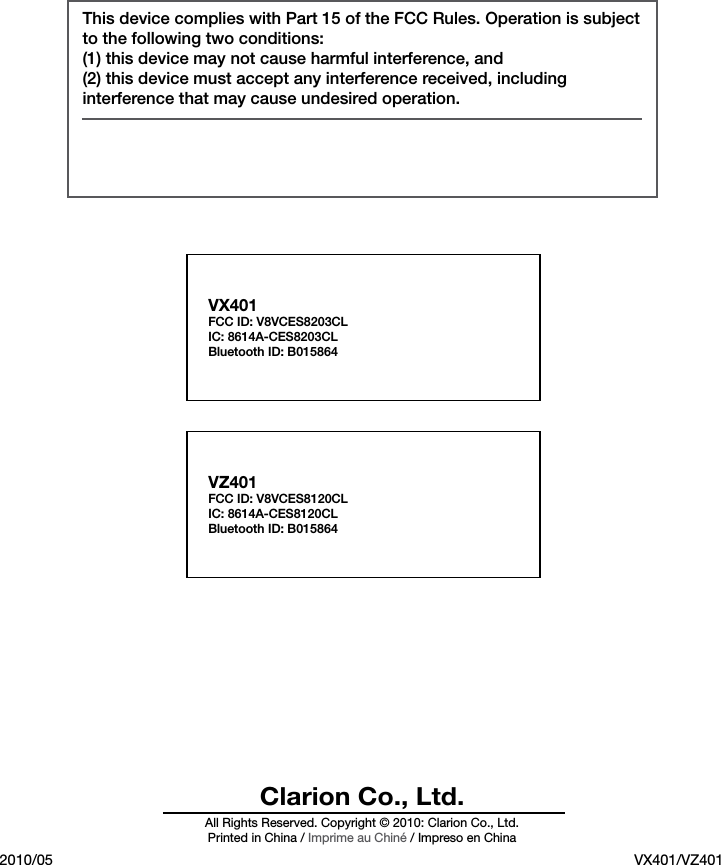
![EnglishVX401/VZ401 7EnglishOwner’s Manual3. CONTROLSOperational Panel[VOL+][SOURCE][PWR]AUX INSENSORRESET[ CLOSE]MIC[VOL-][VOL+][SOURCE][PWR]SENSOR RESETMIC [VOL-][OPEN]AUX INVX401](https://usermanual.wiki/SKYPINE-ELECTRONICS/CES8203CL/User-Guide-1321637-Page-7.png)
![8 VX401/VZ401EnglishOwner’s ManualNote: Be sure to read this chapter while referring to front diagram “CONTROLS”.[ SRC] Button• Press this button to turn the unit power On. The Main menu will be dispalyed. Scroll through the available sources such as AM/FM Tuner, Sirius, DVD, NAVI, USB, Camera modes, etc. • Press and hold this button for more than 2 seconds to turn the power Off.[VOL -], [VOL +] Buttons• Use these buttons to increase/decrease the volume.[OPEN] [CLOSE] Button (VZ401)• Use this button to open/close operation panel.RESET Button• Press this button to reset the unit.SENSOR • Receiver for the remote control unit (operating range: 30 degree in all directions).MIC • Internal microphone for use during Bluetooth phone calls. Sensitivity can be adjusted from the Settings menu.Functions of Buttons](https://usermanual.wiki/SKYPINE-ELECTRONICS/CES8203CL/User-Guide-1321637-Page-8.png)
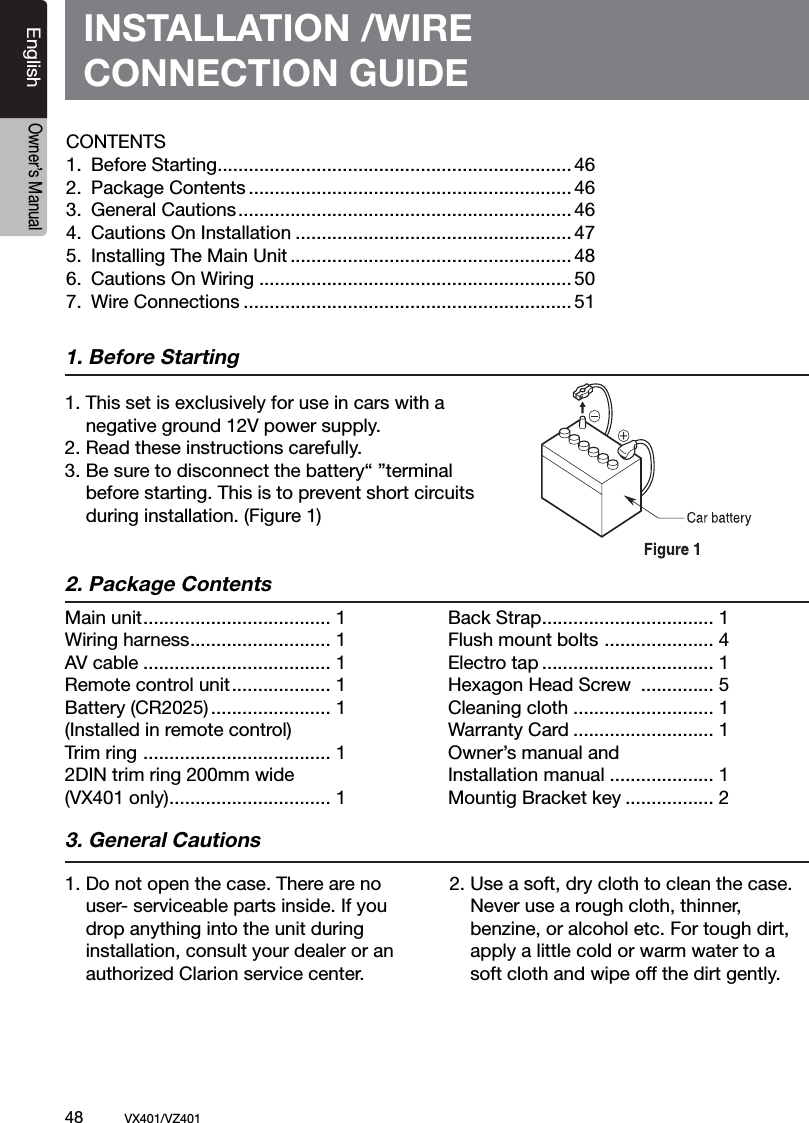
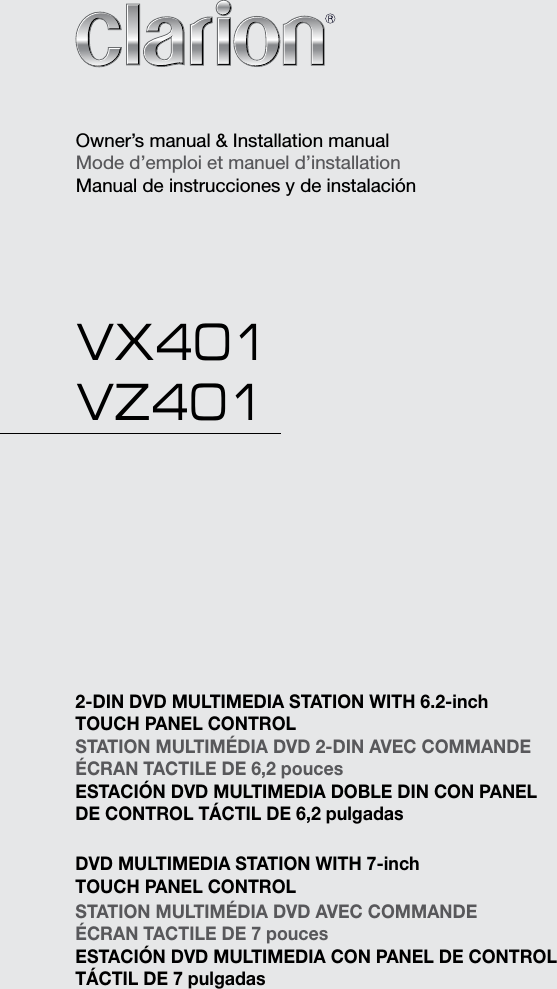
![EnglishVX401/VZ401 9EnglishOwner’s Manual/ BAND[ ]/ BANDRemote ControlSignal transmitterSignal transmitter[OPEN][ ][VOLUME][ ][ ][ ][MENU][PIC][REPEAT][ ]ROOT[ ][ ][SUB TITLE/VIDEO iPod MODE*][ANGLE/AUDIO iPod MODE*][ ] [ ][ ] [ ][MUTE][ ][SRCH][ ][ ][TITLE][ZOOM][AUDIO][0 - 9][ ]Replacing the batteries1. Press the retention tab and pull out the battery tray and remove the old battery.2. Insert the new CR2025 battery and slide the battery tray back in the remote control the same direction that you removed it. Please ensure the tray is inserted in the correct direction.Note: Using batteries improperly can cause them to explode. Take note of the following points: • When replacing batteries, replace both batteries with new ones. • Do not short-circuit, disassemble or heat batteries. • Do not dispose of batteries into fire or flames. • Dispose of discharged batteries properly.* Only when capable iPod/iPhone is connectedBACKSETTAGNAVI/AVSRC/POWERENTER[ ]](https://usermanual.wiki/SKYPINE-ELECTRONICS/CES8203CL/User-Guide-1321637-Page-9.png)
![10 VX401/VZ401EnglishOwner’s Manual/ BANDShared modes[VOLUME] ButtonIncrease or decrease volume.[MUTE] ButtonTurns mute on or off.[OPEN] ButtonPress this button to OPEN or CLOSE the motorized screen (VZ401). Please ensure there are no obstructions before starting the opera-tion.[SRC/POWER] Button• Short press to scroll through the available sources such as the AM/FM tuner, DVD player, iPod, SIRIUS Radio, or AUX IN.• Long press (over 1 second) to turn off the unit. [MENU] ButtonPress this button to access the MAIN MENU. From the main menu, you can select your desired source or change your settings. [PIC] ButtonPress this button to change monitor Brightness.[SET] ButtonPress this button to access the Audio Settings.[BACK] ButtonPress this button to exit selection and adjustment menus.[NAVI/AV] ButtonPress to scroll between the navigation modeand the previous mode.[ENTER] buttonPress to fix the choosed or entered data. TUNER/Satellite Radio mode[BAND] buttonPress this button to switch reception band.[0 - 9] Buttons• Use in the Key Pad screen to set the radio frequency or Satellite Radio channels.• Use to select the preset number in the Preset List screen.[ ], [ ] ButtonsPress to seek the next available station up or down in TUNER Radio and SIRIUS Radio. [ ], [ ] ButtonsPress to manually select the next station up or down in the TUNER Radio mode. In the SIRIUS Radio mode, you will scroll through the catego-ries.modes.[ ], [ ], [ ], [ ] Buttons• Press [ ], [ ] to scroll through the saved presets list in the TUNER mode.• Press [ ], [ ] to scroll through the page screens in the TUNER mode.DVD PLAYER mode• Press to turn on and off the playtime display in the DVD video.• Press to switch in and out of the LIST mode while playing CD audio.[ ] Button• Short press to play or pause the video or audio media.• Long press (over 1 second) to stop the video or audio media.[SEARCH] ButtonPress to open the direct search menu while in the DVD video mode.[ENTER] ButtonPress to select, play or pause video and audio media.[0 - 9] Buttons• Press to enter DVD video chapters/titles in the Key Pad screen.• Press to set the track/folder number of the CD, or MP3/WMA in the Key Pad screen.[TITLE] ButtonPress to go to the title menu on the DVD.[ROOT] ButtonPress to go to the root menu on the DVD.[ ], [ ], [ ], [ ] Buttons• Press to select button items on the menu screen of a DVD video.• Press [ ], [ ] to scroll through the page screens in the CD and MP3/WMA modes.Functions of Remote Control ButtonsYou can use the remote control unit to control the VX401 and VZ401.Note:• The wireless remote control operation may not be optimal in direct sunlight.](https://usermanual.wiki/SKYPINE-ELECTRONICS/CES8203CL/User-Guide-1321637-Page-10.png)
![EnglishVX401/VZ401 11EnglishOwner’s Manual/ BANDFunctions of Remote Control Buttons[ ], [ ] Buttons• Press to select the next chapter number up or down in DVD video mode.• Press to select the next track up or down in in CD meida.[ ], [ ] ButtonsPress to perform fastforward and fastbackward.Press again to advance to higher speed revers-ing or forwarding such as 2x,4x, 8x and 16x.Press once more to resume normal speed playback.[REPEAT] Button• Press to perform chapter repeat in the DVD video mode, and track repeat in CD and MP3/ WMA modes.• Press again to perform title repeat in DVD video mode or folder repeat in MP3/WMA mode. In CD mode, this will activate the repeat all mode.• Press again to perform all repeat in MP3/WMA playback mode.[ZOOM] ButtonPress to turn on and zoom in while in DVDVideo mode. You can zoom in up to 3x.[AUDIO] ButtonPress to switch the AUDIO function in the DVD video mode.[SUB-T] ButtonPress to display subtitles in the DVD video mode.[ANGLE] ButtonPress to switch the ANGLE function in the DVD video mode when the Angle mark is displayed.MAINMENU mode[ ] Button[BAND] Button[TAG] ButtonPress to scroll through the available sources and the Settings.[ ], [ ], [ ], [ ] ButtonsPress to scroll through the available keys.](https://usermanual.wiki/SKYPINE-ELECTRONICS/CES8203CL/User-Guide-1321637-Page-11.png)
![EnglishVX401/VZ401 17EnglishOwner’s Manual6. OPERATIONS Basic OperationsNote:• Be sure to read this chapter referring to the chapter “3. CONTROLS”When the unit is turned on, starting and stopping the engine with its volume raised to the maximum level may harm your hearings. Be careful about adjusting the volume.Turning ON and OFF the PowerNote:• Start the engine before using this unit.• Be careful about using this unit for a long time without running the engine. If you drain the car’s battery too far, you may not be able to start the engine and this can reduce the service life of the battery.1. Start the engine. The power button illumination on the unit will light up.2. Press the [ SRC] button on the unit to turn ON the power. Or press the [ ] power button on the remote control to turn ON the power.3. To turn OFF the power, press and hold the [ SRC] power button on the unit for more than 2 seconds. Or press the [ ] power button on the remote control to turn OFF the power for more than 2 seconds. Opening and Closing Operational PanelPress [OPEN] button on the unit (VZ401).The operational panel will be open.Press the same button again to close the panel.• Do not move the operation panel forcibly or apply strong force to the operation panel.• When the operation panel is operating, be careful not to get your hand or finger caught between the operation panel and main unit or its mechanical parts.• The driver should not operate the operation panel while driving. Adjusting the Angle of the Operational PanelTouch the settings key to enter into the Monitor Adjust to adjust the desired angle (VZ401).Selecting a Mode1. Touch the desired source key you wish to change to: Tuner, Disc, NAVI, USB, SIRIUS, AUX IN, AV IN, iPod/iPhone,etc. *External equipment not connected to this unit is not displayed. Touch the [10:00AM] to display the time.2. Press the [ ] SRC button to scroll through the available sources.CAUTIONEngine ON positionCAUTION](https://usermanual.wiki/SKYPINE-ELECTRONICS/CES8203CL/User-Guide-1321637-Page-17.png)
![18 VX401/VZ401EnglishOwner’s ManualBasic OperationsTurning Monitor ON or OFF1. Touch the screen button Monitor OFF on the Main Menu to turn Off the screen.2. Touch the screen again to turn monitor screen On.[Monitor off]: Turn off the screen. [Audio off]: Turn off the audio of source. Adjusting the VolumePress [VOL-]/[VOL+] buttons to adjust the volume. [VOL -]: Decreases the volume.[VOL+]: Increases the volume.• The volume level indicated in the display is in a range from 0 (min.) to 40 (max.).While driving, keep the volume level at which external sounds can be heard.MutePress the [MUTE] button on the remote control to turn mute On and Off. Adjusting the Settings1. Press [Settings] to enter the setting menu mode. 2. Press the desired mode key. Modes come in the following order: • General • Audio • Regional • Monitor Adjust • Video • Rating • Others3. Perform the adjustment for the desired item. See the following sections fo details.Adjusting the Audio Settings 1. Touch the [Audio Settings] key on the screen or press the [SET] key on the remote control. 2. Touch the item key to adjust. Perform the adjustment.3. Touch the [ ]/[ ] keys to scroll between the pages. 4. Touch the [ ] key to return to the previous screen. * In the above sections, only the details regarding adjustments are described, procedures to select items are skipped. CAUTION](https://usermanual.wiki/SKYPINE-ELECTRONICS/CES8203CL/User-Guide-1321637-Page-18.png)
![EnglishVX401/VZ401 19EnglishOwner’s ManualBasic OperationsAdjusting the EQ The EQ can be adjusted as follows.1. Touch the [ ] or [ ] key to select your settings.2. To set your preferable setting, select User.3. Select from preset setting list: Flat, Jazz, Pop or Classical.Adjusting the Bass The Bass gain and Bass frequency can be adjusted as follows. 1. Touch [ - ] or [ + ] key to set the desirable level.2. To set the Bass center frequency, enter the Audio adjustment in the Settings menu.3. To set the Bass Q-Factor, enter the Audio Adjustment in the Settings menu.Adjusting the Treble The Treble gain and Treble frequency can be adjusted as follows. 1. Touch [ - ] or [ + ] key to set the desirable level. 2. To set the Treble center frequency, enter the Audio adjustment in the Settings menu.Adjusting the Balance/Fader The Balance or Fader can be adjusted as follows. 1. Touch the [R] or [F] key to adjust to the fader level. • The factory default setting is “0”. (Adjustment range: front 9 to rear -9) 2. Touch the [Left] or [Right] key to adjust to the balance level. • The factory default setting is “0”. (Adjustment range: left -9 to right 9).Adjusting the Subwoofer The Subwoofer can be adjusted as follows.1. Touch the [ - ] or [ + ] key to adjust to the subwoofer level. • The factory default setting is “0”. (Adjustment range: left -9 to right 9).Adjusting the Loudness The Loudness can be adjusted as follows.1. Touch the [ ] or [ ] key to turn loudness On or Off.Adjusting the clock1. Touch the [Settings] key. The Settings menu will be displayed.2. Touch the [Clock] key in General sub menu.3. Set up the time by touching the digital numbers on the screen. After inputting the time, you can choose AM or PM if the Clock Mode is set to 12 Hr.4. Touch the [Clock Mode] to change time settings to 12Hr or 24Hr. Adjusting the Radio region1. Touch the [Settings] key. The Settings menu will be displayed. 2. Touch the [Radio Field] key in the General sub menu.3. A region selection menu will appear. Scroll down using the arrow at the bottom of the menu. Scroll up using the arrow at the bottom of the menu. Select the area’s radio region that you are in. If the region selected is incorrect, radio reception will be poor.Reset to Factory Defaults1. Touch the [Settings] key. The Settings menu will be displayed. 2. Touch the [Others] key. 3. Touch the [Reset] key. Select [YES] to restore your unit to factory default settings. This function will erase all memory from the unit and you must reset all personalized items such as tuner presets.NOTE: You will be asked once to confirm if you want to use the default setting. The unit will close the panel automatically.](https://usermanual.wiki/SKYPINE-ELECTRONICS/CES8203CL/User-Guide-1321637-Page-19.png)
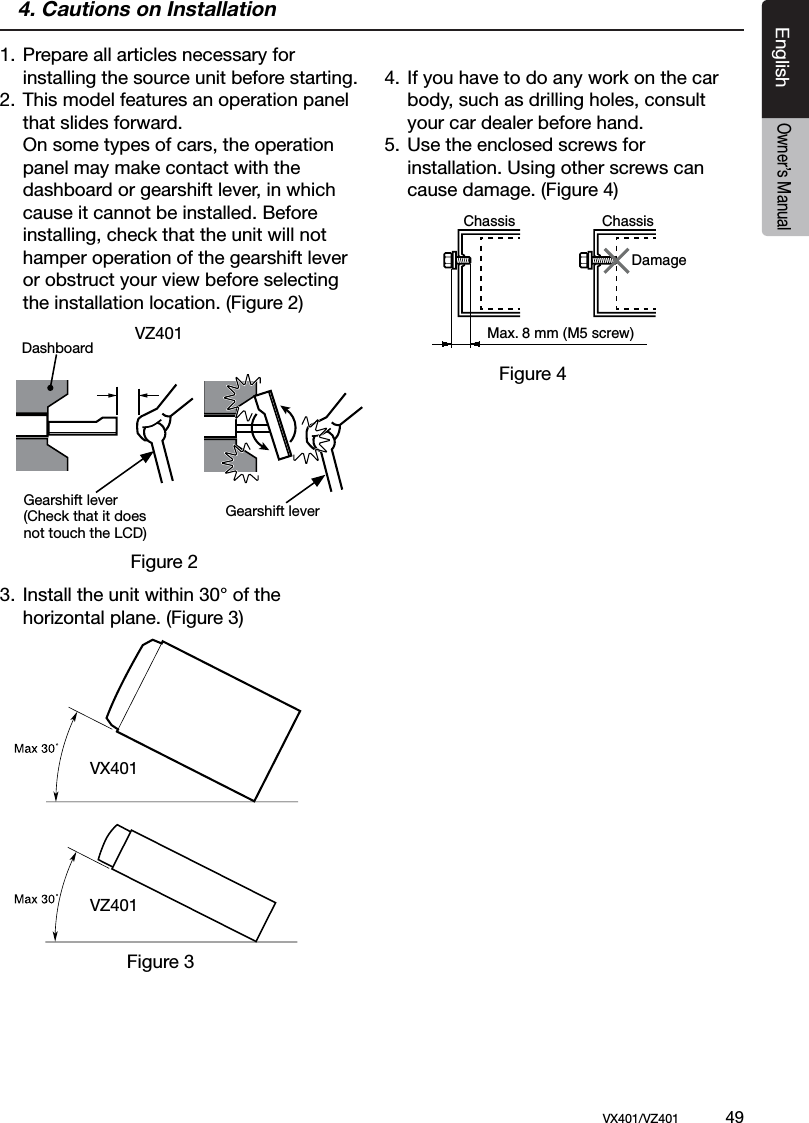
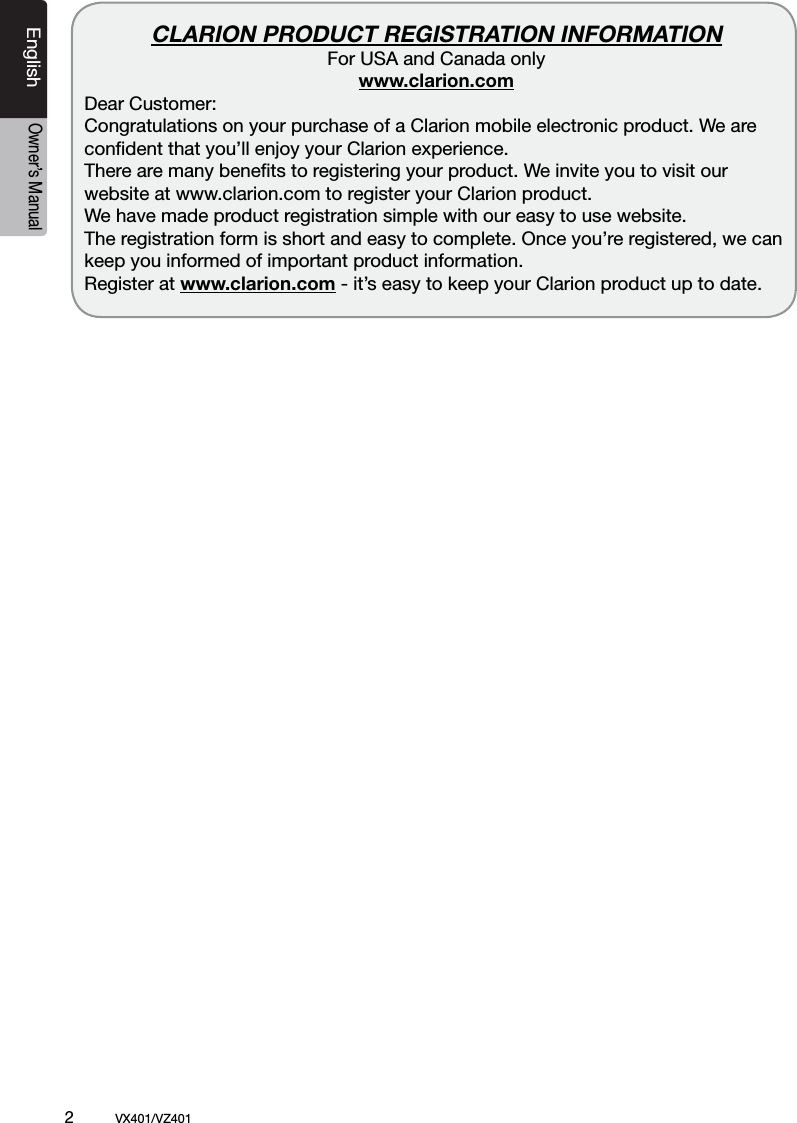
![20 VX401/VZ401EnglishOwner’s ManualListening to the Radio1. Touch the [Tuner] key on the Main menu display. The tuner mode screen is displayed.2. Touch the [BAND] key or touch the [Band] button on remote control to select the radio band. Each time the button is pressed, the radio reception band changes in the following order: FM1, FM2, FM3, AM, FM1...Seek Tuning1. Touch the [BAND] key to select the radio band (FM or AM). 2. Touch the [ ] or [ ] key to automatically seek a station. • When touching the [ ] key, the station is sought in the direction of higher frequencies. • When touching the [ ] key, the station is sought in the direction of lower frequencies.Manual Tuning1. Touch the [BAND] key to select the radio band (FM or AM). 2. Touch the [ ] or [ ] key to manually seek a station. • When touching the [ ] key, the station is tuned in the direction of higher frequencies. • When touching the [ ] key, the station is tuned in the direction of lower frequencies.Recalling a preset stationThere are 2 ways to recall the preset station.• Using the tuner unit: 1. Touch the [BAND] key to select the desire band (FM or AM) on the tuner. 2. Touch the [List] key to display the Preset List screen. 3. Touch the preset station (1 to 12) on tuner display. 4. Touch [ ] or [ ] to select next station up or down the preset list. 5. Touch the [PS] button to begin scanning the preset stations.• Using the remote control: 1. Touch the [BAND] button to select the desire band (FM or AM) on the remote control. 2. Touch the preset number (1 to 12) on numeric pad.Manual memory1. Touch the desired Band key to select the band you wish to store in.2. Tune in the station you wish to store using the seek tuning, manual tuning, or preset tuning.3. Touch and hold the desired Preset key you wish to store the current station for more than 2 seconds.Auto StoreThe Auto Store is a function for storing up to 12 stations that are automatically tuned in sequentially. If 12 receivable stations cannot be received, a previously stored station remains unoverwritten at the memory position.1. Touch the [Band] key to select the desired band. (FM or AM)2. Touch the [Auto Store] key to start the Auto Store function. A beep sounds and the stations with good reception are stored automatically to the preset channels.Radio OperationsSeek SeekSeekSeekM-SeekM-SeekM-Seek M-Seek11 - Band key2 - Scan key3 - Tune Up key4 - Tune Down key5 - Audio Settings key6 - List key7 - Seek Down key8 - Seek Up key9 - Eject key 10 - Main Menu key 11 - Tuner display29 1034587611](https://usermanual.wiki/SKYPINE-ELECTRONICS/CES8203CL/User-Guide-1321637-Page-20.png)
![EnglishVX401/VZ401 21EnglishOwner’s ManualRadio OperationsPreset ScanThe Preset Scan receives the stations stored in the preset memory in order. This function is useful when searching for the desired station in memory.1. Touch the [Band] key to select the desired band. (FM or AM).2. Touch the [List] key to display the Preset List screen.3. Touch the [PS] key to start the Preset Scan. The unit starts scanning each station for 10 seconds sequentially. Presets with a weak signal will be skipped.4. When the desired station is tuned in, touch the [PS] key again to continue receiving that station.LOC/DX SettingThe DX / LOC setting changes the tuner sensitivity in order to seperate closely spaced stations. This feature is useful in areas that have many radio stations in close proximity.1. Touch the [List] key to display the Preset List screen. 2. Touch the [DX] key to switch to DX tuner sensitivity.3. Touch the [LOC] key to switch to Local tuner sensitivity.DVD Video Player OperationsChange DVD System SettingsNote: If the set up operation is performed in the middle of DVD video play, the disc will restart from the beginning.Selecting DVD Set Up Menu1. Touch the [Settings] key on the Main Menu to access the Video set up menu.2. Touch the [Video] key. The video menu is displayed.Setting up the Screen Size 1. Touch the [Aspect Ratio] key in the Video sub menu to change the sceen size.2. Touch the desired aspect ratio: 4:3 or 16:9. The factory default setting is “ 16:9 ”.• When watching a wide type through a conventional type of the rear view monitor (4:3), the leftmost and rightmost areas of the screen are cut off. This function allows displaying the important part of image fully on the screen. In some cases, image is displayed while being panned (scrolled).• When watching a wide type through a wide type of the rear view monitor (16:9), the leftmost and rightmost areas of the screen are not cut off.Setting up the Video System Format 1. Touch the [Aux IN] key in the Video sub menu to set up the video system format. 2. Touch the required format : Auto, PAL or NTSC. The default setting is Auto.Setting up the AUX Input Sensitivity1. Touch the [AUX Input SW] key in the Video sub menu to set up the sensitivity level. 2. Touch the desired sensitivity level displayed: Low, Mid or High. The default setting is Mid.](https://usermanual.wiki/SKYPINE-ELECTRONICS/CES8203CL/User-Guide-1321637-Page-21.png)
![22 VX401/VZ401EnglishOwner’s ManualWARNINGSome videos may be recorded at higher than desired volume levels. Increase the volume gradually from the minimal setting after the video has started.DVD Video Player OperationsCAUTIONFor your safety, the driver should not insert or eject a disc, or operate the controls while driving.Setting up the password for parental level controlThe factory default password is “0000”.1. In Main Menu touch the [Settings] key. 2. Touch the [Rating] key on the dispaly. 3. Touch the [Set Password] key, the numerical key pad will appear. Then input the default password and touch the [OK] key. It shows ‘‘New Password’’.4. Touch the [Set Password] key again, the numerical key pad will appear. Input a new password and touch the [OK] key. Then it shows ‘‘Enter Password Again’’.5. Touch the [Set Password] key for the third time, enter the same password as step 4. Then it shows ‘‘Locked’’ and the new password is set. Note: When a disc with view restrictions is inserted, you will be prompted to input a password. The disc will not be viewable until the correct password is entered.Set rating for parental level control 1. Touch the [Settings] key in the Main Menu.2. Touch the [Parental Control] key in the Rating sub menu. The Parental Control selections will appear.3. Touch the desired rating for level control. Use this table to set the parental level.• The contents that the parental level restricts vary with the country code.Note: The rating can be selected only under the password unlocked status, and the limits can be set only under the password locked status.Watching/Listening to a discNote: Refer to the diagram in “CONTROLS” chapter.To load a disc:1. Press the [OPEN/CLOSE] button to retract the control panel. (VZ401 only)2. Insert the disc into the center of the insertion slot the label side facing up.Note:• Never insert foreign objects into the disc insertion slot.• If the disc is not inserted easily, there maybe another disc in the mechanism or the unit may require service.• 8cm (single play) discs cannot be used.3. Disc starts playing automatically.Ejecting a disc1. Touch the center of the screen. 2. Touch the [ Eject ] key. *If the disc is left in the ejected position for 10 seconds, the disc is automatically reloaded. In this case, the play mode will remain set to the Tuner mode. Note: If you force a disc into before auto reloading, it will damage the player.Kid Safe SAFE FOR KIDG GENERAL AUDIENCES PG PARENTAL GUIDANCE SUGGESTED PG13 PARENTS STRONGLY CAUTIONED PG-R R RESTRICTEDNC-17 NO ONE 17 AND UNDER ADMITTEDAdult ONLY ADULT ADMITTED](https://usermanual.wiki/SKYPINE-ELECTRONICS/CES8203CL/User-Guide-1321637-Page-22.png)
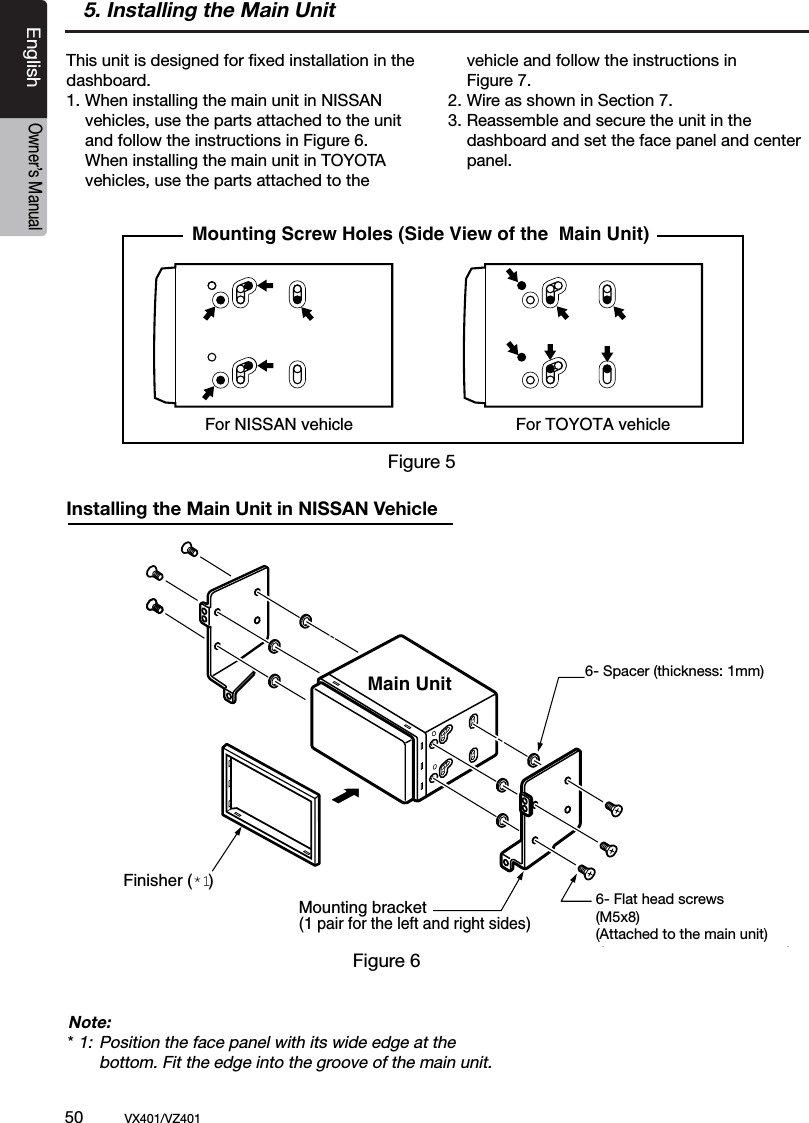
![EnglishVX401/VZ401 23EnglishOwner’s ManualShowing DVD Player mode screenAfter disc is loaded, the play mode is automatically engaged.Touch the screen of the playing disc to displayDVD Video menu. The display will return to the playback screen, if you do not touch the screen for 25 seconds.Stop Playback1. Touch the [ ] key. Playback is stopped. 2. To resume playback, press the [ ] key. Playback resumes from the scene where playback is stopped.Play/Pause Playback1. Touch the [ ] key to pause during playback.2. Touch the [ ] key again to resume playback.Skip (Search) a Chapter1. Touch the [ ] or [ ] key during playback. Chapters are skipped down or up from current locations, as many times as the key is pressed, and playback starts.Fast Forward Fast Backward1. Touch the [ ] or [ ] key to start your fast backward or fast forward during playback. The playback speed starts at 2x, then will increase to 4x, 8x, and 16x with each additional press. *No audio is reproduced during fast forward and fast backward operation. *The fast forward and fast backward speed may differ depending on the disc.Direct Search OptionsYou can locate the beginning of a scene using the time, chapter numbers or title numbers recorded on the DVD Video disc.1. Showing the DVD PLAYER mode screen, touch the [Chap] key.2. The Direct Search Option menu appears with the search options that are available: • Title A large segment to divide the data area of the disc. • Chapter A small segment to divide the data area of the disc. • Time A specific time on the disc.3. Touch the Direct Search method you would like to use. 4. Input the number of the title/chapter/time that you want to play back with the numeric key.5. Touch the [OK] key to confirm. Playback starts from the scene of the input title number, time or chapter number. *If the input title/chapter/time number does not exist or searching with a title/chapter number is not allowed, the screen image will not change. 1 - Play/Pause key2 - Eject key3 - Main Menu key4 - Stop key5 - Previous Playback key6 - Next Playback key7 - Title List key8 - Subtitle List key9 - Audio key10 - Repeat Segment key11 - Information key12 - Chapter key13 - Repeat key14 - Fast Forward key15- Fast Backward key 2 3 4165712 11 10 9 8131415DVD Video Player Operations](https://usermanual.wiki/SKYPINE-ELECTRONICS/CES8203CL/User-Guide-1321637-Page-23.png)
![24 VX401/VZ401EnglishOwner’s ManualRepeat PlaybackThis operation plays back chapters recorded on the DVD Video repeatedly.1. Showing the DVD Player mode screen, touch the [ ] key for Chapter Repeat.2. Touch the [ ] key again for Title Repeat.3. Touch the [ ] key again to turn off the repeat playback.Repeat A BSelect the desired passage to play back.1. Touch the [A B] key to select the Repeat loop starting position. 2. Touch the [A B] key again to select the Repeat loop ending position. The Repeat loop will begin.3. Touch the [A B] key again to stop replay.Using the Title MenuOn DVD discs containing two or more titles, you can select from the title menu for playback.1. Showing the DVD Player mode screen, touch the [ ] key during playback. The title menu screen appears. *Depending on the disc, the title menu cannot be called.2. Select the key items displayed in the title menu screen by the same way of the DVD menu operation. *Depending on the disc, items cannot be selected with the ten-key buttons.Switching among the languagesOn discs in which two or more audios or audio languages have been recorded, you can switch among the audio languages during playback.1. Touch the [ ] audio key during playback. • Each time you touch the key, you can switch among audio languages. • It may take time to switch among audios. * Depending on the disc, up to 8 audios may be recorded. For details, see the mark of the disc: ( Indicates that 8 audios have been recorded). * When the power is turned on and when the disc is changed to a new one, the language set as the factory default is selected. If that language has not been recorded, the language specified on the disc. * Depending on the disc, switching may be completely impossible or impossible on some scenes.2. The DVD PLAYER mode screen will hide in 3 seconds after your selection is made.Switching SubtitlesOn DVD discs in which two or more subtitle languages have been recorded, you can switch among the subtitle languages during playback.1. Touch the [Sub T.] key during playback. Each time you touch the key, you can switch among subtitles. • It may take time to switch among subtitles. * Depending on the disc, up to 32 kinds of subtitles may be recorded. For details, see the mark of the disc: ( Indicates that 8 kinds of 8 subtitles have been recorded). * Depending on the disc, switching may be completely impossible or impossible on some scenes.2. The DVD Player mode screen will hide in 3 seconds after your selection is made.3. To turn off subtitles, repeat touching the [Sub T.] key until subtitles are turned off.Switching anglesOn DVD discs in which video images have been recorded in two or more angles, you can switch among the angles during playback.1. Press the [Angle] button on the remote control during playback. Each time you press the key, you can switch among angles. * It may take time to switch among angles. * Depending on the disc, up to 9 angles may be recorded. For details, see the mark of the disc: ( Indicates multi-angle). * Depending on the disc, angles may switch smoothly or switch with a momentary still image. * Depending on the disc, switching may be completely impossible or impossible on some scenes. * Depending on the disc, scenes recorded in two or more angles may be played back.Displaying the playback statusTouch the [Info] key on the DVD Player mode screen, or remote control.Playback status is displayed on the screen.DVD Video Player Operations88](https://usermanual.wiki/SKYPINE-ELECTRONICS/CES8203CL/User-Guide-1321637-Page-24.png)
![EnglishVX401/VZ401 25EnglishOwner’s ManualDVD Video Player OperationsPausing Playback 1. Touch the [ ] key to pause playback. 2. To resume playback, touch the [ ] key again.Skipping a Track (searching) Touch the [ ] or [ ] key during playback. Tracks are skipped as many times the key is pressed, and playback starts. • Pressing the [ ] key starts playback from the beginning of the next track. • Pressing the [ ] key starts playback from the beginning of the current track. When this key is pressed again within about 2 seconds, playback starts from the beginning of the previous track.Fast Forward and Fast Backward1. Touch the [ ] or [ ] key during playback. The media will advance at 2x speed.2. Touch again to advance to higher speed reversing or forwarding such as 4x, 8x and 16x. Touch once more to resume normal speed playback.Scanning the Tracks1. Touch the [List] key to display the Disc List screen.2. Touch the [Scan] key to begin previewing the first 10 seconds of each song on the disc. Searching with the Track NumberThis operation allows searching using the track numbers recorded on the CDs.1. Touch the [List] key to display the Disc List screen. 2. Touch the [ Key ] key to display the numerical keypad.3. Input the track number that you want to play back with numerical keypad.4. Touch the [OK] key to confirm. • If the input track number does not exist or searching with a track number is not allowed, the unit will return to the List screen.Selecting a track on the Track List ScreenThis function allows you to select tracks from a displayed list.1. Touch the [List] key to display the Disc List screen. 2. Touch the track title on the display list. The selected track will start playing.3. When the desired track is not displayed, touch the [ ] or [ ] key to scroll the track list.4. Touch the desired track title key in the List display. The corresponding track will start playback.5. Touch the [List] key to return to the main screen.Stop Playback 1. Touch the [ ] key to stop playback.Audio Settings 1. Touch the [Audio Settings] key to enter Audio menu.LISTENING TO a CD1 - Play/Pause key2 - Eject key3 - Main Menu key4 - Stop key5 - Previous Track key6 - Next Track key7 - Audio Settings key8 - List key9 - Fast Forward key10 - Fast Backward key11 - Media Information12 - User (Name, Artist, Album) Information13 - Track Play number14 - Track Play time1 2 3 4567109811 12 13 14](https://usermanual.wiki/SKYPINE-ELECTRONICS/CES8203CL/User-Guide-1321637-Page-25.png)
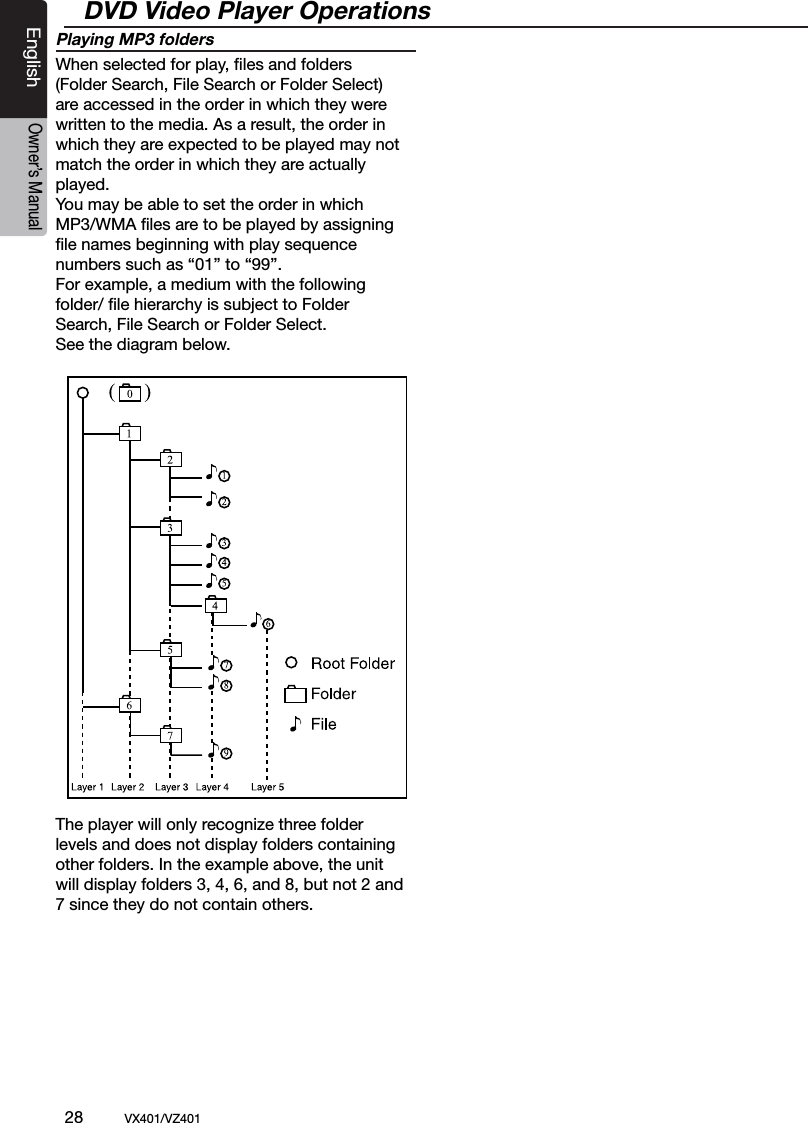
![26 VX401/VZ401EnglishOwner’s ManualOther various play functions1. Touch the [List] key to display the Disc List screen. 2. Touch the key of the function you want to play: Repeat [ ]: Touch once to start a single track repeat. To turn repeat off, press the same key again. • Repeat symbols are displayed in the info window above the song list. Shuffle [ ]: Touch the key to shuffle the tracks during playback. Touch the key again to turn off the feature. • A shuffle symbol is displayed in the info window above the song list.LISTENING TO MP3/WMAThis unit is an ID3 Tag compatible model.This unit supports the ID3 TAGs of the Version 2.4, 2.3, 1.1 and 1.0.In displaying, this unit gives priority to the Version 2.3 and 2.4 TAGs.After USB device inserted into USB slot, or disc is loaded, the play mode is automaticlly engaged.What is MP3/WMA?MP3 is an audio compression method and classified into audio layer 3 of MPEG standards. WMA is an audio compression method developed by Microsoft Corporation.These audio compression methods have penetrated into PC users and become a standard format.These features compress the original audio data to about 10 percent of its initial size with a high sound quality. This means that about 10 music CDs can be recorded on a CD-R disc or CD-RW disc to allow a long listening time withouthaving to change CDs.Note:• Some CDs recorded on CD-R/RW mode may not be usable.Displaying MP3/WMA TAG titles Tag information such as title, artist and album title can be displayed for MP3/WMA file containing Tag information.Precautions when creating MP3 disc• File extensions1. Always add a file extension “.MP3” or “.mp3” to an MP3 file, and “.WMA” or “.wma” to a WMA file by using single byte letters. If you add a file extension other than specified or forget to add these file extension, the file cannot be played. In addition, if you use upper case and lower case letters (capital and small letters) mixedly for file extensions, normal play may not be possible.2. Files other than MP3/WMA data cannot be played. Playing files with a format not supported will be skipped, and the scan, random and repeat playback mode may be canceled.• File and Disc Not Supported Files and discs with following extensions are not supported: *.AAC, *.DLF, *.M3U, *.PLS, MP3 PRO files, files with DRM, open session discs.• Logical format (File system)1. When writing an MP3/WMA file on a disc, please select “ISO9660 level 1 or level 2 (without including expansion format)” as the writing software format. Normal playback may not be possible if the disc is recorded on another format.2. The folder name and file name can be displayed as the title during MP3/WMA play but the title must be within 31 single byte alphabetical letters and numerals for the folder name and file name (including an extension). Entering more letters or numerals than specified may cause an incorrect display.• Entering File and Folder Names Names using the code list characters are the only file names and folder names that can be entered and displayed. Using any other character will cause the file and folder names to be displayed incorrectly.• Electronic Shock Protection 10 seconds for CD-DA (CDA) 45 seconds for MP3 recorded at 44.1 kHz, 128kbps 90 seconds for WMA recorded at 44.1 kHz, 128kbps• Folder structure A disc with a folder having more than 8 hierarchical levels will conflict with the ISO9660 and playback will be impossible.DVD Video Player Operations](https://usermanual.wiki/SKYPINE-ELECTRONICS/CES8203CL/User-Guide-1321637-Page-26.png)
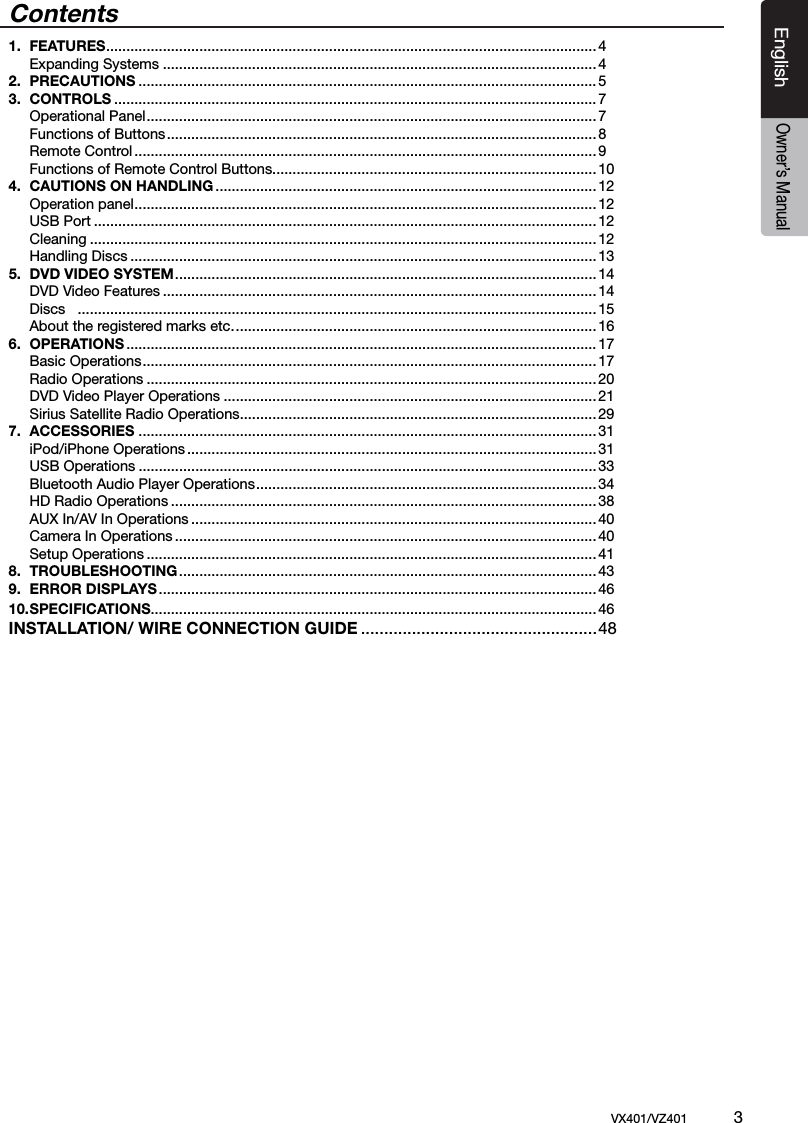
![EnglishVX401/VZ401 29EnglishOwner’s ManualThis function is available when a Sirius Satellite Radio Receiver is connected through the dedicated connection. This unit is recommended to be used with the following receiver:SIRIUS Satellite Radio Receiver: SC-C1Note:SIRIUS satellite radio is a subscription service. Please contact Sirius Radio to begin or alter your subscription:• Internet: www.sirius.comTelephone: 888-539-SIRIUS (747487)Selecting a Satellite Radio ModePress the [SIRIUS] key on Main Menu display. The system changes to the Sirius Satellite Radio mode. The Sirius mode screen is displayed.Information Displayed During ReceptionThe following information is displayed when the satellite radio cannot be received normally.• When the receiver is turned on the first time or after a reset: “UPD” followed by a percentage of completion.• When a channel is being tuned in (no signal is yet received): “NO SIG”• A channel without a broadcast has been selected: “INVLD CH”• A channel not covered by your contract: “CALL 888-539-SIRIUS” Call (888) 539-747487 to activate your radio.• When a channel is out of air time: “OFF AIR”• When the antenna is disconnected or has been damaged: “NO ANT”Confirming Your Radio ID1. Touch the [KEY] key on the SIRIUS Menu display to display the keypad. Enter “0” and press “OK”. Your SIRIUS ID (12-digit number) will be displayed. Channel Selection1. Touch the [List] key on the SIRIUS Menu display to enter channel list preview mode.2. Select the channel with the [ ] or [ ]. Only channels that can be received are selected. Channels that are locked and channels not covered by the contract will be skipped. The receiver seeks the next available channel below or above the current channel.Channel Selection with the Channel Number1. Touch the direct access [Key] on the SIRIUS Menu display to enter direct channel selection.2. Enter the channel number of your desired station by touching the [0] to [9] keys.3. Touch the [OK] key to tune the selection. If you enter a wrong number, you can cancel it by touching the [Clear] key. Sirius Satellite Radio Operations1 - Band key2 - Satellite Signal3 - Eject key4 - Main Menu key5 - Key Pad key6 - Tune Up key7 - Tune Down key8 - Audio Settings key9 - List key10 - Fast Backward key11 - Fast forward key12 - Media Information13 - Sirius Channel Information12 3 46781110951312Seek Seek](https://usermanual.wiki/SKYPINE-ELECTRONICS/CES8203CL/User-Guide-1321637-Page-29.png)
![30 VX401/VZ401EnglishOwner’s ManualSirius Satellite Radio OperationsRecalling the preset stationA total of 20 satellite radio stations can be stored in the receiver’s memory. You can access the presets by touching the Presets keys. This allows you to store your favorite satellite radio stations in the memory for later recall.1. Touch the [Band] key to enter the preset list to select or save your presets.2. Touch the corresponding preset displayed station to start play. * There are 5 pages of preset memory space available for your use. You can scroll the pages by touching the right of the screen.3. Touch the [Band] key to return to the previous screen.Auto Preset Store1. Touch the channel, you would like to store.2. Touch the [Band] key and hold it for 2 seconds the corresponding preset key to save the selected channel.Deleting a Preset1. Touch the [Band] key and enter the preset menu.2. Touch the preset key you would like to delete. 3. Touch and hold the [Del] key to for more than 3 seconds.Receiving Stations by CategorySatellite Radio allows you to select broadcast channel category (contents).1. Touch [ ] or [ ] key to view all valid categories.2. Touch [ ] or [ ] to scroll through the pages3. Touch the desired category item key to select the category.4. Select the desired channel by touching it momentarily on the screen.5. Touch the [Back] key to exit category tuning mode.Note:When the category selection mode is entered, the category of the last received channel is displayed first.Parental Controls Lock Channels1. Touch the [List] key to access the list menu. 2. Long touch the [Lock] key. The numerical pad is displayed.3. Enter the code to lock the desired channel.4. Touch the [OK] key to enter Lock channel. Setting the Password1. Touch the [Settings] key to enter setting list. 2. Touch the [Rating] key to display password screen.3. Enter the password on displayed numerical pad.4. Touch the [OK] key to save. 5. Touch the [ ] key to return to Sirius menu.Note:If you set passwords, you must input the correct code to enter lock list. When you try to locked channel by keypad, it will dispaly password’s keypad. Only entering correct code can tune to the channel, or it will be back to the last channel, if a password is wrong.Seek Seek](https://usermanual.wiki/SKYPINE-ELECTRONICS/CES8203CL/User-Guide-1321637-Page-30.png)
![EnglishVX401/VZ401 31EnglishOwner’s Manual7. ACCESSORIESiPod/iPhone OperationsNotes on using Apple iPod/iPhone• Do not connect an iPod/iPhone to this unit with a headphone connected to the iPod/ iPhone.• After the iPod/iPhone has been connected to this unit, the iPod’s buttons are disabled for operation in the Music mode. • In the Video mode, do not operate the iPod’s buttons.• When in the iPod mode, a special iPod/iPhone control screen is displayed different from the main screens for other modes.• When no data is present, the title display will remain blank.• The iPod/iPhone is used with the equalizer function turned OFF.• Set the iPod/iPhone’s language setting to English before connecting your iPod/iPhone. Some characters of the other languages may not be displayed correctly in this system.• Precautions on battery consumption: If the iPod/iPhone is connected to this unit when the iPod/iPhone’s internal battery has run down, this function may not operate correctly. You must connect the iPod/iPhone after charging the battery if it has run down.Selecting the iPod Mode1. Connect your iPod/iPhone to the USB connector. The system will automatically detect the connected device. The iPod icon is displayed on the Main Menu screen.• When a iPod/iPhone is already connected Touch the [iPod] key on the Main Menu screen. The system changes to the iPod mode, and starts playback from the previous position.Controlling the iPod/iPhoneOperation keys• iPod audio mode screen[ ] Play/Pause key• Use to control playback and pause. 1. Touch the key during playback. Playback pauses. 2. To resume playback touch the key again.[Video] Video/Music key• Touch this key to switch operation mode to the Video mode or Music mode.iPod/iPhones can be connected by using the connector cable supplied with the iPod/iPhone, but in this case, you can enjoy its audio sound only. To enjoy video movies stored in the iPod/iPhone with video displaying them on this unit, it is required to use the special connector cable separately sold.Note:• This system will not operate or may operate improperly with unsupported versions.• For detailed information on the playable iPod/iPhone models, see our home page: www.clarion.com1 - Play/Pause key2 - Eject key3 - Main Menu key4 - Video/Music key5 - Previous Track key6 - Next Track key7 - Audio Settings key8 - List key9 - Fast Forward key10 - Fast Backward key1 2 3 45671098](https://usermanual.wiki/SKYPINE-ELECTRONICS/CES8203CL/User-Guide-1321637-Page-31.png)
![32 VX401/VZ401EnglishOwner’s ManualNote:• Note that not all iPod/iPhone devices are compatible to output video to this unit.[ ] Previous Track key• Touch this key to play the previous track. [ ] Next Track key• Touch this key to play the next track.[Audio Settings] key• Touch this key to switch to the Audio menu for setting the audio settings.[ ] Fast Forward key• Touch this key to fast forward the track selection.[ ] Fast Backward key• Touch this key to fast backward the track selection.[List] key• Touch the List key to display the menu screen to search tracks to be played.[ ] Scroll Up key• Touch this key to scroll up the track list.[ ] Scroll Down key• Touch this key to scroll down the track list.[iPod Menu] key• Touch this key to return to the previous menu.[Folders] key• Touch this key to return to the main track search screen.[ ] Repeat key• Touch this key to repeat the play of the selected track.[ ] Shuffle key• Touch this key to shuffle between the tracks.[Simple Mode] key• Touch this key to access the Simple Mode. All iPod functions can be operated on the iPod device only.Viewing video data in the iPod/iPhone (only for the iPod/iPhone with video features)When you connect an iPod/iPhone with video features by using the optional connector cable for iPod/iPhone with video, you can enjoy the video data and slide show data stored in the iPod/iPhone showing them on the display of this unit (and the rear monitor if connected).Note:Do not connect the iPod/iPhone to this unit when a Video Playlists item is selected on the iPod/iPhone.1. Touch the [Video] key on the iPod audio mode menu screen. The iPod play video screen is displayed. 2. Select the type of video you would like to play, by touching the menu. The video playback will start.Note:Video playback is not available on all iPod/iPhone devices. Please contact your Clarion dealer for details. An optional connection cable or accessory may be required for this feature.3. To stop the video play, touch the screen. iPod play video menu will be displayed.4. Touch the [Music] key to return to the iPod audio menu.Note:• “AUDIO ONLY” is displayed when the automobile is moving.• Image data may not be played back according to the status of the iPod/iPhone.• The volume setting of video data is relatively lower than audio data. Be sure to lower the volume setting before switching to the other mode.• Do not select the categories with no track registered from the iPod menu screen. The iPod/iPhone may be frozen. If the iPod /iPhone is frozen, reset the iPod/iPhone by following the procedure described in the instruction manual of the iPod/iPhone.• Audio may be played back slightly out of synchronization with video images.1 - Scroll Up key2 - Scroll Down key3 - iPod Menu key4 - Folders key5 - Repeat key6 - Shuffle key7 - Simple Mode keyiPod/iPhone Operations1436257](https://usermanual.wiki/SKYPINE-ELECTRONICS/CES8203CL/User-Guide-1321637-Page-32.png)
![EnglishVX401/VZ401 33EnglishOwner’s ManualUSB OperationsThis system can play audio files (MP3/WMA) stored in an USB memory which is recognized as “USB Mass Storage Class device”. You can use your USB memory as an audio device by simply copying desired audio files into it.Note:• This system will not operate or may operate improperly with some USB memory.• Files protected with any DRM can not be played.Notes on using USB memories• General notes • When no data is present, the message “NO FILE” will be displayed.• Notes on the MP3/WMA files • This system can play the MP3/WMA files stored in the USB memory. • This system cannot play DivX files stored in the USB memory. • Set the Sampling Frequency to: For MP3 files: • MPEG1 Layer3: 32, 44.1, or 48 kHz • MPEG2 Layer3: 16, 22.05, or 24 kHz • MPEG2.5 Layer3: 8, 11.025, or 12 kHz For WMA files: 32, 44.1, or 48 kHz • Set the Bit Rate to: For MP3 files: • MPEG1 Layer3: 32 to 320 kbps (VBR) • MPEG2 Layer3: 16 to 160 kbps (VBR) • MPEG2.5 Layer3: 16 to 160 kbps (VBR) For WMA files: 32,48, 64, 80, 96, 128, 160, or 192 kbps • Add the following file extension using single byte characters: For MP3 files: “.MP3” or “.mp3” For WMA files: “.WMA” or “.wma”• Notes on the folder structure • The folder hierarchy must be within 8 hierarchical levels. Otherwise, playback will be impossible. • The maximum allowable number of folders is 200 (including root directory and folders with no MP3/WMA file). • The maximum allowable number of files in a folder is 1500. • The maximum allowable number of files in all folders is 1500. • You can store the MP3 files, WMA files together in a folder.• Notes on the Tag titles The limitations on the Tag titles are same as those in the MP3/WMA modes. • Folder representation in the folder list The limitations on the folder representation are same as those in the MP3/WMA modes. Selecting the USB Memory ModeConnect your USB memory to the USB connector. Touch the [USB] key to select the USB on the Main Menu screen.The system changes to the USB mode and starts playback.Playing Back Files in the USB MemoryThe operations in the USB Memory mode are same as those in the MP3/WMA modes. See “Listening to a CD” for details.](https://usermanual.wiki/SKYPINE-ELECTRONICS/CES8203CL/User-Guide-1321637-Page-33.png)
![34 VX401/VZ401EnglishOwner’s ManualSelecting the Bluetooth Mode 1. Touch the ( ) Bluetooth indicator on the top of the screen. Touch the [ ] key in the Main Menu screen to access the Bluetooth mode directly. The default setting is OFF.2. The system changes to the Bluetooth mode. [Audio Transfer] key While talking, to transfer audio from the unit back to the mobile, touch the key. You can only transfer a call after it has been answered. Touch the key again to transfer the call back to the head unit.[Send] key • Touch this key to answer an incoming call or to make a call.[Phone Function] key • Touch this key to access the phone book [Cancel] key • Touch this key to backspace.[Keypad] key • Touch to access the numerical pad channel.[End] key • Touch this key to reject an incoming call or to end a call.[Music] key • Touch to access the Bluetooth music function.[Settings] key • Touch this key to access the Bluetooth SettingRegistering your Bluetooth Device (Pairing)You can register up to 1 Bluetooth devices.The required password to pair the phone to the unit is “1234”.1. Touch the [Settings] key on the screen.2. Touch the [Pair mode] key on the Settings screen.3. Touch the [Pairing] key to begin the pairing process.4. The cellular phone may prompt to acknowledge the Bluetooth connection and to enter the Pass Key code of this unit. Perform these operations according to the message displayed. 5. When the pairing operation is completed, the registered Bluetooth device is set as current. Bluetooth Indiacator is light up solid.Bluetooth Audio Player OperationsSome Bluetooth cellular phones have the audio features, and some portable audio player support the Bluetooth feature. These devices will be called as “Bluetooth audio players” in this manual. This system can play audio data stored in a Bluetooth audio player.Note:• This system will not operate or may operate improperly with some Bluetooth audio players.• For detailed information on the playable Bluetooth audio players, see our home page: www.clarion.comThis unit has a Bluetooth indicator ( ) on the top of the screen.When the Bluetooth function is “OFF”, the indicator is grey. When the Bluetooth function is “ON” and the phone is not connected, the indicator will blink.If the phone is connected, the indicator is light up solid.678123451 - Audio Transfer key2 - Send key3 - Phone Function key4 - Cancel key5 - Keypad key6 - End key7 - Music key8 - Settings](https://usermanual.wiki/SKYPINE-ELECTRONICS/CES8203CL/User-Guide-1321637-Page-34.png)
![EnglishVX401/VZ401 35EnglishOwner’s ManualNote: • You cannot register the same Bluetooth audio player which is already registered doubly.Controlling the Bluetooth Audio PlayerNote:• Occasionally, depending on the environment, playback sounds may be fragmented, or switch noises may be generated.Playing MusicAfter the connection with a Bluetooth audio player is established, the play mode isautomatically engaged.• When playback is not started, touch the [ ] key.Pausing Playback1. Touch the [ ] key during playback. Playback pauses.2. To resume playback, touch the [ ] key. Playback resumes.Skipping a Track (Searching)1. Touch the [ ] or [ ] key during playback. Tracks are skipped, as many as the times the key is touched, and playback starts.Note: • Control functions such as play, pause and track skipping are not available on all devices.Fast Forward and Fast Backward1. Touch and hold the [ ] or [ ] key during playback. The system enters the fast backward or fast forward playback mode during touching the key. Releasing the key resumes the normal speed playback.[ON] • Touch this key to connect the music.[OFF] • Touch this key to disconnect the music.Note:• Some cellular phones may not be able to transfer the Phone Book data.• The Phone Book data transmission may take a long time. The operations of sending calls are disabled during the data transmission.• You can talk with other party by using the internal microphone. When it is hard to hear for the other party in accordance with the communication condition or the used telephone, use the optional microphone (RCB-199), and set the Microphone Select setting to “External”. The sound will be improved, but noises may still be heard depending on the communication condition.Selecting the BT Phone mode1. Touch the [ ] key to display the Menu screen.2. Touch the [Bluetooth] key to select the Bluetooth mode.3. Touch the [Keypad] key to select the BT Phone mode. The Telephone screen is displayed. • When the connection with a Bluetooth telephone has been established, the icon and signal level indicator are displayed at the top of the screen.Bluetooth Audio Player Operations1 - [ ] key2 - [ ] key3 - [ ] key4 - [ ] key5 - [ON] key6 - [ ] key7 - [OFF] key135 7624](https://usermanual.wiki/SKYPINE-ELECTRONICS/CES8203CL/User-Guide-1321637-Page-35.png)
![36 VX401/VZ401EnglishOwner’s ManualSetting the Telephone Features1. Touch the [Setting] key to display the Telephone Settings screen.2. Perform setting for the desired item. See the following sections for detail.Setting Automatic ConnectionThe system automatically reconnects the cellular phone after the connection is lost or the system is restarted.• The factory default setting is “Manual”. Touch the [Manual] or [Auto] key of the Automatic [Connect] item to set the function preference.Selecting MicrophoneYou can select the microphone to be used.• The factory default setting is “Internal”. Touch the [External] or [Internal] key of the [MIC Select] item to set the functionSetting Microphone Gain1. You can adjust the input level of the microphone in 6 levels. • The factory default setting is “3”.Note:• The input level of the microphone can be affected by its surroundings. Adjust the level when the person on the other end of the telephone has a reception problem.2. Touch the level indicator of the [MIC Gain] key to adjust the input level.Telephone operationsNote:• For your safety, this system disables the calling functions when the car is moving. Be sure to stop the car and apply the parking brake before making a call.Making a Call Using the Ten-Key Pad1. Touch the [Keypad] key to display the Ten-Key pad screen.2. Enter the telephone number by using the Ten-Key pad displayed on the screen.3. Touch the [Send] key to call the entered number. • The following Telephone Interrupt screen is displayed during phone call. • Touch the [Audio Transfer] key to talk using the cellular phone canceling the hands-free function. To return to the hands-free mode, touch the [Audio Transfer] key.4. When the call is finished, touch the [End] key to hang up. The display will return to the previous mode screen selected before entering the BT Phone mode. Note:• Depending on the cellular phone, the Telephone Interrupt screen may be closed and the connection with this system may be disconnected when entering the Private mode.Obtaining the Phone Book DataSending the Phone Book data from the cellular phone enables you to make a call using the Phone Book function from this unit.1. Perform the Object Push transfer operation of the Phone Book data on the current cellular phone. For details of the operation, see the operation manual of the cellular phone.Note:• Some cellular phones may not be able to transfer the Phone Book data.• Some cellular phones cannot transfer the Phone Book data when the hands-free mode is set or it is also registered in the Bluetooth mode. In those cases, disable these functions from the cellular phone before performing the Object Push transfer.• Some cellular phones may transfer Phone Book data automatically.Bluetooth Telephone Operations](https://usermanual.wiki/SKYPINE-ELECTRONICS/CES8203CL/User-Guide-1321637-Page-36.png)
![EnglishVX401/VZ401 37EnglishOwner’s ManualMaking a Call Using the Phone BookYou can use the Phone Book data obtained from the cellular phone to make a call from this unit. Note:• Before using this function, the Phone Book data must be sent from the cellular phone • Only the Phone Book items with at least one telephone number registered in the captured Phone Book data are displayed on the Phone Book screen.1. Touch the [Phone Function] key to display the Phone Log screen.2. Select [My Phonebook] or [SIM Phonebook] to select your desired phonebook to view.3. Touch the desired Name key you wish to dial. Touch the [ ] or [ ] key to scroll the list. When you touch the alphabet key at the right of the screen, the list scrolls to the item which starts with the specified character.4. Touch the desired selection you wish to dial. When the call is finished, touch the [End] key to hang up.Making a Call Using the HistoryThe system will recall the Dialed/Received calls record data in the handset memory. You can confirm it and use it to make a call from this unit.1. Touch the [Phone Function] key. The History List screen is displayed.2. Select [Dialed Call], [Received Call] or [Missed Call] key to select your desired call log. • Touch the [ ] or [ ] key to scroll the list. • Touch the [Phone Function] key to return to the previous screen.3. Touch the desired History item key you wish to dial. When the call is finished, touch the [End] key to hang up.Answering to an Incoming CallWhen a call comes in, the following Telephone Interrupt screen appears.You can answer to the incoming call on this system by the following operation.1. Touch the [Send] key to answer to the call. When the call is finished, touch the [End] key to hang up. Bluetooth Telephone Operations](https://usermanual.wiki/SKYPINE-ELECTRONICS/CES8203CL/User-Guide-1321637-Page-37.png)
![38 VX401/VZ401EnglishOwner’s ManualListening to HD Radio Broadcasts1. Touch the Tuner key on the Main menu display. The tuner mode screen is displayed.2. Touch the [BAND] key or press the [Band] button on remote control to select the radio band. Each time the key is touched, the radio reception band changes between FM and AM.Seek Tuning1. Touch the [BAND] key to select the radio band (FM or AM). 2. Touch the [ ] or [ ] key to automatically seek a station. • When touching the [ ] key, the station is sought in the direction of higher frequencies. • When touching the [ ] key, the station is sought in the direction of lower frequencies.Manual Tuning1. Touch the [BAND] key to select the radio band (FM or AM). 2. Touch the [ ] or [ ] key to manually seek a station. • When touching the [ ] key, the station is sought in the direction of higher frequencies. • When touching the [ ] key, the station is sought in the direction of lower frequencies.Recalling a preset stationThere are 2 ways to recall the preset station.• Using the remote control: 1. Touch the [BAND] button to select the desire band (FM or AM) on the remote control. 2. Touch the preset number (1 to 16) on numeric pad.• Using the tuner unit: 1. Touch the [BAND] key to select the desire band (FM or AM) on the tuner. 2. Touch the [List] key to display the Preset List screen. 3. Touch the preset station (1 to 16) on tuner display. 4. Touch [ ] or [ ] to select next station up or down the preset list. 5. Touch the [PS] button to begin scanning the preset stations.Manual memory1. Touch the desired Band key to select the band you wish to store in.2. Tune in the station you wish to store using the seek tuning, manual tuning, or preset tuning.3. Touch and hold the desired Preset key you wish to store the current station for more than 2 seconds.HD Radio OperationsThis function is available when an HD Radio tuner is connected.This unit can control the following HD Radio tuner:• HD Radio Module (THD400)Note:• Be sure to disconnect power before connecting/disconnecting the HD Radio tuner.• Not all areas offer HD Radio broadcasts• HD Radio stations may not always broadcast subchannels• Volume levels of HD Radio stations may vary. Increase the volume gradually from the minimal setting after the channel is selected. Be sure to lower the volume setting before switching to another mode or channel.Additional information about HD Radio technology can be found at www.hdradio.com 1 - Band key 2 - Signal Strength 3 - Eject key 4 - Main Menu key 5 - HD Multicast key 6 - Tune Up key 7 - Tune Down key 8 - Tag key 9 - List key 10 - Seek Down key 11 - Seek Up key 1 2 3 4 511109678Seek SeekSeekSeekM-SeekM-SeekM-Seek M-Seek](https://usermanual.wiki/SKYPINE-ELECTRONICS/CES8203CL/User-Guide-1321637-Page-38.png)
![EnglishVX401/VZ401 39EnglishOwner’s ManualHD Radio OperationsAuto StoreThe Auto Store is a function for storing up to 16 stations that are automatically tuned in sequentially. If 16 receivable stations cannot be received, a previously stored station remains unoverwritten at the memory position.1. Touch the [Band] key to select the desired band. (FM or AM)2. Touch the [Auto Store] key to start the Auto Store function. A beep sounds and the stations with good reception are stored automatically to the preset channels.Preset ScanThe Preset Scan receives the stations stored in the preset memory in order. This function is useful when searching for the desired station in memory.1. Touch the [Band] key to select the desired band. (FM or AM)2. Touch the [PS] key to start the Preset Scan. The unit starts scanning each station for 10 seconds sequentially.3. When the desired station is tuned in, touch the [PS] key again to continue receiving that station.HD Radio Subchannel Function1. Touch the [HD] key to enter the Subchannels list.2. To tune to the desired subchannel touch the corresponding key.3. You can save your desired subchannel by touching and holding the desired Preset key you wish to store the current subchannel for more than 2 seconds.Note: Not all stations have HD Radio subchannel broadcasts.iTunes Tagging FunctionThis unit offers iTunes® Tagging, whichallows the user to “Tag” songs playing on HDRadio™ stations for purchase later throughiTunes. When press TAG key, the unitstores the title and artist song information thatcan then be transferred to your iPod whenconnected to the unit. A list titled “Tagged”will appear in iTunes, allowing you the optionto purchase your tagged songs.1. Touch the [TAG] key to store the current music information to memory. 2. Up to 64 tags will be stored in the memory.3. When the unit is switched to iPod mode, the unit will automatically transfer the tags to the iPod/iPhone.Note: Not all broadcasted material can be tagged. The iTunes Tagging function is only available for Apple iPod and iPhone devices.Downloading Tags to Your iPodTo download tags to your iPod, plug an iPod into the unit. All existing tags are automatically transferred to the iPod and deleted from the head unit’s memory. If an iPod is connected when a song is tagged, the Tag will be automatically transferred to the device whenthe iPod mode is selected.](https://usermanual.wiki/SKYPINE-ELECTRONICS/CES8203CL/User-Guide-1321637-Page-39.png)
![40 VX401/VZ401EnglishOwner’s ManualExternal peripheral devices, including a game console, camcorder, navigation unit, iPod/iPhone, etc. can be connected to the AUX IN in the front of this unit or AV IN connector on the back of this unit using the A/V media cables.NOTE:For your safety, the unit has a safety function, which turns off the picture when car is moving, so only the audio can be heard. The picture can be only watched, when the car is stopped and parking brake is applied.Switching to AUX IN / AV IN modeTouch [AUX IN] or [AV IN] key on Main Menuto select desired mode (when unit is reading). The LCD will display the external video.The screen will dispaly “No Video” menu, if there is no video signal.You cannot directly control external devices connected to the AUX IN or AV IN input.AUX In / AV In OperationsWARNINGFor your safety, the driver should not watch the VTR, etc. or operate the controls while driving. Please note that watching and operating the VTR, etc. while driving are prohibited by law in some countries.Switching to Camera modeTouch [Camera] key on Main MenuThe LCD will display the external video.The screen will dispaly “No Video Signal” menu, if there is no video signal. When the video signal is displayed, touch the center of the screen to return to the Main Menu.Camera In Operations](https://usermanual.wiki/SKYPINE-ELECTRONICS/CES8203CL/User-Guide-1321637-Page-40.png)
![EnglishVX401/VZ401 41EnglishOwner’s ManualYou can customize the various settings of this unit from the Settings screen. Touch [Settings] key on the Main Menu screen.The Setting menu screen will be displayed.Touch the [Main] key to return to the Main screen.General Settings 1. Touch the [General] key. The general setting screen appears. The screen includes: Clock, Clock Mode, Radio, and Version.2. Touch the desired tab key and perform the basic adjustments. • Setting the Clock Touch this tab to set the time. The keypad will appear for adjustment. Touch the [OK] key to save. • Setting the Clock Mode Touch this tab to change to 12Hr or 24Hr mode. • Radio Touch this tab to select the region you are in. Incorrect selection results in poor reception. • Version This tab displays the software version of your unit. Audio Settings1. Touch the [Audio] key to set: Bass Freq, Treble Freq, and Bass Q-Factor.2. Touch the desired tab key to make the desired audio adjustments. • Bass Freq Select the desired bass center adjustment frequency: 60Hz, 80Hz, 100Hz, 200Hz • Treble Freq Select the desired treble center adjustment frequency:10KHz,12.5KHz,15KHz,17.5KHz • Bass Q-Factor Select the desired bass Q-Factor: 1.0, 1.25, 1.5, 2.0.Regional Settings1. Touch the [Regional] key to set the default subtitle and audio language preferences.2. Touch the desired tab key and perform the adjustments. Select the desired audio/subtitle language: English, French or Spanish. Select Auto to automatically set the language. Select Off to turn the desired function off.Monitor Adjust Settings1. Touch the [Monitor Adjust] key to set: TS Callibration, Brightness, TFT Angle and TFT Auto Open.2. Touch the desired tab key and perform the necessary adjustments. • Touch Screen Callibration This key is to activate the touch screen activation mode, please consult technical support before attempting this process. • Brightness Set screen brightness value from 0 to 20. • TFT Angle Adjust the TFT angle from 0 to 5. • TFT Auto Open When it is On and the ACC power on, the TFT opens automatically. Video Settings1. Touch the [Video] key to set: Aux In Sensitivity, Aux In Format, and Aspect Ratio.2. Touch the desired tab key and perform the adjustments. • Aux In Input SW Select the Low, Mid or High for the Aux In input sensitivity level. • Aux In Select the video format for Aux In signal. Select from Auto, PAL or NTSC. • Aspect Ratio Select the screen area shape: 4:3 or 16:9.Rating Settings1. Touch the [Rating] key to set: Password, DVD Parental control rating.Setup Operations](https://usermanual.wiki/SKYPINE-ELECTRONICS/CES8203CL/User-Guide-1321637-Page-41.png)
![42 VX401/VZ401EnglishOwner’s Manual2. Touch the desired tab key and perform the adjustments. • Password Refer to Setting up the password for parental level control in page 22. • Parental control Touch this key to set the age ratings Choose the desired rating: 1. Kid Safe, 2. G, 3. PG, 4. PG-13 5. PG-R, 6. R, 7. NC-17, 8. Adult.The Others Settings1. Touch the key to set: Anti-theft code, Anti-theft, Bluetooth, Tel Sp, Blinking, Beep GPS Time, DST, and Reset.2. Touch the desired tab key and perform the adjustments. • Anti-theft code If your unit is unlocked, touch this tab to change your anti-theft code. The numerical keypad is displayed, enter the right code to unlock, and it displays ‘‘_ _ _ _’’. Touch again and enter the new code twice, then the code is set and your unit is locked. If your unit is unlocked, enter your code. Touch the [OK] key to save it. • Anti-theft Touch this tab to turn On or Off the anti- theft lock function. Turn on the Back up when the Anti-theft is On, you need enter the right Anti-theft code to turn on the unit normally. If you enter the wrong code for four times, the unit will be locked, and must be unlocked by the professionals. • Bluetooth Touch this tab to turn On or Off the Bluetooth . • Tel SP Touch this tab to set the output speaker for the Bluetooth feature. You may select the Left Front speaker or Right Front speaker. • Blinking Touch this tab to turn the anti-theft blinking indicator On or Off. When the Blinking is On and the ACC power is off, the indicator blinks red. • Beep Touch this key to turn On or Off the beep sound. • GPS Time Touch this key to synchronize the GPS time. When Navigation module is connected, this function is available. [Sync]: Synchronize the GPS time. [Ignore]: Ignore the GPS time. • DST Touch this key to set Daylight Savings Time On or Off. When Navigation module is connected , this function is available. • Reset Touch this key to reset the unit to default settings except Anti-theft and HD preset Channel. Setup Operations](https://usermanual.wiki/SKYPINE-ELECTRONICS/CES8203CL/User-Guide-1321637-Page-42.png)