SKYPINE ELECTRONICS CNE6104RS Multimedia Navigation System User Manual Part 1
SKYPINE ELECTRONICS (SHEN ZHEN) CO., LTD. Multimedia Navigation System Part 1
Contents
- 1. Part 1
- 2. Part 2
Part 1

Navigation
Bluetooth Hands-Free
iPod® and MP3 compatible
Back-up camera ready
Play DVDs, Audio CDs, MP3 Discs
Supports steering wheel controls
Customizable backgrounds
Satellite Radio ready
Bluetooth Phonebook and favorites
Multimedia
Navigation
System Quick Start Guide
ENTERTAINMENT SYSTEMS
Toyota

NOTICE OF INTENDED USE
Some features of Rosen Entertainment Systems are not intended for viewing by the driver when the vehicle is in motion,
such as movie playback. When using navigation, minimize the amount of time spent viewing the screen and use voice
prompts as much as possible. Avoid prolonged use of the touch screen controls. Such use might distract the driver or
interfere with the driver’s safe operation of the vehicle, and thus result in serious injury or death. Such use might also
violate state or local laws.
Rosen Entertainment Systems disclaims any liability for
any bodily injury or property damage that might result
from any improper or unintended use.
ABOUT THE REGISTERED TRADEMARKS
This item incorporates copy protection technology that is protected by U.S. patents and other
intellectual property rights of Rovi Corporation. Reverse engineering and disassembly are
prohibited.
iPod® is a registered trademark of Apple Computer, Inc.
NAVIGATION MAPS
Car navigation maps are frequently updated. While the database was judged to be as ac-
curate as possible at the time of its release, a map database can never be 100% accurate.
Road information that is maintained in the map databases, such as turn restrictions or road
names may change over time.
Errors or missing information in the map data are not covered by the Product Warranty. New
and/or updates for the map data are the responsibility of the End-user.
NOTE: Features listed in this manual are subject to change without notice.
Copyright © 2012 by Rosen Entertainment Systems. All rights reserved. Except as permitted
under the Copyright Act of 1976, no part of this publication may be reproduced or distributed in
any form or by any means, or stored in a database or retrieval system, without the prior written
permission of Rosen Entertainment Systems.
For complete Owner’s and Navigation Manuals,
please visit
Rosen Entertainment Systems online at
www.RosenEntertainment.com
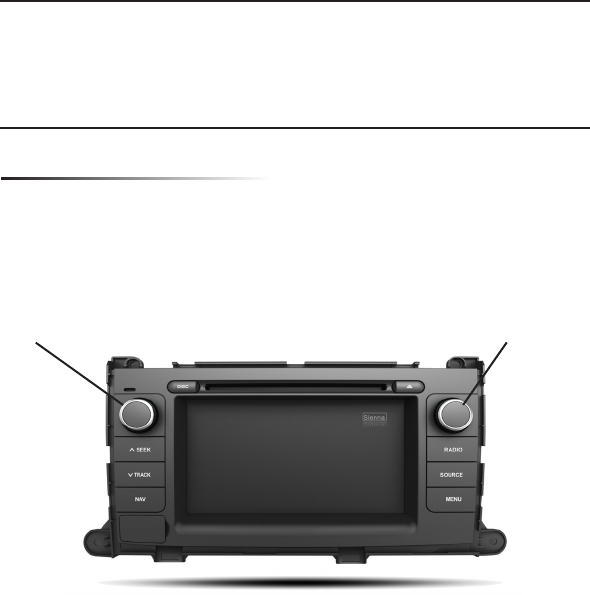
Button & Knob Functions
The buttons and knobs on all of our Toyota units (With the exception of Camry) will
function the same. Please reference the key below as shown on a Toyota Sienna.
1) SEEK: Next Station/Track
2) TRACK: Previous Station/Track
3) NAV: Enter/Exit Navigation
4) RADIO: Radio Function
5) SOURCE: Change Sources
6) MENU: Enter/Exit Setting Menu
●Power: Press & hold
●Press for display to Dim/Off/On
●Volume Control
●Turn to change station/track
●Press for audio menu
*For Camry specic functions and menus, please go to pages 10-11 in this guide
1
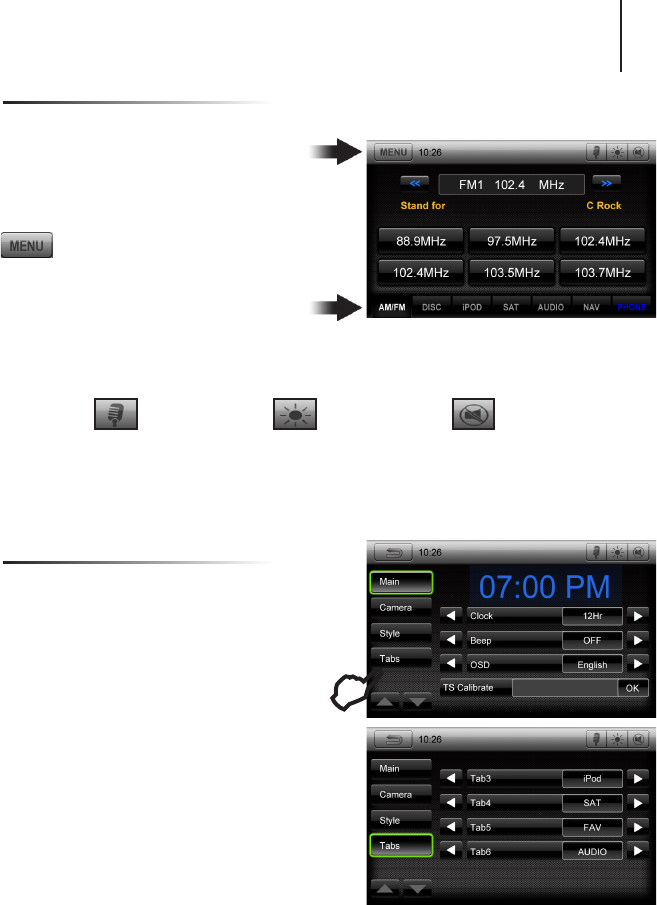
Your system will automatically default to the last screen you were on prior to turning off the unit.
The Information Bar is located at the
top of the screen. Depending on the
source, it will provide information or content
sensitive controls
This will take you to the Settings
Menu for advanced control settings.
The Source Tabs located at the bottom of
the screen will give you direct access to
common sources.
Screen Organization
Note: “PHONE” is highlighted BLUE when a phone is paired to Rosen Bluetooth.
Customizing Source Tabs
You have the option to customize the Source Tabs
3-6 on the bottom of the screen.
AM/FM, DISC and PHONE are not customizable.
To access the tab menu:
1) Press MENU and select SETTINGS
2) In left panel, select TABS
3) For each tab select the left and right arrows to
toggle through the selections
4) Once you are satised with your choices,
press RETURN to save. The customized tabs
will now appear
The Basics
Voice Dial Screen Dimmer Mute ON/OFF
(if supported)
E
2
Short touch to seek previous and
next available stations.
Touch to scan. Each station will
play for several seconds.
Push the volume knob for Tuning, push again
to go back to volume. In Tuning mode,
after several seconds it will automatically
go back to volume if it is not used.
Note: This is only for vehicles with one knob.
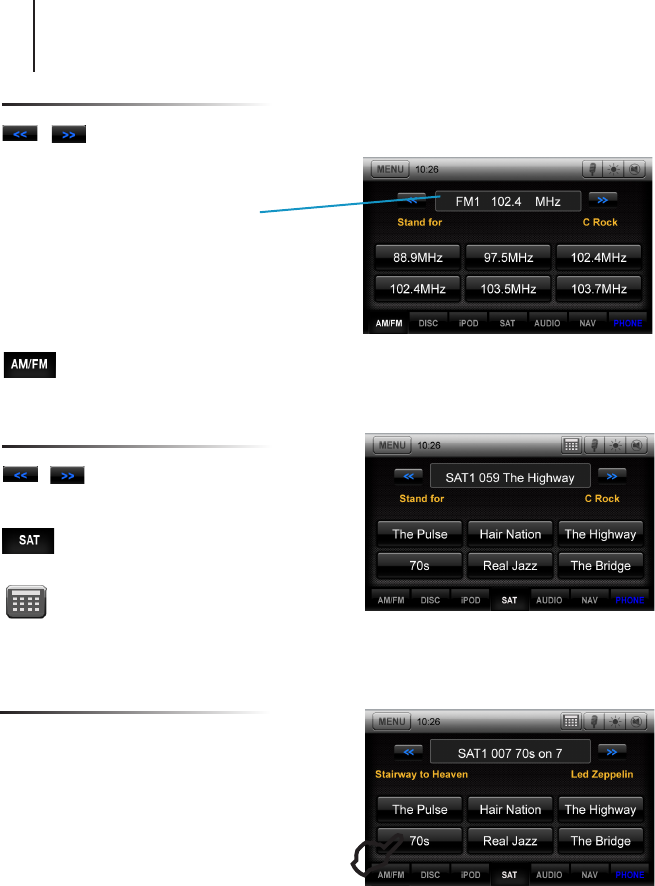
Touch to select AM1 & 2 and FM1,2 & 3
preset screens.
To set a station as a Preset, press and hold the
button. The name of the channel for SAT Radio
or station frequency for AM/FM Radio will
appear in the button when saved.
Short touch the desired Preset button to select
that channel.
Touch to select SAT 1,2 & 3 preset
screens
Use numeric keypad to directly enter a
channel station
Short touch to seek previous and
next available stations.
Channel Selection
Satellite Radio (If Equipped)
Preset Channels
E
Radio
To learn how to access preset channels while in navigation mode, please refer to the Navigation
section of this Quick Start Guide.
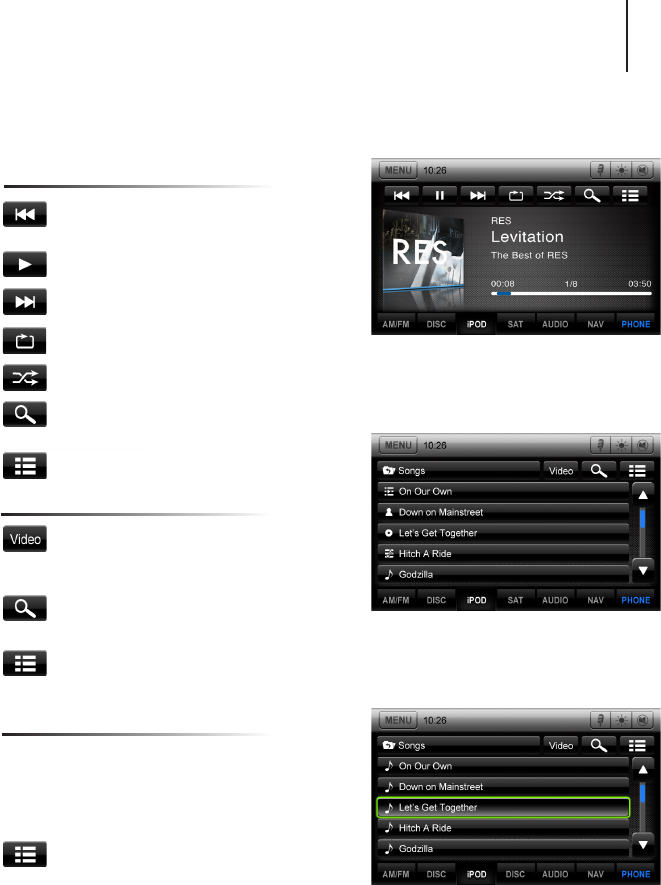
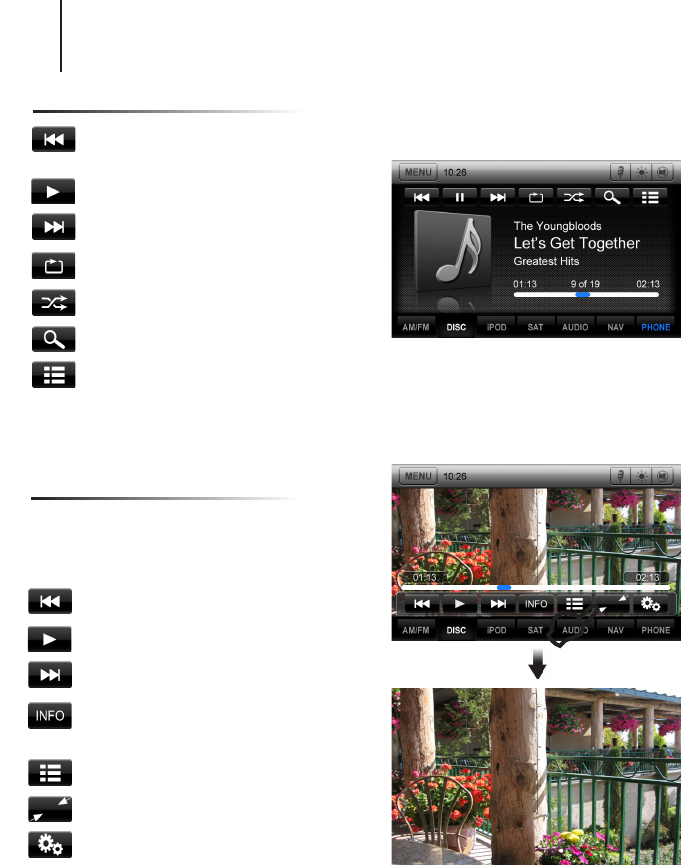
You can access music les on your iPod by using your Apple iPod cable to connect
to the unit. Simply plug it into the USB slot located on the front or rear of the unit.
Touch Button Descriptions
Press once to restart current track, press
again for Previous Track
Play/Pause
Next track
Repeat the current played song
Shufe tracks
Search for artist, album, or song by the
rst letter
Main iPod root menu
3
Note: Sleep mode should be enabled on the iPod to reduce battery drain if the iPod is left
connected with the vehicle off.
Root Menu
Use this to toggle between Video and Audio
menus
Use to search by rst letter
Toggle between song details and root menu
From the list of songs, press once to play the
track and the song playing will be highlighted
Press a second time to display song details and
album artwork.
Select to go back to track list
To Play a Song
Note: A special iPod video cable is required
iPod
4
DVD
Previous Chapter
Play/Pause
Next Chapter
Shows information such as Chapter,
Time Elapsed, etc
Main DVD menu
Exit Menu and return to full screen
DVD Settings menu
Long Touch in DVD mode to show the DVD
control screen. To return to full screen,
either touch the image or leave the screen
idle for several seconds.
E
CD
Press once to restart current track,
press again for Previous Track
Play/Pause
Next track
Repeat the current played song
Shufe tracks
Search for artist, album, or song
Main CD root menu
CD/DVD
Note: DVD video can only be viewed if parking brake is engaged.
Note: This system requires a Bluetooth enabled phone. Bluetooth phones and software vary by
brand and date of manufacture. Some phones or phone functions may not be compatible or may
operate differently with this system during use. Phone compatibility problems are not warrantable
issues.
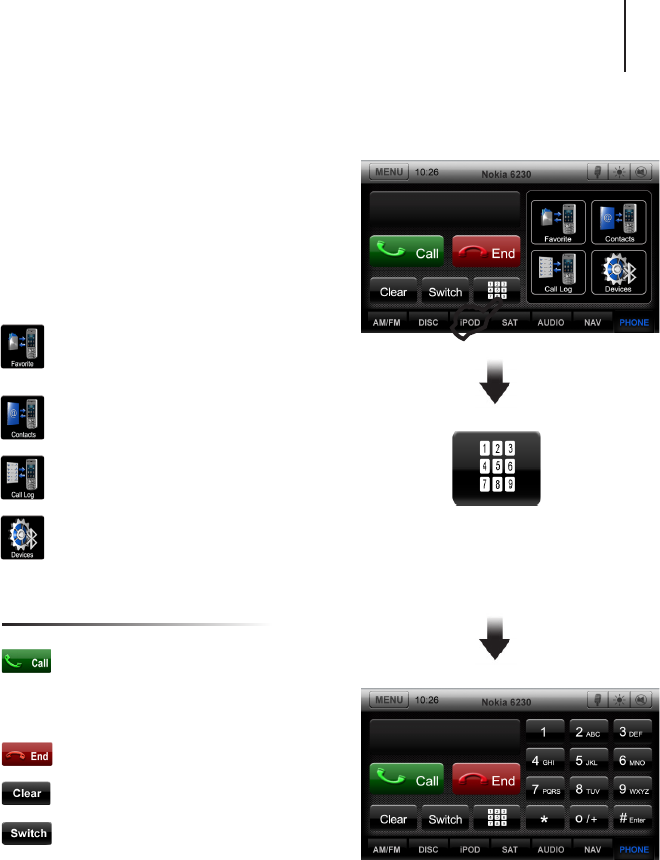
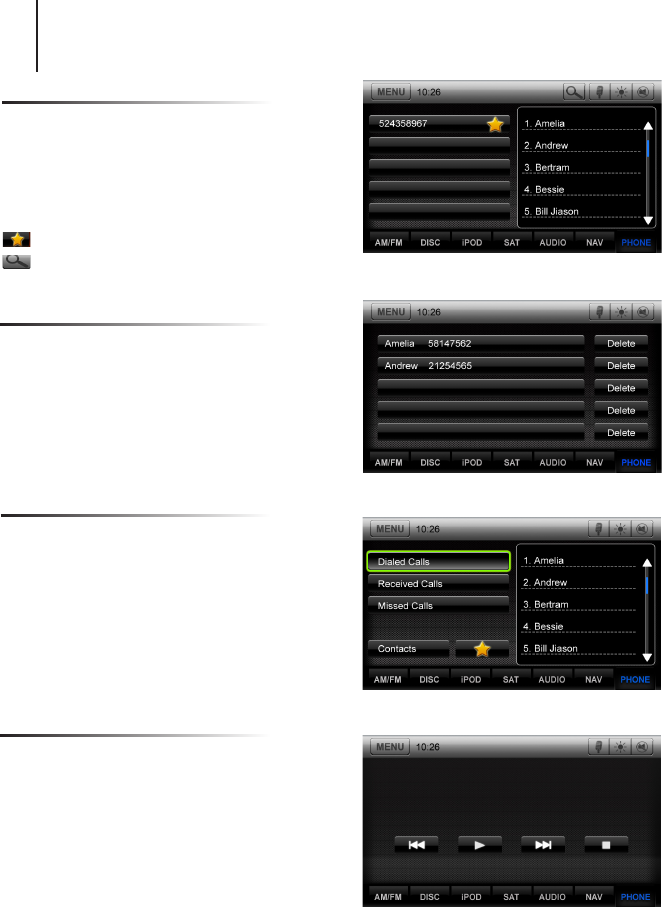
There are several different Bluetooth screens
in the PHONE function. The rst screen you
will see is the Call Screen. To switch between
screens, press the PHONE tab repeatedly or
select from one of the options below.
5
Favorites will display your selected
favorite Contacts
Lists the Contacts from your phone
Call Log lists Dialed, Received and
Missed calls
Devices menu will be shown to setup
your phone
You can dial the number from your
phone or use the touch-screen
shown at the right by entering the
number, then press the Call button.
Press to end the call.
Clear last number
Press to transfer call between phone
and car speakers.
Making/Ending A Call
Press the keyboard
button to access the Call
Screen below
Bluetooth General
E
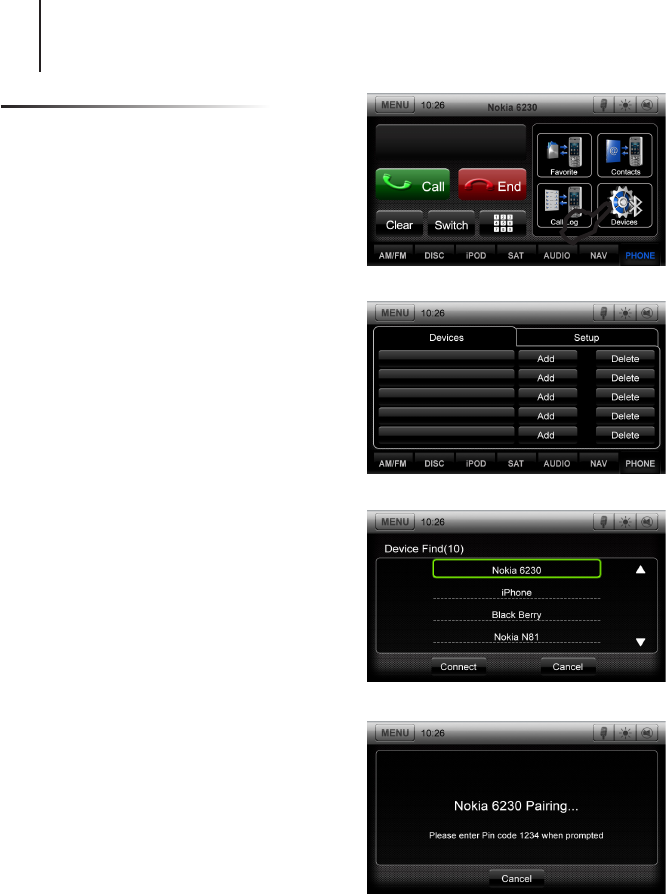
Pairing Your Phone
ROSEN: Set your phone into discoverable mode.
1) Select DEVICES from the Bluetooth menu
2) Press “Add”
3) After several seconds, the unit will display all
devices within range.
4) Select your phone from then list, then “Connect”
6
E
Bluetooth Pairing
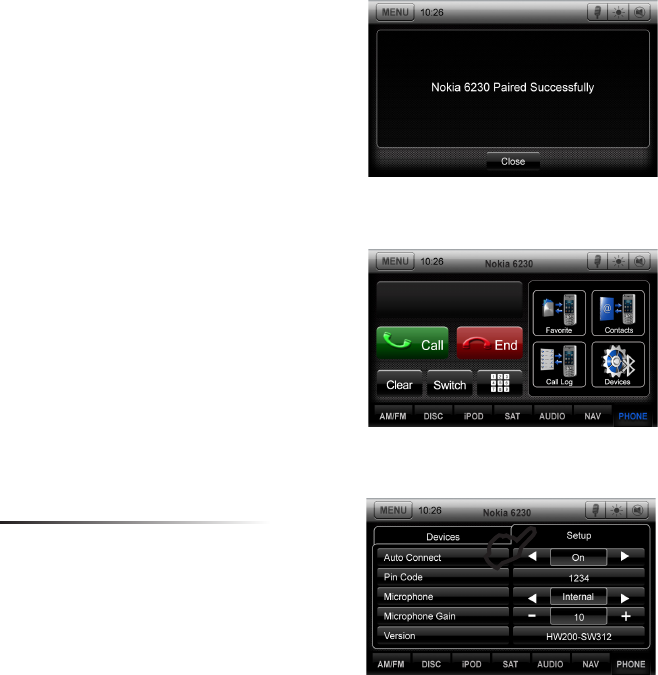
Select Auto Connect If you desire the system’s
Bluetooth feature to automatically detect your
phone when the system is turned on.
You can also change the Pin Code and
Microphone settings in the Setup screen.
Setup Tab
5) “Pairing” will be displayed on the screen. After
the connection succeeds on your phone, enter
the password (1234). The system will indicate
“Pairing Successful” when your phone is
connected and its name will be displayed
on the unit.
Please note that an authorization request will
appear on your phone. You must accept it before
your phone can share contacts, phonebook and
call history.
6) Press “Close” and you will exit back to the main
Bluetooth menu. The name of your phone will
appear in the top menu bar.
E
7
8
Contacts
Call List
Favorites
While your phone is paired, your contacts will
be displayed. This may take several seconds
to load.
When you select a contact from the list, all
associated numbers will be displayed on the left
screen.
Press to set a number as a Favorite
Press to search your Contacts list using the
alpha keypad
You can save up to 5 numbers in the Favorites
folder.
In order to replace a favorite, you will need to
delete the existing number rst, as the unit will
not override it.
Bluetooth Music
The call list can be used to view your dialed,
received and missed calls.
The unit will display as many calls that you can
view from your phone.
You can also quickly access your Contacts and
Favorites from this screen.
To make a call from the list, touch the number
on the screen and it will automatically dial the
number.
You can play the music stored on your phone by
pressing MENU and selecting A2DP.
From your phone, access your music and select
a song to play.
You can use the Previous, Play/Pause, Next
and Stop buttons on the unit to navigate through
your music
Note: Some phones do not support this feature
Bluetooth Options
Press to enter the Settings Menu. To
change system settings, select desired
option.
You can customize the style of your unit with
backgrounds
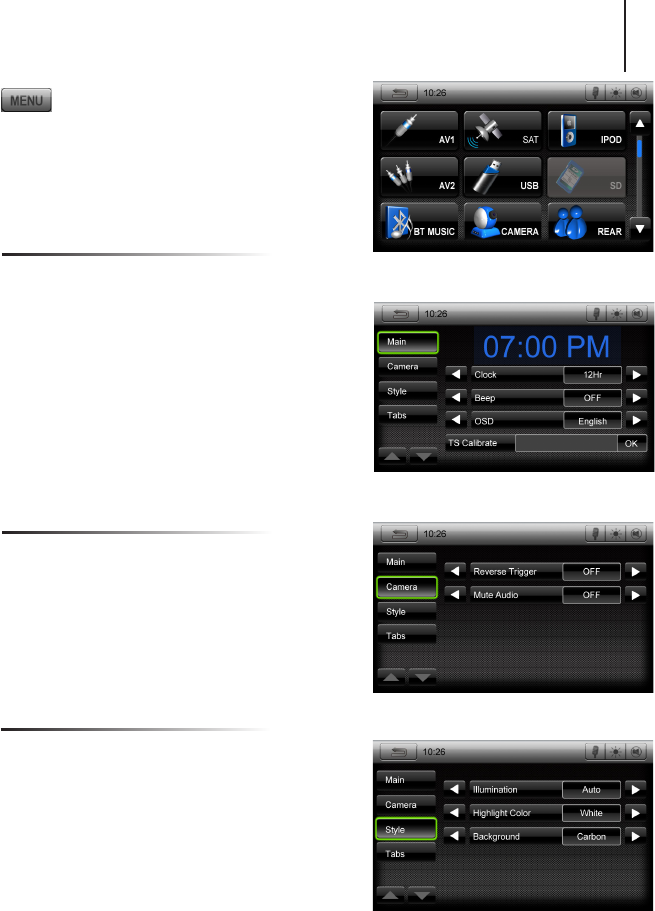
Main
Camera
Style
Settings Menu Screen
9
Main Screen
Camera Screen
Style Screen
Clock: Set clock to display 12hr, 24hr or OFF
Note: The time displayed is controlled by
GPS. Please refer to the navigation section for
instructions on adjusting the time zone.
Beep: Turn button beep ON/OFF
OSD: Set display language
TS Calibrate: Calibrate the Touch Screen
Reverse Trigger: For backup camera ON/OFF
Mute Audio: Mute ON/OFF while in reverse
Illumination: Set to Auto/ON/OFF for the unit
button
Highlight Color: White, Gold, Green, Red, Blue
and Aqua
Background: Select from several options
Settings
Note:If an option is unavailable, it will be grayed out.
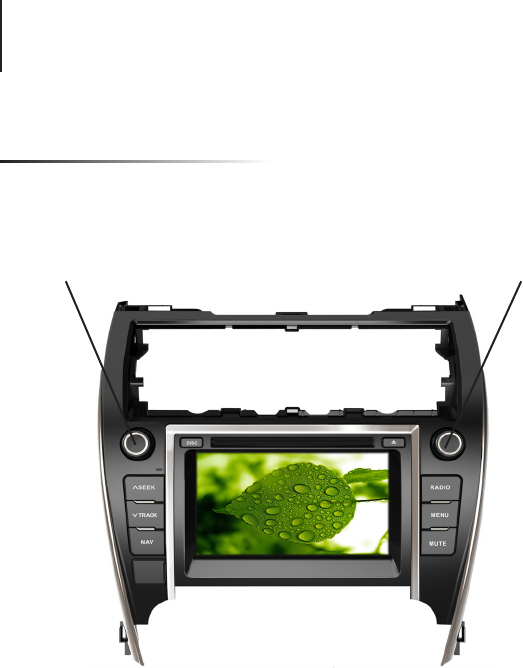
Camry Basics
Button & Knob Functions
1) SEEK: Next Station/Track
2) TRACK: Previous Station/Track
3) NAV: Enter/Exit Navigation
4) RADIO: Radio Function
5) MENU: Enter/Exit Setting Menu
6) MUTE: ON/OFF
●Power: Press & hold
●Press for display to Dim/Off/On
●Volume Control
●Turn to change station/track
●Press for audio menu
10