SKYPINE ELECTRONICS CNE6104RS Multimedia Navigation System User Manual Part 2
SKYPINE ELECTRONICS (SHEN ZHEN) CO., LTD. Multimedia Navigation System Part 2
Contents
- 1. Part 1
- 2. Part 2
Part 2
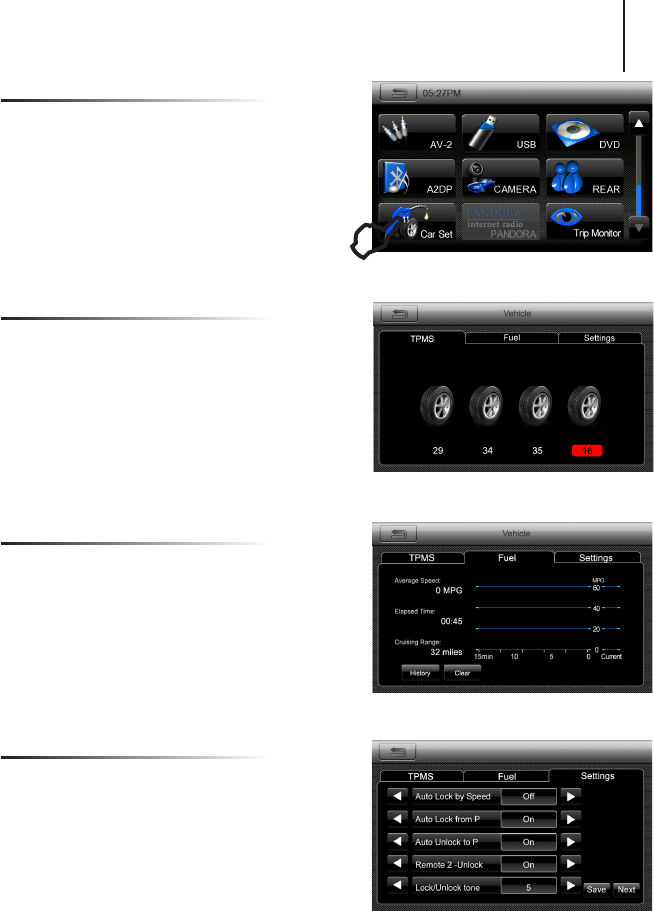
Camry Settings
Main
TPMS
Fuel
11
Press CAR SET to enter the vehicle information
pages.
This screen displays the vehicle’s tire pressures.
If the tire pressure goes below the recommended
level, it will highlight the specic tire in RED.
Also, a TPMS warning icon will appear in the top
menu bar.
Note: Please refer to the vehicle’s manufacturer
owner’s manual for settings on non-factory tires.
Displays the “Trip Information” and “HISTORY”
screens.
Please refer to the vehicle’s owner’s manual for
details.
Settings
This screen allows you to change the vehicle
customization settings.
Note: Please refer to the vehicle’s factory owner’s
manual for a list of settings that can be changed.
E
To access navigation, press the NAV button on the left side of the unit.
To exit navigation, you will need to press the same NAV button.
Entering Navigation
Note: The only way to exit navigation is by selecting the NAV button on the left side of the
unit as pictured above.
Before operating your Rosen Navigation system, please carefully read and
follow the instructions provided in the “Safety Information and Precautions”
located on the inside back cover of this Quick Start Guide.
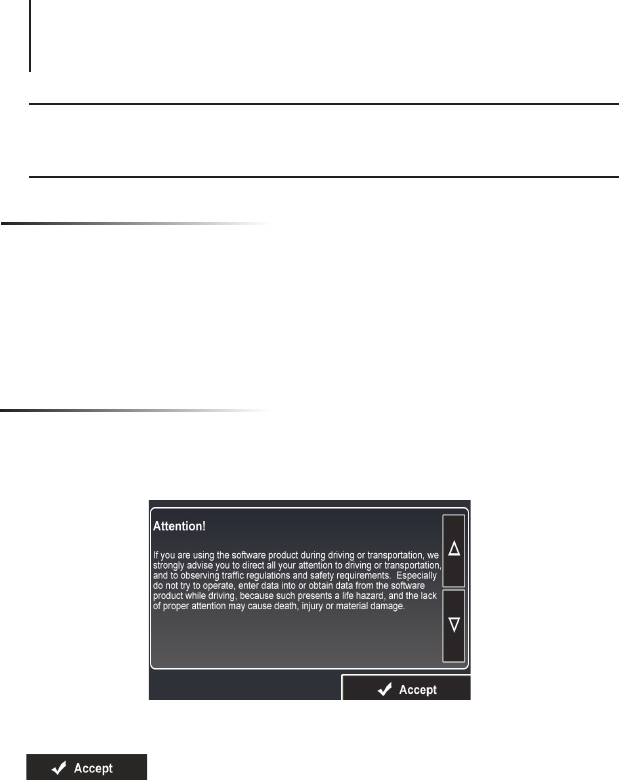
When the navigation software starts, you will see the reminder warning to use your
navigation software safely and lawfully.
Start Up
You must accept these conditions to continue
Please refer to the User’s Manual for additional information and warning on proper
use of the Rosen Navigation product.
12
Navigation
13
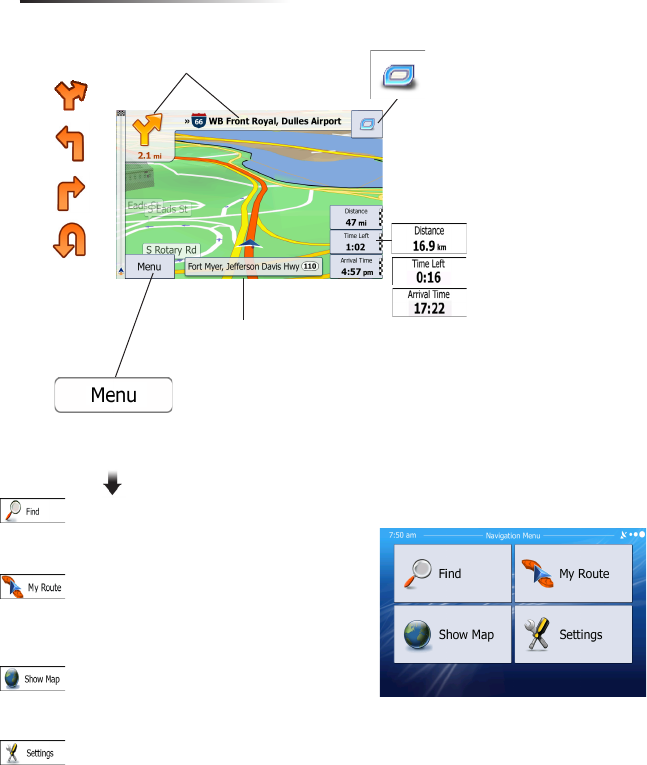
Understanding the Map
Select the Quick
Menu to access the
most used functions
These displays show
you the distance, time
left and the estimated
arrival time of your trip
The top part of the screen shows
you what the next street is and which
direction to turn on your route
Shows you the street
you are currently on
Access the Navigation Menu
Find an address or Point of Interest and
access the Favorites and History menu
Displays the route details and allows
you to edit, change or cancel existing
route
Displays current position, surrounding
map area and route.
Customize the navigation software
14
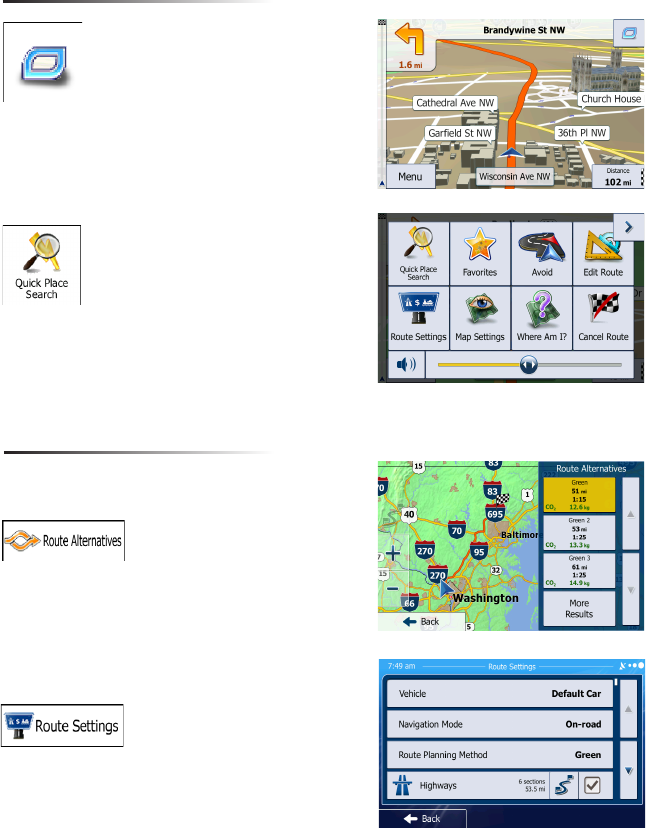
Modifying Existing Routes
You can modify an existing route by accessing
either the Quick Menu or Main Navigation menu
Quick Menu
Located in the top right corner of the
map screen is the Quick Menu. In
this screen, there is a selection of
functions that are frequently needed
during navigation.
You can use this option to search for
places of interest along the way of
your route, such as: Gas Stations,
Restaurants, Parking, etc.
You can use this option to se-
lect an alternative route to your
destination.
This option is a good way to
change road types and modes.
You can avoid highways, allow
toll roads, etc.
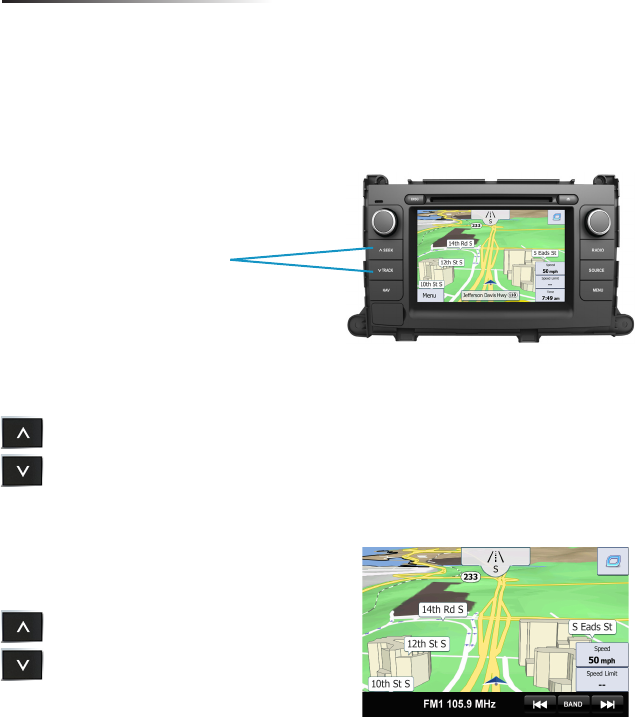
While in navigation, you can access the current
Audio function you are listening to (Radio, SAT,
iPod and CD) without leaving navigation.
Note: This will not scroll through all stations in
Radio and SAT mode, only presets.
Accessing Audio Functions in Navigation
There are several features in navigation that allows you to interact with functions within the
Rosen unit.
UP/DOWN arrows on the unit
Radio/SAT Radio:
Previous Preset
Next Preset
iPod/CD:
Previous Song/Track
Next Song/Track
15
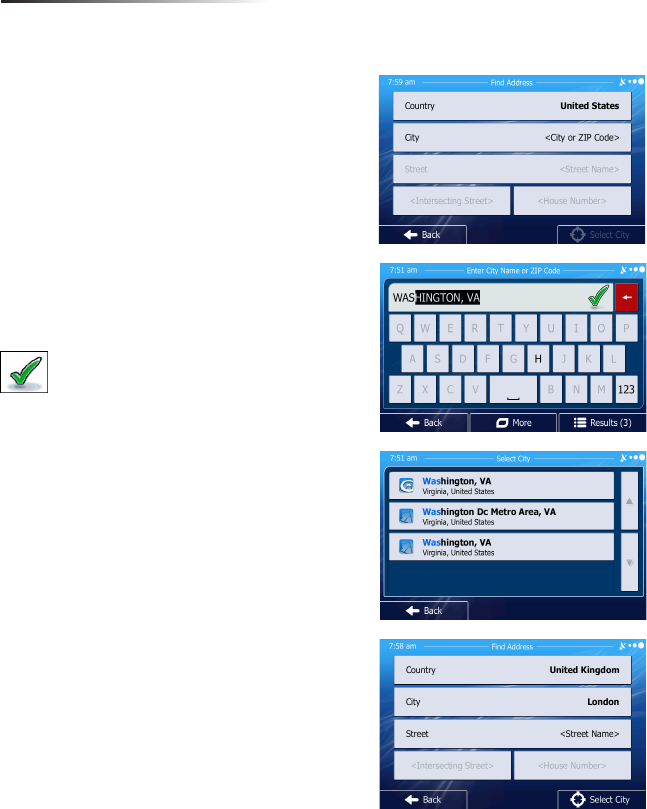
Enter or Find Address
If you are on the Map screen, press MENU. In the Navigation Menu, select Find Address.
Note: By default, the software proposes the country and state where you are currently
located.
1. Touch “City Name” and the key-
board screen will appear.
2. Your current city will automatically
default. To search for a different city,
start typing each letter of the City
name
Tap to conrm city
3. A “Select City” screen will appear.
This will show a list of cities that
match your selection. Touch the city
you desire.
4. Select “Street” and the keyboard
screen will appear.
16
17
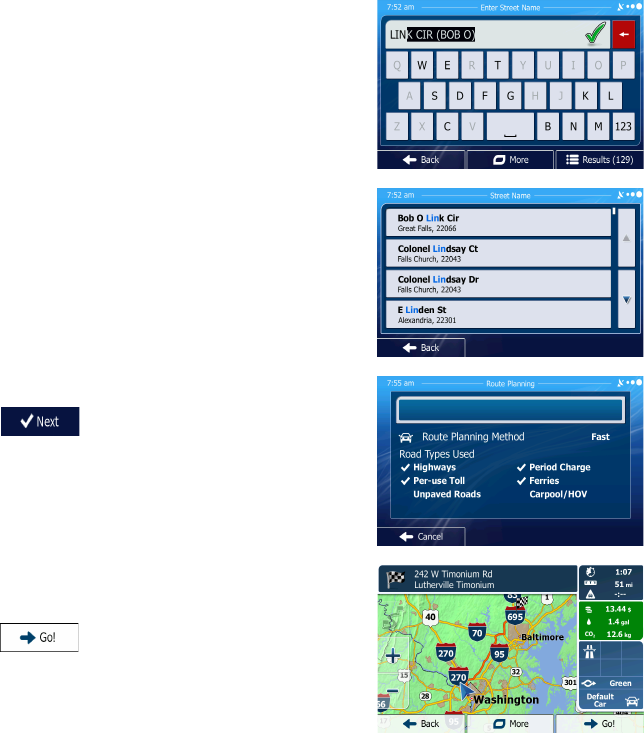
7. Repeat these steps for House number,
or if you do not know it, you can select the
SELECT STREET option.
8. A map will appear.
Click Next and a short
summary of the route will ash on the
screen for a few seconds.
9. After the summary, the map ap-
pears showing the entire route.
Tap to start your journey.
5. Start typing each letter of the street
name.
6. A Street Name list will appear. Se-
lect the one you are looking for.
18
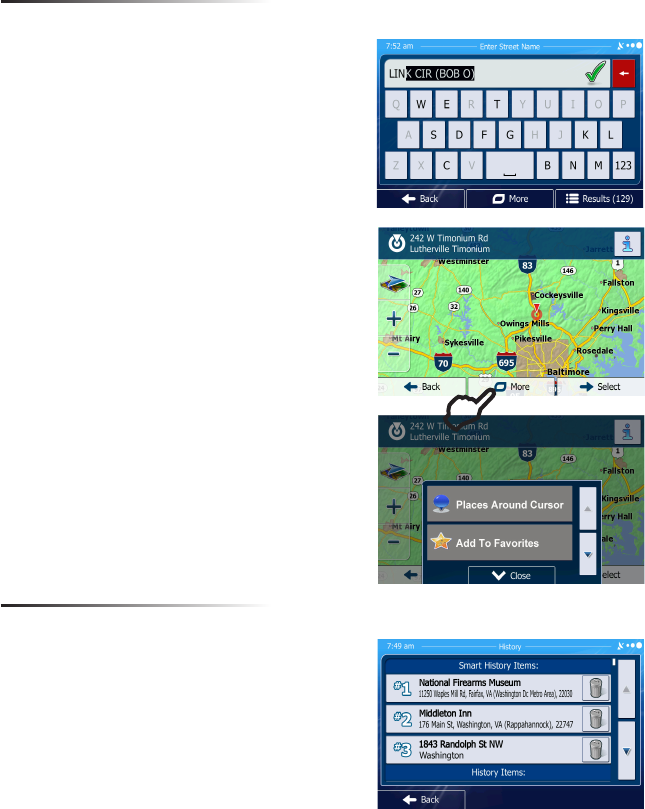
Setting Favorites
You can set Favorite destinations (like Home, etc) so you do not have to enter it manually
each time.
-Once you have entered all information and press
DONE, in the next screen, you will select MORE
-Select ADD TO FAVORITES
-It will take you to keyboard where you can rename
your favorite. (Example: HOME)
-Select DONE and you Favorite is now saved.
Route History
You can also set a Favorite from the History
section. Please see below.
You can search through the History menu to access
past routes or to set a past route as a Favorite.
-From the QUICK MENU or SETTINGS in the main
menu, select HISTORY
- To set as a Route, select the address, then tap
SELECT.
-To set as a Favorite, select the address, then tap
MORE. Select ADD TO FAVORITES.
E
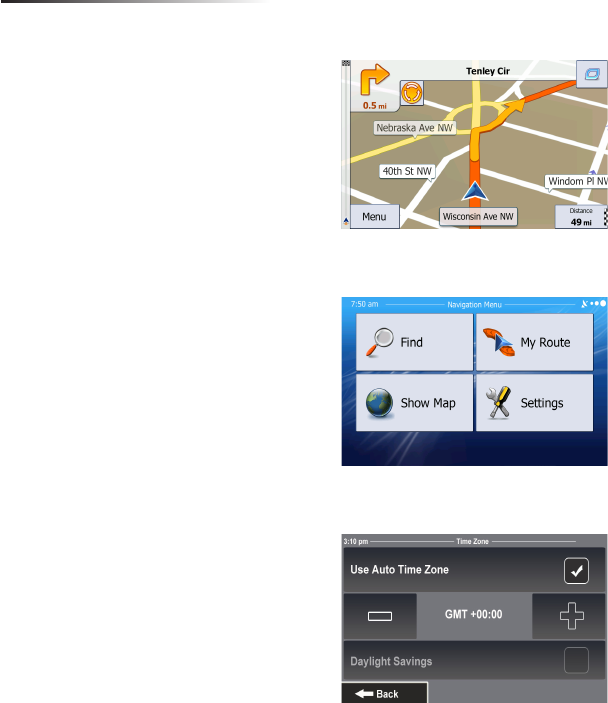
Adjusting the Time Zone
To adjust the time displayed on the unit, please use the steps below.
1. Press MENU in the bottom left
corner of the screen
2. Select SETTINGS
---->REGIONAL
---->Time Zone
3. Now you are in the clock setting screen.
-Use can set the time zone to change
automatically when entering a new time
zone.
-Use the minus and plus icons to adjust
the time in increments of 15 min
-Set Daylight Savings OFF/ON
19
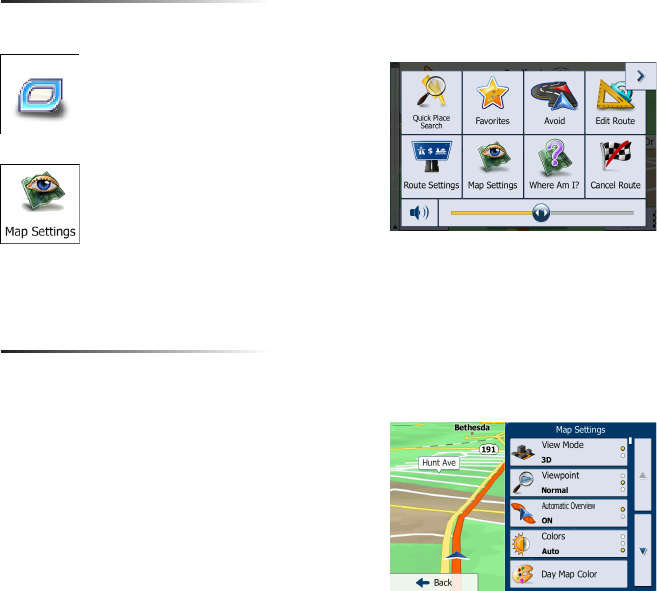
From the map screen select the
Quick Menu button.
Select Map Settings from the list
Map Settings
You can modify and customize the way your maps are displayed by accessing the Map
Settings
Map Setting Options
View Mode: Set as 3D or 2D
Viewpoint: Low, Med or High
Automatic Overview: ON/OFF
Colors: Day, Night or Auto
Day Map Color: Select from several themes
Night Map Color: Select from several themes
3D Vehicle Gallery: Select from several vehicles/people
that will be displayed as your marker
Landmarks: ON/OFF
Buildings: ON/OFF
Track Logs: ON/OFF
Place Markers: Select what markers (such as gas, food,
etc) that you would like the map to automatically display
20
Safety Information and Precautions
WARNING! Please read and follow the following safety precautions.
Failure to follow the instructions below may increase
your risk of collision and personal injury.
The Rosen Navigation software is not a substitute for your personal judgment. The route suggestions should never supersede
any local trafc regulation or your personal judgment and /or knowledge of safe driving practices. Prior to completing any ma-
neuvers suggested by your Rosen Navigation software (for example, a U-turn or a left turn), verify that you can legally and safely
complete the maneuver. Do not follow route suggestions if they direct you to perform an unsafe or illegal maneuver, would place
you in an unsafe situation, or would route you into an area that you consider unsafe.
Do not use the Rosen Navigation software to locate emergency services (such as police, re stations, hospitals, and clinics).
The database may not include all emergency service providers. Use your own best judgment and ask for directions in these
situations.
If the vehicle is in motion, only a passenger should program the Rosen Navigation software. The driver should not program the
system unless the vehicle is parked in a safe location.
The Rosen Navigation software’s map database provides information on suggested routes without regard to factors that may
affect your driving experience or the time required to arrive at your destination. For example, the system does not reect road de-
tours, closures or construction, some road characteristics (e.g., road surface, slope or grade, weight or height restrictions, etc.),
temporary trafc congestion, weather conditions, and similar factors.
Vehicle Position
The Rosen Navigation software’s computer considers vehicle speed and heading changes, together with longitude and latitude
information, to accurately determine vehicle heading and position on a digital map.
Map and Information Database
The map database used by your Rosen Navigation software was created using high-resolution aerial and land based data col-
lection.
Car navigation maps are frequently updated. While the database was judged to be as accurate as possible at the time of its
release, a map database can never be 100% accurate. Road information that is maintained in the map databases, such as turn
restrictions or road names may change over time.
Errors or missing information in the map data are not covered by the Product Warranty. New and/or updates for the map data
are the responsibility of the End-user.
End-User License Agreement
Please refer to the Rosen Navigation User’s Manual to review and accept the terms and conditions in the End-User License
before operating this product.

All rights reserved. Copyright 2012 Rosen Entertainment Systems
PP1003-TY Rev B
FCC NOTE: This device complies with Part 15 of the FCC Rules.
Operation is subject to the following two conditions: 1. This device may not cause
harmful interference, and
2. This device must accept any interference received, including interference that may
cause undesired operation.
FCC Information: Caution: Any changes or modifications not expressly approved by the
party responsible for compliance could void the user's authority to operate this equipment.
This equipment has been tested and found to comply with the limits for a Class B Digital
Device, pursuant to Part 15 of the FCC Rules. These limits are designed to this equipment
generates, uses, and can radiate radio frequency energy and, if not installed and used in
accordance with the instructions, may cause harmful interference to radio
communications. However, there is no guarantee that interference will not occur in a
particular installation. If this equipment does cause harmful interference to radio or
television reception, which can be determined by turning the radio or television off and on,
the user is encouraged to try to correct interference by one or more of the following
measures.
. Reorient or relocate the receiving antenna.
. Increase the separation between the equipment and receiver.
. Connect the equipment into an outlet on another circuit.
. Consult the dealer or an experienced radio/TV technician for help.