SKYPINE ELECTRONICS CNE8205CL All in one DVD Player User Manual manual
SKYPINE ELECTRONICS (SHEN ZHEN) CO., LTD. All in one DVD Player manual
UserManual.wiki
>
SKYPINE ELECTRONICS
>
CNE8205CL User Manual
Users Manual
Navigation menu
Upload a User Manual
Namespaces
Wiki Guide
HTML
PDF
Info
Views
User Manual
Discussion / Help
Navigation
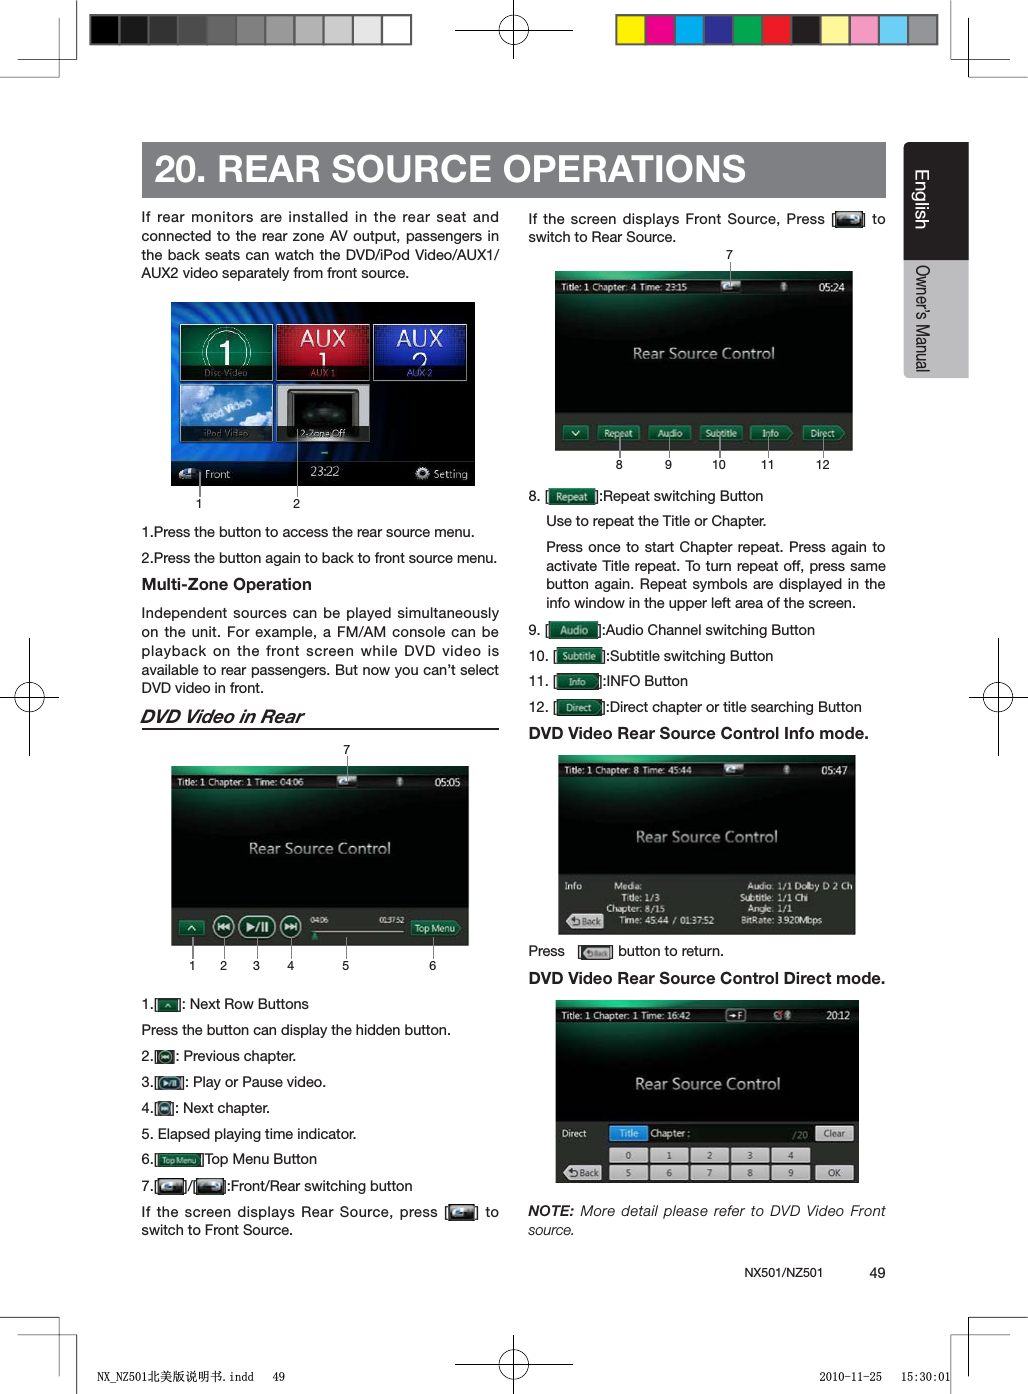
![10 NX501/NZ501EnglishOwner’s Manual4. PANEL CONTROLSNX501 Functions of ButtonsNote: Be sure to read this chapter while referring to front diagram “PANEL CONTROLS”. [PWR/VOL] +NOBs0RESSTHISKEYTOPOWERON THESYSTEMINPOWEROFFmode.s+EEPPRESSINGTHISKEYMORETHAN SECONDTOTURNoff the system when system is in power on mode.s2OTATETHEKNOBTOINCREASEORDECREASETHEVOLUME [NAVI/AV] Buttons0RESSTHISBUTTONTOENTER NAVIGATIONMODEPRESSagain to return current source. s0RESSANDHOLDTHISBUTTON FORSECONDSTODISPLAYthe brightness setting panel.[ ]Ejects0RESSTOEJECTDISCFROMUNIT [MENU] Buttons0RESSTHISBUTTONTODISPLAYMAINMENUPRESSAGAINto return current source.s0RESSANDHOLDTHISBUTTONFORSECONDSTOTURNOFFthe monitor. Press any place of the screen to turn on the monitor again. [RESET] Buttons0RESSTHISBUTTONTOHARDWARERESETTHEUNITNote: When the [RESET] button is pressed, frequencies of radio stations, titles, etc. stored in memory are cleared. [microSD]s)NSERTAMICRO3$INTHISNote: The microSD card is only for navigation. Please don’t remove it, otherwise, the navigation function will be disabled. [AUX IN]AUX 1 Connector. [Microphone]s)NTERNALMICROPHONEFORUSEDURING"LUETOOTHphone calls. Sensitivity can be adjusted fromthe Settings menu. [IR] SENSORs2ECEIVERFORTHEREMOTECONTROLUNITOPERATINGrange: 30 degree in all directions).[ ][Microphone][MENU][NAVI/AV][PWR/VOL][RESET][microSD][AUX IN][IR]1;B1=࣫㕢⠜䇈ᯢкLQGG ](https://usermanual.wiki/SKYPINE-ELECTRONICS/CNE8205CL/User-Guide-1409764-Page-10.png)
![NX501/NZ501 11EnglishEnglishOwner’s ManualNZ501 Functions of Buttons[ ][ ][OPEN][ISR/SEND][ / ][-][+][ IR ];"!.$%.$03=[NAVI/AV][Microphone][RESET][AUX IN][ ][ MENU/PWR ][microSD]Note: Be sure to read this chapter while referring to front diagram “PANEL CONTROLS”. [MENU/PWR] +EYs0RESSTHISKEYTOPOWERON THESYSTEMINPOWEROFFmode.s+EEPPRESSINGTHISKEYMORETHAN SECONDTOTURNoff the system when system is in power on mode.s0RESSTHISBUTTONTODISPLAYMAINMENUPRESSAGAINto return current source when system is in power on mode. [NAVI/AV] Buttons0RESSTHISBUTTONTOENTER NAVIGATIONMODEPRESSagain to return current source. s0RESSANDHOLDTHISBUTTON FORSECONDSTODISPLAYthe brightness setting panel.[ ]Ejects0RESSTOEJECTDISCFROMUNIT [Microphone]s)NTERNALMICROPHONEFORUSEDURING"LUETOOTHphone calls. Sensitivity can be adjusted fromthe Settings menu. [RESET] Buttons0RESSTHISBUTTONTOHARDWARERESETTHEUNITNote: When the [RESET] button is pressed, frequencies of radio stations, titles, etc. stored in memory are cleared. [microSD]s)NSERTAMICRO3$INTHISNote: The microSD card is only for navigation. Please don’t remove it, otherwise, the navigation function will be disabled. [AUX IN]AUX 1 Connector. [ , ] Buttonss0RESSTOSEARCHPREVIOUSORNEXTSTATIONORCHANNELINTuner, SIRIUS radio modes.1;B1=࣫㕢⠜䇈ᯢкLQGG ](https://usermanual.wiki/SKYPINE-ELECTRONICS/CNE8205CL/User-Guide-1409764-Page-11.png)
![12 NX501/NZ501EnglishOwner’s Manuals0RESSTO SEARCHPREVIOUSORNEXTTRACKORCHAPTERINCD, MP3/WMA, iPod and DVD video modes.s0RESSANDHOLDTOFASTFORWARDORFAST BACKWARDBY×2,×4,×8,×16 step in CD, MP3 /WMA and DVD video mode.s0RESSANDHOLDTOFAST FORWARDORFAST BACKWARDINiPod music.s0RESSANDHOLDTOENTERMANUALSEEKSTATUSIN4UNERand SIRIUS radio mode, then press briefly to seek station by step.[ ] Buttons0RESSTOPLAYPAUSEORSCANAUDIOORVIDEOs0RESSSHORTLYTOSCANs0RESSANDHOLDONETIME !UDIOORVIDEOlLEWILLBEpaused, if then press briefly, file will be resumed to play. [+][-] Buttonss0RESSTO)NCREASEANDDECREASEVOLUME[OPEN] Buttons5SETHISBUTTONTOOPENCLOSE4&4PANEL[MENU/PWR ] Buttons0RESSTHISBUTTONTODISPLAYMAINMENUPRESSAGAINto return current source.s0RESSTHISBUTTONTOTURNONTHEPOWERs+EEPPRESSINGTHISKNOBMORETHANSECONDTOTURNoff the power[BAND/END PS] Buttons0RESSTHISBUTTONTOENTER !-&-TUNERMODEFROMany source.s/NCEIN!-&- TUNERMODEYOUCANPRESSITTOchange bands between FM1, FM2, FM3, AM bands.s0RESSTOSTOP0RESET3CAN [ISR/SEND] Button)32&UNCTIONWhen in tuner mode, press and hold this button for 3 seconds to save current station and band to ISR memory, and at the same time, the tuner will enter ISR mode with current station. Note:In ISR mode, the tuning operation is disabled. Press this button again to quit ISR mode.When in the other mode but not tuner mode, press this key will go to ISR memory station directly, it likes a shortcut. Press this key again to go back to previous mode.3%.$&UNCTIONOnly be available when there is a coming call. Press this key to accept the coming call or end a call. [IR] SENSORs2ECEIVERFORTHEREMOTECONTROLUNITOPERATINGrange: 30 degree in all directions).1;B1=࣫㕢⠜䇈ᯢкLQGG ](https://usermanual.wiki/SKYPINE-ELECTRONICS/CNE8205CL/User-Guide-1409764-Page-12.png)
![NX501/NZ501 13EnglishEnglishOwner’s Manual5. REMOTE CONTROL2EPLACINGTHEBATTERIES 1.Press the retention tab and pull out the battery tray and remove the old battery. 2. Insert the new CR2025 battery and slide the battery tray back in the remote control the same direction that you removed it. Please ensure the tray is inserted in the correct direction..OTEUsing batteries improperly can cause them to explode. Take note of the following points:s7HENREPLACINGBATTERIESREPLACEBOTHBATTERIESwith new ones.s$ONOTSHORTCIRCUITDISASSEMBLEORHEATBATTERIESs$ONOTDISPOSEOFBATTERIESINTOlREORmAMESs$ISPOSEOFSPENTBATTERIESPROPERLYSignal transmitterOperating rang : 30°in all directions[ / ][ 0-9 ][SRCH][BACK][ , , , ][TITLE][ ], [ ][ZOOM][MUTE][AUDIO][POWER / SRC][VOLUME][SEL][PIC][TAG][RPT][ ], [ ][SUB.T][OPEN][ANGLE][NAV/ AV][MENU][BAND][ROOT][ENT]!LKALINE#2BATTERIESCONTAIN0ERCHLORATE$ISPOSEOFDISCHARGEDBATTERIESPROPERLYWARNING1;B1=࣫㕢⠜䇈ᯢкLQGG ](https://usermanual.wiki/SKYPINE-ELECTRONICS/CNE8205CL/User-Guide-1409764-Page-13.png)
![14 NX501/NZ501EnglishOwner’s Manual[ / ] Buttons0RESSTHISBUTTONTOPLAYOR PAUSEVIDEOANDAUDIOmedia.s0RESSTHISBUTTONMORETHANSECONDTOSTOPVIDEOand audio media.[MUTE] Buttons-UTEOR5NMUTETHESPEAKERs4HESYMBOL on upper right area of the screen indicates that speaker is muted. [POWER/SRC] Buttons0RESSTHISBUTTONTOMOVETHEFOCUSTONEXTAVAILABLEsource item on main menu.s0RESSTHISBUTTONTOPOWERONWHENTHEUNITISPOWERoff.s0RESSTHISBUTTONMORETHANSECOND TOPOWEROFFwhen the unit is power on.[0 - 9] Buttonss5SEINTHE +EY 0ADSCREENTOSELECTTHERADIOORSatellite Radio.s5SETOSELECTTHETRACKINTHETRACKLISTSCREENs0RESSTOENTER$6$VIDEO CHAPTERSTITLESINTHE+EYPad screen.[VOLUME] Buttonss)NCREASEANDDECREASEVOLUME[NAVI/AV] Buttons0RESSTHISBUTTONTOSWITCH BETWEENCURRENTSOURCEand current position on navigation map.[SRCH] Buttons0RESSTHISBUTTONTOOPEN CHAPTERORTITLESEARCHwindow while playing DVD. [BAND] buttons3WITCHTONEXTBANDALTERNATELY [SET] Buttons0RESSTHISBUTTONTOOPENTHE!UDIOSETTINGMENUINany mode. [BACK] Buttons0RESSTHISBUTTONTOQUITMAINMENUIFCURRENTSCREENis main menu.[ ], [ ], [ ], [ ] Buttonss0RESSTHISBUTTONFORCURSORMOVEMENTINMAINMENUor Setting mode.s&ROMTHEMAINMENUYOU CANSELECTYOURDESIREDsource or change your settings.[MENU] Buttons0RESSTHISBUTTONTOENTERTHE-!).-%.5ORRETURNcurrent resource.[PIC] Buttons0RESSTHISBUTTONTOCHANGEYOURMONITORBRIGHTNESS[ENT] Buttons0RESSTOlXTHEENTEREDDATAIN THE+EY0ADSCREENor enter the item the cursor is on. [TAG] Buttons0RESSTHISBUTTONTORECORD4!'IN($2ADIOMODE [TITLE] Buttons0RESSTOGOTOTHETITLEMENUONTHE$6$[ROOT] Buttons0RESSTOGOTOTHEROOTMENUONTHE$6$ [RPT] Buttons0RESSTOPERFORMCHAPTERREPEATTITLEREPEATREPEAToff while playing DVD mode.s0RESSTOPERFORMTRACKREPEATREPEATOFFWHILEPLAYINGCD.s0RESSTOPERFORMREPEATTRACKREPEATFOLDERREPEAToff while playing MP3/WMA, or video files on disc.s0RESSTOPERFORMREPEATTRACKREPEATFOLDERREPEAToff while playing MP3/WMA, or video files in USB memory. [ ], [ ] Buttonss0RESSTOSEEKTHENEXTAVAILABLE HIGHERORLOWERstation in Tuner mode. s)N3)2)532ADIO MODEYOUWILLSCROLLTHROUGHTHEcategories.s0RESSTOSELECTTHENEXT HIGHERORLOWERCHAPTERnumber in DVD video mode.s0RESSTOSELECTTHENEXTHIGHERORLOWERTRACKIN$6$Audio, USB Video, USB Audio mode.s0RESSFORMOVEMENTOFBACKGROUNDSOURCEINNavigation mode.[ ], [ ]Buttonss0RESSTOMANUALLYSELECTTHE NEXTHIGHERORLOWERstation in Tuner and Satellite Radio modes.s0RESSTOPERFORMFASTFORWARDORFASTBACKWARDsearching. Press again to change the speed to 2x, 4x, 8x or 16x.s0RESSFORMOVEMENTOFBACKGROUNDSOURCEINNavigation mode.Functions of Remote Control ButtonsYou can use the remote control unit to control the NX501 and NZ501.Note:s4HEWIRELESSREMOTECONTROLOPERATIONMAYNOTBEOPTIMALINDIRECTSUNLIGHT1;B1=࣫㕢⠜䇈ᯢкLQGG ](https://usermanual.wiki/SKYPINE-ELECTRONICS/CNE8205CL/User-Guide-1409764-Page-14.png)
![NX501/NZ501 15EnglishEnglishOwner’s ManualFunctions of Remote Control Buttons [ZOOM] Buttons0RESSTOTURNONANDZOOMINWHILEPLAYING$6$9OUcan zoom in up to 3x. (No all DVD disc supports this function). [AUDIO] Buttons0RESSTOSWITCHTHE!5$)/CHANNELOFTHEDISCWHILEplaying DVD. [SUB-T] Buttons0RESSTOSWITCHNEXTAVAILABLE SUBTITLEWHILEPLAYINGDVD.s0RESSTODISPLAY6IDEOMENUINI0ODMODE [ANGLE] Buttons0RESSTOSWITCHTHEDIFFERENT!.',%WHILEPLAYINGDVD. (No all DVD disc supports this function)s0RESSTODISPLAY!UDIOMENUINI0ODMODE [OPEN] Buttons0RESSTHISBUTTONTO/0%.OR#,/3%THEMOTORIZEDscreen. Please ensure there are no obstructions before starting the operation.(NZ501 only)1;B1=࣫㕢⠜䇈ᯢкLQGG ](https://usermanual.wiki/SKYPINE-ELECTRONICS/CNE8205CL/User-Guide-1409764-Page-15.png)
![16 NX501/NZ501EnglishOwner’s ManualFront Zone Source[Tuner]-Press the button to display the Tuner mode.[Disc Audio]-Press the button to display the Disc Audio mode.[SIRIUS]-Press the button to display the SIRIUS mode.[USB Audio]-Press the button to display the USB Audio mode.[Bluetooth Audio]-Press the button to display the Bluetooth Audio mode.[iPod Audio]-Press the button to display the iPod Audio mode.[AUX 1]- Press the button to display the AUX 1 mode.[Disc Video]-Press the button to display the Disc Video mode.[AUX 2]-Press the button to display the AUX 2 mode.[USB Video]-Press the button to display the USB Video mode.[Camera]-Press the button to display the Camera mode.[iPod Video]-Press the button to display the iPod Video mode.[Navigation]-Press the button to display the Navigation mode.[Telephone]-Press the button to display the Telephone mode.[Rear Button]-Press the button to display the rear menu.[Setting Button]-Press the button to display the setting menu.Rear Zone Source[Rear Disc Video]-Press the button to display the Rear Disc Audio mode.[Rear AUX 1]-Press the button to display the Rear AUX 1 mode[Rear iPod Video]-Press the button to display the Rear iPod Video mode.[Rear AUX 2]-Press the button to display the rear AUX 2 mode.[2-Zone Off]-Press the button to closed the rear activity.[Front Button]-Press the button to display the front main menu.[Setting Button]-Press the button to display the setting menu.6. MAINMENU OPERATIONSScrolling the menuPress screen and scrolling to right or left it will switch to next or previous page of mainmenu.Moving the menu position1. Press any quadrate icon on mainmen more than 2 seconds, the icon will float on mainmenu. 2. Scrolling the floating icon to any position you want,1;B1=࣫㕢⠜䇈ᯢкLQGG ](https://usermanual.wiki/SKYPINE-ELECTRONICS/CNE8205CL/User-Guide-1409764-Page-16.png)


![NX501/NZ501 19EnglishEnglishOwner’s ManualChange DVD System SettingsNote: If the set up operation is performed in the middle of DVD video play, the disc will restart from the beginning.Selecting DVD Set Up Menu1. Press the [Setting] button on the Main Menu to access the Video set up menu.2. Press [Video] button. The video menu is displayed.Setting up the Screen Size Press the [DVD Wide Screen Mode] button to turn on or turn off the DVD wide screen mode. 4HEFACTORYDEFAULTSETTINGISh/NvNote: Not all DVD disc supports this function.DVD Wide Screen Mode OnDVD Wide Screen Mode OffSetting up the password for parental level control4HEFACTORYDEFAULTPASSCODEIShv1. In Main Menu press [Setting] button. Press [Others]button on the display. Touch the [Set Password] ---- and a numerical key pad will appear.)NPUTTHEOLDPASSWORDANDTOUCHTHE;/+=KEYORINPUT"4356" to reset password.Input a new password,and touch the [OK] key.Input the same new password again,and touch the [OK] key. Note: When a disc with view restrictions is inserted, you will be prompted to input this password. The disc will not be viewable until the correct password is entered.Set rating for parental level control1. Select Others screen while in Setting mode. Press ;0ARENTAL#ONTROL=BUTTON0RESSTHEDESIREDRATINGFORlevel control. Use this table to set the parental level.+ID3AFE +ID3AFEG General AudiencesPG Parental Guidance SuggestedPG-13 Parents Strongly CautionedPG-R Parental Guidance RestrictedR RestrictedNC-17 No One 17 And Under AdmittedAdult Only Adult s4HECONTENTSTHATTHE PARENTALLEVELRESTRICTSVARYwith the country code.Note: The rating can be selected only under the password unlocked status, and the limits can be set only under the password locked status.Watching to a disc1. To load a disc: Insert the disc into the center of the insertion slot the label side facing up.Note:s Never insert foreign objects into the disc insertion slot.s)FTHEDISCISNOTINSERTEDEASILY THEREMAY BEANOTHERdisc in the mechanism or the unit may require service.sCMSINGLEPLAYDISCSCANNOTBEUSED8. DVD VIDEO PLAYER OPERATIONS1;B1=࣫㕢⠜䇈ᯢкLQGG ](https://usermanual.wiki/SKYPINE-ELECTRONICS/CNE8205CL/User-Guide-1409764-Page-19.png)
![20 NX501/NZ501EnglishOwner’s Manual2. Disc starts playing automatically.Ejecting a disc1. To eject a disc press eject [ ] button. The play mode then switches to the Tuner mode.If the disc is left in the ejected position for 15 seconds, the disc is automatically reloaded. In this case, the play mode will remain in the Tuner mode.Note: If you force a disc into before auto reloading, it may damage a disc.Showing DVD Player mode screenAfter disc is loaded, the play mode is automatically engaged.Touch any place of the screen to display DVD Video menu touch the screen again to return the playback screen. The display will return to the playback screen, if you do not touch the screen for 10 seconds.1 2 3 4 5 6 7 89101112 13 14 15 16 171 - Next page Buttons2 - Previous Track /Fast Backward Button3 - Play/Pause Button4 - Next Track/Fast Forward Button5- Elapsed playing time6- Seek bar7- Total time8- Top Menu Button9- System time10- Bluetooth status11- DVD playback info12- Previous page Button13- Repeat switching Button14- Audio Channel switching Button 15- Subtitle switching Button16- INFO Button17- Direct chapter or title searching ButtonOperate the DVD Player menuYou can select the button items displayed in the DVD menu by directly touching it.Play/Pause Playback1. Touch [ =BUTTONTOPAUSEDURINGPLAYBACK2. Touch [ =BUTTONAGAINTORESUMEPLAYBACKSkip (Search) a Chapter1. Press [ =OR; =BUTTONDURINGPLAYBACKChapters are skipped down or up from current locations, as many times as the button is pressed, and playback starts.Skip use seek barPress the triangle [ =ONSEEKBARAND DRAGITTOANYposition where you want to start playback.Fast Forward/Fast Backward1. Press [ =OR; =BUTTONANDHOLDSECONDSTOSTARTfast backward or fast forward during playback. The playback speed starts at 2x, then will increase to 4x, 8x, and 16x. Release the button will continue playing with normal speed.2. [] or [ ] button on remote control can also be used to start fast backward or fast forward during playback.Note:sNo audio is reproduced during fast forward and fast backward operation.sThe fast forward and fast backward speed may differ depending on the disc.Stop Playback1. Press the [ =BUTTONONREMOTECONTROLMORETHAN second. Playback is stopped.2. To resume playback, press the [ ] button.Playback resumes from start of the disc.Search with a Chapter/Title NumberYou can locate the beginning of a scene using the chapter numbers or title numbers recorded on the DVD Video disc.1;B1=࣫㕢⠜䇈ᯢкLQGG ](https://usermanual.wiki/SKYPINE-ELECTRONICS/CNE8205CL/User-Guide-1409764-Page-20.png)
![22 NX501/NZ501EnglishOwner’s Manual4OUCH;!NGLE=KEYONTHE REMOTECONTROLDURINGplayback. Each time you touch the key, you can switch among angles.sIt may take time to switch among angles.sDepending on the disc, up to 9 angles may be recorded. For details, see the mark of the disc: (Indicates multi-angle).sDepending on the disc, angles may switch smoothly or switch with a momentary still image.sDepending on the disc, switching may be completely impossible or impossible on some scenes.sDepending on the disc, scenes recorded in two or more angles may be played back.Displaying the playback statusTouch [ =BUTTONON$6$ 0LAYERMODESCREENPlayback status is displayed on screen.Play disc video filesThis system can play video files (AVI/MP4, etc) stored on disc.Showing video files Player mode screen1. After disc with video files is loaded, touch [DVD 6IDEO=BUTTON ON-!).-%.5TOSHOW VIDEOFILESplayer mode screen.2. Touch the screen of the playing video file to display Video files player menu touch the screen again to return the playback screen. The display will return to the playback screen, if you do not touch the screen for 10 seconds.1 2 3 4 5 678910 11 12 131 - Next page Button2 - Previous Track /Fast Backward Button3 - Play/Pause Button4 - Next Track/Fast Forward Button5- Elapsed playing time /Seek bar6- List Mode Button7- System time8- Bluetooth status9- Playback info10- Previous Row Buttons11- Repeat Button12- Audio Button 13- Subtitle ButtonOperate the Video files Player menuYou can select the button items displayed in the Video files player menu by directly touching it.Play/Pause Playback1. Touch [ =BUTTONTOPAUSEDURINGPLAYBACK2. Touch [ =BUTTONAGAINTORESUMEPLAYBACKSwitch to Previous/next file1. Press [ =OR ; =BUTTONDURINGPLAYBACKTO PLAYprevious /next file Skip using seek barPress the triangle on seek bar and drag it to any position where you want to start playback.Fast Forward /Fast Backward1. Press [ =OR; =BUTTONANDHOLDSECONDSTOSTARTfast backward or fast forward during playback. The playback speed starts at 2x, then will increase to 4x, 8x, and 16x. Release the button will continue playback with normal speed.2. [] or [ ] button on remote control can also be used to start fast backward or fast forward during playback.Note:sNo audio is reproduced during fast forward and fast backward operation.sThe fast forward and fast backward speed may differ depending on the disc.Stop Playback1. Press the [ ] button on remote control more than 1 second. Playback is stopped.2. To resume playback, press the [] button.Playback resumes from start of the folder which playing track is in.Repeat PlaybackThis operation plays back video files recorded on the disc repeatedly.1;B1=࣫㕢⠜䇈ᯢкLQGG ](https://usermanual.wiki/SKYPINE-ELECTRONICS/CNE8205CL/User-Guide-1409764-Page-22.png)
![24 NX501/NZ501EnglishOwner’s ManualListening to a disc/Ejecting a discPlease refer to Disc Video Player Operations -watching to a disc and Ejecting a disc.Showing CD Player mode screen1. After disc is loaded, the play mode is automatically engaged.2. If disc have been loaded you can touch Disc Audio button on main menu to display CD player mode screen.1 -Open option menu Button2- Elapsed playing time indicator3- Rotation effect4- Audio files or CD tracks.5- System time6- Bluetooth status7- Play back status8- Previous Track /Fast Backward Button9- Repeat Button10- Play/Pause Button11- Shuffle Button12- Next Track/Fast Forward Button13- Direct Searching Button14- Scan Start/Stop Button15- Rotation Effect On/Off Button16 - Song Title17 - Artist Information18 - Album Information19 - Close option menu ButtonOperate the CD Player menuYou can select the button items displayed in the CD player menu by directly touching it in list.Play/Pause Playback1. Touch [ =BUTTONTOPAUSEDURINGPLAYBACK2. Touch [ =BUTTONAGAINTORESUMEPLAYBACKSwitch to Previous/next file or trackPress [ =OR ; =BUTTONDURINGPLAYBACKTO PLAYprevious /next file.s0RESSING; =BUTTONSTARTSPLAYBACK FROMTHEbeginning of the next track.s0RESSING; = BUTTONSTARTSPLAYBACKFROMTHEbeginning of the current track. When this button is pressed again within 5 seconds, playback starts from the beginning of previous track.Fast Forward /Fast Backward1. Press [ =OR; = BUTTONANDHOLDMORETHANseconds to start fast backward or fast forward during playback. The playback speed starts at 2x, then will increase to 4x, 8x, and 1 6x .Release the button will continue playback with normal speed.2. [ ] or [ ] button on remote control can also be used to start fast backward or fast forward during playback.Note:sNo audio is reproduced during fast forward and fast backward operation.sThe fast forward and fast backward speed may differ depending on the disc.Stop Playback1. Press the [ ] button on remote control more than 1 second. Playback is stopped.2. To resume playback, press the [ ] button.Playback resumes from start of disc.Repeat PlaybackThe repeat set as the factory default is Repeat Track.Touch the [ =BUTTONONCEFOR 2EPEATOFFAGAIN FORRepeat Track.Shuffle Playback1. Touch [ =BUTTONTO SHUFFLETHE TRACKS DURINGplayback.9. DVD AUDIO PLAYER OPERATIONS1 2 3567849101112131415191617181;B1=࣫㕢⠜䇈ᯢкLQGG ](https://usermanual.wiki/SKYPINE-ELECTRONICS/CNE8205CL/User-Guide-1409764-Page-24.png)
![NX501/NZ501 25EnglishEnglishOwner’s Manual2. Touch this button again to turn off the feature.Selecting a track on the Track List ScreenThis function allows you to select tracks from a displayed list.1. Touch the track title on the display list. The selected track will start playing.2. When the desired track is not displayed, press and flick the track list up or down.3. Touch the desired track title key. The corresponding track is started playback.Scanning the Tracks1. Touch [ =BUTTONTOSHOW;3CAN =BUTTON2. Touch [Scan =BUTTONDURINGPLAYBACKs)TWILLPLAYFROMNEXTTRACKANDEACHTRACKWILLDISPLAYfor 10 seconds.s4HE;3CAN =BUTTONWILL SWITCHTO;3CAN =button.3. Touch [Scan =BUTTONs)TWILLCONTINUEPLAYBACKFROMCURRENTTRACKs;3CAN =BUTTONWILLSWITCHTO;3CAN =BUTTON*The function will scan all tracks orderly in current folder once. After Scan stopped playback will continue.Searching with the Track NumberThis operation allows searching using the track numbers recorded on the CDs.1. Touch [ ="UTTONTOSHOW; =BUTTON1. Touch [ =BUTTON4HENUMERICAL KEYPADWILLappear on the screen.2. Input the track number that you want to play back with [0] to [9] key.Playback starts from the track of the input track number.s)FTHEINPUTTRACKNUMBERDOESNOTEXISTORSEARCHINGwith track number is not allowed, the screen image will not change.s4OUCHTHE; =BUTTONWILL CLOSETHENUMERICALkeypad.s4OUCH; ="UTTONWILLCLOSE THEOPTIONWINDOWANDdisplay playback screen.Rotation Effect On/OffThis operation allows turn on/turn off rotation effect.* The factory default is On.1. Touch [ ="UTTONTOSHOW;2OTATIONEFFECT=BUTTON2. Press button [ =WILLTURNONTHE2OTATIONEFFECT3. Press button [ =WILLTURNOFFTHE2OTATIONEFFECTListening To MP3/WMAThis unit is an ID3 Tag compatible model.This unit supports the ID3 TAGs of the Version 2.4, 2.3, 1.1 and 1.0.In displaying, this unit gives priority to the Version 2.3 and 2.4 TAGs.What is MP3/WMA?MP3 is an audio compression method and classified into audio layer 3 of MPEG standards.WMA is an audio compression method developed by Microsoft Corporation.These audio compression methods have penetrated into PC users and become a standard format.These features compress the original audio data to about 10 percent of its initial size with a high sound quality. This means that about 10 music CDs can be recorded on a CD-R disc or CD-RW disc to allow a long listening time without having to change CDs.Note: Some CDs recorded on CD-R/RW mode may not be usable.Displaying MP3/WMA TAG titlesTag information such as title, artist and album title can be displayed for MP3/WMA file containing Tag information.Precautions when creating MP3 discs&ILEEXTENSIONS!LWAYSADDA FILEEXTENSIONh-0vORhMPv TOAN-0lLEAND h7-!vORhWMAvTOA 7-!lLEBYusing single byte letters. If you add a file extension other than specified or forget to add these file extension, the file cannot be played. In addition, if you use upper case and lower case letters (capital and small letters) mixed for file extensions, normal play may not be possible.2. Files other than MP3/WMA data cannot be played.Playing files with a format not supported will be skipped, and the scan, random and repeat playback mode may be canceled.s&ILEAND$ISC.OT3UPPORTEDFiles and discs with following extensions are not supported: *.AAC, *.DLF, *.M3U, *.PLS, *.MP3 PRO 1;B1=࣫㕢⠜䇈ᯢкLQGG ](https://usermanual.wiki/SKYPINE-ELECTRONICS/CNE8205CL/User-Guide-1409764-Page-25.png)
![NX501/NZ501 27EnglishEnglishOwner’s Manual3. Current Folders3HOWINGTITLEOFCURRENTFOLDERs4HENUMBERON THEFOLDERSYMBOLISTHE NUMBEROFfiles and folders number in current folder.s4OUCHTHETITLEOFCURRENTFOLDERPLAY LIST WILLSHOWfiles and folders in upper folder.Stop Playback1. Press the [ ] button on remote control more than 1 second. Playback is stopped.2. To resume playback, press the [ ] button.Playback resumes from start of the folder which playing track is in.Other operations about playing MP3/WMA are almost same as CD Player mode.1;B1=࣫㕢⠜䇈ᯢкLQGG ](https://usermanual.wiki/SKYPINE-ELECTRONICS/CNE8205CL/User-Guide-1409764-Page-27.png)
![NX501/NZ501 29EnglishEnglishOwner’s Manual7- Folders in list8- Folders browse control9- Playback status info10- Album Art11-Current ID3 info area12- Elapsed playing time indicator/Seek bar13- Previous Track /Fast Backward Button14- Direct Button 15- Scan Button 16- Close option menu ButtonPlaying MP3/WMA files in USB memoryPlay/Pause Playback1. Touch [ =BUTTONTOPAUSEDURINGPLAYBACK2. Touch [ =BUTTONAGAINTORESUMEPLAYBACKSwitch to Previous/next filePress [ =OR; = BUTTONDURINGPLAYBACKTOPLAYprevious /next file.s0RESSING; =BUTTONSTARTSPLAYBACK FROMTHEbeginning of the next track.s0RESSING; =BUTTONSTARTSPLAYBACKFROMTHEbeginning of the current track; when this button is pressed again within about 5 seconds, playback starts from the beginning of previous track.Fast Forward /Fast Backward1. Press [ =OR; = BUTTON ANDHOLDMORETHANseconds to start fast backward or fast forward during playback. The playback speed starts at 2x, then will increase to 4x, 8x, and 1 6x .Release the button will continue playback with normal speed.2. [] or [ ] button on remote control can also be used to start fast backward or fast forward during playback.Note:sNo audio is reproduced during fast forward and fast backward operation.sThe fast forward and fast backward speed may differ depending on the audio files.Stop Playback1. Press the [ =BUTTONONREMOTECONTROLMORETHANsecond. Playback is stopped.2. To resume playback, press the [ ] button.Playback resumes from start of the folder which playing track is in.Repeat Playback* The repeat set as the factory default is Repeat Folder.Touch the [ =BUTTONONCEFOR2EPEAT4RACKAGAINFORRepeat Folder.Note: The repeat in all USB files function is not available.Shuffle Playback1. Touch [ =BUTTON TOSHUFFLETHE TRACKSINPLAYINGfolder during playback.2. Touch this button again to turn off the feature.Album Art workIf current audio file contains album art image in ID3, the picture will be displayed in this area.ID3 info areaThis area display ID3 info of playing file: song title, artist information, album information, number of current file/total number in current folder, elapsed playing time/total time of current file.Skip use seek barPress on seek bar and drag it to any position where you want to start playback.Select a folder on display listTouch the folder title on the display list, the display list will display files and folders in selected folder.Selecting a track on the display List This function allows you to select tracks from a displayed list.1. Touch the track title on the display list. The selected track will start playing.2. When the desired track is not displayed, press and flick the track list up or down.3. Touch the desired track title key. The corresponding track is started playback.Folders browse controlThis area is same as the mouse touch panel of notebook computer. Flick up and down in this area will browse previous or next folder in current folder. Flick left or right will enter this folder or back to the father folder.Scanning the Tracks1. Touch [ ="UTTONTOSHOW;3CAN =BUTTON2. Touch [Scan =BUTTONDURINGPLAYBACKShow the title of previous folder.Show the title of current folder.Show the title of next folder.1;B1=࣫㕢⠜䇈ᯢкLQGG ](https://usermanual.wiki/SKYPINE-ELECTRONICS/CNE8205CL/User-Guide-1409764-Page-29.png)
![NX501/NZ501 31EnglishEnglishOwner’s Manual11. USB VIDEO OPERATIONSThis system can play USB video files (MP4,3GP, etc) STOREDINAN53"MEMORYWHICHISRECOGNIZEDASh53"Mass Storage Class device” You can use your USB memory as an audio device by simply copying desired audio files into it.Note:sThis system will not operate or may operate improperly with some USB memory.s&ILESPROTECTEDWITHANY$2-CANNOTBEPLAYEDNotes on using USB memories'ENERALNOTESWhen no support files, the file list display nothing..OTESONTHEFOLDERSTRUCTUREThe limitations on the folder structure are same as those in USB Audio Player mode..OTESONTHE4AGTITLESThe limitations on the Tag titles are same as those in DVD Audio Player mode.Select USB Video modeConnect your USB memory with video files to the USB connector. The system will automatically detect the CONNECTEDDEVICEANDTHE;53"6IDEO=BUTTONONMAINmenu will be enabled. s7HENAN53"MEMORYISALREADYCONNECTEDTouch [USB Video] button on main menu to select the USB Video mode.The system changes to the USB Video mode and starts playback from the previous position or from the beginning.NOTE: If you reconnect the same device that you disconnected last, the system will play back where it left off.Playing video files in USB memoryIf the video is playing, touch the screen of the playing video to display Operation buttons. * The display will return to the playback screen, if you do not touch the screen for 10 seconds.1-Previous Track Button2- Play/Pause Button3- Next Track Button4-Elapsed playing time indicator/Seek bar5-Menu Button (Go to list menu mode)6- Repeat Button7- System time8- Bluetooth status9- Playback infoPlay/Pause Playback2. Touch [ =BUTTONTO0AUSEPLAYBACK3. Touch [ =BUTTONTORESUMEPLAYBACKSwitch to Previous/next filePress [ =OR ; = BUTTONDURINGPLAYBACKTOPLAYprevious /next file.s0RESSING; =BUTTONSTARTSPLAYBACK FROMTHEbeginning of the next track.s0RESSING; =BUTTONSTARTSPLAYBACKFROMTHEbeginning of the current track; when this button is pressed again within about 5 seconds, playback starts from the beginning of previous track.Repeat Playback* The repeat set as the factory default is Repeat Folder. Touch the [ =BUTTONONCEFOR2EPEAT4RACKAGAINfor Repeat Folder.Note: The repeat in all USB files function is not available.Skip use seek barPress the on seek bar and drag it to any position where you want to start playback.Switch to USB Video MenuPress [ =BUTTONPLAYBACKWILLBEPAUSEDANDTHEscreen will switch to USB Video Menu.1 2 3 4 5 67891;B1=࣫㕢⠜䇈ᯢкLQGG ](https://usermanual.wiki/SKYPINE-ELECTRONICS/CNE8205CL/User-Guide-1409764-Page-31.png)
![NX501/NZ501 37EnglishEnglishOwner’s Manual13. Bluetooth AUDIO PLAYER OPERATIONSSome Bluetooth cellular phones have audio features, and some portable audio players support the Bluetooth feature. These devices will be called as h"LUETOOTHAUDIOPLAYERSvIN THISMANUAL4HISSYSTEMcan play audio data stored in a Bluetooth audio player..OTEs4HISSYSTEMWILLNOTOPERATEORMAYOPERATEIMPROPERLYwith some Bluetooth audio players.s&ORDETAILEDINFORMATIONON THEPLAYABLE"LUETOOTHaudio players, see our home page: www.clarion.comSelecting the Bluetooth Audio mode1. Press Menu button on Operational Panel to return to the Main Menu.2. Touch the [Bluetooth Audio] key to select the Bluetooth Audio mode. The system changes to the Bluetooth mode. If the connection with a Bluetooth audio player has been already established, you may select the Music function.s7HENTHECONNECTION WITHA"LUETOOTHAUDIOPLAYERhas been established, the [ =ICONISDISPLAYEDATTHEtop of the screen.Bluetooth audio player settings#ONlRMING"LUETOOTH)NFORMATIONANDSETTING0ASS+EYYou can confirm various information concerning about the Bluetooth Interface features.1. Touch the [ =KEYTODISPLAYTHEINFORMATIONONTHEscreen.2. When you finish confirming the Bluetooth information, touch the [ =KEYTO RETURNTOTHEprevious screen.If you want to change the Pin Code setting of this unit, perform the following steps.s4HEFACTORYDEFAULTSETTINGIShv3. Touch the text box of the Pin Code item to display THE4EN+EY0ADSCREEN4. Enter your desired 4-digit PIN number, and then touch the [ =KEYNote:-)#'AINISDISABLEDIN"LUETOOTH!UDIOMODESETTINGSRegistering your Bluetooth audio player (Pairing)You can register up to 5 Bluetooth audio players.1. Turn on the power of the Bluetooth audio player you wish to register.2. Touch the Device key [ =TODISPLAYTHE $EVICESelect screen.3. Touch the [ =KEY TODISPLAYTHE)NQUIRING$EVICEscreen.1;B1=࣫㕢⠜䇈ᯢкLQGG ](https://usermanual.wiki/SKYPINE-ELECTRONICS/CNE8205CL/User-Guide-1409764-Page-37.png)
![NX501/NZ501 39EnglishEnglishOwner’s ManualWhen the connection with your Bluetooth cellular phone is established, the following functions are available on this unit:s,ISTENINGTOYOURTELEPHONECALLSONTHECARSPEAKERSs!NSWERINGTOANINCOMINGCALLs-AKINGACALLUSINGTHE4EN+EYPADSCREENs-AKINGACALL USINGTHE0HONE"OOKDATA INTHEselected cellular phone.s-AKINGACALL USINGTHE(ISTORYDATAOF THEDIALEDreceived calls.Note:s3OMECELLULARPHONES MAYNOTBEABLETO TRANSFERTHEPhone Book data to head unit.s4HE0HONE"OOK DATATRANSMISSIONMAYTAKEA LONGtime. The operations of sending calls are disabled during the data transmission.s9OU CANTALKWITHOTHERPARTY BYUSINGTHEINTERNALmicrophone. When it is hard to hear for the other party in accordance with the communication condition or the used telephone, please use the optional microphone 2#"ANDSETTHE-ICROPHONE 3ELECTSETTINGTO“External”. The sound will be improved, but noises may still be heard depending on the communication condition.Select the BT Phone mode1. Press Menu button on Operational Panel to return to the Main Menu.2. Touch the [Bluetooth Telephone] key to select the Bluetooth Telephone mode. The Telephone screen is displayed.s7HENNO"LUETOOTH4ELEPHONECONNECTEDTHEicon[ =ISDISPLAYEDATTHETOPOFTHESCREENs7HENTHECONNECTION WITHA"LUETOOTH4ELEPHONEhas been established, the icon [ =ANDSIGNALLEVELindicator are displayed at the top of the screen.Bluetooth Telephone settings#ONlRMING"LUETOOTH)NFORMATIONANDSETTING0ASS+EYYou can confirm various information concerning the Bluetooth Interface features.1. Touch the [ =KEYTODISPLAYTHEINFORMATIONONTHEscreen.2. Perform setting for the desired item. See the following sections for detail.3. When you finish confirming the Bluetooth information, touch the [ = KEY TORETURNTOTHEprevious screen.)FYOUWANTTOCHANGETHE0ASS+EYSETTINGOFTHISUNITperform the following steps.4OUCHTHETEXTBOXOFTHE 0ASS +EYITEMTODISPLAYTHE4EN+EY0ADSCREENs4HEFACTORYDEFAULTSETTINGIShv2. Enter your desired 4-digit PIN number, and then touch the [ =KEY3ETTING!UTOMATIC#ONNECTIONThe system automatically reconnects the cellular phone after the connection is lost or the system is restarted.s4HEFACTORYDEFAULT SETTINGISh/&&v4OUCHTHE[=OR; =KEYOFTHE!UTOMATIC#ONNECTIONITEMto set the function ON or OFF.3ETTING!UTOMATIC!NSWERIf a call comes in, answer automatically after 5 seconds.s4HEFACTORYDEFAULT SETTINGISh/&&v4OUCHTHE[=OR; =KEY OFTHE!UTOMATIC!NSWERITEM14. Bluetooth TELEPHONE OPERATIONS1;B1=࣫㕢⠜䇈ᯢкLQGG ](https://usermanual.wiki/SKYPINE-ELECTRONICS/CNE8205CL/User-Guide-1409764-Page-39.png)

![NX501/NZ501 43EnglishEnglishOwner’s Manual15. RADIO OPERATIONSListening to the Radio1. Touch the Tuner button on the Main menu display. The tuner mode screen is displayed.2. Press the [FM1/2/3/AM] button or touch the [Band]key on remote control to select the radio band. Each time the button is pressed, the radio reception band changes in the following order: FM1->FM2->FM3->AM ->FM1...1. Preset Scan Button2.Direct Button3.Preset List Button4.Frequencies Display5.Tune Up6.Tune Down7.Band Display8.LOC/DX Display9.Bluetooth Display10.System Time Seek Tuning1. Press the [FM1/2/3/AM] button to select the radio band (FM or AM).2. Touch the [ =KEYAND THENFLICKTHE")'Frequency up and down to search for next available station.s7HENmICKTHEFREQUENCYUPTHESTATIONISSEARCHEDin the direction of higher frequency.s7HENFLICKTHEFREQUENCYDOWNTHE STATIONISsearched in the direction of lower frequency.Step TuningPress the [FM1/2/3/AM] button to select the radio band (FM or AM).2. Touch the [ =OR; =KEYINFREQUENCYPANELTOTUNEup or down by one step.Recalling a preset stationPress the [FM1/2/3/AM] button to select the desire band (FM or AM) on the tuner.Touch the [ =KEY0RESSTHEPRESETSTATIONTOon preset list.3. Press the [ = KEYTHENPRESSTHE; = BUTTONTOauto search and store the stations.Manual memory1. Touch the desired Band key to select the band you wish to store.2. Tune to a station you want to store using the seek tuning, step tuning, or preset tuning.3. Touch and hold the desired Preset key you want to store for about 3 seconds.Auto StoreThe Auto Store is a function for storing up to 6 stations that are automatically searched in sequentially. If the number of receivable stations cannot reach to 6, the previous stored station remains.1. Touch the [FM1/2/3/AM] key to select the desired band. (FM or AM)2. Press the [ =KEYANDTHENPRESSTHE; =KEYTOstart the Auto Store.A beep sounds and the stations with good reception are stored automatically to the preset list.Preset ScanThe Preset Scan receives the stations stored in the preset memory in order. This function is useful when searching for the desired station in memory.1. Touch the [FM1/2/3/AM] key to select the desired band. (FM or AM)2. Touch the [ =KEYTOSTARTTHE0RESET3CANThe unit starts scanning each station for 10 seconds sequentially. But the station stored is not a valid station; the scanning time is only 2 seconds.3. When the desired station is tuned in, touch the [=KEYAGAINTOSTAYINTHATSTATIONLOC/DX Setting1 328 94651071;B1=࣫㕢⠜䇈ᯢкLQGG ](https://usermanual.wiki/SKYPINE-ELECTRONICS/CNE8205CL/User-Guide-1409764-Page-43.png)
![44 NX501/NZ501EnglishOwner’s Manual16. HD Radio™ RECEIVER OPERATIONS This function is available when an HD Radio tuner is connected.This unit can control the following HD Radio tuner:s($2ADIO4UNER4($Note:s"ESURETOTURNOFFTHE!##POWERBEFORECONNECTINGdisconnecting the HD Radio tuner.s.OTALLAREASOFFER($2ADIOBROADCASTSs($2ADIOSTATIONS MAYNOTALWAYSBROADCASTSUBchannelss6OLUMELEVELSOF($2ADIOSTATIONSMAYVARY)NCREASEthe volume gradually from the minimal setting after the channel is selected. Be sure to lower the volume setting before switching to another mode or channel.Additional information about HD Radio Technology can be found at WWWHDRADIOCOMListening to HD Radio broadcastsNote: Connect THD400 HD RadioTM tuner to activate HD RadioTM function.1. Touch the Tuner button on the Main menu display. The HD Radio mode screen will be displayed.2. Press the [FM1/2/3/AM] button or touch the [Band]key on remote control to select the radio band. Each time the button is pressed, the radio reception band changes in the following order: FM1, FM2, FM3, AM, FM1...1-Preset Scan Button2-Direct Button3-Preset List Button4-Setting Button5-Tune Up6-Tune Down7-Band Display8-Bluetooth Status Display9-System Time Seek Tuning1. Press the [FM1/2/3/AM] button to select the radio band (FM or AM).2. Touch the [ =KEYAND THENFLICKTHE")'Frequency up and down to search for next available station.s7HENmICKTHEFREQUENCYUPTHESTATIONISSEARCHEDin the direction of higher frequency.s7HENFLICKTHEFREQUENCYDOWNTHE STATIONISsearched in the direction of lower frequency.Step Tuning1. Press the [FM1/2/3/AM] button to select the radio band (FM or AM).2. Touch the [ =OR; =KEYINFREQUENCYPANELTOTUNEup or down by one step.Recalling a preset station1. Press the [FM1/2/3/AM] button to select the desire band (FM or AM) on the tuner.2. Touch the [ =KEY3. Press the preset station (1 to 6) on preset list.4. Press the [ = KEYTHENPRESSTHE; = BUTTONTOauto search and store the stations.Manual memory1. Touch the desired Band key to select the band you wish to store.2. Tune to a station you want to store using the seek tuning, step tuning, or preset tuning.3. Touch and hold the desired Preset key you want to store for about 3 seconds.1 328 94657The DX / LOC setting changes the tuner sensitivity in order to separate closely spaced stations. This feature is useful in areas that have many radio stations in close proximity.1. Touch the [ =KEY TOSWITCHTO,/#!,TUNERsensitivity.2. Touch the [ = KEYTOSWITCHTO$8 TUNERsensitivity.1;B1=࣫㕢⠜䇈ᯢкLQGG ](https://usermanual.wiki/SKYPINE-ELECTRONICS/CNE8205CL/User-Guide-1409764-Page-44.png)
![NX501/NZ501 45EnglishEnglishOwner’s ManualAuto StoreThe Auto Store is a function for storing up to 6 stations that are automatically searched in sequentially. If the number of receivable stations cannot reach to 6, the previous stored station remains.4OUCHTHE;&-!-=KEYTO SELECTTHEDESIREDband. (FM or AM)2. Press the [ =KEYANDTHENPRESSTHE; =KEYto start the Auto Store.A beep sounds and the stations with good reception are stored automatically to the preset list.HD Radio Sub channel FunctionIf the [ =KEYISENABLEDPLEASETOUCHTHE; =key to tune to next available sub channel.Note:Not all stations have HD Radio sub channel broadcasts. The [ ] key is only enabled when current station has sub channel broadcast and signal strength is strong enough.iTunes Tagging FunctionA new feature is available to mark songs on HD Radio™ broadcasts for review and purchase at a later time from the listener’s personal computer. This feature is available through HD Radio™ receivers that build in THENEWhI4UNES4AGGINGvFEATURENow iTunes Tagging system is only available for Apple iPod and iPhone.Operation:1. Touch [ =KEYORPRESSTHE;4!'=BUTTONon the remote control to to store the current music information to memory.2. You may store up to 64 tags to the memory of head unit. 3. When an iPod/iPhone is connected to the unit, the unit will automatically transfer the tags in memory to the iPod/iPhoneNote: Not all broadcasted material can be tagged, in this case, the [ ] button will be disabled($2ADIO4-($2ADIO2EADY4-AND THE($ 2ADIO2EADYLOGOAREPROPRIETARYTRADEMARKSOFI"IQUITY$IGITAL#ORPORATION1;B1=࣫㕢⠜䇈ᯢкLQGG ](https://usermanual.wiki/SKYPINE-ELECTRONICS/CNE8205CL/User-Guide-1409764-Page-45.png)
![46 NX501/NZ501EnglishOwner’s Manual17. SIRIUS SATELLITE RADIO OPERATIONSThis function is available when a SIRIUS Satellite Radio Tuner is connected through the dedicated connection. This unit requires the following receiver: 3)2)53#ONNECT©6EHICLE4UNER3##Note:SIRIUS Satellite Radio is a subscription service.Please contact SIRIUS Radio to begin or alter your subscription:s)NTERNETWWWSIRIUSCOMs4ELEPHONE3)2)53Selecting a Satellite Radio modePress the [SIRIUS] button on Main Menu display. The system changes to the SIRIUS Satellite Radio mode. The SIRIUS mode screen is displayed.1-Setting Button2-Previous Category Button+EYPAD"UTTON4-Category Scan Button5-Next Category Button6-Store/Delete Button7-Band Button8-Channel List Button9-Bluetooth Status Display10-Preset List Button11-System Time12-Category List Button13-List Display14-Previous Channel Button15-Next Channel ButtonInformation Displayed During ReceptionThe following information is displayed when the satellite radio cannot be received normally.s7HENTHERECEIVERISTURNEDONTHElRSTTIMEORAFTERARESETh50$!4).'vFOLLOWEDBYAPERCENTAGEOFcompletion.s7HENACHANNEL ISBEINGTUNEDINNO SIGNAL ISYETRECEIVEDh!#15)2).'3)'.!,vs!CHANNELWITHOUT ABROADCASTHAS BEENSELECTEDh).6!,)$#(!..%,vs!CHANNELNOT COVEREDBYYOUR CONTRACThCALL 888-539-SIRIUS”Call (888) 539-747487 to activate your radio or change your subscription package.s7HENTHEANTENNAIS DISCONNECTEDORHASBEENDAMAGEDh!.4%..!%22/2vConfirming Your SIRIUS IDTouch the [ =BUTTONON THE 3)2)53-ENUDISPLAYTOenter Settings menu.Channel Selection1. Touch the [ = BUTTONONTHE3)2)53-ENUdisplay to enter channel list preview mode. You can select any channels in list directly.2. Select the channel with the [ =OR ; =/NLYchannels that can be received are selected. Channels that are locked and channels not covered by the contract will be skipped. The receiver seeks the next available channel below or above the current channel.3 648 91131272 5111514101;B1=࣫㕢⠜䇈ᯢкLQGG ](https://usermanual.wiki/SKYPINE-ELECTRONICS/CNE8205CL/User-Guide-1409764-Page-46.png)
![48 NX501/NZ501EnglishOwner’s Manual18. AUX 1 / AUX 2 OPERATIONSExternal peripheral devices, including a game console, camcorder, iPod/iPhone, etc. can be connected to the AUX 1 or AUX 2 connector on the front or back of this unit using the A/V media cables.Switching to AUX IN / AV IN modesPress [AUX 1] or [AUX 2] button on Main Menu to select desired mode (when unit is reading). If the external device connected to AUX 1or AUX 2 input have audio signal, the unit will broadcast audio of external device. sPress [Menu] button on Operational Panel to return to the Main Menu.You cannot directly control external devices connected to AUX 1or AUX 2 input.19. CAMERA IN OPERATIONSSwitching to Camera modePress [Camera] button on Main Menu to select desired mode.4HE,#$WILLDISPLAYTHEEXTERNALCAMERAVIDEO4HESCREENWILLDISPLAYh.O6IDEO3IGNALvMENUIFAVALIDCAMERAis not connect to this head unit. Press Menu button on Operational Panel to return to the Main Menu.Note:If the reverse cable is connected correctly to the car, the center unit to switch to camera mode automatically when the car is in reverses.1;B1=࣫㕢⠜䇈ᯢкLQGG ](https://usermanual.wiki/SKYPINE-ELECTRONICS/CNE8205CL/User-Guide-1409764-Page-48.png)