SKYPINE ELECTRONICS CNE8205CL All in one DVD Player User Manual manual
SKYPINE ELECTRONICS (SHEN ZHEN) CO., LTD. All in one DVD Player manual
Users Manual
2-DIN DVD MULTIMEDIA STATION WITH
BUILT-IN NAVIGATION & 6.2" TOUCH PANEL CONTROL
STATION MULTIMÉDIA DVD 2-DIN AVEC COMMANDE
ÉCRAN TACTILE DE 6,2 pouces
ESTACIÓN DVD MULTIMEDIA DOBLE DIN CON PANEL
DE CONTROL TÁCTIL DE 6,2 pulgadas
DVD MULTIMEDIA STATION WITH BUILT-IN NAVIGATION &
7" TOUCH PANEL CONTROL
STATION MULTIMÉDIA DVD AVEC COMMANDE
ÉCRAN TACTILE DE 7 pouces
ESTACIÓN DVD MULTIMEDIA CON PANEL DE CONTROL
TÁCTIL DE 7 pulgadas
NX501
N
Z
501
Owner’s manual & Installation manual
Mode d’emploi et manuel d’installation
Manual de instrucciones y de instalación
1;B1=࣫㕢⠜䇈ᯢкLQGG
CLARION PRODUCT REGISTRATION INFORMATION
For USA and Canada only
www.clarion.com
Dear Customer:
Congratulations on your purchase of a Clarion mobile electronic product. We are confident that you’ll enjoy
your Clarion experience.
There are many benefits to registering your product. We invite you to visit our website at www.clarion.com
to register your Clarion product.
We have made product registration simple with our easy to use website.
The registration form is short and easy to complete. Once you’re registered, we can keep you informed of
important product information.
Register at www.clarion.com - it’s easy to keep your Clarion product up to date.
1;B1=࣫㕢⠜䇈ᯢкLQGG

NX501/NZ501 3
English
English
Owner’s Manual
Contents
1. FEATURES ·················································································································5
2. PRECAUTIONS··········································································································6
3. CAUTIONS ON HANDLING·······················································································8
Operation Panel ··········································································································8
USB Port·····················································································································8
Cleaning······················································································································8
Handling Discs············································································································9
4. PANEL CONTROLS·································································································10
NX501 Functions of Buttons·····················································································10
NZ501 Functions of Buttons·····················································································11
5. REMOTE CONTROL································································································13
Functions of Remote Control Buttons ······································································14
6. MAINMENU OPERATIONS ·····················································································16
Front Zone Source ····································································································16
Rear Zone Source·····································································································16
7. DVD SYSTEM ··········································································································17
DVD Video Features··································································································17
Discs ·························································································································17
About the registered marks, etc. ··············································································18
8. DVD VIDEO PLAYER OPERATIONS·······································································19
Change DVD System Settings ··················································································19
Watching to a disc ····································································································19
Operate the DVD Player menu··················································································20
Operate the Video files Player menu·········································································22
9. DVD AUDIO PLAYER OPERATIONS ······································································24
Showing CD Player mode screen·············································································24
Operate the CD Player menu····················································································24
Listening To MP3/WMA ····························································································25
10. USB AUDIO OPERATIONS ···················································································28
Notes on using USB memories·················································································28
Select USB Audio mode ···························································································28
Playing MP3/WMA files in USB memory ··································································29
11. USB VIDEO OPERATIONS····················································································31
Notes on using USB memories·················································································31
Select USB Video mode ···························································································31
Playing video files in USB memory···········································································31
USB Video Menu Operations····················································································32
12. iPod/iPhone OPERATIONS···················································································33
Notes on using Apple iPod/iPhone ············································································33
Controlling the iPod/iPhone ·······················································································33
Selecting the iPod Video mode··················································································35
13. Bluetooth AUDIO PLAYER OPERATIONS ···························································37
Selecting the Bluetooth Audio mode········································································37
Bluetooth audio player settings ················································································37
Registering your Bluetooth audio player (Pairing)·····················································37
Selecting the Bluetooth audio player········································································38
Controlling the Bluetooth audio player ·····································································38
14. Bluetooth TELEPHONE OPERATIONS································································39
Select the BT Phone mode·······················································································39
Bluetooth Telephone settings ···················································································39
Register your cellular phone (Pairing) ·······································································40
Select the cellular phone ··························································································40
Obtaining the Phone Book data ···············································································41
1;B1=࣫㕢⠜䇈ᯢкLQGG

4 NX501/NZ501
English
Owner’s Manual
Telephone operations································································································41
15. RADIO OPERATIONS····························································································43
16. HD Radio™ RECEIVER OPERATIONS ·······························································44
17. SIRIUS SATELLITE RADIO OPERATIONS···························································46
18. AUX 1 / AUX 2 OPERATIONS ···············································································48
19. CAMERA IN OPERATIONS···················································································48
20. REAR SOURCE OPERATIONS ·············································································49
DVD Video in Rear ····································································································49
AUX 1 in Rear············································································································50
AUX 2 in Rear············································································································50
iPod Video in Rear ····································································································50
21. SETTING OPERATIONS························································································51
General Setup Menu·································································································51
Video Setup Menu ····································································································51
Audio Setup Menu ····································································································51
22. MONITOR OFF ······································································································52
Navigation Setup Menu ····························································································52
Others Setup Menu···································································································52
23. TROUBLESHOOTING ···························································································53
GENERAL··················································································································53
DVD PLAYER ············································································································53
USB DEVICE ·············································································································54
Bluetooth ··················································································································54
TV/VTR (When connecting an optional TV tuner, etc.)··············································55
24. ERROR DISPLAY···································································································55
25. SPECIFICATIONS··································································································56
INSTALLATION /WIRE CONNECTION GUIDE···························································58
1;B1=࣫㕢⠜䇈ᯢкLQGG
NX501/NZ501 5
English
English
Owner’s Manual
1. FEATURES
Double Din 6.2” Touch Panel Control
(NX501)
Motorized 7” Touch Panel Control
(NZ501)
DVD Video/CD-DA/MP3/WMA
Playback Capability
Built-In Bluetooth®
OEM Steering Wheel Remote Ready
Compatible with SIRIUS Satellite Radio
Compatible with iPod®/ iPhone®via USB
HD Radio Ready™
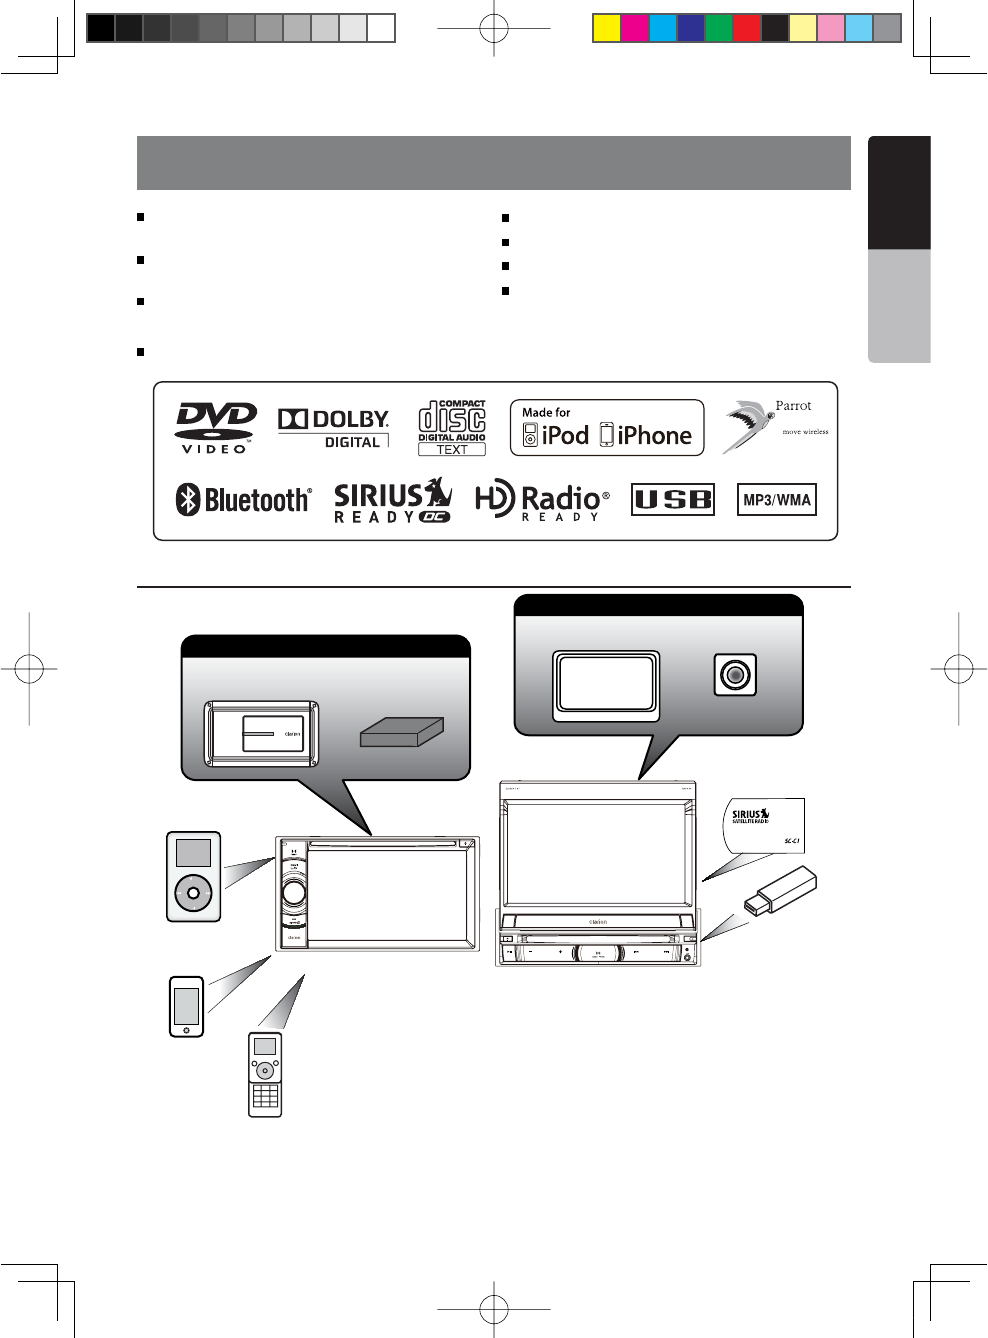
Expanding Systems
NOTE:
The unit can receive analog radio, HD Radio (optional) and SIRIUS satellite radio (optional) broadcasts. The items listed
outside the frames are the commercial products generally sold.
Sirius Connect TM
Vehicle Tuner(SCC1)
Expanding visual features
Rear Monitor
iPod
Rear Vision Camera
Expanding audio features
External Power
Amplifier
HD Radio™
Tuner
iPhone
USB
Memory
Bluetooth
Telephone
SIRIUSCONNECTVEHICLET
UNER
1;B1=࣫㕢⠜䇈ᯢкLQGG

6 NX501/NZ501
English
Owner’s Manual
2. PRECAUTIONS
s&ORYOURSAFETYTHEDRIVERSHOULDNOTWATCHANYVIDEOSOURCESANDOROPERATETHECONTROLSWHILEDRIVING0LEASE
note that watching and operating any video sources while driving are prohibited by law in some countries. Also,
while driving, keep the volume to a level at which external sounds can be heard.
s7HENUSINGTHE NAVIGATIONSYSTEMFOLLOWTHEPRECAUTIONSLISTEDBELOW!FTERREADINGTHISMANUAL BESURETO
keep it in a handy place (such as the glove box of your car).
s4HISNAVIGATIONSYSTEM SHOULDNOTBEUSEDTO REPLACEYOUROWN JUDGMENT.OITINERARYSUGGESTEDBY THIS
navigation system should ever override any highway regulations, your own judgment, or a knowledge of safe
driving practices. Do not follow the navigation system’s suggested itinerary if it would cause you to perform a
dangerous or illegal act, place you in a dangerous situation, or take you into an area you consider unsafe.
s4HEADVICEPROVIDEDBYTHENAVIGATIONSYSTEMISTOBEREGARDEDASASUGGESTIONONLY4HEREMAYBETIMESWHEN
the navigation system displays the vehicle’s location incorrectly, fails to suggest the shortest route, or fails to
direct you to your desired destination. In such instances, rely on your own driving judgment, taking into account
the driving conditions at the time.
s$ONOTUSE THENAVIGATIONSYSTEMTOLOCATE EMERGENCYSERVICES4HE DATABASEDOESNOTCONTAINA COMPLETE
listing of emergency services such as police stations, fire halls, hospitals and walk-in clinics. Please show
discretion and ask for directions in such instances.
s!STHEDRIVERYOUALONEARERESPONSIBLEFORYOURDRIVINGSAFETY
s)NORDERTOAVOIDATRAFlCACCIDENTDONOTOPERATETHESYSTEMWHILEDRIVING
s)NORDERTOAVOIDATRAFlCACCIDENTOPERATETHESYSTEMONLYWHENTHEVEHICLEISSTOPPEDATASAFEPLACEAND
the parking brake is on.
s)NORDERTOAVOIDA TRAFFICACCIDENTOR TRAFFICOFFENSEREMEMBERTHATACTUALROADCONDITIONSAND TRAFFIC
regulations take precedence over the information contained on the navigation system.
s4HESOFTWAREMAYCONTAININACCURATE ORINCOMPLETEINFORMATIONDUETO THEPASSAGEOFTIMECHANGING
circumstances, and the sources of information used. Please respect current traffic conditions and regulations
at all times while driving.
s7HEREACTUALROADCONDITIONSANDHIGHWAYREGULATIONSDIFFERFROMTHEINFORMATIONCONTAINEDONTHENAVIGATION
system, abide by the highway regulations.
s+EEPTHEAMOUNTOFTIMESPENTVIEWINGTHESCREENWHILEDRIVINGTOASTRICTMINIMUM
s4HENAVIGATIONSYSTEMDOES NOTPROVIDENOR REPRESENTINANY WAYINFORMATIONONTRAFFICANDHIGHWAY
regulations; technical aspects of the vehicle including weight, height, width, load and speed limits; road
conditions including grade, percentage of incline and surface conditions; obstacles such as the height and width
of bridges and tunnels; and other current driving or road conditions. Always rely on your own judgment when
driving a car, taking into account current driving conditions.
s$ONOTDISASSEMBLEORMODIFYTHISUNIT)TMAYCAUSEANACCIDENTlREORELECTRICSHOCK
s$ONOTUSETHISUNIT WHENATROUBLEEXISTS SUCHASNOSCREENCONTENTAPPEARSORNOSOUNDISAUDIBLE )TMAY
cause an accident, fire, or electric shock. For that case, consult your authorized dealer or a nearest Clarion
service center.
s)NCASEOFAPROBLEMSUCHASANYMATERIALHASBEENENTEREDINTHEUNITTHEUNITGETSWETORSMOKEORSTRANGE
smells come out of the unit, etc., stop using this unit immediately, and consult your authorized dealer or a
nearest Clarion service center.
Using it in that condition may cause an accident, fire, or electric shock.
s5SEAFUSEWITHTHESAMESPECIlCATIONONLYWHENREPLACINGTHEFUSE
Using a fuse with a different specification may causes a fire.
s&ORTHEINSTALLATION OFTHISUNITORA CHANGEINTHEINSTALLATIONASK YOUR AUTHORIZEDDEALERORANEAREST#LARION
service center for safety. Professional skills and experiences are required to do so.
WARNING
1;B1=࣫㕢⠜䇈ᯢкLQGG
NX501/NZ501 7
English
English
Owner’s Manual
1.When the inside of the car is very cold and
the player is used soon after switching on the
heater, moisture may form on the disc (DVD/
CD) or the optical parts of the player and
proper playback may not be possible. If
moisture forms on the disc (DVD/CD), wipe it
off with a soft cloth. If moisture forms on the
optical parts of the player, do not use the
player for about one hour. The condensation
will disappear naturally allowing normal
operation.
2.Driving on extremely bumpy roads which
cause severe vibration may cause the sound
to skip.
3.This unit uses a precision mechanism. Even
in the event that trouble arises, never open
the case, disassemble the unit, or lubricate
the rotating parts.
4.This equipment complies with FCC RF radiation exposure
limits set forth for an uncontrolled environment. This equipment
should be installed and operated with a minimum distance of
20 centimeters between the radiator and your body.
INFORMATION FOR USERS:
CHANGES OR MODIFICATIONS TO
THIS PRODUCT NOT APPROVED
BY THE MANUFACTURER WILL VOID
THE WARRANTY AND WILL VIOLATE FCC
APPROVAL.
1;B1=࣫㕢⠜䇈ᯢкLQGG
This device complies with Industry Canada licence-exempt
RSS standard(s). Operation is subject to the following two
conditions:
(1) this device may not cause interference, and
(2) this device must accept any interference, including interference
that may cause undesired operation of the device.
8 NX501/NZ501
English
Owner’s Manual
3. CAUTIONS ON HANDLING
Operation Panel
s4HEOPERATIONPANEL WILLOPERATEPROPERLYINA
temperature range of 0˚ to 60˚ C.
s$ONOTALLOWANY LIQUIDSONTHESETFROMDRINKS
umbrellas etc. Doing so may damage the internal
circuitry.
s$ONOTDISASSEMBLEOR MODIFYTHESETINANY WAY
Doing so may result in damage.
s3UBJECTINGTHEOPERATIONPANELTOSHOCKSMAYRESULT
in breakage, deformation or other damage.
s$ONOTLETCIGARETTESBURNTHEDISPLAY
s)FAPROBLEMSHOULDOCCURHAVETHESETINSPECTEDAT
your store of purchase.
s$ONOTINSERTOBJECTS ORPOKEINTHESPACE BETWEEN
the operation panel and the main unit when the panel
is tilted.
s4HEREMOTECONTROLUNITMAYNOTWORKIF THEREMOTE
control sensor is exposed to direct sunlight.
s)NEXTREMELYCOLDWEATHERTHE DISPLAYMOVEMENT
may slow down and the display may darken, but this
is not a malfunction. The display will work normally
when the e temperature increases.
s3MALLBLACKAND SHINYSPOTSINSIDETHELIQUID CRYSTAL
panel are normal for LCD products.
For a longer service life, be sure to read the following cautions.
Cleaning
s#LEANINGTHECABINET
Use a soft, dry cloth and gently wipe off the dirt. For
tough dirt, apply some neutral detergent diluted in
water to a soft cloth, wipe off the dirt gently, then
wipe again with a dry cloth.
Do not use benzene, thinner, car cleaner, etc., as
these substances may damage the cabinet or cause
the paint to peel. Also, leaving rubber or plastic
products in contact with the cabinet for long periods
of time may cause stains.
s#LEANINGTHELIQUIDCRYSTALPANEL
The liquid crystal panel tends to collect dust, so wipe
it off occasionally with a soft cloth. The surface is
easily scratched, so do not rub it with hard objects.
USB Port
s4HE53"MEMORYSTICKMAYSTICKOUTWHENINSERTED
so it may cause danger during driving. In such cases,
you can use a commercial USB extension cable, etc.,
but use it safely under your own judgment.
s4HE53"MEMORYSTICKSMUSTBERECOGNIZEDASh53"
mass storage class” to work properly. Some models
may not operate correctly.
When the memorized data is lost or damaged by any
chance, Clarion shall not be liable for any damage.
When using an USB memory stick, we recommend
that you backup your data stored on it before by
using a personal computer etc.
s$ATAlLESMAY BEBROKENWHEN USING53"MEMORY
sticks in the following situation:
When disconnecting the USB memory stick or
turning the power off during writing or reading data.
When affected by static electricity or electric noise.
Connect/disconnect the USB memory stick when it
is not accessed.
s3OME53"MEMORYSTICKSCANNOTBEINSERTEDTOTHE
main unit because of their shape. In such cases, use
a commercial USB extension cable to connect them.
s#ONNECTINGWITHTHECOMPUTERISNOTCOVERED
s-USICFILES-0 7-!ETCSTOREDINTHE53"
memory stick can be played back.
1;B1=࣫㕢⠜䇈ᯢкLQGG
NX501/NZ501 9
English
English
Owner’s Manual
Handling Discs
Handling
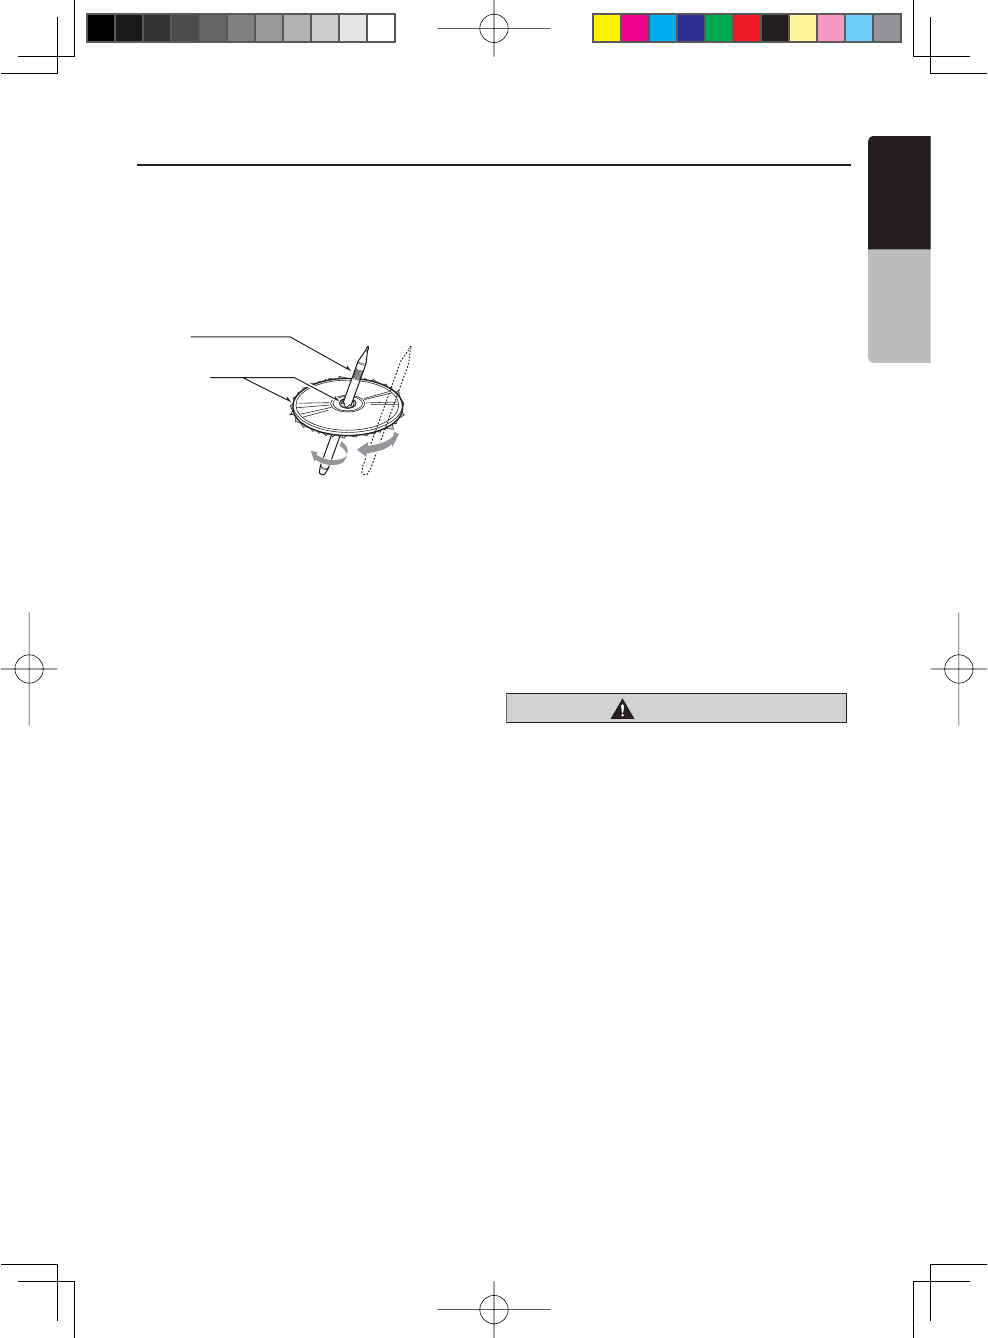
s.EWDISCSMAY HAVESOMEROUGHNESSAROUNDTHE
edges. If such discs are used, the player may not
work or the sound may skip. Use a ball-point pen or
the like to remove any roughness from the edge of
the disc.
s.EVERSTICKLABELSONTHESURFACEOFTHEDISCORMARK
the surface with a pencil or pen.
s.EVERPLAYA DISCWITHANYCELLOPHANETAPE OROTHER
glue on it or with peeling off marks. If you try to play
such a disc, you may not be able to get it back out of
the DVD player or it may damage the DVD player.
s$ONOTUSE DISCSTHATHAVELARGESCRATCHESARE
misshapen, cracked, etc. Use of such discs may
cause misoperation or damage.
s4OREMOVEADISCFROMITSSTORAGECASEPRESSDOWN
on the center of the case and lift the disc out, holding
it carefully by the edges.
s$ONOTUSE COMMERCIALLYAVAILABLEDISC PROTECTION
sheets or discs equipped with stabilizers, etc. These
may damage the disc or cause breakdown of the
internal mechanism.
Storage
s$ONOTEXPOSE DISCSTODIRECTSUNLIGHTORANYHEAT
source.
s$ONOTEXPOSEDISCSTOEXCESSHUMIDITYORDUST
s$ONOTEXPOSEDISCSTODIRECTHEATFROMHEATERS
Cleaning
s4OREMOVElNGERMARKSANDDUSTUSEASOFTCLOTHAND
wipe in a straight line from the center of the disc to
the circumference.
s$ONOTUSE ANYSOLVENTSSUCHASCOMMERCIALLY
available cleaners, anti-static spray, or thinner to
clean discs.
s!FTERUSINGSPECIAL DISCCLEANERLETTHEDISC DRYOFF
well before playing it.
On Discs
s%XERCISEAGOODPRECAUTIONWHENLOADINGADISC4HE
operation panel will close automatically when leaving
it open for a while.
s.EVERTURNOFFTHE POWERANDREMOVETHEUNITFROM
the car with a disc loaded.
Ball-point pen
Roughness
CAUTION
For your safety, the driver should
not insert or eject a disc, opening
the operation panel while driving.
1;B1=࣫㕢⠜䇈ᯢкLQGG
10 NX501/NZ501
English
Owner’s Manual
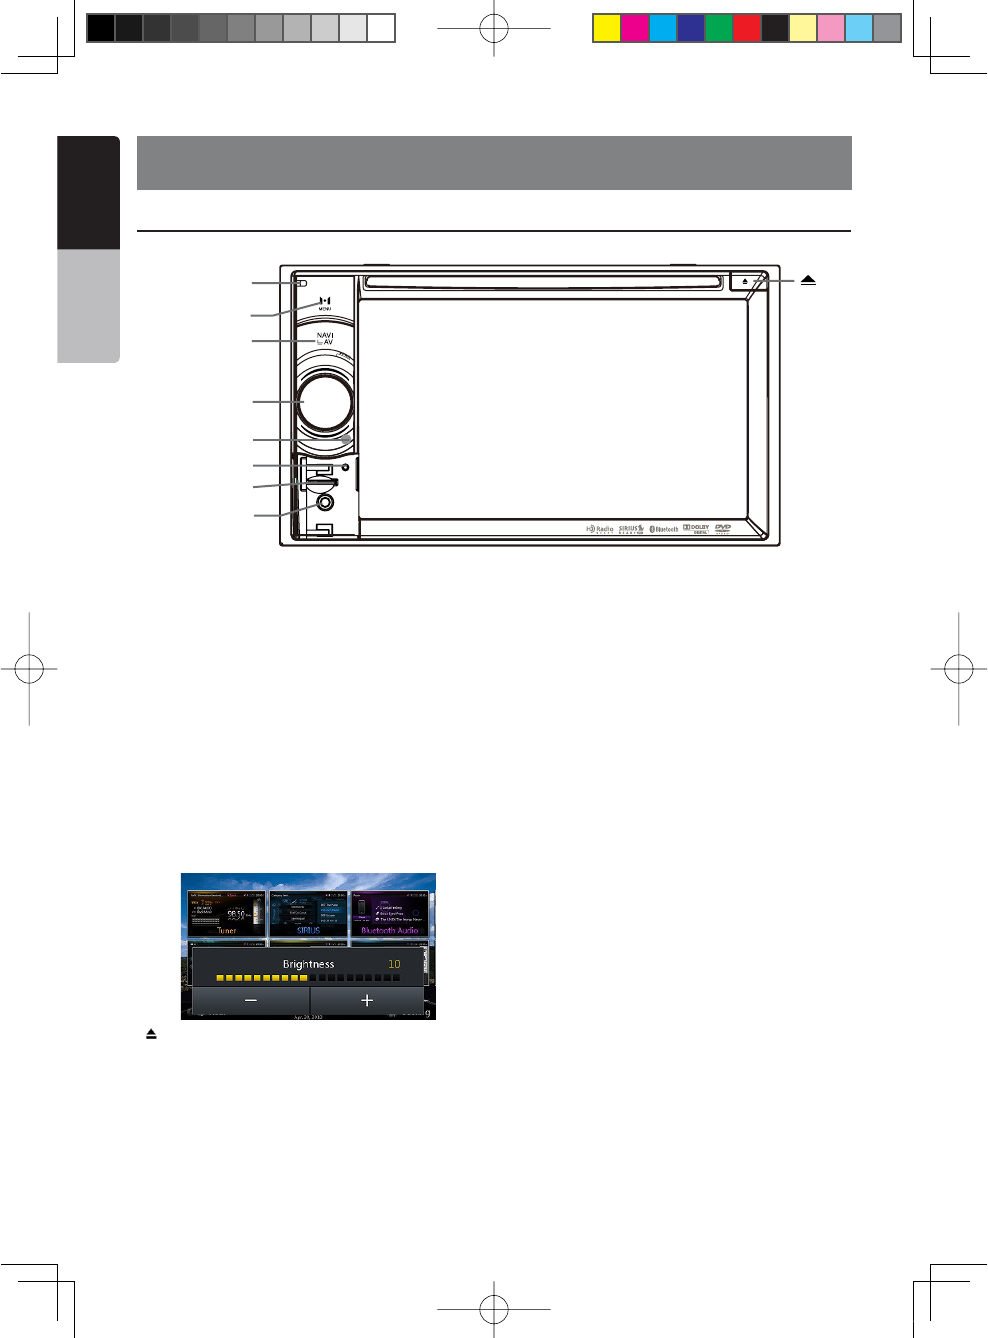
4. PANEL CONTROLS
NX501 Functions of Buttons
Note: Be sure to read this chapter while referring to front
diagram “PANEL CONTROLS”.
[PWR/VOL] +NOB
s0RESSTHISKEYTOPOWERON THESYSTEMINPOWEROFF
mode.
s+EEPPRESSINGTHISKEYMORETHAN SECONDTOTURN
off the system when system is in power on mode.
s2OTATETHEKNOBTOINCREASEORDECREASETHEVOLUME
[NAVI/AV] Button
s0RESSTHISBUTTONTOENTER NAVIGATIONMODEPRESS
again to return current source.
s0RESSANDHOLDTHISBUTTON FORSECONDSTODISPLAY
the brightness setting panel.
[ ]Eject
s0RESSTOEJECTDISCFROMUNIT
[MENU] Button
s0RESSTHISBUTTONTODISPLAYMAINMENUPRESSAGAIN
to return current source.
s0RESSANDHOLDTHISBUTTONFORSECONDSTOTURNOFF
the monitor. Press any place of the screen to turn
on the monitor again.
[RESET] Button
s0RESSTHISBUTTONTOHARDWARERESETTHEUNIT
Note: When the [RESET] button is pressed, frequencies
of radio stations, titles, etc. stored in memory are
cleared.
[microSD]
s)NSERTAMICRO3$INTHIS
Note: The microSD card is only for navigation. Please
don’t remove it, otherwise, the navigation function will be
disabled.
[AUX IN]
AUX 1 Connector.
[Microphone]
s)NTERNALMICROPHONEFORUSEDURING"LUETOOTH
phone calls. Sensitivity can be adjusted from
the Settings menu.
[IR] SENSOR
s2ECEIVERFORTHEREMOTECONTROLUNITOPERATING
range: 30 degree in all directions).
[ ]
[Microphone]
[MENU]
[NAVI/AV]
[PWR/VOL]
[RESET]
[microSD]
[AUX IN]
[IR]
1;B1=࣫㕢⠜䇈ᯢкLQGG
NX501/NZ501 11
English
English
Owner’s Manual
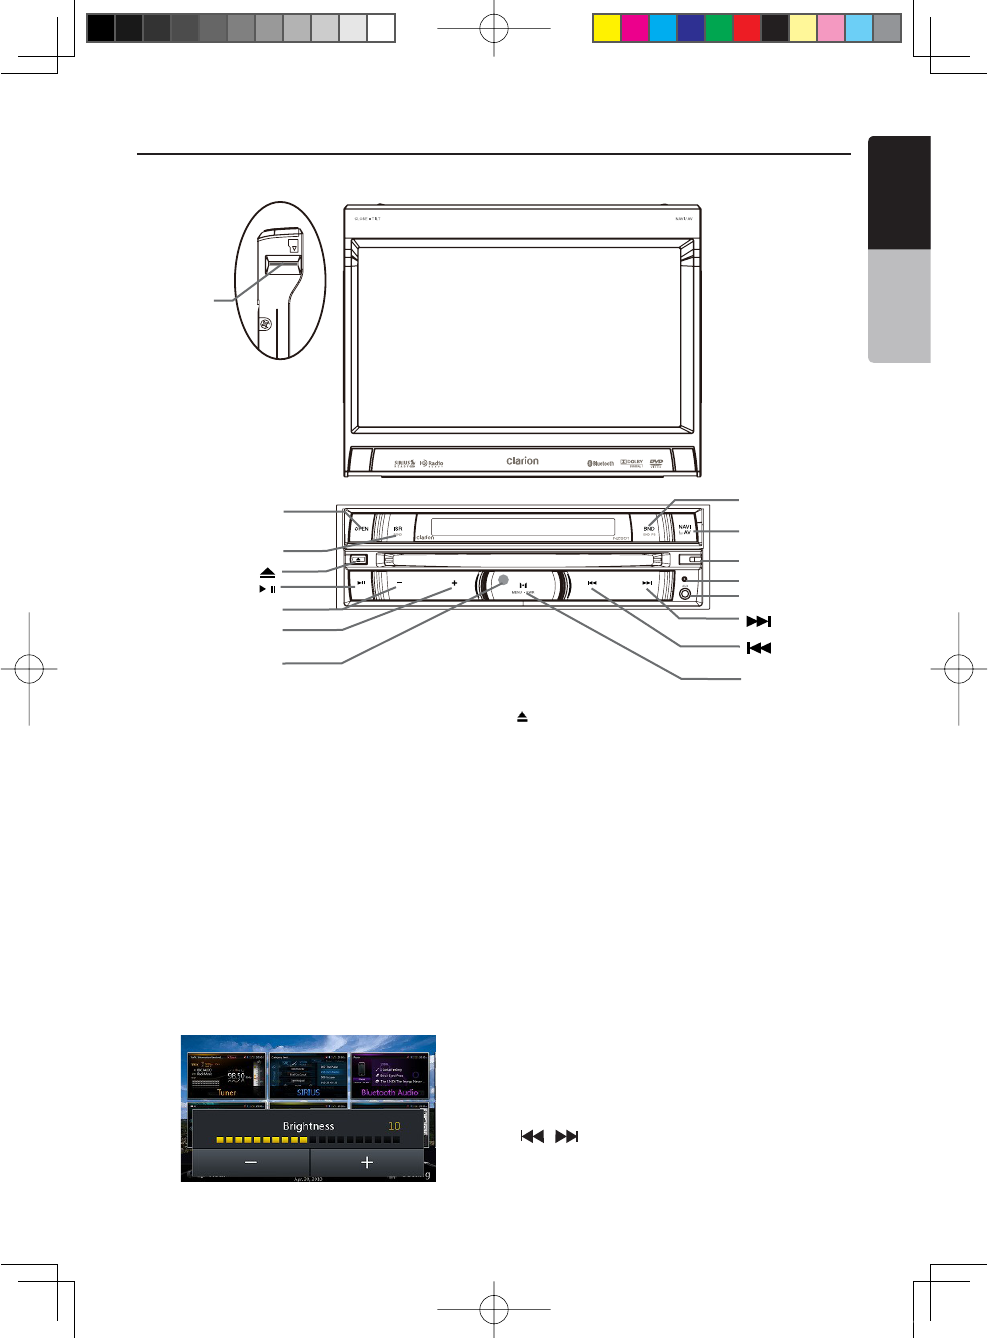
NZ501 Functions of Buttons
[ ]
[ ]
[OPEN]
[ISR/SEND]
[ / ]
[-]
[+]
[ IR ]
;"!.$%.$03=
[NAVI/AV]
[Microphone]
[RESET]
[AUX IN]
[ ]
[ MENU/PWR ]
[microSD]
Note: Be sure to read this chapter while referring to front
diagram “PANEL CONTROLS”.
[MENU/PWR] +EY
s0RESSTHISKEYTOPOWERON THESYSTEMINPOWEROFF
mode.
s+EEPPRESSINGTHISKEYMORETHAN SECONDTOTURN
off the system when system is in power on mode.
s0RESSTHISBUTTONTODISPLAYMAINMENUPRESSAGAIN
to return current source when system is in power on
mode.
[NAVI/AV] Button
s0RESSTHISBUTTONTOENTER NAVIGATIONMODEPRESS
again to return current source.
s0RESSANDHOLDTHISBUTTON FORSECONDSTODISPLAY
the brightness setting panel.
[ ]Eject
s0RESSTOEJECTDISCFROMUNIT
[Microphone]
s)NTERNALMICROPHONEFORUSEDURING"LUETOOTH
phone calls. Sensitivity can be adjusted from
the Settings menu.
[RESET] Button
s0RESSTHISBUTTONTOHARDWARERESETTHEUNIT
Note: When the [RESET] button is pressed, frequencies
of radio stations, titles, etc. stored in memory are
cleared.
[microSD]
s)NSERTAMICRO3$INTHIS
Note: The microSD card is only for navigation. Please
don’t remove it, otherwise, the navigation function will be
disabled.
[AUX IN]
AUX 1 Connector.
[ , ] Buttons
s0RESSTOSEARCHPREVIOUSORNEXTSTATIONORCHANNELIN
Tuner, SIRIUS radio modes.
1;B1=࣫㕢⠜䇈ᯢкLQGG
12 NX501/NZ501
English
Owner’s Manual
s0RESSTO SEARCHPREVIOUSORNEXTTRACKORCHAPTERIN
CD, MP3/WMA, iPod and DVD video modes.
s0RESSANDHOLDTOFASTFORWARDORFAST BACKWARDBY
×2,×4,×8,×16 step in CD, MP3 /WMA and DVD video
mode.
s0RESSANDHOLDTOFAST FORWARDORFAST BACKWARDIN
iPod music.
s0RESSANDHOLDTOENTERMANUALSEEKSTATUSIN4UNER
and SIRIUS radio mode, then press briefly to seek
station by step.
[ ] Button
s0RESSTOPLAYPAUSEORSCANAUDIOORVIDEO
s0RESSSHORTLYTOSCAN
s0RESSANDHOLDONETIME !UDIOORVIDEOlLEWILLBE
paused, if then press briefly, file will be resumed to
play.
[+][-] Buttons
s0RESSTO)NCREASEANDDECREASEVOLUME
[OPEN] Button
s5SETHISBUTTONTOOPENCLOSE4&4PANEL
[MENU/PWR ] Button
s0RESSTHISBUTTONTODISPLAYMAINMENUPRESSAGAIN
to return current source.
s0RESSTHISBUTTONTOTURNONTHEPOWER
s+EEPPRESSINGTHISKNOBMORETHANSECONDTOTURN
off the power
[BAND/END PS] Button
s0RESSTHISBUTTONTOENTER !-&-TUNERMODEFROM
any source.
s/NCEIN!-&- TUNERMODEYOUCANPRESSITTO
change bands between FM1, FM2, FM3, AM bands.
s0RESSTOSTOP0RESET3CAN
[ISR/SEND] Button
)32&UNCTION
When in tuner mode, press and hold this button for
3 seconds to save current station and band to ISR
memory, and at the same time, the tuner will enter ISR
mode with current station.
Note:
In ISR mode, the tuning operation is disabled. Press this
button again to quit ISR mode.
When in the other mode but not tuner mode, press
this key will go to ISR memory station directly, it likes a
shortcut. Press this key again to go back to previous
mode.
3%.$&UNCTION
Only be available when there is a coming call. Press
this key to accept the coming call or end a call.
[IR] SENSOR
s2ECEIVERFORTHEREMOTECONTROLUNITOPERATING
range: 30 degree in all directions).
1;B1=࣫㕢⠜䇈ᯢкLQGG
NX501/NZ501 13
English
English
Owner’s Manual
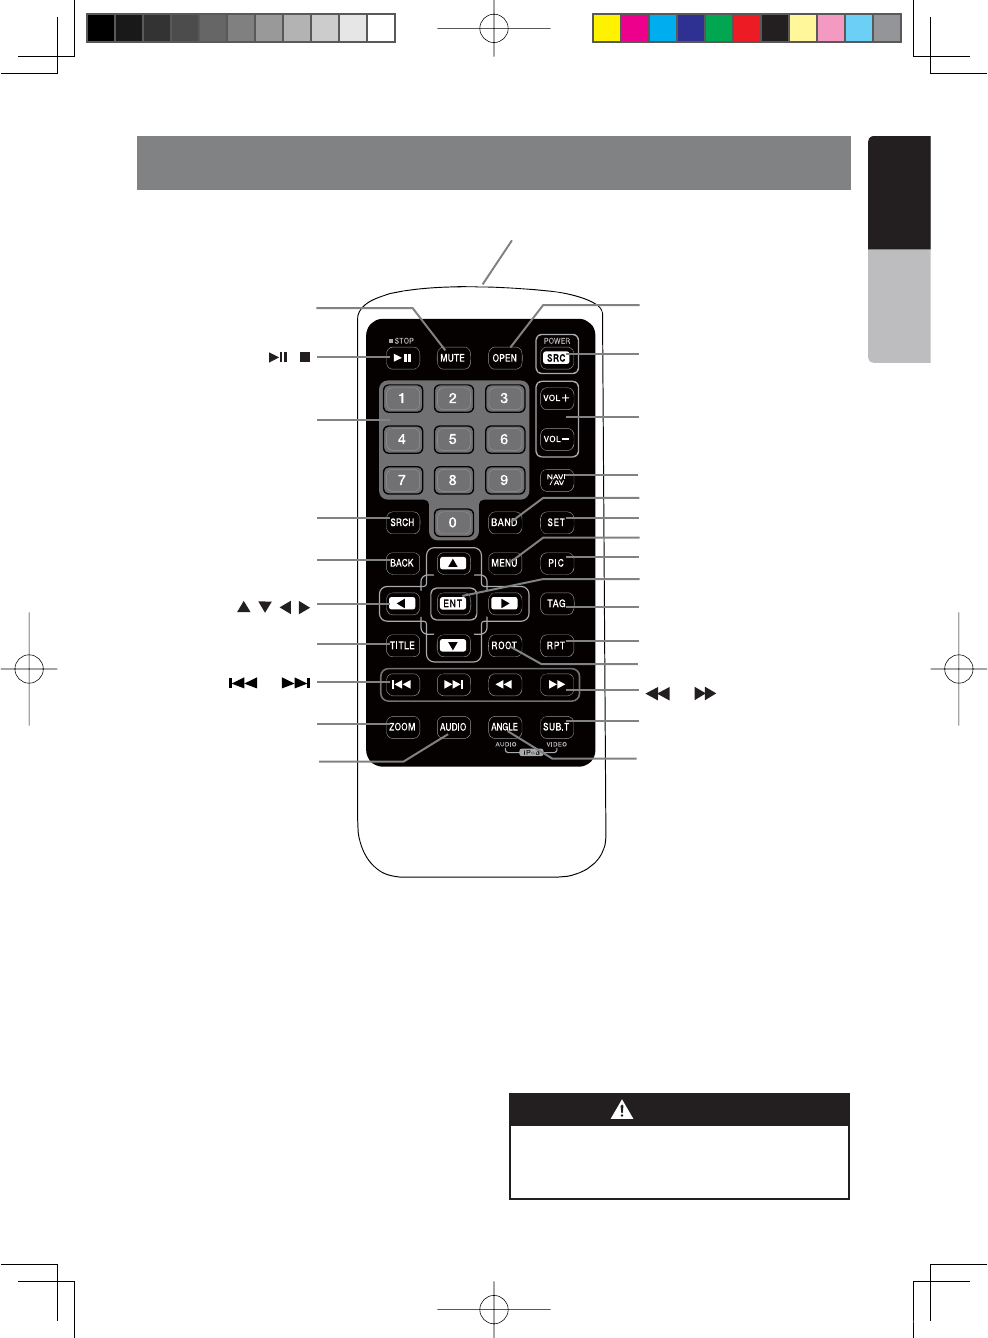
5. REMOTE CONTROL
2EPLACINGTHEBATTERIES
1.Press the retention tab and pull out the
battery tray and remove the old battery.
2. Insert the new CR2025 battery and slide
the battery tray back in the remote control
the same direction that you removed it.
Please ensure the tray is inserted in the
correct direction.
.OTE
Using batteries improperly can cause them to
explode. Take note of the following points:
s7HENREPLACINGBATTERIESREPLACEBOTHBATTERIES
with new ones.
s$ONOTSHORTCIRCUITDISASSEMBLEORHEATBATTERIES
s$ONOTDISPOSEOFBATTERIESINTOlREORmAMES
s$ISPOSEOFSPENTBATTERIESPROPERLY
Signal transmitter
Operating rang : 30°in all directions
[ / ]
[ 0-9 ]
[SRCH]
[BACK]
[ , , , ]
[TITLE]
[ ], [ ]
[ZOOM]
[MUTE]
[AUDIO]
[POWER / SRC]
[VOLUME]
[SEL]
[PIC]
[TAG]
[RPT]
[ ], [ ]
[SUB.T]
[OPEN]
[ANGLE]
[NAV/ AV]
[MENU]
[BAND]
[ROOT]
[ENT]
!LKALINE#2BATTERIESCONTAIN
0ERCHLORATE
$ISPOSEOFDISCHARGEDBATTERIESPROPERLY
WARNING
1;B1=࣫㕢⠜䇈ᯢкLQGG
14 NX501/NZ501
English
Owner’s Manual
[ / ] Button
s0RESSTHISBUTTONTOPLAYOR PAUSEVIDEOANDAUDIO
media.
s0RESSTHISBUTTONMORETHANSECONDTOSTOPVIDEO
and audio media.
[MUTE] Button
s-UTEOR5NMUTETHESPEAKER
s4HESYMBOL on upper right area of the screen
indicates that speaker is muted.
[POWER/SRC] Button
s0RESSTHISBUTTONTOMOVETHEFOCUSTONEXTAVAILABLE
source item on main menu.
s0RESSTHISBUTTONTOPOWERONWHENTHEUNITISPOWER
off.
s0RESSTHISBUTTONMORETHANSECOND TOPOWEROFF
when the unit is power on.
[0 - 9] Buttons
s5SEINTHE +EY 0ADSCREENTOSELECTTHERADIOOR
Satellite Radio.
s5SETOSELECTTHETRACKINTHETRACKLISTSCREEN
s0RESSTOENTER$6$VIDEO CHAPTERSTITLESINTHE+EY
Pad screen.
[VOLUME] Buttons
s)NCREASEANDDECREASEVOLUME
[NAVI/AV] Button
s0RESSTHISBUTTONTOSWITCH BETWEENCURRENTSOURCE
and current position on navigation map.
[SRCH] Button
s0RESSTHISBUTTONTOOPEN CHAPTERORTITLESEARCH
window while playing DVD.
[BAND] button
s3WITCHTONEXTBANDALTERNATELY
[SET] Button
s0RESSTHISBUTTONTOOPENTHE!UDIOSETTINGMENUIN
any mode.
[BACK] Button
s0RESSTHISBUTTONTOQUITMAINMENUIFCURRENTSCREEN
is main menu.
[ ], [ ], [ ], [ ] Buttons
s0RESSTHISBUTTONFORCURSORMOVEMENTINMAINMENU
or Setting mode.
s&ROMTHEMAINMENUYOU CANSELECTYOURDESIRED
source or change your settings.
[MENU] Button
s0RESSTHISBUTTONTOENTERTHE-!).-%.5ORRETURN
current resource.
[PIC] Button
s0RESSTHISBUTTONTOCHANGEYOURMONITORBRIGHTNESS
[ENT] Button
s0RESSTOlXTHEENTEREDDATAIN THE+EY0ADSCREEN
or enter the item the cursor is on.
[TAG] Button
s0RESSTHISBUTTONTORECORD4!'IN($2ADIOMODE
[TITLE] Button
s0RESSTOGOTOTHETITLEMENUONTHE$6$
[ROOT] Button
s0RESSTOGOTOTHEROOTMENUONTHE$6$
[RPT] Button
s0RESSTOPERFORMCHAPTERREPEATTITLEREPEATREPEAT
off while playing DVD mode.
s0RESSTOPERFORMTRACKREPEATREPEATOFFWHILEPLAYING
CD.
s0RESSTOPERFORMREPEATTRACKREPEATFOLDERREPEAT
off while playing MP3/WMA, or video files on disc.
s0RESSTOPERFORMREPEATTRACKREPEATFOLDERREPEAT
off while playing MP3/WMA, or video files in USB
memory.
[ ], [ ] Buttons
s0RESSTOSEEKTHENEXTAVAILABLE HIGHERORLOWER
station in Tuner mode.
s)N3)2)532ADIO MODEYOUWILLSCROLLTHROUGHTHE
categories.
s0RESSTOSELECTTHENEXT HIGHERORLOWERCHAPTER
number in DVD video mode.
s0RESSTOSELECTTHENEXTHIGHERORLOWERTRACKIN$6$
Audio, USB Video, USB Audio mode.
s0RESSFORMOVEMENTOFBACKGROUNDSOURCEIN
Navigation mode.
[ ], [ ]Buttons
s0RESSTOMANUALLYSELECTTHE NEXTHIGHERORLOWER
station in Tuner and Satellite Radio modes.
s0RESSTOPERFORMFASTFORWARDORFASTBACKWARD
searching. Press again to change the speed to 2x,
4x, 8x or 16x.
s0RESSFORMOVEMENTOFBACKGROUNDSOURCEIN
Navigation mode.
Functions of Remote Control Buttons
You can use the remote control unit to control the NX501 and NZ501.
Note:
s4HEWIRELESSREMOTECONTROLOPERATIONMAYNOTBEOPTIMALINDIRECTSUNLIGHT
1;B1=࣫㕢⠜䇈ᯢкLQGG

NX501/NZ501 15
English
English
Owner’s Manual
Functions of Remote Control Buttons
[ZOOM] Button
s0RESSTOTURNONANDZOOMINWHILEPLAYING$6$9OU
can zoom in up to 3x. (No all DVD disc supports this
function).
[AUDIO] Button
s0RESSTOSWITCHTHE!5$)/CHANNELOFTHEDISCWHILE
playing DVD.
[SUB-T] Button
s0RESSTOSWITCHNEXTAVAILABLE SUBTITLEWHILEPLAYING
DVD.
s0RESSTODISPLAY6IDEOMENUINI0ODMODE
[ANGLE] Button
s0RESSTOSWITCHTHEDIFFERENT!.',%WHILEPLAYING
DVD. (No all DVD disc supports this function)
s0RESSTODISPLAY!UDIOMENUINI0ODMODE
[OPEN] Button
s0RESSTHISBUTTONTO/0%.OR#,/3%THEMOTORIZED
screen. Please ensure there are no obstructions
before starting the operation.(NZ501 only)
1;B1=࣫㕢⠜䇈ᯢкLQGG

16 NX501/NZ501
English
Owner’s Manual
Front Zone Source
[Tuner]-Press the button to display the Tuner mode.
[Disc Audio]-Press the button to display the Disc
Audio mode.
[SIRIUS]-Press the button to display the SIRIUS
mode.
[USB Audio]-Press the button to display the USB
Audio mode.
[Bluetooth Audio]-Press the button to display the
Bluetooth Audio mode.
[iPod Audio]-Press the button to display the iPod
Audio mode.
[AUX 1]- Press the button to display the AUX 1 mode.
[Disc Video]-Press the button to display the Disc
Video mode.
[AUX 2]-Press the button to display the AUX 2 mode.
[USB Video]-Press the button to display the USB
Video mode.
[Camera]-Press the button to display the Camera
mode.
[iPod Video]-Press the button to display the iPod
Video mode.
[Navigation]-Press the button to display the
Navigation mode.
[Telephone]-Press the button to display the Telephone
mode.
[Rear Button]-Press the button to display the rear
menu.
[Setting Button]-Press the button to display the
setting menu.
Rear Zone Source
[Rear Disc Video]-Press the button to display the
Rear Disc Audio mode.
[Rear AUX 1]-Press the button to display the Rear
AUX 1 mode
[Rear iPod Video]-Press the button to display the
Rear iPod Video mode.
[Rear AUX 2]-Press the button to display the rear AUX
2 mode.
[2-Zone Off]-Press the button to closed the rear
activity.
[Front Button]-Press the button to display the front
main menu.
[Setting Button]-Press the button to display the
setting menu.
6. MAINMENU OPERATIONS
Scrolling the menu
Press screen and scrolling to right or left it will switch
to next or previous page of mainmenu.
Moving the menu position
1. Press any quadrate icon on mainmen more than 2
seconds, the icon will float on mainmenu.
2. Scrolling the floating icon to any position you
want,
1;B1=࣫㕢⠜䇈ᯢкLQGG
NX501/NZ501 17
English
English
Owner’s Manual
This unit provides the following functions in addition to
the high image quality and sound quality of DVD video.
Note:
s4HEFUNCTIONSDESCRIBEDINTHISSECTIONFOREXAMPLE
the recorded language,subtitles, angles, etc. differ
depending on the DVD video disc.
Refer to the instructions provided with the DVD
video.
s3OMEDISC FUNCTIONS MAYOPERATEDIFFERENTLYFROM
described in this manual.
Multi-sound function
DVD video can store up to 8 languages for one film;
select the language of your preference.
s4HELANGUAGES STOREDONTHE DISCAREINDICATED BY
the icon shown below.
Multi-angle function
A DVD video that is filmed from multiple angles allows
you to select the angle of choice.
s4HENUMBEROFRECORDEDANGLESAREINDICATEDBYTHE
icon shown below.
Subpicture (subtitles) function
A DVD video can record subtitles for up to 32
languages and you can select the language of the
subtitles you wish to see.
s4HENUMBER OFRECORDEDSUBTITLE LANGUAGES ARE
indicated by the icon shown below.
Multi-story function
When a DVD video contains more than one story for
a film, you can select the story you wish to enjoy.
The operation procedures vary with the disc; observe
the instructions for selecting a story provided during
playback.
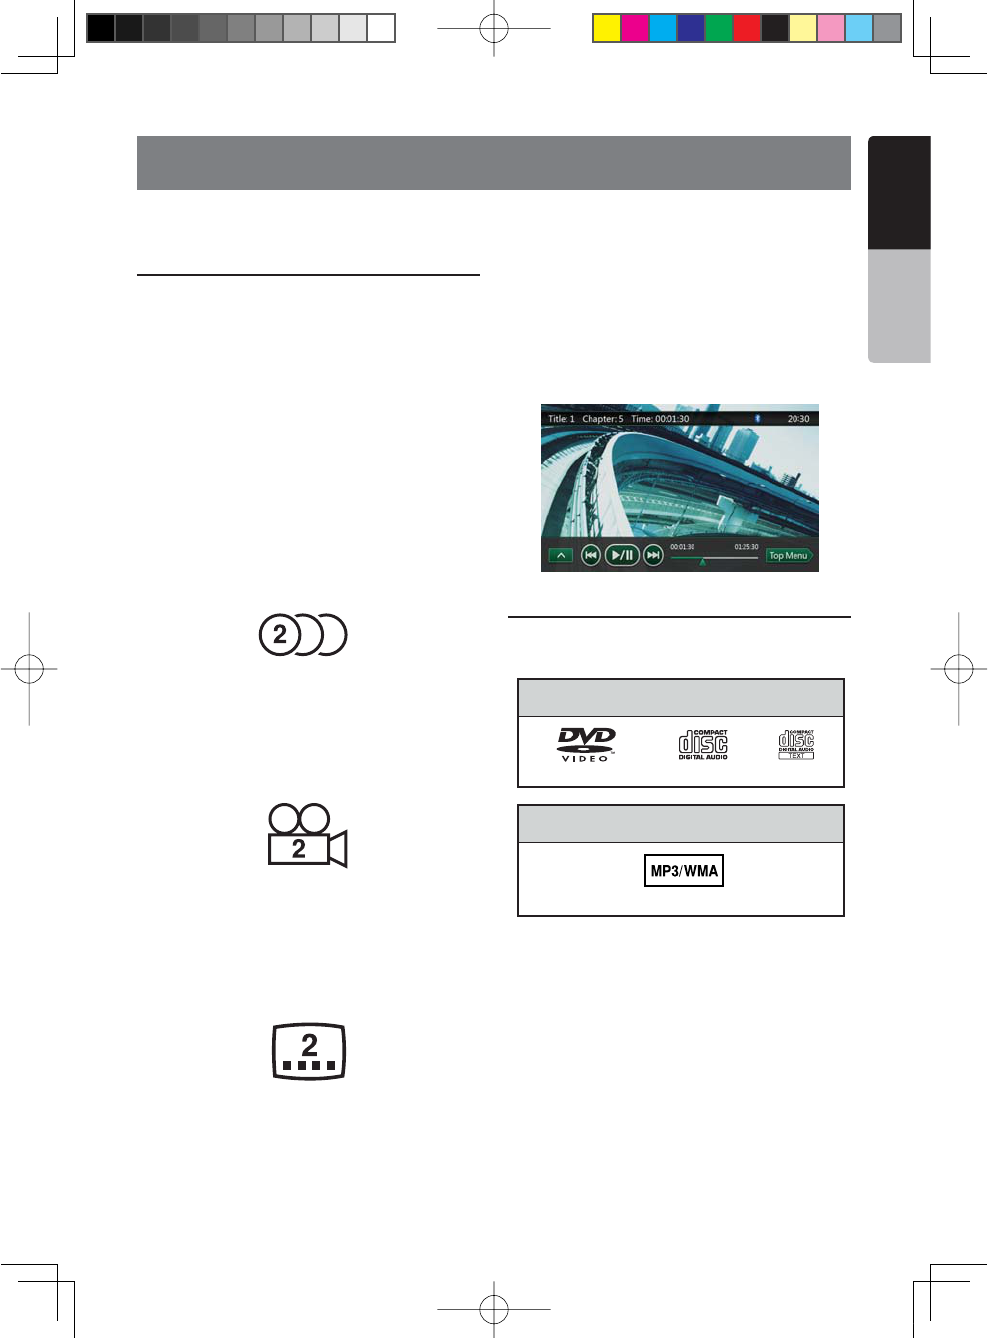
Menu screens
Menu can be called up during DVD video playback to
perform menu setting.
s%XAMPLESHOWINGMENUDISPLAY
Playable discs
This DVD video player can play the following discs.
About CD Extra discs
A CD Extra disc is a disc in which a total of two
sessions have been recorded. The first session is
Audio session and the second session is Data session.
Your personally-created CDs with more than second
data sessions recorded cannot be played on this DVD
video player.
Note:
s7HENYOUPLAYA#$%XTRADISCONLYTHElRSTSESSION
will be recognized.
About playing a CD-R/CD-RW disc (MP3, WMA)
This player can play CD-R/CD-RW discs previously
recorded in music CD format (MP3, WMA).
7. DVD SYSTEM
DVD video is a high-quality digital video source that provides crisp and clear images. One 12 cm disc contains
either one film or four hours of music.
DVD Video Features
Discs
Playable discs
CD TEXTDVD video discs Audio CDs
Playable media files
MP3/WMA
1;B1=࣫㕢⠜䇈ᯢкLQGG
18 NX501/NZ501
English
Owner’s Manual
About playing a DVD-R/RW or DVD+R/RW disc
This player cannot play DVD-R/RW and DVD+R/ RW
discs previously recorded in video CD format.
However, MP3/WMA files recorded on DVD-R/ RW and
DVD+R/RW discs can be played.
Discs that cannot be played back
This DVD video player cannot play back DVD-Audio,
DVD-RAM, Photo CDs, etc.
Note:
s)TMAYALSONOTBEPOSSIBLETOPLAYBACK#$S
recorded on a CD-R unit and CD-RW unit. (Cause:
disc characteristics, cracks, dust/dirt, dust/dirt on
player’s lens, etc.)
s)FA#$2OR#$27DISCTHATHASNOTBEENlNALIZED
is played, it will take a long time to start playing.
Also, it may not be possible to play depending on its
recording conditions.
s9OUCANNOTPLAY3UPER!UDIO #$S0LAYBACKOFTHE
CD player is not supported even if it is a hybrid disc.
About MP3/WMA playback
This unit can play back CD-R/CD-RW, DVD-R/ RW
and DVD+R/RW discs on which MP3/WMA music data
have been recorded.
For a detailed information, see the section entitled
h,ISTENINGTO-07-!v
Note on region numbers
The DVD video system assigns a region number to
DVD video players and DVD discs by sales area. DVD
video players sold in the United States can play back
$6$DISCSWITHTHE REGIONNUMBERhALLvh1” or any
COMBINATIONOFNUMBERSTHATALSOINCORPORATEAh1”.
The DVD video region number is marked on the disc
jacket as shown below.
s4HISPRODUCTINCORPORATESCOPYRIGHTPROTECTION
technology that is protected by U.S. patents and
other intellectual property rights. Use of this copyright
protection technology must be authorized by Rovi
Corporation, and is intended for home and other
limited viewing uses only unless otherwise authorized
by Rovi Corporation. Reverse engineering or
disassembly is prohibited.
s-ANUFACTUREDUNDERLICENSEFROM$OLBY
,ABORATORIESh$OLBYvh0RO,OGICvANDTHEDOUBLE$
symbol are trademarks of Dolby Laboratories.
sh-ADEFORI0ODvAND h-ADEFORI0HONEvMEAN
that an electronic accessory has been designed to
connect specifically to iPod, or iPhone, respectively,
and has been certified by the developer to meet Apple
performance standards.
s!PPLEISNOT RESPONSIBLEFORTHE OPERATIONOFTHIS
device or its compliance with safety and regulatory
standards. Please note that the use of this accessory
with iPod or iPhone may affect wireless performance.
iPhone and iPod are trademarks of Apple Inc.,
registered in the U.S. and other countries.
s($2ADIOTM, HD Radio ReadyTM, and the HD Radio
Ready logo are proprietary trademarks of iBiquity
Digital Corporation.
This HD Radio Ready receiver is ready to receive HD
Radio broadcasts when connected to the THD400,
sold separately.
s4HE"LUETOOTH® word mark and logos are owned by
the Bluetooth® SIG, Inc. and any use of such marks
by Clarion Co.,Ltd. is under license. Other trademarks
and trade names are those of their respective owners.
s3)2)53THE3)2)53$OGLOGOANDRELATEDMARKSARE
trademarks of SIRIUS XM Radio, Inc.
About the registered marks, etc.
ALL
146
1
1;B1=࣫㕢⠜䇈ᯢкLQGG
NX501/NZ501 19
English
English
Owner’s Manual
Change DVD System Settings
Note: If the set up operation is performed in the
middle of DVD video play, the disc will restart from the
beginning.
Selecting DVD Set Up Menu
1. Press the [Setting] button on the Main Menu to
access the Video set up menu.
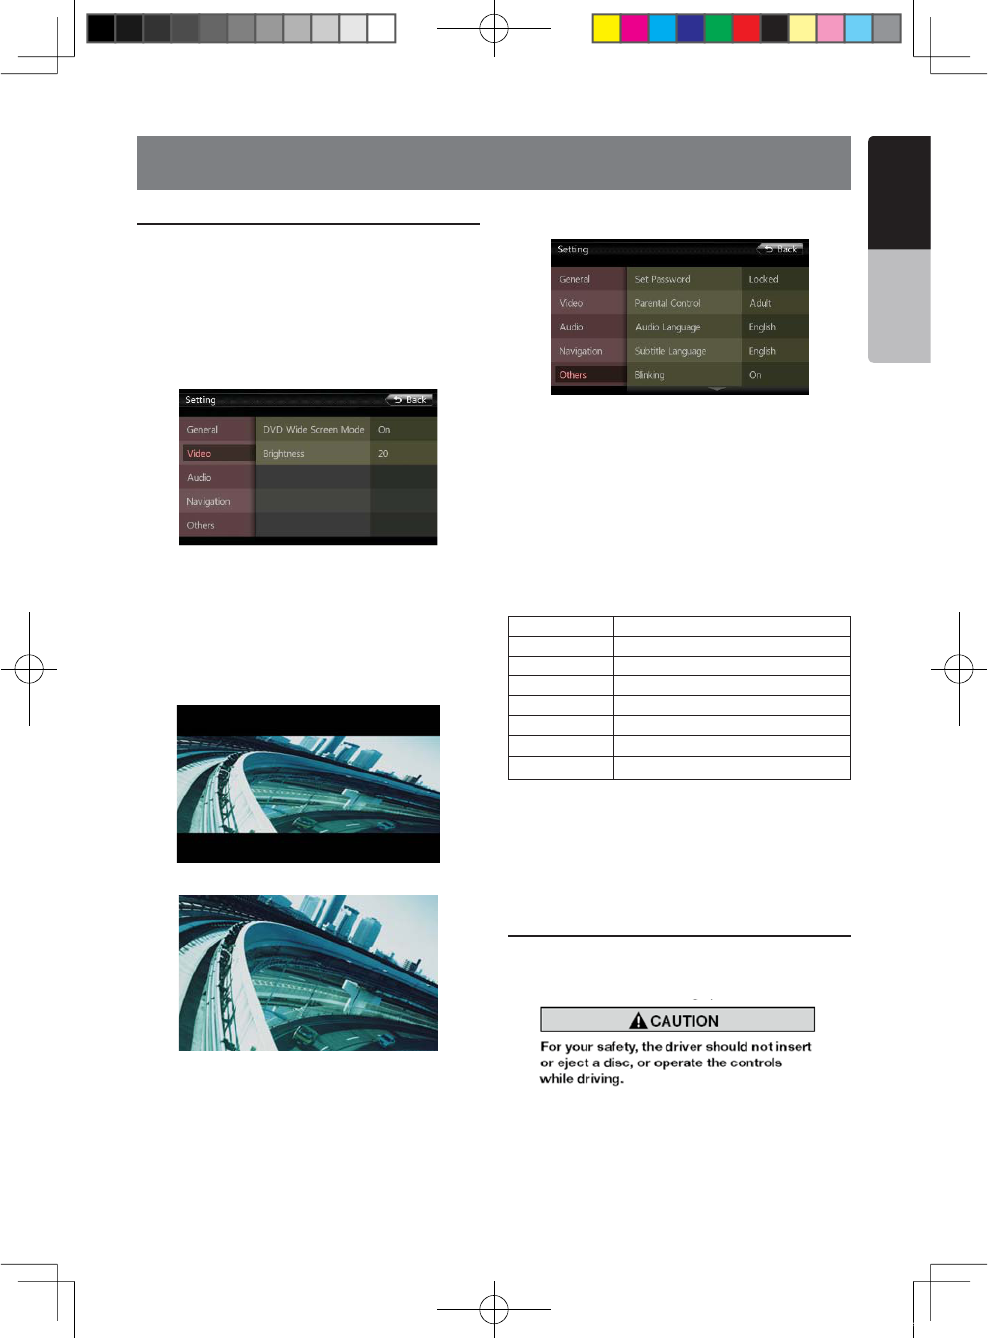
2. Press [Video] button. The video menu is displayed.
Setting up the Screen Size
Press the [DVD Wide Screen Mode] button to turn on
or turn off the DVD wide screen mode.
4HEFACTORYDEFAULTSETTINGISh/Nv
Note: Not all DVD disc supports this function.
DVD Wide Screen Mode On
DVD Wide Screen Mode Off
Setting up the password for parental level
control
4HEFACTORYDEFAULTPASSCODEIShv
1. In Main Menu press [Setting] button. Press [Others]
button on the display. Touch the [Set Password] ----
and a numerical key pad will appear.
)NPUTTHEOLDPASSWORDANDTOUCHTHE;/+=KEYORINPUT
"4356" to reset password.
Input a new password,and touch the [OK] key.
Input the same new password again,and touch the
[OK] key.
Note: When a disc with view restrictions is inserted, you
will be prompted to input this password. The disc will not
be viewable until the correct password is entered.
Set rating for parental level control
1. Select Others screen while in Setting mode. Press
;0ARENTAL#ONTROL=BUTTON0RESSTHEDESIREDRATINGFOR
level control. Use this table to set the parental level.
+ID3AFE +ID3AFE
G General Audiences
PG Parental Guidance Suggested
PG-13 Parents Strongly Cautioned
PG-R Parental Guidance Restricted
R Restricted
NC-17 No One 17 And Under Admitted
Adult Only Adult
s4HECONTENTSTHATTHE PARENTALLEVELRESTRICTSVARY
with the country code.
Note: The rating can be selected only under the
password unlocked status, and the limits can be set only
under the password locked status.
Watching to a disc
1. To load a disc:
Insert the disc into the center of the insertion slot the
label side facing up.
Note:
s Never insert foreign objects into the disc insertion slot.
s)FTHEDISCISNOTINSERTEDEASILY THEREMAY BEANOTHER
disc in the mechanism or the unit may require service.
sCMSINGLEPLAYDISCSCANNOTBEUSED
8. DVD VIDEO PLAYER OPERATIONS
1;B1=࣫㕢⠜䇈ᯢкLQGG

20 NX501/NZ501
English
Owner’s Manual
2. Disc starts playing automatically.
Ejecting a disc
1. To eject a disc press eject [ ] button. The play
mode then switches to the Tuner mode.
If the disc is left in the ejected position for 15 seconds,
the disc is automatically reloaded. In this case, the
play mode will remain in the Tuner mode.
Note: If you force a disc into before auto reloading, it
may damage a disc.
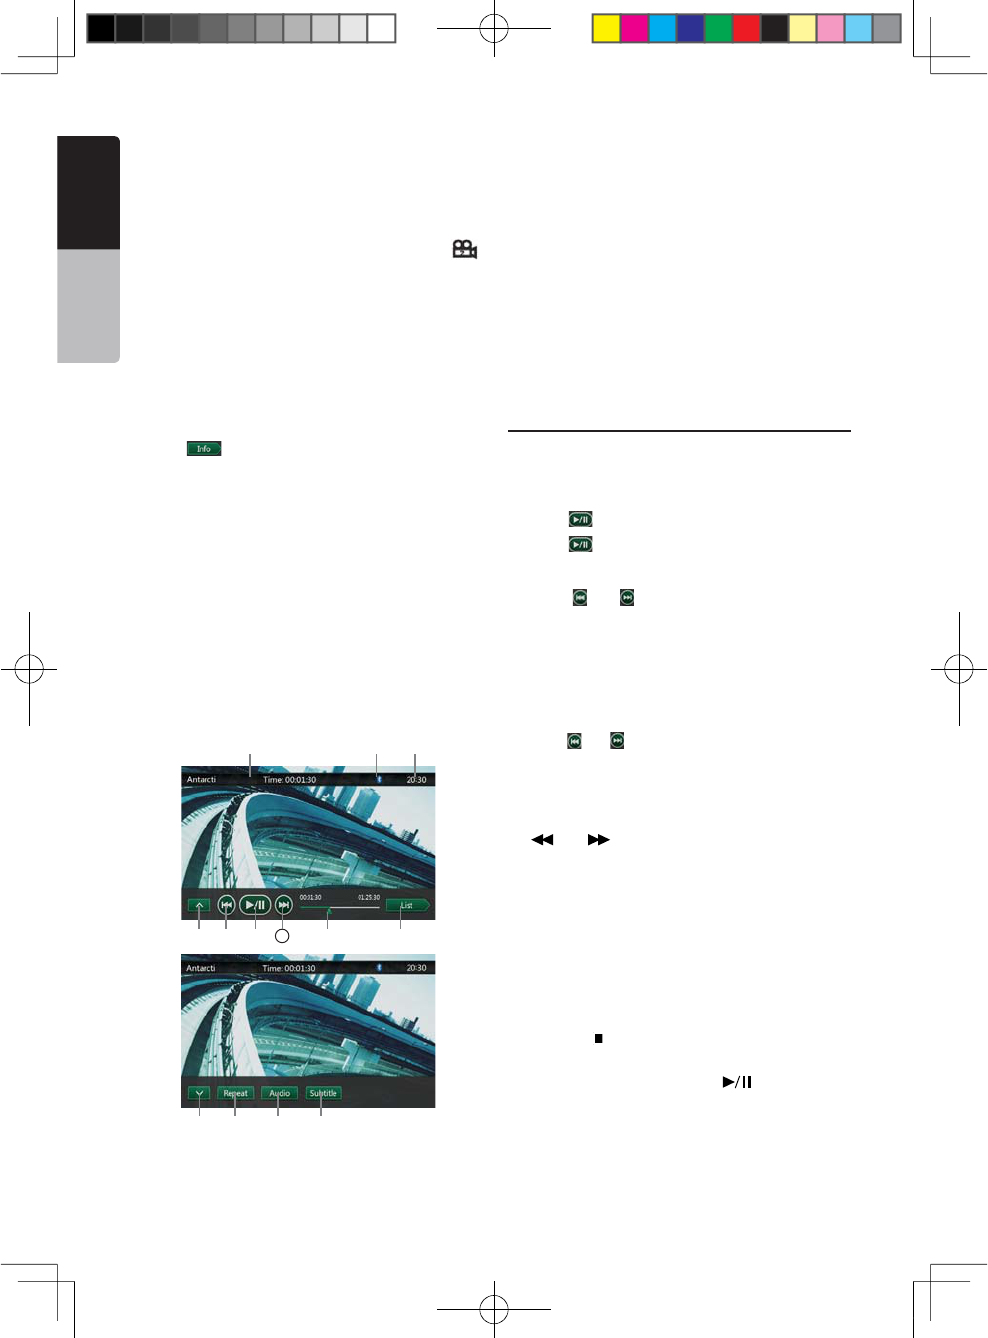
Showing DVD Player mode screen
After disc is loaded, the play mode is automatically
engaged.
Touch any place of the screen to display DVD Video
menu touch the screen again to return the playback
screen. The display will return to the playback screen,
if you do not touch the screen for 10 seconds.
1 2 3 4 5 6 7 8
9
1011
12 13 14 15 16 17
1 - Next page Buttons
2 - Previous Track /Fast Backward Button
3 - Play/Pause Button
4 - Next Track/Fast Forward Button
5- Elapsed playing time
6- Seek bar
7- Total time
8- Top Menu Button
9- System time
10- Bluetooth status
11- DVD playback info
12- Previous page Button
13- Repeat switching Button
14- Audio Channel switching Button
15- Subtitle switching Button
16- INFO Button
17- Direct chapter or title searching Button
Operate the DVD Player menu
You can select the button items displayed in the DVD
menu by directly touching it.
Play/Pause Playback
1. Touch [ =BUTTONTOPAUSEDURINGPLAYBACK
2. Touch [ =BUTTONAGAINTORESUMEPLAYBACK
Skip (Search) a Chapter
1. Press [ =OR; =BUTTONDURINGPLAYBACK
Chapters are skipped down or up from current
locations, as many times as the button is pressed, and
playback starts.
Skip use seek bar
Press the triangle [ =ONSEEKBARAND DRAGITTOANY
position where you want to start playback.
Fast Forward/Fast Backward
1. Press [ =OR; =BUTTONANDHOLDSECONDSTOSTART
fast backward or fast forward during playback. The
playback speed starts at 2x, then will increase to 4x,
8x, and 16x. Release the button will continue playing
with normal speed.
2. [] or [ ] button on remote control can also
be used to start fast backward or fast forward during
playback.
Note:
sNo audio is reproduced during fast forward and fast
backward operation.
sThe fast forward and fast backward speed may differ
depending on the disc.
Stop Playback
1. Press the [ =BUTTONONREMOTECONTROLMORETHAN
second. Playback is stopped.
2. To resume playback, press the [ ] button.
Playback resumes from start of the disc.
Search with a Chapter/Title Number
You can locate the beginning of a scene using the
chapter numbers or title numbers recorded on the DVD
Video disc.
1;B1=࣫㕢⠜䇈ᯢкLQGG
NX501/NZ501 21
English
English
Owner’s Manual
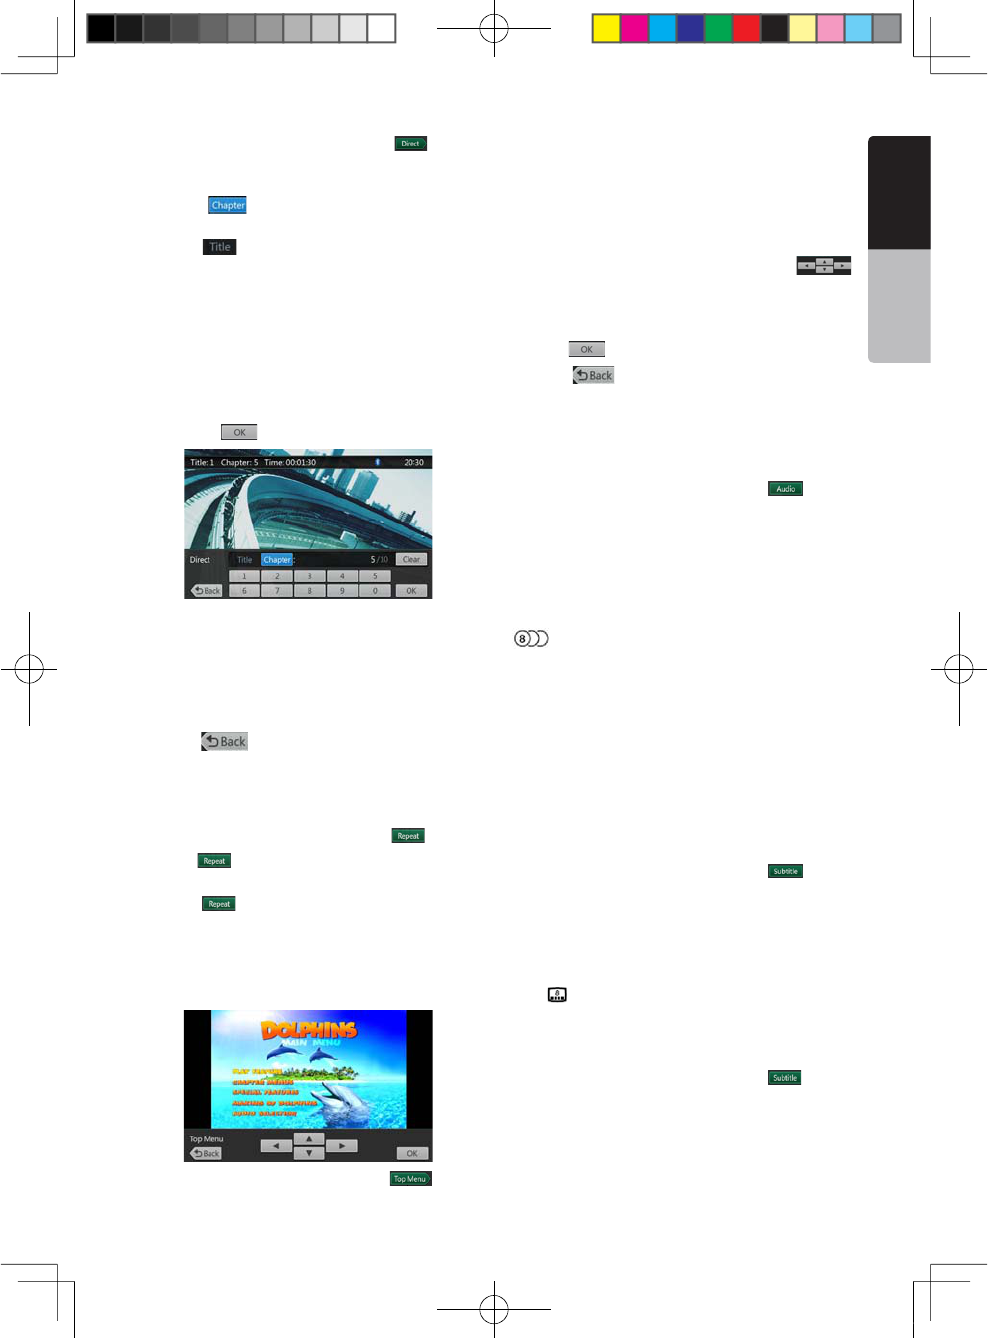
1. Showing the DVD Video menu, touch [ =BUTTON
4HE+EY0ADSCREENAPPEARSWITHTHE CHAPTER4ITLE
number input mode.
Touching [ =BUTTONTURNSTHE+EY0ADTO THE
chapter number input mode.
Touching [ =BUTTON TURNSTHE+EY 0ADTOTHETITLE
number input mode.
s4ITLE
A large segment to divide the data area of the disc.
s#HAPTER
A small segment to divide the data area of the disc.
2. Input the number of the title/chapter that you want
TOPLAYWITHTHE;=TO;=KEY
3. Touch the [ =BUTTON
Playback starts from the scene of the input title
number or chapter number.
NOTE:
If the input title/chapter number does not exist or
searching with a title/chapter number is not allowed, the
screen image will not change.
4. Touch [ =BUTTONTOCLOSETHEKEYPAD
Repeat Playback
This operation plays back chapters recorded on the
DVD-Video repeatedly.
1. Showing the DVD Video menu, touch [ =BUTTON
2. Touch [ =BUTTONONCEFOR#HAPTER2EPEATAGAIN
for Title Repeat.
3. Press [ = BUTTONAGAINTOTURNOFFTHEREPEAT
playback.
Using the Title Menu
On DVD discs containing two or more titles, you can
select from the title menu for playback.
1. Showing the DVD Video menu, touch [ =BUTTON
during playback.
The title menu screen appears.
*Depending on the disc, the title menu may not be
called.
2. Touch the title menu screen.
3. Select the items in the title menu screen by
directional buttons.
*Depending on the disc, items may not be selected
with the directional buttons.
4. Touch [ =BUTTONTOlXONTHESELECTEDITEM
5. Touch [ =BUTTON
Switching Audio
On discs in which two or more audios or audio
languages have been recorded, you can switch among
the audio languages during playback.
1. Showing the DVD Video menu, touch [ =BUTTON
during playback.
s%ACHTIMEYOU TOUCHTHEBUTTONYOUCAN SWITCH
among audio languages.
s)TMAYTAKETIMETOSWITCHAMONGAUDIOS
* Depending on the disc, up to 8 kinds of audios may
be recorded. For details, see the mark of the disc:
(Indicates that 8 audios have been recorded).
* When the power is turned on and when the disc is
changed to a new one, the language set as the factory
default is selected. If that language has not been
recorded on disc the language is specified on the disc.
* Depending on the disc, switching may be completely
impossible or impossible on some scenes.
Switching Subtitles
On DVD discs in with two or more subtitle languages
have been recorded, you can switch among the
subtitle languages during playback.
1. Showing the DVD Video menu, touch [ =BUTTON
to select a subtitle during playback. Each time you
touch the key, you can switch among subtitles.
s)TMAYTAKETIMETOSWITCHAMONGSUBTITLES
* Depending on the disc, up to 32 kinds of subtitles
may be recorded. For details, see the mark of the
disc: ( Indicates that 8 kinds of subtitles have been
recorded).
* Depending on the disc, switching may be completely
impossible or impossible on some scenes.
2. To turn off subtitles, repeat touching [ =BUTTON
until subtitles are turned off.
Switching angles
On DVD discs in with video images have been
recorded in two or more angles, you can switch among
the angles during playback.
1;B1=࣫㕢⠜䇈ᯢкLQGG
22 NX501/NZ501
English
Owner’s Manual
4OUCH;!NGLE=KEYONTHE REMOTECONTROLDURING
playback. Each time you touch the key, you can switch
among angles.
sIt may take time to switch among angles.
sDepending on the disc, up to 9 angles may be
recorded. For details, see the mark of the disc: (
Indicates multi-angle).
sDepending on the disc, angles may switch smoothly
or switch with a momentary still image.
sDepending on the disc, switching may be completely
impossible or impossible on some scenes.
sDepending on the disc, scenes recorded in two or
more angles may be played back.
Displaying the playback status
Touch [ =BUTTONON$6$ 0LAYERMODESCREEN
Playback status is displayed on screen.
Play disc video files
This system can play video files (AVI/MP4, etc) stored
on disc.
Showing video files Player mode screen
1. After disc with video files is loaded, touch [DVD
6IDEO=BUTTON ON-!).-%.5TOSHOW VIDEOFILES
player mode screen.
2. Touch the screen of the playing video file to display
Video files player menu touch the screen again to
return the playback screen. The display will return to
the playback screen, if you do not touch the screen for
10 seconds.
1 2 3 4 5 6
7
89
10 11 12 13
1 - Next page Button
2 - Previous Track /Fast Backward Button
3 - Play/Pause Button
4 - Next Track/Fast Forward Button
5- Elapsed playing time /Seek bar
6- List Mode Button
7- System time
8- Bluetooth status
9- Playback info
10- Previous Row Buttons
11- Repeat Button
12- Audio Button
13- Subtitle Button
Operate the Video files Player menu
You can select the button items displayed in the Video
files player menu by directly touching it.
Play/Pause Playback
1. Touch [ =BUTTONTOPAUSEDURINGPLAYBACK
2. Touch [ =BUTTONAGAINTORESUMEPLAYBACK
Switch to Previous/next file
1. Press [ =OR ; =BUTTONDURINGPLAYBACKTO PLAY
previous /next file
Skip using seek bar
Press the triangle on seek bar and drag it to any
position where you want to start playback.
Fast Forward /Fast Backward
1. Press [ =OR; =BUTTONANDHOLDSECONDSTOSTART
fast backward or fast forward during playback. The
playback speed starts at 2x, then will increase to 4x,
8x, and 16x. Release the button will continue playback
with normal speed.
2. [] or [ ] button on remote control can also
be used to start fast backward or fast forward during
playback.
Note:
sNo audio is reproduced during fast forward and fast
backward operation.
sThe fast forward and fast backward speed may differ
depending on the disc.
Stop Playback
1. Press the [ ] button on remote control more than 1
second. Playback is stopped.
2. To resume playback, press the [] button.
Playback resumes from start of the folder which
playing track is in.
Repeat Playback
This operation plays back video files recorded on the
disc repeatedly.
1;B1=࣫㕢⠜䇈ᯢкLQGG
NX501/NZ501 23
English
English
Owner’s Manual
* The repeat set as the factory default is Repeat Folder.
1. Showing the video files player menu, touch [ =
button.
2. Touch[ =BUTTONONCEFOR2EPEATOFFAGAINFOR
Repeat Track.
3. Press [ =BUTTONAGAINFOR2EPEAT&OLDER
Switching Audio
Some video files will have two or more audio channels;
you can switch among the audio channels during
playback.
1. Touch [ =BUTTONDURINGPLAYBACK
s%ACHTIMEYOUTOUCH THEBUTTONYOUCANSWITCH
among audio languages.
s)TMAYTAKETIMETOSWITCHAMONGAUDIOS
Depending on the disc, switching may be impossible.
Switching Subtitles
Some video files will have two or more subtitles have
been recorded; you can switch among these subtitles
during playback.
1. Touch the [ =BUTTONTOSELECTASUBTITLEDURING
playback.
s%ACHTIMEYOUTOUCHTHEKEYYOUCANSWITCHAMONG
subtitles.
s)TMAYTAKETIMETOSWITCHAMONGSUBTITLES
*Depending on the disc, switching may be impossible.
Video files list
Showing the Video files player menu; touch the [
=BUTTONTODISPLAYVIDEOlLESLISTSCREEN
Video files list operations is almost same as Disc
Audio player mode. Please refer to DVD Audio Player
Operations.
1;B1=࣫㕢⠜䇈ᯢкLQGG
24 NX501/NZ501
English
Owner’s Manual
Listening to a disc/Ejecting a disc
Please refer to Disc Video Player Operations -watching
to a disc and Ejecting a disc.
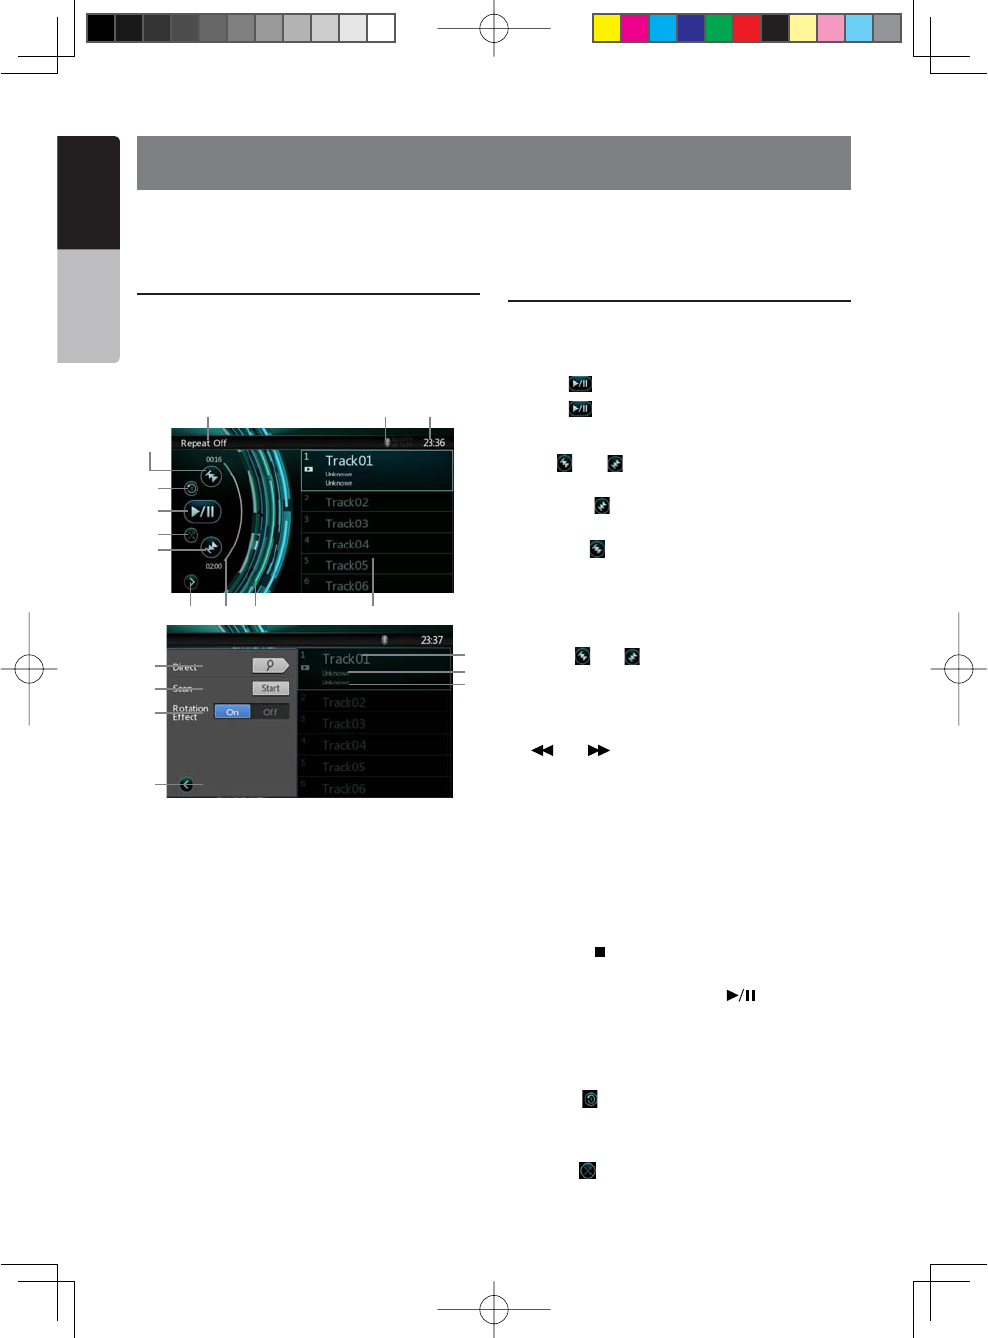
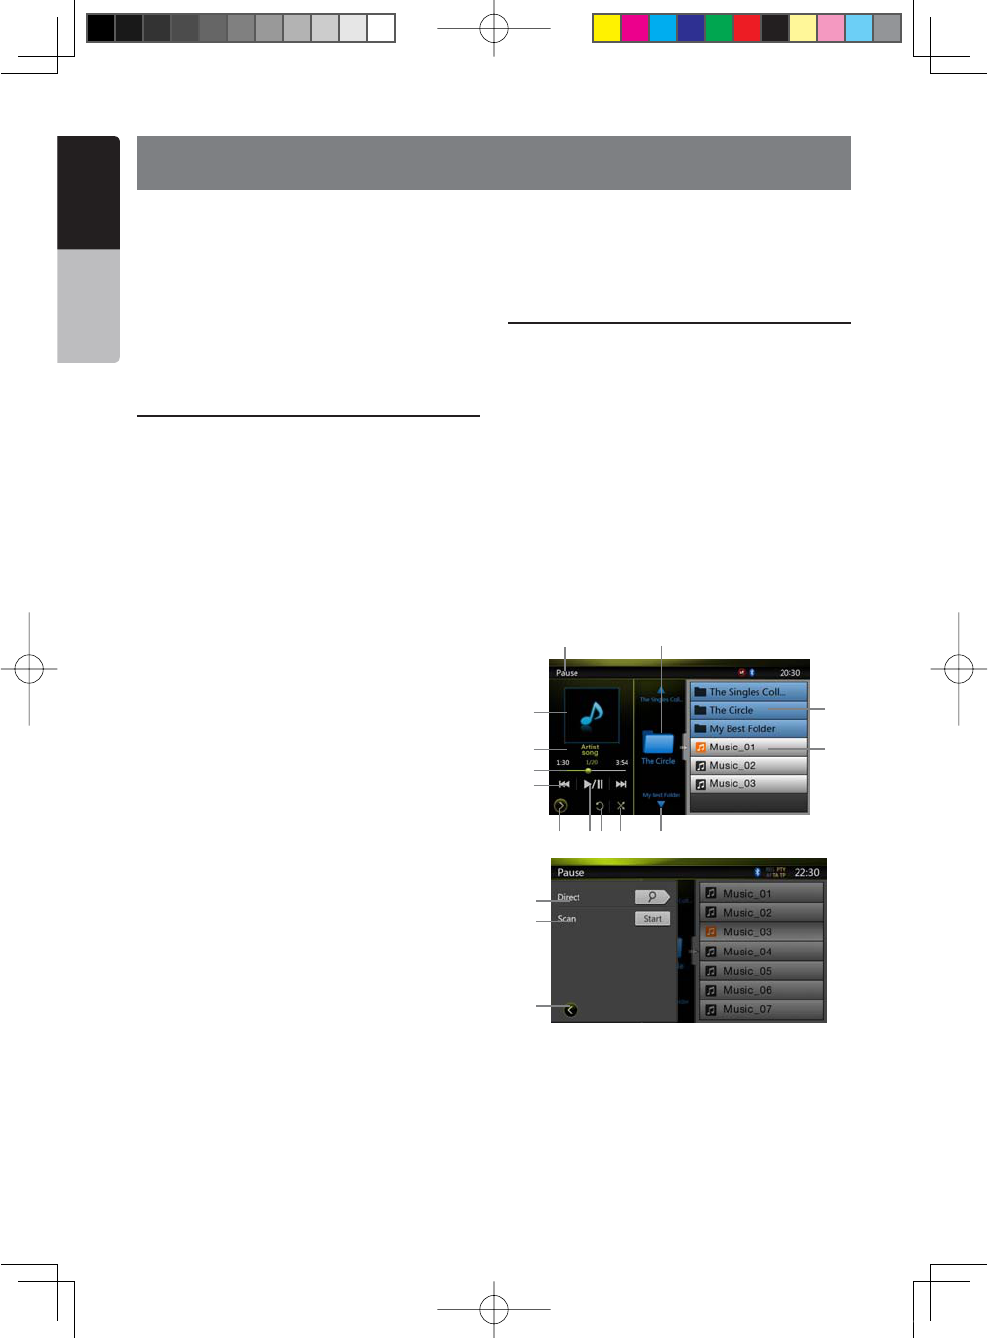
Showing CD Player mode screen
1. After disc is loaded, the play mode is automatically
engaged.
2. If disc have been loaded you can touch Disc Audio
button on main menu to display CD player mode
screen.
1 -Open option menu Button
2- Elapsed playing time indicator
3- Rotation effect
4- Audio files or CD tracks.
5- System time
6- Bluetooth status
7- Play back status
8- Previous Track /Fast Backward Button
9- Repeat Button
10- Play/Pause Button
11- Shuffle Button
12- Next Track/Fast Forward Button
13- Direct Searching Button
14- Scan Start/Stop Button
15- Rotation Effect On/Off Button
16 - Song Title
17 - Artist Information
18 - Album Information
19 - Close option menu Button
Operate the CD Player menu
You can select the button items displayed in the CD
player menu by directly touching it in list.
Play/Pause Playback
1. Touch [ =BUTTONTOPAUSEDURINGPLAYBACK
2. Touch [ =BUTTONAGAINTORESUMEPLAYBACK
Switch to Previous/next file or track
Press [ =OR ; =BUTTONDURINGPLAYBACKTO PLAY
previous /next file.
s0RESSING; =BUTTONSTARTSPLAYBACK FROMTHE
beginning of the next track.
s0RESSING; = BUTTONSTARTSPLAYBACKFROMTHE
beginning of the current track. When this button is
pressed again within 5 seconds, playback starts from
the beginning of previous track.
Fast Forward /Fast Backward
1. Press [ =OR; = BUTTONANDHOLDMORETHAN
seconds to start fast backward or fast forward during
playback. The playback speed starts at 2x, then will
increase to 4x, 8x, and 1 6x .Release the button will
continue playback with normal speed.
2. [ ] or [ ] button on remote control can also
be used to start fast backward or fast forward during
playback.
Note:
sNo audio is reproduced during fast forward and fast
backward operation.
sThe fast forward and fast backward speed may differ
depending on the disc.
Stop Playback
1. Press the [ ] button on remote control more than 1
second. Playback is stopped.
2. To resume playback, press the [ ] button.
Playback resumes from start of disc.
Repeat Playback
The repeat set as the factory default is Repeat Track.
Touch the [ =BUTTONONCEFOR 2EPEATOFFAGAIN FOR
Repeat Track.
Shuffle Playback
1. Touch [ =BUTTONTO SHUFFLETHE TRACKS DURING
playback.
9. DVD AUDIO PLAYER OPERATIONS
1 2 3
5
67
8
4
9
10
11
12
13
14
15
19
16
17
18
1;B1=࣫㕢⠜䇈ᯢкLQGG
NX501/NZ501 25
English
English
Owner’s Manual
2. Touch this button again to turn off the feature.
Selecting a track on the Track List Screen
This function allows you to select tracks from a
displayed list.
1. Touch the track title on the display list. The selected
track will start playing.
2. When the desired track is not displayed, press and
flick the track list up or down.
3. Touch the desired track title key. The corresponding
track is started playback.
Scanning the Tracks
1. Touch [ =BUTTONTOSHOW;3CAN =BUTTON
2. Touch [Scan =BUTTONDURINGPLAYBACK
s)TWILLPLAYFROMNEXTTRACKANDEACHTRACKWILLDISPLAY
for 10 seconds.
s4HE;3CAN =BUTTONWILL SWITCHTO;3CAN =
button.
3. Touch [Scan =BUTTON
s)TWILLCONTINUEPLAYBACKFROMCURRENTTRACK
s;3CAN =BUTTONWILLSWITCHTO;3CAN =BUTTON
*The function will scan all tracks orderly in current
folder once. After Scan stopped playback will continue.
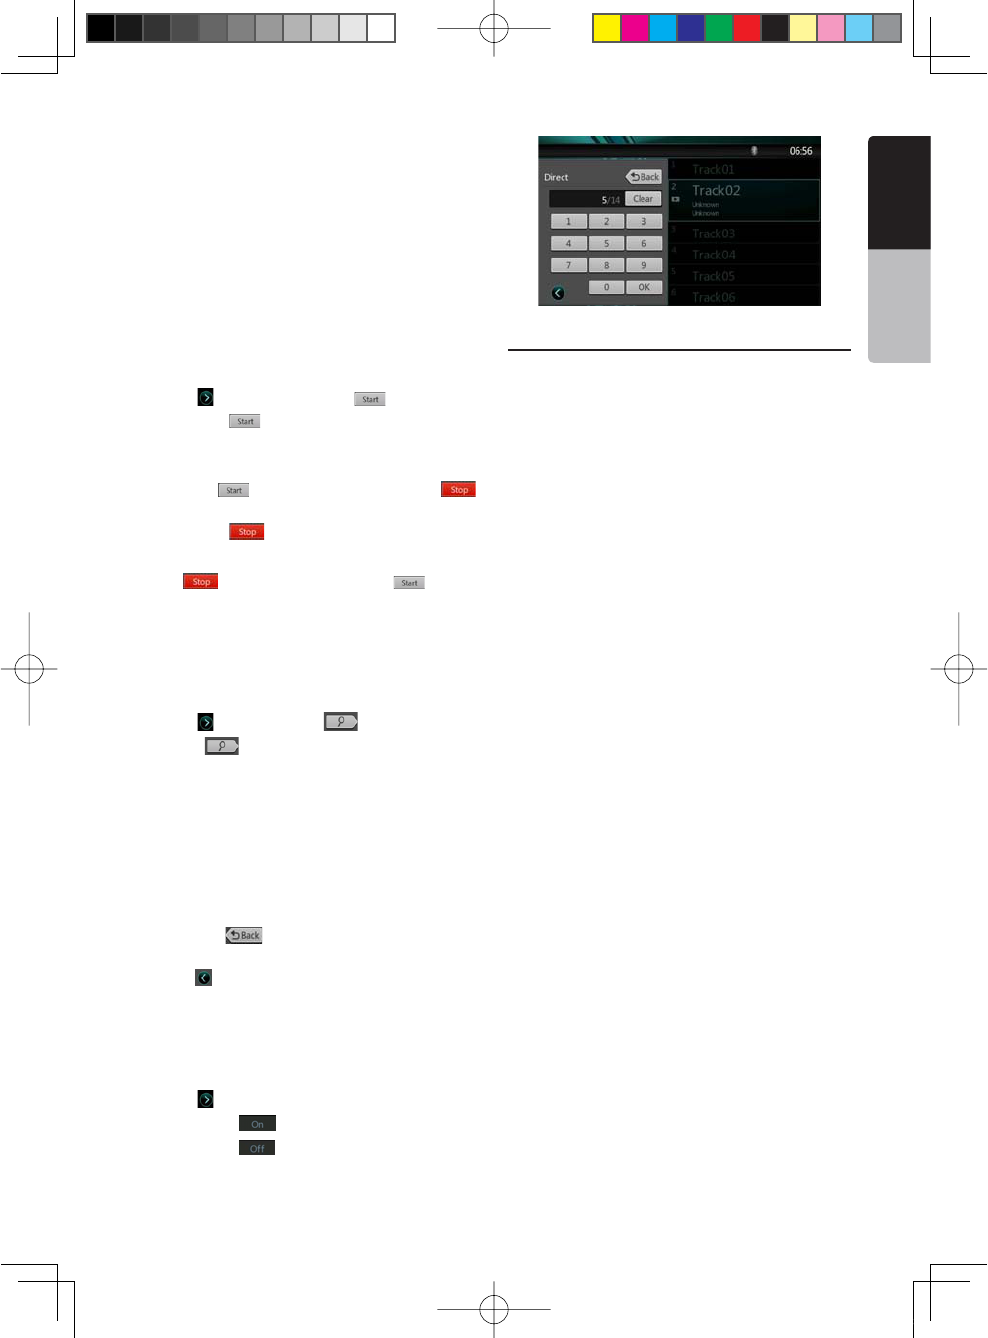
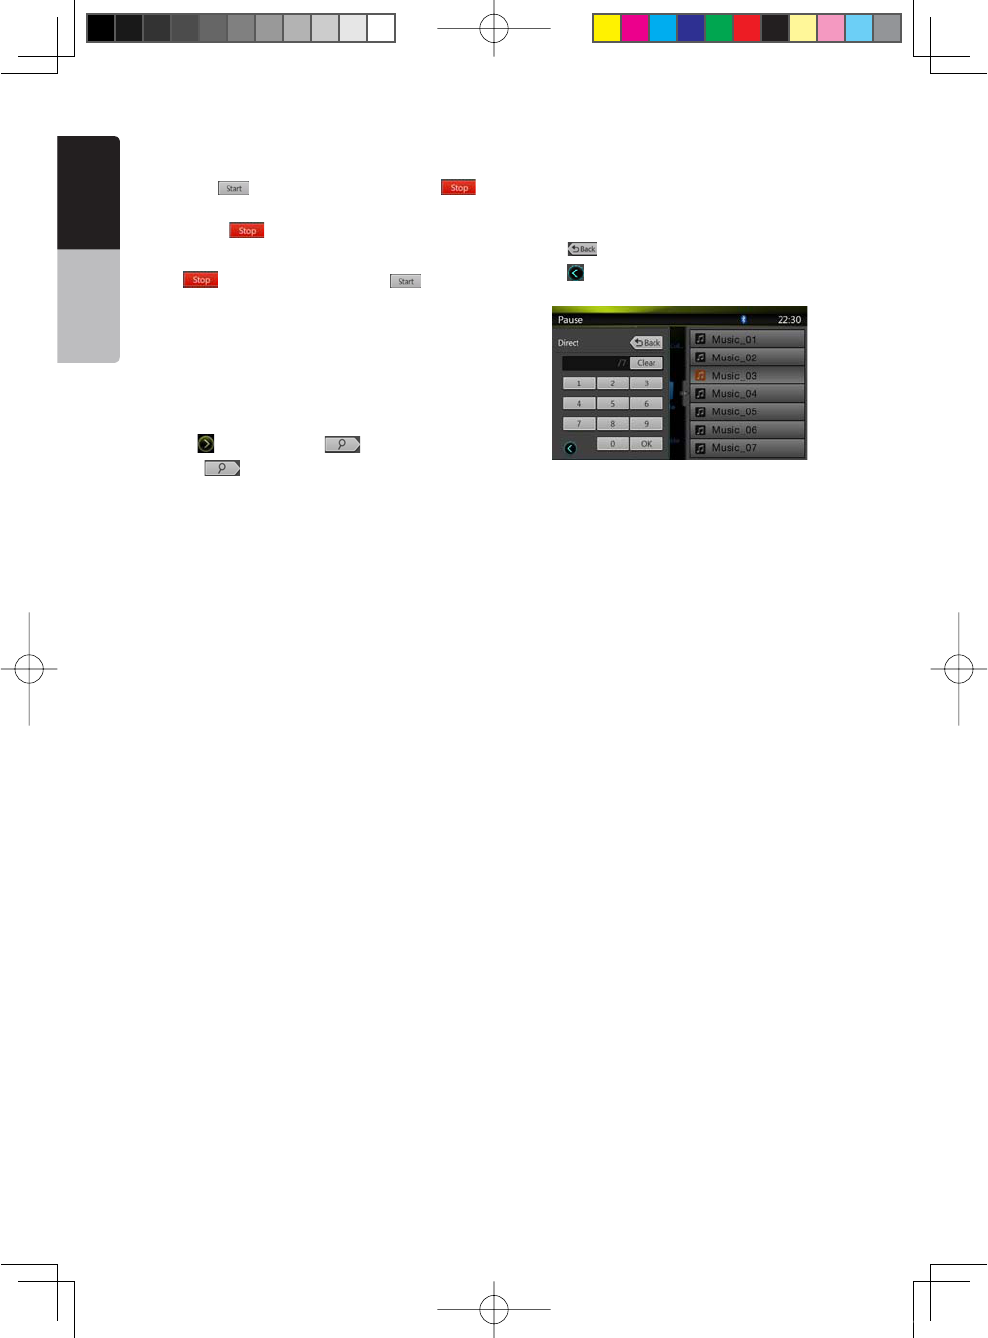
Searching with the Track Number
This operation allows searching using the track
numbers recorded on the CDs.
1. Touch [ ="UTTONTOSHOW; =BUTTON
1. Touch [ =BUTTON4HENUMERICAL KEYPADWILL
appear on the screen.
2. Input the track number that you want to play back
with [0] to [9] key.
Playback starts from the track of the input track
number.
s)FTHEINPUTTRACKNUMBERDOESNOTEXISTORSEARCHING
with track number is not allowed, the screen image will
not change.
s4OUCHTHE; =BUTTONWILL CLOSETHENUMERICAL
keypad.
s4OUCH; ="UTTONWILLCLOSE THEOPTIONWINDOWAND
display playback screen.
Rotation Effect On/Off
This operation allows turn on/turn off rotation effect.
* The factory default is On.
1. Touch [ ="UTTONTOSHOW;2OTATIONEFFECT=BUTTON
2. Press button [ =WILLTURNONTHE2OTATIONEFFECT
3. Press button [ =WILLTURNOFFTHE2OTATIONEFFECT
Listening To MP3/WMA
This unit is an ID3 Tag compatible model.
This unit supports the ID3 TAGs of the Version 2.4, 2.3,
1.1 and 1.0.
In displaying, this unit gives priority to the Version 2.3
and 2.4 TAGs.
What is MP3/WMA?
MP3 is an audio compression method and classified
into audio layer 3 of MPEG standards.
WMA is an audio compression method developed by
Microsoft Corporation.
These audio compression methods have penetrated
into PC users and become a standard format.
These features compress the original audio data to
about 10 percent of its initial size with a high sound
quality. This means that about 10 music CDs can be
recorded on a CD-R disc or CD-RW disc to allow a
long listening time without having to change CDs.
Note: Some CDs recorded on CD-R/RW mode may not
be usable.
Displaying MP3/WMA TAG titles
Tag information such as title, artist and album title
can be displayed for MP3/WMA file containing Tag
information.
Precautions when creating MP3 disc
s&ILEEXTENSIONS
!LWAYSADDA FILEEXTENSIONh-0vORhMPv TO
AN-0lLEAND h7-!vORhWMAvTOA 7-!lLEBY
using single byte letters. If you add a file extension
other than specified or forget to add these file
extension, the file cannot be played. In addition, if you
use upper case and lower case letters (capital and
small letters) mixed for file extensions, normal play
may not be possible.
2. Files other than MP3/WMA data cannot be played.
Playing files with a format not supported will be
skipped, and the scan, random and repeat playback
mode may be canceled.
s&ILEAND$ISC.OT3UPPORTED
Files and discs with following extensions are not
supported: *.AAC, *.DLF, *.M3U, *.PLS, *.MP3 PRO
1;B1=࣫㕢⠜䇈ᯢкLQGG

26 NX501/NZ501
English
Owner’s Manual
files, files with DRM, open session discs.
s,OGICALFORMAT&ILESYSTEM
1. When writing an MP3/WMA file on a disc, please
SELECTh)3/LEVEL ORLEVELWITHOUTINCLUDING
expansion format)” as the writing software format.
Normal playback may not be possible if the disc is
recorded on another format.
2. The folder name and file name can be displayed
as the title during MP3/WMA play but the title must
be within 31 single byte alphabetical letters and
numerals for the folder name and file name (including
an extension). Entering more letters or numerals than
specified may cause an incorrect display.
s%NTERING&ILEAND&OLDER.AMES
Names using the code list characters are the only
file names and folder names that can be entered and
displayed. Using any other character will cause the file
and folder names to be displayed incorrectly.
s%LECTRONIC3HOCK0ROTECTION
10 seconds for CD-DA (CDA)
45 seconds for MP3 recorded at 44.1 kHz, 128 kbps
90 seconds for WMA recorded at 44.1 kHz, 128 kbps
s&OLDERSTRUCTURE
1. A disc with a folder having more than 8 hierarchical
levels will conflict with the ISO9660 and playback will
be impossible.
s.UMBEROFlLESORFOLDERS
1. The maximum allowable number of folders is 255
(including root directory); the maximum allowable
number of files is 512 (max. 255 per folder). This
represents the maximum number of tracks that can be
played back.
2. Tracks are played in the order that they were
recorded onto a disc. (Tracks might not always be
played in the order displayed on the PC).
s3OMENOISEMAYOCCUR DEPENDINGONTHETYPEOF
encoder software used while recording.
s)NCASEOF ATRACKRECORDEDAT6"2 VARIABLEBIT
rate), the display for the play time of the track may be
slightly different from the actual play time. Also, the
recommended value of VBR ranges from 32 kbps to
320 kbps.
s!FTERDISCSELECTION THEPLAYMODEISAUTOMATICALLY
engaged.
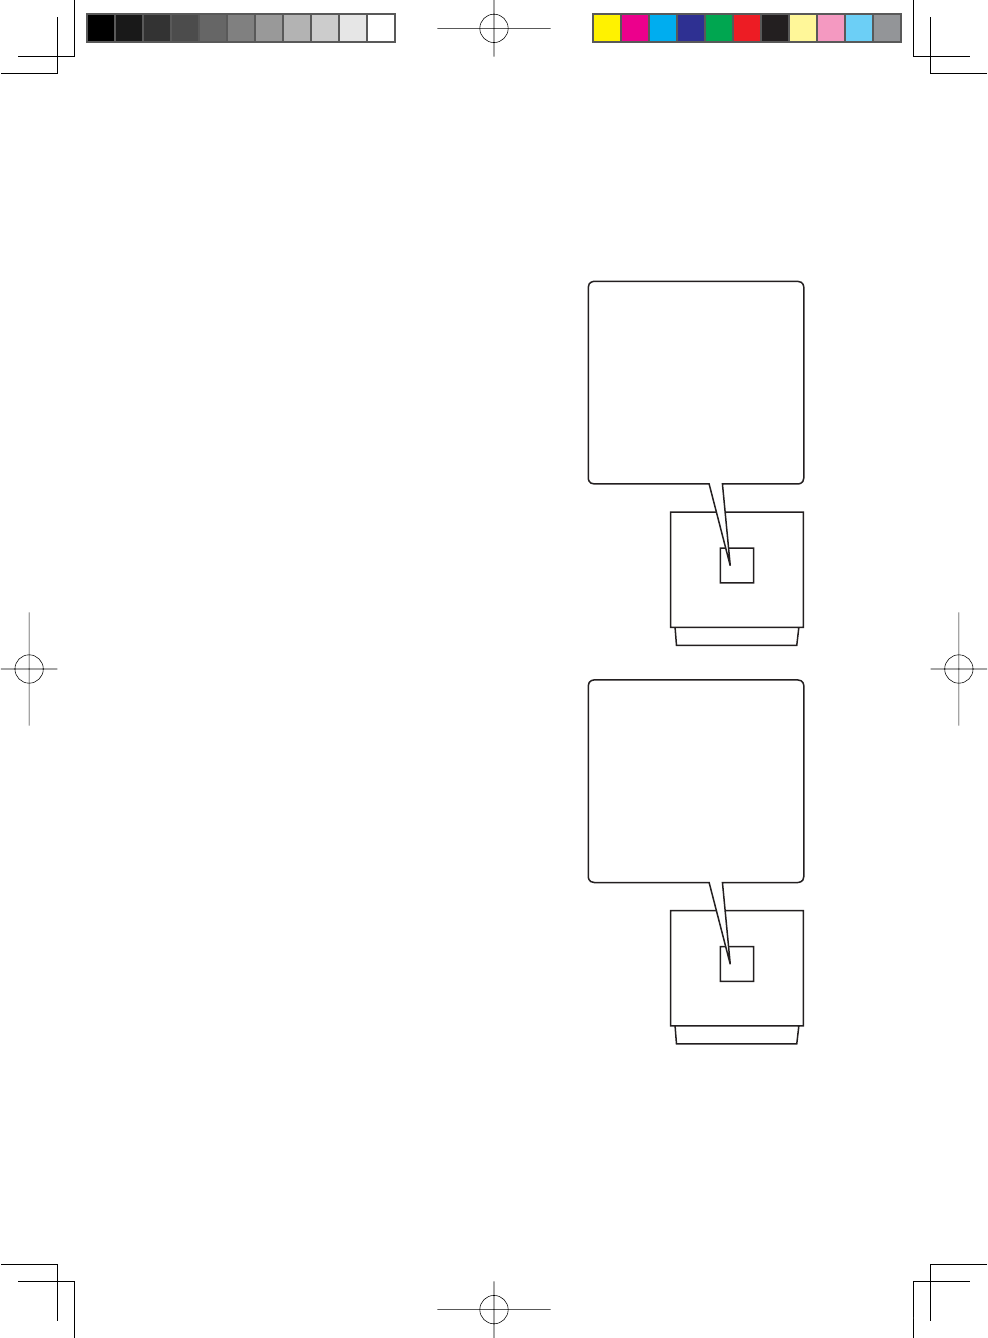
Playing MP3 folders
When selected for play, files and folders (Folder
Search, File Search or Folder Select) are accessed
in the order in which they were written to the media.
As a result, the order in which they are expected to
be played may not match the order in which they are
actually played.
You may be able to set the order in which MP3/WMA
files are to be played by assigning file names beginning
WITHPLAYSEQUENCENUMBERSSUCHAShvTOhv
For example, a medium with the following folder/ file
hierarchy is subject to Folder Search, File Search or
Folder Select.
See the diagram below.
The player will only recognize three folder levels and
does not display folders containing other folders. In
the example above, the unit will display folders 2,3, 5
and 7, but 1 and 6 since they do not contain others.
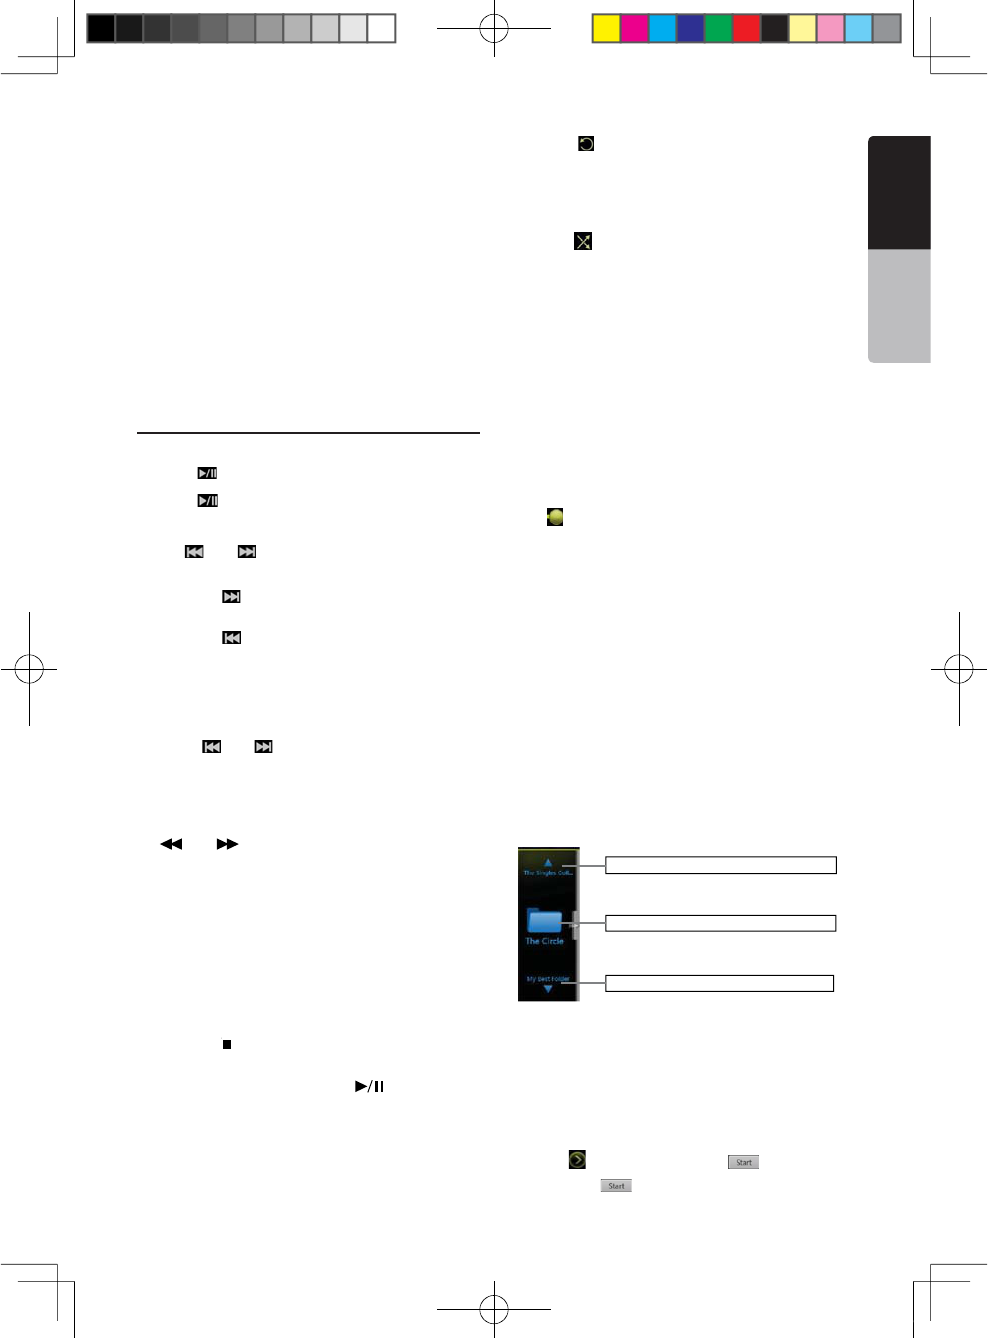
Playback MP3/WMA menu
1. Repeat Playback
While playing MP3/WMA touch button can switch
between Repeat Track Repeat Folder and Repeat Off.
2. Folder
Touch the folder title on the display list, the file list will
display files and folders in selected folder.
1
2
3
1;B1=࣫㕢⠜䇈ᯢкLQGG
NX501/NZ501 27
English
English
Owner’s Manual
3. Current Folder
s3HOWINGTITLEOFCURRENTFOLDER
s4HENUMBERON THEFOLDERSYMBOLISTHE NUMBEROF
files and folders number in current folder.
s4OUCHTHETITLEOFCURRENTFOLDERPLAY LIST WILLSHOW
files and folders in upper folder.
Stop Playback
1. Press the [ ] button on remote control more than 1
second. Playback is stopped.
2. To resume playback, press the [ ] button.
Playback resumes from start of the folder which
playing track is in.
Other operations about playing MP3/WMA are almost
same as CD Player mode.
1;B1=࣫㕢⠜䇈ᯢкLQGG
28 NX501/NZ501
English
Owner’s Manual
10. USB AUDIO OPERATIONS
This system can play audio files (MP3/WMA) stored in
AN53"MEMORYWHICH ISRECOGNIZEDAS h53"-ASS
Storage Class device”. You can use your USB memory
as an audio device by simply copying desired audio
files into it.
Note:
s4HISSYSTEMWILLNOTOPERATEORMAYOPERATEIMPROPERLY
with some USB memory.
s&ILESPROTECTEDWITHANY$2-CANNOTBEPLAYED
Notes on using USB memories
'ENERALNOTES
s7HENNOSUPPORTlLESTHElLELISTDISPLAYNOTHING
.OTESONTHE-07-!lLES
s4HISSYSTEMCAN PLAYTHE-07-!lLESSTOREDIN
the USB memory.
s3ETTHE3AMPLING&REQUENCYTO
For MP3 files:
s-0%',AYERORK(Z
s-0%',AYERORK(Z
s-0%',AYERORK(Z
For WMA files: 32, 44.1, or 48 kHz
s3ETTHE"IT2ATETO
For MP3 files:
s-0%',AYERTOKBPS6"2
s-0%',AYERTOKBPS6"2
s-0%',AYERTOKBPS6"2
For WMA files: 32, 48, 64, 80, 96, 128, 160, or 192
kbps
s!DDTHEFOLLOWING FILEEXTENSIONUSINGSINGLEBYTE
characters:
s&OR-0lLESh-0vORhMPv
s&OR7-!lLESh7-!vORh7MAv
.OTESONTHEFOLDERSTRUCTURE
s4HEFOLDERHIERARCHYMUSTBE WITHINHIERARCHICAL
levels. Otherwise, playback may be impossible.
s4HEMAXIMUMALLOWABLE NUMBEROFFOLDERSIS
(including root directory and folders with no MP3/
WMA file).
s4HEMAXIMUMALLOWABLENUMBEROFlLESINAFOLDERIS
255.
s9OUCANSTORETHE-0lLES7-!lLESTOGETHERINA
folder.
s4HESYSTEMMAY BECOME SLOWIFTHElLESOR FOLDERS
exceed the limitation above.
.OTESONTHE4AGTITLES
The limitations on the Tag titles are same as those in
DVD Audio Player mode.
Select USB Audio mode
Connect your USB memory with MP3/WMA files to the
USB connector. The system will automatically detect
THECONNECTEDDEVICEANDTHE;53"!UDIO=BUTTONON
main menu will be enabled.
s7HENAN53"MEMORYISALREADYCONNECTED
4OUCH ;53"!UDIO=BUTTONTOSELECT THE53"!UDIO
mode.
The system changes to the USB Audio mode and
starts playback from the previous position or from the
beginning.
NOTE:
If you reconnect the same device that you
disconnected last, the system will play back where it
left off.
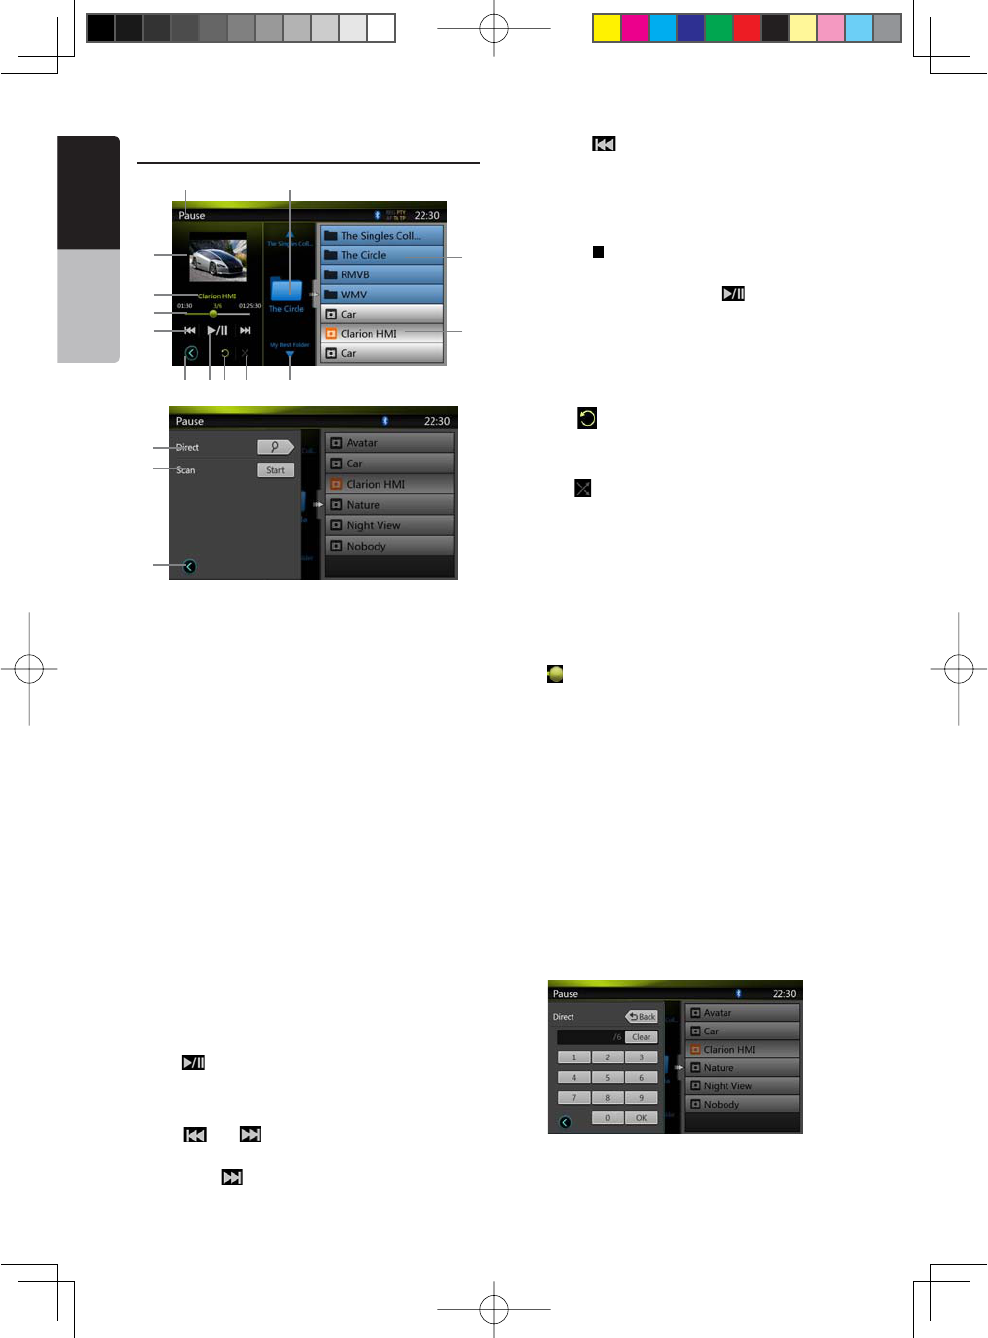
1 -Open option menu Button
2- Play/Pause Button
3- Repeat Button
4- Shuffle Button
5- Next Track/Fast Forward Button
6- MP3/WMA files in list
1 3 4 5
2
6
7
89
10
11
13
12
14
16
15
1;B1=࣫㕢⠜䇈ᯢкLQGG
NX501/NZ501 29
English
English
Owner’s Manual
7- Folders in list
8- Folders browse control
9- Playback status info
10- Album Art
11-Current ID3 info area
12- Elapsed playing time indicator/Seek bar
13- Previous Track /Fast Backward Button
14- Direct Button
15- Scan Button
16- Close option menu Button
Playing MP3/WMA files in USB memory
Play/Pause Playback
1. Touch [ =BUTTONTOPAUSEDURINGPLAYBACK
2. Touch [ =BUTTONAGAINTORESUMEPLAYBACK
Switch to Previous/next file
Press [ =OR; = BUTTONDURINGPLAYBACKTOPLAY
previous /next file.
s0RESSING; =BUTTONSTARTSPLAYBACK FROMTHE
beginning of the next track.
s0RESSING; =BUTTONSTARTSPLAYBACKFROMTHE
beginning of the current track; when this button is
pressed again within about 5 seconds, playback starts
from the beginning of previous track.
Fast Forward /Fast Backward
1. Press [ =OR; = BUTTON ANDHOLDMORETHAN
seconds to start fast backward or fast forward during
playback. The playback speed starts at 2x, then will
increase to 4x, 8x, and 1 6x .Release the button will
continue playback with normal speed.
2. [] or [ ] button on remote control can also
be used to start fast backward or fast forward during
playback.
Note:
sNo audio is reproduced during fast forward and fast
backward operation.
sThe fast forward and fast backward speed may differ
depending on the audio files.
Stop Playback
1. Press the [ =BUTTONONREMOTECONTROLMORETHAN
second. Playback is stopped.
2. To resume playback, press the [ ] button.
Playback resumes from start of the folder which
playing track is in.
Repeat Playback
* The repeat set as the factory default is Repeat Folder.
Touch the [ =BUTTONONCEFOR2EPEAT4RACKAGAINFOR
Repeat Folder.
Note: The repeat in all USB files function is not available.
Shuffle Playback
1. Touch [ =BUTTON TOSHUFFLETHE TRACKSINPLAYING
folder during playback.
2. Touch this button again to turn off the feature.
Album Art work
If current audio file contains album art image in ID3,
the picture will be displayed in this area.
ID3 info area
This area display ID3 info of playing file: song title,
artist information, album information, number of
current file/total number in current folder, elapsed
playing time/total time of current file.
Skip use seek bar
Press on seek bar and drag it to any position where
you want to start playback.
Select a folder on display list
Touch the folder title on the display list, the display list
will display files and folders in selected folder.
Selecting a track on the display List
This function allows you to select tracks from a
displayed list.
1. Touch the track title on the display list. The selected
track will start playing.
2. When the desired track is not displayed, press and
flick the track list up or down.
3. Touch the desired track title key. The corresponding
track is started playback.
Folders browse control
This area is same as the mouse touch panel of
notebook computer. Flick up and down in this area will
browse previous or next folder in current folder. Flick
left or right will enter this folder or back to the father
folder.
Scanning the Tracks
1. Touch [ ="UTTONTOSHOW;3CAN =BUTTON
2. Touch [Scan =BUTTONDURINGPLAYBACK
Show the title of previous folder.
Show the title of current folder.
Show the title of next folder.
1;B1=࣫㕢⠜䇈ᯢкLQGG
30 NX501/NZ501
English
Owner’s Manual
s)TWILLPLAYFROMNEXTTRACKANDEACHTRACKWILLDISPLAY
for 10s.
s4HE;3CAN =BUTTONWILL SWITCHTO;3CAN =
button.
3. Touch [Scan =BUTTON
s)TWILLCONTINUEPLAYBACKFROMCURRENTTRACK
s;3CAN =BUTTONWILLSWITCHTO;3CAN =BUTTON
*The function will scan all tracks orderly in current
folder once .After Scan stopped playback will continue.
Searching with the Track Number
This operation allows searching using the track
numbers in playing folder.
1. Touch [ ="UTTONTOSHOW; =BUTTON
1. Touch [ =BUTTON 4HENUMERICALKEYPADWILL
appear on the screen.
2. Input the track number that you want to play back
WITH;=TO;=KEY
Playback starts from the track of the input track
number.
s)FTHEINPUTTRACKNUMBERDOESNOTEXISTORSEARCHING
with a track number is not allowed, the screen image
will not change.
s4OUCH; =BUTTONWILLCLOSETHENUMERICALKEYPAD
s4OUCH; ="UTTONWILLCLOSE THEOPTIONWINDOWAND
display playback screen.
1;B1=࣫㕢⠜䇈ᯢкLQGG
NX501/NZ501 31
English
English
Owner’s Manual
11. USB VIDEO OPERATIONS
This system can play USB video files (MP4,3GP, etc)
STOREDINAN53"MEMORYWHICHISRECOGNIZEDASh53"
Mass Storage Class device” You can use your USB
memory as an audio device by simply copying desired
audio files into it.
Note:
sThis system will not operate or may operate improperly
with some USB memory.
s&ILESPROTECTEDWITHANY$2-CANNOTBEPLAYED
Notes on using USB memories
'ENERALNOTES
When no support files, the file list display nothing.
.OTESONTHEFOLDERSTRUCTURE
The limitations on the folder structure are same as
those in USB Audio Player mode.
.OTESONTHE4AGTITLES
The limitations on the Tag titles are same as those in
DVD Audio Player mode.
Select USB Video mode
Connect your USB memory with video files to the USB
connector. The system will automatically detect the
CONNECTEDDEVICEANDTHE;53"6IDEO=BUTTONONMAIN
menu will be enabled.
s7HENAN53"MEMORYISALREADYCONNECTED
Touch [USB Video] button on main menu to select the
USB Video mode.
The system changes to the USB Video mode and
starts playback from the previous position or from the
beginning.
NOTE: If you reconnect the same device that you
disconnected last, the system will play back where it left
off.
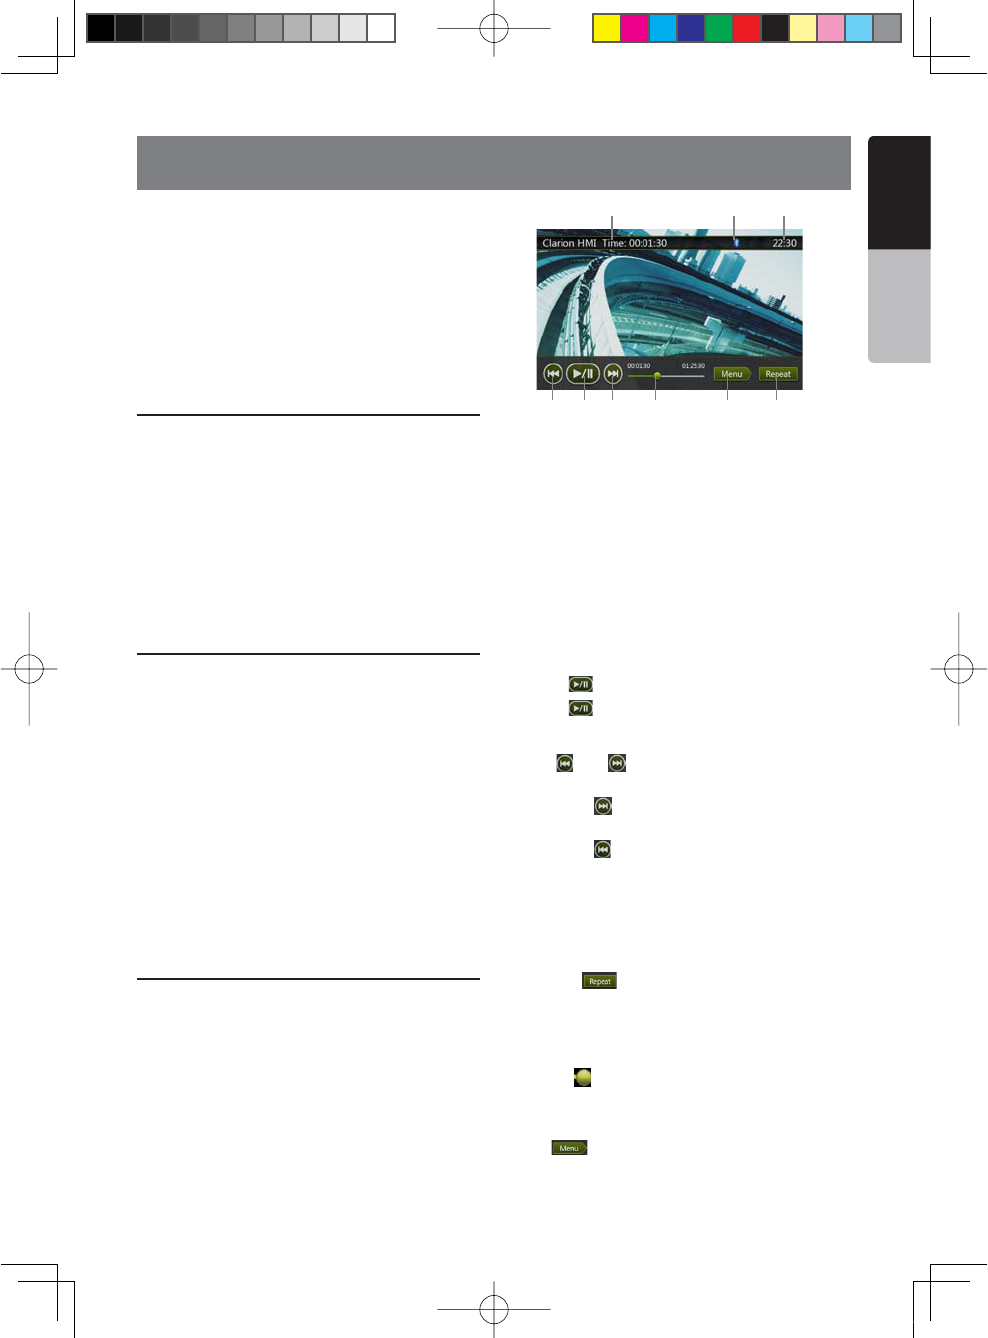
Playing video files in USB memory
If the video is playing, touch the screen of the playing
video to display Operation buttons.
* The display will return to the playback screen, if you
do not touch the screen for 10 seconds.
1-Previous Track Button
2- Play/Pause Button
3- Next Track Button
4-Elapsed playing time indicator/Seek bar
5-Menu Button (Go to list menu mode)
6- Repeat Button
7- System time
8- Bluetooth status
9- Playback info
Play/Pause Playback
2. Touch [ =BUTTONTO0AUSEPLAYBACK
3. Touch [ =BUTTONTORESUMEPLAYBACK
Switch to Previous/next file
Press [ =OR ; = BUTTONDURINGPLAYBACKTOPLAY
previous /next file.
s0RESSING; =BUTTONSTARTSPLAYBACK FROMTHE
beginning of the next track.
s0RESSING; =BUTTONSTARTSPLAYBACKFROMTHE
beginning of the current track; when this button is
pressed again within about 5 seconds, playback starts
from the beginning of previous track.
Repeat Playback
* The repeat set as the factory default is Repeat Folder.
Touch the [ =BUTTONONCEFOR2EPEAT4RACKAGAIN
for Repeat Folder.
Note: The repeat in all USB files function is not available.
Skip use seek bar
Press the on seek bar and drag it to any position
where you want to start playback.
Switch to USB Video Menu
Press [ =BUTTONPLAYBACKWILLBEPAUSEDANDTHE
screen will switch to USB Video Menu.
1 2 3 4 5 6
789
1;B1=࣫㕢⠜䇈ᯢкLQGG
32 NX501/NZ501
English
Owner’s Manual
USB Video Menu Operations
1 -Open option menu button
2- Play/Pause Button
3- Repeat Button
4- Shuffle Button
5- Next Track/Fast Forward Button
6- Video files in list
7- Folders in list
8- Folders area
9- Playback status info
10- Album Art
11- Current file info area
12- Elapsed playing time indicator/Seek bar
13- Previous Track /Fast Backward Button
14- Direct Button
15- Scan Button
16 - Close option menu button
Play/Pause Playback
*On USB Video menu screen, playback status is
pause.
Touch [ =BUTTONTORESUMEPLAYBACK4HESCREENWILL
go to video screen automatically.
Switch to Previous/next file
Press [ =OR; = BUTTONDURINGPLAYBACKTOPLAY
previous /next file.
s0RESSING; =BUTTONSTARTSPLAYBACKFROMTHE
beginning of the next track.
s0RESSING; =BUTTONSTARTSPLAYBACK FROMTHE
beginning of the current track; when this button is
pressed again within about 5 seconds, playback starts
from the beginning of previous track.
Stop Playback
1. Press the [ =BUTTONONREMOTECONTROLMORETHAN
second. Playback is stopped.
2. To resume playback, press the [ =BUTTON
Playback resumes from the first valid media file of the
folder.
Repeat Playback
* The repeat set as the factory default is Repeat Folder.
Touch the [ =BUTTONONCEFOR2EPEAT4RACKAGAINFOR
Repeat Folder.
Shuffle Playback
1. Touch [ =BUTTONTOSHUFFLETHETRACKS IN PLAYING
folder during playback.
2. Touch this button again to turn off the feature.
Current file info area
This area displays info of current video file: file name,
number of current file/total number in current folder,
Elapsed playing time/total time of current file.
Skip use seek bar
Press on seek bar and drag it to any position where
you want to start playback.
Select a folder on display list
This operation is same as this in USB Audio mode.
Selecting a track on the display List
This operation is same as this in USB Audio mode.
Folders area
This operation is same as this in USB Audio mode.
Scanning the Tracks
This operation is same as this in USB Audio mode.
Searching with the Track Number
This operation is same as this in USB Audio mode.
14
16
15
1 3 4 5
2
6
7
89
10
11
13
12
1;B1=࣫㕢⠜䇈ᯢкLQGG
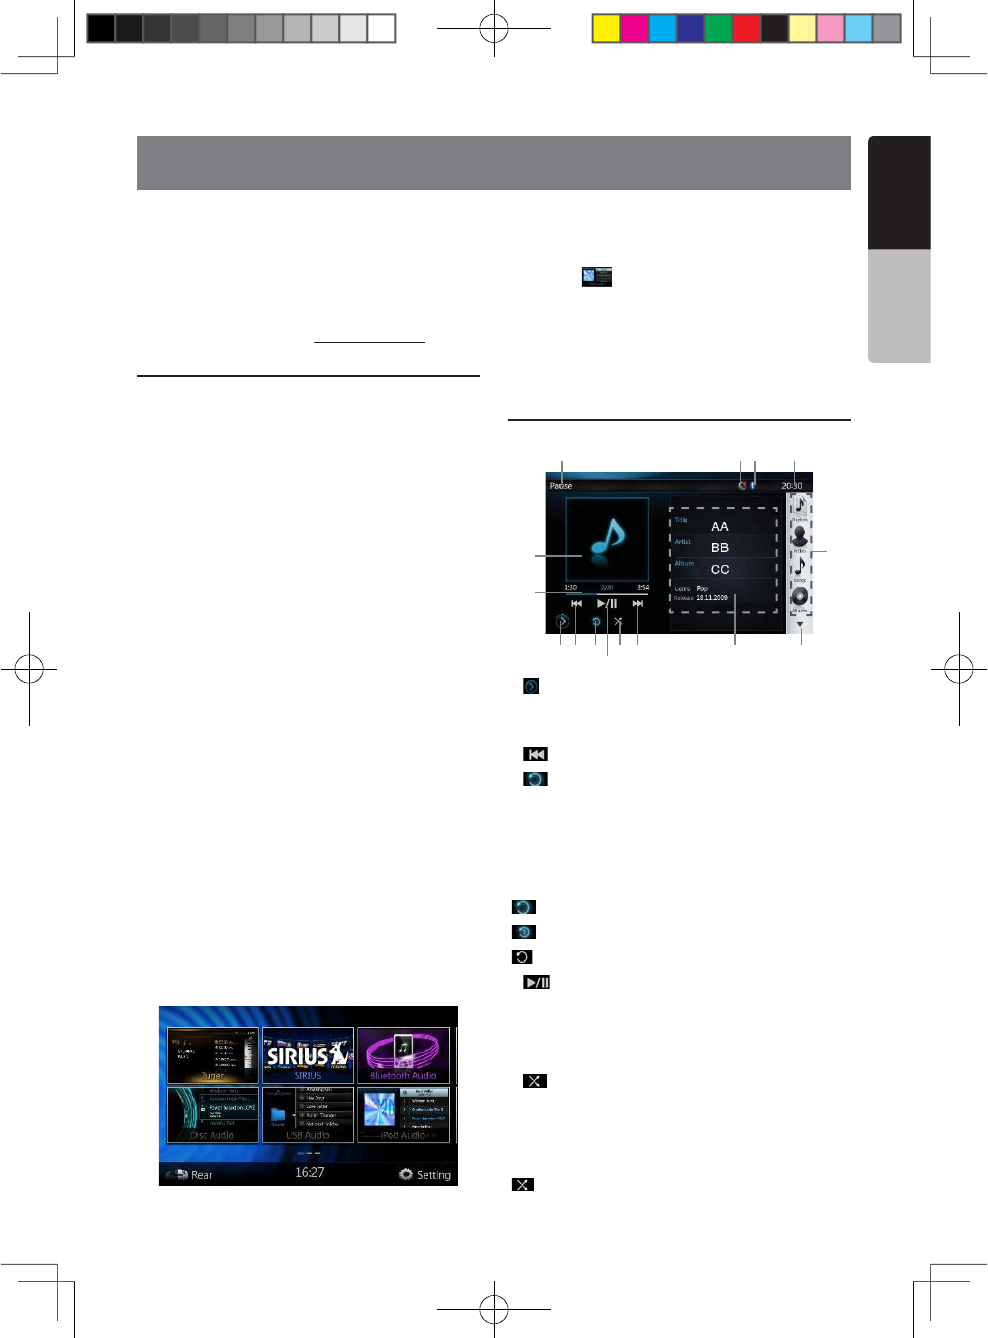
NX501/NZ501 33
English
English
Owner’s Manual
12. iPod/iPhone OPERATIONS
iPod /iPhone can be connected by the special
connector cable (CCA-748) separately sold.
Note:
s4HISSYSTEMWILLNOTOPERATEORMAYOPERATEIMPROPERLY
with unsupported versions.
s&ORDETAILEDINFORMATION ONTHEPLAYABLEI0ODI0HONE
models, see our home page: www.clarion.com
Notes on using Apple iPod/iPhone
s$ONOTCONNECT ANI0ODI0HONETOTHISUNITWITH A
headphone connected to the iPod/ iPhone.
s!FTERTHEI0ODI0HONE HASBEENCONNECTEDTOTHIS
unit, the iPod’s buttons are disabled for operation in
the Music mode. In the Video mode, do not operate
the iPod’s buttons.
s7HENINTHE I0ODMODEASPECIALI0ODI0HONE
control screen is displayed different from the main
screens for other modes.
s7HENINTHEI0ODMODETHESCREENIMAGEINPUTFROM
the AUX terminal is output to the rear monitor.
s7HENNODATAISPRESENTTHETITLEDISPLAYWILLREMAIN
blank.
s4HEI0ODI0HONEIS USEDWITHTHEEQUALIZERFUNCTION
turned OFF.
s3ETTHEI0ODI0HONESLANGUAGESETTING TO %NGLISH
before connecting your iPod/iPhone. Some characters
of the other languages may not be displayed correctly
in this system.
Precautions on battery consumption:
If the iPod/iPhone is connected to this unit when
the iPod/iPhone’s internal battery has run down, this
function may not operate correctly. You must connect
the iPod/iPhone after charging the battery if it has run
down.
Selecting the iPod Audio mode
Connect your iPod/iPhone to the USB connector via
CCA-748 cable. The system will automatically detect
the connected device and the iPod Audio button will
be enabled for operation on the Main Menu screen.
The playback starts after a while, from where the iPod/
iPhone has been paused.
s7HENI0ODI0HONEISALREADYCONNECTED
Touch the [ = KEYONTHE-AIN-ENU SCREEN4HE
system changes to the iPod mode, and starts playback
from the previous position.
Press Menu button on Operational Panel to return to
the Main Menu.
Controlling the iPod/iPhone
iPod audio mode screen
1.[ =3ETTINGS"UTTON
Displays the Options screen. You can specify play
modes and other settings from this screen.
2.[ =0REVIOUS4RACK"UTTON
3.[ =2EPEAT"UTTON
Use to repeat the selected track.
Press once to start a single track repeat. Press again
to activate a repeat all. To turn repeat off, press same
button again. Repeat symbols are displayed in the info
window in the upper left area of the screen.
[=!LLREPEAT
[=4RACKREPEAT
[=2EPEATOFF
4.[ =0LAY0AUSE"UTTON
Use to control playback and pause.
(1). Touch the key during playback. Playback pauses.
(2). To resume playback touch the key again.
5.[ =3HUFmE"UTTON
Use to switch the shuffle mode on or off. When
enabled, this function performs playback of tracks
in random order, regardless of the order in which they
are recorded.
[=3HUFmE/FF
1 2 5 6 7 8
101213
34
11
8
14
15
1;B1=࣫㕢⠜䇈ᯢкLQGG
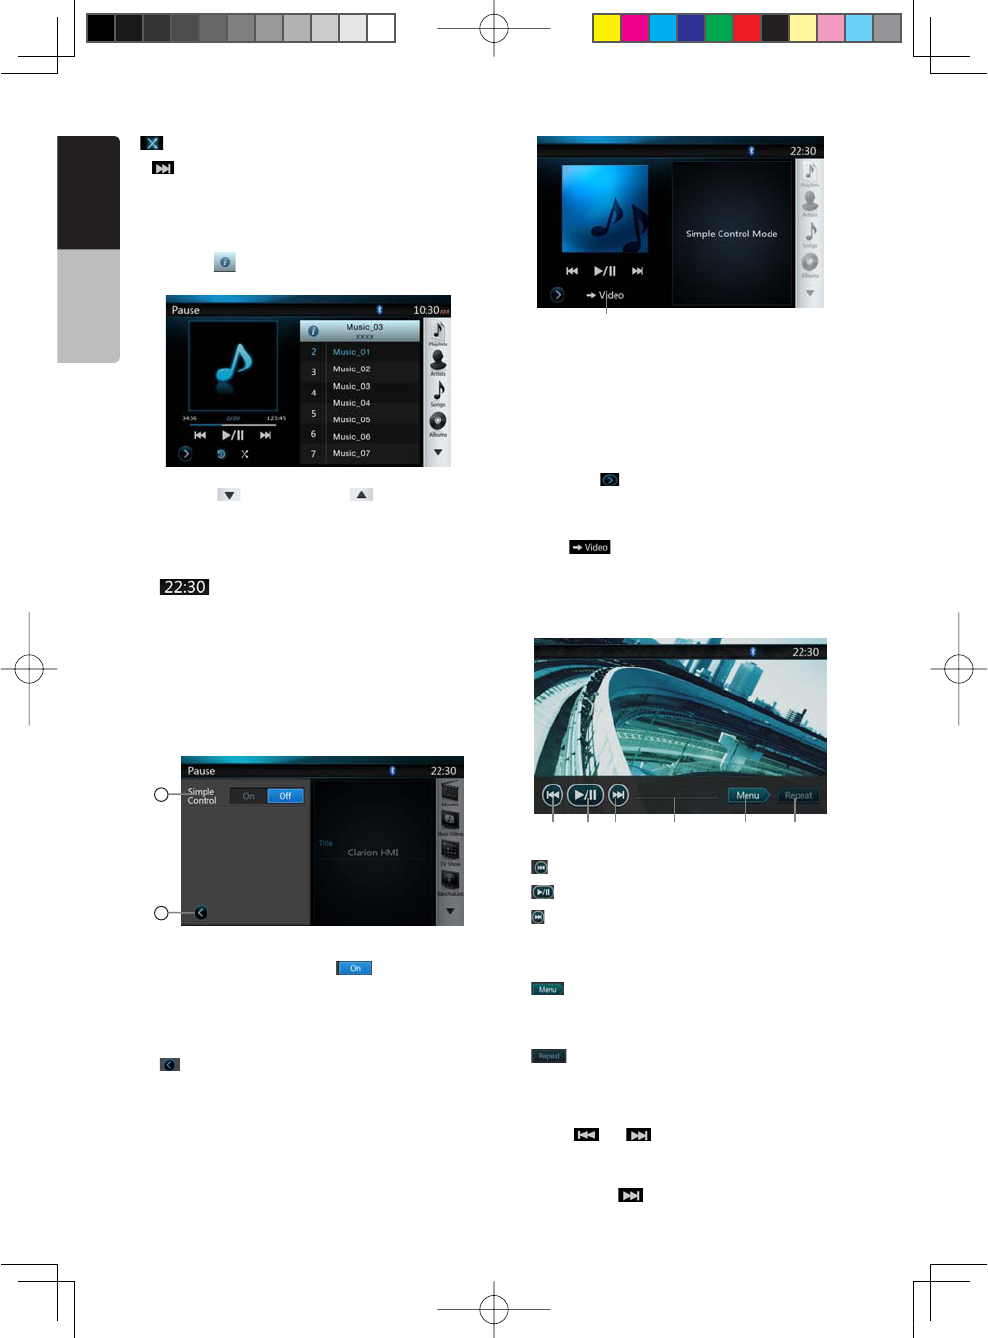
34 NX501/NZ501
English
Owner’s Manual
[=3ONG3HUFmE
6.[ =.EXT4RACK"UTTON
7.ID3 Information
Touch the area of the ID3 Information to display the
current play list.
Touch the [ =ICON CANRETURNTO)$INFORMATION
display.
8.Next Page[ =0REVIOUS0AGE; ="UTTON
9.Category List
Select different category songs to play. The category is
same as the iPod/iPhone.
10.[ =3YSTEM4IMEDISPLAY
11.Bluetooth Status
12.MUTE Status
13.Playback Status
14.Art Work
15.Progress bar
iPod audio settings mode screen
16
17
16.Simple Control:
If the Simple Control is set to [ = 4HESCREENWILL
become to Simple Control Mode. It can also display
the iPod/iPhone’s video regardless it is iPod Audio or
I0OD6IDEOMODE"UTONLYh0REVIOUS4RACKvh0LAY
0AUSEvANDh.EXT4RACKvCANBEOPERATED2EFERTO
17.[ =#LOSETHE3ETTINGS0AGE
18
18.Display iPod/iPhone’s video.
Follow operation steps to display iPod/iPhone’s video
in Simple Control Mode.
s#ONNECTTHEI0ODTO 53"CONNECTORVIA##!
cable.
s3ELECTI0OD!UDIOMODE
s0RESSTHE; =BUTTONON I0ODAUDIOMODESCREEN
to display Settings page.
s3ETTHE3IMPLE#ONTROLTOh/Nv
s0RESS button.
s3ETI0OD6IDEOSETTINGS46/UTTOh/.vINI0OD
s.OWPLAYVIDEOFROMI0OD
sI0ODSVIDEOWILLDISPLAYONTHESCREEN
19 2120 22 23 24
19.[ =0REVIOUSlLES
20.[ =0LAYOR0AUSEVIDEO
21.[ =.EXTlLES
22.Progress bar
4HEh0ROGRESSBARvISNOTAVAILABLEONTHISSCREEN
23.[ =-ENU
Press the Menu button can display the Simple
Control Mode.
24.[ =2EPEAT
4HEh2EPEATv"UTTONCANTOPERATEONTHISSCREEN
Skipping a track (Simple Control Mode)
Press the [ =OR; =BUTTONDURINGPLAYBACK4RACKS
are skipped, as many times as the button is pressed,
and playback starts.
s0RESSINGTHE; =BUTTONSTARTSPLAYBACKFROMTHE
1;B1=࣫㕢⠜䇈ᯢкLQGG
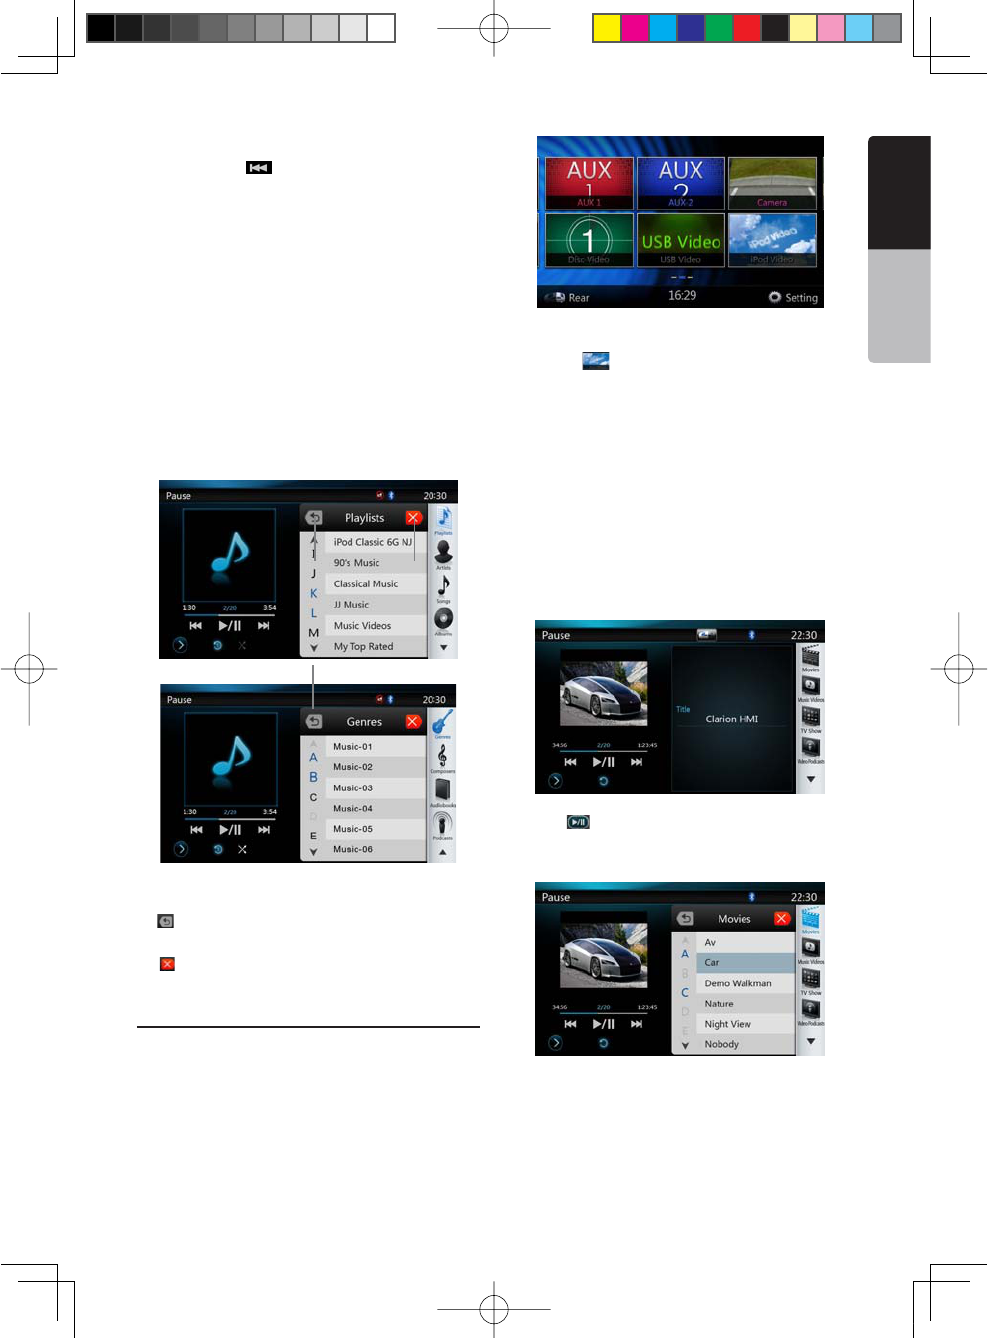
NX501/NZ501 35
English
English
Owner’s Manual
beginning of the next track.
s0RESSINGTHE; =BUTTONSTARTSPLAYBACKFROMTHE
beginning of the current track.
When this button is pressed again within about 2
seconds, playback starts from the beginning of the
previous track.
Note:)N3IMPLE#ONTROL-ODETHEBESTWAYISTOCONTROL
the iPod just on iPod.
Selecting a list item from a list screen
(1). Touch the list screen and flick up or down to scroll
the list.
(2). Touch a desired list item on the screen to display
the corresponding list of tracks.
(3). Touch the desired track name on the list to play it.
iPod audio List mode screen
25.Return to the Previous Level Folder
[=)FTHELISTIS INROOTPRESSTHEBUTTON CANCLOSE
the list.
26.[ =#LOSEDTHE,IST
27.Search with the first alphabet in current list.
Selecting the iPod Video mode
Connect your iPod/iPhone to the USB connector via
CCA-748 cable. The system will automatically detect
the connected device and the iPod Video button will
be enabled for operation on the Main Menu screen.
s7HENANI0ODI0HONEISALREADYCONNECTED
Touch the [ = KEYONTHE-AIN-ENU SCREEN4HE
system changes to the iPod Video mode, and starts
playback from the previous position.
Press Menu button on Operational Panel to return to
the Main Menu.
s6IEWINGVIDEODATAINTHEI0ODI0HONEONLYFORTHE
I0ODI0HONEWITHVIDEOFEATURES
When you connect an iPod/iPhone with video features
by using the optional CCA-748 cable, you can enjoy
the video data and slide show data stored in the iPod/
iPhone and show them on the display of this unit (and
the rear monitor if connected).
sI0OD6IDEO)$MODESCREEN
Press [ =BUTTONTODISPLAYI0OD6IDEOPLAYMODE
screen.
I0OD6IDEO,ISTMODESCREEN
25 26
27
1;B1=࣫㕢⠜䇈ᯢкLQGG

36 NX501/NZ501
English
Owner’s Manual
sI0OD6IDEO3ETTINGSMODESCREEN
sI0OD6IDEO3IMPLE#ONTROL-ODE3CREEN
sI0OD6IDEOPLAYMODESCREEN
1. iPod Video Title.
2. Elapsed playing time.
3. [ =-ENU
Press the Menu button can display the iPod Video
mode screen.
4. [ =2EPEAT"UTTON
Use to repeat the selected track.
Press once to start a single track repeat. Press
again to activate a repeat all. To turn repeat off,
press same button again. Repeat symbols are
displayed in the info window in the upper left area of
the screen.
In iPod Video mode screen, there are three repeat
icons :
[=2EPEAT!LL
[=2EPEAT4RACK
[=2EPEATOFF
Note:
The operation keys in iPod video mode are as same as
I0OD!UDIOMODE0LEASE REFERTOTHEI0OD!UDIO -ODE
operation key.
Note:
Video playback is not available on all iPod/ iPhone
devices. Please contact your Clarion dealer for details.
An optional connection cable or accessory may be
required for this feature.
Note:
sh!5$)//.,9vIS DISPLAYEDWHENTHEAUTOMOBILEIS
moving.
s)MAGEDATAMAY NOTBEPLAYEDBACKACCORDING TOTHE
status of the iPod/iPhone
s4HEVOLUMESETTINGOFVIDEODATAISRELATIVELYLOWERTHAN
audio data. Be sure to lower the volume setting before
switching to the other mode.
s$ONOTSELECTTHE CATEGORIESWITHNOTRACKREGISTERED
from the iPod menu screen. The iPod/iPhone may be
frozen. If the iPod/iPhone is frozen, reset the iPod/iPhone
by following the procedure described in the instruction
manual of the iPod/iPhone.
s!UDIOMAYBEPLAYED BACKSLIGHTLYOUTOF
synchronization with video images.
3 4
1 2
1;B1=࣫㕢⠜䇈ᯢкLQGG
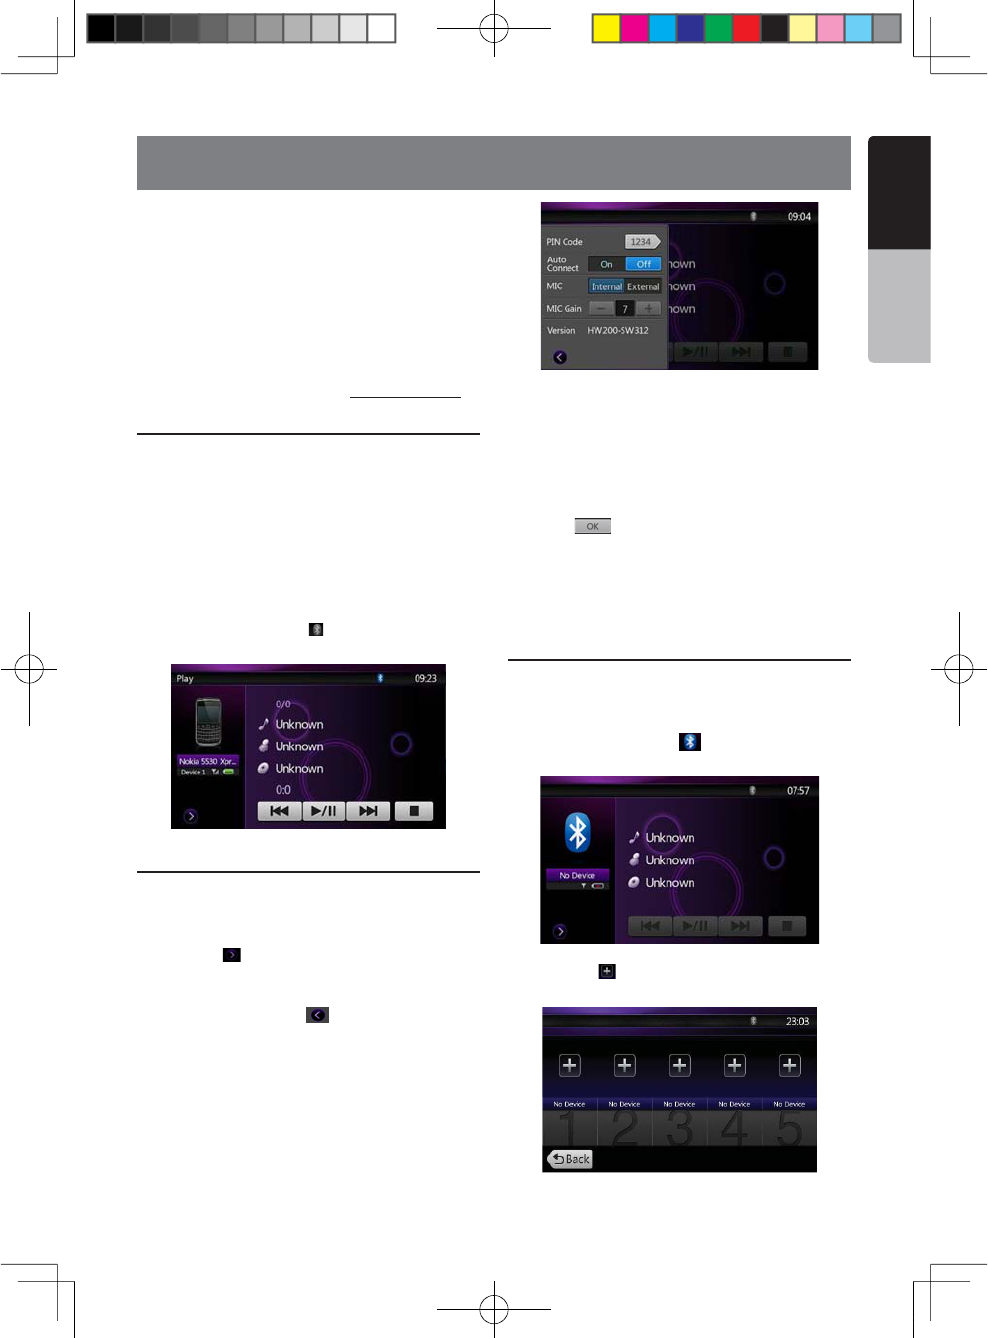
NX501/NZ501 37
English
English
Owner’s Manual
13. Bluetooth AUDIO PLAYER OPERATIONS
Some Bluetooth cellular phones have audio features,
and some portable audio players support the
Bluetooth feature. These devices will be called as
h"LUETOOTHAUDIOPLAYERSvIN THISMANUAL4HISSYSTEM
can play audio data stored in a Bluetooth audio player.
.OTE
s4HISSYSTEMWILLNOTOPERATEORMAYOPERATEIMPROPERLY
with some Bluetooth audio players.
s&ORDETAILEDINFORMATIONON THEPLAYABLE"LUETOOTH
audio players, see our home page: www.clarion.com
Selecting the Bluetooth Audio mode
1. Press Menu button on Operational Panel to return to
the Main Menu.
2. Touch the [Bluetooth Audio] key to select the
Bluetooth Audio mode.
The system changes to the Bluetooth mode. If the
connection with a Bluetooth audio player has been
already established, you may select the Music
function.
s7HENTHECONNECTION WITHA"LUETOOTHAUDIOPLAYER
has been established, the [ =ICONISDISPLAYEDATTHE
top of the screen.
Bluetooth audio player settings
#ONlRMING"LUETOOTH)NFORMATIONANDSETTING0ASS+EY
You can confirm various information concerning about
the Bluetooth Interface features.
1. Touch the [ =KEYTODISPLAYTHEINFORMATIONONTHE
screen.
2. When you finish confirming the Bluetooth
information, touch the [ =KEYTO RETURNTOTHE
previous screen.
If you want to change the Pin Code setting of this unit,
perform the following steps.
s4HEFACTORYDEFAULTSETTINGIShv
3. Touch the text box of the Pin Code item to display
THE4EN+EY0ADSCREEN
4. Enter your desired 4-digit PIN number, and then
touch the [ =KEY
Note:
-)#'AINISDISABLEDIN"LUETOOTH!UDIOMODESETTINGS
Registering your Bluetooth audio player
(Pairing)
You can register up to 5 Bluetooth audio players.
1. Turn on the power of the Bluetooth audio player you
wish to register.
2. Touch the Device key [ =TODISPLAYTHE $EVICE
Select screen.
3. Touch the [ =KEY TODISPLAYTHE)NQUIRING$EVICE
screen.
1;B1=࣫㕢⠜䇈ᯢкLQGG
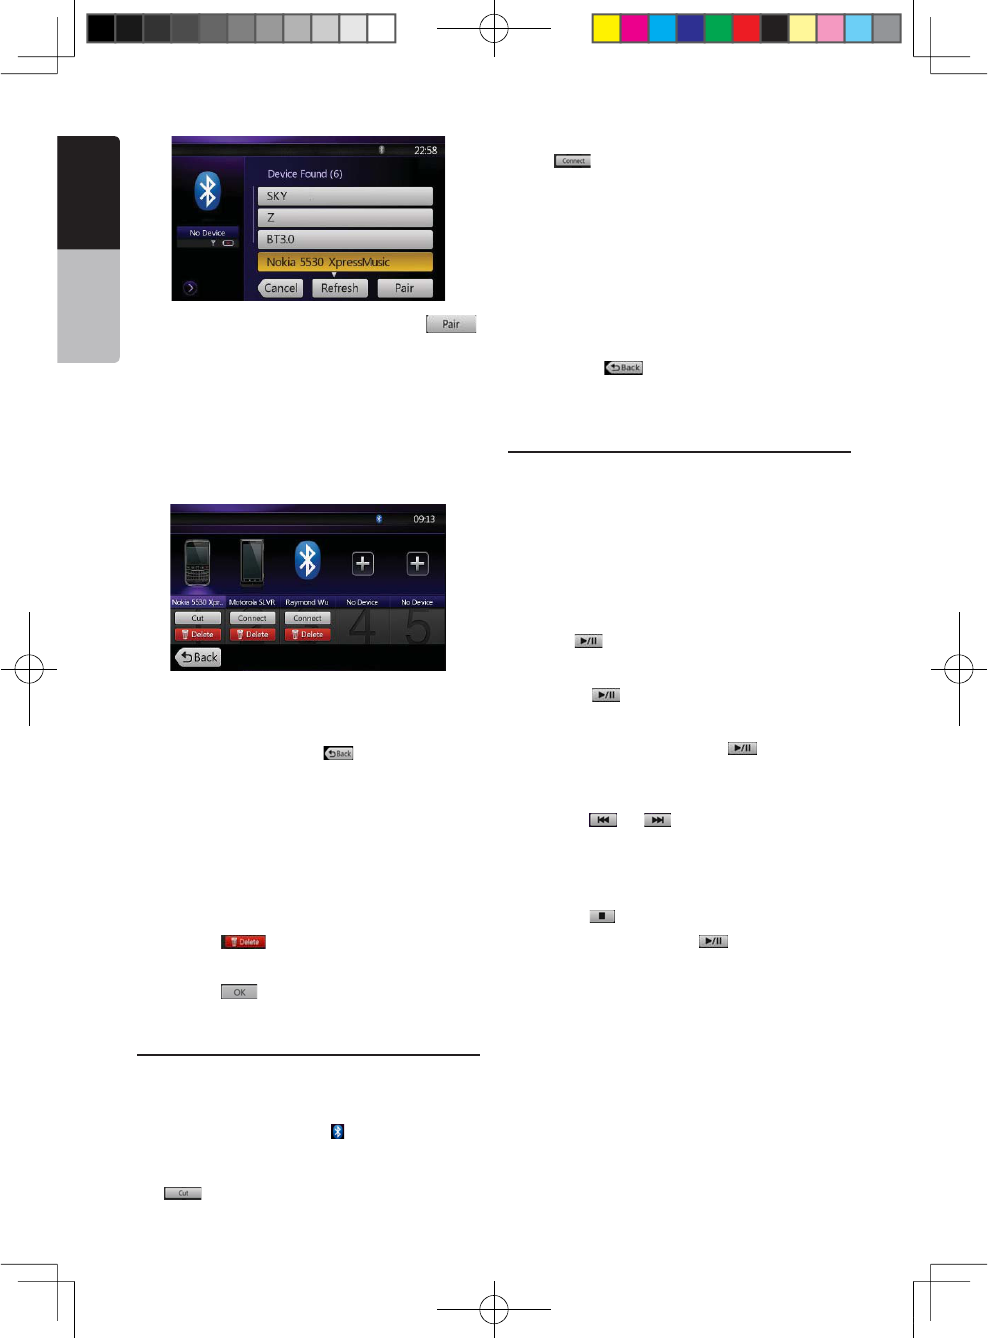
38 NX501/NZ501
English
Owner’s Manual
4. Touch your desired Device and press the[ =
key to register for the Bluetooth audio player..
)FENTERINGTHE 0ASS+EYCODEISPROMPTEDONYOUR
"LUETOOTHAUDIOPLAYERENTERTHE0ASS+EYCODESET
to this unit.
s9OUCANCHANGETHE0ASSKEY SETTINGOFTHISUNIT
from the BT Info screen.
s9OUALSOCANADDTHEFAVORITEICONTOTHECONNECTED
device. There are 10 favorite icons for selection.
When the pairing operation completes, the registered
Bluetooth audio player is set as the current device,
after selecting the favorite icon, the display return to
the device list screen. Press [ =BUTTONTHEDISPLAY
will return to the Bluetooth audio mode screen.
Note:
s9OU CANNOTREGISTERTHESAME"LUETOOTHAUDIO PLAYER
which is already registered.. If you wish to change the
Device key registered, once delete the corresponding
Bluetooth audio player from the previous Device key, and
then register it again to your desired Device key.
s4ODELETETHE"LUETOOTHAUDIOPLAYERREGISTRATION
1. Touch the [ =KEYTODELETETHEDEVICE
A confirmation screen is displayed.
2. Touch the [ =KEYTOCONlRMDELETE
Selecting the Bluetooth audio player
To change the current Bluetooth audio player to the
other device which is already registered, perform the
following operation.
1. Touch the Device key to [ =DISPLAYTHE$EVICE
Select screen.
2. Touch the currently connected device, then press
the [ =KEYTODISCONNECTTHEACTIVEDEVICE
3. Touch the desired Device key you wish to use.
Press [ =KEYTO SELECTITASYOURACTIVE DEVICE
The corresponding cellular phone is set as current
telephone.
s)FTHEPOWER OFTHECELLULARPHONEIS NOTTURNEDON
turn it on.
s4HECELLULARPHONE MAYPROMPTTO ACKNOWLEDGETHE
"LUETOOTHCONNECTIONORASK TOENTERTHE0ASS+EY
code of this unit.
Perform these operations according to the message
displayed.
4. Touch the [ =KEYTO RETURNTOTHEPREVIOUS
screen.
Controlling the Bluetooth audio player
.OTE
s/CCASIONALLY DEPENDINGONTHEENVIRONMENT
playback sounds may be fragmented, or switch noises
may be generated.
Playing a music
After the connection with a Bluetooth audio player is
established, the play mode is automatically engaged.
s7HENPLAYBACKIS NOTSTARTEDFORSOMEDEVICES
touch the [ =KEYMANUALLY
Pausing playback
1. Touch the [ =KEYDURINGPLAYBACK
Playback pauses.
2. To resume playback, touch the [ =KEY0LAYBACK
resumes.
Skipping a track (searching)
3. Press the [ =OR; =BUTTONDURINGPLAYBACK
Tracks are skipped, as many as the times the button is
pressed, and playback starts.
Stopping playback
4. Press the [ =BUTTONDURINGPLAYBACK
Tracks are stopped, press the [ =BUTTONTOPLAYBACK
the first Track.
1;B1=࣫㕢⠜䇈ᯢкLQGG
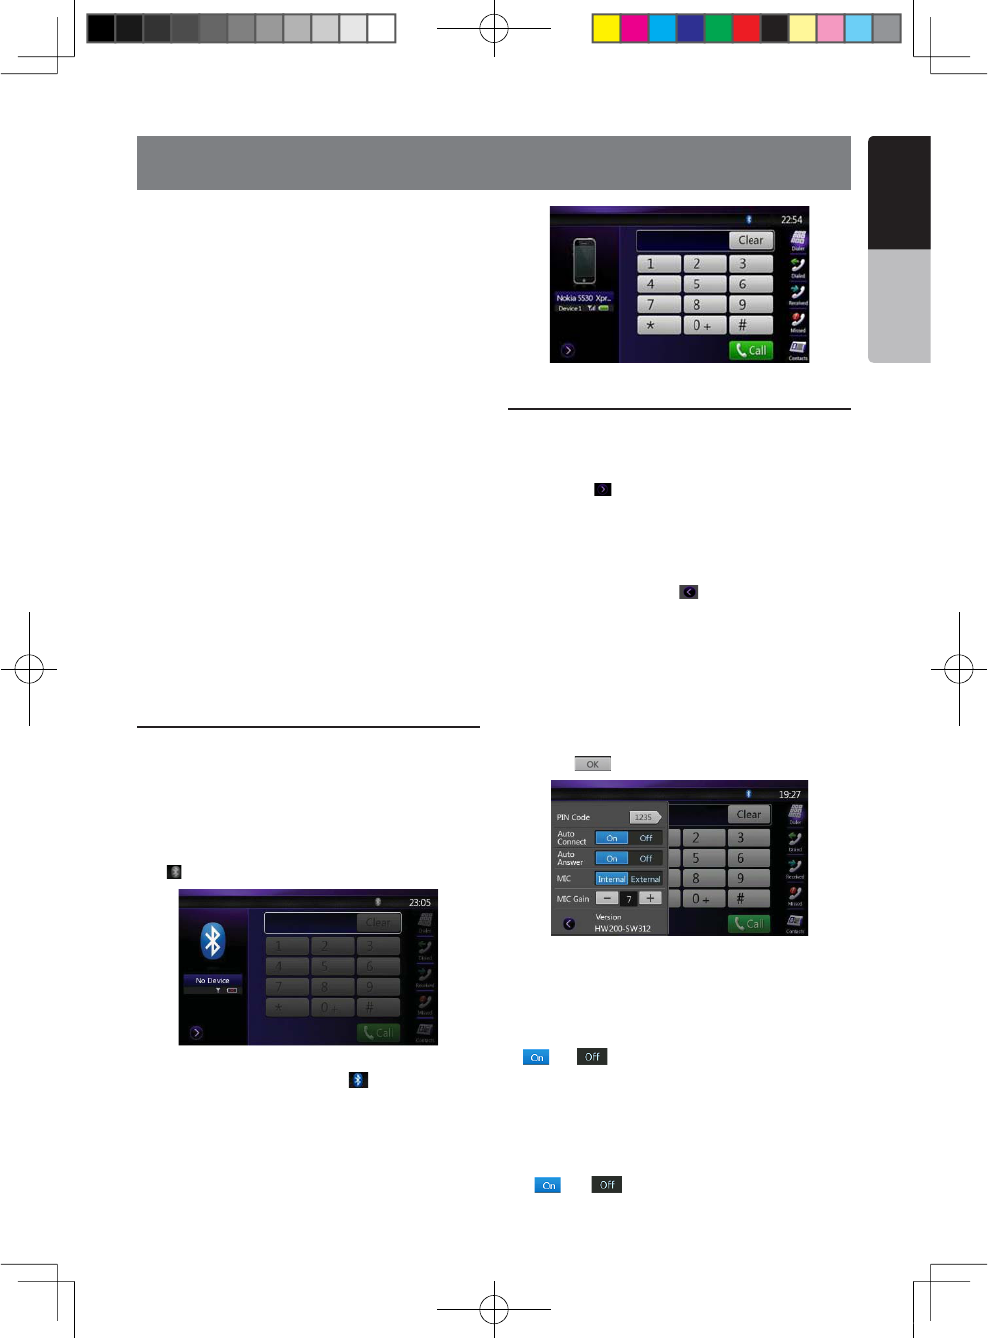
NX501/NZ501 39
English
English
Owner’s Manual
When the connection with your Bluetooth cellular
phone is established, the following functions are
available on this unit:
s,ISTENINGTOYOURTELEPHONECALLSONTHECARSPEAKERS
s!NSWERINGTOANINCOMINGCALL
s-AKINGACALLUSINGTHE4EN+EYPADSCREEN
s-AKINGACALL USINGTHE0HONE"OOKDATA INTHE
selected cellular phone.
s-AKINGACALL USINGTHE(ISTORYDATAOF THEDIALED
received calls.
Note:
s3OMECELLULARPHONES MAYNOTBEABLETO TRANSFERTHE
Phone Book data to head unit.
s4HE0HONE"OOK DATATRANSMISSIONMAYTAKEA LONG
time. The operations of sending calls are disabled
during the data transmission.
s9OU CANTALKWITHOTHERPARTY BYUSINGTHEINTERNAL
microphone. When it is hard to hear for the other party
in accordance with the communication condition or the
used telephone, please use the optional microphone
2#"ANDSETTHE-ICROPHONE 3ELECTSETTINGTO
“External”. The sound will be improved, but noises
may still be heard depending on the communication
condition.
Select the BT Phone mode
1. Press Menu button on Operational Panel to return to
the Main Menu.
2. Touch the [Bluetooth Telephone] key to select the
Bluetooth Telephone mode.
The Telephone screen is displayed.
s7HENNO"LUETOOTH4ELEPHONECONNECTEDTHE
icon[ =ISDISPLAYEDATTHETOPOFTHESCREEN
s7HENTHECONNECTION WITHA"LUETOOTH4ELEPHONE
has been established, the icon [ =ANDSIGNALLEVEL
indicator are displayed at the top of the screen.
Bluetooth Telephone settings
#ONlRMING"LUETOOTH)NFORMATIONANDSETTING0ASS+EY
You can confirm various information concerning the
Bluetooth Interface features.
1. Touch the [ =KEYTODISPLAYTHEINFORMATIONONTHE
screen.
2. Perform setting for the desired item. See the
following sections for detail.
3. When you finish confirming the Bluetooth
information, touch the [ = KEY TORETURNTOTHE
previous screen.
)FYOUWANTTOCHANGETHE0ASS+EYSETTINGOFTHISUNIT
perform the following steps.
4OUCHTHETEXTBOXOFTHE 0ASS +EYITEMTODISPLAY
THE4EN+EY0ADSCREEN
s4HEFACTORYDEFAULTSETTINGIShv
2. Enter your desired 4-digit PIN number, and then
touch the [ =KEY
3ETTING!UTOMATIC#ONNECTION
The system automatically reconnects the cellular
phone after the connection is lost or the system is
restarted.
s4HEFACTORYDEFAULT SETTINGISh/&&v4OUCHTHE
[=OR; =KEYOFTHE!UTOMATIC#ONNECTIONITEM
to set the function ON or OFF.
3ETTING!UTOMATIC!NSWER
If a call comes in, answer automatically after 5
seconds.
s4HEFACTORYDEFAULT SETTINGISh/&&v4OUCHTHE
[=OR; =KEY OFTHE!UTOMATIC!NSWERITEM
14. Bluetooth
TELEPHONE OPERATIONS
1;B1=࣫㕢⠜䇈ᯢкLQGG
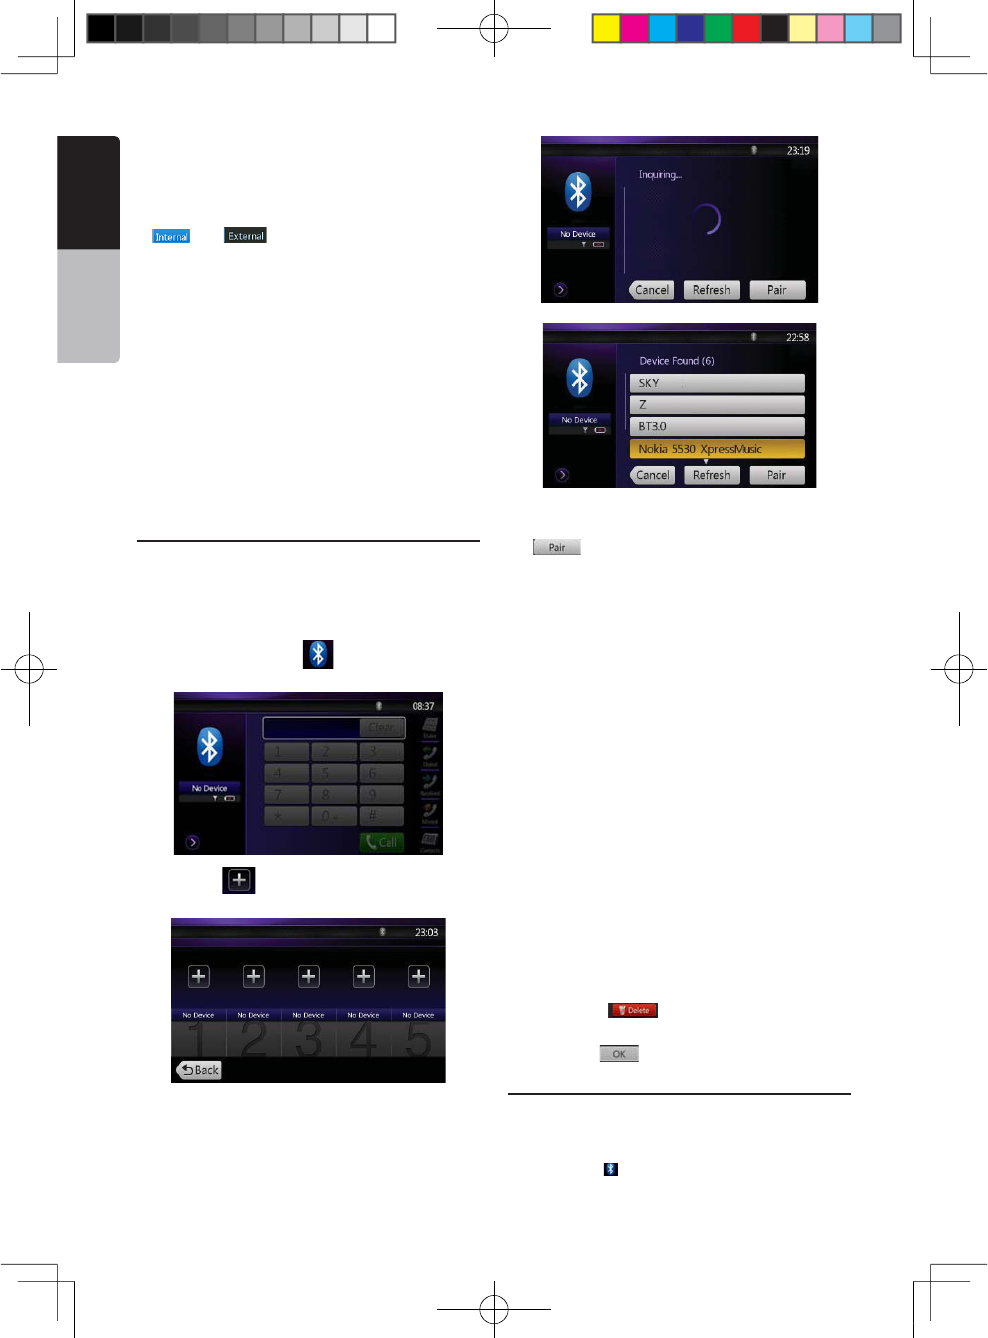
40 NX501/NZ501
English
Owner’s Manual
to set the function ON or OFF.
3ELECTING-ICROPHONE
You can select the microphone to be used.
s4HEFACTORYDEFAULT SETTINGISh)NTERNALv 4OUCHTHE
[=OR; =KEY OFTHE-ICROPHONE3ELECT
item to set the function.
3ETTING-ICROPHONE'AIN
You can adjust the input level of the microphone in 16
levels.
s4HEFACTORYDEFAULTSETTINGIShv
s4OUCH THELEVELINDICATORBUTTONOF THE -ICROPHONE
Gain item to adjust the input level.
Note:
s4HEINPUTLEVELOFTHEMICROPHONECANBEAFFECTEDBYITS
surroundings. Adjust the level if the person on the other
end of the telephone has a reception problem.
Register your cellular phone (Pairing)
You can register up to 5 cellular phones. The
REGISTERINGMETHOD ISASSAMEASh2EGISTERING YOUR
Bluetooth audio player”
1. Turn on the power of the cellular phone you wish to
register.
2. Touch the Device key [ =TODISPLAYTHE$EVICE
Select screen.
3. Touch the [ =KEYTODISPLAYTHE)NQUIRING$EVICE
screen.
4. Touch your desired Cellular key to select the key
for the cellular phone to be registered. And press
the[ =KEYTOREGISTERFORTHE "LUETOOTHAUDIO
player.
s9OUCANNOTSELECTTHE#ELLULARKEYOFWHICHANOTHER
cellular phone is already registered. Select a blank
Cellular key.
)FENTERINGTHE 0ASS+EYCODEISPROMPTEDONYOUR
CELLULARPHONEENTERTHE0ASS+EYCODESETINTHISUNIT
s9OUCANCHANGETHE0ASSKEY SETTINGOFTHISUNIT
from the BT Info screen under the
Telephone Settings screen.
s9OUCANALSOADDTHEFAVORITEICONTOTHECONNECTED
device. There are 10 favorite icons for selecting.
When the pairing operation completes, the registered
cellular phone is set as the current telephone, and
the display returns to the Telephone screen.
Note:
s9OUCANNOTREGISTERTHESAMECELLULARPHONEWHICHIS
already registered. If you wish to change the Cellular
key registered, once delete the corresponding
cellular phone from the current Cellular key, and then
register it again to your desired Cellular key.
s4ODELETETHECELLULARPHONEREGISTRATION
1.Touch the [ = KEYTODELETETHEDEVICE !
confirmation screen is displayed.
2.Touch the [ =KEYTOCONlRMDELETE
Select the cellular phone
To change the current cellular phone to the other
device which is already registered, perform the
following operation.
1. Touch the [ =KEY TODISPLAYTHE$EVICE3ELECT
screen.
1;B1=࣫㕢⠜䇈ᯢкLQGG

NX501/NZ501 41
English
English
Owner’s Manual
2. Touch the currently connected device, then press
[=KEYTODISCONNECTTHEACTIVEDEVICE
3. Touch the desired Device key you wish to use.
Press [ =KEYTO SELECTITASYOURACTIVE DEVICE
The corresponding cellular phone is set as the current
telephone.
s)FTHEPOWER OFTHECELLULARPHONEIS NOTTURNEDON
turn it on.
s4HECELLULARPHONE MAYPROMPTTO ACKNOWLEDGETHE
"LUETOOTHCONNECTIONORTO ENTERTHE0ASS+EYCODE
of this unit. Perform these operations according to the
message displayed.
4. Touch the [ =KEYTO RETURNTOTHEPREVIOUS
screen.
Obtaining the Phone Book data
Sending the Phone Book data from the cellular phone
enables you to make a call using the Phone Book
function from this unit.
1. Perform the Object Push transfer operation of the
Phone Book data on the current cellular phone.
For details of the operation, see the operation manual
of the cellular phone.
.OTE
s3OMECELLULARPHONESMAYNOTBEABLETOTRANSFERTHE
Phone Book data.
s3OMECELLULARPHONES CANNOTTRANSFERTHE0HONE
Book data when the hands-free mode is set or it is
also registered in the Bluetooth mode. In those cases,
disable these functions from the cellular phone before
performing the Object Push transfer.
s3OMECELLULARPHONESMAYTRANSFER0HONE"OOKDATA
automatically.
Telephone operations
Making a call using the Ten-Key pad
1. Touch the [ =KEYTODISPLAYTHE 4EN+EYPAD
screen.
%NTERTHETELEPHONE NUMBERBYUSINGTHE4EN+EY
pad displayed on the screen.
3. Touch the [ =3ENDKEYTOCALLTHE ENTERED
number.
s4HEFOLLOWING4ELEPHONE)NTERRUPTSCREENISDISPLAYED
during phone call.
s4OUCHTHE; =KEYTOTALKBYUSINGTHECELLULARPHONE
and canceling the hands-free function (Private Mode).
To return to the hands-free mode, touch the [ =KEY
again.
s4OUCH THE; =KEYTOMUTE THE MICROPHONE.OWYOU
can hear the other side, but the other side cannot hear
your side.
s4OUCHTHE; =KEYTOHOLDTHECURRENTPHONECALLNOW
you can answer to the other incoming call. Touch again
to talk with previous call
4. When the call is finished, touch [ =KEYTOHANG
up.
.OTE
s$EPENDINGONSOME SPECIALCELLULARPHONETHE
Telephone Interrupt screen may be closed and the
connection with this system may be disconnected
when entering the Private mode.
Making a call using the Phone Book
You can use the Phone Book data obtained from the
cellular phone to make a call from this unit.
.OTE
s"EFOREUSINGTHISFUNCTIONTHE 0HONE"OOKDATA
must be sent from the cellular phone.
s/NLYTHE0HONE "OOKITEMSWITHATLEAST ONE
telephone number registered in the captured Phone
Book data are displayed on the Phone Book screen.
1. Touch the [ =KEYTODISPLAY THE0HONE"OOK
screen.
2. Touch the desired Name key you wish to dial.
s&LICKTHELISTUPANDDOWNTOSCROLLTHELIST
3. Touch the [ =KEYTO CALL THESPECIFIEDNUMBER
The Telephone Interrupt screen is displayed, and
calling starts.
s7HENTHECALLIS FINISHEDTOUCHTHE; =KEYTO
hang up.
Making a call using the History
The system will memorize the Dialed/Received calls
1;B1=࣫㕢⠜䇈ᯢкLQGG
42 NX501/NZ501
English
Owner’s Manual
record data in the memory. You can confirm it and use
it to make a call from this unit.
1. Touch the [ =KEY4HE(ISTORY ,ISTSCREENIS
displayed.
s4HEITEMSARESORTEDBY$IALED-ISSEDAND2ECEIVED
calls.
s&LICKTHELISTUPANDDOWNTOSCROLLTHELIST
2. Touch the desired History item key you wish to dial.
3. Touch the [ =KEYTOCALL THESPECIFIED
number. The Telephone Interrupt screen is displayed,
and calling starts.
s7HENTHECALLISlNISHEDTOUCHTHE; =KEYTO
hang up.
Answering to an incoming call
When a call comes in, the following Telephone
Interrupt screen appears.
You can answer to the incoming call on this system by
the following operation.
1. Touch the [ =KEYTOANSWERTHECALL
2. When the call is finished, touch the [ =KEY
to hang up.
1;B1=࣫㕢⠜䇈ᯢкLQGG
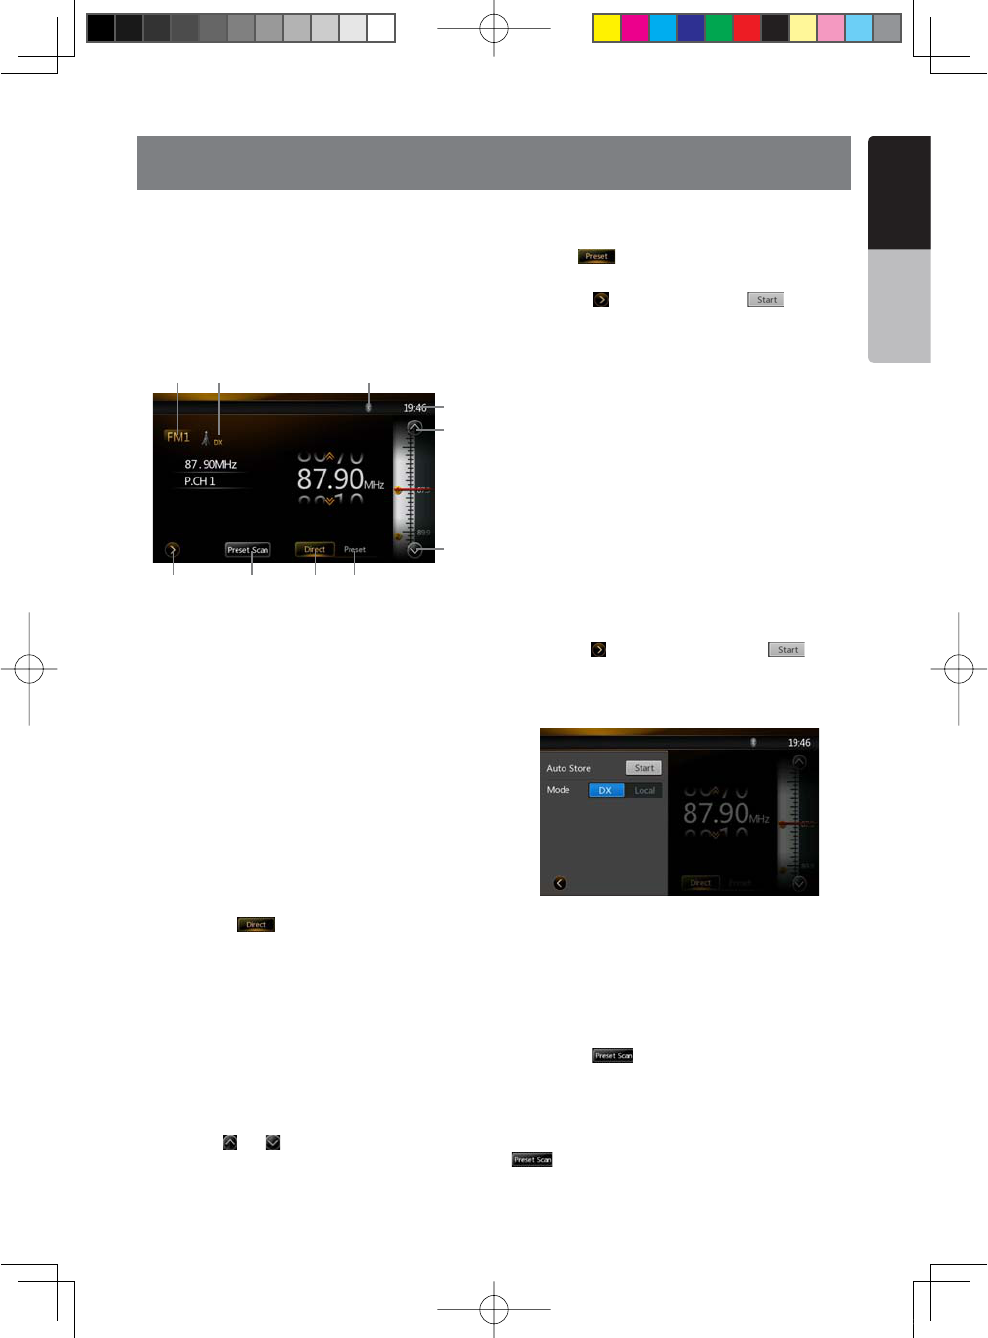
NX501/NZ501 43
English
English
Owner’s Manual
15. RADIO OPERATIONS
Listening to the Radio
1. Touch the Tuner button on the Main menu display.
The tuner mode screen is displayed.
2. Press the [FM1/2/3/AM] button or touch the [Band]
key on remote control to select the radio band. Each
time the button is pressed, the radio reception band
changes in the following order: FM1->FM2->FM3->AM
->FM1...
1. Preset Scan Button
2.Direct Button
3.Preset List Button
4.Frequencies Display
5.Tune Up
6.Tune Down
7.Band Display
8.LOC/DX Display
9.Bluetooth Display
10.System Time
Seek Tuning
1. Press the [FM1/2/3/AM] button to select the radio
band (FM or AM).
2. Touch the [ =KEYAND THENFLICKTHE")'
Frequency up and down to search for next available
station.
s7HENmICKTHEFREQUENCYUPTHESTATIONISSEARCHED
in the direction of higher frequency.
s7HENFLICKTHEFREQUENCYDOWNTHE STATIONIS
searched in the direction of lower frequency.
Step Tuning
Press the [FM1/2/3/AM] button to select the radio
band (FM or AM).
2. Touch the [ =OR; =KEYINFREQUENCYPANELTOTUNE
up or down by one step.
Recalling a preset station
Press the [FM1/2/3/AM] button to select the desire
band (FM or AM) on the tuner.
Touch the [ =KEY0RESSTHEPRESETSTATIONTO
on preset list.
3. Press the [ = KEYTHENPRESSTHE; = BUTTONTO
auto search and store the stations.
Manual memory
1. Touch the desired Band key to select the band you
wish to store.
2. Tune to a station you want to store using the seek
tuning, step tuning, or preset tuning.
3. Touch and hold the desired Preset key you want to
store for about 3 seconds.
Auto Store
The Auto Store is a function for storing up to 6 stations
that are automatically searched in sequentially. If the
number of receivable stations cannot reach to 6, the
previous stored station remains.
1. Touch the [FM1/2/3/AM] key to select the desired
band. (FM or AM)
2. Press the [ =KEYANDTHENPRESSTHE; =KEYTO
start the Auto Store.
A beep sounds and the stations with good reception
are stored automatically to the preset list.
Preset Scan
The Preset Scan receives the stations stored in the
preset memory in order. This function is useful when
searching for the desired station in memory.
1. Touch the [FM1/2/3/AM] key to select the desired
band. (FM or AM)
2. Touch the [ =KEYTOSTARTTHE0RESET3CAN
The unit starts scanning each station for 10 seconds
sequentially. But the station stored is not a valid
station; the scanning time is only 2 seconds.
3. When the desired station is tuned in, touch the
[=KEYAGAINTOSTAYINTHATSTATION
LOC/DX Setting
1 32
8 9
4
6
5
10
7
1;B1=࣫㕢⠜䇈ᯢкLQGG
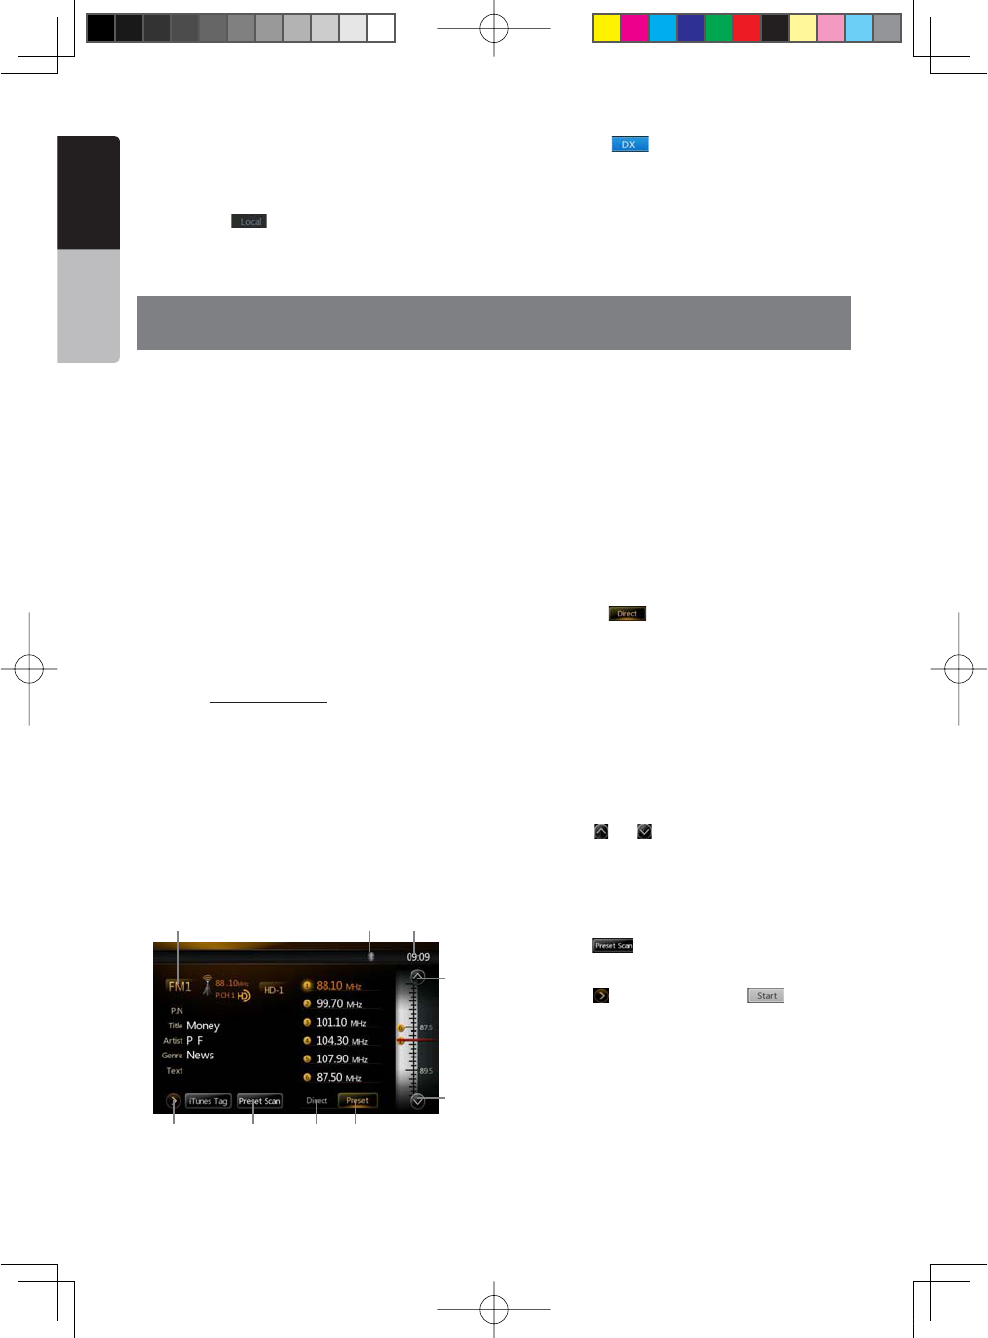
44 NX501/NZ501
English
Owner’s Manual
16. HD Radio™ RECEIVER OPERATIONS
This function is available when an HD Radio tuner is
connected.
This unit can control the following HD Radio tuner:
s($2ADIO4UNER4($
Note:
s"ESURETOTURNOFFTHE!##POWERBEFORECONNECTING
disconnecting the HD Radio tuner.
s.OTALLAREASOFFER($2ADIOBROADCASTS
s($2ADIOSTATIONS MAYNOTALWAYSBROADCASTSUB
channels
s6OLUMELEVELSOF($2ADIOSTATIONSMAYVARY)NCREASE
the volume gradually from the minimal setting after
the channel is selected. Be sure to lower the volume
setting before switching to another mode or channel.
Additional information about HD Radio Technology can
be found at WWWHDRADIOCOM
Listening to HD Radio broadcasts
Note: Connect THD400 HD RadioTM tuner to activate HD
RadioTM function.
1. Touch the Tuner button on the Main menu display.
The HD Radio mode screen will be displayed.
2. Press the [FM1/2/3/AM] button or touch the [Band]
key on remote control to select the radio band. Each
time the button is pressed, the radio reception band
changes in the following order: FM1, FM2, FM3, AM,
FM1...
1-Preset Scan Button
2-Direct Button
3-Preset List Button
4-Setting Button
5-Tune Up
6-Tune Down
7-Band Display
8-Bluetooth Status Display
9-System Time
Seek Tuning
1. Press the [FM1/2/3/AM] button to select the radio
band (FM or AM).
2. Touch the [ =KEYAND THENFLICKTHE")'
Frequency up and down to search for next available
station.
s7HENmICKTHEFREQUENCYUPTHESTATIONISSEARCHED
in the direction of higher frequency.
s7HENFLICKTHEFREQUENCYDOWNTHE STATIONIS
searched in the direction of lower frequency.
Step Tuning
1. Press the [FM1/2/3/AM] button to select the radio
band (FM or AM).
2. Touch the [ =OR; =KEYINFREQUENCYPANELTOTUNE
up or down by one step.
Recalling a preset station
1. Press the [FM1/2/3/AM] button to select the desire
band (FM or AM) on the tuner.
2. Touch the [ =KEY
3. Press the preset station (1 to 6) on preset list.
4. Press the [ = KEYTHENPRESSTHE; = BUTTONTO
auto search and store the stations.
Manual memory
1. Touch the desired Band key to select the band you
wish to store.
2. Tune to a station you want to store using the seek
tuning, step tuning, or preset tuning.
3. Touch and hold the desired Preset key you want to
store for about 3 seconds.
1 32
8 9
4
6
5
7
The DX / LOC setting changes the tuner sensitivity in
order to separate closely spaced stations. This feature
is useful in areas that have many radio stations in close
proximity.
1. Touch the [ =KEY TOSWITCHTO,/#!,TUNER
sensitivity.
2. Touch the [ = KEYTOSWITCHTO$8 TUNER
sensitivity.
1;B1=࣫㕢⠜䇈ᯢкLQGG
NX501/NZ501 45
English
English
Owner’s Manual
Auto Store
The Auto Store is a function for storing up to 6 stations
that are automatically searched in sequentially. If the
number of receivable stations cannot reach to 6, the
previous stored station remains.
4OUCHTHE;&-!-=KEYTO SELECTTHEDESIRED
band. (FM or AM)
2. Press the [ =KEYANDTHENPRESSTHE; =KEY
to start the Auto Store.
A beep sounds and the stations with good reception
are stored automatically to the preset list.
HD Radio Sub channel Function
If the [ =KEYISENABLEDPLEASETOUCHTHE; =
key to tune to next available sub channel.
Note:
Not all stations have HD Radio sub channel broadcasts.
The [ ] key is only enabled when current station
has sub channel broadcast and signal strength is strong
enough.
iTunes Tagging Function
A new feature is available to mark songs on HD
Radio™ broadcasts for review and purchase at a later
time from the listener’s personal computer. This feature
is available through HD Radio™ receivers that build in
THENEWhI4UNES4AGGINGvFEATURE
Now iTunes Tagging system is only available for Apple
iPod and iPhone.
Operation:
1. Touch [ =KEYORPRESSTHE;4!'=BUTTON
on the remote control to to store the current music
information to memory.
2. You may store up to 64 tags to the memory of head
unit. 3. When an iPod/iPhone is connected to the unit,
the unit will automatically transfer the tags in memory
to the iPod/iPhone
Note: Not all broadcasted material can be tagged, in this
case, the [ ] button will be disabled
($2ADIO4-($2ADIO2EADY4-AND THE($ 2ADIO
2EADYLOGOAREPROPRIETARYTRADEMARKSOFI"IQUITY
$IGITAL#ORPORATION
1;B1=࣫㕢⠜䇈ᯢкLQGG
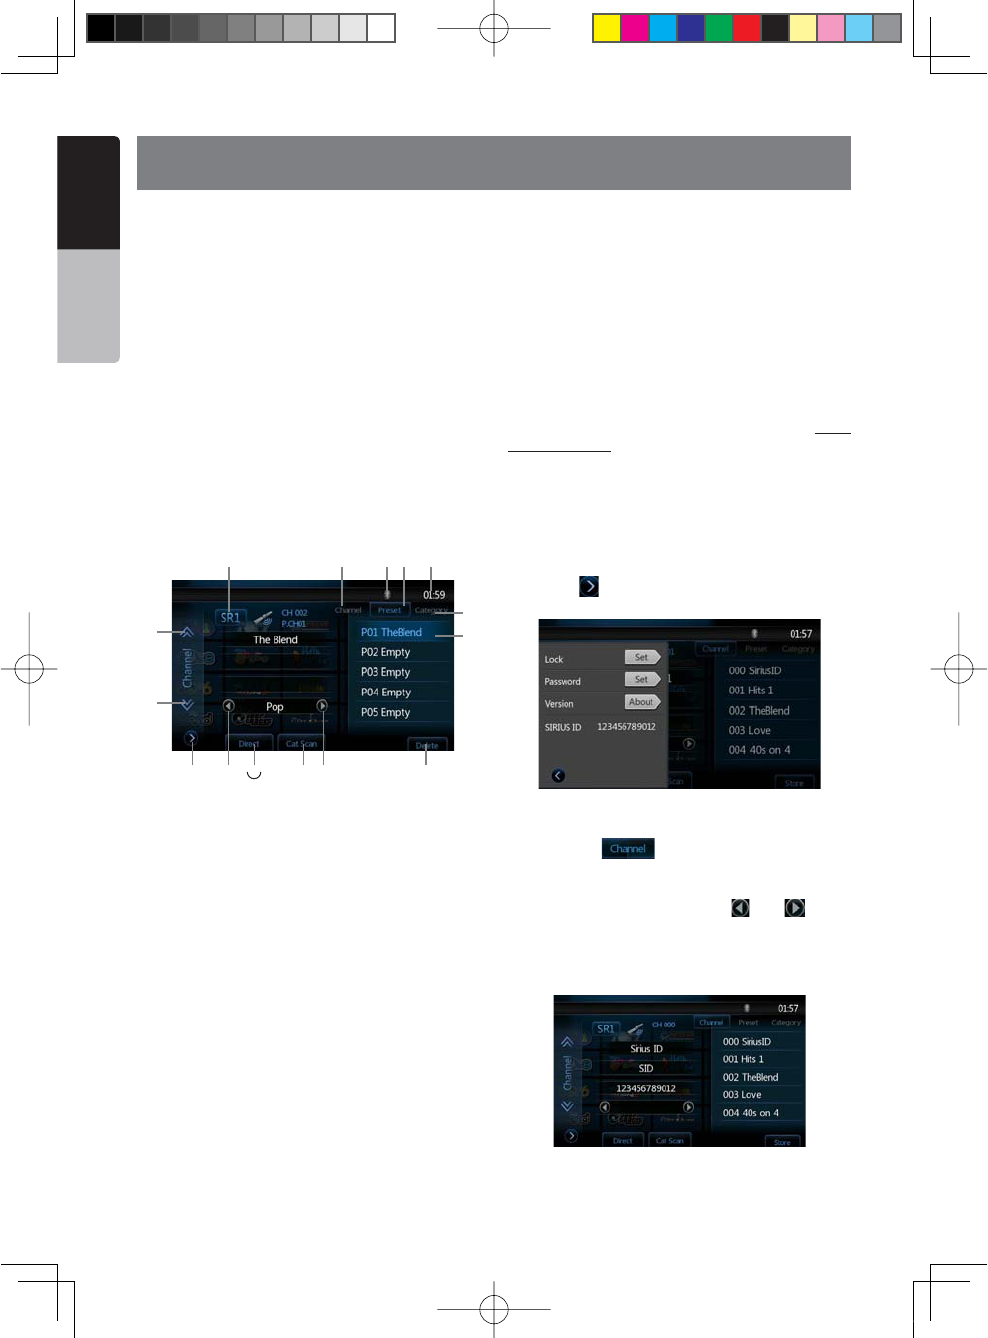
46 NX501/NZ501
English
Owner’s Manual
17. SIRIUS SATELLITE RADIO OPERATIONS
This function is available when a SIRIUS Satellite Radio
Tuner is connected through the dedicated connection.
This unit requires the following receiver:
3)2)53#ONNECT©6EHICLE4UNER3##
Note:
SIRIUS Satellite Radio is a subscription service.
Please contact SIRIUS Radio to begin or alter your
subscription:
s)NTERNETWWWSIRIUSCOM
s4ELEPHONE3)2)53
Selecting a Satellite Radio mode
Press the [SIRIUS] button on Main Menu display. The
system changes to the SIRIUS Satellite Radio mode.
The SIRIUS mode screen is displayed.
1-Setting Button
2-Previous Category Button
+EYPAD"UTTON
4-Category Scan Button
5-Next Category Button
6-Store/Delete Button
7-Band Button
8-Channel List Button
9-Bluetooth Status Display
10-Preset List Button
11-System Time
12-Category List Button
13-List Display
14-Previous Channel Button
15-Next Channel Button
Information Displayed During Reception
The following information is displayed when the
satellite radio cannot be received normally.
s7HENTHERECEIVERISTURNEDONTHElRSTTIMEORAFTER
ARESETh50$!4).'vFOLLOWEDBYAPERCENTAGEOF
completion.
s7HENACHANNEL ISBEINGTUNEDINNO SIGNAL ISYET
RECEIVEDh!#15)2).'3)'.!,v
s!CHANNELWITHOUT ABROADCASTHAS BEENSELECTED
h).6!,)$#(!..%,v
s!CHANNELNOT COVEREDBYYOUR CONTRACThCALL
888-539-SIRIUS”
Call (888) 539-747487 to activate your radio or change
your subscription package.
s7HENTHEANTENNAIS DISCONNECTEDORHASBEEN
DAMAGEDh!.4%..!%22/2v
Confirming Your SIRIUS ID
Touch the [ =BUTTONON THE 3)2)53-ENUDISPLAYTO
enter Settings menu.
Channel Selection
1. Touch the [ = BUTTONONTHE3)2)53-ENU
display to enter channel list preview mode. You can
select any channels in list directly.
2. Select the channel with the [ =OR ; =/NLY
channels that can be received are selected. Channels
that are locked and channels not covered by the
contract will be skipped. The receiver seeks the next
available channel below or above the current channel.
3 64
8 9
1
13
12
7
2 5
11
15
14
10
1;B1=࣫㕢⠜䇈ᯢкLQGG
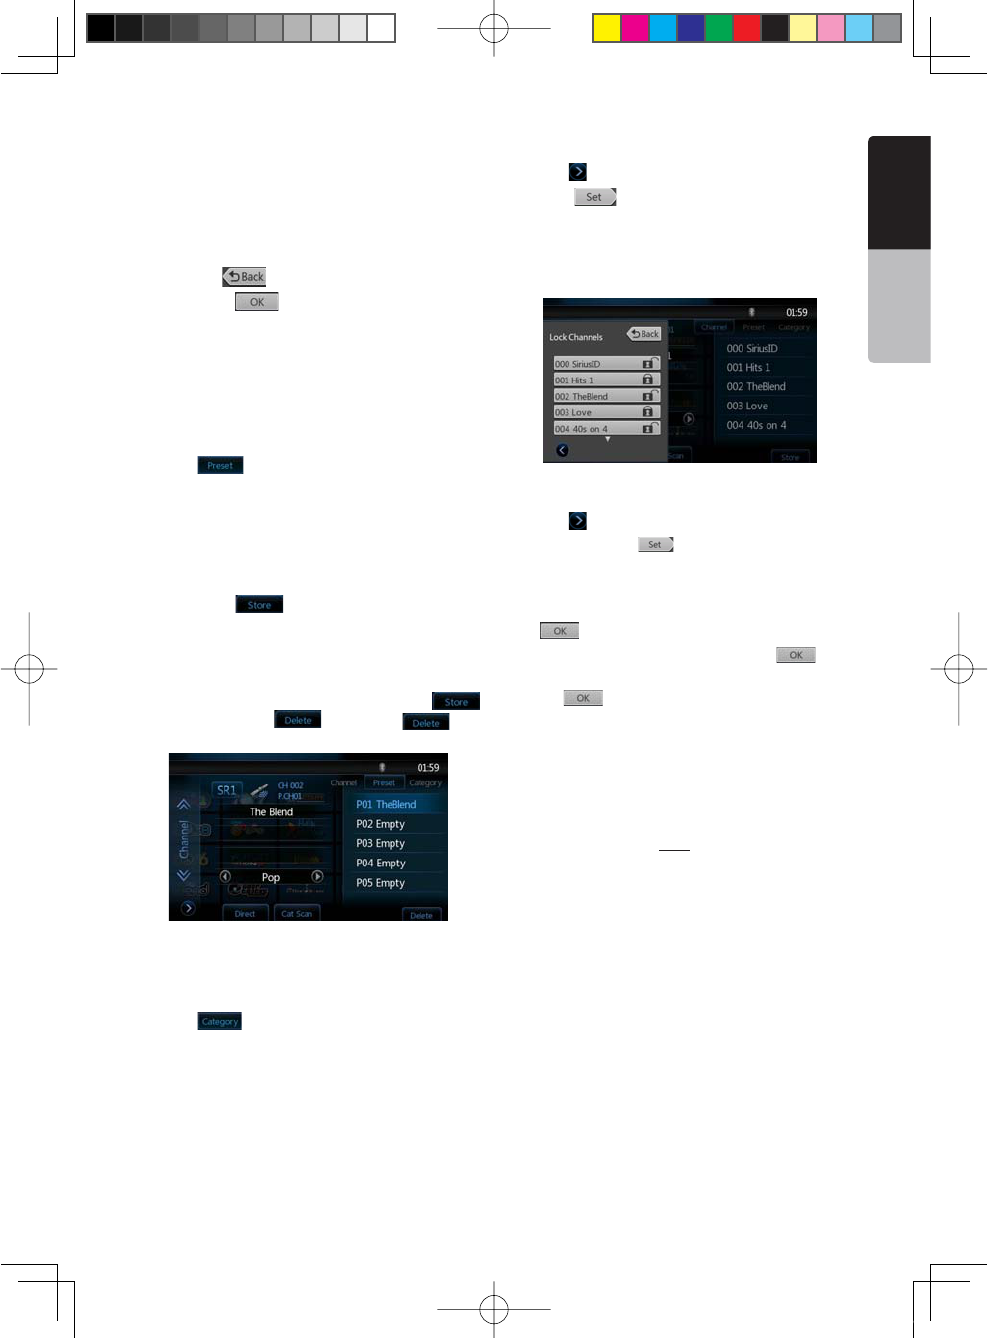
NX501/NZ501 47
English
English
Owner’s Manual
Channel Selection with the channel number
1. Touch the direct access button on the SIRIUS Menu
display to enter direct channel selection.
2. Enter the channel number of your desired station by
TOUCHINGTHE;=TO;=KEYS
If you enter a wrong number, you can cancel it by
touching the [ =KEY
3. Touch the [ = KEY4HERADIO CHANNELYOU
entered will be tuned.
Presets Channel Selection with the channel number
A total of 20 satellite radio stations each band can be
stored in the receiver’s memory. You can access the
presets by pressing the Presets button. This allows
you to store your favorite satellite radio stations in the
memory for later recall.
1. Touch [ =BUTTONANDENTERTHEPRESETMENU
2. When the desired radio station is not displayed,
press and glide the track list up or down.
Preset Store
1. Touch and hold the corresponding preset key for
more than 2 seconds to save the current channel.
2. Touch the [ =BUTTONTOSAVE THECURRENT
channel to the first empty place in presets list.
Deleting a Preset
If current channel is already in presets list, the [
=KEYWILLBECOMETO; =KEYPRESS; =KEY
to remove current channel from presets list.
Receiving Stations by Category
Satellite Radio allows you to select broadcast channel
category (contents).
1. Touch [ =BUTTONTOENTERCATEGORYMODE
2. Press and flick the category list up or down.
3. Touch the desired category item key to enter
channel lists belonging to this category.
4. Select the desired channel by touching it
momentarily on the list.
5. Right flick this channel list to go back to category
list.
Parental Controls Lock Channels
1. Touch [ =BUTTONTOENTERSETTINGPAGE
2. Touch [ =BUTTON IN,OCKITEMTOENTERPASS
code screen, enter the right code to enter lock list.
3. Press and flick the track list up or down.
4. Touch the channel item, and it will be locked or
unlocked alternately.
Setting the password
1. Touch [ =BUTTONTOENTERSETTINGPAGE
2. Touch Password [ =BUTTON
3. Touch the ten key (0 to 9) to input a 4-digit
Password.
sInput the old password or "4356" ,and touch the
[=KEY
sInput a new password, and touch the [ =KEY
sInput the same new password again, and touch
the [ =KEY
Note:
9OUMUST INPUTTHECORRECTCODETO ENTERLOCKLIST
When you try to tune to a locked channel by direct tune
keypad, it will display password keypad. Only entering
correct code can tune to that channel, otherwise it will
go back to the previous channel.
The default pass code is 0000.
1;B1=࣫㕢⠜䇈ᯢкLQGG
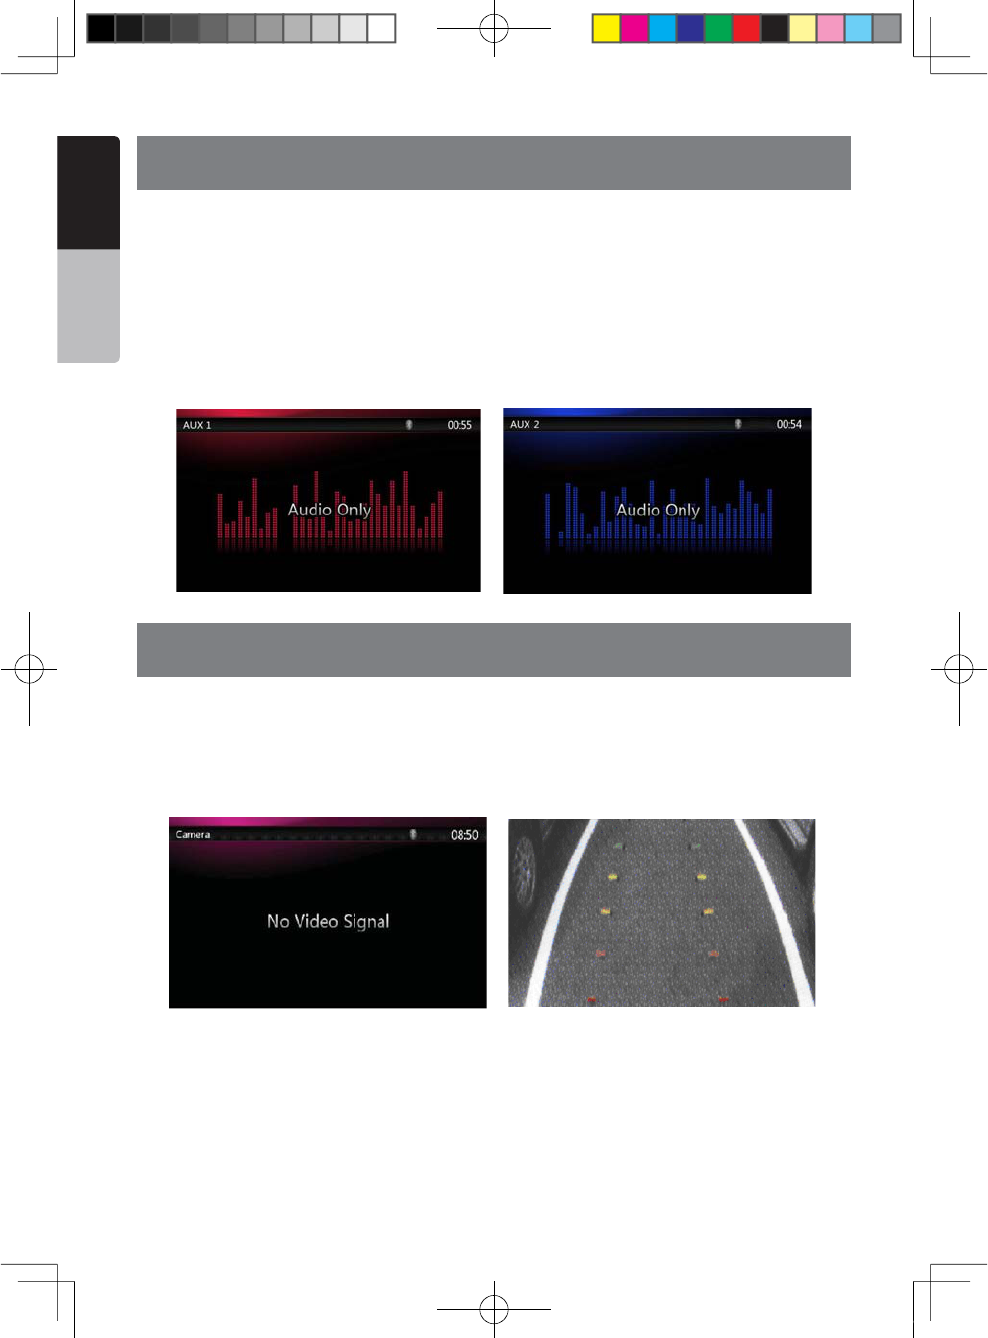
48 NX501/NZ501
English
Owner’s Manual
18. AUX 1 / AUX 2 OPERATIONS
External peripheral devices, including a game console, camcorder, iPod/iPhone, etc. can be connected to the AUX
1 or AUX 2 connector on the front or back of this unit using the A/V media cables.
Switching to AUX IN / AV IN mode
sPress [AUX 1] or [AUX 2] button on Main Menu to select desired mode (when unit is reading). If the external
device connected to AUX 1or AUX 2 input have audio signal, the unit will broadcast audio of external device.
sPress [Menu] button on Operational Panel to return to the Main Menu.
You cannot directly control external devices connected to AUX 1or AUX 2 input.
19. CAMERA IN OPERATIONS
Switching to Camera mode
Press [Camera] button on Main Menu to select desired mode.
4HE,#$WILLDISPLAYTHEEXTERNALCAMERAVIDEO4HESCREENWILLDISPLAYh.O6IDEO3IGNALvMENUIFAVALIDCAMERA
is not connect to this head unit.
Press Menu button on Operational Panel to return to the Main Menu.
Note:
If the reverse cable is connected correctly to the car, the center unit to switch to camera mode automatically when the
car is in reverses.
1;B1=࣫㕢⠜䇈ᯢкLQGG
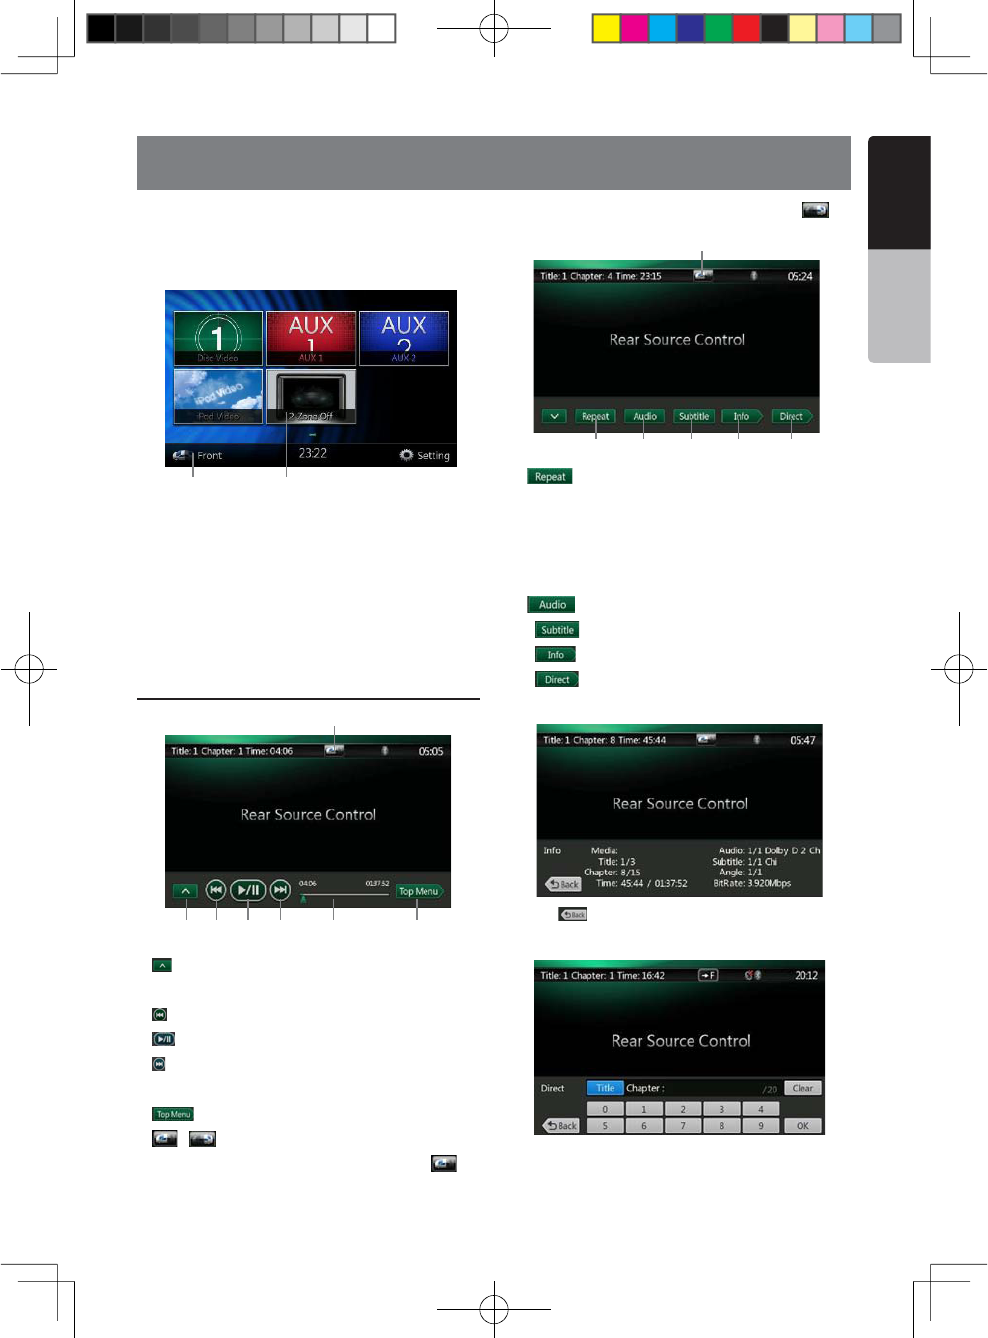
NX501/NZ501 49
English
English
Owner’s Manual
20. REAR SOURCE OPERATIONS
If rear monitors are installed in the rear seat and
connected to the rear zone AV output, passengers in
the back seats can watch the DVD/iPod Video/AUX1/
AUX2 video separately from front source.
1.Press the button to access the rear source menu.
2.Press the button again to back to front source menu.
Multi-Zone Operation
Independent sources can be played simultaneously
on the unit. For example, a FM/AM console can be
playback on the front screen while DVD video is
available to rear passengers. But now you can’t select
DVD video in front.
DVD Video in Rear
1.[ =.EXT2OW"UTTONS
Press the button can display the hidden button.
2.[ =0REVIOUSCHAPTER
3.[ =0LAYOR0AUSEVIDEO
4.[ =.EXTCHAPTER
5. Elapsed playing time indicator.
6.[ =4OP-ENU"UTTON
7.[ =; =&RONT2EARSWITCHINGBUTTON
If the screen displays Rear Source, press [ = TO
switch to Front Source.
If the screen displays Front Source, Press [ =TO
switch to Rear Source.
8. [ =2EPEATSWITCHING"UTTON
Use to repeat the Title or Chapter.
Press once to start Chapter repeat. Press again to
activate Title repeat. To turn repeat off, press same
button again. Repeat symbols are displayed in the
info window in the upper left area of the screen.
9. [ =!UDIO#HANNELSWITCHING"UTTON
10. [ =3UBTITLESWITCHING"UTTON
11. [ =).&/"UTTON
12. [ =$IRECTCHAPTERORTITLESEARCHING"UTTON
DVD Video Rear Source Control Info mode.
Press [ =BUTTONTORETURN
DVD Video Rear Source Control Direct mode.
NOTE: -OREDETAILPLEASE REFERTO$6$6IDEO&RONT
source.
1 2
1 2
7
3 4 5 6
8 9
7
10 11 12
1;B1=࣫㕢⠜䇈ᯢкLQGG
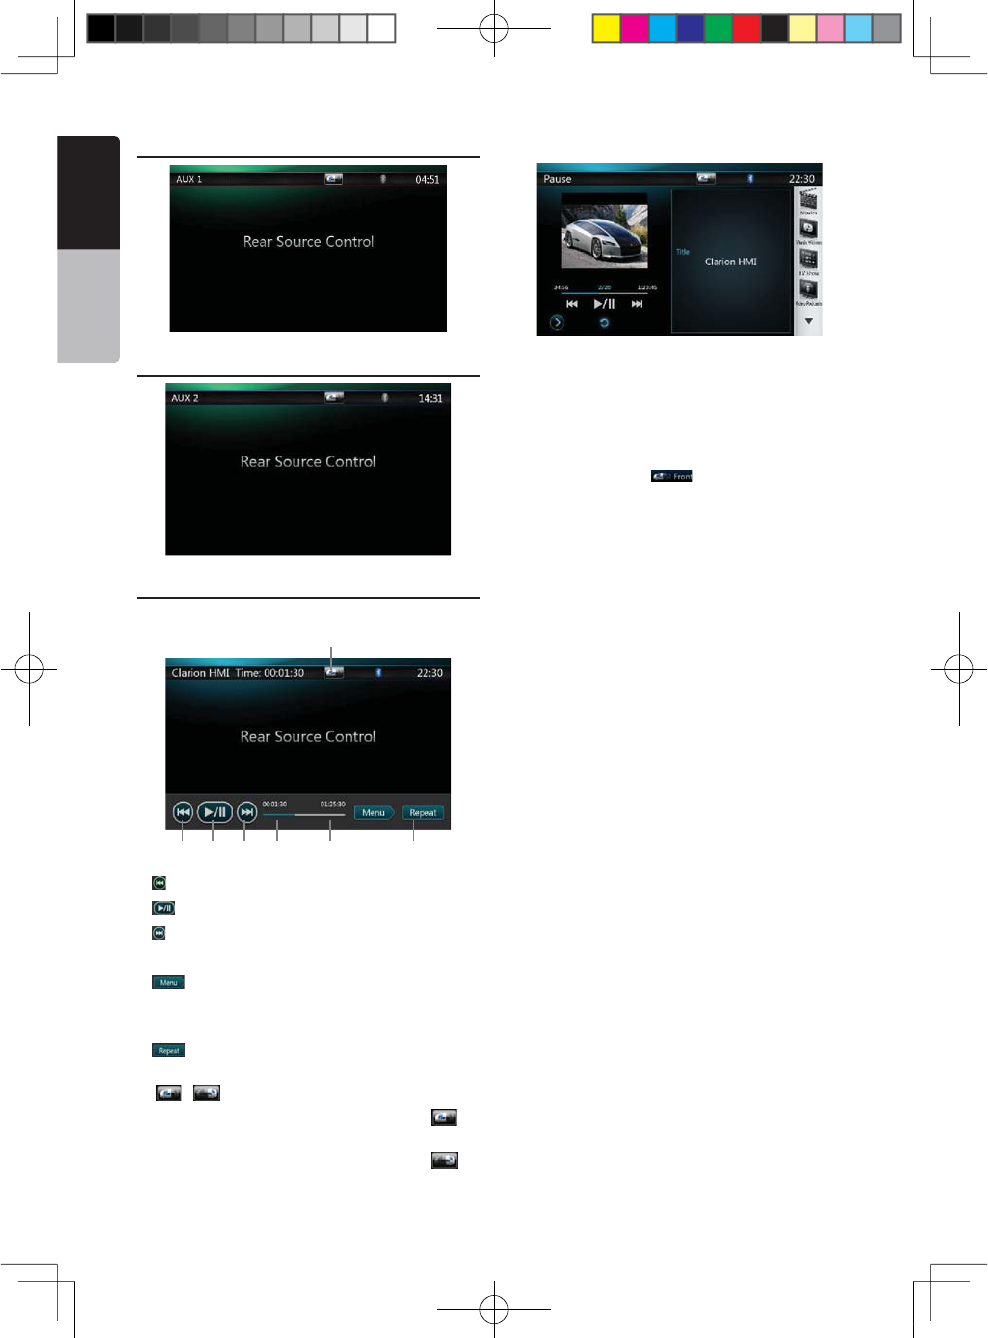
50 NX501/NZ501
English
Owner’s Manual
AUX 1 in Rear
AUX 2 in Rear
iPod Video in Rear
iPod Video Rear Source Control Play Mode
1 2
7
3 4 5 6
1.[ =0REVIOUSlLE
2.[ =0LAYOR0AUSEVIDEO
3.[ =.EXTlLE
4.Elapsed playing time indicator.
5.[ =-ENU
Press the Menu button can display the iPod Video
Rear Source mode screen.
6.[ =2EPEAT"UTTON3AMEASI0ODFUNCTIONOFFRONT
source )
7. [ =; =&RONT2EARBUTTON
If the screen displays Rear Source, press [ = TO
switch to Front Source.
If the screen displays Front Source, Press [ =TO
switch to Rear Source.
iPod Video Rear Source ID3 Mode
NOTE:
If the source is selected as the front, the source in rear
can’t be selected.
If the source is selected as the rear, the source in front
can’t be selected.
0RESSTHE&RONT"UTTON to access the front main
menu but the rear source will keep running.
1;B1=࣫㕢⠜䇈ᯢкLQGG
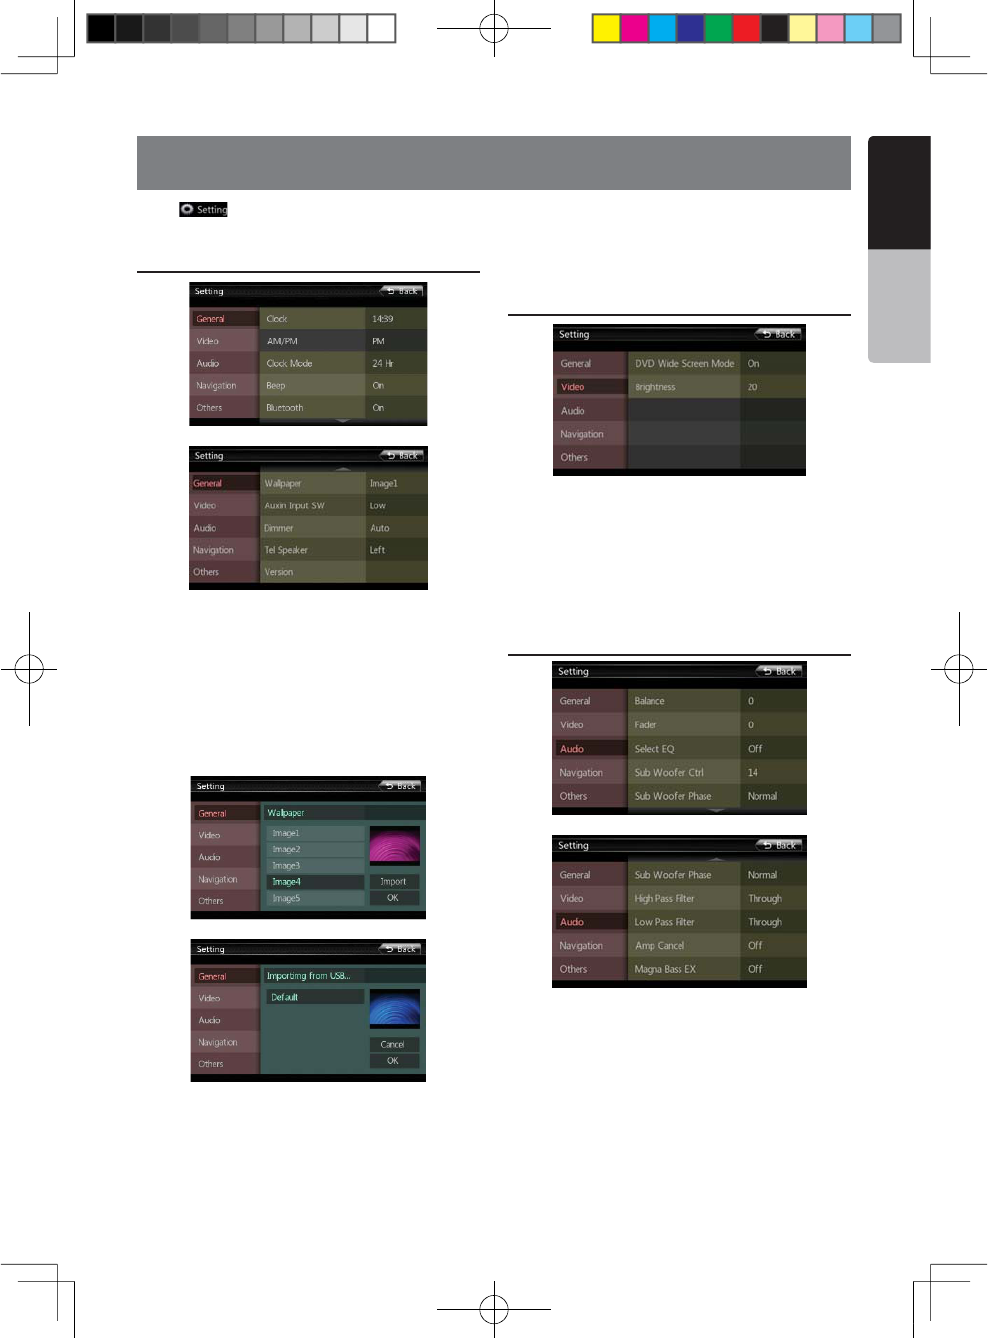
NX501/NZ501 51
English
English
Owner’s Manual
21. SETTING OPERATIONS
Press [ =BUTTONONTHE-AINMENUSCREEN
The Setting menu screen will be displayed.
General Setup Menu
Clock: Set system clock.
AM/PM: Set AM or PM when current time mode is
12HR mode.
Clock Mode: Set the time display mode.
Beep: Turn on or turn off the beep confirmation sound.
Bluetooth: Set the Bluetooth ON or OFF.
Wallpaper: Choose the desired wallpaper.
Auxin Input SW: Auxin input switch, including Low,
Mid, High.
Dimmer: There are three options, Day, Night and Auto.
Tel Speaker: There are two options, Left and Right.
For example, if current setting is Left, when BT phone
is coming in, only left speaker can hear the phone.
Version: Display the software version information.
Video Setup Menu
This menu includes: DVD Wide Screen Mode;
Brightness.
DVD Wide Screen Mode: Set the DVD wide screen
mode on or off.
Brightness: Set brightness value from 0 to 20.
Audio Setup Menu
4HISMENUINCLUDES"ALANCE&ADER3ELECT%13UB
Woofer Ctrl, Sub Woofer Phase, High Pass Filter, low
Pass Filter, Amp Cancel and Magna Bass EX.
Balance: Choose the desired volume for left and right
speaker.
Fader: Choose the desired volume for front and rear
speaker.
Select EQ: Choose the desired mode: Bass Boost,
Impact, Excite, Custom and OFF.
1;B1=࣫㕢⠜䇈ᯢкLQGG
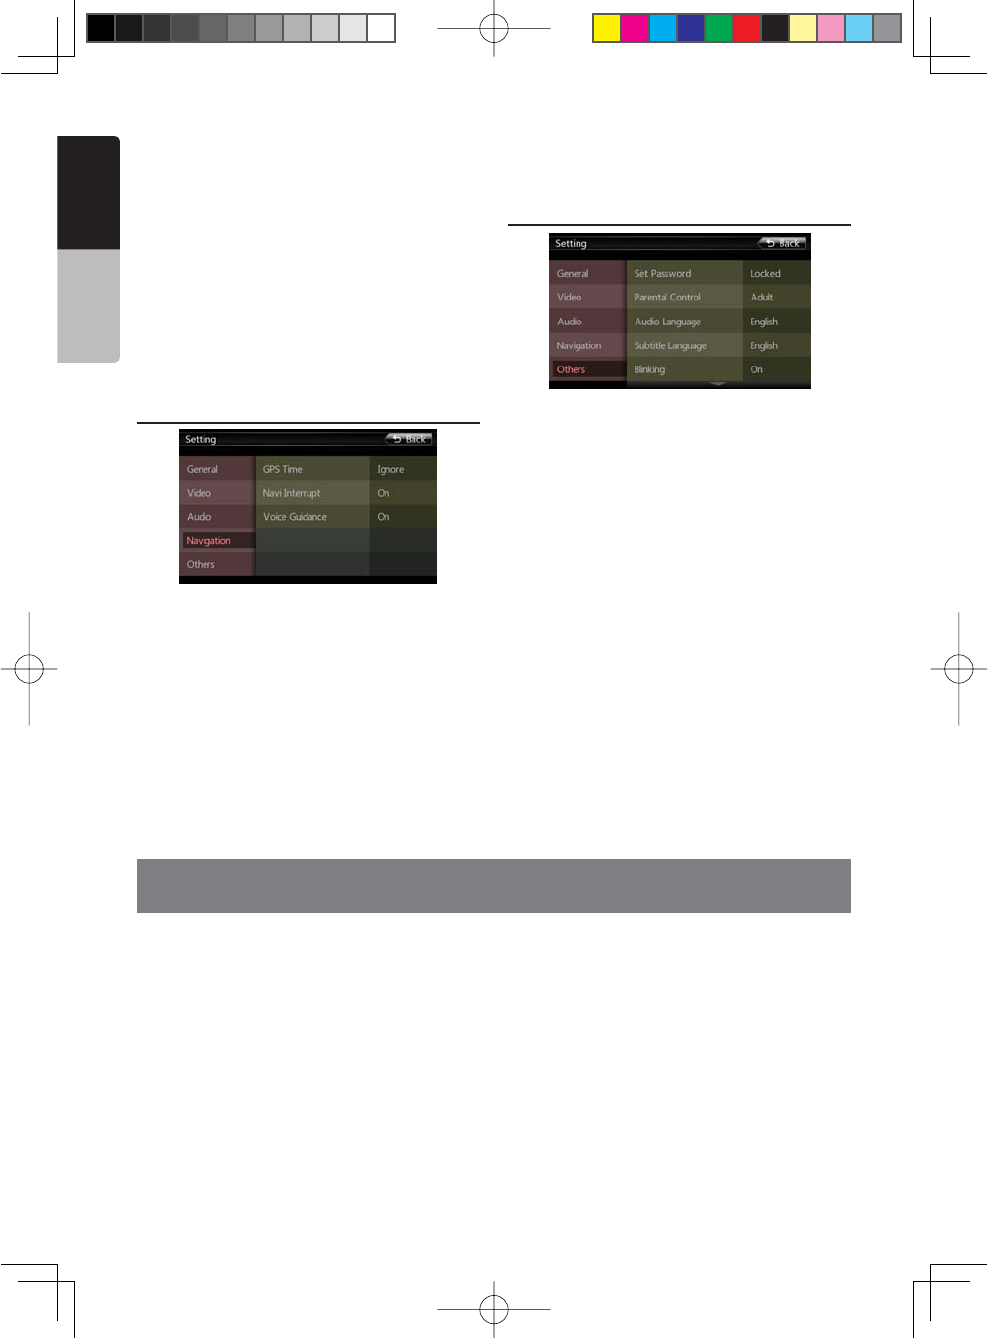
52 NX501/NZ501
English
Owner’s Manual
Sub Woofer Ctrl: Choose the desired sub woofer gain
from 0 to 14.
Sub Woofer Phase: Choose the sub woofer phase
normal or reverse.
High Pass Filter: Choose the high pass filter
62Hz/95Hz/135Hz/through.
Low Pass Filter: Choose the low pass filter
through/62Hz/95Hz/135Hz.
Amp Cancel: Choose the amplifier audio output on or
off.
Magna Bass EX: Choose the loudness on or off.
Navigation Setup Menu
This menu includes: GPS Time, Navi Interrupt, and
Voice Guidance
GPS Time: Set the system time to be synchronized
with GPS local time or not.
Navi Interrupt: There are three choose: On/Popup/
/FFh/Nv 4HENAVIGATIONSCREENWILLCOVERTO!6
SCREENWHENREACHINGSOMEKEYPOINTh0OPUPv7HEN
small turn info window will pop up in the top of the
!6SCREENTOINDICATETHEKEYPOINTh/FFv4URNOFFTHIS
function.
Voice Guidance: Enable or disable the navigation
voice guidance.
Others Setup Menu
This menu include: Set Password; Parental control,
Audio Language,Subtitle Language,Blinking, TS
Calibrate, and Load Factory.
Set password: Set the password for DVD parental
control.
Parental control: Set the rating of the age. It contains
+ID3AFE'0'0'0'22.#!DULT
Audio Language:Set the Language for DVD Audio.
Subtitle Language:Set the Language for DVD subtitle.
Blinking: Choose the blinking ON or OFF.
TS Calibrate: The function of it is to select the Touch
Screen Calibrate YES or NO.
Load Factory: The function is to select to load factory
default or not.
22. MONITOR OFF
,ONG0RESS-ENUBUTTONON/PERATIONAL 0ANELFORSECONDSIT WILLSHOWh-ONITOROFFxx4OUCH THESCREENTO
return” and then the head unit will turn off the TFT screen. Touch any place of the screen, the TFT screen will turn
on again.
1;B1=࣫㕢⠜䇈ᯢкLQGG
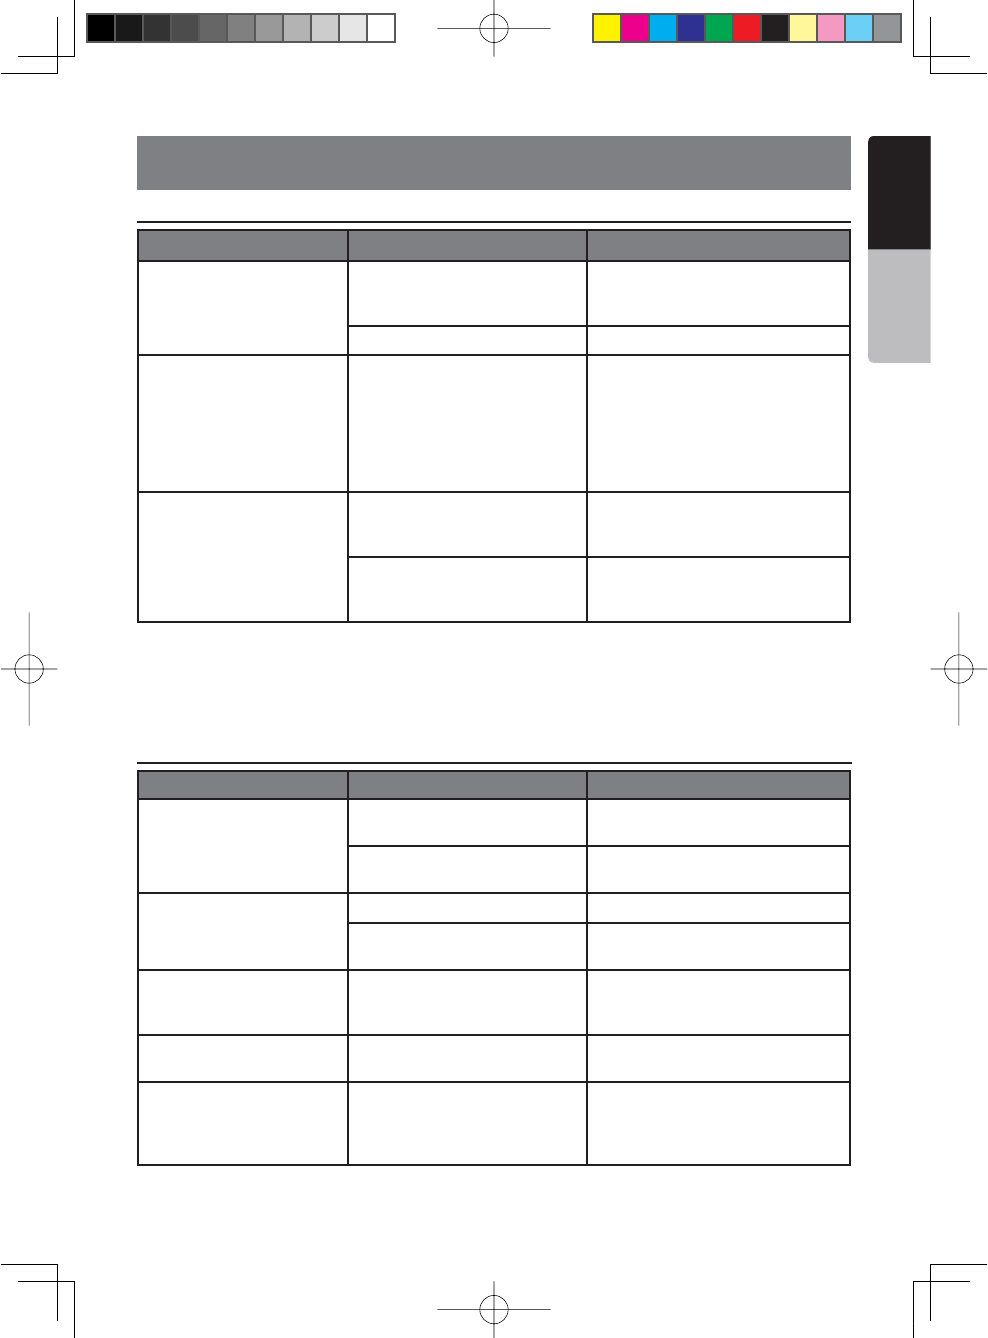
NX501/NZ501 53
English
English
Owner’s Manual
23. TROUBLESHOOTING
GENERAL
DVD PLAYER
Problem Cause Measure
Power does not turn on. (No
sound is produced.)
Fuse is blown.
Replace with a fuse of the same
amperage. If the fuse blows again,
consult your store of purchase.
Incorrect wiring. Consult your installation center.
Nothing happens when buttons
are pressed.
Display is not accurate.
The microprocessor has
malfunctioned due to noise, etc.
Press the reset button with a thin rod.
Note:
When the Reset button is pressed, turn
off the power.
* When the Reset button is pressed,
frequencies of radio stations, titles, etc.
stored in memory are cleared.
The remote control unit does
not work.
Direct rays of the sun fall on the
light-receptive part of the remote
control unit.
When direct rays of the sun fall on
the light-receptive part of the remote
control unit, it may not work.
The battery of the remote control
unit is dead or there is no battery in
the remote control unit.
Check the battery of the remote control
unit.
Problem Cause Measure
Disc cannot be loaded.
A disc is already loaded. Eject the disc before loading the new
one.
There is foreign matter already in
the disc slot.
Remove the foreign matter, or consult a
service station.
Sound skips or is noisy.
Disc is dirty. Clean the disc with a soft cloth.
Disc is heavily scratched or
warped. Replace with a disc in good condition.
Sound is bad directly after
power is turned on.
Condensation may form on the
internal lens when the car is parked
in a humid place.
Let dry for about 1 hour with the power
on.
Video images are not
displayed. The parking brake is not engaged. Check that the parking brake is
engaged.
Disc cannot play with the
DISPLAYh0!2%.4!,
6)/,!4)/.” shown.
Feature exceeds set parental level.
Release the view limitation or change
the parental level.
3EETHESUBSECTIONh3ETTINGUPTHE
parental level”
1;B1=࣫㕢⠜䇈ᯢкLQGG
54 NX501/NZ501
English
Owner’s Manual
USB DEVICE
Problem Cause Measure
USB device cannot be inserted.
The USB device has been inserted
with wrong direction.
Reversing the connection direction
of the USB device, try it again.
The USB connector is broken. Replace with a new USB device.
USB device is not recognized.
The USB device is damaged. Disconnect the USB device and
reconnect. If the device is still not
recognized, try replacing with a
different USB device.
Connectors are loose.
No sound heard and no file display
on file list
No MP3/WMA file is stored in the
USB device.
Store these files properly in the
USB device.
Sound skips or is noisy. MP3/WMA files are not encoded
properly.
Use MP3/WMA files encoded
properly.
The iPod/iPhone’s video
image is disturbed.
The TV Signal setting of the iPod/
iPhone is not set correctly.
Set the TV Signal setting (NTSC/
PAL) of the iPod/iPhone
correctly.
Bluetooth
Problem Cause Measure
Cannot pair the Bluetooth enable
device with the car audio system.
The device does not support the
profiles required for the system. Use another device to connect.
The Bluetooth function of the
device is not enabled.
Refer to the user manual of the
device for how to enable the
function.
The audio quality is poor after
connection with a Bluetooth
enabled device.
The microphone is not correctly
positioned.
Use optional external microphone
and adjust the position of it.
The Bluetooth reception is poor.
Move the device closer to the
car audio system or remove any
obstacle between the device and
the system.
1;B1=࣫㕢⠜䇈ᯢкLQGG
NX501/NZ501 55
English
English
Owner’s Manual
TV/VTR (When connecting an optional TV tuner, etc.)
Problem Cause Measure
The image is not
displayed.
The parking brake is not
engaged. Check that the parking brake is engaged.
The display is dark.
The brightness control is too
low. Adjust the brightness properly.
The operating condition is
not good.
The temperature inside the vehicle may be 0 or
lower. Set to an appropriate temperature (25 or so)
and check it again.
The headlight of the vehicle
is lit
The display is made dark at night to prevent the
glare (When the headlight of the vehicle is lit in the
daytime, the display gets dark).
When the VTR is
connected, the image is
disturbed.
Improper NTSC/PAL setting Set the AUTO/PAL/NTSC properly according to the
VTR.
There are red, green, and
blue points in display. --------------------
This is not a failure, but a phenomenon peculiar
to a liquid crystal panel (The liquid crystal panel is
produced according to technology with very high
precision. Note that, though there are effective
pixels of 99.99% or more, pixel missing or normally
lit pixels account for 0.01%).
24. ERROR DISPLAY
If an error occurs, one of the following displays is displayed.
Take the measures described below to solve the problem.
DVD PLAYER
Display Cause Measure
Invalid Disc A disc is caught inside the DVD deck and
is not ejected.
This is a failure of DVD deck’s
mechanism and consult your store
of purchase.
Invalid Disc A disc cannot be played due to scratches,
etc.
Replace with a non-scratched,
non-warped disc.
Invalid Disc A disc is loaded upside- down inside the
DVD deck and does not play.
Eject the disc then reload it
properly.
PARENTAL VIOLATION Parental level error Set the correct Parental level.
Disc Region incorrect Region code error Eject the disc, and replace correct
region code disc.
If an error display other than the ones described above appears, press the Reset button. If the problem persists,
turn off the power and consult your store of purchase.
* When the Reset button is pressed, frequencies of radio stations, titles, etc. stored in memory are cleared.
1;B1=࣫㕢⠜䇈ᯢкLQGG
56 NX501/NZ501
English
Owner’s Manual
25. SPECIFICATIONS
FM Tuner
&REQUENCY2ANGE 87.9 MHz to 107.9 MHz
5SABLE3ENSITIVITY8 dBμV
D"1UIETING3ENSITIVITY 14 dBμV
!LTERNATE#HANNEL3ELECTIVITY 70 dB
3TEREO3EPARATION
25dB(100Hz),30dB(1kHz),25dB(10kHz)
&REQUENCY2ESPONSE 30 Hz to 14kHz
AM Tuner
&REQUENCY2ANGE 530 kHz to 1710 kHz
5SABLE3ENSITIVITY 30 dBμV
DVD Player System
Digital Versatile Disc System with CDDA capable
5SABLEDISCS
DVD video disc, Compact disc
&REQUENCY2ESPONSE 20 Hz to 20 kHz
3OUND.OISE2ATIO95 dbA (1W Ref)
$YNAMIC2ANGE 95 dB (1 kHz)
$ISTORTION0.05%
6IDEOSYSTEMNTSC/PAL
Audio/Video Input
!UDIOINPUTVOLTAGE d 2 Vrms
6IDEOINPUTVOLTAGE 1.0 Vp-p@75
!UDIOINPUTSENSITIVITYAT6OUTPUT
(IGH 325mVrms
-ID 650mVrms
,OW 1.3Vrms
Audio/Video output
6IDEOOUTPUTVOLTAGE1.0Vp-p @75
.83CREEN3IZE 6.2” wide type
0IXELS 1,152,000
2ESOLUTION 800 x 480 x 3 (RGB)
.:3CREEN3IZE 7” wide type
0IXELS 1,152,000
2ESOLUTION 800 x 480 x 3 (RGB)
Bluetooth
3PECIlCATION Bluetooth Ver 2.1+EDR
0ROlLE HFP1.5(Hands Free Profile)
HSP1.0 (Headset Profile)
A2DP (Advanced Audio Distribution Profile)
AVRCP1.2,1.3,1.4 (AV Remote Control Profile)
0OWER#LASS 2
MP3 mode
"ITRATE 32 kbps to 192 kbps
3AMPLINGRATE 11.025kHz, 22.5kHz, 32kHz,
44.1kHz, 48kHz
WMA mode
"ITRATE64 kbps to 192 kbps
3AMPLINGRATE 11.025kHz, 22.5kHz, 32kHz,
44.1kHz, 48kHz
USB
3PECIlCATIONUSB 1.1/2.0 (FS)
0LAYABLEAUDIOFORMAT
MP3(.mp3): MPEG 2/Audio Layer-3
WMA(.wma): Ver 7/8/9.1/9.2
General
0OWERSOURCEVOLTAGE
14.4 VDC (10.5 to 15.8V allowable)
'ROUNDNegative
#URRENTCONSUMPTION4.0 A @1 W
!UTO!NTENNA2ATED#URRENT 500 mA less
Note:
s3PECIlCATIONSCOMPLYWITH*%)4!3TANDARDS
s3PECIlCATIONSANDDESIGNARESUBJECTTOCHANGE
without notice for further improvement.
1;B1=࣫㕢⠜䇈ᯢкLQGG
NX501/NZ501 57
English
English
Owner’s Manual
7”/178mm
6-7/16"/163mm
5-11/16"/145mm
3-15/16"/100
mm 7"/178mm
7-11/16"/195mm
6-1/2"/165mm
2"/
50mm
2”/
52mm
4.9”/124mm
0.47”/12mm
NX501 dimensions:
NX501 weight: 5.29 lb.(2.4kg)
NZ501 dimensions:
NZ501 weight: 5.29 lb.(2.4kg)
Remote Control dimensions:
Remote Control weight:
50 grams (including battery)
Power Output:
19W RMS x 4 Channels at 4
and 1% THD+N
Signal to Noise Ratio:
95dBA (reference: 1W into 4 )
1;B1=࣫㕢⠜䇈ᯢкLQGG
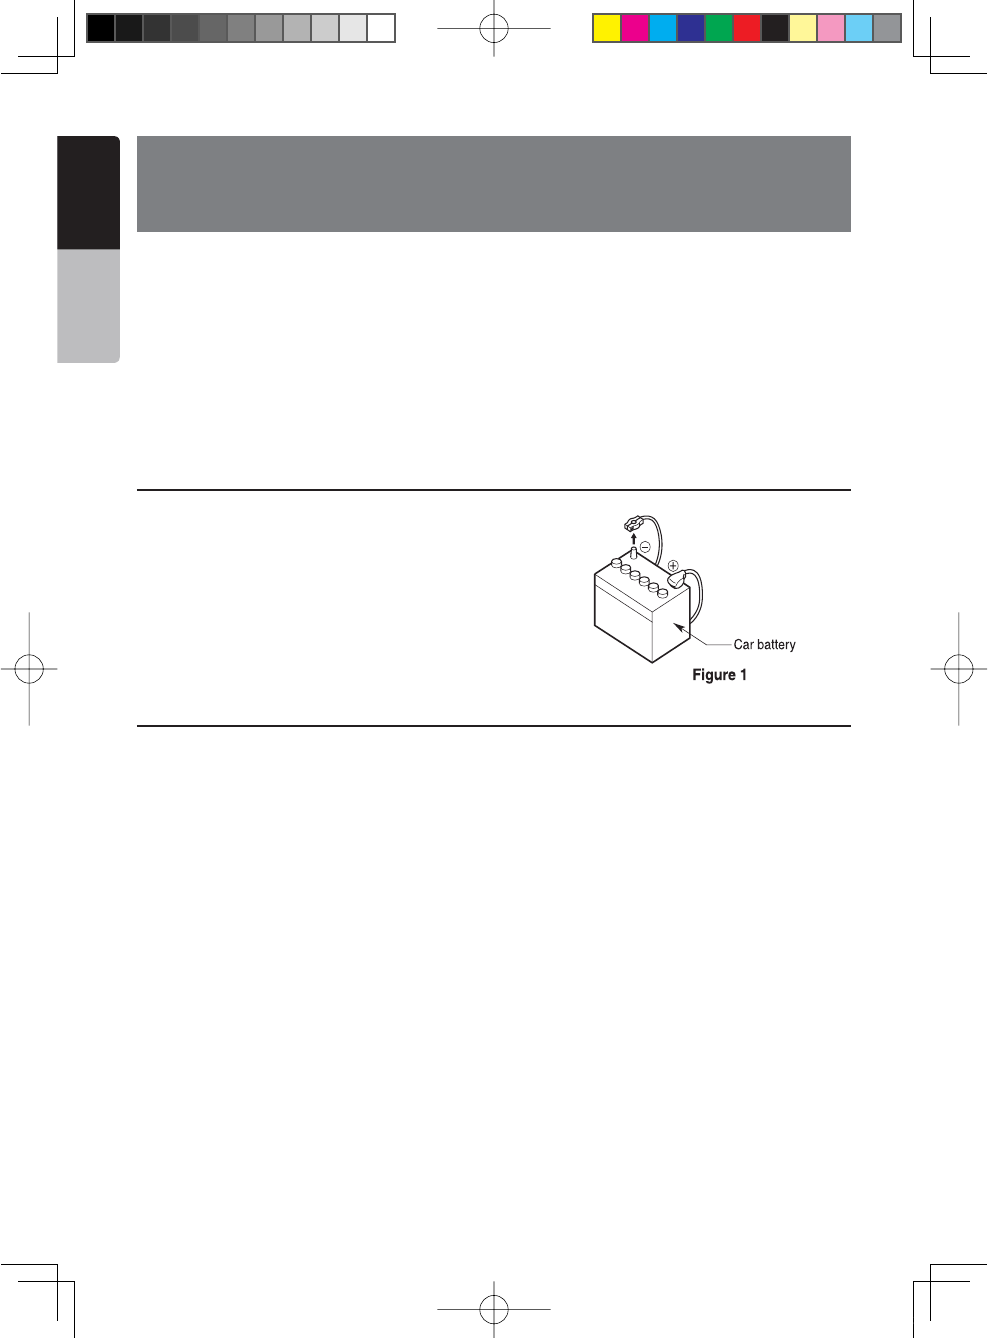
58 NX501/NZ501
English
Owner’s Manual
26. INSTALLATION /WIRE
CONNECTION GUIDE
1. Before Starting
1.This set is exclusively for use in cars with a negative ground
12V power supply.
2.Read these instructions carefully.
"ESURETODISCONNECTTHEBATTERYhvTERMINAL
before starting. This is to prevent short circuits during
installation. (Figure 1)
2. Package Contents
Main unit................................................... 1
Wiring harness.......................................... 1
GPS antenna ............................................ 1
CLAMP for GPS antenna's cable............. 3
DOUBLE FACE TAPE for GPS Antenna ... 1
Remote control unit.................................. 1
Battery (CR2025) ...................................... 1
(Installed in remote control)
Trim ring ................................................... 1
Cleaning cloth........................................... 1
Warranty Card .......................................... 1
Owner’s manual and
Installation manual.................................... 1
Electro tap ................................................ 2
2DIN trim ring 200mm wide
(NX501 only) ............................................. 1
Back Strap (NZ501 only) .......................... 1
Mounting Bracket key
(NZ501 only) ............................................. 2
Flush mount bolts
(NX501)..................................................... 8
(NZ501)..................................................... 4
Hexagon Head Screw
(NX501)..................................................... 8
(NZ501)..................................................... 5
AV cable ................................................... 1
Line out cable (NX501 only)...................... 1
Rear Zone out cable (NX501 only)............ 1
SWI cable (NX501 only)............................ 1
SIRIUS cable (NX501 only)....................... 1
HD Radio cable (NX501 only)................... 1
External Microphone cable
(NX501 only) ............................................. 1
CONTENTS
1. Before Starting .............................................................................................. 58
2. Package Contents.........................................................................................58
3. General Cautions...........................................................................................59
4. Cautions On Installation ................................................................................59
5. Installing The Main Unit.................................................................................60
6. Cautions On Wiring ....................................................................................... 62
7. Wire Connections.......................................................................................... 63
1;B1=࣫㕢⠜䇈ᯢкLQGG
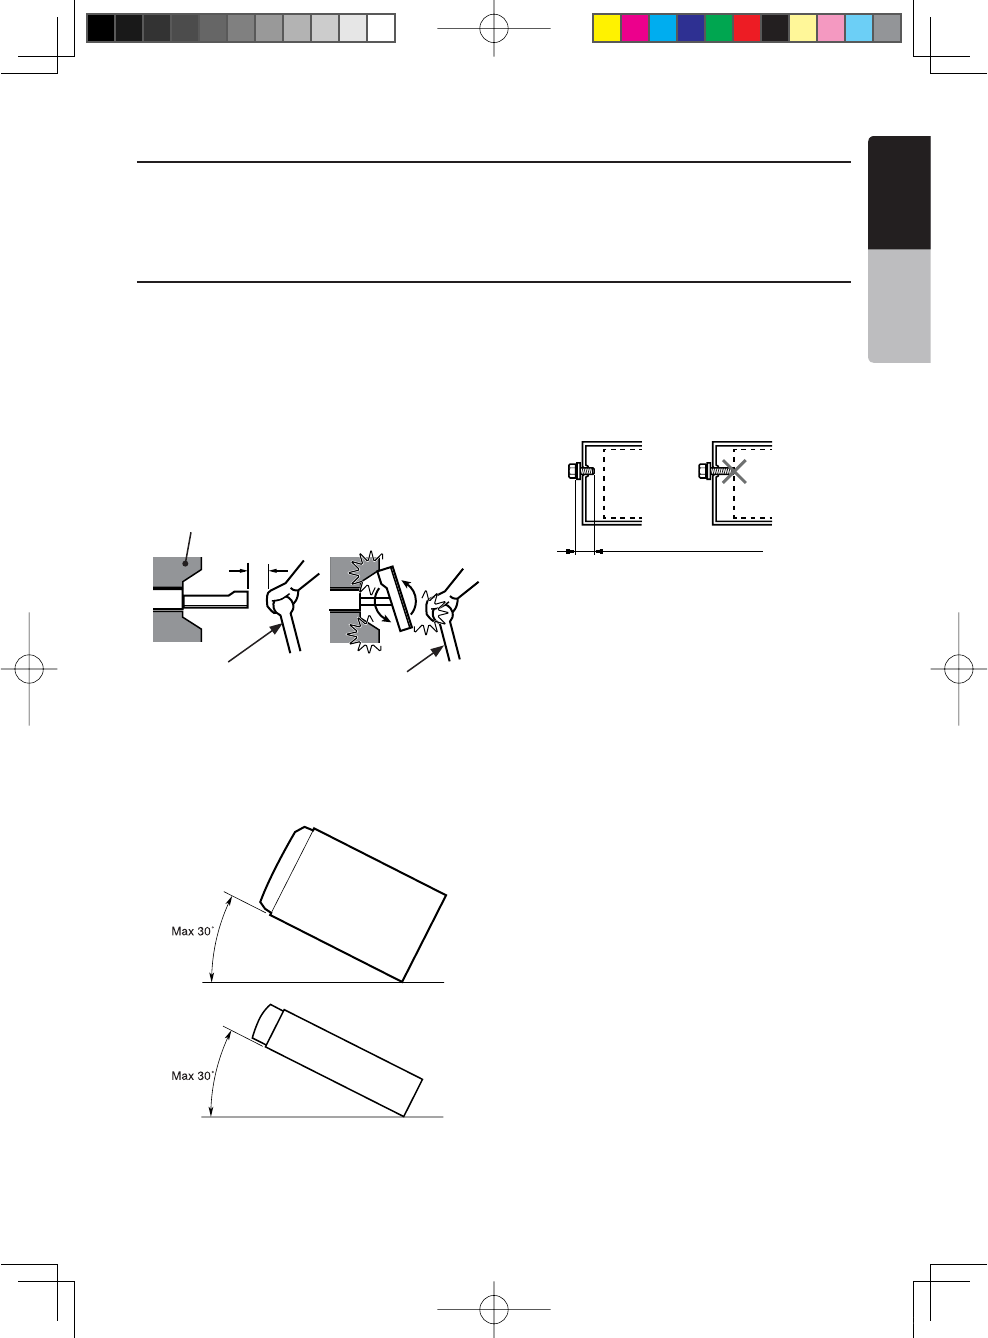
NX501/NZ501 59
English
English
Owner’s Manual
3. General Cautions
1. Do not open the case. There are no user- serviceable
parts inside. If you drop anything into the unit during
installation, consult your dealer or an authorized
Clarion service center.
2. Use a soft, dry cloth to clean the case. Never use
a rough cloth, thinner, benzine, or alcohol etc. For
tough dirt, apply a little cold or warm water to a soft
cloth and wipe off the dirt gently.
4. Cauti
ons on Install
ation
1. Prepare all articles necessary for installing the
source unit before starting.
2. This model features an operation panel that slides
forward.
On some types of cars, the operation panel may
make contact with the dashboard or gearshift
lever, in which cause it cannot be installed. Before
installing, check that the unit will not hamper
operation of the gearshift lever or obstruct your view
before selecting the installation location. (Figure 2)
3. Install the unit within 30° of the horizontal plane.
(Figure 3)
4. If you have to do any work on the car body, such as
drilling holes, consult your car dealer beforehand.
5. Use the enclosed screws for installation. Using other
screws can cause damage. (Figure 4)
Chassis Chassis
Damage
Max. 8 mm (M5 screw)
Figure 4
NX501
NZ501
Figure 3
NZ501
Figure 2
Gearshift lever
(Check that it does not
touch the LCD)
Dashboard
Gearshift lever
1;B1=࣫㕢⠜䇈ᯢкLQGG
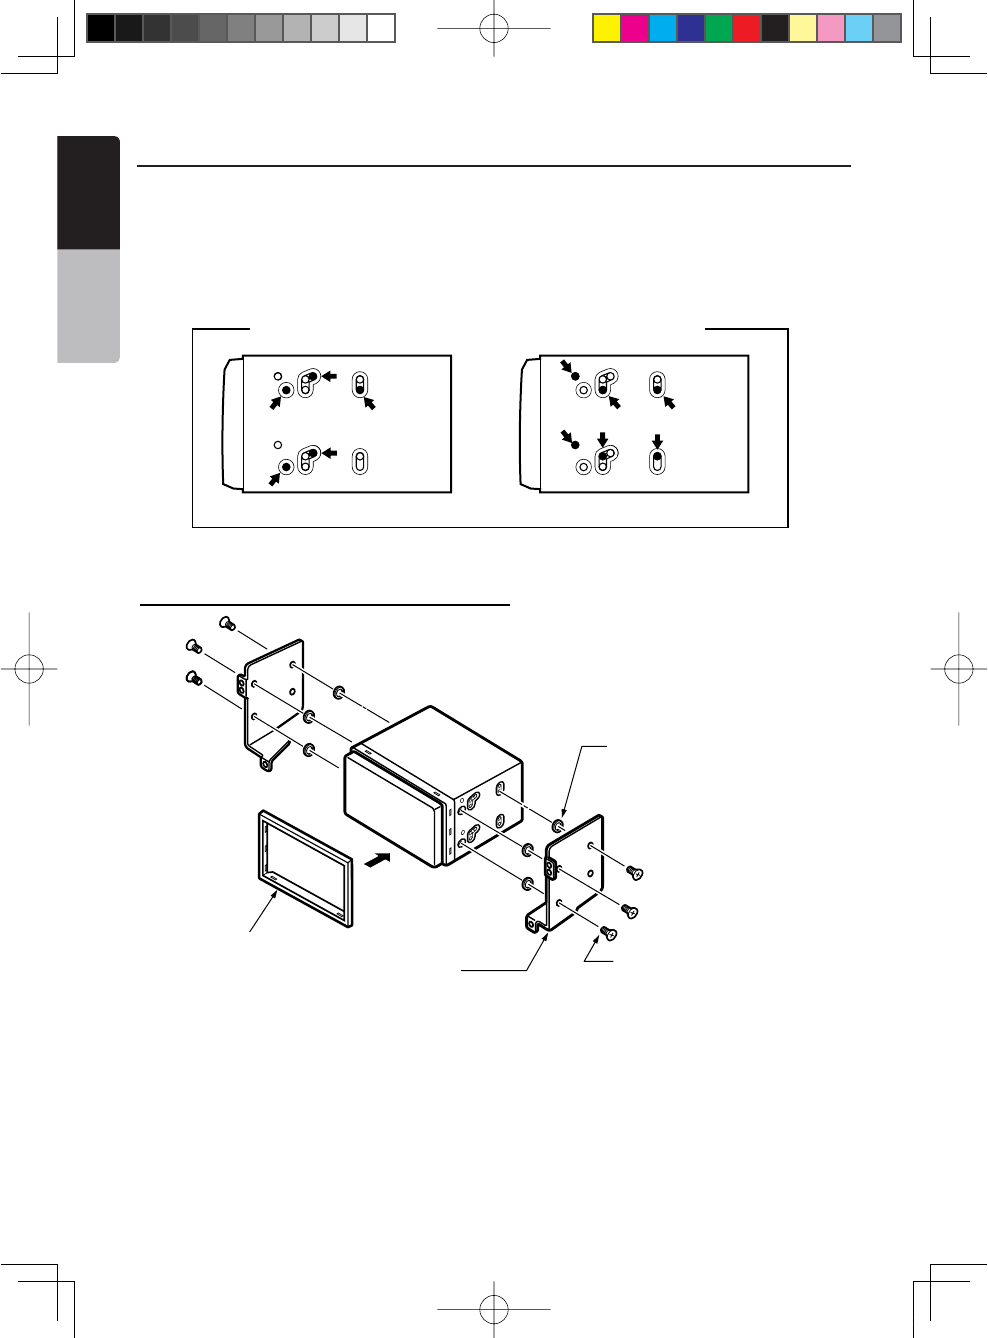
60 NX501/NZ501
English
Owner’s Manual
5. Installing the Main Unit
This unit is designed for fixed installation in the
dashboard.
1. When installing the main unit in NISSAN vehicles,
use the parts attached to the unit and follow the
instructions in Figure 6.
When installing the main unit in TOYOTA vehicles,
use the parts attached to the vehicle and follow the
instructions in Figure 7.
2. Wire as shown in Section 7.
3. Reassemble and secure the unit in the dashboard
and set the face panel and center panel.
For NISSAN vehicle For TOYOTA vehicle
Mounting Screw Holes (Side View of the Main Unit)
Figure 5
Installing the Main Unit in NISSAN Vehicle
Note:
* 1: Position the face panel with its wide edge at the bottom. Fit the edge
into the groove of the main unit.
6-Flat head screw
(M5 8)
(attached to the main unit)
6-Spacer (thickness: 1 mm)
Main Unit
Mounting bracket
(1 pair for the left and right sides)
Figure 6
6- Spacer (thickness: 1mm)
6- Flat head screws
(M5x8)
(Attached to the main unit)
Trim ring
1;B1=࣫㕢⠜䇈ᯢкLQGG
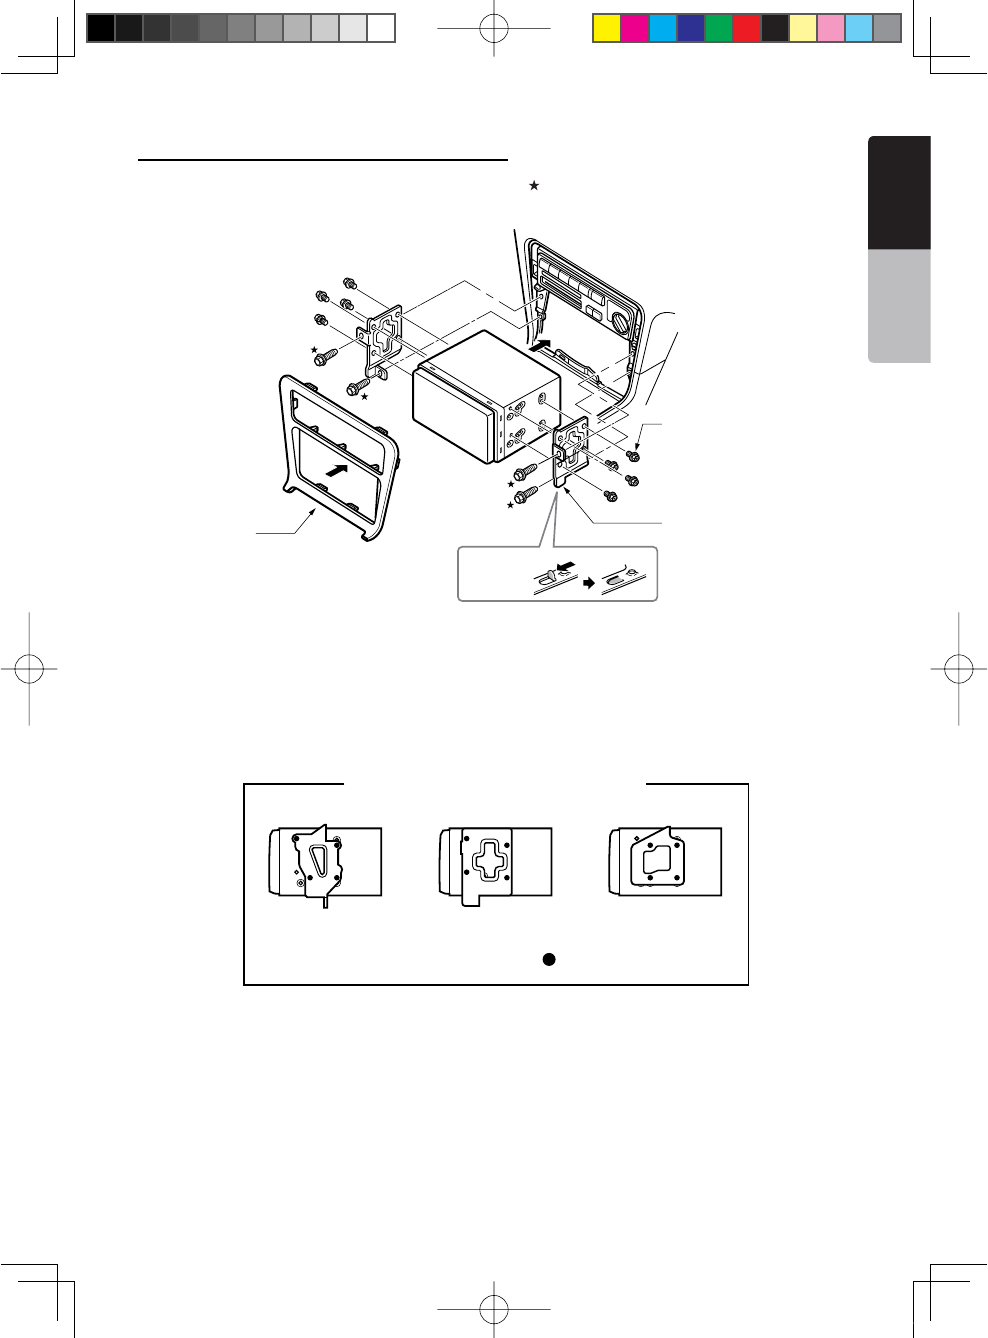
NX501/NZ501 61
English
English
Owner’s Manual
Installing the Main Unit in TOYOTA Vehicle
Install by using parts attached to the vehicle. (Screws marked are attached to the vehicle.)
*2. Some panel openings are too small for the unit
depending on the vehicle type and model. In such
a case, trim the upper and lower sides of the panel
frame by about 0.5 to 1.5 mm so the unit can be
inserted smoothly.
*3. If a hook on the installation bracket interferes with
the unit, bend and flatten it with a nipper or similar
tool.
* 3
Figure 7
Main Unit
8-Hexagonal screw
(M5 8)
Mounting bracket
(1 pair for the left
and right sides)
Center Panel
(*2)
8- Hexagonal screws
(M5x8)
Figure 7
Mounting bracket
(1 pair for the left and
right sides)
Vehicles other than NISSAN and TOYOTA
In some cases the center panel may require modification. (Trimming, filing, etc.)
s2EMOVINGTHE-AIN5NIT
When the main unit is to be removed, disassemble it in the reverse of the order in
h).34!,,).'4(%-!).5.)4v.
3elpmaxE1elpmaxE Example 2
Affix the screws to the marks.
Typical Mounting Brackets
1;B1=࣫㕢⠜䇈ᯢкLQGG
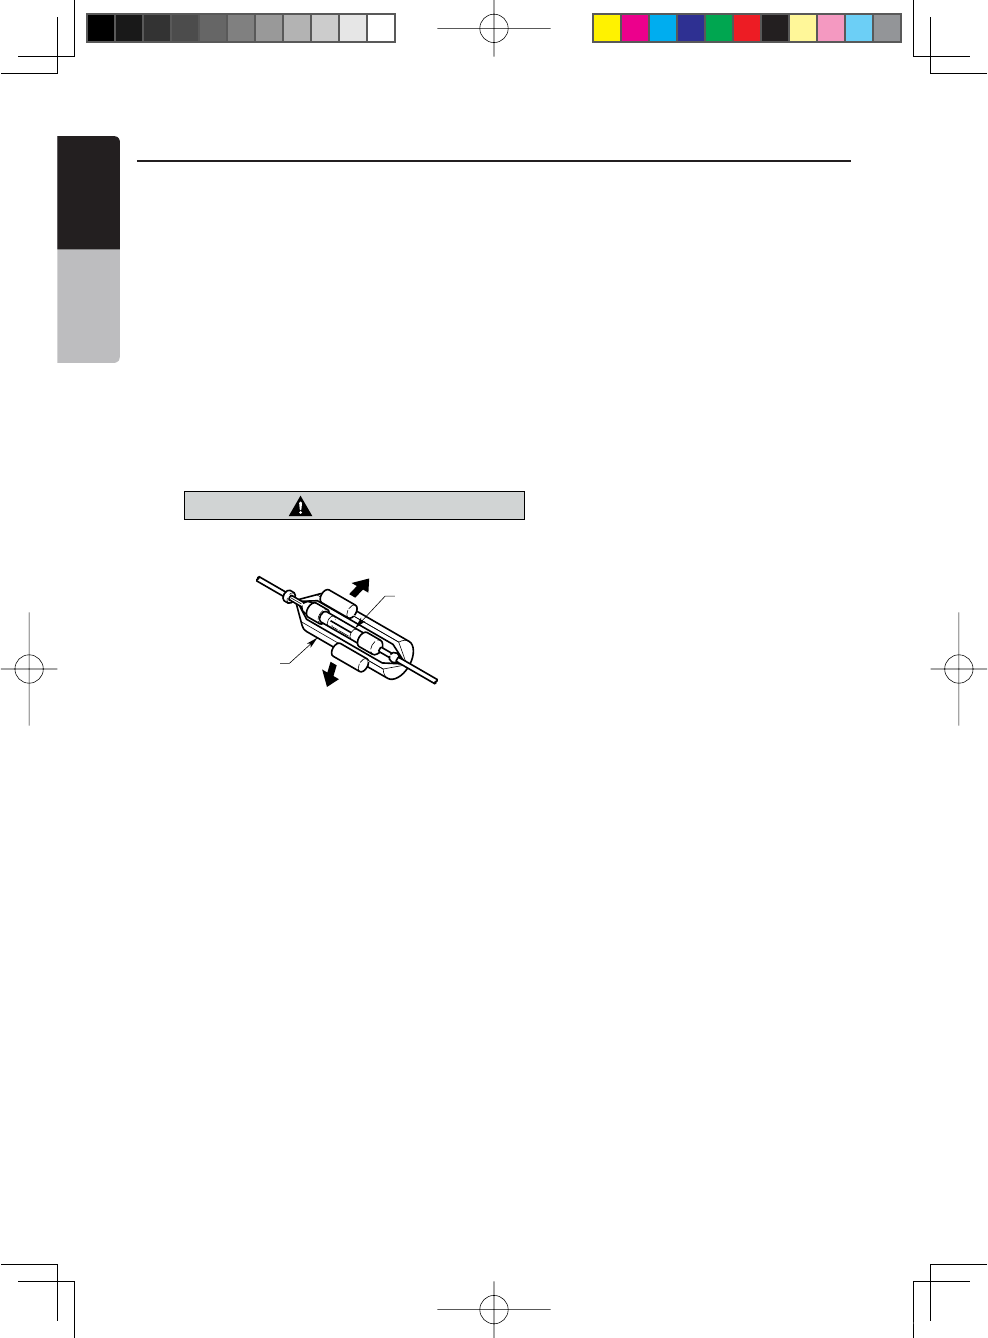
62 NX501/NZ501
English
Owner’s Manual
6. Cautions on Wiring
1. Be sure to turn the power off before wiring.
2. Be particularly careful where you route the wires.
+EEPTHEMWELLAWAYFROMTHEENGINE ANDEXHAUSTPIPEETC(EATMAY
damage the wires.
3. If the fuse should blow, check to see if the wiring is correct.
If a fuse is blown, replace it with a new one of the same amperage rating as
the original (15A FUSE).
4. To replace the fuse, remove the old fuse on the back of the unit and insert the
new one. (Figure 8)
NOTE:
There are various types of fuse holder. Do not let the battery side touch other metal
parts.
CAUTION
caution
After the connection, fix the cord by a clamp
or insulation tape for protection.
Fuse (15A FUSE)
Fuse holder
Figure 8
Figure 8
1;B1=࣫㕢⠜䇈ᯢкLQGG
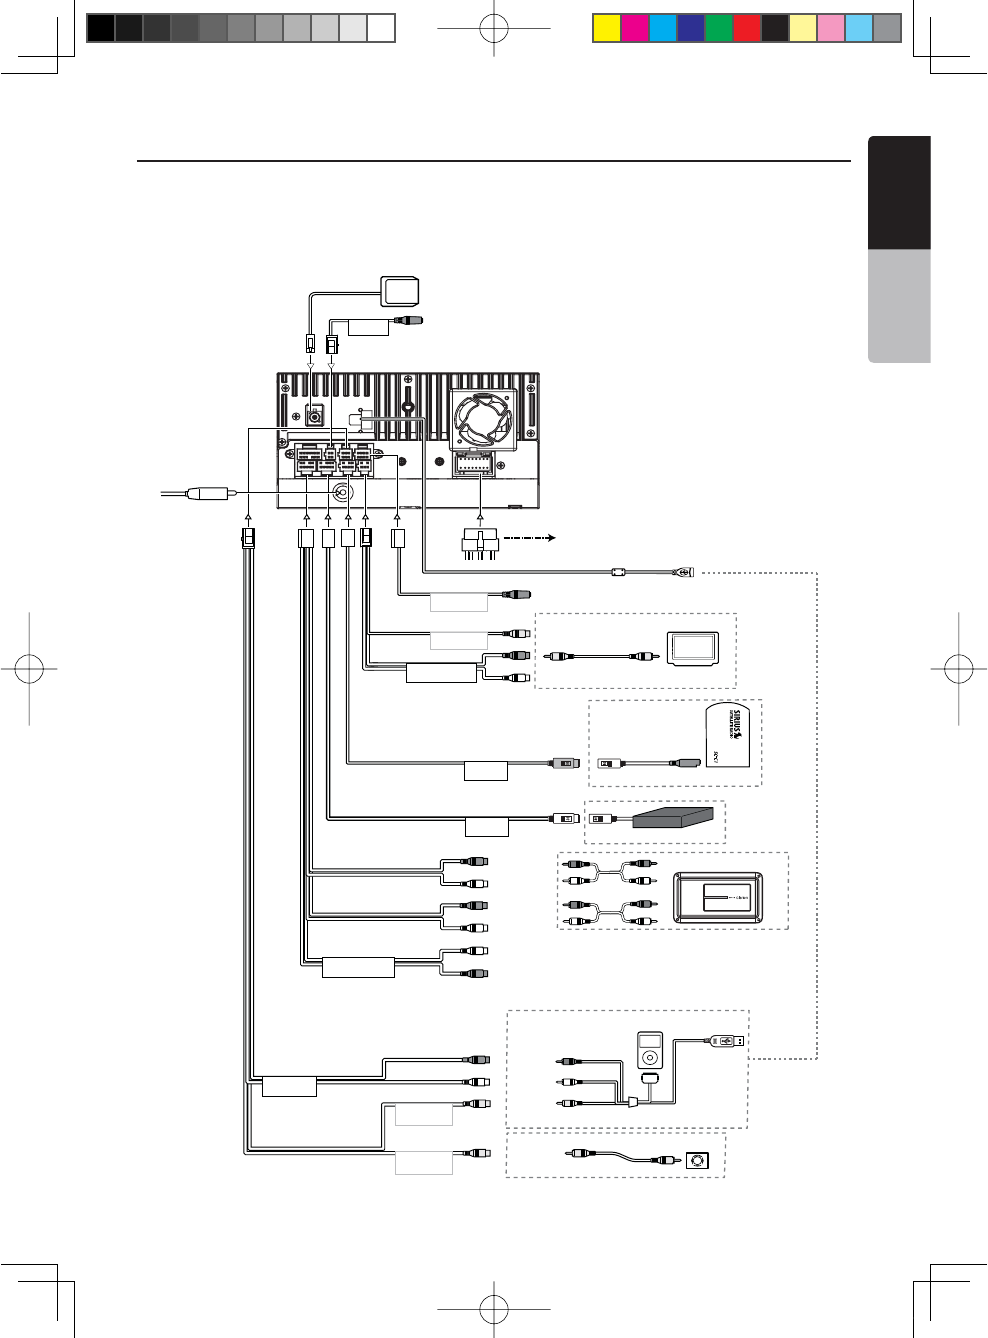
NX501/NZ501 63
English
English
Owner’s Manual
Video In
Audio/L
Audio/R
CCA-748 (sold separately)
4-Channel Amplifier
Subwoofer 1
Subwoofer 2
Line Out
Rear
R
Line Out
Rear
L
Line Out
Front
R
Line Out
Front
L
Purple
Red
Gray
Black
White
Red
White
Steering Wheel
Remote Control Terminal
Yellow
RearZone
Monitor
Yellow
Connector
Cable
SIRIUS
SIRIUSCONNECTVEHICLET
UNER
Yellow
White
Red
GPS
Antenna
External
Microphone
Connection
Radio Antenna
Red
White
Gray
Black
Black
Black
Black
Black
Video Out
Video Out
Rear Vision Camera
HD Radio
Red
HD Radio™ Tuner (THD400)
NX501
Refer to
page 61
SWI
VIDEO OUT
CAMERA
VISUAL IN
Green
White
Red
EX MIC
2 ZONE OUT
Sirius
HD
SUB WOOFER
AUX IN 2
SIRIUS Connect™
Vehicle Tuner (SCC1)
iPod/iPhone
7. Wire Connections
Note:
s Before installing, be sure to disconnect the negative cable of the car battery.
s)NTHEOPTIONALDEVICESTHE2#!CABLESANDTHE#ONNECTORCABLESARESEPARATELYSOLDitems.
Refer to
page 60
1;B1=࣫㕢⠜䇈ᯢкLQGG
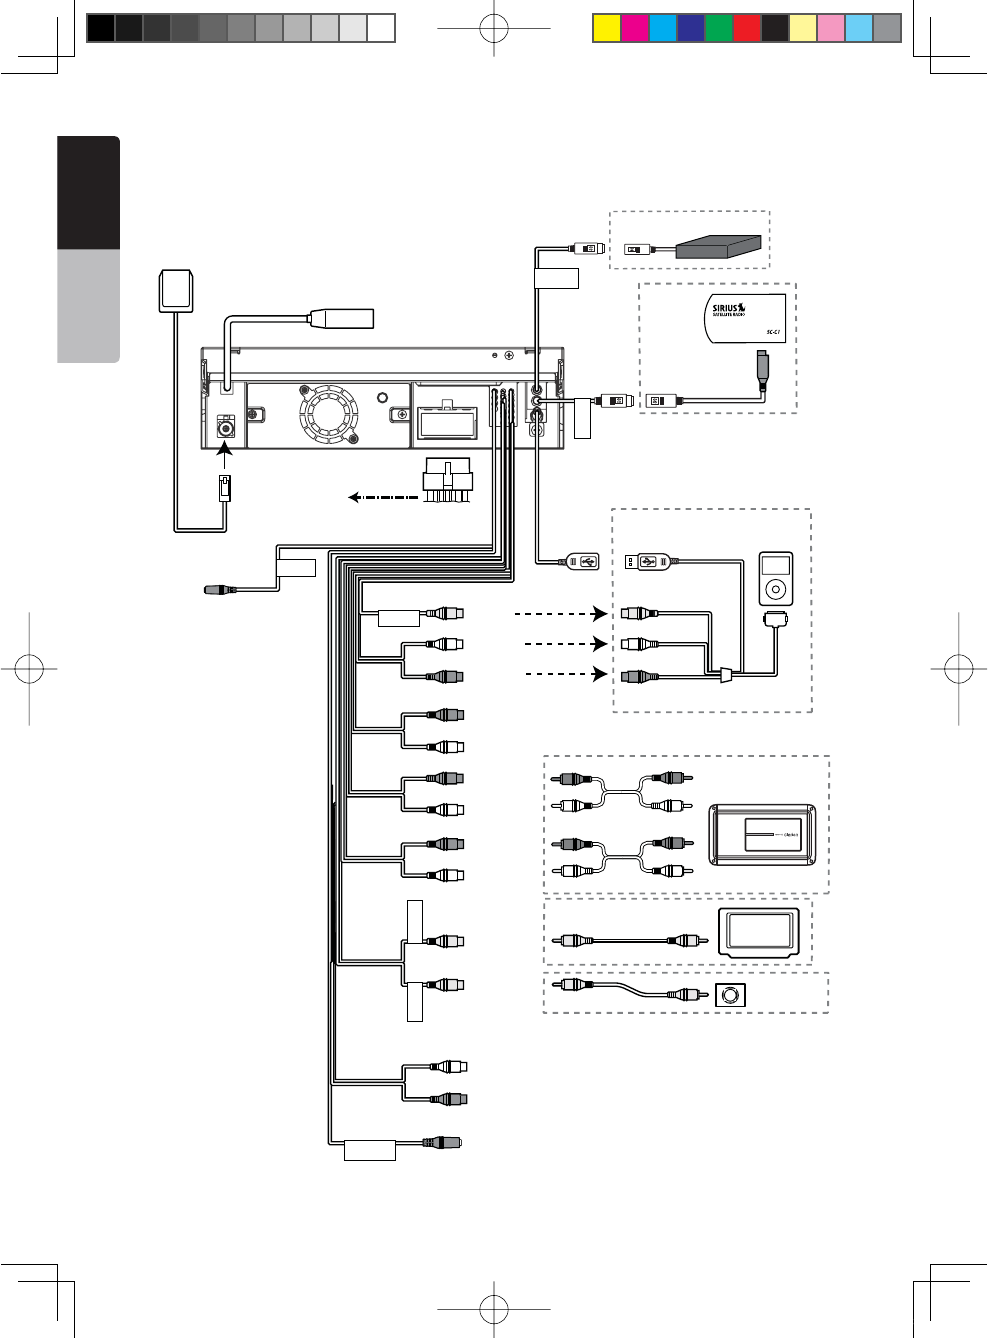
64 NX501/NZ501
English
Owner’s Manual
Black
Radio Antenna Jack
4-Channel Amplifier
Line Out
Subwoofer
Line Out
Rear R
Line Out
Rear L
Line Out
Front R
Line Out
Video Out
Front L
Video
Audio/R
Audio/L
Video Out
Camera
Yellow
White
White
Red
Red
Red
White
Yellow
Purple
Gray
Gray
Red
Black
Black
Black
White
Connector
Cable
Steering Wheel
Remote Control Terminal
SIRIUS
Yellow
Monitor
CCA-748 (sold separately)
Yellow
White
Red
Red
Audio/R
Audio/L
Red
White
Green
GPS
Antenna
External
Microphone
Connection
HD Radio
HD Radio™ Tuner (THD400)
SIRIUS CONNECT VEHICLE TUNER
Refer to
page 62
EX MIC
HD
Sirius
SIRIUS Connect™
Vehicle Tuner
(SCC1)
iPod/iPhone
Rear Vision Camera
SWI
CAMERAVIDEO OUT
VISUAL IN
NZ501
Refer to
page 60
1;B1=࣫㕢⠜䇈ᯢкLQGG
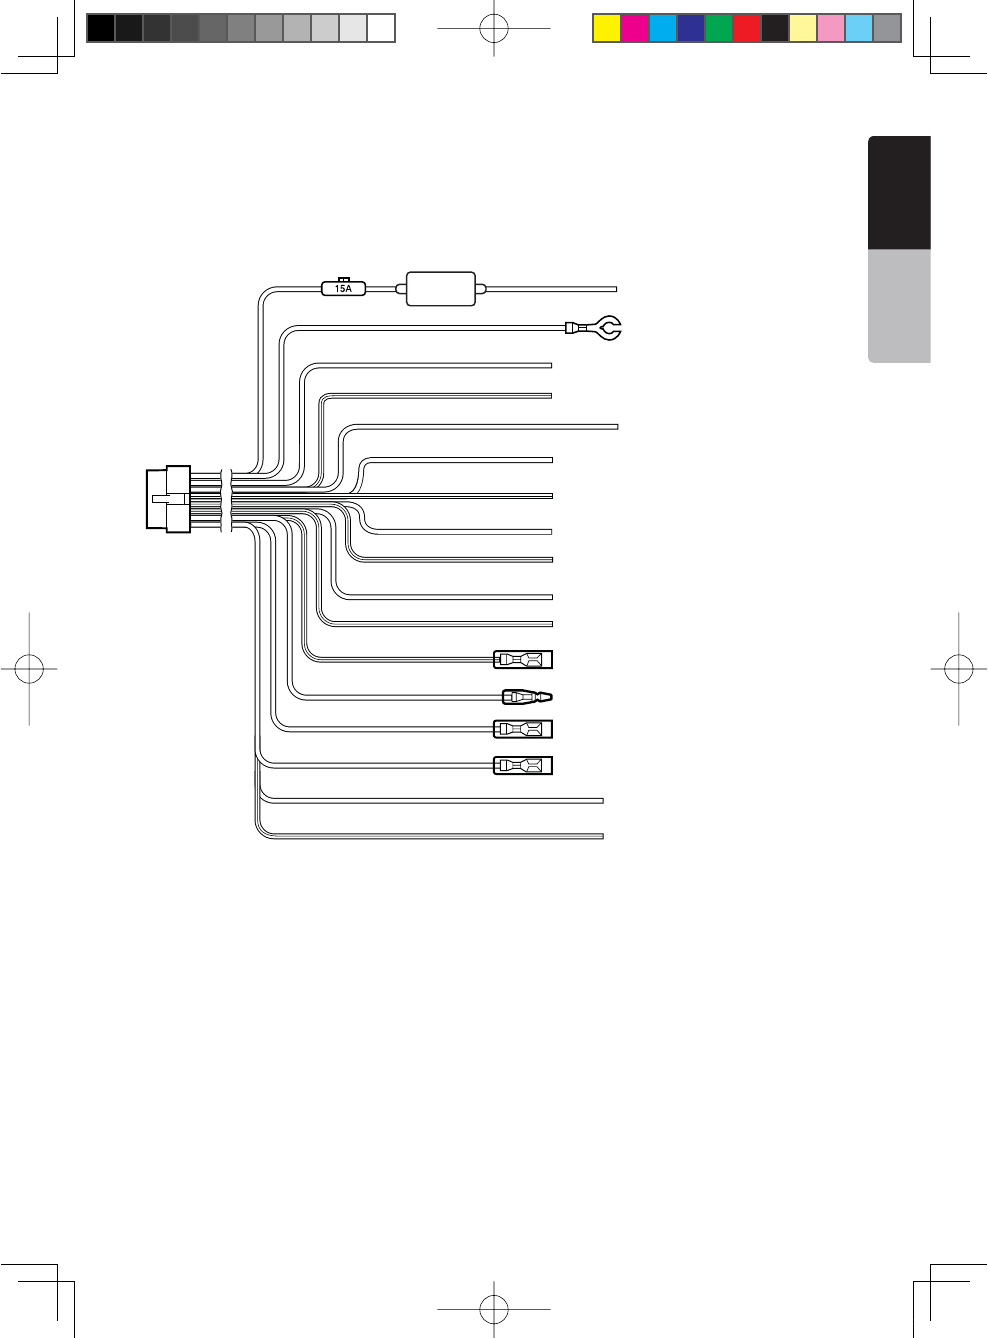
NX501/NZ501 65
English
English
Owner’s Manual
See next page for how to connect the parking brake cord.
Yellow
Black
Purple
Purple/Black
Grass-green
Gray
Gray/Black
White
White/Black
Green
Green/Black
Blue/White
Orange/White
Red
Brown
Blue
+12V main power
Ground
Rear right +
Rear right -
Parking brake cord
Purple/White Reverse gear cord
Front right +
Front right -
Front left +
Front left -
Rear left +
Rear left -
Amplifier turn-on cord
Illumination
+12V accessory
Phone interrupt (*1)
Auto antenna
Note:
*1: Connecting the PHONE INTERRUPT terminal
The phone interrupt will mute the audio if the lead receives a negative or ground signal.
1;B1=࣫㕢⠜䇈ᯢкLQGG
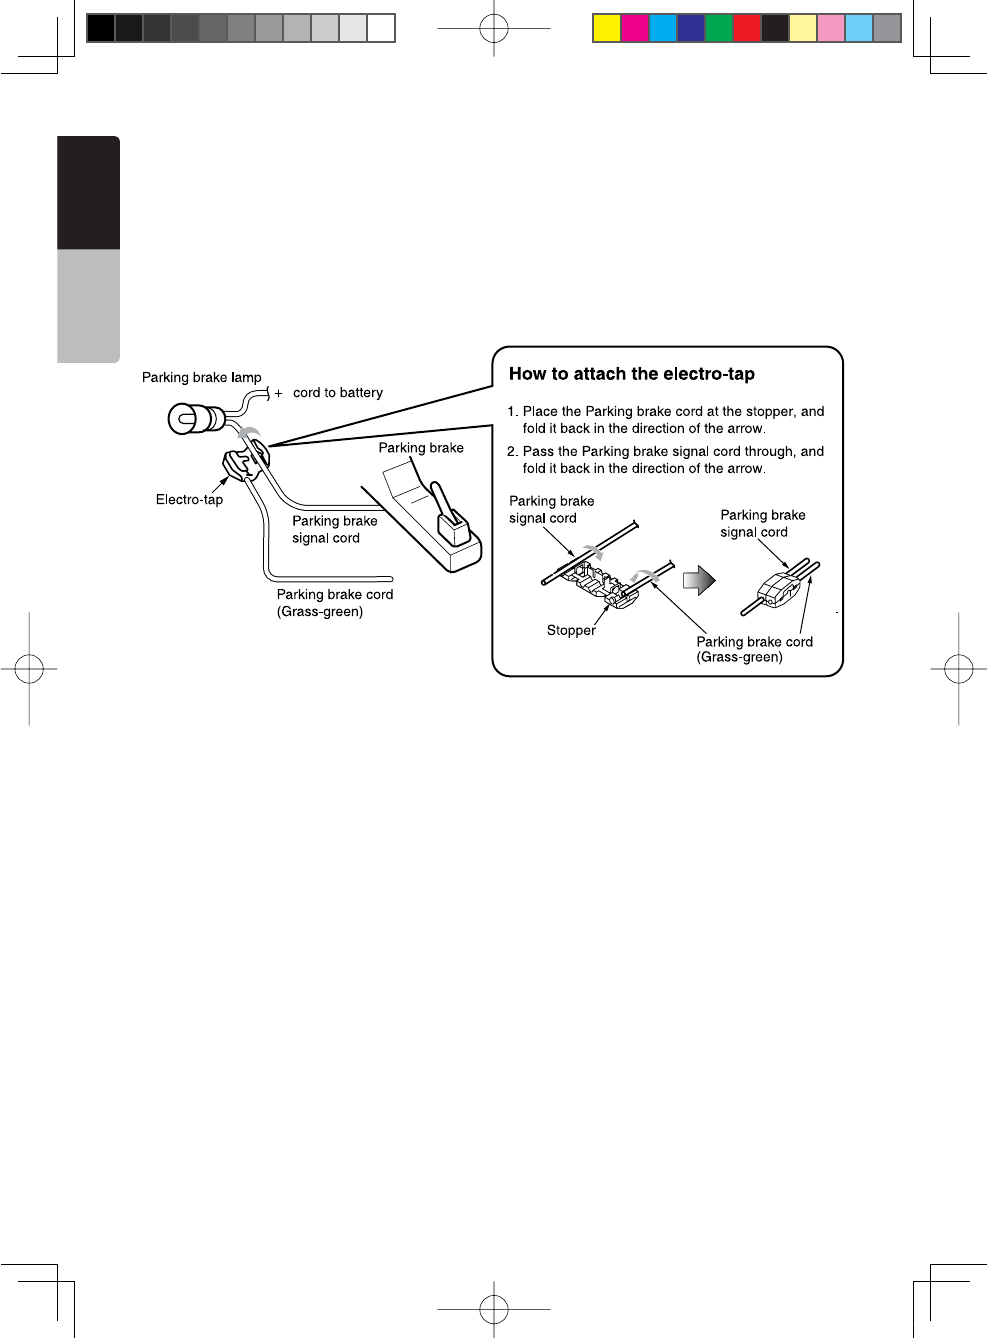
66 NX501/NZ501
English
Owner’s Manual
Connecting the parking brake cord
Connect the cord to parking brake lamp ground in the meter panel.
Note:
s#ONNECTINGTHEPARKINGBRAKECORDTOLAMPGROUNDALLOWSYOUTOWATCHI0ODI0HONEVIDEO$6$VIDEO!6INPUTWHEN
the parking brake is engaged.
s7HENTHEPARKINGBRAKECORDISNOTCONNECTEDTHEMONITORWILLNOTSHOWANYVIDEOSOURCES
s)Fh!5$)//.,9v APPEARSONTHESCREENJUST AFTERTURNINGONTHE!## POWEROFTHECARRELEASE THEPARKINGBRAKE
while confirming safety, and then engage the parking brake again.
Connecting the accessories
s#ONNECTINGTOTHEEXTERNALAMPLIlER
The external amplifiers can be connected to the 6 channel RCA output connections. Ensure that the connectors
are not grounded or shorted to prevent damage to the unit.
s#ONNECTINGTOI0ODI0HONEDEVICE
The iPod/iPhone device can be connected to dedicated iPod/iPhone connection on the main unit. For detailed
information, refer to the instruction sheet or manual for the iPod/iPhone cable.
Note:
s4HISUNITMAYNOTSUPPORTALLFUNCTIONSOFALLI0ODI0HONEDEVICES
s4HEI0ODI0HONECONNECTIONWILLCHARGEYOURI0ODI0HONEUNLESSTHEI0ODI0HONEBATTERYISCOMPLETELYDEPLETED)F
the specified cord of the cellular phone is connected to the phone interrupt cord of the main unit, the audio mute is
activated when cellular phone in use.
s#ONNECTINGTO3)2)533ATELLITE2ADIO2ECEIVER
When SIRIUS Satellite Radio Receiver is to be connected, use the dedicated connector. For detailed
information,refer to the instruction manual of the SIRIUS Satellite Radio Receiver.
1;B1=࣫㕢⠜䇈ᯢкLQGG

NX501/NZ501 67
English
English
Owner’s Manual
1;B1=࣫㕢⠜䇈ᯢкLQGG
Clarion Co., Ltd.
All Rights Reserved. Copyright © 2010: Clarion Co., Ltd.
Printed in China / Imprime au Chiné / Impreso en China
2010/11 NX501/NZ501
4HISDEVICECOMPLIESWITH0ARTOFTHE&##2ULES/PERATIONISSUBJECT
TOTHEFOLLOWINGTWOCONDITIONS
THISDEVICEMAYNOTCAUSEHARMFULINTERFERENCEAND
THISDEVICEMUSTACCEPTANYINTERFERENCERECEIVEDINCLUDING
INTERFERENCETHATMAYCAUSEUNDESIREDOPERATION
4HIS#LASS"DIGITALAPPARATUSCOMPLIESWITH#ANADIAN)#%3
#ETAPPAREILNUMERIQUEDELACLASSE"ESTCONFORMEALANORME.-"
DU#ANADA
NX501
&##)$66#.%#,
)#)$!#.%#,
"LUETOOTH)$
NZ501
&##)$66#.%#,
)#)$!#.%#,
"LUETOOTH)$
1;B1=࣫㕢⠜䇈ᯢкLQGG