SKYPINE ELECTRONICS CNE8206MBRS ALL IN ONE DVD PLAYER User Manual
SKYPINE ELECTRONICS (SHEN ZHEN) CO., LTD. ALL IN ONE DVD PLAYER
UserManual.wiki
>
SKYPINE ELECTRONICS
>
CNE8206MBRS User Manual
User Manual
Navigation menu
Upload a User Manual
Namespaces
Wiki Guide
HTML
PDF
Info
Views
User Manual
Discussion / Help
Navigation

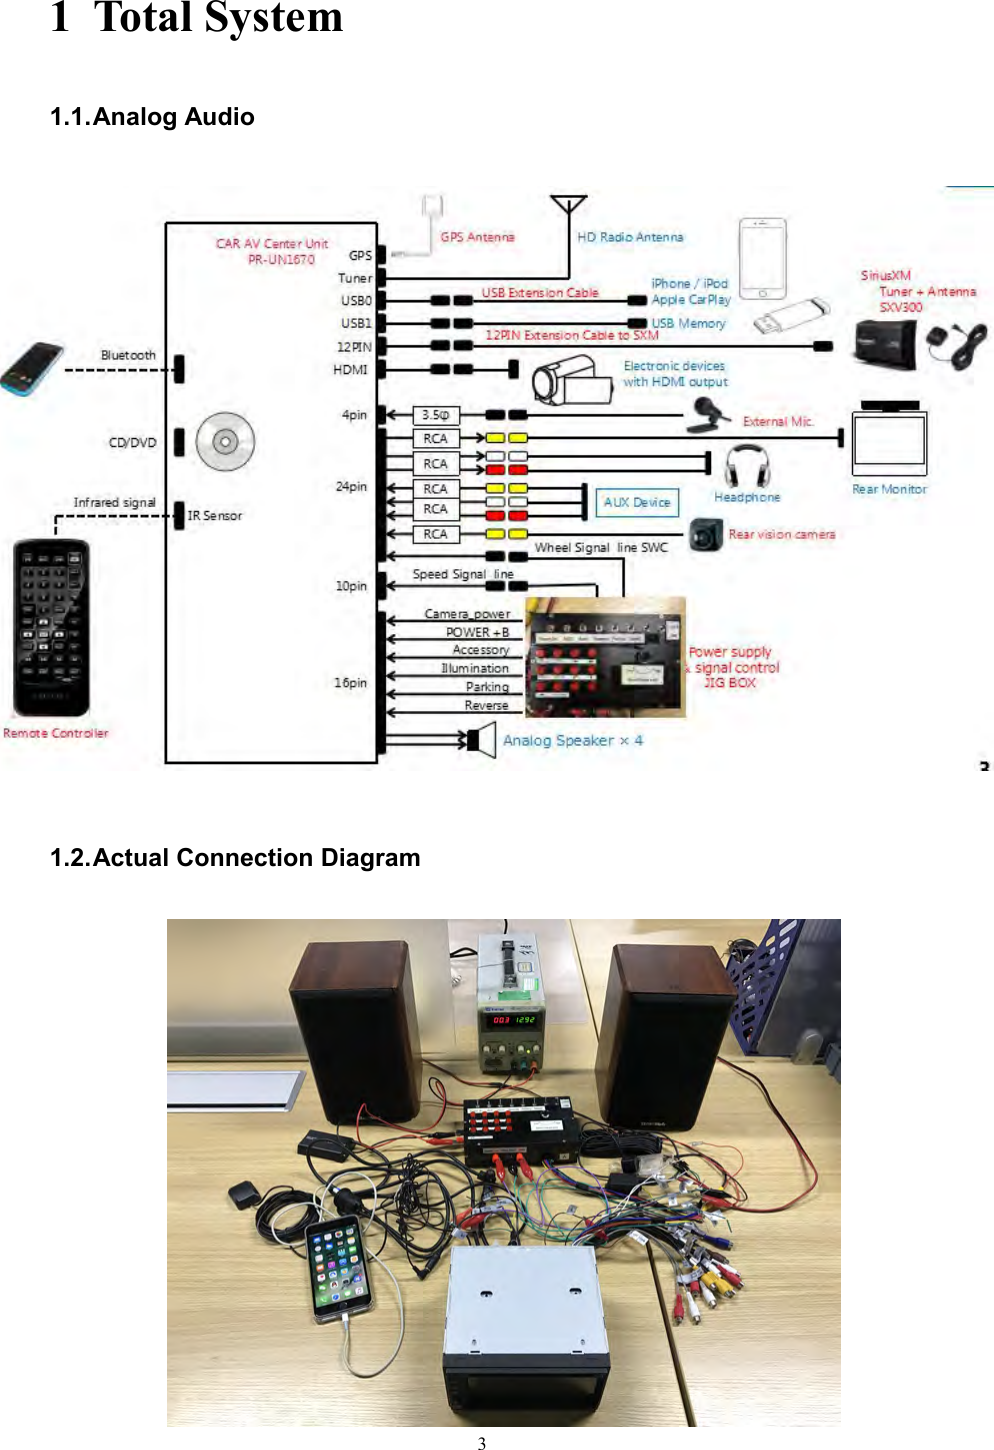
![52 Operations2.1.Panel buttonsFunctions of Buttons1. [NAVI] Button• Press this button to enter navi app.• Press this button to back to the last page.2. [HOME] Button• Press this button to main menu.• Press this button to back to the last source.3. [SIRI] Button• Press this button to use the carplay siri.4. [PWR] [VOL] Knob• Press this knob to turn on the unit.• Long press this knob to turn off the unit.• Rotate the knob to increase or decrease the volume.• Press this knob in radio mode, Rotate the knob within 3 second to tune forward or tunebackward.5. [RESET] Button / Micro SD card slot / USB slot• Press [RESET] button to reset the unit.6. AUX IN• Av-1 input.](https://usermanual.wiki/SKYPINE-ELECTRONICS/CNE8206MBRS/User-Guide-3279542-Page-5.png)
![67. Internal microphone for Bluetooth mode8. Receiver for IR-remote control9. Disc indicator• Disc inside: show white.• No disc inside: show the illumination color which was set in settings.10. DVD/CD slot• Insert a disc with the label on the top side into the DVD/CD slot until it will be insertedautomatically.11. EJECT• Press this button to insert or eject a disc.2.2.Remote Control[ / ] Button• Press this button to play or pause video and audio media.[MUTE] Button• Mute or release mute the speaker.• The symbol on upper right area of the screen indicates that speaker is muted.[OPEN] Button[ / ][OPEN][Power/SRC]Signal transmitterOperating rang: 30°in all directions[VOLUME][SEL][NAV/AV][BAND][MENU][PIC][ENT][TAG][RPT][ROOT][ ][ ][AUDIO][MUTE][0-9][SRCH][ANGLE][BACK][TITLE][ZOOM][SUB.T]](https://usermanual.wiki/SKYPINE-ELECTRONICS/CNE8206MBRS/User-Guide-3279542-Page-6.png)
![7• Press this button to eject the disc.[POWER/SRC] Button• Press this button to change source.• Press this button more than 1 second to power on when the unit is power off.• Press this button more than 1 second to power off when the unit is power on.[0 - 9] Buttons• Use in the Key Pad screen to select the radio or satellite radio.• Press to enter DVD video chapters/titles in the Key Pad screen.[VOLUME] Button• Increase or decrease volume.[NAVI/AV] Button• Press this button to switch between current source and current position on navigation map.[SRCH] Button• Press this button to open chapter or title search window while playing DVD.[BAND] button• Switch to next band alternately.[SET] Button• Press this button to open the Audio setting menu in any mode.[BACK] Button• Press this button to quit main menu if current screen is main menu.Button• Press this button for cursor movement in main menu or Setting mode.• From the main menu, you can select your desired source or change your settings.[MENU] Button• Press this button to enter the MAIN MENU or return current resource.[ENT] Button• Press to fix the entered data in the Key Pad screen or enter the item the cursor is on.[TITLE] Button• Press to go to the title menu on the DVD.[ROOT] Button• Press to go to the root menu on the DVD.[RPT] Button• Press to perform chapter repeat / title repeat / repeat off while playing DVD mode.• Press to perform track repeat/repeat off while playing CD.• Press to perform repeat track /repeat folder/ repeat off while playing MP3/WMA, or video fileson disc.• Press to perform repeat track /repeat folder/ repeat off while playing MP3/WMA, or video filesin USB memory.Buttons• Press to seek the next available higher or lower station in Tuner mode.• In SAT Radio mode, you will scroll through the categories.• Press to select the next higher or lower chapter number in DVD video mode.• Press to select the next higher or lower track in DVD Audio, USB Video, USB Audio mode.• Press for movement of background source in Navigation mode.](https://usermanual.wiki/SKYPINE-ELECTRONICS/CNE8206MBRS/User-Guide-3279542-Page-7.png)
![8Buttons• Press to manually select the next higher or lower station in Tuner and Satellite Radio modes.• Press to perform fast-forward or fast-backward searching. Press again to change the speed to 2x,4x, 8x or 16x.• Press for movement of background source in Navigation mode.[ZOOM] Button• Press to turn on and zoom in while playing DVD. You can zoom in up to 3x. (No all DVD discsupports this function)[AUDIO] Button• Press to switch the AUDIO channel of the disc while playing DVD.[SUB-T] Button• Press to switch next available subtitle while playing DVD.• Press to display Video menu in iPod mode.[ANGLE] Button• Press to switch the different ANGLE while playing DVD. (No all DVD disc supports thisfunction)• Press to display Audio menu in iPod mode.3 Basic operations3.1.Start up and Shut down1. Start up1) Supply (Yellow) +12V Power to the Power-Supply jig box.2) Turn on “Power B+” switch.3) Wait for 1 second, turn on ACC switch.2. Shut down1) Turn off “ACC” switch only. (Do NOT turn off “Power B+” switch at the same time.)1)2)3)](https://usermanual.wiki/SKYPINE-ELECTRONICS/CNE8206MBRS/User-Guide-3279542-Page-8.png)

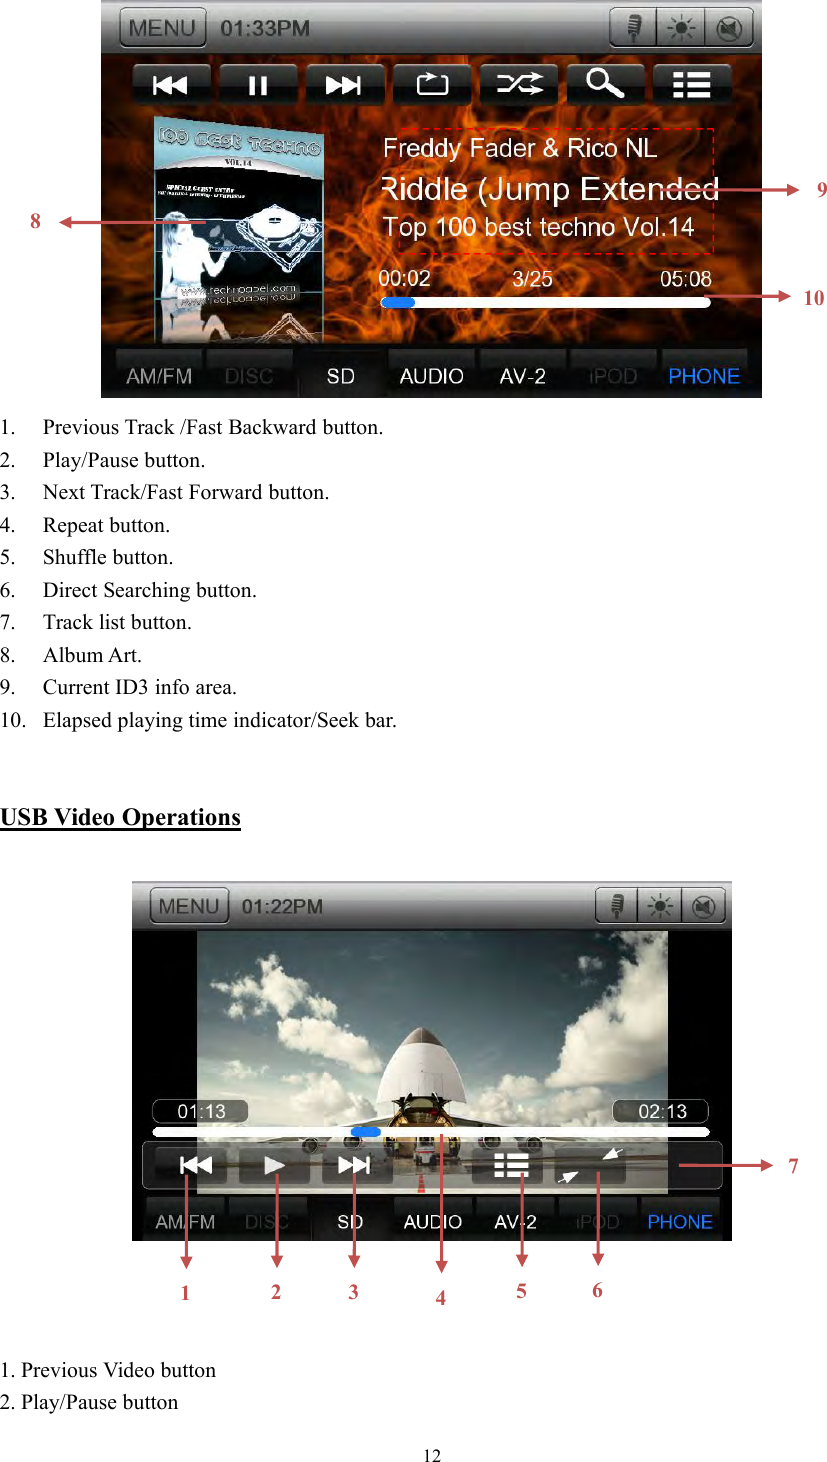
![113. Press “MUTE” button of titlebar again4 USB Mode1. Connect a U-disk to the USB cable.2. The system will automatically detect the connected U-disk.3. Press the Audio [ ] button to display Audio files list.4. Press the Video [ ] button to display Video files list.5. Press the Picture [ ] button to display Picture files list.USB Audio Operations1234567](https://usermanual.wiki/SKYPINE-ELECTRONICS/CNE8206MBRS/User-Guide-3279542-Page-11.png)
![156 SXM OperationsThis function is available when a Satellite Radio Receiver is connected through the dedicatedconnection..Note:Satellite radio is a subscription service.Press the [SXM] button on Main Menu display. The system changes to the SXM. The SXM modescreen is displayed1. Channel up button.2. Play and pause button.3. Channel down button4. Show the channel is live.5. Choose channel list.6. Keypad Button.7. Channel category type.8. Channel list.9. Current Channel Number / Category Name / Preset Number,etc.10. Channel time](https://usermanual.wiki/SKYPINE-ELECTRONICS/CNE8206MBRS/User-Guide-3279542-Page-15.png)
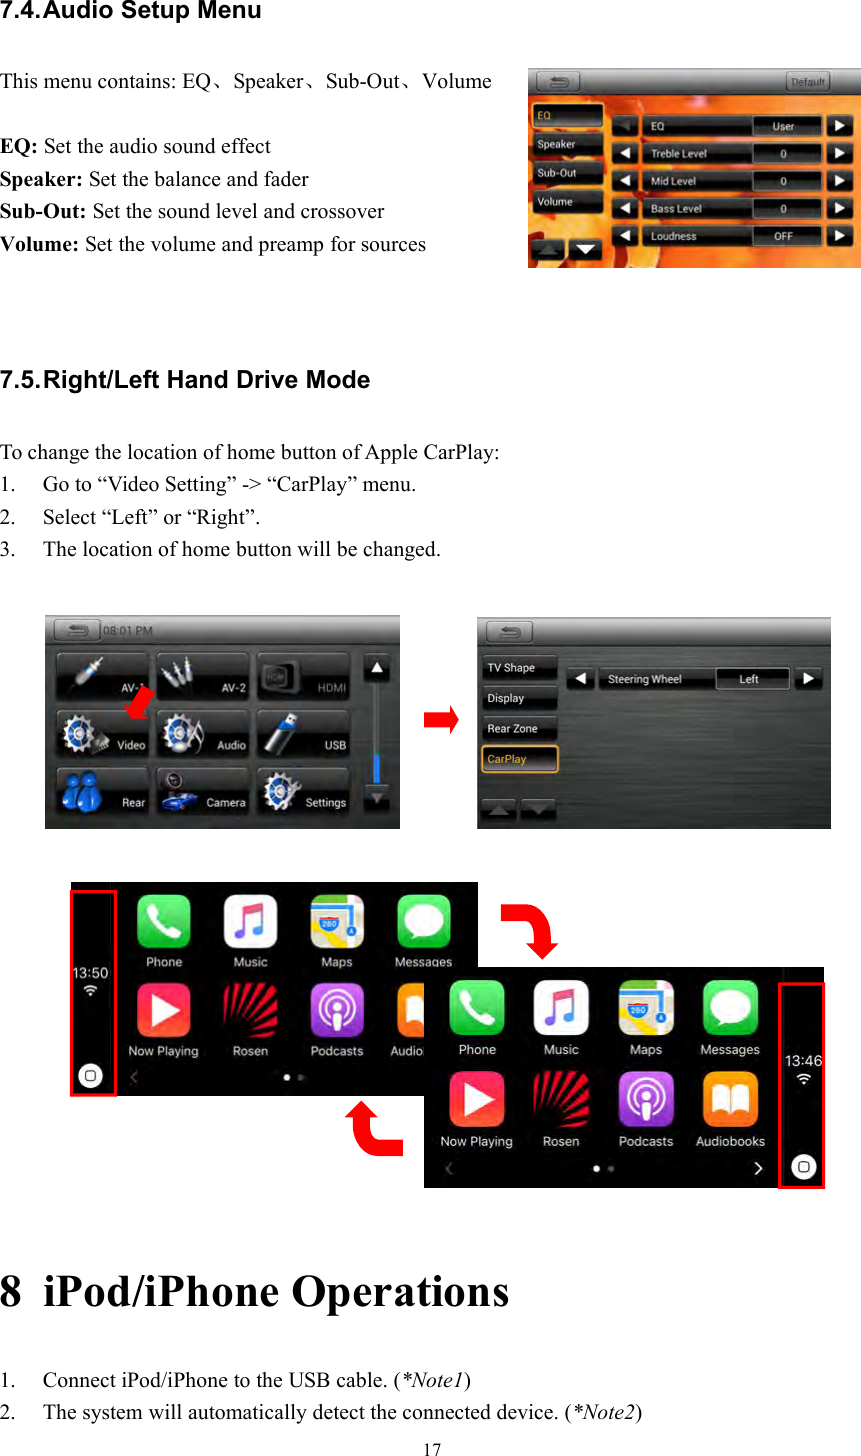
![167 Settings Operation7.1.Main SettingsPress [Settings] button on the Main menu screen. The Setting menu screen will be displayed.Contains Main、Camera、Style、Tabs.7.2.Set Bottom Tabs1. A total of seven tabs are on the shortcut. Among them thethird to the sixth users can customize. User can press [ ]or [ ] button to set different tabs.2. While user sets tabs, the shortcut will be shown the sameon each source.7.3.Video Setup MenuTV Shape: Set TV Shape Normal or Cinema.Set Day: Set Day value from 0 to 20.Set Nigh: Set Nigh value from 0 to 20.Auto: Choose ON or OFF.Rear Zone: Touch the [ / ] key to select the Rear Zone source.](https://usermanual.wiki/SKYPINE-ELECTRONICS/CNE8206MBRS/User-Guide-3279542-Page-16.png)
![183. Touch the iPod Audio icon. iPod Audio mode screen will be displayed.*Note1:The USB cable with the label of “iPod/iPhone” only supports iPod Audio mode.*Note2:When the device which does not support CarPlay or is disabled CarPlay on iPhone is connected,this system will work in the iPod Audio mode.1. PREVIOUS• Touch the [ ] key to choose the previous track.• Touch and hold the [ ] key to fast backward.2. PLAY/PAUSE• Touch the [ ] key during playback to pause.• Touch the [ ] key. Playback resumes.3. NEXT• Touch the [ ] key to choose the next track.• Touch and hold the [ ] key to fast forward.4. REPART• Touch the [ ] key to repeat the selected track.•Touch once to start a single track repeat, touch again repeat off.5. SHUFFLE• Touch the [ ] key to switch the shuffle mode on or off.6. SEARCH• Touch the [ ] key to search with the first alphabet in current list.7. LIST12345610897](https://usermanual.wiki/SKYPINE-ELECTRONICS/CNE8206MBRS/User-Guide-3279542-Page-18.png)
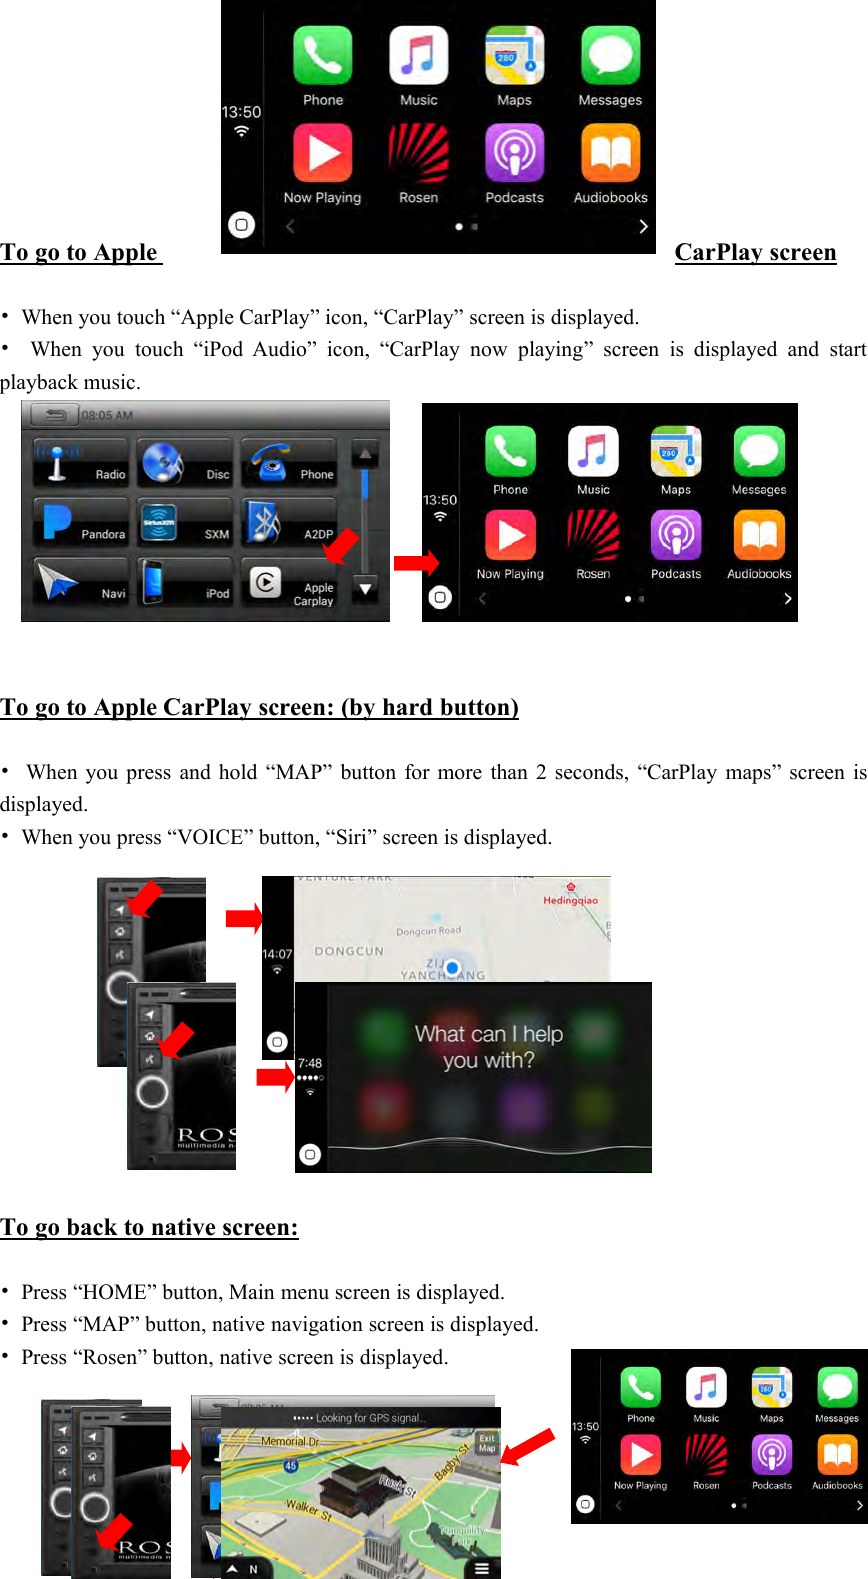
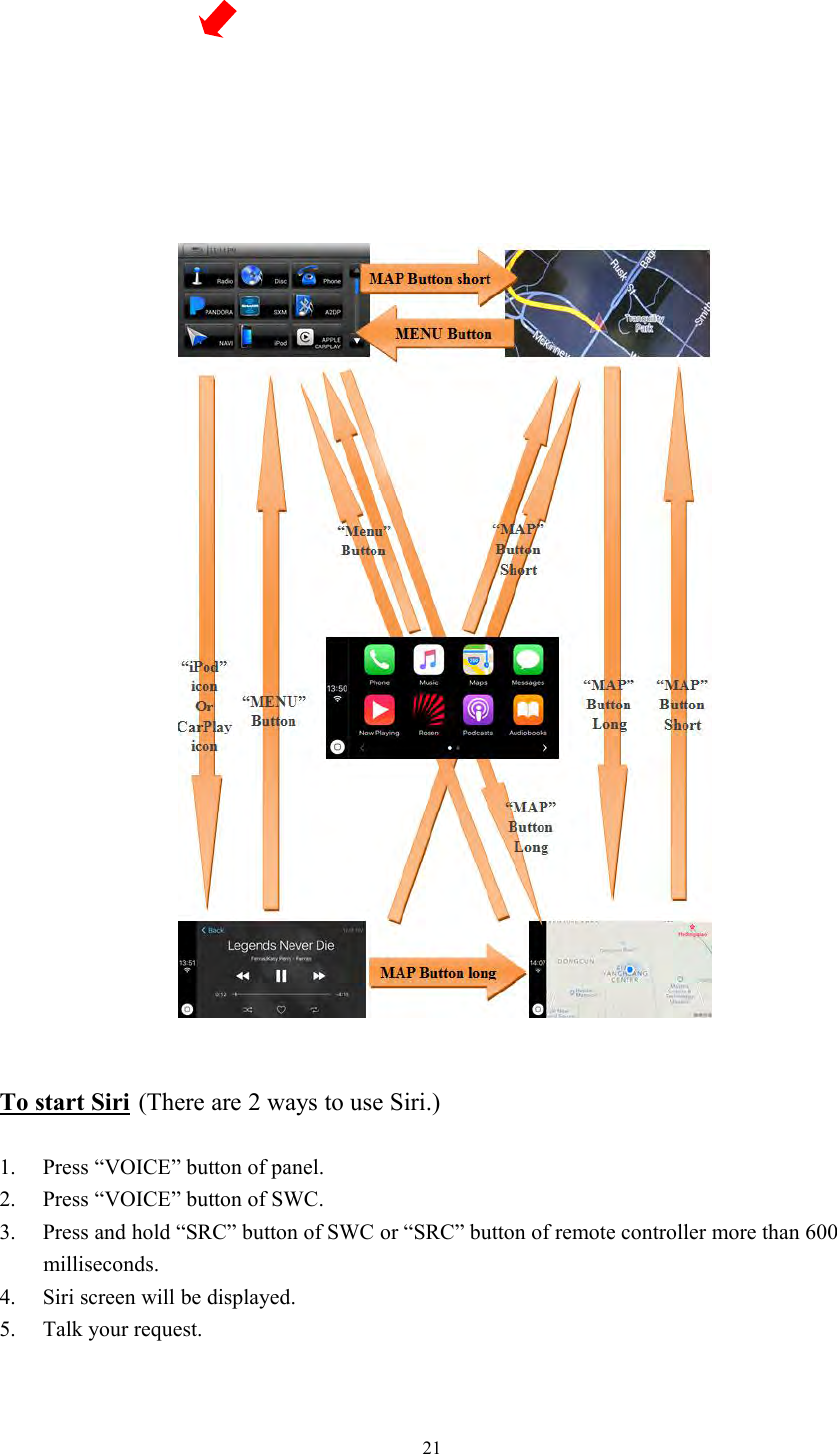
![19• Touch the [ ] key to display the current play list, touch again to display the ID3Information.8. ALBUM ART WORK9. ID3 INFORMATION10. PROCESS BAR• Touch the [ ] on seek bar and drag it to any position where you want to start playback.9 Pandora Audio1. Launch Pandora application on your iPhone.2. Connect iPod/iPhone to the USB cable. (*Note2)3. The system will automatically detect the connected device.4. Touch the Pandora icon. Pandora mode screen will be displayed.*Note1:Please download and install Pandora application from iTunes store on the iPhone.*Note2:The USB cable with the label of “iPod/iPhone” only supports Pandora mode.10 CarPlay OperationsSelecting the CarPlay modeConnect your iPod/iPhone to the USB connector. If the apple device support CarPlay, thesystem will automatically detect the connected device , the CarPlay button will be enabled foroperation on the Main Menu screen and the CarPlay screen will automatically show on the unit.*Note1:Another USB cable is not supported for Apple CarPlay.*Note2:During The connection of CarPlay, prohibit the use of Bluetooth.](https://usermanual.wiki/SKYPINE-ELECTRONICS/CNE8206MBRS/User-Guide-3279542-Page-19.png)
![2412 Bluetooth Operations12.1. Bluetooth Paring1. Turn on the power of the cellular phone you wish to register.2. Touch the [ ] key to display the Device Select screen.3. Touch the [Add] key to display the Inquiring Device screen.12.2. Bluetooth Setting1. Touch the [ ] key to display the Devices information on the screen.2. Touch the [Setup] key to display the Setup information on the screen.12.3. Telephone operations1. Touch the [ ] key to display the Ten-Key pad screen.2. Enter the telephone number by using the Ten-Key pad displayed on the screen.3. Touch the [ ] (Send) key to call the number.4. When the call is finished, touch the [ ] (End) key to hang up.](https://usermanual.wiki/SKYPINE-ELECTRONICS/CNE8206MBRS/User-Guide-3279542-Page-24.png)
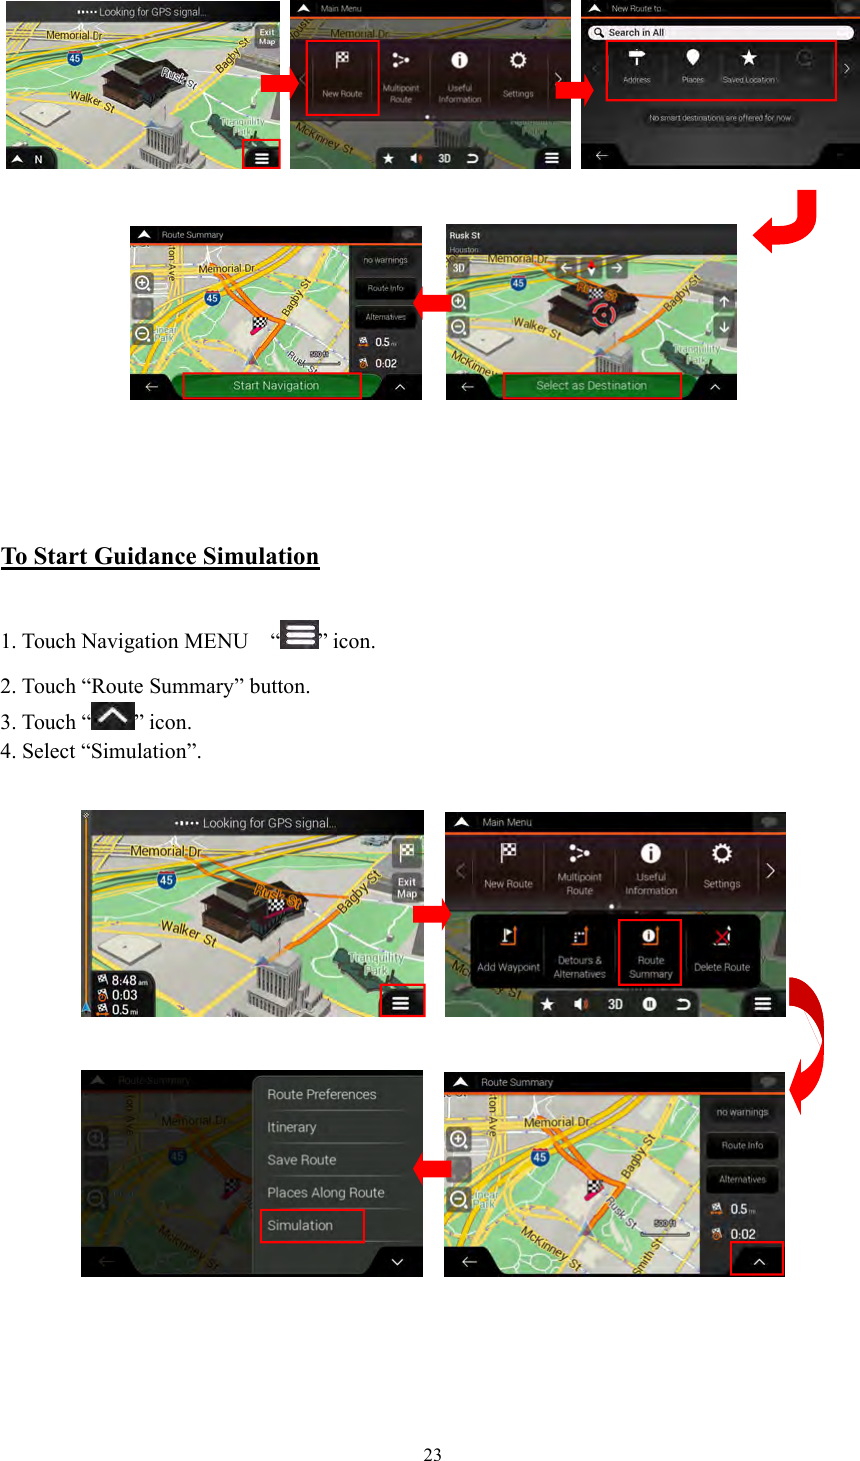
![2512.4. Bluetooth Audio Player Operations1. Confirm that Bluetooth device is connected.2. Press “HOME” button and choose “A2DP” source.3. Bluetooth Audio mode screen will be displayed.Pausing playback• Touch the [ ] key during playback.Playback pauses.• To resume playback, touch the [ ] key. Playback resumes.Skipping a track• Press the [ ] or [ ] button during playback, Tracks are skipped.13 Camera In OperationsSwitching to Camera mode• Touch the [Camera] key on Main Menu to select desired mode.• The LCD will display the external camera video. The screen will display "No Video Signal"menu, if a valid camera is not connect to this head unit.• Press Menu button on Operational Panel to return to the Main Menu.](https://usermanual.wiki/SKYPINE-ELECTRONICS/CNE8206MBRS/User-Guide-3279542-Page-25.png)
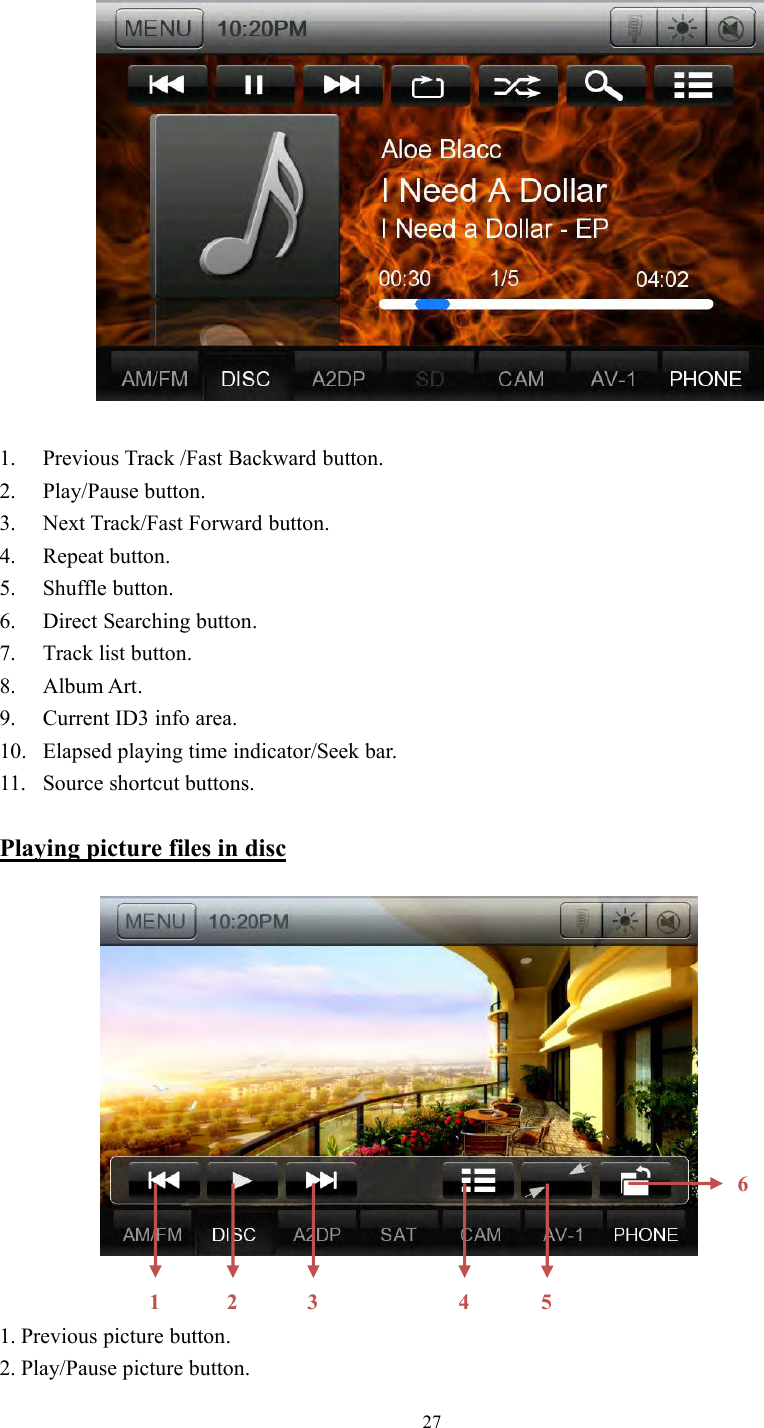
![283. Next picture button.4. Go to list menu mode5. Hide Operation bar and Shortcut bar6. Operation bar.15 HDMI OperationsExternal peripheral devices, including android or iPhone etc. can be connected to the unitthrough HDMI Line. Then you can see the phone screen on the HDMI app, you can watch moviewhich in your phone on unit.16 AUX 1 / AUX 2 OperationsExternal peripheral devices, including a game console, camcorder, navigation unit,iPod/iPhone, etc. can be connected to the AUX 1 or AUX 2 connector on the front or back of thisunit using the A/V media cables.1. Touch [ ] or [ ] button on Main Menu to select desired mode (when unit isreading).2. Touch [ ] or [ ] button in other source to select desired mode.](https://usermanual.wiki/SKYPINE-ELECTRONICS/CNE8206MBRS/User-Guide-3279542-Page-28.png)