SKYPINE ELECTRONICS CNE8206MBRS ALL IN ONE DVD PLAYER User Manual
SKYPINE ELECTRONICS (SHEN ZHEN) CO., LTD. ALL IN ONE DVD PLAYER
User Manual

1
PR-UN1670
(CNE-8206MB-RS)
Operation Manual
All Rights Reserved. Copyright Rosen Entertainment Systems
2
CONTENTS
OPERATION MANUAL........................................................................................................................ 1
1 TOTAL SYSTEM.............................................................................................................................3
1.1. ANALOG AUDIO.........................................................................................................................3
1.2. ACTUAL CONNECTION DIAGRAM.............................................................................................. 3
2 OPERATIONS.................................................................................................................................5
2.1. PANEL BUTTONS.........................................................................................................................5
2.2. REMOTE CONTROL.....................................................................................................................6
3 BASIC OPERATIONS................................................................................................................... 8
3.1. START UP AND SHUT DOWN.......................................................................................................8
3.2. TITLE AND BOTTOM...................................................................................................................9
3.3. CHANGE AUDIO SOURCE........................................................................................................... 9
3.4. AUDIO MUTE-ON / AUDIO MUTE-OFF............................................................................... 10
4 USB MODE....................................................................................................................................11
5 HD RADIOTM OPERATIONS...................................................................................................13
6 SXM OPERATIONS.....................................................................................................................15
7 SETTINGS OPERATION............................................................................................................ 16
7.1. MAIN SETTINGS.......................................................................................................................16
7.2. SET BOTTOM TABS.................................................................................................................. 16
7.3. VIDEO SETUP MENU................................................................................................................ 16
7.4. AUDIO SETUP MENU................................................................................................................17
7.5. RIGHT/LEFT HAND DRIVE MODE............................................................................................ 17
8 IPOD/IPHONE OPERATIONS...................................................................................................17
9 PANDORA AUDIO....................................................................................................................... 19
10 CARPLAY OPERATIONS.......................................................................................................... 19
11 NATIVE NAVIGATION...............................................................................................................22
12 BLUETOOTH OPERATIONS.................................................................................................... 24
12.1. BLUETOOTH PARING................................................................................................................24
12.2. BLUETOOTH SETTING.............................................................................................................. 24
12.3. TELEPHONE OPERATIONS......................................................................................................... 24
12.4. BLUETOOTH AUDIO PLAYER OPERATIONS............................................................................... 25
13 CAMERA IN OPERATIONS...................................................................................................... 25
14 DISC PLAYER OPERATIONS................................................................................................... 26
15 HDMI OPERATIONS.................................................................................................................. 28
16 AUX 1 / AUX 2 OPERATIONS................................................................................................... 28
3
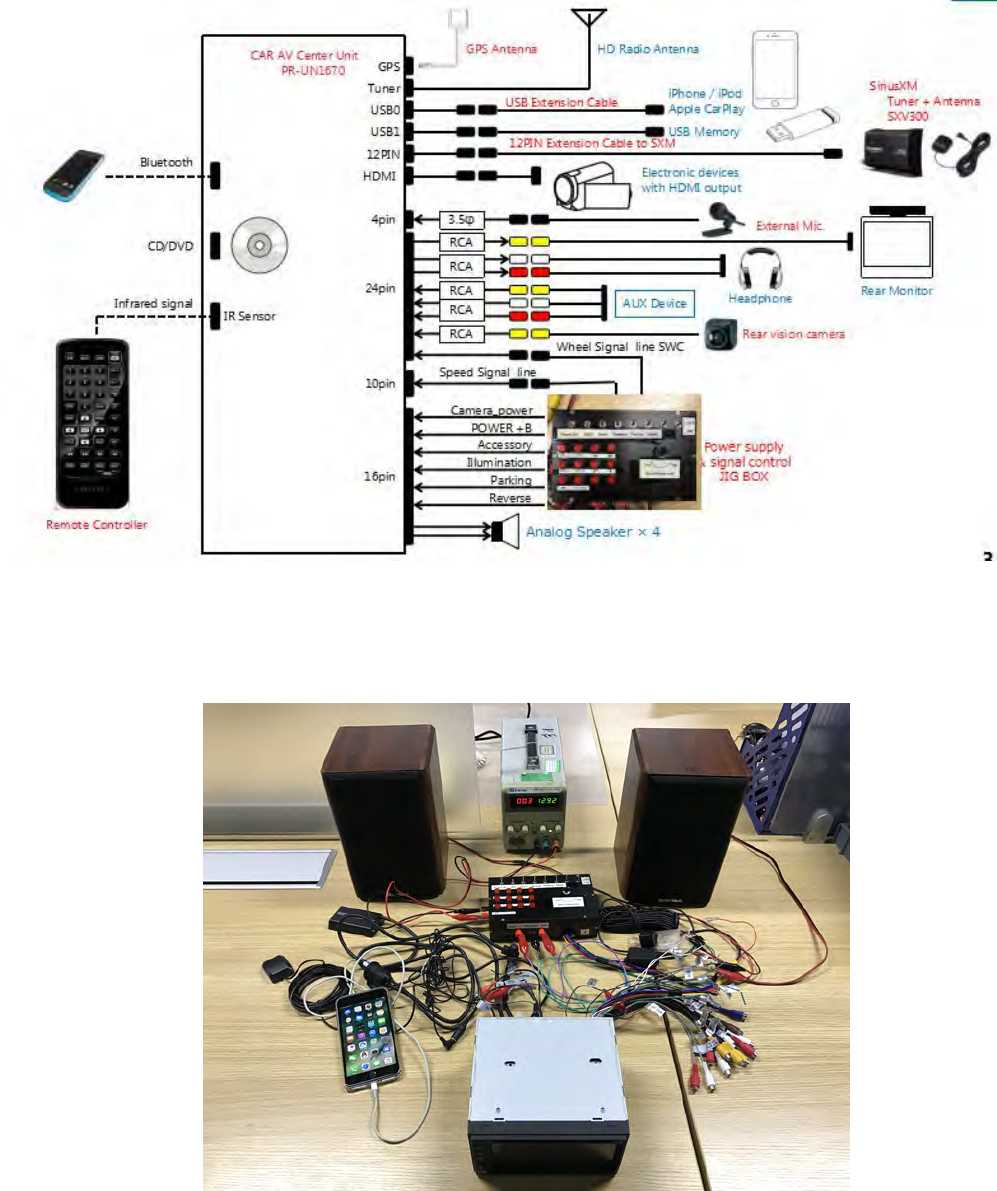
1 Total System
1.1.Analog Audio
1.2.Actual Connection Diagram

4
Speaker connection from 16pin harness
White : Front left speaker+ Gray : Front right speaker +
White/Black : Front left speaker –Gray/Black : Front right speaker –
Green : Rear left speaker+ Purple : Rear right speaker +
Green/Black : Rear left speaker –Purple/Black : Rear right speaker –
The back side
5
2 Operations
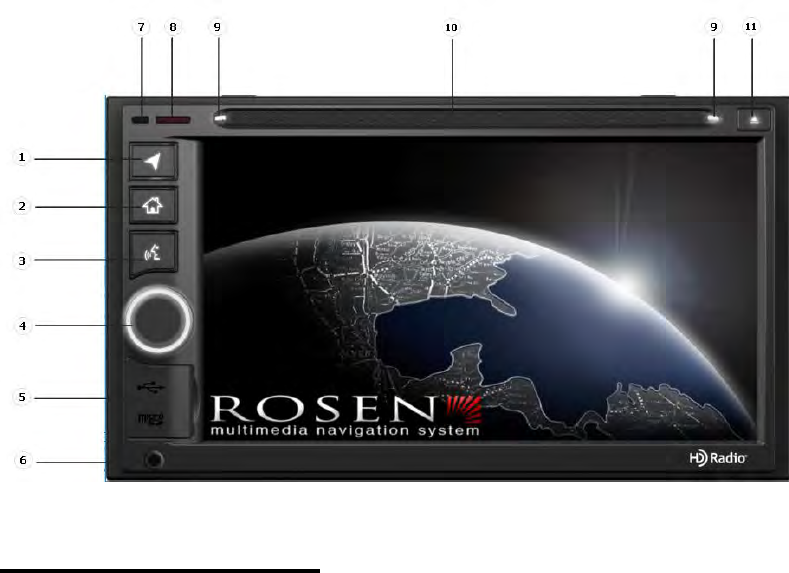
2.1.Panel buttons
Functions of Buttons
1. [NAVI] Button
• Press this button to enter navi app.
• Press this button to back to the last page.
2. [HOME] Button
• Press this button to main menu.
• Press this button to back to the last source.
3. [SIRI] Button
• Press this button to use the carplay siri.
4. [PWR] [VOL] Knob
• Press this knob to turn on the unit.
• Long press this knob to turn off the unit.
• Rotate the knob to increase or decrease the volume.
• Press this knob in radio mode, Rotate the knob within 3 second to tune forward or tune
backward.
5. [RESET] Button / Micro SD card slot / USB slot
• Press [RESET] button to reset the unit.
6. AUX IN
• Av-1 input.
6
7. Internal microphone for Bluetooth mode
8. Receiver for IR-remote control
9. Disc indicator
• Disc inside: show white.
• No disc inside: show the illumination color which was set in settings.
10. DVD/CD slot
• Insert a disc with the label on the top side into the DVD/CD slot until it will be inserted
automatically.
11. EJECT
• Press this button to insert or eject a disc.
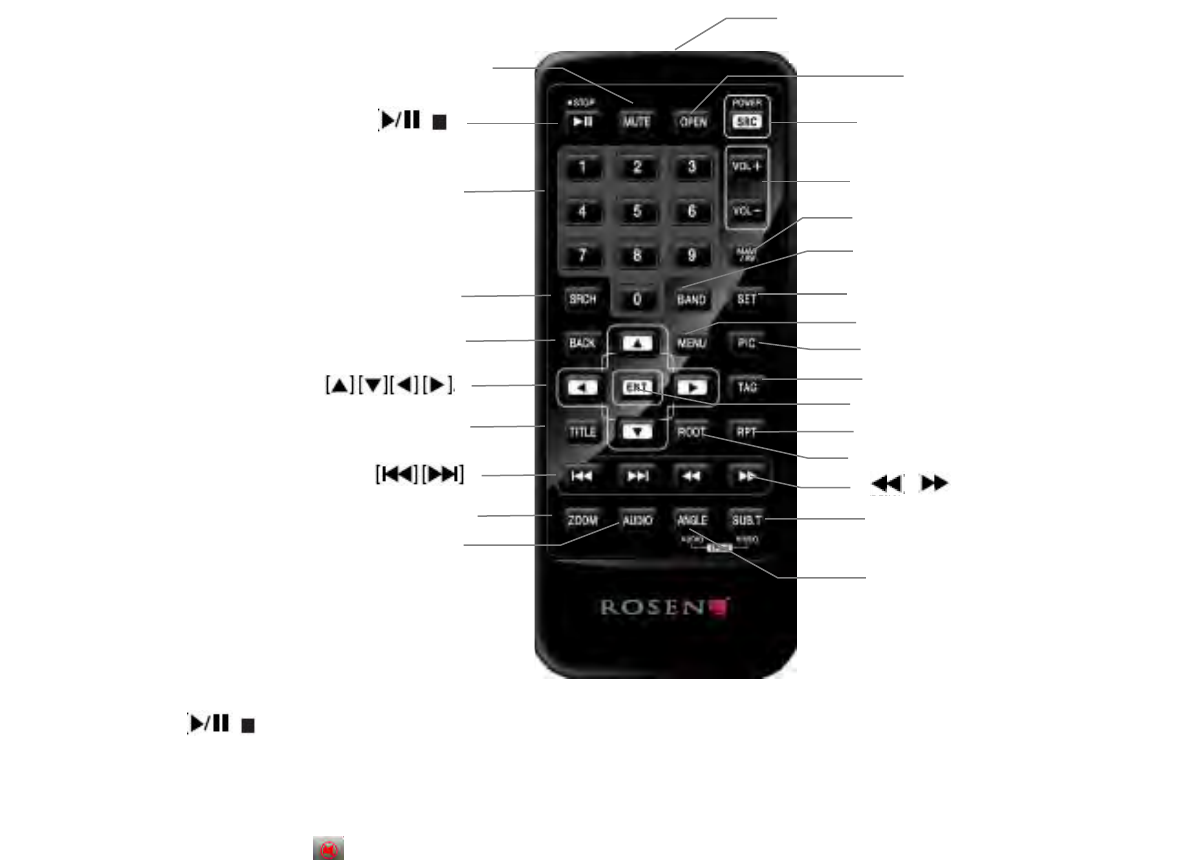
2.2.Remote Control
[ / ] Button
• Press this button to play or pause video and audio media.
[MUTE] Button
• Mute or release mute the speaker.
• The symbol on upper right area of the screen indicates that speaker is muted.
[OPEN] Button
[ / ]
[OPEN]
[Power/SRC]
Signal transmitter
Operating rang: 30°in all directions
[VOLUME]
[SEL]
[NAV/AV]
[BAND]
[MENU]
[PIC]
[ENT]
[TAG]
[RPT]
[ROOT]
[ ][ ]
[AUDIO]
[MUTE]
[0-9]
[SRCH]
[ANGLE]
[BACK]
[TITLE]
[ZOOM]
[SUB.T]

7
• Press this button to eject the disc.
[POWER/SRC] Button
• Press this button to change source.
• Press this button more than 1 second to power on when the unit is power off.
• Press this button more than 1 second to power off when the unit is power on.
[0 - 9] Buttons
• Use in the Key Pad screen to select the radio or satellite radio.
• Press to enter DVD video chapters/titles in the Key Pad screen.
[VOLUME] Button
• Increase or decrease volume.
[NAVI/AV] Button
• Press this button to switch between current source and current position on navigation map.
[SRCH] Button
• Press this button to open chapter or title search window while playing DVD.
[BAND] button
• Switch to next band alternately.
[SET] Button
• Press this button to open the Audio setting menu in any mode.
[BACK] Button
• Press this button to quit main menu if current screen is main menu.
Button
• Press this button for cursor movement in main menu or Setting mode.
• From the main menu, you can select your desired source or change your settings.
[MENU] Button
• Press this button to enter the MAIN MENU or return current resource.
[ENT] Button
• Press to fix the entered data in the Key Pad screen or enter the item the cursor is on.
[TITLE] Button
• Press to go to the title menu on the DVD.
[ROOT] Button
• Press to go to the root menu on the DVD.
[RPT] Button
• Press to perform chapter repeat / title repeat / repeat off while playing DVD mode.
• Press to perform track repeat/repeat off while playing CD.
• Press to perform repeat track /repeat folder/ repeat off while playing MP3/WMA, or video files
on disc.
• Press to perform repeat track /repeat folder/ repeat off while playing MP3/WMA, or video files
in USB memory.
Buttons
• Press to seek the next available higher or lower station in Tuner mode.
• In SAT Radio mode, you will scroll through the categories.
• Press to select the next higher or lower chapter number in DVD video mode.
• Press to select the next higher or lower track in DVD Audio, USB Video, USB Audio mode.
• Press for movement of background source in Navigation mode.

8
Buttons
• Press to manually select the next higher or lower station in Tuner and Satellite Radio modes.
• Press to perform fast-forward or fast-backward searching. Press again to change the speed to 2x,
4x, 8x or 16x.
• Press for movement of background source in Navigation mode.
[ZOOM] Button
• Press to turn on and zoom in while playing DVD. You can zoom in up to 3x. (No all DVD disc
supports this function)
[AUDIO] Button
• Press to switch the AUDIO channel of the disc while playing DVD.
[SUB-T] Button
• Press to switch next available subtitle while playing DVD.
• Press to display Video menu in iPod mode.
[ANGLE] Button
• Press to switch the different ANGLE while playing DVD. (No all DVD disc supports this
function)
• Press to display Audio menu in iPod mode.
3 Basic operations
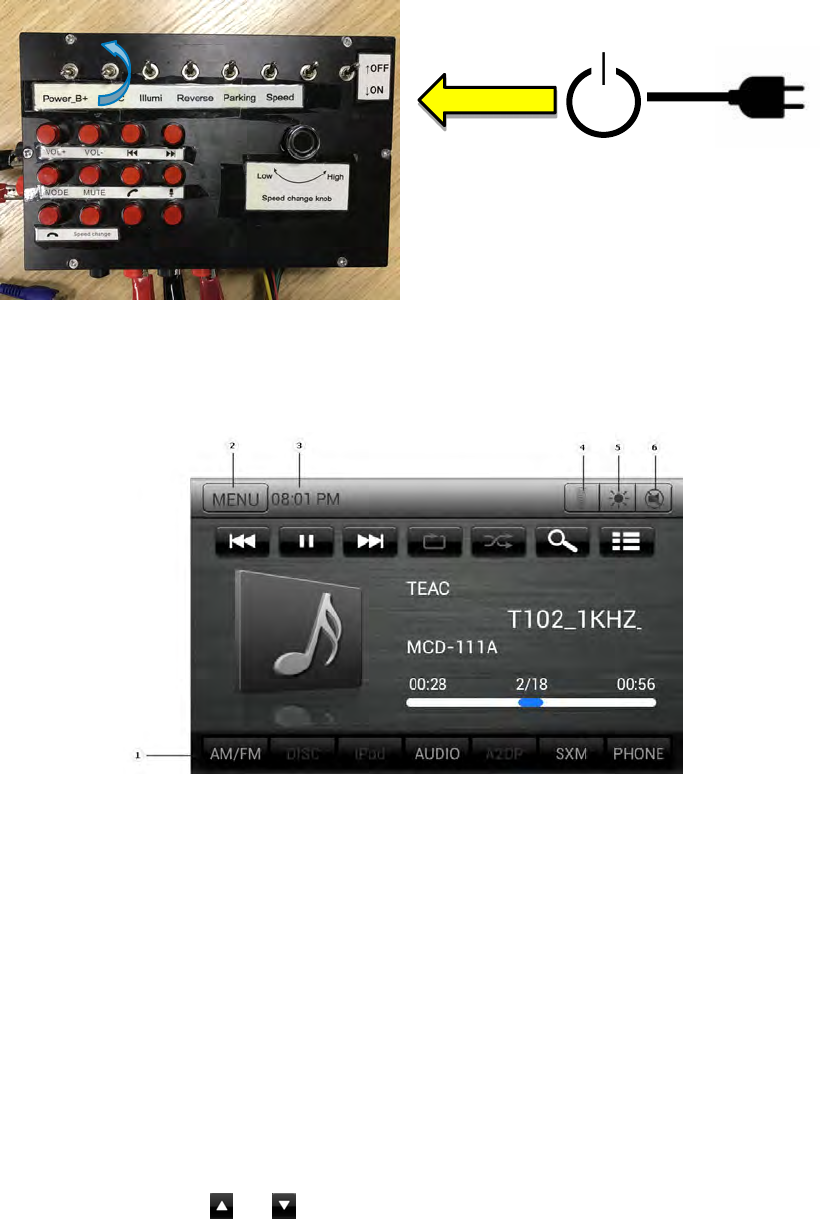
3.1.Start up and Shut down
1. Start up
1) Supply (Yellow) +12V Power to the Power-Supply jig box.
2) Turn on “Power B+” switch.
3) Wait for 1 second, turn on ACC switch.
2. Shut down
1) Turn off “ACC” switch only. (Do NOT turn off “Power B+” switch at the same time.)
1)
2)
3)
9
2) In case of restarting the ACC after 1), wait for more than 10 seconds before turning “ACC”
switch on again.
3.2.Title and Bottom
1. Select the tab and enter the page
2. Back to menu or back to the current audio source.
3. Show the current time
4. When BT connected, launch the phone voice
5. Monitor-OFF / Monitor-ON
6. Audio MUTE-OFF/ Audio MUTE-ON
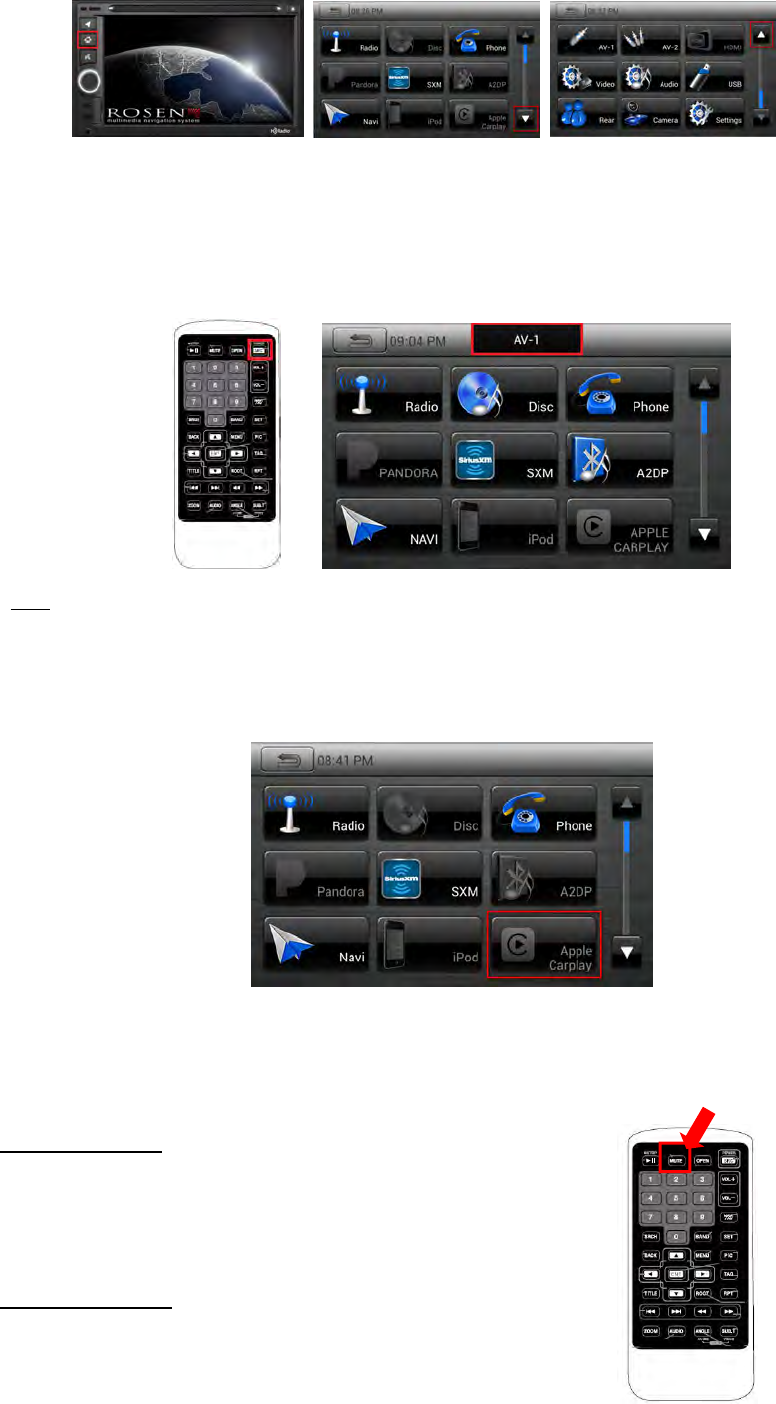
3.3.Change Audio Source
• To change audio source by touch screen:
1. Press “Home” button. Main menu will be displayed.
2. When you touch or icon on the screen or scroll the screen, previous or next page
will be displayed.
3. Touch audio source icon that you want. Then the selected audio source will play.
1)
10
• To change audio source by remote controller or SWC:
1. Press the “SRC” button, it will show next source toast.
2. Each time you continuously press the “SRC” button, active icon moves to the next.
3. If you don’t press the “SRC” button about 2 seconds, the source will be entered.
*Note:
If there is unavailable source, the icon will be disabled and the icon cannot be selected.
For example, if Apple CarPlay device is not connected, "Apple CarPlay" icon will be disabled and
Apple CarPlay mode cannot be selected.
3.4.Audio MUTE-ON / Audio MUTE-OFF
Audio MUTE-ON
1. Press “MUTE” button of remote controller.
2. Press “MUTE” button of SWC.
3. Press “MUTE” button of titlebar.
Audio MUTE-OFF
1. Press “MUTE” button of remote controller again.
2. Press “MUTE” button of SWC again.
11
3. Press “MUTE” button of titlebar again
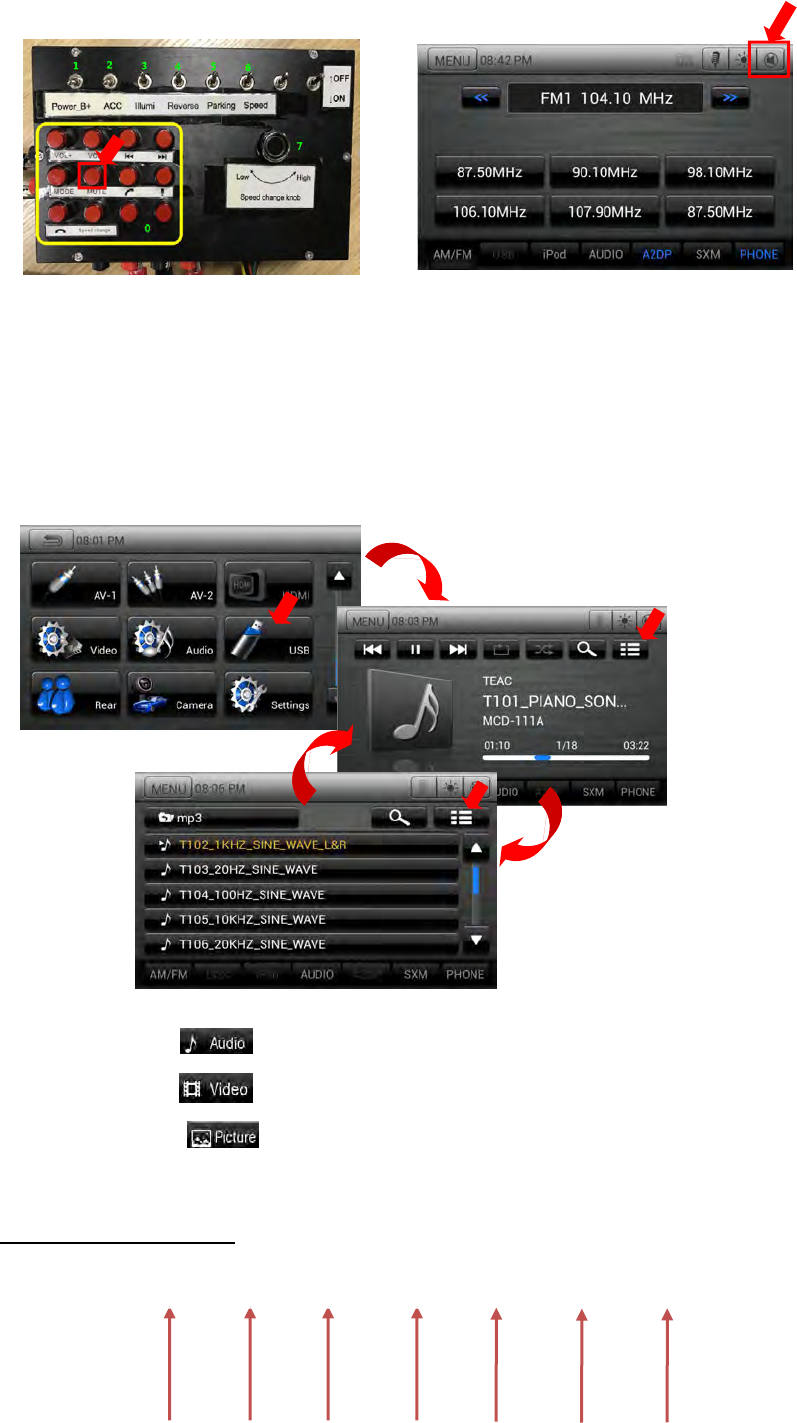
4 USB Mode
1. Connect a U-disk to the USB cable.
2. The system will automatically detect the connected U-disk.
3. Press the Audio [ ] button to display Audio files list.
4. Press the Video [ ] button to display Video files list.
5. Press the Picture [ ] button to display Picture files list.
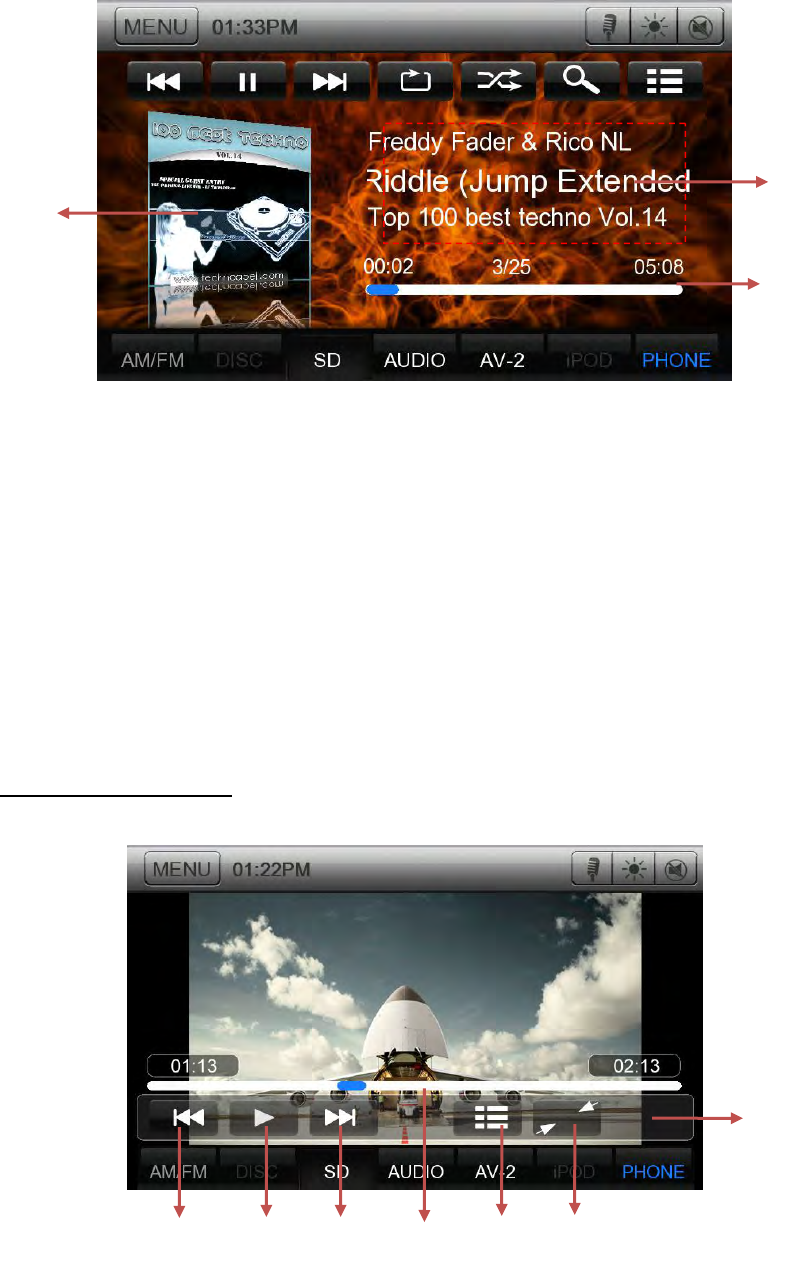
USB Audio Operations
1
2
3
4
5
6
7
12
1. Previous Track /Fast Backward button.
2. Play/Pause button.
3. Next Track/Fast Forward button.
4. Repeat button.
5. Shuffle button.
6. Direct Searching button.
7. Track list button.
8. Album Art.
9. Current ID3 info area.
10. Elapsed playing time indicator/Seek bar.
USB Video Operations
1. Previous Video button
2. Play/Pause button
1
10
8
9
2
3
5
6
4
7
13
3. Next Video button
4. Elapsed playing time indicator/Seek bar
5. Go to list menu mode
6. Hide Operation bar
7. Operation bar.
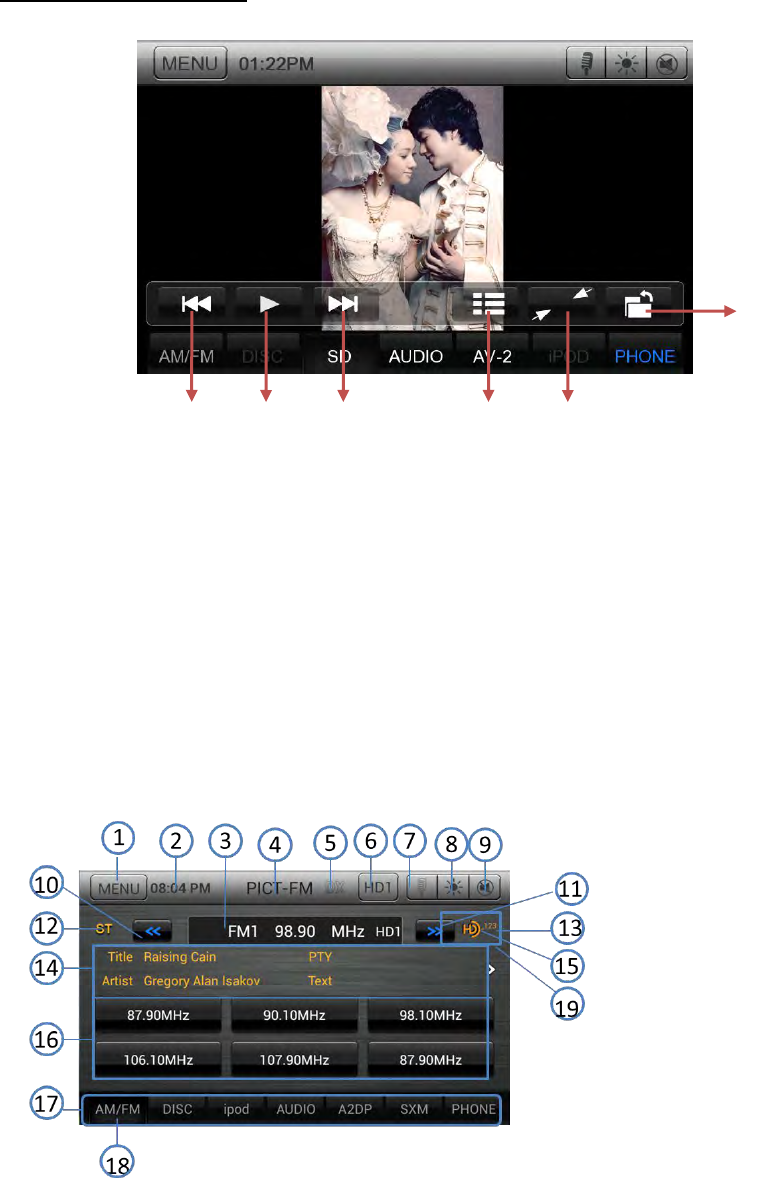
USB Picture Operations
1. Previous picture button.
2. Play/Pause picture button.
3. Next picture button.
4. Go to list menu mode
5. Hide Operation bar and Shortcut bar
6. Operation bar.
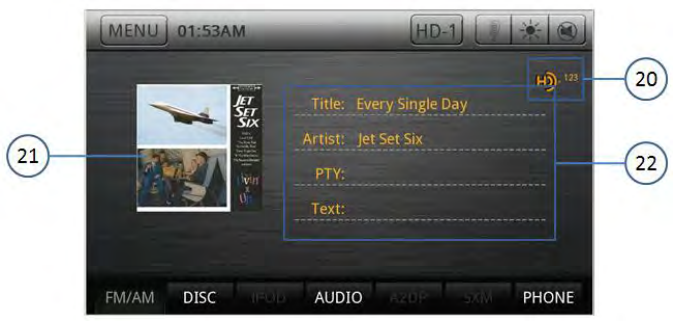
5 HD RadioTM Operations
1
2
3
4
5
6
14
1. Return to Main Menu
2. Time display
3. Frequency display, touch to
automatically seek next
station in the direction of higher frequencies
4. Station name
5. Loc/DX. It is used to set the station is local or dx.
6. Touch to change the next available sub channel
7. Voice dial, if the unit connect to a smart phone which can support this function this button
can be enable
8. Change the back ground light
9. Mute button
10.Tune backward
11.Tune forward
12.ST flag
13.Sub-channel indicator
14.Title, PTY, Artist, Text display area. The strings will roll from left to right to display all the
characters.
15.HD Radio logo when audio is digital
16.Preset station list
17.Mode switch buttons bar
18.AM/FM button
19.Touch this area to switch to Artist experience page
20.Touch this area to switch to Main page
21.Station logo and Album logo
22.Title, PTY, Artist, Text display area
Using the tuner unit:
1. Touch the AM/FM button on the mode switch buttons bar, if the unit does not
work in tuner mode. The tuner mode screen is displayed.
2. Touch the AM/FM button to select the radio band, when the unit already works in
tuner mode. Each time the button is pressed, the radio reception band changes in the
following order: FM1 FM2 FM3 AM FM1 FM2 FM3 AM…
3. Hold one preset station more than 3 seconds to save current station to the preset
station list.

15
6 SXM Operations
This function is available when a Satellite Radio Receiver is connected through the dedicated
connection..
Note:
Satellite radio is a subscription service.
Press the [SXM] button on Main Menu display. The system changes to the SXM. The SXM mode
screen is displayed
1. Channel up button.
2. Play and pause button.
3. Channel down button
4. Show the channel is live.
5. Choose channel list.
6. Keypad Button.
7. Channel category type.
8. Channel list.
9. Current Channel Number / Category Name / Preset Number,etc.
10. Channel time
16
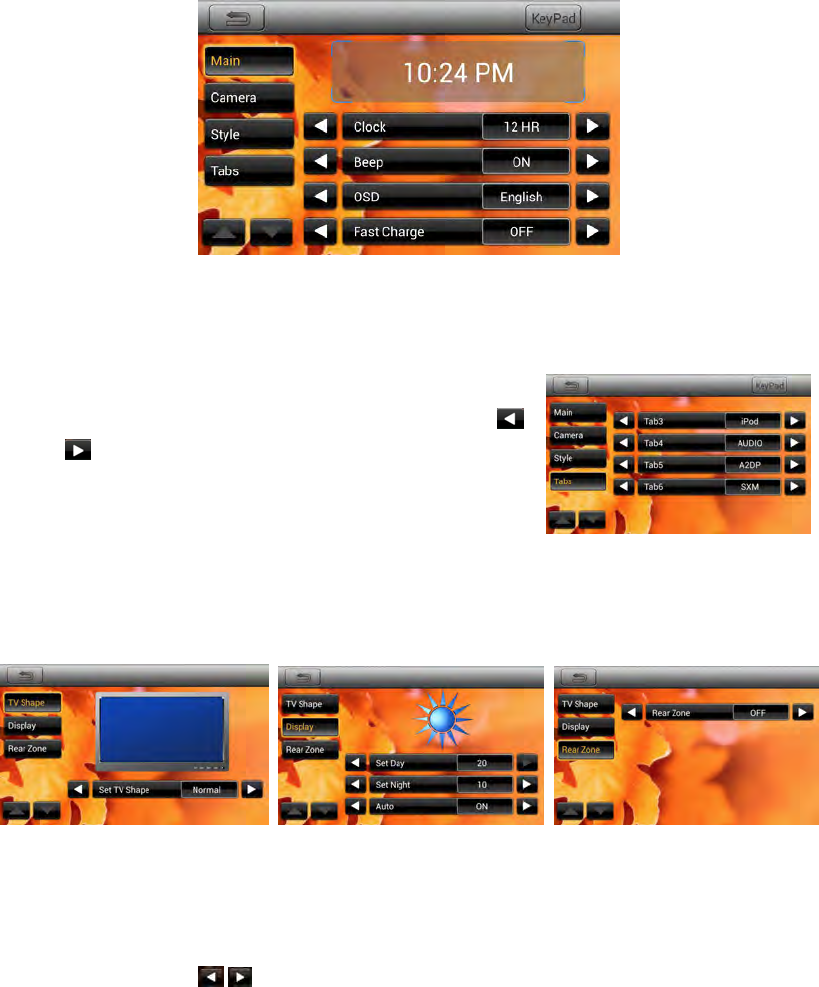
7 Settings Operation
7.1.Main Settings
Press [Settings] button on the Main menu screen. The Setting menu screen will be displayed.
Contains Main、Camera、Style、Tabs.
7.2.Set Bottom Tabs
1. A total of seven tabs are on the shortcut. Among them the
third to the sixth users can customize. User can press [ ]
or [ ] button to set different tabs.
2. While user sets tabs, the shortcut will be shown the same
on each source.
7.3.Video Setup Menu
TV Shape: Set TV Shape Normal or Cinema.
Set Day: Set Day value from 0 to 20.
Set Nigh: Set Nigh value from 0 to 20.
Auto: Choose ON or OFF.
Rear Zone: Touch the [ / ] key to select the Rear Zone source.

17
7.4.Audio Setup Menu
This menu contains: EQ、Speaker、Sub-Out、Volume
EQ: Set the audio sound effect
Speaker: Set the balance and fader
Sub-Out: Set the sound level and crossover
Volume: Set the volume and preamp for sources
7.5.Right/Left Hand Drive Mode
To change the location of home button of Apple CarPlay:
1. Go to “Video Setting” -> “CarPlay” menu.
2. Select “Left” or “Right”.
3. The location of home button will be changed.
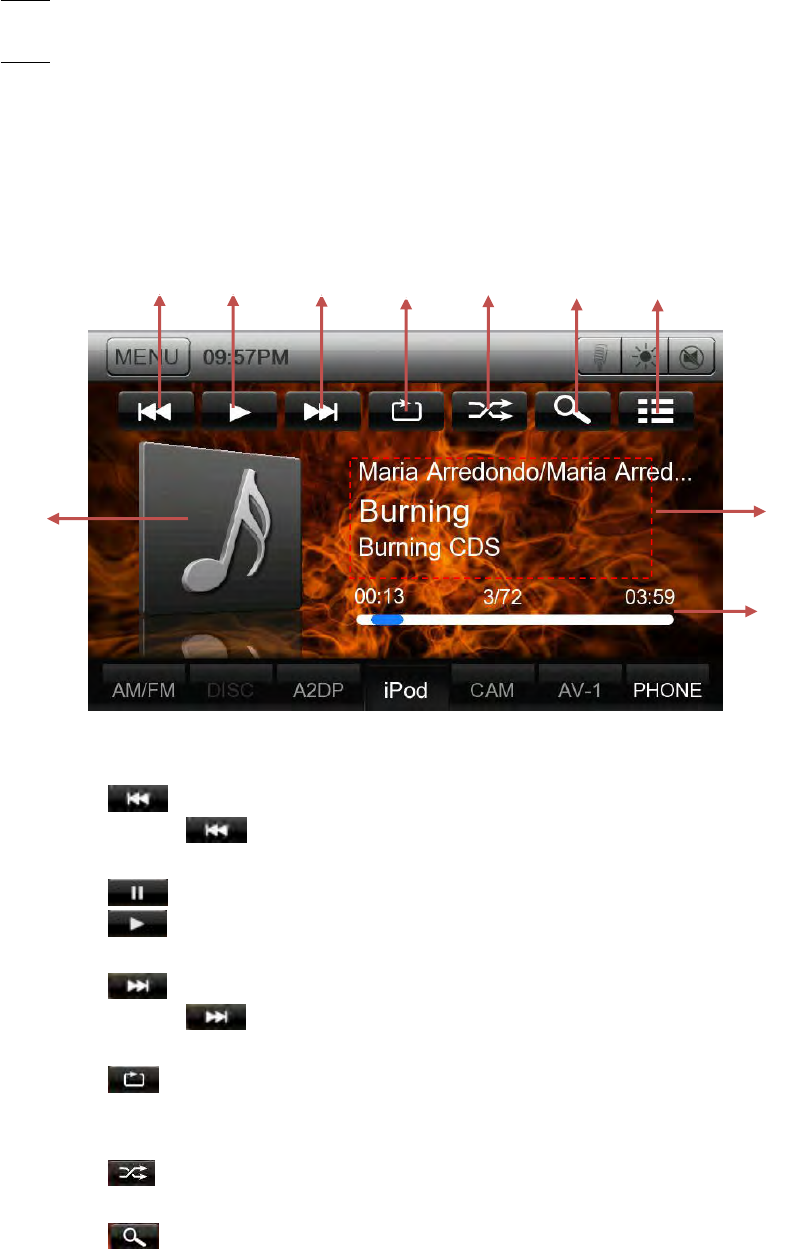
8 iPod/iPhone Operations
1. Connect iPod/iPhone to the USB cable. (*Note1)
2. The system will automatically detect the connected device. (*Note2)
18
3. Touch the iPod Audio icon. iPod Audio mode screen will be displayed.
*Note1:
The USB cable with the label of “iPod/iPhone” only supports iPod Audio mode.
*Note2:
When the device which does not support CarPlay or is disabled CarPlay on iPhone is connected,
this system will work in the iPod Audio mode.
1. PREVIOUS
• Touch the [ ] key to choose the previous track.
• Touch and hold the [ ] key to fast backward.
2. PLAY/PAUSE
• Touch the [ ] key during playback to pause.
• Touch the [ ] key. Playback resumes.
3. NEXT
• Touch the [ ] key to choose the next track.
• Touch and hold the [ ] key to fast forward.
4. REPART
• Touch the [ ] key to repeat the selected track.
•Touch once to start a single track repeat, touch again repeat off.
5. SHUFFLE
• Touch the [ ] key to switch the shuffle mode on or off.
6. SEARCH
• Touch the [ ] key to search with the first alphabet in current list.
7. LIST
1
2
3
4
5
6
10
8
9
7
19
• Touch the [ ] key to display the current play list, touch again to display the ID3
Information.
8. ALBUM ART WORK
9. ID3 INFORMATION
10. PROCESS BAR
• Touch the [ ] on seek bar and drag it to any position where you want to start playback.
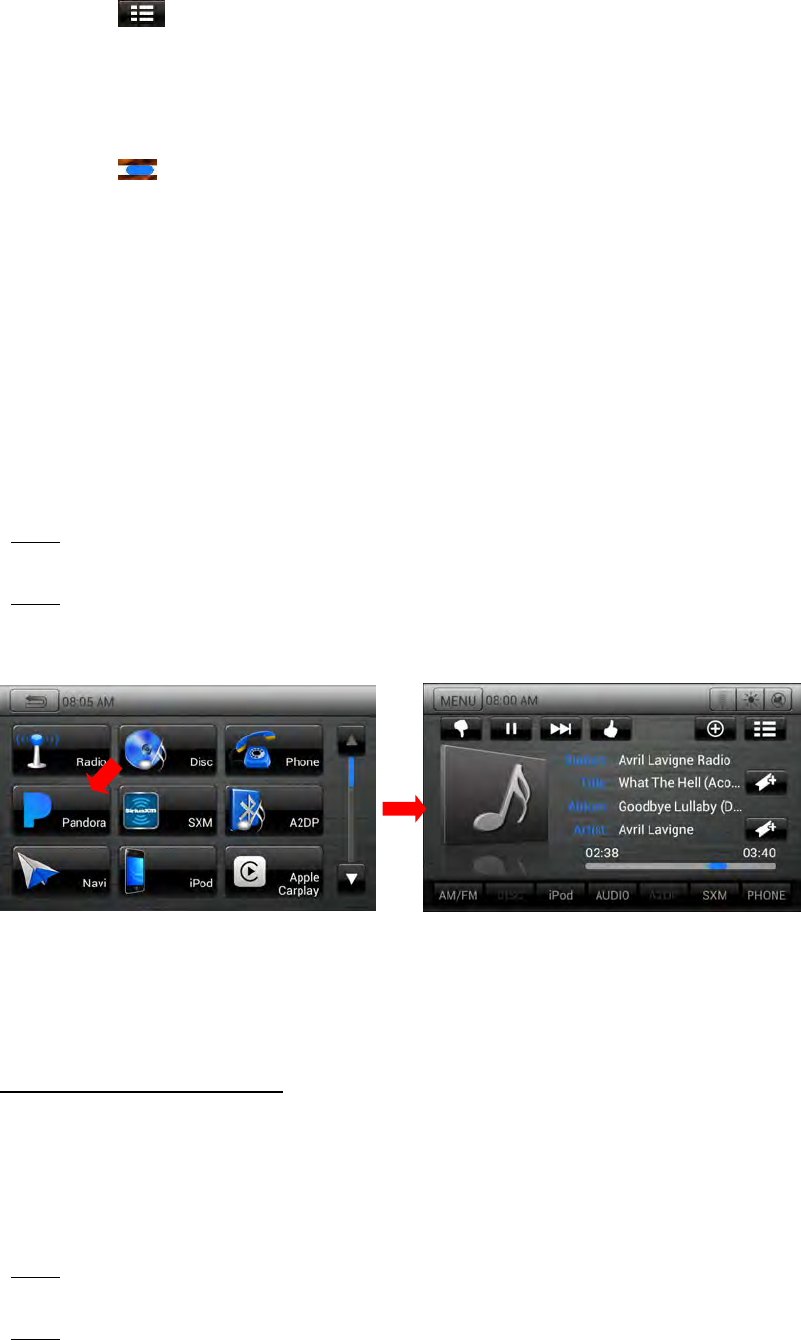
9 Pandora Audio
1. Launch Pandora application on your iPhone.
2. Connect iPod/iPhone to the USB cable. (*Note2)
3. The system will automatically detect the connected device.
4. Touch the Pandora icon. Pandora mode screen will be displayed.
*Note1:
Please download and install Pandora application from iTunes store on the iPhone.
*Note2:
The USB cable with the label of “iPod/iPhone” only supports Pandora mode.
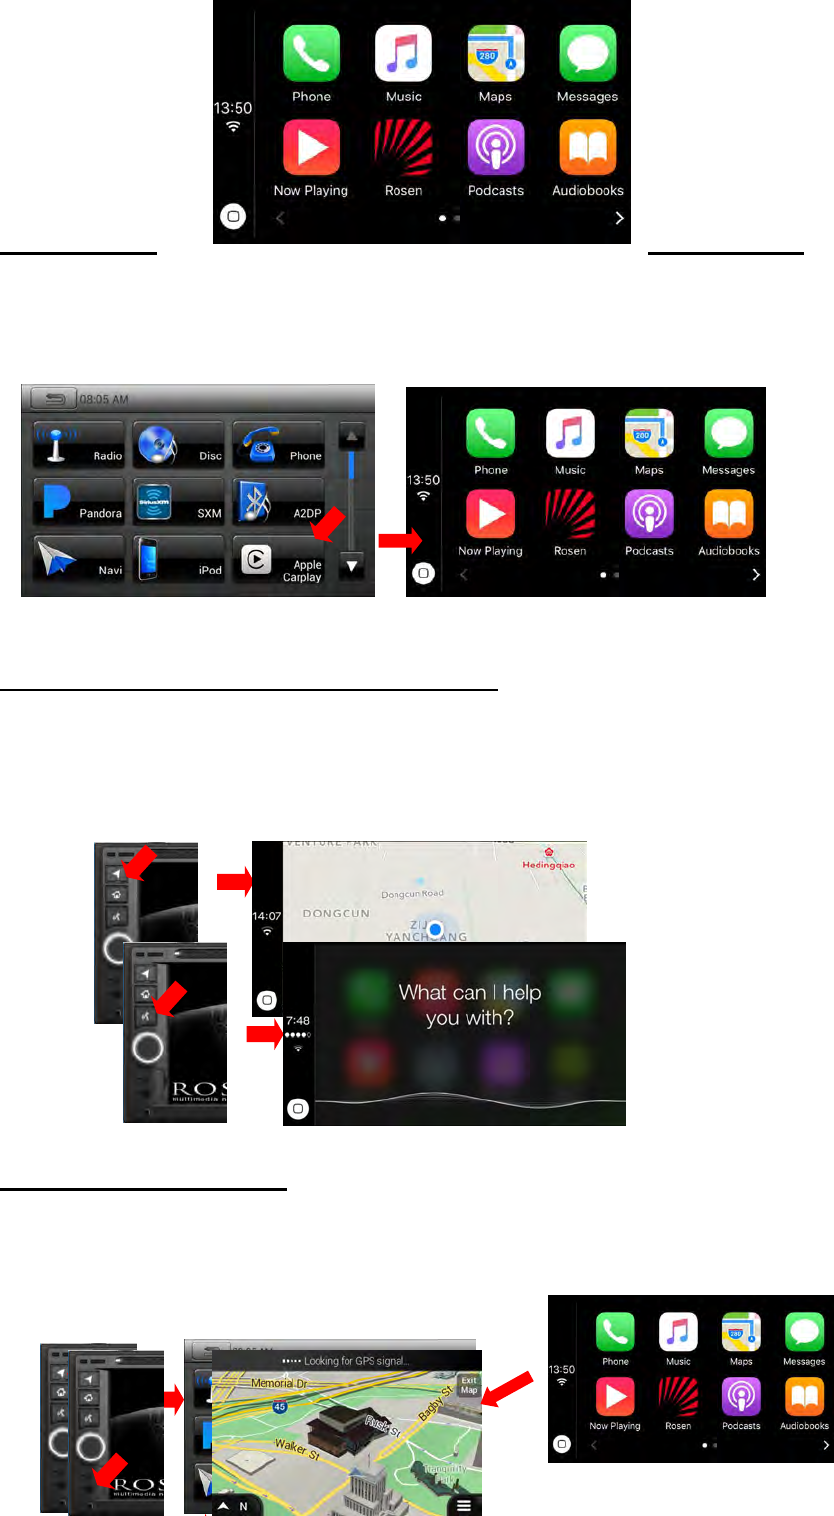
10 CarPlay Operations
Selecting the CarPlay mode
Connect your iPod/iPhone to the USB connector. If the apple device support CarPlay, the
system will automatically detect the connected device , the CarPlay button will be enabled for
operation on the Main Menu screen and the CarPlay screen will automatically show on the unit.
*Note1:
Another USB cable is not supported for Apple CarPlay.
*Note2:
During The connection of CarPlay, prohibit the use of Bluetooth.
20
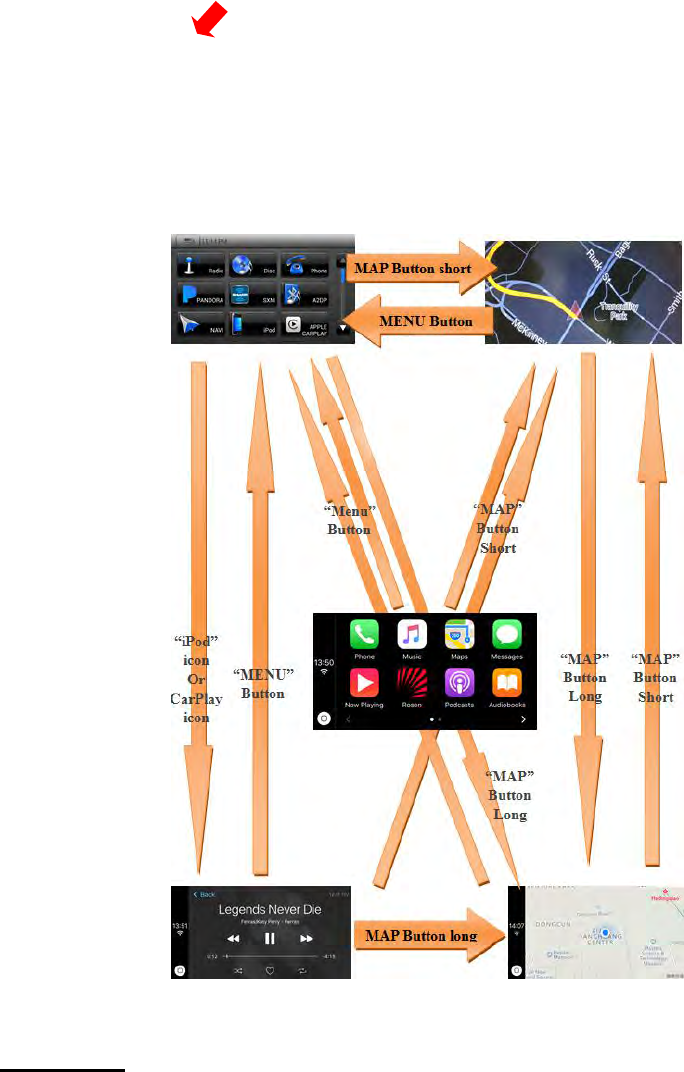
To go to Apple
CarPlay screen
•When you touch “Apple CarPlay” icon, “CarPlay” screen is displayed.
•When you touch “iPod Audio” icon, “CarPlay now playing” screen is displayed and start
playback music.
To go to Apple CarPlay screen: (by hard button)
•When you press and hold “MAP” button for more than 2 seconds, “CarPlay maps” screen is
displayed.
•When you press “VOICE” button, “Siri” screen is displayed.
To go back to native screen:
•Press “HOME” button, Main menu screen is displayed.
•Press “MAP” button, native navigation screen is displayed.
•Press “Rosen” button, native screen is displayed.
21
To start Siri (There are 2 ways to use Siri.)
1. Press “VOICE” button of panel.
2. Press “VOICE” button of SWC.
3. Press and hold “SRC” button of SWC or “SRC” button of remote controller more than 600
milliseconds.
4. Siri screen will be displayed.
5. Talk your request.

22
11Native Navigation
To initialize: (First power-up timing only)
Basically, just touch “Next” button. If you want, you can customize settings.
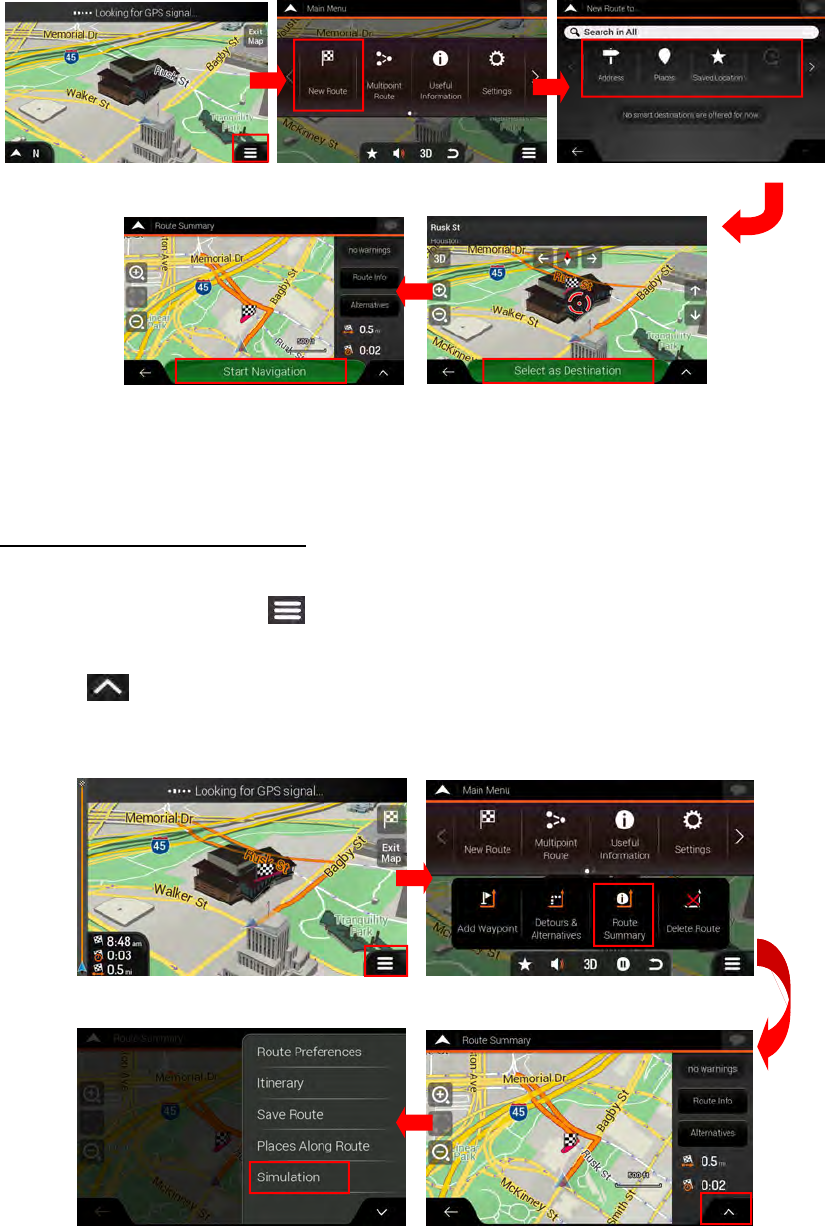
To Set Destination
1. Touch Navigation MENU “ ” icon.
2. Touch “New Route” button.
3. There are several ways to select your destination. Choose one of them.
4. Touch the “Select as Destination”.
5. Touch the “Start Navigation”.
23
To Start Guidance Simulation
1. Touch Navigation MENU “ ” icon.
2. Touch “Route Summary” button.
3. Touch “ ” icon.
4. Select “Simulation”.
24
12 Bluetooth Operations
12.1. Bluetooth Paring
1. Turn on the power of the cellular phone you wish to register.
2. Touch the [ ] key to display the Device Select screen.
3. Touch the [Add] key to display the Inquiring Device screen.
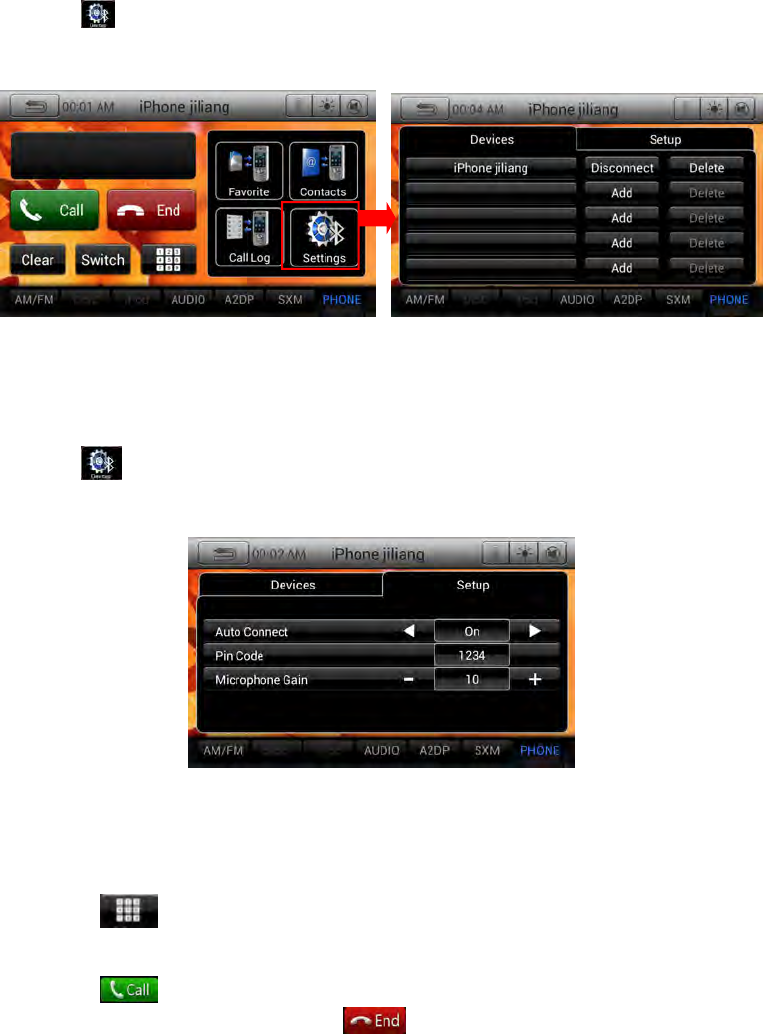
12.2. Bluetooth Setting
1. Touch the [ ] key to display the Devices information on the screen.
2. Touch the [Setup] key to display the Setup information on the screen.
12.3. Telephone operations
1. Touch the [ ] key to display the Ten-Key pad screen.
2. Enter the telephone number by using the Ten-Key pad displayed on the screen.
3. Touch the [ ] (Send) key to call the number.
4. When the call is finished, touch the [ ] (End) key to hang up.
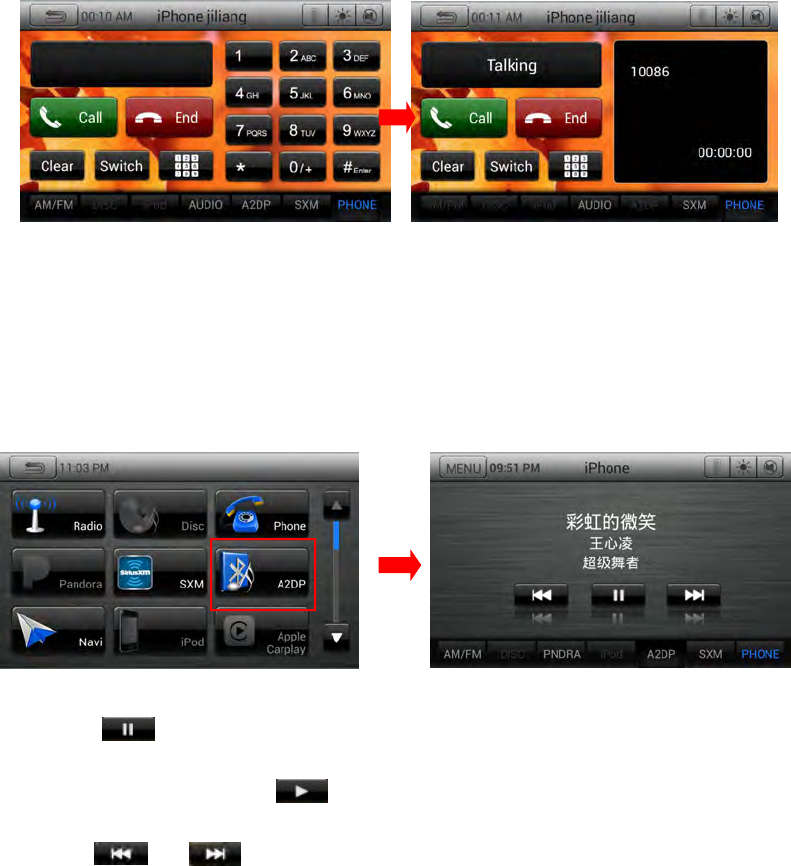
25
12.4. Bluetooth Audio Player Operations
1. Confirm that Bluetooth device is connected.
2. Press “HOME” button and choose “A2DP” source.
3. Bluetooth Audio mode screen will be displayed.
Pausing playback
• Touch the [ ] key during playback.
Playback pauses.
• To resume playback, touch the [ ] key. Playback resumes.
Skipping a track
• Press the [ ] or [ ] button during playback, Tracks are skipped.
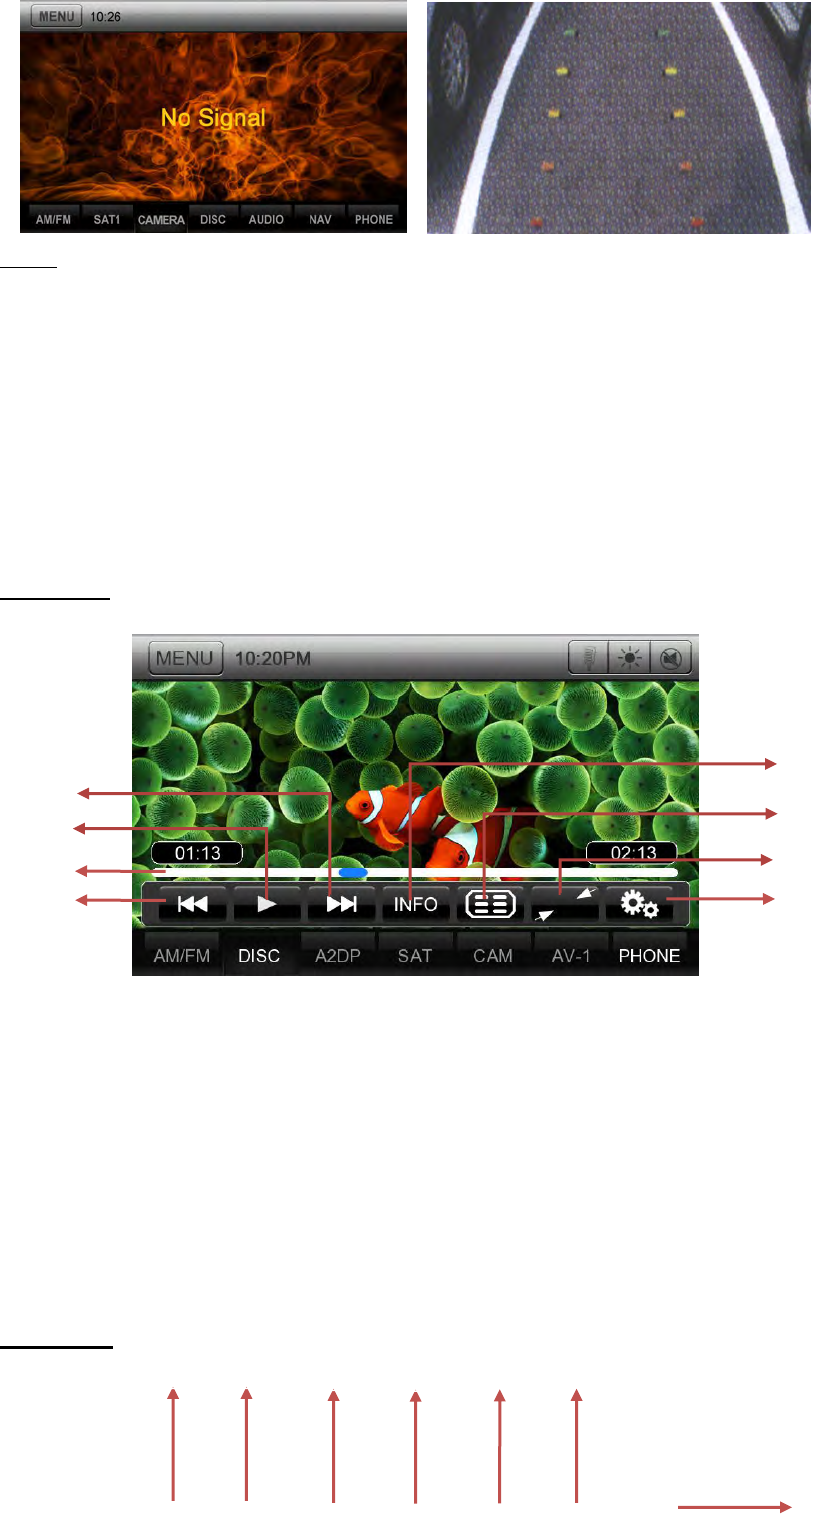
13 Camera In Operations
Switching to Camera mode
• Touch the [Camera] key on Main Menu to select desired mode.
• The LCD will display the external camera video. The screen will display "No Video Signal"
menu, if a valid camera is not connect to this head unit.
• Press Menu button on Operational Panel to return to the Main Menu.
26
*Note:
If the reverse cable is connected correctly to the car, the head unit will go to camera mode
automatically when the car is in reverses.
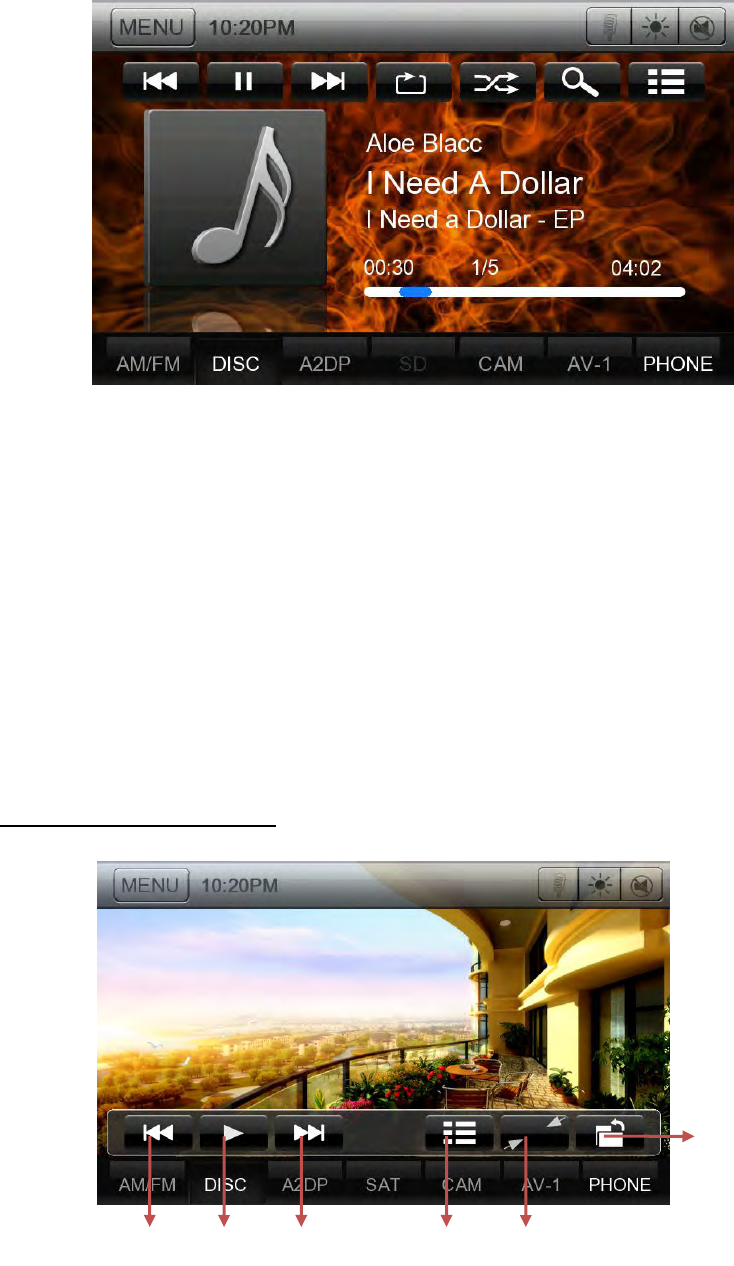
14 DISC Player Operations
1. Confirm that a disc is inserted.
2. Press “HOME” button and choose “Disc” source.
Play Video
1. Previous Track /Fast Backward Button
2. Elapsed playing time indicator/Seek bar
3. Play/Pause Button
4. Next Track/Fast Forward Button
5. DVD playback info
6. Play list
7. Hide Operation bar
8. DVD player setup Button
Play Audio
2
1
4
5
6
7
8
3
1
2
3
4
5
6
7
27
1. Previous Track /Fast Backward button.
2. Play/Pause button.
3. Next Track/Fast Forward button.
4. Repeat button.
5. Shuffle button.
6. Direct Searching button.
7. Track list button.
8. Album Art.
9. Current ID3 info area.
10. Elapsed playing time indicator/Seek bar.
11. Source shortcut buttons.
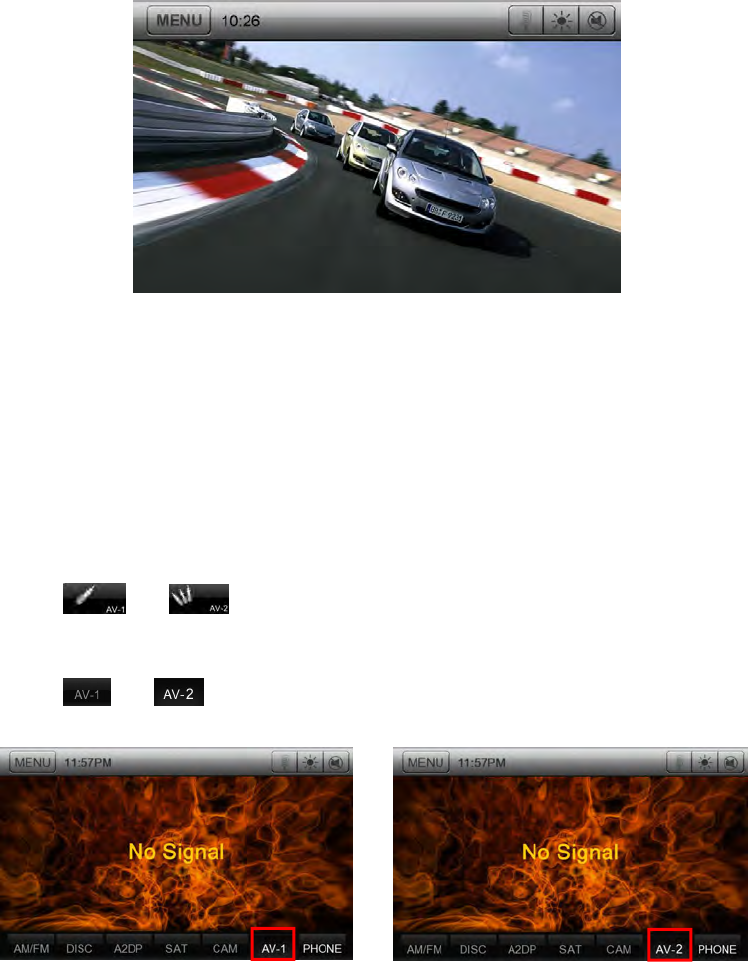
Playing picture files in disc
1
2
3
4
5
6
1. Previous picture button.
2. Play/Pause picture button.
28
3. Next picture button.
4. Go to list menu mode
5. Hide Operation bar and Shortcut bar
6. Operation bar.
15 HDMI Operations
External peripheral devices, including android or iPhone etc. can be connected to the unit
through HDMI Line. Then you can see the phone screen on the HDMI app, you can watch movie
which in your phone on unit.
16 AUX 1 / AUX 2 Operations
External peripheral devices, including a game console, camcorder, navigation unit,
iPod/iPhone, etc. can be connected to the AUX 1 or AUX 2 connector on the front or back of this
unit using the A/V media cables.
1. Touch [ ] or [ ] button on Main Menu to select desired mode (when unit is
reading).
2. Touch [ ] or [ ] button in other source to select desired mode.
29
WARNING
For you safety,the driver should not watch any video sources and/or operate the
controls while driving.Please note that watching and operating any video sources
while driving are prohibited by law in some countries. Also, while driving, keep
the volume to a level at which external sounds can be heard.
Do not disassemble or modify this unit. It may cause an accident, fire, or electric
shock.
Changes or modifications not expressly approved by the party responsible for
compliance could void the user’s authority to operate the equipment.
This equipment has been tested and found to comply with the limits for a Class B
digital device, pursuant to Part 15 of the FCC Rules. These limits are designed to
provide reasonable protection against harmful interference in a residential installation.
This equipment generates, uses and can adiate radio frequency energy and, if not
installed and used in accordance with the instructions, may cause harmful interference
to radio communications. However, there is no guarantee that interference will not
occur in a particular installation.
If this equipment does cause harmful interference to radio or television reception,
which can be determined by turning the equipment off and on, the user is encouraged
to try to correct the interference by one or more of the following measures:
-- Reorient or relocate the receiving antenna.
-- Increase the separation between the equipment and receiver.
-- Connect the equipment into an outlet on a circuit different from that to
which the receiver is connected.
--
Consult
the
dealer
or
an
experienced
radio/TV
technician
for
help.
This
equipment
complies
with
FCC
radiation
exposure
limits
set
forth
for
an
uncontrolled
environment.
End
user
must
follow
the
specific
operating
instructions
for
satisfying
RF
exposure
compliance.
This
transmitter
must
not
be
co-located
or
operating
in
conjunction
with
any
other
antenna
or
transmitter.
Improper connection of speed pulse signal may result in serious damage or injury
including electrical shock, and interference with the operation of the vehicle’s
anti-lock braking system, automatic gearbox and speedometer indication.
To maintain compliance with FCC’s RF exposure guidelines, this equipment should
be installed and operated with a minimum distance of 20cm between the radiator
and your body.
FCC Note:
This device complies with Part 15 of the FCC rules. Operation is subject to the
following two conditions: (1) this device may not cause harmful interference, and (2)
this device must accept any interference received, including interference that may cause
undesired operation.The manufacturer is not responsible for any radio or TV
interference caused by unauthorized modifications or change to this equipment. Such
modifications or change could void the user’s authority to operate the equipment.