SKYPINE ELECTRONICS CNE8215BCL Car Navigation Entertainment System User Manual III
SKYPINE ELECTRONICS (SHEN ZHEN) CO., LTD. Car Navigation Entertainment System III
Contents
- 1. User Manual
- 2. User Manual Part II
- 3. user manual III
- 4. user Manual IV
user manual III
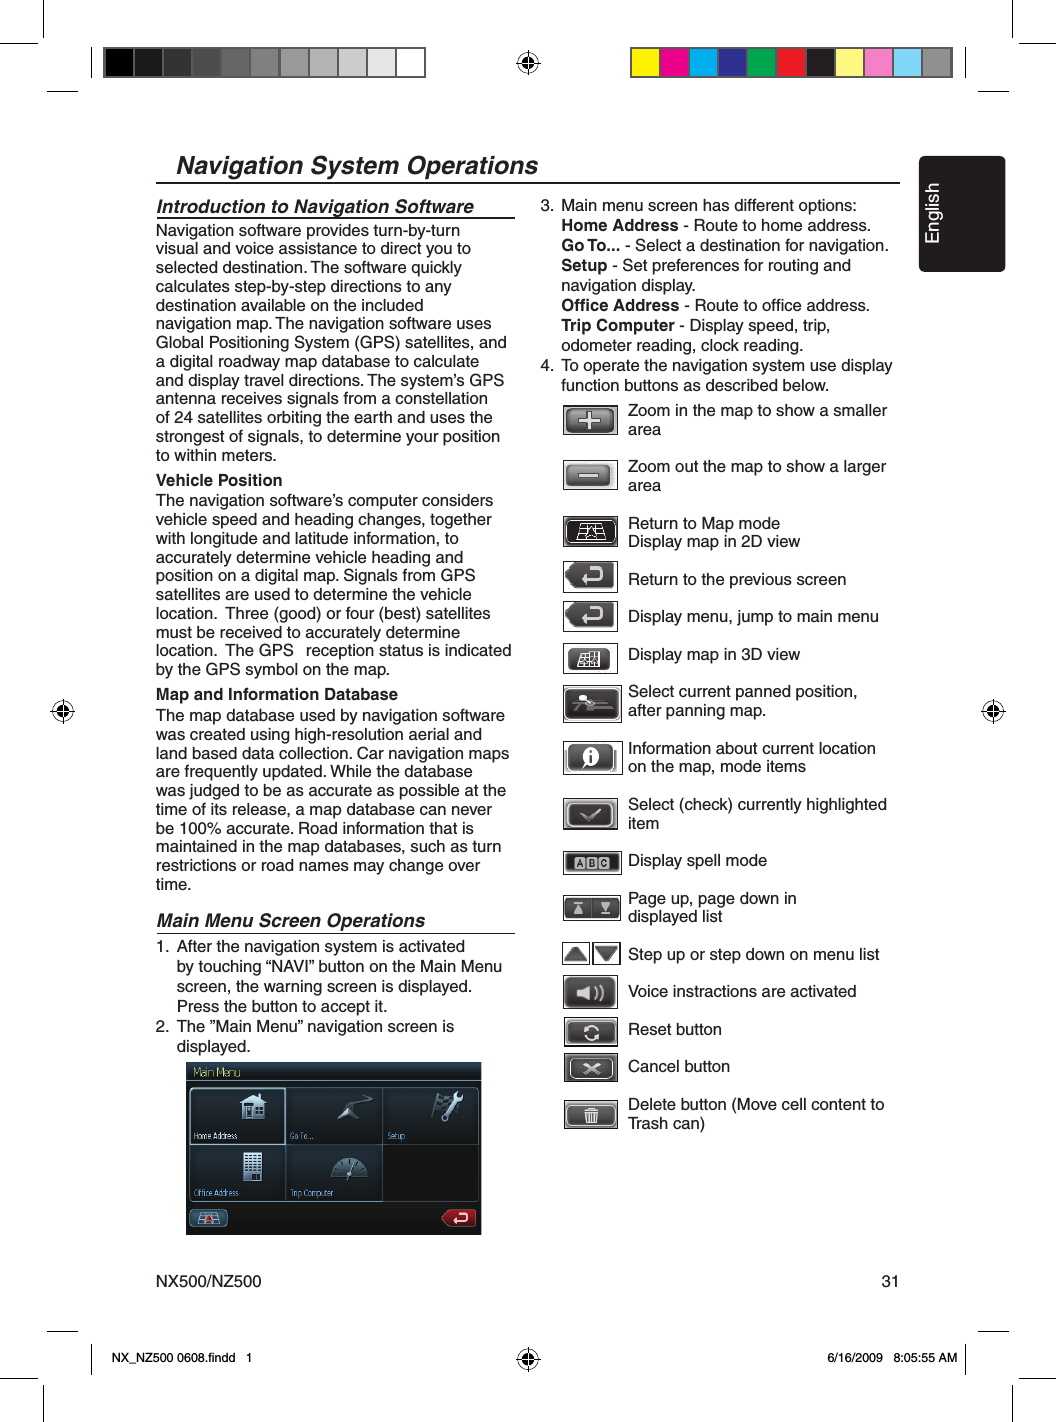
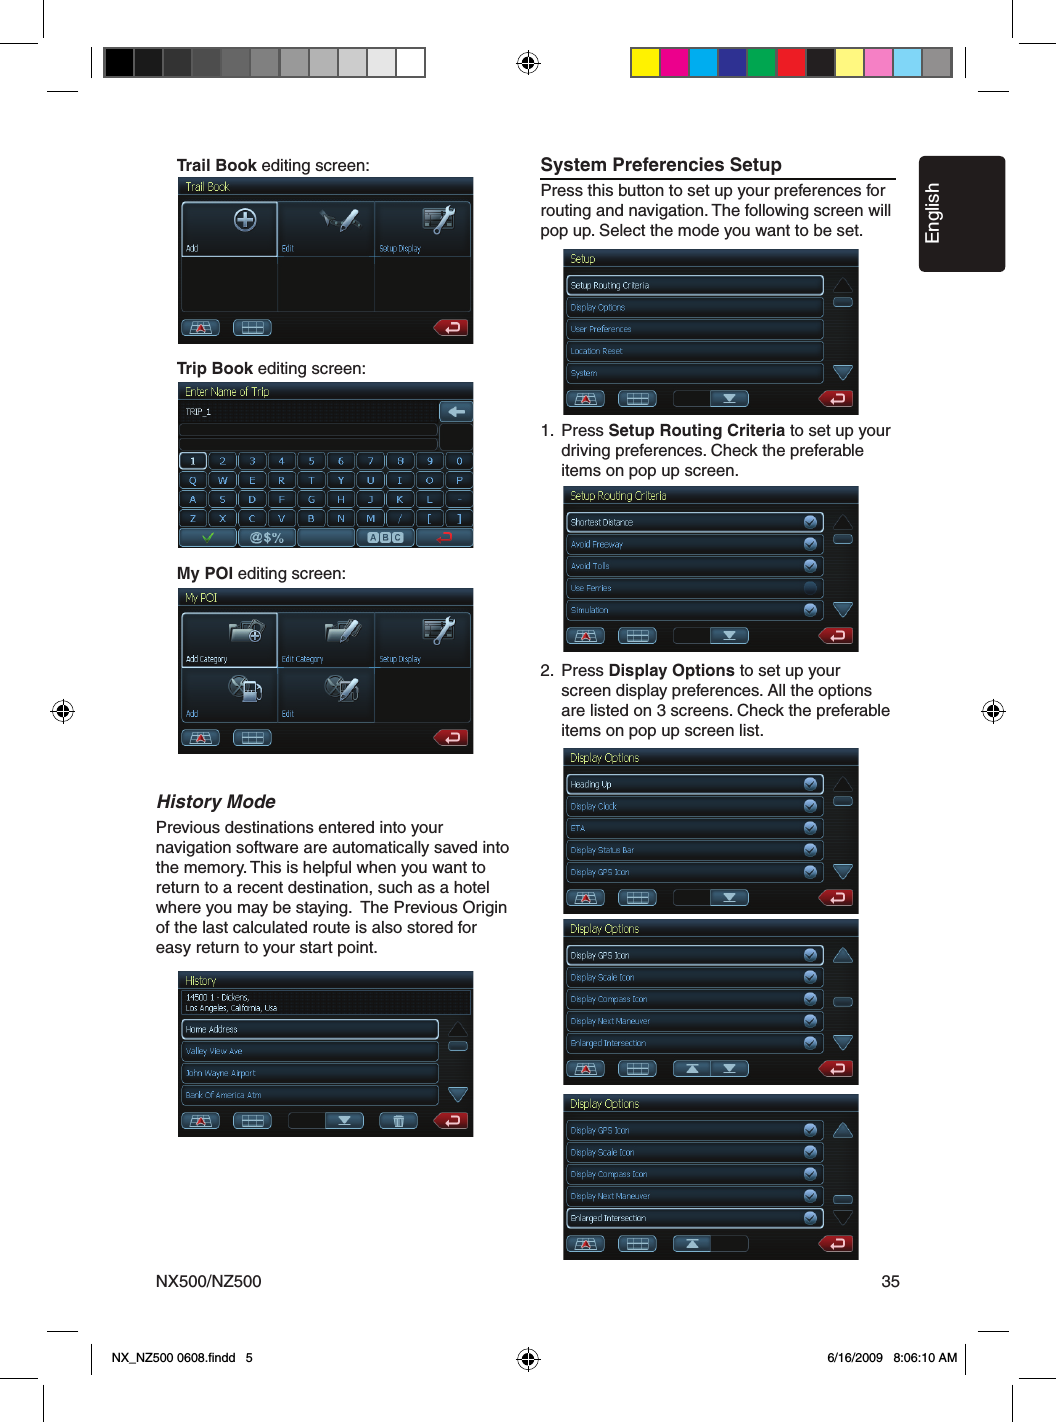
![EnglishNX500/NZ50028DVD Video Player OperationsPlaying MP3 foldersWhen selected for play, files and folders (Folder Search, File Search or Folder Select) are accessed in the order in which they were written to the media. As a result, the order in which they are expected to be played may not match the order in which they are actually played.You may be able to set the order in which MP3/WMA files are to be played by assigning file names beginning with play sequence numbers such as “01” to “99”.For example, a medium with the following folder/ file hierarchy is subject to Folder Search, File Search or Folder Select.See the diagram below.The player will only recognize three folder levels and does not display folders containing other folders. In the example above, the unit will display folders 3, 4, 6, and 8, but not 2 and 7 since they do not contain others. Playback Picture MenuThe picture on the display comes with the different functions to operate.• Touch [ ] button to play next picture.• Touch [ ] button to play previous picture.• Touch [ ] button to stop playing.• Touch [ ] button to rotate picture 900 counterclockwise.• Touch [ ] button to rotate picture 900 clockwise.• Touch [MENU] button to return to disc root Menu.• Touch [ ] button to return to the Main menu.513 42 6 71. Back Button2. Menu Button3. Previous Picture Button4. Next Picture Button5. Stop Button6. Rotate Picture counterclockwise7. Rotate Picture clockwiseNX_NZ500 0608.findd 8 6/16/2009 8:05:52 AM](https://usermanual.wiki/SKYPINE-ELECTRONICS/CNE8215BCL.user-manual-III/User-Guide-1180682-Page-1.png)
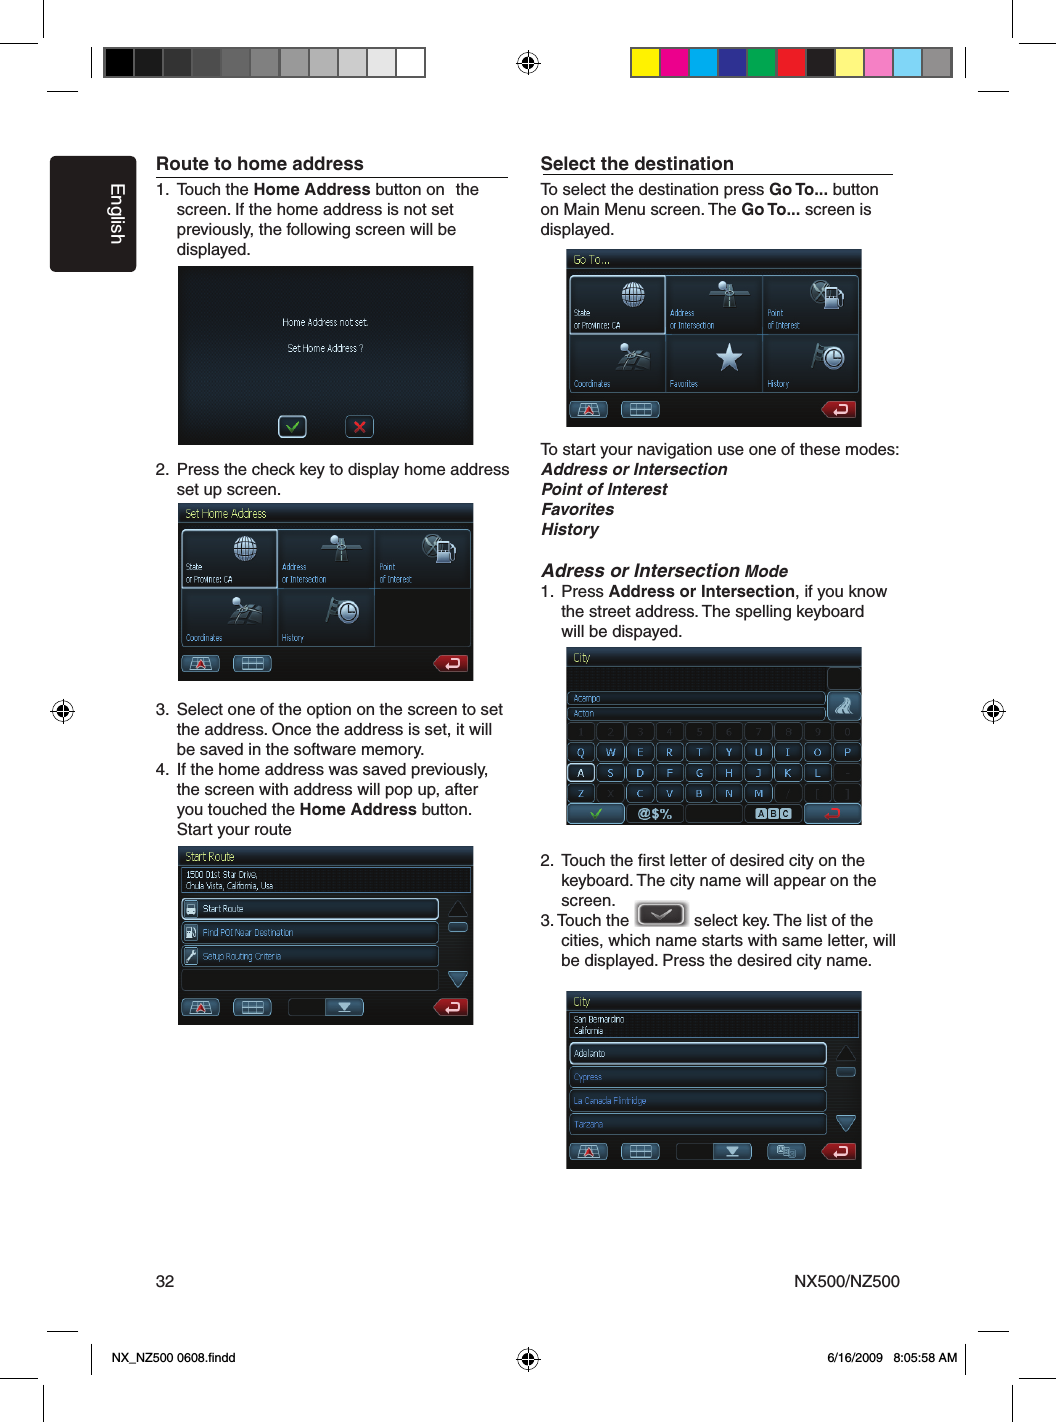
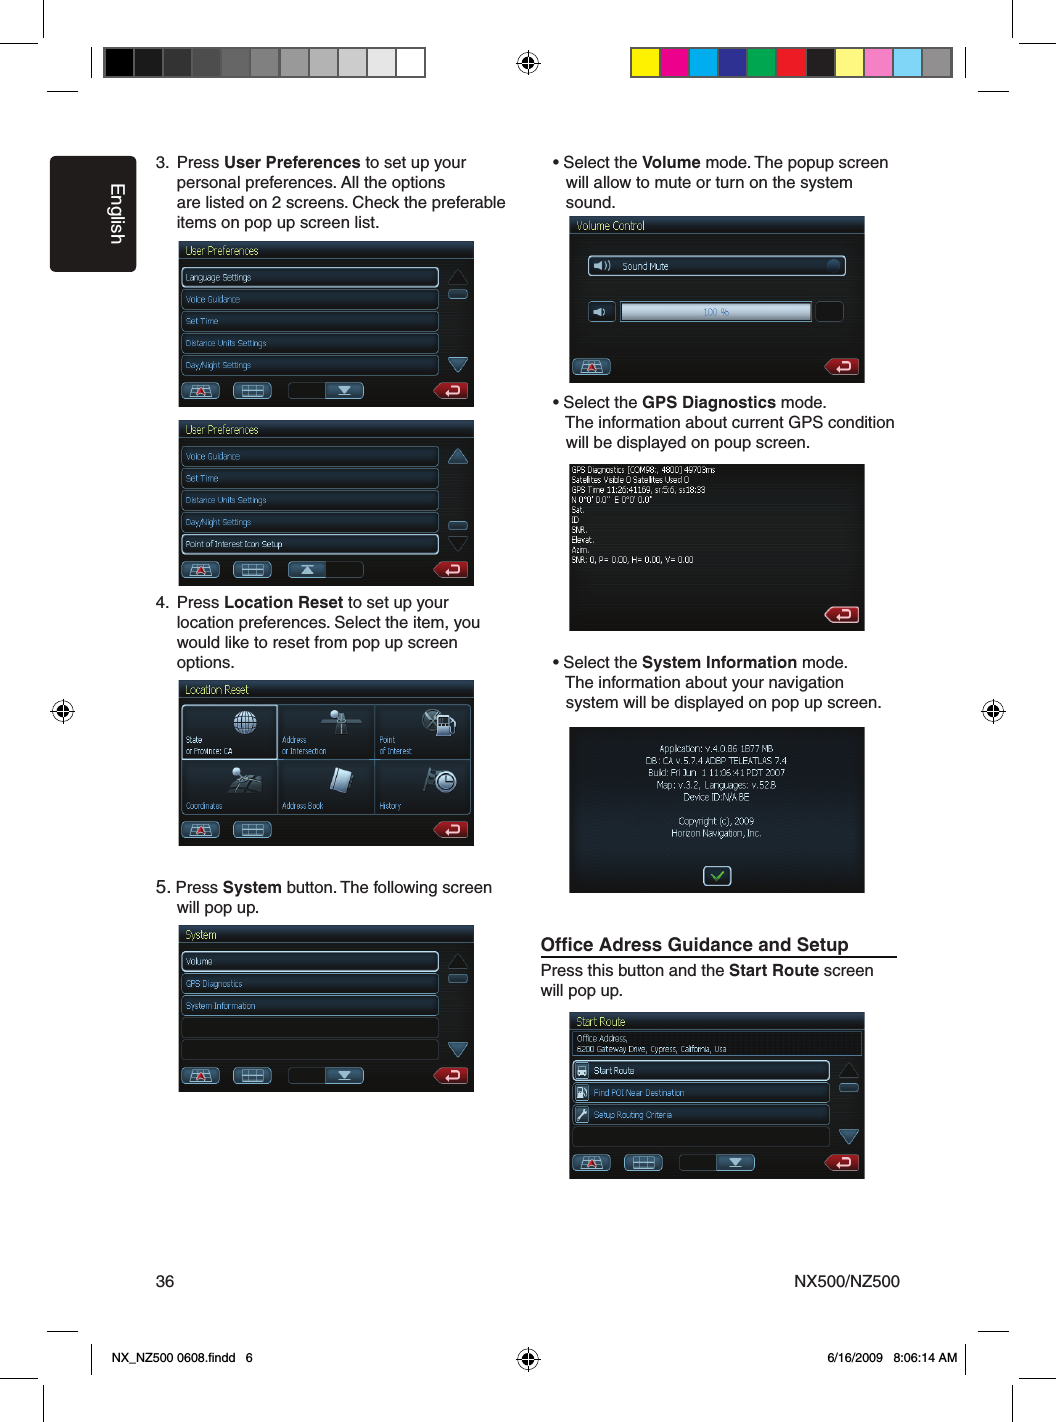
![EnglishNX500/NZ500 29This function is available when a Sirius Satellite Radio Receiver is connected through the dedicated connection. This unit requires the following receiver:SIRIUS Satellite Radio Receiver: SC-C1Note:SIRIUS satellite radio is a subscription service. Please contact Sirius Radio to begin or alter your subscription:• Internet: www.sirius.comTelephone: 888-539-SIRIUS (747487)Selecting a Satellite Radio modePress the [SIRIUS] button on Main Menu display. The system changes to the Sirius Satellite Radio mode. The Sirius mode screen is displayed.Information Displayed During ReceptionThe following information is displayed when the satellite radio cannot be received normally.• When the receiver is turned on the first time or after a reset: “UPDATING” followed by a percentage of completion.• When a channel is being tuned in (no signal is yet received): “ACQUIRING SIGNAL”• A channel without a broadcast has been selected: “INVALID CHANNEL”• A channel not covered by your contract: “CALL 888-539-SIRIUS” Call (888) 539-747487 to activate your radio.• When a channel is out of air time: “OFF AIR”• When the antenna is disconnected or has been damaged: “ANTENNA ERROR”Confirming Your Radio ID1. Touch the [ ] keyboard button on the SIRIUS Menu display to display the keypad. Enter “0” and press “OK”. Your SIRIUS ID (12-digit number) will be displayed. 2. Touch the [Settings] button on the SIRIUS Menu display to enter Settings menu.2. Press [SID] button. Your SIRIUS ID (12-digit number) will be displayed.Channel Selection1. Touch the [Channels] button on the SIRIUS Menu display to enter channel list preview mode.2. Select the channel with the [ ] or [ ]. Only channels that can be received are selected. Channels that are locked and channels not covered by the contract will be skipped. The receiver seeks the next available channel below or above the current channel.Channel Selection with the channel number1. Touch the direct access button on the SIRIUS Menu display to enter direct channel selection.2. Enter the channel number of your desired station by touching the [0] to [9] keys. Sirius Satellite Radio Operations1 34 5 6 7 8214 13 12 10 911151. Keyboard Button2. Previous Channel Button3. Store Button4. Next Channel Button5. Scan Button6. Previous Page Button7. Next Page Button8. EQ Button9. Back Button10. Time Display11. Mute Display12. Satellite Signal13. Next Category Button14. Category Name15. Previous Category ButtonNX_NZ500 0608.findd 9 6/16/2009 8:05:53 AM](https://usermanual.wiki/SKYPINE-ELECTRONICS/CNE8215BCL.user-manual-III/User-Guide-1180682-Page-2.png)
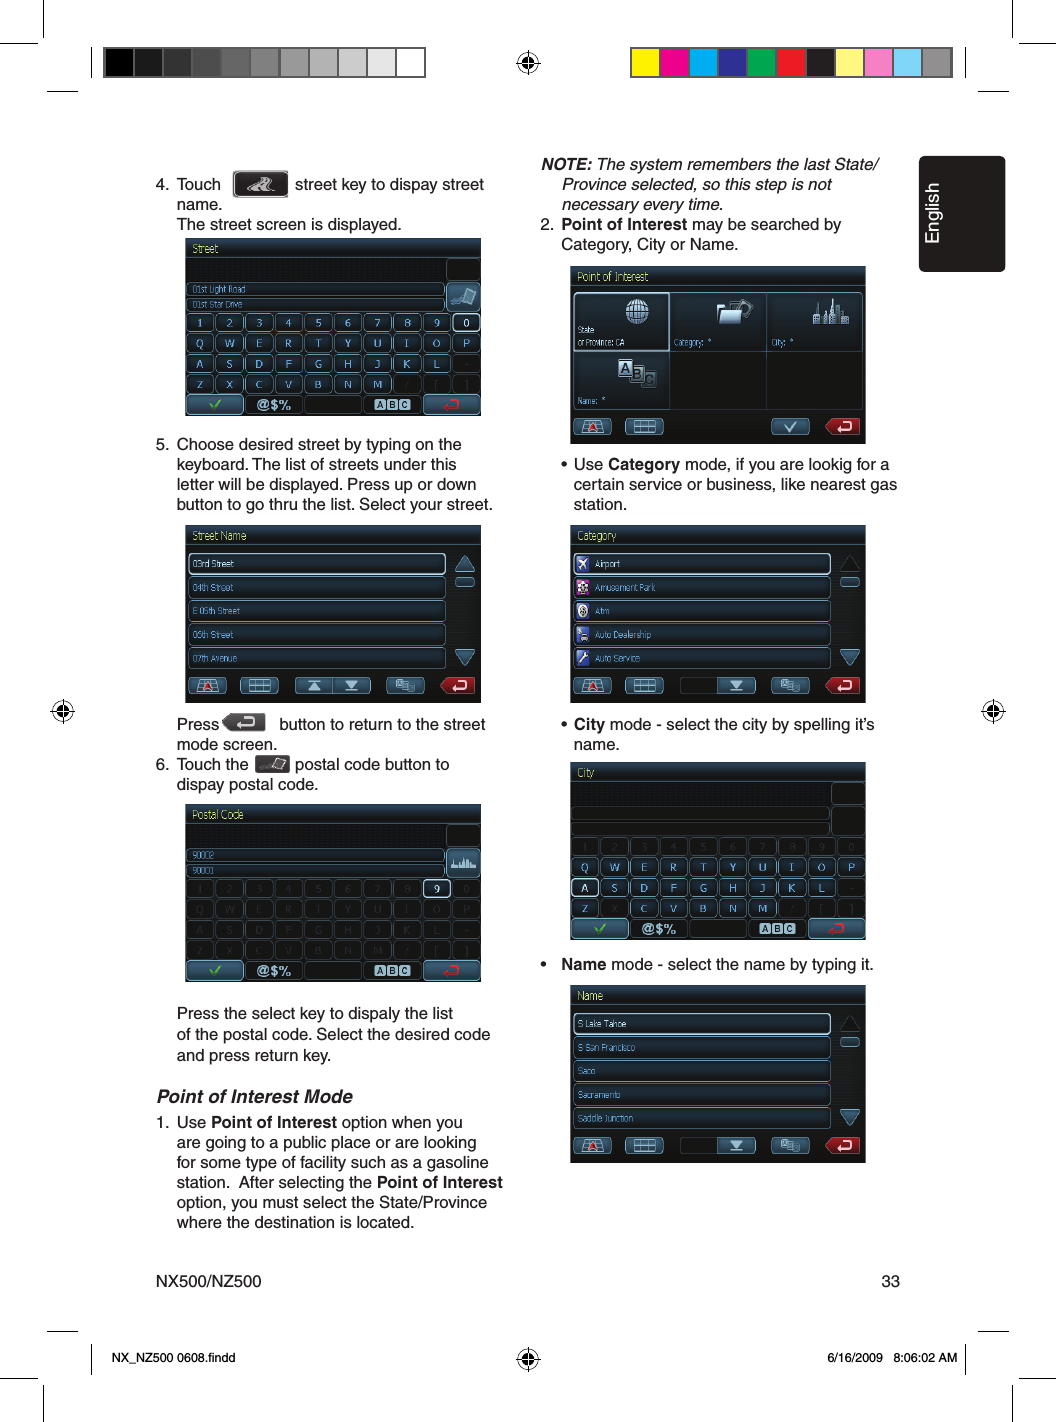
![EnglishNX500/NZ50030Sirius Satellite Radio Operations If you enter a wrong number, you can cancel it by touching the [BACK] key.3. Touch the [OK] key. The radio channel you entered will be tuned.Channel Selection with the channel numberA total of 20 satellite radio stations can be stored in the receiver’s memory. You can access the presets by pressing the Presets button. This allows you to store your favorite satellite radio stations in the memory for later recall.1. Touch the [Preset...] button to enter the preset list to select or save your presets.2. Touch [ ] or [ ] button to view previous or next page.* There are 5 pages of preset memory space available for your use. You can scroll the pages using the scroll bar buttons to the right of the screen.3. Touch the [Preset...] key to return to the previous screen.Auto Preset Store1. Touch and hold for more than 2 seconds the corresponding preset key to save the selected channel.2. Touch the [ ] button to save the current channel.Deleting a Preset1. Touch [Preset...] button and enter the preset menu.2. Touch the preset button you would like to delete. 3. Touch the [DEL] button to delete it.Receiving Stations by CategorySatellite Radio allows you to select broadcast channel category (contents).1. Touch [Categories] button to enter category mode.2. Touch [ ] or [ ] button to view all valid category.3. Touch the desired category item key to select the category.4. Select the desired channel by touching it momentarily on the screen.Note:When the category selection mode is entered, the category of the last received channel is displayed first.Parental Controls Lock Channels1. Touch [Settings] button to enter setting list. 2. Touch [Lock] button to enter lock list.3. Touch [ ] key to view next page in the lock list.4. Touch the channel item, and it will be locked or unlocked altenately.Setting the password1. Touch [Settings] button to enter setting list. 2. Touch [Password] button to enter password mode.3. Touch [ ] to set password.4. Touch [ ] button to remove password.5. Touch [Settings] button to return to Sirius menu.Note:If you set passwords, you must input the correct code to enter lock list. When you try to locked channel by keypad, it will dispaly password’s keypad. Only entering correct code can tune to the channel, or it will be back to the last channel, if a password is wrong.NX_NZ500 0608.findd 0 6/16/2009 8:05:54 AM](https://usermanual.wiki/SKYPINE-ELECTRONICS/CNE8215BCL.user-manual-III/User-Guide-1180682-Page-3.png)
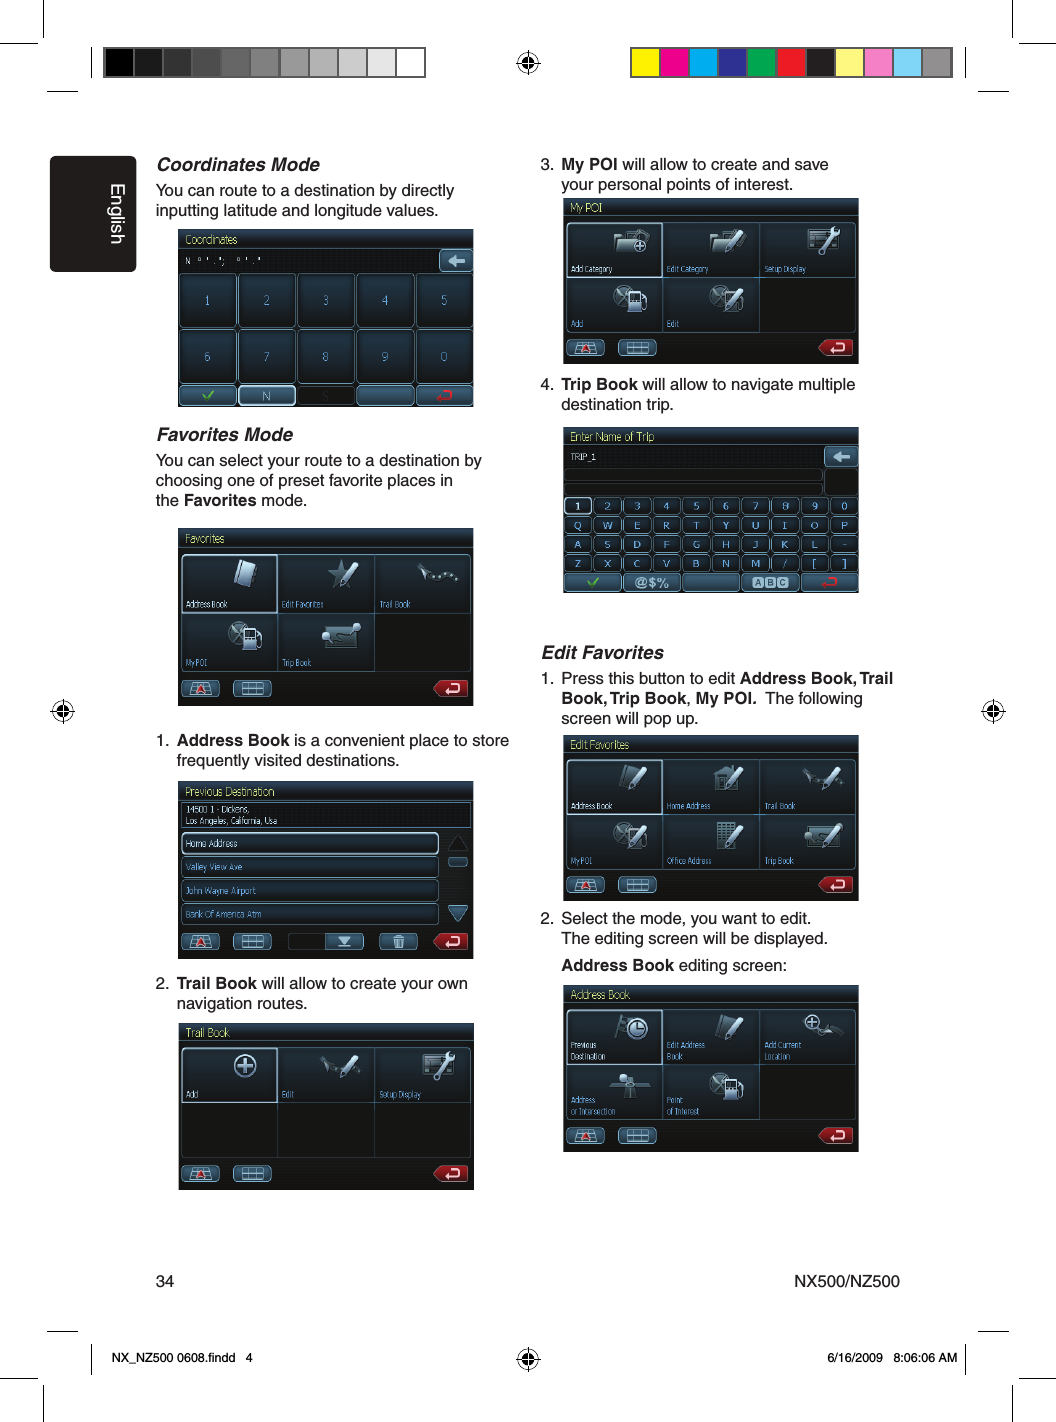
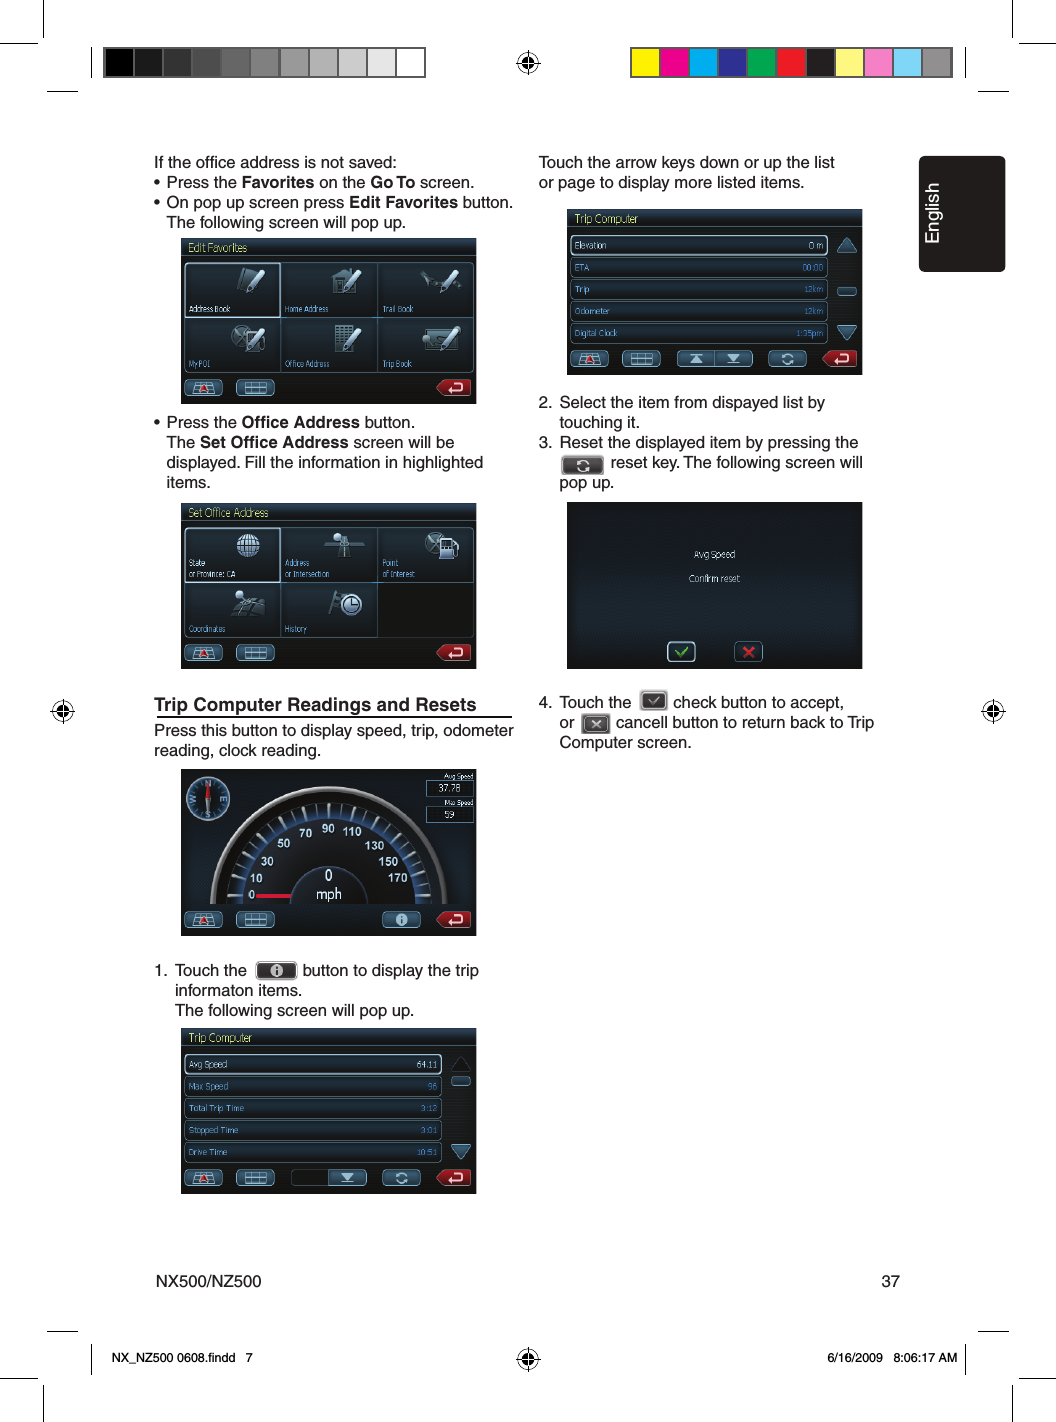
![EnglishNX500/NZ500387. ACCESSORIESiPod/iPhone OperationsNotes on using Apple iPod/iPhone• Do not connect an iPod/iPhone to this unit with a headphone connected to the iPod/iPhone.• After the iPod/iPhone has been connected to this unit, the iPod’s buttons are disabled for operation in the Music mode. In the Video mode, do not operate the iPod’s buttons.• When in the iPod mode, a special iPod/iPhone control screen is displayed different from the main screens for other modes.• When in the iPod mode, the screen image input from the AUX terminal is output to the rear monitor.• When no data is present, the title display will remain blank.• The iPod/iPhone is used with the equalizer function turned OFF.• Set the iPod/iPhone’s language setting to English before connecting your iPod/iPhone. Some characters of the other languages may not be displayed correctly in this system.• Precautions on battery consumption: If the iPod/iPhone is connected to this unit when the iPod/iPhone’s internal battery has run down, this function may not operate correctly. You must connect the iPod/iPhone after charging the battery if it has run down.Selecting the iPod mode1. Connect your iPod/iPhone to the USB connector. The system will automatically detect the connected device and change to the iPod mode. The iPod icon is displayed on the Main Menu screen.The playback starts after a while, from where the iPod/iPhone has been paused. • When a iPod/iPhone is already connected Touch the [iPod] key on the Main Menu screen. The system changes to the iPod mode, and starts playback from the previous position.Controlling the iPod/iPhoneOperation keys• iPod audio mode screen[ ] Video key• Switches to the screen of which the video output from the iPod/iPhone is displayed.Note:• Note that not all iPod/iPhone devices are compatible to output video to this unit.iPod/iPhones can be connected by using the connector cable supplied with the iPod/iPhone, but in this case, you can enjoy its audio sound only. To enjoy video movies stored in the iPod/iPhone with video displaying them on this unit, it is required to use the special connector cable (CCA-723) separately sold.Note:• This system will not operate or may operate improperly with unsupported versions.• For detailed information on the playable iPod/iPhone models, see our home page: www.clarion.com1. Repeat Button2. Shuffle Button3. Previous Track Button 4. Scan Button5. Play/Pause Button6. iPod Video Button7. Next Track Button8. Stop Button9. Previous Page Button10. Next Page Button11. EQ Button12. Back Button13. Time Display14. Shuffle Display15. Repeat Display16. Mute Display17. Song Title18. Artist Information19. Album Information20. Keyboard Button21. Slide Bar1 34 7 8 1092211165171819201216 14 1315NX_NZ500 0608.findd 8 6/16/2009 8:06:18 AM](https://usermanual.wiki/SKYPINE-ELECTRONICS/CNE8215BCL.user-manual-III/User-Guide-1180682-Page-11.png)
![EnglishNX500/NZ500 39iPod/iPhones can be connected by using the connector cable supplied with the iPod/iPhone, but in this case, you can enjoy its audio sound only. To enjoy video movies stored in the iPod/iPhone with video displaying them on this unit, it is required to use the special connector cable (CCA-723) separately sold.Note:• This system will not operate or may operate improperly with unsupported versions.• For detailed information on the playable iPod/iPhone models, see our home page: www.clarion.com[ ] Shuffle key• Use to switch the shuffle mode on or off. When enabled, this function performs playback of tracks in random order, regardless of the order in which they are recorded.[ ] Play/Pause key• Use to control playback and pause. 1. Touch the key during playback. Playback pauses. 2. To resume playback touch the key again.[ ] EQ button• Use to enter Audio Settings menu to set.[ ] Keyboard button• Use to input number to select the track.[ ] Repeat button• Use to repeat the selected track.Skipping a track (searching)1. Press the [ ] or [ ] button during playback. Tracks are skipped, as many times as the button is pressed, and playback starts. • Pressing the [ ] button starts playback from the beginning of the next track. • Pressing the [ ] button starts playback from the beginning of the current track. When this button is pressed again within about 2 seconds, playback starts from the beginning of the previous track.Fast forward and fast backward playbackPress and hold the [ ] or [ ] buttons on the menu display for fast forward or fast reverse. The first press will advance the music at 2x speed. Following presses will increase the speed to 4x, 8x, and 16x.Release the button to resume normal playback.Selecting a list item from a list screen1. Touch the display list icon in the iPod selection screen.2. Touch a desired list item on the screen to display the corresponding list of tracks. • Use the [ ] and [ ] keys to scroll the list.3. Touch the desired track name on the list to play back. • Use the [ ] and [ ] keys to scroll the list.Viewing video data in the iPod/iPhone (only for the iPod/iPhone with video features)When you connect an iPod/iPhone with video features by using the optional connector cable for iPod/iPhone with video, you can enjoy the video data and slide show data stored in the iPod/iPhone showing them on the display of this unit (and the rear monitor if connected).Note:• Do not connect the iPod/iPhone to this unit when a Video Playlists item is selected on the iPod/iPhone.1. Touch the [ ] video key on the iPod audio menu screen. The iPod play video screen is displayed. 2. Select the type of video, you would like to be played, by touching it on the right side of the menu. The video playback will start.Note:Video playback is not available on all iPod/iPhone devices. Please contact your Clarion dealer for details. An optional connection cable or accessory may be required for this feature.3. To stop the video play, touch the screen. iPod play video menu will be displayed.4. Touch the [ ] audio button (1) to return to the iPod audio menu.Note:• “AUDIO ONLY” is displayed when the automobile is moving.• Image data may not be played back according to the status of the iPod/iPhone.• The volume setting of video data is relatively lower than audio data. Be sure to lower the volume setting before switching to the other mode.• Do not select the categories with no track registered from the iPod menu screen. The iPod/iPhone may be frozen. If the iPod /iPhone is frozen, reset the iPod/iPhone by following the procedure described in the instruction manual of the iPod/iPhone.• Audio may be played back slightly out of synchronization with video images.iPod/iPhone Operations1NX_NZ500 0608.findd 9 6/16/2009 8:06:19 AM](https://usermanual.wiki/SKYPINE-ELECTRONICS/CNE8215BCL.user-manual-III/User-Guide-1180682-Page-12.png)
![EnglishNX500/NZ50040USB OperationsThis system can play audio files (MP3/WMA) stored in an USB memory which is recognized as “USB Mass Storage Class device”. You can use your USB memory as an audio device by simply copying desired audio files into it.Note:• This system will not operate or may operate improperly with some USB memory.• Files protected with any DRM can not be played.Notes on using USB memories• General notes • When no data is present, the message “NO FILE” will be displayed. • The USB memory is used with the equalizer function turned OFF.• Notes on the MP3/WMA files • This system can play the MP3/WMA files stored in the USB memory. • This system cannot play DivX files stored in the USB memory. • Set the Sampling Frequency to: For MP3 files: • MPEG1 Layer3: 32, 44.1, or 48 kHz • MPEG2 Layer3: 16, 22.05, or 24 kHz • MPEG2.5 Layer3: 8, 11.025, or 12 kHz For WMA files: 32, 44.1, or 48 kHz • Set the Bit Rate to: For MP3 files: • MPEG1 Layer3: 32 to 320 kbps (VBR) • MPEG2 Layer3: 16 to 160 kbps (VBR) • MPEG2.5 Layer3: 16 to 160 kbps (VBR) For WMA files: 32,48, 64, 80, 96, 128, 160, or 192 kbps • Add the following file extension using single byte characters: For MP3 files: “.MP3” or “.mp3” For WMA files: “.WMA” or “.wma”• Notes on the folder structure • The folder hierarchy must be within 8 hierarchical levels. Otherwise, playback will be impossible. • The maximum allowable number of folders is 512 (including root directory and folders with no MP3/WMA file). • The maximum allowable number of files in a folder is 255. • You can store the MP3 files, WMA files together in a folder.• Notes on the Tag titles The limitations on the Tag titles are same as those in the MP3/WMA modes. • Folder representation in the folder list The limitations on the folder representation are same as those in the MP3/WMA modes. Selecting the USB Memory modeConnect your USB memory to the USB connector. The system will automatically detect the connected device, and change to the USB mode (USB Memory mode), and start playback after a while. If you reconnect the same device that you disconnected last, the system will play back where it left off.• When an USB memory is already connectedTouch the [USB] key to select the USB in aMain Menu mode.The system changes to the USB mode (Mediai-USB mode), and starts playback from the previous position.Playing back files in the USB memoryThe operations in the USB Memory mode are same as those in the MP3/WMA modes. See “Listening to a CD” for details.Note:When performing the fast forward or fast backward function, the playback speed will become 10-time faster. For the VBR files, it may differ depending on the file.NX_NZ500 0608.findd 40 6/16/2009 8:06:19 AM](https://usermanual.wiki/SKYPINE-ELECTRONICS/CNE8215BCL.user-manual-III/User-Guide-1180682-Page-13.png)
![EnglishNX500/NZ500 41External peripheral devices, including a game console, camcorder, navigation unit, iPod/iPhone, etc. can be connected to the AUX IN or AV IN connector on the back of this unit using the A/V media cables.NOTE:For your safety, the unit has a safety function, which turns off the picture when car is moving, so only the audio can be heard. The picture can be only watched, when the car is stopped and parking brake is applied.Switching to AUX IN / AV IN modePress [AUX IN] or [AV IN] button on Main Menuto select desired mode (when unit is reading). The LCD will display the external video.The screen will dispaly “No Video” menu, if there is no video signal.You cannot directly control external devices connected to the AUX IN or AV IN input.AUX In / AV In OperationsWARNINGFor your safety, the driver should not watch the VTR, etc. or operate the controls while driving. Please note that watching and operating the VTR, etc. while driving are prohibited by law in some countries.Switching to Camera modePress [Camera] button on Main Menuto select desired mode (when unit is reading). The LCD will display the external video.The screen will dispaly “No Video” menu, if there is no video signal. Press [ ] back button to return to the Main Menu.When the video signal is displayed, press right top corner to return to the Main Menu.Camera In OperationsNX_NZ500 0608.findd 41 6/16/2009 8:06:20 AM](https://usermanual.wiki/SKYPINE-ELECTRONICS/CNE8215BCL.user-manual-III/User-Guide-1180682-Page-14.png)