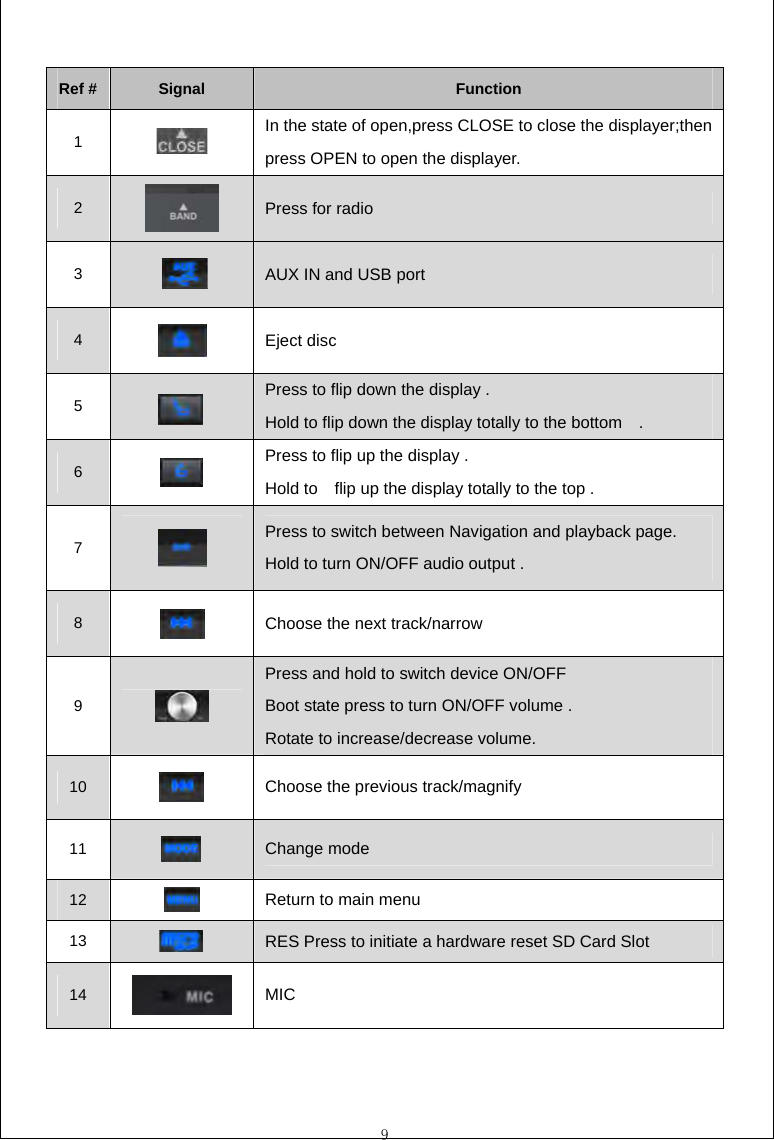
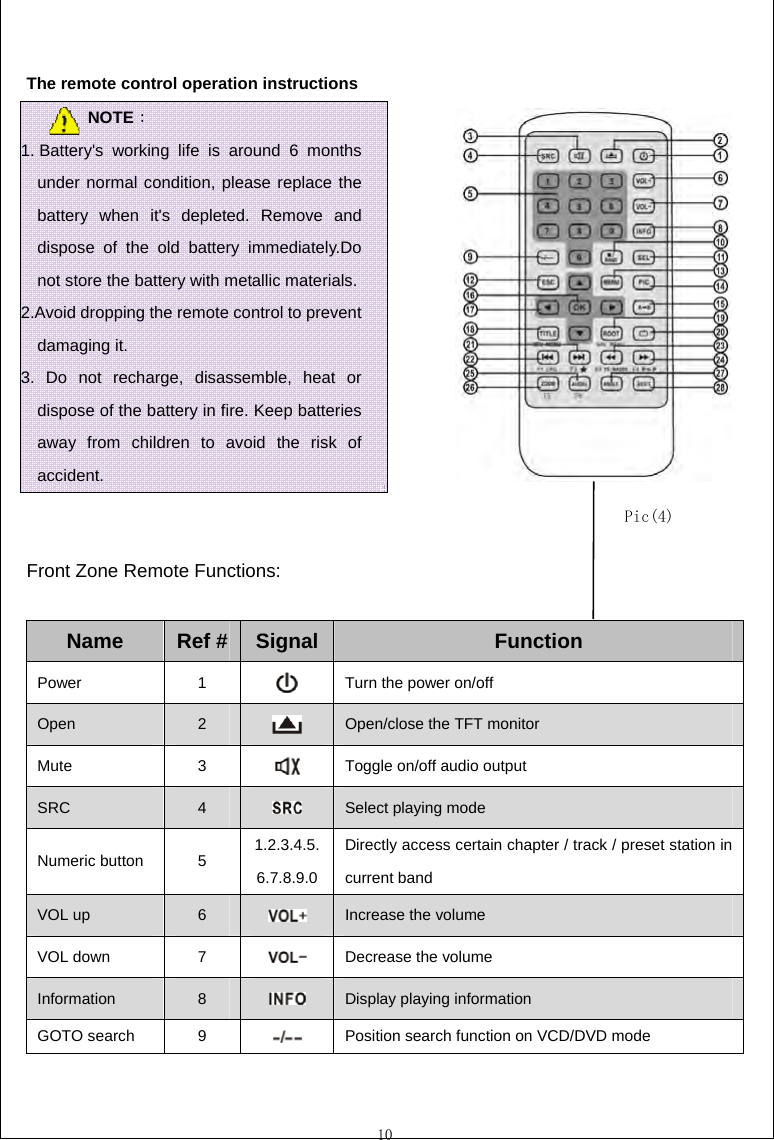
SKYPINE ELECTRONICS CNE8518ALP Entertainment System User Manual
SKYPINE ELECTRONICS (SHEN ZHEN) CO., LTD. Entertainment System Users Manual
UserManual.wiki
>
SKYPINE ELECTRONICS
>
CNE8518ALP User Manual
user manual
Navigation menu
Upload a User Manual
Namespaces
Wiki Guide
HTML
PDF
Info
Views
User Manual
Discussion / Help
Navigation


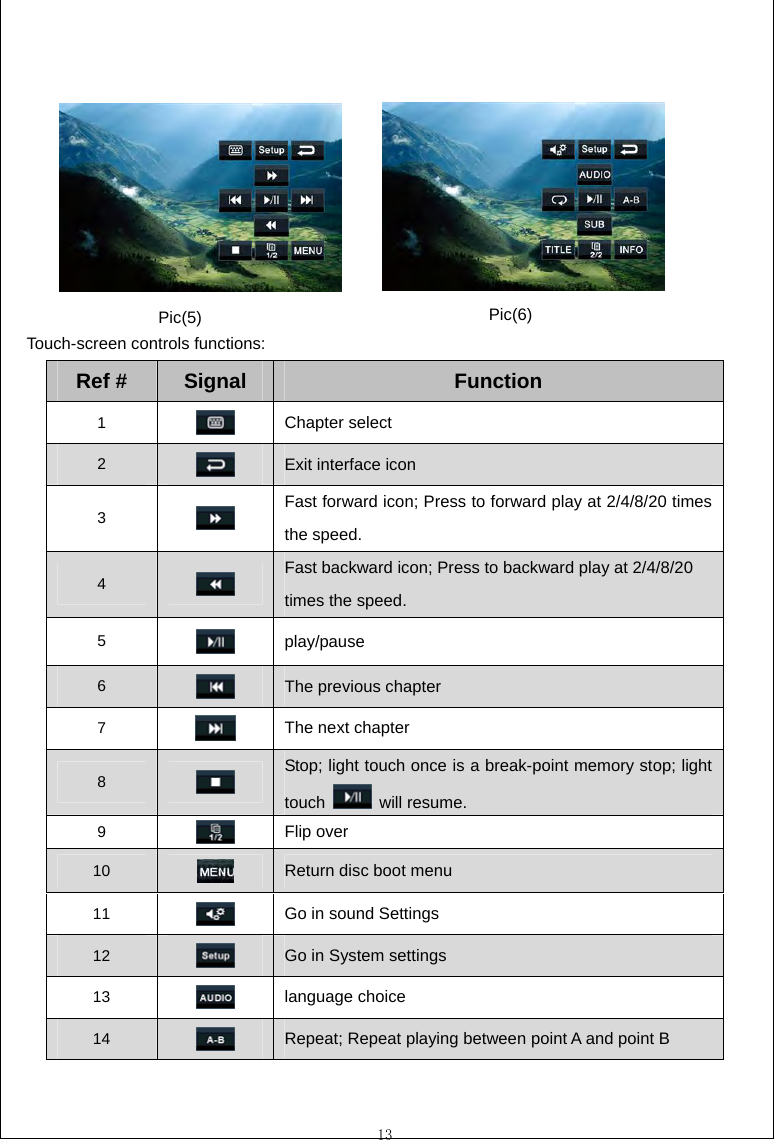
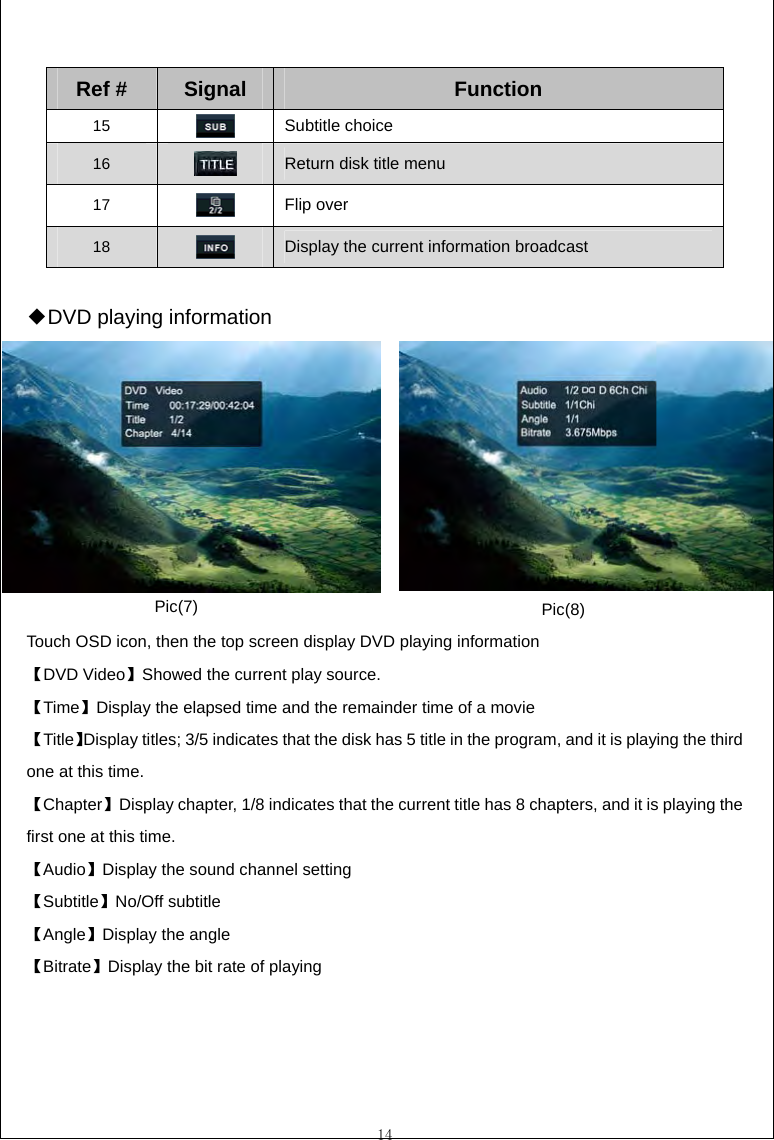
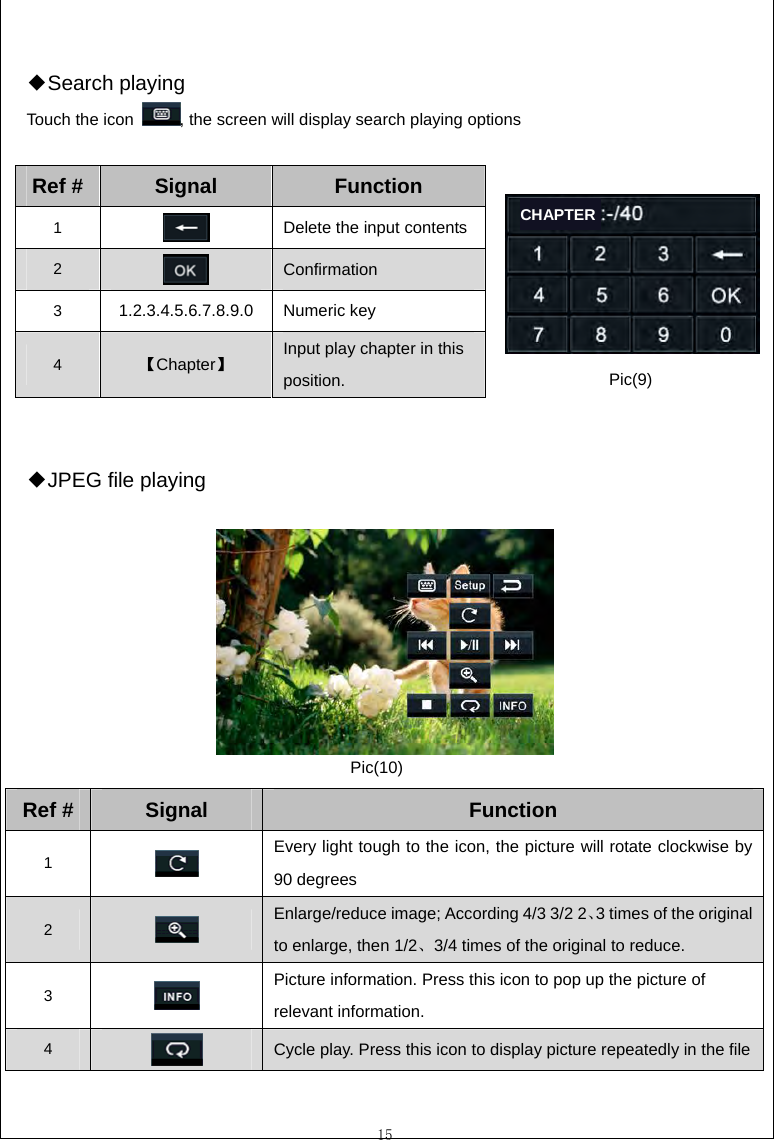
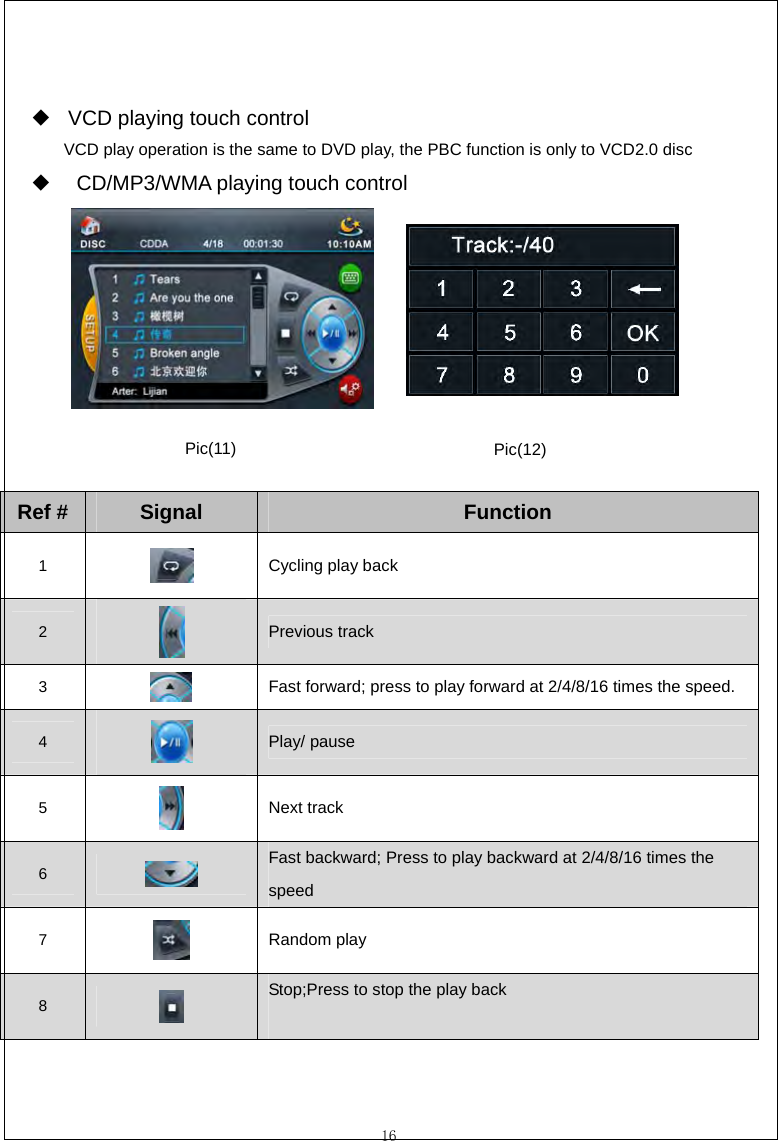

![22 【1】…While displaying “No Signal” or in playing, touch any area of the screen, except left-top conner, will popup menu. 【2】…Left-top conner, touch here to exit DTV. 【3】…Return icon. Gently touch this icon return to previous window. 【4】…Menu items. [TV Channels]: Touch this item will enter “TV Channels”submenu. If there is nothing programs currently, it will prompt that “TV channels Not found”. [TV Guide]: Touch this item will enter “TV Guide”submenu. If there is nothing programs currently, it will prompt that “No EPG Data”. [Program Detail]: Touch this item will enter “Program Detail”submenu. If there is nothing programs currently, it will prompt that “TV channels Not found”. [Channel Scan]: Touch this item will popup “Remove Channel List?”dialog-box. 31 42 34561 2 Pic(21) Pic(22) Pic(23)](https://usermanual.wiki/SKYPINE-ELECTRONICS/CNE8518ALP/User-Guide-1649394-Page-22.png)
![23 NO. Description …Dialog Text① Question you to operate what you’ve selected item. …Select Items② Select “Yes” to clear contents of channel list and execute scaning, select “No”to abort your selection. …Up③ Up-ward select item. …Down④ Down-ward select item. …OK⑤ Execute your selection. …Return⑥ Abort your selection. If You selected Yes and press OK button, it would start to scan channels. …Current frequency① …The TV programs you have scanned out.② …Current percentage③ …How many channels you have searched.④ [Parent Lock]: It contains 2 items in its submenu, one is [Set User Age], the other is [Change Password], but they have similar operations. 134212Pic(24) Pic(25)](https://usermanual.wiki/SKYPINE-ELECTRONICS/CNE8518ALP/User-Guide-1649394-Page-23.png)
![24 …Input box. Allow you input numeric character. Such as password, age, etc.① …Keyboard. ② Touch numeric character button to input number. Touch backspace button to delete number you have input in error. Touch carriage-return button to confirm your input. If you input a wrong password, it will popup a message box to notify you that your password is wrong! [Option]: There are 6 items in option. These items are used to set a certain function to lead you get the best effect in watchingn TV. The 4 header items, [Subtitle], [Language], [Dual Mono] and [Audio Setting] are similar, here take [Subtitle] for example. Pic (26) NO. Description …Title① Current item in option. …Select Items② Select “On” to open subtitle(If current program itself has subtitle), select “Off”to close subtitle. …Up③ Up-ward select item. …Down④ Down-ward select item. …OK⑤ Execute your selection. …Return⑥ Return to last window. 34561](https://usermanual.wiki/SKYPINE-ELECTRONICS/CNE8518ALP/User-Guide-1649394-Page-24.png)
![25 [OSD language]: Since many country use ISDB, so we offered 4 OSD languages for users, they are English, Japanese, Portugues and Spanish. Gently touch any item in OSD language window we save your touched language for you. [Transparency control]: It allows you to modify UI transparency, you can set UI into translucency to watch TV, which won’t interference you watching TV. Figure (20) pic (27) NO. Description …Title① Current item in option. …Indicator② Indicates transparency you have set. …Left③ Decrease transparency. …Right④ Increase transparency.. …OK⑤ Save your settings. …Return⑥ Return to last window. Note:when the television are broadcasting,gently touch screen D area display menu, gently touch A area back to main menu, gently touch C area to broadcast previous pre-stored TV station,gently touch E area to broadcast 34561 2 Note: If the transparency is less than 4(maximum level), operating in menu will blink LOGO when no signal.](https://usermanual.wiki/SKYPINE-ELECTRONICS/CNE8518ALP/User-Guide-1649394-Page-25.png)


![36 activated. the display. Prolonged image or improper height/ width ratio Improper aspect ratio setup. Use correct aspect ratio setting. Auto antenna not properly connected. Connect the auto antenna cable properly. REG function is activated. Turn REG function off. The adapter with antenna power supply is not connected. Connect the antenna power supply adapter properly. Weak station searching. The AF function is not activated Activate the AF function. MP3 The ID3 tags are shown incorrectly. Message is longer than LCD can display or ID3 tag is not compatible. Use proper ID3 tag information. DVD-PLAYER [Bad Disc] Disc is warped or scratched. Use disc in good condition [Bad Disc] Disc is dirty or wet. Clean disc with soft cloth. [Unknown Disc] Incompatible disc is used. Use compatible disc. [Unknown Disc] Disc rating exceeds parental lock rating limit. Change parental lock settings to lower restriction. [Region Error] Disc region code is not compatible with unit. Use disc with proper region code. Disc does not play back. [Bad Disc] Disc is inserted upside down. Insert disc with label side up. Cannot insert disc. Disc already inside unit. Eject current disc and insert new one.](https://usermanual.wiki/SKYPINE-ELECTRONICS/CNE8518ALP/User-Guide-1649394-Page-36.png)