SKYPINE ELECTRONICS CNE8518ALP Entertainment System User Manual
SKYPINE ELECTRONICS (SHEN ZHEN) CO., LTD. Entertainment System Users Manual
user manual

1
User manual

2
Thank you for using our products, you can get the operation method more clearly by
this instruction.
Important statements:
1. The object appearance may be different from what the manual shows, so please subject to our
available products.
2. This manual is the detailed description of our products. The products improve matters would
not be for further notice, we keep the right of final interpretation.
Functions :
● Navigation multimedia entertainment system, standard installation size.
● HD screen.
● Fashion and brief interface ,easy for operation.
● Built-in DVD player, auto private loader.
● Built-in smart GPS navigation system.(optional)
● Built-in BT function, support hand free bluetooth.
● Automatic screen and slip mechanism, a variety of models for choose.
● IPOD,SD,USB port, AUX IN is available.
● Built-in FM/AM radio tuner, RDS function is optional.
● Built-in 4*45w amplifier output,4.1 track circuit output.
● For touch control.
● Built-in digital TV.(optional)
● Reversing visual function, help to monitor the backing up on video(camera need to be mixed
separately)
● Convenient and practical: smart power saving,extend the battery playing time,avoid to affect
driving at night.
3
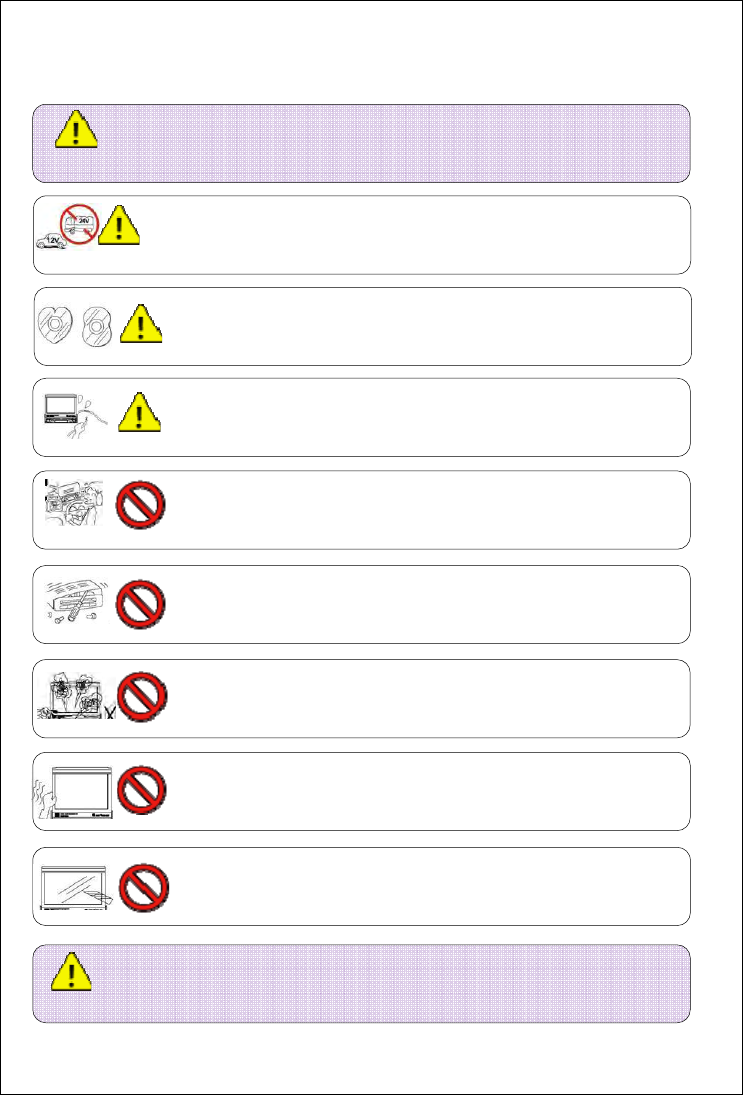
Attention: please read the instructions carefully before installation,
and we recommend the car audio distribution to install the machine.
Please ask the professional to install the machine. Disassembly the
machine unilaterally would damage the machine or cause accident。
Do not let the machine in humid environment and water to avoid
accident or damage by short circuiting.
Please do not operate the machine in driving. The driver should not
watch programs and play the machine in driving. It is very dangerous!
The products use automatic precision transmission components,
please not push hard the machine or knock the TFT display screens.
Please do not use hard thing on the screen to avoid damaging the
screen.
Attention :Please flameout the automobile and cut down the connection
between ACC and B+ to avoid short circuit.
This unit apply to vehicle-mounted 12V power supply system(need connect
ground wire), please not use in 24V bus and lorry, it may breakdown the machine
Please use original discs,the pirate disc may affect the lifetime of the
machine.
Please do not change the power fuses without professional.It is very
dangerous to use the not suitable fuses.

4
Contents
Basic operation...................................................................................................................... 6
Power ON◆.................................................................................................................... 6
Power OFF◆................................................................................................................... 6
Enter m◆ain menu ........................................................................................................ 6
Function mode selection◆............................................................................................ 8
Volume adjustment◆...................................................................................................... 8
The definition of touch screen area operation◆......................................................... 8
System setup◆............................................................................................................... 8
System reset◆................................................................................................................ 8
Panel key operation instructions ......................................................................................... 8
The remote control operation instructions ....................................................................... 10
Function operation .............................................................................................................. 12
1、 Disc playing function operation ........................................................................ 12
Slot disc◆............................................................................................................... 12
Slot◆-out disc........................................................................................................ 12
Restart disc loading◆........................................................................................... 12
DVD playing touch control◆................................................................................. 12
DVD playing information◆.................................................................................... 14
Search play◆ing .................................................................................................... 15
JPEG file playing◆................................................................................................ 15
◆VCD playing touch control................................................................................ 16
◆CD/MP3/WMA playing touch control................................................................ 16
2. Radio function operation....................................................................................... 17
RDS Function◆...................................................................................................... 17
3. SD/USB playing function operation..................................................................... 18
4、iPod playing function opreration ........................................................................... 20
5、TV function operation ............................................................................................. 21
6、AUX IN function opreation...................................................................................... 26
7、Camera function operation..................................................................................... 26
8、BT function operation ............................................................................................. 26

5
Pairing◆.................................................................................................................. 29
Dialing◆.................................................................................................................. 29
Answer or reject a call◆........................................................................................ 29
Play a song via the bluetooth connectivity◆...................................................... 29
System setup ....................................................................................................................... 30
1、EQ setup................................................................................................................... 30
2、System setup........................................................................................................... 31
General setup◆...................................................................................................... 31
Language setup◆.................................................................................................. 31
Audio setup◆......................................................................................................... 32
Rating setup◆........................................................................................................ 32
Hardware setu◆p................................................................................................... 33
P.VOL setup◆......................................................................................................... 33
T◆S CAL................................................................................................................. 34
Bluetooth setup◆.................................................................................................. 34
Troubleshooting................................................................................................................... 35
System parameters.............................................................................................................. 37
Disc logo............................................................................................................................... 38
6
Basic operation
Basic operation
Power ON◆
Turn on ACC, enter last system automatically .
System off state, press or other icons to power on the unit .
Power OFF◆
System automatically turn off , the slip mechanism will back automatically.
Hold for over 2 seconds , the system turn off .
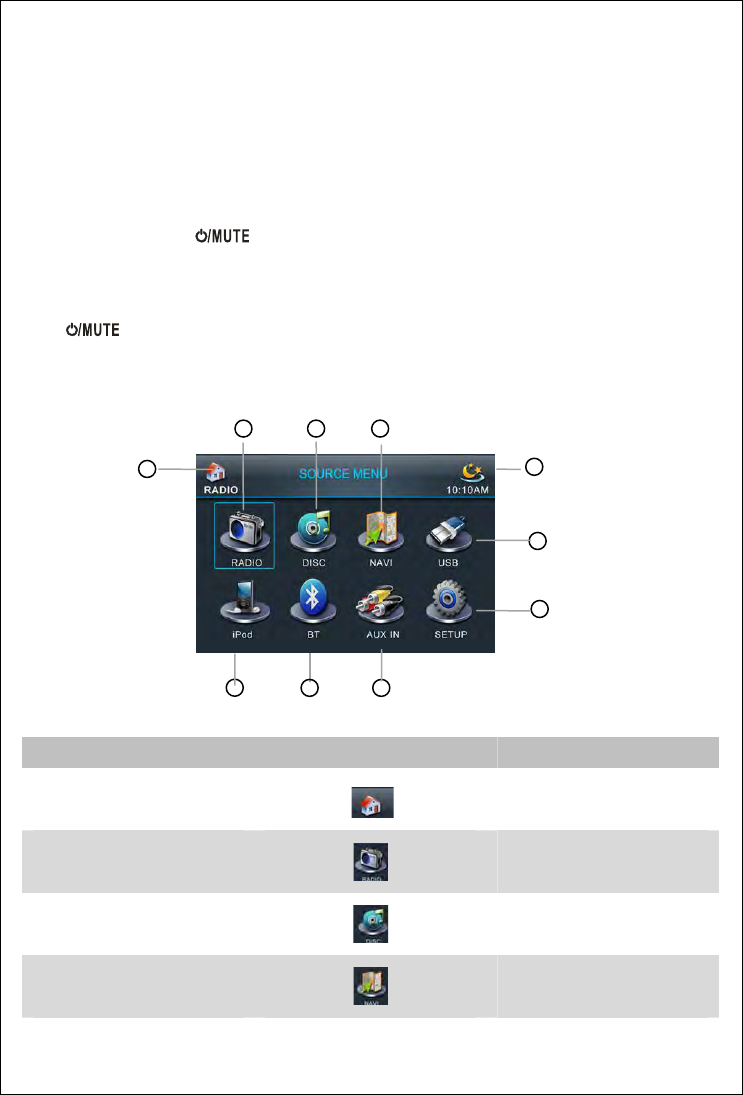
Enter◆ main menu
Turn on the device, lightly touch upper left corner to enter system source menu.
REF# Signal Function
1 Return to Main Menu
2 Radio Mode
3 DVD Playback
4 NAVI Mode
5
6
9 8
1
10
7
2 3 4
Pic(1)
7
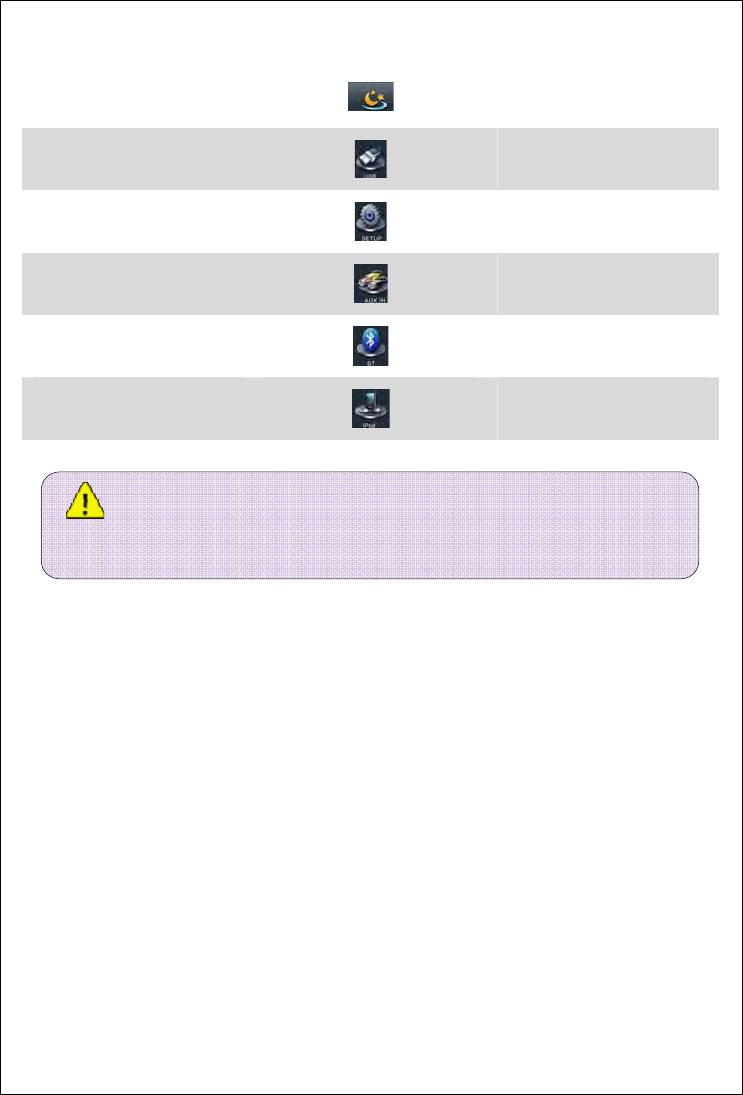
5 Shutdown screen display
6 USB Mode
7 Setup Mode
8 AUX IN Mode
9 Bluetooth Mode
10 iPod Mode
NOTE:Some of the features of above in our company products can be
optional ,the icon text is gray if there is no input source or do not have this feature ,and
lightly touch
ing
theiconisinvalid.
8
◆Function mode selection
Enter main menu , lightly touch the icon on the screen to select the feature.
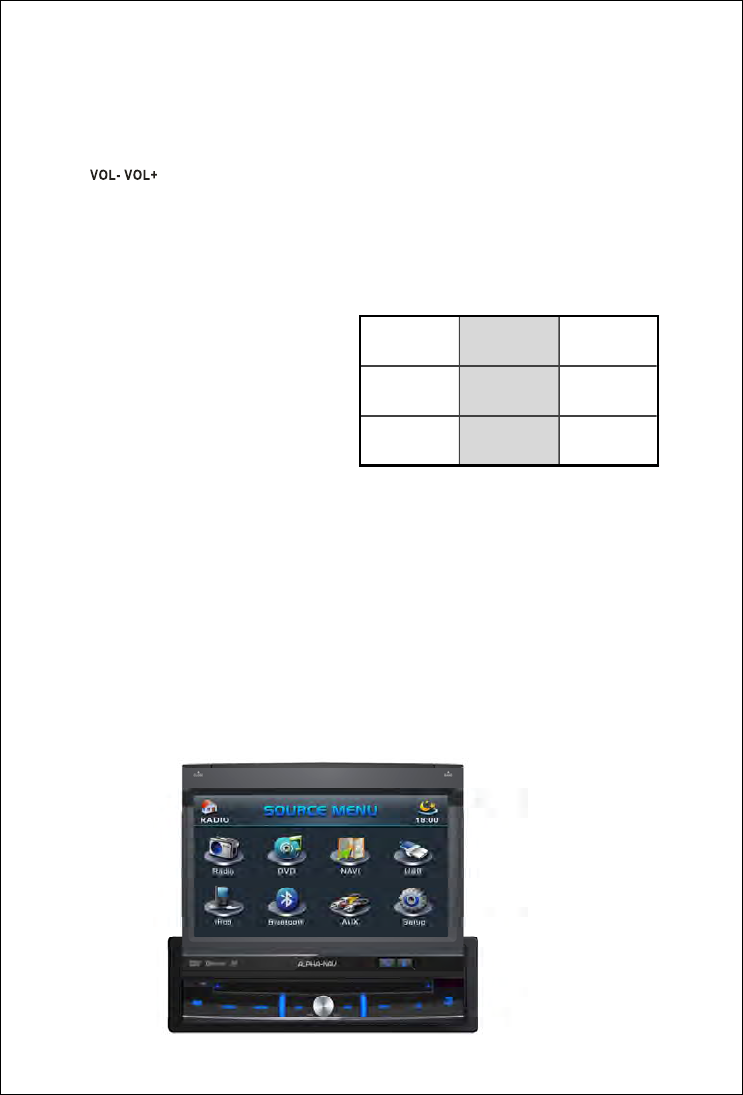
Volume ◆adjustment
Press / or volume knob to adjust volume, the volume ranges from 0-40 .The initial
factory setting is 20. Press EQ icon to select an Audio feature to be adjusted .Adjustable Range:
Rock, Flat, Jazz, POP, Classical,adjust the selected feature on "User" mode.
The definition of touch screen area operation ◆
Under DVD playback mode, The touch area of the system functions are distributed as follows:
A area: Touch to enter system main menu .
B area: Touch to view Playback information .
C area: Touch to previous chapter .
D area: Touch to access Function Bar .
E area: Touch to next chapter .
F area:Touch to shutdown the display.
Lightly touch anywhere on the screen to turn on the display .
S◆ystem setup
Touch Setup icon on the main menu or touch SETUP icon to enter system setup interface .
◆System reset
To correct a system halt or other unusual operation , use the tip of a pen to press the RES
icon ,the unit restores the setting before last power off .
Panel key operation instructions
ABF
CDE
Pic (2)
Pic (3)
9
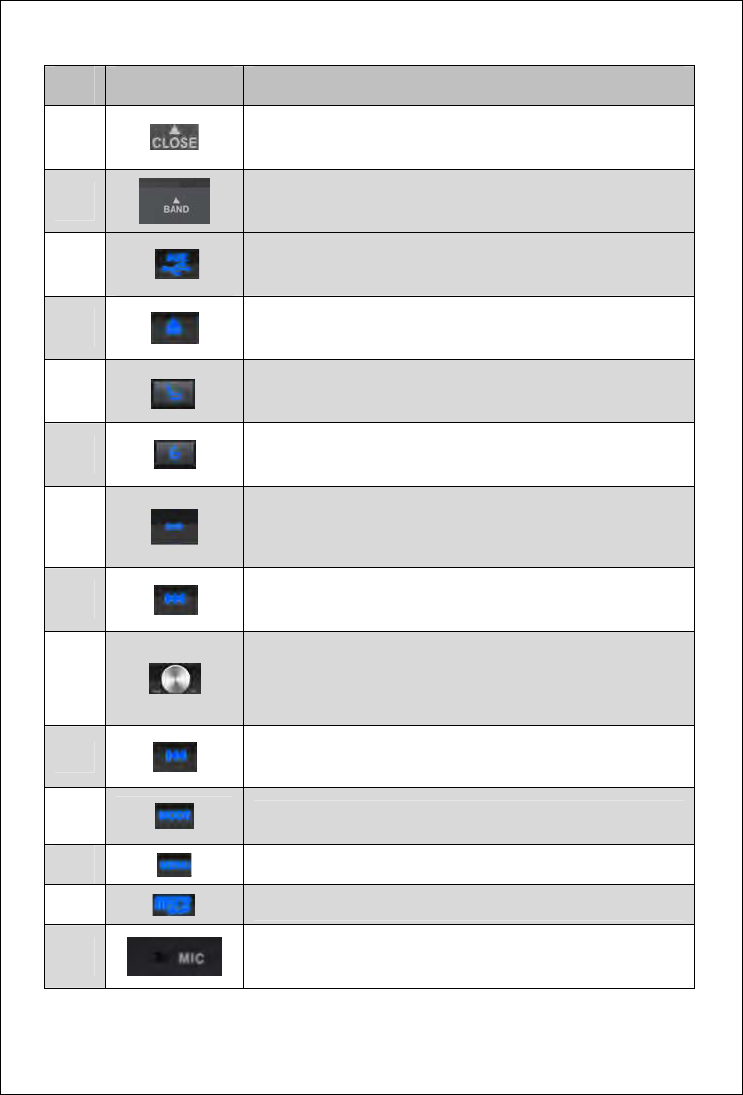
Ref # Signal Function
1
In the state of open,press CLOSE to close the displayer;then
press OPEN to open the displayer.
2 Press for radio
3 AUX IN and USB port
4 Eject disc
5
Press to flip down the display .
Hold to flip down the display totally to the bottom .
6
Press to flip up the display .
Hold to flip up the display totally to the top .
7
Press to switch between Navigation and playback page.
Hold to turn ON/OFF audio output .
8 Choose the next track/narrow
9
Press and hold to switch device ON/OFF
Boot state press to turn ON/OFF volume .
Rotate to increase/decrease volume.
10 Choose the previous track/magnify
11 Change mode
12 Return to main menu
13 RES Press to initiate a hardware reset SD Card Slot
14 MIC
10
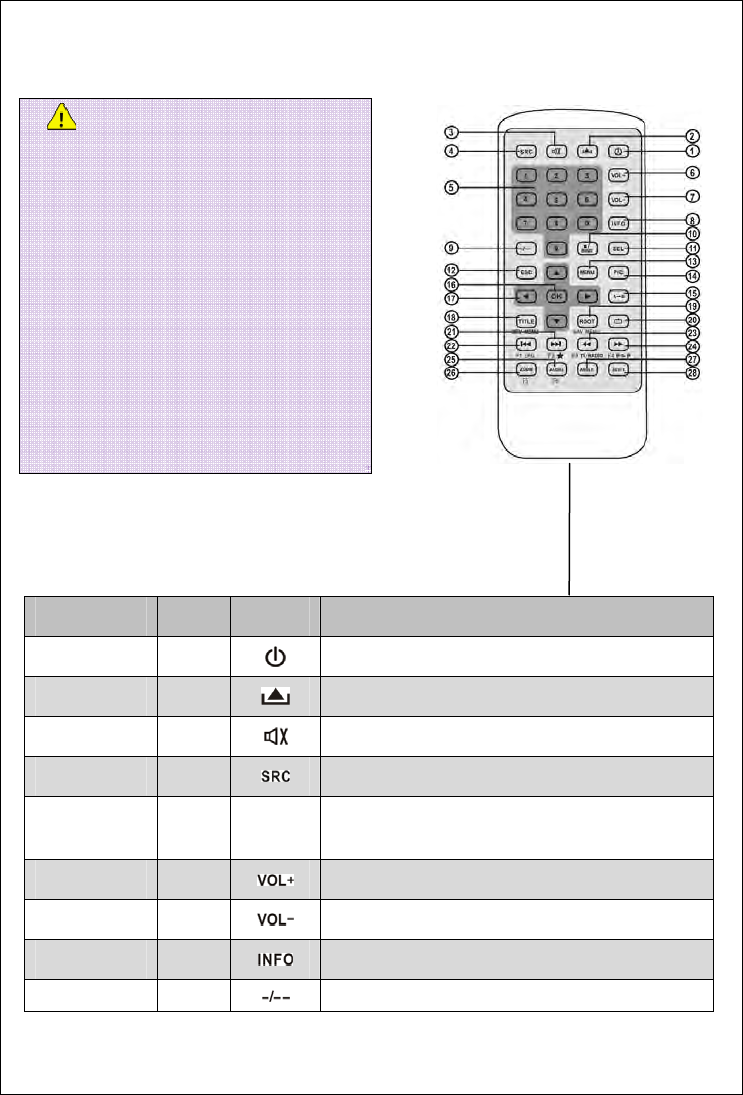
The remote control operation instructions
Front Zone Remote Functions:
Name Ref # Signal Function
Power 1
Turn the power on/off
Open 2 Open/close the TFT monitor
Mute 3
Toggle on/off audio output
SRC 4 Select playing mode
Numeric button 5 1.2.3.4.5.
6.7.8.9.0
Directly access certain chapter / track / preset station in
current band
VOL up 6 Increase the volume
VOL down 7 Decrease the volume
Information 8 Display playing information
GOTO search 9 Position search function on VCD/DVD mode
NOTE:
1. Battery's working life is around 6 months
under normal condition, please replace the
battery when it's depleted. Remove and
dispose of the old battery immediately.Do
not store the battery with metallic materials.
2.Avoid dropping the remote control to prevent
damaging it.
3. Do not recharge, disassemble, heat or
dispose of the battery in fire. Keep batteries
away from children to avoid the risk of
accident.
Pic(4)
11
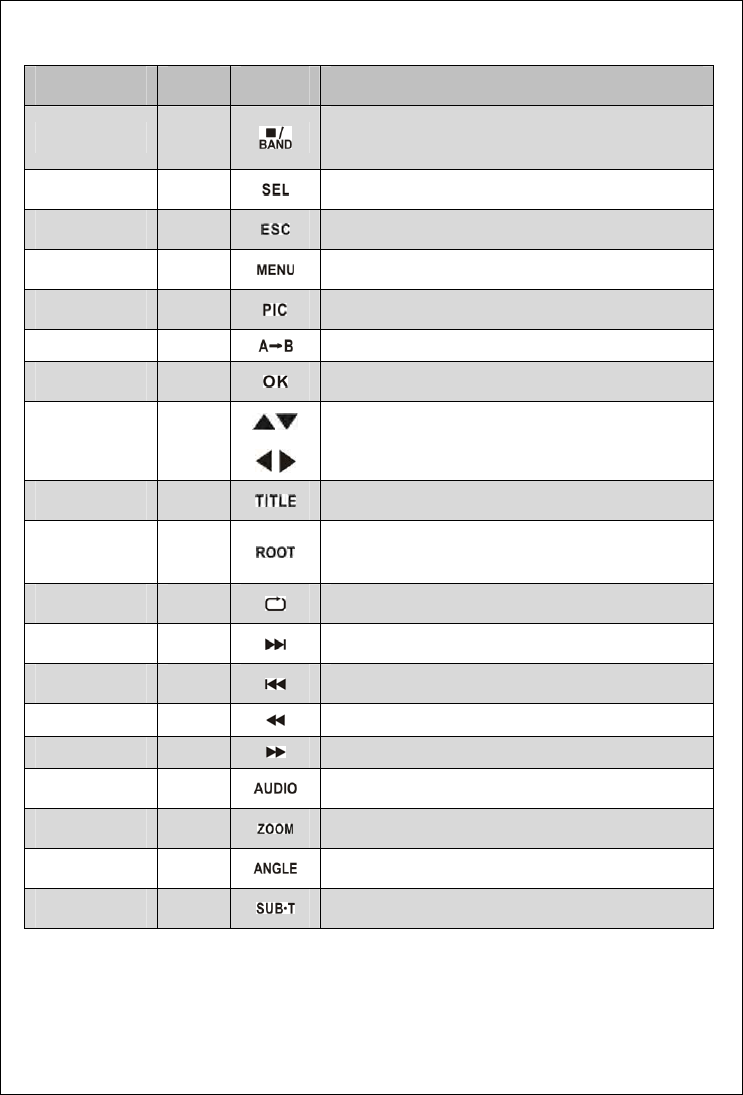
Name Ref # Signal Function
Stop/Band 10
Select FM/AM band on Tuner mode
Stop playback on others mode
Select 11
Enter the audio settings
ESC 12 Exit the current menu
Menu 13
Enter the main menu of system
Picture 14 Adjust the parameter of TFT settings
Repeat AB 15 Set start point A and end point B to repeat continually
OK 16 Start or pause playback confirm settings
Direction uttons 17
Up/down/left/right to select items for setting
Title 18 Enter the title menu of current source
Root 19
Enter the main menu of the disc
Turn on PBC while playing VCD
Repeat 20 Repeat playback for current chapter
Next 21
Select the next chapter/track for playback
Previous 22 Select the previous chapter/track for playback
Fast Reverse 23 Fast reverse the disc content
Fast Forward 24 Fast forward the disc content
Audio 25
Change the audio language for disc playback
Zoom 26 Zooming in/out on an image
Angle 27
Playback in different angel for a scene(if it is applicable)
SUB Title 28 Language selection for subtitle
12
Function operation
1、 Disc playing function operation
Enter◆
Feed a disc and touch upper left corner of TFT monitor , or touch DISC icon on the main menu .
Feed a disc during other playback source except backing up the car .
Feed a disc and press MODE icon with remote control .
◆Quit
Select other mode or eject the disc .
◆Slot disc
The disc will be automatically fed when put it into the slot .
◆Slot-out disc
Press the icon on front panel or eject icon with Remote control .
Restar◆t disc loading
If the disc does not load or does not play properly, press and hold for 3 seconds. The disc
will be ejected and normal operation will resume .
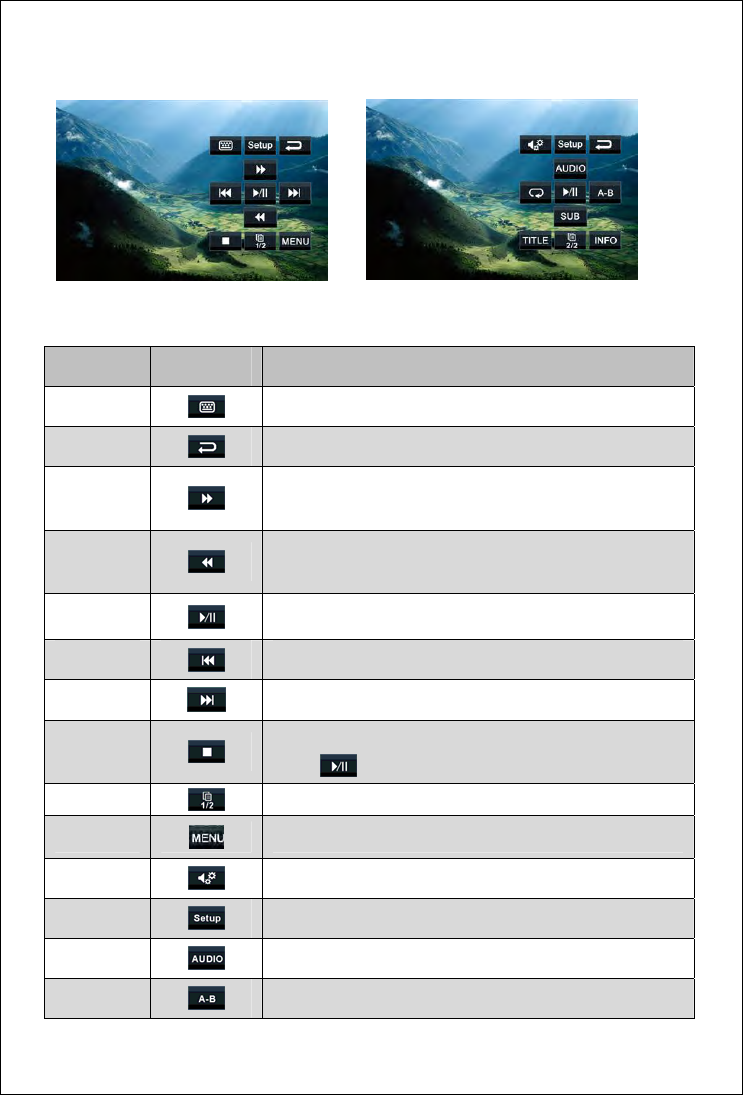
DVD playing touch contro◆l
Touch D zone on the screen during DVD video playback ,the touch-screen controls
automatically display on the screen .
NOTE:
1. Please use standard legal disc and keep cleaning, develop a good habits to assure the
unit working life .
2.If Parental Lock is activated ,the code must be entered .
3.You can not insert a disc if there is already a disc in the unit or if the power is OFF .
13
Touch-screen controls functions:
Ref # Signal Function
1 Chapter select
2 Exit interface icon
3
Fast forward icon; Press to forward play at 2/4/8/20 times
the speed.
4
Fast backward icon; Press to backward play at 2/4/8/20
times the speed.
5 play/pause
6 The previous chapter
7 The next chapter
8
Stop; light touch once is a break-point memory stop; light
touch will resume.
9 Flip over
10 Return disc boot menu
11 Go in sound Settings
12 Go in System settings
13 language choice
14 Repeat; Repeat playing between point A and point B
Pic(5) Pic(6)
14
Ref # Signal Function
15 Subtitle choice
16 Return disk title menu
17 Flip over
18 Display the current information broadcast
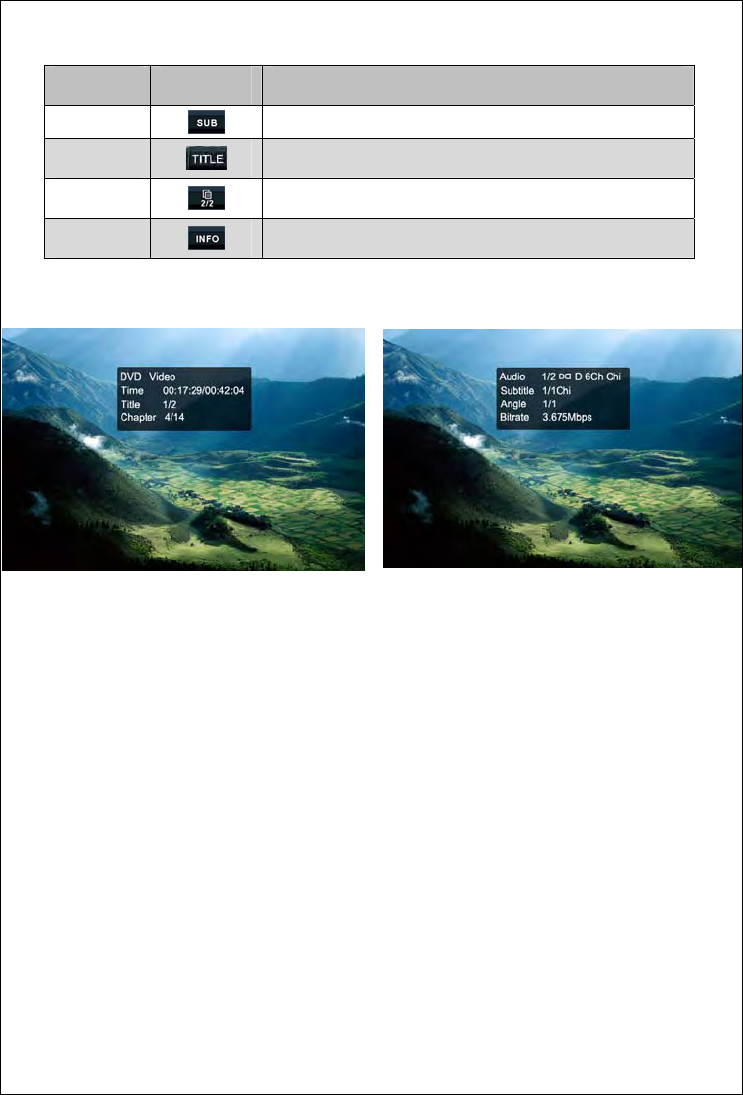
DVD ◆playing information
Touch OSD icon, then the top screen display DVD playing information
【DVD Video】Showed the current play source.
【Time】Display the elapsed time and the remainder time of a movie
【Title】Display titles; 3/5 indicates that the disk has 5 title in the program, and it is playing the third
one at this time.
【Chapter】Display chapter, 1/8 indicates that the current title has 8 chapters, and it is playing the
first one at this time.
【Audio】Display the sound channel setting
【Subtitle】No/Off subtitle
【Angle】Display the angle
【Bitrate】Display the bit rate of playing
Pic(7) Pic(8)
15
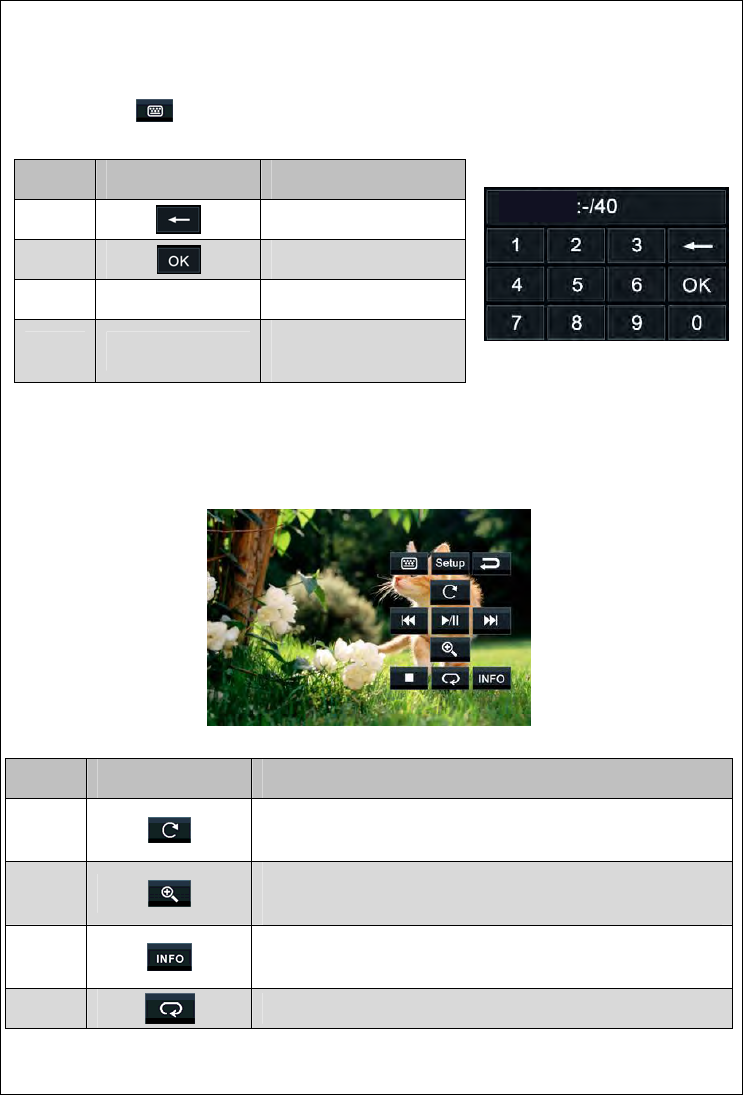
◆Search playing
Touch the icon , the screen will display search playing options
Ref # Signal Function
1 Delete the input contents
2 Confirmation
3 1.2.3.4.5.6.7.8.9.0 Numeric key
4 【Chapter】 Input play chapter in this
position.
JPEG file◆ playing
Ref # Signal Function
1
Every light tough to the icon, the picture will rotate clockwise by
90 degrees
2
Enlarge/reduce image; According 4/3 3/2 2、3 times of the original
to enlarge, then 1/2、3/4 times of the original to reduce.
3
Picture information. Press this icon to pop up the picture of
relevant information.
4 Cycle play. Press this icon to display picture repeatedly in the file
CHAPTER
Pic(9)
Pic(10)

16
◆ VCD playing touch control
VCD play operation is the same to DVD play, the PBC function is only to VCD2.0 disc
◆ CD/MP3/WMA playing touch control
Ref # Signal Function
1 Cycling play back
2
Previous track
3 Fast forward; press to play forward at 2/4/8/16 times the speed.
4 Play/ pause
5 Next track
6
Fast backward; Press to play backward at 2/4/8/16 times the
speed
7 Random play
8
Stop;Press to stop the play back
Pic(11) Pic(12)
17
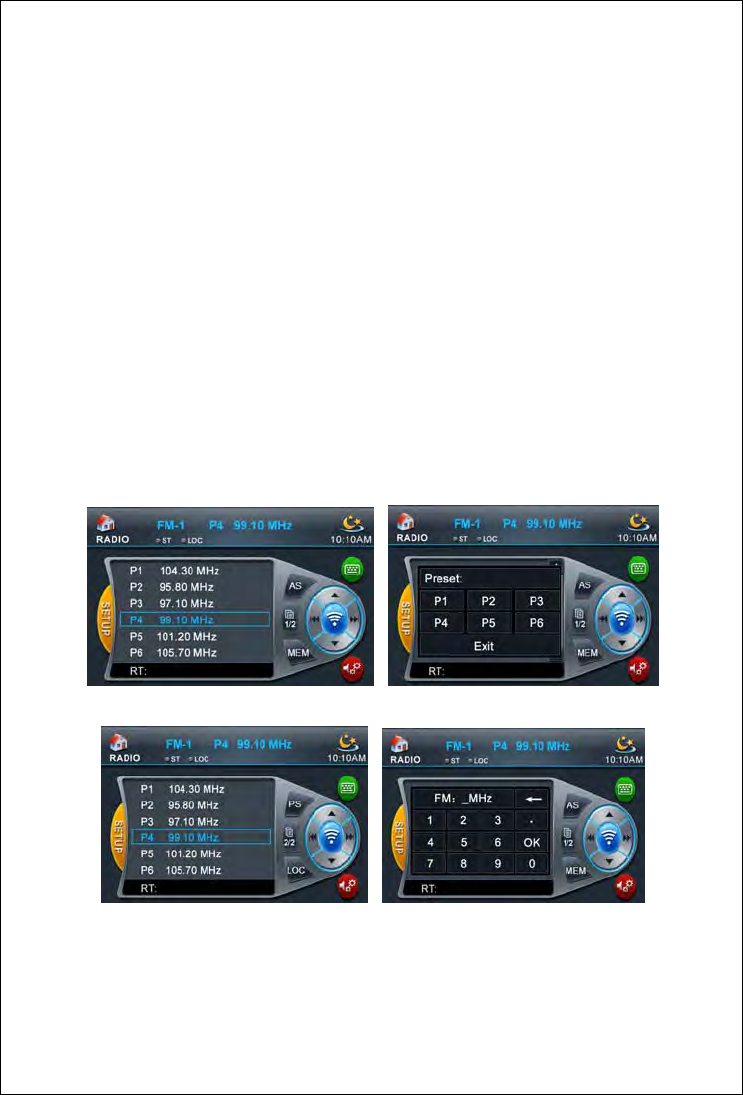
2. Radio function operation
After starting radio function mode, the system will automatically play the last stations. It can also
be chosen stored radio station by touching screen to play. All function operations are shown in the
picture.
E◆nter
Touch the top left corner of the screen lightly, clicking on Radio icon in the main menu.
Press MODE in the remote controller to log in
Q◆uit
Manually or automatically enter into another mode to play.
RDS Function◆
The system default RDS function open. RDS function can be closed through the system menu.
When it is closed, the information bar will display “RDS OFF”. At this time, the icons of RDS
function such as AF/TA are invalid.
Pic(16)
Pic(15)
Pic(14)
Pic(13)
18
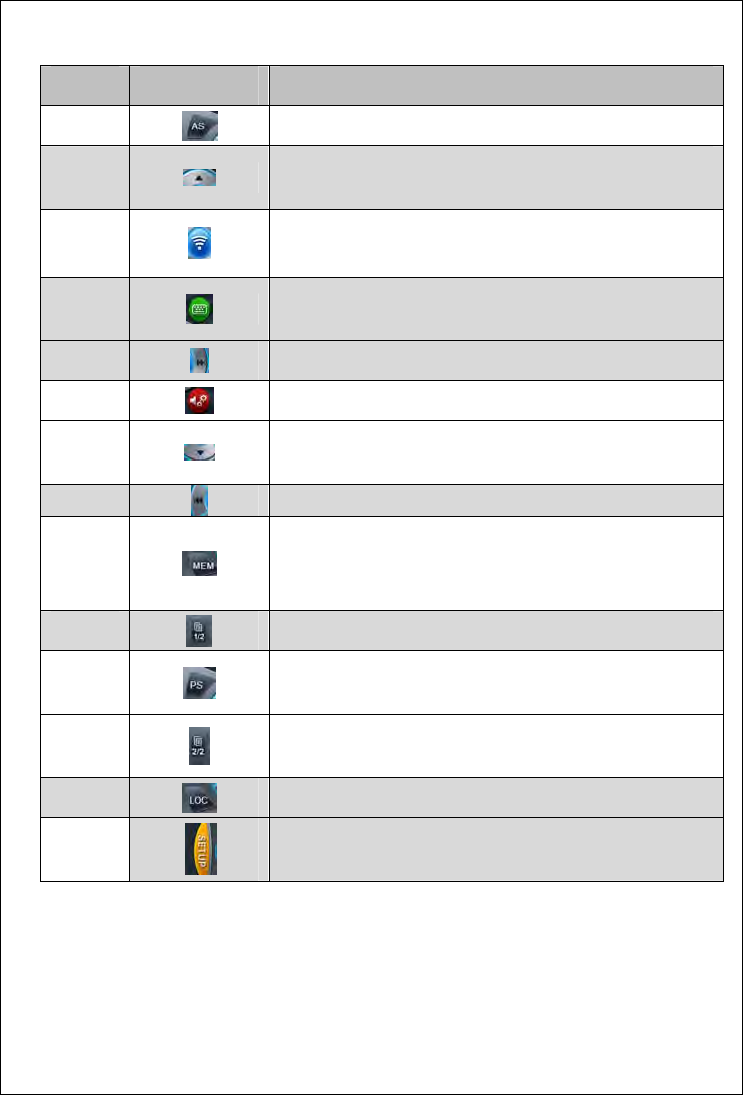
Ref # Signal Function
1 Automatic search
2 Search semi-automatically from low to high frequency and
stop, until the transceiver receives signal and play
3
Conversion of radio band; It can converse amount
FM-1/FM-2/FM-3/AM-1/AM-2 band.
4
Keypad. Press this icon to pop up the keyboard showed as
PIC (16), which can input track to search play.
5 Fine tuning from a single step to high-end frequency
6 EQ setting
7 Search semi-automatically from low to high frequency and
stop, until reach the high-end of the station and play.
8 Fine tuning from a single step to Low frequency
9
Save current frequency as a reset station: click the icon, a
window as picture (14) displays, click a preset station number
in the window, current frequency is saved as a preset station.
10 Flip icon; touch lightly to enter Page Two.
11
Preview playing; Press this icon to preview playing valid radio
station, each station plays ten seconds
12 Flip icon; touch lightly to enter Page One.
13 LOC indicating lamp, light touch is invalid.
14
SETUP mode
19
3. SD/USB Playing Function Operation
This system support WMA, MP3, MPEG, JPEG formats to play which stored in SD card or U
disk. When it is playing MP3/ WMA contents, the interface and function are similar with playing
CD/MP3 / WMA disk. When it is playing a JPEG format content, operation menu is similar with
playing JPEG files. When it is playing MPEG content, the interface and function are similar with
playing DVD disk.
E◆nter
Touch the top left corner of the screen lightly, clicking on SD/USB icon in the main menu.
Press MODE in the remote controller to log in.
Insert the multimedia SD card or USB disk.
Q◆uit
Manually or automatically enter into another mode to play.
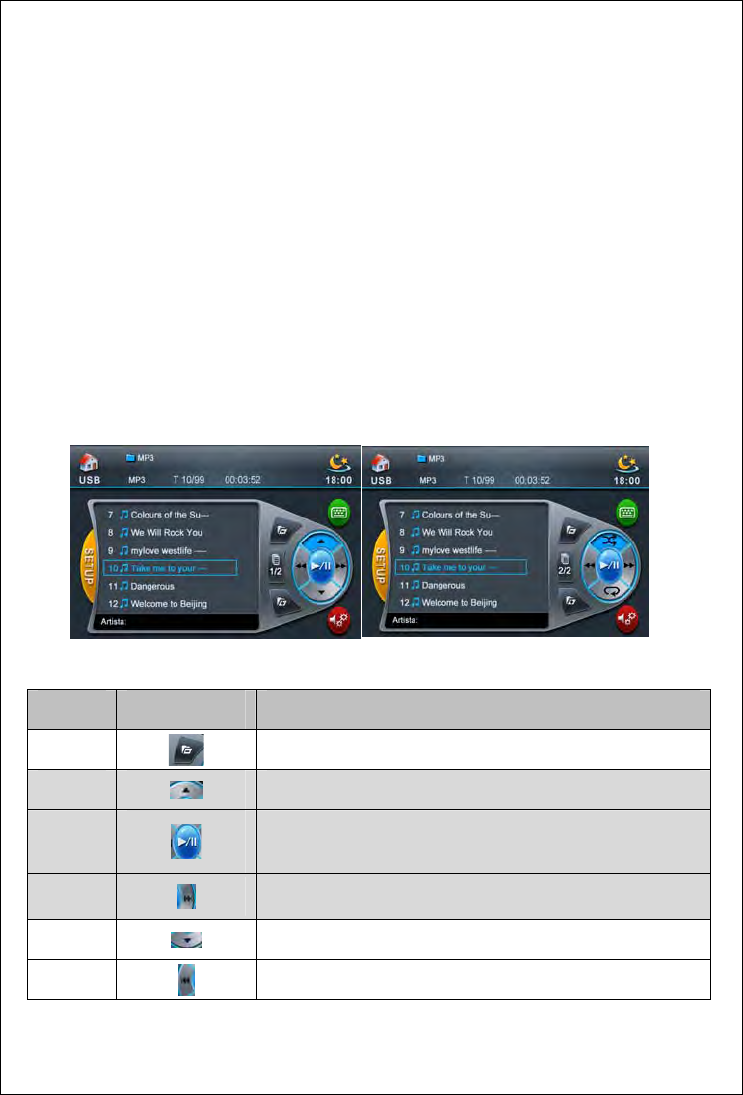
Ref # Signal Function
1 open the folder.
2 previous
6 play/pause
4 fast forward
3 next
5 fast backward
Pic(17) Pic(18)
20
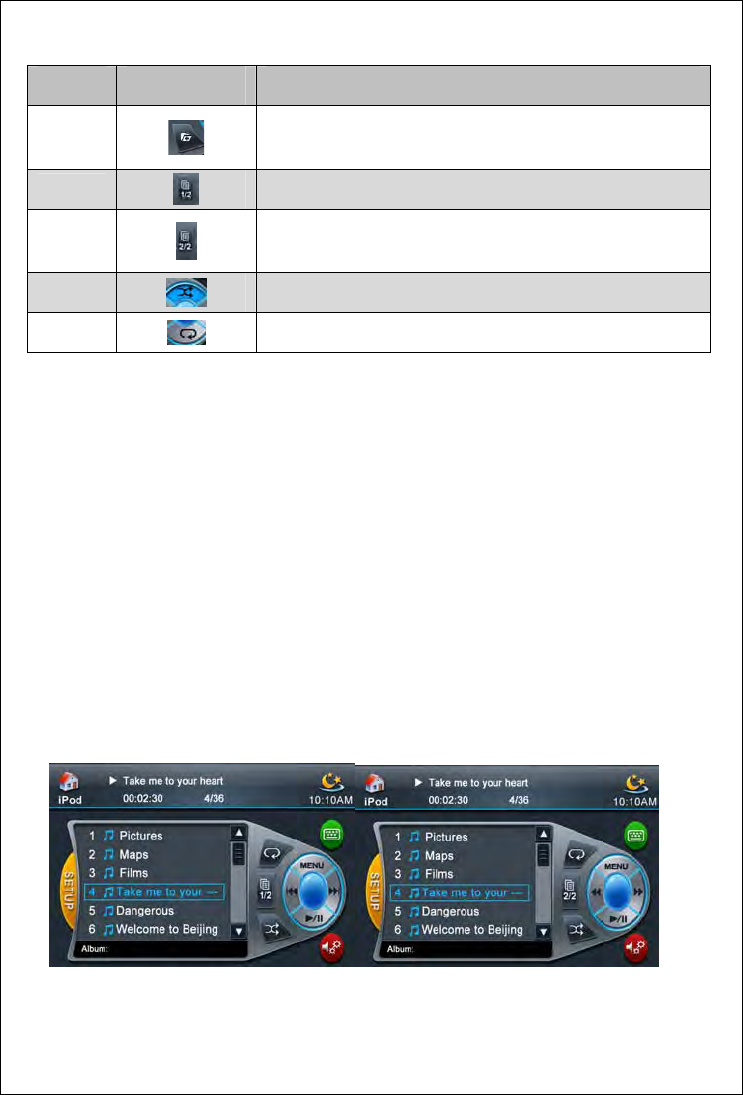
Ref # Signal Function
7 back to the previous content
8 Flip icon; touch lightly to enter Page Two.
9 Flip icon; touch lightly to enter Page One.
10 Random play
11 Cycling play back
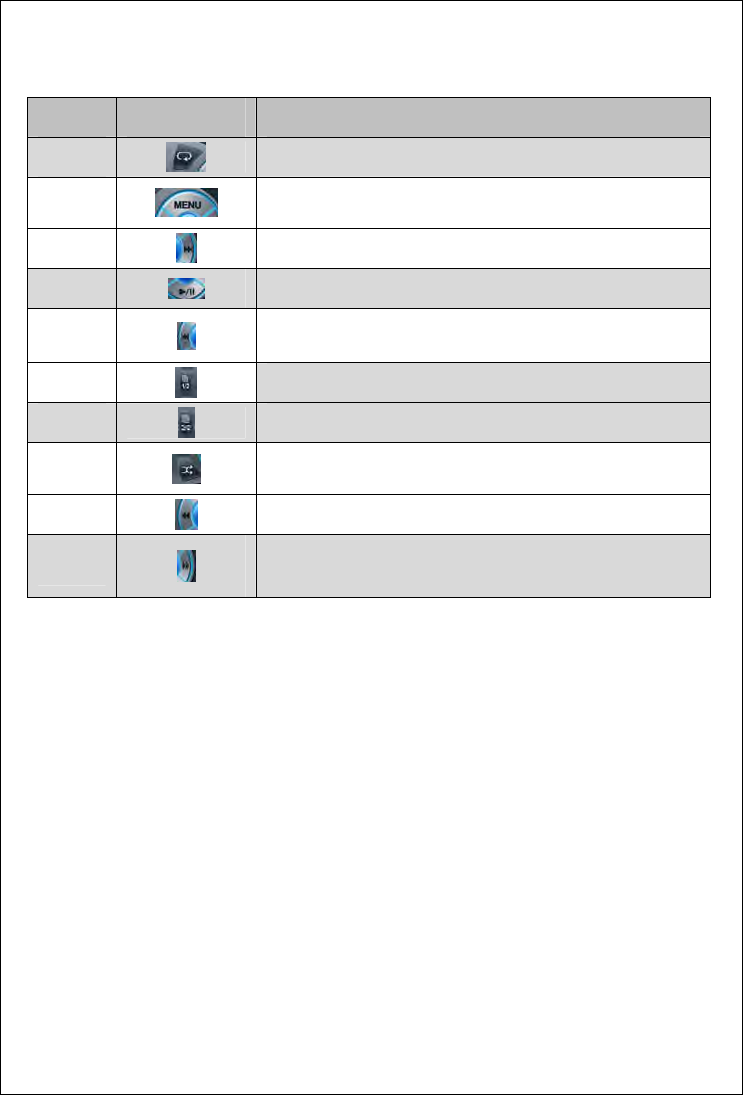
4、iPod Playing Function Opreration
The system support ipod audio play.
◆Enter
Gently touch screen upper left corner, touch iPod icon on the main menu. After connect iPod
successfully, Press remote control MODE to enter. Connect with iPod player.
◆Quit
Manually or automatically enter into another mode to play.
Pic(19) Pic(20)
21
Ref # Signal Function
1 Cycling play back
2 MENU,back to previous menu
3 Next
4 Play/Pause
5 Previous
6 Flip icon; touch lightly to enter Page Two.
7 Flip icon; touch lightly to enter Page One.
8 Random play
9 Fast backward
10 Fast forward
5、TV Function Operation
◆Enter
Gently touch screen upper left corner,touch TV icon on the main menu.
Press remote control MODE to enter.
◆Quit
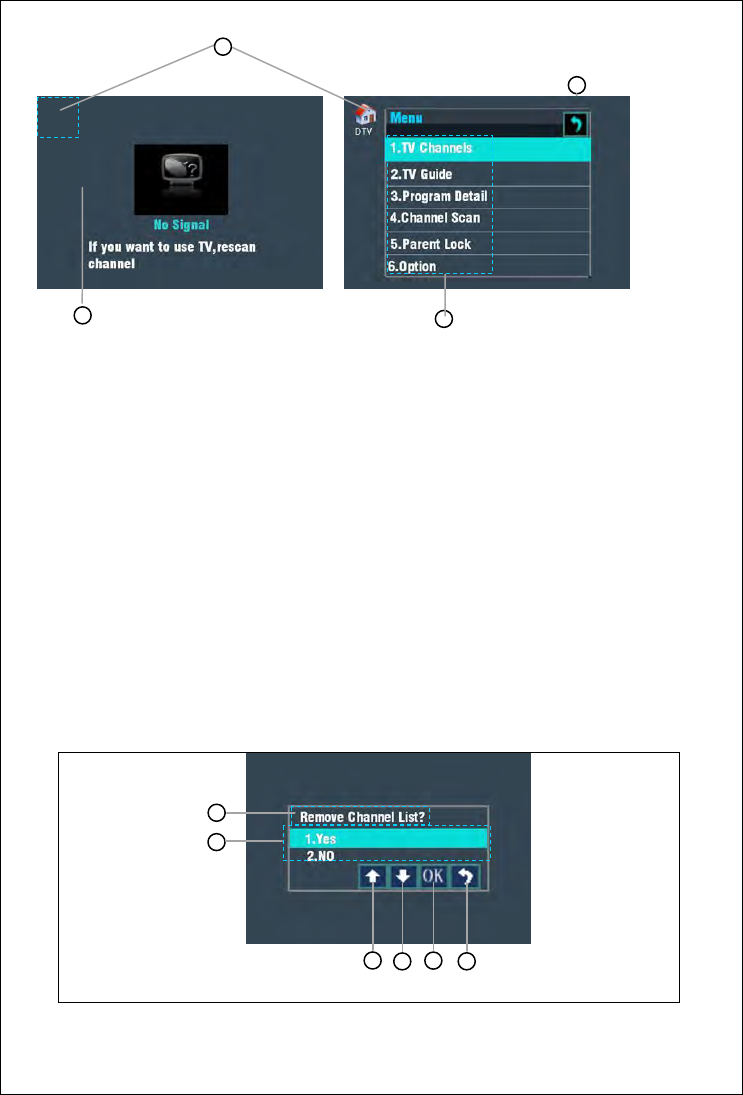
When in DTV mode, touch the left-top conner gently. If menu is popuped, there will be a HOME
icon indicates to return to home page.
22
【1】…While displaying “No Signal” or in playing, touch any area of the screen, except left-top
conner, will popup menu.
【2】…Left-top conner, touch here to exit DTV.
【3】…Return icon. Gently touch this icon return to previous window.
【4】…Menu items.
[TV Channels]: Touch this item will enter “TV Channels”submenu. If there is nothing programs
currently, it will prompt that “TV channels Not found”.
[TV Guide]: Touch this item will enter “TV Guide”submenu. If there is nothing programs
currently, it will prompt that “No EPG Data”.
[Program Detail]: Touch this item will enter “Program Detail”submenu. If there is nothing
programs currently, it will prompt that “TV channels Not found”.
[Channel Scan]: Touch this item will popup “Remove Channel List?”dialog-box.
3
1
4
2
3
4
5
6
1
2
Pic(21) Pic(22)
Pic(23)
23
NO. Description
…Dialog Text① Question you to operate what you’ve selected item.
…Select Items② Select “Yes” to clear contents of channel list and execute
scaning, select “No”to abort your selection.
…Up③ Up-ward select item.
…Down④ Down-ward select item.
…OK⑤ Execute your selection.
…Return⑥ Abort your selection.
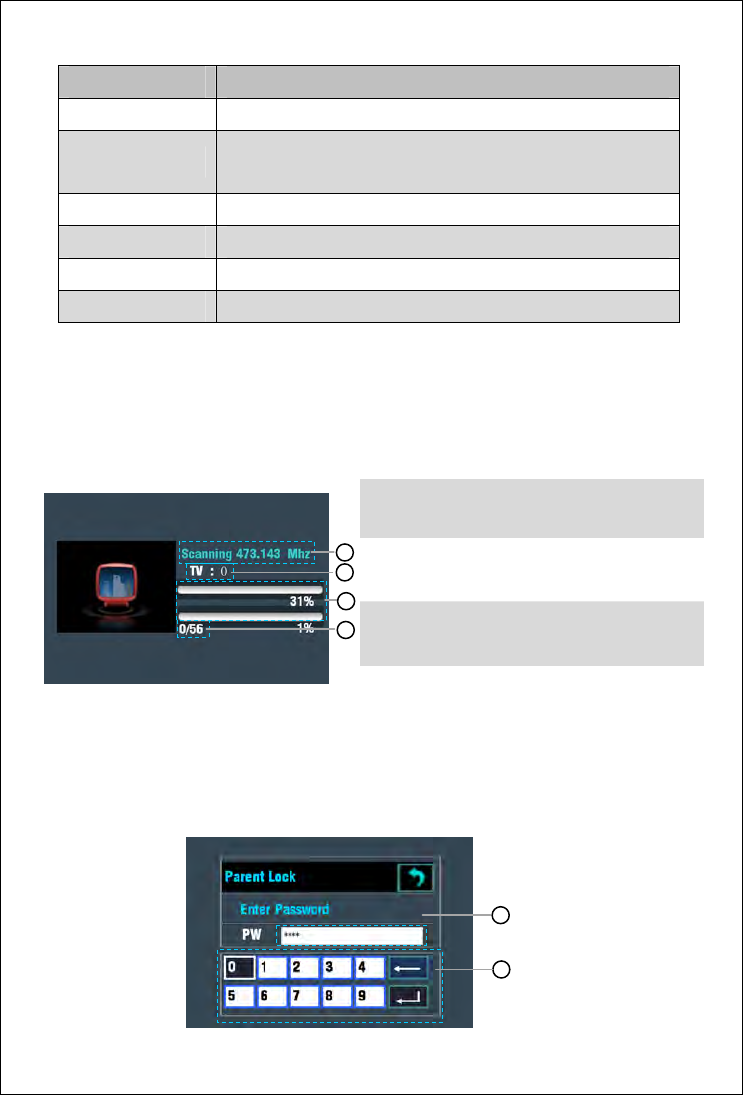
If You selected Yes and press OK button, it would start to scan channels.
…Current frequency①
…The TV programs you have scanned out.②
…Current percentage③
…How many channels you have searched.④
[Parent Lock]: It contains 2 items in its submenu, one is [Set User Age], the other is [Change
Password], but they have similar operations.
1
3
4
2
1
2
Pic(24)
Pic(25)
24
…Input box. Allow you input numeric character. Such as password, age, etc.①
…Keyboard. ②
Touch numeric character button to input number.
Touch backspace button to delete number you have input in error.
Touch carriage-return button to confirm your input.
If you input a wrong password, it will popup a message box to notify you that your password is
wrong!
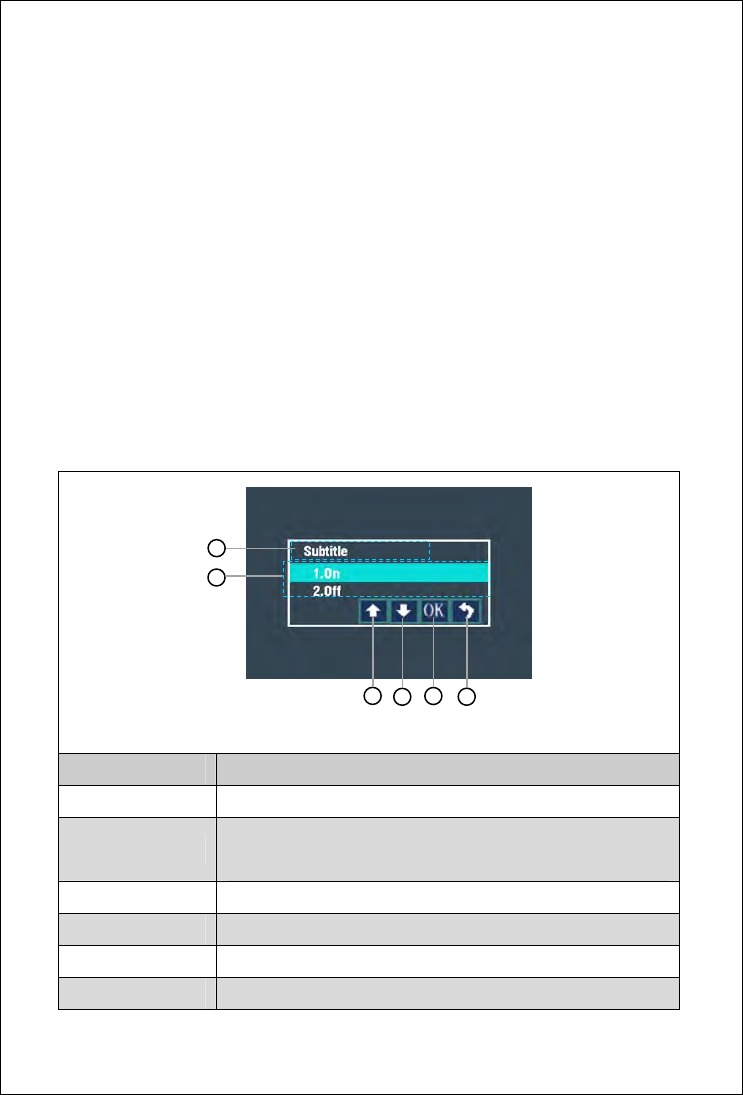
[Option]: There are 6 items in option. These items are used to set a certain function to lead you
get the best effect in watchingn TV.
The 4 header items, [Subtitle], [Language], [Dual Mono] and [Audio Setting] are similar,
here take [Subtitle] for example.
Pic (26)
NO. Description
…Title① Current item in option.
…Select Items② Select “On” to open subtitle(If current program itself has
subtitle), select “Off”to close subtitle.
…Up③ Up-ward select item.
…Down④ Down-ward select item.
…OK⑤ Execute your selection.
…Return⑥ Return to last window.
3
4
5
6
1
25
[OSD language]: Since many country use ISDB, so we offered 4 OSD languages for users,
they are English, Japanese, Portugues and Spanish. Gently touch any item in OSD language
window we save your touched language for you.
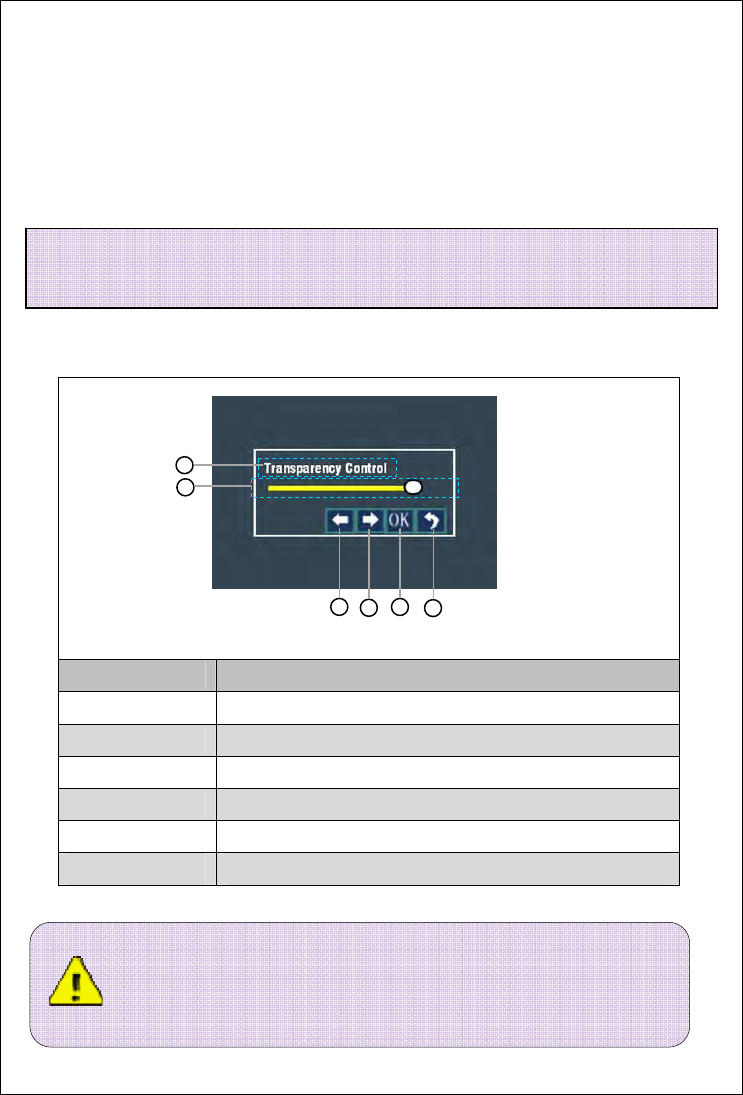
[Transparency control]: It allows you to modify UI transparency, you can set UI into
translucency to watch TV, which won’t interference you watching TV.
Figure (20)
pic (27)
NO. Description
…Title① Current item in option.
…Indicator② Indicates transparency you have set.
…Left③ Decrease transparency.
…Right④ Increase transparency..
…OK⑤ Save your settings.
…Return⑥ Return to last window.
Note:when the television are broadcasting,gently touch screen D area
display menu, gently touch A area back to main menu, gently touch C area to
broadcast previous pre-stored TV station,gently touch E area to broadcast
3
4
5
6
1
2
Note: If the transparency is less than 4(maximum level), operating in menu will blink LOGO
when no signal.
26
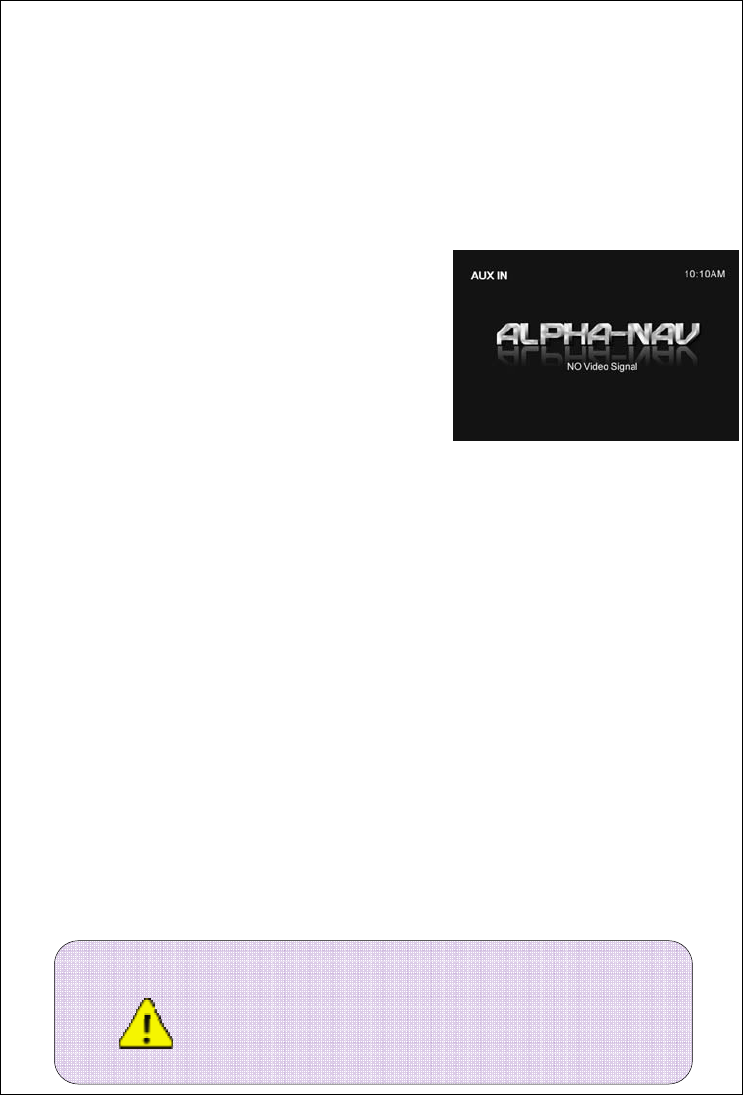
6、AUX IN Function Opreation
The system have two-way audio one-way video auxiliary input,allow external source media
player access to the system and play,such as cameras ,game consoles,external navigation
boxes.When no signal input,the screen display as Pic28. Under AUX IN mode,gently touch A
area,back to system main menu,gently touch F area to close display,gently touch D area,display
system set and EQ setting menu.
◆Enter
Gently touch screen upper left corner, touch AUX IN
icon on the main menu. Press remote control MODE
to enter.
◆Quit
Manually or automatically enter into another mode to
play.
Pic (28)
7、Camera Function Operation
When using rear view mirror function,we must let the camera access to system camera video
input port. After access, we need to confirm and set rear view mirror display mode,avoiding
display picture left and right reversed to lead the driver misjudgment .
◆Enter
Gently touch screen upper left corner,touch Camera icon on the main menu. Press remote
control MODE to enter. Car in reverse gear,the system REVERSE cable connect
◆Quit
Manually or automatically enter into anothermode to play. Exit reverse gear.
8、BT Function Operation
The system built-in Bluetooth have hands-free communication system, which can build connect
with the phone that have BT function. In this system screen we can implement dial, answer,
mobile music player and other functions.
Note:1. If the Mobile phone BT want to play music ,it must support A2DP
agreement.
2. After the machine work,as long as a call comes in,the system will
automaticall
y
turn to BT hands-free mode whatever the mode is.
27
◆Enter
Gently touch screen upper left corner,then touch BT icon on the main menu.
Press remote control MODE to enter. When the mobile phone and system are connecting, that
means have call in.
◆Quit
Manually or automatically enter into anothermode to play. Hang up the phone.
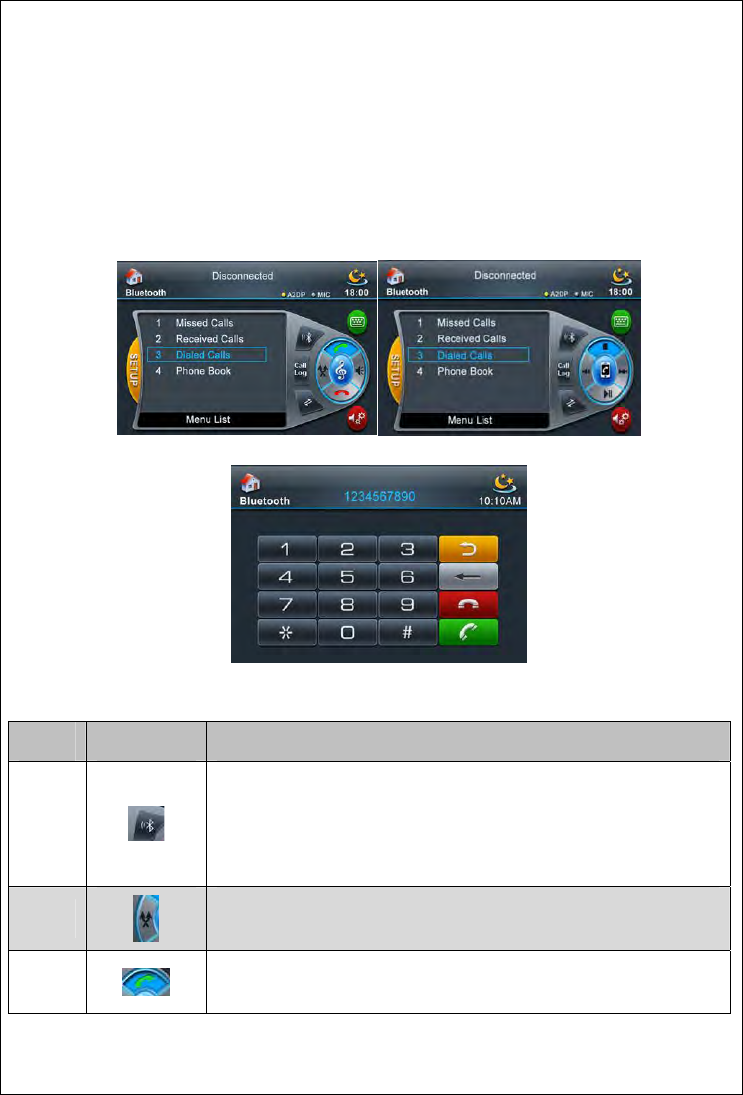
Pic (29) pic (30)
Pic(31)
Ref # Signal Function
1
Mobile phone pairing.When the mobile phone and system do not
connect,gently touch to pairing function,that time mobile phone can
search this system and connect.When the mobile phone and BT
connect successfully,gently touch the icon to cut BT connect.
2
Voice channel conversion.Gently touch the icon to switch voice call
between mobile phone and the system.
3
Phone answer key,dial key.Directly gently touch this key,automatically
dial the last dialled number.Also can gently touch the icon to dial after

28
Ref # Signal Function
enter into missed call,dialled number,received number list .
4
Phone and BT music play switch key,gently touch to switch to music
play operating interface.
5
Small keyboard.Gently touch this key to enter into telephone dial,such
as picture(31)
6 Microphone switch.Whether close the microphone.
7 Hand up.Gently touch to cancel current call.
8 Connect control.Gently touch the key to connect/cut connect.
9 Back to last menu
10 Next track
11 pause music
12
BT music play interface and phone interface switch key,gently touch
can switch to phone operate interface.
13 Previous track
14 Stop play current music
15 Exit dial keyboard.Press this key,will switch to BT main menu.
16 Delete input
17 Hang up key
18 Dial key

29
◆Pairing
Enter into BT interface,gently touch key【5】,display "phone pairing.......".At the same time open
phone BT, after searched this system then connect the device, phone will indicate input pairing
password(default is 0000), after correctly input, phone and the system will automatically finished
pairing and connecting. When connecting successfully, BT connect state identification light will
bright. If not, repeat above operation.
Dial◆ing
Input the telephone number on the keypad,touch the “Dial”icon to dial the number. Another way,
you can dial a number by selecting the number in the list: Missed calls, Received calls, Dialed
numbers.
An◆swer or reject a call
After the cell phone is connected to the unit via Bluetooth, Bluetooth keypad interface will be
automatically displayed on the screen when a call is coming. If the auto answer is set, the call will
be answer automatically. When the manual operation is set, you shall touch “answer” or “reject”
icon to answer or reject the call. The call can be end by touching the “reject” icon in any condition.
Play a song via the bluetooth connectivity◆
Open the music play interface, select the item from the menu list to play or pause the song in
the cellphone.
Note:
1. The cellphone must support A2DP profile.
2.Because the Bluetooth of the cell
p
hone is different,the o
p
eration can be
30
System Setup
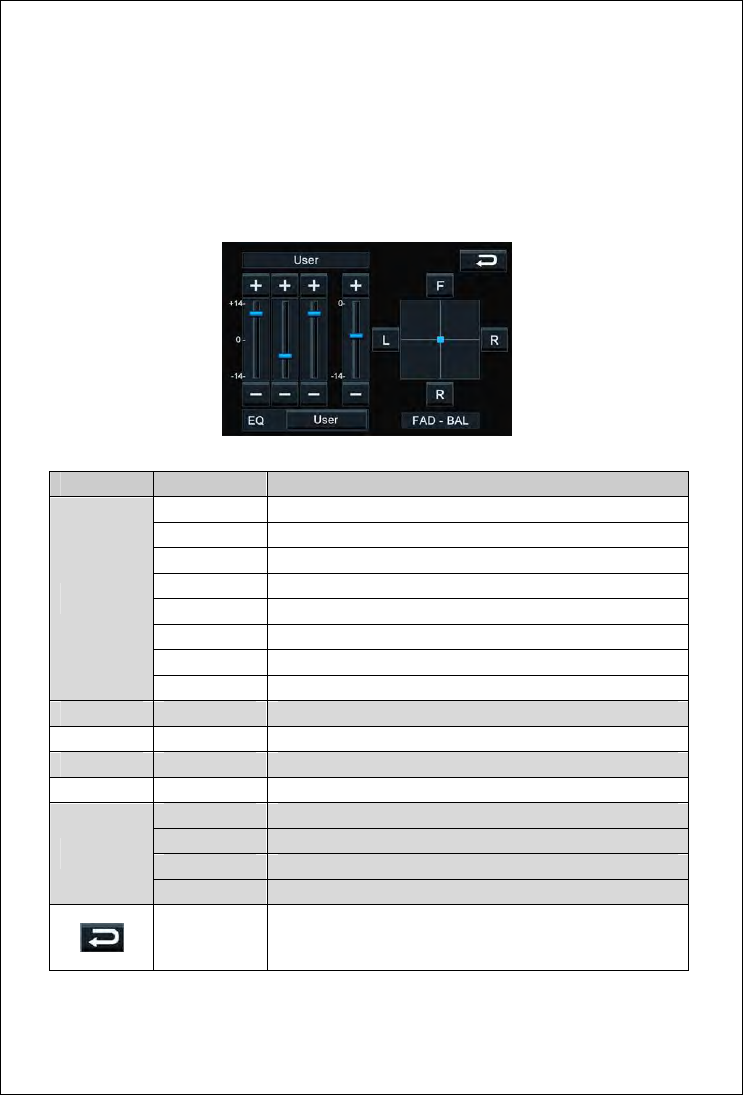
1、EQ setup
Open the EQ setting by touching the EQ icon。
Pic(32)
Settin
g
Item Feature Descri
p
tion
Custom User Preset:Low/Mid/High band enhancement
Rock Rock sound effect preset in the system
RAP RAP sound effect preset in the system
Dance Dance sound effect preset in the system
Latin Latin sound effect preset in the system
RAVE Rave preset in the system
Cit
y
City preset in the system
EQ
Vocals Vocals preset in the system
BASS -14~+14 Low band setting in Custom EQ setting
MID -14~+14 Mid band setting in Custom EQ setting
TREB -14~+14 High band setting in Custom EQ setting
SUB -14~0 Subwoofer channel output gain adjustment
F Front Channel volume up,rear channel volume down
R Rear Channel volume up,Front channel volume down
L Left Channel volume up,right channel volume down
FAD-BAL
R Right Channel volume up,left channel volume down
Exit EQ menu
31
2、System setup
Touch “SETUP” icon,enter the system setting menu。
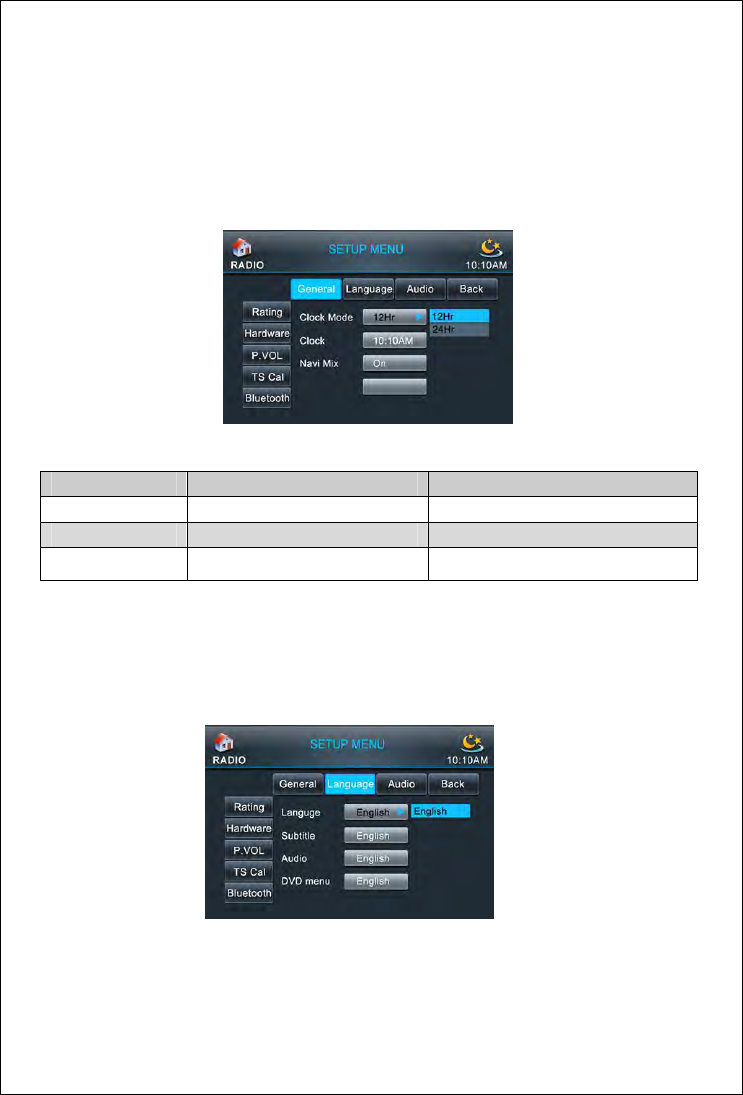
General ◆setup
Touch “General”icon in the system setting menu,enter the general setting. The Clock Mode,
Clock, Tuner Region, TV Region can be set.
pic(33)
Settin
g
Item Feature Descri
p
tion
Clock Mode 12 Hour/24 Hou
r
Select the Clock Mode in the
Clock 00:00 Set the time
Navi Mix On/Off Set navigation sound mixing effect
Language◆ setup
Touch "Language" icon to access language setting menu. You can set OSD language, DVD
subtitle, DVD Audio, DVD menu.
Pic(34)
32
Name Option Description
Language English/Chinese Set OSD language
Subtitle English/Chinese/Auto/Off Set DVD subtitle language
Audio English/Chinese Set DVD audio language
DVD Menu English/Chinese Set DVD menu language
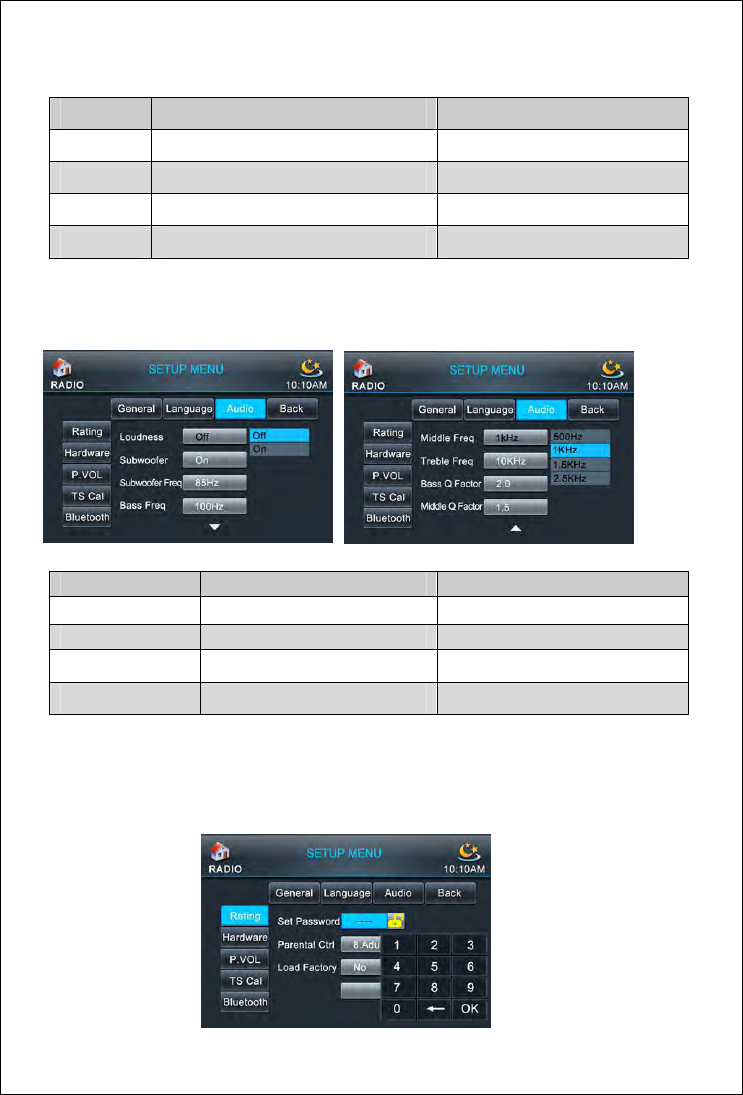
Audio ◆setup
Touch“Audio”icon to access Audio setting menu.You can turn on or turn off Subwoofer.
‘
Name O
p
tion Descri
p
tion
Loudness On/Off Turn on/ off loudness
Subwoofe
r
On/Off Turn on/ off subwoofe
r
Subwoofer Freq 55Hz/85Hz/120Hz Set subwoofer frequency
Bass Freq 60Hz/80Hz/100Hz/120Hz Set Bass frequency
Rating ◆setup
Touch“Rating”icon to access Rating setting menu.
Pic(35) Pic(36)
Pic(37)
33
Name O
p
tion Descri
p
tion
Set Password 0000 Set BT pairing password
Parental Ctrol 1.Child/ 2.G/ 3.PG/ 4.PG-13/ 5.PG-R/
6.R/ 7.NC-17/ 8.Adult Set parental control level
Load Factory Reset Load factory setting
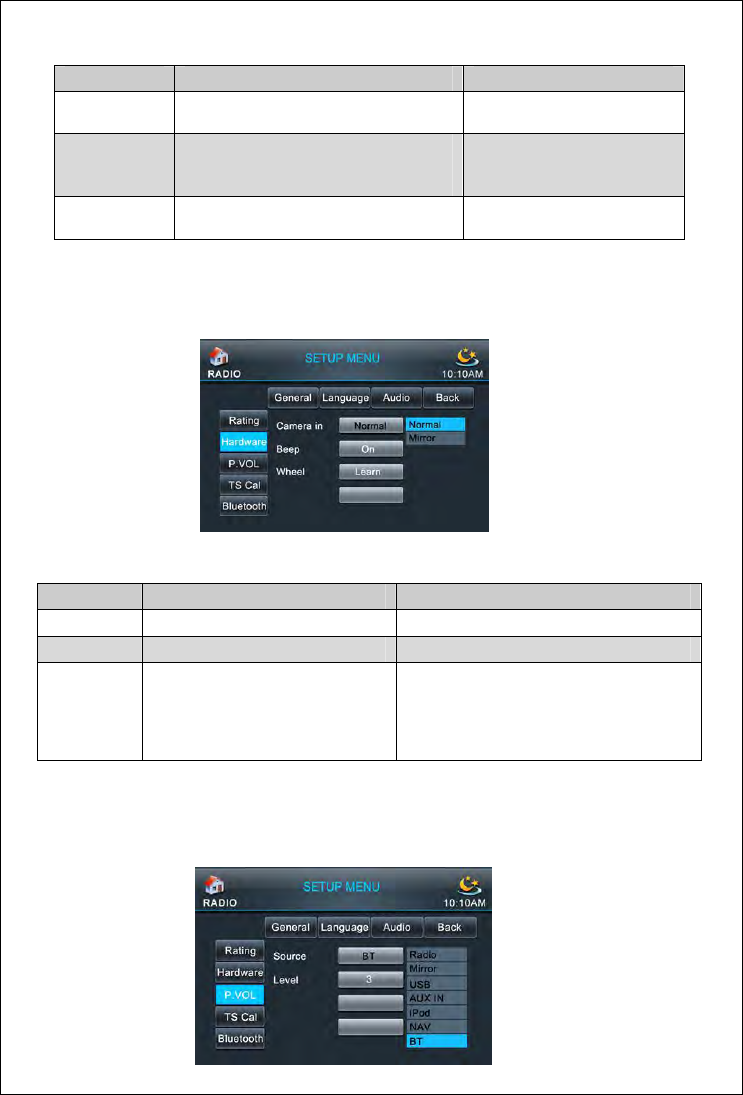
Hardware set◆up
Touch "Hardware" icon to access Hardware setting menu.
Settin
g
O
p
tion Descri
p
tion
Camera in Normal/Mirror Set reverse display mode
Beep On/Off Turn on/off beep
Wheel
Mode/Search up/ Search down/
VOL+/ VOL-
When the wheel key connect to the
system,we can realize the pairing of the
wheel key control through the key study
P.VOL set◆up
Touch "P.VOL" icon to access P.VOL setting menu.
Pic(38)
Pic(39)
34
Settin
g
O
p
tion Descri
p
tion
Source Radio/ DISC/ USB/SD card/ AUX in/iPod/ Choose source
Level 0/1/2/3/4/5/6 Choose P.VOL level
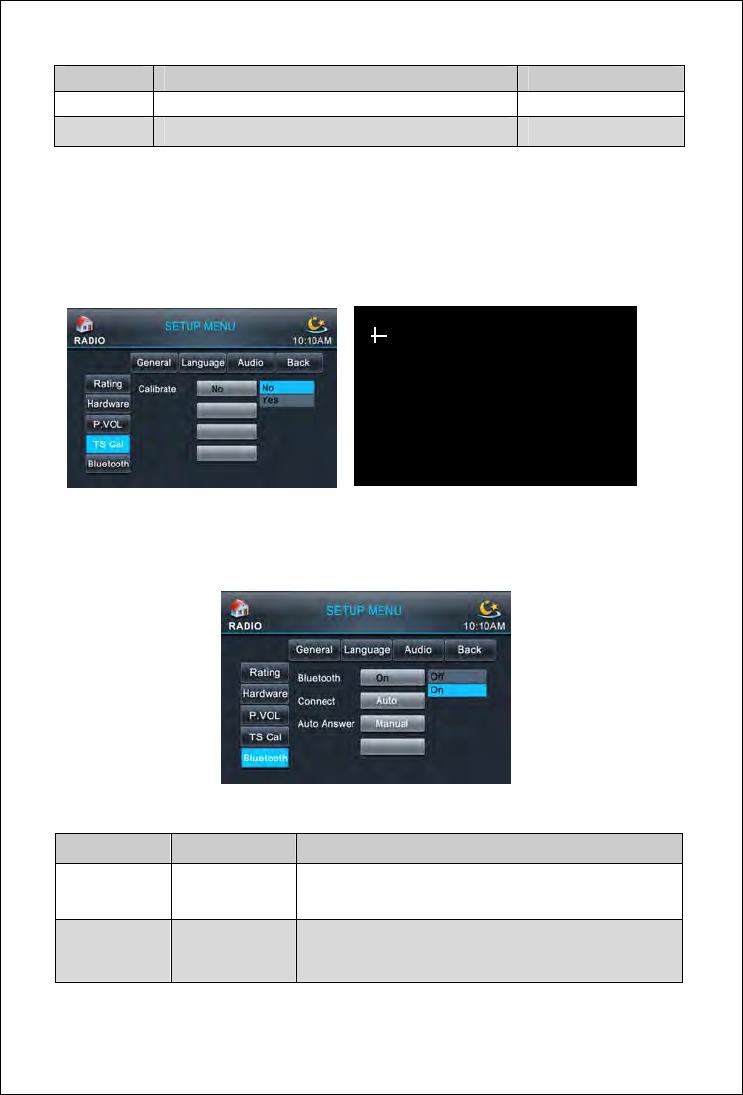
T◆S CAL
Touch "TS Cal" icon to access Touchscreen calibration setting.Touch the cross center,
according to the screen description. After calibration finished, it will be back to setting menu
automatically.
Blue◆tooth setup
Touch "Bluetooth" icon to access Bluetooth setting menu.
Setting Option Description
Connect Auto/Manual Set the BT phone and the unit connection mode
Auto Answer Auto/Manual Set coming call connection mode
Please press point A at upper left corner
Pic(40) Pic(41)
Pic(42)
35
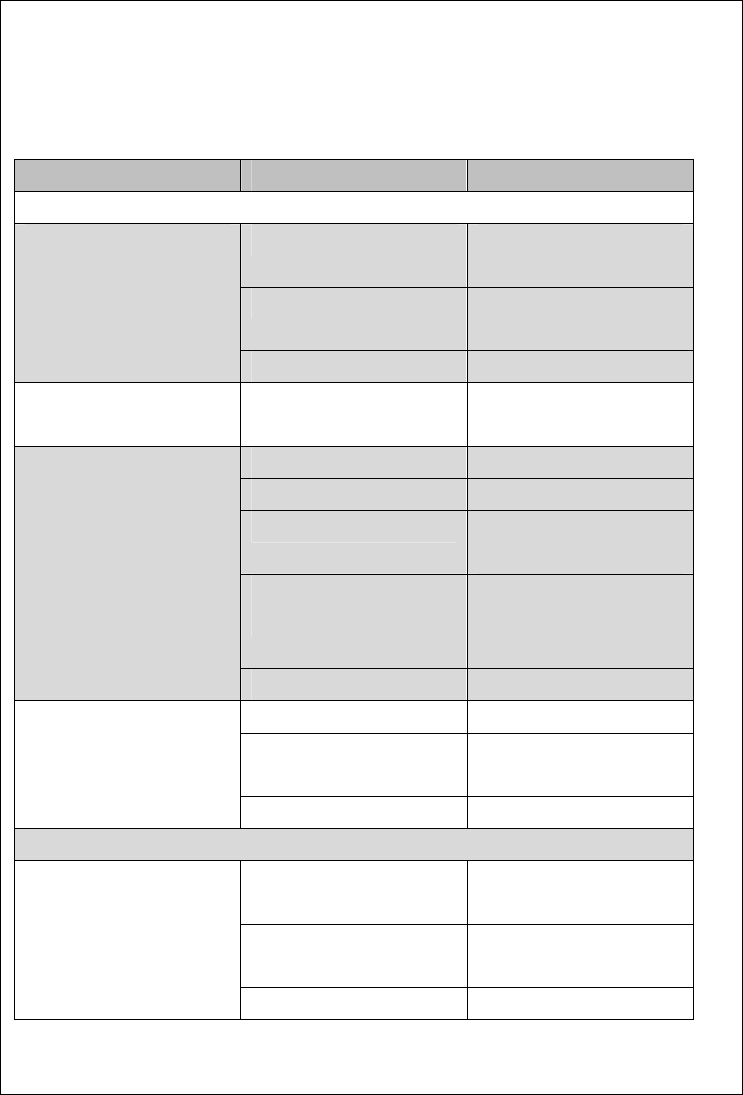
Troubleshooting
Problem Cause Solution
GENERAL
Radio fuse blown. Install new fuse with correct
rating.
Car battery fuse blown. Install new fuse with correct
rating.
Unit will not
power on.
Illegal operation. Press the RESET button.
No/low audio output. Improper audio output
connection.
Check wiring and correct.
Volume set too low. Increase volume level.
Speakers damaged. Replace speakers.
Only one channel is playing. Check the balance and fader
adjustments.
Speaker wiring is in contact
with metal part of car.
Insulate all speaker wiring
connections or replace the
speaker cable
No/low audio output.
Mute is activated. Turn off the Mute function.
Unauthorized disc is in use. Use original disc.
Speaker power rating not
compatible with unit.
Connect proper speakers
Poor sound quality
or distortion.
Speaker is shorted. Check speaker connections.
TFT MONITOR
The parking brake is not
engaged.
Stop vehicle in a safe place
and apply parking brake.
The parking wire was wrong
or not connected.
Please connect the parking
wire correctly.
No image.
The "Monitor off"-function is Touch the monitor to activate
36
activated. the display.
Prolonged image or
improper height/ width ratio
Improper aspect ratio setup. Use correct aspect ratio
setting.
Auto antenna not
properly connected.
Connect the auto antenna
cable properly.
REG function is activated. Turn REG function off.
The adapter with antenna
power supply is not
connected.
Connect the antenna power
supply adapter properly.
Weak station searching.
The AF function is not
activated
Activate the AF function.
MP3
The ID3 tags are shown
incorrectly.
Message is longer than LCD
can display or ID3 tag is not
compatible.
Use proper ID3 tag
information.
DVD-PLAYER
[Bad Disc] Disc is warped or scratched. Use disc in good condition
[Bad Disc] Disc is dirty or wet. Clean disc with soft cloth.
[Unknown Disc] Incompatible disc is used. Use compatible disc.
[Unknown Disc] Disc rating exceeds parental
lock rating limit.
Change parental lock
settings to lower restriction.
[Region Error] Disc region code is not
compatible with unit.
Use disc with proper region
code.
Disc
does
not play
back.
[Bad Disc] Disc is inserted upside
down.
Insert disc with label side up.
Cannot insert disc. Disc already inside unit. Eject current disc and insert
new one.

37
System parameters
DVD/CD playback
Compatible Disc/Format:
DVD-R, DVD-RW, DVD+R, DVD+RW, CD-R, CD-RW,CD-DA, MP3,
WMA, HDVD, SVCD, VCD, MPEG, JPEG
PANEL
Screen size:7"/ 6.2"
Screen style:TFT
Pixel:384,000
Viewing angle:overlook: 65°,uplook: 40°,left look: 65°,right look: 65°
VIDEO
System:NTSC,PAL(AUTO)
Out:1VP-P(75Ω)
In:1VP-P(75Ω)
38
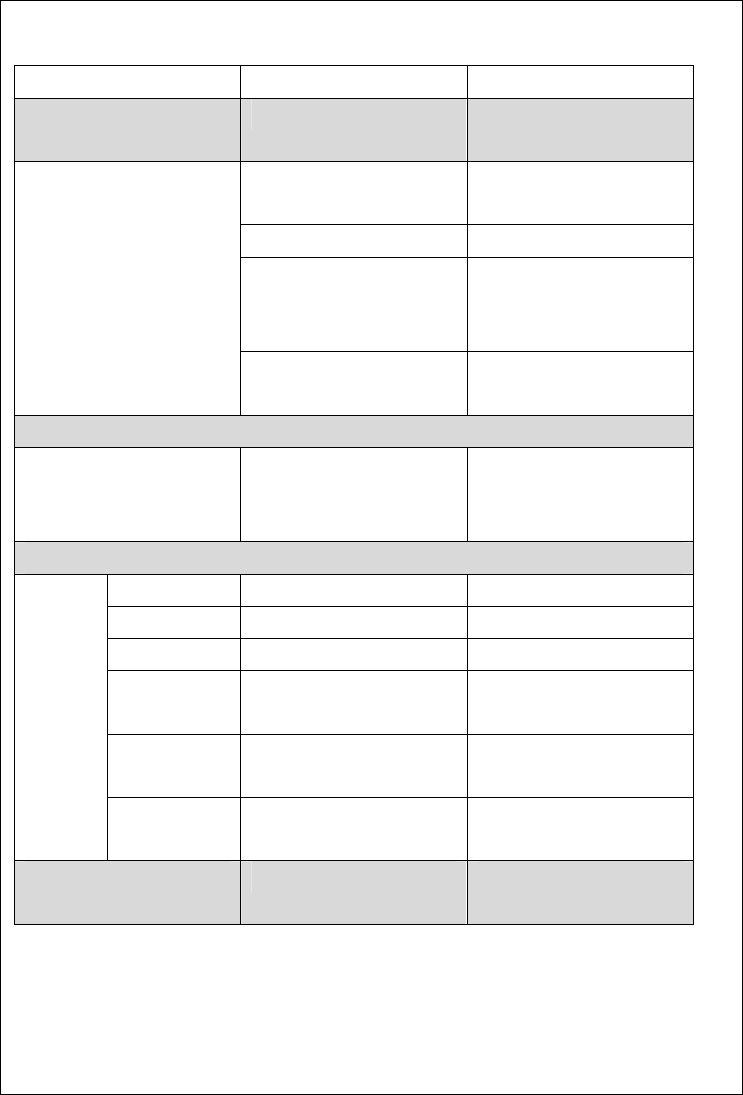
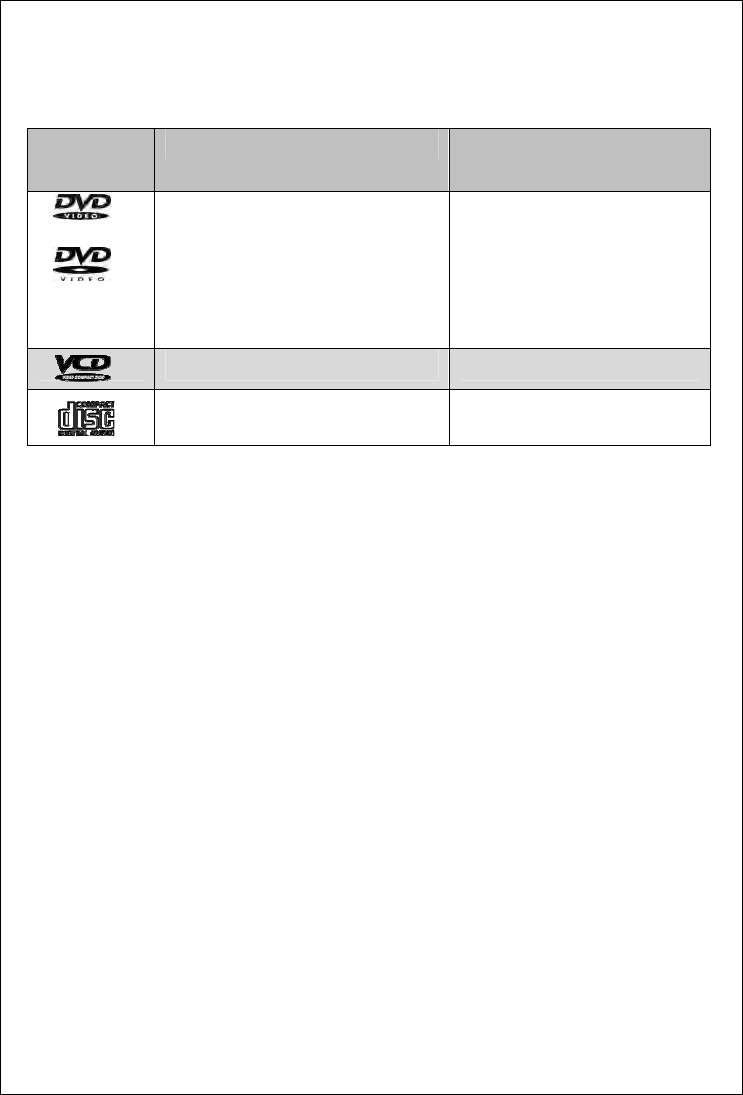
Disc logo
Disc logo
symbol
12cm diameter characteristic Maximum play time
Single-side、single-layer(DVD-5)
Single-side、double-layer(DVD-9)
Double-side、single-layer(DVD-10)
Double-side、double-layer(DVD-18)
(MPEG2 format)
133 minutes
242 minutes
266 minutes
484 minutes
Single-side、single-layer(VCD) (MPEG1 format)74 minutes
Single-sid、single-layer(CD) (CD-DA)74 minutes
FCC STATEMENT
1. This device complies with Part 15 of the FCC Rules.
Operation is subject to the following two conditions:
(1) This device may not cause harmful interference, and
(2) This device must accept any interference received, including interference that may
cause undesired operation.
2. Changes or modifications not expressly approved by the party responsible for compliance
could void the user’s authority to operate the equipment.
NOTE: This equipment has been tested and found to comply with the limits for a
Class B digital device, pursuant to Part 15 of the FCC Rules. These limits are
designed to provide reasonable protection against harmful interference in a
residential installation. This equipment generates, uses and can radiate radio
frequency energy and, if not installed and used in accordance with the
instructions, may cause harmful interference to radio communications. However,
there is no guarantee that interference will not occur in a particular installation.
If this equipment does cause harmful interference to radio or television reception,
which can be determined by turning the equipment off and on, the user is
encouraged to try to correct the interference by one or more of the following
measures:

39
-- Reorient or relocate the receiving antenna.
-- Increase the separation between the equipment and receiver.
-- Connect the equipment into an outlet on a circuit different
from that to which the receiver is connected.
-- Consult the dealer or an experienced radio/TV technician for help.
FCC Radiation Exposure Statement:
This equipment complies with FCC radiation exposure limits set forth for an uncontrolled
environment. In order to avoid the possibility of exceeding the FCC radio frequency exposure
limits, Human proximity to the antenna shall not be less than 20cm (8 inches) during normal
operation.