SKYPINE ELECTRONICS SD9614SV CAR DVD ENTERTAINMENT CENTER (BLUETOOTH PORTION ONLY) User Manual SD 9614 SV
SKYPINE ELECTRONICS (SHEN ZHEN) CO., LTD. CAR DVD ENTERTAINMENT CENTER (BLUETOOTH PORTION ONLY) SD 9614 SV
Contents
- 1. USERS MANUAL 1
- 2. USERS MANUAL 2
- 3. USERS MANUAL 3
USERS MANUAL 1
INSTRUCTION MANUAL
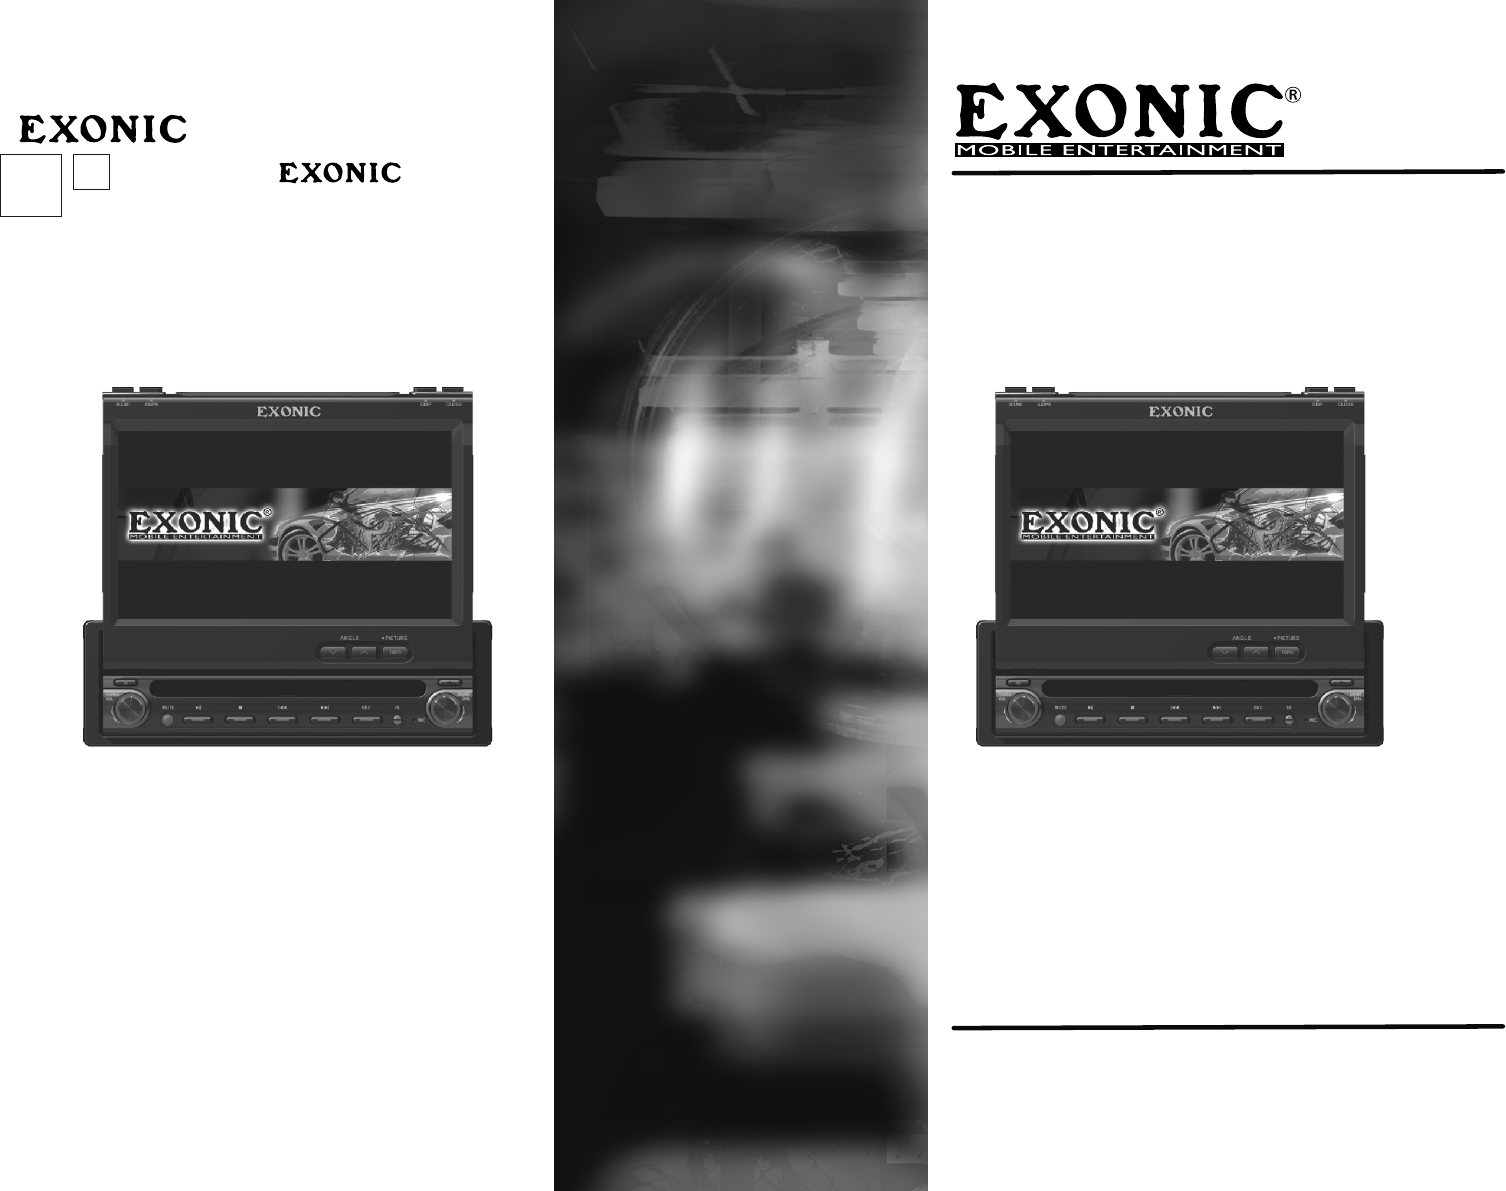
EXD 7090
Motorized 7"Touch Screen In-Dash Multimedia Disc Player
EXONIC Mobile Entertainment
Buena Park,CA.90621 U.S.A
www.exonicmobile.com
.
In Car Audio,
Sonic Excellence by
Mobile Entertainment
[ek-san-ik]means
ʹ
General information
Features
Precautions
Installation instructions
Making the electrical connections
Installing the main unit
After installation and connections
Operation instructions
Detaching the front panel
Resetting the unit
Control elements
Main unit
Remote
Main Access Menu
Touch Screen
AM/FM Tuner Operation
DVD Operation
CD Operation
MP3 Operation
iPod Operation
SD Card Operation
JPEG Operation
Bluetooth Operation
Settings
System GENERAL Setup Menu
General Setup Menu
Adjusting RADIO Frequency
Adjusting the Clock
Audio Signal Processing (ASP)
System SCREEN Setup Menu
Screen Setup Menu
Setting TFT Brightness
Setting TFT Angle
Touch Screen Calibration
DVD setup menu
DVD Setup Menu - Language
DVD Setup Menu - Video
DVD Setup Menu- Ratings
Troubleshooting
IR Remote Preparation
Manufactured under license from Dolby Laboratories.
''Dolby''and the double-D symbol are trademarks of Dolby laboratories.
EXD7090
1
1
1
5
5
9
10
11
11
11
12
12
15
17
17
20
22
24
26
27
30
31
31
34
34
34
35
36
37
38
38
39
40
41
42
42
43
44
46
49
51
50
Specifications
Caution
General information
Features
Thank you purchasing this EXONIC Multimedia Disc Player. Please read this information carefully and
follow all the instructions outlined below. This will ensure reliable operation and durability of your unit.
Keep the packaging and operating instructions in a safe place in order to pass them on to a subsequent
owner in the event of selling the unit at a later date.
Motorized 7" Touch Screen In-dash Multimedia Disc Player
Innovative in-dash monitor design allows the unit to be mounted in a single DIN slot. At the touch of a
button, a 7-inch wide-aspect-radio screen slides out, for comfortable DVD viewing.
High brightness and wide viewing angle monitor.
Touch panel user interface.
DVD, CD, VCD playback compatibility
Compatible with various disc formats, such as DVD-R/-RW, DVD+R/+RW, etc.
iPod
Control and command of most iPods via touch screen displays all information play lists.
Bluetooth
Hands-free phoning with cellular phones featuring Bluetooth technology
Answer and place calls via touch screen
One-touch dialing from phone book
On-screen caller ID
AM/FM Tuner
Auto/Manual search for radio station and preset station memory.
30 preset radio stations (12AM+18FM)
Distance/Local radio station seeking
Radio station scan playing.
Integrated SD card reader
4.1 Audio outputs, 1 Audio/video input, 1 Rear camera input, 1 Multi-zone A/V output and 1Composite
video output provided.
Precautions
To avoid the risk of injury or accident, read the following precautions before installing and operating the
unit.
On safety
Comply with your local traffic rules and regulations.
While driving
You must not watch or operate the monitor. It may lead to distraction and cause an accident. Park your car
in a safe place to watch the monitor and operate the unit.
While operating
Do not insert your hands, fingers or foreign object into the unit while the monitor is functioning. It may
cause injury or damage to the unit.
Keep small articles out of the reach of children. If your car was parked in direct sunlight resulting in a
considerable rise in temperature inside the car, allow the unit to cool off before operating it.
Preventing accidents
The video pictures appear only after you park the car and set the parking brake.
When the car starts moving, the video pictures automatically disappear for safety reasons, after
displaying the following caution.
Do not watch the monitor while driving. You may cause a traffic accident if your attention is distracted by
the monitor.
CAUTION
IT'S UNLAWFUL TO OPERATE A VEHICLE WHILE VIDEO IS DISPLAYED IN THE
DRIVERS VIEWING AREA.
ENGAGE EMERGENCY BRAKE TO ENJOY VIDEO
Do not use the System Setup feature while driving, or perform any other function which could divert your
attention from the road.
When you connect the back camera:
When you drive, watch the surroundings carefully for your safety. Do not depend on the back camera
exclusively.
When backing up you car, be sure to look back for your safety.
Do not touch the liquid crystal fluid if the LCD is damaged or broken. The liquid crystal fluid may be
hazardous to your health or fatal. If the liquid crystal fluid from the LCD contacts your body or clothing,
wash it off with soap immediately.
On installation
Due to its technical nature, it is highly recommended that your EXONIC EXD 7090 is installed by a
professional installer or an authorized dealer. This product is only for use in vehicles with 12VDC negative
ground only.
If you try to install this unit by yourself, refer to the supplied “Installation/Connections” manual and read it
carefully. Make sure to install this unit properly.
Improper installation may cause a short circuit.
If the unit does not work properly, check the connections first (refer to the supplied “
Installation/Connections” manual). If everything in order, check the fuse.
Replacing the fuse
When replacing the fuse, be sure to use only a fuse of the same rating (ampere rating).
Using a different fuse or bridging the contacts with wire is highly dangerous and can lead to serious
damage.
To prevent short circuits when replacing a fuse, disconnect the wiring harness first.
Protect unit surface from damage
Do not expose the unit surface to chemicals such as insecticide, hair spray, insect repellent, etc.
Do not leave rubber or plastic materials in contact with the unit for along tine. Otherwise the finish of the
unit may be impaired, or deformation may occur.
When installing, be sure to turn the ignition key to the off position. Installing the unit while the ignition is on
may cause battery drain or short circuit.
When installing, be sure not to damage any car parts such as pipes, tubes, fuel tank or wiring by using a
drill. It can cause a fire or an accident.
Do not attempt to open or repair the device yourself. This work should be performed by an authorized
service agent.
Installing location
Do not install this unit where:
The driver ’s view will be obstructed when the monitor is in either open or close position.
The operation of the car or the airbag system will be obstructed.
It will obstruct the operation of the vehicle, especially the steering wheel, shift lever or brake pedal.
Moisture condensation
When the temperature of the unit falls (as in winter), the liquid crystal inside the screen will become darker
than usual. Normal brightness will return after using the monitor for a while.
To maintain high sound quality
Be careful not to splash juice or other soft drinks onto the unit or discs.
Playable discs
The following types of discs/files are compatible:
CD-ROM (ISO), CD-R, CD-RW, DVD+R/RW, DVD-R/RW
CD-DA, DVD Video
MP3 data
JPG images
The following types of discs/files are not compatible:
WMA files that are protected by DRM (Digital Rights Management)
WMA lossless format
Discs recorded with Track At Once or packet writing
MP3 PRO format
MP3 playlists
WAV format
WMV format
AVI format
Some recordable DVDs and CDs may be incompatible with this unit, depending on media type and
recording method.
Notes:
If you experience problems during installation, contact your nearest EXONIC dealer.
If the unit malfunctions, reset the unit as described on page 11 first. If the problem still persists,
contact your nearest EXONIC dealer.
DVD Region Management
Some DVD discs can be played only in certain playback modes according to the intentions of the software.
As the EXD 7090 plays discs according to their intentions, some functions may not work as intended.
Please be sure to read the instructions provided with each disc. This player has been designed to play
back DVD software that has been encoded for specific region areas. It cannot play back DVD software
encoded for other region areas than the region areas for which it has been designed.
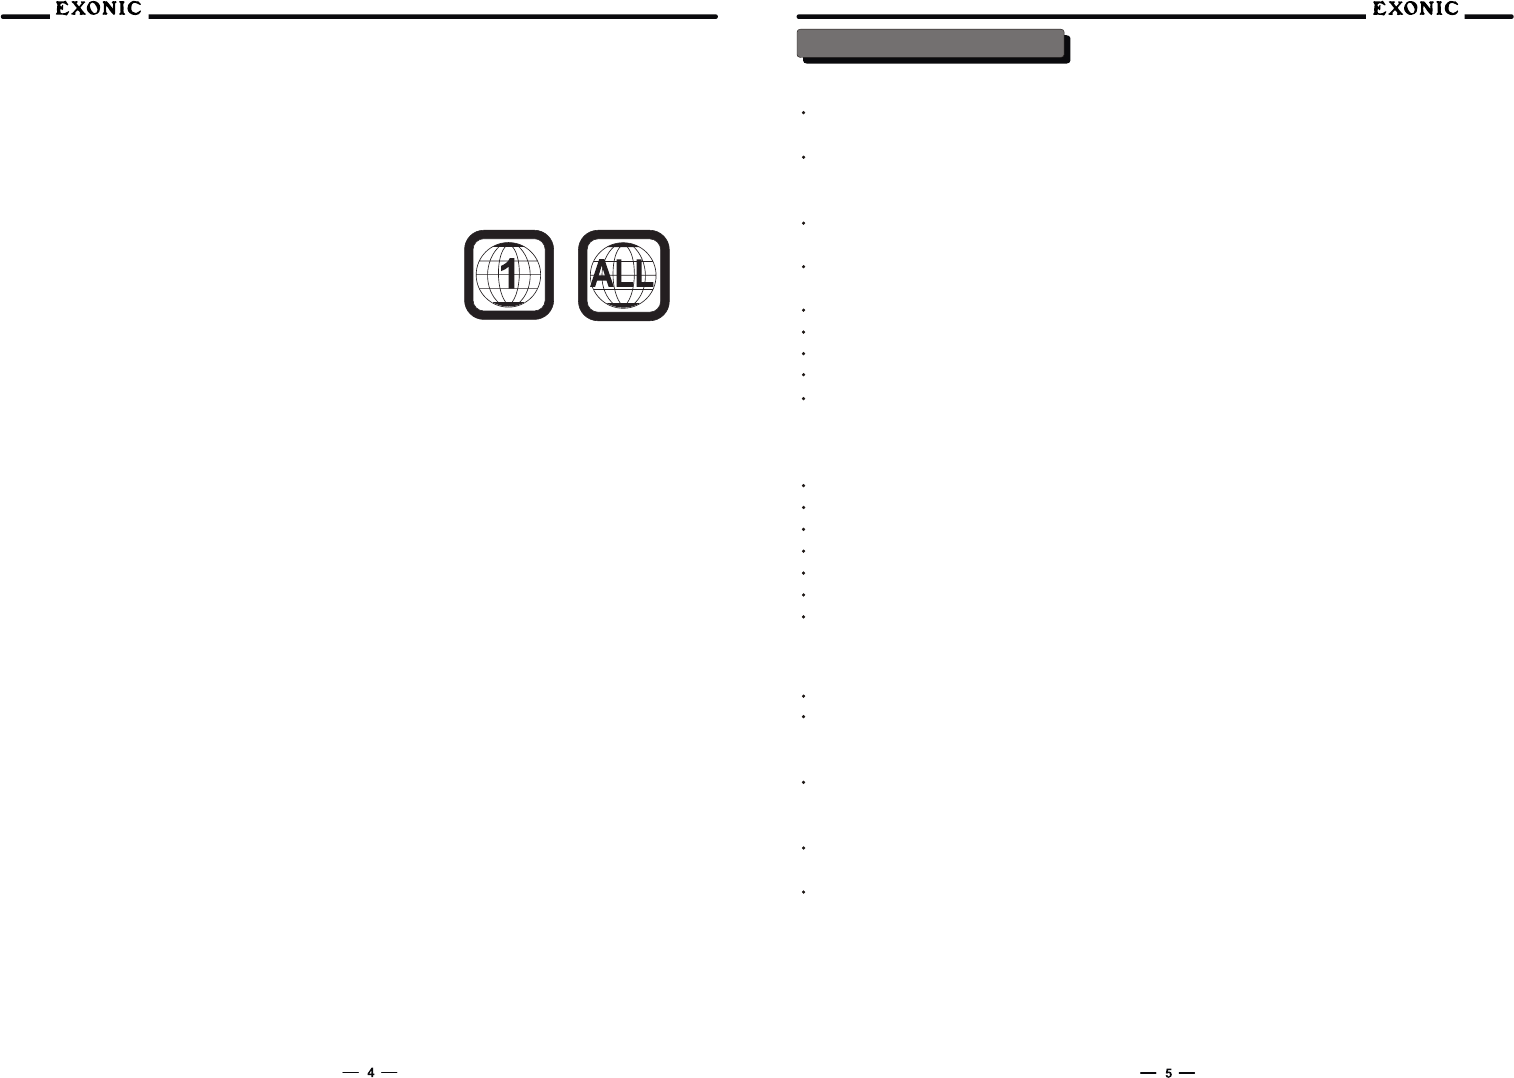
The EXD 7090 will play discs labeled “Region 1” or “All”.
DVD region codes:
1 - USA, Canada 2 - Japan, Europe, South Africa, Middle East
3 - Rep. of Korea, Taiwan, Hong Kong, Parts of Southeast Asia
4 - Australia, New Zealand, Mexico, South America
5 - Eastern Europe, Russia, India, Africa
6 – China
Copyrights
This product incorporates copyright protection technology that is protected by method claims of certain
U.S. patents and other intellectual property rights owned by Macrovision Corporation and other rights
owners. Use of this copyright protection technology must be authorized by Macrovision Corporation, and is
intended for home and other limited viewing uses only unless otherwise authorized by Macrovision
Corporation. Reverse engineering or disassembly is prohibited.
Windows Media and the Windows logo are trademarks, or registered trademarks of Microsoft Corporation
in the United States and or other countries.
iPod is a trademark of Apple Computer, Inc., registered in the U.S. and other countries.
All other trademarks are property of their respective owners.
Installation instructions
IMPORTANT INFORMATION
Unit is designed for negative ground 12V DC systems only. The unit cannot be used in trucks or other cars
with 24V systems.Otherwise, there is a risk of fire and damage.
Do not disassemble or remodel the unit. This can cause electric shock, personal injury or fire. Do not
connect any other system’s power supply cord directly. If you are in any doubt about the safe installation of
this unit, please consult your nearest EXONIC dealer.
Do not install in locations which interfere with airbag operation. Otherwise there is a risk of accidents and
injury.
Use only the specified fuse. When replacing the fuse, be sure to use only a fuse of the same rating
(ampere rating). Otherwise there is a risk of fire.
Do not ger the wires under a screw, or caught in moving parts (e.g.seat railing).
Before making connections, turn the car ignition off to avoid short circuits.
Connect the power input leads only after all other leads have been connected.
Run all ground wires to a common ground point.
Be sure to insulate any loose unconnected wires with electrical tape for safety.
Parts supplied
The pack you have bought contains:
EXONIC EXD 7090 Multimedia Disc Player
Power cord
RCA connector
Operation manual
Remote
IPod connector
Inport Adaptor
Making the electrical connections
Install all cables with care. For wiring, refer to the connection diagram.
To prevent the risk og accidents caused of short-circuits, connect the power supply leads, only after all
other wiring has been completed, and only with the ignition key in the OFF position. Otherwise, accidental
short-circuiting can lead to electric shock and to serious damage.
Subwoofer output
The SUBWOOFER audio output (Blue RCA) is active in all audio modes and must be connected to an
external amplifier.
Rear view camera
A rear view camera (not included) can be connected to the CAMERA input.
NEED HELP??
Contact nearest EXONIC dealer.
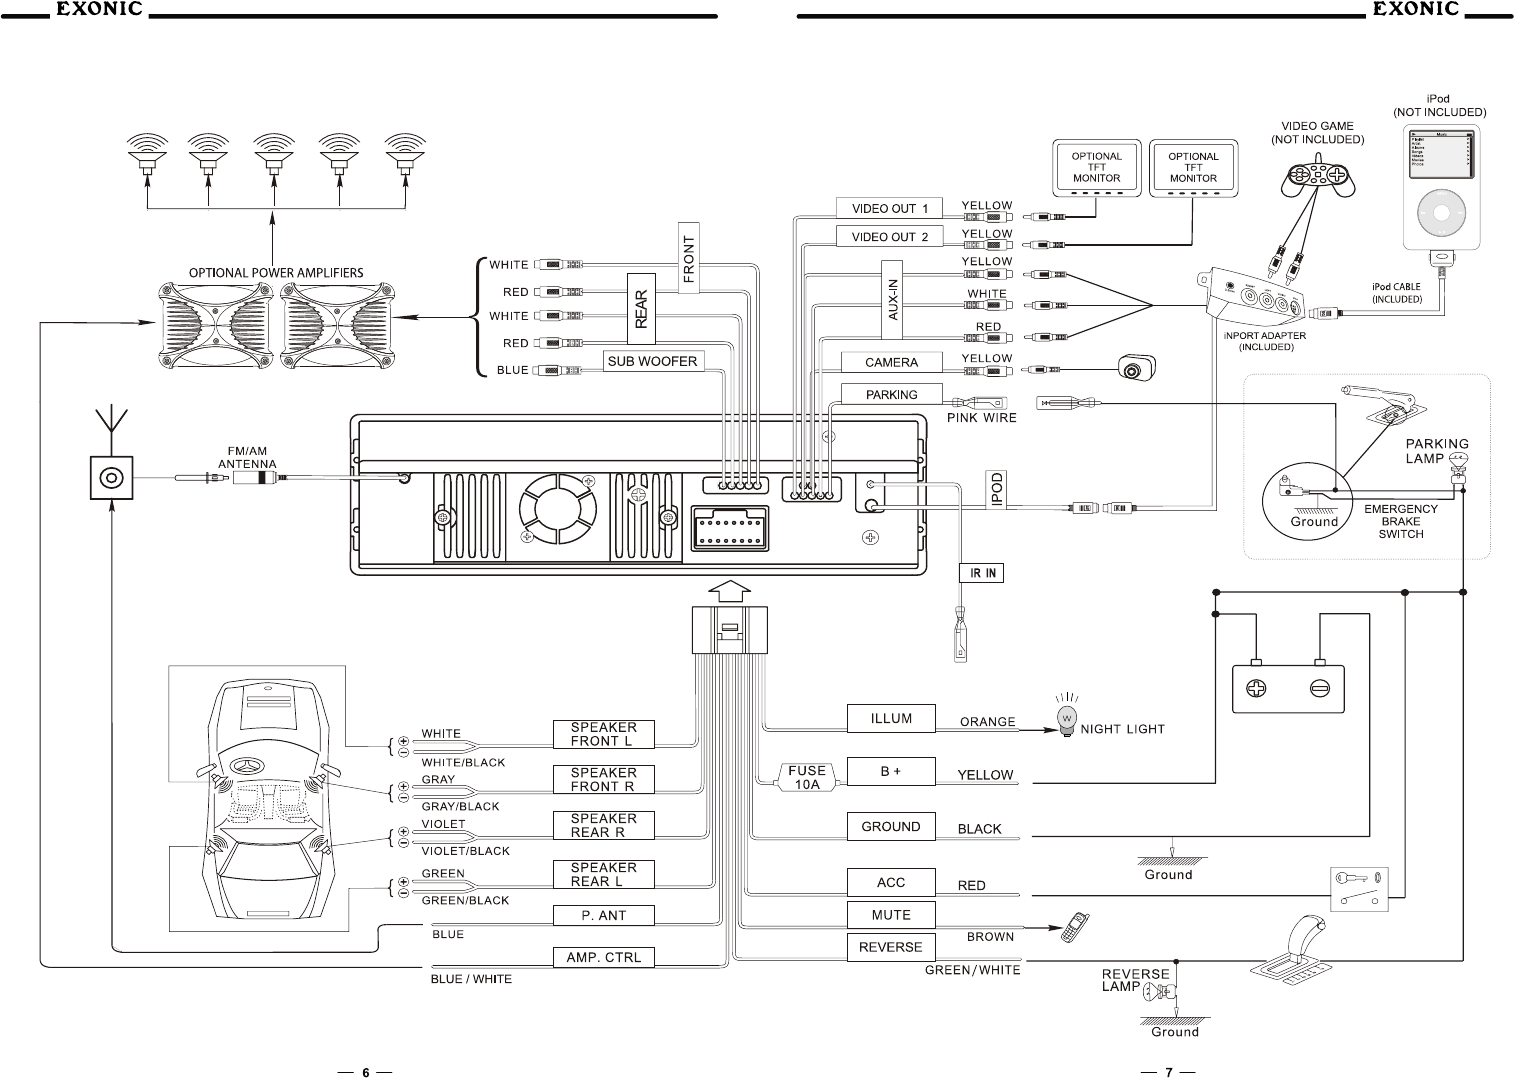
Expanded Wiring Diagram -Inputs/Outputs
REARVIEW CAMERA
Note:
The remote control uses one 3 volt Lithium CR2025 battery. For best performance, replace only with
CR2025 or equivalent.
Installing the main unit
After all connections are made, install the main unit to the dashboard.
Before installation
This unit is designed to be completely safe, but if not installed correctly, it can cause accidents. Be sure to
verify the following points before installation.
Install the unit so that the monitor when opened up will not block access to the hazard switch or other
important controls.
Do not install the unit (monitor) in locations which maybe subject to excessively low or high temperatures.
(Otherwise the unit may be deformed and the LCD may be damaged.)
Exposure to direct sunlight can also lead to high temperatures and should be avoided.
Selecting the installation location
1.Set the ignition key to OFF or remove it.
2.Place the units in their intended mounting locations to check the cable length and monitor installation
conditions.
Installation procedure precautions
Perform the installation carefully. Dropping the unit or otherwise subjecting it to strong impact or force
may deform the chassis, resulting in failure of the monitor loading mechanism or other defects.
To allow for proper opening and closing of the monitor, there must be a clearance of at least 170 mm
between the closest position of the shift lever and the mounting surface for the unit.
In some cases, the shift lever may touch the monitor when moved to a certain position. Make sure that
there is no obstruction to driving operations.
The unit should be installed within an angle of 30 degrees from horizontal. If this angle is exceeded, the
monitor may not open up or retract properly.
Installation procedure
When installing this unit, be sure to close the monitor of the unit.
If the monitor is opened while installing and given too much force, it may cause a malfunction.
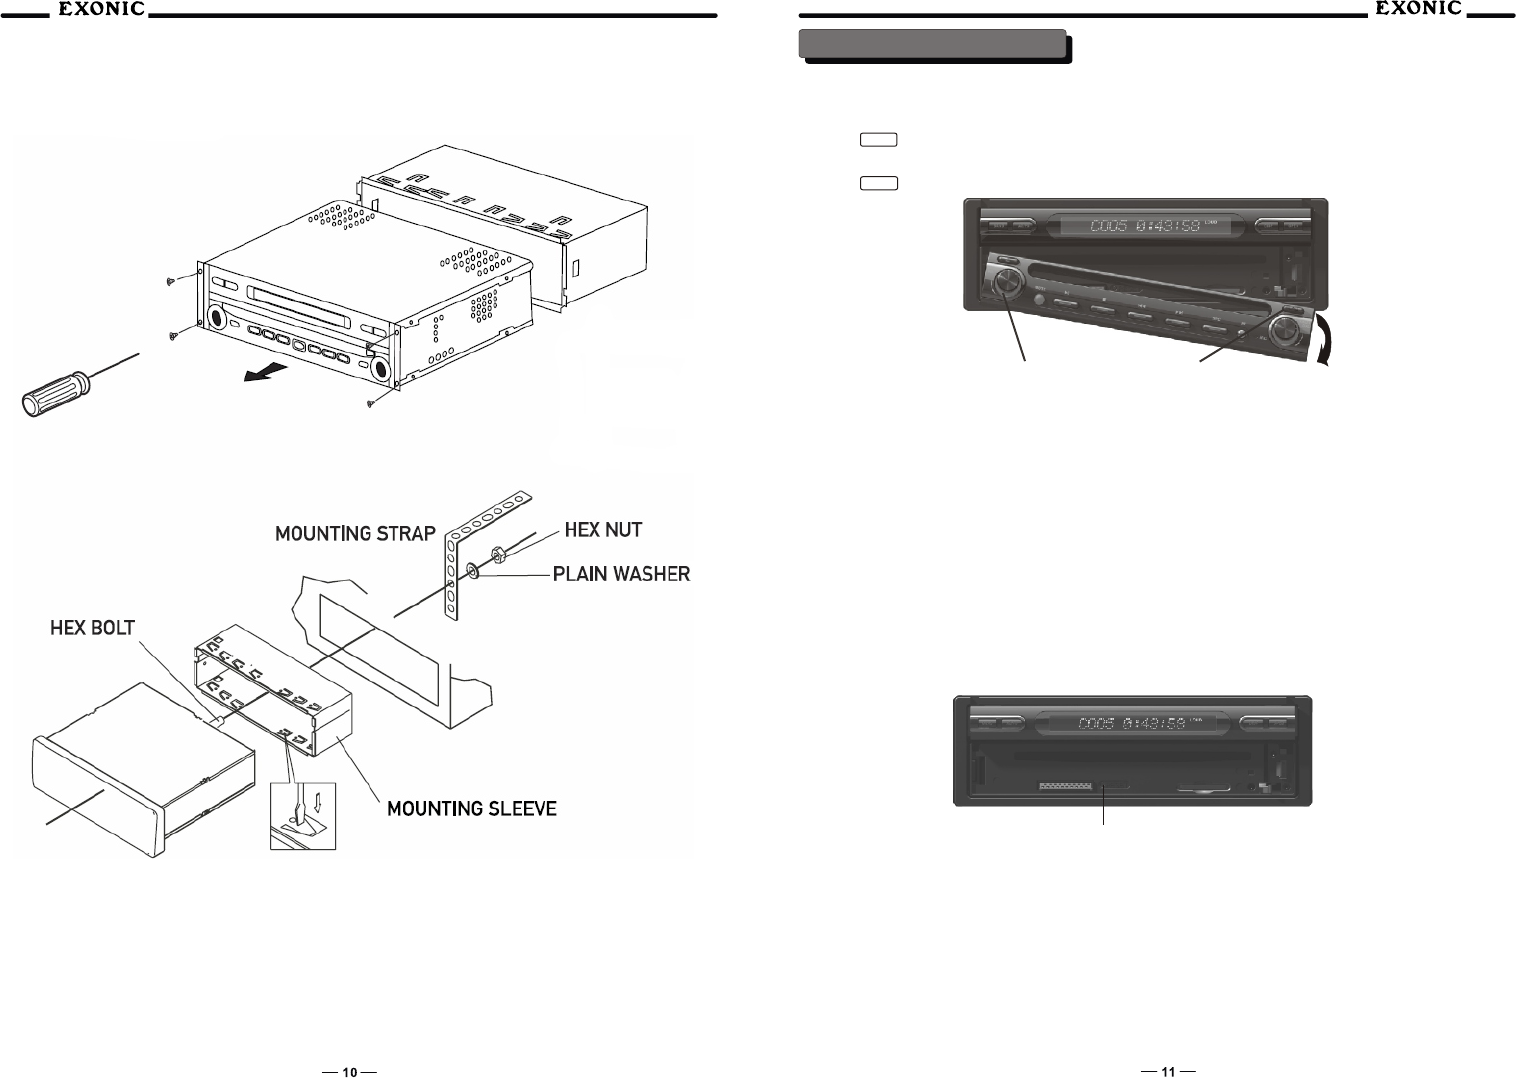
Remove the four #1 phillips head screws from each corner, and slide the unit out of the mounting sleeve.
Install mounting sleeve into opening, bending tabs to secure.
Connect wiring harness and antenna as shown on pages 9-10. Consult a qualified technician if you are
unsure.
Certain vehicles may require an installation kit and/or wiring harness adapter (sold separately).
Test for correct operation and slide unit into mounting sleeve, secure with #1 phillips screws as removed in
step 1.
Snap trim ring into place.
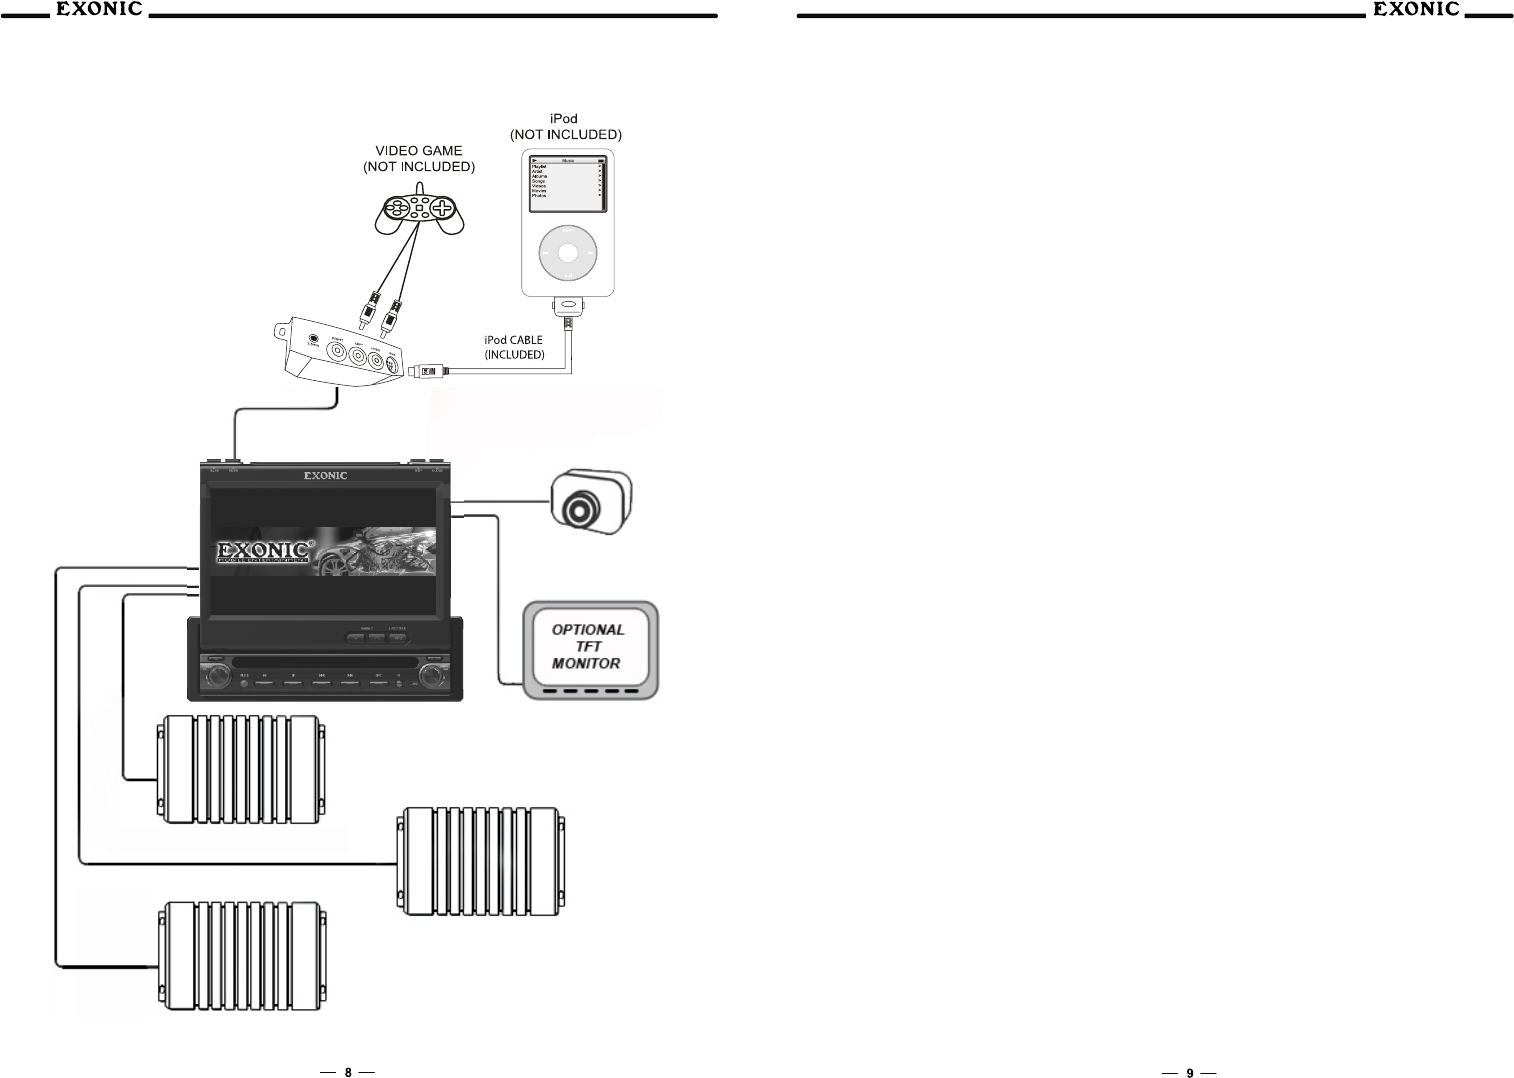
Wiring Diagram - Optional A/V Connections
Front Amplifier
Rear Amplifier
Sub Amplifier
Headrest Monitor
Optional Backup
Camera
Operation instructions
TYPICAL FRONT-LOAD DIN MOUNTING METHOD
After installation and connections
1.Start the car’s engine.
2.Verify that the brake lights, other lights, horn, turn indicators, and all other electrical parts operate
normally.
3.Use a mechanical-pencil or similar to push the Reset button on the unit.
Detaching the front panel
You can detach the front panel of this unit.
1. Press
The unit is turned off.
2. Press
POWER
RELEASE
Notes:Do not drop the front panel or put excessive pressure on them.
Do not subject the front panel to heat/high temperature or moisture. Avoid leaving it in a parked car
or on a dashboard/rear tray.
Resetting the unit
Before operating the unit for the first time, or after replacing the car battery or changing the connections,
you must reset the unit.
Detach the front panel by pressing RELEASE and pull it off towards you .
Use a pointed object such as a mechanical pencil to push the Reset button. To avoid the possibility of
damage, you should not use a needle or push the button too strongly.
Push Reset
Notes:When the Reset button is pushed, the time and all stored settings are lost and will have to be
reprogrammed.
The reset procedure takes about 3 seconds after the Reset button is pushed.
When the reset procedure is completed, press OPEN/CLOSE an verify that the monitor oper, close
the monitor once. Otherwise, it may not operate properly.
POWER RELEAASE
Reset button
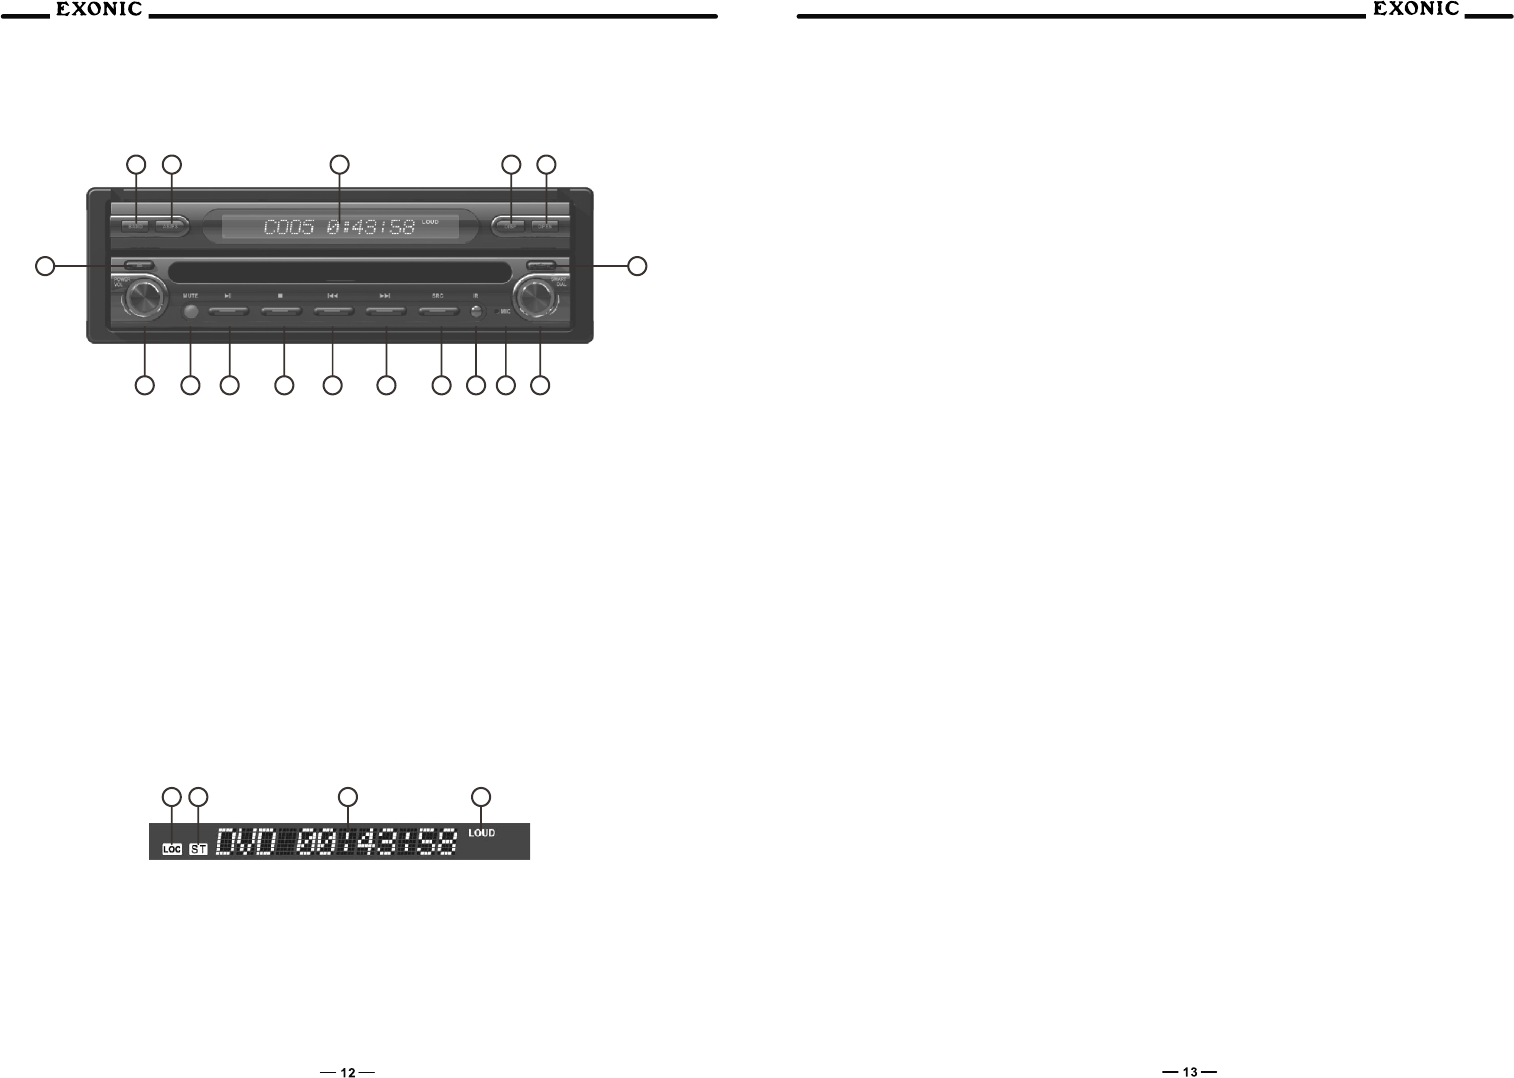
Control elements
Main unit
Monitor closed
15151414121211111010998877
1616
11
11
22
22
33
33
44
44
55
1313
66
1717
Monitor Notes:
This model incorporates a motorized moving monitor. Before final installation, make sure the monitor will
not obstruct the dash, shifter or any other controls.
Upon installation, do not attempt to move the monitor up/down by hand. Use the ANGLE ▲/ and OPEN
▼
buttons on the front panel only.
The unit will stop if it encounters any obstacles during the open/close sequence. If this occurs, remove the
obstacle and press OPEN again to resume the monitor open/close sequence.
1. Band
Press BAND to increment from FM1, FM2, FM3, AM10FM1.
2. AS/PS (Auto Store/Preset Scan)
Press AS/PS for 1 second to start station PRESET SCAN function.
Press AS/PS for 2 seconds to start AUTO STORE station preset function in current BAND.
3. Secondary LCD
Additional LCD for system information while monitor is closed
1)LOC
LOCAL indicator, icon will be off when DISTANT (DX) is selected
2)ST
STEREO radio station indicator
3)TIME
Displays TRACK time, TUNING frequency, MP3 ID3 info, & CLOCK, etc
4)LOUD
LOUDNESS selection indicator
4. Disp
Press the DISP button to display CLOCK information on the secondary LCD screen when the monitor is
closed.
5. Open/Close Monitor
Press OPEN to open or close the monitor. The unit will emit 1 confirmation beep upon opening, 3 beeps
when closing. Be careful not to not touch or obstruct the monitor movement during the open/close
sequence, or permanent damage could occur.
Notes:The unit will stop automatically during open/close if an obstacle is detected. If this occurs,
remove the obstacle and press OPEN again to resume the monitor open/close sequence.
Audio can be heard while the monitor is closed.
6. Release
Press RELEASE, pull it off towards you, then the front panel is detached.
7. Rotary Encoder / Enter
Press to access MAIN menu, rotate clockwise/counter clockwise to select desired item and press once to
ENTER.
8. Microphone
Microphone for the Bluetooth hands-free unit
9. IR
Infrared receiver
10. SRC (Mode conversion)
Press once to incrementally select desired source. Press MODE to select between TUNER, DVD, XM,
iPod, CAMERA and AV1 inputs. Modes of operation are indicated in the OSD (On Screen Display) and
secondary LCD.
Note:
iPod must be connected to appear in the MODE selection string.
11. Fast Forward
Fast forward the disc content.
12. Fast Reverse
Fast reverse the disc content.
13. Stop
Stop playback of DVD / CD / MP3 / iPod.
14. Play/Pause
Press once for PAUSE, press again for PLAY.
15. Mute
Press once to MUTE audio, press again to return audio, an icon indicator will flash on the TFT monitor.
16. Power On/Off
Press Volume knob for 1sec to turn the unit on, the unit will beep 2 times. Press and hold POWER for more
than 2secs, unit will beep 3 time, then turn off. NOTE: EJECT will still function even if POWER is off.
Volume
Rotate clockwise/counter clockwise for desired VOLUME level.
17. Eject
Press once for DISC ejection.

Monitor Open
Disc-In Indicator
Blue = No disc Red = Disc inserted
Monitor Angle
Press ANGLE to increase the monitor view angle.
Press ANGLE to decrease the monitor view angle.
Notes:Do not attempt to move the monitor up/down by hand - severe damage will occur. Use the
front panel buttons or the remote control only.
The color of the LCD monitor varies between viewing angles. Select the angle with the most
optimum view for your location.
The last position of the monitor will be saved in memory. The monitor will return to its last position
automatically the next time it is opened.
4.Info/Pic
Press INFO button for 1 sec to display DVD disc information.
Press and hold INFO for 2 seconds to change TFT LCD BRIGHTNESS:
Press ANGLE to increase, ANGLE to decrease or use VOLUME rotary to adjust the brightness level up
or down (0 minimum / 20 maximum), 10 is default.
After detaching the front panel
Remote
1010998877
Reset button SD Card Slot
Main Access Menu
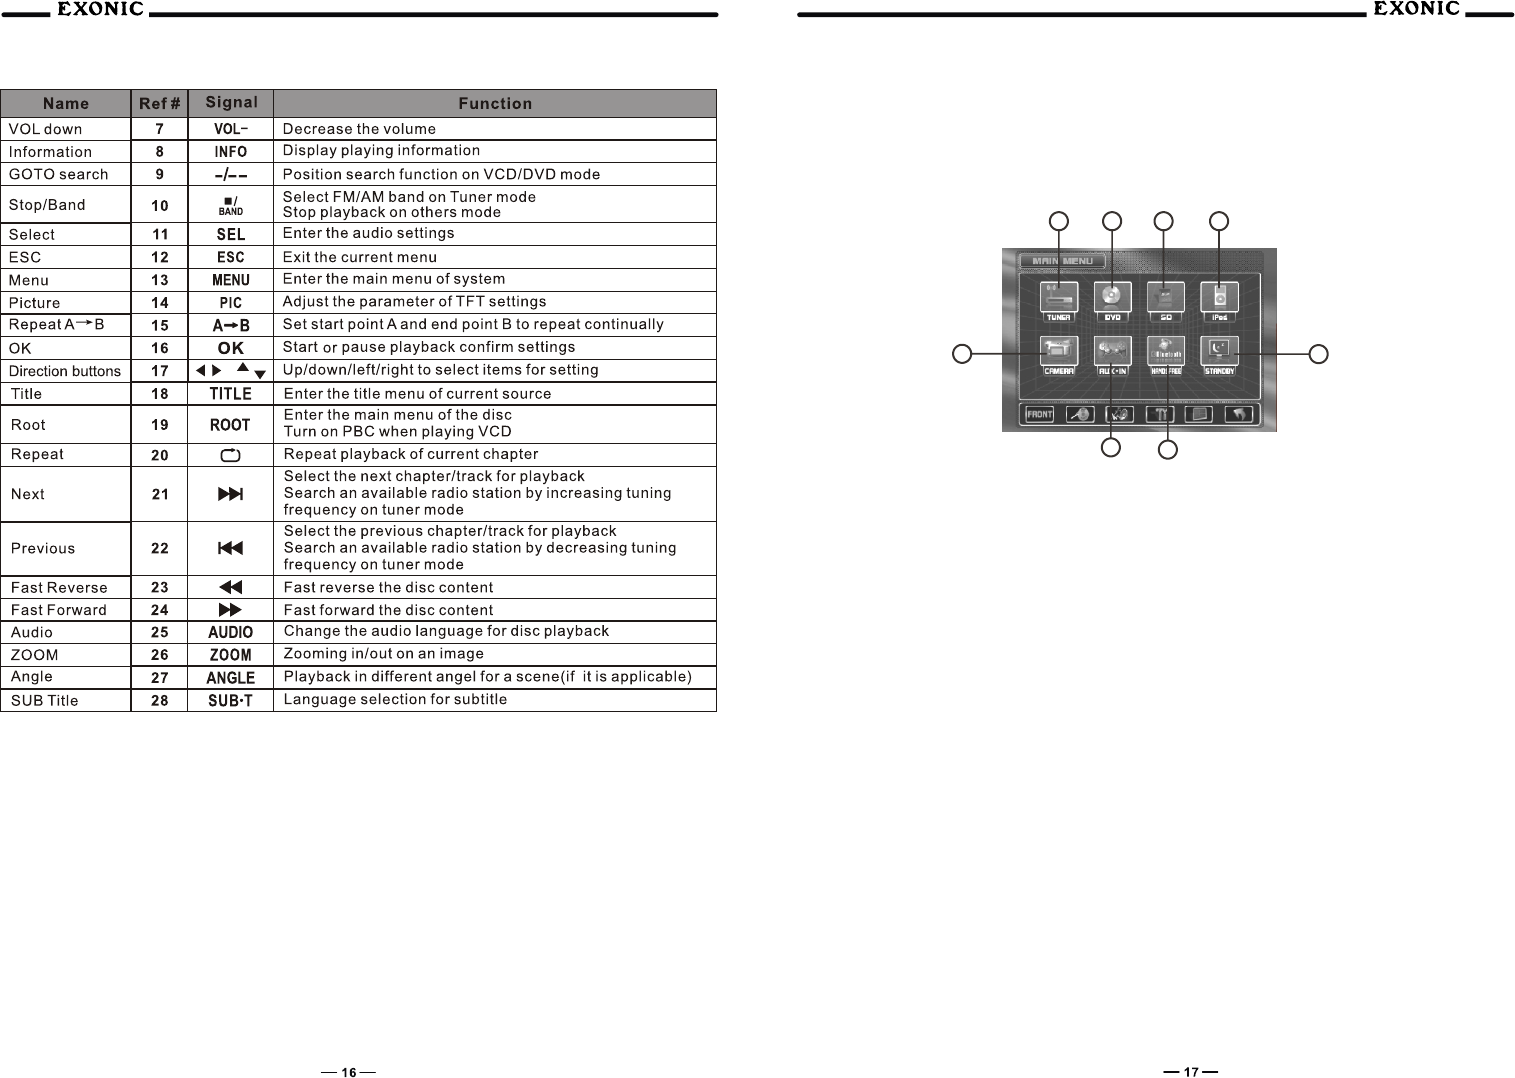
There are three methods to access the MAIN menu
Press the ENTER button on the right ROTARY knob.
Press the MENU button on the IR Remote control.
Touch the A area (upper left hand side) on the touch screen.
Touch Access Buttons
①Touch to access AM/FM TUNER mode.
②Touch to access CD/DVD mode, CD/DVD must be inserted.
③Touch to access SD card MODE, SD card must be inserted.
④Touch to access iPOD mode, iPod must be connected to activate.
⑤Touch to STANDBY screen, touch screen again or any button to resume display.
⑥Touch to access BLUETOOTH mode.
⑦Touch to access AUXILIARY A/V INPUT mode.
⑧Touch to access CAMERA mode, if optional camera isn't connected then "No Video Signal" will be
displayed.
Notes:
VOLUME level can be controlled without interrupting STANDBY.
Touch Screen
Hidden Touch Screen area while in TUNER mode
There are several hidden TOUCH SCREEN areas outlined below, "A" area can be used in any mode to
access MAIN menu
7766
8855
11223344
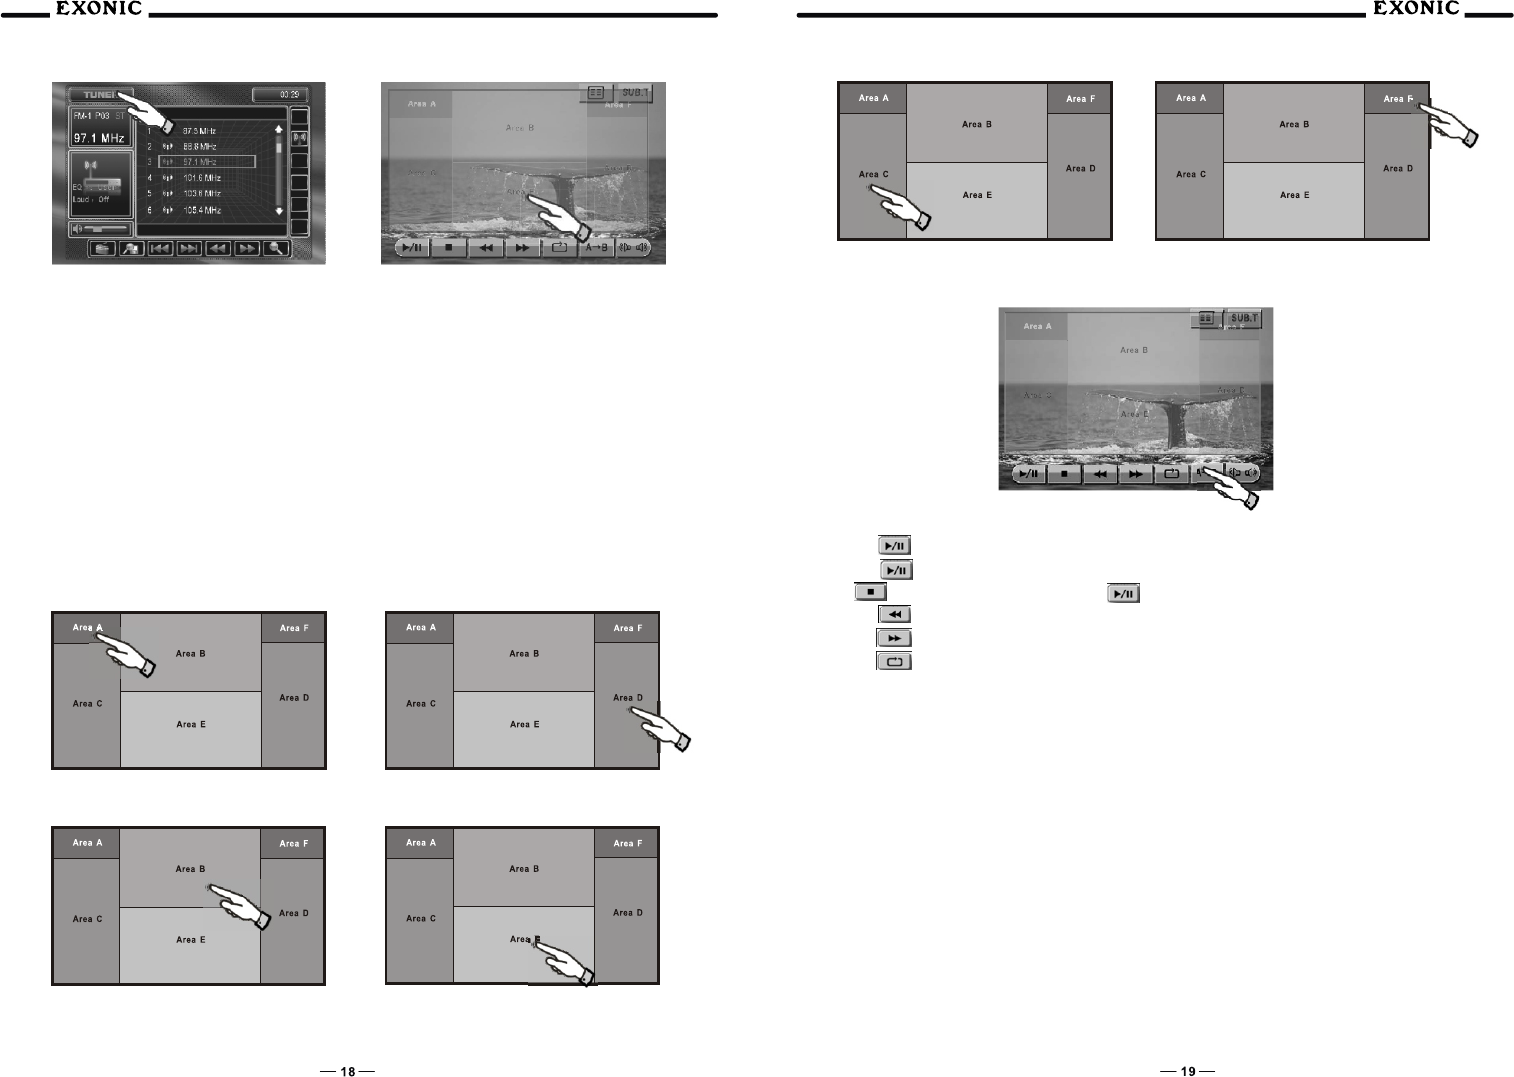
Hidden Touch Screen area while in DVD mode
"A-F" areas can be used in DVD mode to access:
A - MAIN menu access
B - Displays DVD track information
C - Selects PREVIOUS chapter
D - Select NEXT chapter
E - Displays the full DVD transport controls
F - GOTO search menu
Touch Screen Controls
Using the Hidden Touch Screen Controls
Notes:
A DVD disc must be inserted to access these functions and features.
AREA A Access MAIN Menu AREA D Selects NEXT Track
AREA B Displays DVD Track Information AREA E Full DVD Transport Controls
AREA C Selects PREVIOUS Track
DVD Transport Control OSD
AREA FDVD Search
①Touch the PLAY button or on the front panel to resume disk playback.
②Touch the PAUSE button again to suspend the disc playback.
③Touch button to STOP playback, touch or OK on the remote to resume playback.
④Touch the REVERSE button to FAST REVERSE on DVD, 2x, 4x, 8x to 20x.
⑤Touch the FF button to FAST FORWARD on DVD, 2x, 4x, 8x to 20x.
⑥Touch the Repeat to scroll through the following:
DVD: Repeat Title, Repeat Chapter, Repeat OFF
MP3: Repeat Single, Repeat Folder, Repeat OFF
A.Use the A-B function to define a specific area of disc to repeat. Press the Repeat A-B button to set a
start point of the (A) selection.
B.Press the A-B button again once you reach the desired end point (B) of the repeated section,
The selected portion of the DVD will now repeat continuously.
C.Press A-B button once again to cancel the A-B selection and stop repeat playback
⑦Touch to change Audio language playback
⑧Touch to change Sub-title of DVD
⑨Touch to return to DVD MAIN menu
Notes:Some DVD discs can be played only in certain playback modes according to the intentions of
the software. As the plays discs according to their intentions, some functions may not
work as intended. Please be sure to read the instructions provided with each disc.
EXD 7090
11223344
1313 1 212 1111 1 010 9988
1414
1515
1616
1717
1818
1919
55
77
66
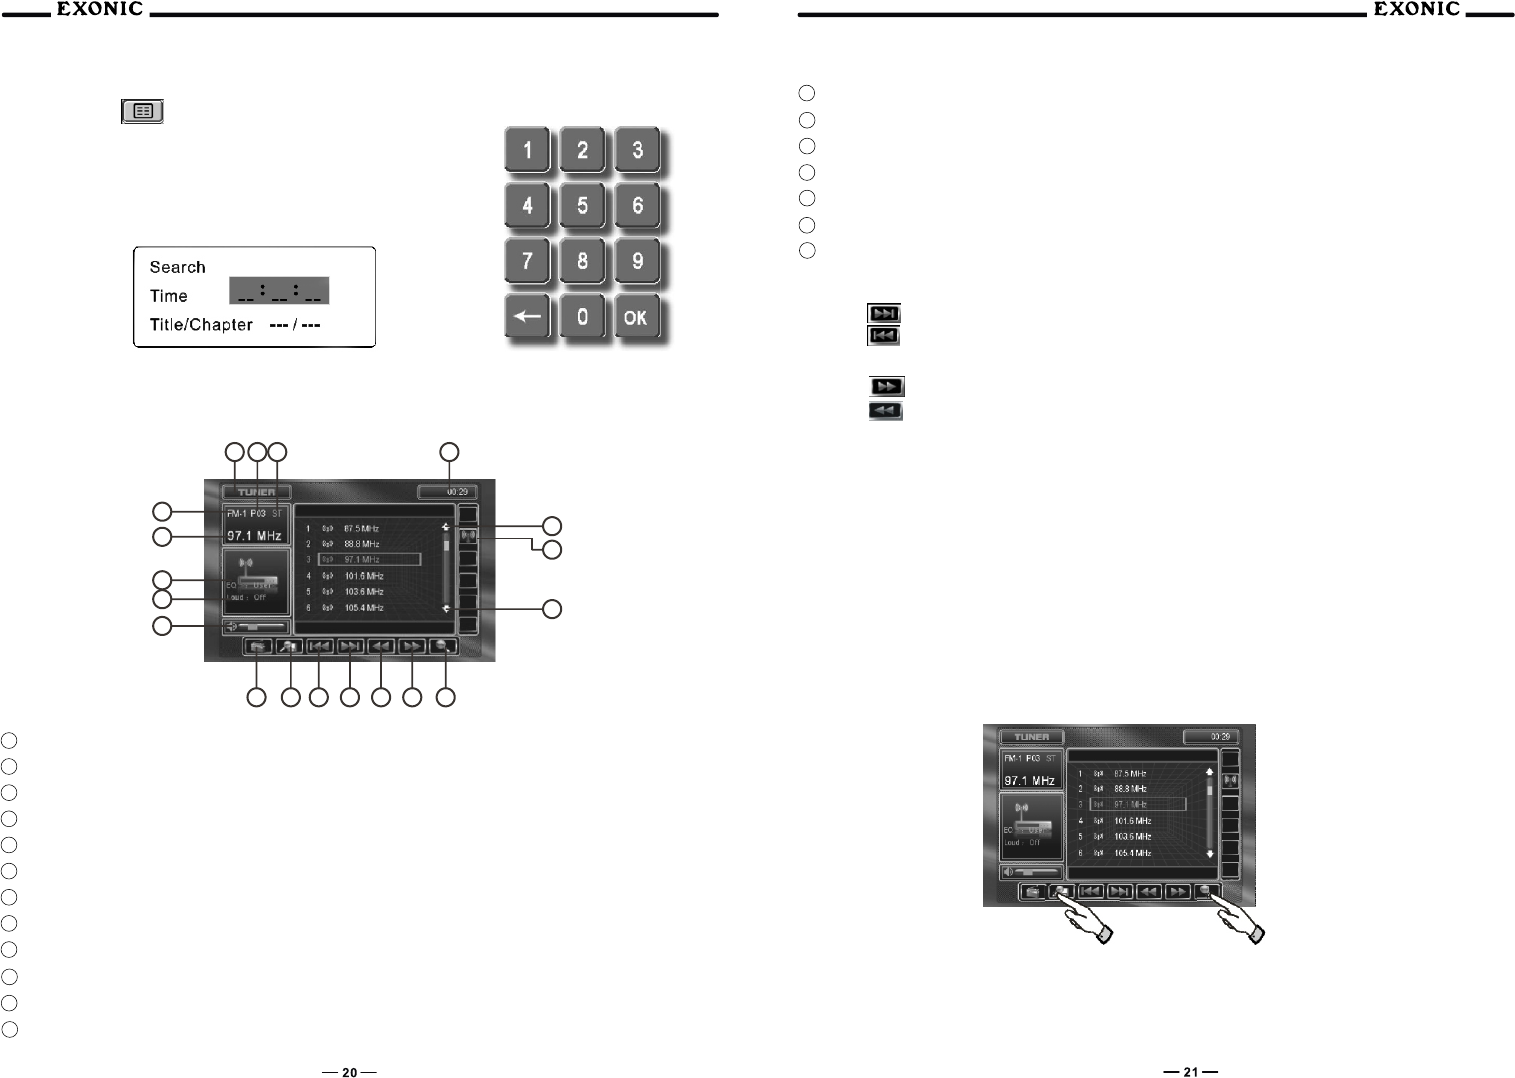
Searching a DVD
Touch the search button in AREA F.
Searching by Time, Title or Chapter
1.Touch the in the TIME area.
2.A touch keypad will now appear, enter your desired TIME to search.
3.Enter OK.
AM/FM Tuner Operation
AM/FM Tuner TFT Display
1 Current source MODE information, touch "A" area to return to MAIN source selection menu
2 Current PRESET station indicator
3 STEREO broadcast indicator
4 Clock
5 PRESET page up
6 LOCAL / DISTANCE selection
7 PRESET page down
8 Auto station SCAN button
9 MANUAL TUNE up
10 MANUAL TUNE down
11 SEEK TUNE up
12 SEEK TUNE down
13 AS/PS (AUTO STORE / PRESET SCAN)
14 BAND selection, FM1, FM2, FM3, AM
15 VOLUME indicator
16 LOUD indicator
17 Equalizer indicator, touch to access AUDIO Setup menu
18 Current radio frequency indicator
19 Current radio BAND indicator
Auto Seek Tuning
Press the button to auto seeks up the next strongest station.
Press the button to auto seeks down the next strongest station.
Manual Tuning
Press the button to manually tune up one step at a time.
Press the button to manually tune down one step at a time.
Auto Store (As)
Press and hold AS/PS for more than 2 seconds to automatically store the twelve strongest stations in the
current band. Automatic local tuning is activated during the initial band scan, repeat for other bands.
Notes:All presets within the current band will be overwritten.
Program Scan (PS)
Press AS/PS for less than 2 seconds to scan presets 1-12 on the current band, pausing for 5 seconds at
each. Press AS/PS again to cancel.
Scan
Press SCAN to preview strong stations on the current band, pausing for 5 seconds at each station. Press
SCAN again to cancel.