SKYPINE ELECTRONICS SD9614SV CAR DVD ENTERTAINMENT CENTER (BLUETOOTH PORTION ONLY) User Manual SD 9614 SV
SKYPINE ELECTRONICS (SHEN ZHEN) CO., LTD. CAR DVD ENTERTAINMENT CENTER (BLUETOOTH PORTION ONLY) SD 9614 SV
Contents
- 1. USERS MANUAL 1
- 2. USERS MANUAL 2
- 3. USERS MANUAL 3
USERS MANUAL 3
38 39
System SCREEN Setup Menu
Screen Setup Menu
Press the SCREEN Setup button to access the SCREEN SETUP mode
Select desired parameter you wish to change
Page will return back to previous screen after 10 seconds of inactivity or by pressing the RETURN button
Adjusting a Feature
Settings Default Options Function
Brightness 10 0 to +20
Press the < / > buttons on the remote or rotate the
ENTER button clockwise / count-clockwise to adjust
the BRIGHTNESS to the desired setting
Screen Tilt 4 1 - 6 Select 1 to 6 to adjust the default tilt angle of the screen
Screen
Saver
On
On Off Select On to activate the screen saver, Off to deactivate
Touch "Yes" to enter the Touch Screen calibration mode
NoNo
Touch
Screen
Calibration
Version
Yes
Setting TFT Brightness
This will set the default setting for the TFT display brightness, this setting can also be set by pressing the
INFO button on the front TFT panel.
Step 2) Touch SCREEN
setup button
Step 3) Touch [-] to DIM
TFT
Software version of unit
2
To conserve the LCD backlight lifespan or to stop annoying glare while night driving, press STANDBY, the
TFT screen only will black out, however all other operations are still possible, press any button except
VOLUME or touch screen again to return normal viewing.
Step 1) Touch top left
corner of screen
Step 4) Touch [+] to
brighten TFT
0 to + 20 is possible
Default = 10
41
40
Step 5) Touch HOME to exit
Setting TFT Angle
Set for best viewing angle in your vehicle
Step 2) Touch SCREEN setup button
Step 3) Touch a number displayed in
SCREEN TILT row
Step 4) Touch desired angle for best viewing angle
1 -6 is possible
Default = 4
Touch Screen Calibration
On occasion the touch screen will have to be calibrated, follow these few steps as described
2
Step 5) Touch HOME to exit
Step 1) Touch top left corner of screen
2
Step 2) Touch SCREEN setup button.
Step 3) Touch NO in TS Calibration row. Step 4) Then press YES.
Step 1) Touch top left corner of screen.
Step 6) Next, touch and hold the pointer B.
Step 5) Touch and hold the pointer A.
Step 7) Touch and hold the pointer C. Step 8) Touch and hold the pointerD.
Step ) Touch to exit9 RETURN
5
7
6
8

42 43
DVD setup menu
DVD Setup Menu - Language
Notes:A DVD disc must be inserted to access these functions and features.
Language Setup Menu
With the monitor open in DVD mode, press the AREA A (top left screen) to display the MAIN menu bar.
Press DVD Setup to access the DVD setup menu.
Press LANGUAGE icon to select LANGUAGE setup page.
Disc Subtitle
Press to select desired disc subtitle language.
ENGLISH
ON
OFF=DEFAULT
Subtitle Language
Press to select desired disc audio language.
ENGLISH = DEFAULT
DVD Menu
Press to select desired disc menu language
ENGLISH = DEFAULT
Press VIDEO icon to select from the following menus:
TV Shape
Press to select desired TV Shape.
DVD Setup Menu - Video
Note:A DVD disc must be inserted to access these functions and features.
Video Setup Menu
With the monitor open in DVD mode, press the AREA A (top left screen) to display the MAIN menu bar.
Press DVD Setup to access the DVD setup menu.
44 45
Angle Mark
Press to select desired Angle Mark.
Video Mode
Press to select desired Video mode.
FILL
ORIGINAL
H FIT
W FIT
FIT TO SCRN
PAN SCAN
OFF
DVD Setup Menu- Ratings
Note:A DVD disc must be inserted to access these functions and features.
Ratings Setup Menu
With the monitor open in DVD mode, press the AREA A (top left screen) to display the MAIN menu bar.
Press DVD Setup to access the DVD setup menu.
Press RATING icon to select from the following menus:
Enable Parental Lock Password
Press ---- to enter a your desired password.
Setting Parental Lock Password
1. Enter a 4-digit code
2. Write the code down
3. Save in a safe place
Rating Setting
Press to select desired Rating Setting.
1. Kid Safe
2. G
3. PG
4. PG-13
5. PG-R
6. R
7. NC-17
8. Adult
Parental Password Override
In the event you forget or loose your PARENTAL LOCK password, enter 9991
46 47
Yellow wire not connected or incorrect voltage.
Red wire not connected or incorrect voltage.
Check connections for proper voltage
(11~16VDC)
Unit will not turn on
(no power) Black wire not connected Check connection to ground
Fuse blown Replace fuse
Unit has power
(but no sound)
Speaker wires not connected Check connections at speakers
One or more speaker wires touching each
other or touching chassis ground
Insulate all bare speaker wires from each other
and chassis ground
Unit blows fuse
Yellow or red wire touching chassis ground Check for pinched wire
Speaker wires touching chassis ground Check for pinched wire
Incorrect fuse rating Use fuse with correct rating
Unit has audio
(but no video)
Parking brake safety circuit not connected
Parking brake not applied Check connections at parking brake Apply parking brake
No video display
(when in reverse)
Reverse circuit not connected
Vehicle is not in reverse
Rear view set to OFF
Check connections at reverse lamp
Select reverse gear
Set rear view to ON - see page 14 for details
DVD does not start play-back Physical defect in media
Wrong region
Check media for scratche
Use discs labeled "Region 1" or "All" only
IR remote does not work Dead battery Replace battery
Excessive skipping Unit is not mounted correctly Check mounting sleeve
Physical defect in media Check media for scratches
ERR-DISC appears
on display
Focus error or disc is in upside down Press eject or RESET
Region code
error appears on display
Region code error Use only DVDs labeled “Region 1” or “All” only
Front panel wil
l not open/close
Front panel obstructed Remove the obstacle and press OPEN again to resume
the monitor open/close sequence
Weak station searching Auto antenna is not fully extended Connect the auto antenna control cable properly
Local function is activated Turn LOCAL function OFF
Unit resets itself
when engine is off
Incorrect connection between ACC and
positive battery wire Check wiring and correct
Message is longer than LCD can display.
Interruption during playback
Disc is dirty or scratched Clean disk or replace
File is damaged/bad recording Recreate disc with good files
Incorrect playback
message is played
iPOD
Bluetooth
Reset Radio
iPod source not available Incorrect cable connections Check connection of the inport adapter to
rear of radio or connection of iPod to inport adapter
Cannot see video and
photo media on TFT screen Wrong iPod Video Settings Change iPod video settings to TV Out Check yellow RCA
cable from the inport adapter to the radio
All other errors
Please connect first appears
in the display
There is no mobile device connected
to the head unit
Pair and or connect a mobile device to the head unit as
described under Bluetooth Operation
Mobile device will not
connect to the head unit
Bluetooth function is not active
on the head unit Activate Bluetooth function in General Setup
Bluetooth function is not active on
the mobile device Refer to owner's manual of your mobile device
A mobile device is already connected to the
head unit. This time the head unit can only
be connected to one device at a time
Disconnect current mobile device first, then connect
the desired mobile device
ERROR! Connect Timeout
appears on display
The time limit for the pairing mobile device
has been reached Pair the mobile device within 120 seconds
Pairing Fail appears
in display The attempted pairing process has failed Retry the pairing process again
48 49
Mobile device will not
connect to the head unit
automatically
When the Connect function is set to Manual,
the head unit will not connect to any mobile
device automatically
Set Connect Function to Auto as described on page 37
Ring tone cannot be heard
through the speakers
Ring tone volume is turned down Increase the volume of the ring tones using the up and
down volume control during the ringing process
MUTE function is activated in the head unit Press MUTE to cancel the mute function and resume audio
Echo or noise is heard
during a phone call
Possible road noise or interior interference Close all windows and turn off any fans or A/C
Microphone opening on the front panel is
obstructed Clear any obstacles in front of microphone opening
Call is connected (but no
audio can be heard through
the speakers)
Audio is routed to the mobile device Press Audio Transfer to allow audio from the
phoneto be heard through the speakers
Call is answered
automatically Auto Answer function is set to ON Set Auto Answer function to OFF as described on page 39
Caller ID does not appear
during incoming call
The calling mobile device is not set to send the
Caller ID or the service is not available
Some devices may not communicate or work
properly with this head unit
Remote control
does not function
Battery is covered with insulation tape Pull out the insulation tape
Battery depleted Replace battery with new one
Battery installed incorrectly Remove battery and install correctly
Remote
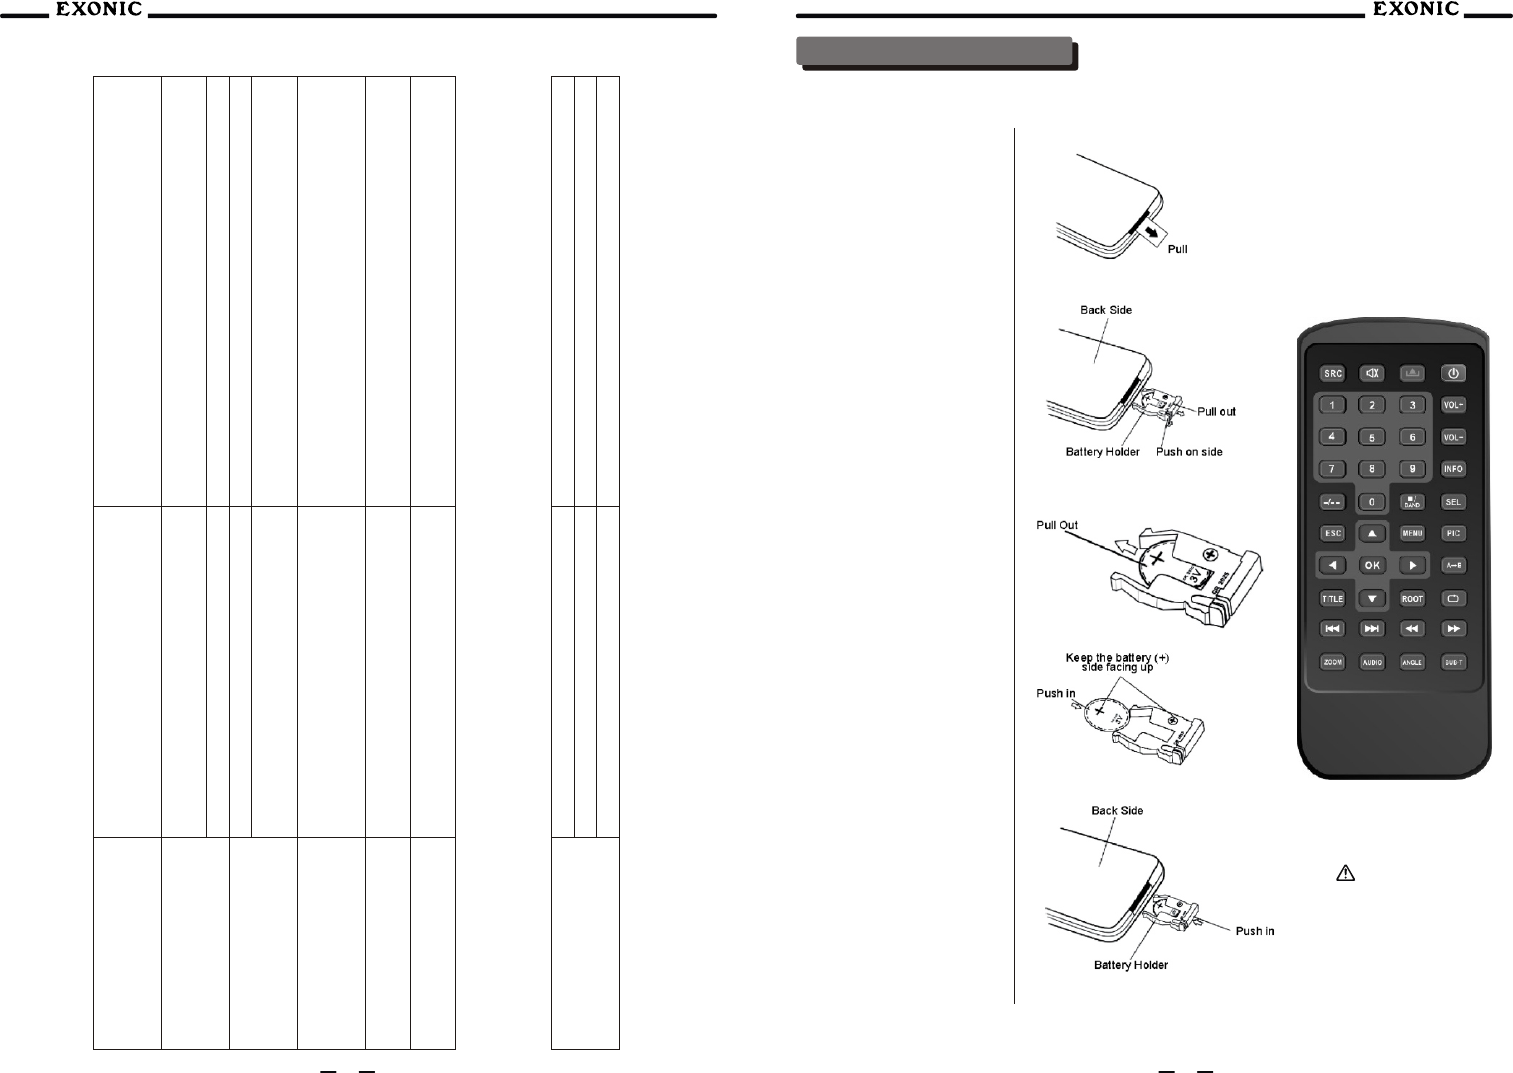
To first use the IR Remote
control, you must first pull
t h e b a ttery insulation
tape out.
I n s e r t / R e p l a c i n g t h e
Battery:
Re m o v e t h e b a t t e r y
holder
Remove the battery from
the battery holder
Install the new battery
Make sure the (+) side
faces up
Insert the battery holder
Notes:
Remove the battery if the IR Remote will not
be used for a month or longer
Remove and dispose of battery properly
CAUTION!!!
Do not store battery
with metallic objects or
materials.
IR Remote Preparation
Caution
Package
Qualified DVD AV System must be packed with general wet-proof inner package.
Carton packing must be general wet-provable:
Packing place should be clean, dry, and harmful medium-less.
Transportation
Car DVD AV Audio system packed in carton can be transported by all type of vehicle, but container and
room of carrier should be clean and spot-less.
Mixture with harmful chemical and wet cargo is seriously forbidden.
Directly expose to rain and snow during transporting should be avoided.
Notes:The set is a precision system, Random or unauthorized dismantling or readjusting is not allowed.
Storage: high temperature, high wet and dust-full place should be avoided.
Handling: additional force to the DVD mechanism is not allowed when handling.
Static-proof action should be taken when contact to the mechanism since LD and OEIC can be easily
damaged by static.
Hand touch Laser pickup is forbidden.
Must avoid laser beam shooting at eyes directly, since the.
Specifications
General
Operation voltage range: 10.5V~ 16.0V. Max operation current:10A.
Current of standby:
ACC OFF、 POWER OFF≤18 mA ACC ON、POWER OFF≤50 mA
Dimension of shell: 50 mm x178 mm x(165+25)mm
Installation angle: forth 0°~ +30°, left and right ±15°
High resolution 7”(16:9) wide screen colorful monitor,dot matrix small LCD is in use.
DVD Player
Frequency response: 10Hz-20kHz
Channel separation @ 1kHz: >65dB
D/A converter: 24 Bit
FM Tuner
Tuning range: 87.5MHz-107.9MHz
Usable sensitivity: 8.5dBf
50dB quieting sensitivity: 10dBf
Stereo separation @ 1kHz: 40dB
Frequency response: 30Hz-13kHz
AM Tuner
Tuning range: 530kHz-1720kHz
Usable sensitivity: 22uV
Frequency response: 30Hz-2.2kHz
Monitor
Panel size: 7” (177.8 mm) diagonal measurement
View angle (up/down/left/right): 30/60/60/60
Resolution: 480 W x 234 H
Brightness (cd/m2): 350
Contrast ratio: 300:1
Elements: 336,960
Environment
Operation temperature range: -20ºC~ +70ºC
Operation moisture range: 45%~80%RH
Storage temperature range: -30ºC~ +80ºC
Storage moisture range: 30%~90%RH
Pressure of atmosphere: 860mbar~1060mbar
50 51