SKYPINE ELECTRONICS SN6805AC Car multimedia system User Manual C8 Camry Corolla
SKYPINE ELECTRONICS (SHEN ZHEN) CO., LTD. Car multimedia system C8 Camry Corolla
User Manual

User Manual
Front Panel Button Operation
SN-6805-AC 效果图
效果图效果图
效果图
1. Power ON/OFF and volume control. Press and hold for 3 seconds to turn off the unit and
press again to turn on the unit.
2. button. Press the button on the front panel to advance to the next chapter or move
to the previous chapter for the DVD. Press the button on the front panel to seek the
next available channel by increasing the tuning frequency for the HDRadio and press the
button again to stop searching. Press the button on the front panel to seek the next
available channel by decreasing the tuning frequency for the HDRadio and press the button
again to stop searching.
3. FAVORITE button. Press the button on the front panel to acquire a channel list at
the bottom of the screen and you can store your favorite channel in the list.
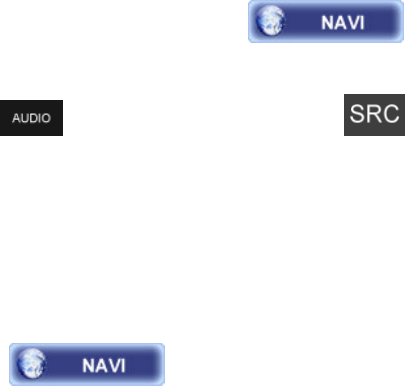
4. AUDIO button. Press to switch one mode to another among the RADIO, NAVI, AV IN2, AV
IN1, USB modes on the MAIN menu.
5. Microphone.
6. AV1 3.5mm audio and video input.
7. button. Press to return to the MAIN menu.
8. button. Press button on on the front panel to repeat title, repeat chapter, repeat
off for the DVD mode.
9. button. Press "NAV" button to switch between NAVI and HDRadio. Press "DEST"
button to select and input the destination.
10. TUNER SELECT button.
11. Eject disc.
12. CDROM: Insert the DVD/CD/MP3 discs directly.
13. SD card slot.
MAIN MENU Operation
Firstly: Button Function Description
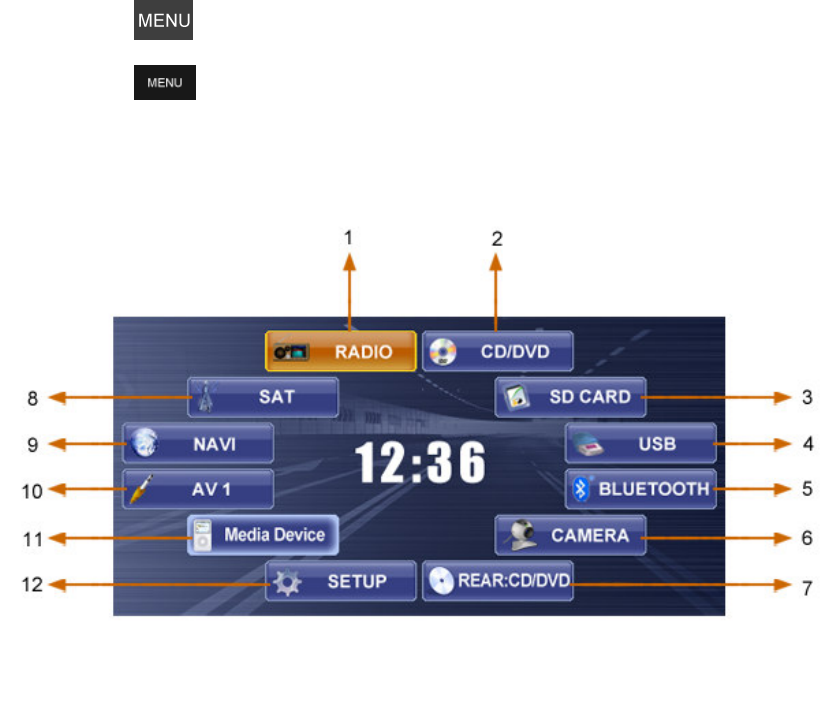
There are two methods to access the MAIN menu:
Press the button on the remote control.
Press the button on the front panel.
Note that the operational modes display contains twelve features for touch-screen selection,
these features consist of:
1. RADIO: Touch to access the HDRadio mode.
2. CD/DVD: Touch to access the CD/DVD mode.
3. SD CARD: Touch to access the SD CARD mode.
4. USB: Touch to access the USB mode.
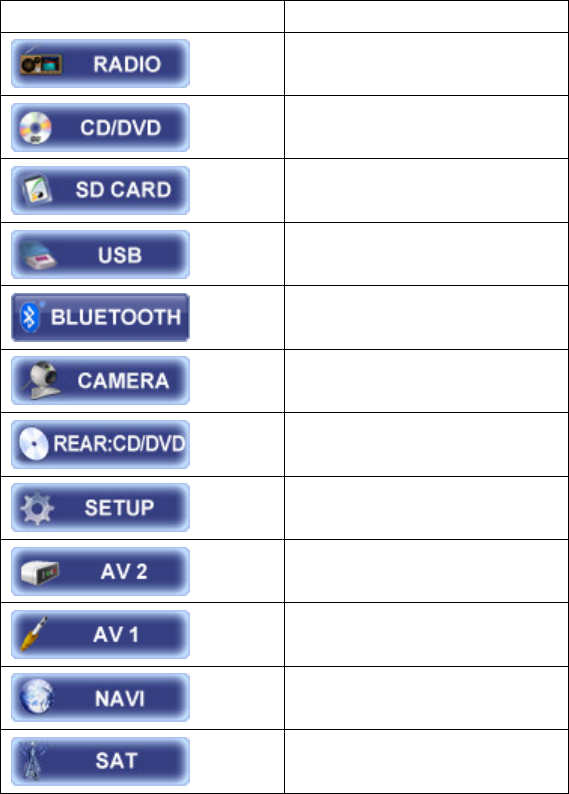
5. BLUETOOTH: Touch to access the BLUETOOTH mode.
6. CAMERA: Touch to access the CAMERA mode.
7. REAR:CD/DVD: Touch to access the REAR:CD/DVD mode.
8. SAT: Touch to access the SAT mode.
9. NAVI: Touch to access the NAVI mode.
10. AV 1: Touch to access the AV 1 mode.
11. AV 2: Touch to access the AV 2 mode.
12. SETUP: Touch to access the SETUP mode.
Here we give a table of the description for summary.
Icon/Button Touch the button icon to...
access the Radio mode.
access the CD/DVD mode.
access the SD CARD mode.
access the USB mode.
access the BLUETOOTH
mode.
access the CAMERA mode.
access the REAR:CD/DVD
mode.
access the SETUP mode.
access the AV 2 mode.
access the AV 1 mode.
access the NAVI mode.
access the SAT mode.
HDRadio (FM/AM) Operation
Firstly: Button Function Description
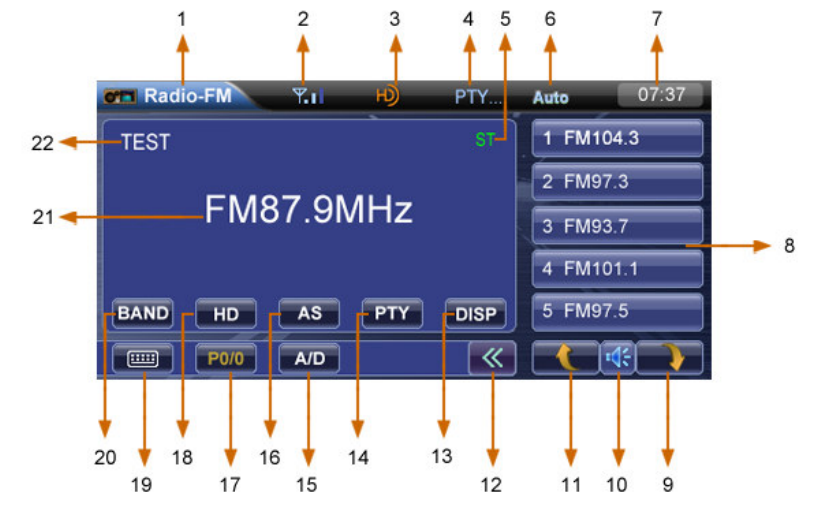
1. Touch to return to MAIN menu.
2. RSSI indicator.
3. HDRadio logo, if current audio is digital audio, the logo will display.
4. When go to PTY search mode, it will display this information.
5. Stereo button.
6. HDRadio blend mode indicator.
7. Current time.
8. List display area. In normal mode, the list will display preset list. In PTY mode, the list

will display PTY category. In HD mode, the list will display sub-channels.
9. Touch this area to go to next list page.
10. Mute button. Touch to mute on and mute off alternately.
11. Touch to go to previous list page.
12. Touch to hide or display additional functions.
13. Touch to display some information about the current channel.
14. Touch to go to PTY search mode.
15. HDRadio blend mode selection. Touch to select between Auto, Digital and Analog
mode.
16. Auto store.
17. If current channel is HDRadio channel with multiple digital sub-channels, this button
will be enabled to let user to select among all sub-channels.
18. Touch to display HD channel list.
19. Touch to display a numeric keypad on the screen to let user input the frequency directly.
20. Touch to change bands between AM and FM.
21. Display current frequency.
22. Call sign display.
Secondly: Some Implenting Modes of Operation
The following sections present a description of each of the operational modes.
SWITCH TO HDRADIO SOURCE
Press the button on the front panel to switch to the HDRadio source.
You can also access the HDRadio mode from MAIN menu directly.
SELECT FM/AM BAND
Touch the button on the screen to change bands between FM and AM.
AUTO TUNING
Press the button on the front panel to seek the next available channel by
increasing the tuning frequency. Press the button again to stop searching.
Press the button on the front panel to seek the next available channel by
decreasing the tuning frequency. Press the button again to stop searching.
USING PRESET STATIONS
Five numbered preset buttons store and recall stations for each band. Five stored stations
(P1-P5) for the current band appear on the screen, touch the channel directly to select one
of them.
You can touch the arrow buttons or on the screen to select
other ten preset stations.
Storing a station
1. Select a band (if needed), then select a station.
2. Touch and hold an on-screen preset list button for three seconds, then the station will be
saved in preset list.
Recalling a station
1. Select a band (if needed).
2. Touch an on-screen preset list button to select the corresponding stored station.
NOTE:
Press the button on the front panel to acquire a channel list at the bottom of the
screen, just do as the second step, you can get the same result.
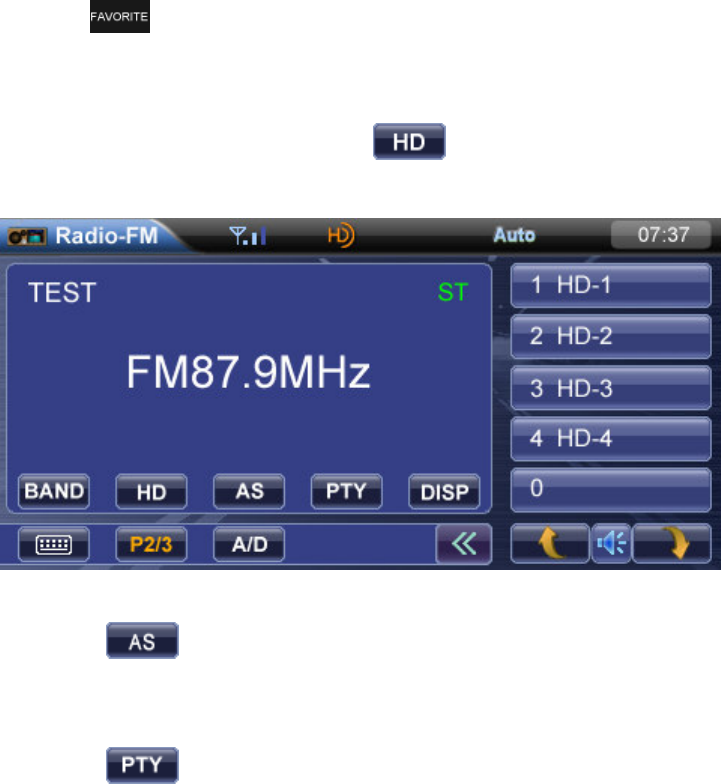
HD MODE
When HD signal is received, touching the button will display HD channel list.
See picture below:
AS(AUTO STORE)
Touch the button on the screen to automatically scan and store strong
HDRadio stations in the five preset channels in the current band.
PTY MODE(Program Type)
Touch the button on the screen to enter the PTY menu, then touch to select
one in the PTY menu, the unit will automatically seek the next available "PTY" by increasing
tuning frequency until the program type matches the "PTY", if no match is found, the tuner
will return to the original radio. See picture below:
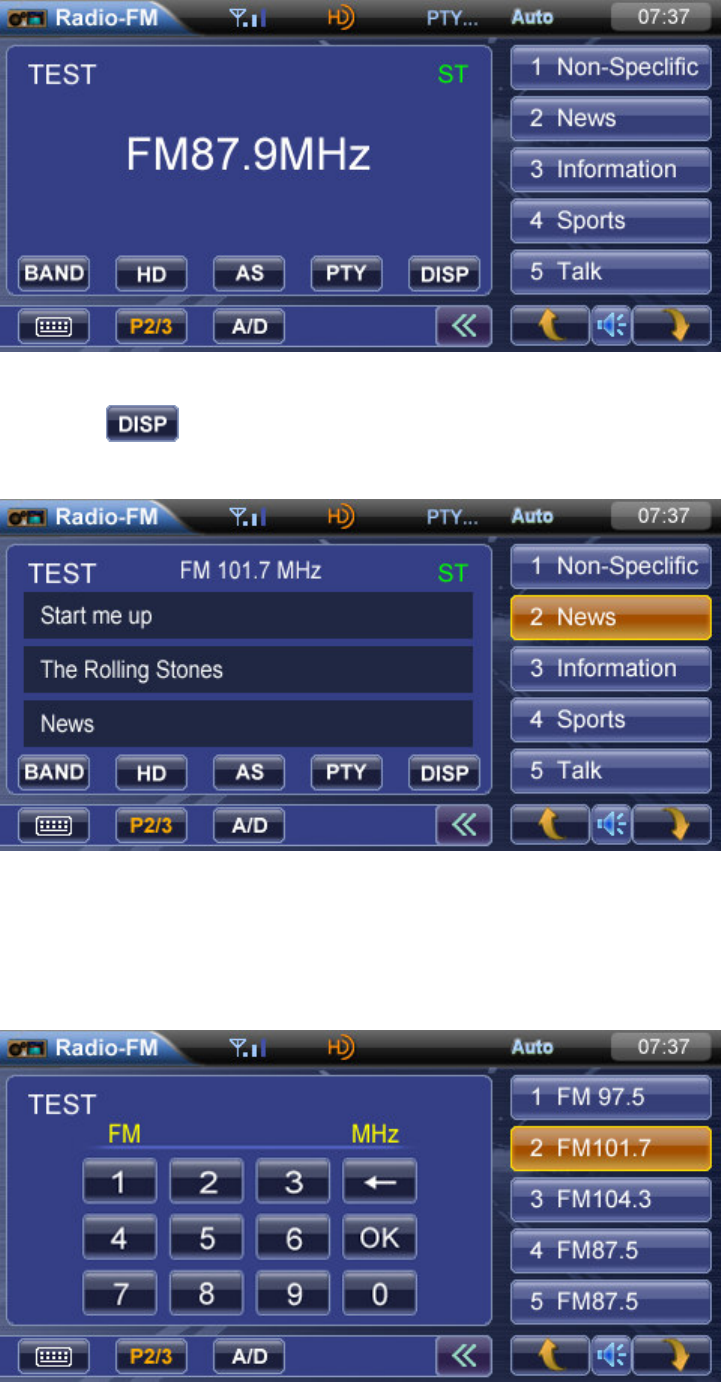
DISP MODE
Touch the button to display some information about the current channel. See
picture below:
NUMERIC KEYPAD
This function displays the numeric keypad on the screen, allowing you to tune by entering a
preset number.
Touch to display a numeric keypad to let user input the frequency directly. See picture
below:
Touch the to key corressponding with the preset you desired, when
you input the wrong number, touch the key to delet the wrong number.
Touch the key to turn in to the entered preset.
DVD Player Operation
Firstly: Basic knowledge about disc
NOTE:When properly installed, DVD video cannot be displayed on the main TFT screen unless
the parking brake is applied. If you attempt to play a DVD while the vehicle is moving, the TFT
screen displays caution information with a blue background. Rear video screens, if applicable, will
operate normally.
OPENING/CLOSING THE TFT VIDEO SCREEN
Opening the TFT screen
Press the button on the remote control to open the TFT video screen.
Closing the TFT screen
Press the button on the remote control again to close the TFT video screen.
INSERT/EJECT DISC
Inserting a disc
When inserting a DVD disc, DVD mode is entered and the playback begins.
Note: you cannot insert a disc if there is already a disc in the unit or if the power is off.
CD-R/RW, DVD-R/RW, DVD+R/RW will not play unless the recording session is closed.
Ejecting a disc
Press the button on the front panel to eject the disc. The unit automatically reverts to
the tuner mode.
RESET THE LOADING MECHANISM
If the disc loads abnormally or dose not play properly, press and hold the button on
the front panel to reset the loading mechanism. The disc is ejected and normal operation resumes.
ACCESSING DVD MODE
To switch to DVD mode when a disc is already inserted, press the button on the
front panel or press the button on the remote control till DVD appears at the top of the
screen.
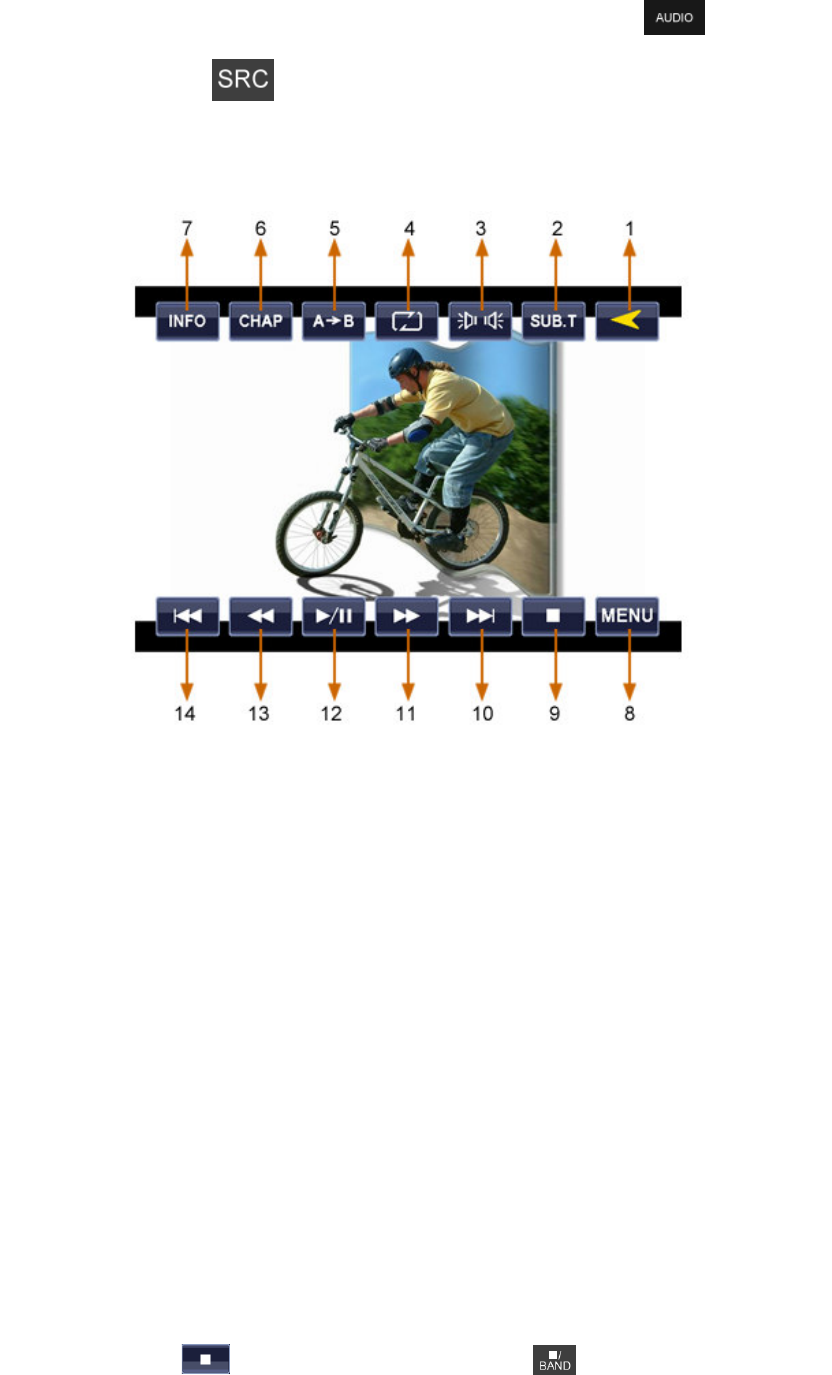
Secondly: Button Function Description
1. Touch to access MAIN menu.
2. Touch to display subtitles.
3. Touch to choose a language on condition that the disc is recorded in multiple languages.
4. Touch to repeat playback.
5. Touch to repeat from A to B. Select the repeat point A whenever you want to start and the
point B whenever you want to end, then the DVD will be playback from A to B continually.
6. Touch to go to search.
7. Touch to show play information.
8. Touch to return to DVD main menu.
9. Touch to stop playback.
10. Touch to play the next chapter.
11. Touch to fast forward.
12. Touch to play/pause.
13. Touch to fast reverse.
14. Touch to play the previous chapter.
Thirdly: Some Implenting Modes of Operation
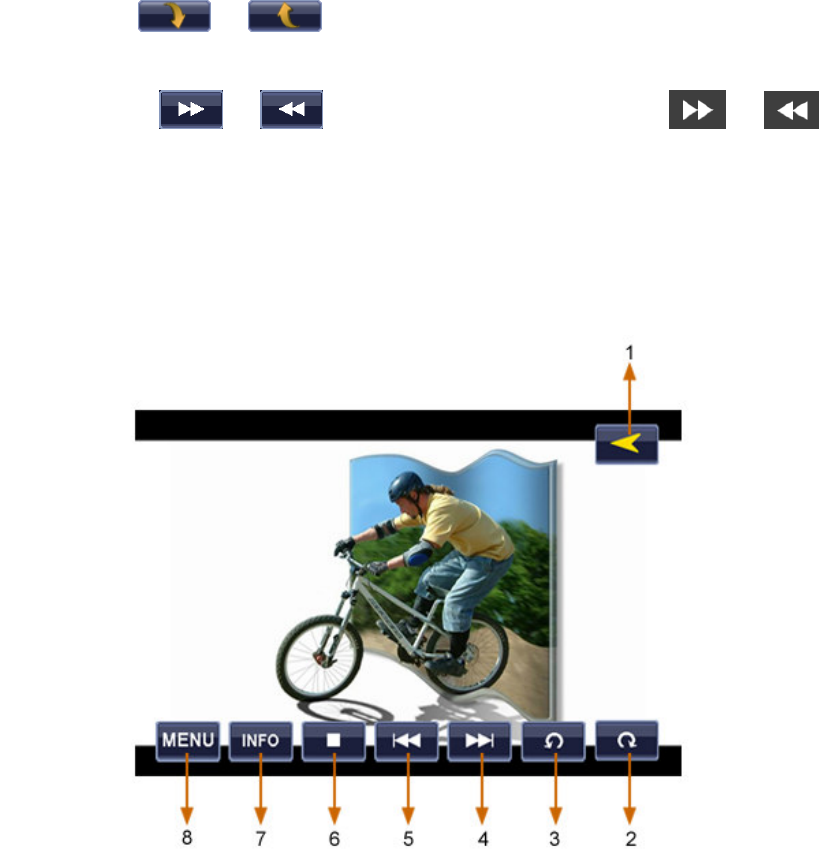
CONTROLLING PLAYBACK
Stopping playback
Touch the stop button on the screen or press the button on the remote control
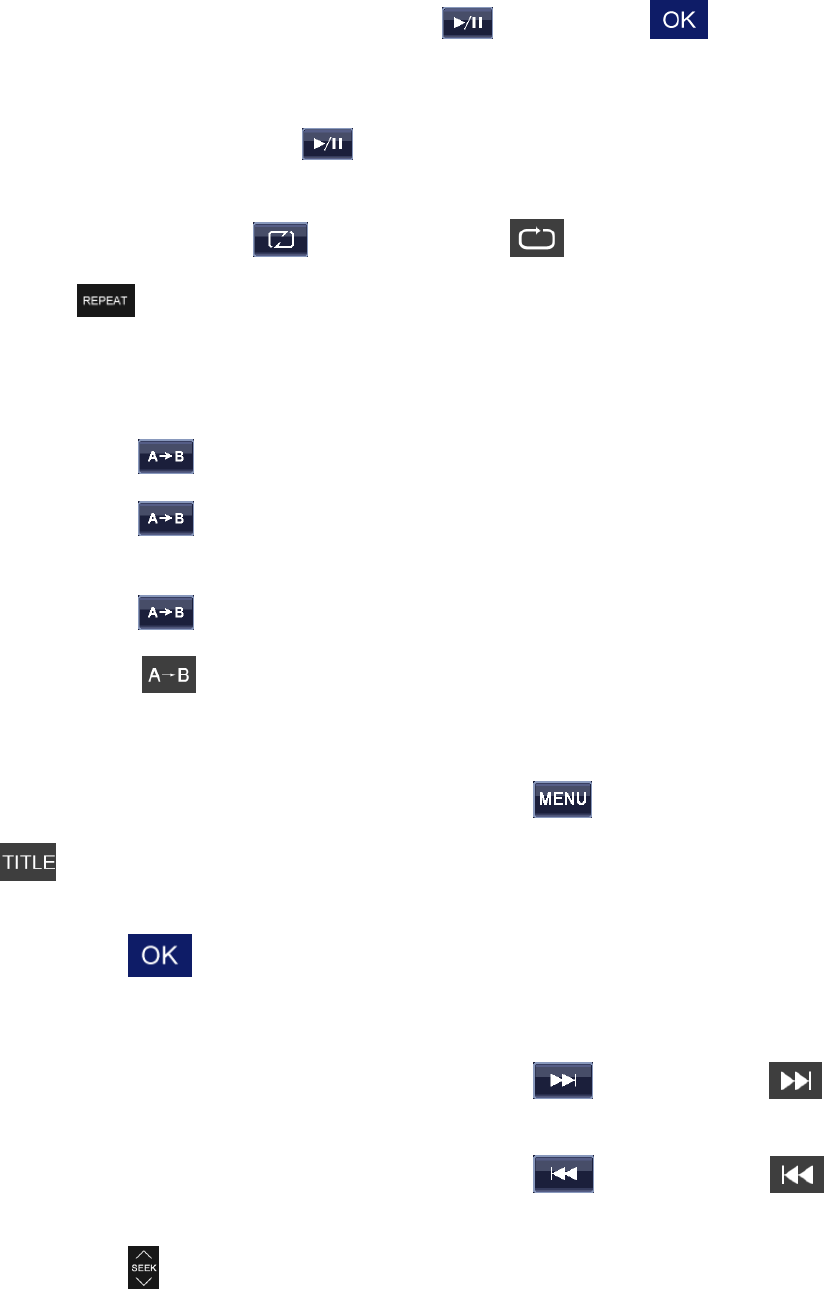
to stop DVD play and touch the play/pause button on the screen or button on the
remote control to resume the disc play.
Pausing playback
Touch the play/pause button on the screen to suspend or resume the disc play.
Repeat playback
Touch the repeat button on the screen or press button on the remote control
or press button on on the front panel to repeat title, repeat chapter,repeat off for the DVD
mode.
Sectional repeat function(A-B)
Using the A-B function to define a specific aera of a disc to repeat.
Touch the button on the screen to set the start point (A) of the repeated section.
Touch the button again once you reach the desired end point (B) of the repeated
section. The selected portion of the DVD will now repeat continuously.
Touch the button again to cancel the A-B section setting and stop repeat play.
Note: using the button on the remote control can also make the repeating available.
ACCESSING THE DVD MENU
There are three steps to access the DVD menu and begin the playback.
Touch the arbitrary aera of the screen, and then touch the button or you can press the
button on the remote control to recall the main DVD menu.
Use the arrow buttons on the remote control to select a title from the menu.
Press the button on the remote control or touch the item directly to confirm your
selection and begin the playback.
MOVING THROUGH CHAPTERS
Touch the arbitrary aera of the screen, and then touch the button or press the
button on the remote control to advance to the next chapter on the DVD.
Touch the arbitrary aera of the screen, and then touch the button or press the
button on the remote control to move to the previous chapter on the DVD.
Press the button on the front panel to advance to the next chapter or move to the
previous chapter on the DVD.
FAST FORWARD/FAST REVERSE
Touch the arbitrary aera of the screen, and then touch the button or press the
button on the remote control to fast forward . Keep touching or pressing and releasing the button
to increase the rate from"2X" to "4X", "8X" and "16X".
Touch the arbitrary aera of the screen, and then touch the button or press the
button on the remote control to fast reverse . Keep touching or pressing and releasing the button to
increase the rate from"2X" to "4X", "8X" and "16X".
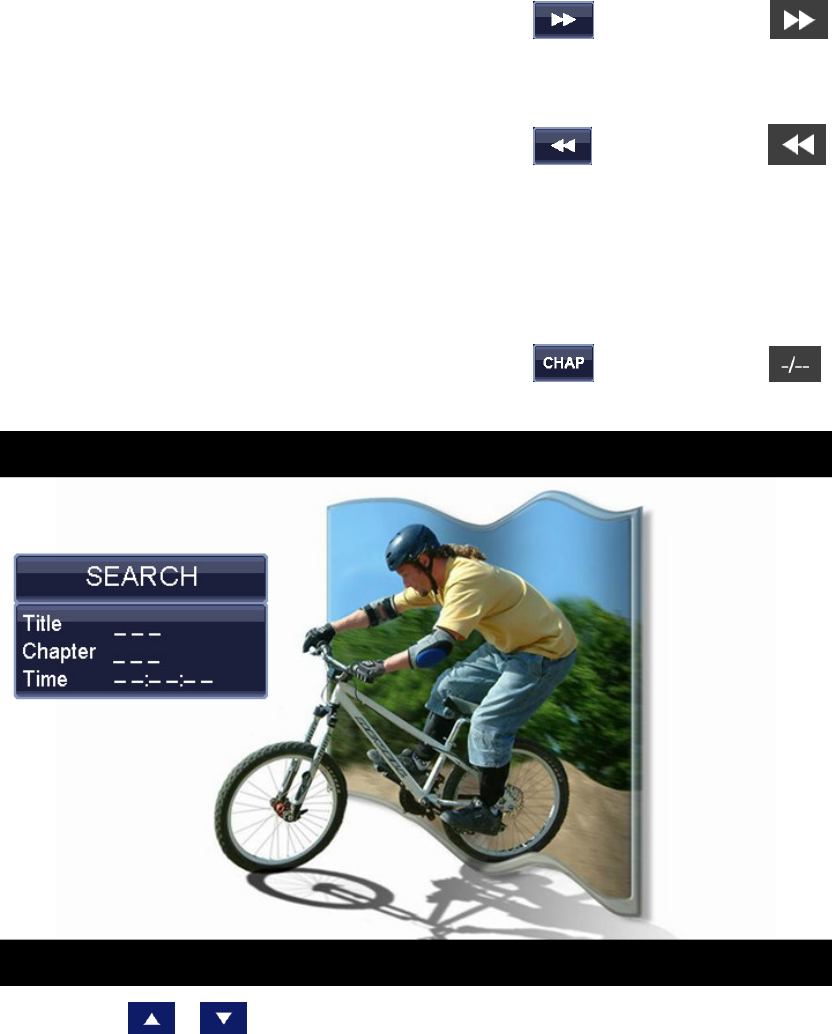
GOTO SEARCH
During the DVD playback, perform the following steps to use the goto feature to access a specific
location on a disc:
Touch the arbitrary aera of the screen, and then touch the button or press the
button on the remote control to enter the "Goto" mode. See picture below:
Press the / buttons on the remote control to select a category.
Touch the the item of the picture on the screen to display a numeric keypad on the screen,
just as below:
Enter a title, chapter, or time number as your desired into the field by using the numeric
keypad on the screen or on the remote control.
Touch the button on the numeric keypad or press the button on the remote
control to go to the specified location on the disc.
NOTE: During the DVD playback, you can use the numeric keypad on the remote control to
access a track directly.
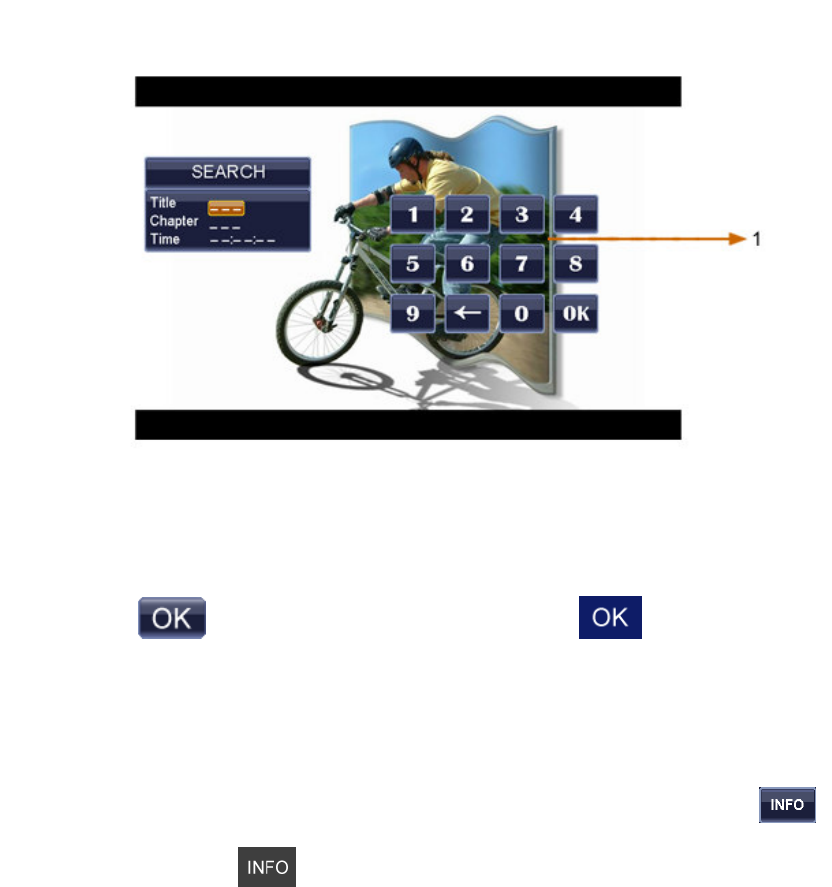
PLAYBACK INFORMATION
During the DVD playback, touch the arbitrary aera of the screen, and then touch the
button or you can press the button on the remote control to display playback information
on the screen, including the media playing and remainder playback time. See picture below:

MULTI-LANGUAGE DISCS(DVD ONLY)
Changing audio language
If you are watching a disc recorded in multiple languages, touch the arbitrary aera of the
screen, and then touch the button to choose a language. You can also press the
button on the remote control to achieve it.
Changing subtitle language
If you are watching a disc recorded in multiple languages with subtitles, touch the arbitrary
aera of the screen, and then touch the button to choose a language in which the subtitles
should appear. You can also press the button on the remote control to achieve it.
VIEWING AN ALTERNATE PICTURE ANGLE(DVD ONLY)
Some DVDs contain scenes that have been shot simultaneously from different angles. For
disc recorded with multiple angles, press the button on the remote control to toggle
available angles of the on-screen image.
ZOOMING
Press the button on the remote control to enlarge and pan through the video image
using the following options: "+1", "+2", "+3" and "off".
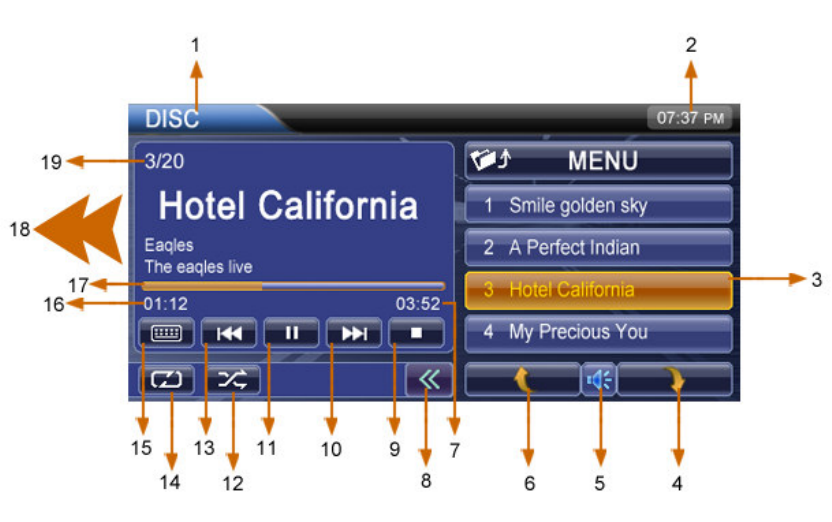
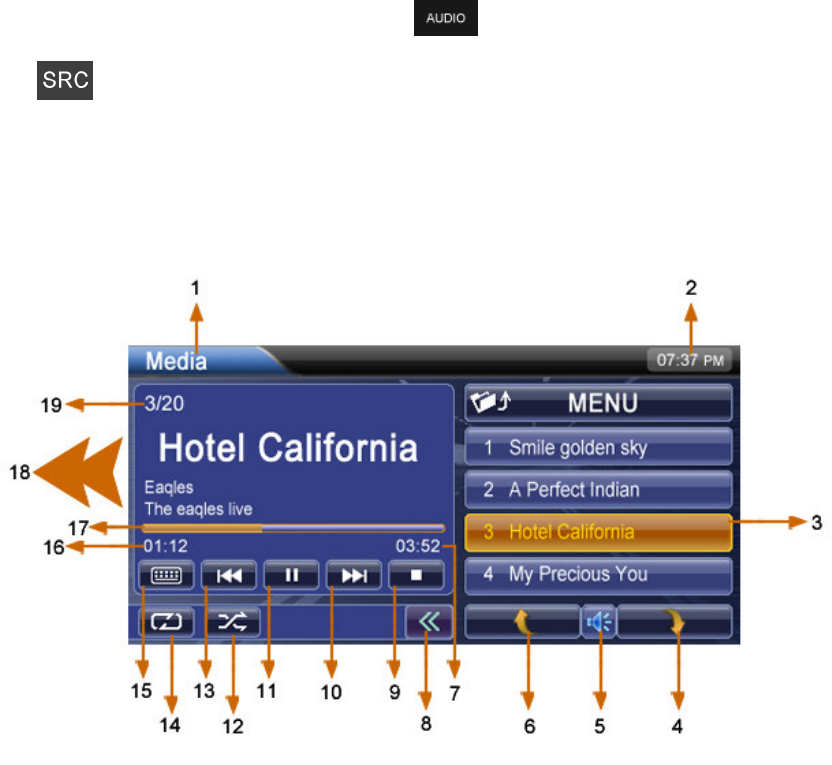
CD/MP3/WMA/JPEG Operation
CD/MP3/WMA DISCS
Firstly: Button Function Description for CD/MP3/WMA
Instruction for insert/eject, play/pause, stoping playback, track selection, repeat and random play
are the same for the DVD, CD, MP3 operation. Please see the DVD player operation section for
information about these topics.
1. Touch to go back to MAIN menu. With different media source, such as CD, MP3, WMA, this
area will display the same words as disc.
2. Current time.
3. Play list with folder.
4. Touch to go to the next list page.
5. Mute button. Touch to mute on and mute off alternately.
6. Touch to go to the previous list page.
7. The total time for playing a track or a song.
8. Touch to hide or display the repeat and random buttons.
9. Touch to stop disc playback.
10. Touch to play the next chapter.
11. Touch to play / pause.
12. Touch to random playback.
13. Touch to the previous chapter.
14. Touch to repeat playback.
15. Touch to display a numeric keypad on the screen, and then you can use the numeric keypad to
access a track or a song directly.
16. Elapsed playing time.
17. The scroll bar for display the schedule of a track or a song.
18. Track for a CD disc, song name and artist name for MP3/WMA disc.
19. Current track or song and total number of tracks or songs on disc.
Secondly: Some Implenting Modes of Operation for
CD/MP3/WMA
PLAY CD/MP3/WMA FILES
After inserting a CD disc, files will play in the sequence of the directory. In playback mode,
you can touch a track on the screen directly or press the numeric button on the remote control to
play it.
PREVIOUS / NEXT PAGE
Touch the or button on the screen to navigate through the pages/files.
NOTE:
There are no or button on the screen, you can press the or
button on the remote control to fast backward or fast forward by the rate from"2X" to "4X", "8X"
and "16X".
JPEG DISCS
Button Function Description
1. Touch to go back to MAIN menu.
2. Touch to rotate picture clockwise 90.
3. Touch to rotate picture counterclockwise 90.
4. Touch to display the next picture.
5. Touch to display the previous picture.
6. Touch to stop displaying the current picture and return to the picture list.
7. Touch to show the picture information.
8. Touch to show the total pictures of the current folder.
SD card reader Operation
NOTE:
Insert the SD card in the slot and press the button on the front panel or press
the button on the remote control to switch to the SD card mode.
Button Function Description for SD Card
The touch keys for SD card playback are described below. The interface is similar to the
CD/MP3/WMA mode.
1. Touch to go back to MAIN menu. With different media source, such as SD, USB, this area will
display the same words as media.
2. Current time.
3. Play list with folder.
4. Touch to go to the next list page.
5. Mute button. Touch to mute on and mute off alternately.
6. Touch to go to the previous list page.
7. The total time for playing a track.
8. Touch to hide or display the repeat and random buttons.
9. Touch to stop disc playback.
10. Touch to play the next chapter.
11. Touch to play / pause.
12. Touch to random playback.
13. Touch to the previous chapter.
14. Touch to repeat playback.
15. Touch to display a numeric keypad on the screen, and then you can use the numeric keypad to
access a track directly.
16. Elapsed playing time.
17. The scroll bar for display the schedule of a track.
18. Track name and artist name.
19. SD card indicator, display the current track and total number of tracks on SD card.
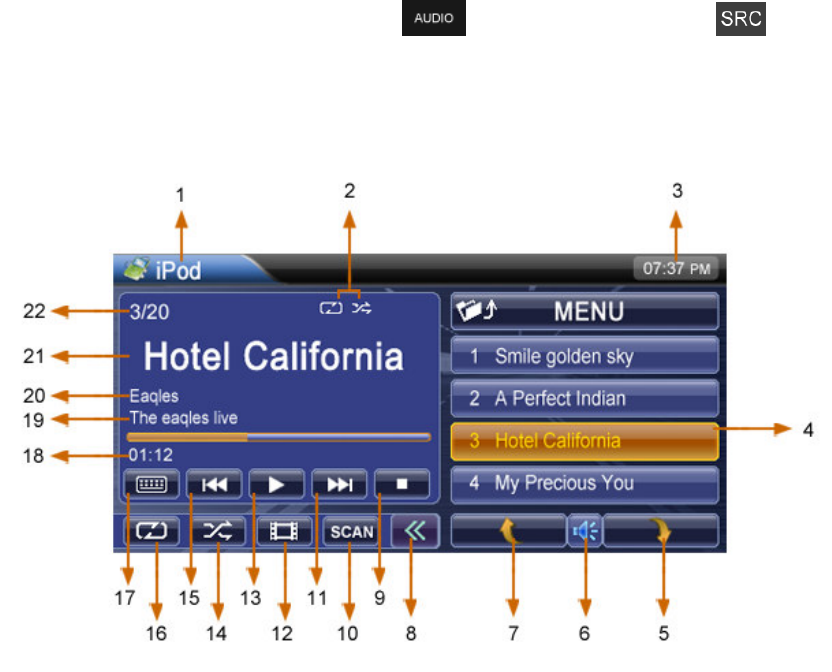
Ipod Operation
NOTE: ACCESSING IPOD MODE
To switch to access ipod mode, press the button on the front panel or
button on the remote control until the ipod symbol appears at the top of the screen.
Firstly: Button Function Description for Ipod
1. Touch to access MAIN menu.
2. Display repeat or random playing.
3. Current time.
4. Ipod play list with category.
5. Touch to show the next page of play list.
6. Touch to mute voice or not.
7. Touch to show the previous page of play list.
8. Touch to show or hide additional functions.
9. Stop button.
10. Scan function. Preview each song for ten seconds.
11. Touch to play the next song, hold for fast playing song or video.
12. Go to video play mode.
13. Play/Pause button.
14. Random button.
15. Touch to play previous song, hold for fast back playing song or video.
16. Repeat playing for a song, a folder, or all.
17. Touch to display a numeric keypad to access a track directly. (the icon will turn to be blink
until the menu is the floor menu.)
18. Play time and progress.
19. Song title.
20. Artist.
21. Song name.
22. Song number index.
Secondly: Some Implenting Modes of Operation
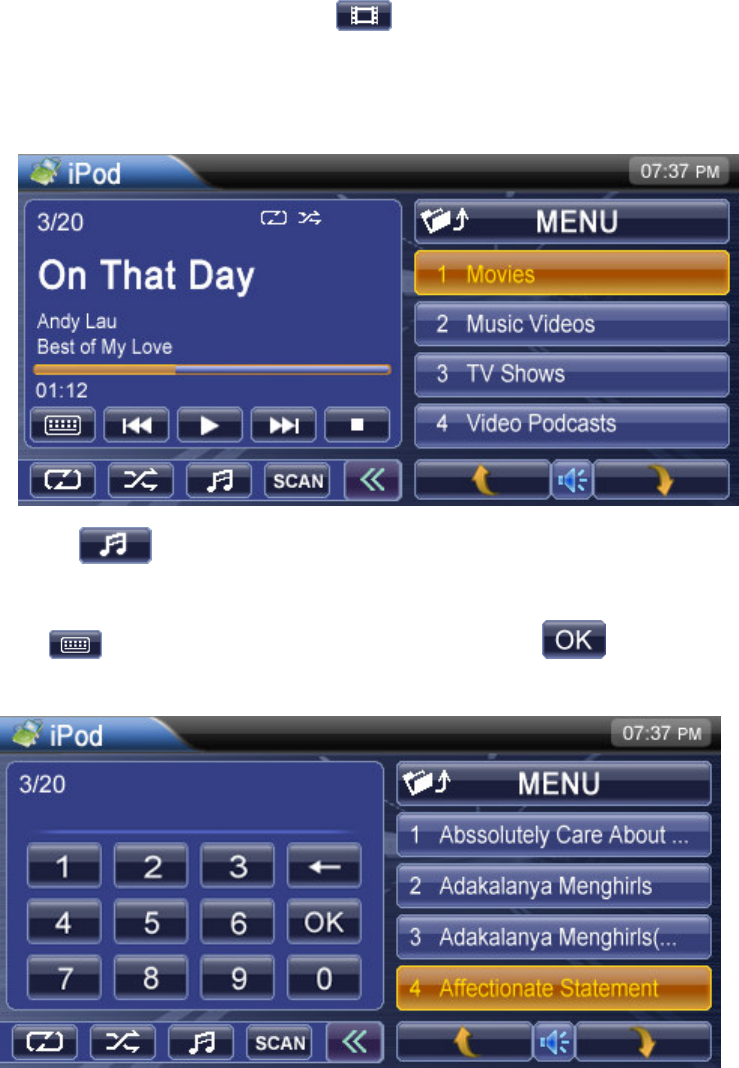
IPOD VIDEO PLAYBACK
It is necessary to activate the video output of the ipod.
If there are some valid videos in ipod and the ipod has been connected to the unit with
USB and video line, you can press button to go into video play mode, and the
video list will appear in the right list area. Touch one video source in the list and the
video will be played full screen. And you can press the center of the video screen again
to go back to ipod video control screen. See picture below:
NOTE: Touch button again to go back to song play mode.
SELECT THE SONG DIRECTLY
Touch button and input the song number, then touch the button. See picture
below:

NOTE: This function is only valid in one browse.
REPEAT OR RANDOM PLAY MODE
Touching button one time can play the current song and touching twice
can repeat playing the songs in current directory.
Touch button can random play the songs in current directory.
SCAN PLAY MODE
Touch button can go into the "SCAN" mode, every song will be played only ten
seconds.
Bluetooth Operation
Firstly: Before using the bluetooth interface
ACTIVATE AND PAIR
Before using the bluetooth interface, it's necessary to perform the following steps. For more
operating details, refer to each section below.
Select the "Bluetooth" option in the Setup and select "On" to activate the
bluetooth interface.
Pair your mobile phone to the unit (refer to the "Pair" operation). It is necessary to pair your
phone to the unit first. Without pairing, bluetooth is not available.
THE BLUETOOTH INDICATOR
There is a bluetooth indicator at the top of the screen.
When the bluetooth function is "Off", the indicator is grey.
When the bluetooth function is "On", the indicator will blink.
ACCESSING BLUETOOTH MODE
Access the MAIN menu first and touch the button on the screen to access
the bluetooth mode.
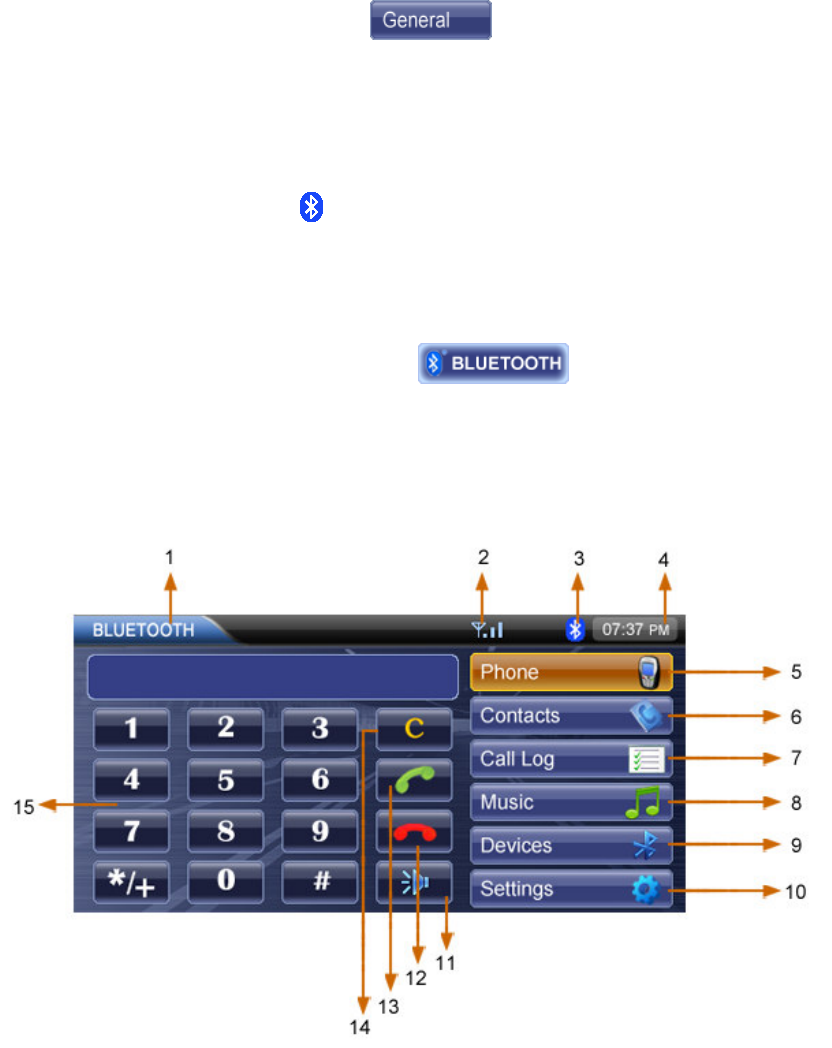
Secondly : Bluetooth User Interface Description
As we know, the basic picture of bluetooth user interface is just as belows:
1. Current source indicator, touch to access the MAIN menu.
2. Bluetooth signal indicator.
3. Bluetooth icon.

4. Current time.
5. Touch to access the "Phone" interface.
6. Touch to access the "Contacts" interface.
7. Touch to access the "Call Log" interface.
8. Touch to access the "Music" interface.
9. Touch to access the "Devices" operation.
10. Touch to access the "Settings" interface.
11. Touch to switch the audio output between the unit and the mobile phone.
12. Touch to end a call.
13. Touch to answer an incoming call or dial a call.
14. Delete input number.
15. Touch the number to initiate the phone call.
Thirdly: Some Implenting Modes of Operation
CONTACTS
Touch the button to access the "Contacts" interface, you can see
the contacts list. See picture below:
1. Contacts list. If the number has been stored in the contacts, it can be accessed by touching
or button on the screen to navigate through the "Contacts" entries. Touch the
number to initiate the phone call.
2. Address list index. Touch one of the letter in the index, you can expediently find the name that
its first letter is just the letter you touched. Touch the or button to display the whole
index.
3. Options button. Touch to see more information, such as "Detail", "Add Voice Tag ", "Call". See
picture below:
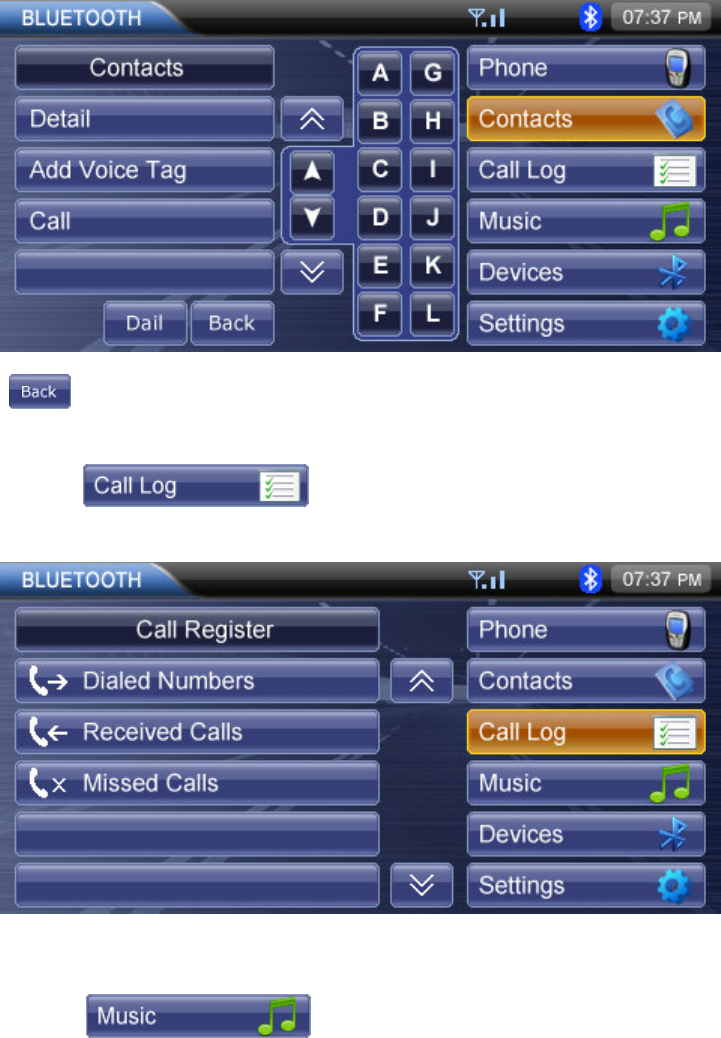
Touch button to return to the previous.
CALL LOG
Touch the button to access the "Call Log" interface. See picture
below:
It contains items as "Dialed Numbers", "Receiced Calls", "Missed Calls".
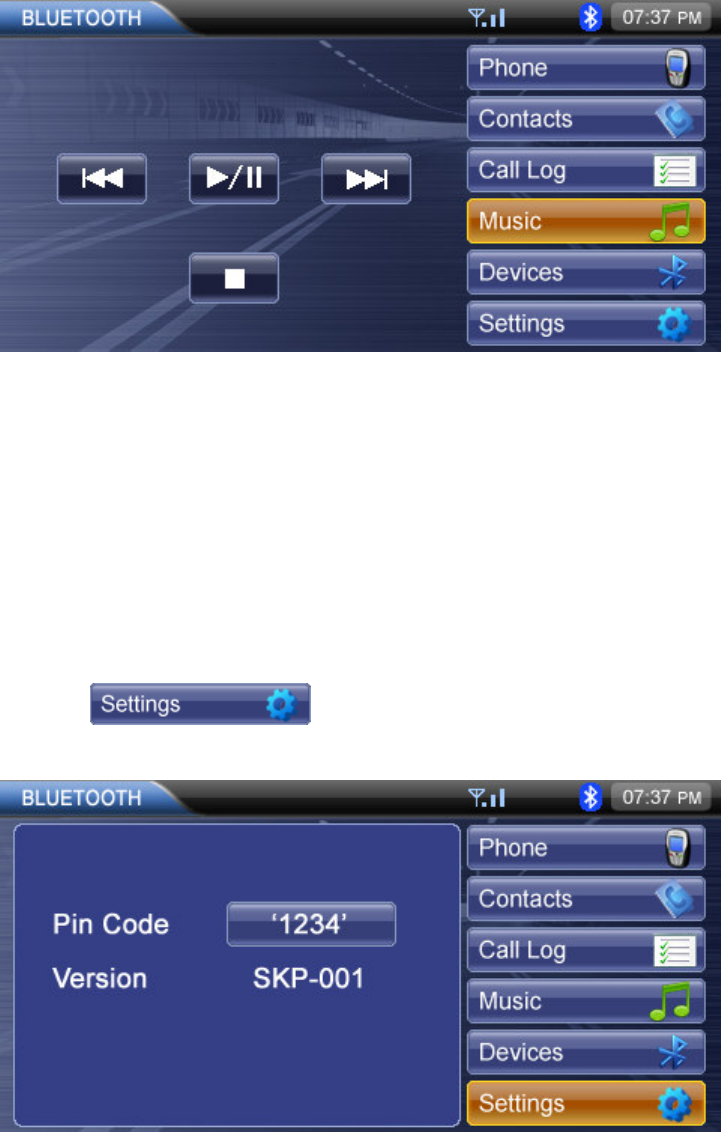
MUSIC
Touch the button to access the "music" interface. See picture
below:
DEVICES
Access the bluetooth devices and choose a pair mode, then "Searching.......", select a device
and input the pin code for pairing.
The unit can pair with five mobile phones in all, but just one can be actived at a time. When
maximum pairing has been completed, that is, five mobile phones have been connected with the
unit, and you want pair a new one, then the system will delete the first phone and the new paired
phone will be added in.
If you want pair your mobile phone with the unit, the pin code 1234 is used to complete the
pairing. When asked, enter this pin word in the mobile phone which you are pairing with this unit.
BLUETOOTH SETTINGS
Touch the button to access the bluetooth setup. See picture
belows:
1. Pin Code: touch to display a numeric keypad on the screen, and then you can use the numeric
keypad to setup the pin code.
2. Display the version of the unit.
MAKING A PHONE CALL
There are three ways to make a phone call from this unit:
Make use of the number dial on the screen to make a call.
You can open the contracts and select one entry to make a call directly. Your cell phone must
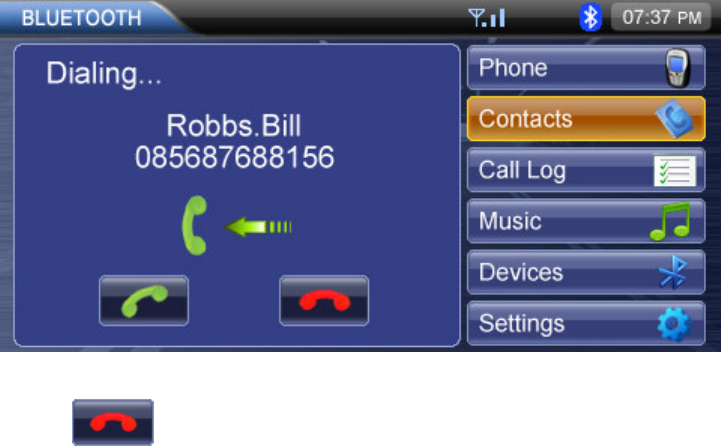
support this option.
If your phone supports voice dial, access this mode on your phone instead of using the
contracts.
ANSWERING AN INCOMING CALL
You can answer an incoming call even if the playing source is other than the telephone is
selected.
You can answer an incoming call manually. when a call comes in, the following interface
will be displayed on the screen:
END A CALL
Touch the icon to end a call.
XM Operation
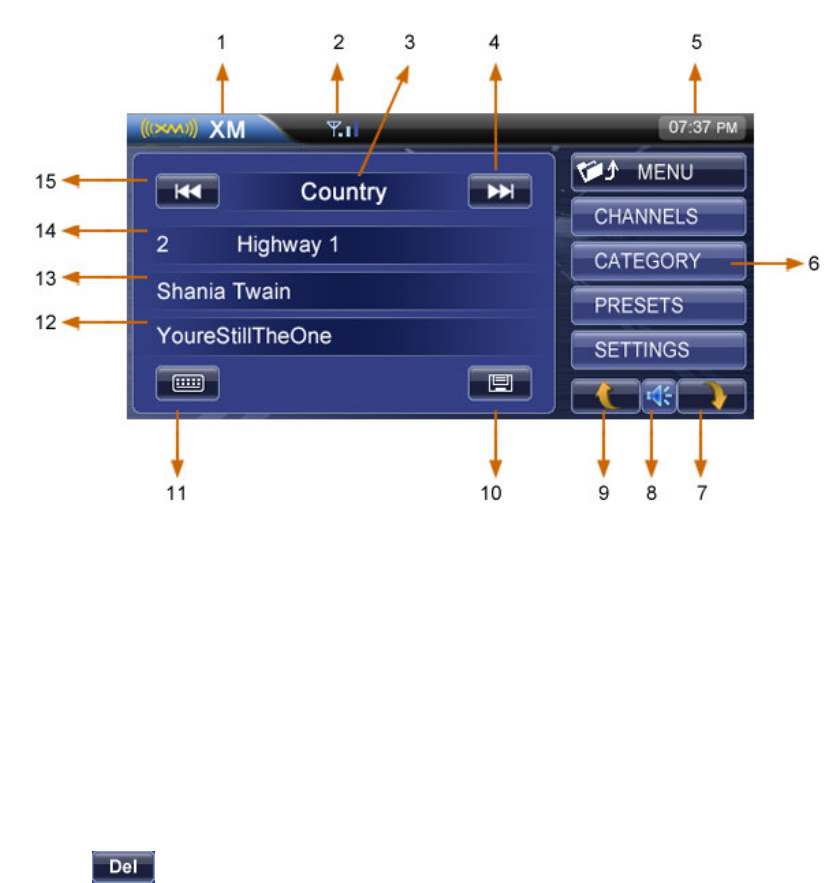
Firstly: Button Function Description for XM
This function is available when a XM Satellite Radio Receiver is connected through the dedicated
connection.
1. Touch to access MAIN menu.
2. Signal indicator.
3. Category quick view.
4. Touch to show the next category.
5. Current time.
6. Play list with folder.
7. Touch to show the next page of current list.
8. Touch to mute voice or not.
9. Touch to show the previous page of current list.
10. Touch to store current channel.(If current channel is already in preset list, this button will
change to button to let user to delete current channel from preset list.)
11. Touch to display the numeric keypad on the screen to access a channel directly.
12. Song title.
13. Artist.
14. Channel number and channel name.
15. Touch to show previous category.
Secondly: Some Implenting Modes of Operation
ACCESSING THE XM MODE
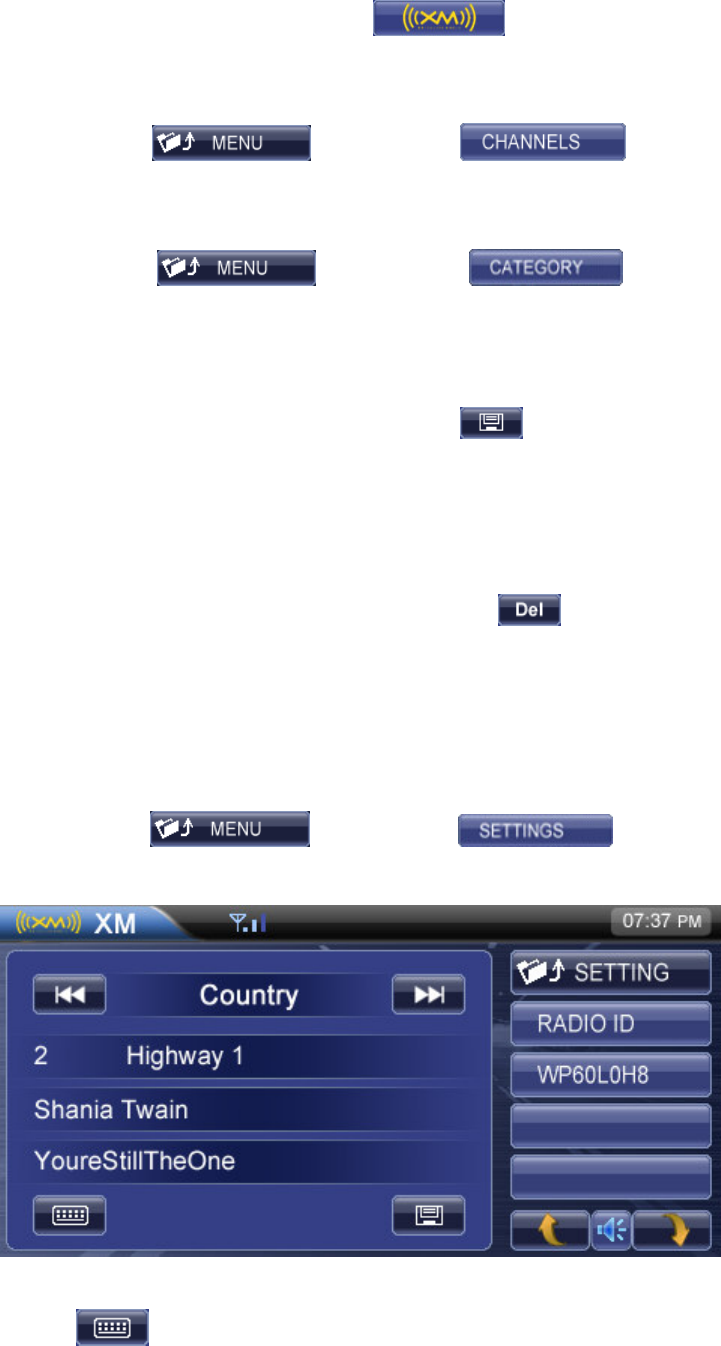
Access the MAIN menu first and touch the button on the screen to access
the XM mode.
VIEW ALL AVAILABLE CHANNELS IN CHANNEL LIST
In list area with root, touching list button will
display channel list, and touching one of the channels will tune to it.
VIEW CATEGORY LIST
In list area with root, touching list button will
display category list, and pressing one category will display the channels in this category.
SAVE ONE CHANNEL TO PRESET LIST
There are two ways to save one channel to preset list:
Select an unsaved channel you want to save, then press button,after that the channel
will be saved in the first empty space of the preset list.
Select an unsaved channel you want to save, then go to preset list, hold one of empty preset
space, after that the channel will be saved in the place you hold.
DELETE ONE CHANNEL FROM PRESET LIST
If the current channel is already in preset list,pressing button will remove the
current channel from preset list.
Select an unsaved channel you want to save, then go to preset list, hold one of the preset
channels you want to delete, after that the new channel will be saved and the old one will be
replaced.
VIEW RADIO ID
In list area with root, touching will display XM
Radio ID. See picture below:
DIRECTLY ACCESS CHANNEL
Touching button will display a numeric keypad as below:
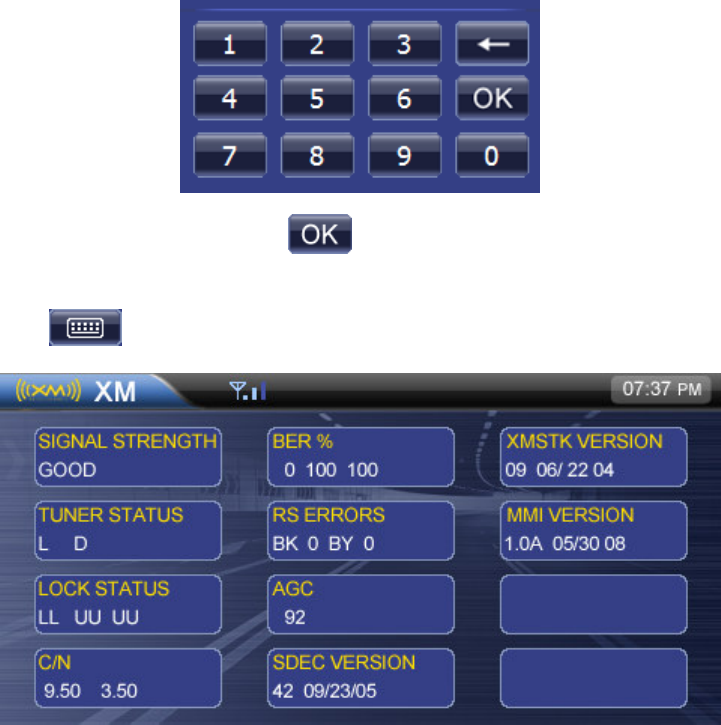
Input a valid channel number and touch button.
GO INTO DIAGNOSTIC MODE
Touch button and input 999, the diagnostic window will be displayed as below:
SIRIUS Operation
Firstly: Button Function Description for SIRIUS
This function is available when a Sirius Satellite Radio Receiver is connected through the
dedicated connection. This unit requires the following receiver:
● SIRIUS Satellite Radio Receiver: SC-C1
Note:
SIRIUS Satellite Radio is a subscription service.
Please contact Sirius Radio to begin or alter your subscription:
Internet: www.sirius.com
Telephone: 888-539-SIRIUS (747487)
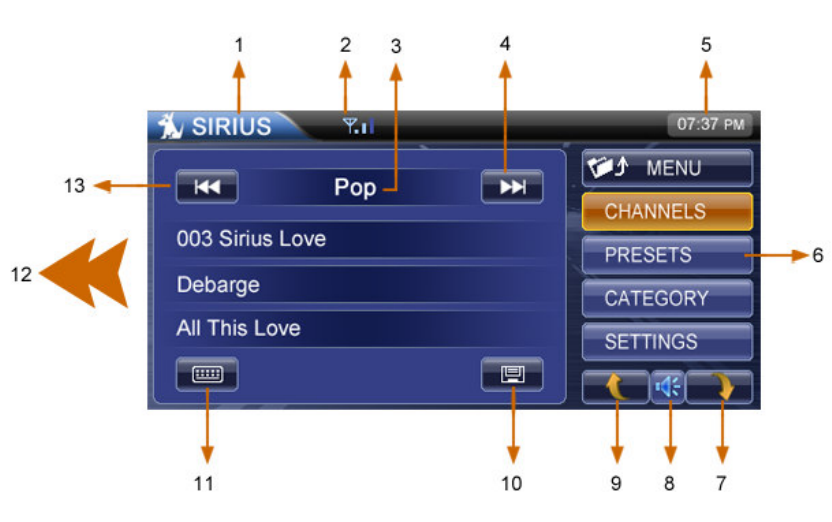
1. Touch to access MAIN menu.
2. Signal indicator.
3. Category quick view.
4. Touch to show next category.
5. Current time.
6. Play list with folder.
7. Touch to show next page of current list.
8. Touch to mute voice or not.
9. Touch to show previous page of current list.
10. Touch to store current channel.
11. Touch to display the numeric keypad on the screen to access a channel directly.
12. SID or the playing channel information. The first line displays the playing channel name, the
second line shows artist of the channel, the third line is the title of the channel.
13. Touch to show previous category.
Secondly: Some Implenting Modes of Operation
ACCESSING THE SIRIUS MODE
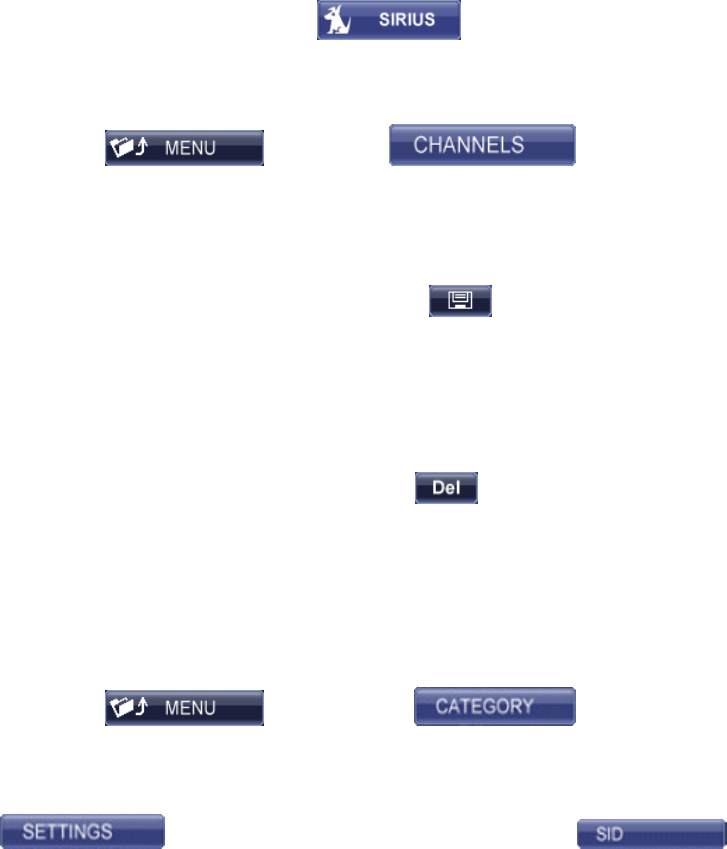
Access the MAIN menu first and touch the button on the screen to access
the SIRIUS mode.
VIEW ALL CHANNELS AVAILABLE
In list area with root, touch list button will
display channel list, and pressing one of the channels will tune to it.
SAVE ONE CHANNEL TO PRESET LIST
There are two ways to save one channel to preset list:
Select an unsaved channel you want to save, then press button to store the current
channel to the first empty preset memory.
Select an unsaved channel you want to save, then go to preset list, hold one of empty preset
space for three seconds, after that the channel will be stored to this space.
DELETE ONE CHANNEL FROM PRESET LIST
If current channel is already in preset list,pressing button will remove current
channel from preset list.
Select an unsaved channel you want to save, then go to preset list, hold one of the preset
channels you want to delete, after that the new channel will be saved and the old one will be
replaced.
VIEW ALL CATEGORIES AVAILABLE
In list area with root, touching list button will
display category list, and pressing one category will display the channels in this category.
SETTINGS FUNCTION
Touch to go into SIRIUS setting mode., then touch
button to display SIRIUS ID. See picture below:

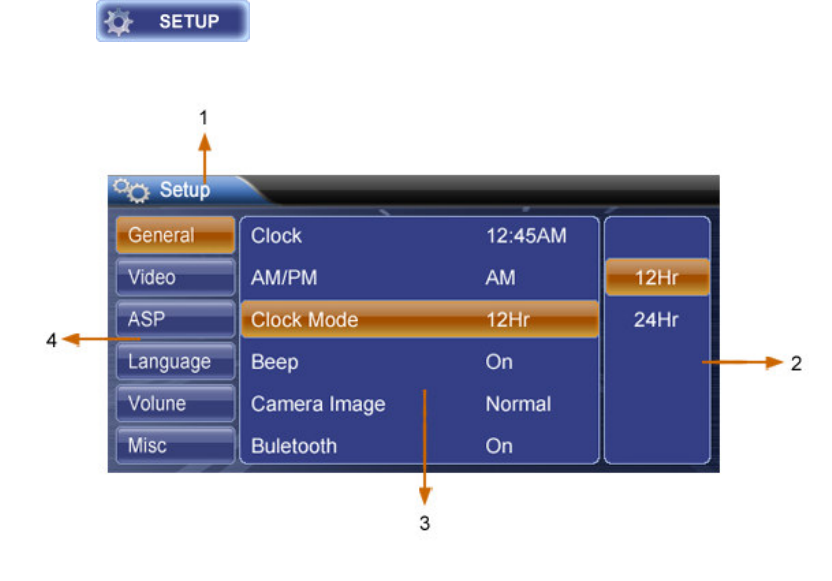
Touch button to display a numeric keypad. See picture below:
then enter the password 0000 and touch button to display as below:
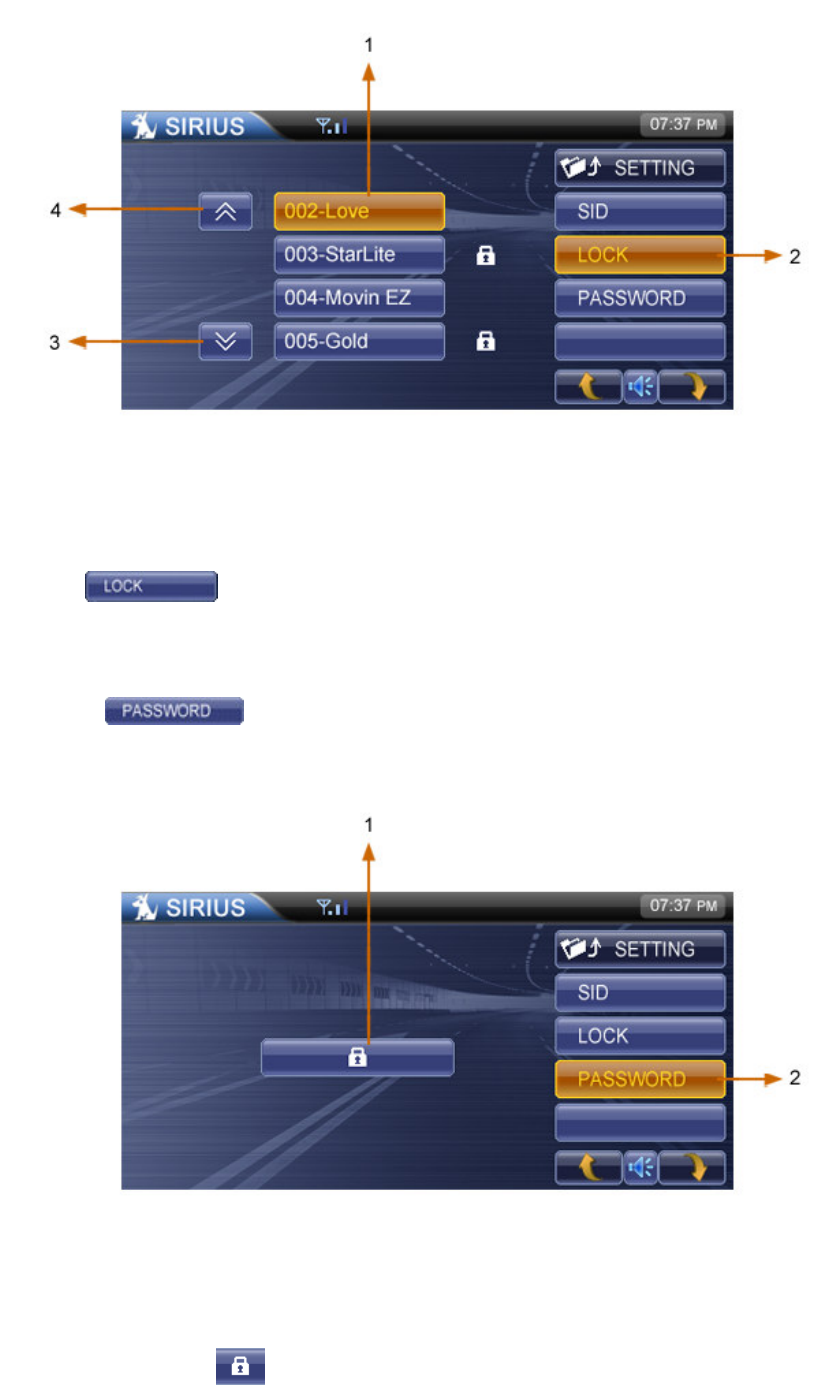
1. Lock list. Touch to lock/unlock the channel.
2. Touch button to go into "LOCK" mode, you need to input a correct password.
3. Next page.
4. Previous page.
Touch to set the password or remove the password. See picture below:
1.Touch this lock button to remove the password (initial password is 8888). Touch the lock
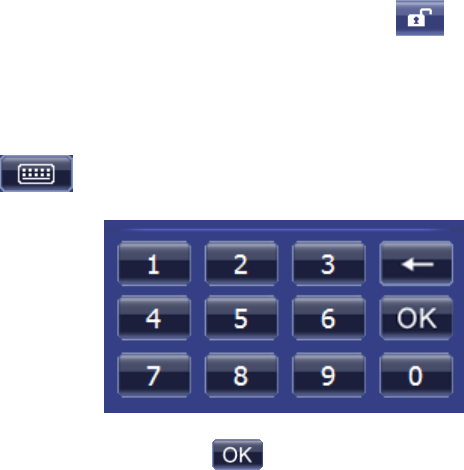
button, and a numeric keypad will display, if you input a correct password, the password will be
removed, and then the lock button will become unlock button .
Note: If you input a wrong password, the numeric keypad will display again and remind you that
the password is error and you should input the correct password again.
DIRECTLY ACCESS CHANNE
Touching button will display a numeric keypad as below:
Input a valid channel number and touch button.
Setup Operation
Firstly: Button Function Description
Touch the button on MAIN menu screen. See picture below:
1. Touch to return to MAIN menu.
2. Setup option, touch to select .
3. Setup item, touch to show it’s option.
4. Setup category list, touch to show relevant setup items.
Secondly: Some Implenting Modes of Operation
SELECTING A FERTURE FOR ADJUSTMENT
Touch the option directly on the screen to select the feature to be adjusted.
ADJUSTING A FEATURE
Enter the option field for the feature you want to adjust by touching the button you selected.
A submenu appears in the item field.
Select a new value by touching the item button. The new value setup is complete.
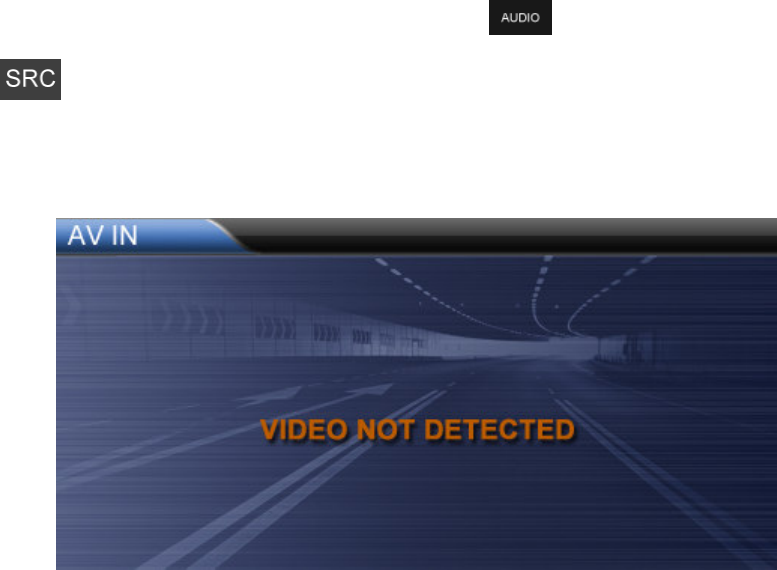
GENERAL MODE
We can understand it clearly by the following table:

General: Settings Options Function
Clock Numeric keypad Adjust the hours and miniutes
AM/PM AM/PM Select AM or PM when the
clock mode display 12Hr, or
else, they will turn to be gray.
12Hr Clock displays 12 hour time
using AM and PM.
Clock Mode
24Hr Clock display 24 hour time up
to 23:59.
On Beep is active. Beep
Off Beep is deactivated.
Normal The output of camera image is
in normal mode.
Camera Image
Mirror The output of camera image is
in reverse mode.
On Select to activate the bluetooth
function.
Bluetooth
Off Select to deactivate the
bluetooth function.
The table of "General"
VIDEO MODE
Video: Settings Options Function
16:9 Tv Shape
4:3
Image is presented in a view
with 16:9 or 4:3 aspect ratio.
Auto The video output is switched
automatically based on the
current disc.
PAL The video output is in the
standard PAL format.
Aux IN
NTSC The video output is in the
standard NTSC format.
Brightness -10 to 10 Select to adjust the brightness.
Table of "Video"

ASP MODE
ASP: Settings Options Function
60Hz
80Hz
100Hz
Bass Freq
200Hz
Depending on the audio
source, select the bass center
frequency to achieve the best
bass effect.
10kHz
12.5kHz
15kHz
Treble Freq
17.5kHz
Depending on the audio
source, select the treble center
frequency to achieve the best
treble effect.
80Hz
120Hz
Sub Filter
160Hz
Selecting a crossover
frequency sets a cut-off
frequency of the subwoofer's
LPF (low-pass filter) and the
"SMALL" Speakers' HPF
(high-pass filter). The
crossover feequency setting
has no effect if the subwoofer
is set to "Off" and any other
speaker is set to "Large".
1.0
1.25
1.5
Bass Q-Factor
2.0
When the bass center
frequency is selected,
adjusting the bass Q-factor
alters the perceived "weight"
of the bass output.
ipod Gain -7 bis +7 Adjust the ipod gain.
Auxin Gain -7 bis +7 Adjust the Auxin gain.
SAT Gain -7 bis +7 Adjust the SAT gain.
DVD Gain -7 bis +7 Adjust the DVD gain.
Tuner Gain -7 bis +7 Adjust the Tuner gain.
Table of "ASP"
LANGUAGE MODE
Language: Settings Options Function
English DVD menu
Spanish
Select the default language
which you would like the
DVD menu (if available) to be
displayed.
English Subtitle
Spanish
Select the default language
which you would like subtitles
(if available) to be displayed.
Audio English Select the default language

Spanish which you would like audio (if
available) to be displayed.
Table of "Language"
VOLUME MODE
The options of the navi volume are 0 to 5, and you can select one of them to confirm the navi
volume.
MISC MODE
Misc: Settings Options Function
No TS Calibrate
Yes
Touch "Yes" to enter the touch
screen calibrate mode.
---- Set Password
Locked
Touch "---" or "Lock"to
display a numeric keypad,
enter a 4-digit password to
deactivate or activate the
"Parental control" feature.
Kid Saf
G
PG
PG-13
PG-R
NC-17
Adult
Parental control
R
Select the appropriate
"Parental control" level for the
intended audience. you can
override highter ratings by
using your password.
No Software Update
Yes
Touch "Yes" to update the
software.
No Navi Update
Yes
Touch "Yes" to update the
navi.
No Load Factory
Yes
Select "Yes" to restore the
factory default settings for the
DVD setup only(except the
password and parental lock
setting).
Table of "Misc"
Note:
The DVD system has a built-in parental lock feature to prevent unauthorized persons from
viewing restricted disc contents. By default, the rating system is unlocked. Once setup, the
parental lock is released only by entering the correct password. Once the password is entered,
rating is available for setup.
Record the password and keep it in a safe place for future reference. The rating for each disc
is marked on the disc, disc packing, or documentation. If the rating is not available on the disc, the
parental lock feature is unavailable. Some discs restrict only portions of the disc and the
appropriate content will play.
AV IN Operation
ACCESSING AV IN MODE
Touch the "AV 1" button on the screen , or press the button on the front panel or the
button on the remote control until "AV IN" Appears at the top of the screen.
Note : for your safety, the unit has a safety function which turns off the picture when the car
is moving, so only the audio can be heard. The picture can only be watched when the car is
stopped and the parking brake is applied.
VIDEO NOT DETECTED
Camera Operation
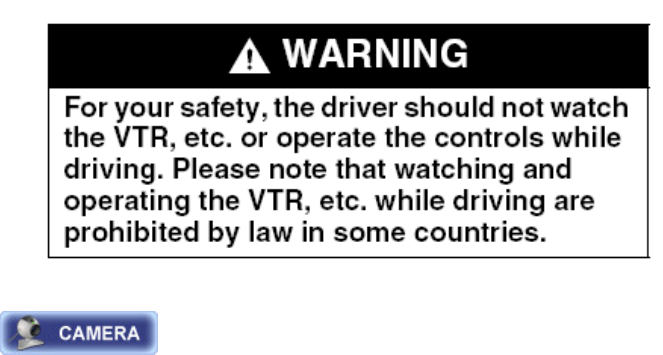
NOTE:
This function is available when a VTR, etc. is connected to the visual terminal. For your safety,
the unit has a safety function which turns off the picture when the car is moving, so only the audio
can be heard. The picture can only be watched when the car is stopped and the parking brake is
applied. See picture below:
ACCESSING CAMERA MODE
Touch button on MAIN menu to access "CAMERA" Mode, or the car shift is
in R state.
Navigation operation
ACCESSING NAVIGATION
Access the MAIN menu and select the icon on the screen to enter the
navigation operation interface.
Press the button on the front panel or the button on the remote control to
switch to navigation.
NAVIGATION OPERATION
Please read the navigation software user manual.
Listening to an audio program while using/viewing the navigation.
You can listen to an other playing mode while using the navigation mode.
1. Select a playing mode.
2. Touch the icon to select the navigation mode. The map will be shown on
screen and audio will continue to play while you are in the navigation mode.
3. Navigation voice prompts will mute the audio source, give the instruction and return to the
audio source.
Note:
Insert the navi SD card to get access to the navigation mode.
Please restart the unit after changing the SD card, otherwise, a full access cannot be
guaranteed.
Note: changes or modifications not expressly approved by the party
responsible for compliance could void the user’s authority to operate the
equipment.