SKYRC Technology Q200 AC/DC Quattro Charger User Manual
SKYRC Technology Co., Ltd. AC/DC Quattro Charger
UserManual.wiki
>
SKYRC Technology
>
Q200 User Manual
User Manual
Navigation menu
Upload a User Manual
Namespaces
Wiki Guide
HTML
PDF
Info
Views
User Manual
Discussion / Help
Navigation
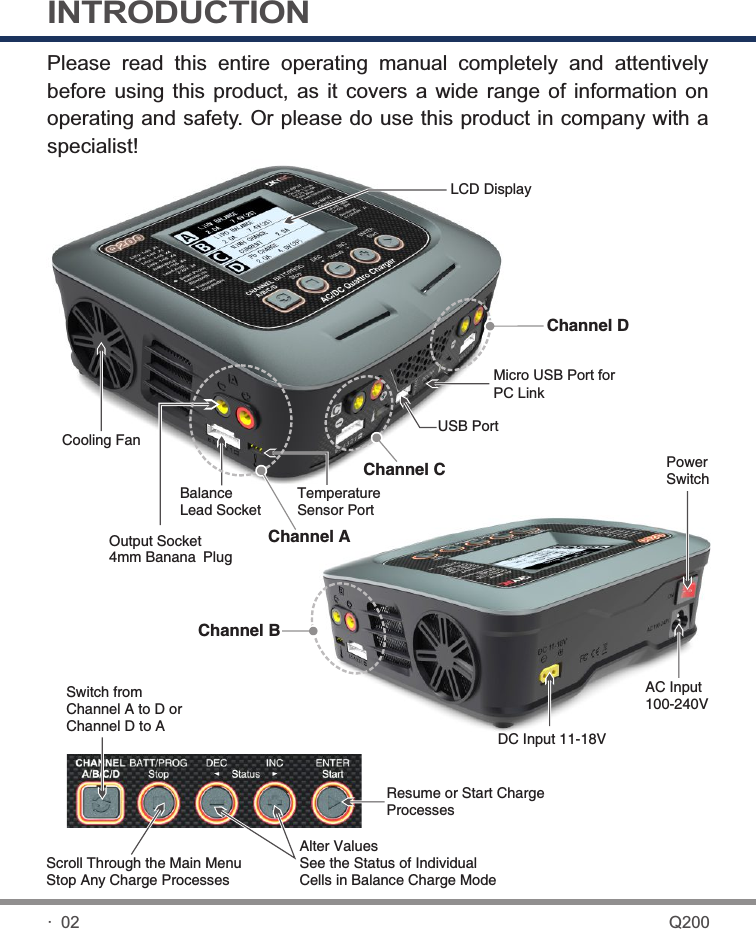
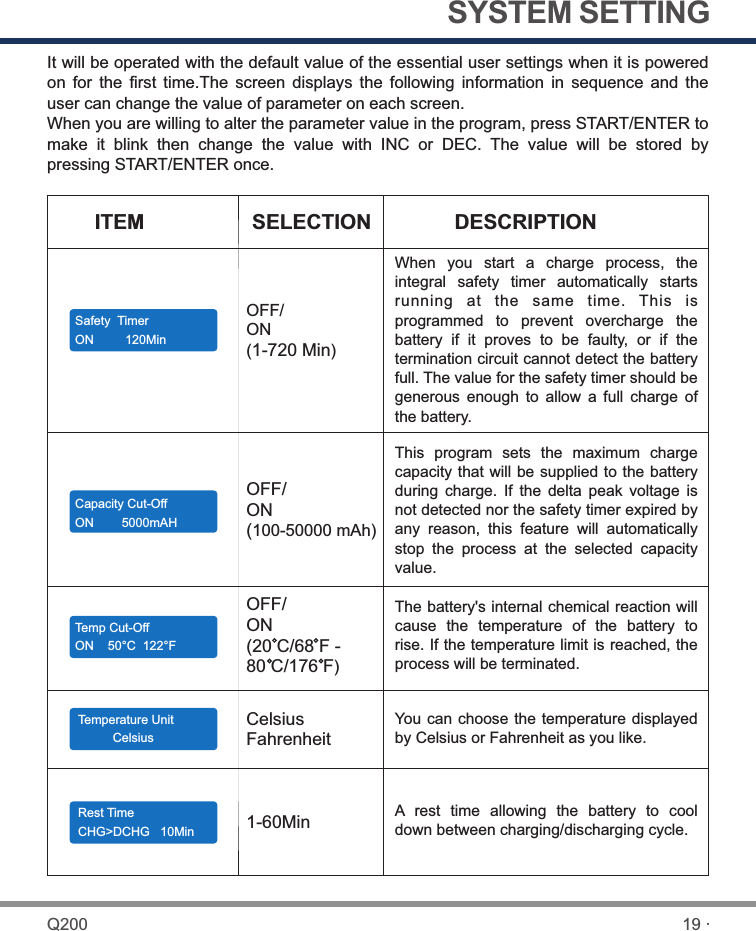
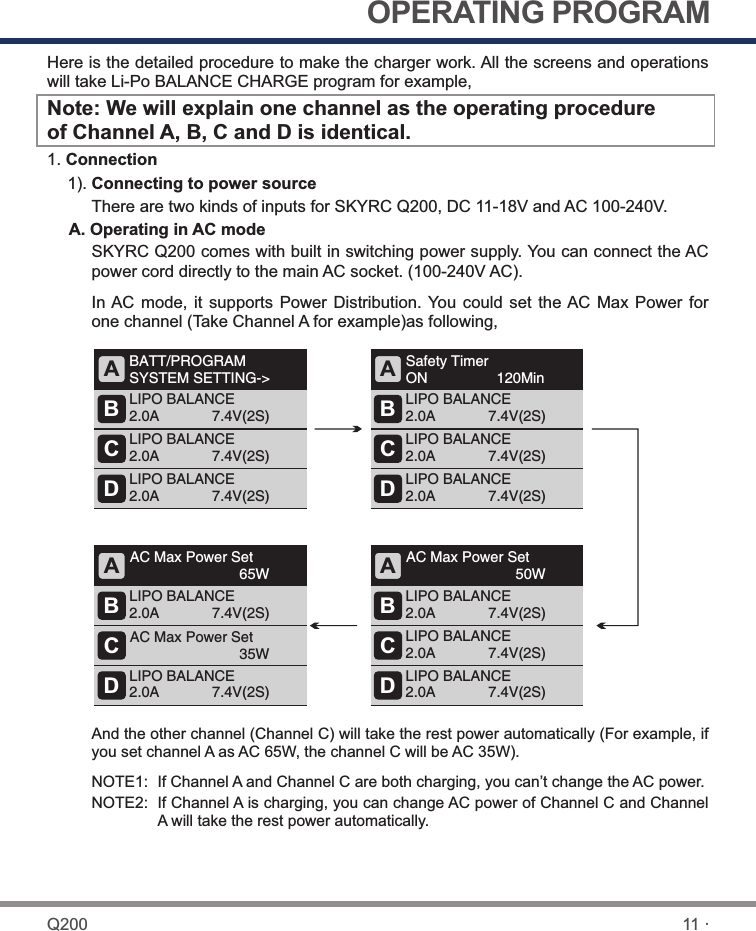
![PROGRAM FLOW CHART BATT/PROGRAM Pb BATT ENTERSTARTPb CHARGE2.0A 2.0V (1P) DECINC Pb DISCHARGE0.1A 2.0V (1P)BATT/PROGRAM NiCd BATTNiCd CHARGECURRENT 2.0AENTERSTARTDECINC NiCd DISCHARGE0.1A CUT: 1.0V DECINC NiCd CYCLECHG>DCHG 1BATT/PROGRAM NiMH BATT ENTERSTARTNiMH CHARGECURRENT 2.0A DECINC NiMH DISCHARGE0.1A CUT: 1.0VNiMH CYCLECHG>DCHG 1DECINCBATT/PROGRAM LiPo BATTLiPo BALANCE CHG2.0A 7.4V (2S)LiPo CHARGE2.0A 7.4V (2S)LiPo FAST CHARGE2.0A 7.4V (2S)LiPo STORAGE2.0A 7.4V (2S)LiPo DISCHARGE2.0A 7.4V (2S)ENTERSTARTDECINCDECINCDECINCDECINCDECINCDECINCBATT/PROGRAM LiFe BATTLilo BALANCE CHG2.0A 7.2V (2S)Lilo CHARGE2.0A 7.2V (2S)Lilo FAST CHARGE2.0A 7.2V (2S)Lilo STORAGE2.0A 7.2V (2S)Lilo DISCHARGE2.0A 7.2V (2S)ENTERSTARTDECINCDECINCDECINCDECINCBATT/PROGRAM LiIo BATTLiFe BALANCE CHG2.0A 6.6V (2S)LiFe CHARGE2.0A 6.6V (2S)LiFe FAST CHARGE2.0A 6.6V (2S)LiFe STORAGE2.0A 6.6V (2S)LiFe DISCHARGE2.0A 6.6V (2S)ENTERSTARTDECINCDECINCDECINCDECINCDECINCBATT/PROGRAMBATT METER4.20 4.19 4.19 V0.00 0.00 0.00 VMAIN 0.00V H0.000V L0.000VDECINCDECINCDECINCDECINCNiCd RE-PEAK 1DECINCNiMH RE-PEAK 1DECINCNiMH Auto CHARGECURRENT 2.0ADECINCNiCd Auto CHARGECURRENT 2.0ADECINCDECINCDECINCLiHV BALANCE CHG2.0A 7.6V (2S)LiHV CHARGE2.0A 7.6V (2S)LiHV FAST CHARGE2.0A 7.6V (2S)LiHV STORAGE2.0A 7.6V (2S)LiHV DISCHARGE2.0A 7.6V (2S)BATT/PROGRAM LiHV BATTENTERSTARTDECINCDECINCDECINCDECINCDECINCNote: The flow chart is taking one channel for example as the flow chart for the two channels (Channel A, B, C and Channel D) are identical.BATT/PROGRAM BATT MEMORYENTERSTART[ BATT MEMORY 1 ] ENTER SET->ENTERSTARTBATT TYPELiPo DECINC BATT VOLTS 7.4V ( 2S ) DECINC CHARGE CURRENT 4.9A DECINC DSCH CURRENT 2.2ADSCH VOLTAGE 3.0V/CELLTVC=YOUR RISK 4.20VDECINCENTERSTARTENTERSTARTBATT/PROGRAMSYSTEM SETTING->ENTERSTARTStopBatt TypeDECINCSAVE PROGRAM ENTERSAVE PROGRAM SAVE….[ BATT MEMORY 1 ]LiPo 7.4V (2S )[ BATT MEMORY 1 ]C:4.9A D:2.2AENTER CHARGERLOAD……LiPo BALANCE CHG4.9A 7.4V(2S)LiPo CHARGE4.9A 7.4V(2S)DECINC LiPo FAST CHARGE4.9A 7.4V(2S)DECINC LiPo STORAGE 4.9A 7.4V(2S)LiPo DISCHARGE2.2A 7.4V(2S)DECINCDECINCBATT TYPEMiMH DECINC BATT VOLTS2.4V (2S)ENTERSTARTCHARGE CURRENT 3.3ADECINCDECINC TRICKLE 100mA DECINC PEAK DELAY 1MinDECINCDSCH CURRENT 2.2ADECINC DSCH VOLTAGE1.1V/CELLSAVE PROGRAM ENTERENTERSTARTBATT TYPE PbBATT VOLTS 4.0V (2P)DECINC CHARGE CURRENT 3.3ADECINC DSCH CURRENT1.5ADECINC DSCH VOLTAGE1.7V/CELLDECINCSAVE PROGRAM ENTERDECINCDECINCDECINCDECINCBATT/PROGRAMBATT RESISTANCEDECINCENTERSTART005 003 003 mΩ005 mΩDECINC TATAL: 16mΩH: 5mΩ L: 3mΩENTERSTARTSTARG/ENTER>3SecondsSAVE PROGRAM SAVE….ENTERSTART[ BATT MEMORY 2 ]NiMH 2.4V (2S )[ BATT MEMORY 2 ]C:1.0A D:1.0ASTARG/ENTER>3sENTER CHARGERLOAD……NiMH CHARGECURRENT 1.0ANiMH Auto CHARGECURRENT 1.2ADECINCDECINCDECINCDECINCNiMH DISCHARGE1.0A CUT: 2.0VNiMH RE-PEAK 2NiMH CYCLEDCHG>CHG 1[ BATT MEMORY 2 ] ENTER SET->[ BATT MEMORY 3 ] ENTER SET->SAVE PROGRAM SAVE….ENTERSTART[ BATT MEMORY 3 ] Pb 4.0V (2S )[ BATT MEMORY 3 ]C:3.3A D:1.5AENTER CHARGERLOAD……Pb CHARGE3.3A 4.0V(2P)Pb DISCHARGE1.5A 4.0V(2P)Rest TimeCHG>DCHG 10MinDECINCSafety TimerON 120Min DECINCCapacity Cut-OffON 5000mAH DECINCDECINCDECINCTemp Cut-OffON 50°C 122°FNiMH SensitivityD.Peak 4mvDECINCNiCd SensitivityD.Peak 4mvKey Beep ONBuzzer ONDECINCDECINCVersionHW:1.00 FW: 1.10Load Factory Set Enter DECINC DC Input LowCUT-OFF 11.0VACMax Power Set 50W DECINCTemperature Unit CelsiusDECINCENTERSTART09 ·Q200START ENTER > 3sBal. Connection ONDECINC](https://usermanual.wiki/SKYRC-Technology/Q200/User-Guide-2924393-Page-11.png)
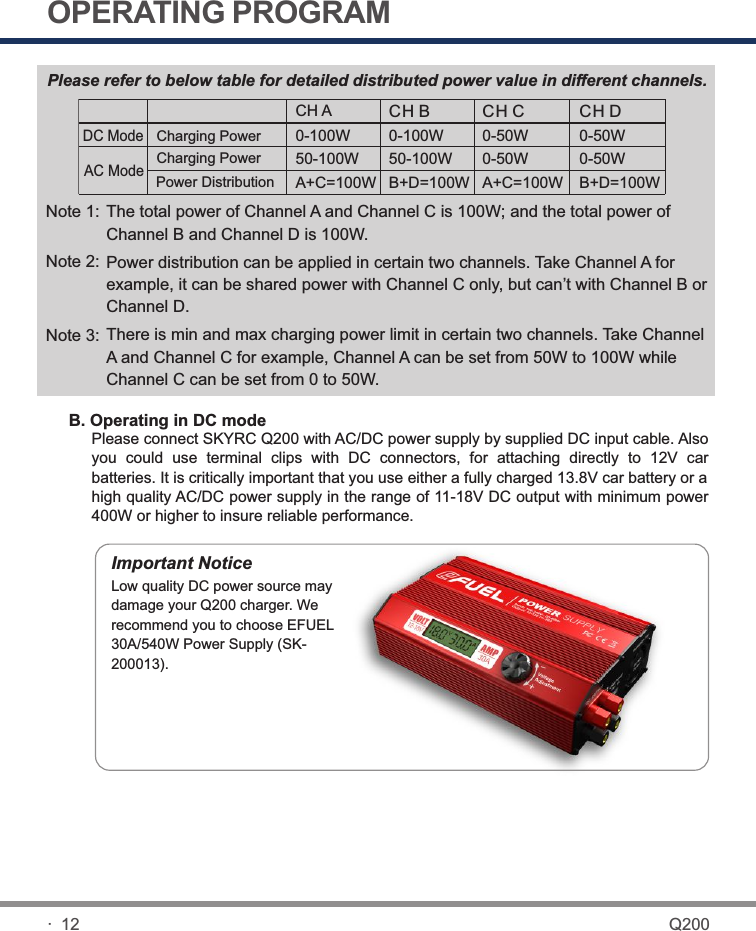
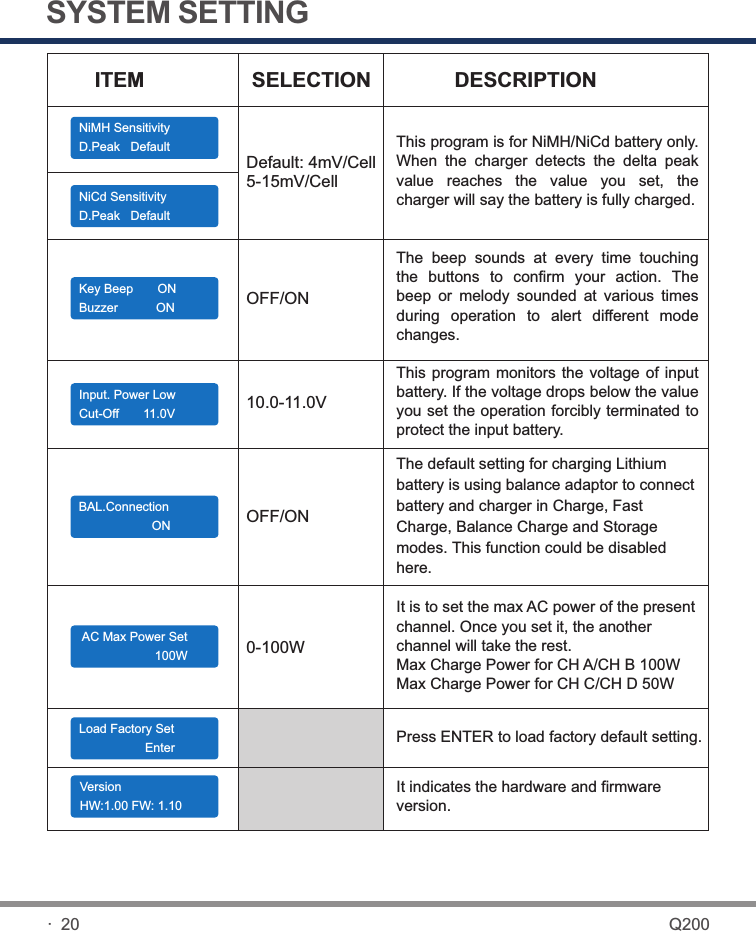
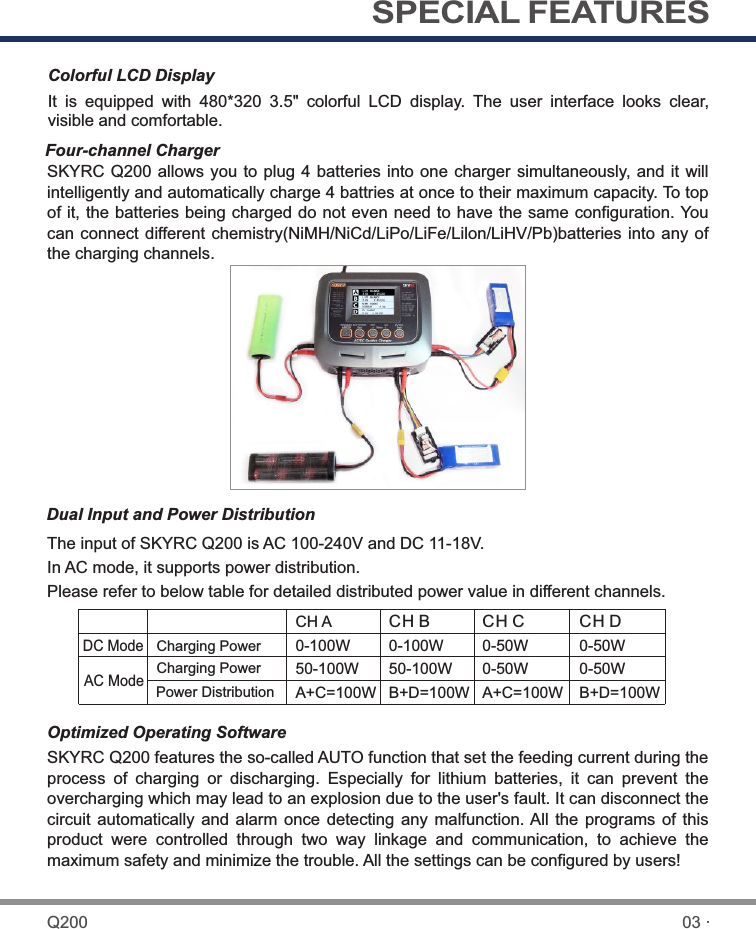
![BATTERY MEMORY SET AND CALL OUT[ BATT MEMORY 1 ] ENTER SET->BATT TYPELiPoBATT VOLTS 7.4V ( 2S )CHARGE CURRENT 4.9ADSCH CURRENT 2.0ADSCH VOLTAGE 3.0V/CELLTVC=YOUR RISK 4.20VSAVE PROGRAM ENTERThe charger can store up to 40 different charge/discharge profiles(each channel 10 sets) for your convenience, and the stored profiles can be recalled quickly without having to go through the setup process.When you are willing to alter the parameter value in the program, press START/ENTER to make it blink then change the value with INC or DEC. The value will be stored by pressing START/ENTER once.Note: All following screen are taking 2S(7.4V) LiPo battery for example.Enter the battery memory program.(10 different charge/discharge profiles can be stored in each channel).Set the battery type(LiPo/LiFe/LiIon/LiHV/NiMH/NiCd/Pb).Set the voltage and number of cells(1S-6S).Set the charge current(CH A/B 0.1-10.0A / CH C/D 0.1-5.0A).Set the discharge current (0.1-2.0A).Set the discharge voltage(3.0-3.3V/Cell).Set the terminal voltage(4.18-4.25V).Press ENTER to save program.1. Battery Memory SetSTART/ENTERDEC INCDEC INCDEC INCDEC INCDEC INCDEC INCSTART/ENTER17 ·Q200](https://usermanual.wiki/SKYRC-Technology/Q200/User-Guide-2924393-Page-19.png)
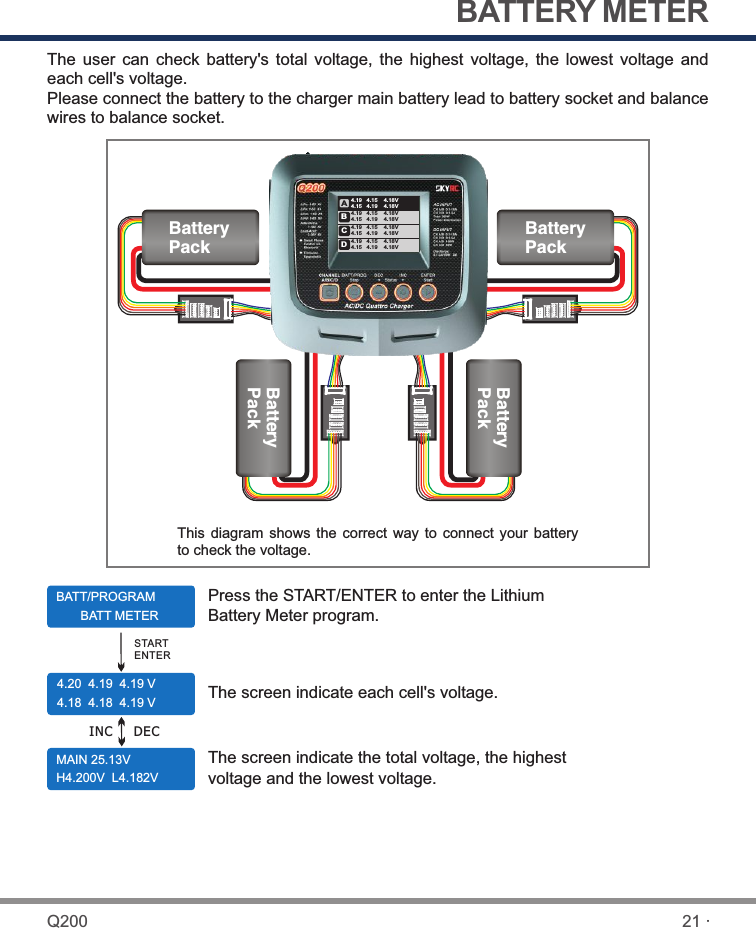
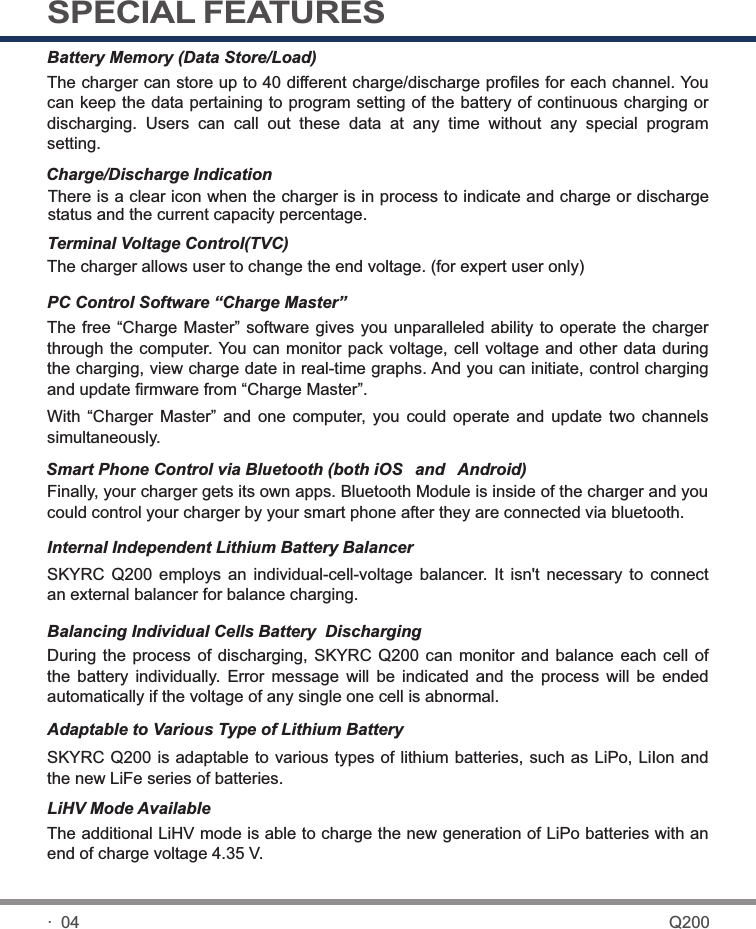
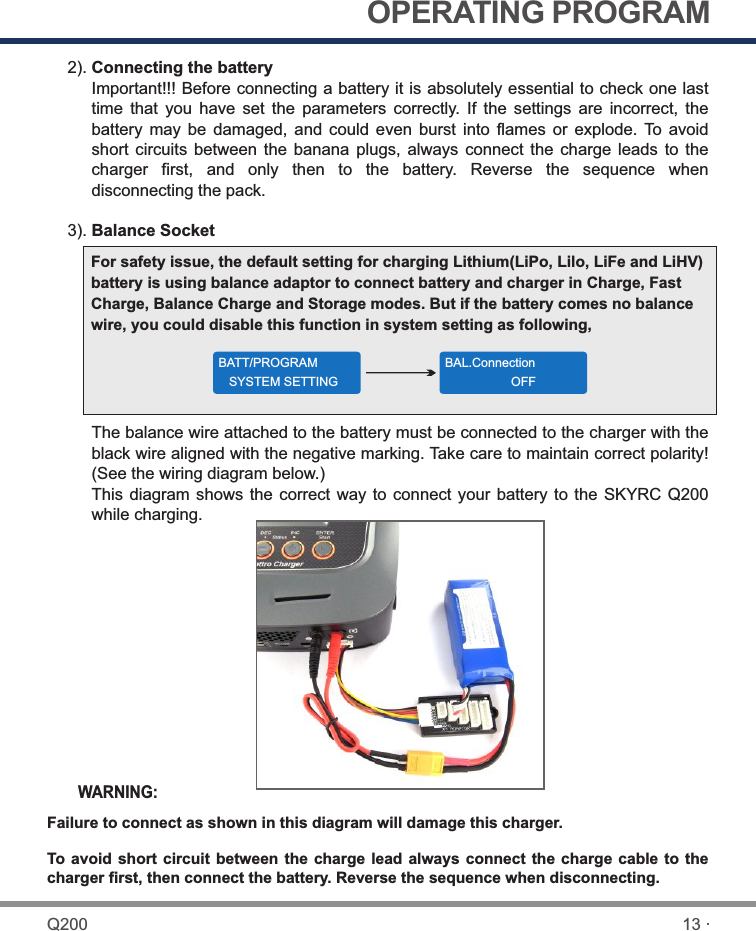
![BATTERY MEMORY SET AND CALL OUTENTER CHARGERLOAD……LiPo BALANCE CHG4.9A 7.4V(2S)SAVE PROGRAM SAVE….[ BATT MEMORY 1 ]LiPo 7.4V (2S)[ BATT MEMORY 1 ]C:4.9A D:2.2AIndicate the battery type and battery cell of the saved profile.Indicate the charge and discharge current of the saved profile.Press the START/ENTER for 3 seconds to call out the memory.2. Battery Memory Call OutLoad the memory set Press START/ENTER for 3 seconds to start the process.START/ENTER>3 Seconds· 18 Q200](https://usermanual.wiki/SKYRC-Technology/Q200/User-Guide-2924393-Page-20.png)