SM Electronics SP2000 Digital Audio Player User Manual
SM Electronics Co., Ltd. Digital Audio Player
UserManual.wiki
>
SM Electronics
>
SP2000 User Manual
User Manual
Navigation menu
Upload a User Manual
Namespaces
Wiki Guide
HTML
PDF
Info
Views
User Manual
Discussion / Help
Navigation


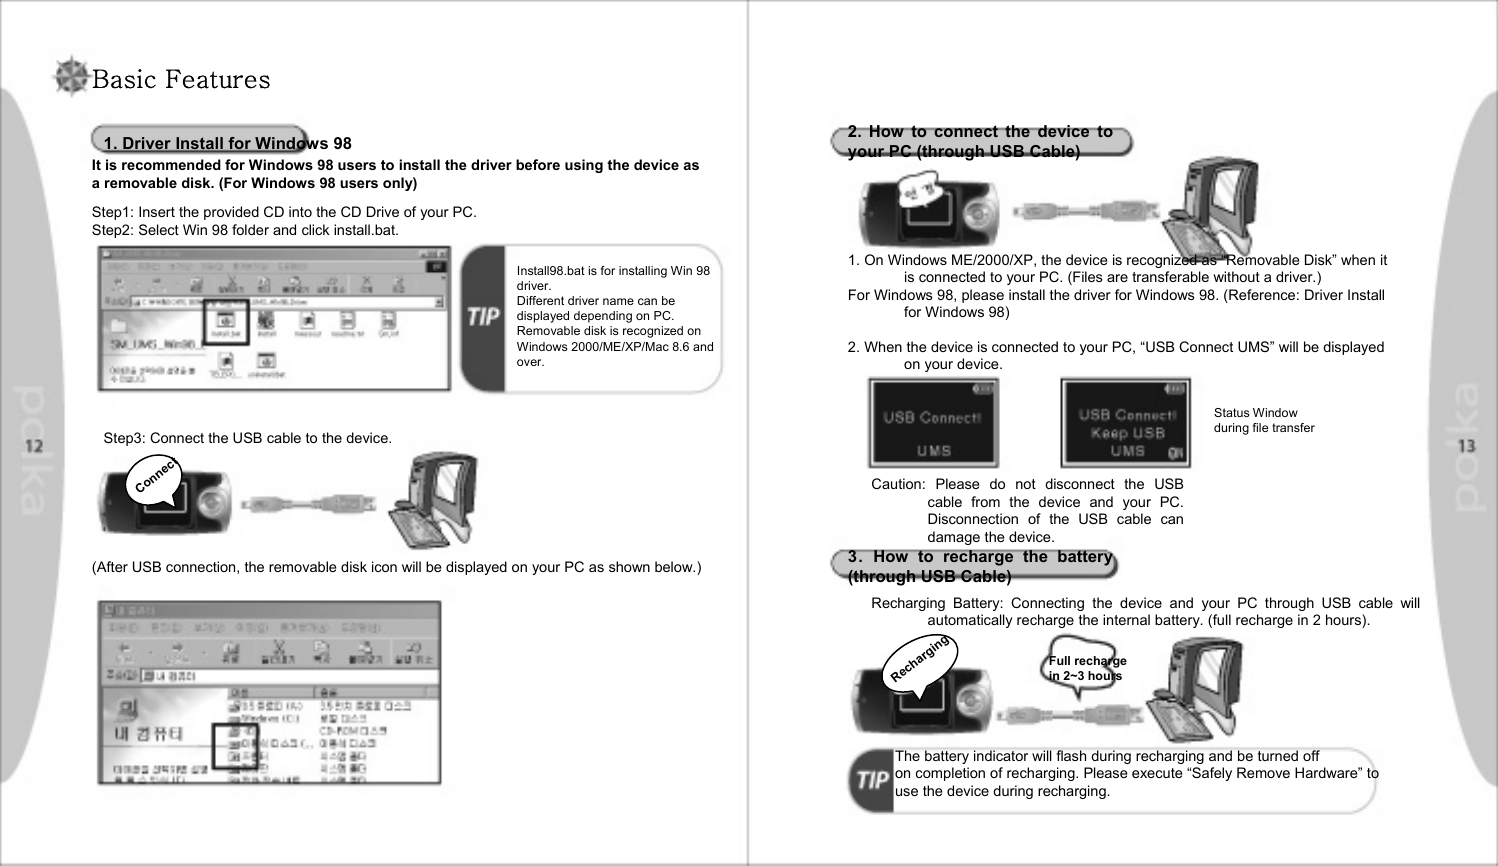
![4. Recording from the external audio device (Direct Encoding)Connect the line-in cable jack to the earphone socket of the external audio device (CD player, cassette player, etc) and connect the other jack to the encoding socket of the device (SP-2000).Bigger JackSmallerJackConnected to the external deviceReset ButtonFile NoRecording TimeAvailable Recording Time In order to record from the external device:1. Press 8and then move to the Record Mode.2. Click to start recording/click to stop recording.3. Click to pause while recording – Indicator for recording time will flash.If there is no specific folder, save the recorded file as “AUDIC001.WMA” into the Root folder. (As for voice recording, start recording after checking the available recording time.)All the recorded files can be played in MP3 format.5. Viewing Avatars and Image FilesIn the MP3 mode, click 8to select an image file (Jpg) and then click or to activate the image file.AvatarWhen the device is turned on, an avatar image can be initially displayed. (Jpg images only. Images asmany as 100 files can be displayed. (avata 000 ~ avata 099)) After the initialization is completed, then the device proceeds to the main display. The image is only displayed within 96 pixels (width). Automatic scaling fits the image into 96 pixels. Screen SaverSetting Screen Saver: Move to menu with 8in the Setting mode to select Screen Saver on the Display menu and select ON.Setting Screen Saver File: Press 8and then move to *.ssr file. Click or to activate. Screen saver must be created as BMP. But it is necessary to change the extension as “ssr” to activate.How to create SSR file: Resize the image in the aspect ratio of 96*64 and save it as ssr file (*.ssr) (Consecutive display of images is possible in a multiple of 96*64.)* BMP files must be 24 bit true color images. (compressed files are not supported)6. ResetIf the image file is selected among the lyric files, it can be displayed. Ex) [00:02] I’ll never gonna…[00:04] “File Name.jpg”[00:06] sing a song again…*The image file name must be placed within “”. * Please utilize “SP-2000 Utility” contained on the CD provided with the product.The reset button is used for sudden failure or malfunction of the device.](https://usermanual.wiki/SM-Electronics/SP2000/User-Guide-493493-Page-13.png)