SM Electronics SP2000 Digital Audio Player User Manual
SM Electronics Co., Ltd. Digital Audio Player
User Manual

THIS DEVICE COMPLIES WITH PART 15 OF THE FCC RULES. OPERATION IS SUBJECT TO THE FOLLOWING TWO CONDITIONS: (1) THIS
DEVICE MAY NOT CAUSE HARMFUL INTERFERENCE, AND (2) THIS DEVICE MUST ACCEPT ANY INTERFERENCE RECEIVED,
INCLUDING INTERFERENCE THAT MAY CAUSE UNDESIRED OPERATION.
•FCC RF
•INTERFERENCE STATEMENT
•NOTE :
•
• This equipment has been tested and found to comply with the limits for a Class B digital device, pursuant to Part 15 of the FCC Rules. These limits
are designed to provide reasonable protection against harmful interference in a residential installation.
•
• This equipment generates, uses and can radiate radio frequency energy and, if not installed and used in accordance with the instructions, may cause
harmful interference to radio communications. However, there is no guarantee that interference will not occur in a particular installation.
•
• If this equipment does cause harmful interference to radio or television reception which can be determined by turning the equipment off and on, the
user is encouraged to try to correct the interference by one or more of the following measures.
•
• - Reorient or relocate the receiving antenna.
• - Increase the separation between the equipment and receiver.
• - Connect the equipment into an outlet on a circuit different from that to which the receiver is connected.
• - Consult the dealer or an experienced radio, TV technical for help.
• - Only shielded interface cable should be used.
•
• Finally, any changes or modifications to the equipment by the user not expressly approved by the grantee or manufacturer could void the users
authority to operate such equipment,
•
We appreciate you for purchasing our product.
Please install driver for Windows98 before using the
product and carefully read instruction guide for safety.
uPlease be cautious of disconnecting the USB cable from
the product while downloading, due to the possibility of
damage to the product.
uAnd also there is a possibility of damage to the product
while formatting the product’s memory on PC.
uPlease install Windows 98 driver provided on the CD onto
your PC.
Copy Right Notice
This user’s manual is a property of SM Electronics Co., Ltd.
Illegal copy or usage of this user’s manual without written
consent from SM Electronics Co., Ltd. is strictly prohibited.
This manual can be altered without notice for product
improvement.
SM Electronics takes no liability for any damage to data by false
usage and operation.
Warranty
1. This product has been tested through strict quality control and
test procedures.
2. Repair fees are covered by this warranty in the case of failure
during normal usage within 1 year during the warranty period.
3. Repair fees are charged in spite of the failure during the
warranty period, if the repair service falls under non-warranty
repair.
4. Please keep this warranty note after filling up the warranty
form.
5. In the case of product’s failure, please contact the place of
the purchase or us at the number below.
Non-warranty Service
•Any failure made from improper usage.
•Any failure made from unauthorized disassembly or reassembly of
the product.
•Any failure made from natural cause such as fire, salt damage,
earthquake, etc.
128MB/256MB/512MBMemory
Internal Lithium Polymer BatteryPower Supply
Windows 98/ME/2000/XP/Mac OS 8.1/Linux 2.4.18OS
Approx 16 hoursPlayback Hours
Korean/English/Japanese/French/ChineseLanguages
Approx 36 hours/memory size 512MB standardVoice Recording
20mW (L) + 20mW (R)Headphone Output
87.5Mhz~108Mhz(Korea, Europe, etc) 76.0Mhz~96.0Mhz (Japan)FM Bandwidth
50dBRatio between FM Frequency and Noise
MP3/WMA/OGGFile Type
5Mbps.USB 1.1File Transference Speed
40g(Internal Battery)Weight
76.5 * 35.5 * 18 (W * H * D)Size
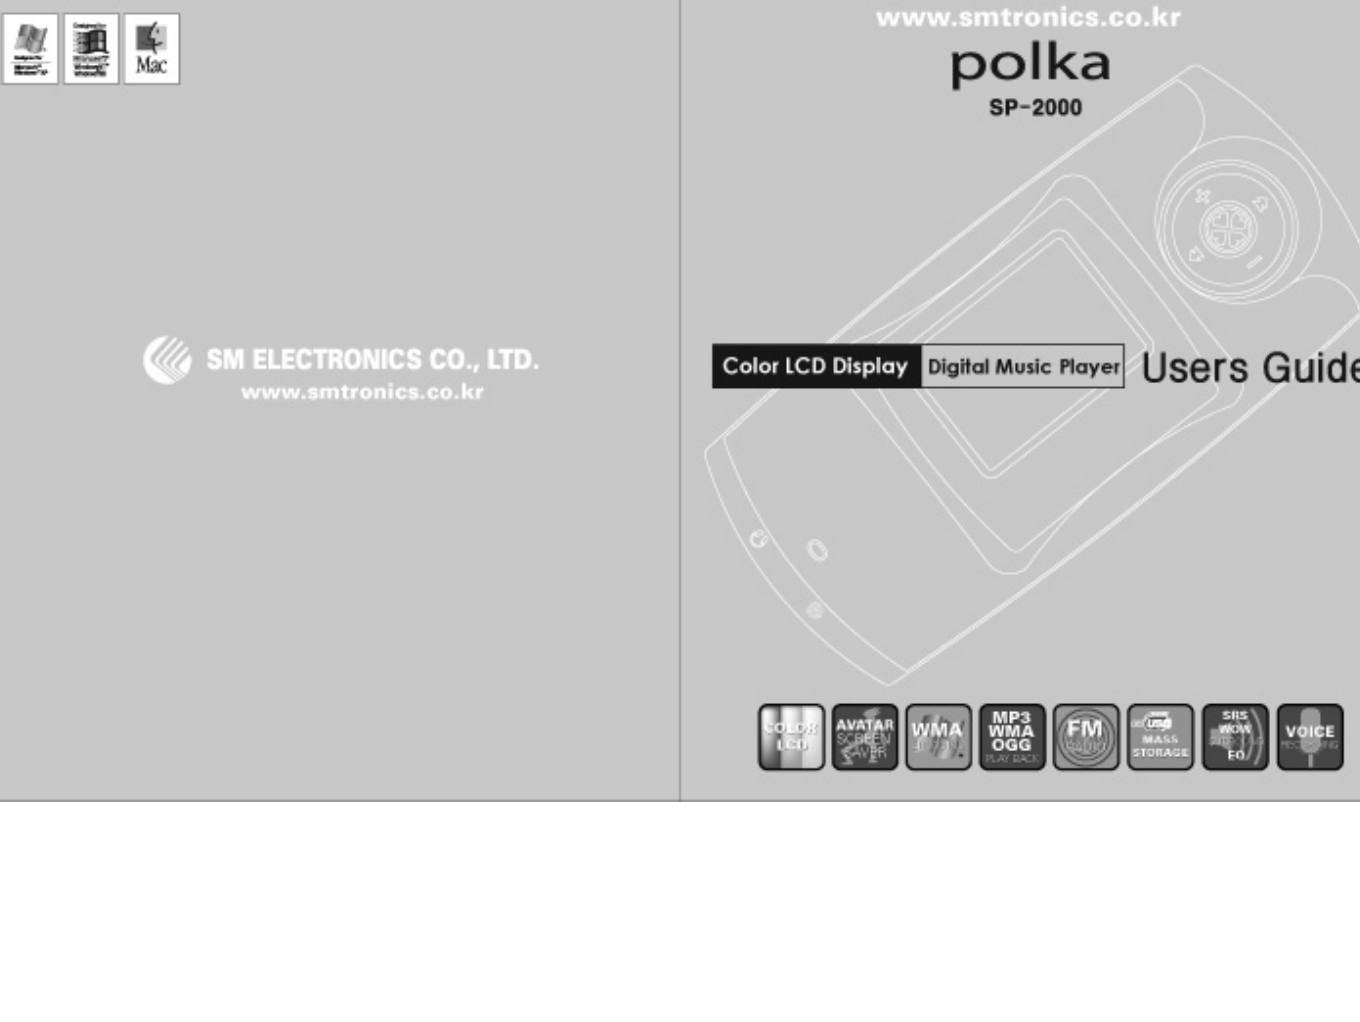
SP-2000Product Name
Model
Name
Serial
No
Purchase
Date
Customer’s
Name
Place of
Purchase
M/ D/ Y
1. Product Features
2. Before using your device
3. Basic Functions
4. User’s Setting
5. A/S and Customer Services
Contents
1. Accessories
2. Caution for safe usage
3. Features
4. Your player at a glance
5. Quick Manual
1. Install Windows 98 driver
2. How to connect the device to PC (through USB cable)
3. Recharging Battery (through USB cable)
4. Downloading music and other files onto the device
1. Playback (MP3, WMA, OGG, etc)
2. FM Radio
3. Recording
4. Recording from the external audio device (Direct
Encoding)
5. Viewing avatars and images
6. Reset
1. Sound Setting
2. Display Setting
3. Record Setting
4. Play Setting
5. Timer Setting
6. System Setting
7. Firmware Upgrade
1. Troubleshooting
2. Customer Services and Warranty
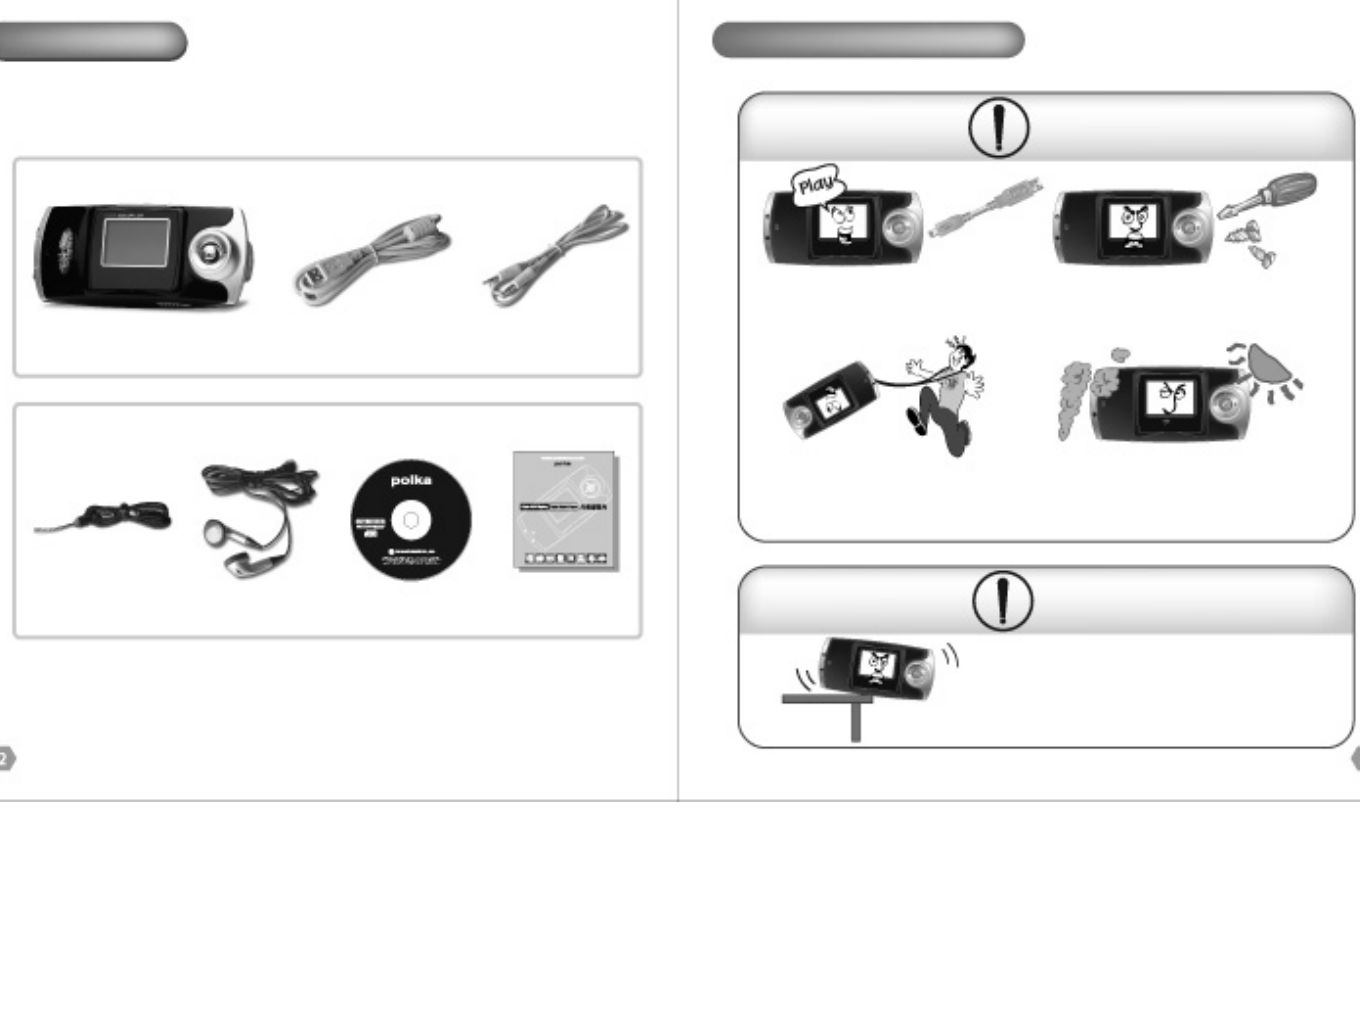
See what comes with the device!
Basic Features
1. Accessories
Main Device (SP-2000) USB Cable Encoding Cable
Neck Strap Earphone CD User’s Manual
Accessories can vary depending on the possible improvement of the product
features.
CAUTION
2. Caution for safe usage
MORE
Please connect the USB cable to your
device while it is not playing, not to
cause unexpected damage.
Please contact the service center
immediately in the case of flooding or
unexpected contamination to your player
and do not try to repair or disassemble the
player on your own.
Please try not to give impact to the player or run
while wearing it, due to the possibility of losing it,
damage to it, or inflicting injury on other people.
Please keep the player away from dust,
high temperature and humidity, soot or
magnetic cards, not to cause failure.
Keep the player away from vibration and impact not to
cause damage to the device.
3. Features
Graphic Color LCD
You can enjoy photos, avatars, and screen savers on the color LCD.
You can enjoy your favorable avatars not only when the device is turned on but also while
enjoying the music.
Automatic Scaling: Automatically resize the photo to fit it into the size of the display (width:
96 lines). (Screen saver, possible to use it for real-time music play)
BMP 24 Bit True Color Format Screen Saver (SSR)
Setting various screen savers and avatars
Playing MP3/OGG/WMA files and encoding WMA files
You can playMP3 files and OGG, WMA files as well.
You can encode WMA files reducing the size by 60% as compared to that of MP3 files.
Rechargeable large capacity internal battery
Lithium polymer rechargeable internal battery, 540mA, 3.7V-handy recharge through USB
Power Navigation
FM Radio
Playback Tempo Control
High Quality Sound
Special Functions
Removable Disk
Firmware Upgrade
Support Lyric
Support various OS
Perfect GUI and pop-up menu, supporting unlimited number of folders, direct file copy,
and delete. You can add a new title to the play list.
Worldwide FM reception, one touch recording
You can control the playback tempo for language learning.
3D sound (SRS-WOW), TruBass, various equalizer、and 24 Bit Codec allow you to
experience real-like sound.
Play List (up to 99 songs) - Creating a list of songs.
Bookmark (up to 99 songs) – For language learning.
Intro – Playing only the beginning of songs for the set period.
Stopwatch – Counting at 1/100 sec up to 10 hours.
Multiple Processing – Processing multiple functions such as file search while listening to music.
UMS (USB Mass Storage) class USB v1.1, auto-plug & play, and automatic recognition
when connected to PC. (Install driver for Windows 98)
Easy firmware upgrade from the web.
Support lrc files and display Jpeg images while playing music.
Windows 98/ME/NT/2000/XP
Mac OS 8.6 and over

4. Your player at a glance
Power on & off (press and hold then let go)/Play/Pause/File Play List,
Saving and deleting FM broadcasting band
Start, stop recording (click in the Recording Mode)/Repeat the song
(click)/Place bookmarks (press and hold then let go)/Lap Time (click in the
Stopwatch Mode)/Go back to the previous stage (click in the
Menu/Navigation Mode)
3D Sound (click while playing)/Equalizer (press and hold then let go while
playing)
Changing the Play Mode, A/P/B/F (click while not playing)
Section Repeat (click while playing)/Presetting the radio channel (click
while FM is on.)
Earphone Socket
Strap Hole
Encoding Cable Socket
USB Cable Socket
Navigation (click the jog lever)/Move to each of 7 Menu Modes (press
and hold then let go)
Move to the next file (click while playing)/Search at high speed (press
and hold then let go while playing)
Move the cursor to the right (click in the Menu/Navigation)
Change the radio frequency (click in the Radio Mode)/Automatic
search for radio frequency (press and hold then let go)
Move to the previous file (click while playing)/Reverse search at high
speed (press and hold and let go while playing)
Move the cursor to the left (click in the Menu/Navigation)
Change the radio frequency (click in the Radio Mode)/Automatic
search for radio frequency (press and hold then let go)
Volume Up (click while playing)
Move the cursor up (click in the Menu/Navigation)
Volume Down (click while playing)
Move the cursor down (click in the Menu/Navigation)
Microphone
Hold
5. Quick Manual
Power On Press and hold then let go
Mode Press and hold then let go
Playing
MP3 Music
FM Radio
When the power is
turned on, you can
play a music file in
the root folder.
Select a music title
Play the selected title
Volume control
Move to the FM mode
Select the FM mode
Select the frequency
Volume control
Song Title
Song Title
Song Title
Song Title
Voice
Recording
Line-in
Connection
Play List
Move to the Voice Recording
mode
Select the Voice Recording
mode
Start
Recording
Playback in MP3 mode
Recorded files are
saved in the order
of “VORC001”.
Start/Stop Recording
Move to the Encoding mode
Start
Recording
Start/Stop Recording
Select the Encoding mode
and then connect the player
to the external device
Recorded files are
saved as WMA in
the order of
“AUDI001”.
Click the jog lever
Playback in MP3 mode
Select the file to put on the list
Activate the pop-up window
Find and select +Playlist
Save the file on the Play List

Bookmark
Press and hold then let go
to place a bookmark
“B” mark will show up when
the button is pressed.
Playing
Playing files on the Play List
Move to the
Play List mode
Select “Open” on the
option list to play the file
Click to play the file
Playing the bookmarked files
Move to the
Bookmark mode
Select “Open” on the
option list to play the file
Click to play the file
Song Title
Song Title
Song Title
Set the Play mode as
“P” while not playing
Play the file
Set the Play mode as
“B” while not playing Play the file
Stopwatch
Move to the Stopwatch mode
Stopwatch is operational in other modes
(radio, record and play mode)
Start
Lap time counting (up to 10 splits)
Move to the
sub mode
Select each
function
Set options
Select the menu
Save the menu
User’s EQ
3D SRS ON
SRS Setting
Sound Balance
EQ Selection
Boundary
Repeat Mode
Random Play Mode
Intro Time Setting
Play Speed
Setting the previous playing
position
Fade-in
Language
Sound Display
Play
Timer
Record
System
LCD Lighting Time
Brightness
Speed of text running
Tag Information
Screen Saver
Frame Rate
Lyric Setting Search Speed
Language Setting
Format
Automatic Hold
Initialization
Memory
F/W Version
Standby Time
Automatic Turn Off
Quality of FM Recording
Quality of Line-in Encoding
Volume of Line-in Encoding
Basic Features
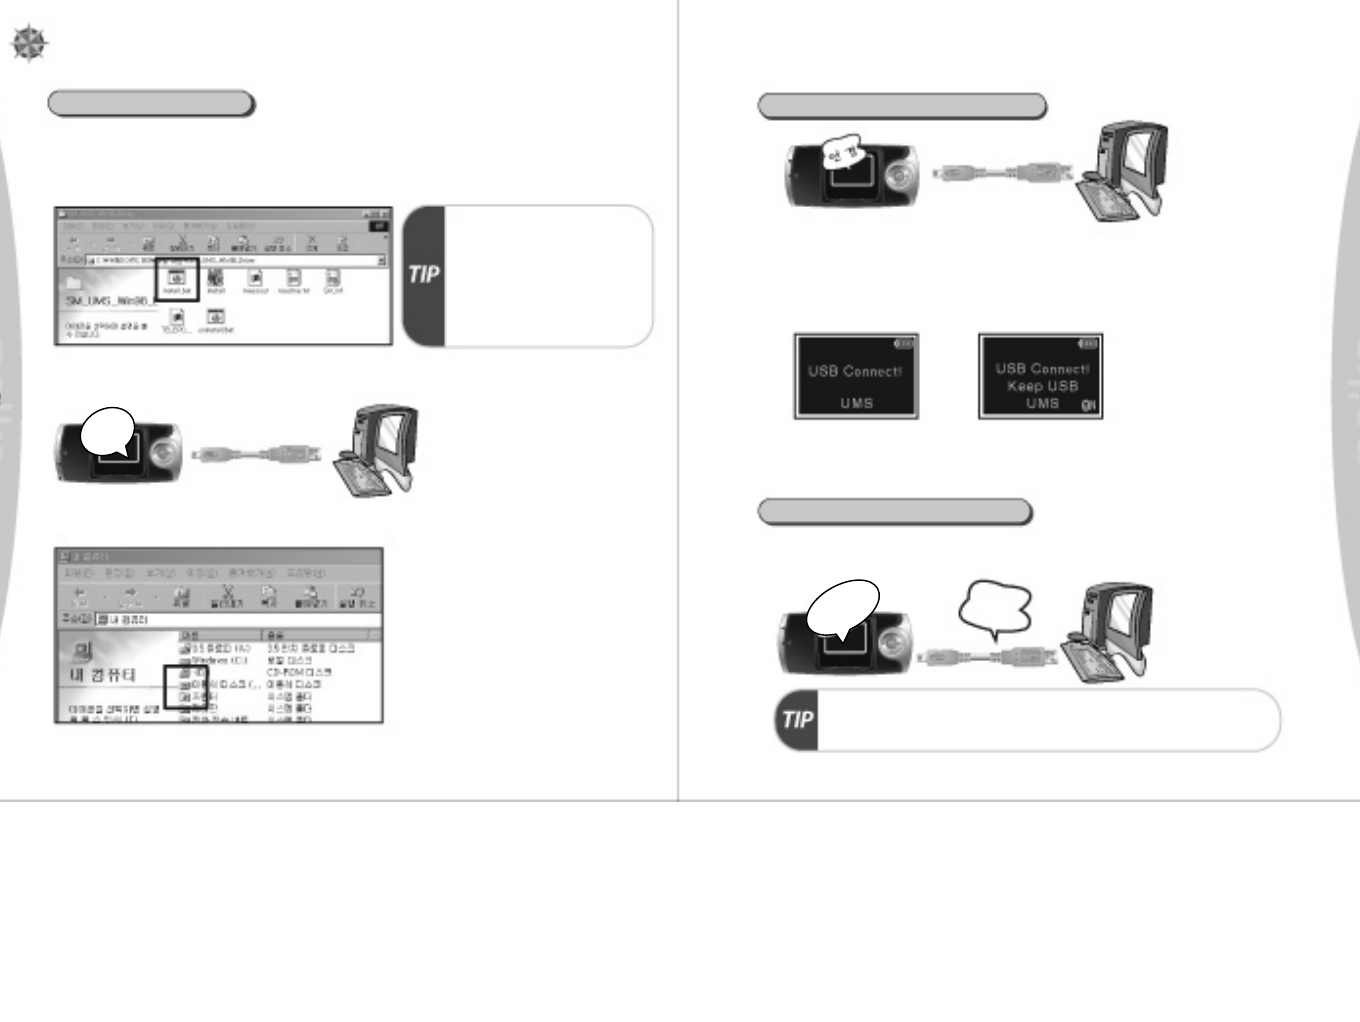
1. Driver Install for Windows 98
It is recommended for Windows 98 users to install the driver before using the device as
a removable disk. (For Windows 98 users only)
Step1: Insert the provided CD into the CD Drive of your PC.
Step2: Select Win 98 folder and click install.bat.
Install98.bat is for installing Win 98
driver.
Different driver name can be
displayed depending on PC.
Removable disk is recognized on
Windows 2000/ME/XP/Mac 8.6 and
over.
Step3: Connect the USB cable to the device.
(After USB connection, the removable disk icon will be displayed on your PC as shown below.)
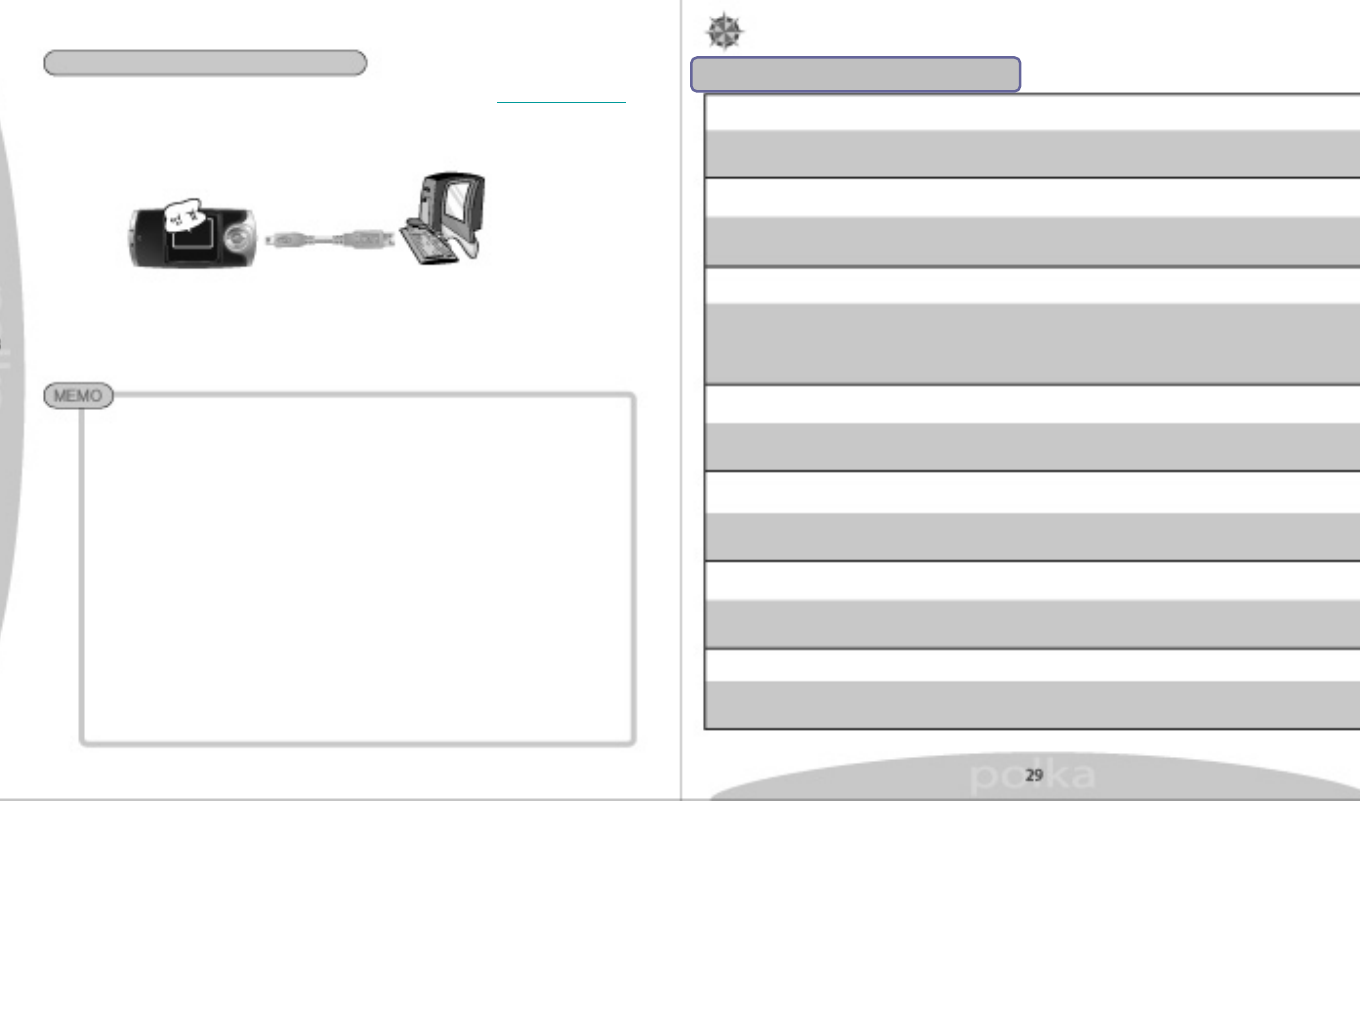
2. How to connect the device to
your PC (through USB Cable)
1. On Windows ME/2000/XP, the device is recognized as “Removable Disk” when it
is connected to your PC. (Files are transferable without a driver.)
For Windows 98, please install the driver for Windows 98. (Reference: Driver Install
for Windows 98)
2. When the device is connected to your PC, “USB Connect UMS” will be displayed
on your device.
Status Window
during file transfer
Caution: Please do not disconnect the USB
cable from the device and your PC.
Disconnection of the USB cable can
damage the device.
3. How to recharge the battery
(through USB Cable)
Recharging Battery: Connecting the device and your PC through USB cable will
automatically recharge the internal battery. (full recharge in 2 hours).
The battery indicator will flash during recharging and be turned off
on completion of recharging. Please execute “Safely Remove Hardware” to
use the device during recharging.
Connect
Recharging
Full recharge
in 2~3 hours
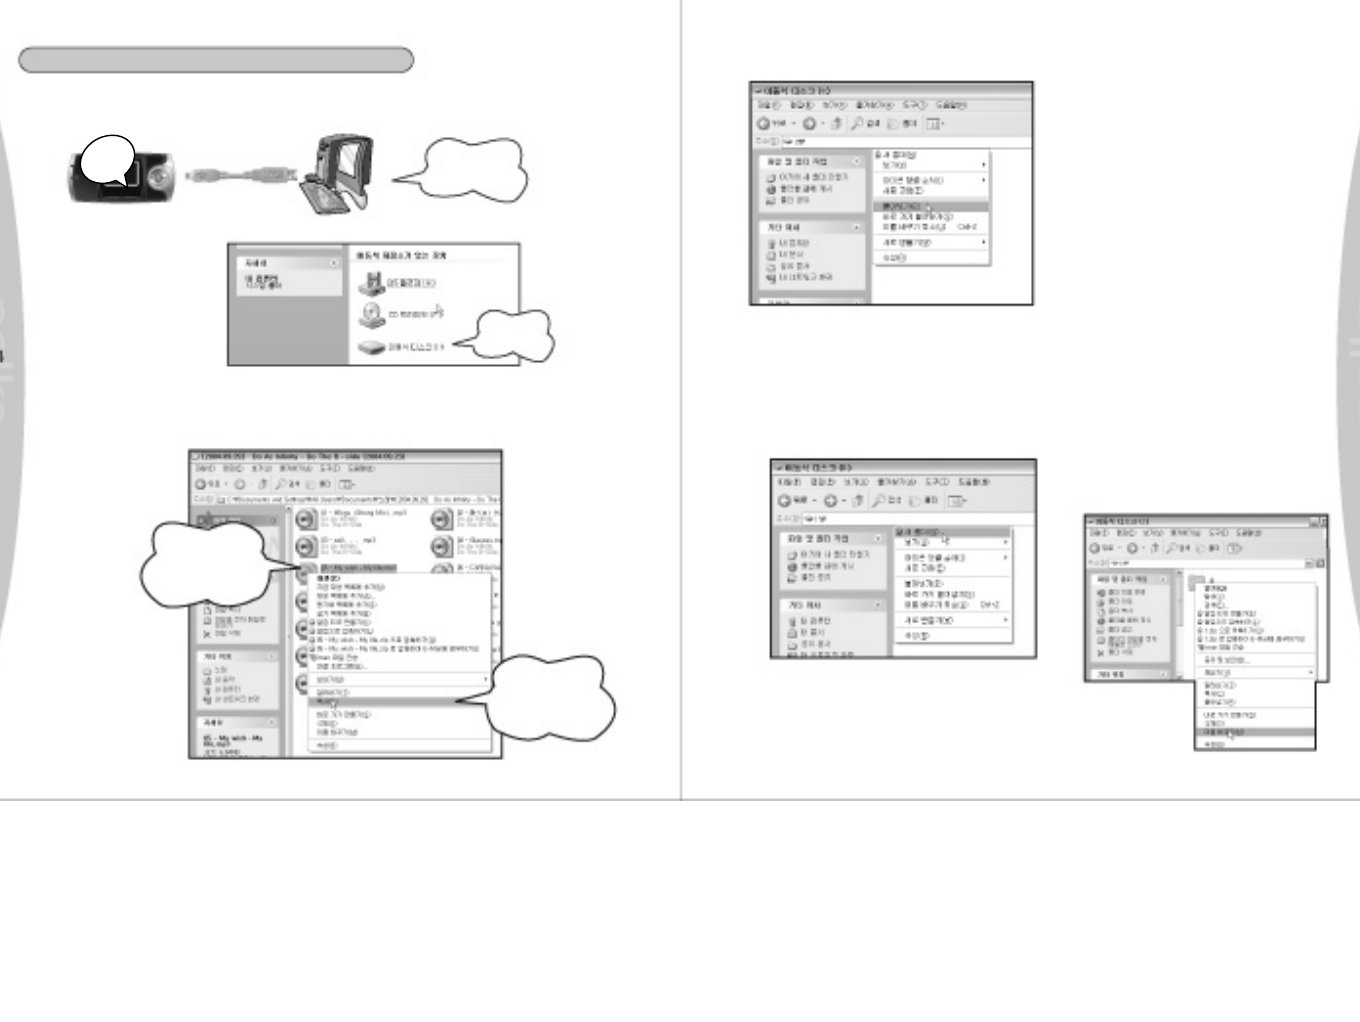
4. Downloading music and other files onto the device
1. Execute the Windows Explorer after securely connecting the device to your PC.
Connect
Copying Files (Downloading files onto the device)
2. Make sure
“Removable Disk” is
displayed on My
Computer window.
The device is
connected to
PC
Removable
Disk
3. Select and copy the file wanted. (MP3 songs or images, etc).
The cursor is
positioned on
the file wanted.
“Copy” is
selected by
clicking the
right button on
the mouse.
4. Paste the copied file onto the “Removable Disk”. (Click the right button on the
mouse and select “Paste”.
Pasting a file copied from your PC
into the removable disk.
①Double click the window
explorer to open the
window
②Double click the
removable disk.
③On the Removable Disk
window, click the right
button on the mouse and
select paste.
④Now you are transferring
the copied file into the
removable disk.
Creating a folder on the Removable Disk.
Create folder to properly manage files
including music and language.
Ex) Music files in the music folder/language
files in the language folder.
Naming the folder
Click the right button on the mouse-select
Change Name and name the
folder.
Ex) In the case of already created folders
such as music folder and
language folder, just copy and
paste them onto the disk.
(Refer to “Paste the copied file…” above)
To systematically manage files by creating
folders: Click the right button on
the mouse in the empty space of
“Removable Disk” – “New Folder”
– And a new folder is created.

Basic
Functions
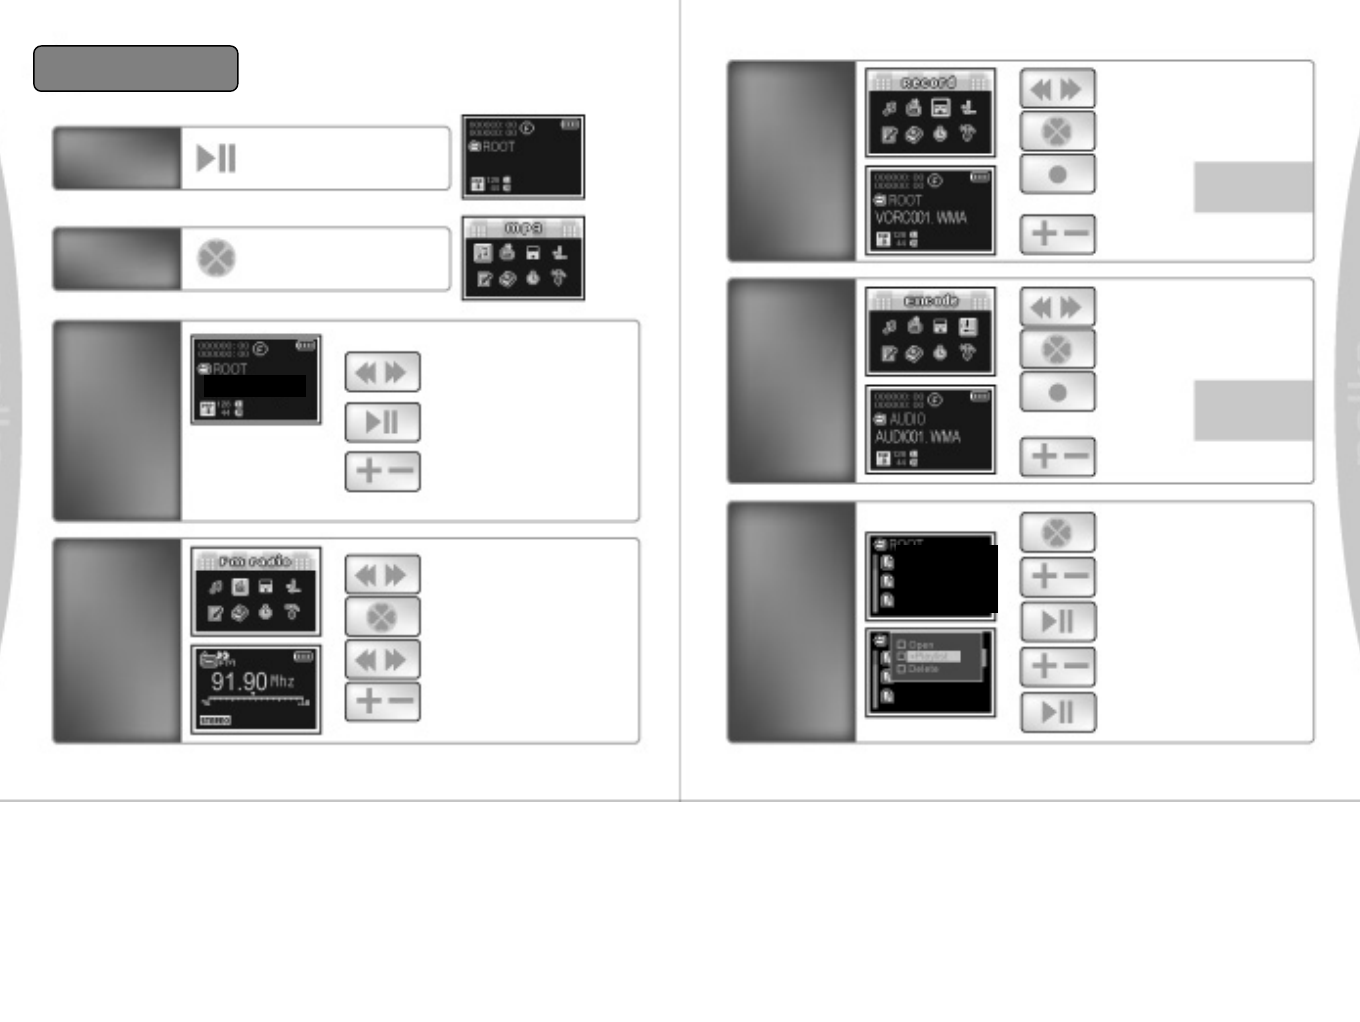
1. Playback (MP3, WMA, OGG, etc)
1. Connect the earphone to the device.
2. Deactivate “Hold” key. (No function will work on hold status.)
3. Power on ( : press and hold)/Play (click)
4. Select the music title ( : click)/High speed rewind and fast
forward (push and hold)
5. Volume Control(+ -: click)
6. Changing functions (8: press and hold the let go)-Play, FM Radio,
Record, Line-in, Play List, Bookmark, and Stopwatch.
Move to each function ( : click).
Selecting functions: select the function with 8and move to the
sub-functions.
7. WOW Function: WOW button (click) On/Off
EQ Function (Press and hold): Normal, Rock, Jazz, Classic, Pop,
User
Title No
The Entire Title Nos
Playback Time
Total Time Play Mode Battery
SRS
Folder
File Type Hold
Earphone Output
About
Play
Mode
A: Playing all the files in the folder F: Repeat all the files in the folder once
P: Playing files in the Play List B: Playing bookmarked files 1: Playing the selected file once
{Play once 4Play repeatedly (press while playing)
2. FM Radio
1. Press 8and then select the FM Mode.
2. Change the radio frequency: ( : click)
3. Change to Stereo/Mono while playing ( : click)
4. Volume Control (+ -: click)
Selecting the radio frequency
1. Change the radio frequency: ( : click)
2. Automatic search for radio frequency: Auto scan
( : press and hold then let go) To stop, ( : click)
5. Save the radio frequencies (up to 20)
FM Radio
Channel
Battery
Stereo/Mono
삭제
3. Recording
Saving FM Radio Channel. (Preset Function)
1. Click the A-B button and select the band with +-.
2. Press to activate the selection window.
3. Select “Store CH” with +- .
4. Store the channel with .
5. Click or to play.
* Auto Scan: Automatic search for radio channel
In order to record FM Radio:
1. Click to start recording while listening to radio/Click to stop recording.
2. Click to pause while recording – Indicator for recording time will flash.
3. In order to hear the recorded file:
If there is no specific folder, save the recorded file as “FMREC001.WMA” into the
Root folder.
(As for voice recording, start recording after checking the available recording time.)
File No
Recording Time
Available Recording
Time
File No
Recording Time
Available Recording
Time
In order to record voice:
1. Press 8and then move to the Record Mode.
2. Click to start recording/Click to stop recording.
3. Click to pause while recording – Indicator for recording time will flash.
If there is no specific folder, save the recorded file as “VORC001.WMA” into the Root
folder. (As for voice recording, start recording after checking the available
recording time.)
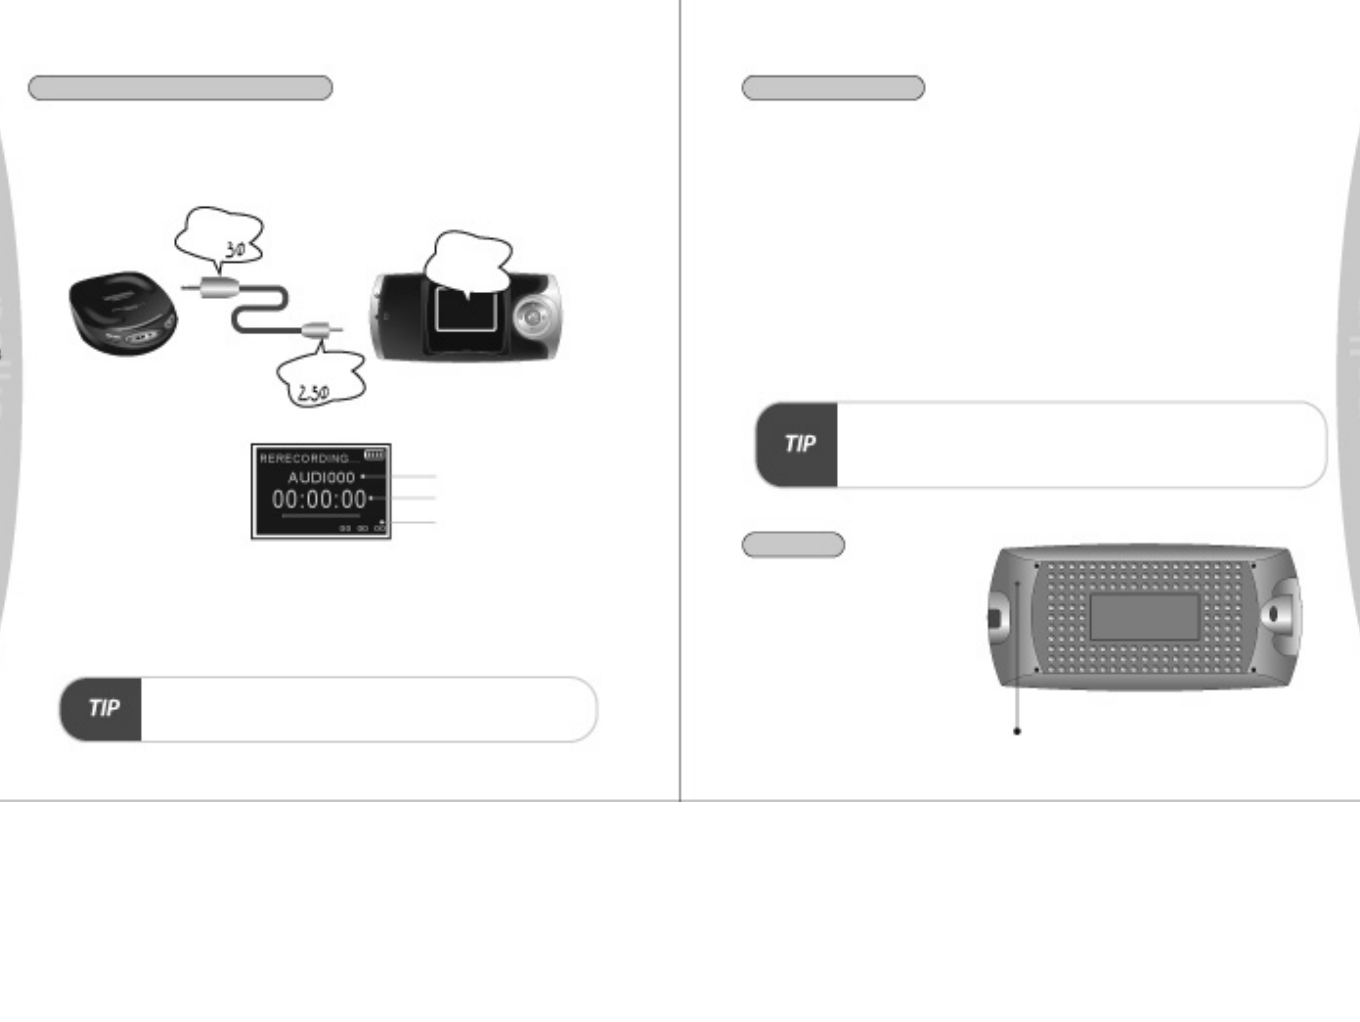
4. Recording from the external audio device (Direct Encoding)
Connect the line-in cable jack to the earphone socket of the external audio device
(CD player, cassette player, etc) and connect the other jack to the
encoding socket of the device (SP-2000).
Bigger
Jack
Smaller
Jack
Connected to
the external
device
Reset
Button
File No
Recording Time
Available Recording
Time
In order to record from the external device:
1. Press 8and then move to the Record Mode.
2. Click to start recording/click to stop recording.
3. Click to pause while recording – Indicator for recording time will flash.
If there is no specific folder, save the recorded file as “AUDIC001.WMA” into the Root
folder. (As for voice recording, start recording after checking the available
recording time.)
All the recorded files can be played in MP3 format.
5. Viewing Avatars and Image Files
In the MP3 mode, click 8to select an image file (Jpg) and then click or to activate the
image file.
Avatar
When the device is turned on, an avatar image can be initially displayed. (Jpg images only. Images as
many as 100 files can be displayed. (avata 000 ~ avata 099)) After the initialization is completed, then
the device proceeds to the main display.
The image is only displayed within 96 pixels (width). Automatic scaling fits the image into 96 pixels.
Screen Saver
Setting Screen Saver: Move to menu with 8in the Setting mode to select Screen Saver on the
Display menu and select ON.
Setting Screen Saver File: Press 8and then move to *.ssr file. Click or to activate.
Screen saver must be created as BMP. But it is necessary to change the extension as “ssr” to activate.
How to create SSR file: Resize the image in the aspect ratio of 96*64 and save it as ssr file (*.ssr)
(Consecutive display of images is possible in a multiple of 96*64.)
* BMP files must be 24 bit true color images. (compressed files are not supported)
6. Reset
If the image file is selected among the lyric files, it can be displayed.
Ex) [00:02] I’ll never gonna…
[00:04] “File Name.jpg”
[00:06] sing a song again…
*The image file name must be placed within “”.
* Please utilize “SP-2000 Utility” contained on the CD provided with the product.
The reset button is used for sudden
failure or malfunction of the device.

User’s Setting
Following order and methods
Move to the
Setting Mode
Set the
options
Move to the
Sub Menu
Set the value
Move
Select
Save
You can set EQ for your preferences.
1. Sound Setting
User EQ
3D SRS ON You can set 3 dimensional sound.
Select the frequency (50hz~14Khz)
Select the level (+12dB~-12dB)
Save the setting
Select ON/OFF
Save the setting
Setting 3D SRS sound with 3 options
Select the Level
Select the option
Save the setting
Select the level
Save the setting
Setting the level of output from the right/left
speakers of earphone or headphone
Selecting 6 types of EQ
Select the option
Save the setting
SRS Sound: You can enjoy more dimensional sound by changing 3 dimensional
sound effects.
Trubass: With deep and low pitch, you can enjoy the grandeur of the sound.
Focus: You can increase the clarity of the sound within the frequency
bandwidth.
is a trademark of SRS Labs, Inc.
WOW technology is incorporated under license from SRS Labs, Inc.
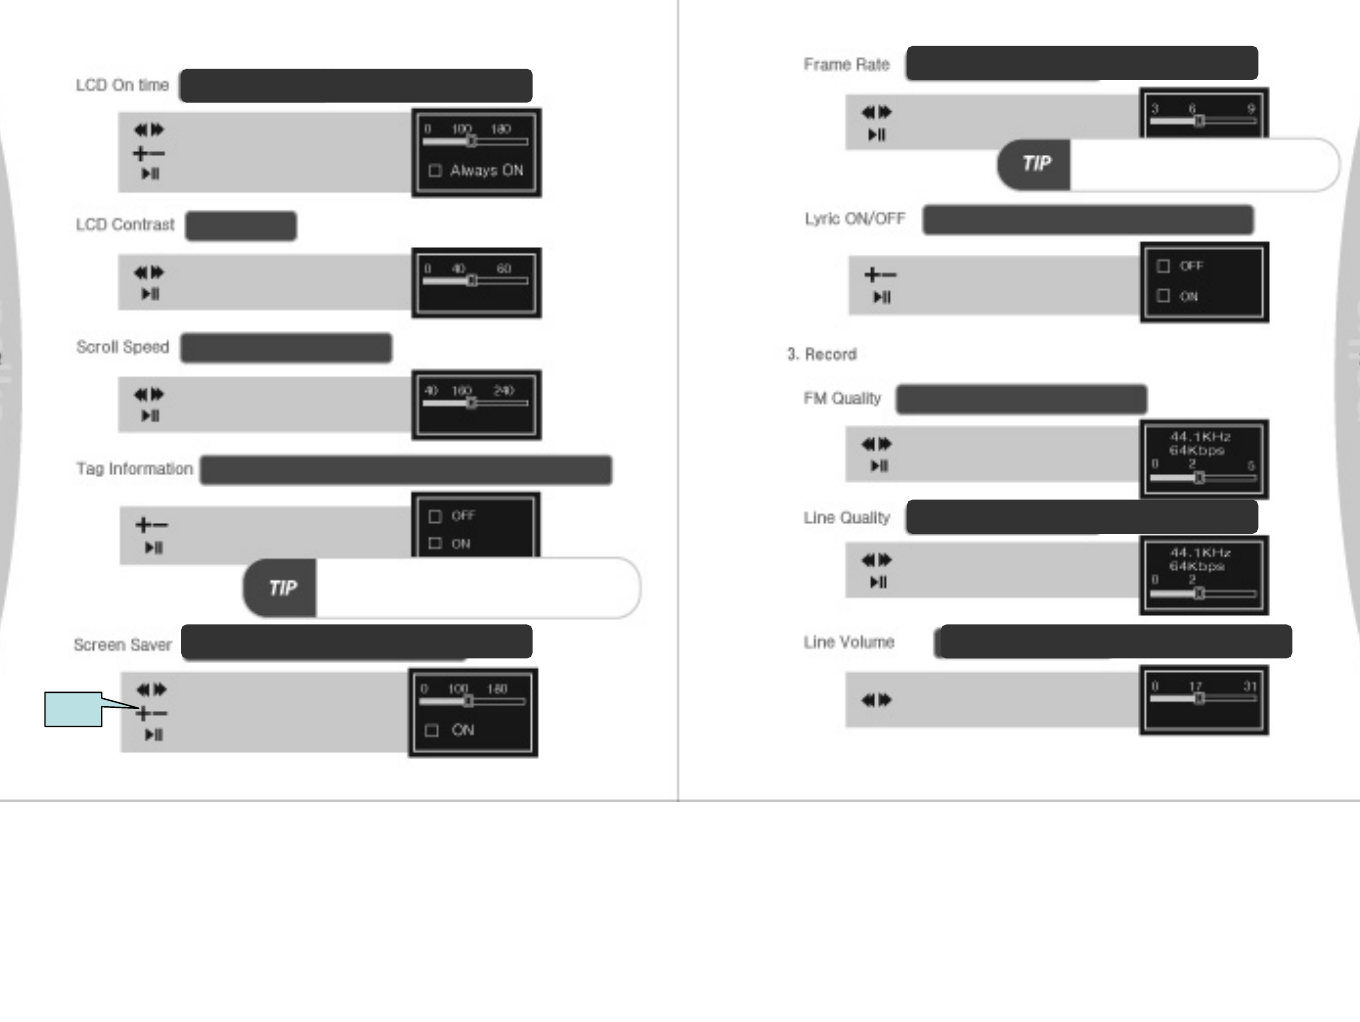
2. Display Setting
Set the time (3 ~ 180sec)
Select ON/OFF
Save the setting
Setting the display brightness
Set the brightness
Save the setting
Set the speed
Save the setting
Setting the running time of a long-named file
Setting the file information. File name or tag.
Select ON/OFF
Save the setting
ON: Music file with tag information is displayed
OFF: File name only.
Only file name is displayed if no tag is attached.
Set the time (10 ~ 180sec)
Select ON/OFF
Save the setting
“-”
Time setting of the background brightness
Setting the time interval between frames
Setting screen saver and its waiting time to start
Set the time
Save the setting
This setting changes the time interval
while the screen saver is on.
Setting the display on music files including lyrics
Select ON/OFF
Save the setting
Setting the sound quality of FM recording
Set the sound quality
Save the setting
Setting the sound quality of line-in encoding
Set the sound quality
Save the setting
Setting the volume level of line-in encoding
Set the volume level
Save the setting
Select the mode
Save the setting
Setting the Play Mode
Setting the repetition
Select ON/OFF
Save the setting
Select ON/OFF
Save the setting
Setting the random play
Setting the intro time
Set the time (5 ~ 60sec)
Select ON/OFF
Save the setting
Setting the play speed
Set the speed (Default: 100)
Save the setting
Setting the position to resume playing
Select ON/OFF
Save the setting
ON: Resume playing from the same position on the file
where the device stopped playing or was turned off.
OFF: Start playing from the beginning of the file after
the device stopped playing or was turned off.
Setting the volume level at the beginning.
Select ON/OFF
Save the setting
ON: Recommended to gradually
increase the volume level for the safety
of audition.
Setting the interval for search
Set the time (0 ~ 300)
Select ON/OFF
Save the setting
1. Clicking while playing allows you to skip
the set intervals.
2. This setting is useful for language learning.
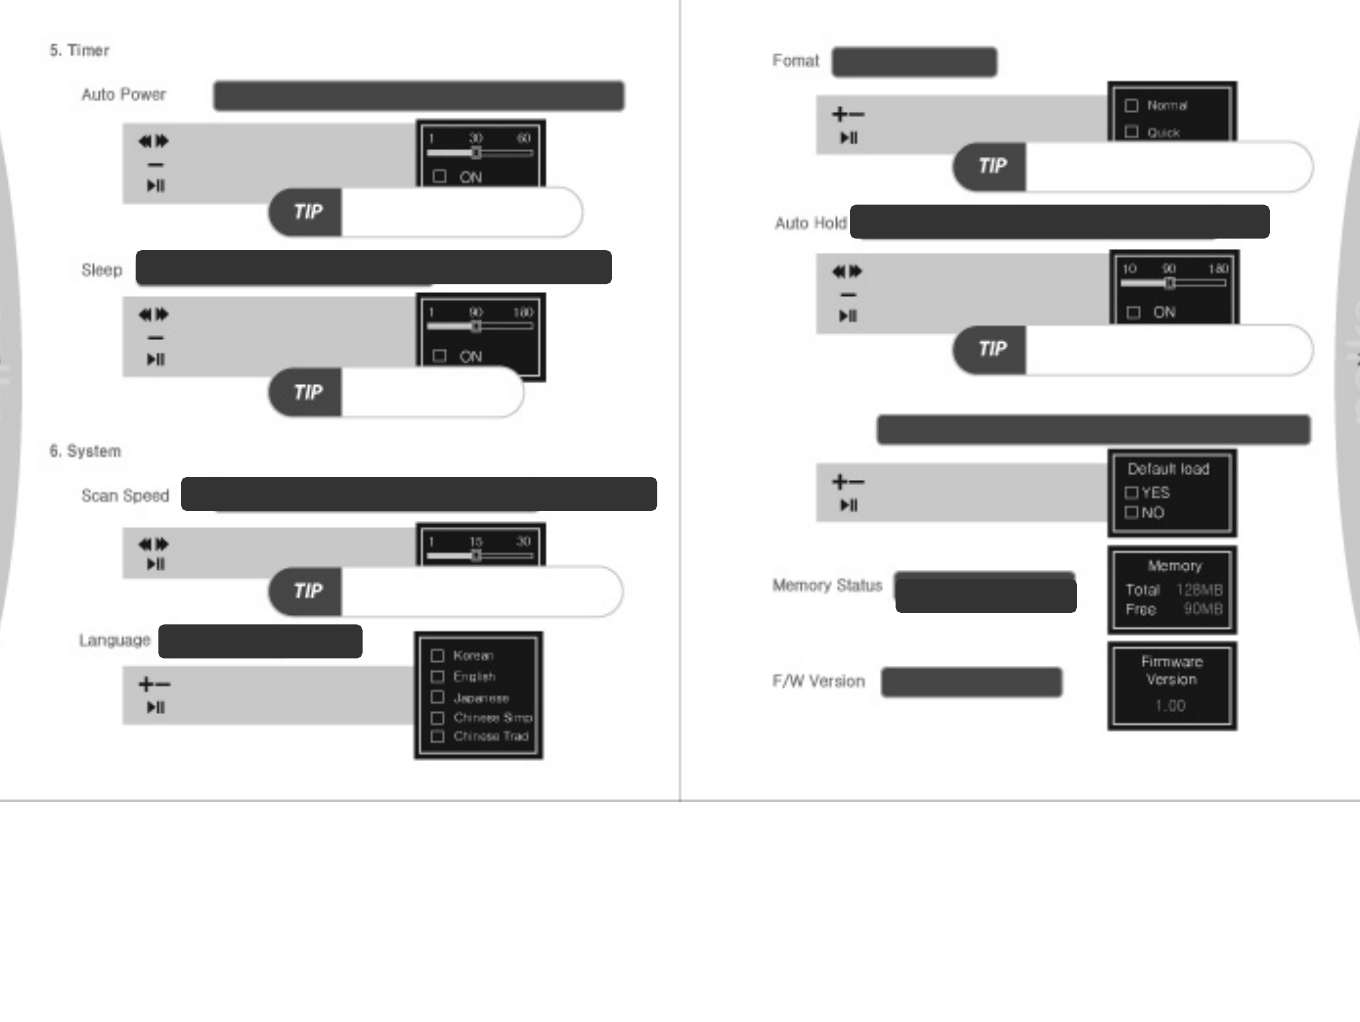
Setting the timer for power off when there is no operation.
Set the time (1 ~ 60sec)
Select ON/OFF
Save the setting
Push the hold switch forward and pull it backward
again to disable Auto Hold.
Quick formatting deletes the entire files and
creates a new folder. Please be cautious of
formatting.
Press to restart.
Setting the timer for automatic power off after certain time period.
Set the time (1 ~ 180min)
Select ON/OFF
Save the setting
Select OFF to disable the setting.
Setting the search speed (handy for language learning) .
Set the speed
Save the setting
Press for searching at high speed.
Select the preferred language.
Select the language
Save the setting
Format the memory.
Select Normal/Quick
Save the setting
Automatically putting the device on hold after certain set time.
Set the time
Select ON/OFF
Save the setting
Default Load Initializing all the functions on the menu as default setting.
Select ON/OFF
Save the setting
Displaying memory capacity.
Displaying the F/W version.
Nothing is displayed on the LCD display.
* Isn’t the battery capacity level too low? If so, recharge the battery.
* Isn’t the LCD’s contrast level too low? If so, please raise the contrast level.
A/S and Troubleshooting
1. To be checked before request for A/S. (If failure is suspected please read the check list.)
Recording is not working.
* Isn’t the device on hold? If so, please disable the hold switch.
* Isn’t the memory already full? If so, please check the memory capacity and delete some
unnecessary files.
Playing is not working.
* Isn’t the device on hold? If so, please disable the hold switch.
* Isn’t the battery capacity level too low? If so, please check the battery capacity level and
recharge the battery.
* Isn’t the volume level too low? If so, please raise the volume.
* Is there any music file stored on your device?
The device can not download files from PC.
* Hasn’t the USB cable got accidentally disconnected while transferring files into the device?
If so, please make sure the cable is well connected to your PC or device.
Characters on display are broken.
* Please make sure your selection of language is correct for your language.
The device seems to be playing at low/high speed.
* Please make sure the speed setting of Speed Mode is correct.
The stored data can not be executed or deleted.
* Please format the memory and try again.
7. Firmware Upgrade (Downloading
and upgrading new F/W).
Step 1: Download and save a new version of F/W from the web site (www.smtronics.co.kr)
onto your PC.
Step 2: Connect the USB cable to the device.
Step 3: Copy and paste the new version of F/W to the device. (refer to the methods of
copying and pasting for detail)
Step4: Reboot the device for automatic upgrade (power ON/OFF).
* Isn’t the volume level 0?
* Is the earphone disconnected from the jack? Is there any dirt in the earphone jack?
(Any dirt in the earphone jack can cause noise.)
* Please make sure there is no damage to the music file. Damaged MP3 or WMA files can produce noise. Please
try other files.
I hear no sound but noise.
The device can not be turned on.
* Is the battery capacity level enough? If so, please recharge the battery.
* Isn’t the device on hold? If so, please deactivate the hold switch not to be on hold.
Nothing is displayed on the screen.
* Please check LCD On Time in the Display Mode.
* Please check the battery capacity level.
* Check the connection between the earphone set and the device. (Otherwise try other earphone set)
* Please check whether the device is on hold.
* Check the level of volume. (Try setting EQ)
* Check the battery capacity level.
* Try initialization of the device.
* Make sure the driver for Windows 98 is installed.
* Please check the LCD contrast.
* Please check Auto Power/Sleep in the Timer Mode.
I hear no sound even though the play button is already pressed.
I can not copy files into the device.
The display is too dark.
I experienced sudden power off.