SM Tech ADV11 USB Storage Device User Manual SM Tech Co Ltd SERVICE CENTER
SM Tech Co., Ltd. USB Storage Device SM Tech Co Ltd SERVICE CENTER
SM Tech >
User Manual


TABLE
▣ProductLayout
▣PartsName&Explain
▣Feature
▣Specification
▣DeviceSet-Up&DriverInstall
▣FORMATTING
▣Password&Change
▣BootingDiskmaking
▣SafeDeviceRemoving
▣precautions
▣Sertification&Verification
▣AfterService(A/S)
▣Warranty
PRODUCTLAYOUT
▣ACCESSDREAMMainPart
▣SupplyCD
▣USBExtensionCable
▣PotableNecklace
▣Manualbook
PARTSNAME&EXPLAIN
4
1
3
2
6
5

1.CAP:ProtectingUSBConnectorarea
2.USBConnector:ConnectingComputer&Connector
3.LED
1)GreenLEDlight:StandbyforReading/WritingasconnectingComputer.
2)OrangeLEDlight:OnDataReading/Writing
Caution):DatamaybedamagedifdeviceisremovedwithOrangeLEDlighton.
4.HoldingClip:SafelyholdingthedeviceinBagorPocket.
5.LockingSwitch
1) :Reading/WritingAvailable
2) : Only Reading[No writing]
6. A ring to put in a potable necklace.
Feature
1.Matchrefineddesignwithhigh-qualifiedmaterialofAluminum.
-UsingclassicalAluminummaterial,discriminatedproductwithstrong,
luxurioustouchandrefineddesign.
2.Convenient&MobileStorageDevice.
-StoragespacemadeofMemoryChip,handyandusefulstoragedeviceaslike
aHardDisk.
3.NoneedPower
DonotneedadditionalpowersupplybyusingUSBBus’sPower.
4.FastTransmissionspeedusingUSBPort.
Providehigh-speedtransmissionbyusingUSBPort(12MbpsMax)
5.ButtingDiskFunction
IndependentbuttingsupportavailablesameasFDD,CDR,HDD.
Usingbuttingfunction,sameaslikeproducingbuttingdisk.
(cf:OnlyavailablebyMain-BoardsupportingUSBbutting.)
6.PASSWORD
S/Wsecurityfunction,unabletoaccesstodatainthedevicebyunauthorized
people.Enteryourpasswordtoreachyourdata.Youhavetoformatifyoulose
yourpassword.

7.WritingForbiddingswitch( )
Not allow writing, protecting data from virus infection & damage by user’s
mistakes.
Specification
MemoryCapacity 16MB,32MB,64MB,128MB,256MB
Interface USB1.1VersionSpec
Operating(OS) MS-DOS,Win98/SE/ME/2000/XP,OverMac8.6,Linux2.4,WinCE3.0
Apply AllcomputersprovidingUSBport
TransmissionSpeed Read:900Kbytes/secWrite:700Kbytes/sec
Dataretention 10Years
Power USBBus-Powered(4.75V5.25V)
Size 75mmX26mmX12mm(includingCAP)
Weight 29g
DeviceSet-Up&DriverInstall
1. DeviceSet-up
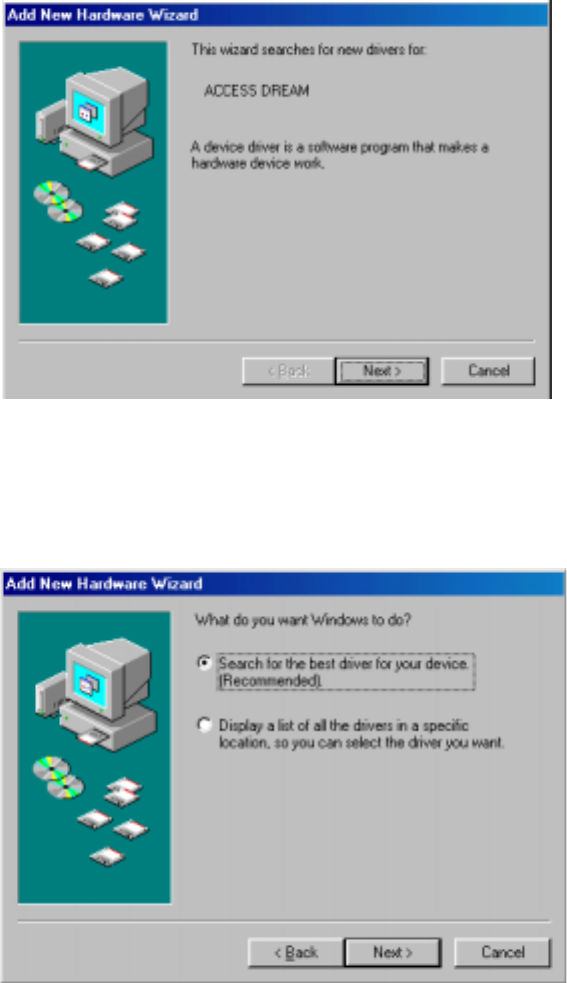
1) [Picture1]DirectconnectiontoComputerUSBport.
[Picture2]Useanextensioncablebetweencomputerandthedevice.
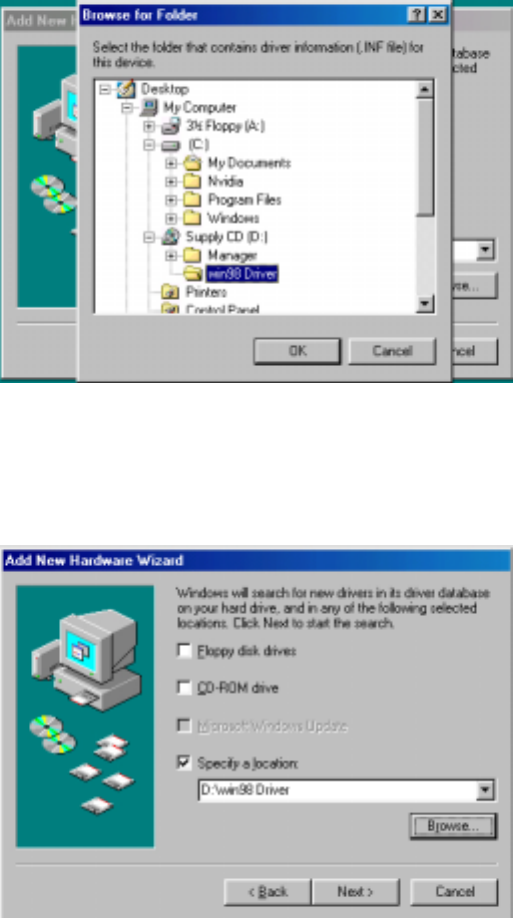
2) Referto[Picture3]recognizingthroughRemovableDiskafterconnection.
Caution).NotshowingtextindiskonCodeMode.
Mustgetcodeauthenticationtoaccessintothedisk.
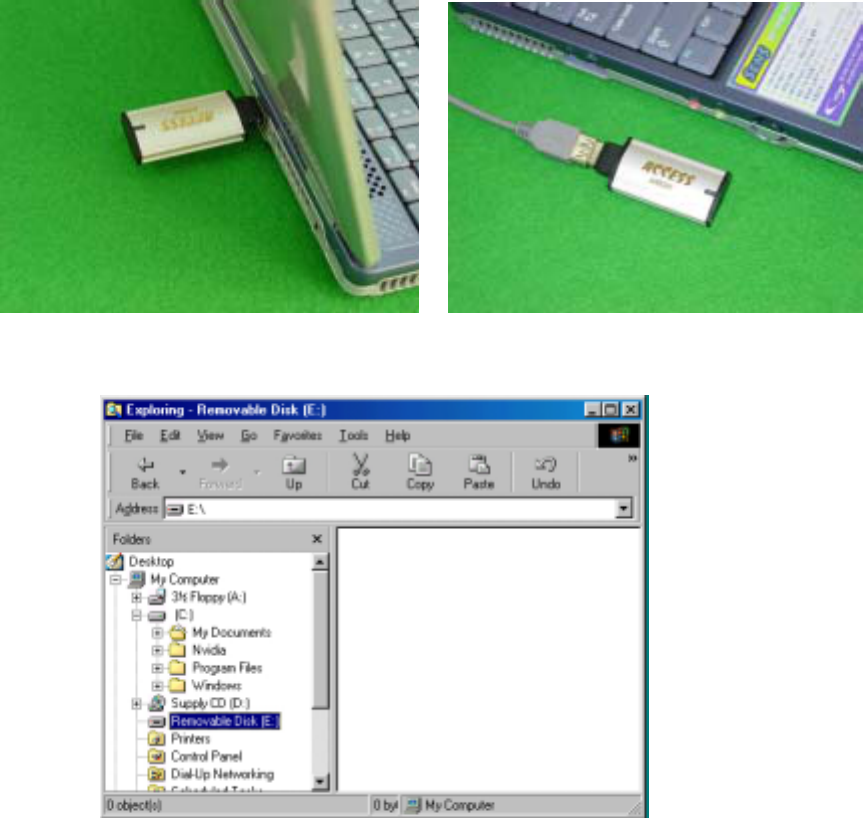
[Picture1]Directconnect[Picture2]Extensioncable
[Picture3]RemovableDiskonWindows
2. DriverInstall
•DonotneedtoinstallthedriveronanyOS,exceptWindows98,Windows98SE.
•UseSupplyCDprovidedforWindows98,Windows98SE.
Caution).IfunabletoautomaticallyinstallonWindows9X(OS),installthedriver
manually.
3.Windows98DriverManuallyInstalling
1) WhenACCESSDREAMfirstconnectinthe[Picture4].
Click‘Next’button.
[Picture4]AsACCESSDREAMfirstconnected
2) [Picture5]Select‘Searchforthebestdriverforyourdevice(Recommended)’
andClickon‘Next’button.
[Picture5]SelectionofDeriverSearch
3)[Picture6].Select‘Specifyalocation’andlocatewherethedriversis
by‘Browse’,[Picture7]Click‘Next’button.
[Picture6]Searchingdriverlocation
[Picture7]AppointDriverLocation
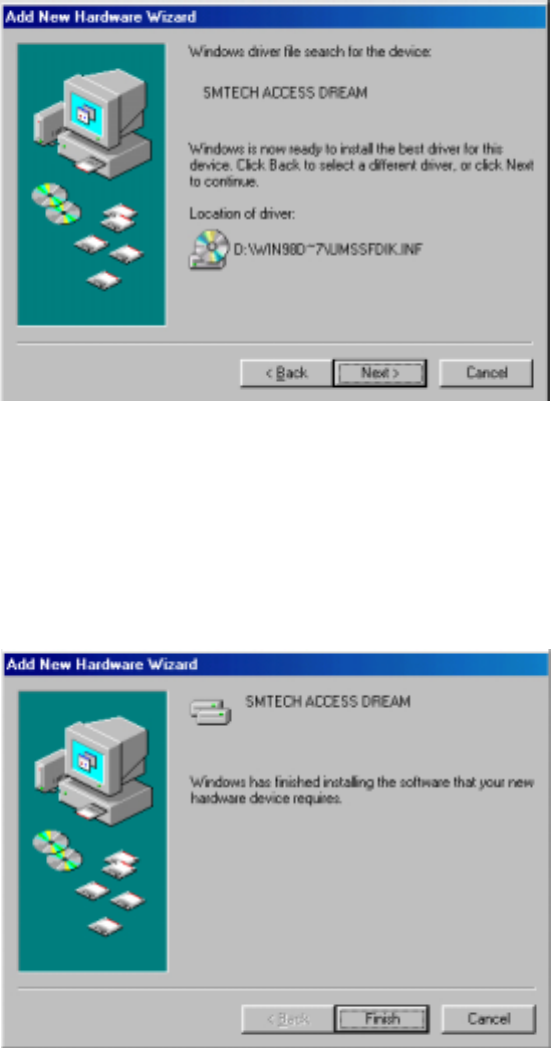
4)Appearawindowasfoundadriveron[Picture8],
otherwise,checkthelocationbackinNo3).
Click‘Next’button&Installdriveron‘InstallingProcessWindow’.
[Picture8]DriverInstallation
5)CompleteDriverInstallation
Click‘Finish’buttontodisappear&waitforDriverinstallationofACCESS
DREAM[Picture9].
[Picture9]CompleteDriverInstallation
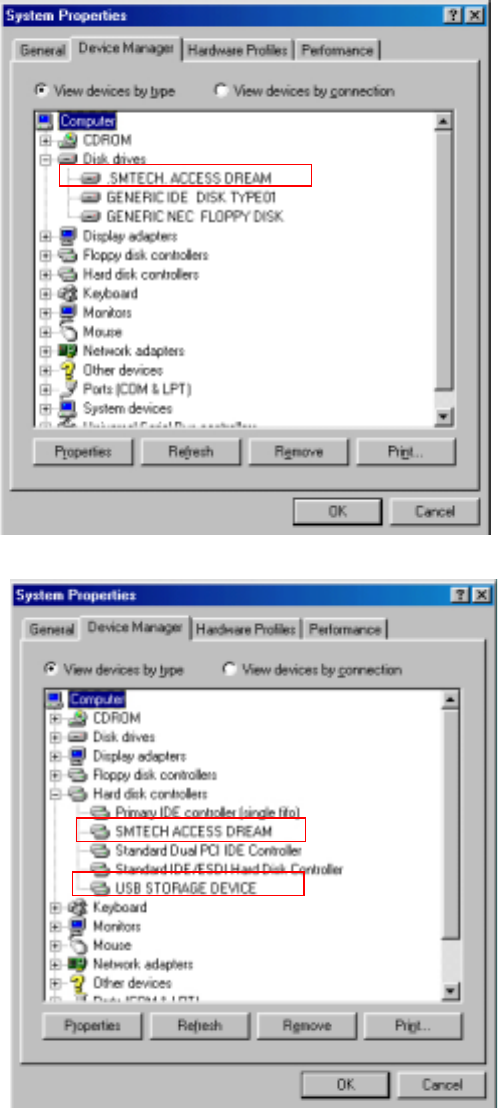
6)ConfirmDriverInstallation.
RightInstallationofACCESSDREAM—‘Start→ Settings→ Control
Panel→ System→ DeviceManager’.
Both[Picture10]and[Picture11]needforoperating.
[Picture10]DriverInstallationConfirm
[Picture11]DriverInstallationConfirm
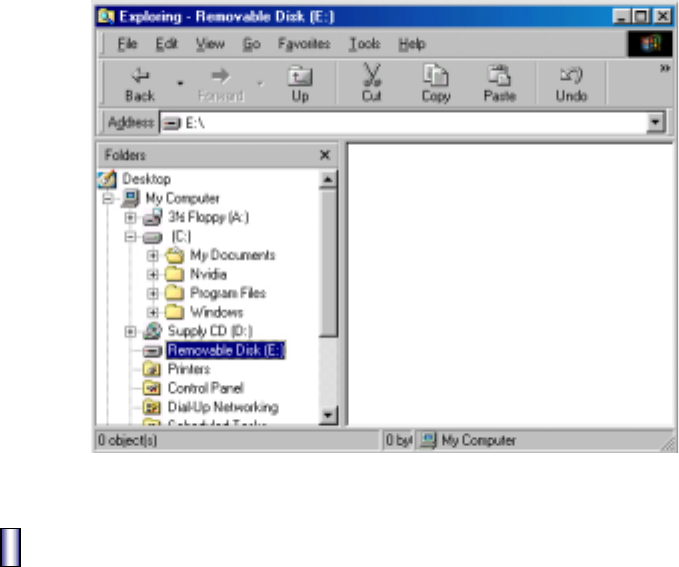
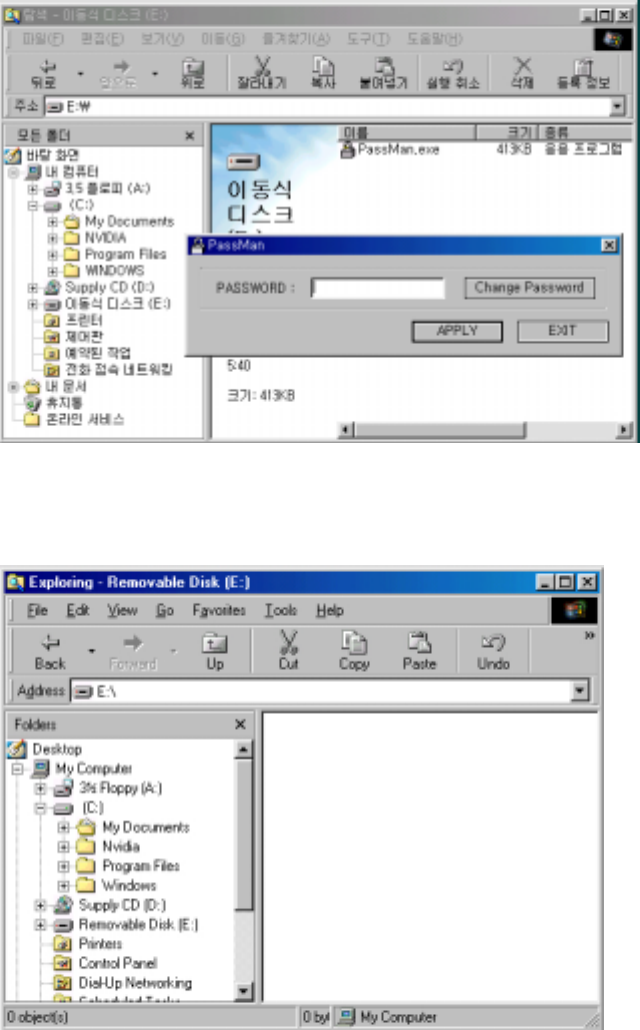
7)OpenWindowsExploringandRemovableDisk[Picture12]comesout.
[Picture12]RemovableDiskonWindowSearcher
FORMATTING
[WhenyouneedFormatting?]
•WhendiskclearingoflotsofbadblocksinFlashMemory.
•Badblockgeneratedafter“QuickFormat”.
•NeedtocreatenewPassword
(Allfilesinthedevicewillbedeletedandthebasicpasswordis”0000”.)
1.ConnectACCESSDREAMintoUSB.
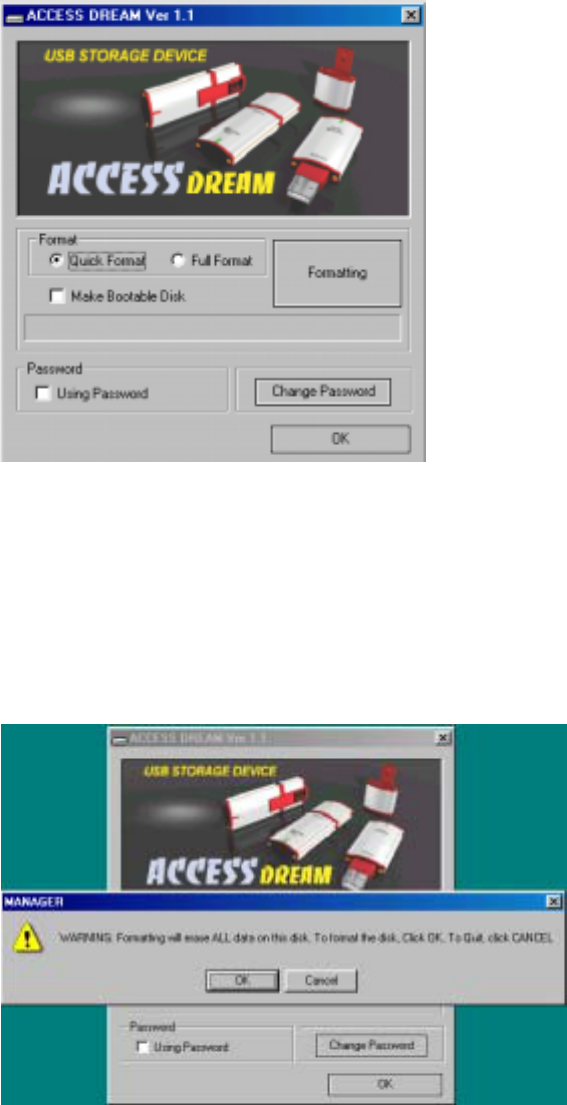
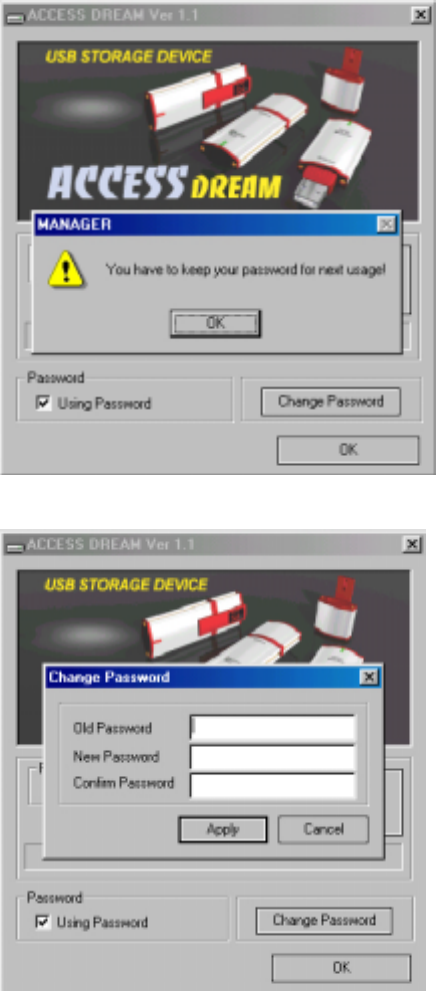
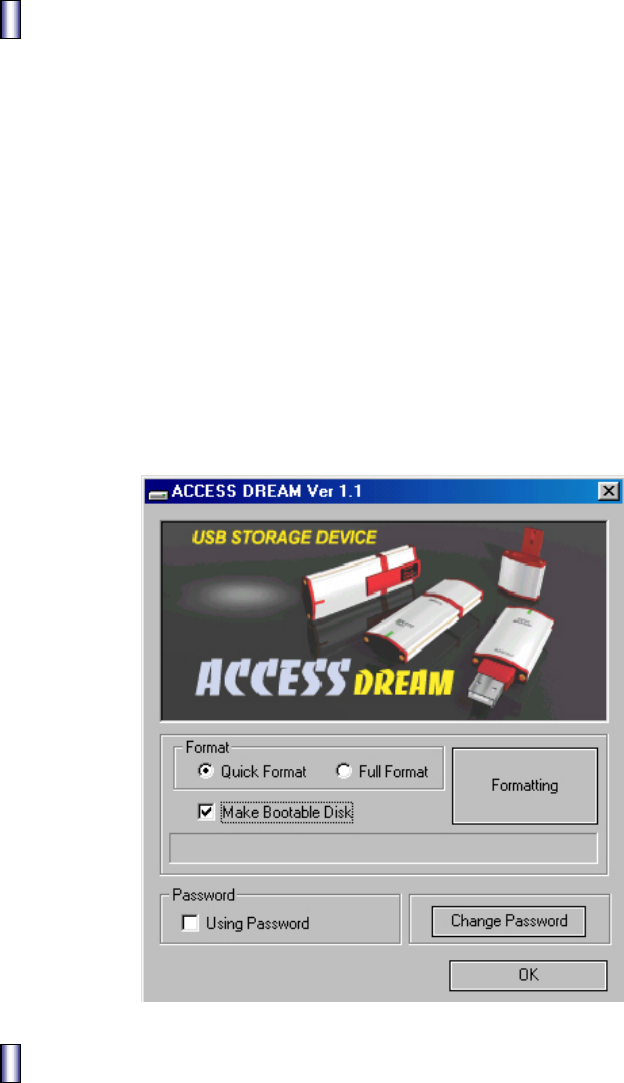
2.ExecuteD:ManagerEnglishManager.exeinSupplyCDandappear[Picture13].
[Picture13]InitialManagerProgram
Caution).If‘PluginACCESSDREAM!’comesout,ACCESSDREAM이USBportisnot
connected,thenplugoutandtryagain.
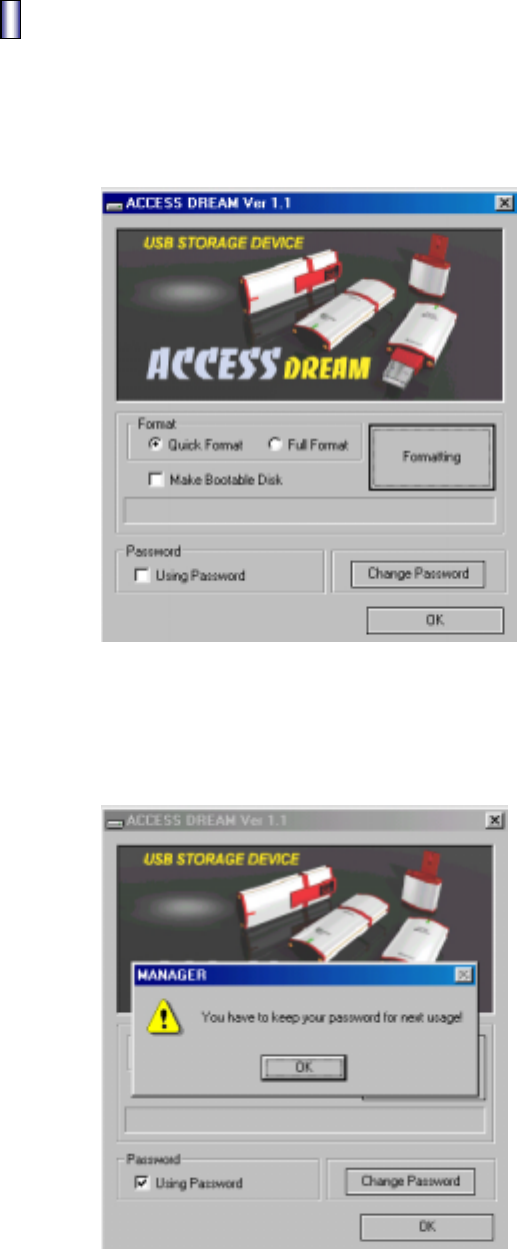
3.Select‘QuickFormat’or‘FullFormat’andclick‘Formatting’button.
(Takingforawhilewith‘FullFormat’.)
Click‘OK’buttonif[Picture14]comesup.
[Picture14]CautionMessage
[Picture15]FormatProcessing
Caution)PleaseBack-upimportantdatatopreventallfilesfromdeleting
byInitializing..
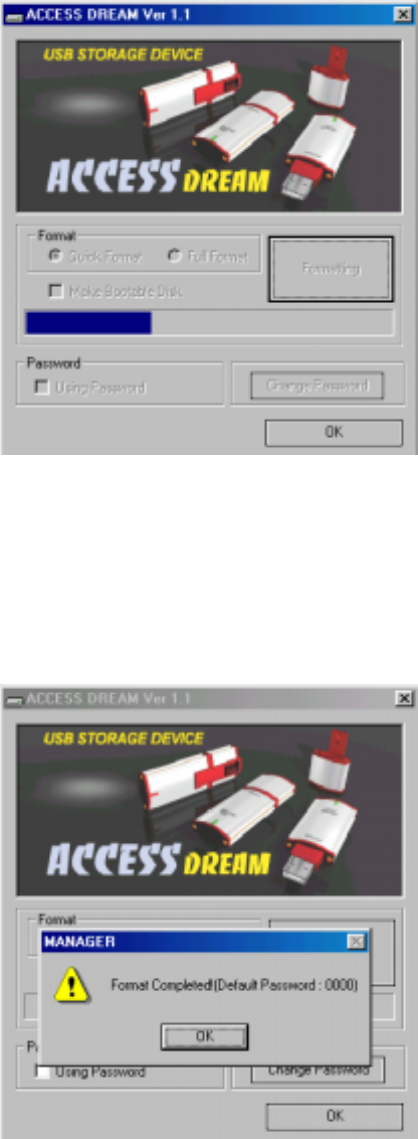
4.[Picture16]comesoutwhencompleteformatting.
[Picture16]CompleteFormat
Password&ChangePassword
1. Password
1) ConnectformatteddevicetoUSBport.
2) ExecuteD:ManagerEnglishManager.exeinSupplyCDprovided
[Picture17]comesup.
[Picture17]InitialManagerProgram
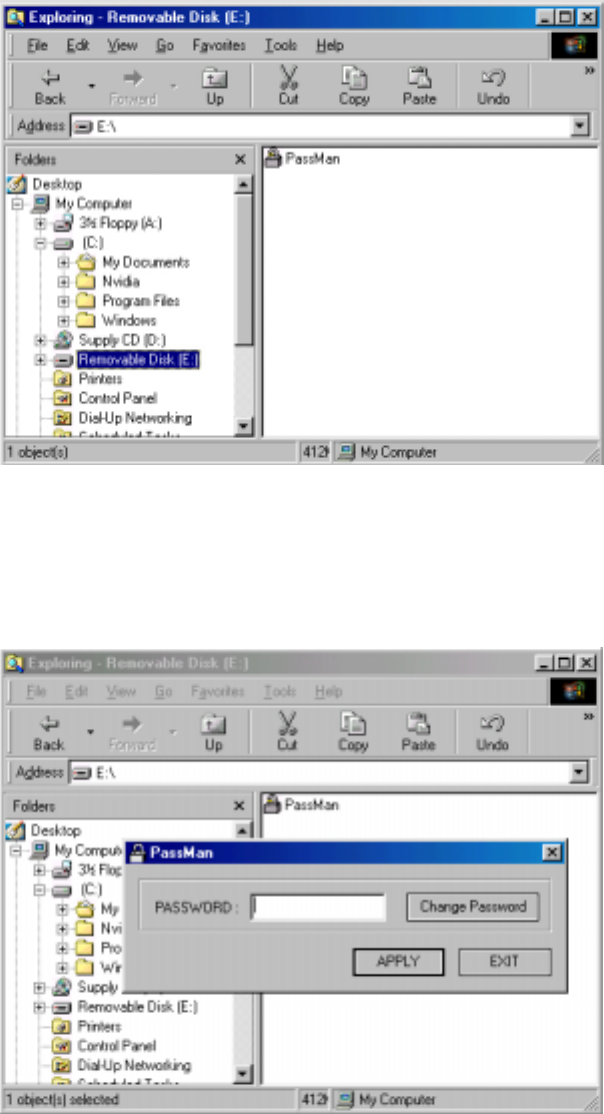
3) Select‘UsingPassword’tousepasswordfunction.
Click‘OK’button[Picture18]andtry.
[Picture18]SecuritySet-up
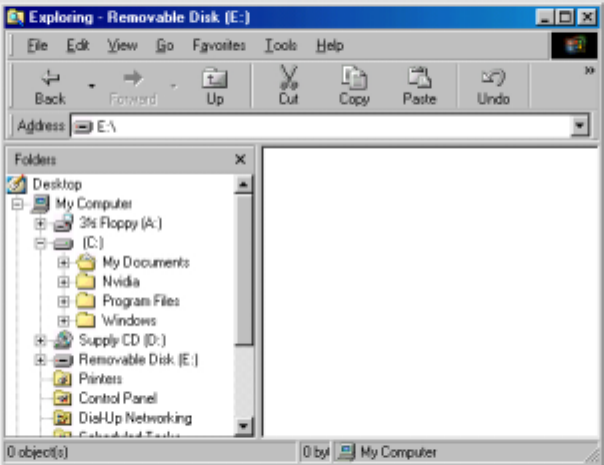
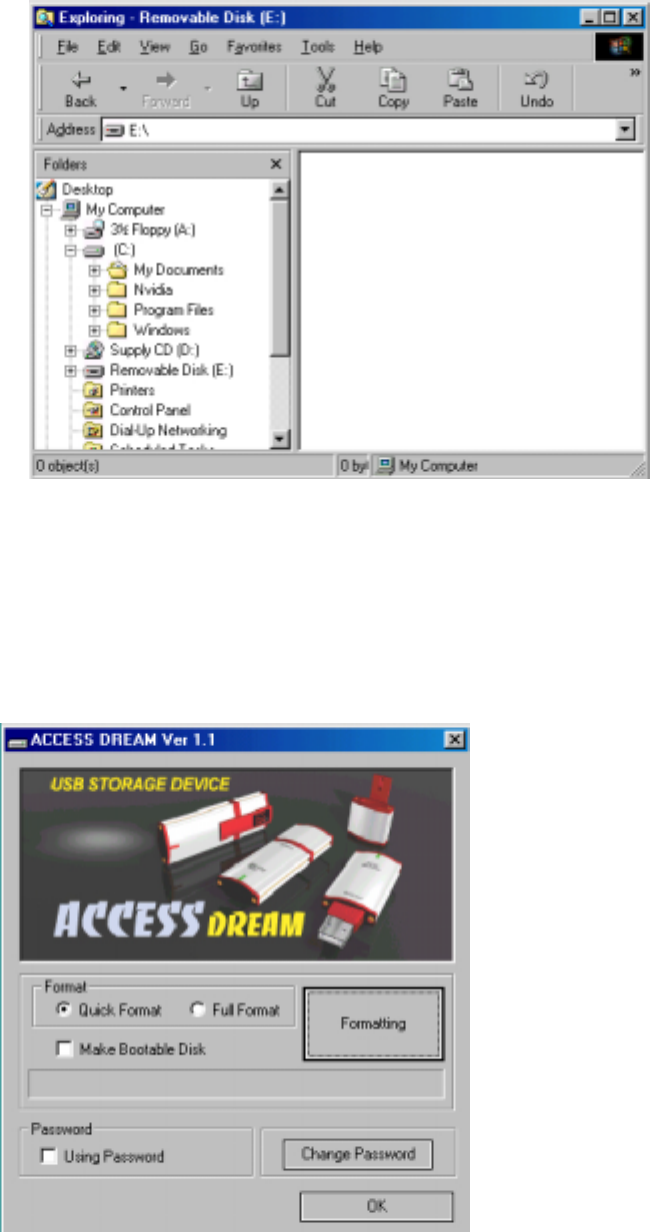
4)Clickon‘RemovableDisk’[Picture19]afterPlugout&inACCESSDREAM.
[Picture19]Screenwhenusingpassword
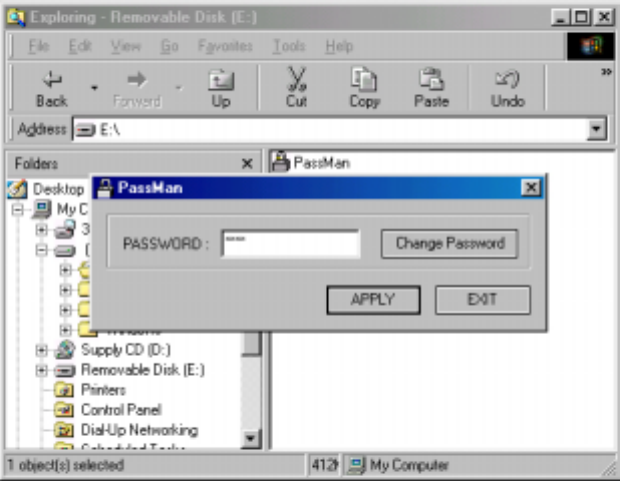
7)Execute‘PassMan.exe’onrightcornerandclick‘Apply’buttonafter
Insertingpassword[Picture20].
(Initializedpasswordis“0000”)
[Picture20]EnterPassword
6)Disappear[Picture20]withcompletionofLog-In,
availabletousenormally[Picture21].
[Picture21]CompleteLog-In
2.ChangingPassword
1) ConnectdevicepasswordinsertedtoUSBport.
2) Onpasswordmode,Execute‘Passman.exe’,andthen[Picture22]comesup.
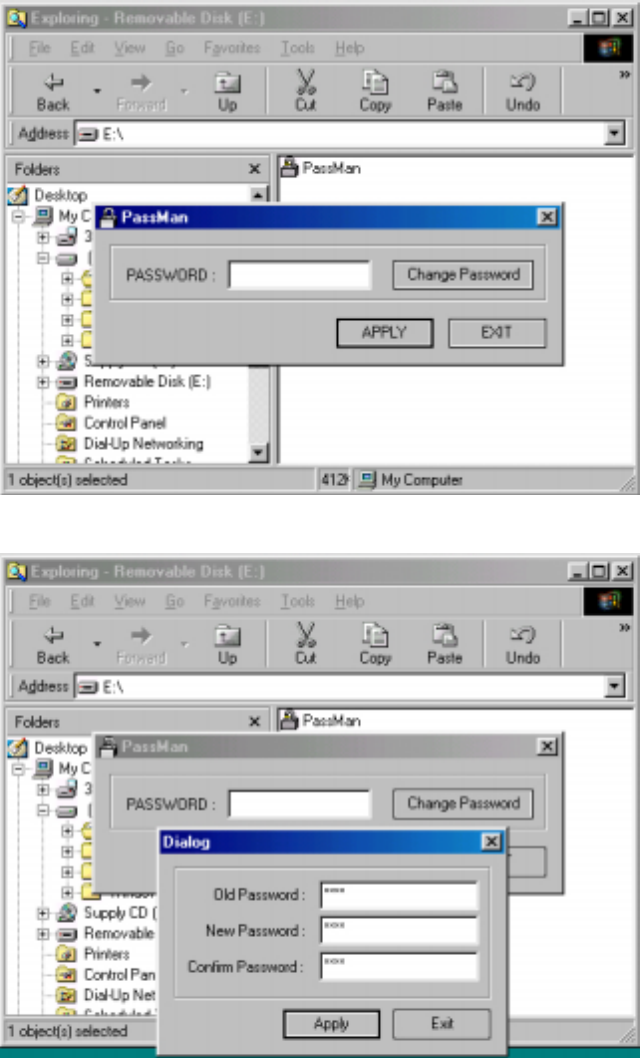
Click‘ChangePassword’buttonandthenchangepassword[Picture23].
[Picture22]Click“ChangePassword”
[Picture23]Enterpasswordyouwant
-OldPassword:Enterformerpassword(Initialpassword”0000”)
-NewPassword:Enternewpassword(upto8figuresnumbers)
-ConfirmPassword:Re-entertheNewPassword(confirmpassword)
Caution).Onlynumbersavailableforpassword.
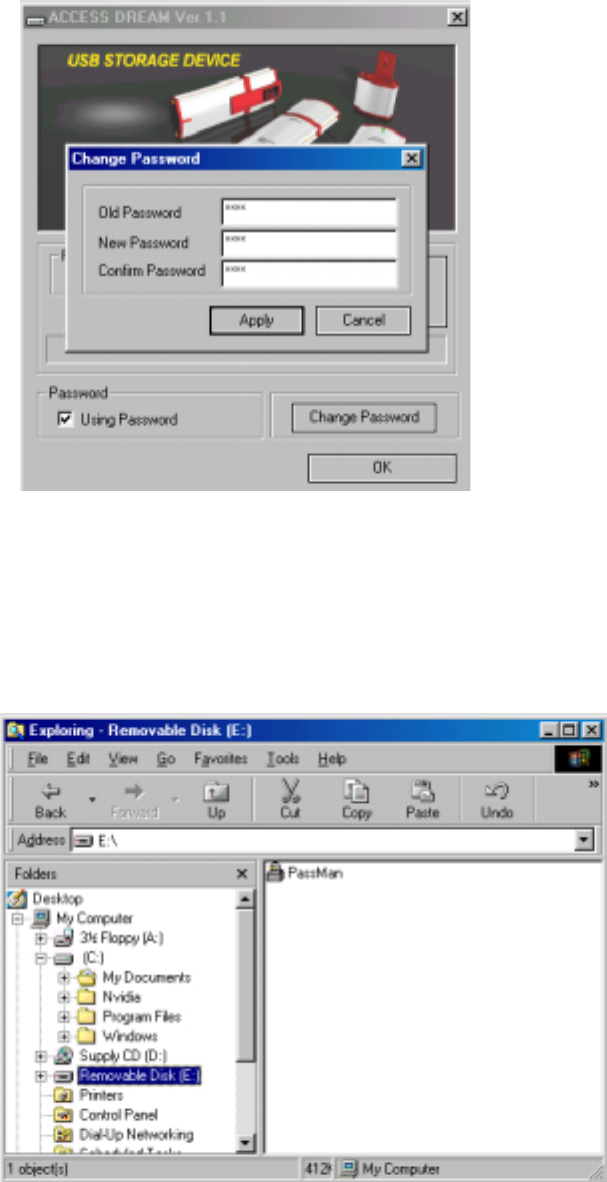
3) Enternewpasswordin[Picture23]andclick‘Apply’button.
[Picture24]comesout,re-enterthepasswordandclick‘Apply’button.
[Picture24]Enternewpassword
4) [Picture24]disappearsafterLog-Inandthennormaluseon[Picture25].
[Picture25]CompletionLog-In
5) IfchangingpasswordoutofPasswordMode,
executeD:ManagerEnglishManager.exeinSupplyCDprovided,then
[Picture26]comesout.
[Picture26]InitialManagerProgram
6) Check‘UsingPassword’,then,[Picture27]withcautionmessagecomesout.
Click‘OK’button&‘ChangePassword’next,then,[Picture28]comesout.
[Picture27]Checking“UsingPassword”
[Picture28]Click“ChangePassword”button
5) Enter ”0000” in ‘Old Password’. Enter your new password in ‘New Password’&
‘ConfirmPassword’.(cf:upto8figuresofnumbersonly)
[Picture29]Enternewpassword
Enternewpasswordin[Picture29]andClick‘Apply’button.
ClosetheManagerProgram.
6) PlugoutandinACCESSDREAMandclick‘RemovableDisk’.
[Picture30]comesout.
[Picture30]ClickRemovableDisk
7) Execute‘PassMan.exe’andthen[Picture31]comesout.
Enternewpasswordandclick‘Apply’button.
[Picture31]EnterPassword
8)Disappear[Picture31]afterLog-Inand[Picture32]comesupinnormaluse.
[Picture32]CompleteLog-In
BootingDiskMaking
ThisfunctionisonlyavailableonWindows98.
Formatafterselecting‘MakeBootableDisk’in[Picture33].
(ItisunabletoselectoverWindows98versions[Picture33],whichisinactive.)
Bootingafterselecting‘USBZIP’fromBootDevicefollowedbyformatting.
Makesuretouseafterdeleting‘UsingPassword’optionifyouwantbootingbythis
device,becausefilesrelatingBootingarenotwrittenonPasswordModebutwritten
onDataMode.Inaddition,tomakeBootableDisk,youhavetoselecttheoptionof
BootingDiskMakingOptionWhenwindowsset-up,otherwisenofileexistonthetask
ofmakingbootingdisk.Inthiscase,afteraboveprocedures,savefilesinfloppy
diskintoAccessDreamhassamefunctionasbootingdisk.
[Picture33]InitialManagerProgram
SafeDeviceRemoval
1. Windows98:MakesuretoremovewhenredLEDlightoff.
2. WindowsME,2000,XP:Removeafterexecuting‘DeviceRemoval’rightbottomof
Windows
3. Mac:RemoveafterwastingintoRubbishBin
4. Linux:Removeafterexecuting‘unmount’

precautions
1.DonotremoveACCESSDREAMwhenOrangeLEDlighton,nottolosedata.
2.Makesuretorememberpasswordtoaccessdatasavedinthedevice.
2. AvailabletouseutilitiesofonlyoneACCESSDREAMtooperate.
SMTechCo.,Ltdisnotresponsibleforanyproblemsoccurringbyusing
manydevicesatthesametime.
5. SM Tech Co., Ltd is only responsible for losing data caused byfundamental
manufacturingproblems..
Certification&Verification
▣This device complies with part 15of the FCC Rules. Operation is subject to the
following two conditions : (1) This device may not cause harmful interference, and
(2) this device must accept any interference received, including interference that
may cause undesired operation.
▣Caution : Any changes or modifications in construction of this device which are not
expressly approved bythe party responsible for compliance could void the
user’s authority to operate the equipment.
▣Note : This equipment has been tested and found to comply with the limits for a
Class B digital device, pursuant to part 15 of the FCC Rules. These limits are
designed to provide reasonable protection against harmful interference in a
residential installation this equipment generates, uses and can radiate radio
frequency energy and, if not installed and used in accordance with the
instructions, may cause harmful interference to radio communications,
However, there is no guarantee that interference will not occur in a particular
installation. If this equipment does cause harmful interference to radio or
television reception, which can be determined by turning the equipment off
and on, the user is encouraged to try to correct the interference by one or
more of the following measures :
- Reorient or relocate the receiving antenna.
- Increase the separation between the equipment and receiver.
- Connect the equipment into an outlet on a circuit different from that to
which the receiver is connected.
- Consult the dealer or an experienced radio/TV technician for help.

AfterService(A/S)
1. Warrant
Warrant with free of charge for one year from purchasing date of Access Dream.
cf) It is not available to warrant damages caused by naturaldisaster or user’s fault
even though it is in a term of 1 year warrant.
2. Pay Service
1. Damages by inserting alien substances (water, drink, coffee, sand, etc).
2. Defect or functional disorder by dropping of the device.
3. Case defect or variation caused bybenzene,thinner etc.
4. Damages by using irregular device or part.
5. Damage by user’s optional disassembling,causinglosingofparts.
6. Damages caused by repairman who is not from SM Tech Co., Ltd
7. Damages by natural disaster (lightning, storm, flood)
SMTechCo.,LtdSERVICECENTER
ADDRESS:SangwooBldg8Yuweol-Dong,Ojung-GuPuchonCityKyungki-DoKorea
전화:++82-32-681-2051
FAX:++82-32-681-2053
Web-Page:www.smtechkr.com
WARRANT
WARRANTY CERTIFICATE
PRODUCT :
MODEL NAME :
DATE OF PURCHASE : (YEAR) (MONTH) (DATE)
USER NAME : TEL :
ADDRESS :
NAME OF SALES : TEL :
ADDRESS :
TERM
1YEAR
SM TECH CO., LTD
● Present this certificate with purchasing date when you need A/S for sufficient
Warranty service.
1. The quality of this product will be warranty according to this certificate.
2. The term of warrant applies from the purchasing date. Please keep the
purchasing date.
(Without purchasing date, the term of warrant is regarded for 1 year after 6
months from manufactured date, month, year.)
3. This certificate will not re-issued.
The external appearance and standard may be variable for quality improvement
without customer notification.