SMART Technologies SRP05 Smart Response LE and PE Remote control User Manual SMART Response User s Guiude
SMART Technologies Inc. Smart Response LE and PE Remote control SMART Response User s Guiude
Manual
SMARTResponse™ 2011
Interactive Response System
User's Guide

Product registration
If you register your SMART product, we’ll notify you of new features and software upgrades.
Register online at smarttech.com/registration.
Keep the following information available in case you need to contact SMARTSupport.
Serial number:
Date of purchase:
FCC notice
This equipment has been tested and found to comply with the limits for a Class B digital device, pursuant to part 15 of the FCC Rules. These limits are designed to provide
reasonable protection against harmful interference in a residential installation. This equipment generates, uses and can radiate radio frequency energy and, if not installed
and used in accordance with the instructions, may cause harmful interference to radio communications. However, there is no guarantee that interference will not occur in a
particular installation. If this equipment does cause harmful interference to radio or television reception, which can be determined by turning the equipment off and on, the
user is encouraged to try to correct the interference by one or more of the following measures:
- Reorient or relocate the receiving antenna.
- Increase the separation between the equipment and receiver.
- Connect the equipment into an outlet on a circuit different from that to which the receiver is connected.
- Consult the dealer or an experienced radio/TV technician for help.
Appendix 1: IC RSS 210 notice
This device complies with Industry Canada licence-exempt RSS standard(s). Operation is subject to the following two conditions: (1) this device may not cause
interference, and (2) this device must accept any interference, including interference that may cause undesired operation of the device.
Le présent appareil est conforme aux CNR d'Industrie Canada applicables aux appareils radio exempts de licence. L'exploitation est autorisée aux deux conditions
suivantes : (1) l'appareil ne doit pas produire de brouillage, et (2) l'utilisateur de l'appareil doit accepter tout brouillage radioélectrique subi, même si le brouillage est
susceptible d'en compromettre le fonctionnement.
Trademark notice
SMART Response, SMART Notebook, SMARTBoard, SMART Sync, Senteo, smarttech, the SMART logo and all SMART taglines are trademarks or registered
trademarks of SMARTTechnologiesULC in the U.S. and/or other countries. Microsoft, Windows, Windows Vista, Internet Explorer, DirectX, PowerPoint and Excel are
either registered trademarks or trademarks of Microsoft Corporation in the U.S. and/or other countries. Mac, Mac OS, Safari and Finder are trademarks of Apple, Inc.,
registered in the U.S. and other countries. Adobe, Flash and Reader are either registered trademarks or trademarks of Adobe Systems Incorporated in the U.S. and/or other
countries. Intel, Pentium and Itanium are trademarks or registered trademarks of Intel Corporation or its subsidiaries in the U.S. and other countries. ExamView is a
registered trademark of FSCreations, Inc. All other third-party product and company names may be trademarks of their respective owners.
Copyright notice
© 2007–2011 SMARTTechnologiesULC. All rights reserved. The use and copying of SMART Response assessment software is subject to a license agreement. Any other
use is prohibited. No part of this publication may be reproduced, transmitted, transcribed, stored in a retrieval system or translated into any language in any form by any
means without the prior written consent of SMARTTechnologiesULC. Information in this manual is subject to change without notice and does not represent a commitment
on the part of SMART.
One or more of the following patents: US6320597; US6326954; US6741267; US7151533; US7499033; and CA2252302. Other patents pending.
July 2011
Important information
Safety information i
Compliance ii
Before you use your SMARTResponse™ interactive response system, please read and understand
the safety warnings and precautions described in this guide. These safety warnings and precautions
instruct you in the safe and correct operation of the system and its accessories so you can prevent
injuries to yourself and others or damage to the equipment. You must always ensure that the
SMARTResponse system is being used correctly.
N N O T E
If you own a SMART product other than a SMARTResponse system, refer to the user’s guide that
came with your product for relevant warnings and maintenance instructions.
Safety information
W W A R N I N G
lFailure to follow the installation instructions that ship with the SMART product could result in
personal injury or damage to the product.
lWhen using your SMARTResponse system with a SMARTBoard™ interactive whiteboard
and projector, do not stare into the beam of light created by the projector. Instruct children not
to look in the direction of, or stare at, this beam of light.
lEnsure that any cables extending across the floor to your SMART product are properly
bundled and marked to prevent a trip hazard.
lTo reduce the risk of fire or electric shock, do not expose the components to rain or moisture.
C C A U T I ON
lUse only the batteries provided or equivalent replacements. Do not attempt to recharge the
batteries.
i

lDo not install batteries with the polarity (+/-) reversed.
lDo not dispose of batteries in a fire or incinerator.
Dispose of batteries according to the laws and regulations of your region. If you do not know
the applicable rules for your region, consult the battery manufacturer.
lDo not use abrasive erasers or harsh chemicals when cleaning SMARTResponse system
hardware.
lDo not open the receiver or clicker units to attempt repairs. Refer all service to authorized
SMART service personnel.
I I M P O R T A N T
lYou must connect the USB cable that came with your SMART product to a computer that
has a USB compliant interface and that bears the USB logo. In addition, the USB source
computer must be compliant with CSA/UL/EN 60950 and bear the CE mark and CSA and/or
UL Mark(s) for CSA/UL 60950. This is for operating safety and to avoid damage to the
SMART product.
lIf your SMART product requires replacement parts, make sure the service technician uses
replacement parts specified by SMART Technologies or parts with the same characteristics
as the original.
Compliance
This device complies with Part 15 of the FCC rules. Operation is subject to the following two
conditions:
1. This device may not cause harmful interference, and
2. This device must accept any interference received, including interference that may cause
undesired operation.
Changes or modifications to this equipment not expressly approved by SMART Technologies may
void the user’s authority to operate this equipment.
I M P O R T A N T I N F O R M A T I O N
ii

Contents
Important information i
Safety information i
Compliance ii
Chapter 1: About the SMARTResponse system 1
Introduction 1
Features 2
Hardware – clickers and receivers 4
Chapter 2: Getting started 5
Using your SMART Response system 7
Environmental requirements 8
Computer requirements 9
Connecting hardware and activating SMART Response software 11
Activating SMART Response software 15
Selecting how students answer questions 17
Starting SMARTResponse LE software the first time 20
Asking instant questions 22
Setting up Teacher Tools 23
Creating a class list 28
Editing a class list 35
Chapter 3: Using SMARTResponse software 39
About SMARTNotebook software 40
Creating assessments 42
Adding questions to the assessment 45
Starting and connecting to a class 62
Connecting to the class 66
Disconnecting students from a class 71
Using clickers 73
Completing assessments 82
Chapter 4: Reviewing, printing and exporting assessment results 91
Importing assessment results 92
Reviewing assessment results 94
Flagging results 96
Generating student performance reports 97
Generating class performance reports 98
iii

Printing and exporting questions and results 99
Chapter 5: Maintaining your SMART Responsesystem 103
Preventing component damage 103
Changing the clicker batteries 104
Resetting clickers 105
Receiver indicator lights 105
Troubleshooting the receiver 106
Troubleshooting SMARTResponseCE connection issues 107
Importing student responses 107
Other troubleshooting tips 109
Appendix A: Hardware environmental compliance 111
Waste Electrical and Electronic Equipment Regulations (WEEE directive) 111
Restriction of Certain Hazardous Substances (RoHS directive) 111
Batteries 111
Packaging 112
Covered electronic devices 112
China’s Electronic Information Products regulations 112
U.S. Consumer Product Safety Improvement Act 112
California Air Resources Board – Airborne Toxic Control Measure 112
Restriction of Certain Chemicals (REACH directive) 113
C O N T E N T S
iv

Chapter 1: About the SMARTResponse
system
Introduction 1
Integration with SMART Notebook SE (Student Edition) software 1
Features 2
Hardware – clickers and receivers 4
Introduction
The SMARTResponse interactive response system is an assessment tool that enhances learning.
It facilitates summative and formative assessment by enabling you to pose a question before, during
or after a lesson to find out whether students are on track. You can use the feedback to help shape
the rest of your lesson.
Once you finish the lesson, create a question set with SMART Response assessment software to
evaluate learning more formally. You can feel confident that the students have answered the way
they intended, because they can verify and change their self-paced responses directly.
Teachers can easily add creativity to questions by combining text with images to make questions
more dynamic. The SMARTResponse system comes with SMARTNotebook™ collaborative
learning software, and offers 6,000 learning objects that you can add to quizzes.
The SMARTResponse system also increases one-to-one interaction by enabling teachers to survey
and engage students and to collect responses.
Integration with SMART Notebook SE (Student Edition) software
SMARTNotebookSE software enables your students to connect to your class, take quizzes and
assessments, respond to questions and submit their work. For more information on how students use
SMARTNotebookSE software with SMARTResponseCE interactive response software, see the
SMARTNotebookSE online Help.
Chapter 1
1

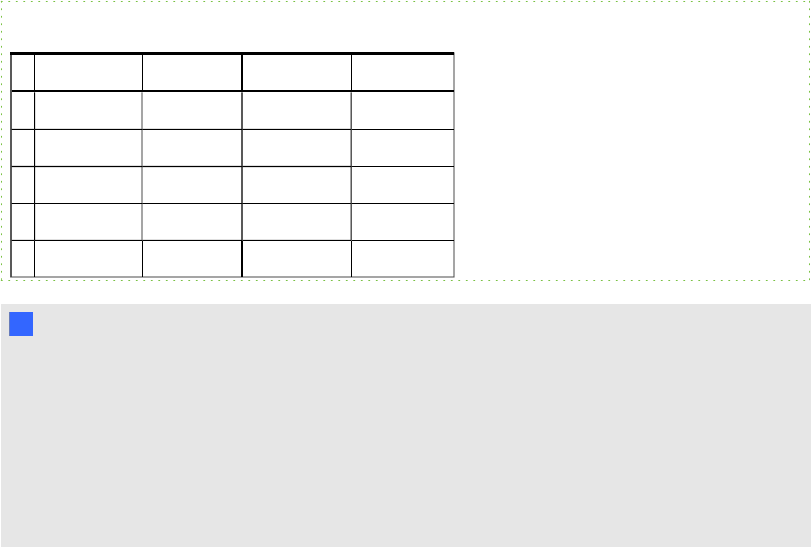
Features
Feature Description
Integration with
SMARTNotebook
software
Open SMART Response software from a tab in SMARTNotebook
software. With SMART Notebook’s Gallery of more than 6,000 items of
graphic-rich content, you can add images and other multimedia content to
your questions and/or assessments.
SMARTNotebook Full
Screen mode toolbar
When you put SMARTNotebook software in Full Screen mode, SMART
Response buttons for creating questions, running assessments and
viewing results appear in the toolbar. You can use SMARTNotebook
software in Full Screen mode to reduce distractions while presenting your
lesson.
SMARTNotebook
Transparent mode
toolbar
When you put SMARTNotebook software in Transparent mode, SMART
Response buttons for creating questions, running assessments and
viewing results appear in the toolbar. In Transparent mode you can use
other applications and see supporting content while presenting your
lesson.
Multiple assessment
options
Compile questions for formative and summative assessment, prepare
quizzes or exams in advance and ask spontaneous questions to gauge
student comprehension at any point during a lesson.
Teacher Tools Access, view and manage all assessment data in one location. This
powerful tool enables you to create class lists and manage tests and
quizzes.
Question variety Teachers can ask different types of questions, including true or false, yes
or no, multiple choice, multiple answer, numeric fraction or math
expression and text answer.
Familiar user interface SMART Response software’s intuitive software lets you create pages that
have clear, contextual and concise information for users at any level of
experience.
Math expression
questions and
intelligent grading
When you create an expression question with a correct answer, you can
choose which intelligent expression grading option that SMARTResponse
uses to determine which mathematically equivalent answers you want to
accept as correct.
Monitoring students
during and after the test
You can monitor how much time is remaining for a quiz. Grades are
immediately calculated after the test and displayed in graphical charts and
numeric tables.
C H A P T E R 1
About the SMARTResponse system
2

Feature Description
Previewing results
during an assessment
You can see what responses students have submitted during the
assessment and get immediate feedback on how the class is doing.
Easy-to-view results Display results in easy-to-view pie charts or graphs, which you can then
insert on a SMART Notebook page for a closer view and to add your own
notes in digital ink. You can also view results in detail, so you can see
exactly how each student has answered.
Add or change correct
answers to completed
assessments
Using Teacher Tools, you can choose to accept a submitted answer as
correct in addition to (or instead of) the original correct answer. SMART
Response software calculates the students' grades after the changes.
Multiple print options Print assessments as handouts so students can complete them at their
own pace, or add comments to completed assessments that can be
printed and used later as study guides.
Anonymous mode Allows students to respond with complete anonymity. Students can use
SMART Response software without signing in, or they can participate in
an assessment using any clicker, allowing you to gauge the group's
understanding.
Integration with third-
party question bank
SMART Response software is compatible with commonly used file
formats, so you can easily import questions from other applications,
including Microsoft Word and PowerPoint®, PDFs and third-party question
banks.
Integrated Gradebook Through Teacher Tools Gradebook, you can build comprehensive student
progress reports which can be as simple or as detailed as you need.
Create high-level comparisons of class performance, specific reports
based on tagged characteristics such as demographics or curriculum
standards, or personalized reports on how individual students are doing.
Tagging You can tag students and questions and automatically generate reports
with comprehensive student and class performance breakdowns.
You can also tag key words to describe various characteristics, correlate
questions to curriculum standards and break down performance into a
printable chart.
C H A P T E R 1
About the SMARTResponse system
3

Hardware – clickers and receivers
Feature Description
Radio frequency (RF)
technology
RF technology provides a reliable wireless connection between the
student clickers and the central receiver. You don’t need a line of sight to
the clickers, and the clickers and the receiver can connect within a 100'
(30 m) range.
Ergonomic design Designed to fit comfortably in young hands or to lie flat on a desk. Even
young students find the durable handheld clickers easy to use and
comfortable to hold. Responding to questions is quick and easy.
Ability to input math
expressions
XE clickers have dedicated buttons that enable students to enter complex
math and science expressions.
Ability to enter symbols
as well as letters with
diacritics
In XEmode, you can enter common math and science symbols. You can
also enter diacritics (letters with special symbols or accents).
LCD screen The easy-to-read LCD screen has room to display several lines of text.
Students can see whether responses have been sent, and they can review
the status of their clicker’s battery power and network connection.
Descriptive icons Icons on the LCD screen enable students to monitor the battery power and
the network status of their clicker.
Extended battery life Each clicker uses long-lasting AA or AAA batteries.
Easy connection The receiver connects to a computer using a USB cable, and it doesn’t
require an additional power adapter.
Flexible installation The receiver weighs just under 6 oz. (165 g) and easily mounts onto walls,
desks or tables.
C H A P T E R 1
About the SMARTResponse system
4

Chapter 2: Getting started
Using your SMART Response system 7
Teacher Tools 7
SMART Response system hardware 7
Using the interactive response system 8
Environmental requirements 8
Temperature 8
Humidity 8
Water and fluid resistance 8
Dust and scratching 8
Electrostatic discharge (ESD) 9
Conducted and radiated emissions 9
Computer requirements 9
Windows operating systems 9
Mac OS X operating system software 10
Connecting hardware and activating SMART Response software 11
Connecting the receiver 11
Recommended height for mounting the receiver 11
Extending the USB cable 13
Checking the receiver’s status 14
Activating SMART Response software 15
Activating SMART Response CE software 16
Activating SMART Response VE software 16
Selecting how students answer questions 17
Multiple SMART Response devices mode limitations 19
Why don't I use Multiple SMART Response devices mode all the time? 19
Starting SMARTResponse LE software the first time 20
Pairing student clickers 20
Assigning clicker IDs 21
Asking instant questions 22
Setting up Teacher Tools 23
Starting Teacher Tools 23
Starting Teacher Tools in CE mode using SMARTSync Class List Server 24
Creating a SMART Teacher file 24
Chapter 2
5

Editing your SMART Teacher file 25
Adjusting privacy and alert options 25
Using Privacy mode 25
Changing alerts 26
Applying encryption methods 26
Configuring service ports 27
Creating a class list 28
Creating a class list in Teacher Tools 28
Importing a class list from Excel 29
Creating class lists for all modes except LE 29
Creating class lists for LE mode 30
Importing the class list 31
Importing a class list from a CSV file 32
Creating class lists for all modes except LE 32
Creating class lists for LE mode 32
CSV file formatting 33
Tips for formatting CSV files for importing class lists 33
Using SMARTSync Class List Server class lists 34
Editing a class list 35
Editing student information 35
Adding students to a class list 35
Removing students from a class list 36
Tagging students 37
Changing a class's passing grade 37
C H A P T E R 2
Getting started
6
Using your SMART Response system
Using the SMART Response interactive response system, you can perform planned or spontaneous
student assessments in the same software you use to deliver your lessons—it integrates seamlessly
with SMART Notebook collaborative learning software.
You can easily prepare exams in advance or spontaneously quiz students during a lesson and receive
immediate responses from your class. Depending on the mode you're using, SMART Response
software supports several different types of questions, including true or false, yes or no, multiple
choice, multiple answer, text answers, and numerical fractions and expressions. You can import
questions from third-party question banks, Microsoft applications and other common programs.
After students submit their answers, you can see the results by percentage in a graphical format,
which gives an accurate representation of the whole class's performance, not just that of individual
students.
Teacher Tools
Using Teacher Tools, you can access, view and manage all assessment data in one location. You
can create class lists and set up, conduct and manage tests and quizzes. You can track each
student's progress over several assessments, and you can even tag questions with key words to
evaluate test results and student performance in greater detail.
Teacher Tools makes it easy for you to keep everything organized. The easy-to-use management tool
automatically files test results in the built-in gradebook. It also lets you manage your class lists and
view performance reports and test scores.
The Teacher Tools Gradebook gives you quick access to test results, making it easy to prepare
reports and conduct evaluations. Reports can be as simple or as detailed as you need. Create high-
level comparisons of class performance, specific reports based on tagged characteristics such as
demographics or curriculum standards, or personalized reports on how individual students perform.
You can also create reports that show grades for the entire school year.
SMART Response system hardware
The SMART Response receiver and clickers use radio frequency technology to provide a reliable
wireless connection between the student clickers and the central receiver. You don't need a line of
sight to the clickers, and the range is 100' (30 m). The receiver verifies receipt of every signal and
messages automatically re-send if they aren't received.
C H A P T E R 2
Getting started
7
Students find the handheld clickers easy to use and comfortable to hold. Students can easily read
several lines of text on the large display screen. They can see if responses have been sent and can
review the status of their clicker's battery power and network connection.
Using the interactive response system
You can purchase SMART Response interactive response system software for both Windows and
Mac computers that meet the minimum requirements. See Computer requirements on the next page
for information.
You can use SMART Response software's integrated SMART Notebook features on any computer,
so you can take your laptop home to develop assessment questions without having to connect a
receiver. You can then copy the assessment files to a classroom computer where you can run your
assessments.
When you install SMART Response software, by default, the installation program installs SMART
Notebook software, SMARTProduct Drivers and SMART Response software. SMARTResponse
software includes Teacher Tools and menus that appear in the SMART Notebook software toolbar.
You can use the software for free for 30 days after which you must activate the software.
Environmental requirements
Before installing or using your SMART Response interactive response system, review the following
environmental requirements and compliance statements.
Temperature
SMART Response components can operate in the temperature range of 41°F to 95°F (5°C to 35°C).
In addition, the product can withstand storage temperatures from -40°F to 120°F (-40°C to 50°C).
Humidity
SMART Response components can operate in up to 80% relative humidity, non-condensing.
Water and fluid resistance
SMART Response components are for indoor use only and don’t meet any salt-spray or water-
ingress requirements. Don’t pour or spray any liquids directly onto SMART Response components.
These liquids can get into areas where they can damage sensitive electronic components.
Dust and scratching
SMART Response components are for use in office and classroom environments, and they aren’t for
industrial use where heavy dust and pollutants can cause malfunctions or impaired operation. They’re
C H A P T E R 2
Getting started
8

designed for pollution degree 1 (P1) as per EN61558-1, which is defined as “No pollution or only dry
non-conductive pollution.”
Electrostatic discharge (ESD)
SMART Response components meet the requirements of EN61000-4-2 severity level 4 for direct and
indirect ESD. No malfunction or damage up to 15 kV (both polarities) with a 330 ohm, 150 pF probe
(air discharge). Unmated connectors meet 8 kV for direct (contact) discharge.
Conducted and radiated emissions
SMART Response hardware’s narrowband radiated electric field meets the limits for Class B
performance, as defined in EN55022/CISPR 22.
Computer requirements
Windows operating systems
lPentium® 4 or later processor
l512 MB of RAM (1 GB recommended)
lFree hard disk space:
Software Space required
SMARTNotebook software 277 MB
___Gallery Essentials 549 MB
___Lesson Activity Toolkit 111 MB
SMARTProduct Drivers 145 MB
SMART Response assessment software 47 MB
SMARTSync Teacher software 37 MB
Common platform 62 MB
Total 1228 MB
lWindows® XP SP3, WindowsVista® SP2 or Windows 7 operating system
lInternetExplorer® Internet browser 6.0 or later
lAdobe® Flash® Player 10 Firefox® plug-in
lAdobe Flash Player 10 ActiveX® control for SMARTNotebook software
C H A P T E R 2
Getting started
9
lAdobe Reader® 8.0 or later
lMicrosoft® DirectX® technology 8.1 or later (required for SMART Video Player)
Mac OS X operating system software
l1.5 GHz Intel® or later processor
l1 GB of RAM
lFree hard disk space:
Software Space required
SMARTNotebook software 163 MB
___Gallery Essentials 499 MB
___Lesson Activity Toolkit 70 MB
SMARTProduct Drivers 203 MB
SMART Response assessment software 65 MB
SMARTSync Teacher software 25 MB
Common platform 257 MB
Total 1282 MB
lMac OS X 10.5.8 or later operating system software
lAdobe Reader® 8.0 or later
lSafari application program 4.0.2 or later
lAdobe Flash Player 10 or later
N N O T E S
o1 MB = 1024² bytes, 1 GB = 1024³ bytes.
oSMART Response assessment software runs on 32-bit and 64-bit operating systems.
C H A P T E R 2
Getting started
10

Connecting hardware and activating SMART
Response software
To send information to and receive information from SMART Response clickers, you must connect
the SMART Response receiver to your computer. You can then check the receiver's status in
Teacher Tools.
I I M P O R T A N T
You must activate your SMART Response software within 30 days of installation. SMART
Response software automatically activates when you connect your SMART Response receiver. If
the activation is not successful, use the manual procedure in this section to find your license code
and activate the software.
N N O T E
If you're using SMARTResponse software in CE or VE mode, which doesn't require a receiver,
see Activating SMART Response CE software on page 16 for instructions.
Connecting the receiver
I I M P O R T A N T
lDo not connect the receiver to your computer until after you install SMART Response
software.
lFor operating safety and to prevent damage to the receiver, connect its USB connector only
to a computer that has a USB compliant interface and that bears the USB logo. In addition,
the USB source computer must be compliant with CSA/UL/EN 60950 and bear the CE mark
and CSA and/or UL mark(s) for CSA/UL 60950.
lThe receiver has a USB 2.0 full-speed peripheral interface that runs at speeds of up to 12
Mbps. The unit works with USB 2.0- and USB 1.1-compliant USB interfaces.
Recommended height for mounting the receiver
Unlike infrared devices, SMART Response receivers don’t require an unobstructed line-of-sight
transmission path, such as that required by infrared devices. You can operate SMART Response
over longer distances if you minimize interference, signal reflections and the number and size of
objects between the receiver and the clickers.
C H A P T E R 2
Getting started
11
Choose a location for the receiver that’s as high as possible and in plain view of the students’
clickers. For permanent installations, use a USB extender to mount the receiver high on a wall. To
minimize interference from other radio-frequency equipment, position the receiver away from other
wireless products, such as 2.4 GHz routers and cordless telephones.
W W A R N I N G
To prevent product damage or personal injury, route the USB cable where it will not be stepped on
or tripped over.
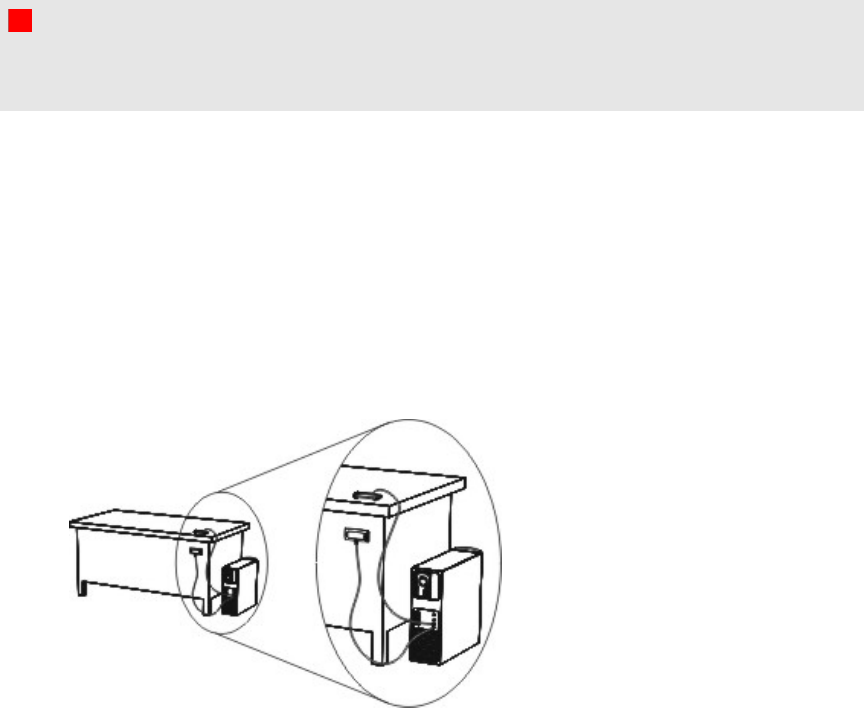
gTo connect the receiver
1. Position the receiver in an unobstructed location away from other wireless products, such as
2.4 GHz routers and cordless telephones.
oFor temporary installations, place the receiver on top of your desk.
oFor permanent installations, mount the receiver on a wall or on the front of a piece of
furniture using two screws (not provided).
Orient the receiver with the long side or edge facing the class as shown.
C H A P T E R 2
Getting started
12
2. Insert the receiver's captive USB cable connector into an available USB receptacle on your
computer.
The Ready light on the receiver turns on to indicate that the receiver is receiving power.
On Windows computers, the first time you connect the receiver, a balloon message appears
from the notification area indicating that new hardware has been detected.
I I M P O R T A N T
If the balloon message indicates that Windows is starting to try to locate a driver from the
Microsoft website, stop the search. If Windows does not find the driver on your computer,
you did not install SMART Response software. Install the software and repeat the above
procedure.
3. See Checking the receiver’s status on the next page to verify that the receiver is working
properly.
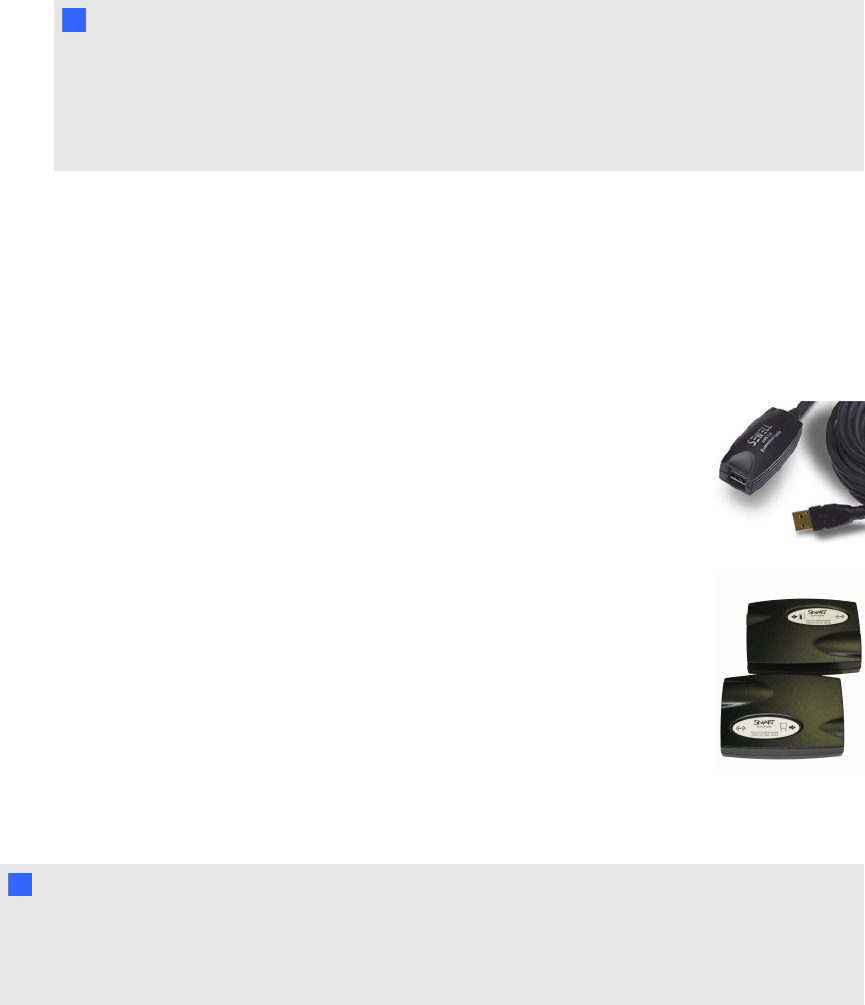
Extending the USB cable
If the provided 6' (1.8 m) USB cable attached to the receiver isn’t long enough, use active USB
extender cables, USB extenders or hubs.
This graphic shows the SMART active USB extension cable (Part No. USB-XT).
In some cases, you can use up to four cables to extend the length to about 80' (25
m), which is the limit of the USB specification. Passive USB extension cables
aren’t supported.
Alternatively, USB extenders that use Cat 5 cabling can extend the range to
approximately 325' (100 m) at a much higher cost. The more economical SMART
USB extender pair (Part No. CAT5-XT) can extend the USB connection up to 120'
(36.6 m) for Windows computers or 90' (27.5 m) for Mac computers using an RJ45
Cat 5 cable.
These units require that you use the provided 6' (1.8 m) cables or use cables and
connectors that meet the same specifications. Impedance mismatches and poor
connections can cause signal degradation and performance problems.
N N O T E
Some computers use internal active hubs to provide more USB receptacles. The computer’s
operating system could interpret these internal hubs as external devices, limiting the number of
USB extenders you can use.
C H A P T E R 2
Getting started
13

Checking the receiver’s status
If you connected the receiver, you're ready to start a class session. You can check the receiver’s
communication status at any time using the following procedure.
gTo check the receiver’s status
1. Click the SMART Response icon in the Windows notification area or Mac menu bar.
A message appears below the Configure Devices heading indicating how many receivers are
connected.
2. Click the icon below the Configure Devices heading.
Teacher Tools starts.
The Devices window appears showing a status message.
3. If a “Your SMART Response receiver is connected and working” message appears, the
SMART Response receiver is connected and communicating with the SMART Response
software. The receiver name appears below the Devices button.
Click My Receiver to display the classroom name and the make, model and hardware ID
(MAC address) of the receiver.
OR
If a “Your SMART Response receiver is not connected” message appears, the SMART
Response receiver isn’t connected or isn’t working properly. The receiver name doesn’t appear
below the Devices button.
Check the receiver connections or repeat the receiver installation. See Connecting the receiver
on page 11.
C H A P T E R 2
Getting started
14
Activating SMART Response software
You must activate your SMART Response software within 30 days of installation. SMART
Response software automatically activates when you connect your receiver.
lIf you are using SMART Response software in CE mode, see Activating SMART Response
CE software on the next page.
lIf you are using SMART Response software in VE mode, see Activating SMART Response
VE software on the next page.
N N O T E S
lYou must connect your computer to the Internet and connect the SMART Response receiver
to your computer before you can activate the software.
lAfter you find your license code, you don't need to connect the SMART Response receiver to
the other computers that you want to activate SMART Response software on.
After you complete the following procedure to find your license code, you can use the code to activate
SMART Response assessment software on other computers, as outlined in the License tab in the
About SMART Response dialog box.
gTo find the license code after the software is activated
1. Click the SMART Response icon in the Windows notification area or Mac menu bar, and
then select About SMART Response.
2. Record the license code that appears on the Description tab.
gTo activate SMART Response software on other computers
1. On the other computer, click the SMART Response icon in the Windows notification area
or Mac menu bar, and then select Check for Updates and Activation.
The SMARTProduct Update dialog box appears and displays the time remaining in your
software's evaluation period.
N N O T E
If your SMART Response software is already activated, the Status (Days Left) column
shows Activated beside SMART Response.
C H A P T E R 2
Getting started
15
2. Click Activate.
If your 30 day evaluation period has expired, the SMARTResponse Software Evaluation
Expired dialog box appears. Click Activate Now.
If you are within the 30 day evaluation period, the SMART Response Software Evaluation
dialog box appears and displays the time remaining in your software evaluation period. Click
Activate Now.
3. Type your license code and e-mail address, and then click Next.
Your SMART Response software activates.
Activating SMART Response CE software
You must activate SMART Response software within 30 days of installation. After you install the
software, use the following procedure to activate it.
gTo activate SMART Response CE software
1. Click the SMART Response icon in the Windows notification area or Mac menu bar, and
then select Check for Updates and Activation.
The SMARTProduct Update dialog box appears and displays the time remaining in your
software's evaluation period.
N N O T E
If your SMART Response software is already activated, the Status (Days Left) column
shows Activated beside SMART Response.
2. Click Activate.
3. Type your product key in the text box, select the I accept check box, and then click Next.
N N O T E
If you don't have a software license, contact your authorized local reseller through
smarttech.com/where.
Activating SMART Response VE software
You must activate SMART Response within 30 days of installation.
gTo activate SMART Response VE software
1. Click the SMART Response icon in the Windows notification area or Mac menu bar, and
then select Check for Updates and Activation.
C H A P T E R 2
Getting started
16

The SMARTProduct Update dialog box appears and displays the time remaining in your
software's evaluation period.
N N O T E
If your SMART Response software is already activated, the Status (Days Left) column
shows Activated beside SMART Response.
2. Click Activate.
3. Type your product key in the text box, select the I accept check box, and then click Next.
N N O T E
If you don't have a software license, contact your authorized local reseller through
smarttech.com/where.
Selecting how students answer questions
Students can answer questions using one of these options:
lSMART Response / Senteo clickers
lSMART Response PE clickers
lSMART Response LE clickers
lSMART Response XE clickers
lSMARTNotebookSE software on student devices
lSMART Response VE using Internet enabled devices
lMultiple SMART Response devices, optionally including SMART Response VE
Each of these options has a corresponding mode in SMART Response software. The first time you
start SMARTResponse software, it prompts you to select the operating mode. Subsequently, you
can select the appropriate mode for the devices in your classroom using the SMART Response
Setup Tool.
N N O T E S
lIf you have more than one type of SMART Response responding device in your classroom,
you can choose Multiple SMART Response devices mode, or you can choose the mode that
matches the type of device you’re using, and then use only that type of device while in that
mode.
C H A P T E R 2
Getting started
17
lSome question types aren't available in all responding modes. See About question types on
page 45 for more information.
lStudents can use SMART Response PE, SMART Response LE or SMART Response XE
clickers, SMARTNotebookSE (SMART Response CE) or Internet enabled devices
(SMART Response VE) while SMART Response is in Multiple SMART Response devices
mode, but there are some limitations. See Multiple SMART Response devices mode
limitations on the next page for more information.
gTo open the SMART Response Setup Tool on a Windows computer
1. Close SMART Notebook software and Teacher Tools if they're running.
2. Click the SMART Response icon in the Windows notification area or Mac menu bar, and
then select Setup Tool.
The SMART Response Setup Tool window opens.
gTo open the SMART Response Setup Tool on a Mac computer
1. Close SMART Notebook software and Teacher Tools if they're running.
2. Click the SMART Response icon in the or Mac menu bar, and then select Setup Tool.
The SMART Response Setup Tool window opens.
gTo select how students answer questions
1. Open the SMART Response Setup Tool.
2. Select one of the following options:
oSMART Response LE oSMART Response PE
oSMART Response XE oSMART Response / Senteo
oSMART Response VE oSMARTNotebookSE
oMultiple SMART Response devices
oInclude SMART Response VE
N N O T E S
oClasses that are running stop automatically.
oThe SMARTNotebookSE option isn't currently available for Mac OS X operating
system software.
C H A P T E R 2
Getting started
18

3. Click OK.
A message appears stating that your setup has changed. If you switch to SMART Response
VEor Multiple SMART Response devices mode, a message appears asking you to accept the
terms of use. Click I Accept.
When you start SMART Response software, your students can answer questions using the
device(s) you selected in step 2.
Multiple SMART Response devices mode limitations
In addition to using any available SMART Response clickers, students can use
SMARTNotebookSE software (SMART Response CE) or Internet enabled devices (SMART
Response VE) while SMART Response is in Multiple SMART Response Devices mode. This can be
particularly useful if you have a variety of responding devices in your class.
I I M P O R T A N T
You must be licensed to use all the devices you want to use in Multiple SMART Response Devices
mode. See Activating SMART Response software on page 15.
Why don't I use Multiple SMART Response devices mode all the time?
When in Multiple Devices mode, SMART Response software features are limited to those that all
modes share.
The following are examples of limitations when in Multiple SMART Response devices mode:
lStudents are unable to answer text questions.
lStudents are unable to answer SMART Response XE math expression questions.
lStudents can only answer the first question of an assessment when they use SMART
Response LE clickers.
lStudents are unable to answer multiple answer or mathematics questions when they use
SMART Response LE clickers.
C H A P T E R 2
Getting started
19

Starting SMARTResponse LE software the first
time
You can use SMARTResponse LE in two modes: Anonymous mode and Sign-in mode. See About
Sign In and Anonymous modes on page 62 for information about the operating modes..
Before you can use SMARTResponse LE in your classroom in Anonymous mode, you must
lassign a classroom name to the receiver, which you can do by creating a .teacher file, or by
starting an assessment in SMARTNotebook software.
lpair the students' clickers with the SMARTResponse receiver.
To use SMARTResponse LE in Sign-in mode, in addition to the above, you must
lassign clicker IDs to each student’s clicker (which you can do when you pair the clickers with
the receiver).
lcreate a class with a class list containing the clicker IDs.
N N O T E S
lYou’re unable to assign a classroom name while you install SMARTResponse software.
You can create a classroom name only after the software is installed and Teacher Tools
starts for the first time.
lIf you created a .teacher file on another computer, you can copy it to your computer and open
it instead of creating a new file.
Pairing student clickers
I I M P O R T A N T
You must connect the receiver and start a class before you can pair the clickers with the receiver.
gTo pair clickers with the SMARTResponse receiver
1. If a class isn’t running, start Teacher Tools. See Starting Teacher Tools on page 23.
Teacher Tools appears.
C H A P T E R 2
Getting started
20
2. Select Anonymous Mode, and then click Start Class.
The receiver’s Power light flashes and then turns solid green. The receiver’s Transmit light
flashes green.
3. Press the clicker's Power and Menu buttons simultaneously for two seconds.
Teacher Mode appears on the screen.
4. Using the clicker’s Up and Down buttons, select Scan & Pick, and then press Enter.
The clicker searches for available classrooms.
5. Use the clicker’s Up and Down buttons to select your class from the list, and then press
Enter.
If your connection is successful, a “Paired With RCV” message appears.
6. Use the Up and Down buttons to select Exit, or hold down the clicker’s Power button to turn
off the clicker.
7. Repeat steps 3 through 6 for the rest of your clickers.
You’re now ready to start a class and ask questions in Anonymous mode. See Asking instant
questions on the next page to ask single questions, or see Adding questions using the Insert
Question wizard on page 47 to create assessments.
Assigning clicker IDs
Before your students can connect and use their clickers, you must program each student’s clicker
with a unique clicker ID number. When your students connect to a class, SMART Response
software checks their clicker ID's against the class list to determine whether they are valid members
of the class.
If their clicker IDs aren't in the class list, the clickers don't connect.
gTo program clicker IDs into the clickers
1. If the clicker is turned on, press the clicker's Power button to turn it off.
2. Press the clicker's Power and Menu buttons simultaneously.
Teacher Mode appears on the clicker’s screen.
3. Use the Up and Down buttons to scroll to Clicker ID, and then press Enter.
C H A P T E R 2
Getting started
21
4. Use the Up and Down buttons to select a unique number between 1 and 199, and then press
the Menu button.
I I M P O R T A N T
Each clicker's ID must be unique and must correspond to the student’s clicker ID in your
class list. See Creating a class list on page 28 for information.
5. Use the Up and Down buttons to scroll to Exit, and then press Enter.
The clicker starts and is ready to use.
6. Repeat steps 1 to 5 for every clicker in your class.
Asking instant questions
Use the Instant Question feature to introduce the SMART Response interactive response system to
your students. Instant questions are individual questions you ask spontaneously—they aren't part of
an assessment. When you use the Instant Questions feature, you’re unable to type a question or
assign a correct answer.
You can ask an instant question verbally, write or type it on an interactive whiteboard and add objects
directly onto the SMART Notebook page.
N N O T E
Ensure that you start your class and that all students are connected before you ask an instant
question.
gTo ask individual questions using the Instant Question feature
1. Click the SMART Response icon in the Windows notification area or the Mac menu bar,
and then select Open Notebook Software.
A blank SMART Notebook page appears.
2. Click the Insert Question icon on the toolbar.
T T I P
If Insert Question isn't on the toolbar, you can right-click the toolbar and add it.
3. Click one of the Instant Question buttons.
The Instant Question dialog box appears asking whether you want to insert the question on this
page or on a new page.
C H A P T E R 2
Getting started
22
4. Select one of the options.
T T I P
If you want to use the same option by default, select the Always perform this action
option. You can change the default in the Preferences menu.
A SMART Notebook page appears showing the possible answers to the question. The
Response tab changes to Single Question, and the Progress button is selected.
The question starts automatically and appears on the student's display.
N N O T E
If you haven't started a class, a message appears asking you to select a class. Select a
class, and then click Start Class.
5. Present your question to the class.
6. After all students answer the question, click Stop this question.
7. To save the results, click Save .
To add another question without clearing the results of the previous question, don't click Clear,
and then repeat steps 2 to 6.
Setting up Teacher Tools
With Teacher Tools, you can
lcheck the status and performance of the receivers, clickers and students.
lselect Sign In mode or Anonymous mode of operation.
lmanage class lists.
lstart classes so that students can sign in.
When you open Teacher Tools for the first time, you create a SMART Teacher file. You can later edit
the SMART Teacher file and adjust the privacy options.
Starting Teacher Tools
When you start Teacher Tools for the first time, it opens to the Welcome to Teacher Tools view where
you can create a SMART Teacher file, manage class lists, generate class or student performance
reports and perform many other tasks.
C H A P T E R 2
Getting started
23
lIf this is the first time you're starting SMARTResponse software in LE mode, see Starting
SMARTResponse LE software the first time on page 20 for information.
gTo start Teacher Tools
Click the SMART Response icon in the Windows notification area or Mac menu bar, and then
select the icon below the Teacher Tools heading.
Teacher Tools appears in Gradebook view.
N N O T E
If SMARTNotebook software is open, you can also start Teacher Tools by selecting Response >
Teacher Tools.
Starting Teacher Tools in CE mode using SMARTSync Class List Server
When SMARTResponse software is in CE mode (using SMART Notebook SE software) and
connected to a SMARTSync Class List server, and you start Teacher Tools, a Welcome dialog box
appears. You can select one of the teacher names in the dialog box to load the Administered
Teacher's class information into Teacher Tools. See Using SMARTSync Class List Server class
lists on page 34 for more information.
Creating a SMART Teacher file
If you want to save all of your class lists and assessment results, you need to create a SMART
Teacher file. Your SMART Teacher file also enables your students to find and connect to your
classes when they connect in Sign In mode.
If you need to, you can create additional SMART Teacher files after you create the initial one.
gTo create a SMART Teacher file the first time you use SMART Response software
1. Click the SMART Response icon in the Windows notification area or Mac menu bar, and
then select the icon below the Teacher Tools heading.
The Welcome to Teacher Tools wizard appears.
N N O T E
The wizard appears only if you haven't created a SMART Teacher file.
2. Type your name and other information in the text boxes. The Save button is unavailable until
you provide all the required information.
3. Click Save.
ASave As dialog box appears.
C H A P T E R 2
Getting started
24

4. Type a file name, and then click Save.
The .teacher file saves and the Gradebook window appears displaying the teacher’s name.
gTo create an additional SMART Teacher file
1. Start Teacher Tools. See Starting Teacher Tools on page 23.
Teacher Tools appears.
2. Select File > New.
The Gradebook Information screen appears.
3. Type your information in the text boxes, and then click Save.
4. Browse to where you want to save your SMART Teacher file, and then click Save.
Editing your SMART Teacher file
The first time you started SMART Response Teacher Tools, you created a SMART Teacher file to let
your students find and connect to your class. See Creating a SMART Teacher file on the previous
page.
You can use the following steps to change the information in your SMART Teacher file.
gTo edit your SMART Teacher file
1. Start Teacher Tools. See Starting Teacher Tools on page 23.
Teacher Tools appears.
N N O T E
You're unable to edit your classroom name if a class is running.
2. Click Edit beside the Gradebook name.
The Edit Gradebook Information window appears.
3. Edit the information, and then click Done.
Adjusting privacy and alert options
You can set the level of student information that appears on your display and define whether you want
student sign-in and sign-out alerts to appear.
Using Privacy mode
By default, SMART Response software displays student information such as ID numbers and
grades. If you don't want to display sensitive information in front of your class you can turn Privacy
C H A P T E R 2
Getting started
25
mode on.
gTo hide private information
Click the Privacy: Off button in the upper right corner of the screen.
gTo display private information
Click the Privacy: On button in the upper right corner of the screen.
Changing alerts
You can set SMART Response software to display an alert message on your screen when students
sign in or out.
N N O T E
Alerts appear only when the SMART Response Desktop menu is running.
gTo set sign-in and sign-out alerts
1. Start Teacher Tools. See Starting Teacher Tools on page 23.
Teacher Tools appears.
2. Select Edit > Preferences (Windows computers) or Teacher Tools > Preferences (Mac
computers) from the menu bar.
The SMART Response Preferences dialog box appears.
3. Click the Alerts tab.
4. Select or clear the check boxes for the alerts you want to display or hide, and then click OK.
Applying encryption methods
You can set SMARTResponse CE software to use SSL or Diffie-Hellman encryption. SSL
encryption allows other programs to access SMARTResponse CE software. Diffie-Hellman
encryption (the default method) doesn't allow other programs to access SMARTResponse CE
software.
N N O T E
The system administrator can override this setting.
C H A P T E R 2
Getting started
26
gTo apply an encryption method
1. Start Teacher Tools. See Starting Teacher Tools on page 23.
Teacher Tools appears.
2. Select Edit > Preferences (Windows computers) or Teacher Tools > Preferences (Mac
computers) from the menu bar.
The SMART Response Preferences dialog box appears.
3. Click the Encryption tab.
4. Select Diffie Hellman or SSL Digital Certificate from the Method drop-down list.
If you selected SSL Digital Certificate, additional options appear:
oSelect Automatically generated certificate if you want SMART Response CE
software to generate and use a security certificate.
oSelect Imported certificate, and then browse to and select the certificate you want to
import, to use an existing certificate.
5. Click OK.
Configuring service ports
You can specify the ports SMARTResponse CE software uses for the file data channel and
encrypted data channel, or set the software to use random ports.
gTo specify the service ports
1. Start Teacher Tools. See Starting Teacher Tools on page 23,
Teacher Tools appears.
2. Select Edit > Preferences (Windows computers) or Teacher Tools > Preferences (Mac
computers) from the menu bar.
The SMART Response Preferences dialog box appears.
3. Click the Networking tab.
4. Clear the Randomize check boxes beside the Encrypted data channel and File data channel
boxes if they're selected, and then type the port numbers you want to use.
5. Click OK.
C H A P T E R 2
Getting started
27

gTo use random service ports
1. Start Teacher Tools. See Starting Teacher Tools on page 23,
Teacher Tools appears.
2. Select Edit > Preferences (Windows computers) or Teacher Tools > Preferences (Mac
computers) from the menu bar.
The SMART Response Preferences dialog box appears.
3. Click the Networking tab.
4. Select the Randomize check box beside the Encrypted data channel or File data channel
boxes.
5. Click OK.
Creating a class list
Before you can start a class in Sign In mode, you must have a class list. You can use Teacher Tools
to create a list, or you can import one from a Microsoft Excel® or comma separated values (CSV) file.
N N O T E
You don't need to create a class list if you're starting the class in Anonymous mode. For more
information, see About Sign In and Anonymous modes on page 62.
Creating a class list in Teacher Tools
gTo create a class list
1. Start Teacher Tools. See Starting Teacher Tools on page 23.
Teacher Tools appears.
2. Click Add a Class in the Gradebook area on the left.
3. Type a name for your class (for example, Math), add any optional details in the Class
Information boxes, and then click Add.
After a short delay, the new class's window appears and the class name appears in the
Gradebook area.
4. Click the Students tab at the top of the window.
C H A P T E R 2
Getting started
28

5. Click Add on the toolbar.
The Properties window appears below the table.
6. If you are using SMARTResponse LE clickers, type a unique number between 1 and 199 in the
Clicker ID box.
N N O T E
The clicker IDs in the class list must correspond with the IDs programmed into the student
clickers.
7. Type a unique 1 to 15 digit ID in the Student ID box.
8. Type a student's name in the Name boxes. The student's e-mail address and tags are optional.
You can also type name and ID information directly in the table.
N N O T E
You can use tags to categorize the students in custom groupings that SMARTResponse
software uses when you create student reports.
The student information saves to the class list as you type it.
9. Repeat these steps for each student.
Importing a class list from Excel
I I M P O R T A N T
This feature is supported by SMARTResponse software for Windows operating systems only.
If you use Microsoft Excel to maintain class lists, you can import an .xls or .xlsx file into Teacher
Tools to create a SMARTResponse class list. You might find it easier to copy the list of names in
your current Excel document into a new spreadsheet.
Creating class lists for all modes except LE
Use the following procedure to create class lists for classes that don't use LE clickers.
gTo create a class list in an Excel spreadsheet
1. Open the Excel spreadsheet that contains your students' names.
2. Insert a blank row at the top of the spreadsheet if it doesn't already have one.
3. Type ID Number in the first cell (A1).
4. Type First Name in the first cell of the second column (B1).
C H A P T E R 2
Getting started
29

5. Type Last Name in the first cell of the third column (C1).
6. Move the first and last names into the columns directly below the headings.
7. In column A, type a unique 1 to 15 digit ID number for each student.
EXAMPLE
A B C
1 ID Number First Name Last name
2 1234 David Jones
3 6789 Jane Doe
4 5678 John Swartz
5 3456 Mary Smith
8. Save the spreadsheet.
Creating class lists for LE mode
Use the following procedure to create class lists for classes that use LE clickers.
gTo create a class list in an Excel spreadsheet
1. Open the Excel spreadsheet that contains your students' names.
2. Insert a blank row at the top of the spreadsheet if it doesn't already have one.
3. Type ID Number in the first cell (A1).
4. Type Clicker ID in the first cell of the second column (B1).
5. Type First Name in the first cell of the third column (C1).
6. Type Last Name in the first cell of the fourth column (D1).
7. Move the first and last names into the columns directly below the headings.
8. In column A, type a unique 1 to 15 digit ID number for each student.
C H A P T E R 2
Getting started
30
9. In column B, type a unique clicker ID from 1 to 199 for each student's clicker.
EXAMPLE
A B C D
1 ID Number Clicker ID First Name Last name
2 12345 1 David Jones
3 67890 2 Jane Doe
4 56789 3 John Swartz
5 34567 4 Mary Smith
N N O T E S
oThe clicker ID must match the ID programmed into the student’s clicker. See
Assigning clicker IDs on page 21.
oIf you don’t include a Clicker ID column in the spreadsheet, SMART Response
software will insert sequential Clicker IDs into the class list. You must then match the
clicker IDs to the clickers either by editing the class list or by re-programming the
clickers.
10. Save the spreadsheet.
Importing the class list
gTo import a class list from an Excel spreadsheet
1. Start Teacher Tools. See Starting Teacher Tools on page 23.
Teacher Tools appears.
2. Click Add a Class in the Gradebook area on the left.
3. Type a name for your class, add any optional details to the Class Information boxes, and then
click Add.
After a short delay, the new class's window appears, and the class name appears in the
Gradebook area.
4. Click the Students tab at the top of the window.
5. Click the Import button at the top of the window, and then select Students.
The Import dialog box appears.
6. Select the class you want to import the student list into, and then click Next.
7. Select Microsoft Excel from the Import from list, and then click Next.
C H A P T E R 2
Getting started
31
8. Browse to and select the .xls or .xlsx file containing the class list, and then click Open.
After a short delay, the names and IDs from the spreadsheet appear in the Students page. You
can now edit each student's properties, as required.
Importing a class list from a CSV file
If you use a database or spreadsheet program to maintain class lists, you may be able to export class
lists as comma separated values (CSV) files. Refer to your database or spreadsheet program's Help
or user's guide for more information.
Creating class lists for all modes except LE
Use the following procedure to create class lists for classes that don't use LE clickers.
gTo create a class list in CSV format
After exporting your class list as a CSV file, format your file in a text editor so that the first three
values are ID Number,First Name and Last Name as shown below.
EXAMPLE
IDNumber,First Name,Last Name,
12345,John,Doe,
54321,Jane,Doe,
56789,Bob,Jones,
98765,Barb,White
For more information, see CSV file formatting on the next page.
Creating class lists for LE mode
Use the following procedure to create class lists for classes that use LE clickers.
gTo create a class list in CSV format
After exporting your class list as a CSV file, format your file in a text editor so that the first four values
are ID Number,Clicker ID,First Name and Last Name as shown below.
EXAMPLE
IDNumber,Clicker ID,First Name,Last Name,
12345,1,John,Doe,
54321,2,Jane,Doe,
56789,3,Bob,Jones,
98765,4,Barb,White
C H A P T E R 2
Getting started
32
For more information, see CSV file formatting below.
gTo import a class list from a CSV file
1. Start Teacher Tools. See Starting Teacher Tools on page 23.
Teacher Tools appears.
2. Click Add a Class in the Gradebook area on the left.
3. Type a name for your class, add any optional details to the Class Information boxes, and then
click Add.
After a short delay, the new class's window appears, and the class name appears in the
Gradebook area.
4. Click the Students tab at the top of the window.
5. Click the Import button at the top of the window, and then select Students.
The Import dialog box appears.
6. Select the class you want to import the student list into, and then click Next.
7. Select Comma Separated Values (CSV) from the Import from list, and then click Next.
8. Browse to and select the CSV file containing the class list, and then click Open.
After a short delay, the names and IDs from your CSV file appear in the Students page. You
can now edit each student's properties, as required.
CSV file formatting
Tips for formatting CSV files for importing class lists
The following is the general format you should use for CSV files:
The order of the columns isn't important, but the first row must contain the column headings
identifying what's in each column.
lYou must have a column with the heading ID Number.
oYou must put a single space between ID and Number.
oIn place of ID Number, you can use ID,Student ID or Number.
oIf you don't use a correct column name for the ID Number, the software is unable to
import the list.
C H A P T E R 2
Getting started
33

lSpecify student first and last names in separate columns.
oFor the student's given name, use First Name for the column heading.
oFor the student's family name, use Last Name as the column heading.
oYou must put a single space between First (or Last) and Name.
oIn place of First Name, you can use Given Name.
oIn place of Last Name you can use Last,Family Name or Surname.
lYou can also use the heading Full Name to import a single value that combines the first and
last names.
oYou must put a single space between Full and Name.
oIn place of Full Name, you can use Full or Name.
oIf you use Full Name, the software checks to see whether the first and last names are
separated by a comma (Last, First). If there isn't a comma, it separates the names with a
space (First Last).
oIf you put three or more names with spaces between them, the software uses the last
word as the last name and joins all of the first words to form the first name. For example,
"Michael John Smith" is split with the last name as Smith, and the first name as Michael
John.
N N O T E
If your spreadsheet or database software automatically inserts quotation marks around the comma
separated values, the software ignores them and the import works properly.
Using SMARTSync Class List Server class lists
When you use SMART Response software in CE mode, you can use class list information from a
SMARTSync Class List Server instead of using a class list you created using Teacher Tools.
Teachers using SMART Sync can create class list information and store it on their SMARTSync
Class List Server. When you start SMART Response Teacher Tools, you can then select which
teacher's class information to use for your class.
Alternatively, teachers using SMARTSync software can start a SMART Response class using their
class information.
C H A P T E R 2
Getting started
34

Editing a class list
After you create a class list, you can use Teacher Tools to edit it.
N N O T E S
lYou're unable to edit a class list or remove students from it if a class is running. However,
you can add students and import class lists after a class has started.
lWhen you use SMART Response in CE mode while connected to a SMARTSync Class List
Server, you can't make changes to the class list information stored on the server.
Editing student information
N N O T E
You’re unable to edit student information if a class is running.
gTo edit student information
1. Start Teacher Tools. See Starting Teacher Tools on page 23.
Teacher Tools appears.
2. Select the class from the Gradebook area on the left.
3. Click the Students tab.
The class list appears.
4. Select the student whose information you want to edit.
The Properties tab appears below the class list.
5. Type the changes into the Properties boxes.
6. Repeat steps 4 and 5 for each student.
Adding students to a class list
gTo add a student to a class list
1. Start Teacher Tools. See Starting Teacher Tools on page 23.
Teacher Tools appears.
2. Select the class from the Gradebook area on the left.
C H A P T E R 2
Getting started
35

3. Click the Students tab.
The class list appears.
4. Click Add on the toolbar.
The Properties tab appears below the class list.
5. Type a unique number of 1 to 15 digits in the Student ID box.
N N O T E S
oIf you are using SMART Response in CE mode, you can use up to 40 alphanumeric
characters in the Student ID box.
oStudents with alphanumeric IDs or IDs of more than 15 characters can't sign in using a
clicker or Internet-enabled devices (VE mode).
The student information saves to the class list as you type it.
6. Type a student's name in the Name boxes. The student's e-mail address and tags are optional.
You can also type name and ID information directly in the table.
T T I P
You can use tags to categorize the students in custom groupings that SMART Response
software uses when you create student reports. See Tagging students on the next page.
7. Repeat steps 4 to 6 for each student.
Removing students from a class list
N N O T E
You're unable to remove students from a class list if a class is running.
gTo remove a student from a class list
1. Start Teacher Tools. See Starting Teacher Tools on page 23.
Teacher Tools appears.
2. Select the class from the Gradebook area on the left.
3. Click the Students tab.
The class list appears.
4. Select the student you want to remove, and then click Delete on the toolbar.
C H A P T E R 2
Getting started
36
A message appears asking you to confirm the deletion.
5. Click Yes.
Tagging students
You can use tags to identify groups or categories of students. SMART Response software uses the
tags to sort student results when you generate class performance reports. For example, if you assign
the tags “Senior” and “Junior” to the students, SMART Response software adds a chart to the report,
with one bar for each of the two tags.
You can assign multiple tags to a student by separating the tags with a semicolon (;), for example
“Senior;Honors” and “Junior;Honors”. In this case, SMART Response software adds a chart to the
report, with three bars (one each for “Senior”, “Junior” and “Honors”).
You can also create tag subcategories by separating the tags with a colon (:). An example would be
“Gender:Male” and “Gender:Female”. In this case, SMART Response software generates a single
report section for “Gender” showing data grouped in “Male” and “Female” subcategories.
Changing a class's passing grade
When you create a class list, you define the passing grade for the class. You can change that grade
later if you want.
gTo change a class's passing grade
1. Start Teacher Tools. See Starting Teacher Tools on page 23.
Teacher Tools appears.
2. Select the class from the Gradebook area on the left.
3. Click Edit beside the class name.
The Edit Class Information window appears.
4. Edit the Passing Grade value, and then click Done.
C H A P T E R 2
Getting started
37

Chapter 3: Using SMARTResponse
software
About SMARTNotebook software 40
SMARTResponse software with SMARTResponse software 41
Setting SMART Response preferences in SMART Notebook software 41
Creating assessments 42
Creating an assessment 42
Adding content pages to the assessment 43
Defining feedback options 44
Adding questions to the assessment 45
About question types 45
Adding questions using the Insert Question wizard 47
About intelligent expression grading 48
Creating answer keys 51
Importing questions from a Word document 52
Example Word document question formats 53
Importing questions from an XML or SQZ file 54
Importing questions from a PDF file 55
PDF document formatting 56
Importing questions from ExamView HTML 57
Exporting ExamView tests 58
About ExamView HTML question importing 59
Setting answers for imported questions 60
Adding choices to a question 60
Tagging questions 61
Starting and connecting to a class 62
Before class begins 62
Safety tips for teachers 62
Starting a class 62
About Sign In and Anonymous modes 62
Starting a class in Anonymous mode 63
Starting a class in Sign In mode 64
Monitoring clickers 65
Chapter 3
39

Connecting to the class 66
Connecting in Anonymous mode 66
Connecting in Sign In mode 67
Manually connecting to a class 69
Locking sign-in 70
Disconnecting students from a class 71
Disconnecting all students 71
Disconnecting individual clickers using Teacher Tools 71
Students disconnecting manually 72
Using clickers 73
About SMARTResponse PE clickers 73
Changing SMARTResponse PE clicker settings 73
Answering yes or no questions 74
Answering true or false questions 74
Answering multiple choice questions 74
Answering multiple answer questions 75
Answering number, fraction or decimal questions 75
Answering text answer questions 77
About SMART Response LE clickers 78
Clicker Buttons 78
Using the Teacher mode menu 79
About SMART Response XE clickers 80
Asking questions 81
Completing assessments 82
Starting an assessment 82
Collecting question responses 86
Reviewing results after an assessment 86
Previewing results during an assessment 88
About SMARTNotebook software
Use SMARTNotebook collaborative learning software to save notes written on a SMART interactive
product or at your computer as a series of pages. You can use SMARTNotebook software to create a
presentation full of colorful clip art, graphics, text and Adobe Flash Player compatible files. Then you
can present that SMARTNotebook file, keeping your audience’s attention as you move and interact
with these objects. When your audience provides comments and suggestions, write their input on a
page using the pen tray tools or the pen buttons in SMARTNotebook software.
Because SMARTNotebook software works on many platforms, you can share files created on a
Windows computer with people who use a Mac computer. You can also export your
SMARTNotebook file as a cross-platform HTML or PDF file, or as a series of image files.
C H A P T E R 3
Using SMARTResponse software
40
SMARTResponse software with SMARTResponse software
The integration of SMARTResponse software with SMARTNotebook software means that you can
create question sets, import questions from Microsoft Word or XML files and start and stop question
sessions directly from SMARTNotebook software. You can export the class’s and individual
students’ results to a Microsoft Excel file or an HTML page. Using SMART Response software’s
printing feature, create handout materials, copies of the questions and graded results pages for each
student and for the class. This section introduces the SMARTResponse software features in
SMARTNotebook software. For more information about using other SMARTNotebook features,
refer to SMART Notebook’s online Help or the SMART website.
Setting SMART Response preferences in SMART Notebook software
You can customize the default behavior of some of SMART Notebook software's SMART Response
features.
gTo define how SMART Response software inserts instant questions
1. Select Response > Preferences from the SMART Notebook menu bar.
2. If you want the Insert Question button to insert the question on a SMART Notebook page that
already has notes or images on it, select Insert on the current page when possible.
If you want to create a new page containing your question, select Always insert on a new
page.
If you want SMART Response software to ask you each time, select Always ask before
inserting (default setting).
gTo define the Response tab options
1. Select Response > Preferences from the SMART Notebook menu bar.
2. Select Pie Chart or Bar Chart In the Default chart type for tab results drop-down list to define
the type of results chart you want to display by default.
3. If you want to display the Response tab immediately after you start an assessment so you can
immediately monitor the progress of the assessment, select Show the Response tab when
you start an assessment.
If you want to display the Response tab immediately after you stop an assessment so you can
immediately display the assessment results, select Show the Response tab when you stop
an assessment.
C H A P T E R 3
Using SMARTResponse software
41

Creating assessments
You can use SMART Notebook software to create assessments.
Creating an assessment
By creating assessments, you can collect results for each question and for the entire assessment at
the same time. You can define feedback options that show whether students answered correctly,
what the correct answer was and how the class performed on the question or the entire assessment.
You can install SMART Response software on any computer to create question sets that you can
later copy to and run on the computer system in your classroom.
N N O T E
You're unable to run assessment files on a computer with standard SMART Notebook software
installed. You must have SMART Notebook software that includes SMART Response software.
gTo create an assessment
1. Click the SMART Response icon in the Windows notification area or Mac menu bar, and
then select Open Notebook Software.
A blank SMART Notebook page appears.
2. Click the Response tab.
T T I P
On Windows computers, you can clear the Auto-hide option to keep the options visible while
you work on your assessment.
3. Click Title Page.
The Insert Title Page dialog box appears.
4. In the top text box, type a title for your assessment.
5. Select the type of assessment you want to create, and then click Add. Optionally, you can
type Subject and Topic information.
Title page information appears on the SMART Notebook page, and the Response tab displays
several options that enable you to customize your assessment.
C H A P T E R 3
Using SMARTResponse software
42

gTo edit the assessment title page and description
1. On the SMART Notebook page, double-click the title, grade, subject or date text to change its
properties or edit the text.
2. Click the Response tab.
3. In the Description area, edit the options you defined when you created the assessment.
N N O T E
If you edit the SMART Notebook page, the Description information doesn't change.
Similarly, if you edit the Description information, the SMART Notebook page doesn't change.
gTo add question and content pages to your assessment
See Adding questions to the assessment on page 45 and Adding content pages to the assessment
below.
gTo save your assessment
1. Click Save .
ASave As dialog box appears.
2. Browse to a folder, type a file name, and then click Save.
Adding content pages to the assessment
You can add content pages anywhere in your assessment to introduce questions or provide
background information.
gTo add a content page
1. Create your assessment. See Creating an assessment on the previous page for more
information.
2. Click the Page Sorter tab, and then select the page you want to insert a content page after.
3. Click the Response tab.
4. Click the Next Steps tab.
5. Click Make the next page a content page.
A blank page appears.
C H A P T E R 3
Using SMARTResponse software
43
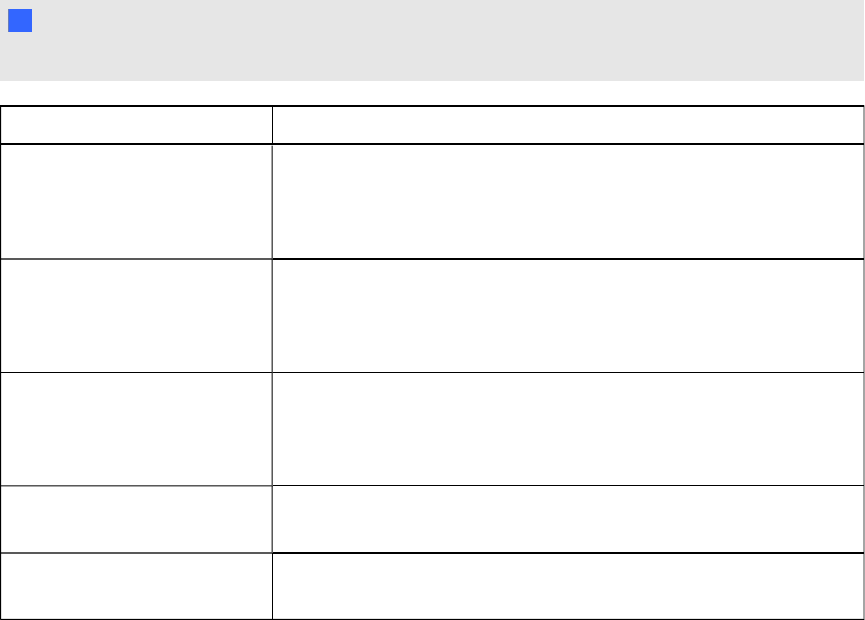
6. Use SMART Notebook's tools to add text, images or Adobe Flash Player compatible files from
the Gallery.
Defining feedback options
Feedback options allow you to show your students their individual grades, the correct answers and
the class average.
N N O T E
The feedback options available vary depending on the SMART Response mode.
Feedback option Description
After you stop collecting
responses
The students can see how they answered and see their grades after
you click Stop.
If you select this option, you can also choose to show the correct
answers with grades and show class average.
After all questions are
answered
The students can see how they answered and see their grades after
they finish answering all questions.
If you select this option, you can also choose to show the correct
answers with grades and show the class average.
After each question is
answered
The students can see how they answered each question and see
their grades after they finish answering all questions.
If you select this option, you can also choose to show the correct
answers with grades and show class average.
Don't show students their
grades
The students can't see how they answered or their grades.
Don't allow students to save
assessment
Students using SMARTNotebook SE software can't save the
assessment to their binders after they finish.
gTo define feedback options
1. Create your assessment. See Creating an assessment on page 42 for more information.
2. On the Response tab for the assessment's title page, select one of the options described in the
previous table from the Show results to students drop-down list.
C H A P T E R 3
Using SMARTResponse software
44
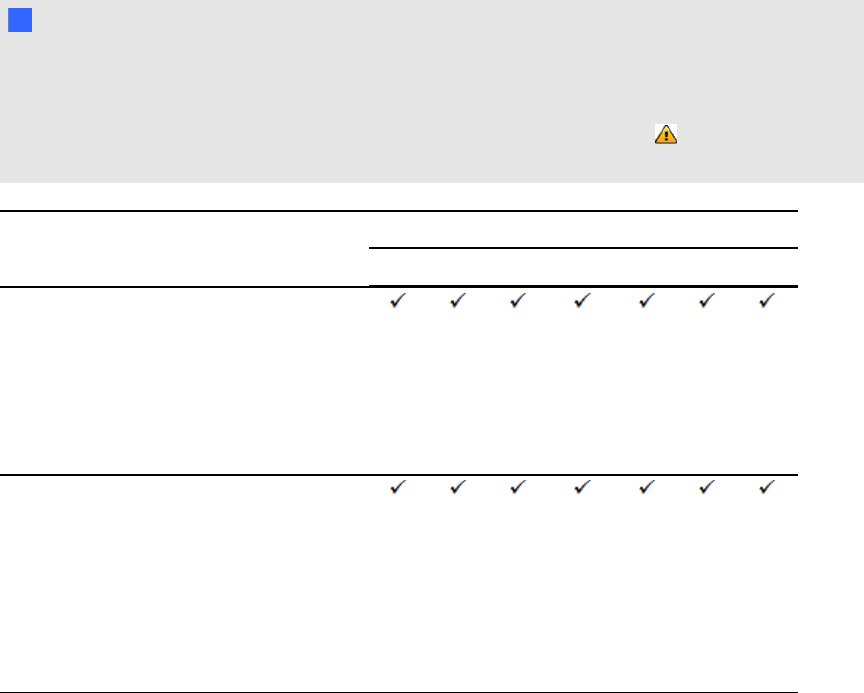
Adding questions to the assessment
SMART Response supports up to seven question types depending on the device students use to
answer questions.
You can add questions to the assessment using the Insert Question wizard or by importing questions
from a Microsoft Word document, XML file, SQZ file, PDF file (Mac only) or ExamView® HTML file.
After you create a question, you can add choices to it or tag it.
About question types
Using SMART Response software, you can ask the following types of questions either individually or
as question sets. You can also add notes to any question type that appears when you print the
question results.
N N O T E S
lOpinion questions don’t have a correct answer and aren’t worth points.
lIf you include a question of a type that isn't supported in the SMARTResponse mode you're
using, the question appears with an Unsupported Question Type icon in the Page Sorter
tab in SMART Notebook software.
Question
type
Description Students can answer with
Std. PE LE NBSE XE VE Multi
Yes or no Students use the Y(green on
LEclickers) or N(red on LE
clickers) button to answer a
question. You can also
choose the Opinion option
to allow either answer.
True or
false
Students use the True (green
on LEclickers) or False (red
on LE clickers) button to
answer a question. You can
also choose the Opinion
option to allow either answer.
C H A P T E R 3
Using SMARTResponse software
45

Question
type
Description Students can answer with
Std. PE LE NBSE XE VE Multi
Multiple
choice
Students use a single button,
Athrough J, to answer the
question. Select from 2 to 10
answers (2 to 5 answers for
LE clickers) for a question.
You can also choose the
Opinion option to allow any
answer.
Multiple
answer
Students use the Athrough J
buttons to select the correct
combination of answers to
the question. Select from 2 to
10 answers for the question.
You can also choose the
Opinion option to allow any
combination of answers.
Number,
fraction or
decimal
Students use the number
buttons to answer questions
with numeric answers using
whole numbers, fractions or
decimals. You can also
choose the Opinion option
to allow any answer.
Text
answer
Students type the answer to
the question. You can
choose the Opinion option
to allow any answer. There is
a 20-character limit on text
answer questions.
Number,
fraction or
expression
Students use math symbols
and numeric values to
answer the question. There
is a 30-character limit on
expression answers.
C H A P T E R 3
Using SMARTResponse software
46
Adding questions using the Insert Question wizard
With SMART Notebook software, you can ask your students questions and collect their answers.
gTo add a question using the Insert Question wizard
1. Click the SMART Response icon in the Windows notification area or Mac menu bar, and
then select Open Notebook Software.
A blank SMART Notebook page appears.
2. Click Insert Question on the toolbar.
T T I P
If Insert Question isn't on the toolbar, you can right-click the toolbar and add it.
The Insert Question wizard appears.
3. Click the thumbnail of the question type you want to add, and then click Next.
4. Type the question in the text box.
5. If you use tags to create categories in your reports, type them in the Tags box using the
examples, and then click Next.
6. For yes or no and true or false questions, select the correct answer or the Opinion option.
For number, fraction or expression questions, type the correct answer or select the Opinion
option.
For multiple choice or multiple answer questions, select the number of answers, type the
answers in the text boxes, click Next, and then select the correct answers or the Opinion
option.
For text answer questions, type one to four acceptable answers or select the Opinion option.
See Note 1 below.
For number, fraction or expression questions, use the expression editor to create the
expression question, and then use the editor to create a correct expression answer. See Note 2
below.
7. Type the number of points the student receives for a correct answer.
T T I P
The value can be a whole or decimal number.
8. If you want to create more questions, click Insert Another, and then repeat steps 2 to 7.
C H A P T E R 3
Using SMARTResponse software
47
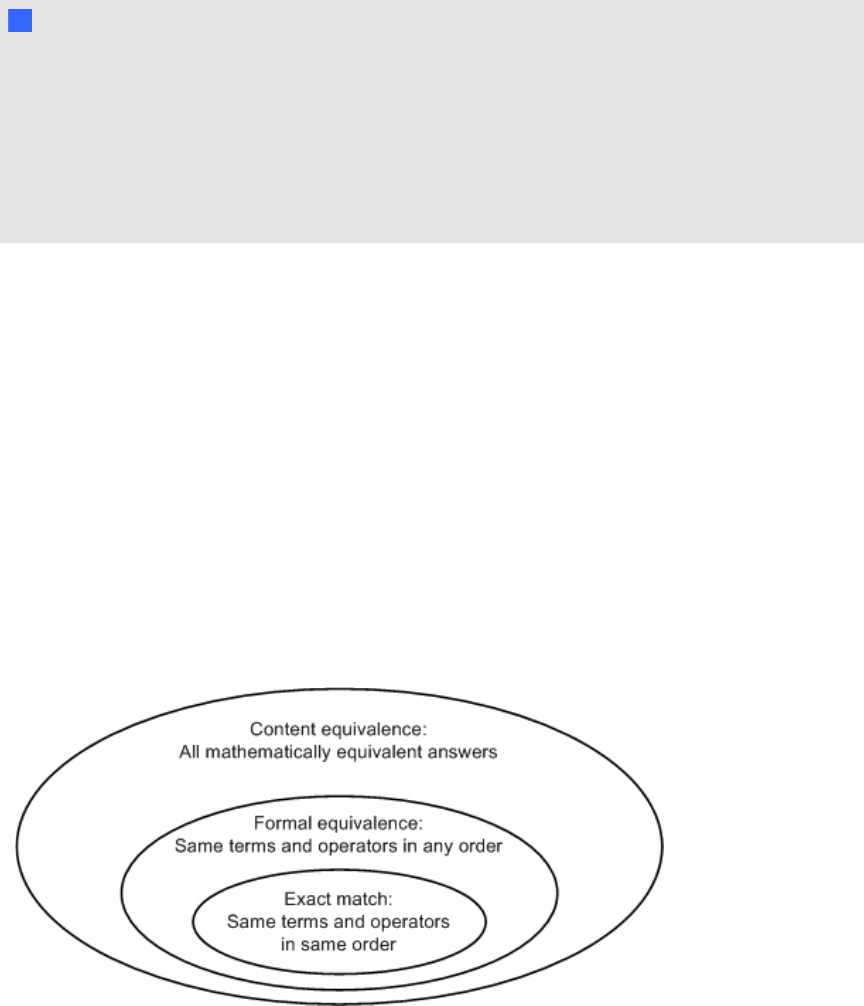
9. Click Finish.
10. Optionally, use SMART Notebook's tools to add images or Adobe Flash Player compatible
files from the Gallery.
N N O T E S
1. Text answer questions are case-sensitive. You can enter up to four answers to support
different capitalizations (for example, "iron", "Iron" and "IRON").
2. SMARTResponse XE software's intelligent expression grading feature compares the
student responses to the correct expression answer to determine whether it is equivalent
based on the Intelligent Grading settings you define. See About intelligent expression
grading below for more information.
About intelligent expression grading
When you create an expression question and correct answer, intelligent expression grading accepts
multiple representations of that answer expression as correct.
A student’s answer is always graded correct if it:
lmatches the question's correct answer exactly
lhas a different representation, but is mathematically equivalent and uses the same terms and
operators in the same order as the question's correct answer
You can use intelligent grading options to decide which other mathematically equivalent answers to
accept as correct. The following graphic shows the three levels of equivalency that you can define for
your questions.
C H A P T E R 3
Using SMARTResponse software
48
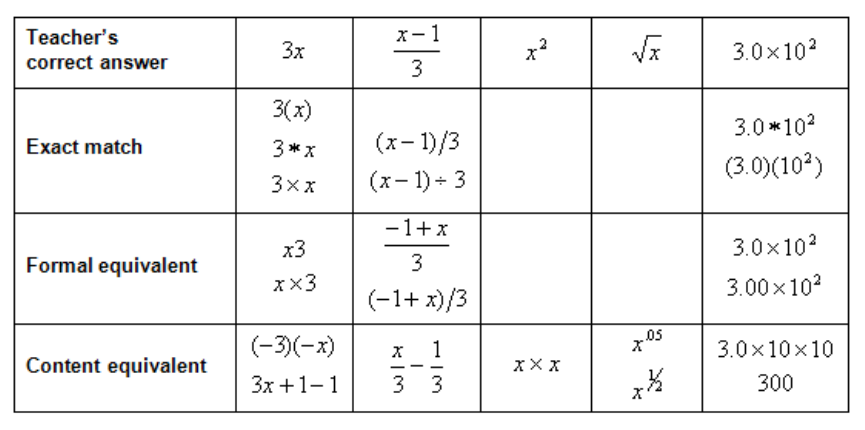
The following table shows examples of how SMARTResponse software's intelligent expression
grading compares expression answers to the question's correct expression answer.
C H A P T E R 3
Using SMARTResponse software
49
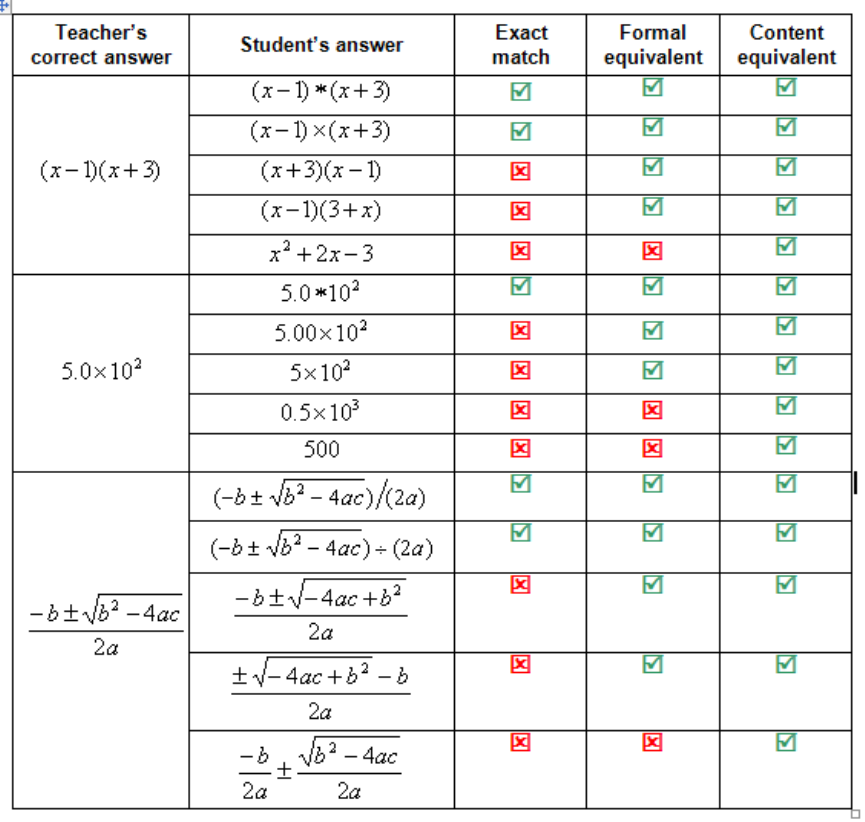
The following table shows examples of how student answers would be graded depending on which
equivalency option you chose.
C H A P T E R 3
Using SMARTResponse software
50

Creating answer keys
If you already have a quiz or assessment in another format, such as in a hardcopy format, or in a
multimedia file, you can create an answer key for that assessment to record the assessment's
progress and student's grades. You can then use SMART Response tools to generate, export and
print assessment and student reports.
When you create an answer key you create a SMARTNotebook file containing a series of SMART
Response question pages showing possible answers to your assessment questions but without
question content. When you start your assessment, students can use SMART Response devices to
answer the questions at their own pace.
N N O T E
The question options available when you create your answer key change depending on SMART
Response operating mode you are using. See Selecting how students answer questions on page
17.
gTo create an answer key
1. Click Response >Create Answer Key.
The Create Answer Key dialog box appears.
2. Type a title in the Title box.
3. Select an option from the Type drop down list.
4. Select the thumbnail for the type of question you want.
The correct answer options available depend on the question type you select.
5. Select or type the correct answer, or the Opinion option for this question.
6. Adjust the points value and create tags for this question, if required.
7. If you selected Multiple answer,Text or Number, fraction, expression questions in step 4, click
Add.
The Questions table updates showing your selection.
8. Repeat steps 4 through 7 for each question.
9. Click Create.
SMARTNotebook software adds pages for each question, preceded by a title page.
10. Click File > Save As, type a file name, and then click Save.
C H A P T E R 3
Using SMARTResponse software
51

You can now start the assessment, and ask the students to respond to the questions. Refer to
Starting and connecting to a class on page 62 for information. You can edit your answer key using the
same procedures found in Adding questions to the assessment on page 45.
Importing questions from a Word document
I I M P O R T A N T
This feature is supported on SMART Response software for Windows computers only.
When you import questions from a Microsoft Word document, SMART Response software's
conversion utility uses a variety of techniques to identify which paragraphs are questions, which
paragraphs are possible answers and what type of question to create from the given information. Its
most basic technique is to interpret the numbering of the paragraphs. The software also searches for
key words when parsing the paragraphs. The software then converts the paragraphs into SMART
Notebook assessment pages. See Example Word document question formats on the next page for
more information.
N N O T E
SMART Response software is unable to provide the correct answers to imported questions.
gTo import questions from a Word document
1. Click the SMART Response icon in the Windows notification area, and then select Open
Notebook Software.
A blank SMART Notebook page appears.
2. Select Response > Import Question From > Microsoft Word.
The Open dialog box appears.
3. Browse to and select the Word document, and then click Open.
A progress bar appears and closes when the conversion is complete.
4. In the Page Sorter tab, select the thumbnail for the title page.
5. Optionally, edit and customize the title page and description.
6. In the Page Sorter tab, select the thumbnail for the first question page and check it carefully to
verify that the conversion process was successful.
7. Repeat step 6 for all questions in the assessment.
After you import the questions, see Setting answers for imported questions on page 60.
C H A P T E R 3
Using SMARTResponse software
52

Example Word document question formats
The following list of questions is an example of how to format your Word document before you import
it into SMARTResponse software.
N N O T E
Some SMARTResponse modes don't support all of the following example question types. See
Selecting how students answer questions on page 17 for more information.
1. According to the U.S. Census Bureau, the majority of poor children live in:
a. urban areas
b. suburban areas
c. rural areas
2. Can you fill a 10 L aquarium with five 2 L pitchers of water?
Yes
No
3. True or false: Half of all even whole numbers are divisible by 4.
True
False
4. Let x = 3. Compute y from the equation below.
y = 20 - 4x
Answer: ____________________________
5. Which Native American group lived in the highlighted area on the map?
a. Kwakiutl
b. Sioux
c. Iroquois
N N O T E
Ensure that you format the questions in your Word document like the ones in these examples
before you import the file. In most cases, the import utility ignores headers and footers in the Word
document.
C H A P T E R 3
Using SMARTResponse software
53
Importing questions from an XML or SQZ file
SMART Response software includes an import feature for converting questions from ExamView
format XML files or SMARTSync™ classroom management software SQZ files into question sets.
SMART Response software uses the tags in the XML and SQZ files to extract questions, answers
and correct responses, and then converts the information into assessment pages.
I I M P O R T A N T
You must have or create an ExamView formatted XML text file or a SMARTSync software SQZ
file before you can perform this procedure. Binary ExamView formatted files are not supported.
gTo import questions from an XML or SQZ file
1. Click the SMART Response icon in the Windows notification area or Mac menu bar, and
then select Open Notebook Software.
A blank SMART Notebook page appears.
2. Select Response > Import Question From > XML.
The Open dialog box appears.
3. Browse to and select an XML or SQZ file, and then click Open.
A progress bar appears, followed by the title page for the new question set.
4. In the Page Sorter tab, select the thumbnail for the first question page.
5. Add a title page to the assessment, and then customize the page and description as desired.
6. Edit and customize the first question page as desired.
Check the question carefully, including the correct answer (see below), to verify that the
conversion process was successful.
7. Repeat step 6 for all questions in the set.
8. Click Save .
ASave As dialog box appears.
9. Browse to a folder, type a name for the file, and then click Save.
After you import the questions, see Setting answers for imported questions on page 60
C H A P T E R 3
Using SMARTResponse software
54

Importing questions from a PDF file
I I M P O R T A N T
This feature is available only with SMART Response for Mac computers.
When you import questions from a PDF file, the SMART Response conversion utility interprets the
numbering of the paragraphs. The software also recognizes key words when parsing the paragraphs.
The software then converts the paragraphs into SMART Notebook assessment pages.
I I M P O R T A N T
Ensure that you format the questions in your PDF file like the ones in PDF document formatting on
the next page before you begin this procedure.
gTo import questions from a PDF file
1. Click the SMART Response icon in the Mac menu bar, and then select Open Notebook
Software.
A blank SMART Notebook page appears.
2. Select Response > Import Question From > PDF File.
The Open dialog box appears.
3. Browse to and select the PDF file, and then click Open.
A progress bar appears and closes when the conversion is complete.
4. In the Page Sorter tab, select the thumbnail of the title page.
5. Edit and customize the title page and description.
6. Edit and customize the first question page.
7. Check the question carefully to verify that the conversion process was successful.
8. Repeat steps 6 and 7 for all questions in the assessment.
After you import the questions, see Setting answers for imported questions on page 60
C H A P T E R 3
Using SMARTResponse software
55

PDF document formatting
The text below shows examples of multiple choice questions formatted so that SMART Response
software can easily convert them to question pages.
1. How is the boy involved in the dog’s care?
a. He feeds the dog twice a day.
b. He walks the dog once a day.
c. He cleans up the dog’s messes.
d. He gives the dog a lot of affection.
2. What percentage of the U.S. Government budget goes to welfare and Social Security?
a. 25% to welfare and 25% to Social Security
b. less than 1% to welfare and 20% to Social Security
c. 20% to welfare and 1% to Social Security
d. less than 1% to welfare and less than 1% to Social Security
N N O T E S
lYou can import only multiple choice questions.
lRemove headers and footers from your PDF file because the import utility will attempt to
convert them into questions.
lIntroduction, background or source information not related to questions should be on
separate pages.
lText and graphics that the import utility can't convert into questions are imported to a
SMART Notebook page as a graphic.
C H A P T E R 3
Using SMARTResponse software
56

Importing questions from ExamView HTML
You can import ExamView 5.2.0 and 6.2.1 HTMLquestion files into a SMARTResponse
assessment. See Exporting ExamView tests on the next page for information about exporting
HTMLquestion files from ExamView.
N N O T E
SMART Response is unable to identify the correct answers to imported questions. You must set
the correct answers after you import the questions. See Setting answers for imported questions on
page 60.
gTo import questions from an ExamView HTML file
1. Click the SMART Response icon in the Windows notification area or Mac menu bar, and
then select Open Notebook Software.
A blank SMART Notebook page appears.
2. Select Response > Import Question From > ExamView HTML.
The Open dialog box appears.
3. Browse to and select the HTMLfile, and then click Open.
A progress bar appears and closes when the conversion is complete.
4. In the Page Sorter tab, select the thumbnail for the title page.
5. Optionally, edit and customize the title page and description.
6. In the Page Sorter tab, select the thumbnail for the first question page and check it carefully to
verify that the conversion process was successful.
See About ExamView HTML question importing on page 59 for information about how
ExamView questions are converted to SMARTResponse questions.
7. Repeat step 6 for all questions in the assessment.
After you import the questions, see Setting answers for imported questions on page 60.
C H A P T E R 3
Using SMARTResponse software
57

Exporting ExamView tests
You can export ExamView 5.2.0 and 6.2.1 online tests as HTML documents.
gTo export an HTMLtest document from ExamView 5.2.0
1. In ExamView Test Generator 5.2.0, select File > Publish Online Test.
The Publish Online Test dialog box appears.
2. In Step 1, type a title for the assessment.
3. In Step 2, select the Save test as an HTMLdocument to your hard drive option, and then
click Next.
4. In Step 3, select the Publish a study guide option, and then click Next.
I I M P O R T A N T
If you do not select the Publish a study guide option, you must manually add answer
information to the questions.
T T I P
You can also select the Show Rational,Show Feedback and Show Reference options.
SMARTResponse converts any notes in the rational, feedback and reference boxes to
SMARTNotebook notes.
5. Type a file name for the HTML file, and then click OK.
ExamView creates the HTMLfile and a _files folder containing all the image files used in the
test.
gTo export an HTMLtest document from ExamView 6.2.1
1. In ExamView Test Generator 6.2.1, select File > Export to HTML.
The Export to HTML dialog box appears.
2. Type a title for the assessment, select the Export as study guide option, and then click OK.
T T I P
You can also select the Show Rational,Show Feedback and Show Reference options.
SMARTResponse converts any notes in the rational, feedback and reference boxes to
SMARTNotebook notes.
3. Type a file name for the HTML file, and then click OK.
ExamView creates the HTMLfile.
C H A P T E R 3
Using SMARTResponse software
58

About ExamView HTML question importing
The following table shows how SMARTResponse software imports ExamView HTML question files.
This ExamView question type Imports as this SMARTResponse question type
True or false True or false
Modified true or false
This is a two-part question: if the
answer is false, the student modifies
the question to make it true.
True or false
Multiple choice Multiple choice
Choice labels import in uppercase letters. Custom choice
labels don't import.
Multiple answer Multiple answer
Choice labels import in uppercase letters. Custom choice
labels don't import.
Yes or no Yes or no
Numeric response If the original answer is a decimal or fraction value, it
imports as a Numeric, decimal, fraction question.
If the original answer is a math expression, it imports as an
Opinion Numeric, fraction, expression question.
Short answer or text answer Text answer
Only the first 20 characters of the answer import.
Matching Content page
Problem Text answer
Only the first 20 characters of the answer import.
Essay Text answer
Only the first 20 characters of the answer import.
Case Text answer
Only the first 20 characters of the answer import.
Other Text answer
Only the first 20 characters of the answer import.
C H A P T E R 3
Using SMARTResponse software
59
Setting answers for imported questions
After you import questions, you can set or change the answers to your assessment questions.
gTo set the answers for imported questions
1. In the Page Sorter tab, select the thumbnail for the first question page.
2. Select Response > Set All Answers.
The Set All Answers dialog box appears.
3. Type or select the correct answers from the options for all questions, and then click Done.
4. Click Save .
ASave As dialog box appears.
5. Browse to a folder, type a file name, and then click Save.
You can run the question set on this computer or copy the SMART Notebook file to any
computer that has SMART Response software installed.
Adding choices to a question
After you create a question, you can add choices to it.
gTo add a choice to a question
1. Click the Page Sorter tab.
2. Select the thumbnail of the question page you want to add a choice to.
3. Select Response > Add Choice.
4. Follow the on-screen instructions.
5. If you have to change the correct answer for the question, select Response > Set All
Answers, and then make the changes.
N N O T E
If you add choices to a true/false, yes/no, number/faction/decimal or text answer question,
the question changes to multiple choice.
C H A P T E R 3
Using SMARTResponse software
60

Tagging questions
Using the Insert Question wizard, you can add tags to the questions you create in SMART Notebook
software. You can also add or change the tags to questions after you finish creating an assessment.
You can use tags to identify groups or categories of questions. SMART Response software uses the
tags to sort responses to questions when you generate Student Performance and Class Performance
reports. For example, if you assign the tags "Difficult" and "Easy" to the questions,
SMARTResponse software creates a chart in the report for questions with "Difficult" and "Easy"
tags.
You can assign multiple tags to a question by separating the tags with a semicolon (;), for example,
"Science;Nature" and "Science;Astronomy". SMART Response software then generates one chart
with three bars for "Science", "Nature" and "Astronomy".
You can also create tag subcategories by separating the tags with a colon (:), for example,
"Science:Basic" and "Science:Advanced". In this case, SMART Response software generates a
single report section for "Science" showing data grouped into "Basic" and "Advanced" subsections.
gTo add or change tags in existing questions
1. Click the SMART Response icon in the Windows notification area or Mac menu bar, and
then select Open Notebook Software.
A blank SMART Notebook page appears.
2. Select File > Open, and then select your assessment file.
The SMART Notebook file appears displaying the title page.
3. Select the thumbnail for the question page you want to add tags to.
The question page appears.
4. Click the SMART Response tab, and then select the Properties tab.
5. If the Tags box isn't visible, click Show beside the Answer Key heading.
6. Type your tags in the Tags box. When you finish, click the page.
7. Press Page Up or Page Down to select other questions as required, and then repeat step 6.
8. Save your assessment.
C H A P T E R 3
Using SMARTResponse software
61

Starting and connecting to a class
To use SMART Response interactive response system in your classroom, you must start a class
and allow students to connect to it. You can monitor the student connections during the class and
disconnect them when the class is done.
Before class begins
Safety tips for teachers
When using SMART Response with a SMART Board interactive whiteboard and a projector:
lTell students not to look directly at the light beam from the projector. Instead, encourage them
to keep their back to the projector when working at the interactive whiteboard. Before they turn
to face the class, they should take a big step (or two) sideways.
lMake sure you don’t look directly into the light beam from the projector. Keep your back to the
class when you write over a projected image. Step to the side of the interactive whiteboard
before you turn to face the class.
lTell your students not to touch the projector, because it can become extremely hot during
normal operation.
lDon’t use a chair to increase a student’s reach. If your students can’t reach the top of the
interactive whiteboard, lower it. You may need to remount a wall-mounted unit to a lower
position. If your interactive whiteboard is mounted on a floor stand, lower it with the help of
another adult.
lTell students not to run in the vicinity of the floor stand, because they could trip over the floor
stand’s feet.
Starting a class
You can start a class in Sign In mode or Anonymous mode.
About Sign In and Anonymous modes
Before you start a class session, you must decide whether you want the system to operate in Sign In
mode or Anonymous mode. This table summarizes the characteristics of each mode.
Sign In mode Anonymous mode
Teachers use a class list that identifies each
student by name and ID number.
Teachers can operate the system without a class
list.
Students can connect to the class, but they must
sign in with their assigned ID numbers.
Students can connect to the class without
identifying themselves.
C H A P T E R 3
Using SMARTResponse software
62

Sign In mode Anonymous mode
Teachers can control when students can sign in
by locking a class.
Teachers can't control when students using
clickers can sign in to their class.
Under the teacher's control, students can see
their own grades, but they can't see any other
students' grades.
Under the teacher's control, students can see
their own grades, but they can't see any other
students' grades.
If the Remember names check box is selected,
teachers can identify individual students as they
connect to the class.
Teachers can see how many students are
connected.
Teachers can use Gradebook to save and
analyze student and class performance over
time.
Teachers are unable to save and analyze student
and class performance over time.
Teachers can generate student and class
reports.
Teachers are unable to generate student or class
performance reports.
Teachers can see, export and print the total class
grade.
Teachers can see, export and print the total class
grade.
Teachers can see, export and print total scores
for each question.
Teachers can see, export and print total scores
for each question.
Teachers can see, export and print each
student's grade for each question and for the
whole assessment.
Teachers are unable to identify student names or
individual grades.
Teachers can review results during the
assessment in the Response tab for the class as
a whole and for individual students (if the
Remember names check box is selected).
Teachers can view results for the class as a
whole during the assessment in the Response
tab.
Starting a class in Anonymous mode
You don't need a class list to operate SMART Response software in Anonymous mode. See About
Sign In and Anonymous modes on the previous page for more information.
gTo start a class in Anonymous mode
In SMARTNotebook software, select Response > Start Class, and then select Anonymous
Mode.
lIf students are using clickers,the receiver’s Ready light flashes and then turns solid green, and
the receiver's Transmit light flashes green.
lIf SMARTResponse software is in CE mode, the name of the SMARTTeacher file and class
information appears in the student's SMARTNotebook SE Quick Links tab.
You can now ask the students to connect.
C H A P T E R 3
Using SMARTResponse software
63
N N O T E S
lYou can start a class and the assessment at the same time in SMARTNotebook software
by selecting Response >Start Assessment.
If you don't have a class list, the class starts in Anonymous mode. If you do have a class list,
a list of classes appears where you can select Anonymous mode.
lYou can also start a class in Teacher Tools.
lIf the students are already signed in to a class using clickers or SMARTNotebook SE
software and you select Anonymous Mode, the software switches to Anonymous mode.
lIf the students are connected in Anonymous mode and you start a class that requires sign-in,
the students are signed off and then asked to sign in.
Starting a class in Sign In mode
When you use SMART Response software in Sign In mode, you can monitor each student’s
responses and create reports on student and class performance. For more information, see About
Sign In and Anonymous modes on page 62.
N N O T E
Before you can start a class and have students connect in Sign In mode, you must have a class
list. If you don't have a class list, you can create or import one. See Creating a class list on page
28.
I I M P O R T A N T
Before you can use SMART Response LE software in LE mode, you must
lassign clicker IDs to each student’s clicker. See Pairing student clickers on page 20.
lcreate a class with a class list containing the clicker IDs. See Creating a class list in Teacher
Tools on page 28.
gTo start a class in Sign In mode
In SMARTNotebook software, select Response > Start Class, and then select Sign In Mode.
lIf students are using clickers,the receiver’s Ready light flashes and then turns solid green, and
the receiver's Transmit light flashes green.
lIf SMARTResponse software is in CE mode, the name of the SMARTTeacher file and class
information appears in the student's SMARTNotebook SE Quick Links tab.
You can now ask the students to connect.
C H A P T E R 3
Using SMARTResponse software
64

N N O T E
You can also start a class in Teacher Tools.
Monitoring clickers
You can use Teacher Tools to see if a clicker is logged on or if it's in Anonymous mode. If the clicker
is logged on, you can also see the student's name. You can see each clicker's hardware ID (MAC
address) and identify which logged-on student is using it.
The display shows the signal strength of each clicker, as measured by the receiver. If the signal level
is low for one or more clickers, and they are having communication problems, you can reposition the
receiver or remove signal path obstructions.
gTo monitor clickers
1. Start a class and have your students connect their clickers.
The SMART Response receiver indicator lights are green.
2. Start Teacher Tools. See Starting Teacher Tools on page 23.
Teacher Tools appears.
3. Click the Devices button in the left column.
The Devices window appears with the message "Your SMART Response receiver is
connected and working". The receiver name appears below the Devices button.
N N O T E
If the "Your SMART Response receiver is not connected" message appears, the SMART
Response receiver isn't connected or isn't working properly. Check the receiver connections
or repeat the receiver installation.
4. Click My Receiver, and then click the Clickers tab at the top of the window.
The Clickers window appears and displays a table of all connected clickers. Each row of the
table shows one clicker's signal strength, battery condition, student name and hardware ID
(MAC address).
N N O T E
If students' clickers are connected anonymously, the Student Name field displays
Anonymous.
C H A P T E R 3
Using SMARTResponse software
65

Connecting to the class
After you start a class, you can tell your students to connect to the class.
How the students connect to the class depends on SMART Response software's current mode. In
addition, you can prevent students from signing in.
Connecting in Anonymous mode
You must start a class in Anonymous mode before your students connect. See Starting a class in
Anonymous mode on page 63.
I I M P O R T A N T
In all modes except VE mode, students must know the class name.
gTo connect PE clickers in Anonymous mode
When the “SMART Response is ready to use” balloon message appears, tell your students to follow
this procedure.
1. Press the clicker's Power button for one second.
A message appears asking if you want to join the last class the clicker was connected to or find
a different class.
Students using LE clickers see a "Hello" message appears on their clicker's display.
2. Press the Enter button to join the last class.
OR
Press the Down button to select Find a class, and then press Enter.
The clicker scans for classes, and then displays a list of classes within range. Press the Up
and Down buttons to select the correct class, and then press Enter.
3. Press the Enter button to connect.
gTo connect XE clickers in Anonymous mode
When the “SMART Response is ready to use” balloon message appears, tell your students to follow
this procedure.
C H A P T E R 3
Using SMARTResponse software
66

1. Press the clicker's Power button for one second.
2. Use the soft keys to join the last class.
OR
Use the soft keys to find a class, and then to select the class.
gTo connect LE clickers in Anonymous mode
Tell the students to press their clicker's Power button for one second.
A "Hello" message appears on the clicker display.
gTo connect SMARTNotebook SE users in Anonymous mode
Tell your students to follow the steps described in the SMARTNotebook SE online Help system.
N N O T E S
lIf you selected the Lock Sign In option, the student sees a “Fail to login” message. If this
occurs, unlock Sign In, and then tell the students to reconnect.
lWhen all of your students are connected, you can start asking questions. Refer to Creating
assessments on page 42 for information about using SMART Notebook software to ask
questions and create assessments.
Connecting in Sign In mode
You must start a class in Sign In mode before your students connect. See Starting a class in Sign In
mode on page 64.
I I M P O R T A N T
When students use PEclickers, XE clickers, or SMARTNotebook SE software to connect to a
class in Sign In mode, they must know the class name. They must also sign in with a unique ID
number.
gTo connect PEclickers in Sign In mode
After you start a class, tell your students to follow this procedure.
1. Press the clicker's Power button for one second.
A message appears asking if you want to join the last class the clicker was connected to or find
a different class.
C H A P T E R 3
Using SMARTResponse software
67

2. Press the Enter button to join the last class.
OR
Press the Down button to select Find a class, and then press Enter.
The clicker scans for classes, and then displays a list of classes within range. Press the Up
and Down buttons to select the correct class, and then press Enter.
A connecting message appears, followed by a message asking for an ID number.
3. Press the number buttons to enter your ID number, and then press Enter.
If the ID is valid, a message appears asking you to confirm your name.
N N O T E
If the teacher selected the Lock Sign In option, a message appears on the clicker indicating
that the student can't sign in at this time, and then a Retry option appears.
4. Press the Enter button to connect.
A welcome message appears.
gTo connect XEclickers in Sign In mode
After you start a class, tell your students to follow this procedure.
1. Press the clicker's Power button for one second.
A message appears asking if you want to join the last class the clicker was connected to or find
a different class.
2. Use the soft keys to join the last class.
OR
Use the soft keys to find a class, and then select the class.
A connecting message appears, followed by a message asking for an ID number.
3. Press the number buttons to enter your ID number, and then press the soft key to sign in.
If the ID is valid, a message appears asking you to confirm your name.
N N O T E
If the teacher selected the Lock Sign In option, a message appears on the clicker indicating
that the student can't sign in at this time, and then a Retry option appears.
4. Press the soft key to connect.
A welcome message appears.
C H A P T E R 3
Using SMARTResponse software
68

N N O T E
If a student attempts to sign in using an ID that another student is already using, a message
appears indicating that they're unable to sign in and lets them retry.
gTo connect SMARTNotebook SE in Sign In mode
After you start a class, tell your students to sign in by following the procedure described in the
SMARTNotebook SE online Help system.
gTo connect LEclickers in Sign in mode
Tell your students to press their clicker's Power button for one second.
A "Hello" message appears on the clicker display.
When all of your students are connected, you can start asking questions. Refer to Creating
assessments on page 42Creating assessments on page 42for information about using SMART
Notebook software to ask questions and create assessments.
Manually connecting to a class
I I M P O R T A N T
You can perform this procedure only if SMART Response software is in CE mode.
After you start a class, students can connect to it automatically by following the steps in the SMART
Notebook SE online Help system. Students can also connect manually by entering your class's
Internet Protocol (IP) address and port number.
The following procedure explains how to find this information so you can provide it to your students.
gTo find your class's IP address and port number
1. Start Teacher Tools. See Starting Teacher Tools on page 23.
Teacher Tools appears.
2. Ensure that your class is started.
3. Click Connect students manually on the Home tab.
The Manual Connection Information screen appears and displays your class's IP address and
port number.
C H A P T E R 3
Using SMARTResponse software
69

Locking sign-in
You can block students from signing in to your class. Select the Lock Sign In button to block
students from signing in before you're ready or to block late students from signing in. When you start
a class, sign-in is unlocked by default. If you stop and restart SMART Response software or open a
new class list, sign-in unlocks.
N N O T E S
lIn PE, LE and XE modes, you can lock sign-in only in Sign In mode.
lIn CE mode, you can lock sign-in in Sign In and Anonymous modes.
lYou are unable to lock sign-in in VE mode.
gTo block students from signing in
1. Start Teacher Tools. See Starting Teacher Tools on page 23.
Teacher Tools appears.
2. If a class isn't already started, select a class in the Gradebook area, and then click Start
Class.
3. Click Lock Sign In.
Students are unable to sign in.
N N O T E
If students disconnect from your class when sign-in is locked, they're unable to sign in again until
you click Unlock Sign In.
C H A P T E R 3
Using SMARTResponse software
70
Disconnecting students from a class
You can disconnect students from a class in three ways. You can disconnect them simultaneously.
disconnect individual clickers using Teacher Tools or have your students manually disconnect their
clickers.
Disconnecting all students
You can disconnect all students simultaneously.
gTo disconnect all students by stopping the class
Select Response > Stop Class in the SMARTNotebook menu bar.
lAll clicker-connected students disconnect, and a message appears on their clickers indicating
that the class is over and that the clickers are turning off. The Transmit and Receive lights on
the receiver turn off and the Ready light turns red.
lAll SMARTNotebookSE software-connected students disconnect from the class, and a
message appears stating “All students are signed out”.
Disconnecting individual clickers using Teacher Tools
N N O T E
This option is available only if the students are connected to a class in Sign In mode.
gTo disconnect individual clickers using Teacher Tools
1. Start Teacher Tools. See Starting Teacher Tools on page 23.
2. Select the active class in the Gradebook area.
3. Click the Students tab.
4. Select the row of the student you want to disconnect.
The Properties window appears below the student list table.
5. Click Disconnect Clicker at the top-right corner of the window.
The Log Off Student dialog box appears.
C H A P T E R 3
Using SMARTResponse software
71

6. Click OK to disconnect the student.
N N O T E
The student can log back on immediately.
OR
If you don't want the student to be able log on for a while, select Also ban this student for,
select the number of minutes, and then click OK.
Students disconnecting manually
Students with SMARTResponse clickers can disconnect them by pressing the Power button for one
to two seconds.
If signed-in students turn off their clickers when a question set is started, they can turn on the
clickers, sign in with the same ID and join the assessment in progress without losing any previous
answers. If students are connected anonymously, they lose any previous answers when they
reconnect.
gTo disconnect after connecting to the wrong class
Students using PE or LE clickers
Tell students to log off by pressing the Menu button, selecting Sign out and then pressing the Enter
button.
Students using XE clickers
Tell students to log off by pressing the Sym button, pressing the spacebar, and then selecting Log
Out.
They can then connect and sign in to the correct class without turning off their clickers.
Students using SMART Response CE software
Tell students to sign out by clicking Disconnect, and then sign in to the correct class.
T T I P
For more information on how students connect to SMART Response CE classes using SMART
Notebook SE software, see the SMART Notebook SE online Help.
In Sign In mode, if students disconnect during an assessment, they can sign in with the same ID to
join the assessment without losing the answers they previously entered. In Anonymous mode,
students lose any previously entered answers when they reconnect.
C H A P T E R 3
Using SMARTResponse software
72
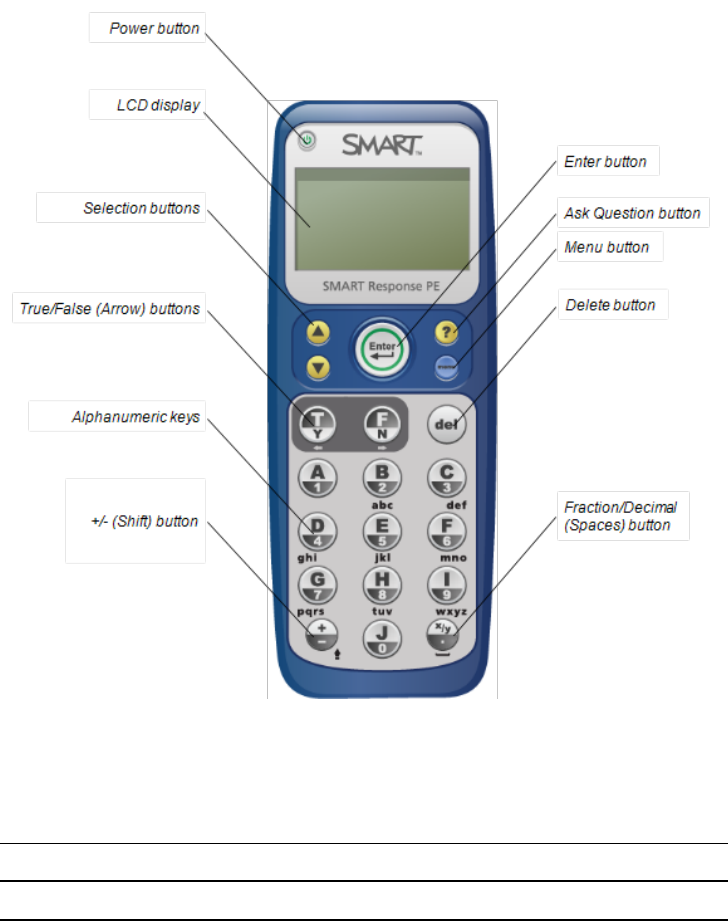
Using clickers
After students connect their clickers to your class, they can use their clickers to complete
assessments.
In addition, students using SMART Response PE or XE clickers can ask questions using their
clickers and change their clicker settings.
About SMARTResponse PE clickers
Changing SMARTResponse PE clicker settings
Students can press the Menu button at any time to log off the session or to modify the clicker's
settings. These options are available in the menu:
Option Description
Sign out Press to log off a class without turning off the clicker.
C H A P T E R 3
Using SMARTResponse software
73

Option Description
Language Not supported at this time.
Contrast Press to brighten or darken the clicker's LCD display. Use the
selection buttons to increase or decrease the contrast.
Device info Press to display the clicker’s MAC address and firmware version.
Advanced You must have a valid security code to open this menu. Your
customer support representative can provide the code to help
troubleshoot clicker problems.
Answering yes or no questions
Students can answer yes or no questions using the following two buttons on their clickers:
N N O T E
These are the same buttons students use to answer true or false questions.
Answering true or false questions
Students can answer true or false questions using the following two buttons on their clickers:
N N O T E
These are the same buttons students use to answer yes or no questions.
Answering multiple choice questions
Students can answer multiple choice questions using the following buttons on their clickers:
C H A P T E R 3
Using SMARTResponse software
74
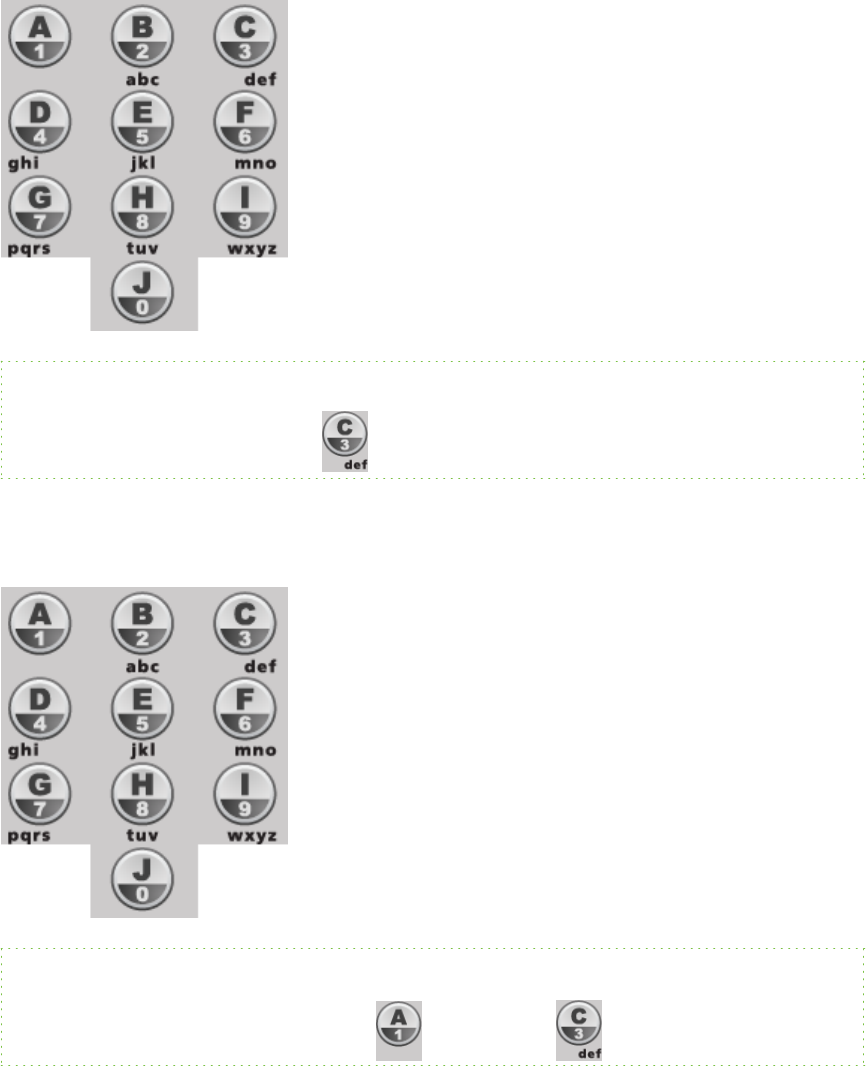
EXAMPLE
To answer C, a student would press
Answering multiple answer questions
Students can answer multiple answer questions using the following buttons on their clickers:
EXAMPLE
To answer A and C, a student would press and then press .
Answering number, fraction or decimal questions
Students can enter numbers using the following buttons on their clickers:
C H A P T E R 3
Using SMARTResponse software
75
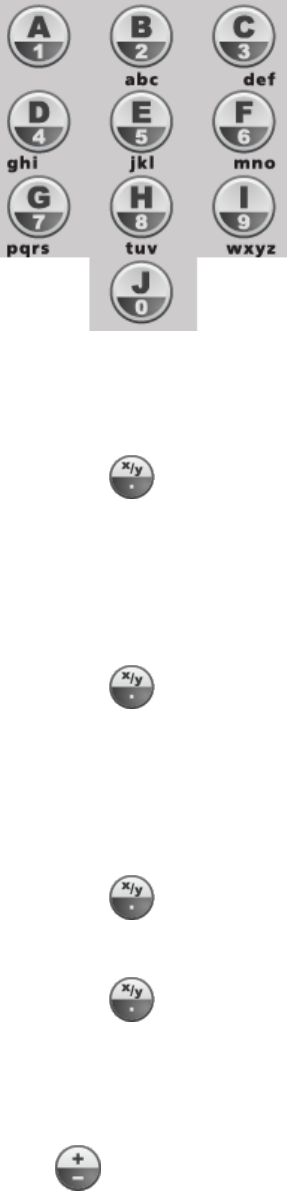
gTo enter a decimal number
1. Enter the numbers to the left of the decimal point.
2. Press .
3. Enter the numbers to the right of the decimal point.
gTo enter a fraction
1. Enter the numerator
2. Press .
3. Enter the denominator.
gTo enter a mixed fraction
1. Enter the whole number
2. Press .
3. Enter the numerator.
4. Press .
5. Enter the denominator.
gTo change a number from positive to negative (or vice versa)
Press .
C H A P T E R 3
Using SMARTResponse software
76
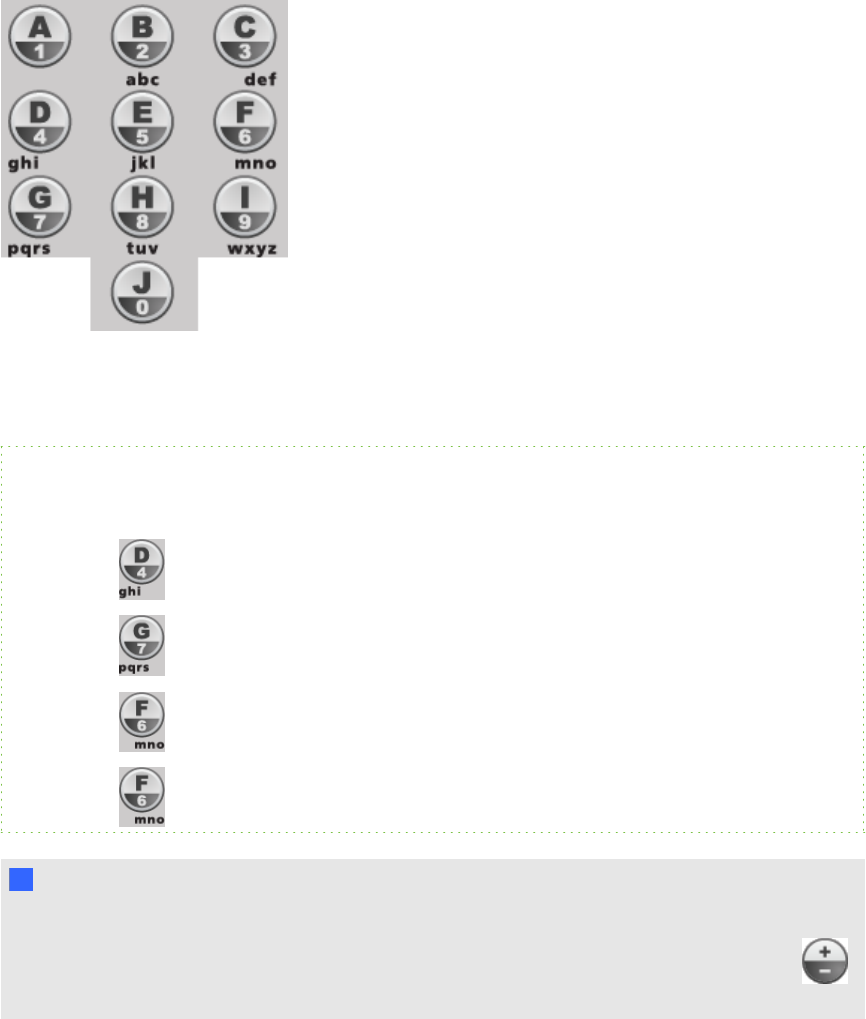
Answering text answer questions
Students can answer text questions using the following buttons on their clickers:
Responding to text answer questions on a SMART Response PE clicker is similar to texting on a cell
phone.
EXAMPLE
To respond "iron", a student would do the following:
1. Press three times to enter i.
2. Press three times to enter r.
3. Press three times to enter o.
4. Press two times to enter n.
I I M P O R T A N T
Text answers are case sensitive. If the only acceptable answer to a text answer question is "Iron",
students must enter "Iron" and not "iron" or "IRON". To change to uppercase, students press
on their clickers.
C H A P T E R 3
Using SMARTResponse software
77
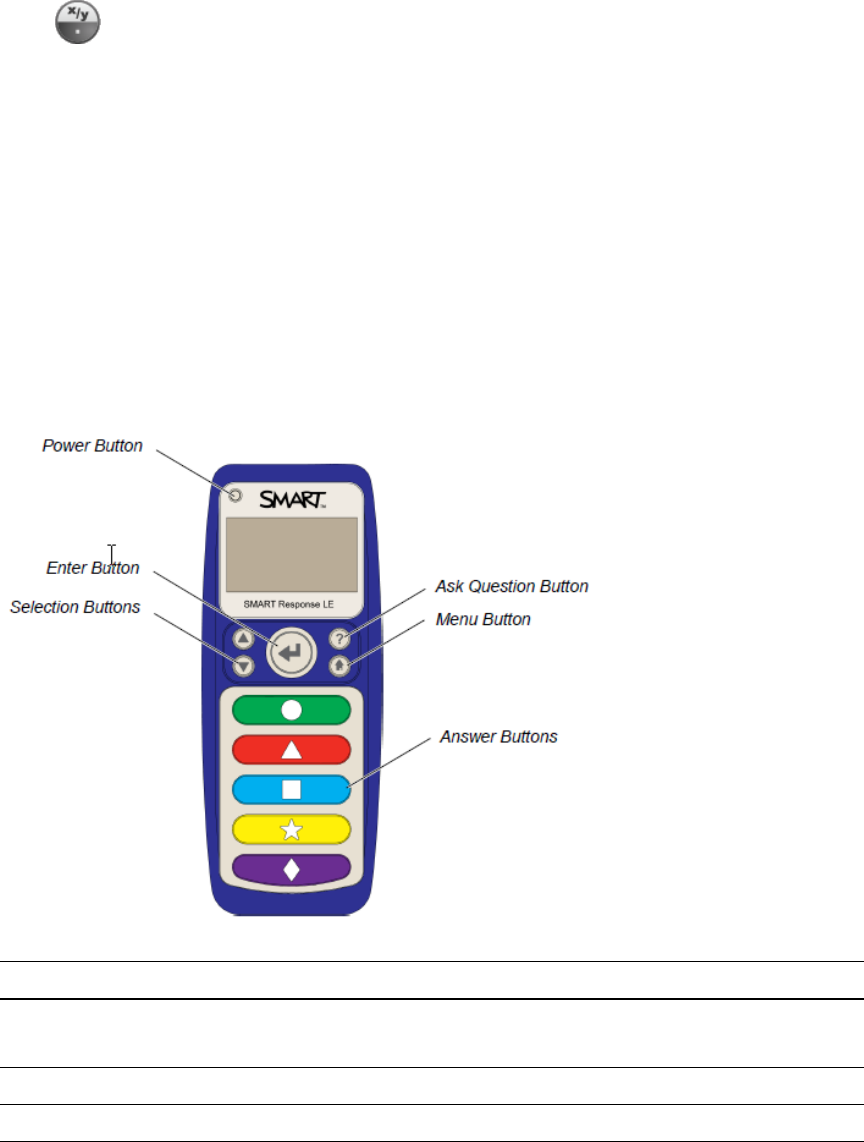
gTo enter a space
Press .
gTo make a change
1. Use the arrow buttons to move the cursor to the character you want to change.
2. Press the Delete button to delete the character.
3. Enter a new character.
About SMART Response LE clickers
The students use only the Power, selection and answer buttons. The other buttons are for Teacher
mode.
Clicker Buttons
Clicker button Description
Power Press for one second to turn on the clicker. Press for one to two seconds
to turn off the clicker.
Selection Scroll through option lists.
Enter Make or confirm a selection.
C H A P T E R 3
Using SMARTResponse software
78
Clicker button Description
Ask Question Displays the clicker ID.
Menu Press with the Power button to open the clicker menu in Teacher mode.
See Using the Teacher mode menu below.
Answer Five colored buttons with geometric shapes to answer questions.
Using the Teacher mode menu
gTo put SMART Response LE clickers into Teacher mode
Press the Power and Home buttons simultaneously.
N N O T E
You can press the Home button by itself without any effect.
Press the Enter button to make your selections. Press the Home button to return to the primary
menu.
The following options are available in the Teacher mode menu:
Option Description
Scan & Pick Pair the clicker with your receiver during setup.
Show Rcv PID Display the current Pan ID.
Clicker ID Set the Clicker ID.
Contrast Lightens or darkens the clicker’s LCD display. Use the up
and down arrows to increase or decrease the contrast.
Device Info Display the clicker’s MAC address and firmware version.
Restore Default Restore the clicker’s factory default settings.
Exit Exit Teacher mode to connect to the class.
C H A P T E R 3
Using SMARTResponse software
79
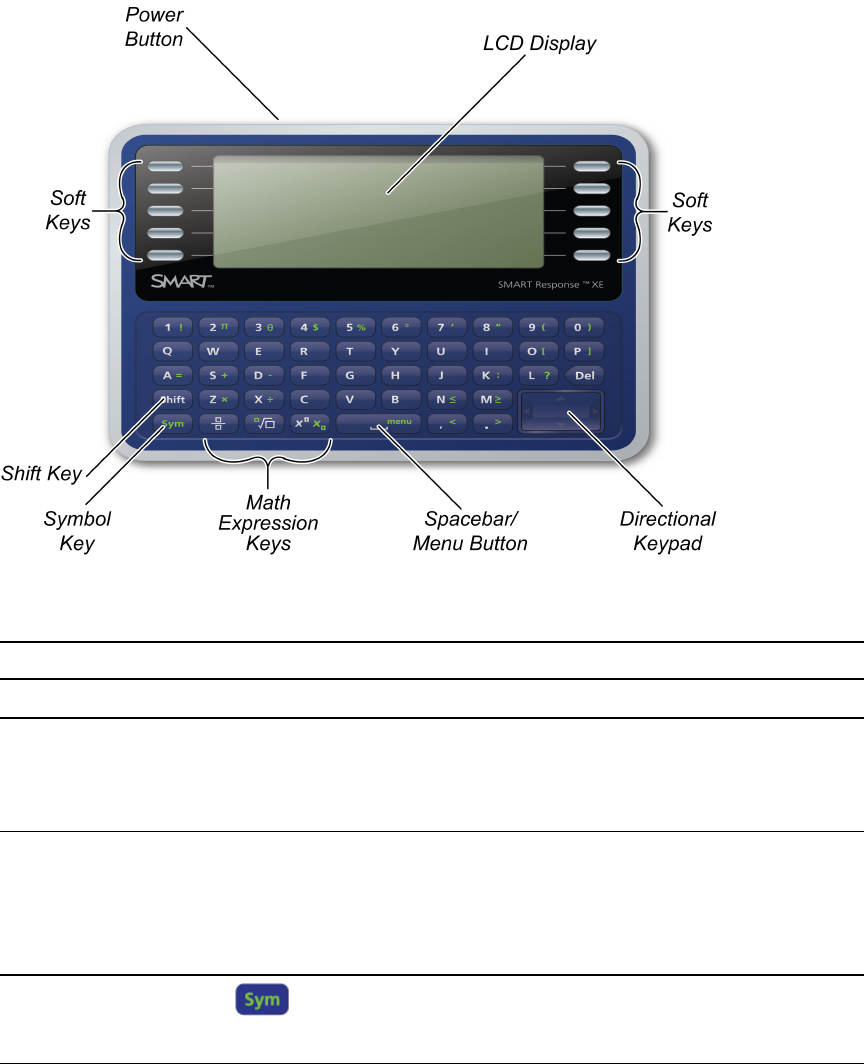
About SMART Response XE clickers
Button/key name Key Function
Power button Press and hold to turn clicker on or off.
Soft keys Press to select functions displayed on the LCD display. The
functions depend on the clicker's mode.
Press to answer multiple choice, multiple answer, true/false
and yes/no questions.
Letter and number
keys
Press to insert lowercase value.
Press while holding the Shift key to insert an uppercase
value.
Press and hold a,e,i,o,u,y,cor nkeys to select other
character variations.
Symbol key Press and release to select green key functions.
Press and hold to display a menu where you can select
symbols.
C H A P T E R 3
Using SMARTResponse software
80

Button/key name Key Function
Spacebar/Menu
button
Press to add a space in text or mathematical expressions.
Press after pressing the Sym key to display a menu where
you can select Raise hand,Symbols or other functions
depending on clicker mode.
Directional
keypad
Press to navigate menu options or navigate text and
mathematic expression content.
Shift key Press and then press a letter key to enter an uppercase
character.
Math expression
keys–fraction
Press to insert fractional values in an expression.
Math expression
keys–root
Press to insert a square root value in an expression.
Press after pressing the Sym key to insert a radicand.
Math expression
keys–
superscript/subscript
Press to insert a superscript value in an expression.
Press after pressing the Sym key to insert a subscript value
in an expression.
Asking questions
At any time during a class, students using SMART Response PE or XE clickers can request the
teacher's attention.
lStudents using SMART Response PE clickers can press the Ask Question button.
lStudents using SMART Response XE clickers can press the Sym button, press the spacebar,
and then select Raise hand.
Teacher Tools displays the number of students who have questions on the Home tab beside the
Questions heading.
gTo identify students with questions
1. Click the Students tab in Teacher Tools Gradebook to show the list of student names and IDs.
In the Status column, you might see one or more rows with a question icon .
2. If you've answered a student's question, select the row that displays the student's name, and
then click the Clear Question icon in the top-right corner of the Properties window.
C H A P T E R 3
Using SMARTResponse software
81

Completing assessments
After you create an assessment, you can start it in SMART Response software. Students then
complete the assessment. During the assessment, you can view results.
Starting an assessment
When you use SMART Notebook software to ask questions, SMART Response uses the options
you set in Teacher Tools to control how students interact with the teacher. If students are using
clickers, before starting a SMART Response assessment, check that the receiver is connected and
ready. If you don’t have a SMART Notebook assessment file, you must create one. See Creating an
assessment on page 42 for more information.
gTo open and set assessment options
1. Click the SMART Response icon in the Windows notification area or Mac menu bar, and
then select Open Notebook Software.
A blank SMART Notebook page appears.
2. Select File > Open.
3. Select the SMART Notebook file containing your questions, and then click Open.
The assessment file's title page appears.
4. Click the Response tab, and then click Properties if it isn't already selected.
C H A P T E R 3
Using SMARTResponse software
82
5. Select the Remember names check box to display student names in the Response tab during
the assessment.
OR
Clear the Remember names check box to hide student names in the Response tab during the
assessment.
N N O T E S
oSelect the Remember names check box if you want to identify students when you
review results during the assessment.
oClear the Remember names check box if you want to display the SMART Notebook
file on a SMART Board interactive whiteboard during the assessment but don't want
students to see each other's results.
oYou can review, print and export the results after the assessment even if you clear the
Remember names check box.
6. Select one of the following options from the Show results to students drop-down list:
N N O T E
The feedback options available vary depending on the SMART Response mode.
Feedback option Description
After you stop
collecting responses
Students can see how they answered and see their grades after you
click Stop.
If you select this option, you can also choose to show the correct
answers with grades and show the class average.
After all questions are
answered
Students can see how they answered and see their grades after
they finish answering all questions.
If you select this option, you can also choose to show the correct
answers with grades and show the class average.
After each question is
answered
Students can see how they answered each question and see their
grades after they finish answering all questions.
If you select this option, you can also choose to show the correct
answers with grades and show the class average.
Don't show students
their grades
Students can't see how they answered or see their grades.
Don't allow students to
save assessment
Students using SMARTNotebook SE software can't save the
assessment to their binders after they finish.
C H A P T E R 3
Using SMARTResponse software
83
gTo start an assessment and ask questions in PE, XE and CE modes
1. Start a class now, if you haven't already done so.
2. Have your students connect to the class, if they haven't already done so.
3. Select Response > Start Assessment.
The Response tab opens with the Progress button selected.
If you’re displaying the questions on a screen, you can control the students’ progress by
selecting each question page in turn.
4. Use the Forward or Back buttons on the the menu bar to open a question page.
OR
Click the Page Sorter tab, and then select the thumbnail of a question page.
5. Click Response > Stop Assessment in the menu bar to end the session.
6. If you chose to show results to students, select Response > End Review Mode when the
students are done reviewing their results.
7. Click Save to save the results.
gTo start an assessment and ask questions in LE mode
1. Start a class now, if you haven't already done so.
2. Have your students connect to the class, if they haven't already done so.
3. Select Response > Start Assessment.
The Response tab opens with the Progress button selected.
If you’re displaying the questions on a screen, you can control the students’ progress by
selecting each question page in turn.
4. Use the Forward or Back buttons on the the menu bar to open a question page.
OR
Click the Page Sorter tab, and then select the thumbnail of a question page.
5. Select Response > Start Question.
The Response tab opens with the Progress button selected.
6. Ask your students to answer the question with their clickers.
C H A P T E R 3
Using SMARTResponse software
84
7. When the “All the students have answered” message appears in the Response tab, select
Response > Stop Question.
A chart showing your students’ results and several options appears in the Response tab.
Select the options you want.
8. Repeat steps 4 through 7 for each question in your assessment.
N N O T E
You must stop the current question before you can ask another question.
9. Click Response > Stop Assessment in the menu bar to end the session.
10. If you chose to show results to students, select Response > End Review Mode when the
students are done reviewing their results.
11. Click Save to save the results.
gTo start an assessment and ask questions in VE mode
1. Start a class, if you haven't already done so.
2. Select Response > Start Assessment.
The Assessment Started dialog box appears displaying the URL and Assessment ID that the
students need to connect to the assessment.
The Response tab opens with the Progress button selected.
3. Tell your students to browse to response.smarttech.com, and then enter their Student IDs
and the Assessment ID.
The assessment appears on their browsers.
4. When all your students are connected, click OK to close the Assessment Started dialog box.
5. Use the Forward or Back buttons on the the menu bar to open a question page.
OR
Click the Page Sorter tab, and then select the thumbnail of a question page.
6. Click Response > Stop Assessment in the menu bar to end the session.
7. Click Save to save the results.
C H A P T E R 3
Using SMARTResponse software
85

Collecting question responses
N N O T E
Make sure that you start your class and that all the students using clickers are connected before
you ask questions.
gTo collect question responses
1. Select Response > Start Assessment.
If you haven’t started a class, a message appears asking you to select a class. Select a class,
and then click Start Class.
A message appears on the clickers asking the students to respond.
2. After all students answer the questions, select Response > Stop Assessment.
N N O T E
SMART Notebook software stores the results in your document. Remember to save your
document after you collect responses.
3. If you want to save the questions as a SMART Notebook file, select File > Save (or Save As).
ASave As dialog box appears.
4. Browse to a destination folder, type a file name, and then click Save.
Reviewing results after an assessment
You can use SMART Response software to collect and display results instantly after you run an
assessment. You can use assessments as an interactive learning tool and as a way to give students
continual feedback on what they're learning.
gTo display instant class assessment results
1. After all students answer the questions, return to the assessment's title page.
2. Click SMART Notebook's Response tab if it isn't already open.
3. Select Progress > Stop this assessment.
The Progress button changes to Results. A summary of the class's performance appears,
including a chart showing the class's responses to each question.
C H A P T E R 3
Using SMARTResponse software
86
4. If you want to view more detailed class results, click Show beside Details.
A list of students, their grades and the duration of the assessment appears.
I I M P O R T A N T
Use discretion when displaying sensitive grade information to all class members. If you
started the class in Sign In mode, consider clearing the Remember names check box before
you start the assessment to hide student names in the Response tab. (You can later review,
print and export the results in Teacher Tools.)
N N O T E
If you start the class in Anonymous mode or clear the Remember names check box before
you start the assessment, student names display as Anonymous-1,Anonymous-2, and so
on.
gTo display instant results for each question
1. After all students answer the questions, return to the assessment's title page.
2. Click SMART Notebook software's Response tab if it isn't already open.
3. Select Progress > Stop this assessment.
The Progress button changes to Results. A chart representing the class's performance
appears.
4. Click the Page Sorter tab, and then select a question.
5. Click the Response tab.
6. Click Results.
A summary of the class's responses to the question appears, including a chart showing the
number of responses to each possible answer.
T T I P S
oYou can change the type of chart displayed by selecting Show bar chart or Show pie
chart.
oYou can insert the chart into the question page by clicking Insert chart into
Notebook.
C H A P T E R 3
Using SMARTResponse software
87

7. Click Show beside Details.
A list showing each student's submitted response appears, including the time it took to
respond.
I I M P O R T A N T
Use discretion when displaying sensitive grade information to all class members. If you
started the class in Sign In mode, consider clearing the Remember names check box before
you start the assessment to hide student names in the Response tab. (You can later review,
print and export the results in Teacher Tools.)
N N O T E
If you start the class in Anonymous mode or clear the Remember names check box before
you start the assessment, student names display as Anonymous-1,Anonymous-2, and so
on.
Previewing results during an assessment
You can use SMART Response software to display results instantly while you run an assessment.
You can use assessments as an interactive learning tool and a way to give students continual
feedback on what they're learning.
I I M P O R T A N T
You must have two or more students participating in your assessment to use this feature.
gTo preview class assessment results
1. Start your assessment, if it isn't already running.
2. Display the question using the Page sorter or the left and right arrows.
3. Click SMART Notebook software's Response tab, and then select the Progress button.
C H A P T E R 3
Using SMARTResponse software
88

4. Click Show beside Results Preview.
A chart showing the class's current responses to the question appears.
N N O T E S
oThe chart changes as students answer the question, and changes as students change
their answers.
oSelect the assessment's title page to preview a summary of the progress of all the
assessment's questions. You can use this chart to see how much of the assessment
the class has completed.
C H A P T E R 3
Using SMARTResponse software
89

Chapter 4: Reviewing, printing and
exporting assessment results
Importing assessment results 92
Formatting the results files for importing 92
Importing a class results file 92
CSV and XLS file formatting 93
Reviewing assessment results 94
Flagging results 96
Generating student performance reports 97
Generating class performance reports 98
Printing and exporting questions and results 99
Printing from SMARTNotebook software's Response menu 99
Exporting results 100
The Teacher Tools Gradebook gives you quick access to test results, making it easy to prepare
reports and conduct evaluations. Reports can be as simple or as detailed as you need. You can
create high-level comparisons of class performance, specific reports based on tagged characteristics
such as demographics or curriculum standard and personalized reports on how individual students
perform. You can also create reports that show grades for the entire school year.
You can display results and generate reports to review during an assessment or after you run an
assessment. In addition, you can print or export questions and assessment results.
N N O T E
Assessment results for students aren't saved in Anonymous mode.
Chapter 4
91

Importing assessment results
You can import the results of an assessment that you performed without using your SMART
Response system. You can then generate reports that combine the results from your assessments
with the imported results.
You can import results using either comma separated values (CSV) files or Microsoft Excel files
(Windows operating systems only).
N N O T E
The ID numbers you use in the list you import must match the ID numbers assigned to the students
in the class list that you're using.
Formatting the results files for importing
You must use the headings ID Number and Marks when you format the CSV, XLS or XLSX file for
importing. If you're using information from another program, copy it to a new file and then format it as
shown in CSV and XLS file formatting on the next page.
Importing a class results file
You can import a class results file using Teacher Tools.
gTo import a class results file
1. Start Teacher Tools. See Starting Teacher Tools on page 23.
Teacher Tools appears.
2. In the Gradebook area, select the class you want to import the results to.
3. Click Import on the menu bar, and then select Assessments.
4. Click the target class, and then click Next.
5. Type the title, and then select the type of the assessment. Optionally, type the subject and
topic information.
6. Select the Percentage or Raw values score formats, and then click Next.
7. Select the file type, and then click Next.
C H A P T E R 4
Reviewing, printing and exporting assessment results
92
8. Browse to and select the file, and then click Open.
The student results information appears in the Students and Assessments tabs. You can also
generate reports that include the imported scores.
CSV and XLS file formatting
EXAMPLE
Comma separated values (CSV) file
ID Number,Marks
8781,33
8727,32
8534,18
2504,22
8759,29
8753,35
8815,25
8811,28
8716,26
EXAMPLE
Excel spreadsheet (XLS) file
A B
1 ID Number Marks
2 8781 33
3 8727 32
4 8534 18
5 2504 22
6 8759 29
7 8753 35
8 8815 25
9 8811 28
10 8716 26
C H A P T E R 4
Reviewing, printing and exporting assessment results
93
Reviewing assessment results
After you run and stop an assessment, Teacher Tools records the class results and each student's
results. At any time after you run an assessment, you can review the student, question or
assessment results and performance. If you ask a series of questions consecutively, their results are
aggregated so that you can review them as a single assessment.
N N O T E
Use discretion when displaying sensitive information to all class members. To hide sensitive
information, click the Privacy: Off indicator before you display student or assessment results. See
Adjusting privacy and alert options on page 25 for more information.
gTo display student results
1. If a class is running, stop it.
2. In Teacher Tools, select the class name in the Gradebook area.
The class window appears with the Home tab selected.
3. Click the Students tab.
After a short delay, a table of results appears. If you previously turned on Privacy mode, the
student IDs and average scores appear as gray shapes in the table.
4. If Privacy mode is on, click the Privacy: On indicator .
The columns of the table of class results show the student names, ID and average score for all
the assessments each student has participated in.
gTo display detailed results for each student
1. Complete the above procedure, and then select the student's row.
The student's information appears in the lower pane.
2. Click the Performance tab.
An Assessment Results over Time graph appears showing the student's results compared to
the class average for all assessments since the first assessment was run.
N N O T E
The graph is hidden when Teacher Tools is in Privacy mode.
3. Place your pointer over the graph to display details about the specific assessment.
C H A P T E R 4
Reviewing, printing and exporting assessment results
94

4. Click the Results tab.
A table appears showing detailed information about each assessment the student has
participated in, including the date and the score the student achieved. If the student's score is
below the passing grade you defined when you created the class, the score appears in red. See
Changing a class's passing grade on page 37 for information.
gTo display class assessment results
1. If a class is currently running, stop it.
2. In Teacher Tools, select the class name in the Gradebook area.
The class window appears with the Home tab selected.
3. Click the Assessments tab.
After a short delay, a table of results appears listing all assessments that the class has
participated in, including the class average score for each assessment. If the class average
score is below the passing grade you defined when you created the class, the score appears in
red. See Changing a class's passing grade on page 37 for information.
gTo display detailed results for each assessment
1. Complete the previous procedure, and then select the assessment's row.
The lower pane of the window displays the assessment's properties.
2. Click the Performance tab.
AStudent Achievement per Question graph appears showing the student responses to each
question.
N N O T E
The graph is hidden when Teacher Tools is in Privacy mode.
3. Place your pointer over the graph to display details about the specific questions.
4. Click the Results tab.
A table appears showing the mark each student received for the assessment. If the student's
score is below the passing grade you defined when you created the class, the mark appears in
red.
C H A P T E R 4
Reviewing, printing and exporting assessment results
95

gTo display and change results for each question in an assessment
1. If a class is running, stop it.
2. In Teacher Tools, select the class name in the Gradebook area.
The class window appears with the Home tab selected.
3. Click the Assessments tab.
After a short delay, a table of results appears listing all assessments that the class has
participated in.
4. Select the row for the assessment you want to display.
5. Click the Questions tab.
A list of the assessment's questions appears showing the student responses to each question.
6. If you want to change an answer to be graded as correct or incorrect, select the question you
want to change, and then select or clear the Correct checkbox.
The student grades and the class average change.
Flagging results
You can add a blue flag to a student’s results as a visual reminder to follow up for any reason, for
example, if a student requires remedial work. You can also clear the blue flag from the student’s
results.
N N O T E
If students are disconnected during an assessment, a Disconnected Student icon appears beside
their names. To clear this flag, see Importing student responses on page 1.
gTo add a follow-up flag
1. Start Teacher Tools. See Starting Teacher Tools on page 23.
Teacher Toolsappears.
2. Select the class the student belongs to in the Gradebook class list.
The class information appears.
3. Click the Students tab.
4. Select the student’s name in the list.
The student’s information appears in the lower pane.
C H A P T E R 4
Reviewing, printing and exporting assessment results
96

5. Click the Results tab.
6. Select the assessment result you want to flag in the list.
7. Click the Set flag icon above the results list.
A blue flag appears in the Mark column.
gTo clear a follow-up flag
1. In the Results tab, select the assessment result with the flag you want to clear.
2. Click the Clear flag icon above the results list.
The flag disappears.
Generating student performance reports
You can generate student performance reports at any time after your assessments are complete. You
can tailor the reports to include all classes or select classes. You can also create reports for individual
students or for all students in the selected classes at one time.
gTo generate a student performance report
1. Start Teacher Tools. See Starting Teacher Tools on page 23.
Teacher Tools appears.
2. In the Reports area, click Student Performance.
The Student Performance Report window appears.
3. In the Class drop-down list, select the class you want a report for.
OR
Select All classes for a report on all classes.
4. In the Student drop-down list, select the student you want a report for.
OR
Select All students for a report on all students.
5. Define the Report Period if you want a report for a specific range of dates.
6. In the Include drop-down list, select Selected assessment types or All assessment types.
7. If you chose Selected assessment types, select the types you want a report for from the
check list that appears.
C H A P T E R 4
Reviewing, printing and exporting assessment results
97
8. Browse to the location where you want to save the report file, and then click Create.
SMART Response software creates one or more reports as PDF files that appear in your
default PDF viewer. The files are named using the student name and ID and the date the files
were created.
If you generate one report, the report opens automatically. If you generated multiple reports, the
reports' folder location appears in Windows Explorer or Mac Finder.
Generating class performance reports
You can generate class performance reports at any time after your assessments are complete. You
can tailor the reports to include all classes or select classes. You can also create reports on all
assessment types or on specific types of your choice.
gTo generate a class performance report
1. Start Teacher Tools. See Starting Teacher Tools on page 23.
Teacher Tools appears.
2. In the Reports area, click Class Performance.
The Class Performance Report window appears.
3. In the Class drop-down list, select the class you want a report for.
OR
Select All classes for a report on all classes.
4. Define the Report Period if you want a report for a specific range of dates.
5. In the Include drop-down list, select Selected assessment types or All assessment types.
6. If you chose Selected assessment types, select the types you want a report for from the
check list that appears.
7. Browse to the locations where you want to save the report file, and then click Create.
SMART Response software creates one or more reports as PDF files that appear in your
default PDF viewer. The files are named using the class name and ID and the date the files
were created.
If you generate one report, the report opens automatically. If you generated multiple reports, the
reports' folder location appears in Windows Explorer or Mac Finder.
C H A P T E R 4
Reviewing, printing and exporting assessment results
98
Printing and exporting questions and results
Using SMART Notebook software's Response menu, you can create hard copies of questions,
handouts and student results. You can also export questions and student results to an Excel
spreadsheet, a comma separated values (CSV) file or an HTML web page.
Printing from SMARTNotebook software's Response menu
You can print a variety of information from the Response menu in SMART Notebook software. You
can create and include header, footer and date information, and select a page range to print.
Print option Description
Thumbnails On one page, print up to six full-color, reduced images of SMART
Notebook pages. You can include page numbers, image borders and page
titles.
Handouts On one page, print up to three full-color, reduced images of SMART
Notebook pages, with ruled lines for notes. You can include page
numbers, image borders and page titles.
Full page On one page, print a full-color image of a SMART Notebook question page.
You can include page numbers.
Questions Print several questions on a page. If the question page doesn't have any
objects or images, only the text appears. If there are objects on the
question page, a full-color thumbnail of the question appears. You can
include page numbers.
Results N N O T E
This option is available only after you stop your assessment.
Print several questions on a page. If the question page doesn't have any
objects or images, only the text appears on the page. If there are objects
on the question page, a full-color thumbnail of the question appears. In the
Print Preview view, you can click the question to toggle from thumbnail to
text-only format.
The correct answer and the student’s response appear beside each
question, and the total score appears at the top of the first page. You can
include page numbers.
You can print a summary of the results for all students in the class list or
for selected students.
C H A P T E R 4
Reviewing, printing and exporting assessment results
99

gTo print questions or results
Select Response > Print, and then select the print option you want.
OR
For other options, select Response > Print > More Print Options to open SMART Response
software's print window.
N N O T E
The Questions and Results print options are available only if the SMART Notebook file includes
SMART Response questions and saved results information. If the assessment is still running, or if
it stops before any student answers a question, no results are saved.
Exporting results
If you save your SMART Notebook file after you ask questions, or after you run an assessment, you
can open the SMART Notebook file at any time to view the results.
You can export the results to an Excel spreadsheet (Windows only), to an HTML page for viewing on
a web browser or to a comma separated values (CSV) file that you can import into many spreadsheet
and database applications. See CSV and XLS file formatting on page 93. You can also export the
results to a third-party gradebook in one of the predefined formats, or you can create a custom format.
N N O T E
You can export results only after you stop the assessment. If you clear the results after you stop,
the results are permanently deleted and you're unable to print or export them. After you save and
close the SMART Notebook file, you can open the file and print or export the results.
gTo export results from Teacher Tools
1. Start Teacher Tools. See Starting Teacher Tools on page 23.
Teacher Tools appears.
2. Select File > Export from the menu bar.
The Export dialog box appears.
3. In the list, select the class with the results you want to export, and then click Next.
C H A P T E R 4
Reviewing, printing and exporting assessment results
100

4. Select the By student option if you want to export results for your entire class (the default
selection) or for an individual student. If you want to export results for an individual student,
also select the student's name from the drop-down list.
OR
Select the By assessment option if you want to export the results of a class assessment or all
assessments the class has taken.
OR
Select the To another gradebook format option if you want to export the results to a third-
party gradebook.
N N O T E
If you select the CSV file format, you can customize the format to be compatible with your
third-party gradebook. SMARTResponse software saves the customized format so that you
don't have to customize the format each time you export the results.
5. Click Next.
6. Select the format you want to export the results in, and then click Next.
The Save As dialog box appears.
7. Browse to a folder, type a name for the file, and then click Save.
The results export and open in your computer's default file viewer.
gTo export results from SMARTNotebook software
1. Stop the assessment if it's running.
I I M P O R T A N T
Do not clear the results.
2. In SMART Notebook software, select Response > Export results to > Microsoft Excel.
N N O T E
Exporting to Excel isn't available on Mac computers.
OR
Select Response > Export results to > Web Page (HTML).
OR
Select Response > Export results to > Comma Separated Values (CSV).
The Save As dialog box appears.
C H A P T E R 4
Reviewing, printing and exporting assessment results
101
3. Browse to a folder, type a name for the file, and then click Save.
Either Excel or your default web browser opens showing the exported file.
C H A P T E R 4
Reviewing, printing and exporting assessment results
102

Chapter 5: Maintaining your SMART
Responsesystem
Preventing component damage 103
Cleaning the receiver and clickers 104
Transporting SMART Response hardware 104
Changing the clicker batteries 104
Resetting clickers 105
Receiver indicator lights 105
Troubleshooting the receiver 106
Resetting the receiver 106
Interpreting the receiver indicator lights 106
Troubleshooting SMARTResponseCE connection issues 107
Importing student responses 107
Finalizing disconnected students' results in Teacher Tools 108
Other troubleshooting tips 109
Preventing component damage
C C A U T I ON
lDo not use sharp or pointed objects, such as ballpoint pens or pointers, to press the clicker
buttons.
lDo not use abrasive erasers or harsh chemicals to clean the receiver or clickers.
lAvoid setting up and using your system in an area with excessive levels of dust, humidity or
smoke.
Chapter 5
103
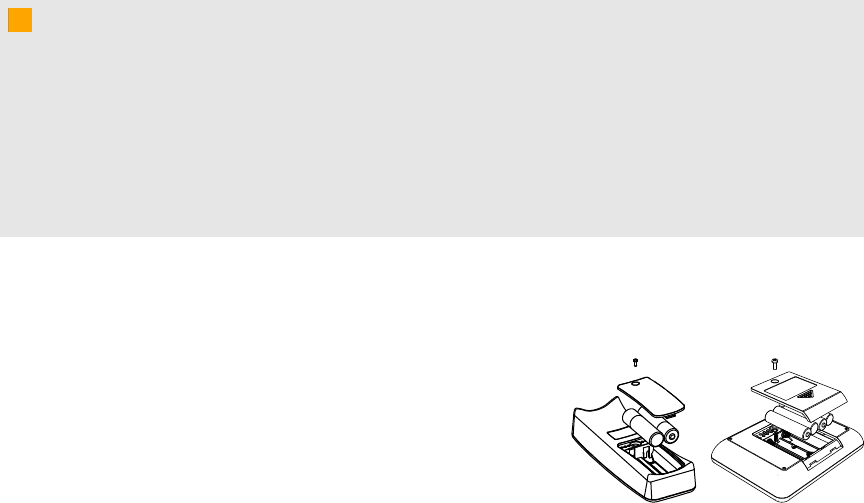
Cleaning the receiver and clickers
With proper care, your SMART Response hardware will provide years of trouble-free performance.
Follow these cleaning tips to maintain your SMART Response system:
lRemove dust with a damp cloth before you use a cleaner.
lClean the unit’s surface with a household glass cleaner, such as Windex®, daily, weekly or as
required.
lDo not spray cleaner directly onto the clicker. Instead, spray a small amount of cleaner on a
cloth and then gently wipe the clicker.
Transporting SMART Response hardware
If you need to ship your SMART Response hardware, repack it with as much of the original packaging
as possible. If you prefer to use your own packaging materials, make sure you adequately protect the
product.
Changing the clicker batteries
Under normal operating conditions, the clicker batteries can operate for up to 200 days. When you
replace them, use fresh batteries of the same type and quality, and change all of them at the same
time.
C C A U T I ON
lDo not install batteries with the polarity (+/-) reversed.
lDo not attempt to recharge the batteries.
lDo not dispose of batteries in a fire or incinerator.
lDispose of batteries according to your region’s laws and regulations. If you don’t know the
applicable rules for your region, consult your battery manufacturer.
gTo change the clicker batteries
1. If the clicker is on, turn it off.
2. Using the included Phillips screwdriver, remove the screw
from the back of the clicker, and then remove the cover.
3. Remove all of the exhausted batteries and dispose of them
according to local regulations.
C H A P T E R 5
Maintaining your SMART Responsesystem
104

4. Insert fresh batteries.
5. Replace the cover and screw.
Resetting clickers
If a clicker isn't operating as expected, you might need to reset it. Perform the following steps to reset
your clicker.
gTo reset a clicker
1. If the clicker is on, turn it off.
2. Using the included Phillips screwdriver, remove the screw from the back of the clicker, and
then remove the cover.
3. Remove the batteries.
4. Press and hold the Power button for at least five seconds.
5. Replace the batteries.
6. Replace the cover and screw.
Receiver indicator lights
Receivers have the following indicator lights:
lReady light
lTransmit light
lReceive light
The Ready light is in the upper right corner of the receiver. The Ready light indicates the operational
state of the receiver module. The Transmit and Receive lights flash green to indicate transmit and
receive activity between the receiver and the clickers.
The following table shows the Ready light’s normal states. If the light’s behavior doesn’t match a
state listed here, refer to Troubleshooting the receiver on the next page.
Ready light
state
Description
Off The receiver is disconnected from the computer.
Solid red The receiver has power, but either it isn’t communicating with the computer or no
class is started.
C H A P T E R 5
Maintaining your SMART Responsesystem
105
Ready light
state
Description
Solid green The receiver is receiving power and communicating successfully with SMART
Response software.
Troubleshooting the receiver
C C A U T I ON
Do not open the receiver or the clicker units to attempt repairs. Refer all service inquiries to
authorized SMART service personnel.
Resetting the receiver
If your SMART Response system behaves erratically (possibly because of a static discharge or
power fade), you might be able to restore normal operation by resetting the receiver.
Reset the receiver completely by disconnecting and then reconnecting the USB cable.
Interpreting the receiver indicator lights
If you experience a problem with your receiver, you can use its indicator lights to troubleshoot it.
Ready light Transmit
light
Receive
light
Receiver state
Red, green,
yellow
Green Green The receiver is starting up. Lights flash in sequence.
Flashing
green
Off Off The receiver is scanning radio channels.
Flashing
green
Any state Any state The receiver is accepting commands from the
computer.
Green Constant
flashing
Flashes
when it
receives data
from a clicker
Receiver has power and is communicating with the
computer, but it isn’t receiving commands.
Yellow Off Off The receiver has power, but communication circuits
have failed.
Flashing red Flashing Flashing Manufacturing tests are running, and the receiver isn’t
operational. All lights flash together.
C H A P T E R 5
Maintaining your SMART Responsesystem
106

Ready light Transmit
light
Receive
light
Receiver state
Flashing
yellow
Any state Any state The receiver software checksum failed.
Flashing
yellow
Flashing Flashing The receiver has a software failure.
Troubleshooting SMARTResponseCE
connection issues
If students using SMARTNotebook SE software are disconnected during an assessment, they can
still complete the assessment offline and save their responses to a USB storage device from which
you can import their answers. See Importing assessment results on page 92.
If your students are disconnected from your class and aren't able to reconnect, try the following tips.
lEnsure that the student's network cable is properly connected to the student's device. If it's
connected, disconnect it, and then reconnect it.
lEnsure that your own network cable is properly connected to your computer. If it's connected,
disconnect it, and then reconnect it.
lUse the Windows network connection repair utility. See your operating system's Help system
for more information.
lIf your students can't see your class in SMART Notebook SE software, try connecting them
manually. See Manually connecting to a class on page 69.
lContact your system administrator for help.
Importing student responses
If students are disconnected during an assessment, SMART Notebook SE software automatically
attempts to reconnect to the class. If the software is unable to reconnect, students can still complete
their assessments offline and save their responses to a USB drive from which you can import their
answers. Disconnected students will be prompted to save their responses after they click Finish in
SMART Notebook SE software.
gTo import student responses
1. Start Teacher Tools. See Starting Teacher Tools on page 23.
Teacher Tools appears.
C H A P T E R 5
Maintaining your SMART Responsesystem
107

2. Connect the student's USB drive to your computer.
3. Select Import > Student Responses from the toolbar.
The Select Unsent SMART Response Files dialog box appears.
4. Browse to and select the unsent response (.unsent) file, and then click Open.
The Import dialog box appears and displays a progress bar.
5. When the import is complete, click OK.
Finalizing disconnected students' results in Teacher Tools
If students are disconnected from your class during an assessment before they submit their
responses, a Disconnected Students icon appears beside their names in the Assessments tab,
indicating that their marks aren't final. If you import a disconnected student’s responses or edit a
disconnected student’s mark, the Disconnected Students icon disappears.
If you want to manually clear the icon and set the marks as final, follow the instructions below.
gTo set a disconnected student's mark as final
1. Start Teacher Tools. See Starting Teacher Tools on page 23.
Teacher Tools appears.
2. Select the class the student belongs to in the Gradebook class list.
The class information appears.
3. Click the Students tab.
4. Select the student's name in the list.
The student's information appears in the lower pane.
5. Click the Results tab.
6. Select the row of the student whose mark you want to set as final, and then click the Clear flag
icon .
The icon disappears.
C H A P T E R 5
Maintaining your SMART Responsesystem
108
Other troubleshooting tips
Symptom/observation Action/remedy
When you export SMART Response
question set results from a SMART
Notebook file using the CSV
command, fractions change to dates.
In your exported results, change the exported dates to
fractions, add a space before each fraction and convert the
month to its numerical value. The converted month is the
fraction’s numerator, and the day is the denominator.
Your computer doesn’t recognize
SMART Response software, and the
receiver’s Status LED light remains
solid red.
Remove the SMART Response hardware drivers on your
computer, and then reconnect the receiver following the
instructions in The SMARTResponse System Receiver
Doesn't Work (smarttech.com/kb/115401).
The receiver's Status LED flashes red
when SMARTResponse software is in
CE or VE mode.
This is normal. When SMARTResponse software is in a
mode that doesn't require a receiver, the software doesn't
start the hardware drivers.
Responses from students don’t appear
in SMART Notebook reports.
Wait at least 10 seconds after the last student responds
before you stop a question set.
Additional SMART Response
receivers don’t connect to the network
when you install more than one
receiver on your computer.
Disconnect the additional receiver’s USB plug to resume
normal operation. Disconnect and reconnect the first
receiver’s USB plug if it doesn’t work, or if the Status light
turns red.
N N O T E
Installing more than one receiver affects your computer’s
performance and doesn’t increase your reception.
C H A P T E R 5
Maintaining your SMART Responsesystem
109
Appendix A: Hardware environmental
compliance
SMART Technologies supports global efforts to ensure that electronic equipment is manufactured,
sold and disposed of in a safe and environmentally friendly manner.
Waste Electrical and Electronic Equipment
Regulations (WEEE directive)
Waste Electrical and Electronic Equipment regulations apply to all electrical and electronic equipment
sold within the European Union.
When you dispose of any electrical or electronic equipment, including SMARTTechnologies
products, we strongly encourage you to properly recycle the electronic product when it has reached
end of its life. If you require further information, please contact your reseller or SMARTTechnologies
for information on which recycling agency to contact.
Restriction of Certain Hazardous Substances
(RoHS directive)
This product meets the requirements of the European Union’s Restriction of Certain Hazardous
Substances (RoHS) Directive 2002/95/EC.
Consequently, this product also complies with other regulations that have arisen in various
geographical areas, and that reference the European Union’s RoHS directive.
Batteries
Batteries are regulated in many countries. Check with your reseller to find out how to recycle used
batteries.
There are special regulations that must be met when shipping a product that has a lithium ion battery
packaged with the product or shipping a lithium ion battery. When returning a SMARTTechnologies
Appendix A
111
product which contains a lithium ion battery or returning a lithium ion battery, call
SMARTTechnologies RMA for information on these special shipping regulations:
l1.866.518.6791, Option 4 (U.S./Canada)
l1.403.228.5940 (all other countries)
Packaging
Many countries have regulations restricting the use of certain heavy metals in product packaging. The
packaging used by SMARTTechnologies to ship products complies with applicable packaging laws.
Covered electronic devices
Many U.S. states classify monitors as covered electronic devices and regulate their disposal.
Applicable SMARTTechnologies products meet the requirements of the covered electronic devices
regulations.
China’s Electronic Information Products
regulations
China regulates products that are classified as EIP (Electronic Information Products).
SMARTTechnologies products fall under this classification and meet the requirements for China’s
EIP regulations.
U.S. Consumer Product Safety Improvement Act
The United States has enacted the Consumer Product Safety Improvement Act which limits the lead
(Pb) content in products used by children. SMARTTechnologies is committed to complying with this
initiative.
California Air Resources Board – Airborne Toxic
Control Measure
California has enacted a law to restrict the emissions of formaldehyde from composite wood
products. The SMARTTechnologies products that contain composite wood products are compliant to
this regulation.
A P P E N D I X A
Hardware environmental compliance
112
Restriction of Certain Chemicals (REACH
directive)
The European Union has enacted the EU REACH Directive which restricts the use of certain
chemicals in products. SMARTTechnologies is committed to complying with this initiative.
A P P E N D I X A
Hardware environmental compliance
113