SOUNDMAX ELECTRONICS NA788 Car Audio System player User Manual NA788S C ENG SP IM T150123
Soundmax Electronics Limited Car Audio System player NA788S C ENG SP IM T150123
UserManual.wiki
>
SOUNDMAX ELECTRONICS
>
NA788 User Manual
User manual
Navigation menu
Upload a User Manual
Namespaces
Wiki Guide
HTML
PDF
Info
Views
User Manual
Discussion / Help
Navigation
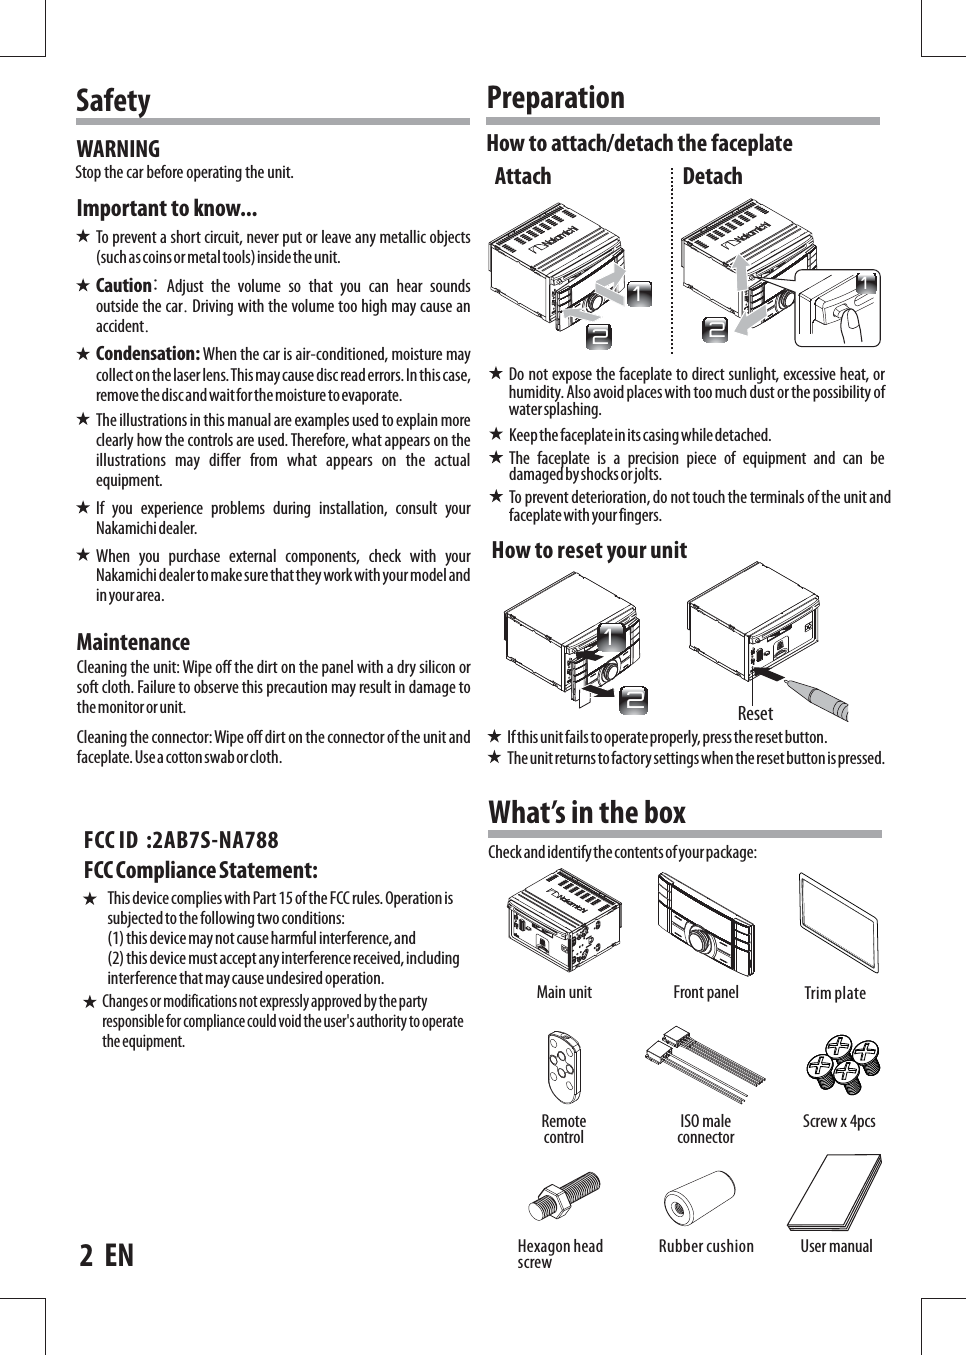
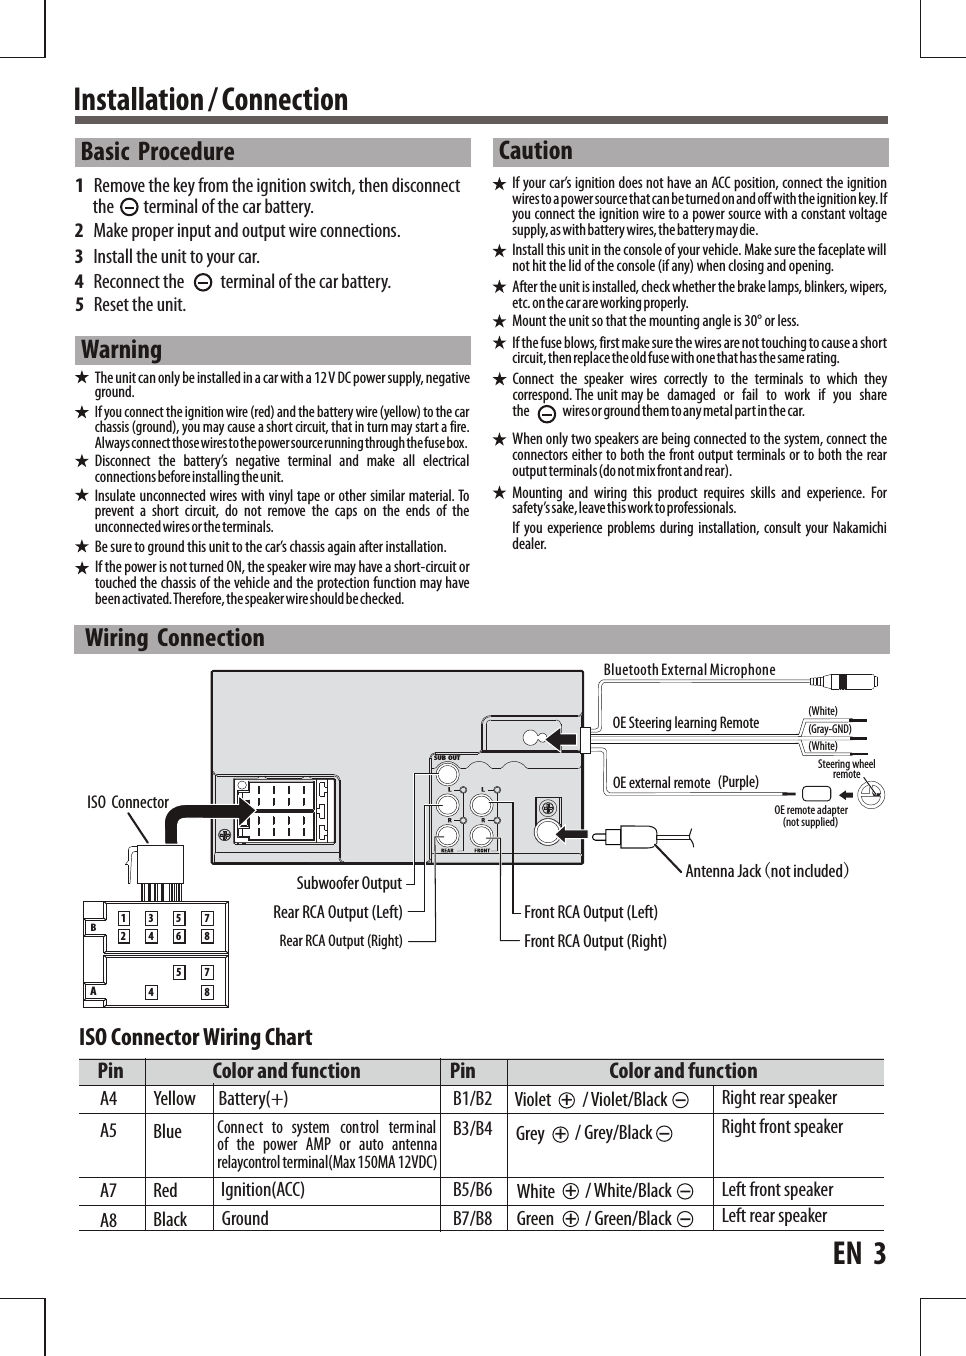
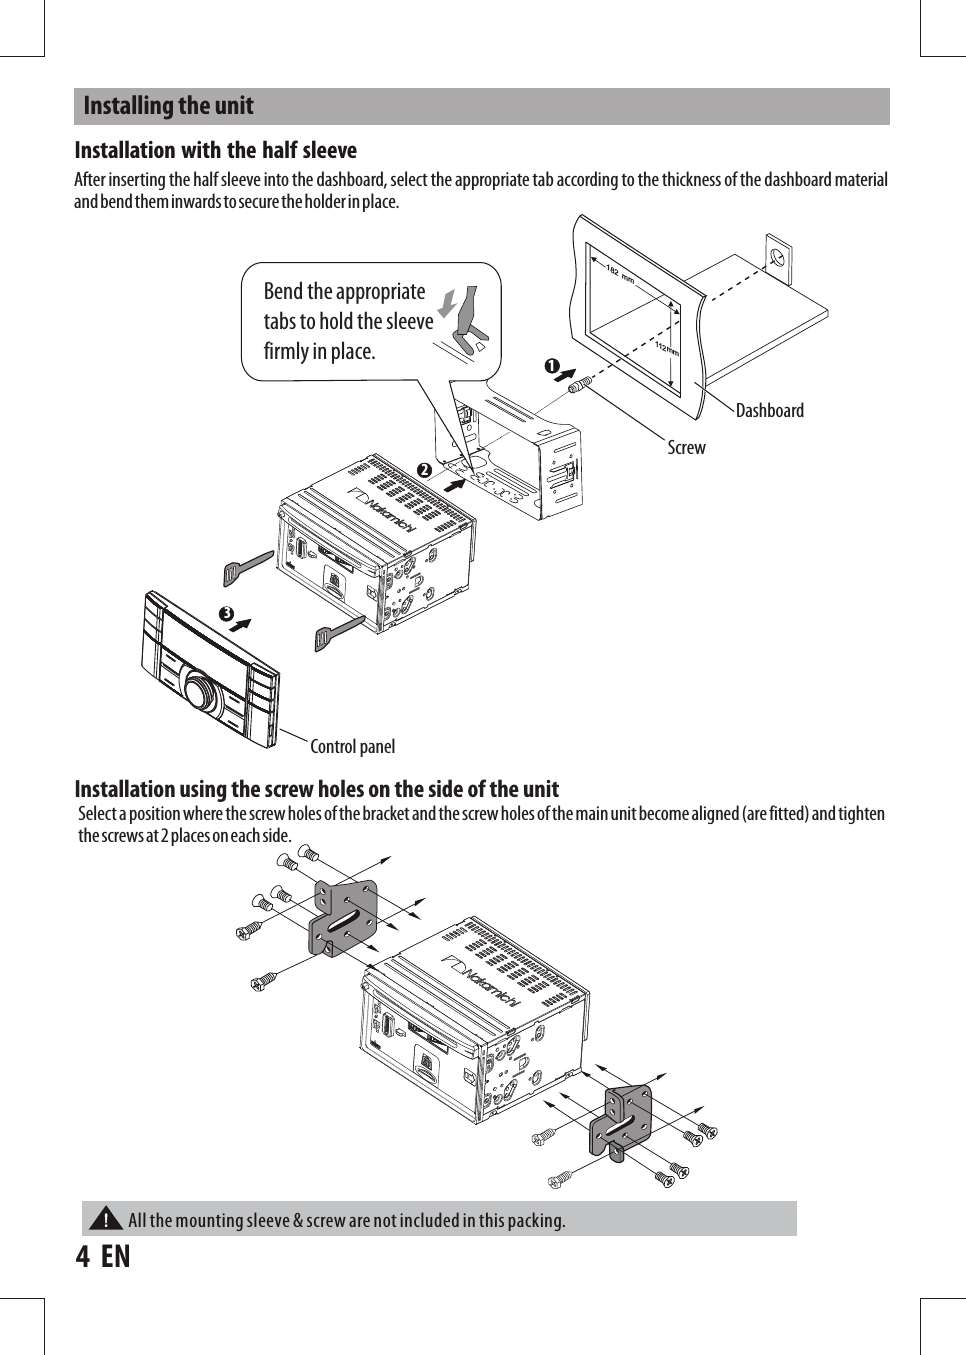
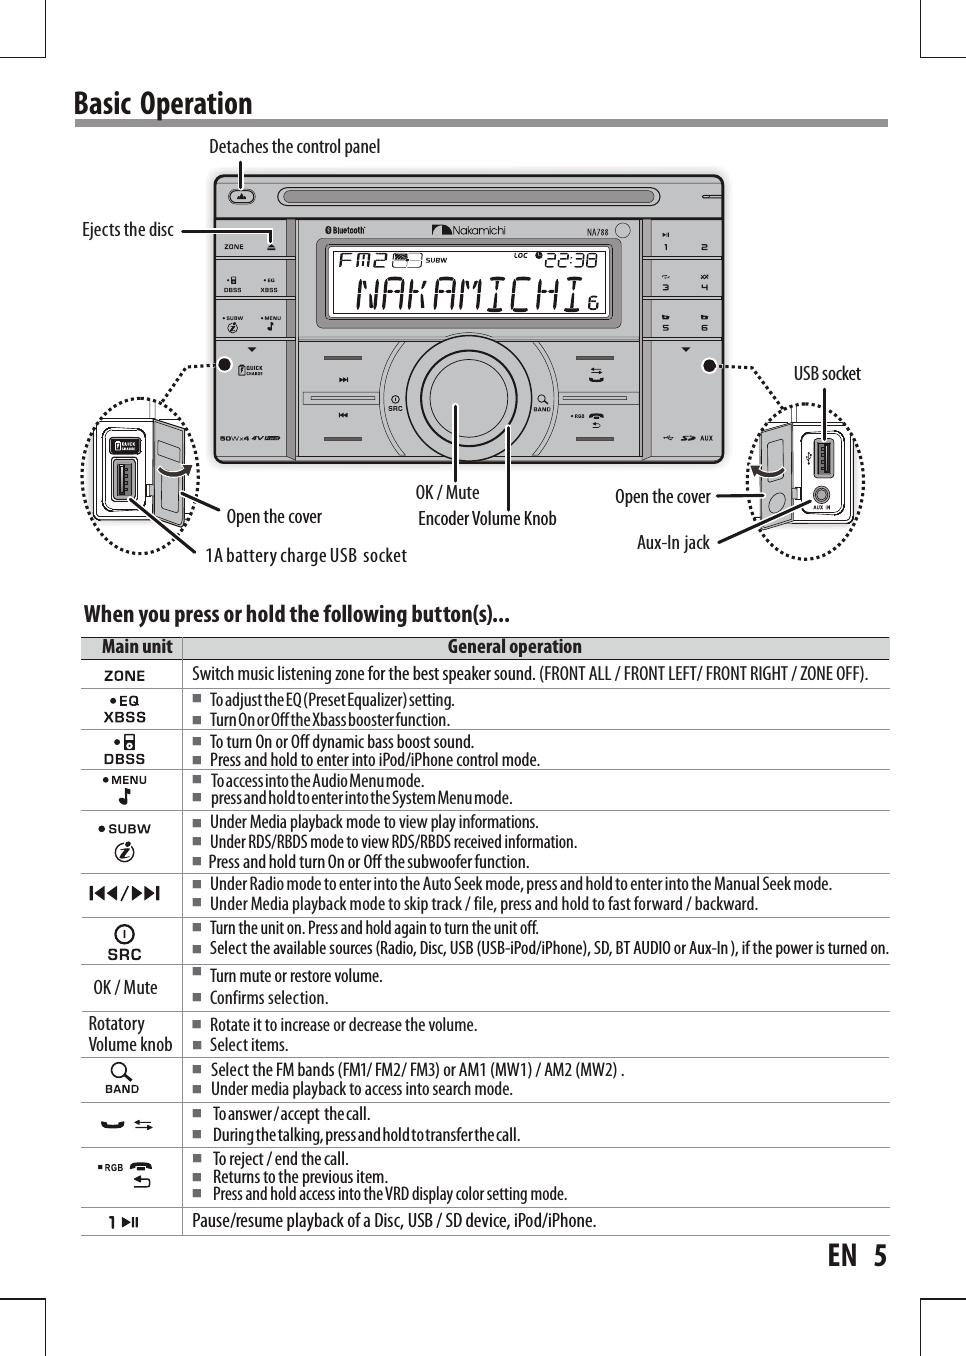
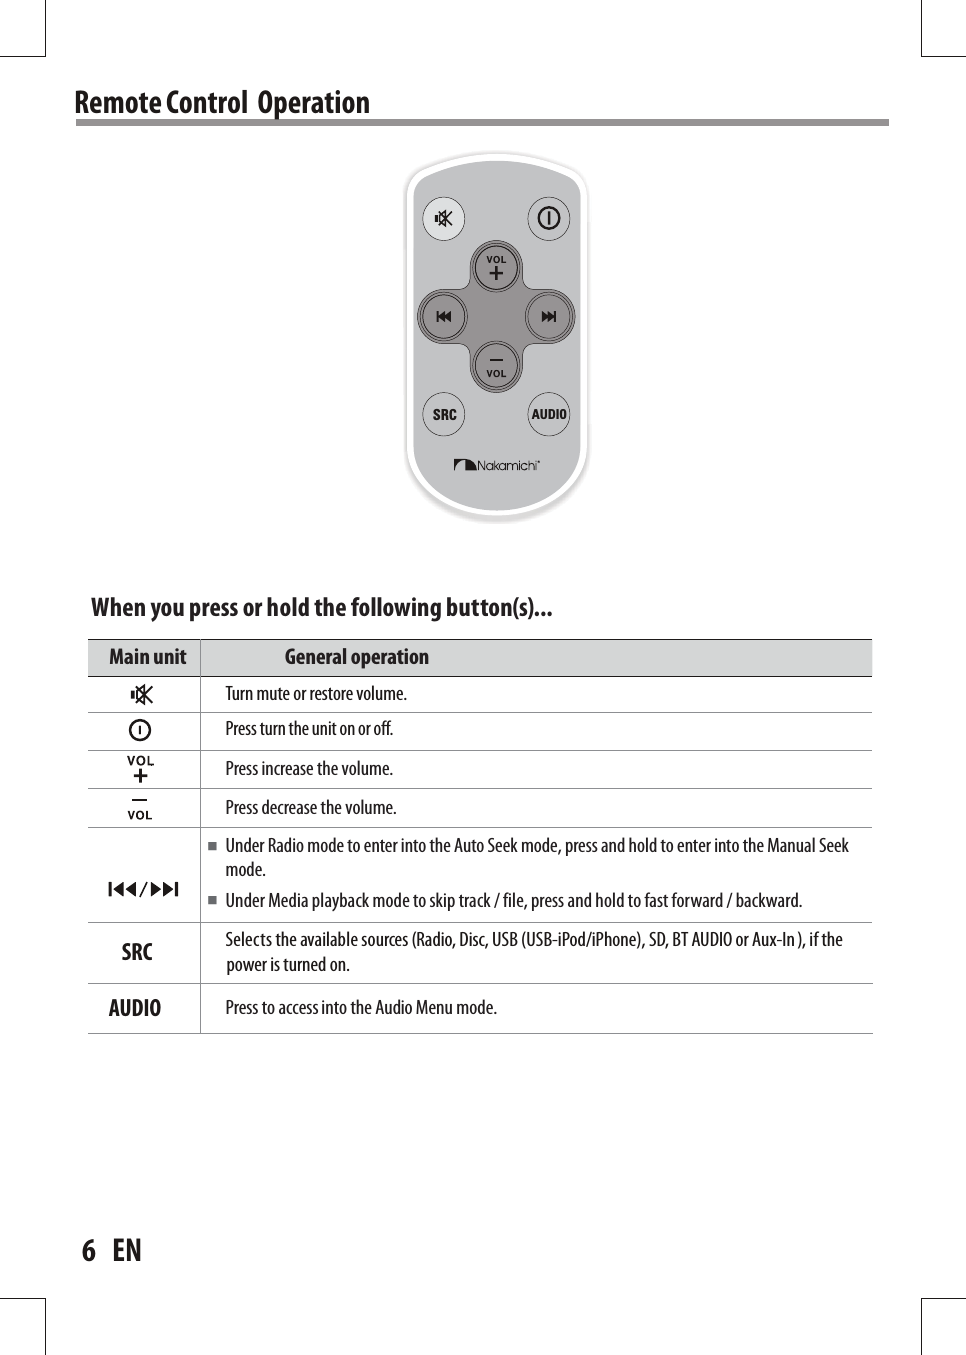
![SUBWOOFER LEVELSUBWOOFER LPFFunction Settings1 Press to access into the [AUDIO MENU] mode, press and hold to enter into the [MENU] mode.2 Press repeatedly to select the item to be adjusted.3 Turn the encoder volume knob to select a value / option.[AUDIO MENU]...[MENU]...Item Selectable SettingItem Selectable SettingCLOCKBASS LEVELCLOCK SETMIDDLE LEVELTREBLE LEVELCLOCK FORMATRESUMEBEEP TONEDEMOBALANCEFADER Adjust the Hours and Minutes Select the time format 12H or 24H Resume the preset EQ value to factory default value. Turn On or Off this beep sound This unit is equipped with variable color display. Once into the RGB COLOR mode, rotating encoder volue knob to selected the LCD color.To automatically demo this unit’s major features cyclic on LCD display. ■COLOR SCAN (default setting); WHITE; GREEN 1; GREEN 2; GREEN 3; AMBER; PI NK 1; PINK 2; PURPLE 1; PURPLE 2; BLUE 1; BLUE 2; ORANGE; USER COLOR; SCAN. EN 7SWC SET If you car is equipped with the steering wheel remote controller, you can operate this unit usingthe controller. ■■Press the “OK / Mute” to access into SWC SET mode. Rotate encoder volume knob to select the function you want the steering remote to learn, then press and hold the same function button on the steering wheel remote until “SUCCEED” is displayed. RGB COLORSUBWOOFER ADJUST Adjust the level 0 to 12. Subwoofer low pass filter range: 80 / 120 / 160.BASS ADJUSTMIDDLE ADJUSTTREBLE ADJUST Adjust the level -7 to +7. Adjust the level -7 to +7. Adjust the level -7 to +7. Adjust the balance between the right and left speakers from 12R (full right) to 12L (full left). Adjust the fader between the front and rear speakers from 12R (full rear) to 12F (full front).[ZONE]...This innovative Zone technology enables driver or passengers to enjoy music with the best speakers balance and experience a more vivid spacial effect as the artist is intended to create.User can switch the music listening zonefrom driver to passengers for the best speaker sound settings in car.1 Press the ZONE button,The current setting is displayed.2 Press the ZONE repeatedly to select one of the below setting: • FRONT ALL ( All) • FRONT LEFT ( Left) • FRONT RIGHT(Right) • ZONE OFF (Off)Check the BT connected status.CONNECT](https://usermanual.wiki/SOUNDMAX-ELECTRONICS/NA788/User-Guide-2840282-Page-7.png)
![Listening to the Radio1 Press repeatedly to a band ( FM1, FM2, FM3, AM1(MW1) or AM2 (MW2) ).2 Press to search for a station.Adjust [MENU] mode settingsWhile listening to the radio...Item Selectable SettingAUTO STOREAF(Alternate Frequencies)TA(Traffic Announcement)RDS On/OffAREALOCAL SEEKPTYPress the “OK / Mute” to access into Auto Store mode, the six strongest stations of the selected band are saved in preset channel automatically: FM1, FM2, FM3(1-6), AM1, AM2.ON: The unit will be searches for another station with stronger signal, but with the same program identification as the current station automatically. OFF: Cancel ON: When there is traffic announcement, the unit switches to the tuner mode (regardless of the current mode) and begins to broadcast the announcemet on traffic conditions. When the trafficannouncement is over, it returns to the previous mode.OFF: Traffic announcement does not cut in.Turn On or Off the RDS function.Select suitable country region of the radio: USA; LATIN; EUROPE; RUSSIA(Oirt); M-EAST; ASIA; JAPAN; AUST (Australia)To receive more radio stations or only stations with strong signal, you can adjust the radio sensitivity.Once into the PTY mode, press the “OK / Mute” get into program type item, and rotating encoder volume knob to selected category.3 Press repeatedly to view RDS received information.1 Press and hold to enter into the [MENU] mode.2 Press repeatedly to select the item to be adjusted.3 Turn the encoder volume knob to select a value / option. ■■■■■ Avai lable Program Type: 8 EN (Program Type)Hold for about 2 seconds to memorize the current station.In receive traffic, press to cancel receive the current traffic.Press briefly to recall memorized station.■■NEWS; AFFAIRS; INFO; SPORT; EDUCATE; DRAMA; CULTURE; SCIENCE; VARIED; POP M; ROCK M; EASY M; LIGHT M; CLASSICS; OTHER M; WEATHER; FINANCE; CHILDREN; SOCIAL; RELIGION; PHONE IN; TRAVEL; LEISURE; JAZZ M; COUNTRY; NATION M; OLDIES M; FOLK M; DOCUMENT; ALARM;A-TEST REMARKS:When in USA region, it will not display RDS info (PTY/AF/TA), you can hold and press button " “ to check current RBDS station info.](https://usermanual.wiki/SOUNDMAX-ELECTRONICS/NA788/User-Guide-2840282-Page-8.png)