users manual

ACE
Programming
Guide
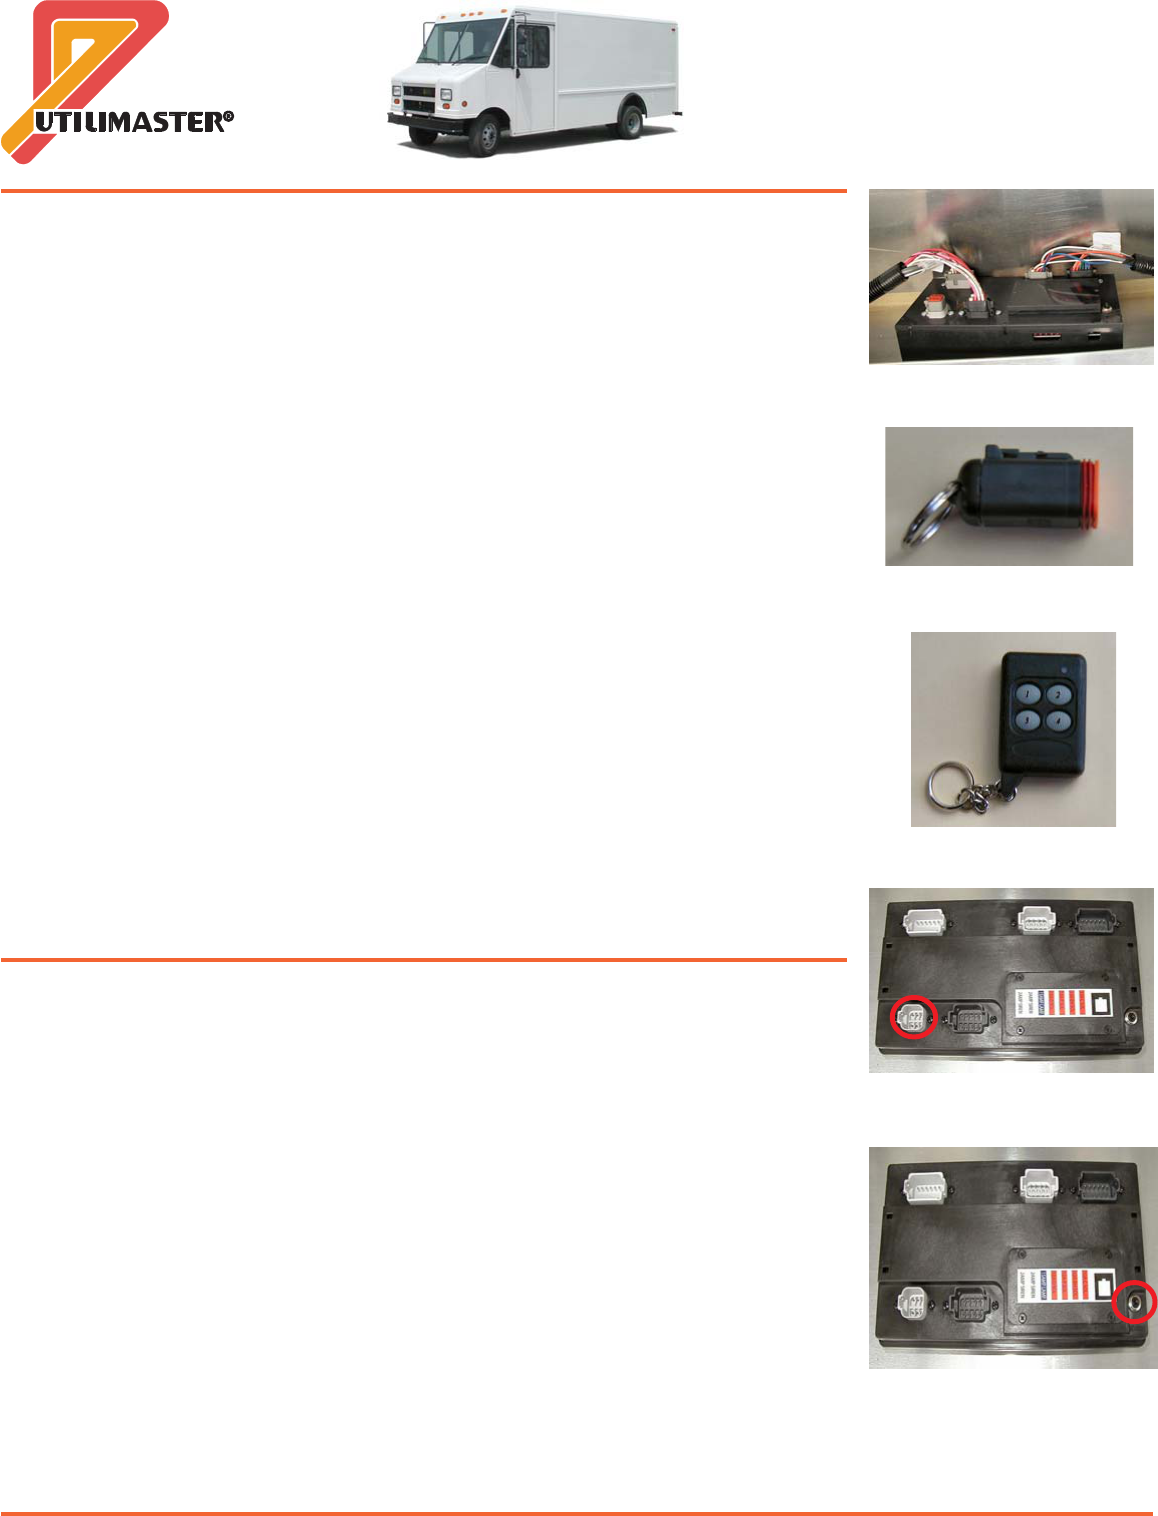
1. ACE Main Module
2. Jumper
3. Transmitter Unit
4. Jumper Socket
5. Programming Button
New Owner/Operator Vehicles
Owner/operator prepped vehicles are identified by the Black Jumper in the ACE Main
Module mounted on the overhead shelf on the passenger side (Fig. 1).
• If the vehicle is equipped with an alarm, remove the Jumper and press button #1
on a trained transmitter to ARM the system. Keep the Jumper (Fig. 2) in a secure
location for training new transmitters should any get lost or stolen.
• If the vehicle is NOT equipped with an alarm, remove the Jumper (even if the
vehicle is delivered fully operational) and store it in a secure location for training
replacement transmitters.
NOTE: The vehicle will not respond to a transmitter (key fob, Fig. 3) unless the transmitter
is correctly programmed to the specific vehicle.
NOTE: Owner/operator vehicles with alarms are NOT ARMED when shipped from
Utilimaster. To arm the system, remove the Black Jumper from the Main Module upon
receiving the vehicle and press button #1 on a trained transmitter .
IMPORTANT: ALWAYS tag and store ALL Jumpers in a secure location when not using
them to train a vehicle.
For additional information, see the ACE (Automated Control and Entry) System Opera-
tion and Service Manual (Part Number 03102977). This manual describes the other
features of the optional ignition control and alarm system.
NOTE: The information in this guide is generic. Details in the illustrations and procedures
may differ from those in your vehicle. Use this information as a guideline where
applicable.
New Fleet Vehicles
Fleet prepped vehicles are identified by the empty Jumper socket in the ACE Main
Module mounted on the overhead shelf on the passenger side and the alarms (if so
equipped) ARE active. It is advised that new Jumpers be inserted into all new vehicles
and the transmitters be trained upon arrival. Continue on the back page for instructions
on how to train transmitters and change Jumpers.
ACE
Programming
Guide

©2005, Utilimaster.® printed Aug 2005 in U.S.A. Utilimaster Corporation, 65906 State Road 19, P.O. Box 585, Wakarusa, Indiana, 46573–0585.
ACE Programming Guide
(Part Number 03102976) DRAFT
Training Transmitters
IMPORTANT: When training new transmitters ALL of the previously trained transmitters will be erased from the system
memory, so have ALL required transmitters available before proceeding.
NOTE: All system functions are disabled while in training mode.
NOTE: Up to 10 transmitters may be trained at one time per vehicle.
NOTE: Before starting work, read and understand all of the instructions
1. Stop the engine, and be certain the vehicle is not in the accessory mode.
2. Remove the jumper socket cover from the Main Module and plug the currently programmed (or transport) Jumper
into the Main Module socket (Fig. 4). (The speaker, if equipped, will make a short, low-tone beep followed by a
short, high-tone beep.)
3. Press and release the programming button 5 times (Fig. 5). (The speaker will make a single high-tone beep and the
Green programming LED will light.)
4. Press button #1 on the first transmitter. (The speaker beeps once and the programming LED will flash once to con-
firm the transmitter is recognized.)
5. Repeat step 4 to train additional transmitters up to a maximum of 10 per vehicle.
NOTE: The system will wait up to 5 seconds between transmitters being trained. If no additional transmitters are detected,
the system will time out automatically. Upon exiting, the speaker will beep and the LED will flash once for each trained
transmitter. When the LED has finished flashing, it remains lit for another 2.5 seconds, then turns off.
Changing Jumpers
IMPORTANT: When a new Jumper is used to train a vehicle, the old jumper and ALL Transmitters are erased from the
system memory. Transmitters must be retrained.
NOTE: Before starting work, read and understand all of the instructions
1. Stop the engine, and be certain the vehicle is not in the accessory mode.
2. Plug the currently programmed Jumper into the Main Module Jumper socket. (The speaker will make a short, low-
tone beep followed by a short, high-tone beep.)
3. Press and hold the programming button (Fig. 7) for 5 seconds. (The speaker will beep three times and the Green
programming LED will flash.
IMPORTANT: You only have 10 seconds to complete the next two steps.
4. Remove the current Jumper and replace it with a new Jumper.
5. Press the programming button on the Main Module once. (If the new Jumper was recognized, the programming LED
will light for 3 seconds indicating the system is fully functional. If the new Jumper was not recognized, the speaker
beeps for one second and the programming LED turns off shortly after. This indicates the old Jumper information is
still trained into the system and the programming procedure must be repeated.)
IMPORTANT: After the new Jumper is confirmed ALL previous transmitters are no longer recognized and will need to be
retrained to the vehicle.
6. Train transmitters to the vehicle. (See above section.)
IMPORTANT: If the socket cover is not installed, the main module is not sealed properly and is susceptible to damage.
IMPORTANT: ALWAYS tag and store ALL Jumpers in a secure location when not using them to train a vehicle.
For additional information, see the ACE (Automated Control and Entry) System Operation and Service Manual (Part
Number 03102977). This manual describes the other features of the optional ignition control and alarm system.
For additional information, browse www.utilimaster.com/ace. From there, the
ACE (Automated Control and Entry) System Operation and
Service Manual
(Part Number 03102977) can be downloaded in Adobe Acrobat format. Also, a paper copy can be ordered by emailing
CustSvc@Utilimaster.com, calling 800–237–7806 (574–862–3219), or faxing 574–862–7637. This manual describes the other features of
the optional ignition control and alarm system.