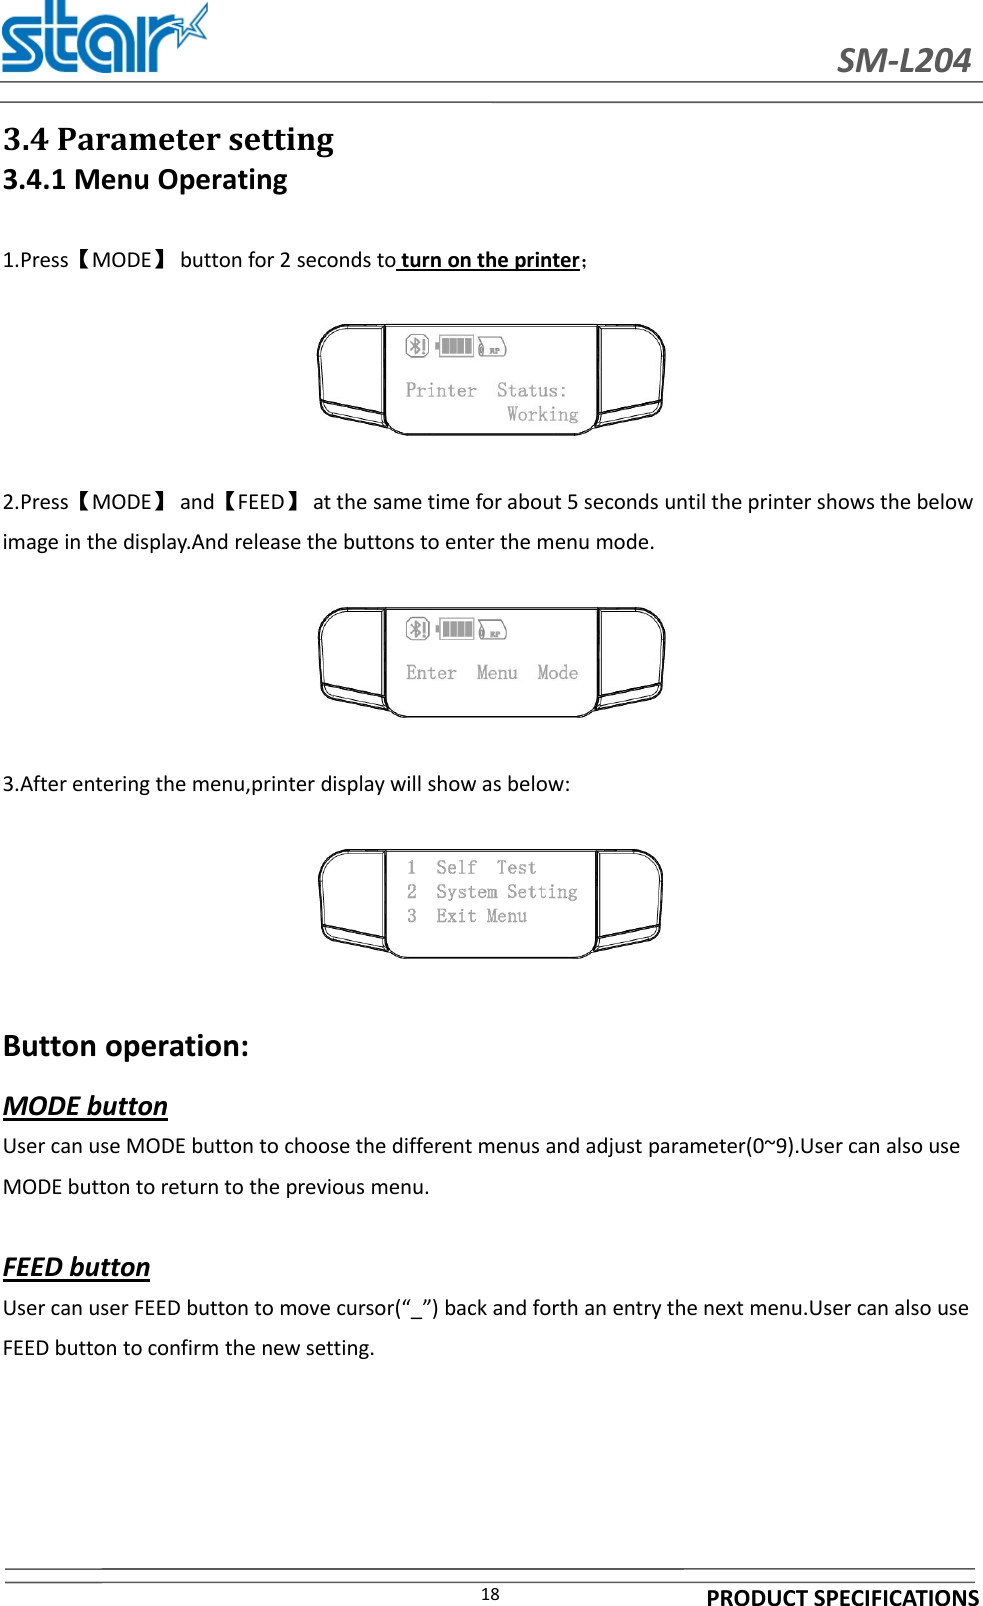
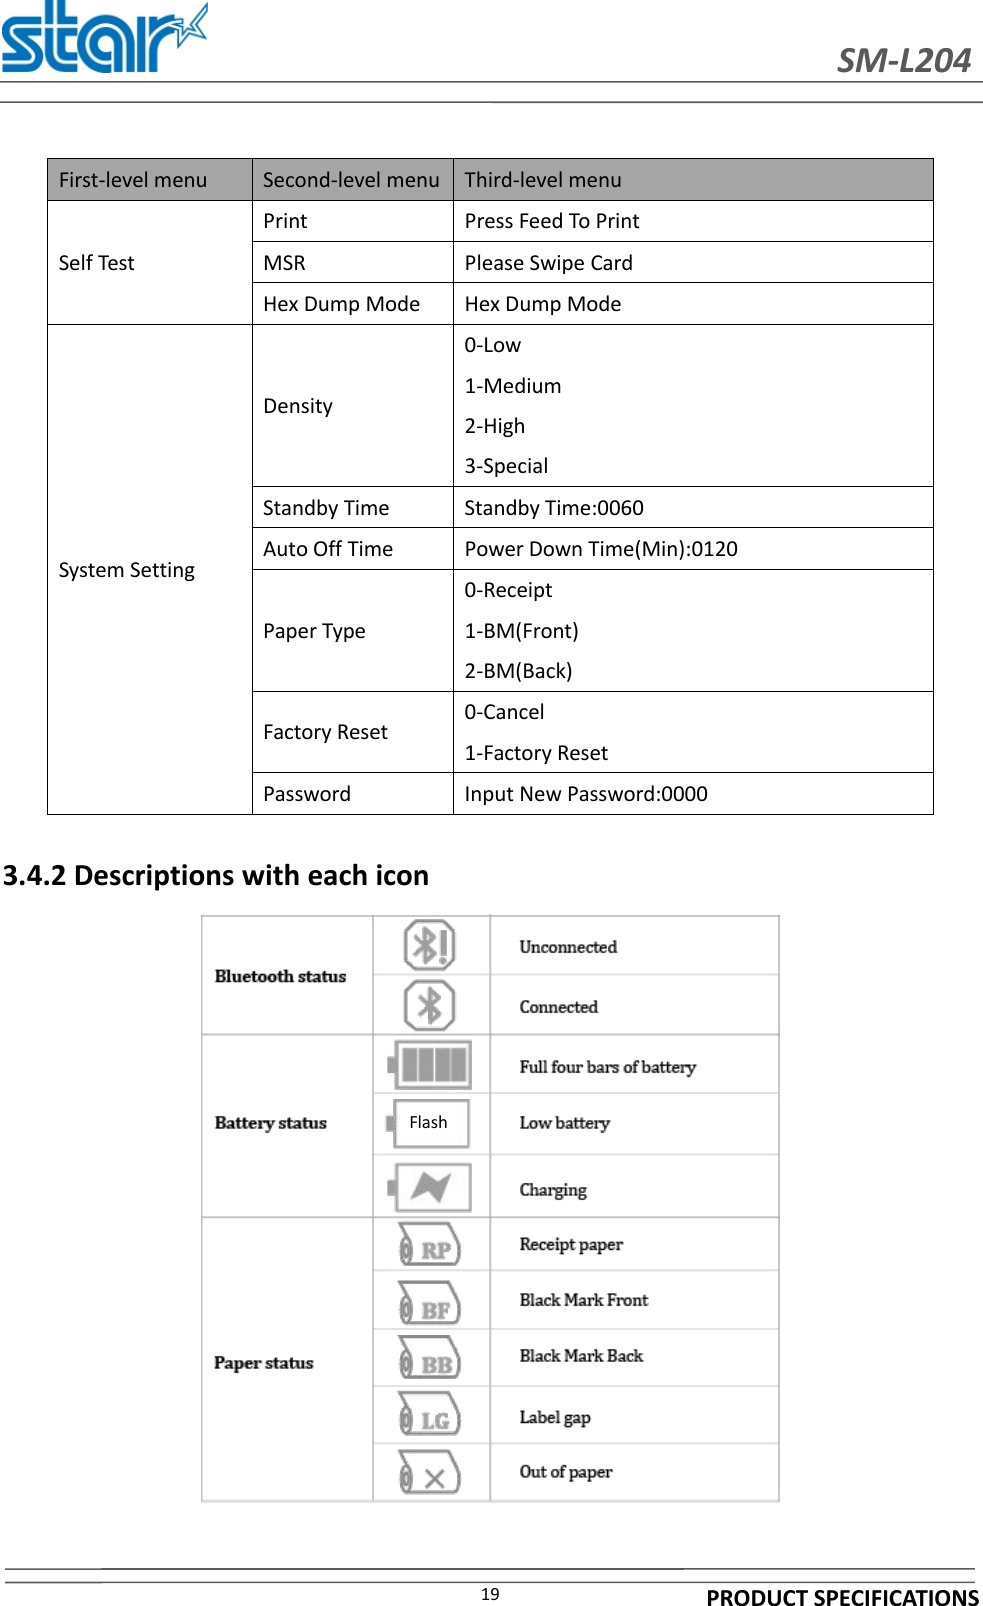
STAR MICRONICS SM-L200 Thermal Printer User Manual MPTI II
STAR MICRONICS CO., LTD. Thermal Printer MPTI II
UserManual.wiki
>
STAR MICRONICS
>
SM L200 User Manual
Manual
Navigation menu
Upload a User Manual
Namespaces
Wiki Guide
HTML
PDF
Info
Views
User Manual
Discussion / Help
Navigation
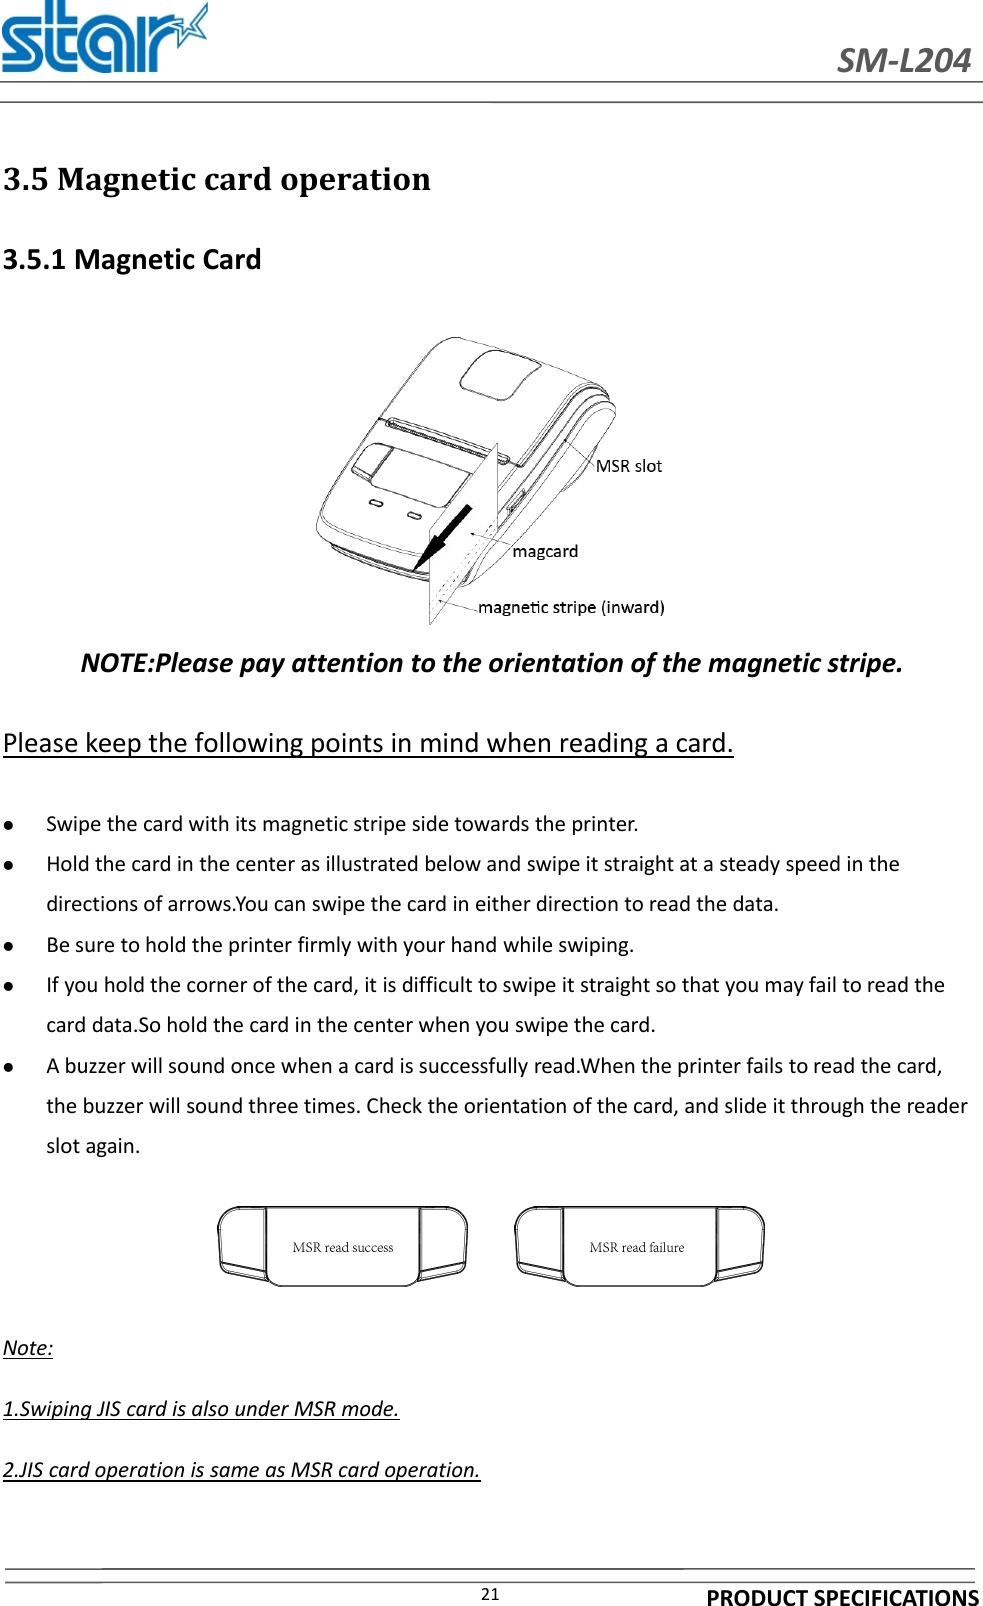
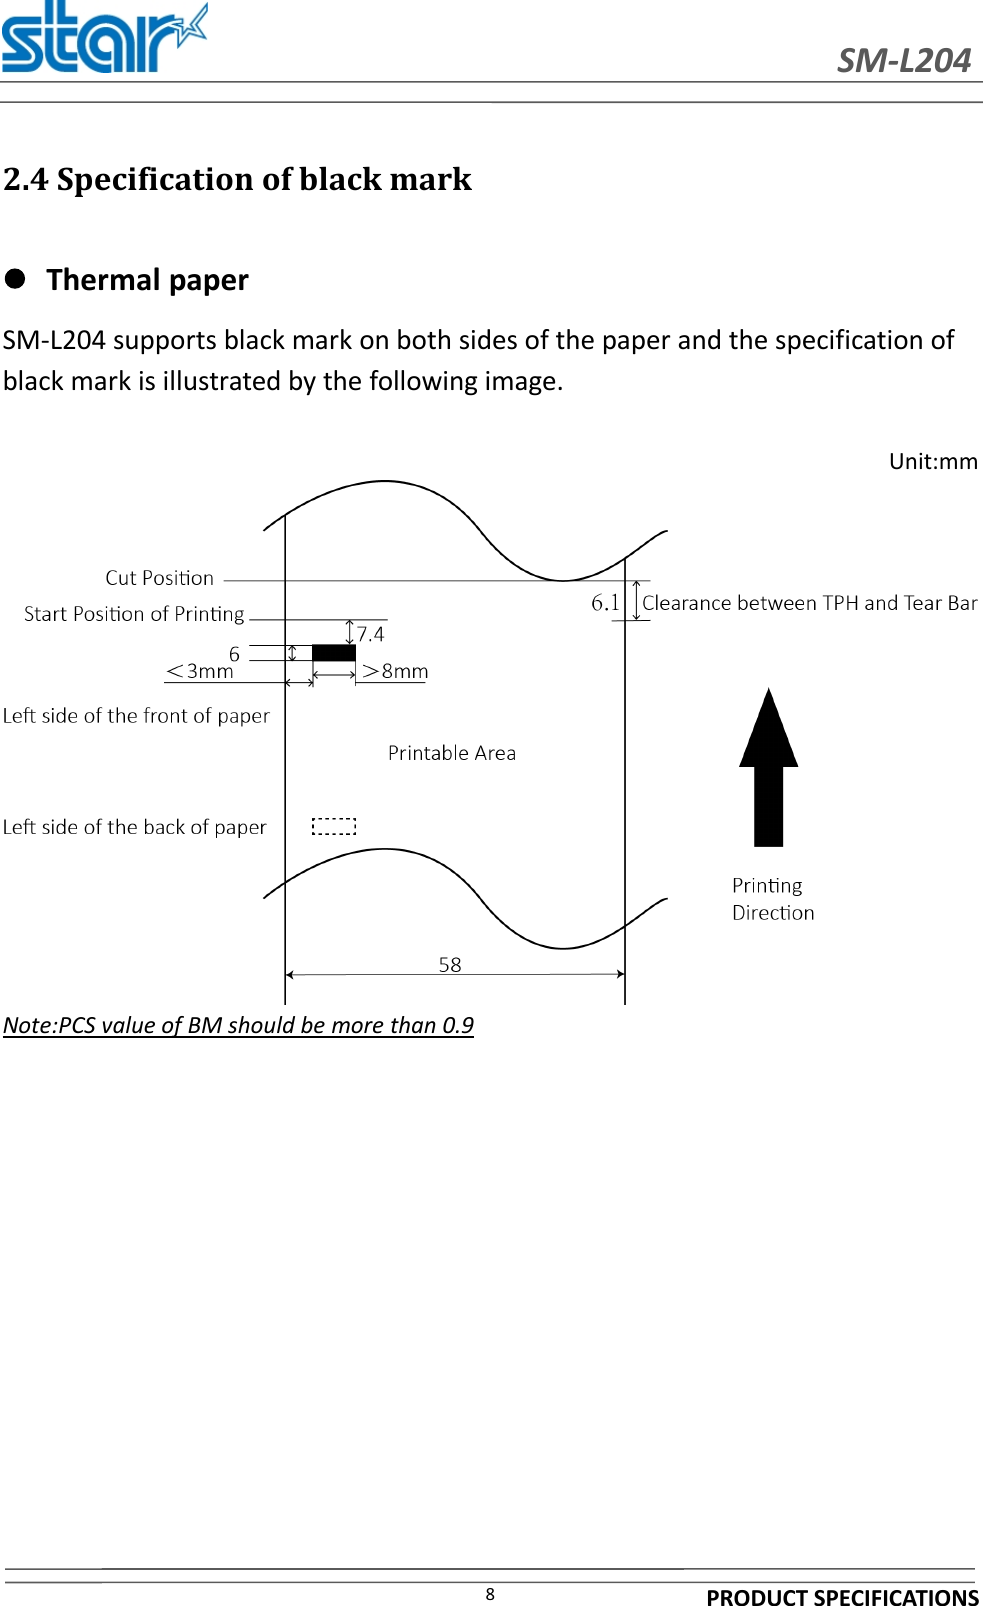
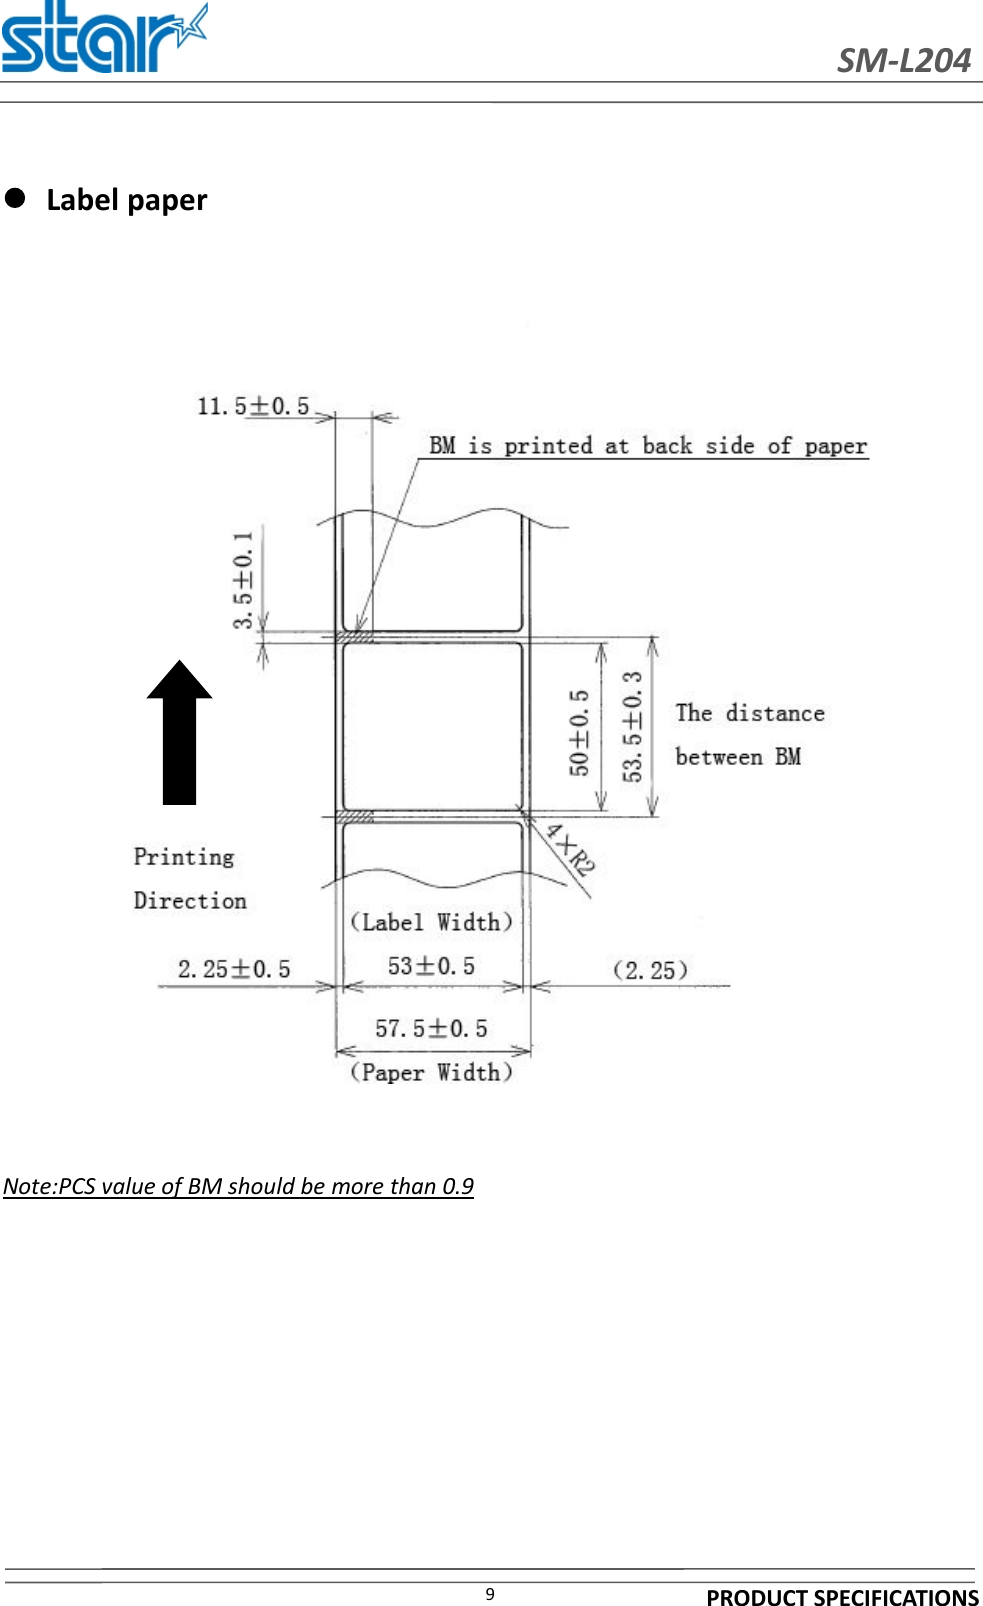
![SM-L204PRODUCT SPECIFICATIONS<USA model>Federal Communications CommissionRadio Frequency Interference StatementThis device complies with Part 15 of the FCC Rules. Operation is subject to the following two conditions:(1) This device may not cause harmful interference, and (2) this device must accept any interferencereceived, including interference that may cause undesired operation.CAUTION: Changes or modifications not expressly approved by the party responsible for compliancecould void the user’s authority to operate the equipment.Note: This equipment has been tested and found to comply with the limits for a Class B digital device,pursuant to part 15 of the FCC Rules. These limits are designed to provide reasonable protection againstharmful interference in a residential installation. This equipment generates, uses and can radiate radiofrequency energy and, if not installed and used in accordance with the instructions, may cause harmfulinterference to radio communications.However, there is no guarantee that interference will not occur in a particular installation. If thisequipment does cause harmful interference to radio or television reception, which can be determined byturning the equipment of and on, the user is encouraged to try to correct the interference by one ormore of the following measures:•Reorient or relocate the receiving antenna.•Increase the separation between the equipment and receiver.•Connect the equipment into an outlet on a circuit different from that to which the receiver isconnected.FCC WARNINGChanges or modifications not expressly approved by the party responsible for compliance could void theuser’s authority to operate the equipment.For compliance with the Federal Noise InterferenceStandard, this equipment requires a shielded cable.For RF interference suppression, if a ferrite core isprovided with this device, aff it to the interface cable.The above statement applies only to equipments marketed in U.S.A.<Europe model>English: Hereby, STAR MICRONICS CO.,LTD. declares that this Wireless Device is in compliancewith the essential requirements and other relevant provisions of Directive 1999/5/ECDeutsch:[German]Hiermit erklärt STAR MICRONICS CO.,LTD., dass sich das Gerät Wireless Device inÜbereinstimmung mit den grundlegenden Anforderungen und den übrigen einschlägigenBestimmungen der Richtlinie 1999/5/EG befidet.Svenska:[Swedish]Härmed intygar STAR MICRONICS CO.,LTD. att denna Wireless Device står Iöverensstämmelse med de väsentliga egenskapskravoch övriga relevanta bestämmelsersom framgår av direktiv 1999/5/EGEspañol:[Spanish]Por medio de la presente STAR MICRONICS CO.,LTD. declara que el Wireless Devicecumple con los requisitos esenciales y cualesquiera otras disposiciones aplicables oexigibles de la Directiva 1999/5/CE.](https://usermanual.wiki/STAR-MICRONICS/SM-L200/User-Guide-2577387-Page-2.png)
![SM-L204PRODUCT SPECIFICATIONSPortuguês:[Portuguese]STAR MICRONICS CO.,LTD. declara que este Wireless Device está conforme com osrequisitos essenciais e outras disposições da Directiva 1999/5/CE.Français:[French]Par la présente STAR MICRONICS CO.,LTD. déclare que l’appareil Wireless Device estconforme aux exigences essentielles et aux autres dispositions pertinentes de la directive1999/5/CE.Suomi:[Finnish]STAR MICRONICS CO.,LTD. vakuuttaa täten että Wireless Device tyyppinen laite ondirektiivin 1999/5/EY oleellisten vaatimusten jasitä koskevien direktiivin muiden ehtojenmukainen.Italiano:[Italian]Con la presente STAR MICRONICS CO.,LTD. dichiara che questo Wireless Device èconforme ai requisiti essenziali ed alle altre disposizioni pertinenti stabilite dalla direttiva1999/5/CE.Dansk:Nederlands:Undertegnede STAR MICRONICS CO.,LTD. erklærer herved, at følgende udstyr WirelessDevice overholder de væsentlige krav og øvrige relevante krav i direktiv 1999/5/EF.Nederlands:[Dutch]Hierbij verklaart STAR MICRONICS CO.,LTD. dat het toestel Wireless Device inovereenstemming is met de essentiële eisen en de andere relevante bepalingen vanrichtlijn 1999/5/EGEesti:[Estonian]Käesolevaga kinnitab STAR MICRONICS CO.,LTD. seadme Wireless Device vastavustdirektiivi 1999/5/EÜ põhinõuetele ja nimetatud direktiivist tulenevatele teisteleasjakohastele sätetele.Ελληνική:[Greek]ΜΕ ΤΗΝ ΠΑΡΟΥΣΑ STAR MICRONICS CO.,LTD. ΔΗΛΩΝΕΙ ΟΤΙWireless Device ΣΥΜΜΟΡΦΩΝΕΤΑΙ ΠΡΟΣ ΤΙΣ ΟΥΣΙΩΔΕΙΣ ΑΠΑΙΤΗΣΕΙΣΚΑΙ ΤΙΣ ΛΟΙΠΕΣ ΣΧΕΤΙΚΕΣ ΔΙΑΤΑΞΕΙΣ ΤΗΣ ΟΔΗΓΙΑΣ 1999/5/ΕΚ.Slovensky:[Slovak]STAR MICRONICS CO.,LTD. týmto vyhlasuje, že Wireless Device spĺňa základné požiadavkya všetky príslušné ustanovenia Smernice 1999/5/ES.Slovensko:[Slovenian]STAR MICRONICS CO.,LTD. izjavlja, da je ta Wireless Device v skladu z bistvenimizahtevami in ostalimi relevantnimi določili direktive 1999/5/ES.Česky:[Czech]STAR MICRONICS CO.,LTD. tímto prohlašuje, že tento Wireless Device je ve shoděsezákladními požadavky a dalšími príslušnými ustanoveními smernice 1999/5/ES.Magyar:[Hungarian]Alulírott, STAR MICRONICS CO.,LTD. nyilatkozom, hogy a Wireless Device megfelel avonatkozó alapvetõ követelményeknek és az 1999/5/EC irányelv egyéb elõírásainak.Български:[Bulgarian]това Безжично устройство е в съответствие със задължителните изисквания и другите приложими разпоредби на Директива1999/5/EC.Polski: Niniejszym STAR MICRONICS CO.,LTD. oświadcza, że Wireless Device jest zgodny z](https://usermanual.wiki/STAR-MICRONICS/SM-L200/User-Guide-2577387-Page-3.png)
![SM-L204PRODUCT SPECIFICATIONS[Polish] zasadniczymi wymogami oraz pozostałymi stosownymi postanowieniami Dyrektywy1999/5/EC.Malti:[Maltese]Hawnhekk, STAR MICRONICS CO.,LTD., jiddikjara li dan Wireless Device jikkonforma mal-ħtiġijiet essenzjali u ma provvedimenti oħrajn relevanti li hemm fid-Dirrettiva 1999/5/EC.Latviski:[Latvian]Ar šo STAR MICRONICS CO.,LTD. deklarē, ka Wireless Device atbilst Direktīvas 1999/5/EKbūtiskajām prasībām un citiem ar to saistītajiem noteikumiem.Lietuvių :[Lithuanian]Šiuo STAR MICRONICS CO.,LTD. deklaruoja, kad šis Wireless Device atitinka esminiusreikalavimus ir kitas 1999/5/EB Direktyvos nuostatas.Norsk:[Norwegian]STAR MICRONICS CO.,LTD. erklærer herved at utstyret Wireless Device er i samsvar medde grunnleggende krav og øvrige relevante krav i direktiv 1999/5/EF.Íslenska:[Icelandic]Hér með lýsir STAR MICRONICS CO.,LTD. yfi Því að Wireless Device er í samræmi viðgrunnkröfur og aðrar kröfur, sem gerðar eru í tilskipun 1999/5/EC.This is a class B product. In a domestic environment, this product may cause radio interference, in whichcase the user may be required to take adequate measures.Notice: This device can be operated in all European countries.France: Outdoor use limited to 10 mW e.i.r.p. within the band 2454-2483.5 MHz.(The wireless output power of this printer is less than 10mW e.i.r.p.)Italy: For private use, a general authorisation is required ifWAS/RLAN’s are used outside ownpremises. For public use, a general authorisation is required.Norway: This subsection does not apply for the geographical area within a radius of 20 km from thecentre of Ny-Ålesund.“Made for iPod”,”Made for iPhone”,”Made for iPad” mean that an electronic accessory has beendesigned to connect specially to iPod, iPhone and iPad, respectively, and has been certified by thedeveloper to meet Apple performance standards.Apple is not responsible for the operation of this device or its compliance with safety and regulatorystandards.iPod is a trademark of Apple Inc., registered in the U.S. and other countries.iPod touch is a trademark of Apple Inc. iPhone is a trademark of Apple Inc. iPad is a trademark of AppleInc.Trademark acknowledgmentsSM-L204: Star Micronics Co., Ltd.Notice•All rights reserved. Reproduction of any part of this manual in any form whatsoever, withoutSTAR’s express permission is forbidden.•The contents of this manual are subject to change without notice.•All efforts have been made to ensure the accuracy of the contents of this manual at the time ofgoing to press. However, should any errors be detected, STAR would greatly appreciate beinginformed of them.•The above notwithstanding, STAR can assume no responsibility for any errors in this manual.](https://usermanual.wiki/STAR-MICRONICS/SM-L200/User-Guide-2577387-Page-4.png)
![SM-L204PRODUCT SPECIFICATIONSDo not open the printer cover while the printer is printing.Before you open the printer cover, make sure that printing data is not being sent to the printer.Do not unplug or plug in a USB cable while the printer is printing or during communication.Do not touch a USB connector while the printer is printing.Turn off the printer when you are not using it.When the printer is used in a low temperature environment, the battery's performance will bediminished, and the amount of time that you can use the printer for may be reduced.Do not pull out paper while the printer cover is closed.The heating element and the driver IC of the thermal head are easily damaged. Do not touch themwith metal objects, sandpaper, etc.Printing quality may suffer if the thermal head heating element becomes soiled by being touchedwith your hands. Do not touch the thermal head heating element.There is a risk of damage to the driver IC of the thermal head from static electricity.Never directlytouch the IC.Do not operate the printer if there is moisture on the front surface of the head from condensation,etc.Thermal Paper HandlingOnly use thermal paper with the designated specifications.The printing quality and working life ofthe thermal head cannot be guaranteed if any paper other than that recommended is used. Inparticular, paper containing [Na+, K+, C1-] may drastically reduce the working life of the thermalhead. Please exercise caution.Store the thermal paper in a cool, dry, dark location.Do not rub the thermal paper with a hard object.Do not leave the thermal paper in contact with plastic film, an eraser, or adhesive tape for a longperiod of time.Do not stack the thermal paper on fresh diazo copies or wet-type copies.Do not use chemical glue on the thermal paper.Do not use thermal paper that has been stored for a long period of time.Operating Environment for the PrinterBefore actually unpacking the printer, you should take a few minutes to think about where you plan touse it. Remember the following points when doing this.Do not use the printer in an environment in which it will be subject to strong shaking while it isprinting.Be careful to ensure that the printer is not exposed to direct sunlight.The appropriate environmentfor using the printer is described below.](https://usermanual.wiki/STAR-MICRONICS/SM-L200/User-Guide-2577387-Page-6.png)
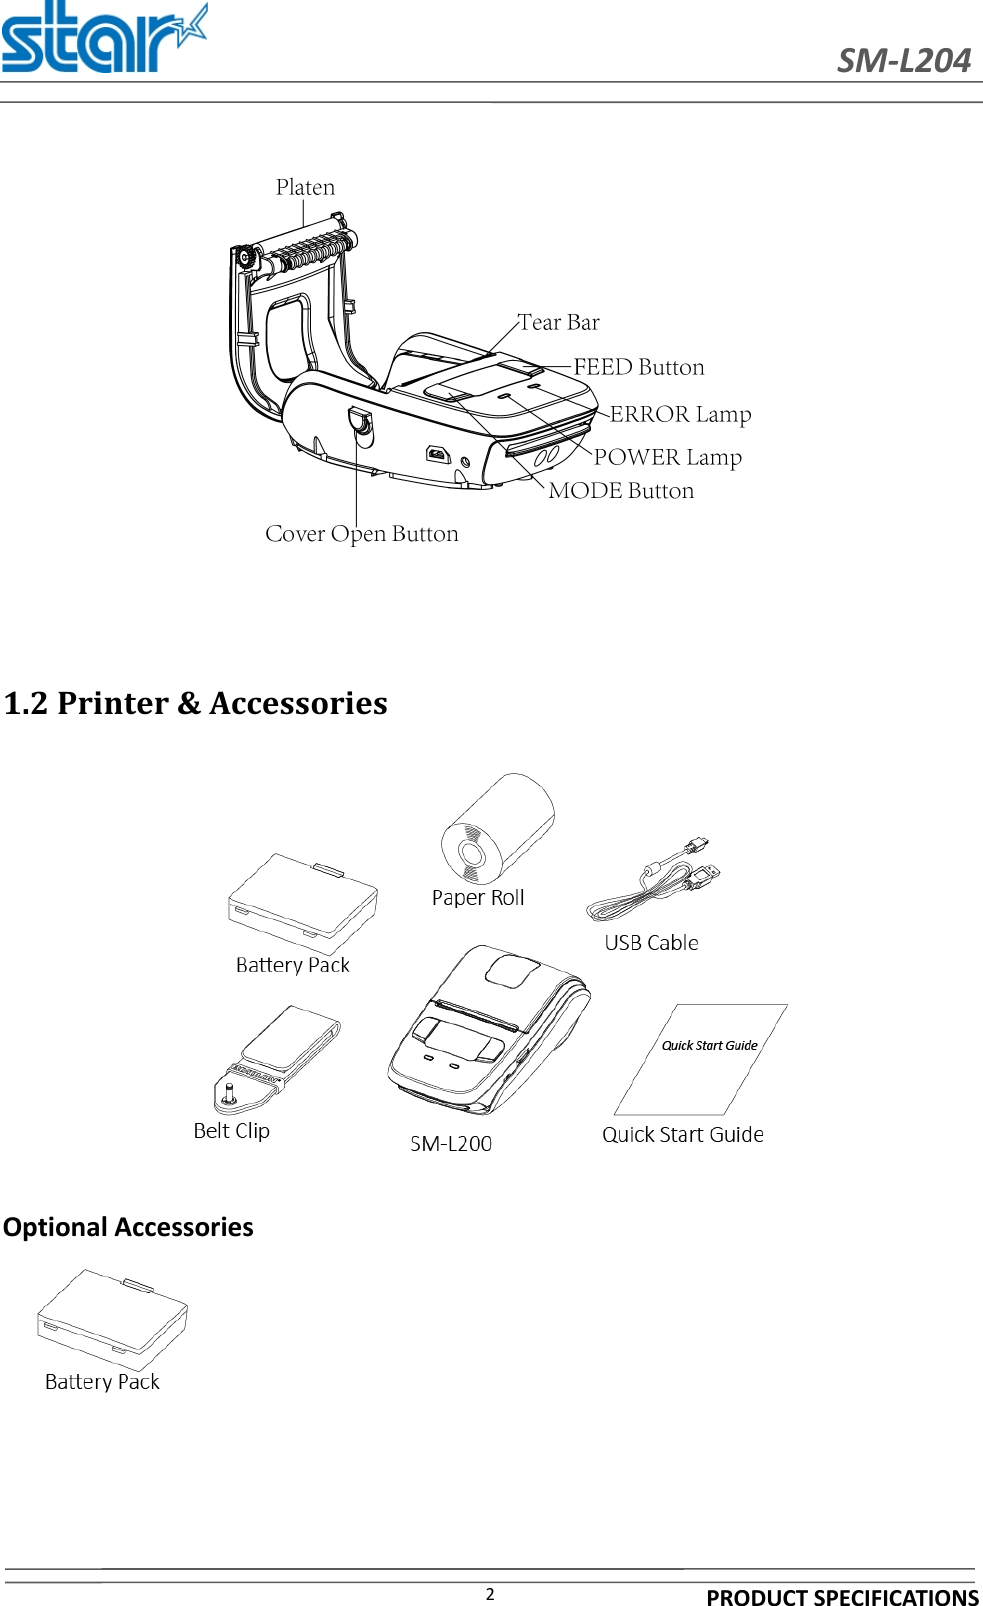
![SM-L204PRODUCT SPECIFICATIONS1Chapter 1 Brief Introduction1.1Appearance1.OLED Panels 7.USB Interface2.[FEED] Button 8.Magnetic Stripe Reader3.[MODE] Button (MSR mounting model)4.Green [POWER] Lamp 9.Battery Pack5.Blue [ERROR] Lamp 10.Paper Roll Perspective Window6.Cover Open Button 11.Belt Strap Hole](https://usermanual.wiki/STAR-MICRONICS/SM-L200/User-Guide-2577387-Page-10.png)
![SM-L204PRODUCT SPECIFICATIONS31.3 Product OverviewThis printer is perfect for mobile banking systems, retail, POS (point of sale) terminals and other forms ofmobile computing.The characteristics of this printer are listed below:•Pocket size (83 ×122.5 ×44mm)•Extremely light and mobile (220g including Battery pack)•Ultra-long standby time(20h) and continuously work for 1.2 hours•1.2m Drop Resistance (Tough Rubber Type Case Design)*Our test procedure, Not guarantee•Very silent printing thru direct thermal printing method•Print speed 30mm/s (Paper feed 70mm/s)•Standard-equipped dual interface(USB and Bluetooth Ver3.0/4.0[BLE] Dual Mode)•Support Magnetic Stripe Reader <Model with Card Reader>•Support Graphic FSTN(128×64 dots) with Blue Backlight•Belt Clip as a standard accessory•Support text and graphic printing•Drop-in design that makes it easy to load paper•A printer cover that can be opened with the touch of a button•Printer cover open sensor, Paper-out sensor and Black mark sensor](https://usermanual.wiki/STAR-MICRONICS/SM-L200/User-Guide-2577387-Page-12.png)
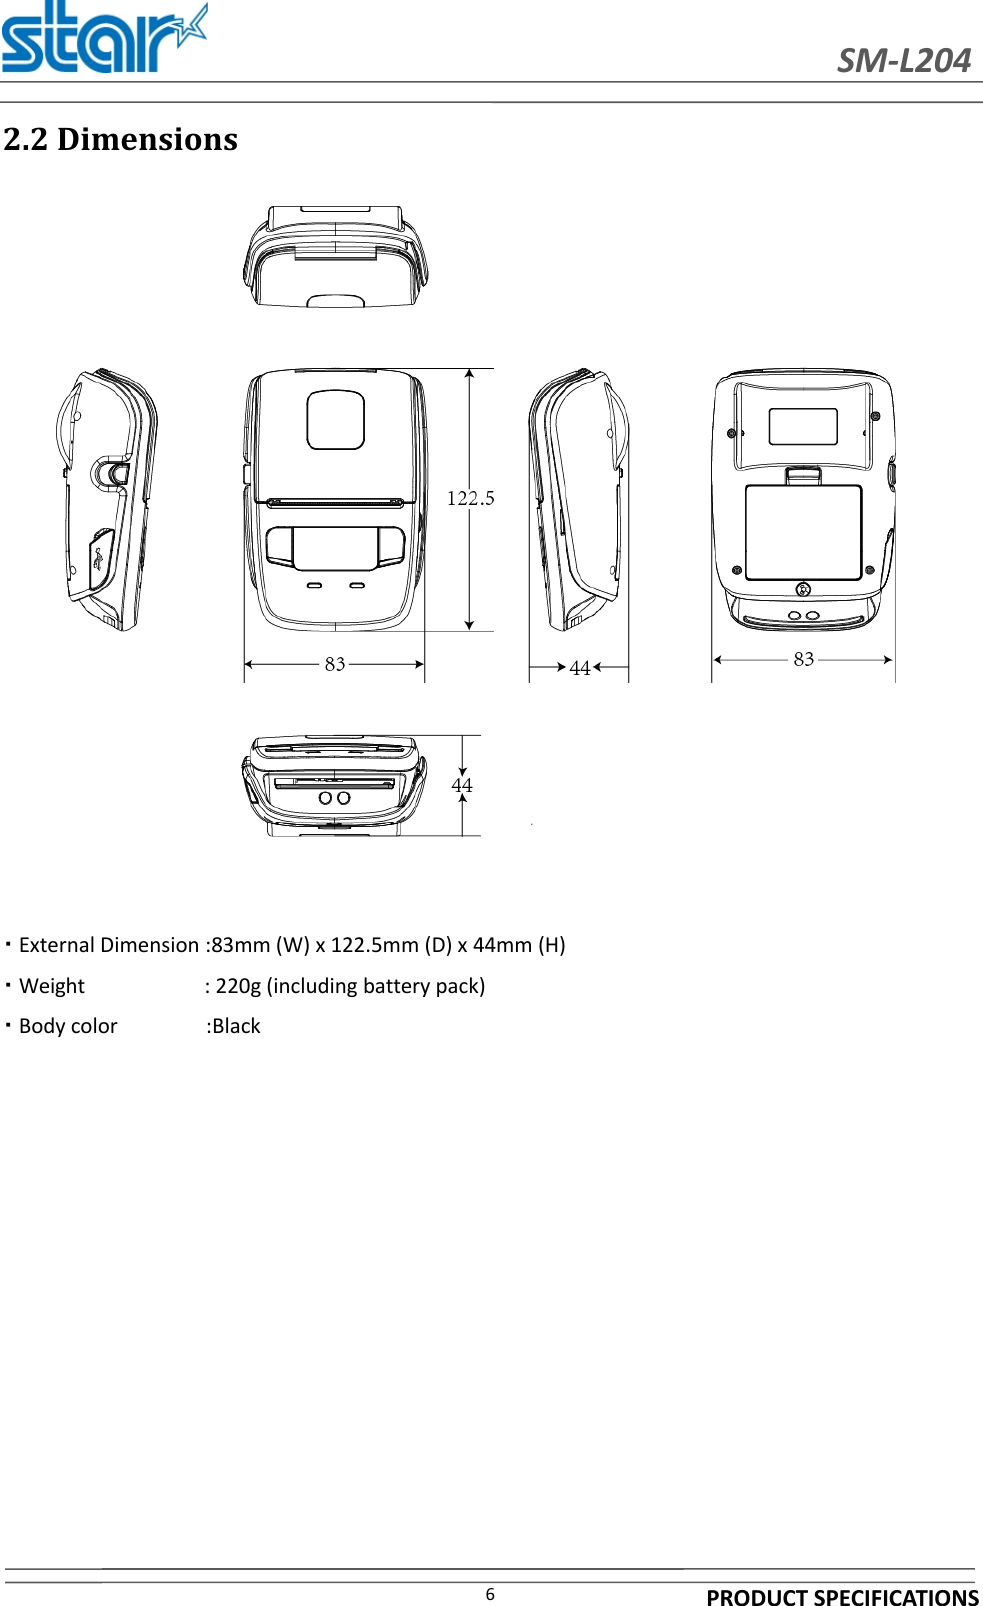
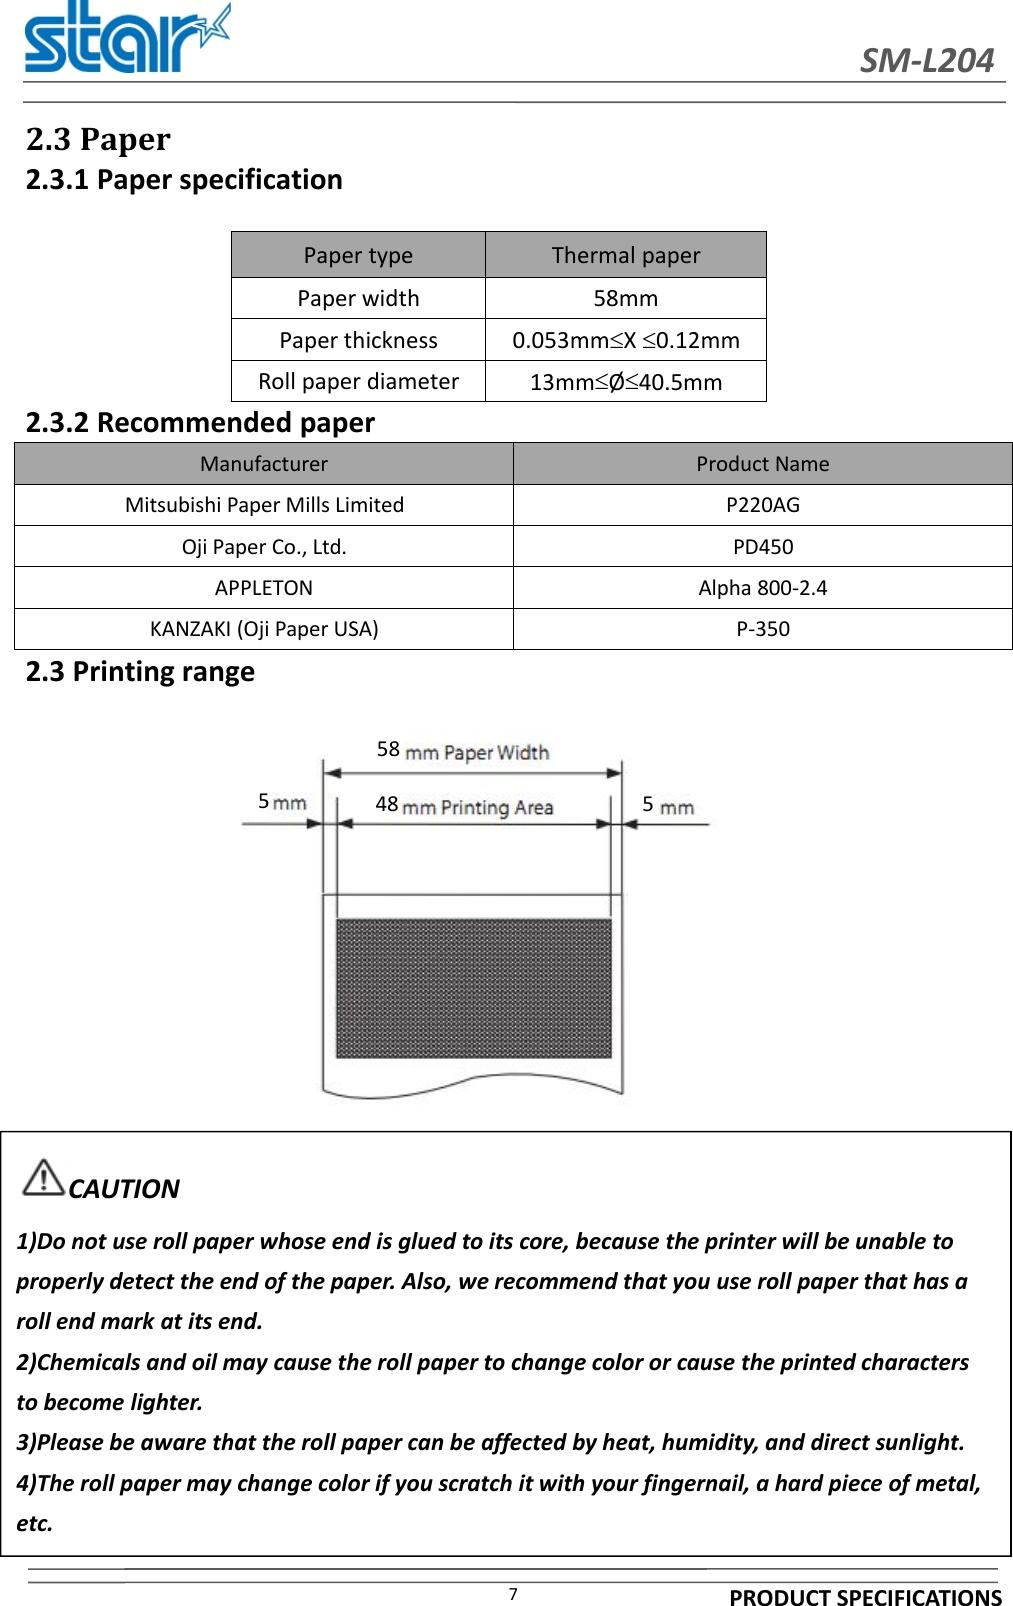
![SM-L204PRODUCT SPECIFICATIONS4Chapter 2 Specifications2.1 General specificationTable 2-1 General specification(1/2)Item ParameterPrintingPrinting method Thermal line printingResolution 203dpi (8dots/mm)Printing speed 70mm/s (Max.)Valid printing width 48mm (384dots)Interface BluetoothBluetooth Spec Bluetooth Ver 3.0/4.0 [BLE]Dual ModeFrequency range 2.4GHz ISM bandData transmission rate 115200bps adjustableData bit 8 data bit fixedParity bit No parity fixedStop bit 1 stop bit fixedSSP CompatibleUSB 2.0 Full SpeedPower saving Sleep mode YESCharacter Set Font Alphanumeric: 9x17, 9x24, 12x24 dotsKanji:24x24 dotsBarcodeSymbologies1D UPC-A, UPC-E, EAN8, EAN13, CODE39, ITF, CODE128,CODE932D QR code,PDF417Graphics Support bitmap printing with different density and userdefined bitmap printing (Max. 512K for total)Detection Sensors Printer cover open sensor, Paper-out sensor and Blackmark sensorLED lamp Power lamp GreenError lamp Blue](https://usermanual.wiki/STAR-MICRONICS/SM-L200/User-Guide-2577387-Page-13.png)
![SM-L204PRODUCT SPECIFICATIONS20Choose the command set: StarLine or ESC/POSESC/POSStarLine modeSet a paper and close the paper cover*Indicates "Close the paper cover withsetting a paper" on the screen.Print a Self-test to confirm *Return tomain menu on the screen at same timeOpen the paper coverReadyKeep pushing POWER & FEED button(5 seconds)Select "1"Buzzer beeps and show [StarLine mode]/ [ESC/POS] to select on the menu.Select "0"StarLine[0] or ESC/POS[1]](https://usermanual.wiki/STAR-MICRONICS/SM-L200/User-Guide-2577387-Page-29.png)