STAR MICRONICS SM-S220 Mobile Printer User Manual Mobile Printer SM S220I series Hardware Manual
STAR MICRONICS CO., LTD. Mobile Printer Mobile Printer SM S220I series Hardware Manual
UserManual.wiki
>
STAR MICRONICS
>
SM S220 User Manual
user manual
Navigation menu
Upload a User Manual
Namespaces
Wiki Guide
HTML
PDF
Info
Views
User Manual
Discussion / Help
Navigation
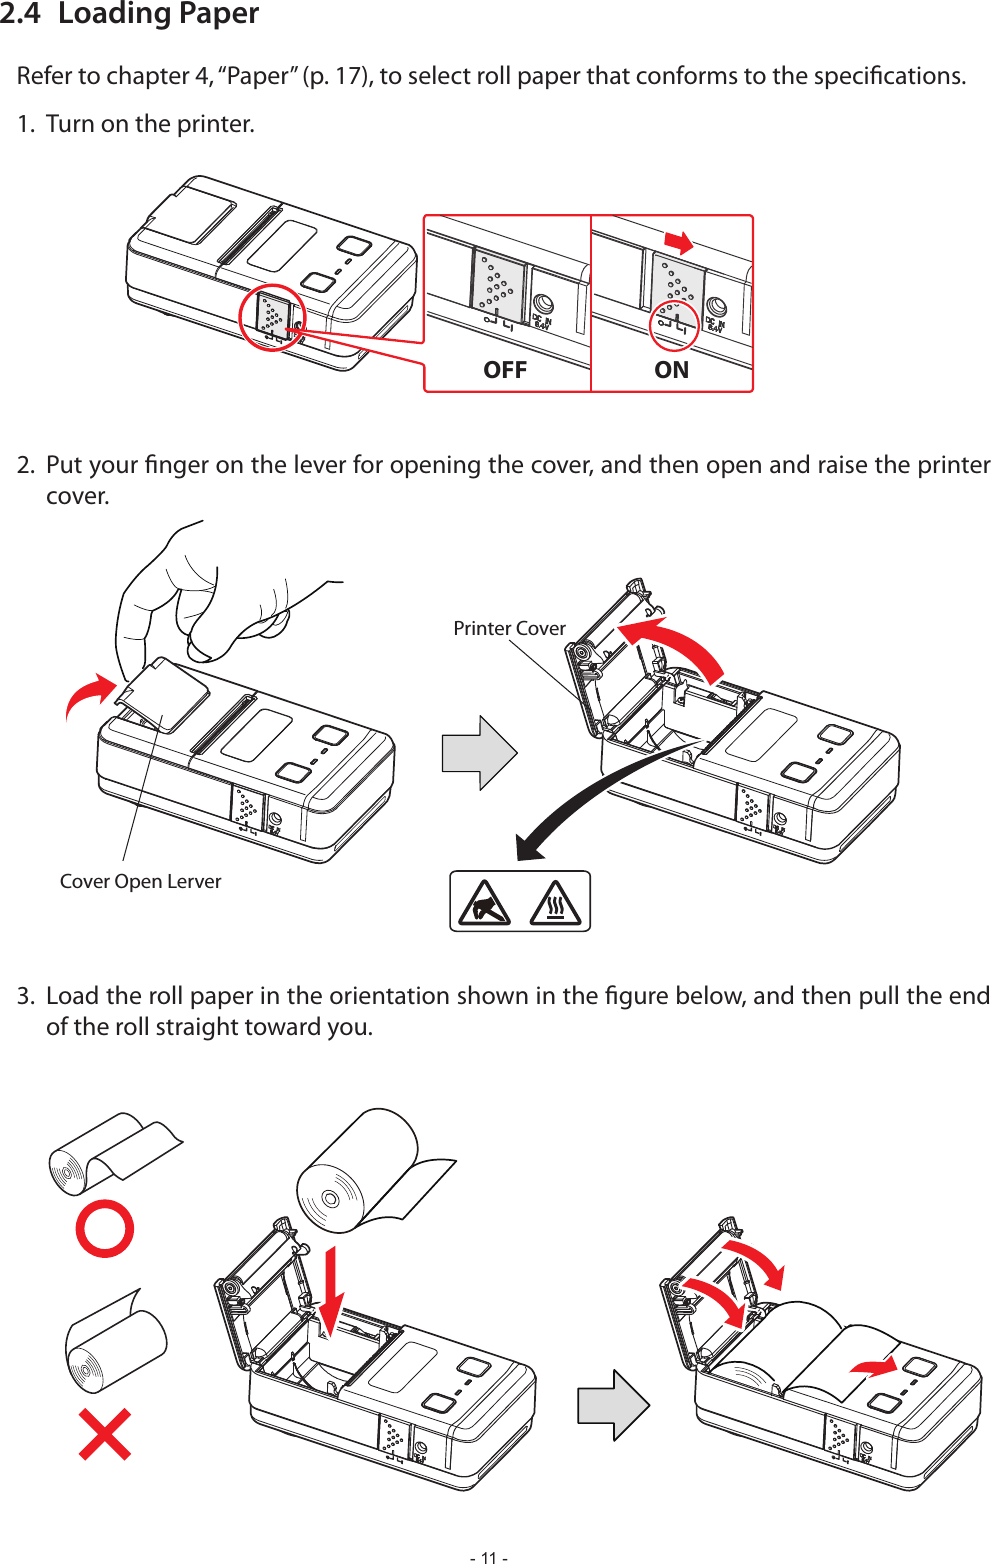
![<USA model>Federal Communications Commission Radio Frequency Interference StatementFCC ID : R49SM-S220This device complies with Part 15 of the FCC Rules. Operation is subject to the following two conditions:(1) This device may not cause harmful interference, and (2) this device must accept any interference received, including interference that may cause undesired operation.CAUTION: Changes or modications not expressly approved by the party responsible for compliance could void the user’s authority to operate the equipment.Note: This equipment has been tested and found to comply with the limits for a Class B digital device, pursuant to part 15 of the FCC Rules. These limits are designed to provide reasonable protection against harmful interference in a residential installation. This equipment generates, uses and can radiate radio frequency energy and, if not installed and used in accordance with the instructions, may cause harmful interference to radio communications. However, there is no guarantee that interference will not occur in a particular installation. If this equipment does cause harmful interference to radio or television reception, which can be determined by turning the equipment off and on, the user is encouraged to try to correct the interference by one or more of the following measures: Modications not expressly approved by the manufacturer could void the user’s authority to operated the equipment under FCC rules. This transmitter must not be co-located or operated in conjunction with any other antenna or transmitter. This equipment complies with FCC radiation exposure limits set forth for uncontrolled equipment and meets the FCC radio frequency (RF) Exposure Guidelines in Supplement C to OET65. This equipment has very low levels of RF energy that it is deemed to comply without testing of specic absorption ratio (SAR). FCC WARNINGChanges or modications not expressly approved by the party responsible for compliance could void the user’s authority to operate the equipment.For compliance with the Federal Noise Interference Standard, this equipment requires a shielded cable.For RF interference suppression, if a ferrite core is provided with this device, ax it to the interface cable.The above statement applies only to equipments marketed in U.S.A.<Europe model>English: Hereby, STAR MICRONICS CO.,LTD. declares that this Wireless Device is in compliance with the essential requirements and other Deutsch: Hiermit erklärt STAR MICRONICS CO.,LTD., dass sich das Gerät Wireless Device in Übereinstimmung mit den grundlegenden [German] Svenska: Härmed intygar STAR MICRONICS CO.,LTD. att denna Wireless Device står I överensstämmelse med de väsentliga egenskapskrav [Swedish] Español: Por medio de la presente STAR MICRONICS CO.,LTD. declara que el Wireless Device cumple con los requisitos esenciales y cualesquiera [Spanish] Português: STAR MICRONICS CO.,LTD. declara que este Wireless Device está conforme com os requisitos essenciais e outras disposições [Portuguese] Français: Par la présente STAR MICRONICS CO.,LTD. déclare que l’appareil Wireless Device est conforme aux exigences essentielles et aux [French] [Finnish] sitä koskevien direktiivin muiden ehtojen mukainen.Italiano: Con la presente STAR MICRONICS CO.,LTD. dichiara che questo Wireless Device è conforme ai requisiti essenziali ed alle altre [Italian] Dansk: Undertegnede STAR MICRONICS CO.,LTD. erklærer herved, at følgende udstyr Wireless Device overholder de væsentlige krav og [Danish] Nederlands: Hierbij verklaart STAR MICRONICS CO.,LTD. dat het toestel Wireless Device in overeenstemming is met de essentiële eisen en de [Dutch] [Estonian] direktiivist tulenevatele teistele asjakohastele sätetele.Ελληνική: ΜΕ ΤΗΝ ΠΑΡΟΥΣΑ STAR MICRONICS CO.,LTD. ΗΛΝΕΙ ΟΤΙ Wireless Device ΣΥΜΜΟΡΦΝΕΤΑΙ ΠΡΟΣ ΤΙΣ ΟΥΣΙΕΙΣ ΑΠΑΙΤΗΣΕΙΣ [Greek] Slovensky: STAR MICRONICS CO.,LTD. týmto vyhlasuje, že Wireless Device spĺňa základné požiadavky a všetky príslušné ustanovenia Smernice [Slovak] Slovensko: STAR MICRONICS CO.,LTD. izjavlja, da je ta Wireless Device v skladu z bistvenimi zahtevami in ostalimi relevantnimi določili direktive [Slovenian] Česky: STAR MICRONICS CO.,LTD. tímto prohlašuje, že tento Wireless Device je ve shodě se základními požadavky a dalšími príslušnými [Czech] ](https://usermanual.wiki/STAR-MICRONICS/SM-S220/User-Guide-1844668-Page-2.png)
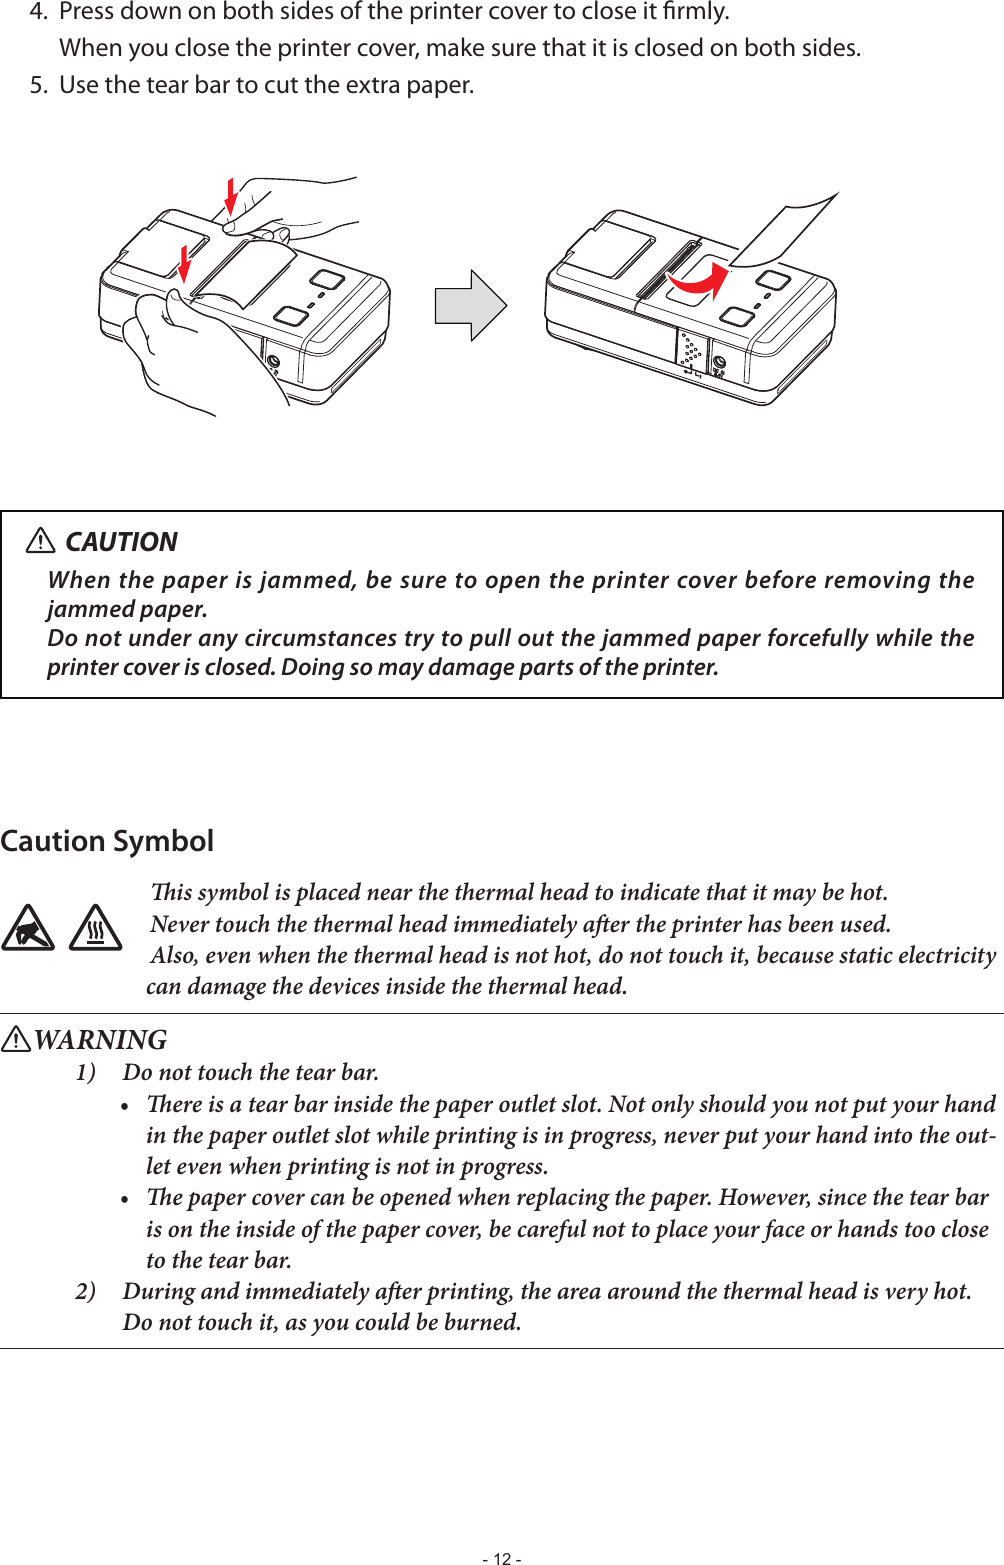
![Trademark acknowledgmentsSM-S220: Star Micronics Co., Ltd.Notice• All rights reserved. Reproduction of any part of this manual in any form whatsoever, without STAR’s express permission is forbidden.• e contents of this manual are subject to change without notice.• All eorts have been made to ensure the accuracy of the contents of this manual at the time of going to press. However, should any errors be detected, STAR would greatly appreciate being informed of them.• e above notwithstanding, STAR can assume no responsibility for any errors in this manual. Copyright © 2012 Star Micronics Co., Ltd. Magyar: Alulírott, STAR MICRONICS CO.,LTD. nyilatkozom, hogy a Wireless Device megfelel a vonatkozó alapvetõ követelményeknek [Hungarian] : [Bulgarian] Polski: Niniejszym STAR MICRONICS CO.,LTD. oświadcza, że Wireless Device jest zgodny z zasadniczymi wymogami oraz pozostałymi [Polish] Malti: Hawnhekk, STAR MICRONICS CO.,LTD., jiddikjara li dan Wireless Device jikkonforma mal-ħtiġijiet essenzjali u ma provvedimenti [Maltese] [Latvian] saistītajiem noteikumiem. [Lithuanian] nuostatas.Norsk: STAR MICRONICS CO.,LTD. erklærer herved at utstyret Wireless Device er i samsvar med de grunnleggende krav og øvrige Íslenska: Hér með lýsir STAR MICRONICS CO.,LTD. yr Því að Wireless Device er í samræmi við grunnkröfur og aðrar kröfur, sem gerðar eru í [Icelandic] This is a class B product. In a domestic environment, this product may cause radio interference, in which case the user may be required to take adequate measures.Notice: This device can be operated in all European countries.France: Outdoor use limited to 10 mW e.i.r.p. within the band 2454-2483.5 MHz. (The wireless output power of this printer is less than 10mW e.i.r.p.) authorisation is required.Norway: This subsection does not apply for the geographical area within a radius of 20 km from the centre of Ny-Ålesund.“Made for iPod”, “Made for iPhone”, “Made for iPad”mean that an electronic accessory has been designed to con-nect specically to iPod, iPhone and iPad, respectively, and has been certied by the developer to meet Apple performance standards.Apple is not responsible for the operation of this device or its compliance with safety and regulatory standards.iPod is a trademark of Apple Inc., registered in the U.S. and other countries.iPod touch is a trademark of Apple Inc. iPone touch is a trademark of Apple Inc. iPad touch is a trademark of Apple Inc.](https://usermanual.wiki/STAR-MICRONICS/SM-S220/User-Guide-1844668-Page-3.png)

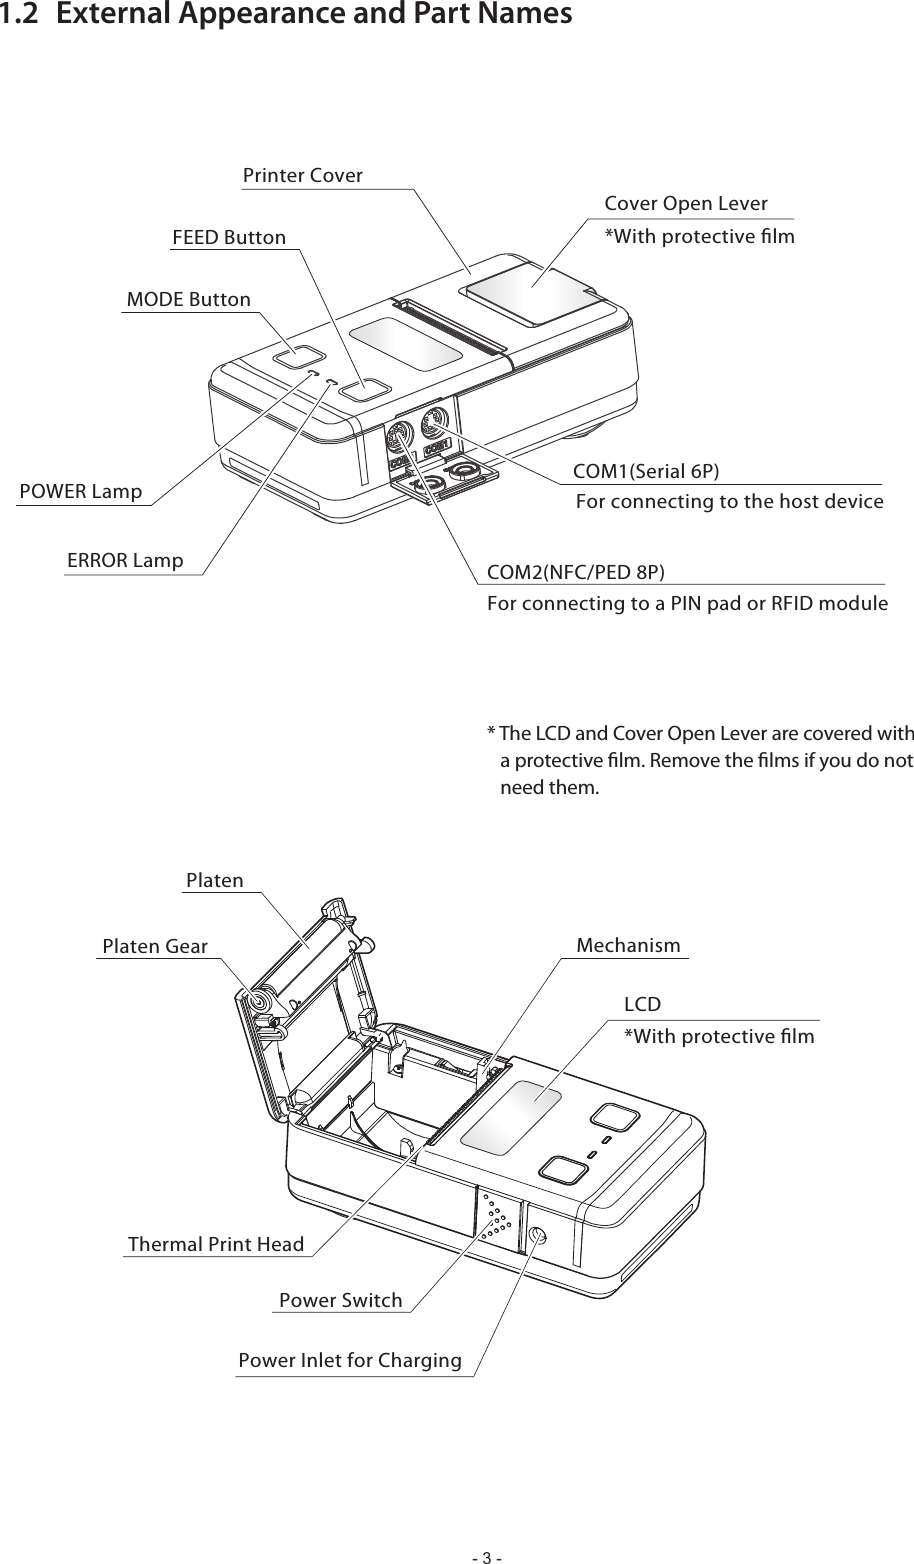

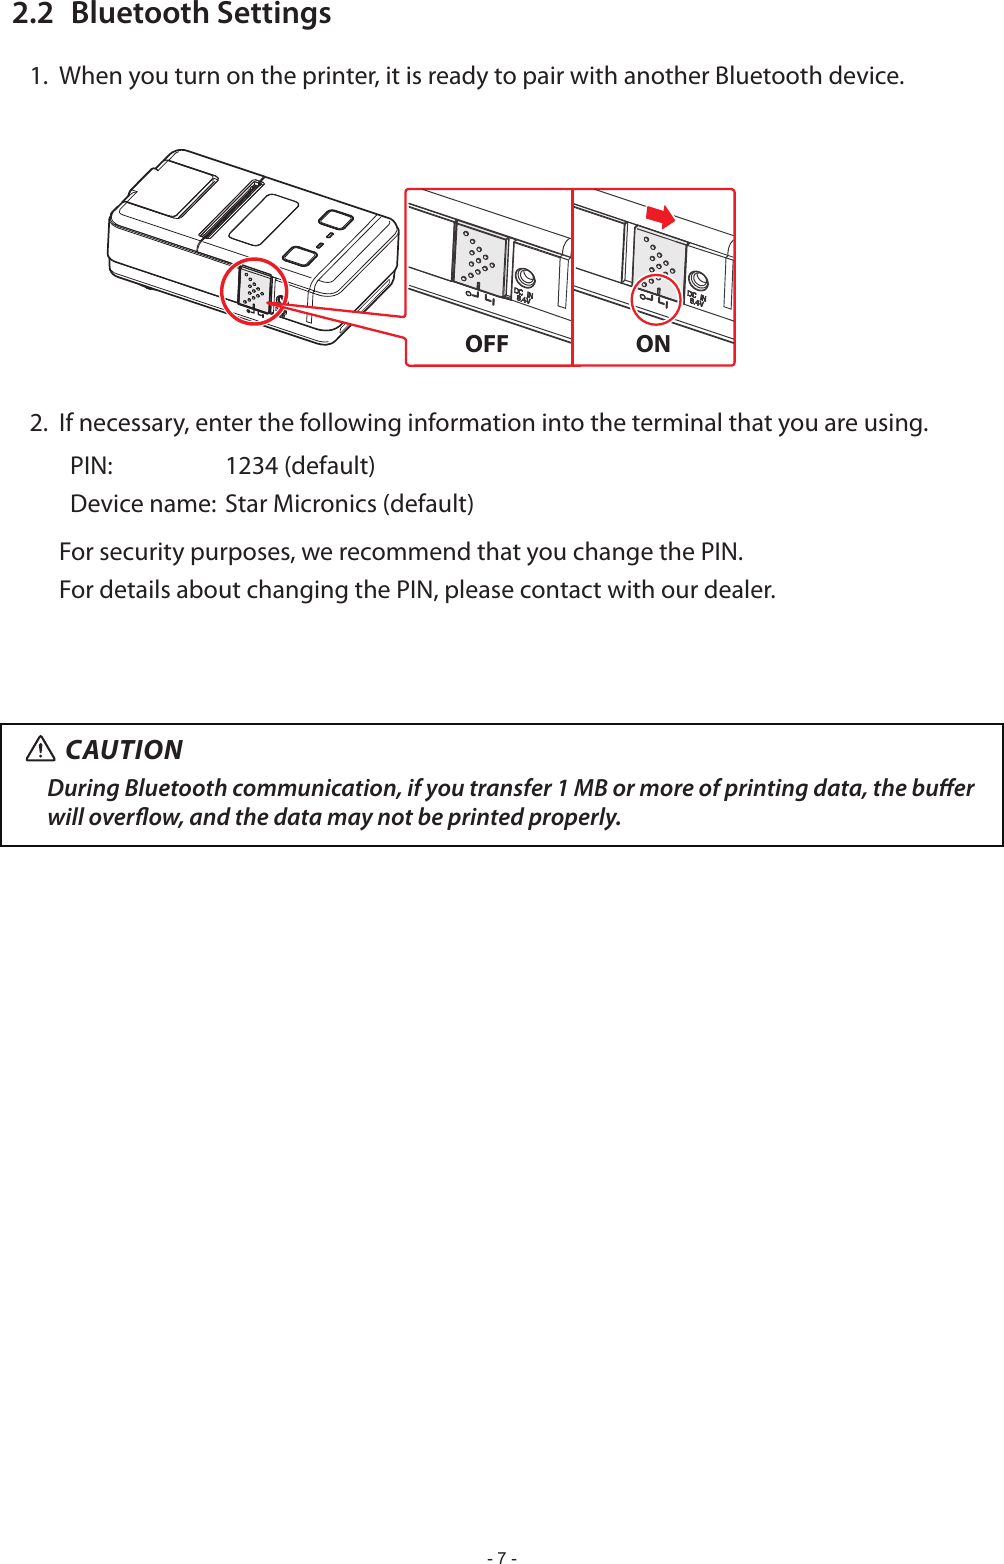
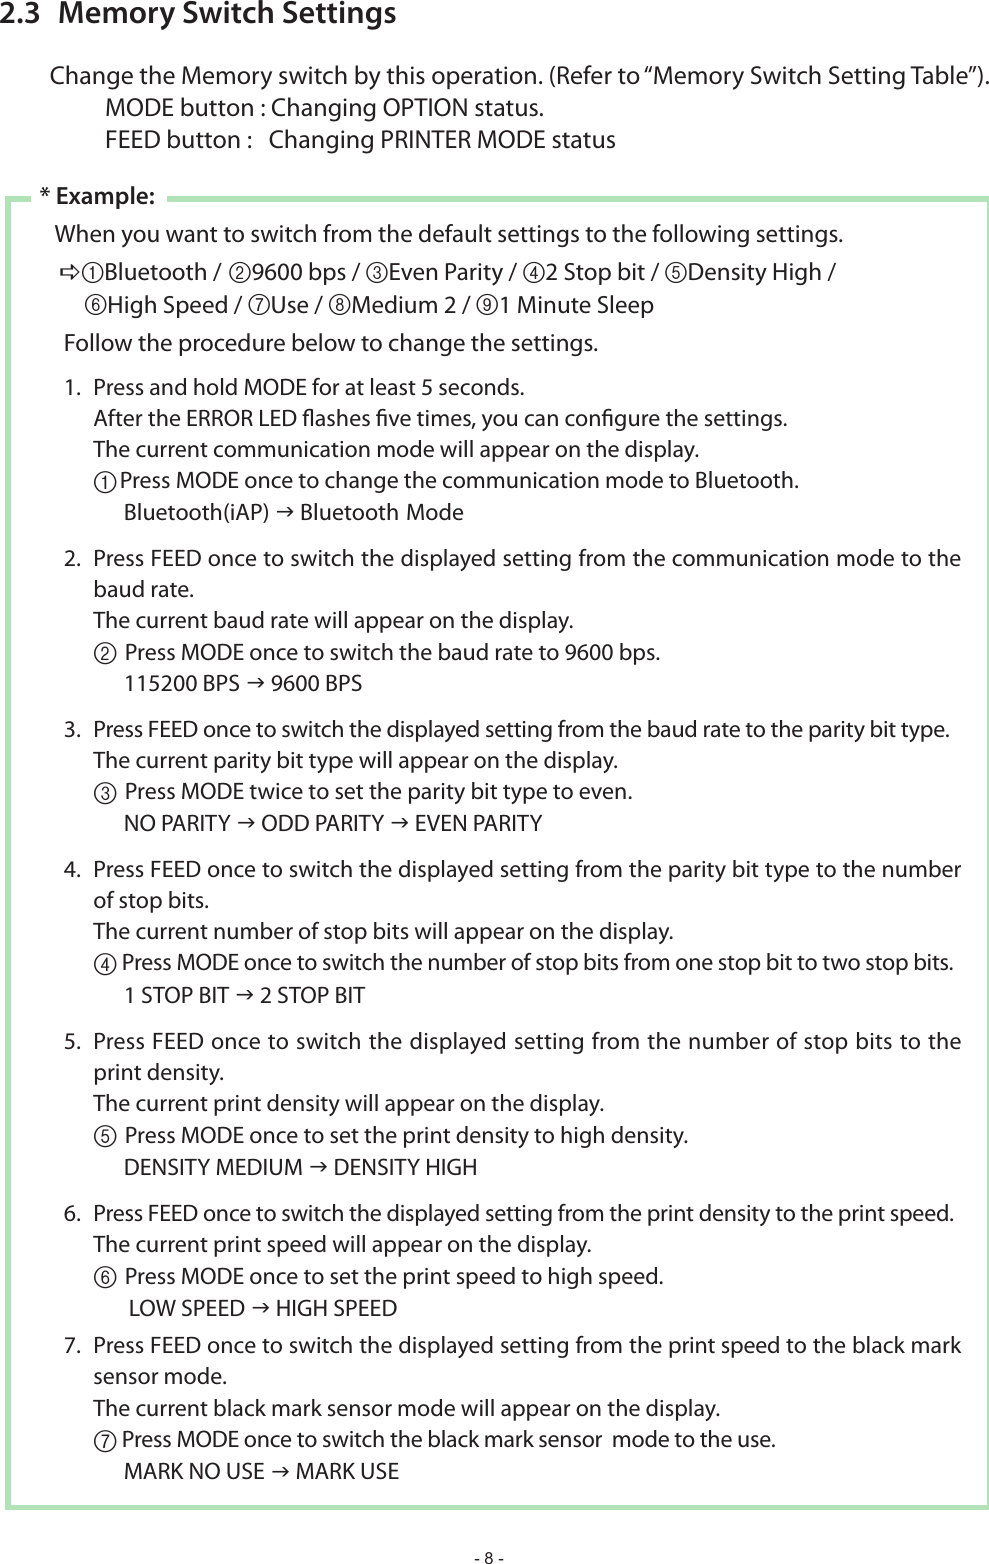
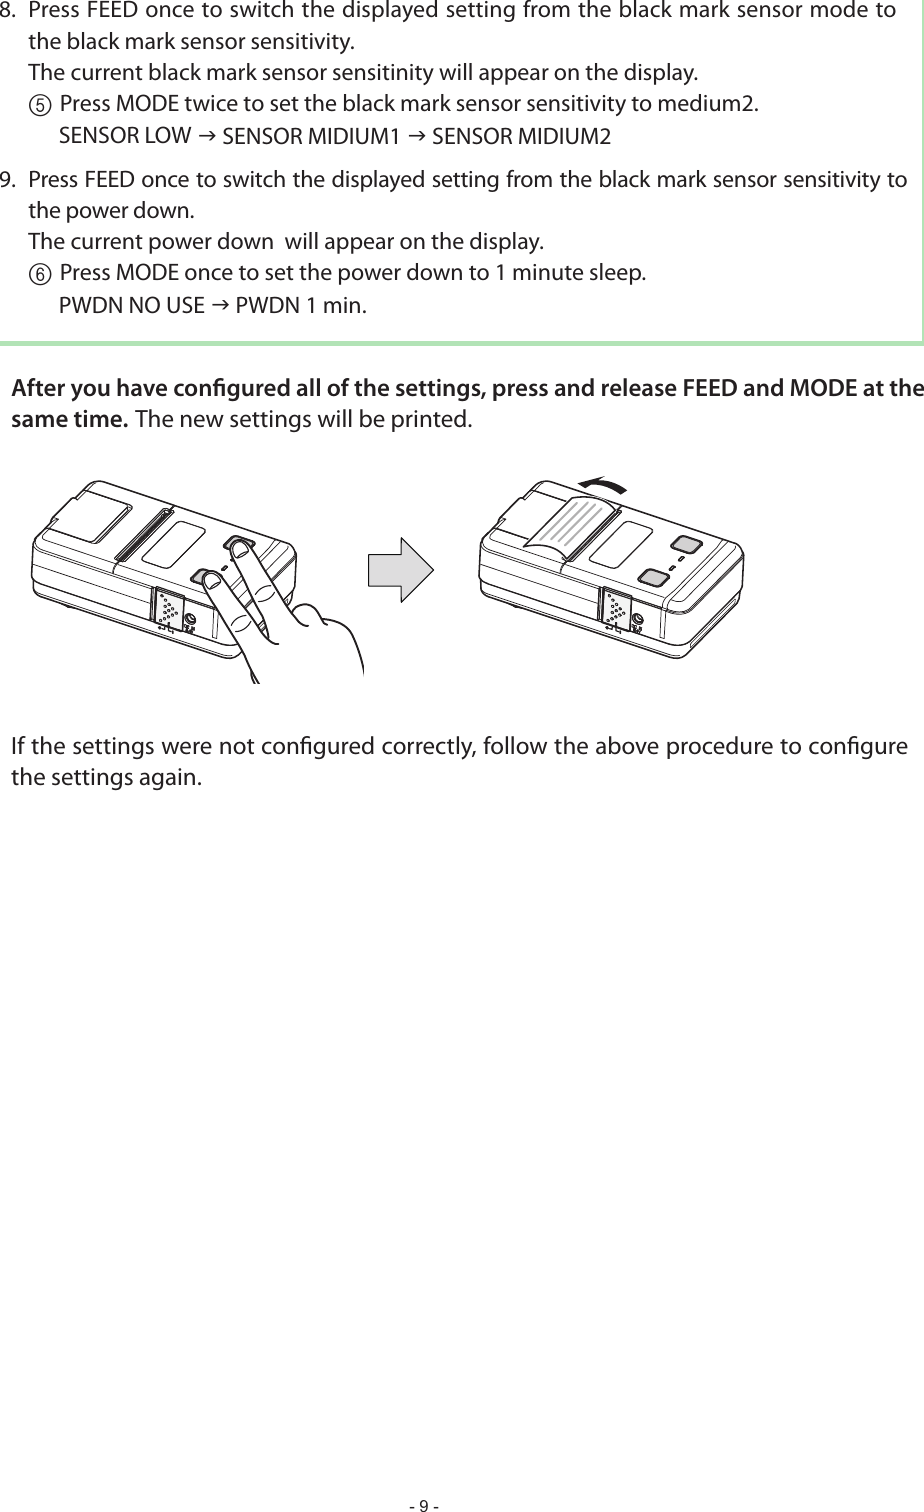
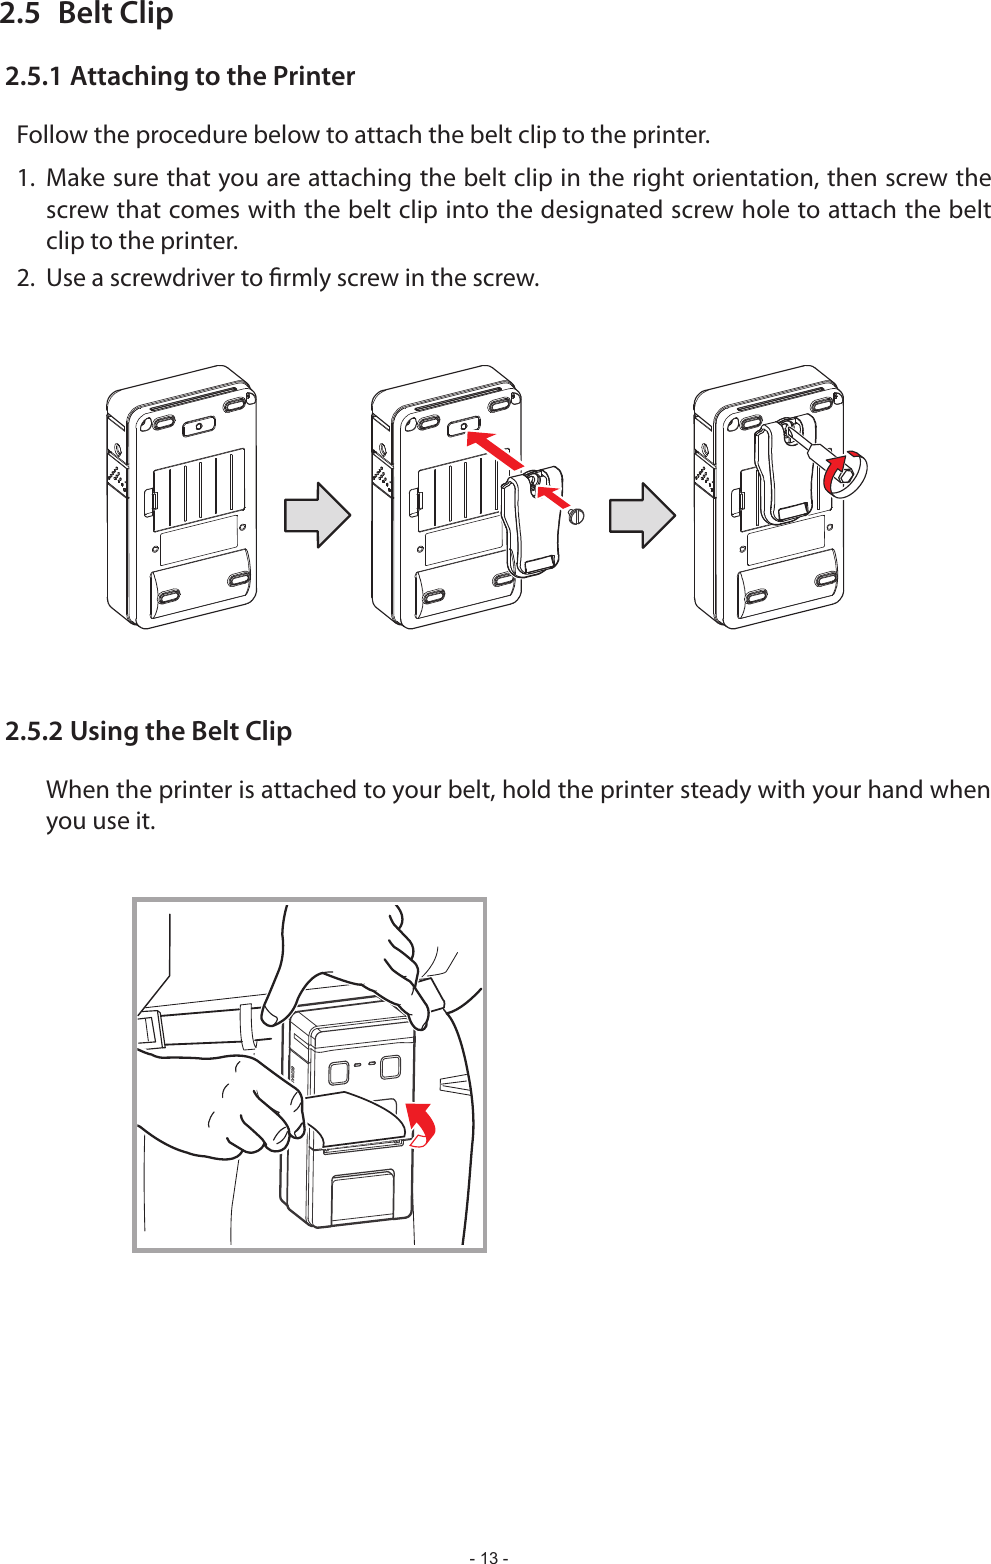
![- 10 -Memory Switch Setting TablePrinter Mode Setting Display1 Communication Port *1)Bluetooth(iOS) * Bluetooth(iAP)BluetoothBluetooth ModeRS-232CUART Mode2 Baud Rate9600 bps 9600 BPS38400 bps 38400 BPS115200 bps * 115200 BPS3 Parity BitNo Parity * Odd Parity Even Parity 4 Stop Bit 1 Stop bit * 1 STOP BIT2 Stop bit 2 STOP BIT5 Print DensityDensity Low Density Medium * Density High 6 Print Speed LOW SPEED HIGH SPEED7 Black Mark Sensor *2)No use * MARK NO USEUse MARK USE8 Black Mark Sensor SensitivityLow * SENSOR LOWMedium 1 SENSOR MEDIUM1Medium 2 SENSOR MEDIUM2High SENSOR HIGH9 Power DownNo use * PWDN NO USE1 Minute Sleep PWDN 1 min.2 Minute Sleep PWDN 2 min.3 Minute Sleep PWDN 3 min.4 Minute Sleep PWDN 4 min.5 Minute Sleep PWDN 5 min.*1)Communication modeIt is possible to change the communication mode setting between Bluetooth and serial. Please see below for details to select the proper communication mode for your application.Bluetooth (iOS): The display shows [Bluetooth(iAP)]. At the Bluetooth (iOS) mode, the printer can communi-cate with an iOS device over Bluetooth.Bluetooth: The display shows [Bluetooth Mode]. At the Bluetooth mode, the printer can communicate with an Android device or a device other than iOS devices over Bluetooth.RS-232C: The display shows [UART Mode]. At the RS-232C mode, the printer can communicate with a device using the serial communication cable supplied with the printer. When you con-nect the serial cable, the printer is automatically switched to serial communication from Bluetooth communication.*2)When the black mark sensor is set to Use, the printer cannot detect the paper–end status.](https://usermanual.wiki/STAR-MICRONICS/SM-S220/User-Guide-1844668-Page-16.png)
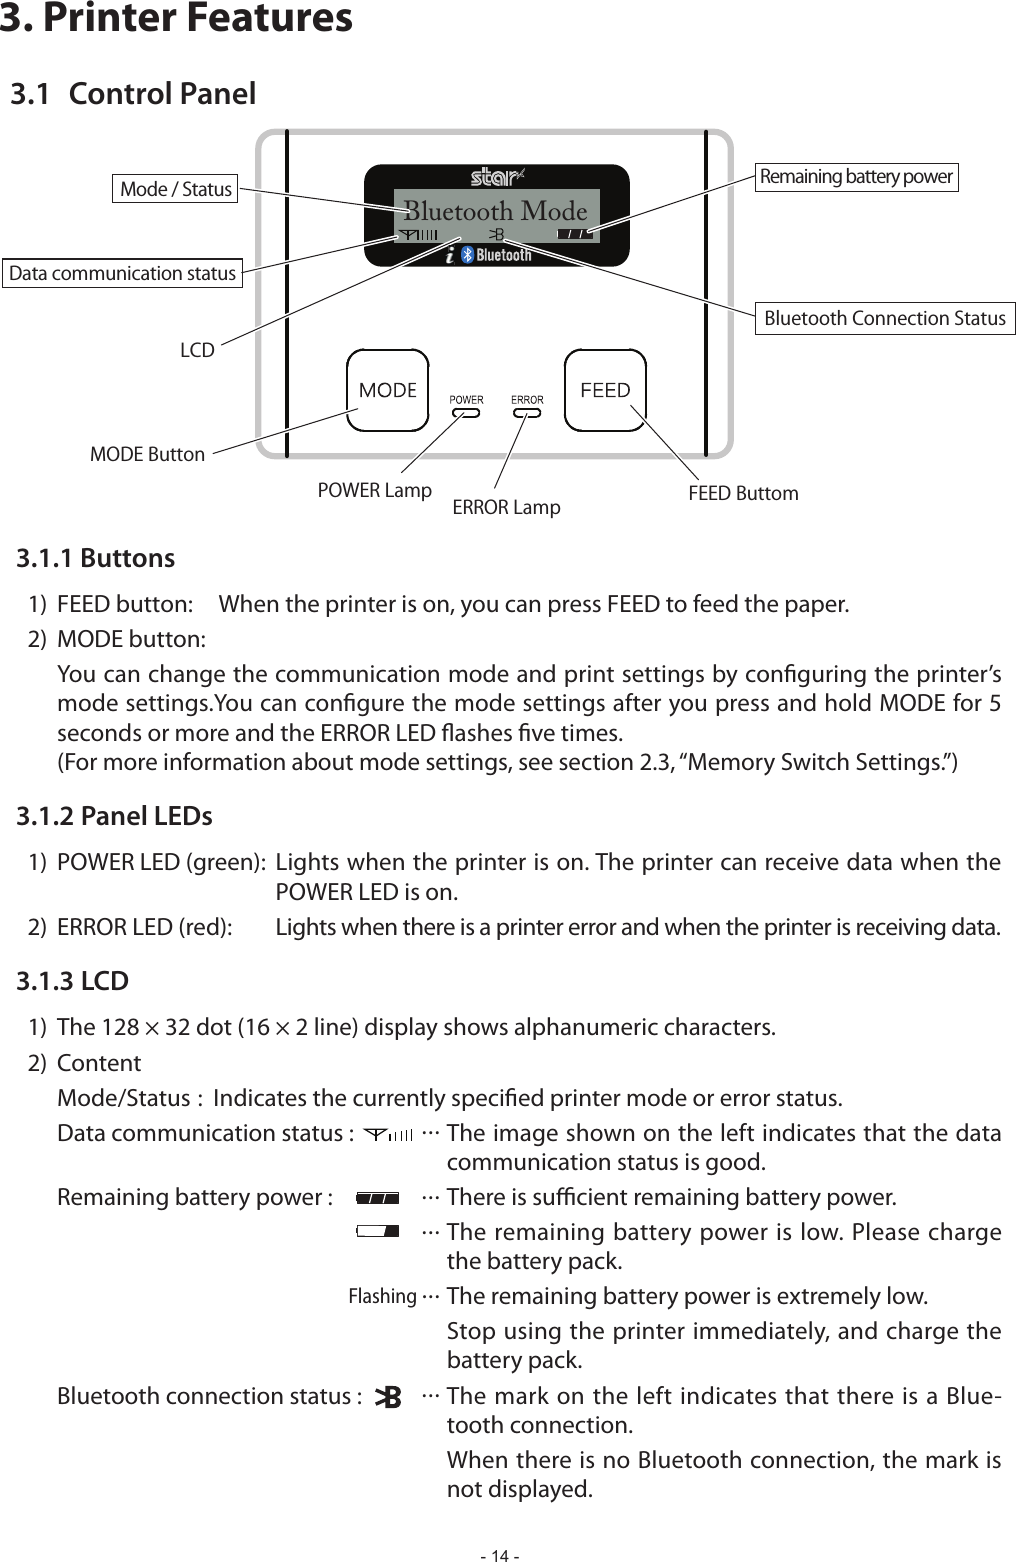
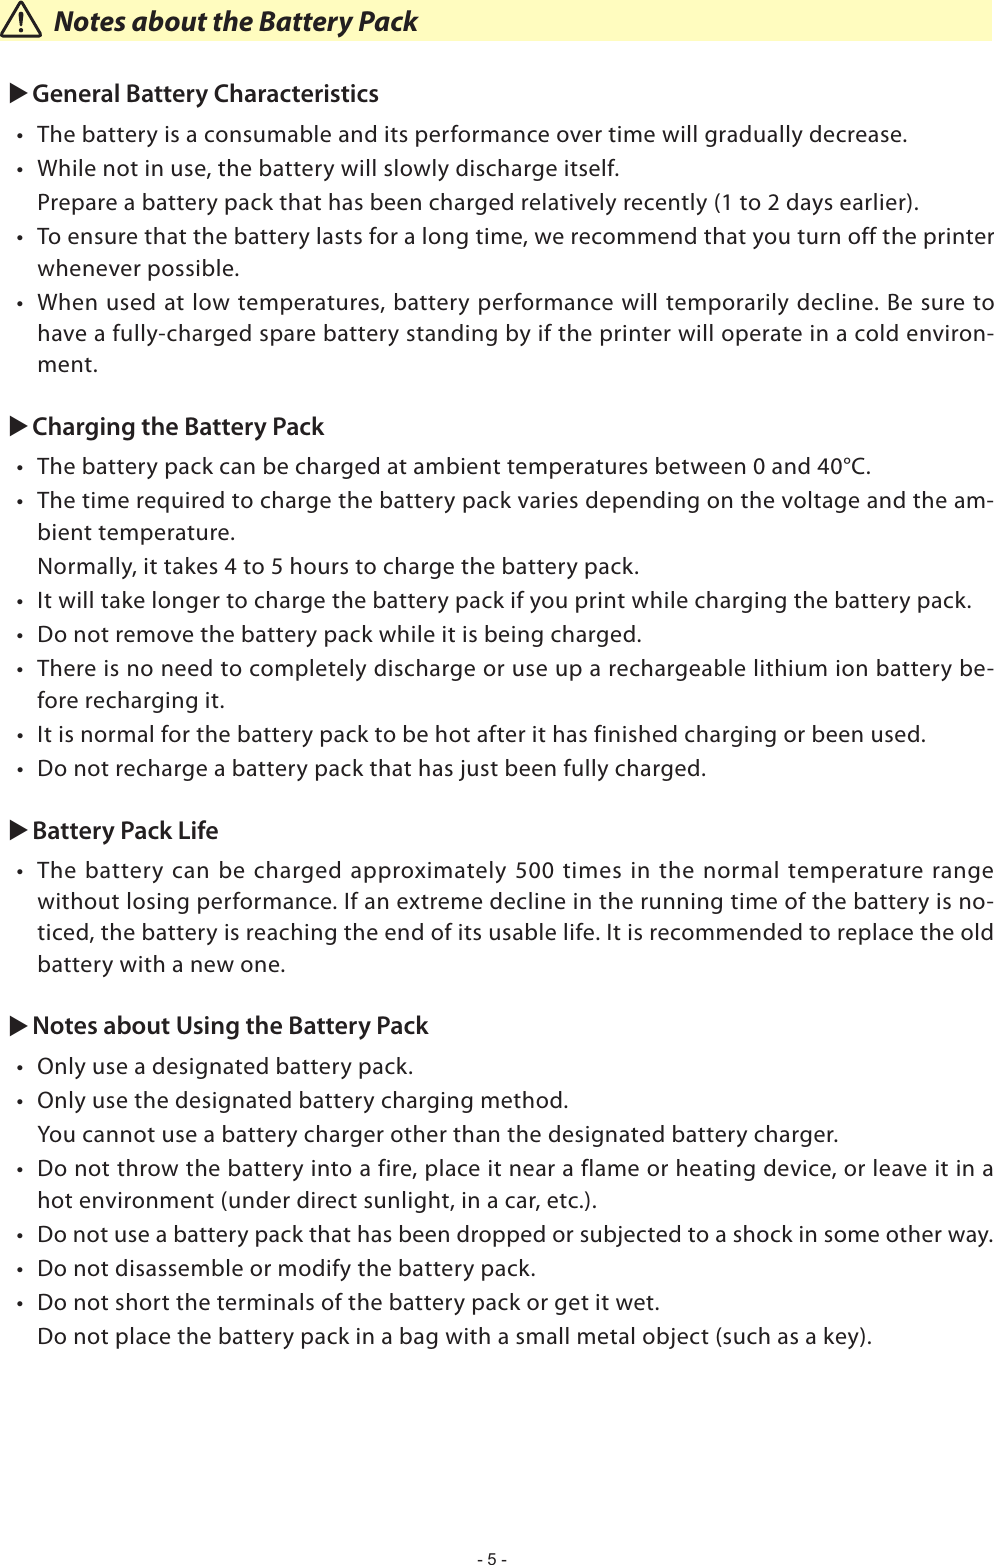
![- 15 -Printer Status ActionLEDLCD BuzzerPOWER(Green)ERROR(Red)Printer Initialization(Power On) Flickering Flickering Display : [ Bluetooth Mode ]Back Light : Flickering during initialization Beep 3On-LineCOM1Cable notStand-byON OFFDisplay : [ Bluetooth Mode ]Back Light : 1 sec ickering and OFFNothingCable Connected Display : [ Cable Detect ] g[ UART Mode ]Back Light : 1 sec ickering and OFF Beep 2COM1Cable ConnectedStand-by Display : [ UART Mode ]Back Light : 1 sec ickering and OFF Nothing Display : [ Cable Out ] g[ Bluetooth Mode ]Back Light : 1 sec ickering and OFF Beep 2Operation Mode PIN PAD ON OFF Display : [ PIN Mode ]Back Light : 1 sec ickering and OFF NothingReceiving Data ON ONStatus of Antenna Icon is changedNo displayed Back Light : OFFNothingOn-Line(Busy) Printing Data ON OFF Display : [ Working... ]Back Light : ON NothingStored Terminal SettingFlickering FlickeringNo displayed NothingSetup Mode ON OFF[ Setup Mode ]g[ Print Status ] <Get out Setup Mode>Display : [ Setup Mode ]Back Light : ONNothingTest Printing ON OFF Display : [ Print Test ] g[ Working...]Back Light : ON NothingWritting Firmware ON OFF Display : [ Downloading... ]Back Light : ON NothingErrorRecoverable ErrorNo Paper Error ON Flickering Display : [ Paper Empty ]Back Light : ON1 Happened gBeep 32 Recovered gBeep 1Cover Open Error ON Flickering Display : [ Cover Open ]Back Light : ON1 Happened gBeep 32 Recovered gBeep 1Auto Recoverable ErrorHeat Protection of Thermal Head ON Flickering Display : [ Head Hot ]Back Light : ON1 Happened gBeep 32 Recovered gBeep 1 n LED & LCD Display / Error](https://usermanual.wiki/STAR-MICRONICS/SM-S220/User-Guide-1844668-Page-21.png)