STAR MICRONICS SM-S220 Mobile Printer User Manual Mobile Printer SM S220I series Hardware Manual
STAR MICRONICS CO., LTD. Mobile Printer Mobile Printer SM S220I series Hardware Manual
user manual
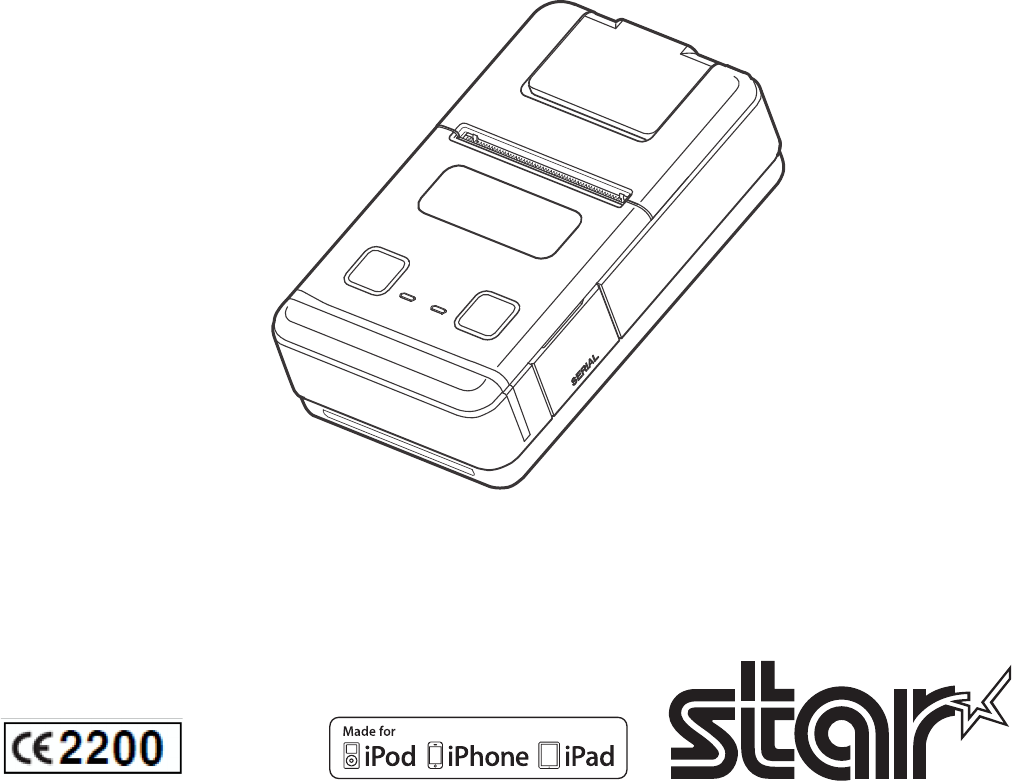
Mobile Printer
SM-S220 SERIES
Hardware Manual
<USA model>
Federal Communications Commission
Radio Frequency Interference Statement
FCC ID : R49SM-S220
This device complies with Part 15 of the FCC Rules. Operation is subject to the following two conditions:
(1) This device may not cause harmful interference, and (2) this device must accept any interference received, including interference that may cause
undesired operation.
CAUTION: Changes or modications not expressly approved by the party responsible for compliance could void the user’s authority to operate the
equipment.
Note: This equipment has been tested and found to comply with the limits for a Class B digital device, pursuant to part 15 of the FCC Rules. These
limits are designed to provide reasonable protection against harmful interference in a residential installation. This equipment generates, uses
and can radiate radio frequency energy and, if not installed and used in accordance with the instructions, may cause harmful interference to
radio communications. However, there is no guarantee that interference will not occur in a particular installation. If this equipment does
cause harmful interference to radio or television reception, which can be determined by turning the equipment off and on, the user is
encouraged to try to correct the interference by one or more of the following measures:
Modications not expressly approved by the manufacturer could void the user’s authority to operated the equipment under FCC rules.
This transmitter must not be co-located or operated in conjunction with any other antenna or transmitter.
This equipment complies with FCC radiation exposure limits set forth for uncontrolled equipment and meets the FCC radio frequency (RF)
Exposure Guidelines in Supplement C to OET65. This equipment has very low levels of RF energy that it is deemed to comply without testing of
specic absorption ratio (SAR).
FCC WARNING
Changes or modications not expressly approved by the party responsible for compliance could void the user’s authority to operate the equipment.
For compliance with the Federal Noise Interference Standard, this equipment requires a shielded cable.
For RF interference suppression, if a ferrite core is provided with this device, ax it to the interface cable.
The above statement applies only to equipments marketed in U.S.A.
<Europe model>
English: Hereby, STAR MICRONICS CO.,LTD. declares that this Wireless Device is in compliance with the essential requirements and other
Deutsch: Hiermit erklärt STAR MICRONICS CO.,LTD., dass sich das Gerät Wireless Device in Übereinstimmung mit den grundlegenden
[German]
Svenska: Härmed intygar STAR MICRONICS CO.,LTD. att denna Wireless Device står I överensstämmelse med de väsentliga egenskapskrav
[Swedish]
Español: Por medio de la presente STAR MICRONICS CO.,LTD. declara que el Wireless Device cumple con los requisitos esenciales y cualesquiera
[Spanish]
Português: STAR MICRONICS CO.,LTD. declara que este Wireless Device está conforme com os requisitos essenciais e outras disposições
[Portuguese]
Français: Par la présente STAR MICRONICS CO.,LTD. déclare que l’appareil Wireless Device est conforme aux exigences essentielles et aux
[French]
[Finnish] sitä koskevien direktiivin muiden ehtojen mukainen.
Italiano: Con la presente STAR MICRONICS CO.,LTD. dichiara che questo Wireless Device è conforme ai requisiti essenziali ed alle altre
[Italian]
Dansk: Undertegnede STAR MICRONICS CO.,LTD. erklærer herved, at følgende udstyr Wireless Device overholder de væsentlige krav og
[Danish]
Nederlands:
Hierbij verklaart STAR MICRONICS CO.,LTD. dat het toestel Wireless Device in overeenstemming is met de essentiële eisen en de
[Dutch]
[Estonian] direktiivist tulenevatele teistele asjakohastele sätetele.
Ελληνική: ΜΕ ΤΗΝ ΠΑΡΟΥΣΑ STAR MICRONICS CO.,LTD. ΗΛΝΕΙ ΟΤΙ Wireless Device ΣΥΜΜΟΡΦΝΕΤΑΙ ΠΡΟΣ ΤΙΣ ΟΥΣΙΕΙΣ ΑΠΑΙΤΗΣΕΙΣ
[Greek]
Slovensky: STAR MICRONICS CO.,LTD. týmto vyhlasuje, že Wireless Device spĺňa základné požiadavky a všetky príslušné ustanovenia Smernice
[Slovak]
Slovensko: STAR MICRONICS CO.,LTD. izjavlja, da je ta Wireless Device v skladu z bistvenimi zahtevami in ostalimi relevantnimi določili direktive
[Slovenian]
Česky: STAR MICRONICS CO.,LTD. tímto prohlašuje, že tento Wireless Device je ve shodě se základními požadavky a dalšími príslušnými
[Czech]

Trademark acknowledgments
SM-S220: Star Micronics Co., Ltd.
Notice
• All rights reserved. Reproduction of any part of this manual in any form whatsoever, without STAR’s
express permission is forbidden.
• e contents of this manual are subject to change without notice.
• All eorts have been made to ensure the accuracy of the contents of this manual at the time of going
to press. However, should any errors be detected, STAR would greatly appreciate being informed of
them.
• e above notwithstanding, STAR can assume no responsibility for any errors in this manual.
Copyright
©
2012 Star Micronics Co., Ltd.
Magyar: Alulírott, STAR MICRONICS CO.,LTD. nyilatkozom, hogy a Wireless Device megfelel a vonatkozó alapvetõ követelményeknek
[
Hungarian
]
:
[Bulgarian]
Polski: Niniejszym STAR MICRONICS CO.,LTD. oświadcza, że Wireless Device jest zgodny z zasadniczymi wymogami oraz pozostałymi
[Polish]
Malti: Hawnhekk, STAR MICRONICS CO.,LTD., jiddikjara li dan Wireless Device jikkonforma mal-ħtiġijiet essenzjali u ma provvedimenti
[Maltese]
[Latvian] saistītajiem noteikumiem.
[Lithuanian] nuostatas.
Norsk: STAR MICRONICS CO.,LTD. erklærer herved at utstyret Wireless Device er i samsvar med de grunnleggende krav og øvrige
Íslenska: Hér með lýsir STAR MICRONICS CO.,LTD. yr Því að Wireless Device er í samræmi við grunnkröfur og aðrar kröfur, sem gerðar eru í
[Icelandic]
This is a class B product. In a domestic environment, this product may cause radio interference, in which case the user may be required to take
adequate measures.
Notice: This device can be operated in all European countries.
France: Outdoor use limited to 10 mW e.i.r.p. within the band 2454-2483.5 MHz.
(The wireless output power of this printer is less than 10mW e.i.r.p.)
authorisation is required.
Norway: This subsection does not apply for the geographical area within a radius of 20 km from the centre of Ny-Ålesund.
“Made for iPod”, “Made for iPhone”, “Made for iPad”mean that an electronic accessory has been designed to con-
nect specically to iPod, iPhone and iPad, respectively, and has been certied by the developer to meet Apple
performance standards.
Apple is not responsible for the operation of this device or its compliance with safety and regulatory standards.
iPod is a trademark of Apple Inc., registered in the U.S. and other countries.
iPod touch is a trademark of Apple Inc. iPone touch is a trademark of Apple Inc. iPad touch is a trademark of
Apple Inc.

To use this product properly, please follow the precautions given below.
WARNING
P If you notice smoke, a strange smell, or a strange sound, turn o the power immediately,
and remove the battery pack and battery charger. en contact a Star Micronics dealer.
P e battery pack may be hot immediately aer the product has been used.
P Do not attempt to repair the product.
Improper repairs are dangerous and could lead to injury. Contact the dealer that you
bought the product for repairs.
P Do not disassemble or modify the product. Doing so could lead to injury, re, or elec-
tric shock.
n Using the Printer
P Some semiconductors can be damaged by static electricity.
Be sure to turn o the printer when inserting or removing the battery pack.
P Do not drop the printer or hit it against a hard object.
P Do not open the printer cover while the printer is printing.
P Before you open the printer cover, make sure that printing data is not being sent to the
printer.
P Do not unplug or plug in a communication cable while the printer is printing or during
communication.
P Do not touch a communication connector while the printer is printing.
P Turn o the printer when you are not using it.
P When the printer is used in a low temperature environment or when a PIN pad or other
device that needs electricity is connected to the printer, the battery's performance will be
diminished, and the amount of time that you can use the printer for may be reduced.
n ermal Paper Handling
P Only use thermal paper with the designated specications.
P Store the thermal paper in a cool, dry, dark location.
P Do not rub the thermal paper with a hard object.
P Do not leave the thermal paper in contact with plastic lm, an eraser, or adhesive tape for
a long period of time.
P Do not stack the thermal paper on fresh diazo copies or wet-type copies.
P Do not use chemical glue on the thermal paper.
P Do not use thermal paper that has been stored for a long period of time.
Precautions for Using This Product

n Operating Environment for the Printer
Before actually unpacking the printer, you should take a few minutes to think about
where you plan to use it. Remember the following points when doing this.
P Do not use the printer in an environment in which it will be subject to strong shaking
while it is printing.
P Be careful to ensure that the printer is not exposed to direct sunlight.
e appropriate environment for using the printer is described below.
Temperature: 0°C to 50°C
Humidity: 30% RH to 80% RH (no condensation)
P Do not place the printer near a copying machine or other device that produces a strong
electromagnetic eld.
P Keep the printer suciently removed from heaters and other sources of heat.
P Use the printer in a clean, low-humidity environment that is free from dust.
P Avoid using the printer in high-humidity rooms.
P We recommend that you unplug the printer from the power outlet whenever you do not
plan to use it for long periods. Because of this, you should locate the printer so that the
power outlet it is plugged into is nearby and easy to access.
n Printer Maintenance
Please perform the following maintenance every 6 months.
P ermal head
Dip a cotton swab in an alcohol solvent (ethanol, methanol, or isopropyl alcohol), and
clean the heating area of the head.
P Platen
While turning the platen, use a so, dry cloth to lightly rub the entire surface of the plat-
en and remove any foreign objects.
P Paper storage unit and the surrounding area
Remove any dirt, dust, pieces of paper, etc., from the paper storage unit.
Table of Contents
1. Product Overview .................................................................. 1
1.1 Printer & Accessories ..................................................................................... 2
1.2 External Appearance and Part Names ........................................................ 3
2. Setup ....................................................................................... 4
2.1 Buttery Pack .................................................................................................... 4
2.1.1 Inserting into the Printer ................................................................................... 4
2.1.2 Charging the Battery ........................................................................................... 4
2.2 Bluetooth Settings ......................................................................................... 7
2.3 Memory Switch Settings ............................................................................... 8
2.4 Loading Paper ..............................................................................................11
2.5 Belt Clip .........................................................................................................13
2.5.1 Attaching to the Printer ...................................................................................13
2.5.2 Using the Belt Clip ..............................................................................................13
3. Printer Feathres .................................................................... 14
3.1 Control Panel ................................................................................................. 14
3.1.1 Buttons ................................................................................................................14
3.1.2 Panel LEDs ...........................................................................................................14
3.1.3 LCD .......................................................................................................................14
3.2 Self Test ...........................................................................................................16
3.2.1 Self Test Procedure ............................................................................................16
3.2.2 Printing the Bluetooth Device Name and MAC Address.............................16
4. Paper ......................................................................................17
4.1 Paper Specications .....................................................................................17
4.2 Recommended Paper (Common thermal roll paper) ............................17
4.3 Printing Range ..............................................................................................17
5. General Specicatons ...........................................................18

- 1 -
iPod, iPhone and iPad compatibility list
Made for
iPod touch (4th generation)
iPhone 4S
iPhone 4
iPad (3rd generation)
iPad 2
iPad
Note: as of July. 2012
1. Product Overview
This printer is perfect for mobile banking systems, retail, POS (point of sale) terminals and
other forms of mobile computing.
The characteristics of this printer are listed below:
• Pocket size (82×140×47 mm)
• Extremely light and mobile (289 g)
• Up to 8 hours of battery-powered operation
(33% longer operation than previous 2inch printer)
• Quiet, direct thermal printing
•
• -
terface)
• Support for secure Bluetooth communications
Support for Bluetooth Security Mode 3 (PINs of up to 16 digits in length)
• LED backlit graphic LCD (128 × 32 dots)
• Remaining battery power, communication status, and error type indications on the LCD
• Support for the printing of text and graphics
• Support for the printing of a bit image (logo) stored on the printer (A special tool is required
to register a logo on the printer.)
• Drop-in design that makes it easy to load paper
• Printer cover can be opened simply by pulling the lever
• Apple Certied to print directly from iOS devices over Bluetooth
• Easy set-up to switch from printing directly from iOS to Android devices
- 2 -
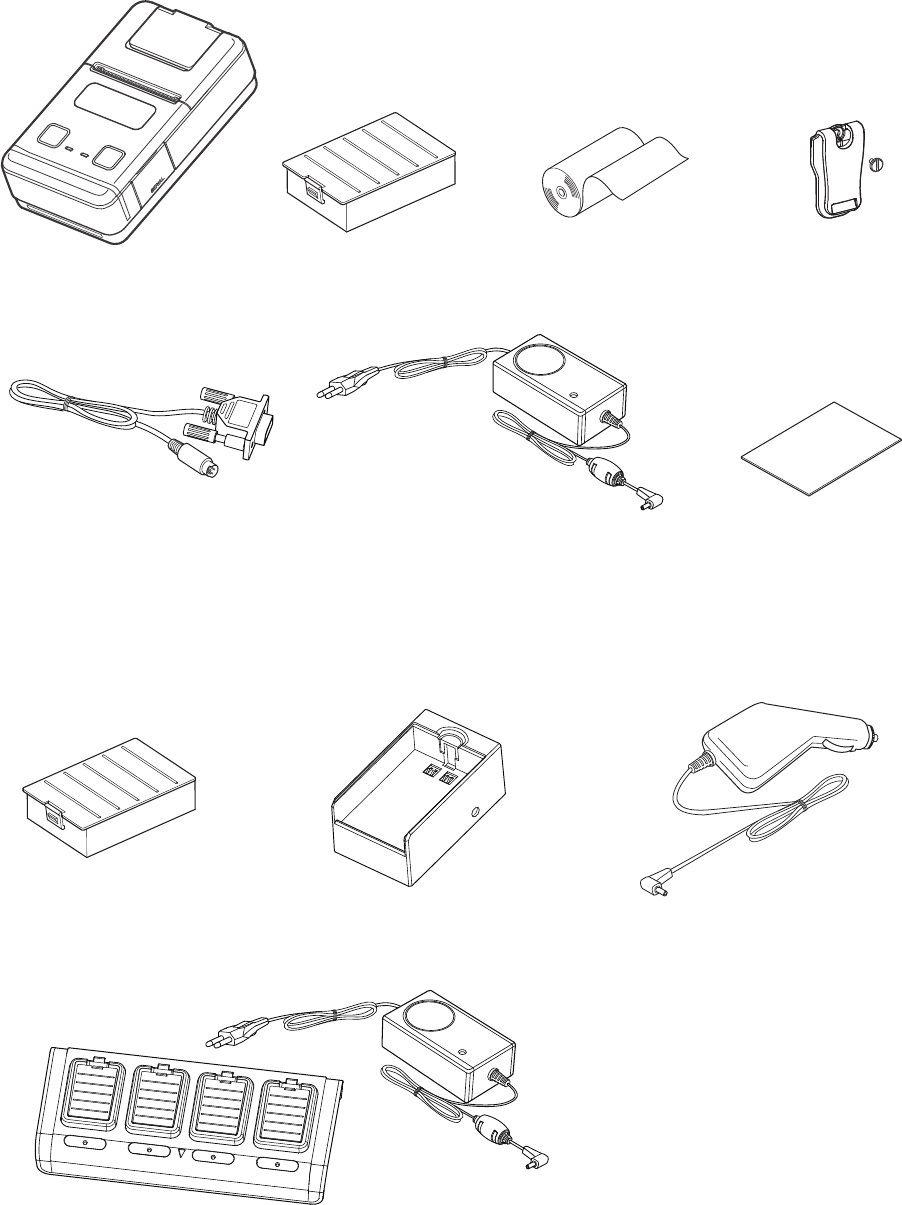
1.1 Printer & Accessories
The printer is packaged with the following accessories.
If any of these accessories is broken or missing, please contact the dealer that you bought
the product.
u The optional items for this printer are listed below.
Battery Pack
Serial Communication Cable
Printer paper samplePrinter
Battery Charger Safety Instruction Sheet
Extra Battery Pack Battery Holder
Belt Clip and Score
Car Charger
- 3 -
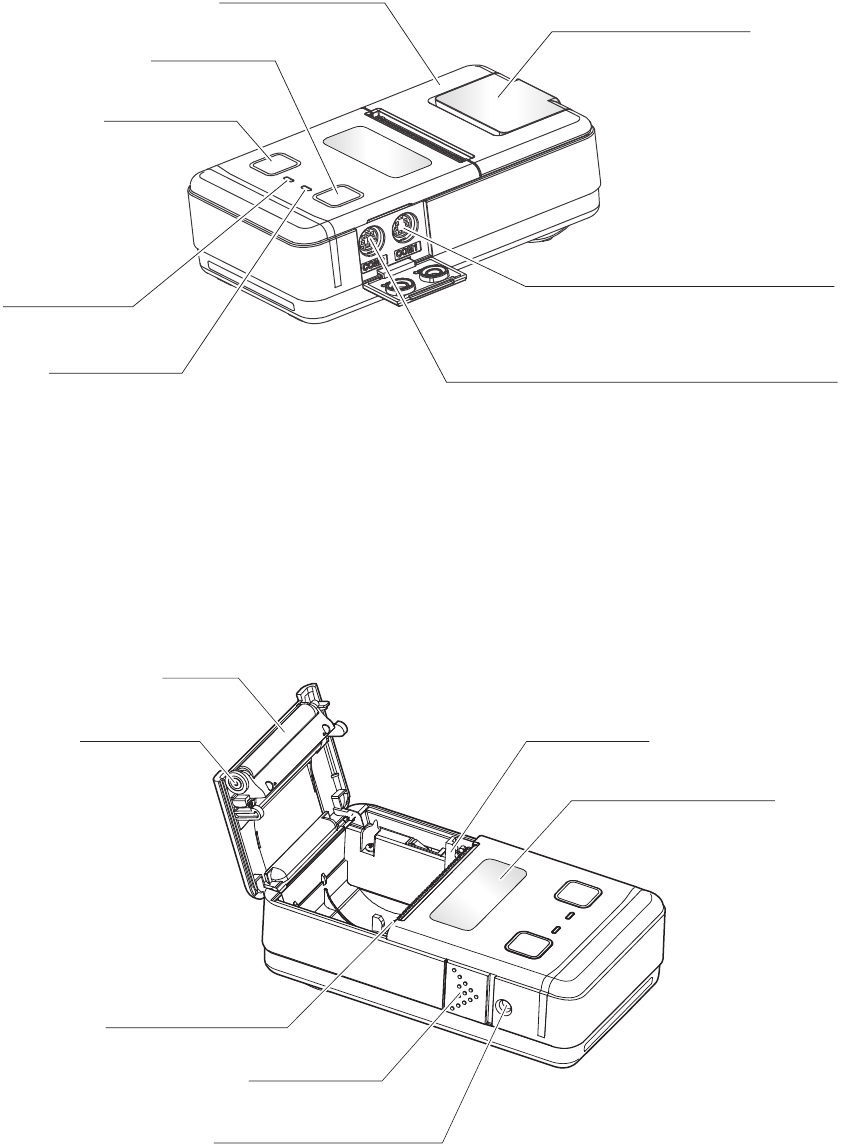
1.2 External Appearance and Part Names
LCD
*With protective lm
Mechanism
Platen
Platen Gear
Power Inlet for Charging
Power Switch
Thermal Print Head
COM1(Serial 6P)
For connecting to the host device
For connecting to a PIN pad or RFID module
COM2(NFC/PED 8P)
Cover Open Lever
ERROR Lamp
POWER Lamp
FEED Button
MODE Button
Printer Cover
*With protective lm
* The LCD and Cover Open Lever are covered with
a protective lm. Remove the lms if you do not
need them.
- 4 -
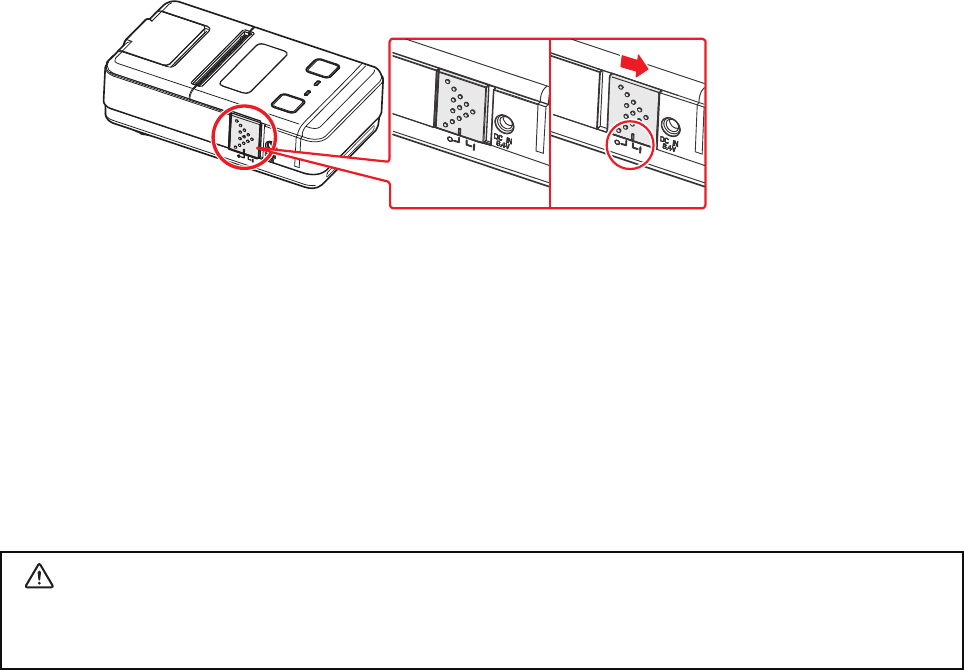
2. Setup
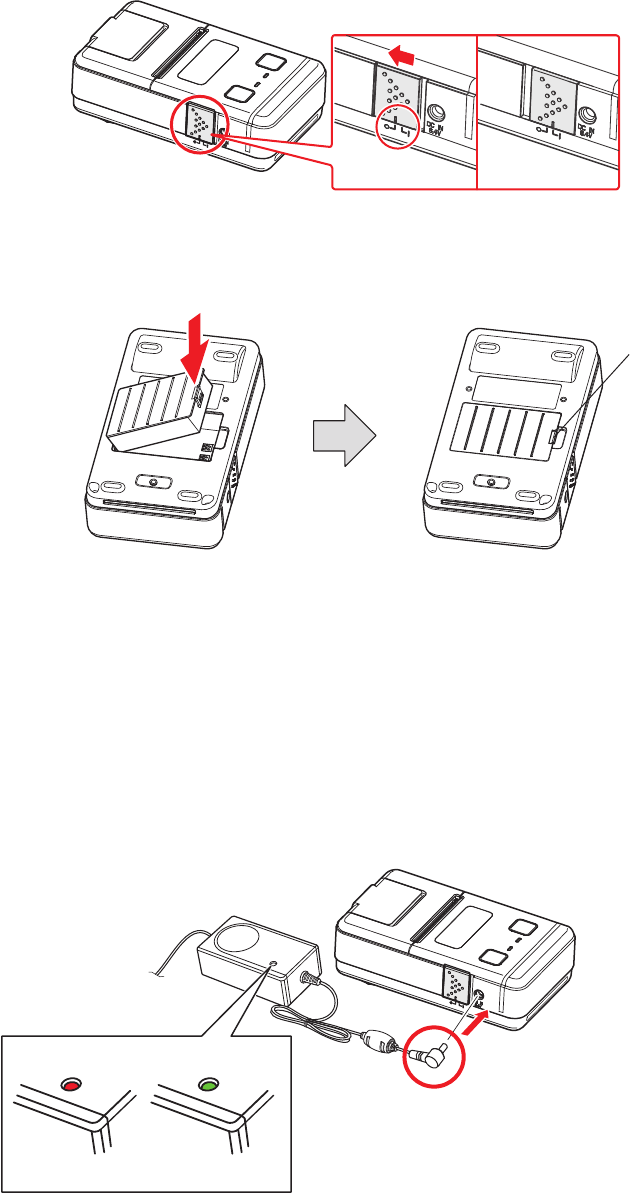
2.1 Battery Pack
2.1.1 Inserting into the Printer
pack.
2. Insert the battery pack into the back of the printer as in the gure shown below, follow-
ing the direction of the arrow.
3. To remove the battery back, pull back the hook, and use the opposite procedure from
the one you used to insert the battery pack.
2.1.2 Charging the Battery
Insert the battery pack into the printer to charge it.
Insert the battery charger cable into the printer’s power inlet for charging.
OFF ON
Lamp(Red) Lamp(Green)
Charging Fully charged
Hook

- 5 -
Notes about the Battery Pack
uGeneral Battery Characteristics
The battery is a consumable and its performance over time will gradually decrease.
While not in use, the battery will slowly discharge itself.
Prepare a battery pack that has been charged relatively recently (1 to 2 days earlier).
To ensure that the battery lasts for a long time, we recommend that you turn off the printer
whenever possible.
When used at low temperatures, battery performance will temporarily decline. Be sure to
have a fully-charged spare battery standing by if the printer will operate in a cold environ-
ment.
uCharging the Battery Pack
-
bient temperature.
Normally, it takes 4 to 5 hours to charge the battery pack.
-
fore recharging it.
uBattery Pack Life
without losing performance. If an extreme decline in the running time of the battery is no-
ticed, the battery is reaching the end of its usable life. It is recommended to replace the old
battery with a new one.
uNotes about Using the Battery Pack
hot environment (under direct sunlight, in a car, etc.).
Do not place the battery pack in a bag with a small metal object (such as a key).

- 6 -
uNotes about Storing the Battery Pack
a long period of time. If you do not intend to use the battery pack for a while, use up its
power before storing it.
printer, and do not leave it connected to a battery pack holder for external charging.
* We recommend that you store the battery pack in a dry area with an ambient tempera-
ture of 15 to 25 oC.
* Avoid storing the battery in locations with high or extremely low temperatures.
uBattery Disposal and Recycling
A lithium-ion battery is used to power this device. Since the disposal process of batteries
varies from country to country, refer to the appropriate measures mandating the disposal
method of the country in which this device is used.
by returning your used rechargeable batteries to the collection and recycling
location nearest you. For more information regarding recycling of recharge-
< For U.S.A. and Canada >
- 7 -
2.2 Bluetooth Settings
1. When you turn on the printer, it is ready to pair with another Bluetooth device.
2. If necessary, enter the following information into the terminal that you are using.
PIN: 1234 (default)
Device name: Star Micronics (default)
For security purposes, we recommend that you change the PIN.
For details about changing the PIN, please contact with our dealer.
CAUTION
During Bluetooth communication, if you transfer 1 MB or more of printing data, the buer
will overow, and the data may not be printed properly.
OFF ON

- 8 -
2.3 Memory Switch Settings
Change the Memory switch by this operation. (Refer to “Memory Switch Setting Table”).
MODE button : Changing OPTION status.
FEED button : Changing PRINTER MODE status
* Example:
When you want to switch from the default settings to the following settings.
a1 2345
67891 Minute Sleep
Follow the procedure below to change the settings.
1. Press and hold MODE for at least 5 seconds.
After the ERROR LED ashes ve times, you can congure the settings.
The current communication mode will appear on the display.
1Press MODE once to change the communication mode to Bluetooth.
Bluetooth(iAP) g Bluetooth Mode
2. Press FEED once to switch the displayed setting from the communication mode to the
baud rate.
The current baud rate will appear on the display.
2 Press MODE once to switch the baud rate to 9600 bps.
115200 BPS g 9600 BPS
3. Press FEED once to switch the displayed setting from the baud rate to the parity bit type.
The current parity bit type will appear on the display.
3 Press MODE twice to set the parity bit type to even.
gg
4. Press FEED once to switch the displayed setting from the parity bit type to the number
of stop bits.
The current number of stop bits will appear on the display.
4 Press MODE once to switch the number of stop bits from one stop bit to two stop bits.
1 STOP BIT g 2 STOP BIT
5. Press FEED once to switch the displayed setting from the number of stop bits to the
print density.
The current print density will appear on the display.
5 Press MODE once to set the print density to high density.
g
6. Press FEED once to switch the displayed setting from the print density to the print speed.
The current print speed will appear on the display.
6 Press MODE once to set the print speed to high speed.
LOW SPEED g HIGH SPEED
7. Press FEED once to switch the displayed setting from the print speed to the black mark
sensor mode.
The current black mark sensor mode will appear on the display.
7 Press MODE once to switch the black mark sensor mode to the use.
MARK NO USE g MARK USE
- 9 -
After you have congured all of the settings, press and release FEED and MODE at the
same time. The new settings will be printed.
If the settings were not congured correctly, follow the above procedure to congure
the settings again.
8. Press FEED once to switch the displayed setting from the black mark sensor mode to
the black mark sensor sensitivity.
The current black mark sensor sensitinity will appear on the display.
5 Press MODE twice to set the black mark sensor sensitivity to medium2.
SENSOR LOW g SENSOR MIDIUM1 g SENSOR MIDIUM2
9. Press FEED once to switch the displayed setting from the black mark sensor sensitivity to
the power down.
The current power down will appear on the display.
6 Press MODE once to set the power down to 1 minute sleep.
PWDN NO USE g PWDN 1 min.

- 10 -
Memory Switch Setting Table
Printer Mode Setting Display
1 Communication Port *1)
Bluetooth(iOS) * Bluetooth(iAP)
Bluetooth
Bluetooth Mode
RS-232C
UART Mode
2 Baud Rate
9600 bps 9600 BPS
38400 bps 38400 BPS
115200 bps * 115200 BPS
3 Parity Bit
No Parity *
Odd Parity
Even Parity
4 Stop Bit 1 Stop bit * 1 STOP BIT
2 Stop bit 2 STOP BIT
5 Print Density
Density Low
Density Medium *
Density High
6 Print Speed LOW SPEED
HIGH SPEED
7 Black Mark Sensor *2)No use * MARK NO USE
Use MARK USE
8 Black Mark Sensor Sensitivity
Low * SENSOR LOW
Medium 1 SENSOR MEDIUM1
Medium 2 SENSOR MEDIUM2
High SENSOR HIGH
9 Power Down
No use * PWDN NO USE
1 Minute Sleep PWDN 1 min.
2 Minute Sleep PWDN 2 min.
3 Minute Sleep PWDN 3 min.
4 Minute Sleep PWDN 4 min.
5 Minute Sleep PWDN 5 min.
*1)Communication mode
It is possible to change the communication mode setting between Bluetooth and serial. Please
see below for details to select the proper communication mode for your application.
Bluetooth (iOS):
The display shows [Bluetooth(iAP)]. At the Bluetooth (iOS) mode, the printer can communi-
cate with an iOS device over Bluetooth.
Bluetooth:
The display shows [Bluetooth Mode]. At the Bluetooth mode, the printer can communicate
with an Android device or a device other than iOS devices over Bluetooth.
RS-232C:
The display shows [UART Mode]. At the RS-232C mode, the printer can communicate with
a device using the serial communication cable supplied with the printer. When you con-
nect the serial cable, the printer is automatically switched to serial communication from
Bluetooth communication.
*2)When the black mark sensor is set to Use, the printer cannot detect the paper–end status.
- 11 -
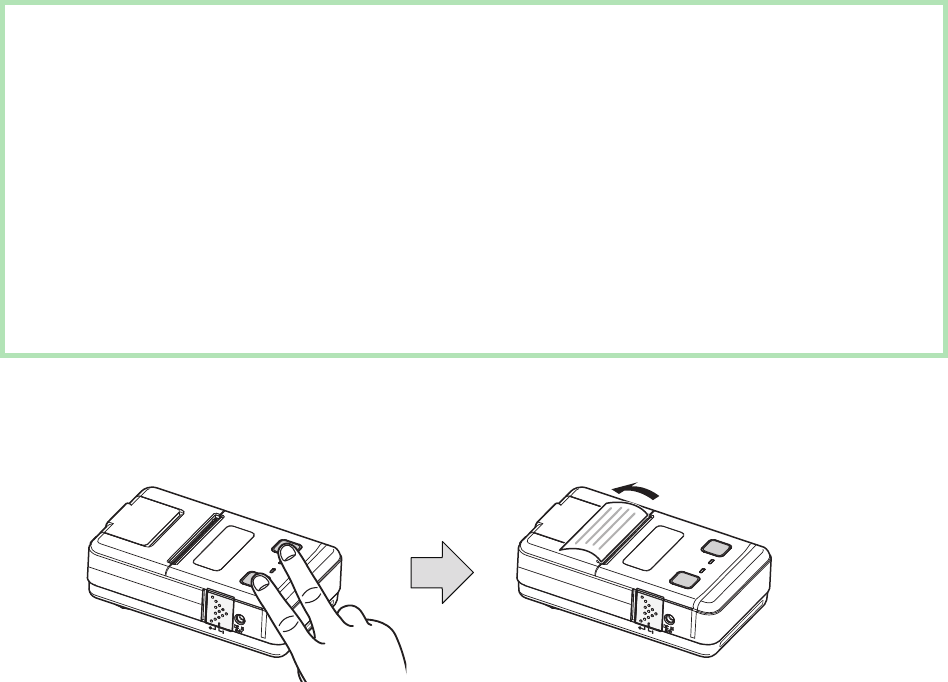
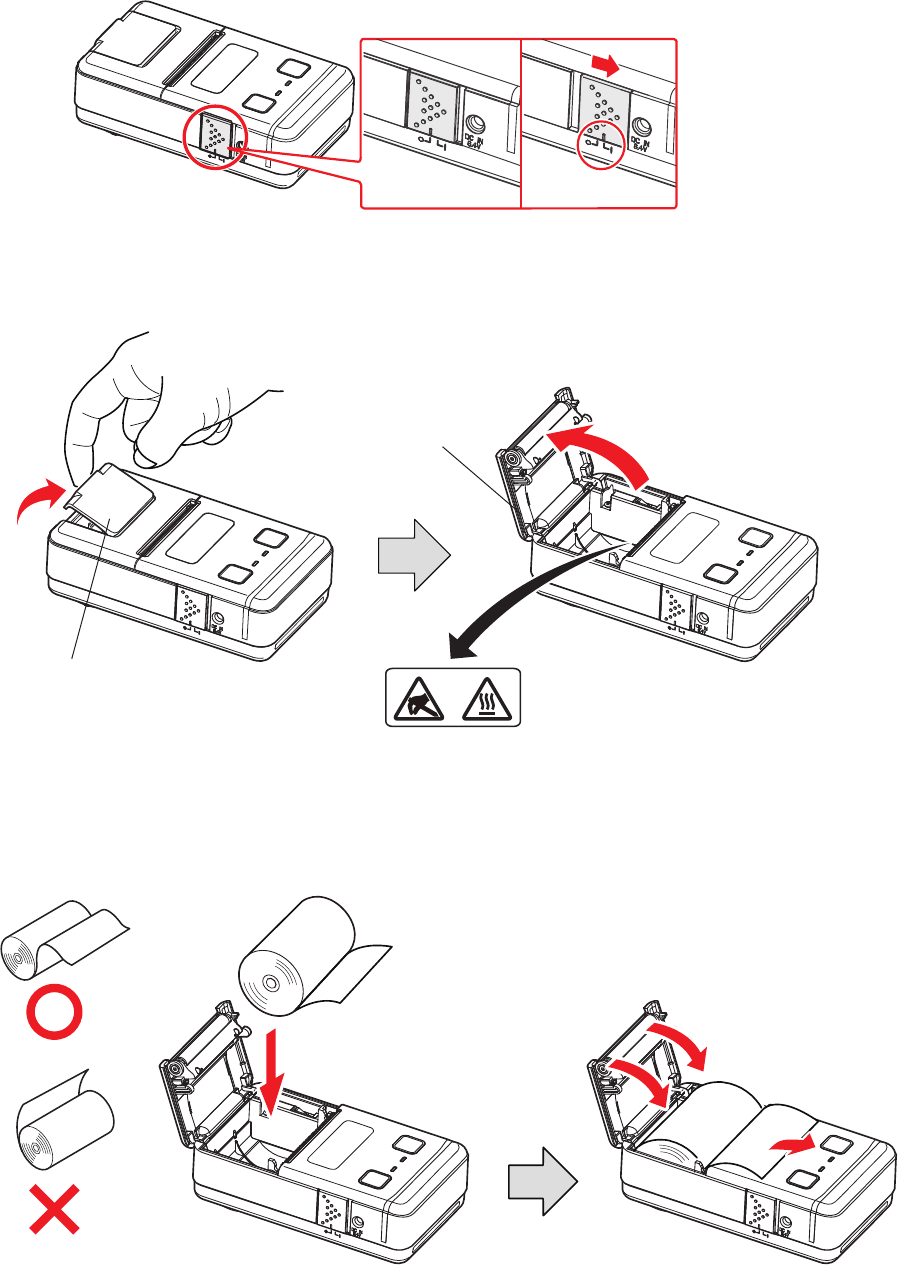
2.4 Loading Paper
Refer to chapter 4, “Paper” (p. 17), to select roll paper that conforms to the specications.
1. Turn on the printer.
2. Put your nger on the lever for opening the cover, and then open and raise the printer
cover.
3. Load the roll paper in the orientation shown in the gure below, and then pull the end
of the roll straight toward you.
OFF ON
Cover Open Lerver
Printer Cover
- 12 -
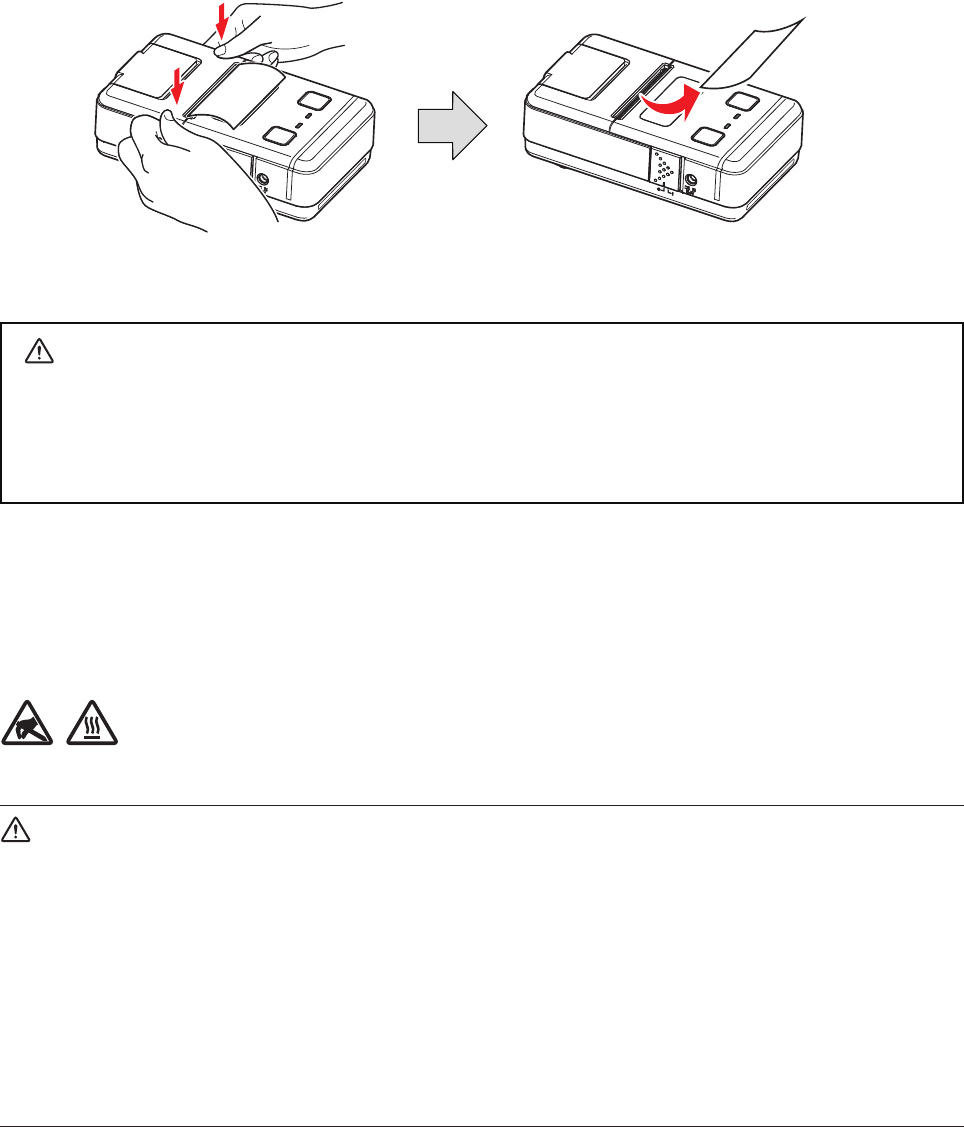
4. Press down on both sides of the printer cover to close it rmly.
When you close the printer cover, make sure that it is closed on both sides.
5. Use the tear bar to cut the extra paper.
CAUTION
When the paper is jammed, be sure to open the printer cover before removing the
jammed paper.
Do not under any circumstances try to pull out the jammed paper forcefully while the
printer cover is closed. Doing so may damage parts of the printer.
Caution Symbol
is symbol is placed near the thermal head to indicate that it may be hot.
Never touch the thermal head immediately aer the printer has been used.
Also, even when the thermal head is not hot, do not touch it, because static electricity
can damage the devices inside the thermal head.
WARNING
1) Do not touch the tear bar.
in the paper outlet slot while printing is in progress, never put your hand into the out-
let even when printing is not in progress.
is on the inside of the paper cover, be careful not to place your face or hands too close
to the tear bar.
2) During and immediately aer printing, the area around the thermal head is very hot.
Do not touch it, as you could be burned.
- 13 -
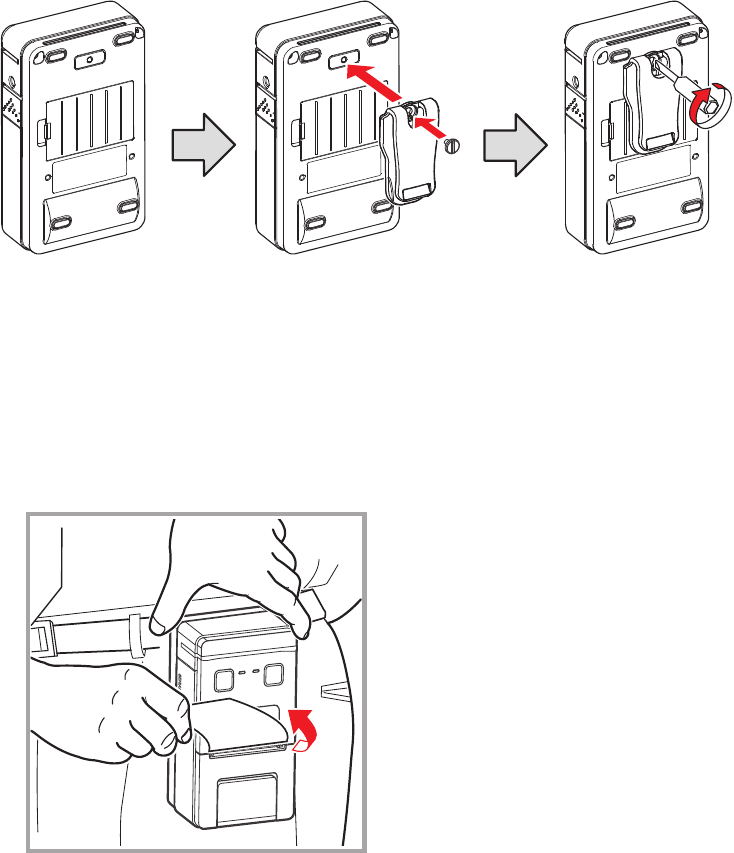
2.5 Belt Clip
2.5.1 Attaching to the Printer
Follow the procedure below to attach the belt clip to the printer.
1. Make sure that you are attaching the belt clip in the right orientation, then screw the
screw that comes with the belt clip into the designated screw hole to attach the belt
clip to the printer.
2. Use a screwdriver to rmly screw in the screw.
2.5.2 Using the Belt Clip
When the printer is attached to your belt, hold the printer steady with your hand when
you use it.
- 14 -
3. Printer Features
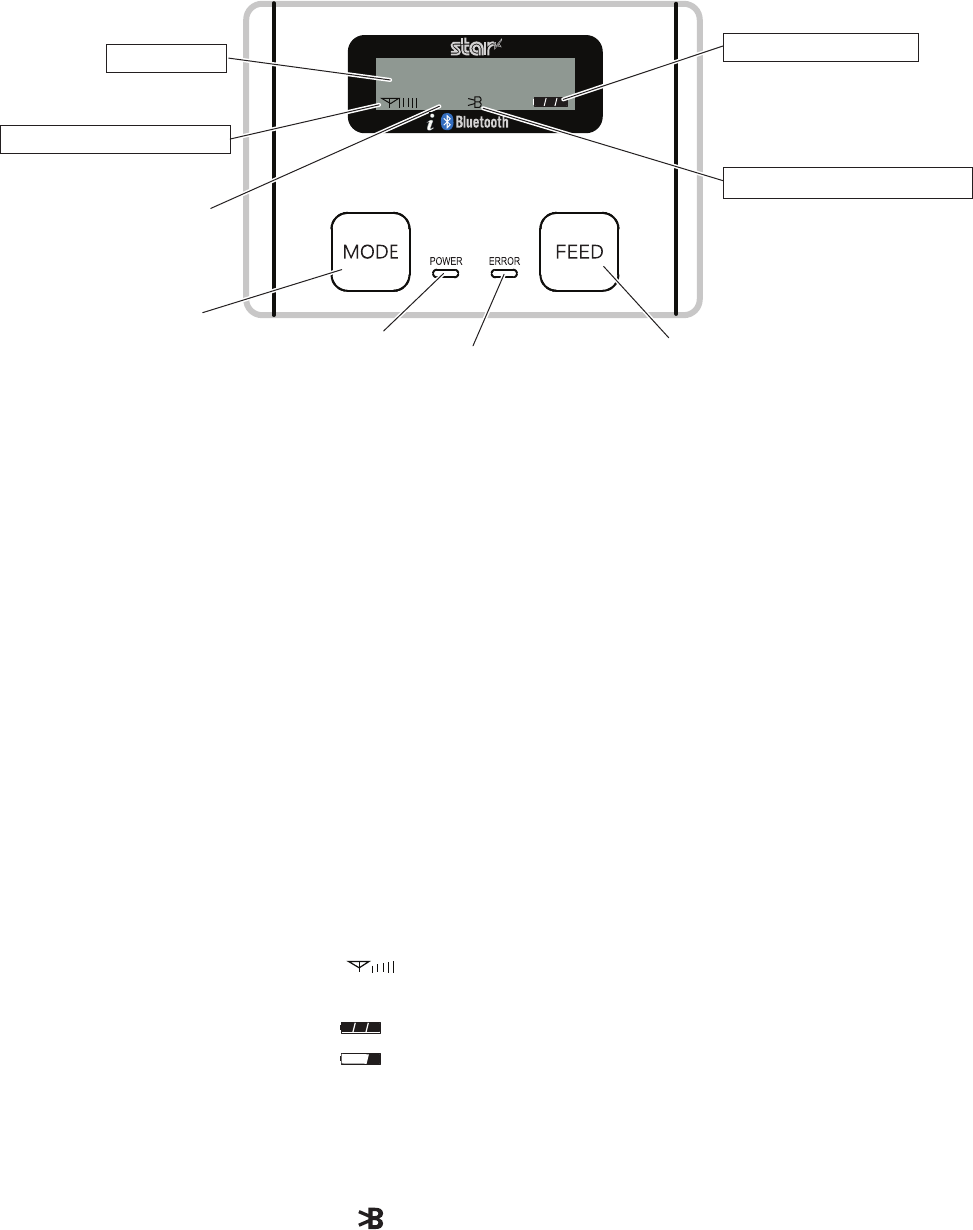
3.1 Control Panel
3.1.1 Buttons
1) FEED button: When the printer is on, you can press FEED to feed the paper.
2) MODE button:
seconds or more and the ERROR LED ashes ve times.
(For more information about mode settings, see section 2.3, “Memory Switch Settings.”)
3.1.2 Panel LEDs
1) POWER LED (green): Lights when the printer is on. The printer can receive data when the
POWER LED is on.
2) ERROR LED (red): Lights when there is a printer error and when the printer is receiving data.
3.1.3 LCD
1) The 128 × 32 dot (16 × 2 line) display shows alphanumeric characters.
2) Content
: Indicates the currently specied printer mode or error status.
Data communication status : ... The image shown on the left indicates that the data
communication status is good.
Remaining battery power : ... There is sucient remaining battery power.
... The remaining battery power is low. Please charge
the battery pack.
Flashing
... The remaining battery power is extremely low.
Stop using the printer immediately, and charge the
battery pack.
Bluetooth connection status : ... The mark on the left indicates that there is a Blue-
tooth connection.
When there is no Bluetooth connection, the mark is
not displayed.
Bluetooth Mode

- 15 -
Printer Status Action
LED
LCD Buzzer
POWER
(Green)
ERROR
(Red)
Printer Initialization(Power On) Flickering Flickering Display : [ Bluetooth Mode ]
Back Light : Flickering during initialization Beep 3
On-Line
COM1
Cable not
Stand-by
ON OFF
Display : [ Bluetooth Mode ]
Back Light : 1 sec ickering and OFF
Nothing
Cable Connected Display : [ Cable Detect ] g[ UART Mode ]
Back Light : 1 sec ickering and OFF Beep 2
COM1
Cable
Connected
Stand-by Display : [ UART Mode ]
Back Light : 1 sec ickering and OFF Nothing
Display : [ Cable Out ] g[ Bluetooth Mode ]
Back Light : 1 sec ickering and OFF Beep 2
Operation
Mode PIN PAD ON OFF Display : [ PIN Mode ]
Back Light : 1 sec ickering and OFF Nothing
Receiving Data ON ON
Status of Antenna Icon is changed
No displayed
Back Light : OFF
Nothing
On-Line
(Busy) Printing Data ON OFF Display : [ Working... ]
Back Light : ON Nothing
Stored Terminal Setting
Flickering Flickering
No displayed Nothing
Setup Mode ON OFF
[ Setup Mode ]g[ Print Status ] <Get out
Setup Mode>
Display : [ Setup Mode ]
Back Light : ON
Nothing
Test Printing ON OFF Display : [ Print Test ] g[ Working...]
Back Light : ON Nothing
Writting Firmware ON OFF Display : [ Downloading... ]
Back Light : ON Nothing
Error
Recoverable
Error
No Paper Error ON Flickering Display : [ Paper Empty ]
Back Light : ON
1 Happened
gBeep 3
2 Recovered
gBeep 1
Cover Open
Error ON Flickering Display : [ Cover Open ]
Back Light : ON
1 Happened
gBeep 3
2 Recovered
gBeep 1
Auto
Recoverable
Error
Heat Protection
of Thermal Head ON Flickering Display : [ Head Hot ]
Back Light : ON
1 Happened
gBeep 3
2 Recovered
gBeep 1
n LED & LCD Display / Error
- 16 -
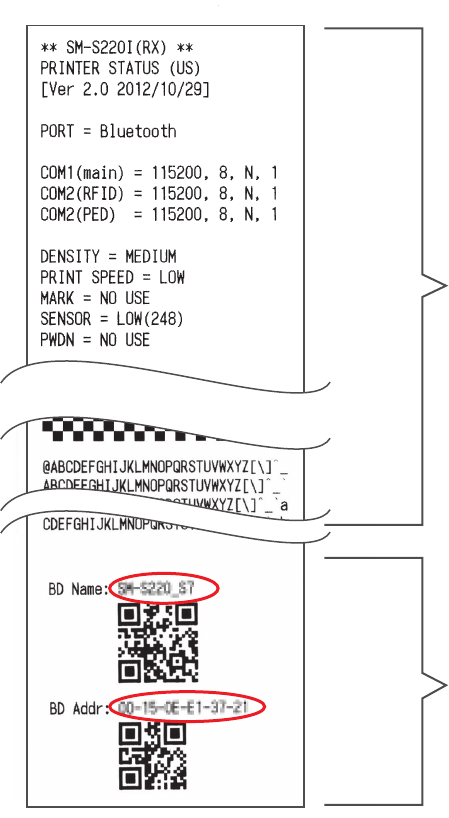
3.2 Self Test
Before you start the self test, make sure that roll paper has been properly loaded into the
printer.
3.2.1 Self Test Procedure
1) Turn on the power while holding down FEED.
2) The printer will print the current printer status, including the rmware version, commu-
nication mode, and print settings.
3) The self test will nish automatically. The printer will be ready to receive data after the
self test nishes.
3.2.2 Printing the Bluetooth Device Name and MAC Address
1) Follow the procedure in section 3.2.1 to perform a self test.
2) Before the self test nishes, press and hold FEED and MODE at the same time.
3) The printer will print the Bluetooth device name and MAC address, and the self test will
nish automatically.
The printer will be ready to receive data after the self test nishes.
Self test information
Bluetooth device name and MAC address
- 17 -
4.2 Recommended Paper (Common thermal roll paper)
Manufacturer Product Name
Mitsubishi Paper Mills Limited P220AG
Oji Paper Co., Ltd. PD450
APPLETON Alpha 800-2.4
KANZAKI (Oji Paper USA) P-350
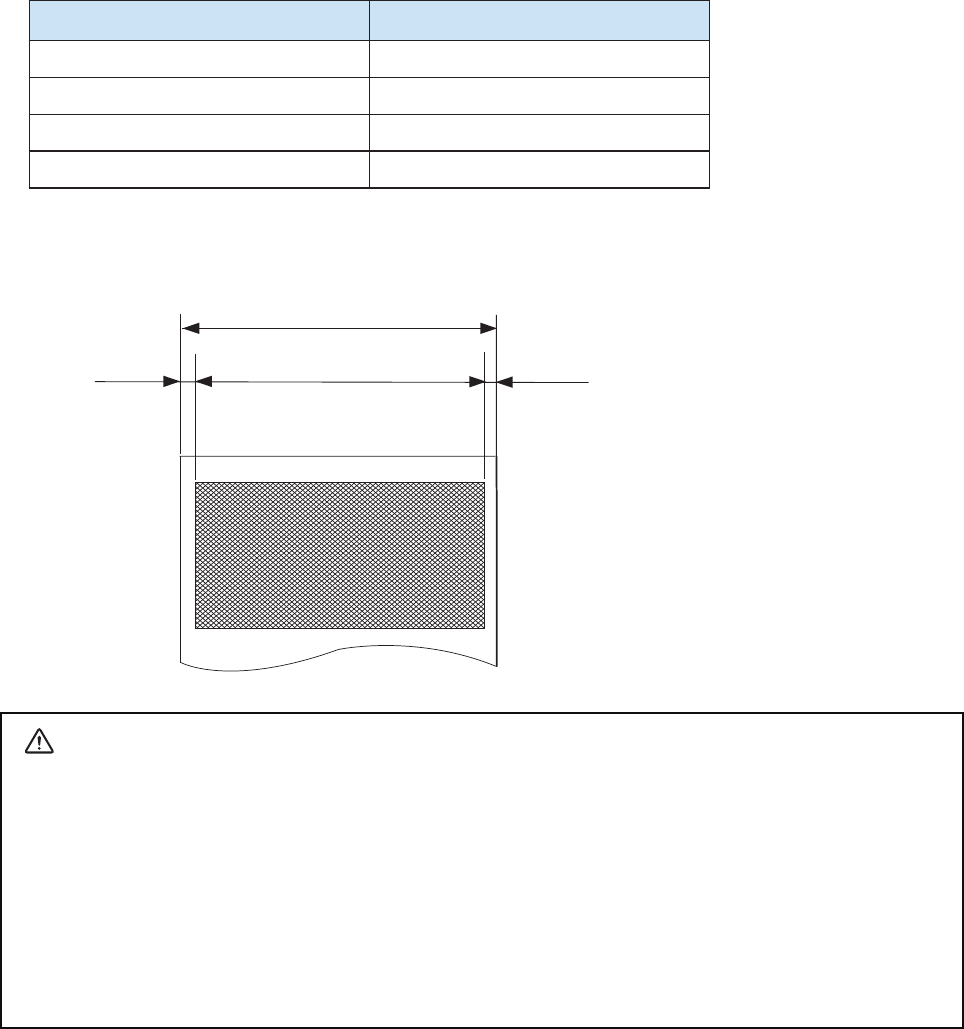
4.3 Printing Range
4. Paper
4.1 Paper Specications
Type : Thermal Paper
Paper width : 57.5±0.5 mm
Paper thickness : 65±5 µm
External diameter : Ø40 mm or less
Inner diameter : Ø12mm±1 or more
Printed surface : Outer edge of roll
CAUTION
1) Do not use roll paper whose end is glued to its core, because the printer will be unable to prop-
erly detect the end of the paper. Also, we recommend that you use roll paper that has a roll end
mark at its end.
2) Chemicals and oil may cause the roll paper to change color or cause the printed characters to
become lighter.
3) The roll paper starts changing color at approximately 70°C.
Please be aware that the roll paper can be aected by heat, humidity, and direct sunlight.
4) The roll paper may change color if you scratch it with your ngernail, a hard piece of metal, etc.
4.75 mm4.75 mm 48 mm Printing Area
57.5±0.5 Paper Width

- 18 -
5. General Specications
Item Specications
Printing method Direct line thermal printing
Characters per line Maximum 42 cpl
Character size Alphanumeric characters: 12 X 24 dots, 9 X 24 dots, and 7 X 17 dots
Japanese characters: 24 X 24 dots
Character types Alphanumeric characters, expanded graphic characters, JIS Level-1 Kanji Set, JIS
Level-2 Kanji Set, and special characters
Dot density
Printing width 48 mm (384 dots)
Print speed
Interface Bluetooth
Bluetooth Spec.
Frequency Range 2.4GHz ISM BAND (2402~2480 MHz)
RF Power Below 10 dBm
Modulation method GFSK
Oscillation method PLL
RS-232C × 2
Roll paper Thermal roll paper (57.5 ± 0.5 mm wide with a diameter of 40 mm)
Barcode 1D: JAN, EAN, UPC, ITF, Code39, Code93, Code128, CODABAR(NW-7)
2D: PDF417, QR Code, DATA Matrix
Communication packet size Maximum 8K byte
Emulation
LCD 128 × 32 dots (LED backlight)
Battery pack
Battery operating time Approximately 8 hours (normal mode)
Approximately 45 minutes (continuous printing)
Battery charger
Environmental
Requirements
Temperature *1 ) 0 oC to 50 oC (for operation)
-20 oC to 60 oC (for storage)
Humidity 30% to 80% (for operation)
10% to 90% (for storage)
Print head life Approximately 50 km
Drop resistance 1.2 m. Please note that this value was obtained under testing conditions stipulated
*1) When the temperature of the operating environment is 10°C or less, in the memory switch settings, set the
print density to high.
- 19 -
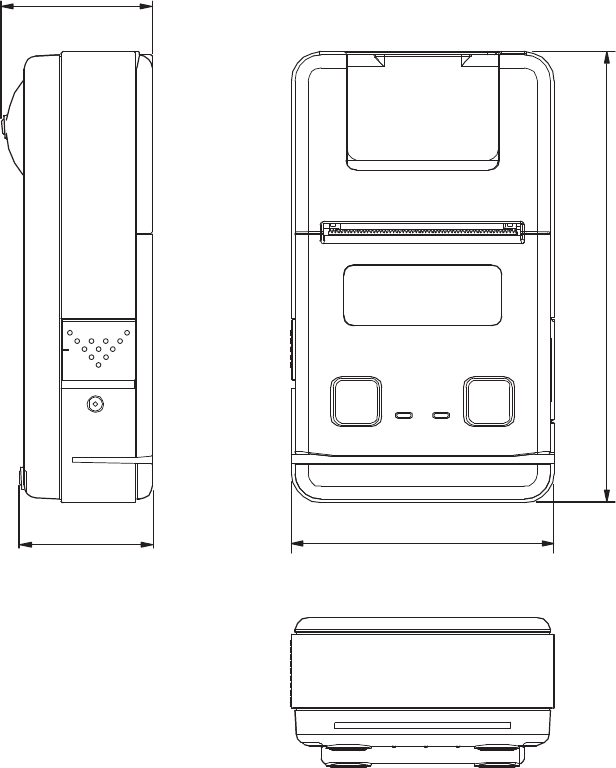
n External Specications
External dimensions: Approximately 82 mm (W) × 140 mm (D) × 47 mm (H)
* The weight of the roll paper is not included.
Body color: Front
g Shiny black
Back g Black
Side g Blue silver
47
140
82
42

URL: http://www.starmicronics.com/support/ Rev. 1.0