STONEX SRL S4 S4 Handheld User Manual
STONEX SRL S4 Handheld
User manual
S4 USER MANUAL
(V1.0)
2013.01.28
Table of Contents
Chapter 1 Product Introduction ..................................................................................................... 1
1.1 Front Components .............................................................................................................. 1
1.1.1 Keypad ...................................................................................................................... 3
1.2 Back Components ............................................................................................................... 5
1.3 Bottom Components ........................................................................................................... 6
Chapter 2 Basic Operation ............................................................................................................. 7
2.1 Turning on、Suspending、Turning Off、Resetting ............................................................ 7
2.1.1 Turning on ................................................................................................................ 7
2.1.2 Suspending ............................................................................................................... 7
2.1.3 Turning off ................................................................................................................ 8
2.1.4 Resetting................................................................................................................... 8
2.1.4.1 Performing a Hard Reset ............................................................................... 8
2.2 Pull the Stylus out and in ..................................................................................................... 9
2.3 Installing、Uninstalling the SIM、TF Card and Battery ...................................................... 9
2.4 Charging the Battery ......................................................................................................... 10
2.5 Fitting the Hand Strap ....................................................................................................... 11
Chapter 3 Connecting and Synchronizing with Your Computer ................................................... 12
3.1 Installing Connection Management Software ................................................................... 12
3.1.1 Installing the Windows Mobile Device Center ....................................................... 12
3.1.2 Installing ActiveSync ............................................................................................... 13
3.2 Connecting and Synchronizing With Your Computer ........................................................ 13
3.2.1 Managing the Connection and Synchronization Using the Windows Mobile Device
Center .............................................................................................................................. 13
3.2.2 Managing the Connection and Synchronization Using the ActiveSync .................. 17
3.2.3 Connecting with U Disk Mode ................................................................................ 20
3.2.4 OTG Connection ..................................................................................................... 21
Chapter 4 Brief Description of the Operating System .................................................................. 22
4.1 System Main Interface and the Start Menu ...................................................................... 22
4.2 Status Indicators ................................................................................................................ 24
4.2.1 Battery Status Indicators ........................................................................................ 24
4.2.2 Speaker Status Indicators ....................................................................................... 24
4.2.3 Network and Modem Status Indicators ................................................................. 25
4.3 Pre-installed Programs ...................................................................................................... 25
4.4 Interacting With the Device .............................................................................................. 26
4.5 Entering Information ......................................................................................................... 27
4.5.1 Using the On-screen Keyboard ............................................................................... 27
4.5.2 Drawing and Writing on the Screen Directly .......................................................... 28
4.5.3 Recording a Message .............................................................................................. 29
4.5.4 Camera (Select Models Only) ................................................................................. 30
4.5.4.1 Taking Pictures ............................................................................................. 30
4.5.4.2 Recording Video Clips .................................................................................. 32
4.6 Personal Settings ............................................................................................................... 34
4.6.1 Buttons ................................................................................................................... 34
4.6.2 Home ...................................................................................................................... 35
4.6.2.1 Appearance ................................................................................................. 35
4.6.2.2 Items ............................................................................................................ 36
4.6.2.3 Set Date and time ........................................................................................ 37
4.6.3 Screen Lock............................................................................................................. 38
4.6.4 Set Passwords ......................................................................................................... 39
4.6.5 Power ..................................................................................................................... 40
4.6.6 Sounds and Notifications ....................................................................................... 41
4.6.7 Screen ..................................................................................................................... 42
4.6.8 Backlight ................................................................................................................. 43
4.6.9 Align Screen ............................................................................................................ 44
4.7 GPRS Network Setting ....................................................................................................... 45
4.7.1 Add New GPRS Connecting .................................................................................... 45
4.8 Bluetooth Connecting ....................................................................................................... 47
4.9 Phone and Text Messages (Select Models Only) ............................................................... 49
4.9.1 Phone ..................................................................................................................... 49
4.9.1.1 About Your Phone ....................................................................................... 49
4.9.1.2 Making a Call ............................................................................................... 52
4.9.1.3 Responding to a Call .................................................................................... 54
4.9.1.4 Operations During a Call ............................................................................. 55
4.9.1.5 Using Call History ........................................................................................ 59
4.9.1.6 Using Speed Dial .......................................................................................... 60
4.9.1.7 Customizing Your Phone .............................................................................. 61
4.9.1.8 Additional Phone Operations ...................................................................... 63
4.9.2 Text Messages ........................................................................................................ 65
4.9.2.1 Reading Text Messages ............................................................................... 65
4.9.2.2 Composing and Sending a Text Message .................................................... 65
4.10 WIFI Connecting .............................................................................................................. 66
4.10.1 Switching On or Off the Wi-Fi Radio .................................................................... 66
4.10.2 Connecting to a Wireless Network ....................................................................... 67
Chapter 5 Software Operation ..................................................................................................... 69
5.1 Installing Programs ............................................................................................................ 69
5.2 Uninstalling Programs ....................................................................................................... 69
Chapter 6 Troubleshooting and Maintenance ............................................................................. 70
6.1 Troubleshooting ................................................................................................................ 70
6.2 Resetting Your Device ........................................................................................................ 71
6.3 Caring for Your Device ....................................................................................................... 72
1
Chapter 1 Product Introduction
This chapter mainly introduces you to the external components of your
device.
1.1 Front Components

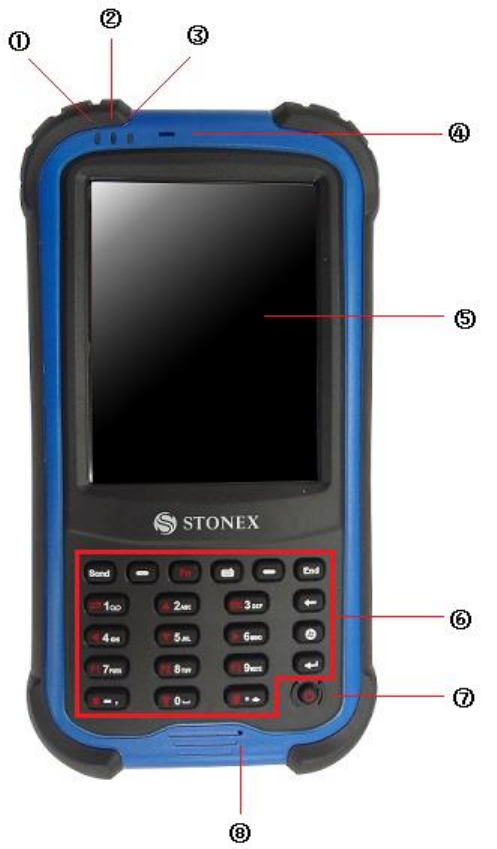
2
Ref
Component
Description
①
Charge/Power on
Indicator
Flashes in red to indicate that your device
is being turned on.
When battery charging, Flashes in green
to indicate battery charging is in progress.
Flashes in amber to indicate that the
battery is fully charged.
②
GPS Indicator
Flashes in green to indicate that the GPS
function is switched on.
③
Wireless
communication
indicator
Flashes in blue to indicate that the
Bluetooth function is on.
Flashes in green to indicate that the
Phone function is on.
④
Earpiece
Serves as the phone earpiece during a
call.
⑤
Touch Screen
Displays the output of your device and
responds to your tapping.
⑥
Keypad
Includes keys for numbers and specific
functions.
⑦
Power Button
Turns on or off your device.
⑧
Microphone
Records voices.
Serves as the mouthpiece during a call.

3
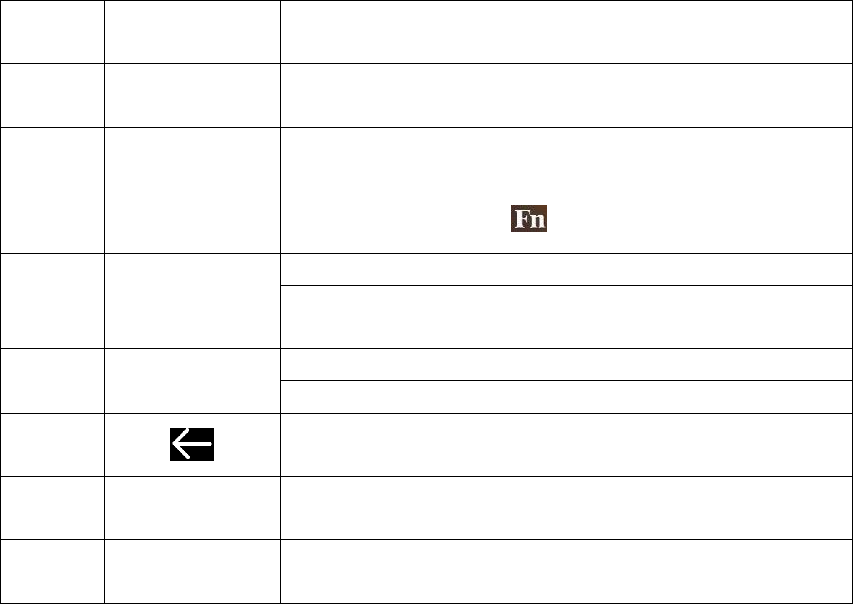
1.1.1 Keypad
Ref
Component
Description
①
Numeric Keys
Enter numbers(majorly for models with the phone
function)
Alternative
Function Keys
Provide functions as indicated by the red icons when Fn
lock is on.
Moves up, down, left and right within
the screen or menu.
Goes to the next input field.
Increases the brightness level of the
screen. It cycles to the lowest level after
reaching the highest level.
Exit the currently opened menu or
program.
, ,
Performs the program assigned under
Personal settings when you press one of
them.
4
②
Send Key
Dials or answers a call.
③
Left/Right Soft
Key
Performs the command shown on the bottom left or
right corner of the screen.
④
Function Key
Switches on or off the alternative functions of the
numeric keys. Fn lock is off by default. When it is
switched on, the icon shows in the navigation bar.
⑤
Camera Key
Starts the Camera program.
Serves as the shutter release button if the Camera
program is currently in use.
⑥
End Key
Ends or rejects a call (select models only).
Returns to the Today screen from another program.
⑦
Backspaces over one character when in a text input
field.
⑧
Start Key
Opens the Start menu.
⑨
Action Key
Confirms your selection by pressing, similar to the Enter
key on a keyboard.
5
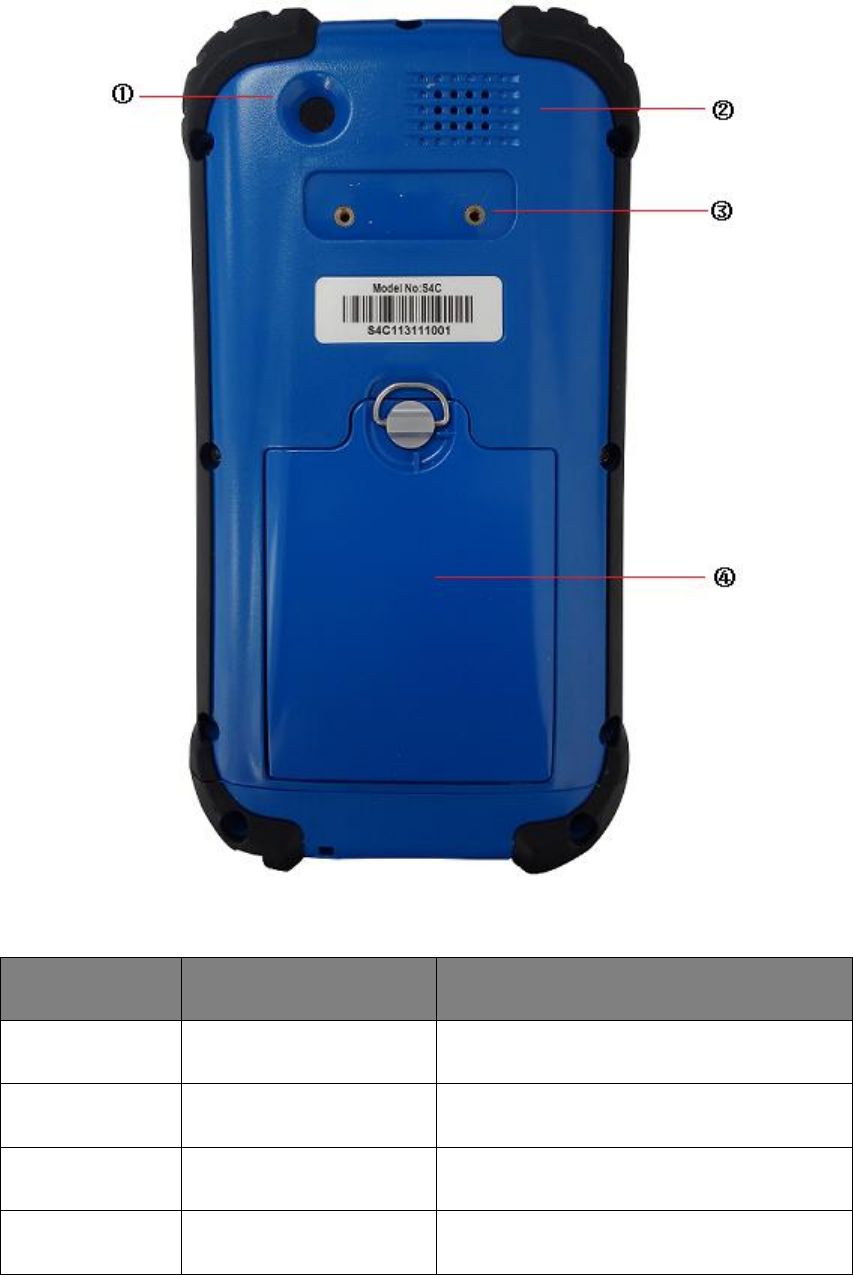
1.2 Back Components
Ref
Component
Description
①
Camera Lens
Takes still pictures or records video clips.
②
Speaker
Plays music, sounds and voices.
③
Hand Strap Holders
The hand strap attaches here.
④
Battery Cover
Inside is the battery.
6
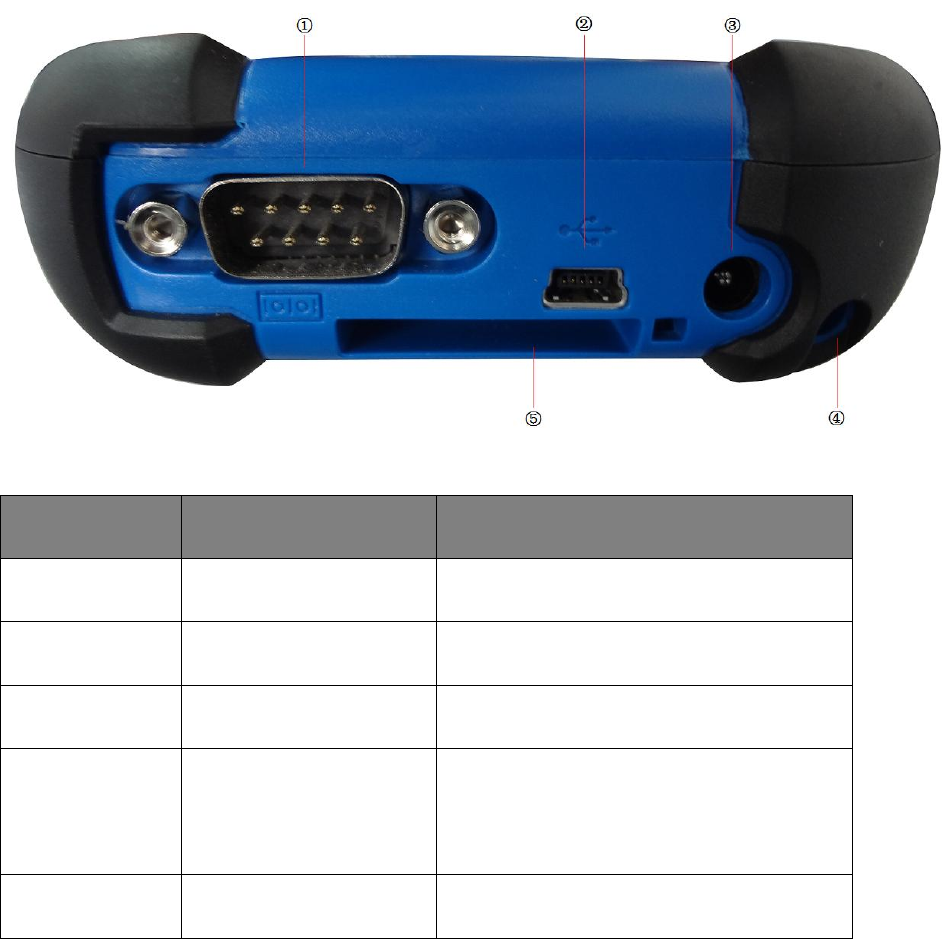
1.3 Bottom Components
Ref
Component
Description
①
Serial Connector
Provides D-sub 9 pins RS232 function.
②
USB OTG (Host &
Client) Connector
Connects to the USB cable.
③
Power Connector
Connects to the AC adapter.
④
Stylus Pinhole
Used to place the stylus that is served as
the input device by tapping on the
touch screen to make selections and
enter information.
⑤
Hand Strap Holders
The hand strap attaches here.
7
Chapter 2 Basic Operation
This chapter mainly introduces you to the basic operations of your
device.
2.1 Turning on、Suspending、Turning Off、Resetting
2.1.1 Turning on
Press the Power Button and don not let go until the indicator color turns
to green from red. It’s about 33 seconds to turn on the product. Then the
screen will appear the device information and Windows icon in order.
2.1.2 Suspending
Press the power button one second when the device is on, let go, the
device will be suspended and the first indicator from the left color turns
to amber.
If the device has already in use, the device suspends halfway (black
screen),to resume operation, press the power button. You will be back
to where you left off.
CAUTION: The mobile phone indicator keeps on flashing when your
device is suspended. Any incoming call will resume your device.
8
2.1.3 Turning off
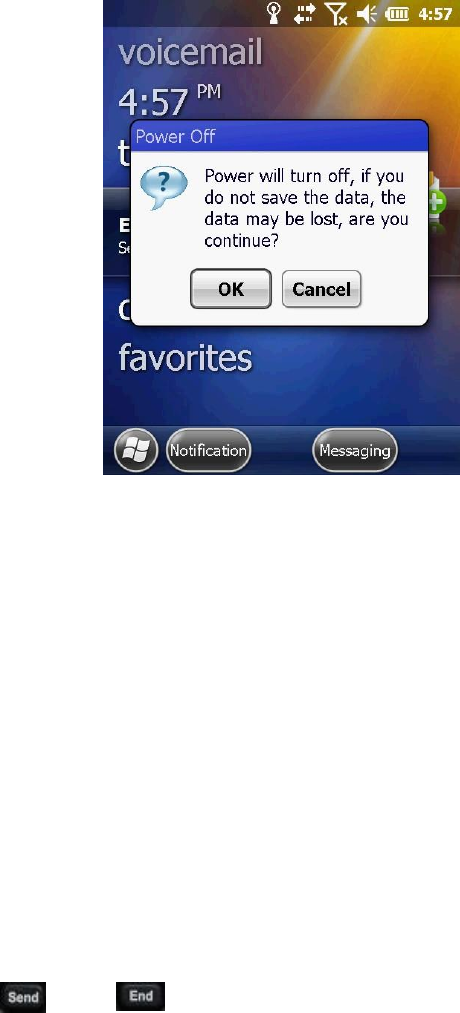
If you are not using your device, press and hold the power button for at
least 3 seconds until the device appears a dialog box as shown in figure 1.
Then click “OK”.
Figure 1
2.1.4 Resetting
If the device stops responding to the stylus or if it does not respond
when you press any of the keypad buttons, you may need to reset it by
performing a hard reset.
2.1.4.1 Performing a Hard Reset
Press both and buttons one second at the same time,and
then press the power button to turn on your device.
9
2.2 Pull the Stylus out and in
Use the stylus to navigate and select objects on the screen.
Attach the stylus and your device with the tether. Pull the stylus out of
the slot and extend it for ease of use. Store it in the slot when not in use.
2.3 Installing、Uninstalling the SIM、TF Card and Battery
1. Lift the latch handle of the battery cover and turn it counterclockwise
to the unlock (vertical) position. Then, detach the cover from the device.
2. We can see two slots then, with the upper side one installing SIM card
and the bottom side one installing TF card. To install the SIM card, push
the SIM card holder right. With the SIM card’s chip side facing down put
the card into the slot. Close the holder then. The TF card installation is
similar to the SIM card installation. To remove the SIM card and TF card,
push the holder and then take out the card.
3. To install the battery, attach the bottom side of the battery to the
compartment at an angle and then lower the upper side to engage the
connector. Attach the bottom side of the battery cover to the device at
an angle, and then with the handle still in the unlock (vertical) position,
fit the latch handle into place. Secure the latch by turning it clockwise to
the lock (horizontal) position.

10
CAUTION
RISK OF EXPLOSION IF BATTERY IS REPLACED
BY AN INCORRECT TYPE.
DISPOSE OF USED BATTERIES ACCORDING TO THE INSTRUCTIONS
CAUTION: it’s easy to cause damage to the battery when installing the
battery, if we lower the upper side of the battery to engage the
connector first in an angle and then attach the bottom side of the
battery to the compartment.
2.4 Charging the Battery
The battery isn’t charging when factory. So we must charge the battery
completely before using it for the first time. Charging lasts for two and a
half hours, the charger has overcharge protection function.
CAUTION: For optimal performance of the lithium battery, take note of
the following:
Use the included AC adapter and charger only.
There is no need to fully discharge the battery before charging. You
can charge the battery before it is discharged.
Do not charge the battery where the temperature is high(higher than
50℃) or low(less than 0℃).
If you will not use the product for a long period of time, be sure to
fully charge the battery at least once every two weeks, over
discharge of the battery can affect the charging performance.

11
2.5 Fitting the Hand Strap
Align the upper hand strap bracket with the two mounting holes behind
the device and then use a screwdriver to tighten the screws. The other
side is fixed to the hand strap holders at the bottom of the device. We
can see it after the installation is complete as shown in figure 2.
Figure 2
12
Chapter 3 Connecting and Synchronizing with Your
Computer
3.1 Installing Connection Management Software
To install software onto a device powered by the Windows Mobile
operating system or to copy files between your device and a PC you must
connect the device to a PC. If the computer is running:
• Windows 7 or Windows Vista operating system, use the Windows
Mobile Device Center (WMDC) to manage the connection.
• Windows XP or 2000 operating system, use ActiveSync to manage the
connection.
CAUTION: You must install the Windows Mobile Device Center or
ActiveSync technology onto the computer before you connect the
handheld.
3.1.1 Installing the Windows Mobile Device Center
The Windows 7 and the Windows Vista operating system include a basic
connectivity driver for devices powered by a Windows Mobile operating
system. This driver allows you to transfer files from the device to an
office computer.
To install software onto a device powered by a Windows Mobile

13
operating system, you must install Windows Mobile Device Center 6.5
onto a PC.
3.1.2 Installing ActiveSync
Search the ActiveSync 4.5 version to download. Alternatively, visit
http://www.microsoft.com/en-us/download/details.aspx?id=15 to
download the latest version from the Microsoft website.
3.2 Connecting and Synchronizing With Your Computer
To connect the device to a PC:
1. Make sure that the device and the PC are switched on.
2. Make sure you have installed the appropriate connection
management software onto the PC.
3. To form a connection, do one of the following:
① Use the device's integrated Bluetooth radio to establish a wireless
serial link to a Bluetooth-enabled computer.
② Use a USB connection: Plug the USB cable into the USB port on the
device. Plug the other end of the USB cable into a USB port on the PC.
3.2.1 Managing the Connection and Synchronization Using the
Windows Mobile Device Center
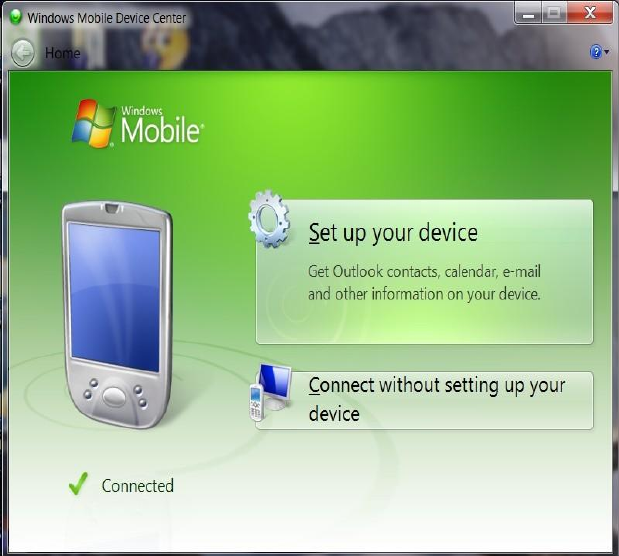
Connect the device to the PC. It will appear a dialog box shown as in
figure 3 if the device successfully connects to the PC.
14
Figure 3
CAUTION: If the device doesn’t establish a connection automatically,
check whether the connection is enabled in the Windows Mobile Device
Center software and on the device.
Click “connect without setting up your device” shown as in figure 4.
15
Figure 4
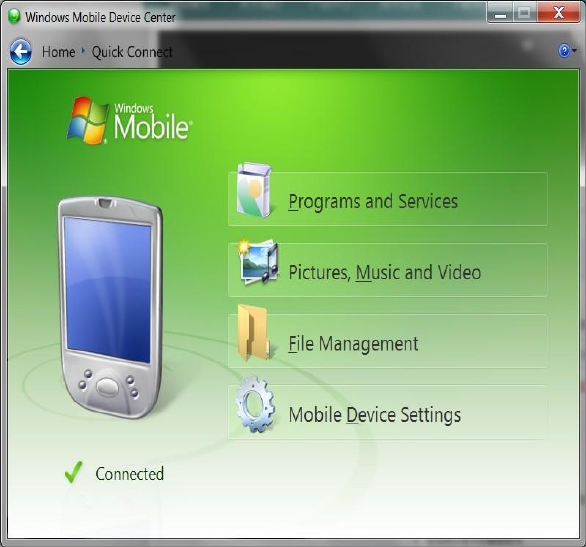
Click “File Management”. Appear a drop-down menu shown as in figure
5.
16
Figure 5
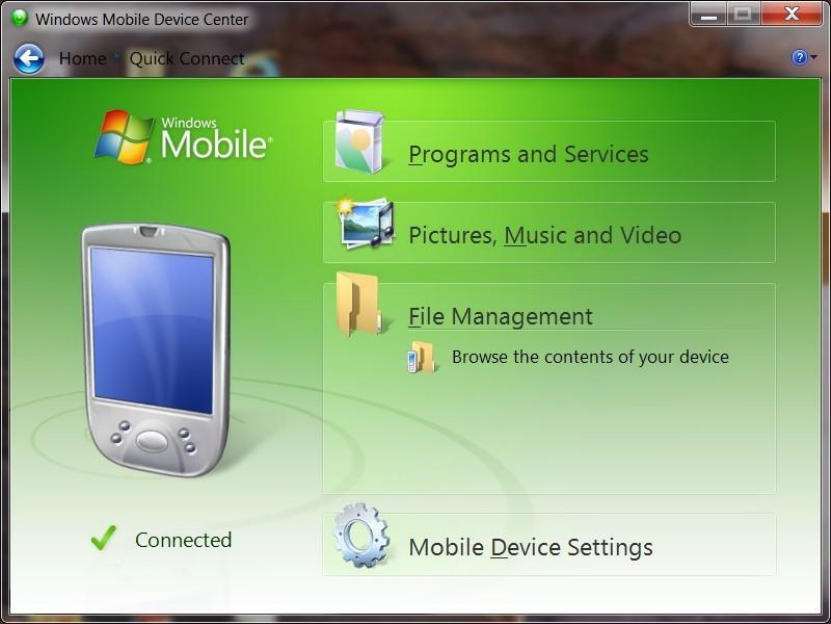
Click “Browse the contents of your device” shown as in figure 6.
17
Figure 6
Open the data of the corresponding letter of the disk, select the files in
the desired path you want to realize uploading and downloading files.
3.2.2 Managing the Connection and Synchronization Using the
ActiveSync
Connect your device and a computer, and then it will appear the dialog
box shown as “Microsoft Outlook”, tap “×” on the upper-right corner.
Tap “×” when it appears the dialog box on the upper-right corner shown
as in figure 7.
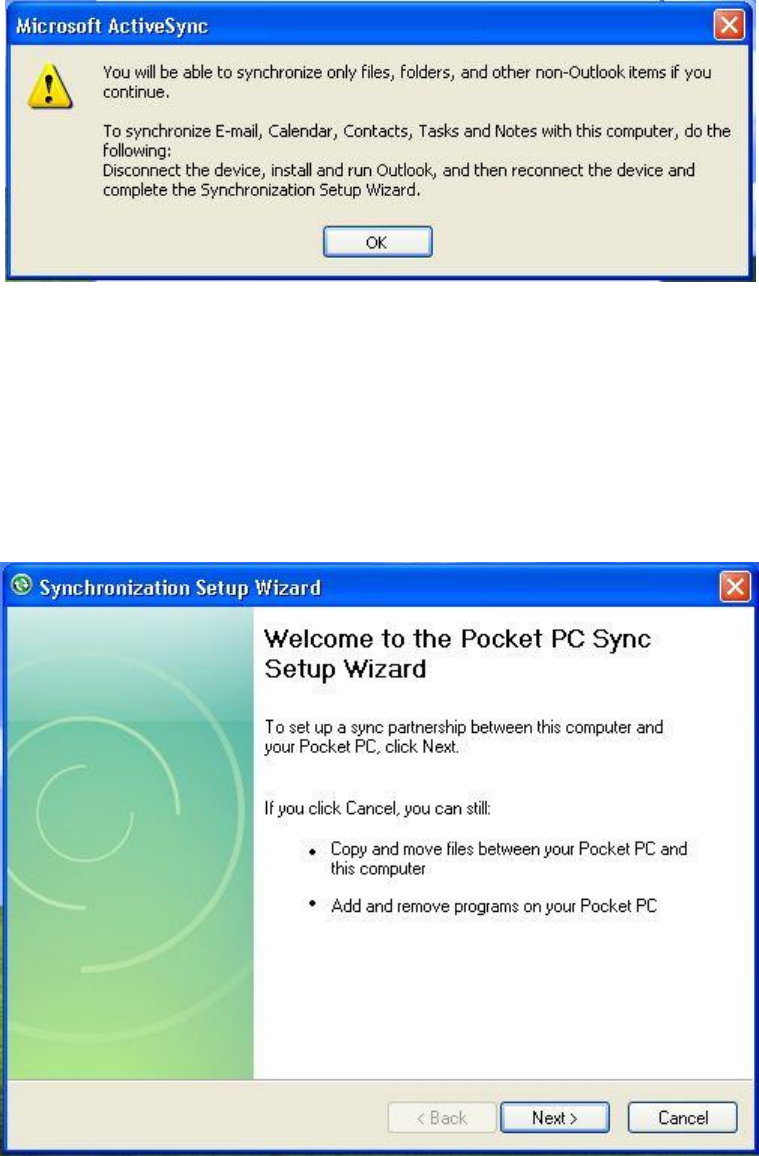
18
Figure 7
When the Welcome to the Pocket PC sync setup wizard shown as in
figure 8 appears, tap “×” on the upper-right corner.
Figure 8
Enter the synchronization interface shown as in figure 9, tap “Explore”.
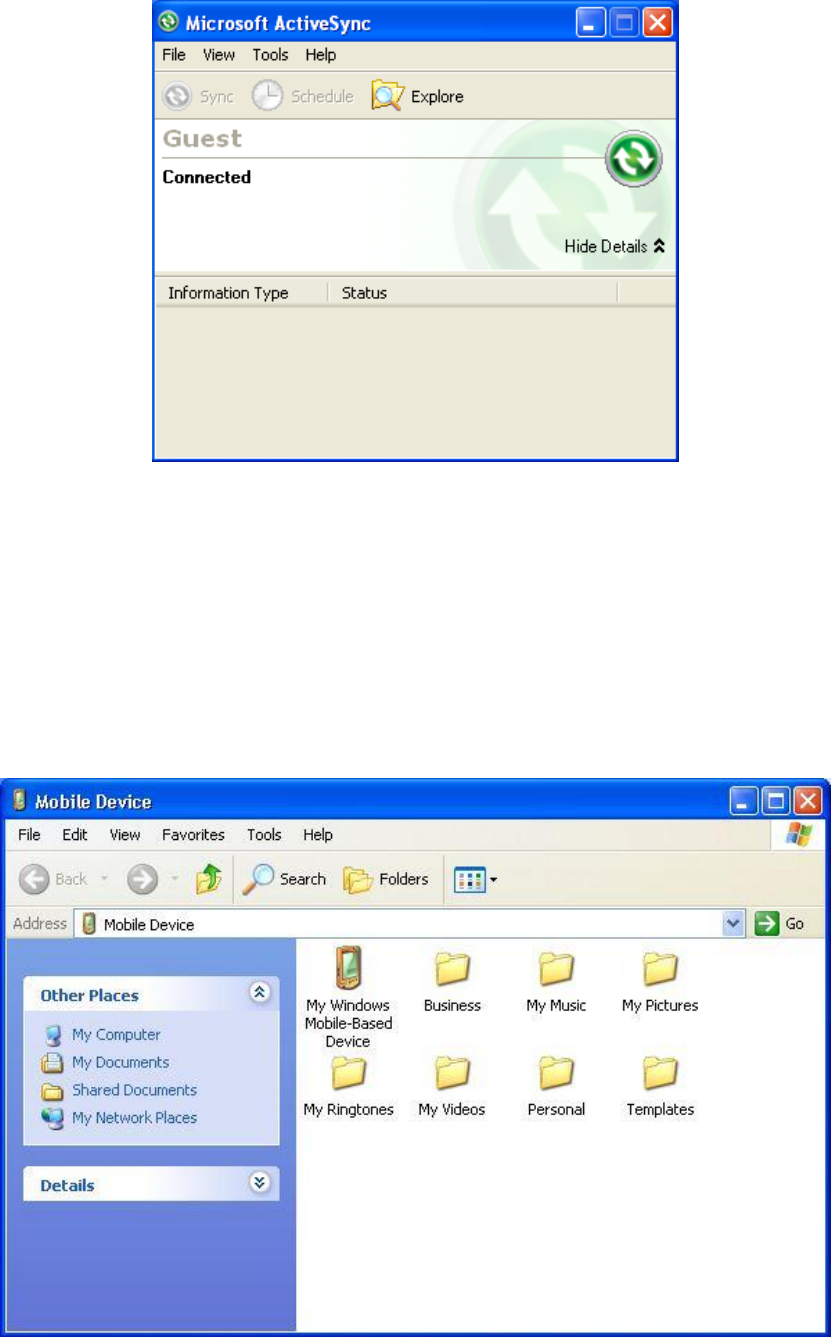
19
Figure 9
You will enter the Mobile device interface shown as in figure 10. Tap “My
Windows Mobile-Based Device” to enter the letter of disk interface and
import and export data
Figure 10
20
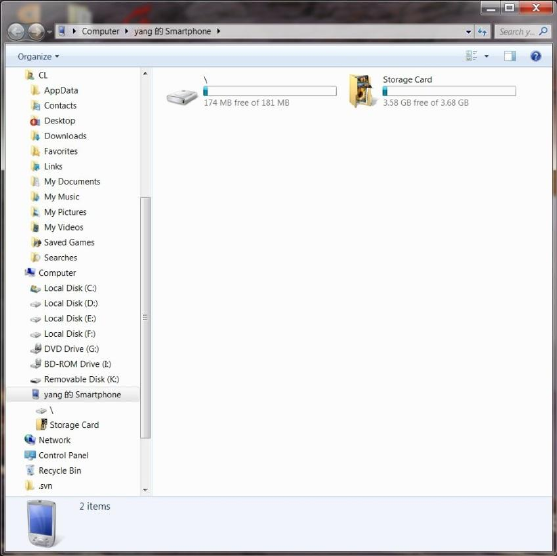
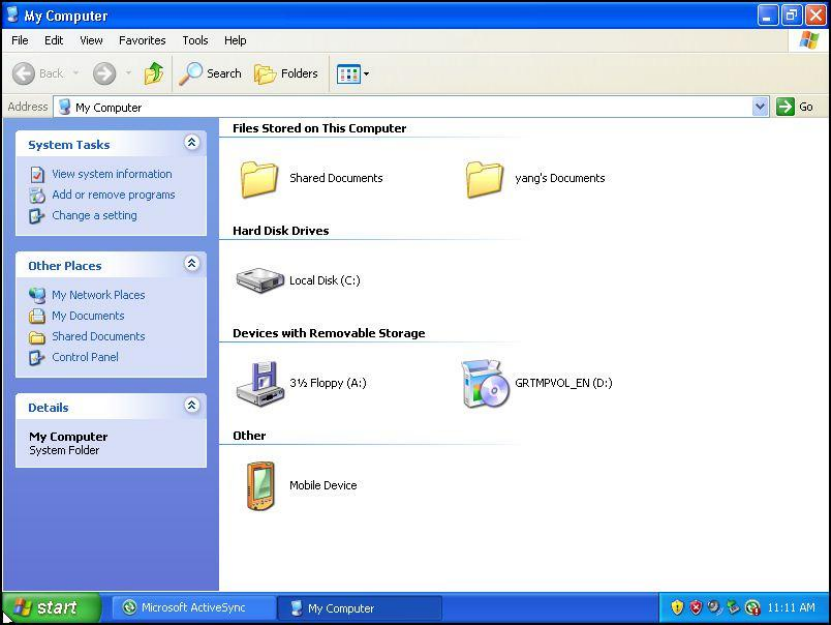
3.2.3 Connecting with U Disk Mode
When you have established connection between your device and your
computer, the U disk mode will complete before ActiveSync mode. Open
“My computer” and then you can see the letter of “Mobile Device”
shown as in figure 11.
Figure 11
Open “Mobile Device”, you will enter the same operation interface as the
ActiveSync mode shown as in figure 12. The later procedure is the same
as the ActiveSync.
21
Figure 12
CAUTION: please ensure the device has enough power during
synchronously transmitting data.
3.2.4 OTG Connection
Use OTG function connecting cord to connect the U disk or other USB
mobile storage devices to USB connector on the bottom of the device.
Open File Explorer, tap the pull-down box of my device, then you can see
the letter of “Hard Disk”. You can transform data between the hard disk
and the device.
22
Chapter 4 Brief Description of the Operating System
4.1 System Main Interface and the Start Menu
Turn on the device by press the battery button for some time, then we
can see the home screen shown as figure 13.
Figure 13
Click the Windows icon in the lower left corner of the home screen.
We can see the start menu shown as figure 14 where we can conduct
basic settings and start relevant procedures.
23
Figure 14
Press and hold the program icon until the icon bounce shown as figure
15, then drag the icon to the location where you want shown as figure
16.
Figure 15 Figure 16
24
4.2 Status Indicators
The status indicators appear in the title bar at the top of the screen.
4.2.1 Battery Status Indicators
The battery status icon on the title bar of the Home screen or the Start
screen shows the status of the battery charge.
Icon
Description
Battery has full charge
Battery has high charge
Battery has medium charge
Battery has low charge
Battery has very low
charge(20% or less)
Battery charging/use external
charge
4.2.2 Speaker Status Indicators
The battery status icon on the title bar of the Home screen or the Start
screen shows the status of the speaker.
Icon
Description
Speaker is on
Speaker is off
25
4.2.3 Network and Modem Status Indicators
The network and modem status icons on the title bar of the Home
screen or the Start screen show the status of each radio.
Icon
Description
Connected to ActiveSync or the
Windows Mobile Device
Center(WMDC)on a computer
Connected to Bluetooth-enabled
computer
Wi-Fi radio is on
Maximum cellular modem signal
strength
Cellular modem is turned off
No cellular service
No SIM card
4.3 Pre-installed Programs
Programs that are pre-installed on the device are as follows:
Program
Function
ActiveSync
Synchronize information between the device and a
computer.
Alarms
Set alarms.
Text
Send, receive and organize text messages.
E-mail
Compose, send and receive E-mail messages.
Internet
Explorer
Brows the world wide web.
26
Calendar
Keep track of appointments and arrange meetings.
Contacts
Keep track of your friends and colleagues.
Windows
Live
Access Windows Live services, including: E-mail, instant
messenger and Internet search.
Windows
Media
Play Windows Media or MP3 audio and video files.
Notes
Create handwritten, typed or recorded notes.
Calculator
Perform basic arithmetic functions.
Tasks
Keep track of your tasks.
Pictures &
Videos
Take, view, and edit pictures, or record and launch video
clips.
Search Phone
Search for a file or item stored on the device
4.4 Interacting With the Device
To interact with the handheld use the stylus or your finger to tap items
on the touch screen or to scroll up or down.
Action
Definition
Tap
Touch the screen once to open the items and select
options.
Press and hold
Press and hold an item to see a list of actions available for
that item. On the pop-up menu that appears, tap the
action you want to perform.
Drag
Hold the stylus on the screen and drag across the screen to
select text and images. Drag in a list to select multiple
27
items.
Flick
Flick the stylus or your finger to scroll a page or a list up
and down.
4.5 Entering Information
Depending on the program you are using, you can enter information in
several ways, as described below:
Input method
Description
Synchronizing
Use Microsoft connection management software to
exchange information between the device and a PC.
Typing
Use the Keyboard input panel to enter typed text by
clicking keys on the on- screen keyboard.
Drawing
Use the stylus (like using a pen) to draw (or write) directly
on the screen.
Recording
Create a stand-alone recording or embed a recording into a
note.
4.5.1 Using the On-screen Keyboard
Tap the input panel button to show the input panel as shown in
figure 17.

28
Figure 17 Figure 18
To show special characters containing numbers and symbols shown as in
figure 18, tap .
When you use the Input panel, your device anticipates the word you are
typing or writing and displays it above the Input panel. When you tap the
displayed word, it is inserted into your text at the insertion point. The
more you use your device, the more words it learns to anticipate.
To hide the input panel, tap the input panel button again.
4.5.2 Drawing and Writing on the Screen Directly
In some applications, for example Notes, you can directly draw (or write)
on the screen using the stylus.
Tap / Notes shown as in figure 19, tap menu, select Draw, and then
you can write or draw directly on the screen.
29
Figure 19
4.5.3 Recording a Message
Tap / Notes, then tap . To create a stand-alone recording, in the
screen displaying the list of Notes, tap View Recording Toolbar in figure
19, and then tap Record button to begin recording. To add a
recording to a Note, create or open a Note and then tap the Record
button to begin recording. When you finish recording, tap the Stop
button . If you are recording in an open Note an icon appears in the
Note. Tap “OK” to return to the Note list.
To play a recording tap the recording in the Note list or open the Note
and then tap the icon in the Note.
30
4.5.4 Camera (Select Models Only)
Camera function built-in allows you to take photo or video in real time.
4.5.4.1 Taking Pictures
1. To start the program, press the key on your device or tap /
Pictures & Videos/ Camera.
The Camera screen appears shown as in figure 20. Below the display area
are indicators of the current status.
Figure 20
2. For camera controls, tap “Menu” shown as in figure 21.
31
Figure 21
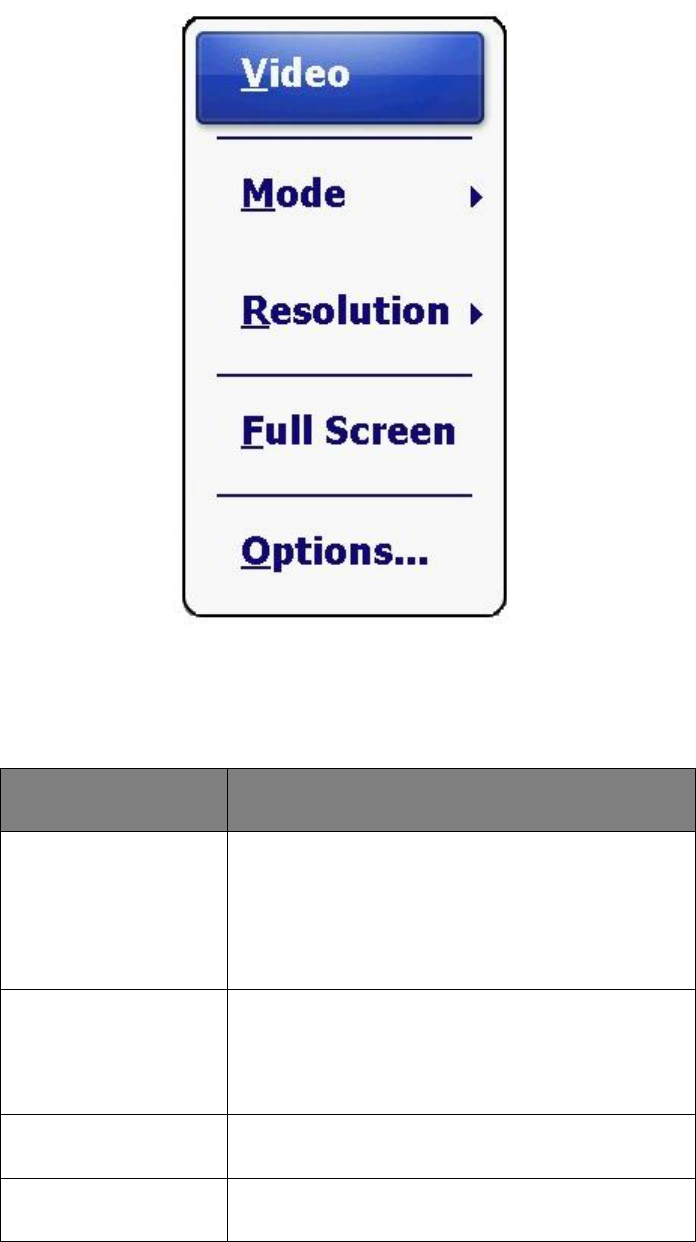
Menu Items
Descriptions
Mode
Three choices:
1. Normal
2. Burst- Continuous shooting of 5 pictures
3. Timer-5 second countdown before
shooting
Resolution
Three choices:
1. 640×480yv12
2. 1024×768yv2
3. 2048×1536yv12
Full Screen
Full screen on or off.
Options
Overall settings to the Camera program.
CAUTION: By default, the display area blanks out and shows the word

32
“standby” when the camera has been idle for one minute. To resume,
tap the screen.
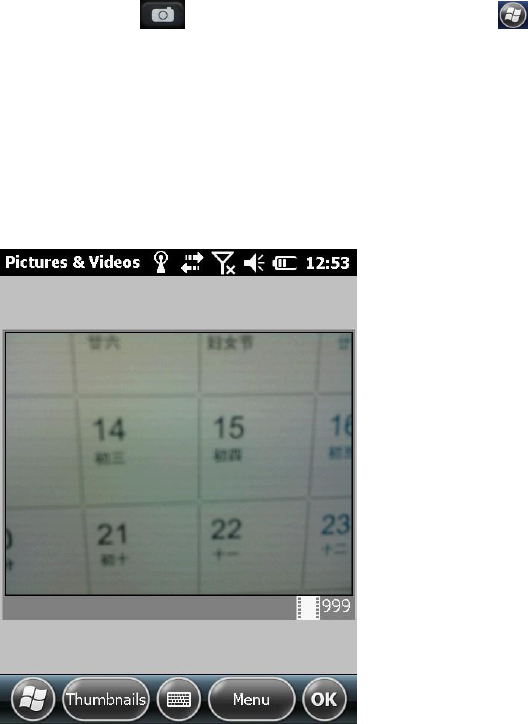
3. Press the key to take the picture.
4. The result shows on the screen if the picture was taken in Normal or
Timer mode. At this time, you can tap “Menu” to perform a desired task
to the current picture. Tap “Camera” or “ok” to go back to the Camera
screen.
5. The picture is saved to the predefined storage location (as long as you
didn’t delete it in the previous step).
4.5.4.2 Recording Video Clips
1. To start the program, press the key on your device or tap /
Pictures & Videos/ Camera.
2. Tap Menu/ Video to switch to the video mode shown as in figure 22.
Below the display area are indicators of the current status.

33
Figure 22
3. For recording controls, tap “Menu” shown as in figure 23.
Figure 23
CAUTION: By default, the display area blanks out and shows the word
“standby” when the camera has been idle for one minute. To resume,
tap the screen.

34
4. Press the key to start recording. If needed, you can tap “Pause” to
temporarily pause the recording and then tap “Resume” to continue.
5. To stop, press the key or tap “Stop”. Or, the recording will
automatically stop when the length reaches the pre-defined maximum
value (30 seconds by default).
6. The video clip is saved to the predefined storage location. To view the
video clip, tap “Thumbnails” and choose the video you want to view.
4.6 Personal Settings
Use the controls in the Settings area to customize the device. The
following examples describe controls that are available.
4.6.1 Buttons
Use the Buttons control under Personal settings to assign the action you
want to be performed when you press theF1, F2 or F3. By default, these
keys perform the same action as the left and right tiles in the tile bar.
Tap / Settings/ Personal/ Buttons, open the button interface shown
as in figure 24.
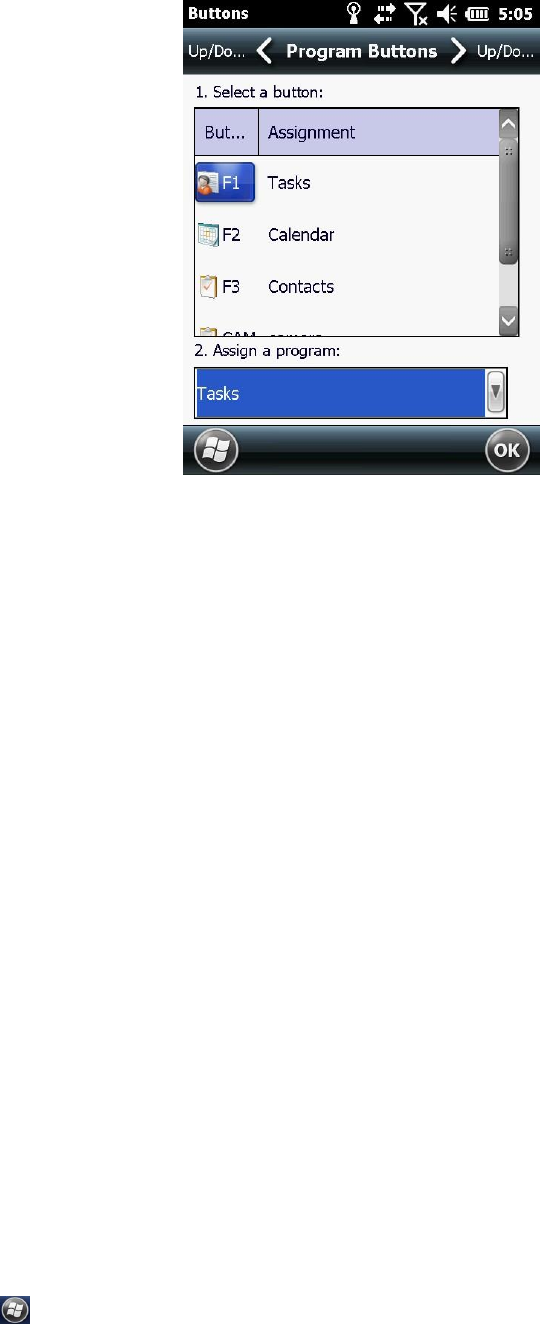
35
Figure 24
Select a button, select the action you want to occur when you press the
button or tap the soft key from the assign a program drop-down list, and
then tap “OK”.
4.6.2 Home
Use the Home settings to change the display theme that controls the
appearance of the Home screen and to customize how items appear on
the Home screen.
4.6.2.1 Appearance
You can use a theme to customize the background picture on the Home
screen, the color of the title and tile bars, menus and messages.
Tap / Settings/ Home/ Appearance, you can see the interface shown
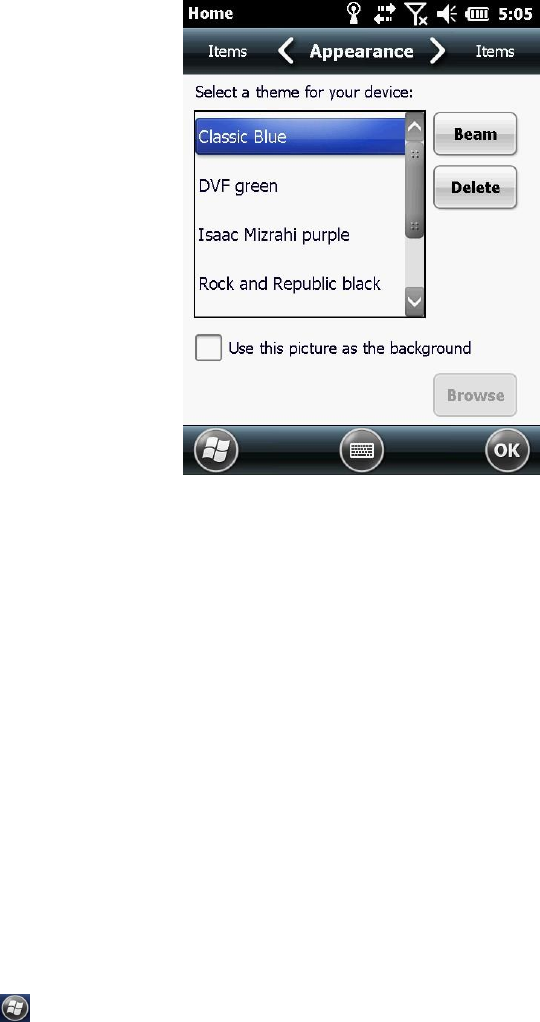
36
as in figure 25.
Figure 25
To use a predefined theme select it from the list. Select “Use this picture
as the background” check box, and then tap “Browse” to search for a file
on the device. Tap “OK” to complete the theme picture settings.
4.6.2.2 Items
You can customize which items appear on the Home screen and the
order in which they appear by the item tab.
Tap / Settings/ Home/ Items, you can see the interface shown as in
figure 26.

37
Figure 26
Select the items to appear on the home screen and the order in which
they appear, and then tap “OK”.
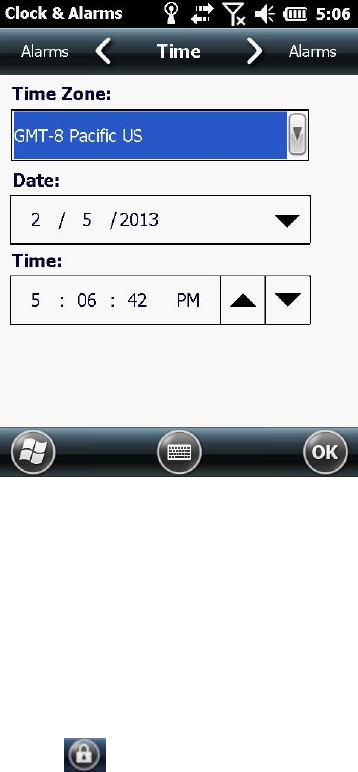
4.6.2.3 Set Date and time
There are three methods as follows to open the Clock &Alarms interface:
1. Tap the clock item on the home screen.
2. Tap the tittle bar and then tap the clock icon on the pull-down list.
3. Tap / Settings / Clock &Alarms.
Tap “Time” tab as shown in figure 27.
38
Figure 27
Set the required hours, minutes, seconds from the drop-down list then.
4.6.3 Screen Lock
Tap the Screen Lock icon on the Start screen to lock the screen and
keypad while the device remains turned on. After that you can see the
interface shown as in figure 28.
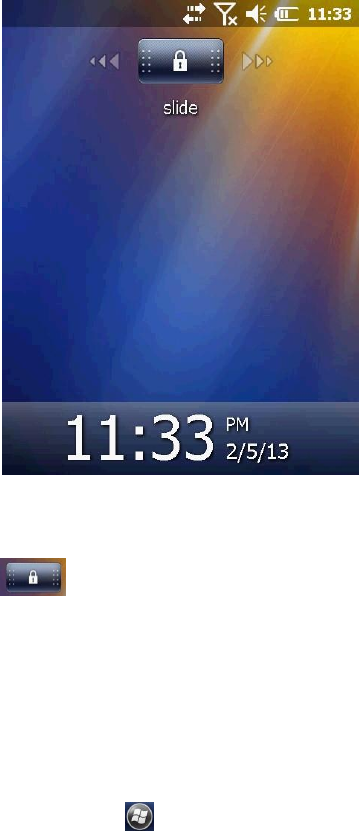
39
Figure 28
Slide the unlock icon to unlock.
4.6.4 Set Passwords
It is possible to keep your data secure by requiring a password each time
the handheld is turned on, tap / Settings / Lock to set a password or
to change password settings shown as in figure 29.
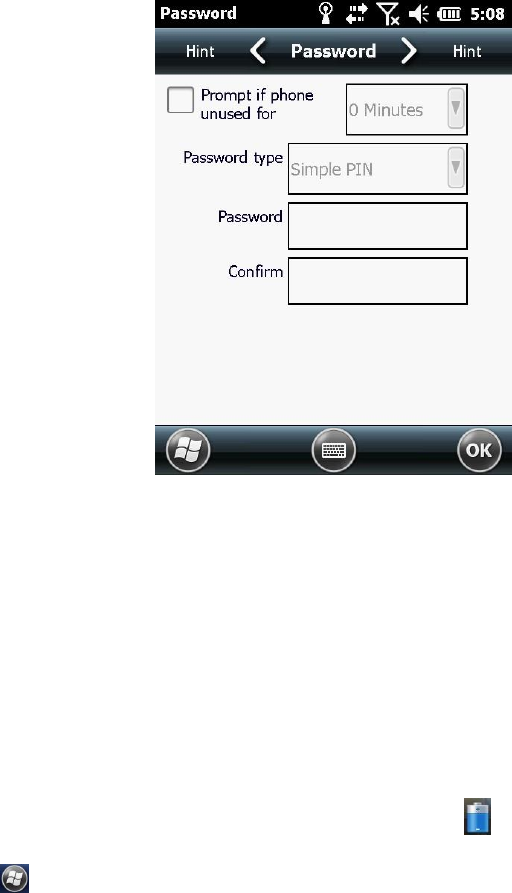
40
Figure 29
You can set password and hint by taping “Password” tab and “Hint” tab.
4.6.5 Power
There are two methods as follows to open the power control:
1. Tap the tittle bar and then tap the power icon on the pull-down list.
2. Tap / Settings/ Power.
You can see the dialog box shown as in figure 30.

41
Figure 30 Figure 31
Tap “Battery” tab to check the battery level. Tap “Advanced” tab shown
as in figure 31 to set the time before the device turns off when idle.
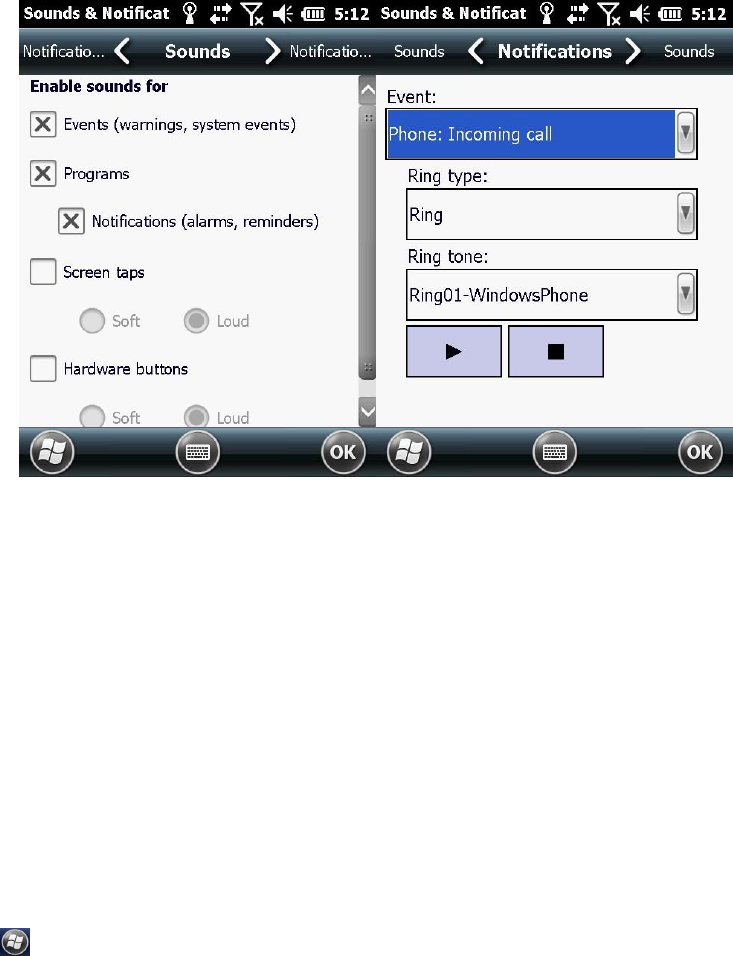
4.6.6 Sounds and Notifications
Use the Sounds & Notifications control set preferences for the speaker
volume and system sounds.
Tap / Settings/ Sounds & Notifications, tap “Sounds” tab shown as in
figure 32 to set the sounds of the event.
42
Figure 32 Figure 33
Tap “Notifications” tab shown as in figure 33 to set the Ring type and
Ring tone of the event.
4.6.7 Screen
Use the Screen interface to align the touch screen or to change the
appearance of text on the screen.
Tap / Settings/ System/ Screen, and then tap “General” tab. It’s shown
as in figure 34. Select an option in the orientation group to change the
screen orientation, and then tap “OK”.
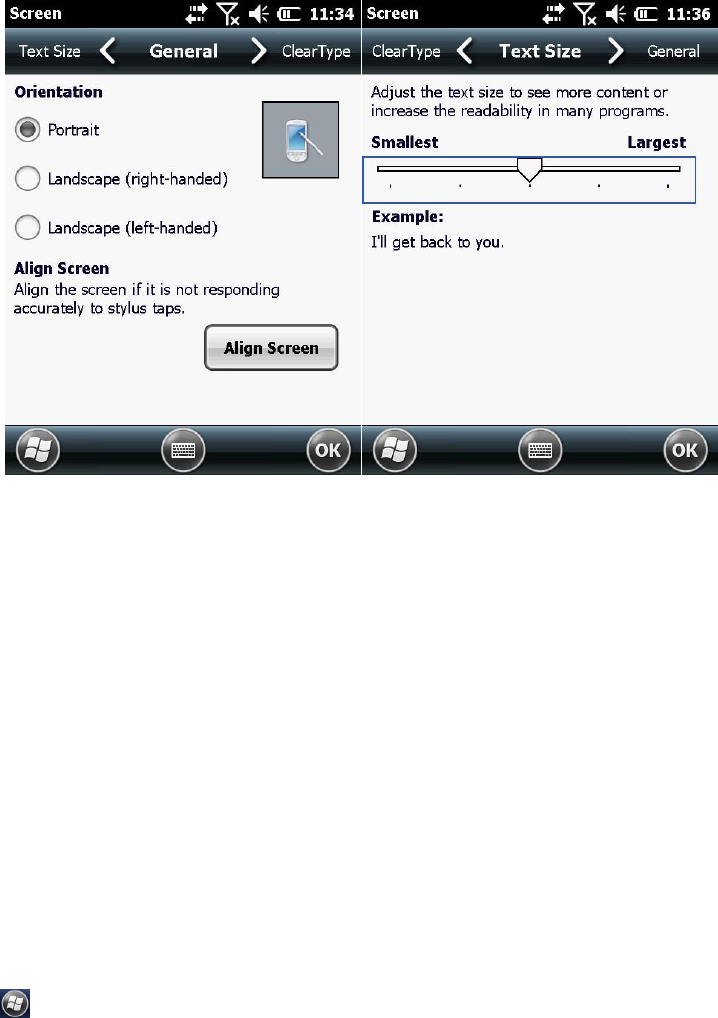
43
Figure 34 Figure 35
Tap “Text Size” tab shown as in figure 35 and drag the slider control to
change the size of the text, tap “OK”.
4.6.8 Backlight
The backlight makes the screen easier to read in low light but uses extra
power. Use the Backlight control to configure power-saving settings for
the backlight.
Tap / Settings/ System/ Backlight shown as in figure 36 to set the time
before the device turns off the backlight when idle.
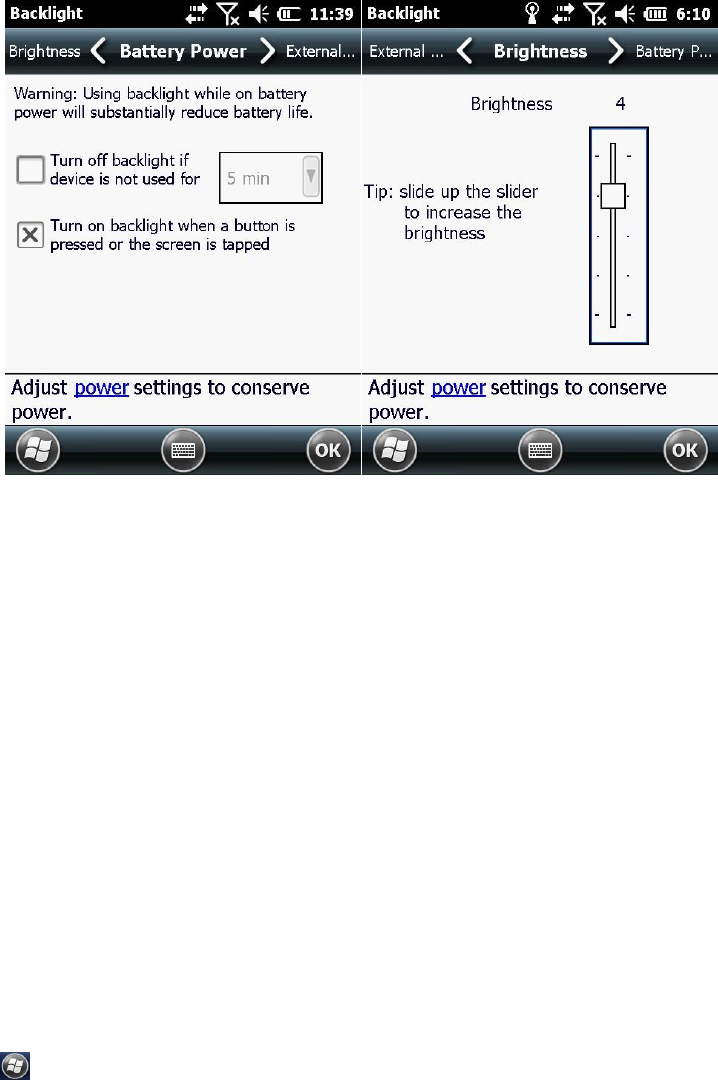
44
Figure 36 Figure 37
Unselect “Turn off backlight if device is not used for”, then the device
won’t turn off the backlight when idle.
Tap “Brightness” shown as in figure 37 to change the brightness of the
device.
4.6.9 Align Screen
Whenever the screen doesn’t respond to the stylus or your finger, you
should align the screen.
Tap / Settings/ System/ Screen shown as in figure 38 and tap “Align
Screen” tab shown as in figure 39.
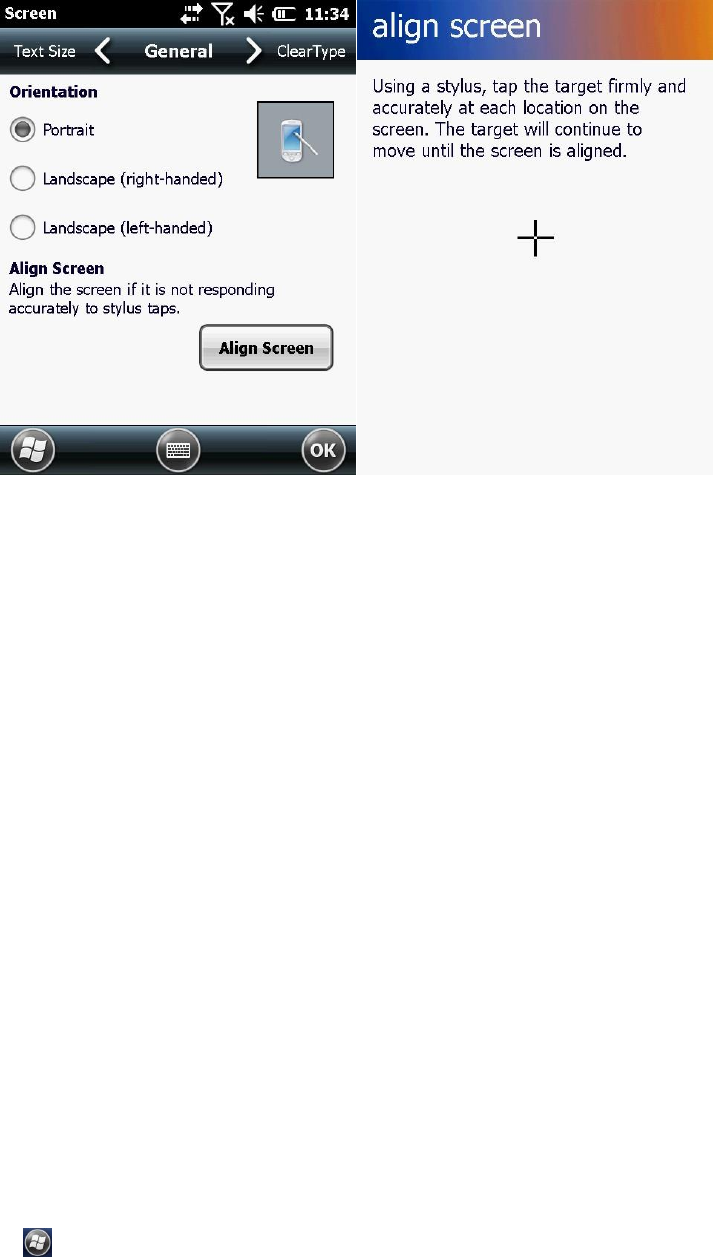
45
Figure 38 Figure 39
Tap the target to align the screen, the device will exit the align interface
automatic after the screen is aligned.
4.7 GPRS Network Setting
Use GPRS to connect the internet, you can receive and send messages
through the network. You need to apply for GPRS Service from your
service provider, and you can search the rate of the GPRS provided by
the service provider. Please contact with your service provider to
specifically know the rate of GPRS and the tariff standard
4.7.1 Add New GPRS Connecting
1. Tap / Settings/ Connections/ Connections. It’s shown as in figure
40.
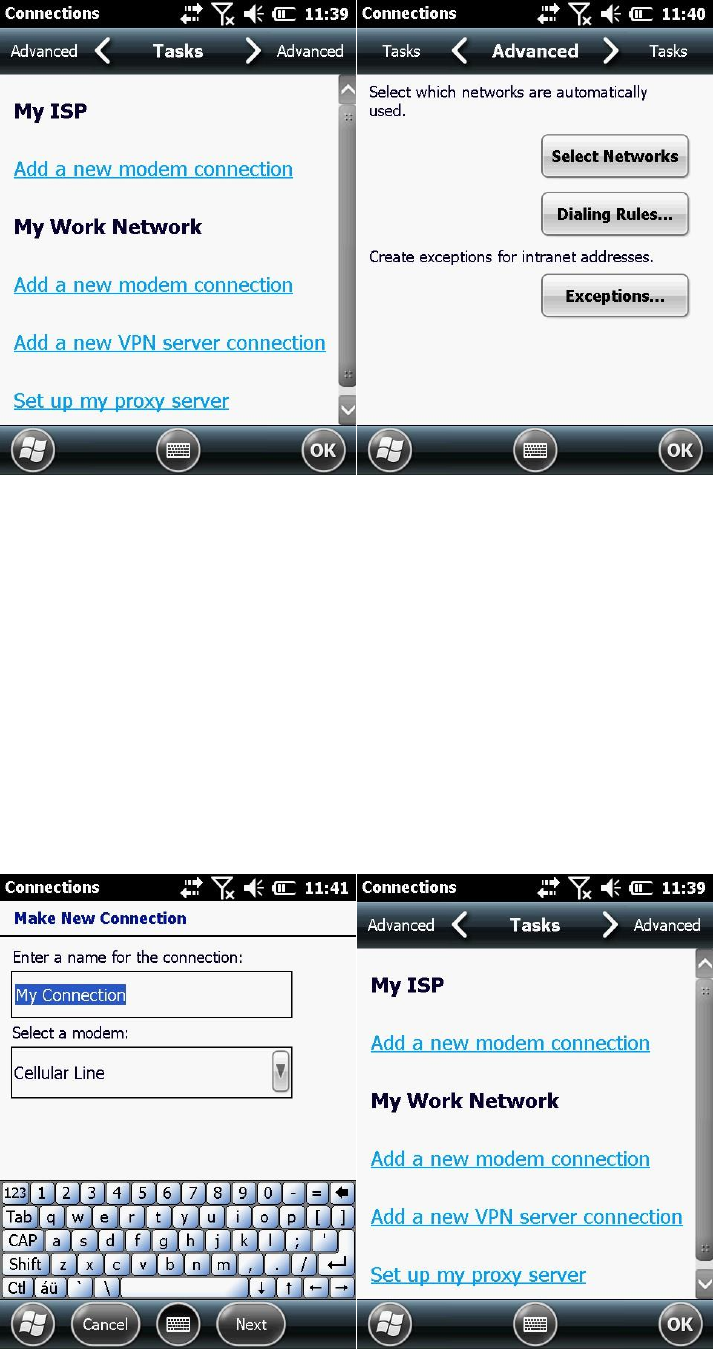
46
Figure 40 Figure 41
2. Choose “advanced” as shown in figure 41, tap “select networks”
shown as in figure 42. Remarks: if internet had been set, you can turn to
step 5.
3. Choose “My ISP” in drop-down box and click “Ok” to return to figure
41 and then click the “tasks” tag in the upside as shown in figure 43.
47
Figure 42 Figure 43
4. Tap “Add a new modem connection” as shown in figure 44.
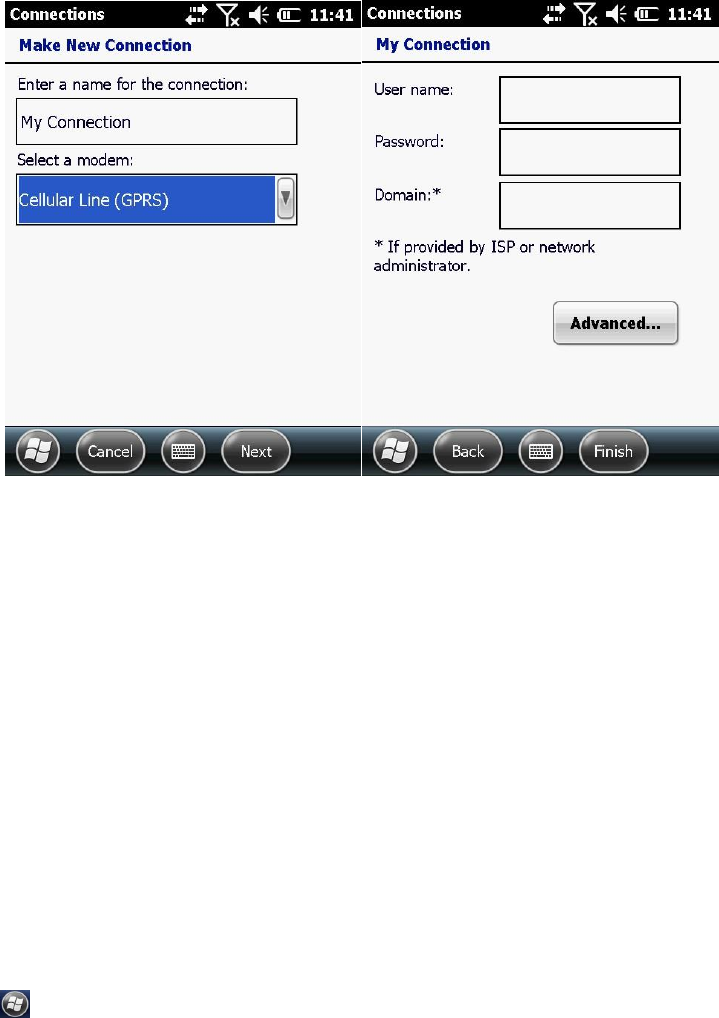
5. In “select a modem” choose “cellular line (GPRS)” and then click the
next step. Input the name of access point “CMNET”.
Figure 44 Figure 45
Tap “Next” as shown in figure 45, it’s not need to fill User name,
Password and Domain. Tap “Finish”.
CAUTION: Please confirm GPRS connecting is on and has established
connection before you use the GPS to measure.
4.8 Bluetooth Connecting
Tap / Settings/ Bluetooth as shown in figure 46.

48
Figure 46
Tap “Add new device” and select the specified Bluetooth device. Tap
“Next” to input password (default password is 1234) as shown in figure
47, tap “Next”, and then tap “OK”.
Figure 47 Figure 48
Back to Bluetooth main screen, select “COM ports”. Choose “New
49
Outgoing Port”. Confirm the device SN and then click “Next”. Choose
port (you can use COM0, COM4, COM7, COM8, COM9) as show in figure
48, and then click “Finish”.
CAUTION: To delete the port matched before when we are using
Bluetooth, the right operation method is delete it first in the matching
port, and then delete the specific device in the “disconnected”. It will
bring inconvenience to use if you do in an improper order.
4.9 Phone and Text Messages (Select Models Only)
4.9.1 Phone
4.9.1.1 About Your Phone
Select models are equipped with mobile telephony communications
protocol. It can operate on 850/900/1800/1900 MHz.
To use the phone, you need to first set up an account with a mobile
phone network service. The functions available to you depend on the
services offered by your mobile phone network service provider and
your type of subscription.
Your service provider will provide you with a SIM card. This card contains
your mobile phone account details and rights, contacts that can be
stored and any additional services to which you have subscribed. You
50
must install a SIM card before you can make or receive phone calls or use
wireless data services.
4.9.1.1.1 Switching on or off the Phone
When the device is turned on, the phone is switched on by default.
When needed (for example, on an airplane), you can switch off the
phone without turning off your device.
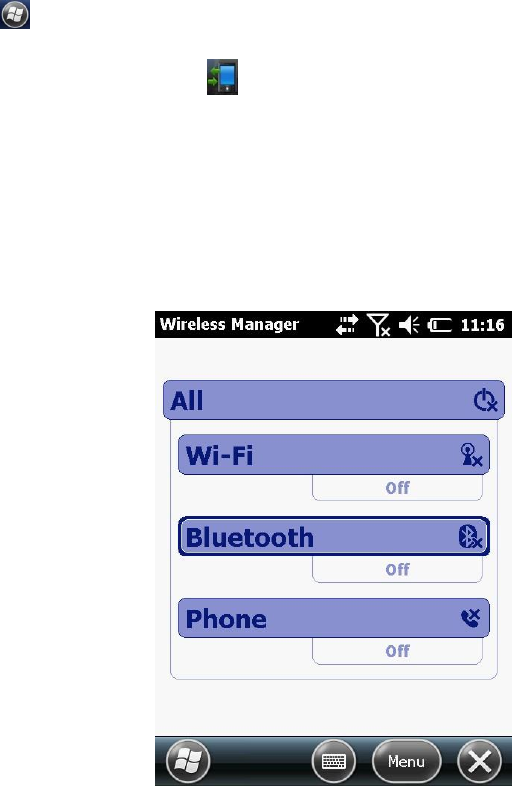
1. Tap / Settings/ Connections/ Wireless Manager, or tap the tittle bar,
tap connectivity indicator on the pull-down list, and then tap
“Wireless Manager”.
2. Appear the screen as shown in figure 49.
Figure 49

51
Tap “Phone” to switch it from off to on.
3. When the phone is switched on, you may be requested to enter the
PIN (Personal Identification Number) code if it has been set.
Then, your device will search for the mobile phone network service and
show the name in the Wireless Manager section on the Today screen.
Tap “Phone” again if you want to turn it off, then the Phone section
displays Phone off.
4.9.1.1.2 Starting the Phone Program
Start the Phone program by any of the three methods:
1. Press the Send key on the device.
2. Tap Phone (left soft key) on the Today screen.
3. Tap / Phone.
CAUTION: if the phone is currently off, you will be asked to turn it on.
Whenever you start Phone, the Phone screen displays the soft keypad.
You can tap Hide Keypad (left soft key).
You can use other programs during a call. To quickly switch back to
Phone, press the Send key on your device.
4.9.1.1.3 Phone Status Icons
Icons will be displayed on the navigation bar to indicate the status of the

52
phone functions. They are listed below:
Icon
Meaning
Phone off (airplane
mode)
Signal strength
Call in progress
Missed call
Call on hold
GPRS available
GPRS in use
4.9.1.2 Making a Call
4.9.1.2.1 Dialing a Call
1. When on the Today screen: Press the numeric keys on your device to
start entering the phone number. Your device will automatically switch to
the Phone program.
While in the Phone program: Enter the phone number using the physical
or onscreen keypad.
2. As you enter the phone number, the program searches Contacts, Call
History, and Speed Dial to find a matching name and/or number. When
you see the name of the person to call listed, select it and the desired
phone number.
Or, you can continue entering the complete phone number.
3. Press the Send key on your device to make the call.
53
CAUTION:
If you enter a wrong number, use the Backspace key to eraser
individual numbers one at a time.
If you are making an international call, tap and hold on the number
key 0 until + sign appears. The + sign replaces the international prefix
of the country from where you are calling.
4.9.1.2.2 Making a Call From the Onscreen List
Whenever you start the Phone program, the screen lists all recent calls,
speed dials, and contacts.
If the list contains the number you want to call, you can conveniently
select from the list and press the Send key on your device.
CATION: To view a different list on the phone screen, tap menu/ view
and select one of the options.
4.9.1.2.3 Making a Call From Contacts
Microsoft Contacts displays your contact information stored both in your
device’s memory and on your SIM card.
1. Start the Contacts program.
2. Do one of the followings to call a person in the contact list:
① Tap the contact to call. Then tap the number to call; or move to
54
the number to call and then tap Call or press the Send key.
② Tap and hold on the contact to call, and then tap the number to
call in the shortcut menu.
4.9.1.2.4 Making a Call From the Call History List
The Call History list displays the calls you made, received or missed.
1. While in the Phone program, tap “Call History”.
If have hidden the keypad, tap Keypad to see the Call History key.
2. Do one of the followings to call a person in the Call History list:
① Select the number to call and then tap “Call” or press the Send key
on your device.
② Tap and hold on the number to call and then tap “Call” in the
shortcut menu.
4.9.1.2.5 Making a Call From Speed Dial
If you have created speed dial entries, you can call a person quickly.
When on the Today screen or in the Phone program, press and hold the
numeric key of the assigned speed dial number to make the call.
4.9.1.3 Responding to a Call
When an incoming call is received, your device rings or vibrates
according to the options you have set for the phone. The name and

55
number of the caller are displayed on the pop-up window. If the name of
the caller is not in your contact list, only the caller’s phone number is
displayed.
4.9.1.3.1 Answering a Call
To answer an incoming call, press the Send key on your device or tap
Answer (left soft key).
4.9.1.3.2 Rejecting a Call
To reject an incoming call, press the End key on your device or tap Ignore
(right soft key).
4.9.1.3.3 Ending a Call
To end a call, press the End key on your device or tap End on the screen.
4.9.1.4 Operations During a Call
4.9.1.4.1 Adjusting the Phone Volume
To adjust the volume during a call, tap the icon on the navigation bar
and select a volume level.
4.9.1.4.2 Using the Mute Function
During a call, you can mute your microphone so that the person with

56
whom you are speaking cannot hear you, but you can still hear him or
her.
On the Phone keypad, tap “Mute” to switch on the mute function. The
icon will appear on the upper-right corner. To switch off the mute
function, tap “Unmute”.
4.9.1.4.3 Using the Speakerphone
Tap “Speaker” On to switch on the speakerphone function. The icon will
appear on the navigation bar.
To switch off the speakerphone function, tap “Speaker Off”.
4.9.1.4.4 Managing More Than One Call
CAUTION: You may need to register for the “call waiting” service with
your mobile phone network service and set your device accordingly. The
exact number of people you can talk at the same time depends on your
mobile phone network service.
During a call, you can make or take a second call while putting the
current call on hold. Then, you can choose to swap between the two
callers or set up a conference call between all three parties.
Holding a Call to Take a Second Call
1. If there is another incoming call when you are talking on your device, a
pop-up window appears to notify you.
57
2. Tap “Answer” to place the first call on hold, and answer the second
call.
3. To end the second call and go back to the first, tap “End”.
Rejecting the Second Call
To reject the second call and keep your current call in progress, tap
Ignore. Be careful not to tap End; doing so will end the current call.
Placing a Call on Hold to Make a Second Call
1. During a call, tap “Hold” to place the first call on hold.
2. Dial a second number or the first few letters of the second contact’s
name by using the numeric keypad on your device. Then press the Send
key to connect. Wait for it to be picked up.
3. To end the second call and go back to the first, tap “End”.
Swapping Between Calls
When you have put a call on hold and made or taken another call as
described earlier, you can swap between the two calls by tapping
“Swap”.
Setting up a Conference Call

58
CAUTION: You may need to consult your mobile phone network service
for the availability and subscription of the conference call function.
1. When you have put a call on hold and made or taken another call as
described earlier, you can set up conference calling by tapping Menu/
Conference.
2. To add additional people to your conference, tap Hold. Dial a second
number and press the Send key to connect. Wait for it to be picked up.
Then tap Menu/ Conference.
3. If you want to talk to one of the parties privately during the call, tap
Menu/ Private. Select a number, and tap “Private”.
4.9.1.4.5 Taking a Note During a Call
You can take a note during a call.
1. Tap “Notes”.
2. Enter your note and tap “ok”.
To access a note you created during a call:
1. While in the Phone program, tap “Call History”.
2. The icon indicates that the phone call entry contains a note. Tap and
hold the name or number for that entry, and tap “View Note” in the
shortcut menu.
59
CAUTION: You can also tap “Programs”, “Notes”, and access the note in
the Calls folder.
4.9.1.5 Using Call History
Call History provides the time and duration of all incoming, outgoing,
and missed calls, and a summary of total calls. Call History also provides
easy access to any notes taken during a call.
To access Call History while in the Phone program, tap “Call History”.
4.9.1.5.1 Viewing Call History
You can tap Menu/ Filter to change the Call History view (All Calls by
default).
All Calls: Displays all calls made to and from your device in a
chronological order.
Missed: Displays only calls that were not answered.
Outgoing: Displays only calls made from your device.
Incoming: Displays only calls made to your device.
To see the time, date and duration of a call, tap the item on the list to
view details.
To clear all items on the list, tap Menu/ Delete All Calls.
60
4.9.1.5.2 Adding an Entry to Contacts Using Call History
You can add a phone number in the Call History to Outlook Contacts or
SIM Contact.
1. Tap and hold the entry you wish to transfer, and tap Save to Contacts
in the shortcut menu.
2. Tap New Contact and select a contact type.
3. Enter the contact’s name, and select the proper number type.
Using the Phone is selected Models Only.
4. Tap “Save” to save the entry.
4.9.1.6 Using Speed Dial
You can create Speed Dials for frequently-called phone numbers so you
can dial a number with a single key press.
4.9.1.6.1 Creating a Speed Dial Entry
Speed dials can only be created for numbers stored in Contacts.
1. While in the Phone program, tap “Speed Dial”.
2. Tap Menu/ New.
3. Tap the desired contact.
4. In Name, accept the current name or change it if you want to.
5. In Number, select the phone number if there is more than one
number for the contact.
61
6. If Location, accept the current speed dial number or change the
number if you want to.
7. Tap “ok” to save the setting.
The new Speed Dial entry is now on the Speed Dial list. The letter on the
lower-right corner of the entry indicates the assigned phone number. For
example, ‚m‛ indicates the mobile phone number.
4.9.1.6.2 Editing or Deleting a Speed Dial Entry
1. While in the Phone program, tap “Speed Dial”.
2. Tap the desired entry and tap Delete or Tap and hold on the desired
entry, and tap “Delete” in the shortcut menu. (Select Models Only)
3. Tap “Yes”.
4.9.1.7 Customizing Your Phone
To access the Phone Settings, start the Phone program and tap Menu/
Options.
4.9.1.7.1 Changing Phone Settings
Tap “Phone” tab.
You can customize phone settings, such as the ring type and ring tone to
be used for incoming calls, and the keypad tone to be used when
entering phone numbers.
62
CAUTION: To use custom .mp3, .wav or .mid files as ring tones for
incoming calls, copy the files to the Application data/ Sounds folder on
your device or to the inserted storage card. Then, select the sound from
the Ring Tone list.
4.9.1.7.2 Changing Security Settings
Tap “Security” tab.
You can protect your phone from unauthorized use.
You might be prompted to enter the PIN2 code for specific functions
(such as the pre-paid card’s charging counters). Consult your mobile
phone network service to check if your SIM card supports PIN2-related
functions and services.
CAUTION: Emergency call can be placed at any time without requiring a
PIN code.
4.9.1.7.3 Changing Services Settings
Tap “Services” tab.
You can access and configure settings for the phone services you
subscribed to through your mobile phone network service. For example,
you may want to block certain types of incoming and/or outgoing calls,
forward incoming calls to a different phone number based on your
63
situation, be notified of incoming calls when you are already in a call, or
let others know your identity when making calls. Services available to
you depend on your mobile phone network service and the type of your
subscription.
To view your services settings, tap a service and then tap “Get Settings”.
4.9.1.7.4 Changing Network Settings
Tap “Network” tab.
You can view available wireless networks, determine the order in which
your phone accesses another network if the current one is unavailable,
and specify whether you want to change networks manually or
automatically. The current network will remain active until you change it,
lose your signal, or change your SIM card.
4.9.1.8 Additional Phone Operations
4.9.1.8.1 Using Text Messages
Text messages are automatically received when your phone is switched
on. The Today screen shows if there are new text messages. You can tap
the section to open the message list.
To send a text message, you can do one of the followings:
① Select a phone number from a program such as Phone or Contacts
at first. Then select “Send Text Message” from the shortcut menu or soft
64
key.
② Start the Messaging program at first. Then select the phone
number.
4.9.1.8.2 Setting up an Internet Connection
You can set up an Internet connection using the mobile network.
4.9.1.8.3 Checking Your Voice Mail
The first position in your speed dial list defaults as your voice mailbox.
When you insert your SIM card, your device automatically detects your
voice mailbox number and sets it to the first position in your speed dial
list.
4.9.1.8.4 Making an Emergency Call
You can use your device to dial the international emergency number 112.
This number can normally be used to make an emergency call in any
country with or without a SIM card inserted, as long as you are within a
mobile phone network.
Some mobile phone network services may require that a SIM card be
inserted, and in some cases that the PIN be entered.
There may be other emergency numbers available. Your mobile phone
network service may save additional local emergency numbers in the

65
SIM card.
4.9.1.8.5 Dialing an International Call
When you are manually dialing a number, tap and hold on the number
key 0 until the + sign appears. The + sign replaces the international prefix
of the country from where you are calling.
Enter the full phone number you want to dial including country code,
area code (without the leading area code zero) and local phone number.
4.9.2 Text Messages
4.9.2.1 Reading Text Messages
Text messages are automatically received when your phone is switched
on. The Today screen shows if there are new text messages. You can tap
the section to open the message list.
To manually open the message list:
1. Tap / Text.
2. The message list appears. Select the item you want to read.
4.9.2.2 Composing and Sending a Text Message
1. Tap / Text.
2. Tap Menu/ New.
66
CAUTION: You can also send a text message by selecting a phone number
from another program such as Contacts or Phone. Then select “Send text
message” from the shortcut menu or soft key.
3. Enter the phone number of one or more recipients, separating them
with a semicolon.
To select phone numbers from Contacts, tap “To”.
4. Enter your message.
To quickly add common messages, tap Menu/ My Text, and tap a desired
message.
5. Tap “Send”.
4.10 WIFI Connecting
4.10.1 Switching On or Off the Wi-Fi Radio
By default, the Wi-Fi radio is switched off. To switch on or off the Wi-Fi
radio:
1. Tap the Wireless Manager section on the Today screen or tap the
connectivity indicator on the navigation bar and tap “Wireless Manager”.
2. In the Wireless Manager screen, tap Wi-Fi to change the Wi-Fi radio
status.
When switched on, your device will display the word Available if wireless
networks are detected.
If you have previously connected to a wireless network, your device will

67
try to connect to the same network and display the name of the network
after the connection.
4.10.2 Connecting to a Wireless Network
1. Switch on the Wi-Fi radio. (See ‚Switching On or Off the Wi-Fi Radio‛
previously.)
2. Your device will detect available Wi-Fi networks.
If more than one network is detected, the screen will display a network
list. Select the network you want to connect to, and tap “OK”.
3. Select to connect to the Internet or the private network, and then tap
“Connect”.
4. If the selected network requires a network key, enter the key and tap
“Connect”.
The WIFI icon appears on the navigation bar.
CAUTION: You can also search for a network to connect by tapping /
Settings/ Connections/ Wi-Fi.
Once you have connected to a network, the shortcut is created in
Settings. Tap / Settings/ Connections/ Wi-Fi to change the network
settings. Tap the desired network and change the settings.
5. When you have finished using the wireless network, end the Wi-Fi
connection by switching off its radio.
68
CAUTION: Leaving the radio on will consume more power.

69
Chapter 5 Software Operation
You can install programs you need on the device except Pre-installed
programs.
5.1 Installing Programs
1. Download the programs you need or copy them directly from the CD
to your computer.
2. Connect your device and computer, and copy the installation program
to your device when you have established the connection between your
device and your computer. Find the program you want in the File
Explorer and run it. Install the program following the instruction and
select the installation path customizing. The system will automatically
generate a shortcut when the installation has successfully completed.
Click the shortcut to run the program.
CAUTION: If the system prompts to restart the device when the
installation has successfully completed, follow the prompts.
5.2 Uninstalling Programs
Tap / Settings/ System/ Remove Programs and select the program you
want to uninstall, tap “Remove” to accomplish the operation.

70
Chapter 6 Troubleshooting and Maintenance
This chapter gives solutions to common device problems you may
encounter. It also provides guidelines on taking care of your device.
If you have any questions, please contact with technical personnel.
6.1 Troubleshooting
Problem
Solution
Power does not switch on
when using battery power.
The remaining battery power may be too low
to run your device. Charge the battery.
Screen responds slowly.
Make sure that your device is not running out
of battery power. If the problem still persists,
restart your device.
Screen freezes.
Restart your device.
Cannot establish a connection
with a computer via USB.
Make sure that your device and your
computer are both switched on before trying
to establish a connection.
Make sure that the cable is securely plugged
into the USB port on your computer and on
your device. Connect the USB cable directly to
your computer—do not run the cable through
a USB hub.
Restart your device before connecting the
cable. Always disconnect your device before
you restart your computer.
71
In some specific cases, your device may
experience connection problems when it is
connected to a Windows computer running
ActiveSync. To resolve the problems, please
tap / Settings/ Connections/ USB to PC,
and then clear “Enable advanced network”
functionality.
A warning message of not
enough memory appears.
Delete files you no longer need.
Remove programs you no longer need.
Delete all files and clear history in Internet
Explorer.
Stop programs you are not currently using. To
check the state of your active programs, tap
/ Settings/ System/ Task Manager.
Restart your device.
6.2 Resetting Your Device
In some cases, you may need to restore your device to the factory
default state by clearing the memory. For example, you should clear the
memory when the device can’t be turned off, start or when you forget
your password.
Clearing the memory means all data you have entered in your device’s
memory, including all files, system settings and additional programs you
have installed, will be erased. (Programs installed to ROM at the factory
are not affected.)
CAUTION: To ensure the integrity of your data should it be necessary to
clear the memory, you are advised to regularly back up your data.
72
You can do one of the followings to upgrade:
1. Please consult the aftermarket Technical support or factory technician
to ensure the upgrade files are correct and latest.
2. Upgrade BOOT: Press and hold the power button, number keys 4 and 7
when your device is off until the screen appears upgrade BOOT. Restart
your device when the upgrade has successfully completed.
3. Upgrade OS: Press and hold the Power button, number key 4 and “*”
until the screen appears upgrade OS. The upgrade process takes a few
minutes, please be patient.
6.3 Caring for Your Device
Taking good care of your device will ensure trouble-free operation and
reduce the risk of damage to your device.
Keep your device away from extreme temperatures and excessive
moisture.
Avoid exposing your device to direct sunlight or strong ultraviolet
light for extended periods of time.
Do not place anything on top of your device or drop objects on your
device.
Never privately attempt to disassemble, repair or make any
modifications to your device.
Do not store or carry flammable liquids, gases or explosive materials
73
in the same compartment as your device, its parts or accessories.
FCC warning Statements:
1. This device complies with Part 15 of the FCC Rules. Operation is
subject to the following two conditions:
(1) This device may not cause harmful interference.
(2) This device must accept any interference received, including
interference that may cause undesired operation.
Changes or modifications not expressly approved by the party
responsible for compliance could void the user’s authority to operate the
equipment.
This equipment has been tested and found to comply with the limits for
a Class B digital device, pursuant to Part 15 of the FCC Rules. These limits
are designed to provide reasonable protection against harmful
interference in a residential installation. This equipment generates, uses
and can radiate radio frequency energy and, if not installed and used in
accordance with the instructions, may cause harmful interference to
radio communications. However, there is no guarantee that interference
will not occur in a particular installation.
74
If this equipment does cause harmful interference to radio or television
reception, which can be determined by turning the equipment off and
on, the user is encouraged to try to correct the interference by one or
more of the following measures:
-- Reorient or relocate the receiving antenna.
-- Increase the separation between the equipment and receiver.
-- Connect the equipment into an outlet on a circuit different from
that to which the receiver is connected.
-- Consult the dealer or an experienced radio/TV technician for help.
SAR Information Statement
Your device is a radio transmitter and receiver. It is designed and
manufactured not to exceed the emission limits for exposure to
radiofrequency (RF) energy set by the Federal Communications
Commission of the U.S. Government. These limits are part of
comprehensive guidelines and establish permitted levels of RF energy for
the general population. The guidelines are based on standards that were
developed by independent scientific organizations through periodic and
thorough evaluation of scientific studies. The standards include a
substantial safety margin designed to assure the safety of all persons,
regardless of age and health. The exposure standard for wireless mobile
75
phones employs a unit of measurement known as the Specific
Absorption Rate, or SAR. The SAR limit set by the FCC is 1.6 W/kg. * Tests
for SAR are conducted with the phone transmitting at its highest
certified power level in all tested frequency bands. Although the SAR is
determined at the highest certified power level, the actual SAR level of
the phone while operating can be well below the maximum value. This is
because the phone is designed to operate at multiple power levels so as
to use only the power required to reach the network. In general, the
closer you are to a wireless base station antenna, the lower the power
output. Before a phone model is available for sale to the public, it must
be tested and certified to the FCC that it does not exceed the limit
established by the government adopted requirement for safe exposure.
The tests are performed in positions and locations (e.g., at the ear and
worn on the body) as required by the FCC for each model. The highest
SAR value for this device when tested for use at the ear is 0.169 W/Kg
and when worn on the body, as described in this user guide, is 0.365
W/Kg(Body-worn measurements differ among phone models, depending
upon available accessories and FCC requirements.) The FCC has granted
an Equipment Authorization for this model phone with all reported SAR
levels evaluated as in compliance with the FCC RF exposure guidelines.
SAR information on this model phone is on file with the FCC and can be
found under the Display Grant section of http://www.fcc.gov/ oet/fccid
76
after searching on FCC ID: Y44-S4, Additional information on Specific
Absorption Rates (SAR) can be found on the Cellular Telecommunications
Industry Asso-ciation (CTIA) web-site at http://www.wow-com.com. *
Third-party belt-clips, holsters, and similar accessories used by this
device should not contain any metallic components. Body-worn
accessories that do not meet these requirements may not comply with
RF exposure requirements and should be avoided. Use only the supplied
or an approved antenna.