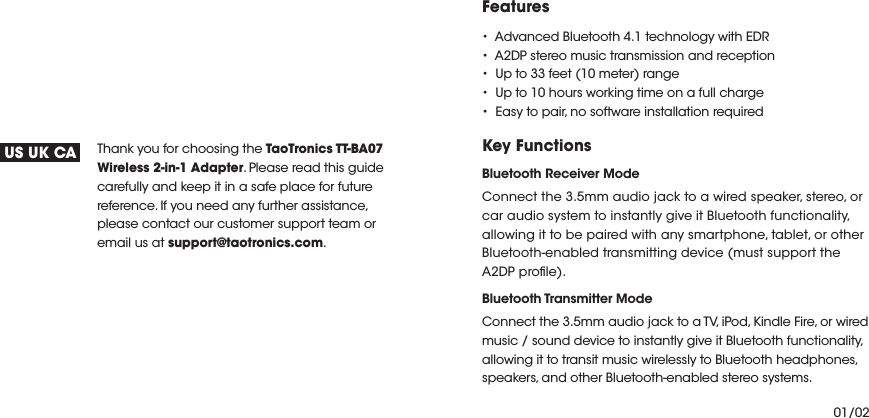
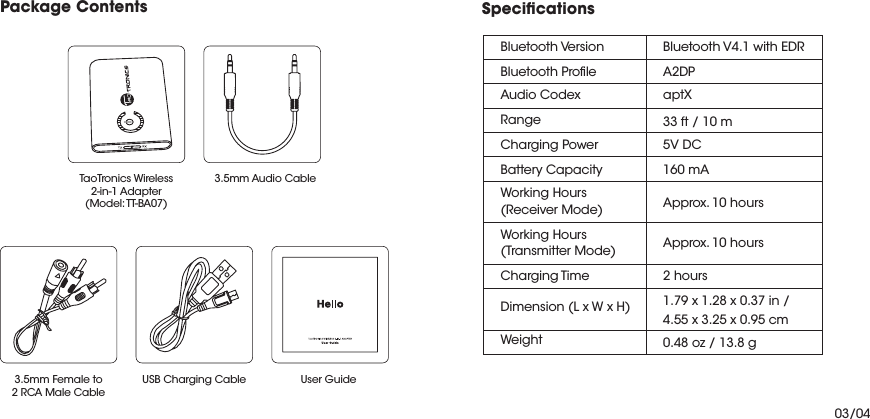
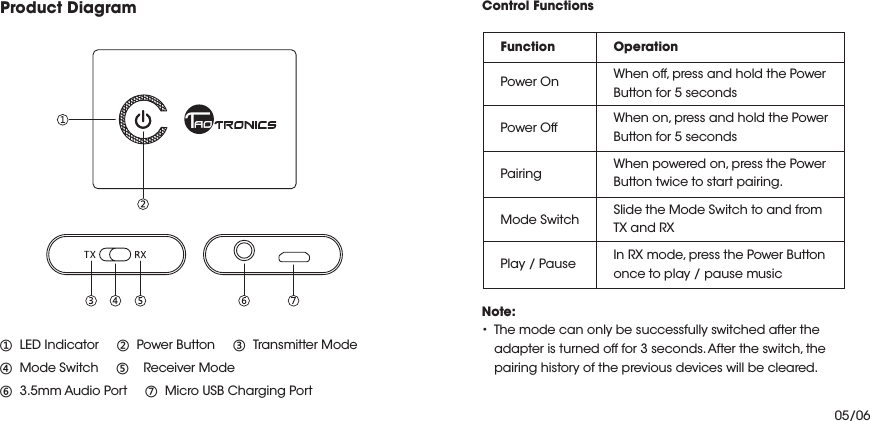
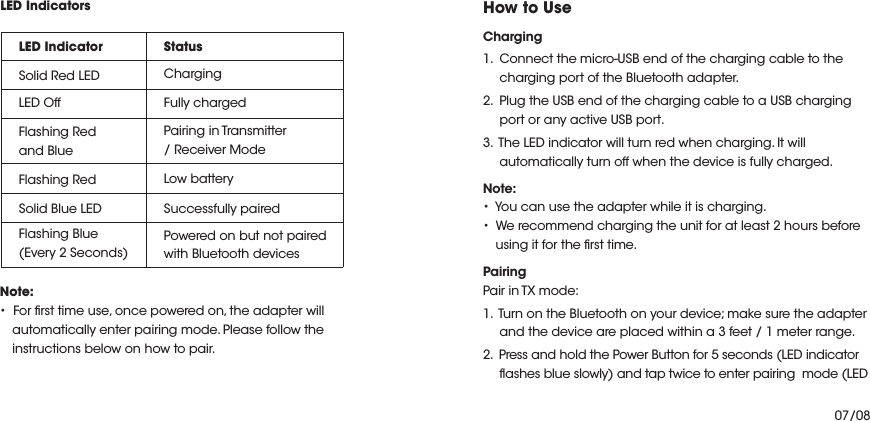
SUNVALLEYTEK BAXX Wireless 2-in-1 Adapter User Manual 15 TT BA07 UserMan

SUNVALLEYTEK INTERNATIONAL, INC. Wireless 2-in-1 Adapter 15 TT BA07 UserMan

15_TT-BA07 UserMan.pdf

TAOTRONICS WIRELESS 2-IN-1 ADAPTERUser GuideHelloTT-BA07E-mail : support.jp@taotronics.com(JP)EUROPEE-mail: support.uk@taotronics.com(UK)support.de@taotronics.com(DE)support.fr@taotronics.com(FR)support.es@taotronics.com(ES)support.it@taotronics.com(IT)EU Importer: ZBT International Trading GmbH, Lederstr 21a, 22525 Hamburg, DeutschlandNORTH AMERICAE-mail : support@taotronics.com(US)support.ca@taotronics.com(CA)Tel : 1-888-456-8468  (Monday-Friday: 9:00 – 17:00 PST)Address: 46724 Lakeview Blvd, Fremont, CA 94538ASIA PACIFICwww.taotronics.com
Thank you for choosing the TaoTronics TT-BA07 Wireless 2-in-1 Adapter. Please read this guide carefully and keep it in a safe place for future reference. If you need any further assistance, please contact our customer support team or email us at support@taotronics.com.US UK CAFeaturestAdvanced Bluetooth 4.1 technology with EDRtA2DP stereo music transmission and receptiontUp to 33 feet (10 meter) rangetUp to 10 hours working time on a full chargetEasy to pair, no software installation requiredKey Functions Bluetooth Receiver ModeConnect the 3.5mm audio jack to a wired speaker, stereo, or car audio system to instantly give it Bluetooth functionality, allowing it to be paired with any smartphone, tablet, or other Bluetooth-enabled transmitting device (must support the A2DP prole).Bluetooth Transmitter Mode Connect the 3.5mm audio jack to a TV, iPod, Kindle Fire, or wired music / sound device to instantly give it Bluetooth functionality, allowing it to transit music wirelessly to Bluetooth headphones, speakers, and other Bluetooth-enabled stereo systems.01/02
Package Contents TaoTronics Wireless2-in-1 Adapter(Model: TT-BA07)3.5mm Female to2 RCA Male CableUSB Charging Cable User Guide 3.5mm Audio CableSpecicationsBluetooth VersionBluetooth ProleAudio Codex RangeCharging PowerBattery Capacity Working Hours(Receiver Mode)Working Hours(Transmitter Mode)Charging TimeDimension (L x W x H)WeightBluetooth V4.1 with EDRA2DPaptX33 ft / 10 m 5V DC160 mAApprox. 10 hoursApprox. 10 hours2 hours1.79 x 1.28 x 0.37 in /4.55 x 3.25 x 0.95 cm0.48 oz / 13.8 g03/04
Product Diagram ʒLED Indicator     ʓPower Button     ʔTransmitter ModeʕMode Switch     ʖ  Receiver Mode ʗ3.5mm Audio Port     ʘMicro USB Charging PortControl Functions FunctionPower OnPower OffPairing Mode Switch Play / PauseOperationWhen off, press and hold the PowerButton for 5 secondsWhen on, press and hold the PowerButton for 5 secondsWhen powered on, press the PowerButton twice to start pairing.Slide the Mode Switch to and fromTX and RX In RX mode, press the Power Buttononce to play / pause music Note:  t5IFNPEFDBOPOMZCFTVDDFTTGVMMZTXJUDIFEBGUFSUIFadapter is turned off for 3 seconds. After the switch, the pairing history of the previous devices will be cleared. 05/06
How to UseCharging1.  Connect the micro-USB end of the charging cable to the charging port of the Bluetooth adapter.2.  Plug the USB end of the charging cable to a USB charging port or any active USB port. 3.  The LED indicator will turn red when charging. It will automatically turn off when the device is fully charged. Note:t:PVDBOVTFUIFBEBQUFSXIJMFJUJTDIBSHJOHt8FSFDPNNFOEDIBSHJOHUIFVOJUGPSBUMFBTUIPVSTCFGPSFusing it for the rst time.PairingPair in TX mode:1.  Turn on the Bluetooth on your device; make sure the adapter and the device are placed within a 3 feet / 1 meter range. 2.  Press and hold the Power Button for 5 seconds (LED indicator ashes blue slowly) and tap twice to enter pairing  mode (LEDLED IndicatorsLED Indicator Solid Red LEDLED OffFlashing Redand BlueFlashing RedSolid Blue LEDFlashing Blue(Every 2 Seconds) Status Charging Fully charged Pairing in Transmitter/ Receiver Mode Low battery Successfully paired Powered on but not pairedwith Bluetooth devices Note: t'PSåSTUUJNFVTFPODFQPXFSFEPOUIFBEBQUFSXJMMautomatically enter pairing mode. Please follow the instructions below on how to pair. 07/08
     indicator ashes red and blue alternately). After approximately 30 seconds, the pairing will be done (LED indicator in solid blue).Pair in RX mode:Press and hold the Power Button of the adapter for 5 seconds (LED indicator ashes blue slowly). It will start pairing 5 seconds after being powered on (LED indicator ashes red and blue alternatively).  1.  Activate the Bluetooth function on your phone and search for the nearby Bluetooth devices:t'PSJ044FUUJOHT#MVFUPPUI0Ot'PS"OESPJE4FUUJOHT8JSFMFTT/FUXPSLT#MVFUPPUI0O4DBOGPSEFWJDFT2.  Find “TaoTronics TT-BA07” in the search results and tap on it to connect. Once connected, the LED indicator will turn solid blue.  Note:t5IFBEBQUFSFOUFSTQBJSJOHNPEFBVUPNBUJDBMMZXIFOpowered on for the rst time. t5IFPSJHJOBMQBJSJOHNFNPSZXJMMCFDMFBSFEBGUFSBNPEFswitch. It will automatically start pairing each time it’s powered on.   t*GB1*/DPEFJTSFRVJSFEGPSQBJSJOHUSZGPVS[FSPFT8888 (four eights), 1111 (four ones), or 1234.t5IFBEBQUFSDBOSFNFNCFSQSFWJPVTMZQBJSFEEFWJDFTBOEwill attempt to pair with devices automatically, without going into pairing mode.Pair with two devices at the same time In TX mode: In TX mode, the adapter is able to pair with two Bluetooth stereo earphones/speakers at the same time. 1.  Follow the previous instructions in the “Pairing” section to pair the TT-BA07 with your rst device.2.  Turn off the Bluetooth function on your rst device, tap the Power Button twice to pair and connect to your second device. 3.  Turn on the Bluetooth function on your rst device. In approximately 30 seconds, the second device will automatically connect in. Note: t8IFOZPVQBJSXJUIUXPEFWJDFTCPUIDBOQMBZNVTJDBUUIF09/10
same time. t5IFBEBQUFSXJMMBVUPNBUJDBMMZSFQBJSXIFOQPXFSFEPOIn RX mode: In RX mode, the adapter is able to pair with two Bluetooth devices at the same time. 1.  Follow previous instructions in the “Pairing” section to pair the TT-BA07 with your rst device. Disable the Bluetooth function on your rst device. Tap the Power Button twice to pair with the second device. 2.  Turn on the Bluetooth of the rst device, now TT-BA07 adapter is successfully paired with both devices. Note: t0OMZPOFEFWJDFDBOQMBZNVTJDBUBOZUJNF:PVIBWFUPstop the music on one device to play on the other. t5IFBEBQUFSXJMMBVUPNBUJDBMMZSFQBJSXIFOQPXFSFEPOCare and Maintenancet,FFQUIFBEBQUFSBXBZGSPNIFBUBOEIVNJEJUZt%POPUFYQPTFUIFBEBQUFSUPEJSFDUTVOMJHIUPSFYUSFNFIFBUt%POPUUSZUPUBLFUIFBEBQUFSBQBSU*UNBZDBVTFTFSJPVTdamage.t%POPUESPQPSLOPDLUIFBEBQUFSPOIBSETVSGBDFTBTJUdamages the interior circuit. t%POPUVTFDIFNJDBMTPSEFUFSHFOUTUPDMFBOUIFQSPEVDUt%POPUTDSBQFUIFTVSGBDFXJUITIBSQPCKFDUTTroubleshootingMy adapter will not power on.Please recharge it and make sure the adapter has enough battery power. Plug the unit to a charger and see if the LED indicator becomes red. I am having trouble pairing and connecting to my Bluetooth pairing device.Please check the following:t:PVS#MVFUPPUIEFWJDFTVQQPSUTUIF"%1QSPåMFt5IFBEBQUFSBOEZPVSEFWJDFBSFOFYUUPFBDIPUIFSPSXJUIJO3 feet / 1 meter.t5IFBEBQUFSJTJOQBJSJOHNPEFUIJTJTJOEJDBUFECZUIF-&%ashing in red and blue alternately.11/12
After connecting and pairing with my Bluetooth device, I cannot hear any music from my sound system.Please check the following:t:PVSTPVOETZTUFNJTDPOOFDUFEUPUIFBEBQUFSWJBUIF3.5mm Audio Cable. t.BLFTVSFUIFNVTJDWPMVNFJTBUBOBVEJCMFMFWFMPOCPUIyour Bluetooth device and sound system.t'PSTPNFTZTUFNTZPVNBZOFFEUPTFMFDUi"69wPSi-JOFJOwBTthe audio input mode.t1MFBTFNBLFTVSFZPVSBVEJPEFWJDFJTQMBZJOHNVTJDWJBBluetooth. Some devices (such as computer) require manually selecting the music output mode.Can I use the TT-BA07 adapter while it is charging? :FTUIFBEBQUFSJTEFTJHOFEUPCFVTFEXIJMFDIBSHJOH5IFinternal circuit is protected from over-charging. WarrantyThis product is covered with TaoTronics parts and labor warranty for 12 months from date of its original purchase. If the device fails due to a manufacturing defect, please contact TaoTronics Support (support@taotronics.com) immediately to launch a warranty claim. We will instruct you on how to return the defective unit back to us for repair and replacement. The following are excluded from TaoTronics warranty cover:t%FWJDFQVSDIBTFEBTOEIBOEVTFEPSGSPN    unauthorized sellerst%BNBHFSFTVMUFEGSPNNJTVTFBOEBCVTJWFBDUJPOt%BNBHFSFTVMUFEGSPNDIFNJDBMåSFSBEJPBDUJWFTVCTUBODFpoison, or liquid t%BNBHFSFTVMUFEGSPNOBUVSBMEJTBTUFSt%BNBHFDBVTFEUPBOZSEQBSUZQFSTPOPCKFDU    and beyondNo return will be accepted without seller authorization.StatementWe can only provide after sale services for products that are sold by TaoTronics or TaoTronics authorized retailer and distributor. If you have purchased your unit from a different place, please contact the seller for return and warranty issues. 13/14
MADE IN CHINAFCC ID:2AFDGBAXXFCC ComplianceThis device complies with Part 15 of the FCC Rules. Operation is subject to the following two conditions: (1) This device may not cause harmful interference, and (2) this device must withstand any interference received, including interference that may cause undesired operation.TECHNOLOGY ENHANCES LIFENOTE: This equipment has been tested and found to comply with the limits for a Class B digitaldevice, pursuant to part 15 of the FCC Rules. These limits are designed to provide reasonable protectionagainst harmful interference in a residential installation. This equipment generates, uses and can radiateradio frequency energy and, if not installed and used in accordance with the instructions, may causeharmful interference to radio communications. However, there is no guarantee that interference will notoccur in a particular installation. If this equipment does cause harmful interference to radio or televisionreception, which can be determined by turning the equipment off and on, the user is encouraged to try tocorrect the interference by one or more of the following measures:—Reorient or relocate the receiving antenna.—Increase the separation between the equipment and receiver.—Connect the equipment into an outlet on a circuit different from that to which the receiver isconnected.—Consult the dealer or an experienced radio/TV technician for help.Changes or modifications to this unit not expressly approved by the party responsible forcompliance could void the user's authority to operate the equipment.

Navigation menu