SUNVALLEYTEK BAXX Wireless 2-in-1 Adapter User Manual 15 TT BA07 UserMan
SUNVALLEYTEK INTERNATIONAL, INC. Wireless 2-in-1 Adapter 15 TT BA07 UserMan
15_TT-BA07 UserMan.pdf

TAOTRONICS WIRELESS 2-IN-1 ADAPTER
User Guide
Hello
TT-BA07
E-mail : support.jp@taotronics.com(JP)
EUROPE
E-mail:
support.uk@taotronics.com(UK)
support.de@taotronics.com(DE)
support.fr@taotronics.com(FR)
support.es@taotronics.com(ES)
support.it@taotronics.com(IT)
EU Importer: ZBT International Trading GmbH, Lederstr
21a, 22525 Hamburg, Deutschland
NORTH AMERICA
E-mail : support@taotronics.com(US)
support.ca@taotronics.com(CA)
Tel : 1-888-456-8468 (Monday-Friday: 9:00 – 17:00 PST)
Address:
46724 Lakeview Blvd, Fremont, CA 94538
ASIA PACIFIC
www.taotronics.com

Thank you for choosing the TaoTronics TT-BA07
Wireless 2-in-1 Adapter. Please read this guide
carefully and keep it in a safe place for future
reference. If you need any further assistance,
please contact our customer support team or
email us at support@taotronics.com.
US UK CA
Features
tAdvanced Bluetooth 4.1 technology with EDR
tA2DP stereo music transmission and reception
tUp to 33 feet (10 meter) range
tUp to 10 hours working time on a full charge
tEasy to pair, no software installation required
Key Functions
Bluetooth Receiver Mode
Connect the 3.5mm audio jack to a wired speaker, stereo, or
car audio system to instantly give it Bluetooth functionality,
allowing it to be paired with any smartphone, tablet, or other
Bluetooth-enabled transmitting device (must support the
A2DP prole).
Bluetooth Transmitter Mode
Connect the 3.5mm audio jack to a TV, iPod, Kindle Fire, or wired
music / sound device to instantly give it Bluetooth functionality,
allowing it to transit music wirelessly to Bluetooth headphones,
speakers, and other Bluetooth-enabled stereo systems.
01/02
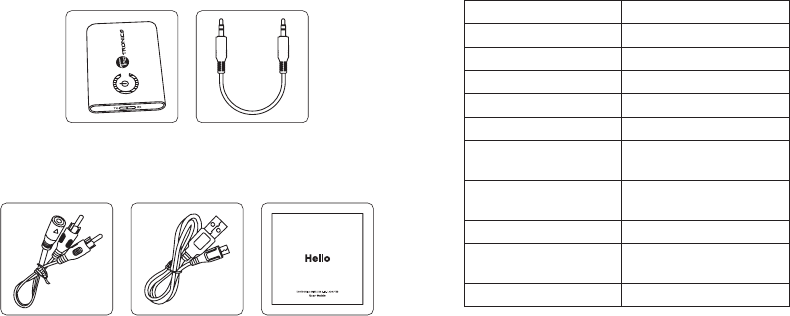
Package Contents
TaoTronics Wireless
2-in-1 Adapter
(Model: TT-BA07)
3.5mm Female to
2 RCA Male Cable
USB Charging Cable User Guide
3.5mm Audio Cable
Specications
Bluetooth Version
Bluetooth Prole
Audio Codex
Range
Charging Power
Battery Capacity
Working Hours
(Receiver Mode)
Working Hours
(Transmitter Mode)
Charging Time
Dimension (L x W x H)
Weight
Bluetooth V4.1 with EDR
A2DP
aptX
33 ft / 10 m
5V DC
160 mA
Approx. 10 hours
Approx. 10 hours
2 hours
1.79 x 1.28 x 0.37 in /
4.55 x 3.25 x 0.95 cm
0.48 oz / 13.8 g
03/04
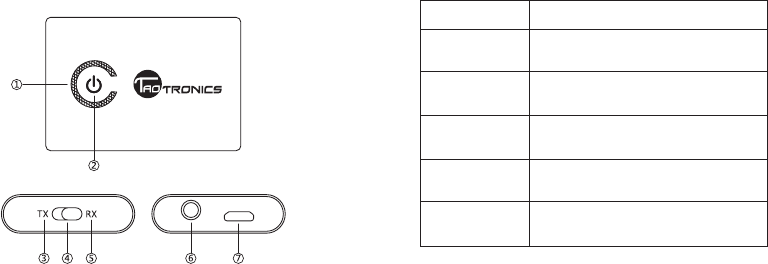
Product Diagram
ʒLED Indicator ʓPower Button ʔTransmitter Mode
ʕMode Switch ʖ Receiver Mode
ʗ3.5mm Audio Port ʘMicro USB Charging Port
Control Functions
Function
Power On
Power Off
Pairing
Mode Switch
Play / Pause
Operation
When off, press and hold the Power
Button for 5 seconds
When on, press and hold the Power
Button for 5 seconds
When powered on, press the Power
Button twice to start pairing.
Slide the Mode Switch to and from
TX and RX
In RX mode, press the Power Button
once to play / pause music
Note:
t5IFNPEFDBOPOMZCFTVDDFTTGVMMZTXJUDIFEBGUFSUIF
adapter is turned off for 3 seconds. After the switch, the
pairing history of the previous devices will be cleared.
05/06

How to Use
Charging
1. Connect the micro-USB end of the charging cable to the
charging port of the Bluetooth adapter.
2. Plug the USB end of the charging cable to a USB charging
port or any active USB port.
3. The LED indicator will turn red when charging. It will
automatically turn off when the device is fully charged.
Note:
t:PVDBOVTFUIFBEBQUFSXIJMFJUJTDIBSHJOH
t8FSFDPNNFOEDIBSHJOHUIFVOJUGPSBUMFBTUIPVSTCFGPSF
using it for the rst time.
Pairing
Pair in TX mode:
1. Turn on the Bluetooth on your device; make sure the adapter
and the device are placed within a 3 feet / 1 meter range.
2. Press and hold the Power Button for 5 seconds (LED indicator
ashes blue slowly) and tap twice to enter pairing mode (LED
LED Indicators
LED Indicator
Solid Red LED
LED Off
Flashing Red
and Blue
Flashing Red
Solid Blue LED
Flashing Blue
(Every 2 Seconds)
Status
Charging
Fully charged
Pairing in Transmitter
/ Receiver Mode
Low battery
Successfully paired
Powered on but not paired
with Bluetooth devices
Note:
t'PSåSTUUJNFVTFPODFQPXFSFEPOUIFBEBQUFSXJMM
automatically enter pairing mode. Please follow the
instructions below on how to pair.
07/08
indicator ashes red and blue alternately). After
approximately 30 seconds, the pairing will be done (LED
indicator in solid blue).
Pair in RX mode:
Press and hold the Power Button of the adapter for 5 seconds
(LED indicator ashes blue slowly). It will start pairing 5 seconds
after being powered on (LED indicator ashes red and blue
alternatively).
1. Activate the Bluetooth function on your phone and search
for the nearby Bluetooth devices:
t'PSJ044FUUJOHT#MVFUPPUI0O
t'PS"OESPJE4FUUJOHT8JSFMFTT/FUXPSLT#MVFUPPUI
0O4DBOGPSEFWJDFT
2. Find “TaoTronics TT-BA07” in the search results and tap on it to
connect. Once connected, the LED indicator will turn solid blue.
Note:
t5IFBEBQUFSFOUFSTQBJSJOHNPEFBVUPNBUJDBMMZXIFO
powered on for the rst time.
t5IFPSJHJOBMQBJSJOHNFNPSZXJMMCFDMFBSFEBGUFSBNPEF
switch. It will automatically start pairing each time it’s
powered on.
t*GB1*/DPEFJTSFRVJSFEGPSQBJSJOHUSZGPVS[FSPFT
8888 (four eights), 1111 (four ones), or 1234.
t5IFBEBQUFSDBOSFNFNCFSQSFWJPVTMZQBJSFEEFWJDFTBOE
will attempt to pair with devices automatically, without going
into pairing mode.
Pair with two devices at the same time
In TX mode:
In TX mode, the adapter is able to pair with two Bluetooth stereo
earphones/speakers at the same time.
1. Follow the previous instructions in the “Pairing” section to pair
the TT-BA07 with your rst device.
2. Turn off the Bluetooth function on your rst device, tap the
Power Button twice to pair and connect to your second
device.
3. Turn on the Bluetooth function on your rst device. In
approximately 30 seconds, the second device will
automatically connect in.
Note:
t8IFOZPVQBJSXJUIUXPEFWJDFTCPUIDBOQMBZNVTJDBUUIF
09/10
same time.
t5IFBEBQUFSXJMMBVUPNBUJDBMMZSFQBJSXIFOQPXFSFEPO
In RX mode:
In RX mode, the adapter is able to pair with two Bluetooth
devices at the same time.
1. Follow previous instructions in the “Pairing” section to pair the
TT-BA07 with your rst device. Disable the Bluetooth function
on your rst device. Tap the Power Button twice to pair with
the second device.
2. Turn on the Bluetooth of the rst device, now TT-BA07 adapter
is successfully paired with both devices.
Note:
t0OMZPOFEFWJDFDBOQMBZNVTJDBUBOZUJNF:PVIBWFUP
stop the music on one device to play on the other.
t5IFBEBQUFSXJMMBVUPNBUJDBMMZSFQBJSXIFOQPXFSFEPO
Care and Maintenance
t,FFQUIFBEBQUFSBXBZGSPNIFBUBOEIVNJEJUZ
t%POPUFYQPTFUIFBEBQUFSUPEJSFDUTVOMJHIUPSFYUSFNFIFBU
t%POPUUSZUPUBLFUIFBEBQUFSBQBSU*UNBZDBVTFTFSJPVT
damage.
t%POPUESPQPSLOPDLUIFBEBQUFSPOIBSETVSGBDFTBTJU
damages the interior circuit.
t%POPUVTFDIFNJDBMTPSEFUFSHFOUTUPDMFBOUIFQSPEVDU
t%POPUTDSBQFUIFTVSGBDFXJUITIBSQPCKFDUT
Troubleshooting
My adapter will not power on.
Please recharge it and make sure the adapter has enough
battery power. Plug the unit to a charger and see if the LED
indicator becomes red.
I am having trouble pairing and connecting to my Bluetooth
pairing device.
Please check the following:
t:PVS#MVFUPPUIEFWJDFTVQQPSUTUIF"%1QSPåMF
t5IFBEBQUFSBOEZPVSEFWJDFBSFOFYUUPFBDIPUIFSPSXJUIJO
3 feet / 1 meter.
t5IFBEBQUFSJTJOQBJSJOHNPEFUIJTJTJOEJDBUFECZUIF-&%
ashing in red and blue alternately.
11/12
After connecting and pairing with my Bluetooth device, I
cannot hear any music from my sound system.
Please check the following:
t:PVSTPVOETZTUFNJTDPOOFDUFEUPUIFBEBQUFSWJBUIF
3.5mm Audio Cable.
t.BLFTVSFUIFNVTJDWPMVNFJTBUBOBVEJCMFMFWFMPOCPUI
your Bluetooth device and sound system.
t'PSTPNFTZTUFNTZPVNBZOFFEUPTFMFDUi"69wPSi-JOFJOwBT
the audio input mode.
t1MFBTFNBLFTVSFZPVSBVEJPEFWJDFJTQMBZJOHNVTJDWJB
Bluetooth. Some devices (such as computer) require
manually selecting the music output mode.
Can I use the TT-BA07 adapter while it is charging?
:FTUIFBEBQUFSJTEFTJHOFEUPCFVTFEXIJMFDIBSHJOH5IF
internal circuit is protected from over-charging.
Warranty
This product is covered with TaoTronics parts and labor warranty
for 12 months from date of its original purchase. If the device
fails due to a manufacturing defect, please contact TaoTronics
Support (support@taotronics.com) immediately to launch a
warranty claim. We will instruct you on how to return the
defective unit back to us for repair and replacement.
The following are excluded from TaoTronics warranty cover:
t%FWJDFQVSDIBTFEBTOEIBOEVTFEPSGSPN
unauthorized sellers
t%BNBHFSFTVMUFEGSPNNJTVTFBOEBCVTJWFBDUJPO
t%BNBHFSFTVMUFEGSPNDIFNJDBMåSFSBEJPBDUJWFTVCTUBODF
poison, or liquid
t%BNBHFSFTVMUFEGSPNOBUVSBMEJTBTUFS
t%BNBHFDBVTFEUPBOZSEQBSUZQFSTPOPCKFDU
and beyond
No return will be accepted without seller authorization.
Statement
We can only provide after sale services for products that are
sold by TaoTronics or TaoTronics authorized retailer and
distributor. If you have purchased your unit from a different
place, please contact the seller for return and warranty issues.
13/14

MADE IN CHINA
FCC ID:2AFDGBAXX
FCC Compliance
This device complies with Part 15 of the FCC Rules. Operation is subject to the
following two conditions: (1) This device may not cause harmful interference, and (2)
this device must withstand any interference received, including interference that may
cause undesired operation.
TECHNOLOGY ENHANCES LIFE
NOTE: This equipment has been tested and found to comply with the limits for a Class B digital
device, pursuant to part 15 of the FCC Rules. These limits are designed to provide reasonable protection
against harmful interference in a residential installation. This equipment generates, uses and can radiate
radio frequency energy and, if not installed and used in accordance with the instructions, may cause
harmful interference to radio communications. However, there is no guarantee that interference will not
occur in a particular installation. If this equipment does cause harmful interference to radio or television
reception, which can be determined by turning the equipment off and on, the user is encouraged to try to
correct the interference by one or more of the following measures:
—Reorient or relocate the receiving antenna.
—Increase the separation between the equipment and receiver.
—Connect the equipment into an outlet on a circuit different from that to which the receiver is
connected.
—Consult the dealer or an experienced radio/TV technician for help.
Changes or modifications to this unit not expressly approved by the party responsible for
compliance could void the user's authority to operate the equipment.