SYLVANIA TV/VCR Or DVD Combo Manual L0605428
User Manual: SYLVANIA SYLVANIA TV/VCR or DVD Combo Manual SYLVANIA TV/VCR or DVD Combo Owner's Manual, SYLVANIA TV/VCR or DVD Combo installation guides
Open the PDF directly: View PDF ![]() .
.
Page Count: 32
_lFm--th. _
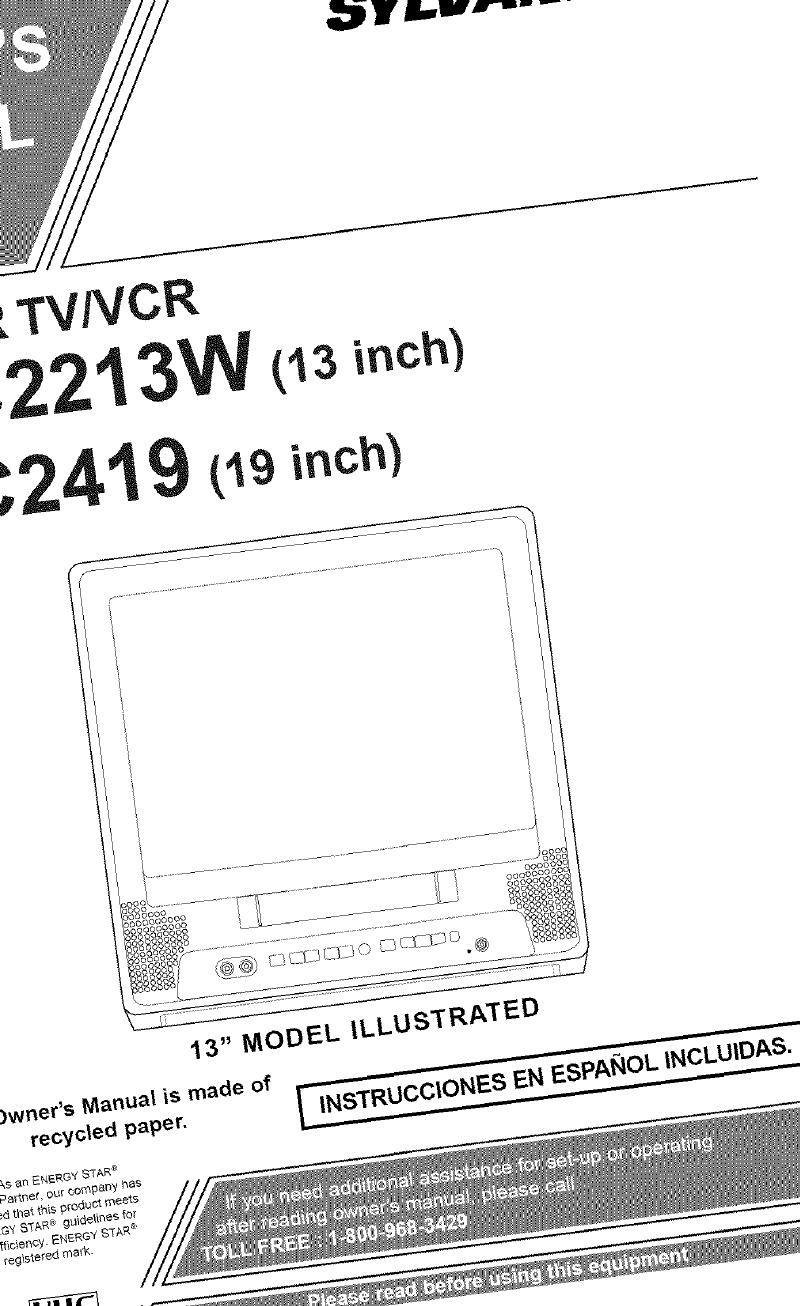
'TVNCR
i, 13W inch)
;2419
13" MODEL ILLUSTRATED
INSTRUCCIONES EN ESPAIWOL INCLUIDA
WARNING: TO REDUCE THE RISK OF FIRE OR ELECTRIC SHOCK, DO NOT EXPOSE THIS APPLIANCE
TO RAIN OR MOISTURE.
CA[ TION: TO REDUCE THE RISK OF ELECTRIC
SHOCK, DO NOT REMOVE (;OVER (OR BACK).
NO USER SERVICEABLE PARTS INSIDE. REFER
SERVICING TO QUALIFIED SERVICE PERSON-
NEL.
The caution marking is located on the rear of the cabinet.
IMPORTANT
THIS SYMBOL INDICATES THAT DAN-
GEROUS VOLTAGE CONSTITUTING A
RISK OF ELECTRIC SHOCK IS PRESENT
WITHIN THIS UNIT.
THIS SYMBOL INDICATES THAT THERE
ARE IMPORTANT OPERATING AND
MAINTENANCE INSTRUCTIONS IN THE
LITERATURE ACCOMPANYING THE
APPLIANCE.
SAFEGUARDS
1.Read instructions-All the safety and operating instructions
should be read before the appliance is operated.
2.Retain Instructions-The safety and operating instructions
should be retained *br future reference.
&Heed '_ilrnings-All warnings on the appliance and in the
operating instructions should be adhered to.
4.Follow Instructions-All operating and use instructions
should be followed.
5.C|eaning-Unplug TVVCR from the wall outlet before
cleaning. Do not use liquid cleaners or aerosol cleaners. Use
a damp cloth tbr cleaning.
EXCEPTION: A product that is meam for uninterrupted
service and, that for some specific reason, such as the possi-
bility of the loss of an authorization code for a CATV con-
verter, is not intended to be unplugged by the uses"for clean-
ing or aW other purpose, may exclude the reference m
unplugging the appliance in the cleaning description other-
wise required in item 5.
&Attachments-Do not use attachments not reconnnended by
the TVVCR manufucturer as they may cause hazards.
7._'_lter and Moisture-Do not use this TVVCR near water-
t\_rexample, near a bath tub, wash bowl, idtchen sil_k, or
laundry rob, in a wet basement, or near a swinnning pool,
and the like.
8.Accessories-Do not place this TVVCR on an unstable cart,
stand, tripod, bracket, or table. The TVVCR may fall, caus-
ing serious injuW to someone, and serious damage to the
appliance. Use only with a cart, stand, tripod, bracket, or
table reeonnnended by the manutacrurer, or sold with the
TViVCR. Any mounting of the PORTABLE CART WARNING
applianceshould _llow the manu-
facturer's instructions and should __
use a mounting accessor7reconl-
mended by the manuiacturer. An
appliance and cart combination
should be mined with care.
Quick stops, excessix e force, and
uneven surfuces may cause the
appliance and cart combination to
overturn.
.&ME[ BLES- Cet appareil ne dolt _tre S MBOLEDA'ERTISSEMEN POUR
LESCO_POS_NTES
placd que sur un meuble (avec ou sans ..........................
roulettes) recommandd par le fabricant.
Si vous l'installez sur un meuble
roulettes, d@lacez les deux ensembles
avec pr&aution. Un arr_t brusque, l'u-
tilisation d'une *brce excessive et des surfaces irrdgulibres
risquent de ddstabiliser l'ensemble et de le renverser.
9.Ventilation-Slots and openings in the cabinet and the back
or bottom are prox ided *br xentilation and to ensure reliable
operation of the TVV(R and to protect it from overheat-
ing, and these openings must not be blocked or covered.
The openings should never be blocked by placing the
TV/VCR on a bed, solh, rug, or other similar surface. This
TV'VCR should hexer be placed near or over a radiator or
heat register. This TV,'VCR should not be placed in a built-
in installation such as a bookcase or rack unless proper
ventilation is provided or the manu*hcturer's instructions
have been adhered to.
10.Power Sources-This TVVCR should be operated only
from the type of pmxer source indicated on the marking
label. If you are not sure of the type of power supply to
your home, consult your appliance dealer or local pmxer
company. For TV VCRs intended to operate from battery
power, or other sources, re*er to the operating instructions.
ll.Gronnding or Polarization-This TVVCR is equipped
with a polarized alternating-current line plug(a plug having
one blade wider than the other). This plug xxillfit into the
power outlet only one xxay.This is a safety feature. If you
are unable to insert the plug fully into the outlet, tW revers-
ing the plug. If the plug should still full to fit, contact your
electrician to replace your obsolete outlet. Do not defeat the
safety purpose of the polarized plug.
12.Power-Cord Protection-Power-supply cords should be
routed so that they are not likely to be walked on or
pinched by items placed upon or against them, paying par-
ticular attention to cords at plugs, convenience receptacles,
and the point where they exit fi'om the appliance.
-2- EN
9103
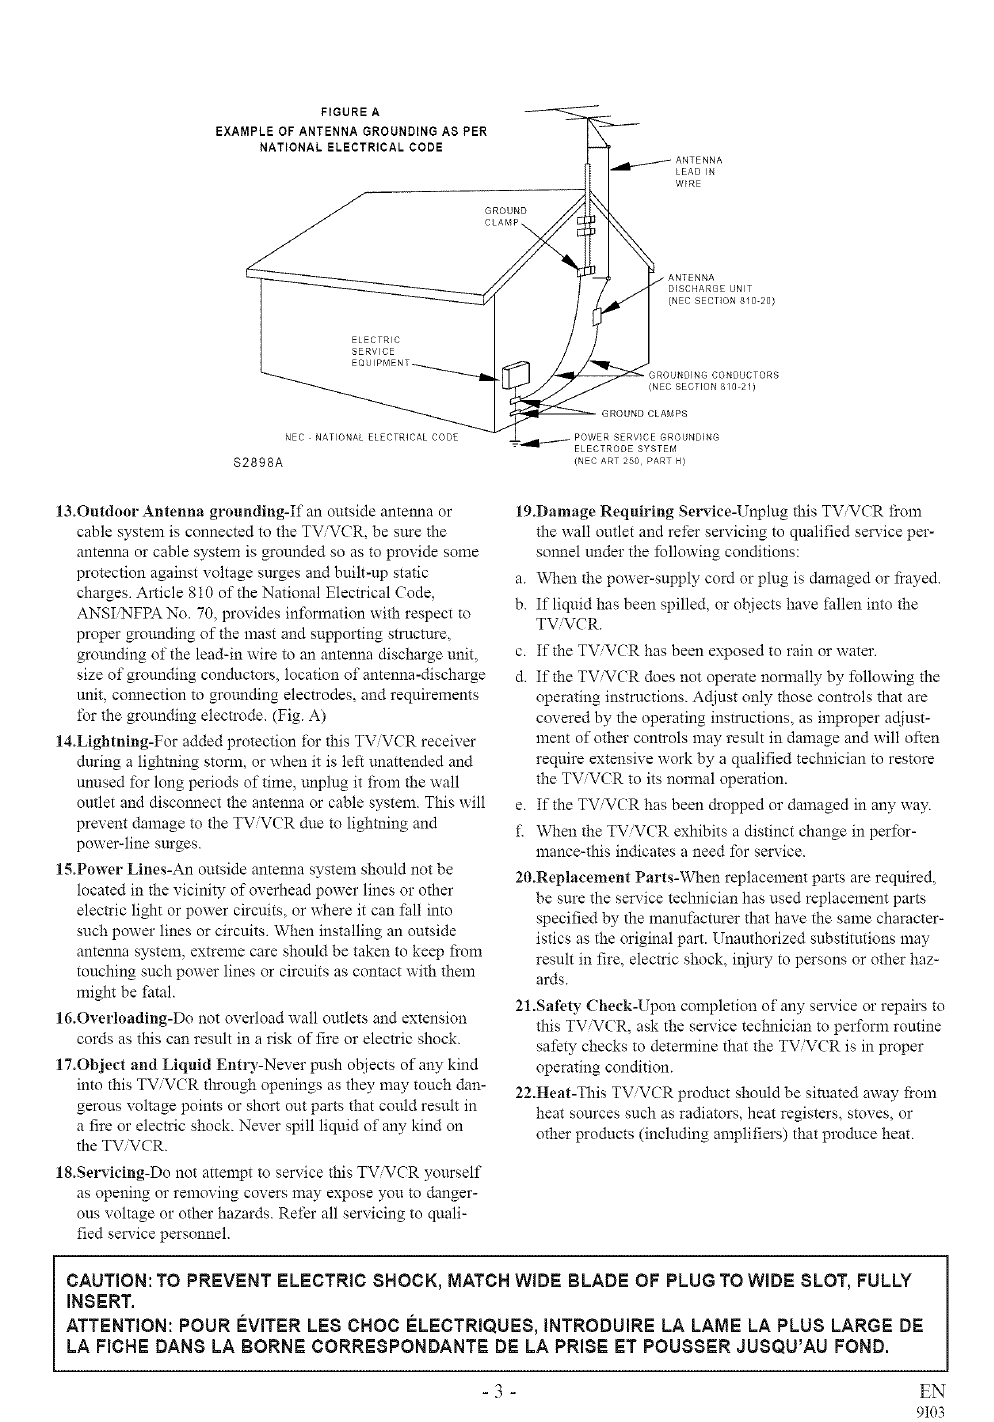
FIGURE A
EXAMPLE OF ANTENNA GROUNDING AS PER
NATIONAL ELECTRICAL CODE
LEAD IN
W_RE
ELECTRIC
SERVICE
DISCHARGE UNIT
(NEC SECTION 8/0 20)
GROUNDING CONDUCTORS
(NLC SECTION 8/0 2/)
NEC NATIONAL ELECTRICAL CODE
$2898A
ELECTRODE SYSTEM
(NEC ART 250 PART H)
13.Outdoor Antenna grounding-If an outside antenna or
cable system is connected to the TV VCR, be sure the
antenna or cable system is grounded so as to provide some
protection against voltage surges and built-up static
charges. Article 810 of the National Electrical Code,
ANSI NFPA No. 70, provides inforxnation with respect to
proper grounding of the mast and supporting structure,
grounding of the lead-in wire m an antenna discharge unit,
size of grounding conductors, location of antenna-discharge
unit, co:mection to grounding electrodes, and requirements
ior the grounding electrode. (Fig. A)
14.Lightning-For added protection J:br this TVVCR receiver
during a lighming storm, or when it is lefi unattended and
unused for long periods of time, unplug it ii'om the wall
outlet and disco:mect the antenna or cable system. This will
prevent damage to the TViVCR due to lightning and
power-line surges.
15.Power Lines-An outside antenna system should not be
located in the vicinity of overhead power lines or other
electric light or power circuits, or where it can ball into
such power lines or circuits. When installing an outside
antenna system, extreme care should be taken to keep from
touching such power lines or circuits as contact with them
might be _htal.
16.Overloading-Do not overload wall omlets and extension
cords as this can result in a risk of fire or electric shock.
17.Object and Liquid Entry-Never push objects of any kind
into this TV VCR tln'ough openings as they may touch dan-
gerous voltage points or short out parts that could result in
a fire or electric shock. Never spill liquid of any kind on
the TV'VCR.
18.Servicing-Do not attempt to service this TVVCR yourself
as opening or removing covers may expose you to danger-
ous voltage or other hazards. ReIer all servicing to quali-
fied service personnel.
19.Damage Requiring Service-Unplug this TViVCR fi'om
the wall outlet and reid" servicing to qualified service pet'-
sonnel under the following conditions:
a. When the power-supply cord or plug is damaged or frayed.
b. If liquid has been spilled, or objects have *hllen into the
TV VCR.
c. If the TVVCR has been exposed to rain or water.
d. If the TVVCR does not operate normally by following the
operating instructions. Adjust only those controls that are
covered by the operating instructions, as improper adjust-
ment of other controls may result in damage and will often
require extensive work by a qualified techuician to restore
the TV VCR to its normal operation.
e. If the TViVCR has been &opped or damaged in any way.
£ When the TViVCR exhibits a distinct change in perfor-
mance-this indicates a need for service.
20.Replacement Parts-When replacement parts are required,
be sure the service technician has used replacement parts
specified by the manufacturer that have the same character-
istics as the original part. Unauthorized substitutions may
result in fire, electric shock, injury to persons or other haz-
ards.
21.Safety Check-Upon completion of any service or repairs to
this TV VCR, ask the service teclmician to per*_rm routine
safety checks to determine that the TVVCR is in proper
operating condition.
22.Heat-This TVVCR product should be situated away fi'om
heat soumes such as radiators, heat registers, stoves, or
other products (including amplifiers) that produce heat.
CAUTION: TO PREVENT ELECTRIC SHOCK, MATCH WIDE BLADE OF PLUG TO WIDE SLOT, FULLY
INSERT.
ATTENTION: POUR r3VITER LES CHOC r3LECTRIQUES, INTRODUIRE LA LAME LA PLUS LARGE DE
LA FICHE DANS LA BORNE CORRESPONDANTE DE LA PRISE ET POUSSER JUSQU'AU FOND.
-3-EN
9103
PRECAUTIONS
For safe operation and satisfactory performance of
your TV/VCR, keep the following in mind when
selecting a place for its installation:
* Shield it t}om direct sunlight and keep it away
t}om sources of intense heat.
* Avoid dusty or humid places.
* Avoid places with insufficient ventilation for proper
heat dissipation. Do not block the ventilation holes
at the top and bottom of the unit. Do not place the
unit on a carpet because this will block the ventila-
tion holes.
* Install unit in a horizontal position.
* Avoid locations subject to strong vibration.
* Do not place the TV/VCR ne_ strong nx_gnetic fields.
* Avoid moving TV/VCR to locations where temper-
ature differences are extreme.
* Do not handle the power cord with wet hands.
* Do not pull on the power cord when disconnecting
it from an AC wall outlet. Grasp it by the plug.
* II; by accident, water is spilled on your unit, unplug
the power cord immediately and take the unit to ,an
Authorized Service Center %r servicing.
* Do not put your fingers or objects into the
TV/VCR cassette holder.
* Do not place anything directly on top of the unit.
Moisture condensation may occur inside the unit
when it is moved from a cold place to a warm place,
or after heating a cold room or under conditions of
high humidity. If a tape is played in a TV/VCR
which has moisture, it may damage the tape and
TV/VCR. Therefore if condensation occurs inside the
unit, turn the POWER button on and allow at least 2
hours for the unit to dry out.
IMPORTANT COPYRIGHT INFORMATION
Unauthorized recording or use of broadcast televi-
sion programming, video tape, film or other copy-
righted material may violate applicable copyright
laws. We assume no responsibility for the unautho-
rized duplication, use, or other acts which int}inge
upon the rights of copyright owners.
FCC WARNING- This equipment may gener-
ate or use radio fi'equency energy. Changes or
modifications to this equipment may cause
harmful interference unless the modifications
are expressly approved in the instruction man-
ual. The user could lose the authori D to oper-
ate this equipment if an unauthorized change
or modification is made.
This equipment has been tested and found to com-
ply with the limits for a Class B digital device, pur-
suant to Part 15 of the FCC Rules. These limits are
designed to provide reasonable protection against
harmful interference in a residential installation.
This equipment generates, uses, and can radiate
radio t}equency energy and, if not installed and
used in accordance with the instructions, may cause
harmful interference to radio colmnunications.
However, there is no guarantee that interference
will not occur in a particular installation. If this
equipment does cause harmful interference to
radio or television reception, which can be deter-
mined by turning the equipment off and on, the
user is encouraged to try to correct the interfer-
ence by one or more of the following measures:
1) Reorient or relocate the receiving antenna.
2) Increase the separation between the equipment
and receiver.
3) Connect the equipment to an outlet on a circuit
different from that to which the receiver is con-
nected.
4) Consult the dealer or an experienced radJo/TV
technician %r help.
The serial number of this product may be %und on the back of the unit. No other TV/VCR has the same serial
number as yours. You should record the number and other vital information here and retain this book as a per-
manent record of your purchase to aid identification in case of theft. Serial numbers arc not kept on file.
Date of Purchase
Dealer name
Dealer Address
Dealer Phone No.
Model No.
Serial No.
-4- EN
9103
T _ ' T _
[] IMPORTANT SAFEGUARDS ............. 2
[] PRECAUTIONS . ....................... 4
[] FEATURES ............................ 6
[] SUPPLIED A(_TSSORIES ............... 6
[] OPERATING CONTROLS AND FUNCTIONS 7
[] PREPARATION" FOR USE ................ 9
ANTENNA/CABLE CONNECTIONS ....... 9
FRONT A/V INPUT .................... 10
INSTALLING THE BATTERIES ........... 10
[] SET UP FOR USE ..................... lO
SELECTING THE LANGUAGE ........... 10
CLOCK SET UP (AUTO /MANUAL) ...... 10
DAYLIGHT-SAVING TIME .............. 12
CHANNEL SET UP .................... 13
DELETING (OR ADDING) CHANNEL ..... 13
[] TV OPERATION". ...................... 14
WATCHING A TV PROGRAM ............ 14
GAME MODE ......................... 14
DEGAUSS ING ........................ 14
PICTURE CONTROL ................... 14
CLOSED CAPTION SYSTEM ............ 15
V-CHIP SET UP ........................ 15
FM MODE (13 inch model only) ........... 17
[] PLAYBACK ........................... 17
NORMAL PLAYBACK .................. 18
AUTO REPEAT PLAYBACK ............. 18
SEARCH ............................. 18
SLOW MOTION ....................... 19
RENTAL PLAYBACK ................... 19
VERTICAL HOLD CONTROL ............ 20
STILL PICTURE ....................... 20
TRACKING ADJUSTMENT .............. 20
[] RECORDING ......................... 20
NORMAL RECORDING ................. 20
OTR (One Touch Recording) .............. 21
TIMER RECORDING ................... 21
TIMER PROGRAM EXTENSION ......... 22
HINTS FOR AUTOMATIC TIMER
RECORDING ......................... 23
AUTO RETURN ....................... 23
WAKE UP TIMER ...................... 23
SLEEP TIMER ......................... 24
[] COPYING A VIDEO TAPE ............... 24
[] ON"SCREEN DL_PLAY ................. 25
[] SPECIAL FEATURES .................. 25
REAL TIME TAPE COLEN-TER ............ 25
AUTO REWIND-EJECT ................. 25
[] MAINTENANCE ....................... 25
[] TROUBLESHOOTING GUIDE ........... 26
[] SPE (_IFICATIONS ..................... 2 7
[] CABLE CHANNEL DESIGNATIONS ...... 27
[] WARRANTY ................... Back Cover
CONTROLES DE OPERACH)N Y SELECCION DE IDIOMA ................. 30
SUS FUNgJONES ........................ 28 AJUSTE DE CANAL ...................... 31
CONEXIONES DE ANTENA/CABLE ........ 30 AJUSTE DEL RELOJ ..................... 31
MODO DE ENTRADA EXTERNA ........... 30
A NOTE ABOUT RECYCLING
This product's packaging materials arc recyclable and can be reused. Please dispose of any materials in
accordance with your local recycling regulations.
Batteries should never be thrown away or incinerated but disposed of in accordance with your local regula-
tions concerning chemical wastes.
-5- EN
9103
* Rotary 4-head Record/Playback System-Four * Auto Head Cleaner-Automatically cleans video
heads ensure excellent picture quality and special
effects playback.
* Index Search-Fast-forwards to start of next recording.
* Slow Motion-View recorded program at slower
than normal speed.
* Infrared remote control
* Trilingual on screen menu display selectable in
English, Spanish, or French
" Real time counter-This shows the elapsed record-
ing or playback time in hours, minutes, and sec-
onds. The .... indication will appear when the tape
is rewound further than the tape counter position
"0:00:00".
* 181 channel capability PLL frequency synthesiz-
er tuner with direct station call-(A converter may
be necessary to view scrambled cable channels.)
*Auto Clock Setting-Allows you to set the clock
*:rom a PBS broadcast station.
* Closed caption system-You may view specially
labeled (cc) TV programs, movies, news, prere-
corded tapes, etc. with either a dialogue caption or
text display added to the program.
* Game mode-Automatically selects *:font A/V input
mode and allows the TV/VCR display to be suit-
able for use with TV games.
* Auto power on and off system-Automatically
turns on the TV/VCR when you insert the cassette,
rams off after auto-rewind, and ejects when the
beginning of the tape is reached.
* Auto rewind when the end of a tape is
reached-This function doesn't occur when using
timer recording.
*2Step picture search operation-You can view a
video program at a high speed or super high speed
in either a folavard or reverse direction in LP and
SLP mode. For SP mode only high speed.
* Three different playback tape speeds :SP/LP/SLP
* Two different recording tape speeds : SP/SLP
heads as you insert or remove a cassette.
* Zero Return-The tape returns to counter of
0:00:00 by rewinding or t:astt\_rwarding.
* Still-"Freeze" the picture at any time, t\_rclose
viewing of a particular scene. Only tapes recorded
in SLP mode wil! show a t;airlyclear picture.
*Digital Auto Tracking (DTR)-Automatically
adjusts the tracking t\_reach tape you play.
* Rental play mode-Improves playback picture
quality t:romworn tapes, such as rental tapes.
* Auto repeat-Allows you to repeat the playing of a
tape indefinitely without pressing the PLAY button.
* Time search-Lets you set the TV/VCR to advance
the tape by entering the desired playback time you
want to skip.
*OTR (One Touch Recording)-][nstant recording in
30 to 480 minutes increments is possible at the
push of the REC/OTR button.
* 1Year, 8 events (including Daily and Weekly
Timer Recording)-The built-in timer allows you to
record up to 8 pro_ams at different times on dif-
ferent channels up to 1 year in advance. The Daily
timer allows recordings to be made of daily broad-
casts, and the Weekly timer allows recording to be
made once a week up to the end of the tape.
* Auto return-After timer recording is finished, the
TV/VCR can return to the beginning of the record-
ing.
* Wake-uplSleep timer-Allows you to have the
TV/VCR automatically turn on or off at a desired
time.
*Timer Program Extension-Allow you to shift the
time schedule t\_r automatic timer recording.
* V-CHiP-Enables parents to prevent their children
t:rom watching inappropriate material on TV.
* FM mode-Allows you to listen to the FM radio.
(13 inch model/SRC2213 W only)
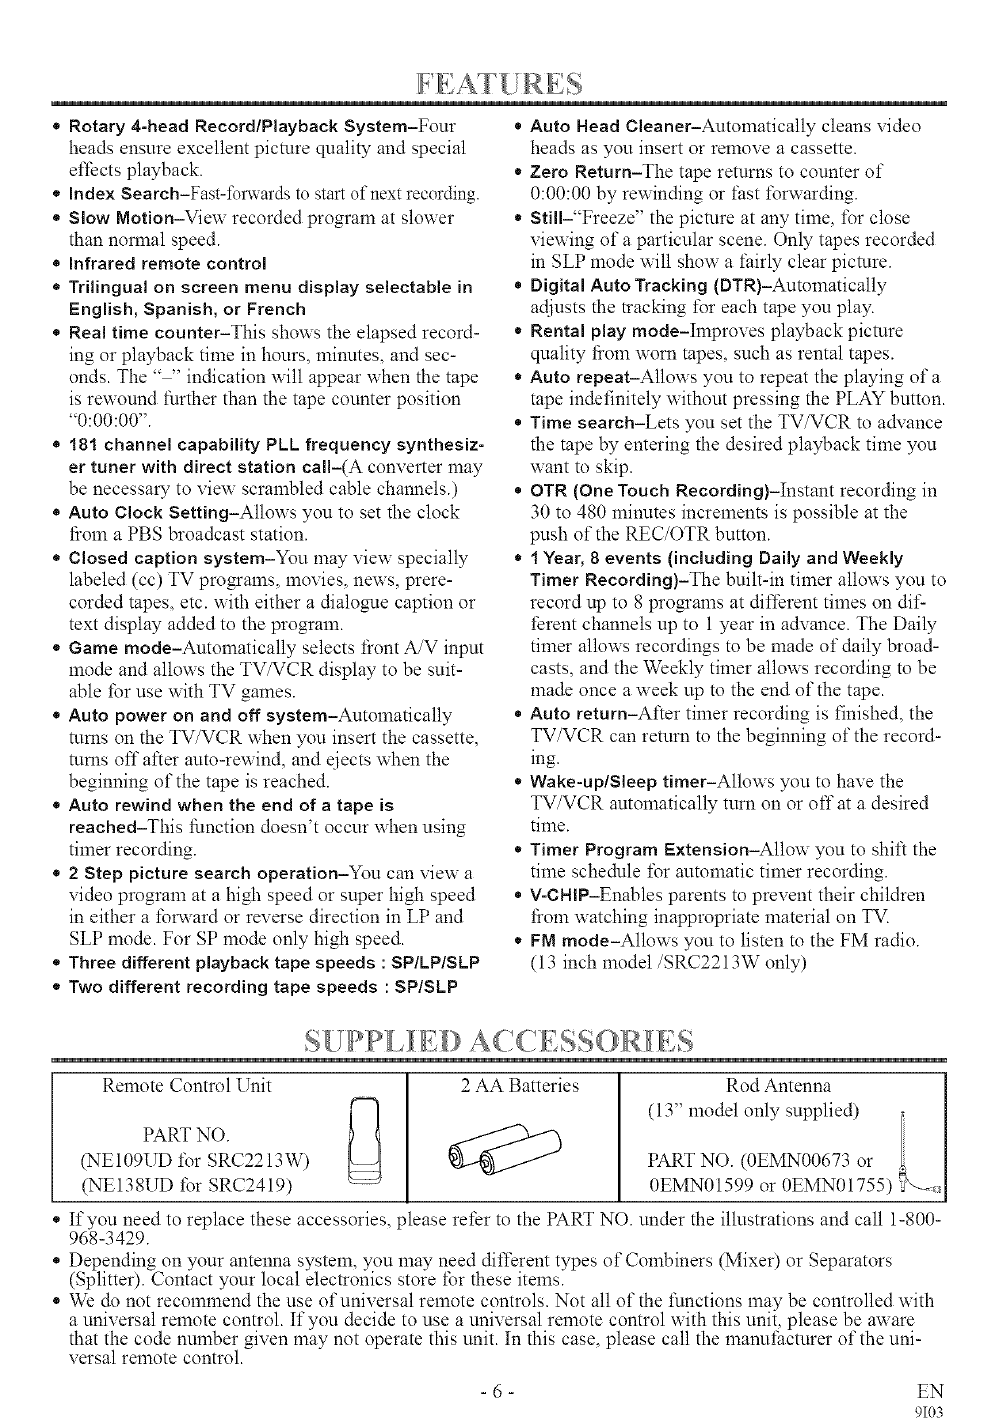
Remote Control Unit 2 AA Batteries Rod Antenna J
I
(1. model only supphed)
PART NO.
(NE 109UD l\_r SRC2213 W) PART NO. (0EMN00673 or
(NE138UD for SRC2419) 0EMN01599 or 0EMN01755) :_
* If you need to replace these accessories, please refer to the PART NO. under the illustrations and call 1-800-
968-3429.
* Depending on your antenna system, you may need different types of Combiners (Mixer) or Separators
(Splitter). Contact your local electronics store for these items.
* We do not recommend the use of universal remote controls. Not all of the functions may be controlled with
a universal remote control. If you decide to use a universal remote control with this unit, please be aware
that the code number given may not operate this unit. In this case, please call the manuti_cturer of the uni-
versal remote control.
-6- EN
9103
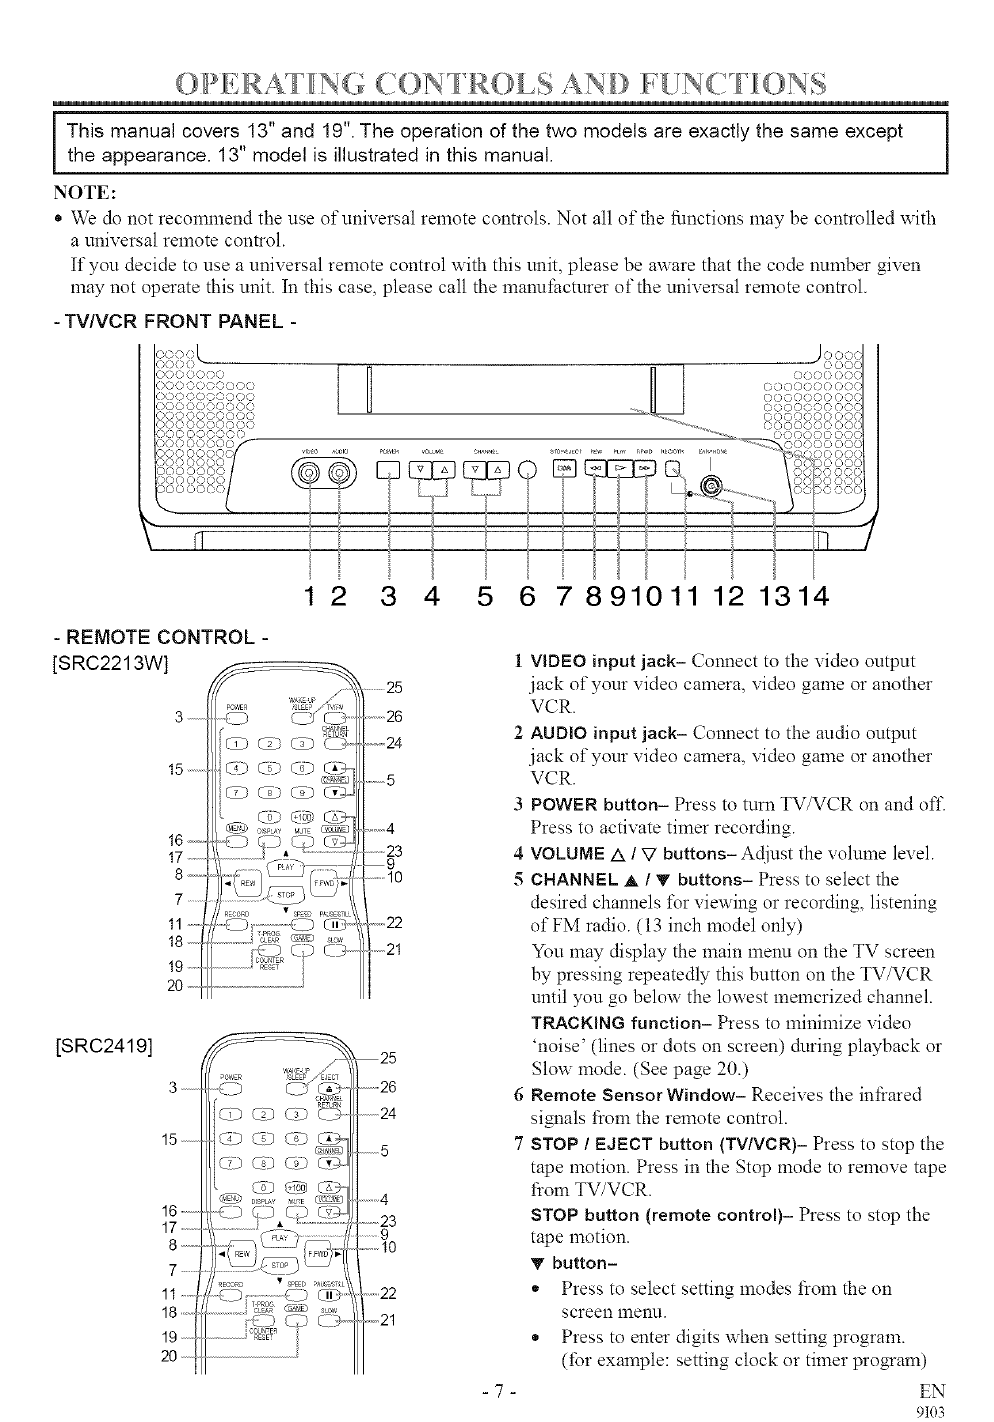
©//,RATING (.()N'I R©LS I) FUN(. [/©MS
This manual covers 13" and 19". The operation of the two models are exactly the same except
the appearance, 13" model is illustrated in this manual,
NOTE:
* We do not recommend the use of universal remote controls. Not all of the ffmctions may be controlled with
a universal remote control.
If you decide to use a universal remote control with this unit, please be aware that the code number given
may not operate this unit. In this case, please call the manufi_cturer of the universal remote control.
-TV/VCR FRONT PANEL -
- REMOTE CONTROL -
[SRC2213W]
3 .........
15 .........
16--
17°4
8--
7 .........
11
18
19-
20,,,,,
<
....(-)
RETUR_
(Tb (Tg (->_
GD G) GD __j
LT3 Cg2 Lvg
R£CORD • S_SO P_E,STILt
(-3 ¢30,,-
...................... E
.......................... /
[SRC2419]
3 ..........
15 ..........
16,--
17 .....
7 .........
11 .......
18
19
20
CO 0-3 Cz3 _2_
_EOORa • S_EEOP_US_T_[
(.--3........ CU _r3
T PROG _......
@ c>,,
................... T
2 3 4 5 6 7 891011 12 1314
25
26
.........24
..........5
---4
9
.........10
_22
21
25
26
24
5
-4
......23
.......9
..........10
.....22
.........21
1VIDEO input jack- Connect to the video output
jack of your video camera, video game or another
VCR.
2AUDIO input jack- Connect to the audio output
jack of your video camera, video game or another
VCR.
3 POWER button- Press to turn TV/VCR on and off.
Press to activate timer recording.
4 VOLUME A/V buttons- Adjust the volulne level.
CHANNEL A /Y buttons- Press to select the
desired channels t%rviewing or recording, listening
of FM radio. (13 inch model only)
You may display the main menu on the TV screen
by pressing repeatedly this button on the TV/VCR
until you go below the lowest lnelncrized channel.
TRACKING function- Press to minimize video
'noise' (lines or dots on screen) during playback or
Slow mode. (See page 20.)
6 Remote Sensor Window- Receives the infi:ared
signals from the remote control.
7 STOP /EJECT button (TV/VCR)- Press to stop the
tape motion. Press in the Stop mode to remove tape
from TV/VCR.
STOP button (remote control)- Press to stop the
tape motion.
'_"button-
* Press to select setting modes from the on
screen nlenu.
* Press to enter digits when setting program.
(for example: setting clock or timer program)
EN
9103
-7-
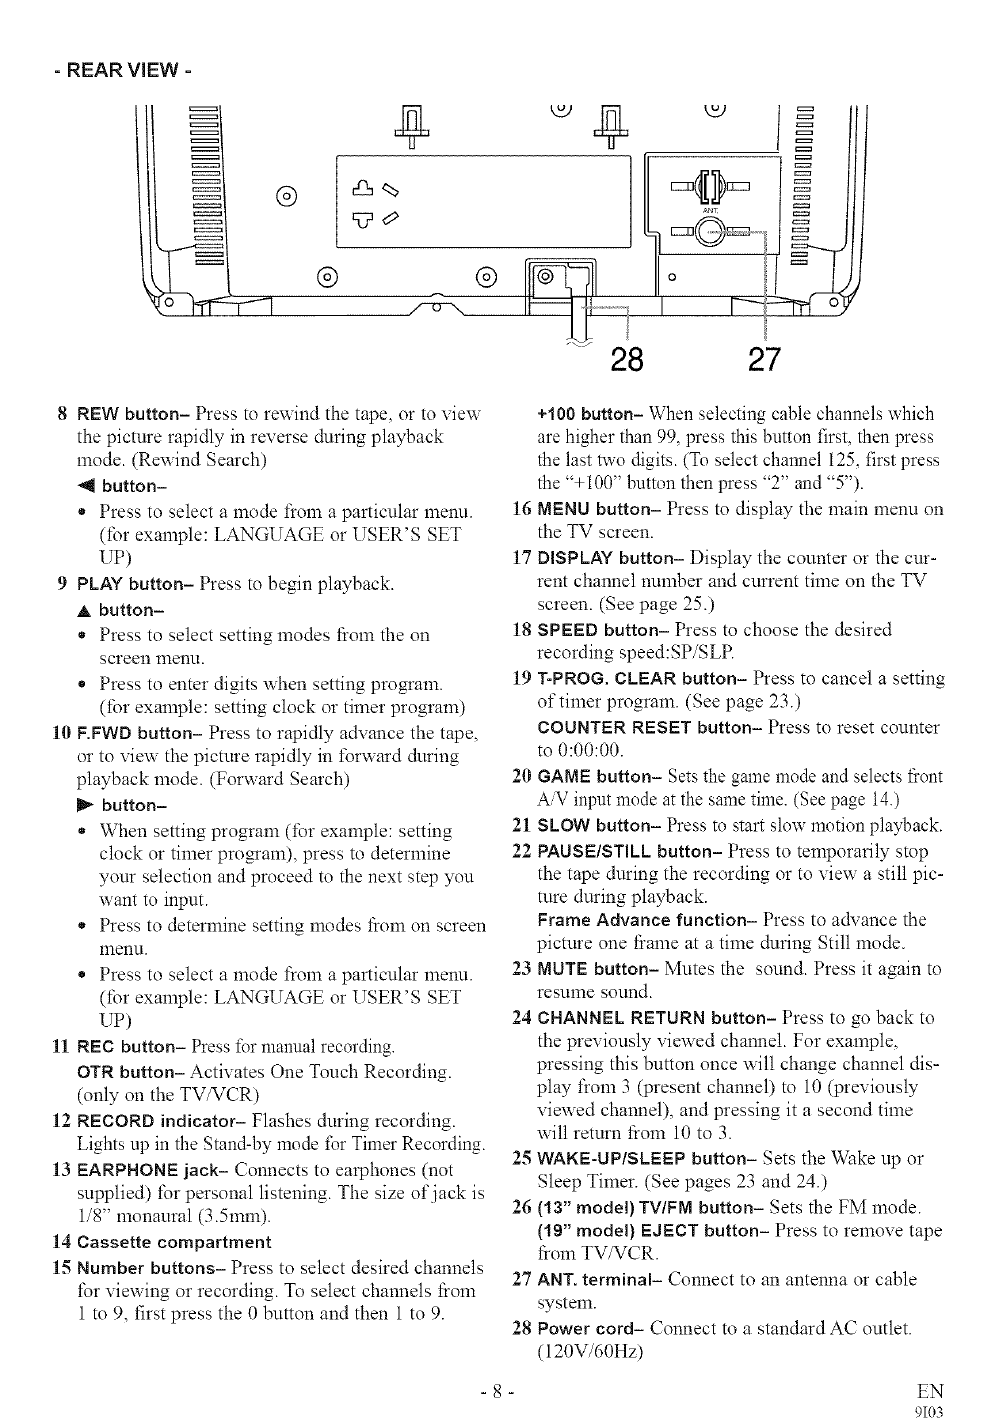
- REAR VIEW -
®
g
® ®
28 27
8 REW button- Press to rewind the tape, or to view
the picture rapidly in reverse during playback
mode. (Rewind Search)
"_1button-
* Press to select a mode from a particular menu.
(for example: LANGUAGE or USER'S SET
UP)
9PLAY button- Press to begin playback.
A button-
* Press to select setting modes fi:om the on
screen nlenlJ.
* Press to enter digits when setting program.
(for example: setting clock or timer program)
10 F.FWD button- Press to rapidly advance the tape,
or to view the picture rapidly in forward during
playback mode. (Forward Search)
button-
*When setting program (for example: setting
clock or timer pro_am), press to determine
your selection and proceed to the next step you
want to input.
* Press to determine setting modes fi:om on screen
nlenu.
* Press to select a mode from a particular menu.
(for example: LANGUAGE or USER'S SET
UP)
11 REC button- Press for manual recording.
OTR button- Activates One Touch Recording.
(only on the TV/VCR)
12 RECORD indicator- Flashes during recording.
Lights up in the Stand-by mode for Timer Recording.
13 EARPHONE jack- Connects to earphones (not
supplied) for personal listening. The size of jack is
1/8" monaural (3.5mm).
14 Cassette compartment
15 Number buttons- Press to select desired channels
for viewing or recording. To select channels fi:om
1 to 9, first press the 0 button and then 1 to 9.
+100 button- When selecting cable channels which
are higher than 99, press this button first, then press
the last two digits. (To select channel 125, first press
the '%100" button then press "2" and "5").
16 MENU button- Press to display the main menu on
the TV screen.
17 DISPLAY button- Display the counter or the cur-
rent channel number and current time on the TV
screen. (See page 25.)
18 SPEED button- Press to choose the desired
recording speed:SP/SLR
19 T-PROG. CLEAR button- Press to cancel a setting
of timer program. (See page 23.)
COUNTER RESET button- Press to reset counter
to 0:00:00.
20 GAME button- Sets the game mode and selects front
AV input mode at the same time. (See page 14.)
21 SLOW button- Press to start slow motion playback.
22 PAUSE/STILL button- Press to temporarily stop
the tape during the recording or to view a still pic-
ture during playback.
Frame Advance function- Press to advance the
picture one fi:ame at a time during Still mode.
23 MUTE button- Mutes the sound. Press it again to
resume sound.
24 CHANNEL RETURN button- Press to go back to
the previously viewed channe!. For example,
pressing this button once wil! change channel dis-
play from 3 (present channel) to 10 (previously
viewed channel), and pressing it a second time
will return fi:om 10 to 3.
25 WAKE-UP/SLEEP button- Sets the Wake up or
Sleep Timer. (See pages 23 and 24.)
26 (13" model) TV/FM button- Sets the FM mode.
(19" model) EdEDT button- Press to remove tape
fi:om TV/VCR.
27 ANT. terminal- Connect to an antenna or cable
system.
28 Power cord- Connect to a standard AC outlet.
(120V/60Hz)
-8- EN
9103
" I ....... _ "_ .... "_ "i_
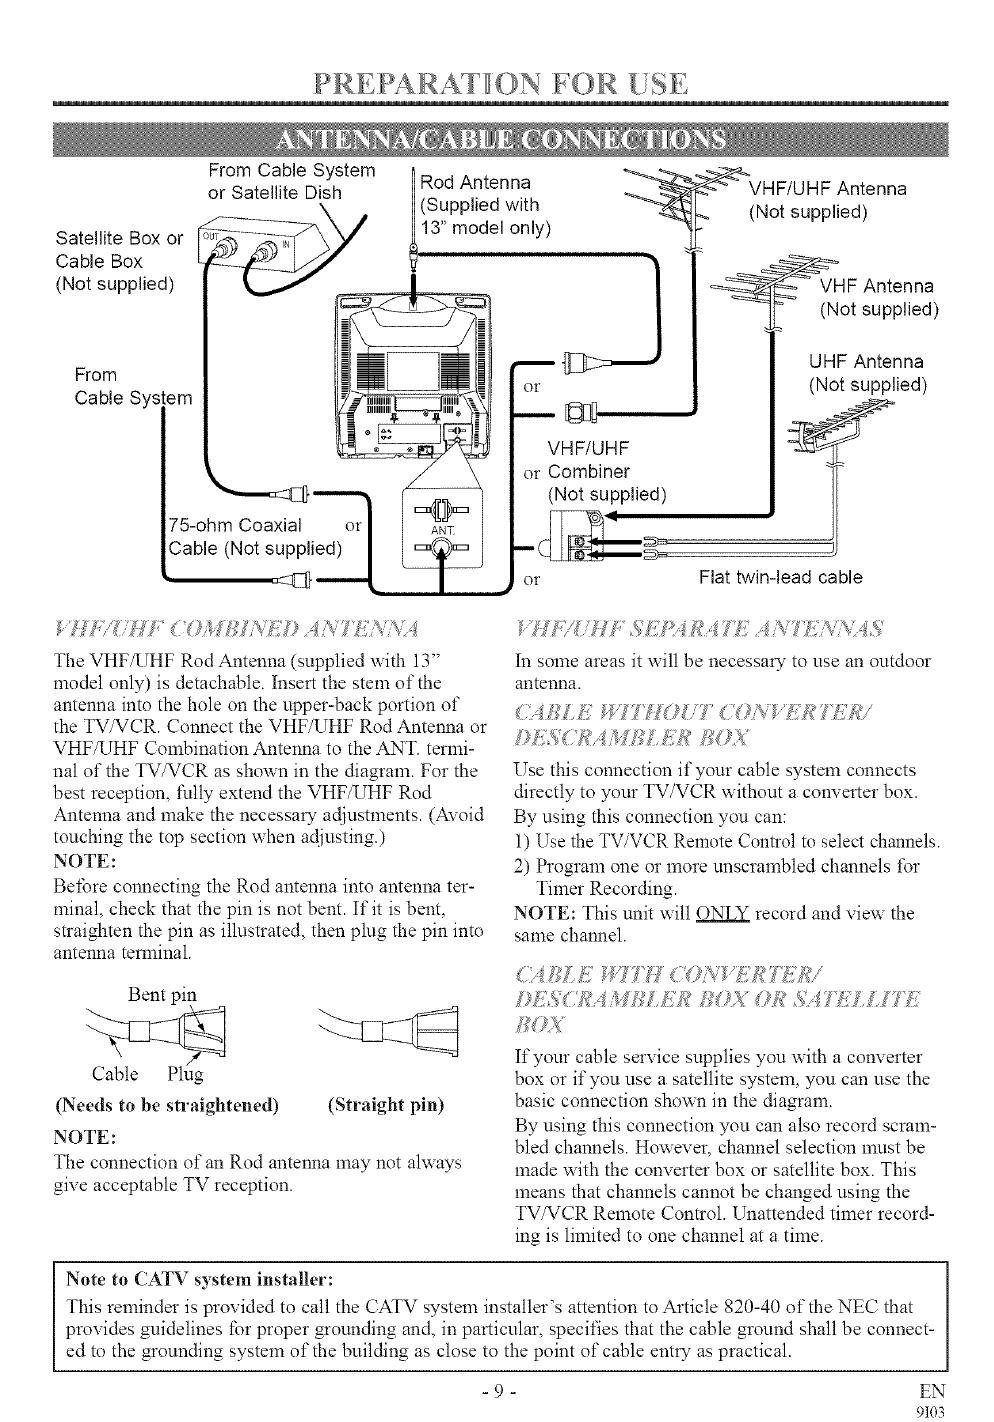
PRIi]PA/ ATI© /i()R
From Cable System
or Satellite Dish
Satellite Box or
Cable Box
(Not supplied)
From lJJ iL!
..syse.
75-oh mCoaxia_/l}l --'_or _
Cable (Not s_,_[ _ _ J
Rod Antenna
(Supplied with
13" model only)
_j
or
VHF/UHF
or Combiner
(Not supplied)
or
_(N HF/U HF Antenna
ot supplied)
_H F Antenna
= (Not supplied)
UHF Antenna
(Not supplied)
Flat twin-lead cable
The VHFA/HF Rod Antenna (supplied with 13"
model only) is detachable. Insert the stem of the
antenna into the hole on the upper-back portion of
the TV/VCR. Connect the VHF/UHF Rod Antenna or
VHFAIHF Combination Antenna to the ANT. termi-
nal of the TV/VCR as shown in the diagram. For the
best reception, fully extend the VHF/UHF Rod
Antenna and make the necessary adjustments. (Avoid
touching the top section when adjusting.)
NOTE:
Before connecting the Rod antenna into antenna ter-
minal, check that the pin is not bent. If it is bent,
straighten the pin as illustrated, then plug the pin into
antenna terminal.
Bent pin
Cable Plug
(Needs to be straightened) (Straight pin)
NOTE:
The connection of an Rod antenna may not always
give acceptable TV reception.
In some areas it will be necessary to use an outdoor
antenna.
L5¢ ;*_:,_MBL t;R Y_?_
Use this connection if your cable system connects
directly to your TV/VCR without a converter box.
By using this connection you can:
1) Use the TViVCR Remote Control to select channels.
2) Program one or more unscrambled channels for
Timer Recording.
NOTE: This unit will ONLY record and view the
same channel.
)'IHIAI'I Y'? 'II (;Z)/_+,,I'Ii,IiI ?TAP"
I}L>_,CH 4 4:'Fli%KH II_;_ )({" H,,I TLILLI ?'LI
If your cable service supplies you with a converter
box or if you use a satellite system, you can use the
basic connection shown in the diagram.
By using this connection you can also record scram-
bled channels. However, channel selection mtlst be
made with the converter box or satellite box. This
means that channels cannot be changed using the
TV/VCR Remote Control. Unattended timer record-
ing is limited to one channel at a time.
Note to CATV system installer:
This reminder is provided to call the CATV system insta!ler's attention to Article 820-40 of the NEC that
provides guidelines for proper _oundJng and, in particular, specifies that the cable ground shall be connect-
ed to the grounding system of the building as close to the point of cable entry as practical.
-9- EN
9103
TO RECORD A SCRAMBLED/UNSCRAMBLED
CHANNEL
1) Set the TV/VCR channel selector to the output
channel of the Cable Converter Box or Satellite
Box. (Example: CH3)
2) Select the channel to record fiom your Cable
Converter Box or Satellite Box.
When using an external input signal (another VCR,
video game or video camera), connect the player's
audio/video output cables to the AUDIO IN/VIDEO
IN jacks of your TV/VCR. Then press the CHAN-
NEL a` or 'V button until "AUX" appears on the
screen.
NOTE: "AUX" is found below the AUX
lowest memorized channel.
(Example: CH2)
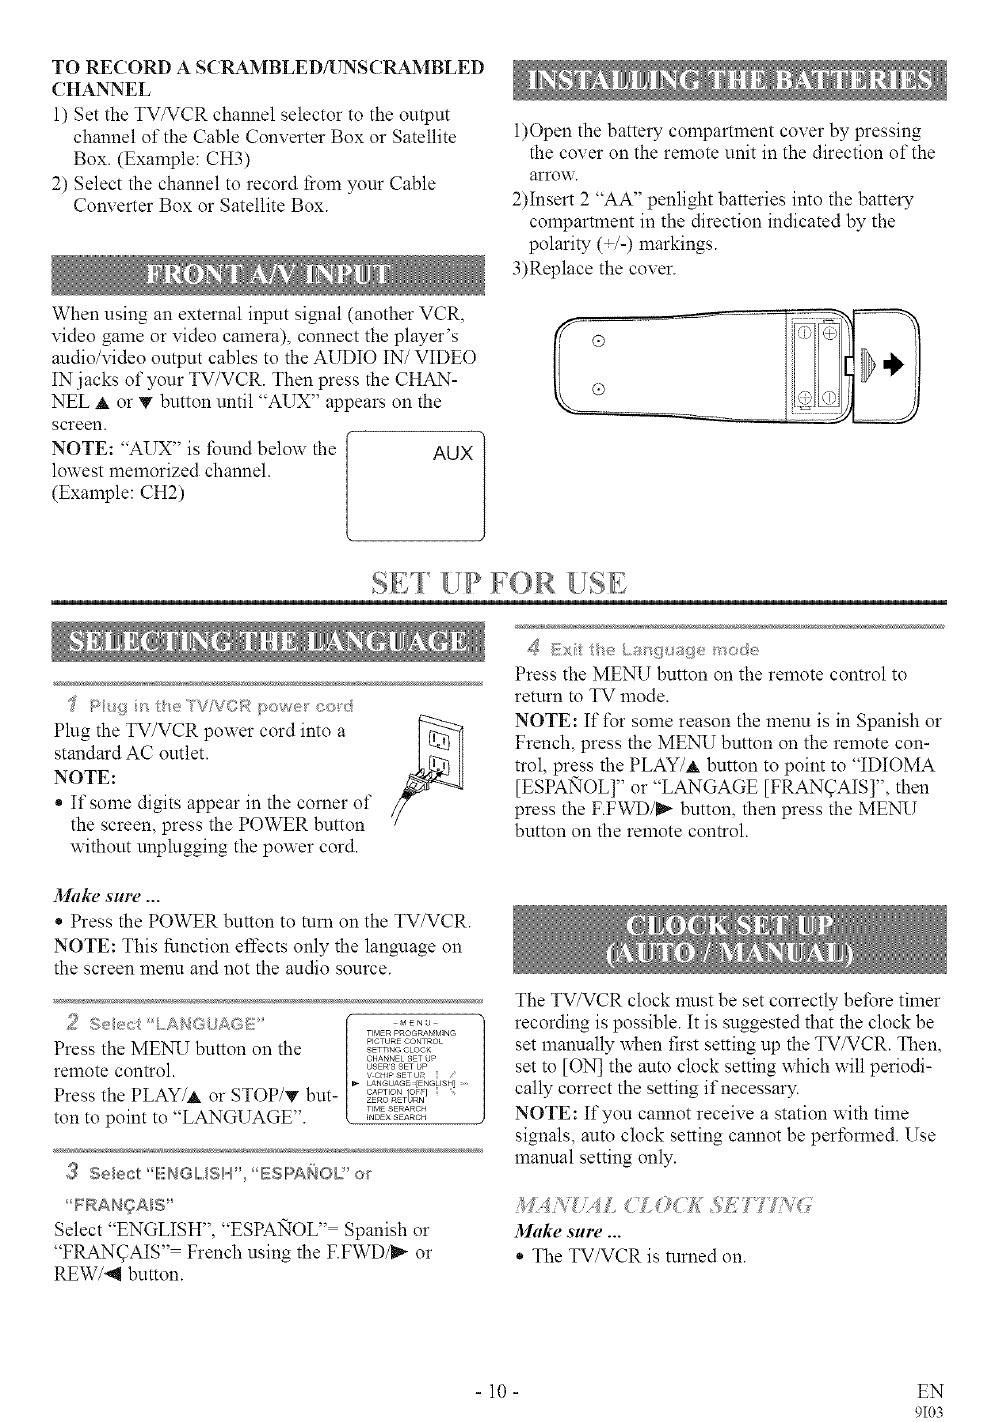
1)Open the battery conapamnent cover by pressing
the cover on the remote unit in the direction of the
arrow.
2)Insert 2 "AA" penlight batteries into the battery
compartment in the direction indicated by the
polarity (_/-) markings.
3)Replace the cover.
q
SE'I UP F©R USE
'_ r_ eTV/VCR :>ow_e_'co,d
Plug the TV/VCR power cord into a
standard AC outlet.
NOTE:
If some digits appear in the comer of
the screen, press the POWER button
x_ithout unplugging the pox_er cord.
Press the MENU button on the remote control to
return to TV mode.
NOTE: If t%r some reason the menu is in Spanish or
French, press the ME_Y button on the remote con-
trol, press the PLAY/a, button to point to "IDIOMA
[ESPANOL]" or "LANGAGE [FRAN_AIS]", then
press the F.FWD/mI,+button, then press the MEN_Y
button on the remote control.
Make sure ...
* Press the POWER button to mm on the TV/VCR.
NOTE: This function effects only the language on
the screen menu and not the audio source.
Press the MEN_; button on the _+_,,_..............o_oo_
CHAHNEL SET UP
remote control, us++_s+_op
V CHIp SET Ur'
CANGklAGE ENGUSH ....
Press the PLAY/a` or STOP/T but- +++o°......++,o+_°+_....
ton to point to "LANGUAGE". ...........
_ Se_ec_ "IENGII,,,,,,{SH",'ESIPA}4OL" or
_FRAHgAIS"
Select "ENGLISH", "ESPANOL" Spanish or
"FRAN_AIS '' French using the F.FWD/_ or
REW/-_I button.
The TV/VCR clock nmst be set correctly before timer
recording is possible. It is suggested that the clock be
set manually when first setting up the TV/VCR. Then,
set to [ON] the auto clock setting which will periodi-
cally correct the setting if necessary.
NOTE: ffyou cannot receive a station with time
signals, auto clock setting cannot be performed. Use
manual setting only.
Make sure ...
* The TV/VCR is turned on.
- 10 - EN
9103
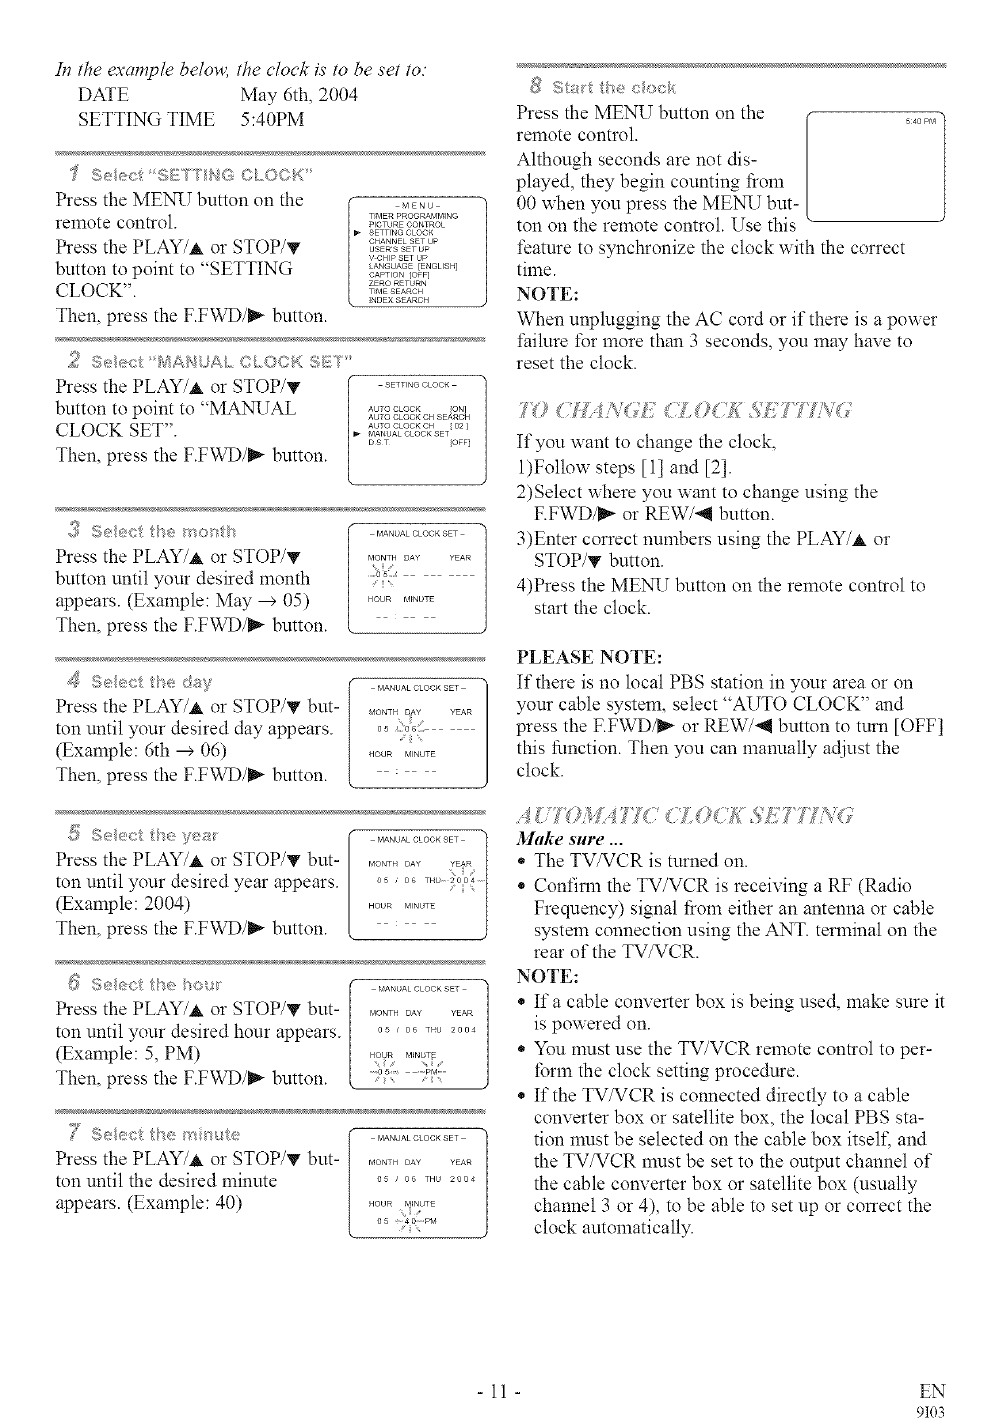
In the example below, the clock is to be set to.
DATE May 6th, 2004
SETTING TIME 5:40PM
"J Seect S}I{TTb<'G©LO©b::'
Press the MENI/button on the
remote control.
Press the PLAY/I, or STOP/T
button to point to "SETTING
CLOCK". I MENU
TIMER PROGRAMMIN6
PICTURE OONTROC
SETTING OLOOK
CHANNEL SET UP
USERS SET UP
V CHIP SET UP
LANGUAGE [ENGLISH]
CAPTION /O_F]
ZERO RETURN
T_dE SEARCH
INDEX S£AROH
Then, press the F.FWD/I_ button.
Press the PLAY/at or STOP/T (...........
button to point to "MANUAL '_ ......... _o_
AUTO GLOGK OH SEARCH
CLOCK SET". ........... i0_1
MANUAL GLOGK SET
D 8 • /OFF]
Then, press the F.FWD/I_ button.
_;}_ S_ee /'e 8;q© t_AHUALCLOCKSE_
Pressthe PLAY/_ or STOP/T ............
k
......0 5_
button until your desired month
appears.(E×ample: May -->05) ...........
Then, pressthe F.FWD/_ button.
Press the PLAY/_ or STOP/_ but- _..... _ .....
ton until your desired day appears. 0_o_
(Example: 6th --+06) ..........
Then, press the F.FWD/_ button.
Press the PLAY/_ or STOP/T but- _.......... sR
ton until your desired year appears, o_, .................
(Example: 2004) ...........
Then, press the F.FWD/_ button.
/
Press the PLAY/A or STOP/T but- _...........
ton until your desired hour appears. 0...........
(Example: 5, PM) _?_=_o_
Then, press the F.FWD/_ button .... ....
_'_ Oi+_' ::4; @ _ANUA_C_OCnS_T
Press the PLAY/A or STOP/T but- _...........
ton until the desired minute ............
appears. (Example: 40) ..........
05 40 ply}
_ St;a _:H;e coo/<
Press the MENU button on the
remote control.
Although seconds are not dis-
played, they begin counting l:rom
00 when you press the MEN_/but-
ton on the remote control. Use this
feature to synchronize the clock with the correct
time.
NOTE:
When unplugging the AC cord or if there is a power
*:ailure fi_rmore than 3 seconds, you may have to
reset the clock.
70 (+Md,k(7;f7 ZO7£ _/£7+777YQ,
If you want to change the clock,
1)Follow steps [1] and [2].
2)Select where you want to change using the
F.FWD/_ or REW/-_ button.
3)Enter correct numbers using the PLAY/at or
STOP/T button.
4)Press the MEN_; button on the remote control to
start the clock.
PLEASE NOTE:
If there is no local PBS station in your area or on
your cable system, select "AUTO CLOCK" and
press the F.FWD/_ or REW/"q button to turn [OFF]
this function. Then you can manually adjust the
clock.
,47; 7LkD'F;'I?7_7770U'I( q<ET '7!_',(7
Make sure ...
* The TV/VCR is turned on.
* Confirm the TV/VCR is receiving a RF (Radio
Frequency) signal fi'om either an antenna or cable
system connection using the ANT. terminal on the
rear of the TV/VCR.
NOTE:
* Ifa cable converter box is being used, make sure it
is powered on.
* You nlust use the TV/VCR remote control to per-
form the clock setting procedure.
* If the TV/VCR is connected directly to a cable
converter box or satellite box, the local PBS sta-
tion must be selected on the cable box itsel£ and
the TV/VCR nlust be set to the output channel of
the cable converter box or satellite box (usually
channel 3 or 4), to be able to set up or correct the
clock automatically.
- 11 - EN
9103
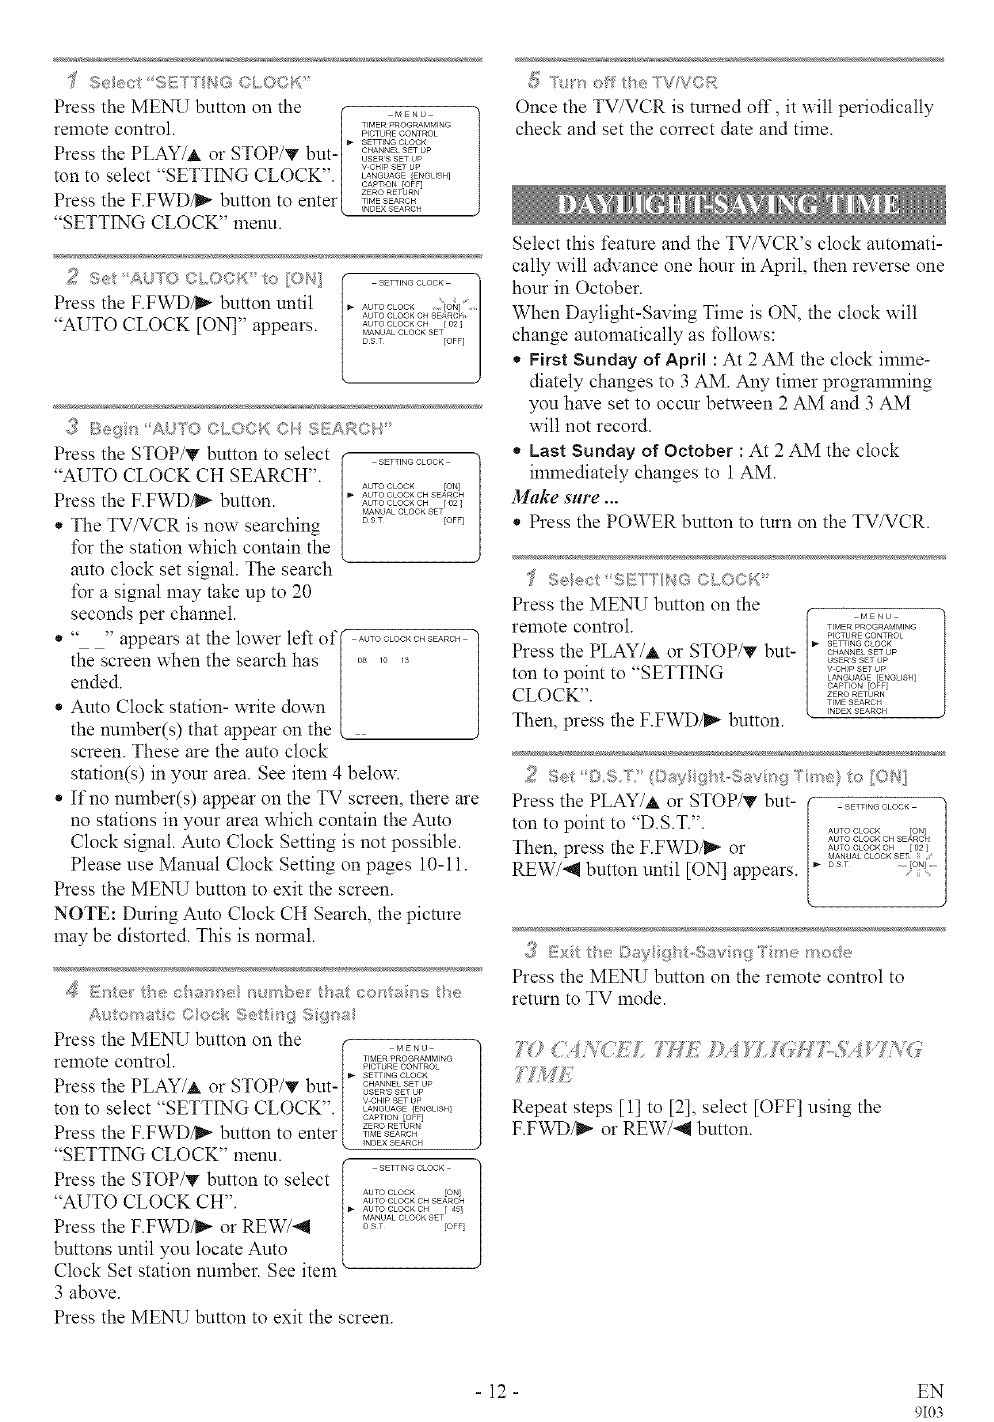
Press the MEN_; button on the (- ....
1 / ..................
remote contro . P,CVURECONTROL
_1,_ SETTING CLOCK
th PLAY/_, STOP/T b}[!.............
Press e or usaRsSaTUP
v CHIP SET UP
ton to select 'SETTING CLOCK I ........ _......
• | CAPTION [OFF 1
ZERO RETURN
Press the F FWD/_ button to enter[ ..........• NDEX SEARCH
"SETTING CLOCK" menu.
2 o_:_ °U C/,OCK't>[Of, a
Press the F.FWD/_ button until
"AUTO CLOCK [ON]" appears•
" _"' ,+,} SEAAObi
{:_Bgi>..... IU'TO,.,L,.CK _"....
Press the STOP/'V button to select SETTING CLOCK
"AUTO CLOCK CH SEARCH". AUTO CLOCK [ON]
Press the F.FWD/_ button• _o_o_................o_oo_c. r0_
MANUAL CLOCK SET
* The TV/VCR is now searching O_T To<
*\_rthe station x_hich contain the
auto clock set signal. The search
for a signal may take up to 20
seconds per channel.
* .... appears at the lower left of I .................
the screen when the search has / .....
ended• /
* Auto Clock station- write down [
the number(s) that appear on the L
screen• These are the auto clock
station(s) in your area• See item 4 below.
* If no number(s) appear on the TV screen, there are
no stations in your area which contain the Auto
Clock signal. Auto Clock Setting is not possible•
Please use Manual Clock Setting on pages 10-11.
Press the ME_; button to exit the screen•
NOTE: During Auto Clock CH Search, the picture
may be distorted• This is normal.
_g Er <'_ isecame ; /_rbu /:ha co_'s{a _s _: e
Auf:omatc©ock Se sgSg/"_a
Press the MEN_; button on the i" ....
relnote control. _PICTURETIMERPROGRAMMNGcoNTROL
i_ SETTING CLOCK
Press the PLAY/_, or STOP/_ but .............O_ER*_ uo
v CHP SET UP
ton to select "SETTING CLOCK . ! ........ {.......
/CAPTION [OFF]
t ZERO RETRN
Press the F.FWD/_ button to enter ..........
INDEX SEARCH
"SETTING CLOCK" menu. f
Press the STOP/T button to select
"AUTO CLOCK CH". "k _I__kgg_.... [o_
AUTO CLOCK CH [ 451
Press the F.FWD/_ or REW/'_I _ _d$N#.......... TO<
buttons until you locate Auto
Clock Set station number. See item
3 above•
Press the MEN_; button to exit the screen•
I_ off 7VVOR
Once the TV/VCR is turned off, it will periodically
check and set the correct date and time.
Select this feature and the TV/VCR's clock automati-
cally will advance one hour in April, then reverse one
hour in October•
When Daylight-Saving Time is ON, the clock will
change automatically as follows:
* First Sunday of April : At 2 AM the clock imme-
diately changes to 3 AM. Any timer programming
you have set to occur between 2 AM and 3 AM
will not record•
*Last Sunday of October : At 2 AM the clock
immediately changes to 1 AM.
Make sure...
* Press the POWER button to mrn on the TV/VCR.
@ s:_ :1:F 'I" '+ ¢'i (,¢'#
> 4..... > .... <i(;_ +J ,,,,,,> ,_,
Press the MINT; button on the MEN
remote control. _,ME_pRo_=v,._
PICTURE CONTROL
Press the PLAY/_ or STOP/T but- _..........CHANNEL SET UP
USERS SET UP
ton to point to "SETTING .........
LANGUAGE IENGLISH]
CAPTION [OFF]
CLOCK". ..........
TIME SEARCH
Then, press the F.FWD/I_ button. ..........
/,,_ 71 If / ' :)_/_g7 } l t: 1) /+s,)
Press the PLAY/_ or STOP/T but- _..........
ton to point to "D.S.T.". AUTO CLOCK {ON]
Then, press the F.FWD/_ or
REW/-_I button until [ON] appears.
]_ /!:ix/: t e /:)a i" t 5i_av _s*'_ mo(e
PresstheMEiX_ buttonon theremotecontrolto
return to TV mode.
70 UTI/CUWL 7It£ l:):I 1U;1[7t77:%:_ I/YG
77MIT
Repeat steps [1] to [21, select [OFF] using the
F.FWD/_ or REW/-_I button.
- 12 - EN
9103
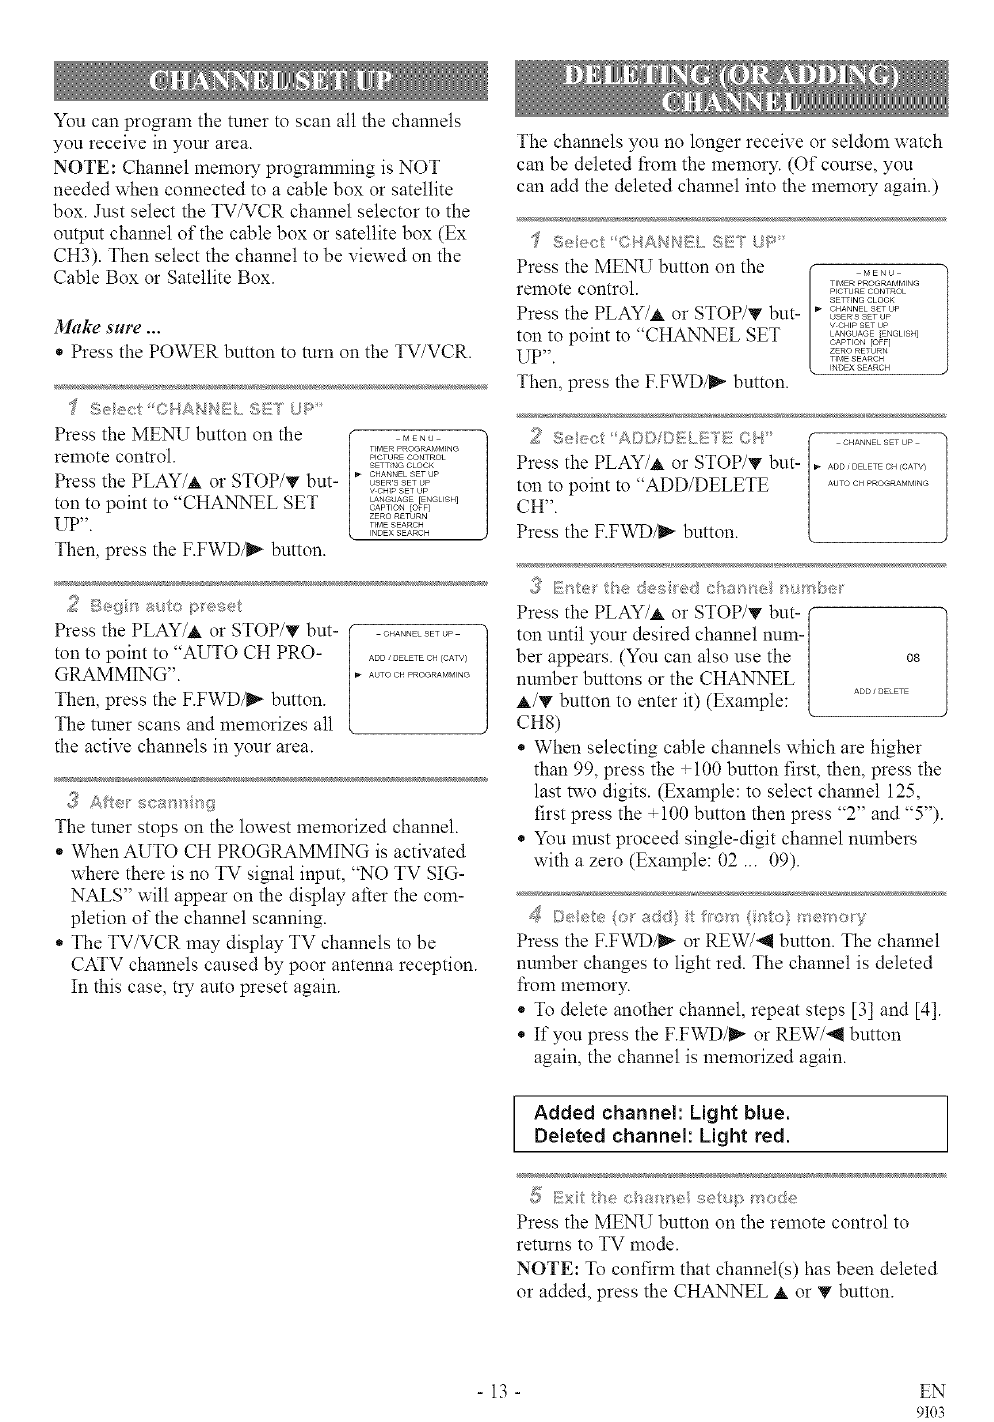
You can program the tuner to scan all the channels
you receive in your area.
NOTE: Channel memory programming is NOT
needed when connected to a cable box or satellite
box. Just select the TV/VCR channel selector to the
output channel of the cable box or satellite box (Ex
CH3). Then select the channel to be viewed on the
Cable Box or Satellite Box.
_llke S[Ire ...
* Press the POWER button to mm on the TV/VCR.
'_ Seeet CHANN_;/ SET UP
Press the MEN_I button on the (.....
remote control, r_MERP,CrUREPROG_MM,_CO_rRO_
SETTING CLOCK
Press the PLAY/_, or STOP/T but- '_............u_E__
V CHIP SET UP
ton to point to "CHANNEL SET o_,,o_........._o_r.......
ZERO RETURN
UP". ...........
INDEX SEARCH
Then, press the F.FWD/_ button.
2 i}}e{/_ 8_/o > e_>e{
Press the PLAY/A or STOP/T but-
ton to point to "AUTO CH PRO-
GRAMMING".
Then, press the F.FWD/_ button.
The tuner scans and memorizes all
the active channels in your area.
CHANNEL SET UP
ADD / DELETE OH (CAW)
AUTO OH PROGRAMMING
_)) AXe scan_ g
The tuner stops on the lowest memorized channel.
* When AUTO CH PROGRAMMING is activated
where there is no TV signal input, "NO TV SIG-
NALS" will appear on the display after the com-
pletion of the channel scanning.
* The TV/VCR may display TV channels to be
CATV channels caused by poor antenna reception.
In this case, try auto preset again.
The channels you no longer receive or seldom watch
can be deleted from the memory. (Of course, you
can add the deleted channel into the memory again.)
"[ _b<<<;0/4/_4_4_1}/_SE'/UP'
Press the MEN_I button on the (.....
remote control. ! TIMKRPROGRAMMINGpcTURECONTROL
SE_ING CLOCK
Press the PLAY/A or STOP/_' but- '_ ............_,o_
V CHIP SET Ogo
ton to point to "CHANNEL SET ........ _......
CAPTION [OFF]
UP". ..........TIMESEARCH
INDEX SEARCH
Then, press the F.FWD/_ button.
Press the PLAY/A or STOP/T but- , ............ c,,,0
ton to point to "ADD/DELETE ..................
CH".
Press the F.FWD/_ button.
_!_ E tethedes_ed esa_ e u>be_ _
Press the PLAY/A or STOP/T but-
ton until your desired channel num-
ber appears. (You can also use the 0s
number buttons or the CHANNEL
A/V button to enter it) (Example: ..........
CHS)
* When selecting cable channels which are higher
than 99, press the +100 button first, then, press the
last two digits. (Example: to select channel 125,
first press the -100 button then press "2" and "5").
* You must proceed single-digit channel numbers
with a zero (Example: 02 ... 09).
Deete{o add} tf_'o*q( _to}¢_er_oy
Press the F.FWD/_ or REW/'_ button. The channel
number changes to light red. The channel is deleted
from memory.
* To delete another channel, repeat steps [3] and [4].
* If you press the F.FWD/_ or REW/_I button
again, the channel is memorized again.
Added channel: Light blue.
Deleted channel: Light red.
_; i!_ixitthecB _e se_pmode
Press the MEN_I button on the remote control to
returns to TV mode.
NOTE: To confirm that channel(s) has been deleted
or added, press the CHANNEL _ or V button.
- 13 - EN
9103
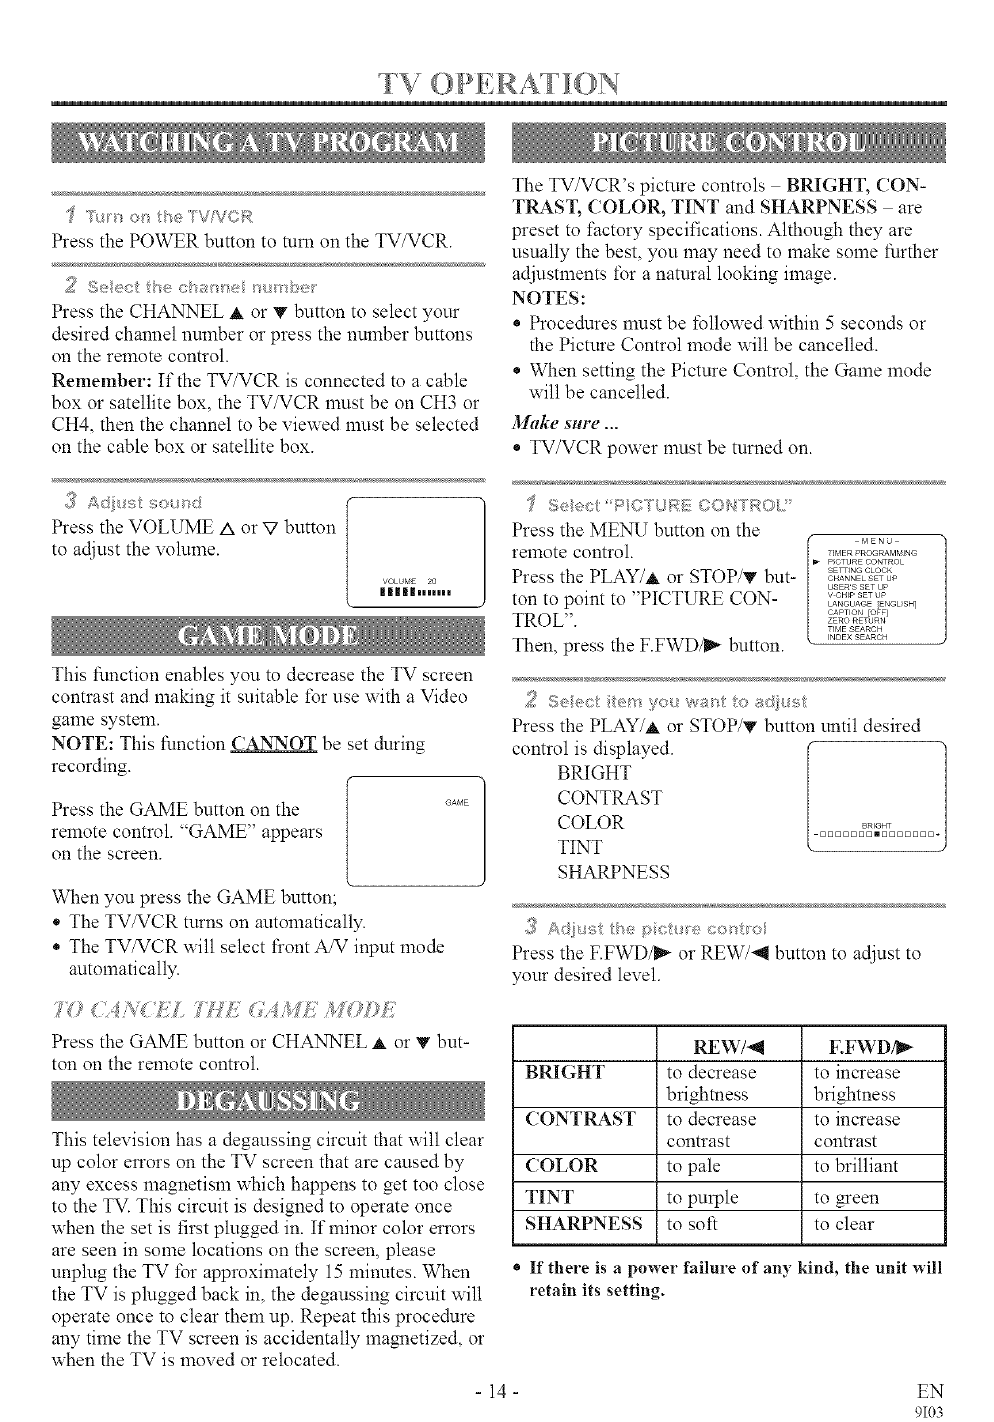
TV O//,RATIO.
'J X,_r on eTVfVCR
Press the POWER button to mm on the TV/VCR.
Press the CHANNEL at or T button to select your
desired channel nunrber or press the number buttons
on the remote control.
Remember: If the TV/VCR is connected to a cable
box or satellite box, the TV/VCR must be on CH3 or
CH4, then the channel to be viewed nmst be selected
on the cable box or satellite box.
if A@_st soun<
Press the VOLUME Aor V button
to adjust the volume.
This function enables you to decrease the TV screen
contrast and making it suitable *\_ruse with a Video
game system.
NOTE: This function CANNOT be set during
recording.
Press the GAME button on the
remote control. "GAME" appears
on the screen.
When you press the GAME button;
* The TV/VCR turns on automatically.
* The TV/VCR will select front A/V input mode
automatically.
:1) (,i,\( £L 77:ti{' (44MIi, ,4)I)£
Press the GAME button or CHANNEL at or T but-
ton on the remote control.
This television has a degaussing circuit that will clear
up color errors on the TV screen that arc caused by
any excess magnetism which happens to get too close
to the TV. This circuit is designed to operate once
when the set is first plugged in. If minor color errors
are seen in some locations on the screen, please
unplug the TV for approximately 15 minutes. When
the TV is plugged back in, the degaussing circuit wil!
operate once to clear them up. Repeat this procedure
any time the TV screen is accidentally magnetized, or
when the TV is moved or relocated.
The TV/VCR's picture controls BRIGHT, CON-
TRAST, COLOR, TINT and SHARPNESS arc
preset to factory specifications. Although they are
usually the best, you may need to make some further
adiustments *\_ra natural looking image.
NOTES:
* Procedures must be followed within 5 seconds or
the Picture Control mode will be cancelled.
* When setting the Picture Control, the Game mode
will be cancelled.
Make SHre ...
* TV/VCR power must be turned on.
Press the MENU button on the MENU
remote control. TIr,_ERPROGP,AMr,qlqG
p CT/IRE CONTROL
Press the PLAY/A or STOP/T but- ,..........CHANNEL SET UP
USERS SEWUP
ton to point to "PICTURE CON- v.........
LANGUA®E [ENGL SH]
CAPTION [OFF]
TROL". ..........
TIME SEARCH
Then, press the F.FWD/I_ button. ,..........
:) ;_- ....:........ "" 1:o< J,,
=,, o_; {'. _<?/ },/q_J ,:_t <+"' I ....
Press the PLAY/at or STOP/V button until desired
control is displayed.
BRIGHT
CONTRAST
COLOR BRIGHT
TINT
SHARPNESS
's, s,t stlhe po e c rIx>l
Press the F.FWD/_ or REW/-_ button to adjust to
your desired level.
REW/-_I F.FWD/_
BRIGHT to decrease to increase
brighmess brightness
CONTRAST to decrease to increase
contrast contrast
COLOR to pale to brilliant
TINT to purple to green
SHARPNESS to soft to clear
* If there is a power failure of an), kind, the unit will
retain its setting.
14 EN
9103
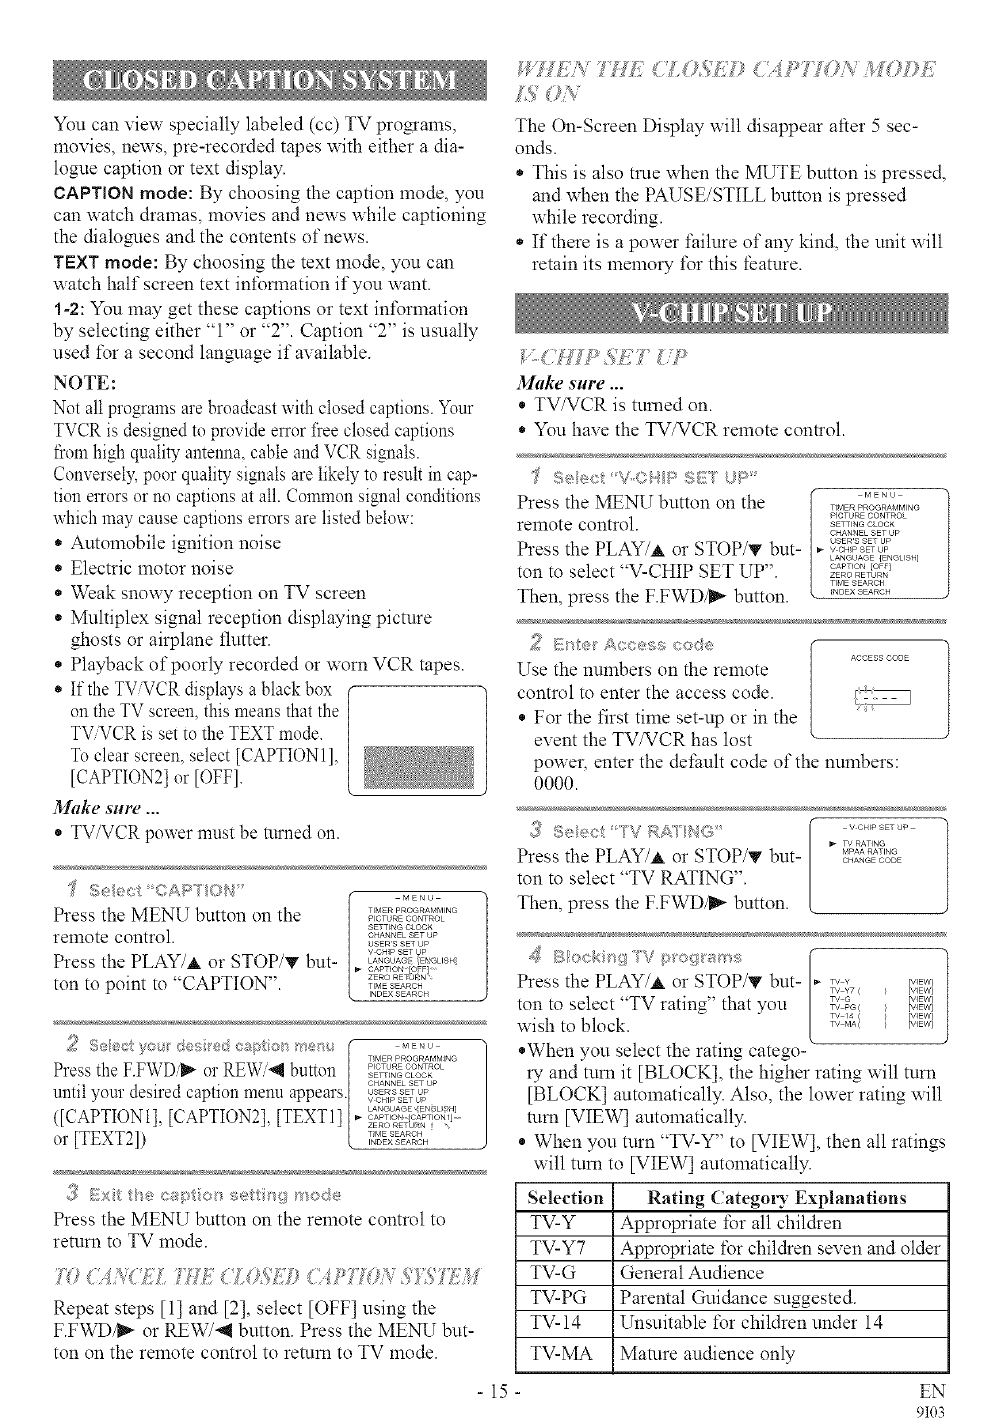
You can view specially labeled (cc) TV pro_anrs,
movies, news, pre-recorded tapes with either a dia-
logue caption or text display.
CAPTION mode: By choosing the caption mode, you
can watch dramas, movies and news while captioning
the dialo_les and the contents of news.
TEXT mode: By choosing the text mode, you can
watch half screen text information if you want.
1-2: You may get these captions or text int\_rmation
by selecting either "1" or "2". Caption "2" is usually
used t\_r a second language if available.
NOTE:
Not all programs are broadcast with closed captions. Your
TVCR is designed to provide error fiee closed captions
from high quality antenna, cable and VCR signals.
Conversely, poor quality signals are likely to result in cap-
tion errors or no captions at all. Common signal conditions
which may cause captions errors are listed below:
* Autonrobile i_fition noise
* Electric motor noise
* Weak snowy reception on TV screen
* Multiplex signal reception displaying picture
ghosts or airplane flutter.
* Playback of poorly recorded or worn VCR tapes.
* If the TViVCR displays a black box
on the TV screen, this means that the
TVVCR is set to the TEXT mode.
To clear screen, select [CAPTIONl],
[CAPTION2] or [OFF].
Make s*lre ...
* TV/VCR power must be turned on.
_TL>, 7"i_::: _ l;OH£ill _,I > YOi ', M)©E
L<d(?B
The On-Screen Display will disappear aRer 5 sec-
onds.
* This is also true when the MUTE button is pressed,
and when the PAUSE/STILL button is pressed
while recording.
* If there is a power failure of any kind, the unit will
retain its nrenrory _\_rthis feature.
%177"117>
Make sure ...
* TV/VCR is tamed on.
* You have the TV/VCR remote control.
'_ S<,<.c_: V C;;_,/PS/_!'7{!P"
Press the MENU button on the ....
TIldER PROGRAMM NG
PICTURE CONTROL
remote control. S_T,,_o_oc_
CHANNEL SET UP
USERS SET UP
Press the PLAY/_, or STOP/T but ...........
LANGUAGE {ENGLISh]
ton to select 'W-CHIP SET UP". ==o.......==.o_,'<
TINIE SEARCh
Then, press the F.FWD/_ button. _.........
2 g_'_ e_ Acce<x::; c<:<e
ACCESS OOOF
Use the nunrbers on the renrote
control to enter the access code.
* For the first time set-up or in the
event the TV/VCR has lost
power, enter the deIhult code of the nunrbers:
0000.
Press the MENU button on the _,o.u_.................oo=t=o_
SETTlinG CROCK
remote control. CHA;,_ELSETUp
USERS SET UP
VGHIp SET UP
Press the PLAY/A or STOP/T but- ,. ...... < =_:_u_<
CAPTIOIl _ p_F ....
ton to point to "CAPTION". T,=_.........._=_o,'
INDEXSEARCH
or [TEXT2])
Press the MENU button on the renrote control to
return to TV mode.
7#'C43,{ EL _!£ <LOSlsT)C,I P/7_'?),,_13_ f:i'_'I
Repeat steps [1] and [2], select [OFF] using the
F.FWD/_ or REW/-_I button. Press the MEN_; but-
ton on the renrote control to remm to TV mode.
d4 _,,,I<_;</"_,,t/,,
Press the PLAY/_ or STOP/_ but ...... _,,=w_
TV Y7 ( } [VIEW]
ton to select "TV rating" that you _,,...._ _ _,,=w_"=w_
TV 74 ( [VIEW]
wish to block. _,,_,< I _,=_
*When you select the rating catego-
ry and mm it [BLOCK], the higher rating will turn
[BLOCK] autonratically. Also, the lower rating will
mm [VIEW] autonratically.
* When you turn "TV-Y" to [VIEW], then all ratings
will mm to [VIEW] autonratically.
Selection Rating Category Explanations
TV-Y Appropriate for all children
TV-Y7 Appropriate *\)rchildren seven and older
TV-G General Audience
TV-PG Parental Guidance suggested.
TV-14 Unsuitable *\)rchildren under 14
TV-MA Mature audience only
- 15 - EN
9103
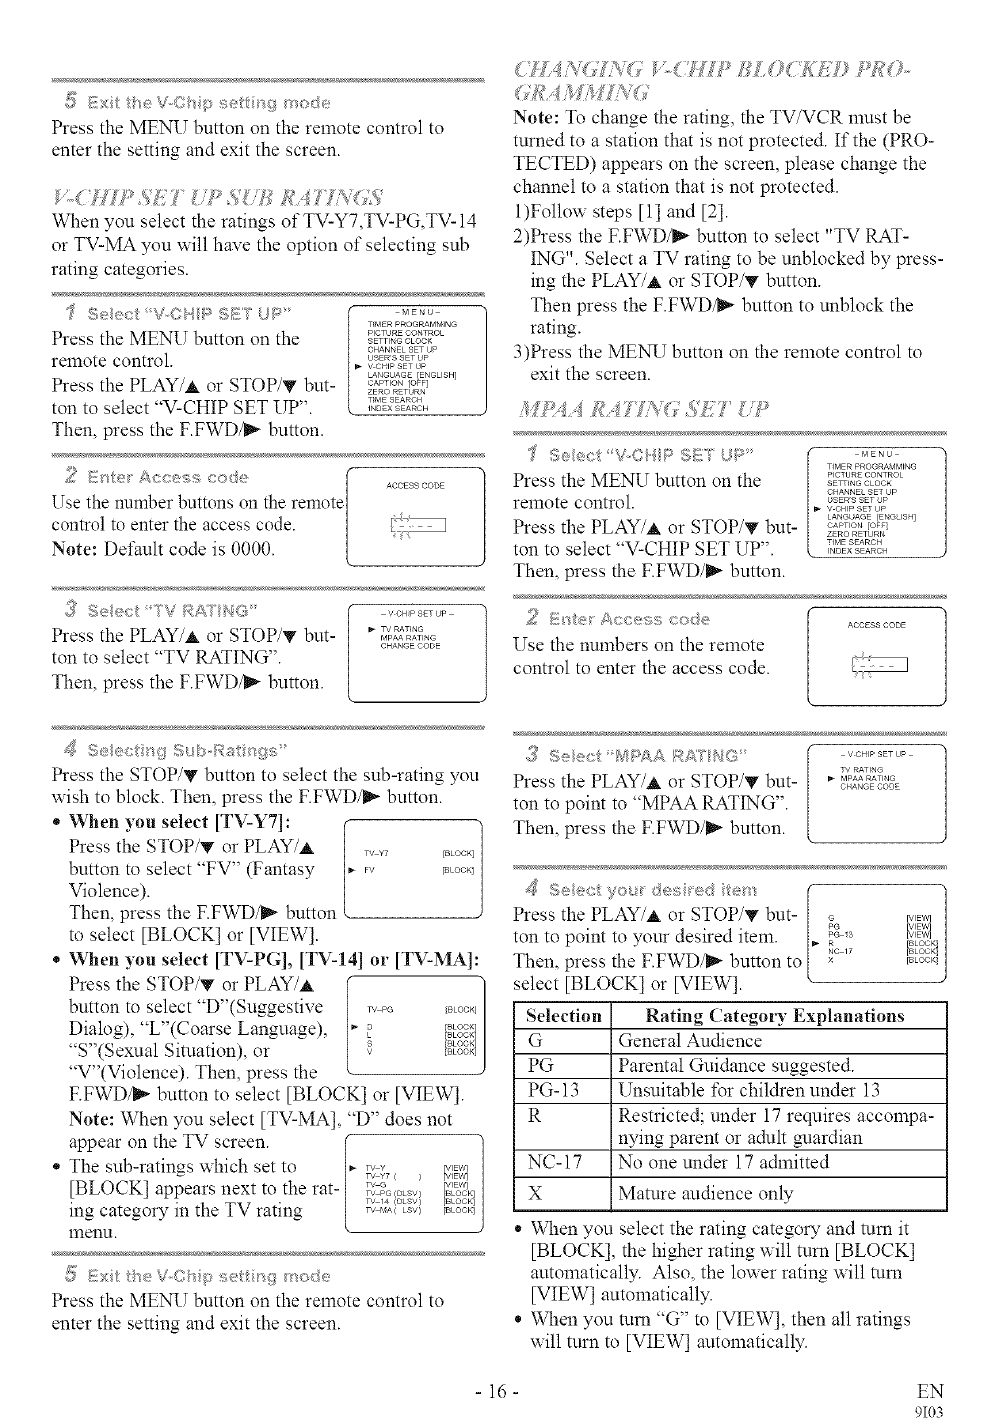
Press the MENU button on the remote control to
enter the setting and exit the screen.
_A:. I'? /:i!:I
When you select the ratings of TV-Y7,TV-PG,TV-14
or TV-MA you will have the option of selecting sub
rating categories.
TIMIR PROGRAMMING
Press the MINt} button on the ==_,=,,..............o=o°=
CHANNEL SET UP
remote control. USERsSETUP
• v CHIP SET UP
LANGUAGE [ENGLISH]
Press the PLAY/_, or STOP/V but ........ _o<
ZERO RETURN
ton to select "V-CHIP SET tiP". ..........INDEX SEARCH
Then, press the F.FWD/_ button.
i,, _%U '?,' ' # '";_
ACCESS CODE
!
Use the number buttons on the remote]
control to enter the access code. /
/
Note: Defimlt code is 0000. [
if Seec_ TV _<A[]NG
Press the PLAY/A or STOP/V but-
ton to select "TV RATING".
Then, press the F.FWD/_ button.
v CHIP SET UP
P_' RATING
MPAA RATING
CHANGE CODE
CII.4?.,Y/I_.,( ';,<:7t,H > l;_LO4 £//:I) Vi:O-
(111 iI-IIA:UK[I
Note: To change the rating, the TV/VCR must be
turned to a station that is not protected. If the (PRO-
TECTED) appears on the screen, please change the
channel to a station that is not protected.
1)Follow steps [1] and [2].
2)Press the F.FWD/_ button to select "TV RAT-
ING". Select a TV rating to be unblocked by press-
ing the PLAY/a, or STOP/T button.
Then press the F.FWD/_ button to unblock the
rating.
3)Press the ME_; button on the remote control to
exit the screen.
5"M:>'_A£d775_ 7 ?£Y [7 >
'_ Seect >O}{P SET UP" _"°
T{MER PR©GRAMM}NG
Press the MINt} button on the ==_,=_.............°=oo=
°HANNEL gET UP
remote control, os_=ss_,op
V °HIP SET UP
LANGUAGE [ENGUSH]
Press the PLAY/A or STOP/V but........ to<
ZERO RETURN
ton to select "V-CHIP SET UP". ...........INDEX SEARCH
Then, press the F.FWD/_ button.
2_22_;<:I"Acc, ess. o:>@:_ ..........
Use the numbers on the remote
control to enter the access code.
./ ...... I u(; I:? = _;,
Press the STOP/T button to select the sub-rating you
x_ish to block. Then, press the F.FWD/_ button.
* When you select [TV-Y7]:
Press the STOP/'g or PLAY/_
button to select "FV" (Fantasy
Violence).
Then, press the F.FWD/_ button
to select [BLOCK] or [VIEW].
TV Y7 [6LOCK]
FV [SLO©K]
* When you select [TV-PG], [TV-14] or [TV-MA]:
Press the STOP/T or PLAY/_ [_
button to select "D"(Suggestive _ _ o_oc_
Dialog), "L"(Coarse Language), p ,_oc_
DLOC_q
DLOCKI
"S '(Sexual Situation), or 8 _oc_
"V"(Violence). Then, press the
F.FWD/_ button to select [BLOCK] or [VIEW].
Note: When you select [TV-MA], "D" does not
appear on the TV screen. I
* The sub-ratings which set to [,__ _ _,=_a
rv Y7 ( ) [VlE_a
[BLOCK] appears next to the rat- [ TM __'_
TV pG (DLSV} [TLOCK]
y i L TV 14 (DLSV} [6LOOK]
ing categor n the TV rating .... __ r_oon
nlenl_l.
5 E_<t eV(': _> shoAe
Press the MEN_I button on the remote control to
enter the setting and exit the screen.
_!_ ,;>:,_:..... I'd{i, sA I';8A[INIG ,,.........
TV RATING
Press the PLAY/_ or STOP/V but...........CHANGE CODE
ton to point to "MPAA RATING".
Then, press the F.FWD/_ button.
Press the PLAY/_ or STOP/V but- -i_ v'='_,=_
ton to point to your desired item. _ _ r,,=,,,q
[_LOCK]
xNC17 [8LOCK]
Then, press the F.FWD/_ button to r=_oon
select [BLOCK] or [VIEW].
Selection Rating Category Explanations
G General Audience
PG Parental Guidance suggested.
PG- 13 Unsuitable *br children under 13
R Restricted; under 17 requires accompa-
nying parent or adult guardian
NC-17 No one under 17 admitted
X Mature audience only
* When you select the rating category and turn it
[BLOCK], the higher rating will turn [BLOCK]
automatically. Also, the lower rating will mm
[VIEW] automatically.
* When you mm "G" to [VIEW], then all ratings
will turn to [VIEW[ automatically.
- 16- EN
9103
_!_Ext tseV, C/" p setting >ode
Press the MEN_I button on the remote control to
enter the setting and exit the screen.
( M :I?_(i£ ,A4__:l>%,; _(:)bl!i
To change access code, t\dlow the steps.
_ Exit theVO/spset/: 9 rode
Press the MEN_; button on the remote control to exit
the screen.
Note: If you unplug the power code or power *hilure
occurs, the changed access code will be lost and will
remm to default (0000). Change your access code
again as necessary.
"_ Se/ec V,OI,,III:_SET UP'
Press the MENU button on the remote control.
Press the PLAY/A or STOP/'V"button to select "V-
CHIP SET UP".
Then, press the F.FWD/_ button.
]_' Access c)( _ ACCESSCODE
Use the nunlber on the remote con-
trol to enter the access code.
Note: The de*hult code is 0000.
,,> .................. ,......... OO[)E _.........
[R/ RATING
Press the PLAY/A or STOP/_' but ...........
CHANGE CODE
ton to select "CHANGE CODE".
Then, press the F.FWD/_ button.
_ _!:i_e New code
Use the number buttons to enter
your desired access code in the ........
NEW CODE space. Then enter CONFIRM CODE
the same code in the CONFIRM EZZZ1
CODE space. V-CHIP SET UP
screen appear on the screen.
* If you enter wrong code, repeat step 4, making
sure you enter the same new code exactly in the
confirm code space.
This function enables you to receive FM radio broad-
casting.
" I£ ,> , _]l_a ,_>
i{ ,,_:, 0: ;: 11_ <> I
Press the TV/FM button on the
remote control. The radio frequency _ FMss.0MH_
appears on the TV screen.
2Se/ec(/_e radio fs'e B e cy yo_ wa_sl/o eceive
Press the CHANNEL _ or T button until your
desired radio frequency appears.
NOTES:
* The radio frequency indication repeats to appear
and disappear.
* You can not record the FM radio station.
* If you receive a weak radio signal, you lnay change
the FM Antenna mode to INT(internal) or
EXT(external) by t\dlowing the step below.
1)Press the MEN_/button. Press the PLAY/_, or
STOP/T button to point to "CHANNEL SET UP".
Then, press the F.FWD/_ button.
2)Press the PLAY/_ or STOP/'_ button to point to
"FM ANTENNA". Select [INT] or [EXT] using
the F.FWD/_ or REW/'_I button.
This TV/VCR wilt operate with any cassette that has the _ mark. For best results, we
recommend the use of high-quality tapes. Do not use poor quality or damaged tapes.
/'°/5££ 't _C(74
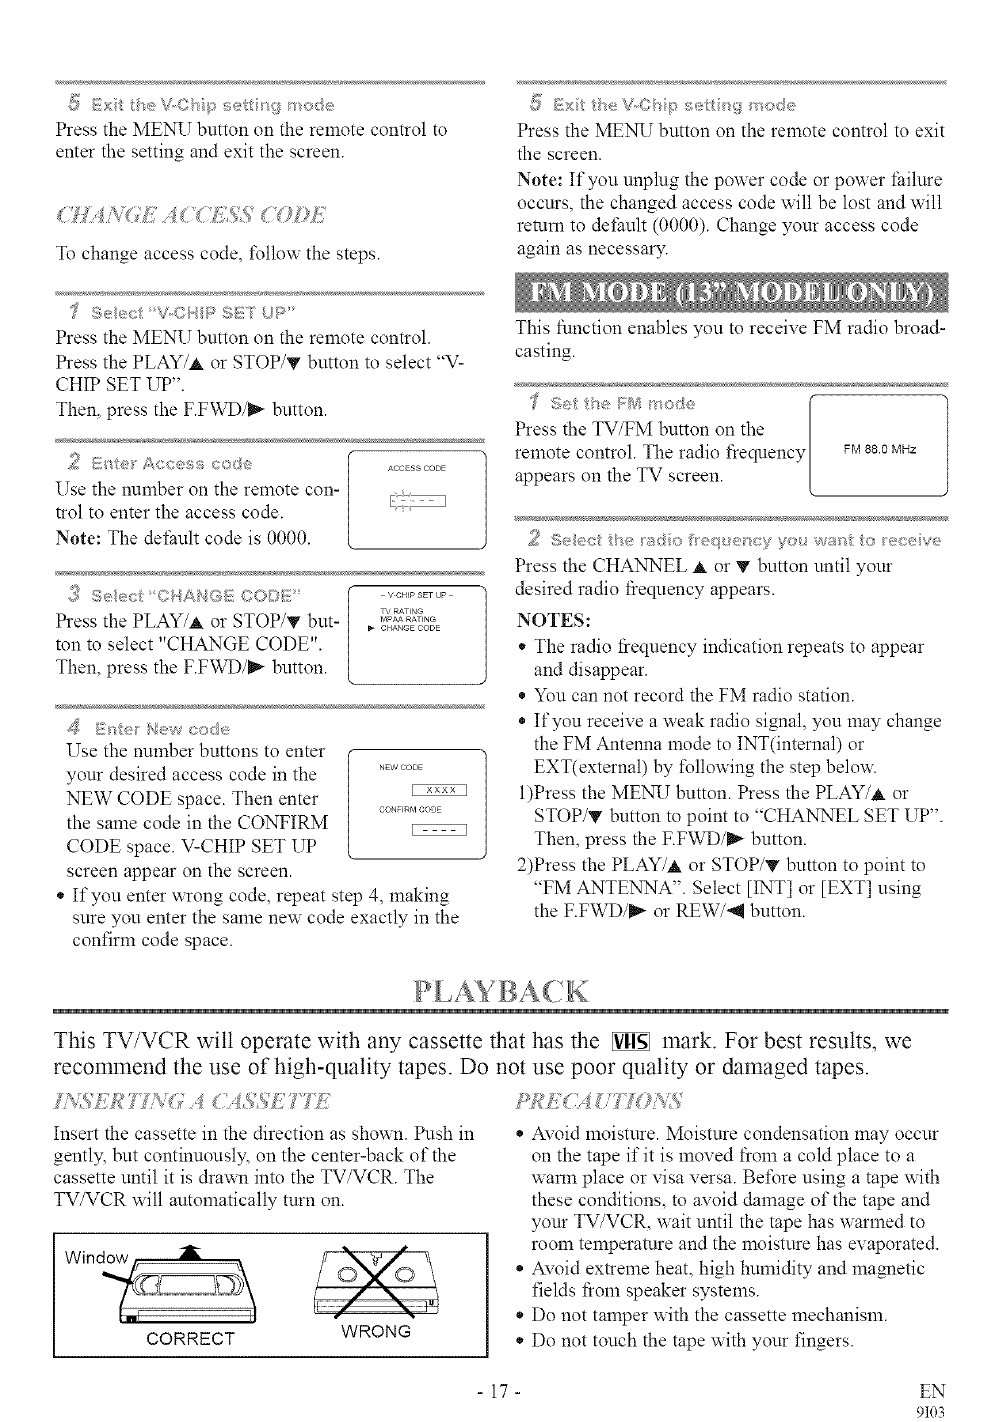
Insert the cassette in the direction as shown. Push in
gently, but continuously, on the center-back of the
cassette until it is drawn into the TV/VCR. The
TV/VCR will automatically turn on.
WRONG
CORRECT
* Avoid moisture. Moisture condensation may occur
on the tape if it is moved from a cold place to a
warm place or visa versa. Before using a tape with
these conditions, to avoid damage of the tape and
your TV/VCR, wait until the tape has warmed to
room temperature and the moisture has evaporated.
* Avoid extreme heat, high humidity and magnetic
fields from speaker systems.
* Do not tamper with the cassette mechanism.
* Do not touch the tape with your fingers.
- 17- EN
9103
Make sure ...
* TV/VCR power must be turned on.
If the erase-protection tab has been removed, the
TV/VCR will start playback automatically.
2 I i>e{j> : u?ii>g<;_ ( .....
Press the PLAY button. [
Note: If any menu is activated on
the screen, the PLAY button does
not function. Press the MENU but-
ton to clear the menu, then press the PLAY button.
]_ stop >;:_ba_:l;
Press the STOP button x_hen playback is completed.
The TV/VCR has an auto repeat function that allows
you to repeat a tape indefinitely without touching the
PLAY button.
Ak.l_R_P_T: Repeat playback from the beginning
to the end of the tape.
Bt.ANK RI=pt=_T: Repeat playback from the begin-
ning to a blank part of more than 10 seconds.
'f Seect Lt:i4_:5 St]] UP' MENLO
Press the MENU button on the .................
PICTURK CONTROL
remote control. SETTINGCLOCK
ChANNKL SET UP
USERS SET UP
Press the PLAY/_, or STOP/_" but- _AN_O*_'........ _u_<
CAOTION [O_F]
ton to point to "USER'S SET UP". ..........T,_*=*=O.
Then, press the F.FWD/_ button. '..........
Press the PLAY/,t or STOP/T but- RENTAL [© F!
ton to point to "REPEAT PLAY". AO_O.............==,o_= >U....
Press the F.FWD/_ or REW/'_I
button repeatedly until your desired
selection TALL1 or [BLANK] appears.
]I l£xI I Re>,_ l,>;r_vs ""
>1 ...... +.......
Press the MEN_} button on the remote control to
return to the TV mode.
I /}¢1;'t i f
Press the PLAY button to start the Repeat Play.
"REPEAT PLAY _" appears.
* Once you select the Repeat Play mode, it stays in
effect even after you turn off the TV/VCR.
* If the Rental mode is set [ON], the "RENTAL
PLAY _" display has priority.
7Y} _d?C(Z:L 'M_i/{fF;iPAI:_7 PL, IFM¢)MI5"
Repeat steps 111and I21, select [OFF] using the
F.FWD/_ or REW/-_ button on the remote control.
Press the MEN_I button on the remote control to
return to TV mode.
If there is a power failure of any kind, the unit
will retain its memory for this feature.
This feature is very useful in finding or skipping over
a particular scene on a tape. in this mode, the sound
will be muted.
1)You may view a video tape at a high speed in
either a forward or reverse direction by pressing
the F.FWD or REW button during playback (in the
SP /LP /SLP modes).
2)Press it again and the TV/VCR will now search in
super high speed (in the LP /SLP modes only).
NOTE: Tapes recorded in the SP or LP mode will
display a noise bar on the TV screen and the pic-
ture may revert to Black and White. This is normal.
3)Press the PLAY button to remm to normal speed.
ZkIR</_L, ? #'RN
This function allows you to search easily a beginning
point that you want to review by rewinding or *;ast
%rwarding.
NOTE:
Zero Return WILL NOT work on a blank tape or a
blank portion of a tape.
'_Slot: a ,<_,
Rewind or t:ast %r_ ard the tape to the beginning
point from which you want to review.
Press the COI_E',rTERRESET button repeatedly.
Press the RECORD or PLAY button.
Press the STOP button when recording or playback is
completed.
"f%_ctivale Z[]RO 17°['JRI4
MENU
=, i TIMER pR©GPdkMMING
I _I. ..... PIGTURE OONTROL
SETTING CLOCK
Press the MEN_/button on the ............u_===S=TUP
V CHIP SET UP
remote control. LANGUAGE EENGLSH]
CAPTION [OFF]
. ZERO RETURN
Pressthe PLAY/_, or STOP/V but............
INDEX SEARCH
ton to point to "ZERO RETISRN".
Then, press the F.FWD/_ button.
The counter will appear on the TV screen.
The tape will automatically stop when the counter
returns to 0:00:00.
18 EN
9103
The Time Search function makes it possible to quick-
ly advance the tape to your desired position simply by
entering the exact amount of playback time you want
to skip.
NOTES:
*Time Search can be set up to a maximum of 9
hours 50 minutes (9:50) by 10 minutes at a time.
* This function will not operate in recording mode.
In the example below: To watch a program that is 2
hours, 50 minutes from the present tape position, in
either direction.
'_ rser a/ape
* After index search, the TV/VCR will play the tape
automatically.
* In some cases, the index mark at the beginning of
video tape cannot be detected.
Press the SLOW button to reduce the playback speed.
The TV/VCR nmtes the sound during slow motion.
Press the PLAY button to return to norlnal playback.
NOTE: If left in the Slow mode *%rmore than five
minutes, the TV/VCR will automatically go into the
Stop mode.
Press the PLAY/A or STOP/'V button until your
desired time appears. (Example: "2:50" stands t%r2
hours 50 minutes)
If you wish to cancel the Time Search at this point,
press the ME_; button on the remote control.
By pressing the REW/_,9 or F.FWD/_ button, the
TV/VCR will rewind or thst forward to the specified
point.
The time counts down as the searching progresses.
When 0:00 is reached, the tape will start playback
automatically.
Press the STOP/EJECT button on the TV/VCR or the
remote control. This will delete the selected time.
I-°'+_)LTIY_iLbl 6ii;M
An index signal is recorded on the tape automatically
when the recording is started. To view a recording at a
specific start point: MENU
1)Press the MED_Ybutton on the _,,..............
PICTURE CONTROL
remote control. Press the PLAY/A ............CHANNEL SET UP
USERS SET UP
or STOP/_" button to point to ..........
LANGUAGE [ENGLISH 1
CAPTION /©FF]
"INDEX SEARCH", then press .........
TIME SEARCH
the F.FWD/_ button. _ ...........
2)Press the PLAY/A or STOP/'V button within 30 sec-
onds until the number of programs that you want to
skip appears.
3)Press the F.FWD/_ or REW/_ button to start
index search. If you want to go forward, press the
F.FWD/_ button. If you want to go back, press the
REW/-_I button. - 19-
This function enables you to improve the picture
quality when playing back worn cassettes such as
rented tapes.
'_ Seect USERS SET UP
Press the MENU button on the
remote control.
Press the PLAY/a, or STOP/'V but-
ton to point to "USER'S SET UP".
Then, press the F.FWD/_ button.
MENU
TIMER PROGRAMMING
PICTURE CONTROL
SEJTING CLOCK
CHANNEL SET UP
USElesS SET UP
V CHIP SET UP
LANGUAGE [ENGUSH]
CAK_ON [OF_]
ZERO RETURN
TIME SEARCH
INDEXSEARCH
Y', USERS SET UP
Press the PLAY/_ or STOP/_" but- RENTAL ....F@NI>
ton to point to "RENTAL". _g_%_
Press the F.FWD/_ or REW/-_I
button until [ON] appears.
Press the MENU button on the remote control to
remm to the TV mode.
Start playback4
Press the PLAY button to start playback. "RENTAL
PLAY _" appears.
* Once you select the Rental mode, it stays in effect
even after you turn off the TV/VCR.
;,_Y,ICAi_ 7LL "/MI£ !{V!UVT/'_i; ;!1Q'71}17:7
Repeat steps [1] and [2], select [OFF] using the
F.FWD/_ or REW/-_ button on the remote control.
Press the MEN_I button on the remote control to
remm to TV mode.
If there is apower failure of any kind, the unit
will remember the setting.
EN
9103
In the Pause/Still mode only. when the picture begins
to vibrate vertically, stabilize the picture by pressing
the CHANNEL _ or 'V"button.
NOTE:
If there are video noise lines on the screen, see Tracking
Adjustment section.
You can view a still picture on the TV screen during
playback (the Still mode). Press the PAUSE/STILL
button during playback. Only tapes recorded in the
SLP mode will show the least amount of lines. Press
the PLAY button to remm to playback.
NOTES:
* You can advance the picture one frame at a time by
pressing the PAUSE/STILL button during the Still
mode.
* If it is left in the Still mode for more than five min-
utes, the TV/VCR will automatically switch to the
Stop mode.
,, Tracking adjustment will be set automatically
(Digital Tracking function) when you start play-
back.
,, However when playing pre-recorded tapes or tapes
recorded on units other than your own, noise lines
(black and white streaks) may appear on the play-
back picture. If this occurs, you can adjust the
tracking control manually by pressing the CHAN-
NEL _. or T button until the streaks disappear. To
return to the DTR function, stop the tape once and
start playback again.
* You can reduce the noise lines by pressing the
CHANNEL A or _' button in slow mode, too.
Tracking adjustment in Slow mode will not be set
automatically.
NOTE:
* In Still mode, press the SLOW button and press the
CHANNEL A or T button until streaks disappear.
To remm to Still mode, press the PAUSE/STILL
button again.
The desired channel is selected by pressing the num-
ber buttons on the remote control or the CHANNEL
Up/Down button. (If the TV/VCR is connected to a
cable box or satellite box, the TV/VCR must be on
CH3 or CH4, then the channel to be recorded is
selected on the cable box or satellite box. )
There is a tape with its safety tab into the VCR.
The desired recording speed is selected in SP(stan-
dard play) or SLP(super long play) mode by press-
ing the SPEED button on the remote control.
Tape Speed Recording/Playback Time
IType T60 T120 T160
0ftape
SP mode 1 hour 2 hours 2-2/3 hours
SLP mode 3 hours 6 hours 8 hours
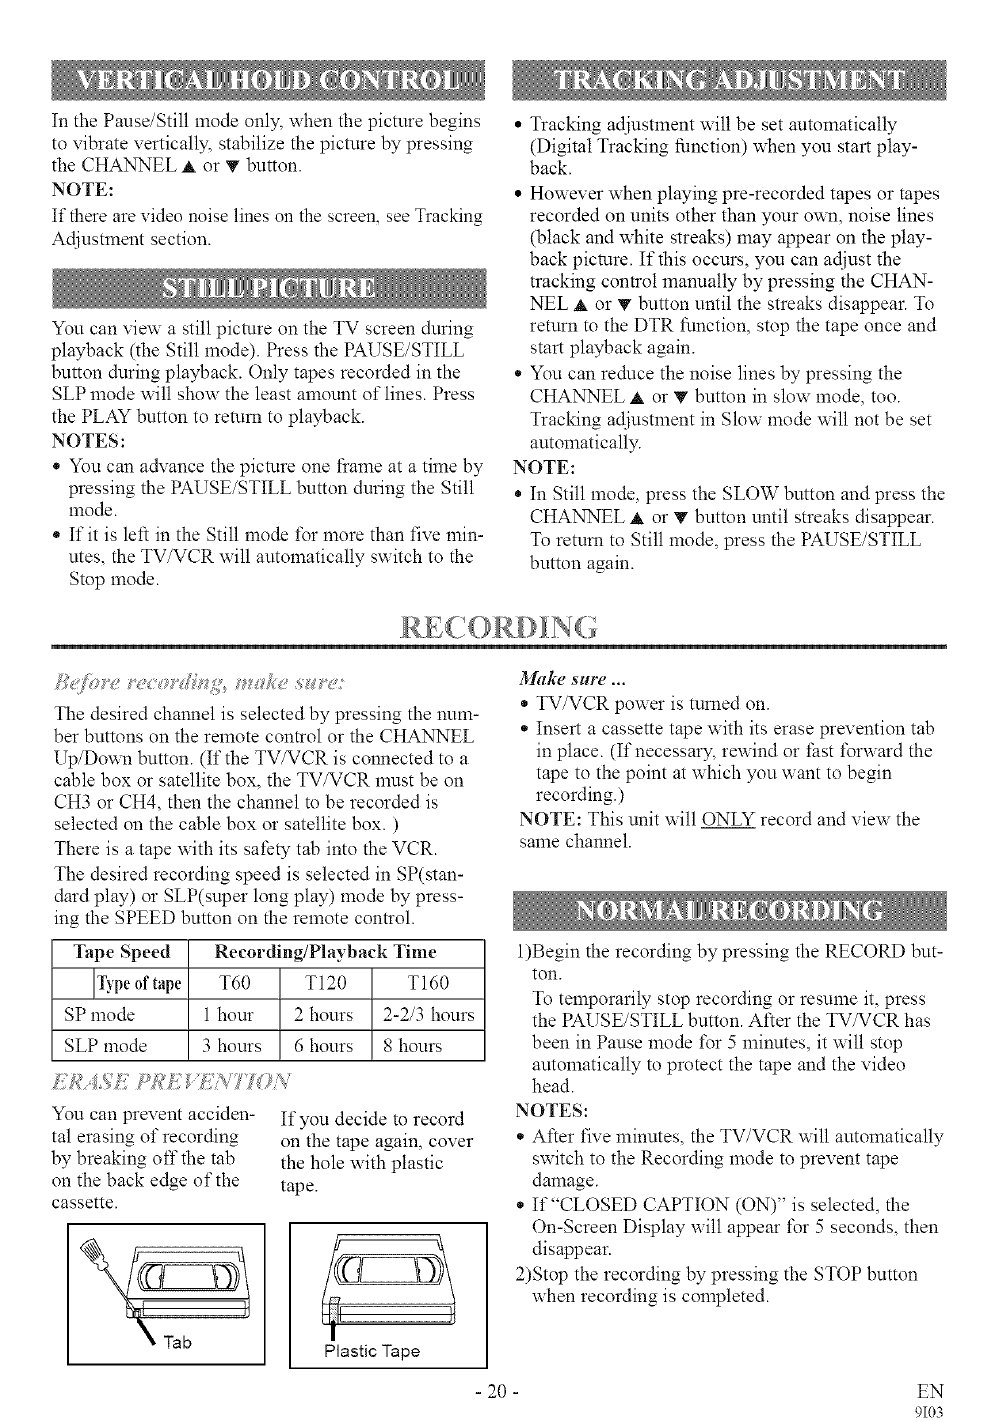
You can prevent acciden-
tal erasing of recording
by breaking off the tab
on the back edge of the
cassette.
If you decide to record
on the tape again, cover
the hole with plastic
tape.
Plastic Tape
Make sllre ...
* TV/VCR power is turned on.
* Insert a cassette tape with its erase prevention tab
in place. (If necessar> rewind or fast forward the
tape to the point at which you want to begin
recording.)
NOTE: This unit will ONLY record and view the
same channel.
1)Begin the recording by pressing the RECORD but-
ton.
To temporarily stop recording or resume it, press
the PAUSE/STILL button. After the TV/VCR has
been in Pause mode f\_r 5 minutes, it will stop
automatically to plotect the tape and the video
head.
NOTES:
* After five minutes, the TV/VCR will automatically
switch to the Recording mode to prevent tape
damage.
* If"CLOSED CAPTION (ON)" is selected, the
On-Screen Display will appear f\_r 5 seconds, then
disappear.
2)Stop the recording by pressing the STOP button
when recording is completed.
20 EN
9103
This function enables you to set the recording length
simply by pressing the REC/OTR button on the
TV/VCR.
1)Begin OTR by pressing the (oT=_=30_
REC/OTR button on the /
TV/VCR repeatedly until the
desired recording length appears.
Recording stops when 0:00 is _P
reached.
NOTES:
* This function CANNOT be done from the remote
control.
* To stop the OTR operation, press the STOP button
on the TV/VCR or on the rmnote control.
* If the tape runs out bet\_re the end time, the
TV/VCR will switch to the Stop mode immediate-
ly, eject the tape and turn itself of£
* If you press the power button during OTR, the TV
monitor turns oft'. But the recording continues until
the selected length is reached.
Push@s) Display Recording length
1 push (continuous recording)
2 pushes 0:30 30 minutes
3 pushes 1:00 60 minutes
4 pushes 1:30 90 minutes
4. $ 4.
17 pushes 8:00 480 minutes
You may set the TV/VCR to start and end a record-
ing while you are away. You can set 8 programs to
record on specific days, daily or weekly within a 1
year period.
In the example below, the timer is"being set to record:
DATE: July 4th, 2004
SETTING TIME: from 7:30PM to 8:50PM
CHADINEL: CH61
TAPE SPEED: SP
Make sure ...
* If your TV/VCR is connected to a cable or satellite
box, you must set the TV/VCR to channel 3 or 4 to
match the output channel of the box.
* Clock is set to the correct time and date bel\_re set-
ting the timer.
* TV/VCR power is tamed on to pro_am it.
* To insert a cassette tape with its erase prevention
tab in place. (If necessary, rewind or fast forward
the tape to the point at which you want to begin
recording.)
* The channel you want to record is properly set in
advance.
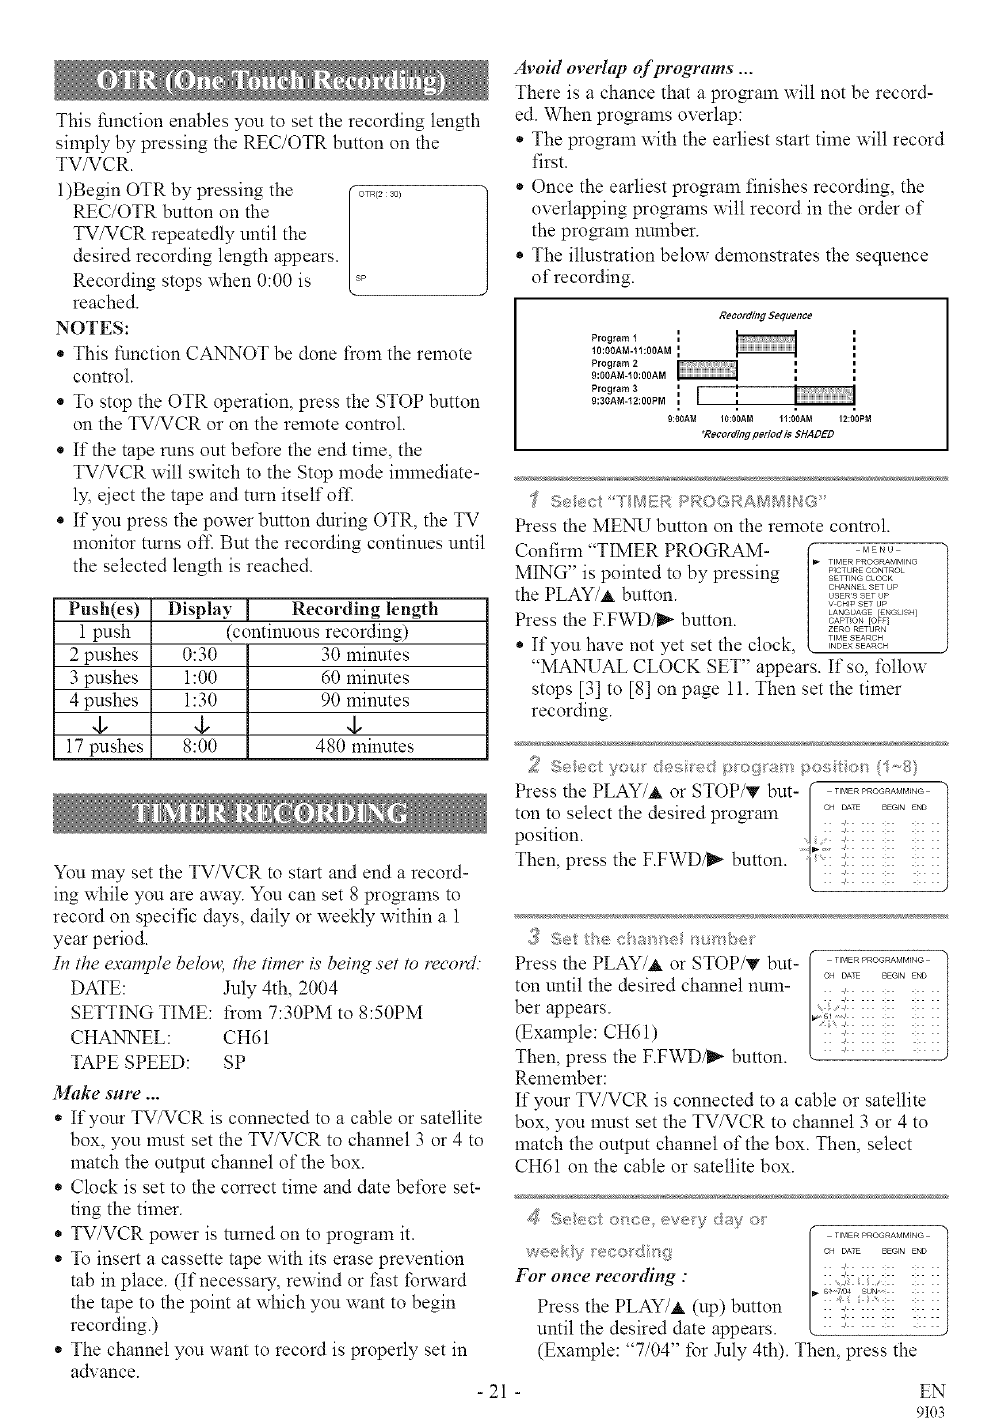
Avoid overlap of programs ...
There is a chance that a pro_am will not be record-
ed. When programs overlap:
* The program with the earliest start time will record
first.
* Once the earliest program finishes recording, the
overlapping pro_ams will record in the order of
the program number.
*The illustration below demonstrates the sequence
of recording.
RecordingSequence
Program 1 {
10:00AM-!I:00AM {
Program 2
9:00AM-!0:00AM
Program 3' I
i i
9:30AM-12:00PM = [ =
9:00AM 10:00AN 11:00AN 12:00PN
*Recording period is SHADED
-21 -
Press the MEN_I button on the remote control.
Confirm "TIMER PROGRAM ..... TIMER pROGRAMMING
MING" is pointed to by pressing s_,,_..............o_oo,
the PLAY/A button, os_°...........s_To_
V CHIP SET UP
LANGUAGE [ENGLISH]
Press the F.FWD/_ button, o...... to<
ZERO RETURN
* If you have not yet set the clock, •.........
NDEX SEARCH
"MAN_;AL CLOCK SET" appears. If so, follow
stops [3] to [8] on page 11. Then set the timer
recording.
,>,,;=4 y:>, desi'edpo{la t ('-8)
f TIMER PROGRAMM_N®
Press the PLAY/a, or STOP/T but- o__.......
ton to select the desired program
position. , ',
Then, press the F.FWD/_ button, ii ;
_,_"Is¢c;;>l;lI O '_ @I 'I14 _'I )@I'
Press the PLAY/A or STOP/T but-
ton until the desired channel nun>
ber appears.
(Example: CH61)
Then, press the F.FWD/_ button.
Remember:
t TIMER PROGRA_M_I6
CH _ fEGIN END
•/
!! !!! x
If your TV/VCR is connected to a cable or satellite
box, you must set the TV/VCR to channel 3 or 4 to
match the output channel of the box. Then, select
CH61 on the cable or satellite box.
,>:1<: O/ _]0@ eve y ;JiIy O[
[_1,_ TIMER PROGRAMMING
, _ CH _JE BEGN END
For once recording Ex:,:, : :,:x :x
Press the PLAY/at (up) button !II'i IYi:: :x
until the desired date appears.
(Example: "7/04" for July 4th). Then, press the
EN
9103
F.FWD/_ button.
For every day recording : To record a TVpmgram at
the same time on the same channel every &O'.
(Example: Monday through Sund<v)
Pressthe STOP/T ,!down) button (- .................. ]
until 'EVRYDAY appears. | ............ {
Then, press the F.FWD/_ but- /x:i:::x: :x x/
ton. I"?_??_?_';<: x: ::l
i :
(,j
For weeMy recording : To record a TVpmgram at
the same time on the same channel eve<v week.
(Example: every Mondco')
Press the STOP/T (down) button _ .................. ]
until "EVRY" and your desired [ ?"_ _E?__77 |
day of the week appear together. [ x,:i::::x :x xl
Then, press the F.FWD/_ but- r_I _i,iTi_ i ; ii/
ton. k ' 1
£_ S!,1: s " ],_}
..... d_y TIMER pROGRAfAM_NG
CH DA-e BEG_N END
Press the PLAY/A or STOP/T but- :!::::: ::: ::: ::
ton until the desired hour appears ...... 7,O4 SU_ 7 2%
(Example:"7,PM"for7:30PM) iii
Then, press the F.FWD/_ button.
Press the PLAY/A or STOP/_' but- /777 77
ton until the desired minute appears. | :: 2: ::: :::
(Example: "30 _or 7:30PM) 1':: :!::::: :::
Then, press the F.FWD/_ button. [ :: :',::::: ::: :::
7Set er_d/_ot _'
Press the PLAY/A or STOP/T but-
ton until the desired hour appears.
(Example: "8, PM" for 8:50PM)
Then, press the F.FWD/_ button.
Press the PLaY/at or STOP/* but- / c.7 °E°"E'°{
ton until the desired minute appears. [ :: 2: ::: ::: x:::|
, . _ 6 7,04 sun 7so p 8 50
(Example: "50 *or 8:50PM) 1'ii iliiiii iii
Then, press the F.FWD/_ button. [ ; J
_!) Set the tape spee_
Press the PLAY/at or STOP/T but-
ton until the desired tape speed
appears. (Example: SP)
Then, press the F.FWD/I_ button.
'J0 Se tibet _er
Press the POWER button to set automatic timer
recording. The RECORD indicator lights up.
,. You must turn off the TV/VCR to activate autonmt-
ic timer recording.
If power is not turned off and you continue watch-
ing TV, "TIMER REC STANDBY" starts flashing
on the TV screen 2 minutes before the programmed
start time.
To shift the time schedule of an autonmtic timer
recording.
1)Press the POWER button.
2)Repeat step [1] on page 21.
3)Press the RECORD button and select the desired
program using the PLAY/at or STOP/_r button.
4)Press the RECORD button again.
Each additional push will shift forward the
begin/end time t\_r recording by 10 minutes. When
the recording is already in progress, each additional
push will shift forward the end time only. If you
want to cancel while setting, press the
PAUSE/STILL button on the remote control. The
recording time returns to the original time.
NOTE: When you shift forward the time schedule
during recording, the recording speed will autonmt-
ically be set to the SLP mode.
5)Press the F.FWD/_ or REW/"q button to exit the
setting menu. Then press the MEN_I button on the
remote control to return to original mode.
7} <0££E<" 7'4 PT OG£Aik
* While setting aprogram; press the REW/"_ but-
ton to go back one step and enter the correct nmn-
bers using the PLAY/at or STOP/_" button.
* After setting a program;
1)Press the POWER button.
2)Repeat steps [1] - [2] on page 21.
3)Press the F.FWD/_ button (or press the REW/-_I
button to go back one step) until the part you
want to correct begins flashing, then make the
changes pressing the PLAY/at or STOP/_" but-
ton.
4)Press the POWER button to set automatic timer
recording.
The program is now completed.
* To set another program, repeat steps [2] to [10].
* Press the MENU button on the remote control
to return to original mode.
- 22 - EN
9103
IY) ,'_?_,d I 7Y)/!.4 177( 7"/_M7;_"
* After setting a program;
1)Press the POWER button.
2)Repeat steps [1] - [2] under TIMER RECORD-
ING, page 21, and select a program you want to
cancel.
3)Press the T-PROG. CLEAR button.
4)Press the MEN_Ybutton on the remote control to
return to TV mode.
* While recording is in progress;
1)Press POWER button.
2)Press the STOP/EJECT button on the TV/VCR.
7Y} 7?LCH TMFf, IILO:Z_I}_7._ I?"_.411
1)Press the POWER button so that the REC indicator
goes off.
2)Press the MENU button on the remote control.
3)Confirm "TIMER PROGRAMMING" is pointed
to.
4)Press the F.FWD/_ button. The details of pro-
grams appear on the TV screen.
5)Press the ME_I button on the remote control to
remm to TV mode.
* Make sure the channel you want to record is plop-
erly set in advance.
* It is not necessary to press the RECORD button for
timer recording.
*Recording begins automatically at the Start time.
* If you are recording using a Timer mode, you may
not operate the unit manually.
* The erase-prevention tab on the cassette must be in
place (or you must put tape over the hole).
* If the erase-prevention tab is removed, the cassette
will be ejected when the POWER button is pressed
to oft'.
* If the tape runs out before the end time, the
TV/VCR will switch to the Stop mode immediate-
131.and the tape will be ejected.
With this feature, after timer recording is finished,
the beginning of the recorded program(s) can be
searched *\_rautomatically.
'_ Select USIS[RS SET UP
Press the MENU button on the
remote control.
Press the PLAY/A or STOP/T but-
ton to point to "USER'S SET UP".
Then, press the F.FWD/_ button.
1 MEbaU
TIMERPROGP4_MMJNG
PICTURE CONTROL
SE_ING CLOOK
CHANNEL SET UP
USERS SET UP
V OHIP SET UP
LANGUAGE [ENGLISH]
CAPTION IOFF]
ZERO RETURN
TIMESEARCH
INI)EX SEARCH
I
Press the PLAY/A or STOP/V but- =..... r*<
REPEAT PLAY [C FF_]
ton to point to "AUTO RETURN". .......... [o=_
> ....
Press the F.FWD/_ or REW/-_I
button until [ON] appears. Then,
press the MERCI button on the remote control to
return to TV mode.
When all the timer recordings are completed, the
TV/VCR will rewind to the beginning of the recorded
program(s).
NOTE:
* If you press the POWER button while tape is
rewinding, the Auto Return will stop.
+<._Wg_te/tie recoded p ogr_ _
Press the PLAY button.
7Y? ll/ii,d 7',fy} I?I!: "I I<'C
MI') M:
Repeat steps [1] and [2], select [OFF] using the
F.FWD/_ or REW/"_ button. Then, press the MEN_I
button on the remote control to remm to TV mode.
If there is a power failure of any Mnd, the unit
will retain its memory for this feature.
The Wake Up Timer function turns on the TV/VCR
without using the POWER button after a desired
period of time.
NOTES:
* Use the remote control for this procedure.
* Clock must be set to the correct time before setting
the timer.
* If you want to select [TAPE], you must insert a
cassette tape in the TV/VCR. The tape will start
playback automatically on your desired time.
'_ Select W,¢_KI_I{UP'Y'IM{I!R
Press the WAKE-UP/SLEEP button
on the remote control once, and
confirm "ON/OFF' is pointed.
Press the F.FWD/_ or REW/-_I
button until [ON] appears.
- 23 - EN
9103
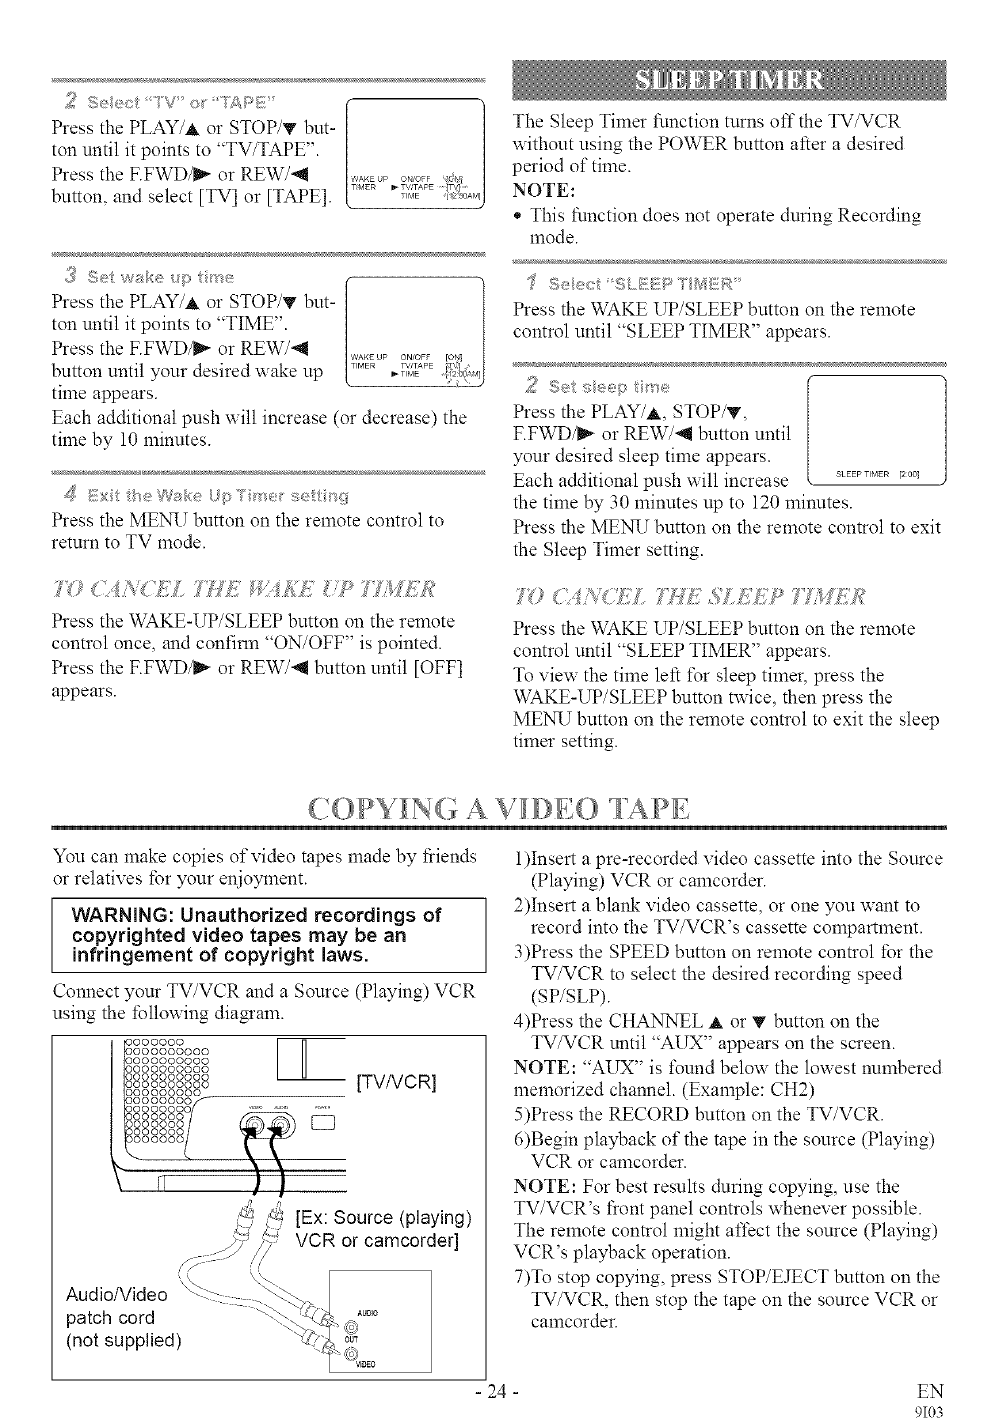
Seect 'IV or °fAP_?;'
Press the PLAY/A or STOP/T but-
ton until it points to "TV/TAPE".
Press the F.FWD/_ or REW/-_
button, and select [TV] or [TAPE].
{i_ Set wuke +4ptr<*e
Press the PLAY/_ or STOP/_' but-
ton until it points to "TIME".
Press the F.FWD/_ or REW/'_I
button until your desired wake up
time appears.
............ roll
TIMER TV/TAPE _ _
+T,++ .!;?
Each additional push x_ill increase (or decrease) the
time by 10 minutes.
Press the MEN_; button on the remote control to
return to TV mode.
777 (' <_0_('£ ; T/L£ _'4£L; _/'P T?'_/7i£
Press the WAKE-UP/SLEEP button on the remote
control once, and confirm "ON/OFF" is pointed.
Press the F.FWD/_ or REW/-_I button until [OFF]
appears.
The Sleep Timer function turns off the TV/VCR
without using the POWER button after a desired
period of time.
NOTE:
* This function does not operate during Recording
nlode.
Press the WAKE UP/SLEEP button on the remote
control until "SLEEP TIMER" appears.
Set seep tree
Press the PLAY/_,, STOP/T,
F.FWD/_ or REW/-_ button until
your desired sleep time appears.
Each additional push will increase .......... r_00_
the time by 30 minutes up to 120 minutes.
Press the MEN_Y button on the remote control to exit
the Sleep Timer setting.
7} ,,_L +,,t/,,+,,: ,, /_i'_;', [it
Press the WAKE UP/SLEEP button on the remote
control until "SLEEP TIMER" appears.
To view the time left t\_r sleep timer, press the
WAKE-UP/SLEEP button twice, then press the
MEN_Ybutton on the remote control to exit the sleep
timer setting.
<.{)PY[N (+ A V D<} TA PE
You can make copies of video tapes made by fi:iends
or relatives for your enjoyment.
WARNING: Unauthorized recordings of
copyrighted video tapes may be an
infringement of copyright laws.
Connect your TV/VCR and a Source (Playing) VCR
using the following diagram.
+oooooo [ n
{9000000000
0000000000
O000OO0000
oooooooooo -- [TV/VCR]
O000000000
000000000
O000OOO_f
O00000OO "+° *_'_'_ _"
_0000oO
OOOOOO [[[[[1
000000
00000
t))
[Ex: Source (playing)
VCR or camcorder]
Aud o/V dec _ '_%"
• ' --<:........ /
patch cord -_'%b_?_ 2 ....
(not supplied) "_>:_' _
1)Insert a pre-recorded video cassette into the Source
(Playing) VCR or camcorder.
2)Insert a blank video cassette, or one you want to
record into the TV/VCR's cassette compartment.
3)Press the SPEED button on remote control for the
TV/VCR to select the desired recording speed
(SP/SLP).
4)Press the CHANNEL A or T button on the
TV/VCR until "AUX" appears on the screen.
NOTE: "AUX" is found below the lowest numbered
memorized channel. (Example: CH2)
5)Press the RECORD button on the TV/VCR.
6)Begin playback of the tape in the source (Playing)
VCR or camcorder.
NOTE: For best results during copying, use the
TV/VCR's front panel controls whenever possible.
The remote control might affect the source (Playing)
VCR's playback operation.
7)To stop copying, press STOP/EJECT button on the
TV/VCR, then stop the tape on the source VCR or
camcorder.
24 EN
9103
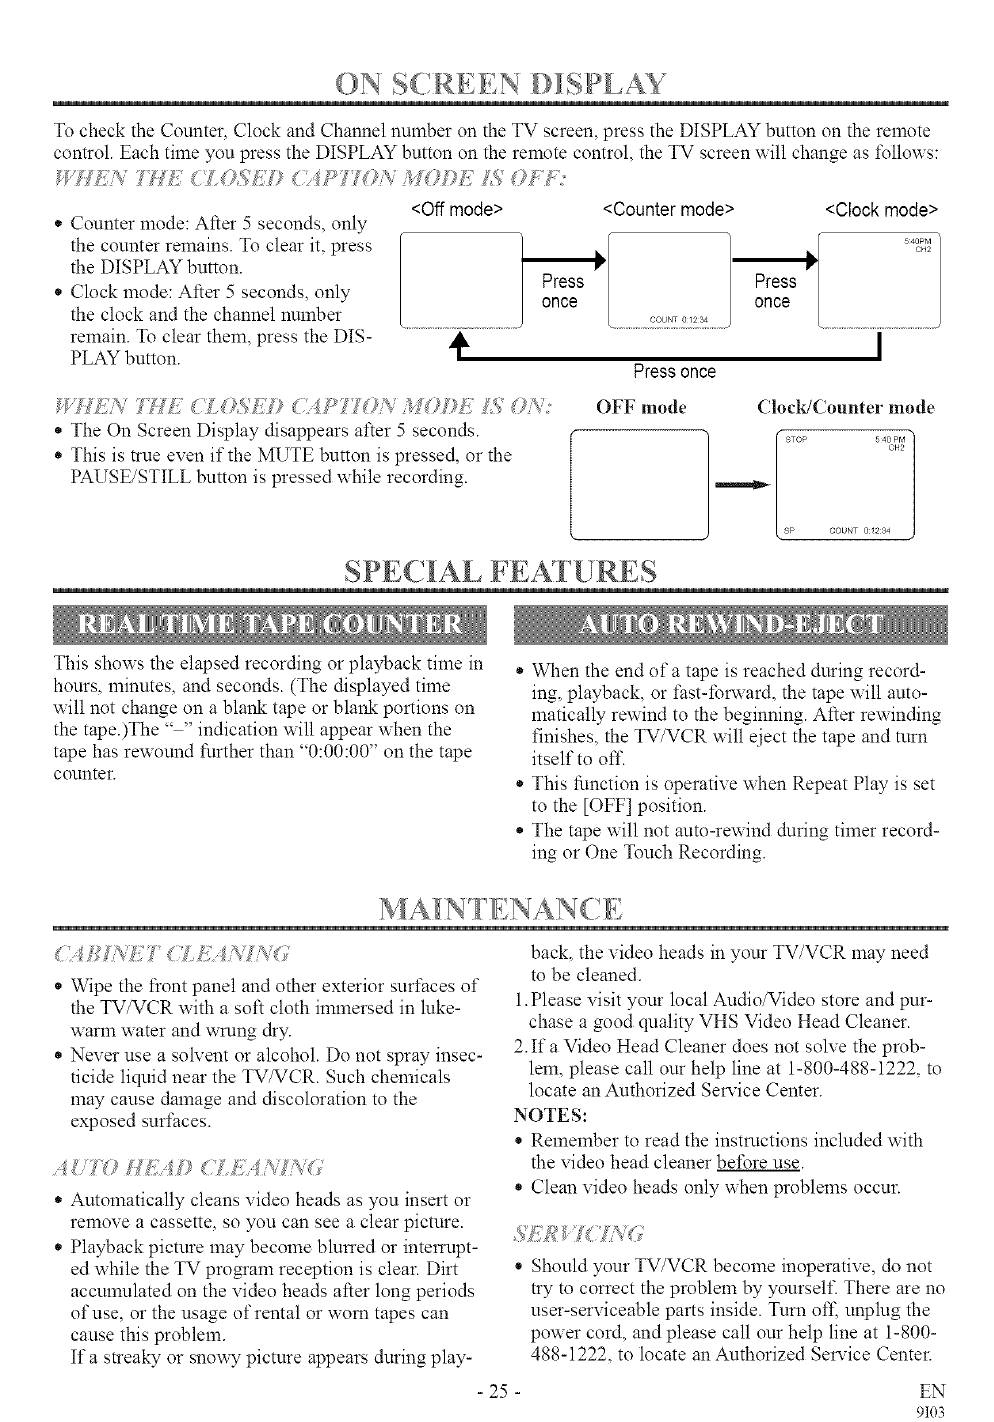
"_ _ ..... " :i_ T
ON S(,RE [)[SPLAY
To check the Counter, Clock and Channel number on the TV screen, press the DISPLAY button on the remote
control. Each time you press the DISPLAY button on the remote control, the TV screen will change as t\_llows:
* Counter mode: After 5 seconds, only
the counter remains. To clear it, press
the DISPLAY button.
*Clock mode: After 5 seconds, only
the clock and the channel number
remain. To clear them, press the DIS-
PLAY button.
<Off mode> <Counter mode> <Clockmode>
Press
once
Pressonce
g fV;HiT",,77H;" L(93J # />77< S ),9£ L5
*The On Screen Display disappears after 5 seconds.
* This is true even if the MUTE button is pressed, or the
PAUSE/STILL button is pressed while recording.
OFF mode Clock/Counter mode
[ sp COUNT 0234
SPECIAL FEATURES
This shows the elapsed recording or playback time in
hours, minutes, and seconds. (The displayed time
wil! not change on a blank tape or blank portions on
the tape.)The .... indication will appear when the
tape has rewound further than "0:00:00" on the tape
counter.
* When the end of a tape is reached during record-
ing, playback, or fiast-forward, the tape will auto-
matically rewind to the beginning. After rewinding
finishes, the TV/VCR will eject the tape and turn
itself to off.
* This fi_mctionis operative when Repeat Play is set
to the [OFF] position.
* The tape will not auto-rewind during timer record-
ing or One Touch Recording.
T _,_'u T T
MA N [ ENAN(.E
,:_, L7 ( ,E,:_ /,'o,',,
* Wipe the front panel and other exterior surI:aces of
the TV/VCR with a soft cloth immersed in luke-
warm water and wrung dry.
* Never use a solvent or alcohol. Do not spray insec-
ticide liquid near the TV/VCR. Such chemicals
may cause dalnage and discoloration to the
exposed surfaces.
* Automatically cleans video heads as you insert or
remove a cassette, so you can see a clear picture.
* Playback picture may become blurred or interrupt-
ed while the TV program reception is clear. Dirt
accumulated on the video heads after long periods
of use, or the usage of rental or worn tapes can
cause this problem.
If a streaky or snox_T picture appears during play-
back, the video heads in your TV/VCR may need
to be cleaned.
1.Please visit your local Audio/Video store and pur-
chase a good quality VHS Video Head Cleaner.
2.If a Video Head Cleaner does not solve the prob-
lem, please call our help line at 1-800-488-1222, to
locate an Authorized Service Center.
NOTES:
* Remelnber to read the instructions included with
the video head cleaner be%re use.
* Clean video heads only when problems occur.
* Should your TV/VCR become inoperative, do not
try to correct the problem by yourself. There are no
user-serviceable parts inside. Turn off; unplug the
power cord, and please call our help line at 1-800-
488-1222, to locate an Authorized Service Center.
- 25 - EN
9103
'_ T
If you have t\_llowed the instructions contained in this manual and have difficulty in operating your TV/VCR,
locate the PROBLEM in the left colunm belox_. Check the corresponding CORRECTIVE ACTION colunm to
remedy the problem.
PROBLEM CORRECTIVE ACTION
No pox_er. * Make sure the AC cord is connected to an AC outlet.
• Make sure the pox_er is turned on.
No picture and sound. * Make sure the AC cord is connected to an AC outlet.
• Check antenna connection.
• Program TV channels into TV/VCR.
No picture or poor picture on * Adjust direction or replace antenna.
TV/VCR. * Adjust picture controls.
No sound or poor sound. * Adjust volume control on remote control or main unit.
• Press the MUTE button to restore sound.
Timer recording is not possible. * Make sure the timer recording is set correctly.
• Make sure the pox_er is off.
• Make sure the TV/VCR clock is set correctly.
Cannot go into Record mode. * Make sure the video tape has an erase-prevention tab in place. If the
tab has been removed, please cover the open space with tape.
Playback picture is partially noisy. ,*Adjust tracking control for a better picture using the CHANNEL A
or '!vbutton on the TV/VCR.
No picture but the audio is OK t\_r * Head cleaning may be necessary. Refer to "AUTO HEAD
tape playback. CLEANING" on page 25.
No operation by infiared Remote ,*Make sure the AC cord is connected to an AC outlet.
Control. ,*Check batteries in remote control.
Video or color fades in and out ,*You can not copy a copyrighted video tape. You are experiencing
when making a copy of a video tape. copy guard protection.
Different color marks on screen. ,*Magnetism from nearby appliances or unshielded stereo speakers or
geomagnetisln might affect the color of the TV picture. Refer to
"DEGAUSSING" on page 14.
CLOSED CAPTION PROBLEM POSSIBLE REMEDY
My TV/VCR is shinning captions *You are watching a live broadcast and spelling errors made by the
that are misspelled, closed captioning production company may pass through uncorrected.
A prerecorded pro_am will not show any misspelled words because
of the normal time available for editing the captions.
My TV/VCR will not show the text *Captions that are delayed a few seconds behind the actual dialogue
in its entirety or there is a delay of are comlnon for live broadcast. Most captioning production companies
what is being said. can display a dialogue to a maximum of 220 words per minute. If a
dialogue exceeds that rate, selective editing is used to insure that the
captions remain up-to-date with the current TV screen dialogue.
My captions are scrambled with *Interference caused by building, power lines, thunderstorms, etc.
white boxes on the TV screen, may cause scrambled or incomplete captions to appear.
My program guide listed a TV show *Broadcasters may at times use a time compression process to speed
as being closed captioned but none up the actual program so that additional advertising time can be
of the captions were displayed, given. Since the decoder cannot read the compressed information,
captions will be lost.
My prerecorded video tape does not *The video tape was either an illegal copy or the tape duplicating
show any captions. The tape box company accidentally left out the captioning signals during the
mentions it being closed captioned, copying process.
My TV screen shows a black box *You are in the TEXT mode. Select CAPTION mode to CAPTION
on certain channels. [OFF].
26 EN
9103
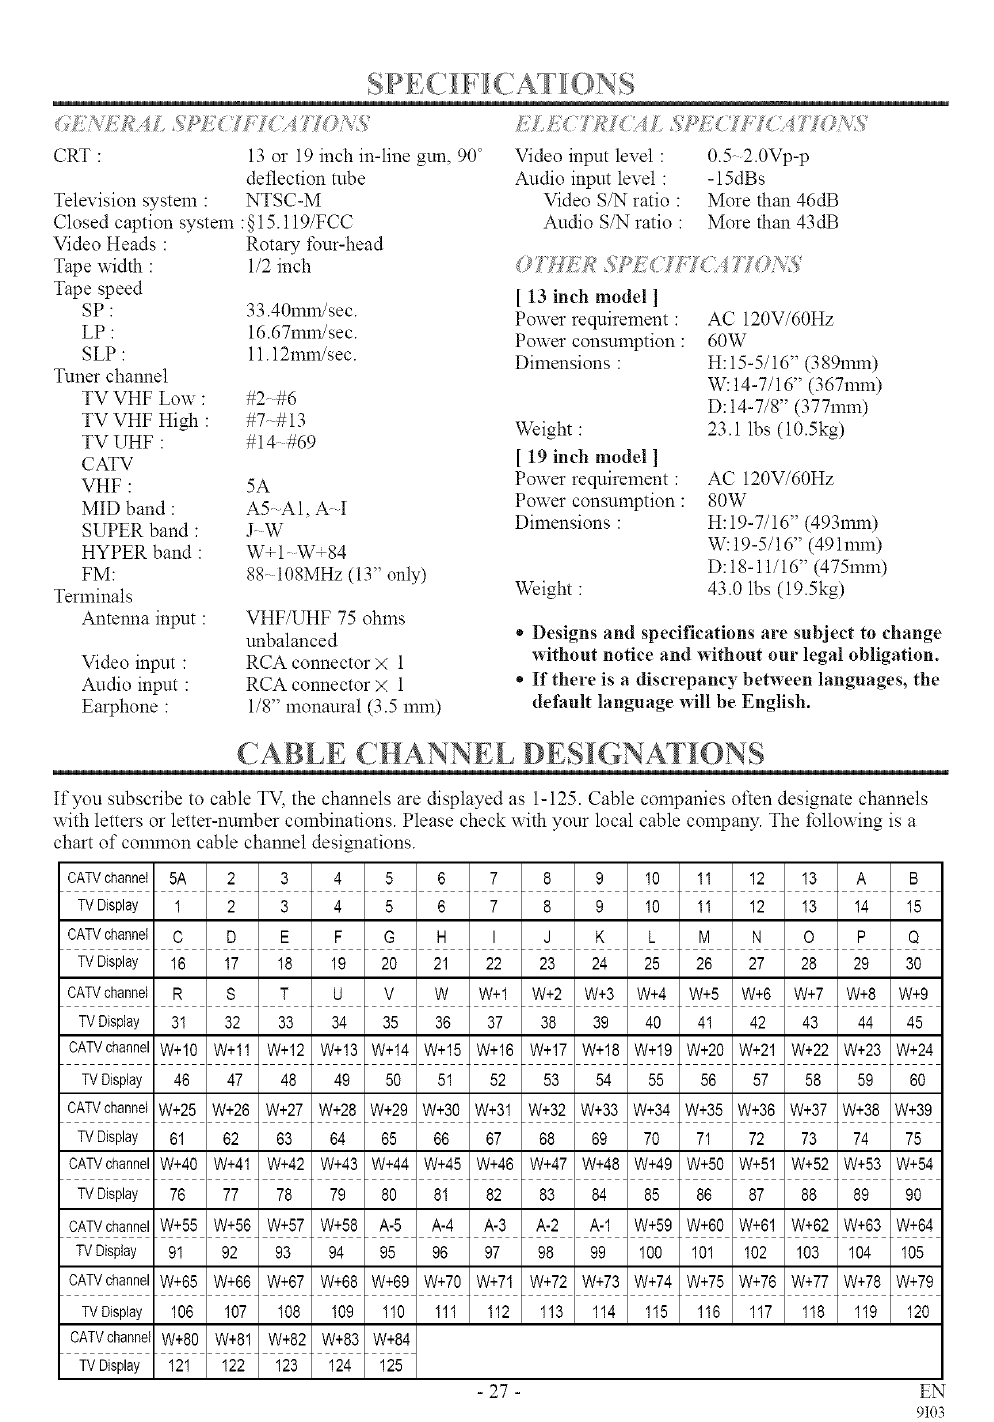
CRT :
Television system :
Closed caption system
Video Heads :
Tape width :
Tape speed
SP:
LP:
SLP :
Tuner channel
TV VHF Low:
TV VHF High
TV UHF :
CATV
VHF :
MID band :
SUPER band :
HYPER band :
FM:
Terminals
Antenna input
Video input :
Audio input :
Earphone :
13 or 19 inch in-line gun, 90 °
deflection tube
NTSC-M
:§15.119/FCC
Rotary four-head
1/2 inch
33.40mm/sec.
16.67mm/sec.
11.12mm/sec.
#2-#6
#7--#13
#14 #69
5A
A5 A1, A I
JW
W+I W+84
88- 108MHz (13" only)
VHF/UHF 75 ohms
unbalanced
RCA connector X 1
RCA connector X 1
1/8" monaural (3.5 mm)
Video input level :
Audio input level :
Video S/N ratio :
Audio S/N ratio :
0.5- 2.0Vp-p
-15dBs
More than 46dB
More than 43dB
[13 inch model ]
Power requirement :
Power consumption :
Dimensions :
Weight :
[ 19 inch model ]
Power requirement :
Power consumption :
Dimensions :
Weight :
AC 120V/60Hz
60W
H:15-5/16" (389mm)
W: 14-7/16" (367mm)
D: 14-7/8" (377mm)
23.1 lbs (10.5kg)
AC 120V/60Hz
80W
H:19-7/16" (493mm)
W: 19-5/16" (491 ram)
D:18-11/16" (475mm)
43.0 lbs (19.5kg)
*Designs and specifications are subject to change
without notice and without our legal obligation.
* If there is a discrepancy between languages, the
default language will be English.
CABLE CHANNEL DES GNAT ©NS
If you subscribe to cable TV, the channels are displayed as 1-125. Cable companies often designate channels
with letters or letter-number combinations. Please check with your local cable company. The following is a
chart of common cable channel designations.
CATVchanneI 5A 2 3 4 5 6 7 8 9 10 11 12 13 A B
TVDisplay 1 2 3 4 5 6 7 8 9 10 11 12 13 14 15
CATVchannel C D E F G H I J K L M N O P Q
TVDisplay 16 17 18 19 20 21 22 23 24 25 26 27 28 29 30
CATVchannel R S T U V W W+I W+2 W+3 W+4 W+5 W+6 W+7 W+8 W+9
TVDisplay 3! 32 33 34 35 36 37 38 39 40 41 42 43 44 45
CATVchannelW+10 W+11 W+12 W+13 W+14 W+15 W+16 W+17 W+18 W+19 W+20 W+21 W+22 W+23 W+24
TVDisplay 46 47 48 49 50 51 52 53 54 55 56 57 58 59 60
W+26 W+27 W+28 W+29 W+30 W+31 W+32 W+33 W+34 W+35 W+36 W+37 W+38 W+39
62 63 64 65 66 67 68 69 70 71 72 73 74 75
W+41 W+42 W+43 W+44 W+45 W+46 W+47 W+48 W+49 W+50 W+51 W+52 W+53 W+54
77 78 79 80 81 82 83 84 85 86 87 88 89 90
W+56 W+57 W+58 A-5 A-4 A-3 A-2 A-1 W+59 W+60 W+61 W+62 W+63 W+64
92 93 94 95 96 97 98 99 100 101 102 103 104 105
W+71 W+72 W+73 W+74 W+75 W+76 W+77 W+78 W+79
112 113 114 1!5 1!6 1!7 1!8 1!9 120
CATVchannel W+25
TVDisplay 61
CATVchannel W+40
TVDisplay 76
CATVchannel W+55
TVDisplay 91
CATVchannel W+65
TVDisplay 106
CATVchannel W+80
TVDisplay 121
W+66 W+67 W+68 W+69 W+70
107 108 109 110 11!
W+81 W+82 W+83 W+84
122 123 124 125
- 27 - EN
9103

Este manual sirve para los modelos de 13" y 19". A excepcidn de la aparieneia, la operacidn de los dos modelos es exac- ]
tamente la misma. En este manual se muestra el modelo de 13". I
NOTA:
No recomendamos utilizar mandos a distancia universales. No todas las fhnciones pueden ser controladas mediante un
mando a distaneia universal. Si decide utilizar un mando a distancia unix ersal con esta unidad, tenga en cuenta que con el
n6mero de cddigo dado tal xez no se pueda controlar la unidad. En este caso, pdngase en contacto con el fabricante del
mando a distancia universal.
- PANEL DELANTERO -,bbb_
,_UtJU_UU 1 ! ] O00000C
OO000OOOOO OOOO00OOOC
O0000OO000 OOQOOOOOOC
O0000OO000 OOOOO000OC
O000OO0000 "_ O00000000C
OOOO00OO00 ................... OOOOOOOOOC
OO0000000 ................. O00000OOC
OOOOOOOy I 0 O_OOO OOC
OOOOOOO0 ,_ _0_o r,_r_ ,o_ _,,_ _,o_ , r_, r._ ,_,o _r_ *r_._. _ OOOOC
G I oo_oooc
OOO00OO
ooooooo _ oo©oooc
ooooooo/ _J T <,_@ opooo_
( __J_J ......../ )
fl __ , ,
1 2 3 4 5 6 7 891011 12 1314
-CONTROL REMOTO-
11
1
1
WAKE-UP
/SLEEP
CHANNEL
RETURN
RECORD • SPEED PAUSE_STILL
SLOW
OO ........
SYLVANIA
---25
.............26
............24
........
.........
.........23
................
_10
.......22
.........21
1Toma de entrada de video (VIDEO)-
Con&tela a la toma de salida de video de su
videoc,'imara u otra video_abadora.
2 Toma de entrada de audio (AUDIO)-
Con&tela a la toma de salida de audio de su equipo
de audio, videocfimara u otra video_abadora.
3 Botdn de la alimentaci6n (POWER)- Pt'_lselo
para encender y apagar el televisor/video_abadora.
Pfllselo para activar la _abacidn con temporizador.
4 Botones de volumen (VOLUME A/V)-
Ajustan el nivel del vohmen.
SBotones de canales (CHANNEL A/V)-
Pt'llselos para seleccionar los canales deseados para
ver o grabar.
Se puede mostrar el ment'l principal en la pantalla del
televisor pulsando repetidamente este botdn del tele-
visor/video_abadora.
Funci6n de seguimiento- Pulse los botones
para minimizar el ruido de video (lineas o puntos en
la pantalla) durante la reproduccidn.
6 Ventanilla sensora del mando a distancia-
Recibe las sefiales infrarrojas plocedentes del
mando a distancia.
7Botdn v-
• P{llselo para seleccionar los modos de ajuste
des& el men{lde la pantalla.
• P{llselo para introducir digitos cuando establez-
ca un programa.
(Por ejemplo: Para ajustar el reloj o establecer un
plograma de temporizador)
[ Tdevisor/videograbadora ]
Bot6n de parada/expulsi6n (STOP/EJECT)-
Pfllselo para detener la cinta. Pfllselo en el modo
de parada para expulsar la cinta del
televisor/videograbadora.
[ Control remoto ]
Botdn de parada (STOP)- P{llselo para &ten-
er la cinta.
8 Botdn de rebobinado (REW)- P£11selo para
rebobinar la cinta, o para ver la imagen en retroceso
r@ido durante el modo de reproduccidn. (B%queda
con rebobinado)
Botdn _-
•Pt'flselo para seleccionar un modo des& un ment'l
particular.
(Por ejemplo: IDIOMA o ADJUST DE USER)
28 ES
0129
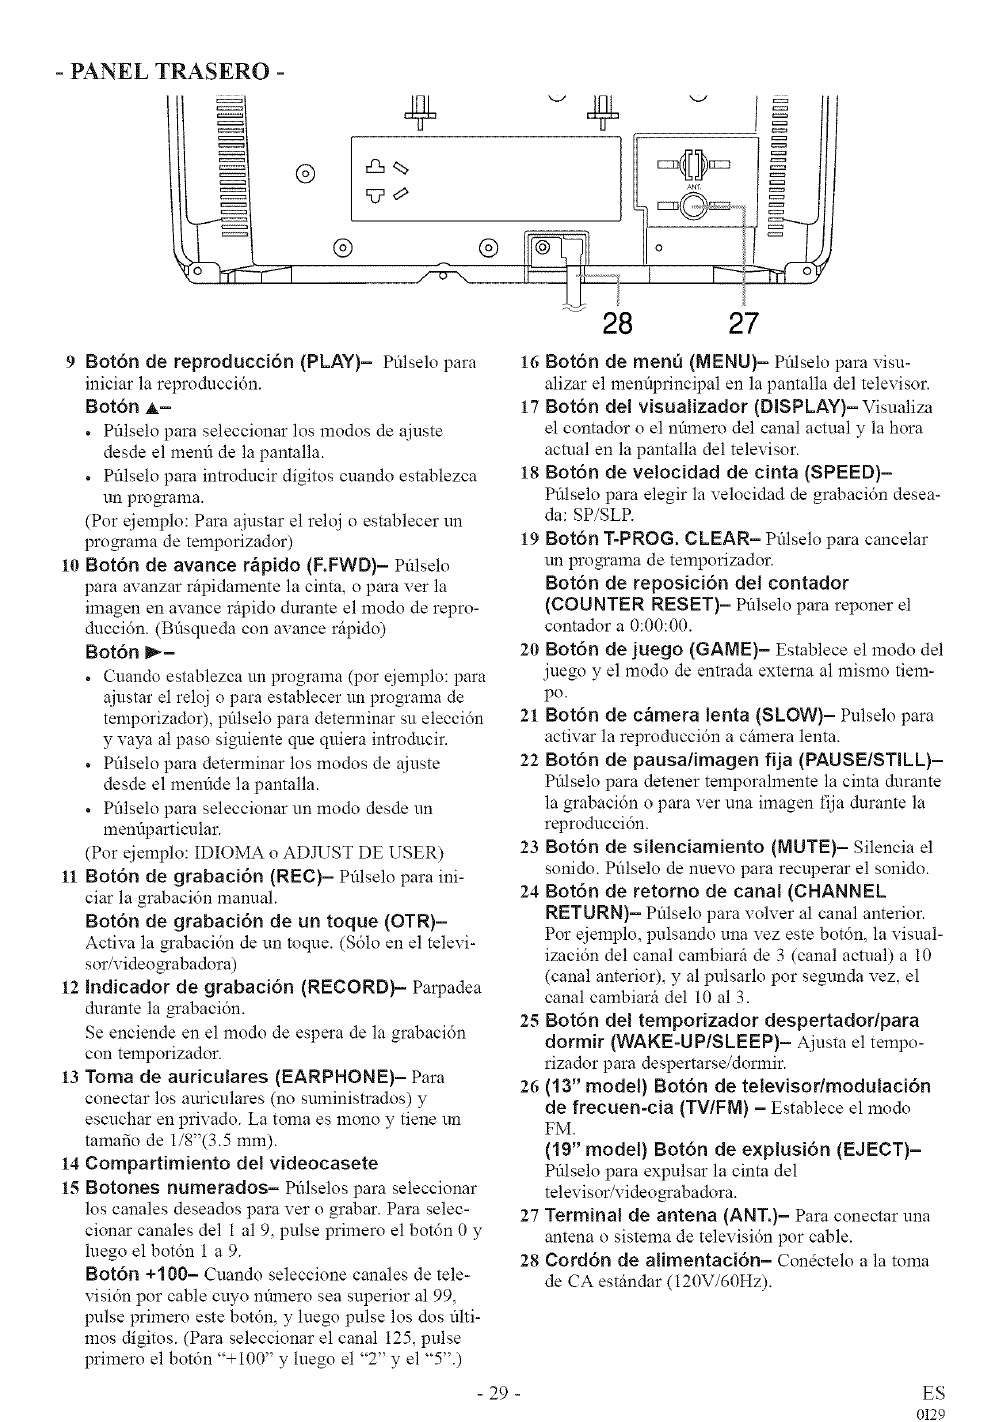
- PANEL TRASERO -
G
® ®
9 Botdn de reproduccidn (PLAY)- PNselo para
iniciar la reproduccidn.
Botdn A-
° Pt'dselo para seleccionar los modos de ajuste
desde el menfi de la pantalla.
• Pfilselo para introducir digitos cuando establezca
un prouama.
(Por ejemplo: Para ajustar el reloj o establecer un
prouama de temporizador)
10 Botdn de avance r_pido (F.FWD)- Pt'dselo
para avanzar r@idamente la cinta, o para ver la
imagen en avance rfipido durante el modo de repro-
duccidn. (Bfisqueda con avance rfipido)
Botdn I_-
• Cuando establezca un programa (por ejemplo: para
ajustar el reloj o para establecer un programa de
temporizador), pidselo para detenninar su eleccidn
y vaya al paso siguiente qne quiera introdncir.
• Pt'dselo para determinar los modos de ajuste
desde el mem'lde la pantalla.
• Pt'dselo para seleccionar un modo desde un
mem'_particular.
(Por ejemplo: IDIOMA oADJUST DE USER)
11 Bot6n de grabaci6n (REC)- Pt'dselo para ini-
ciar la grabacidn manual.
Botdn de grabacidn de un toque (OTR)-
Activa la _abacidn de tin toque. (Sdlo en el televi-
sor/videouabadora)
12 Indicador de grabacidn (RECORD)- Parpadea
durante la uabacidn.
Se enciende en el modo de espera de la grabacidn
con temporizador.
13 Toma de auriculares (EARPHONE)- Para
conectar los auriculares (no suministrados) y
escuchar en privado. La toma es mono y tiene tin
tamafio de I/8"(3.5 ram).
14 Compartimiento del videocasete
15 Botones numerados- PNselos para seleccionar
los canales deseados para ver o grabar. Para selec-
cionar canales del i al 9, pulse primero el botdn 0 y
luego el botdn 1 a 9.
Bot6n +100- Cuando seleccione canales de tele-
visidn por cable cuyo nfimero sea superior al 99,
pulse primero este botdn, y luego pulse los dos filti-
mos digitos. (Para seleccionar el canal i25, pulse
primero el botdn "+i00" y luego el "2" y el "5".)
- 29 -
28 27
16 Bot6n de ment_ (MENU)- PNselo para visu-
alizar el mem'lprincipal en la pantalla del televisor.
17 Botdn del visualizador (DISPLAY)-Visualiza
el contador o el nfimero del canal actual y la hora
actual en la pantalla del televisor.
18 Botdn de velocidad de cinta (SPEED)-
Pt'dselo para elegir la velocidad de grabacidn desea-
da: SP/SLP.
19 Bot6n T-PROG. CLEAR- Pt'dselo para cancelar
tin pro_ama de temporizador.
Botdn de reposicidn del contador
(COUNTER RESET)- Pt'dselo para reponer el
contador a 0:00:00.
20 Botdn de juego (GAME)- Establece el modo del
juego y el modo de entrada externa al mismo tiem-
po.
21 Botdn de c&mera lenta (SLOW)- Pulselo para
activar la reproduccidn a ci_mera lenta.
22 Botdn de pausa/imagen fija (PAUSE/STILL)-
Pfdselo para detener temporalmente la cinta durante
la grabacidn o para ver una imagen fija durante la
reproduccidn.
23 Botdn de silenciamiento (MUTE)- Silencia el
sonido. Pfilselo de nuevo para recuperar el sonido.
24 Botdn de retorno de canal (CHANNEL
RETURN)- PNselo para volver al canal anterior.
Por ejemplo, pulsando una vez este botdn, la visual-
izacidn del canal cambiarfi de 3 (canal actual) a 10
(canal anterior), y al pulsarlo por segunda vez, el
canal cambiarfi del 10 al 3.
25 Botdn del temporizador despertadorlpara
dormir (WAKE-UP/SLEEP)- Ajusta el tempo-
rizador para despertarse/dormir.
26 (13" model) Botdn de televisorlmodulacidn
de frecuen-cia (TV/FM) - Establece el modo
FM.
(19" model) Botdn de explusidn (EJECT)-
Pfdselo para expulsar la cinta del
televisor/video_abadora.
27 Terminal de antena (ANT.)- Para conectar una
antena o sistema de televisidn por cable.
28 Corddn de alimentaci6n- Condctelo a la toma
de CA estfindar (120V/60Hz).
ES
0129
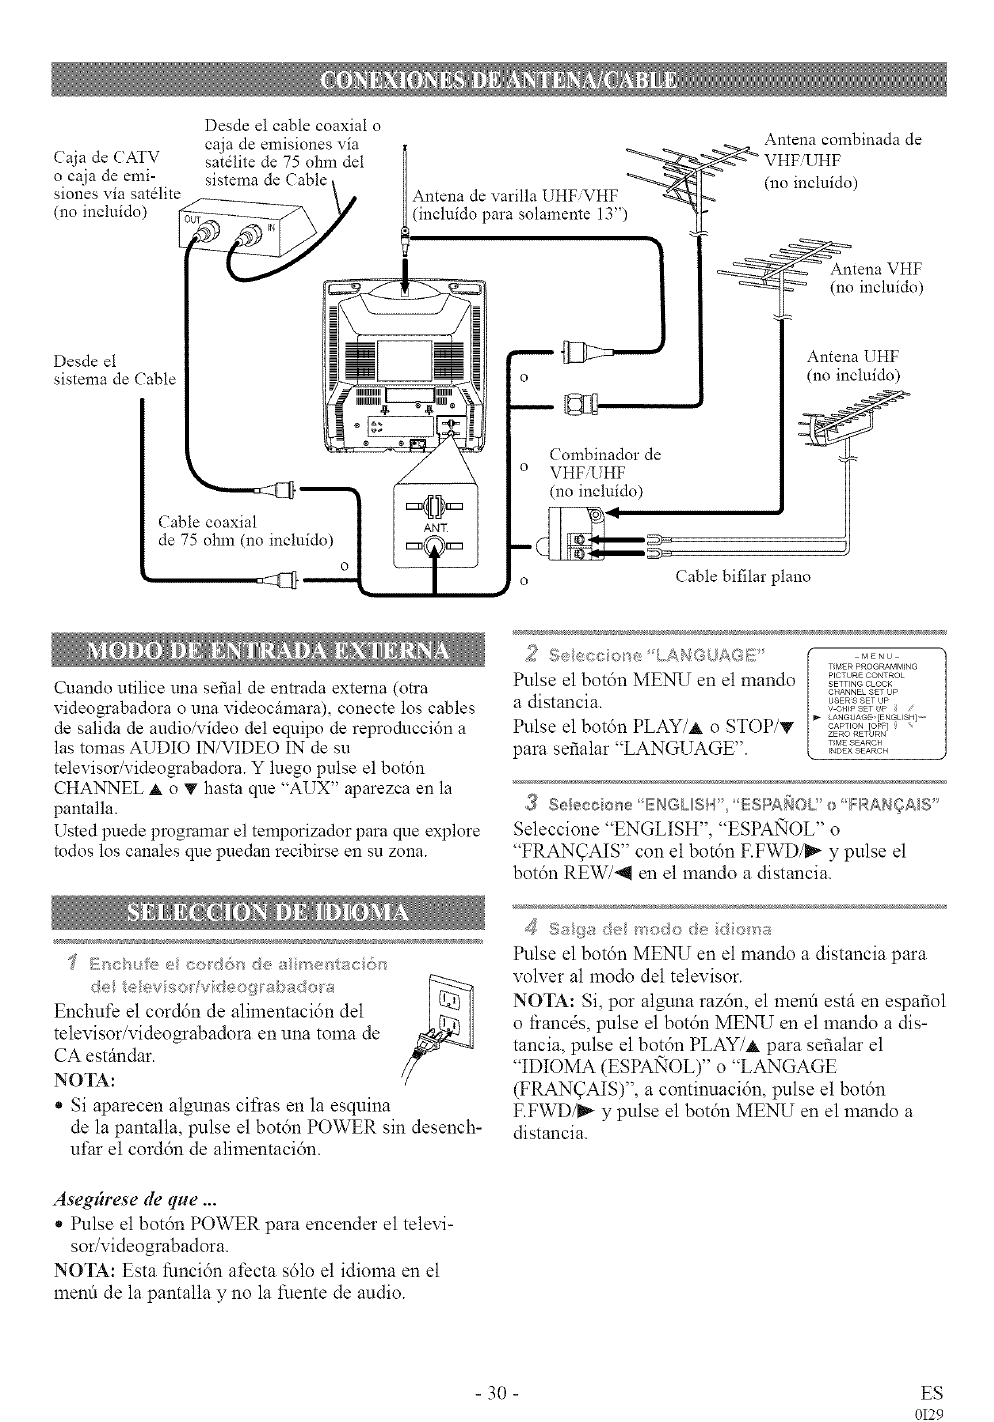
Caja de CATV
o caja de emi-
siones via satdlite
(no incluido)
Des& el
sistema de (?able
Cable coaxial
de 75 ohm (no incluido)
Desde el cable coaxial o
caja de emisiones via
satdlite de 75 ohm del
Antena de varilla UHF VHF
(incluido para solamente lo")
=@=
ANT
Combinador de
VHF UHF
(11oincluido)
Antena combinada de
_ VHF UHF
(no incluido)
Antena VHF
(no incluido)
Antena UHF
(no incluido)
Cable bifilar plano
Cuando utilice una serial de entrada externa (otra
video_abadora o una videocfimara), conecte los cables
de salida de audio/video del equipo de reproduccidn a
las tomas AUDIO IN/VIDEO IN de su
televisor/video_abadora. Y luego pulse el botdn
CHANNEL ,t o T hasta que "AUX" aparezca en la
pantalla.
Usted puede programar el temporizador para que explore
todos los canales que puedan recibirse en su zona.
; s s A
Enchufe el corddn de alimentacidn del
televisor/videograbadora en una toms de
CA estfindar.
NOTA:
* Si aparecen algunas cifras en la esquina
de la pantalla, pulse el botdn POWER sin descnch-
ut;ar el corddn de alimentacidn.
Asegiirese de que ...
* Pulse el botdn POWER pars encender el televi-
sor/videograbadora.
NOTA: Esta fi_mci6nafecta s61o el idioms en el
men_5de la pantalla y no la fuente de audio.
2 Se< _;< < oAN:G(JA(}_{:/ M_o
TIMER pROGP4_MMING
Pulse el botdn MENU en el mando ..............
SETTING CLOCK
CHANNEL SET UP
a distancia, u_ ......
v CHIP SET 'P
LANGUAG_ [ENqL SH]
Pulse el botdn PLAY/A o STOP/_" ....... _o< ,
ZER© RETURN
pars sefialar "LANGUAGE". ..........
INDEX SEARCH
_ Select oHe _'ENGLISH",_ESPANOC'0 _F'RANgAIS"
Seleccione "ENGLISH", "ESPANOL" o
"FRAN(_AIS '' con e! botdn F.FWD/_ y pulse el
botdn REW/-_ en el mando a distancia.
Sa@s(Se _ odod<_ do a
Pulse el botdn ME_; en el msndo a distancis pars
volver al modo de! televisor.
NOTA: Si, por alguna razdn, el men_5estfi cn espafiol
o fi:anc_s, pulse el botdn ME_; en el mando a dis-
tancia, pulse el botdn PLAY/_ pars sefialar el
"IDIOMA (ESPANOL)" o "LANGAGE
(FRAN_AIS)", a continuacidn, pulse el botdn
F.FWD/_ y pulse el botdn MEN[; en el mando a
distancia.
30 ES
0129
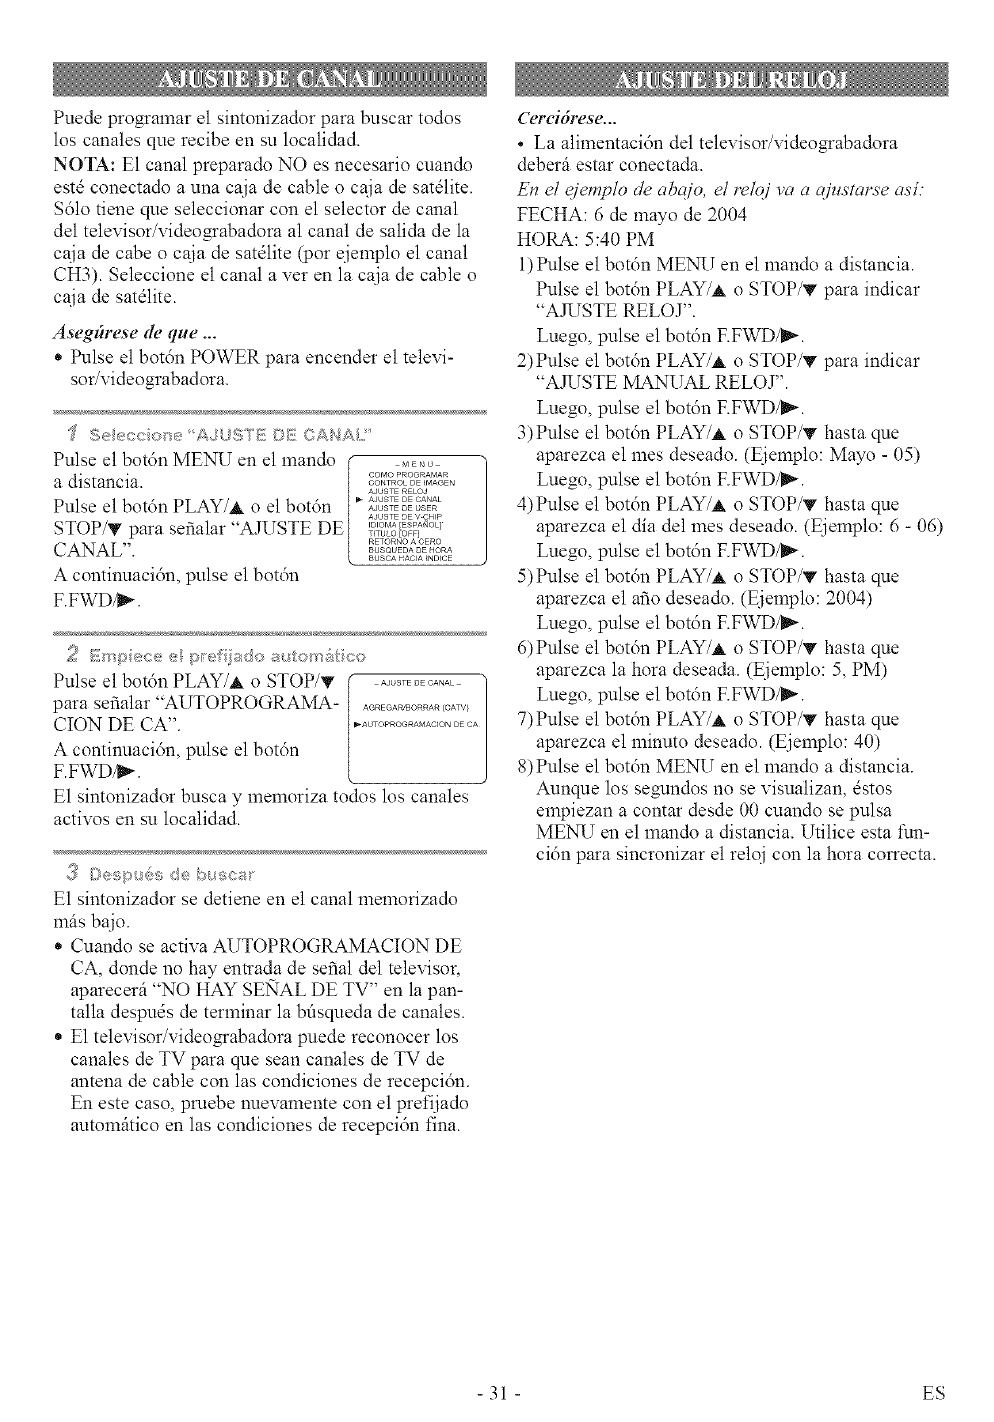
Puede programar el sintonizador para buscar todos
los canales que recibe en su localidad.
NOTA: E1canal preparado NO es necesario cuando
est4 conectado a una caja de cable o caia de sat41ite.
$61o tiene que seleccionar con el selector de canal
del televisor/video_abadora al canal de salida de la
caia de cabe o caia de sat4lite (por ejemplo el cana!
CH3). Seleccione el canal aver en la caja de cable o
caja de sat41ite.
Aseg_rese de que ...
* Pulse el botdn POWER para encender el televi-
sor/videograbadora.
"[ Seecco e A#!,Sf'EDE ©A/_,_A/i
Pulse el botdn MENU en el mando _ ....
di i / ...............
a stanc a. CONTROL DE {MAGEN
AJUSTE RELOJ
1 ! b PLAY/A l b | ..............
Pusee ot6n oe ot6n ............
A JUSTE DE V CHIP
STOP/T para serialar 'AJUSTE DE { _,_oEo<;_'_a°L_
RETORNO A CERO
CANAL". { .............
BUSCA HACIA ND_CE
A continuaci6n, pulse el bot6n
F.FWD/_.
Empece÷ ;>'el a;oa_xtomStco
Pulse el botdn PLAY/A o STOP/T .............
para serialar "AUTOPROGRAMA- _............ _°_,,_
CION DE CA". .....................
A continuaci6n, pulse el botdn
F.FWD_.-.
E1 sintonizador busca y memoriza todos los canales
activos en su localidad.
{_ ©esp<6s de b _sca__
E1 sintonizador se detiene en el canal memofizado
mils bajo.
* Cuando se activa AUTOPROGRAMACION DE
CA, donde no hay entrada de serial del televisor,
aparecerit "NO HAY SENAL DE TV" en la pan-
talla despu4s de tenninar la bfisqueda de canales.
* E1televisor/videograbadora puede reconocer los
canales de TV para clue scan canales de TV de
antena de cable con las condiciones de recepcidn.
En este caso, pmebe nuevamente con el prefijado
automfitico en las condiciones de recepci6n fina.
('ercidrese...
* La alimentacidn del televisor/videograbadora
deberfi estar conectada.
En el ejemplo de ahajo, el reloj va a q/_¢starse ash
FECHA: 6 de mayo de 2004
HORA: 5:40 PM
1)Pulse el botdn ME_; en el mando a distancia.
Pulse el botdn PLAY/A o STOP/_" para indJcar
"AJUSTE RELOJ".
Luego, pulse el botdn F.FWD/_.
2) Pulse el botdn PLAY/A o STOP/_" para indJcar
"AJUSTE MANUAL RELOJ".
Luego, pulse el botdn F.FWD/_.
3)Pulse el botdn PLAY/A o STOP?_' hasta que
aparezca el rues deseado. (Ejemplo: Mayo - 05)
Luego, pulse el botdn F.FWD/_.
4)Pulse el botdn PLAY/A o STOP/T hasta que
aparezca el dia del rues deseado. (Ejemplo: 6 - 06)
Luego, pulse el botdn F.FWD/_.
5)Pulse el botdn PLAY/A o STOP/T hasta que
aparezca el ario deseado. (Ejemplo: 2004)
Luego, pulse el botdn F.FWD/mD_.
6)Pulse el botdn PLAY/A o STOP/T hasta clue
aparezca la hora &sea&. (Ejemplo: 5, PM)
Luego, pulse el botdn F.FWD/_.
7)Pulse el botdn PLAY/A o STOP/T hasta que
aparezca el minuto deseado. (Ejemplo: 40)
8) Pulse el botdn MENU en el mando a dJstancia.
Aunque los segundos no se visualizan, 4stos
empiezan a contar desde 00 cuando se pulsa
MEN_/en el mando a dJstancia. Utilice esta fun-
ci6n para sincronizar el reloj con la hora correcta.
- 31 - ES

Your Home
For repair- in your home -of all major brand appliances,
lawn and garden equipment, or heating and cooling systems,
no matter who made it, no matter who sold it!
For the replacement parts, accessories and
owner's manuals that you need to do-it-yourself.
For Sears professional installation of home appliances
and items like garage door openers and water heaters.
1-800-4-MY-HOME ® (i-800-469-4663)
Call anytime, day or night(U.S.A, and Canada)
www.sears.com www.sears.ca
Our Home
For repair of carry-in items like vacuums, lawn equipment,
and electronics, call or go on-line for the location of your nearest
Sears Parts & Repair Center.
1-800-488-1222
Call anytime, day or night (U.S.A. only)
www.sears.com
To purchase a protection agreement on a product serviced by Sears:
1-800-827-6655 (U.S.A.) 1-800-361-6665 (Canada)
Para pedir servicio de reparaci6n Au Canada pour service en franQais:
a domicitio, y para ordenar piezas: 1-800-LE-FOYER Mc
1-888-SU-HOGAR sM (1-800-533-6937)
(1-888-784-6427) www.sears.ca
EARS
TM SM
¢ Registered Trademark Trademark /Selvice Mark of Sears Roebuck and Co
TM SM
® Marca Registlada 'Marca de Fabrica, Marca de Servicio de Sears, Roebuck and Co
M MD
C Marque de commerce Marque dcpos_e de Sears¸ Roebuck and Co CDSears Roebuck and Co
LIMITED 90 DAY WARRANTY FOR 13 INCH MODEL
If this (product) experiences any failure due to a defect in material or workmanship within 90 days from the date of
purchase, return it to your nearest Sears store, and it will be replaced free of charge.
This warranty applies only if this (product) is used for private household purposes.
This warranty gives you specific legal rights, and you may also have other rights which vary from state to state.
FULL 90 DAY WARRANTY FOR 19 INCH MODEL
For 90 days from the date of purchase, Sears will repair any defect in material or workmanship in this TV/VCR
combination, free of charge. For one year from the date of purchase, Sears will supply, at no charge, replacement
for defective parts.
Two (2) years for Picture Tube. Certain parts are excluded from this warranty.
The above warranty coverage applies only to TV/VCR combination which are used for private household purposes.
TO OBTAIN WARRANTY SERVICE, SIMPLY RETURN THE TV/VCR COMBINATION TO THE NEAREST SEARS
SERVICE CENTER IN THE UNITED STATES.
This warranty gives you specific legal rights, and you may also have other rights which vary from state to state.
Sears Roebuck and Co., Dept. 817WA Hoffman Estates, IL 60179
For the location of a Sears Service Center in your area : 1-800-488-1222
Printed in Malaysia 0EMN02407
T5505UF/T7505UF _--k_
