SZ DJI TECHNOLOGY FC2001307 WiFi enabled Camera User Manual
SZ DJI TECHNOLOGY CO., LTD WiFi enabled Camera
UserManual.wiki
>
SZ DJI TECHNOLOGY
>
FC2001307 User Manual
User manual
Navigation menu
Upload a User Manual
Namespaces
Wiki Guide
HTML
PDF
Info
Views
User Manual
Discussion / Help
Navigation

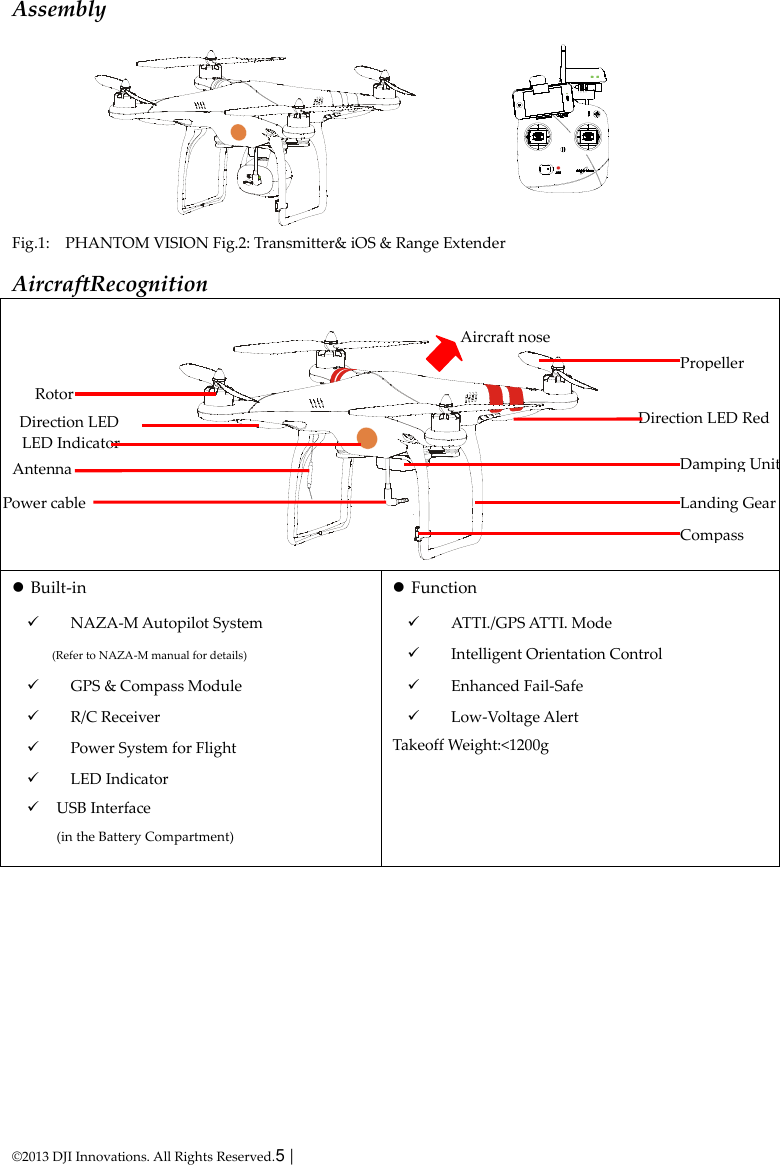
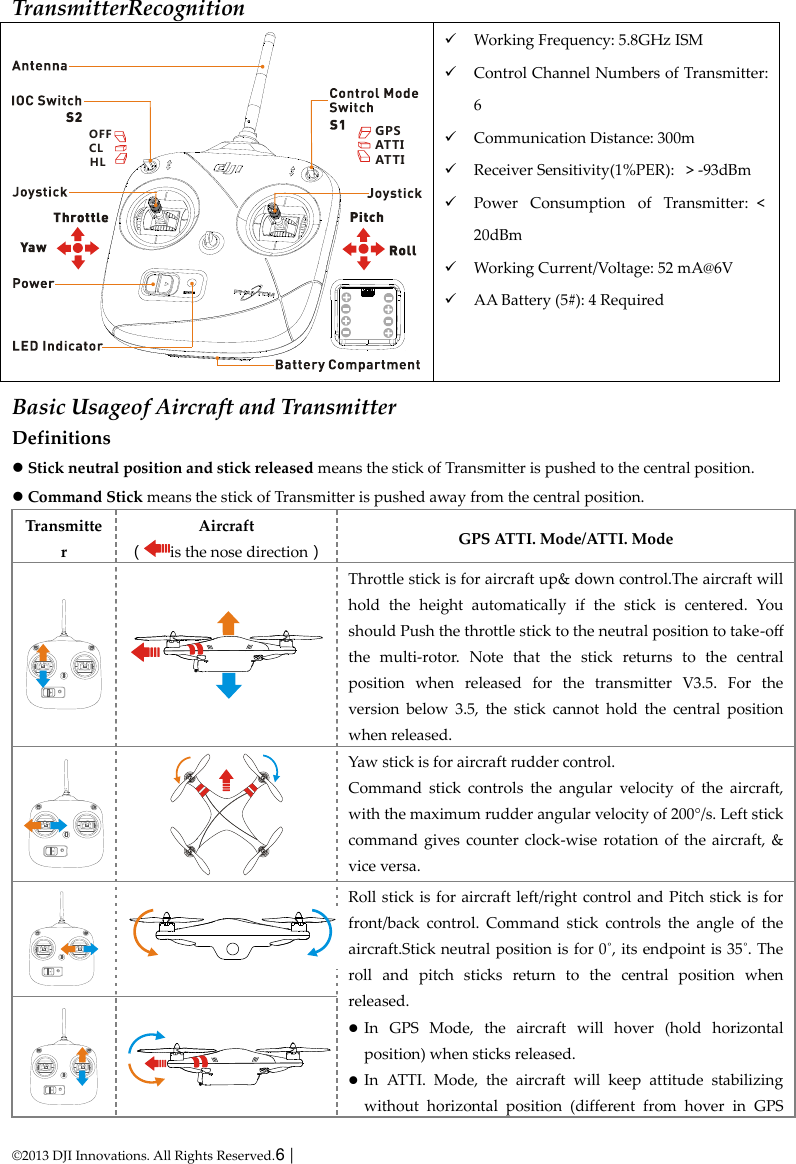
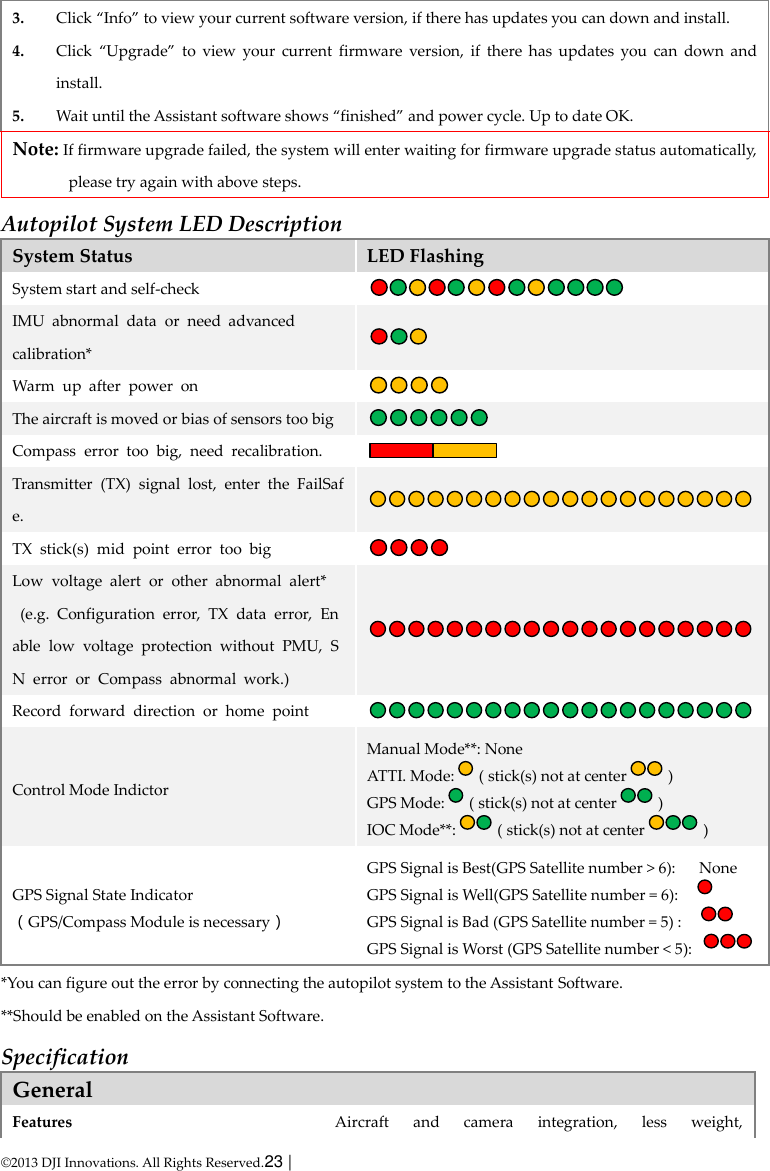
![© 2013 DJI Innovations. All Rights Reserved.7 | Mode). GPS ATTI. ATTI. ATTI. (Manual or Failsafe is selectable in software.) 3-position switch (S1) on the Transmitter for mode control. Only after Compass Module connection and Compass calibration, GPS ATTI. Mode is available. Otherwise, all switch positions are for ATTI. Mode. Pay attention because the GPS ATTI. Mode is dependent on the number of GPS satellites acquired by the main controller. Refer to the LED Indicator. When GPS signal has been lost for 3s, system enters ATTI. Mode automatically. You can enable the Manual Mode or Fail Safe (also known as One-key Go-home) in the assistant software->Basic->R/C->Control Mode. OFF Course Lock Home Lock 3-position switch (S2) on the Transmitter for Intelligent Orientation Control (IOC). Set the switch to OFF in basic flight. This function is defaulted to off. If you want to use this function refer to the advanced manual, and enable it in the assistant software. Use IOC when you are familiar with basic flight. CameraRecognition [1]Power Switch(on the back of the camera) Three stops: (1) OFF – Powered off (2) CAM ON – Power on, Wi-Fi off (3) WIFI ON –Power and Wi-Fi are both on [2]LED Indicator (on the back of the camera) LED WIFI CAMERA Solid on OFF Power On; Idle State [2] [1] [3] [4] [5]](https://usermanual.wiki/SZ-DJI-TECHNOLOGY/FC2001307/User-Guide-2097304-Page-7.png)
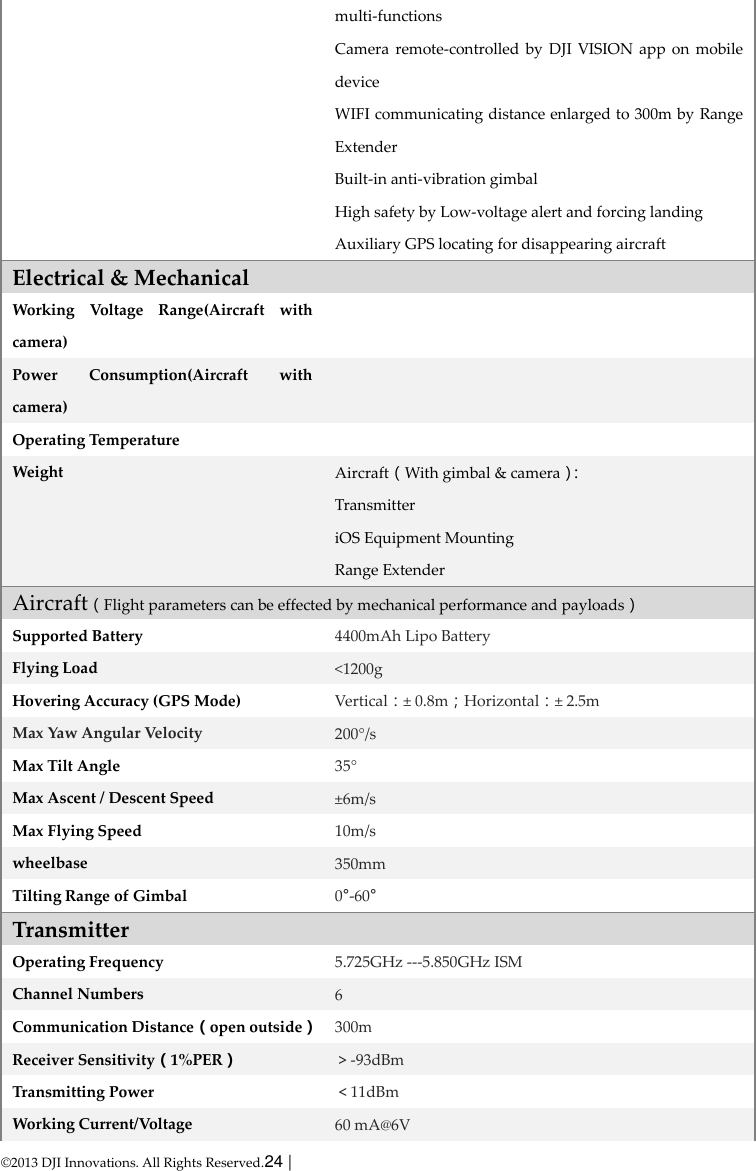
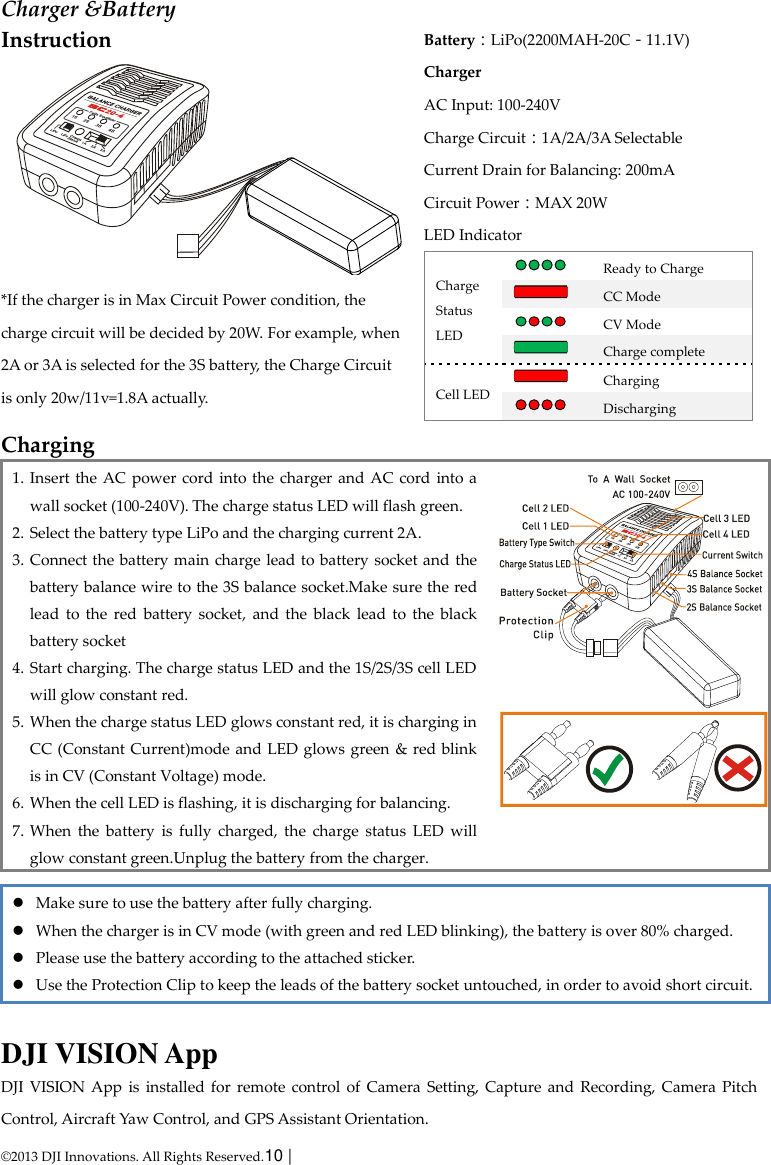
![© 2013 DJI Innovations. All Rights Reserved.8 | Slow Blink (0.2s on, 1.8s off) ON Idle State Fast Blink (0.1s on, 0.3s off) ON Accessing photos and videos in the camera Solid on OFF Recording Blink Once(0.2s on, 0.3s off) ON/OFF making a single capture Blink 3 Times(0.1s on, 0.1s off) ON/OFF making a multiple capture,3 or 5 pictures per shot Fast Blink(0.1s on, 0.3s off) ON/OFF Firmware Upgrading (0.2s green, 1.8s amber) ON Recording Solid on ON/OFF Critical error Blink Slow (0.2s on, 1.8s off) ON/OFF Sensor error Blink Once(0.2s on, 0.3s off) ON/OFF Operation failed Blink 3 Times(0.1s on, 0.1s off) ON/OFF SD Card error Blink Fast(0.1s on, 0.3s off) ON/OFF Upgrade error (0.5s Green, 0.5s Amber, 0.5s Red, 0.5s Off) ON/OFF Camera overheat When camera temperature goes above 80℃, the LED indicator will blink and the camera will automatically power off when the temperature goes above 85℃ Statuses including Red is either error or malfunction [3]Micro-SD Card Slot(on the back of the camera) Make sure that the Micro-SD card is inserted before you take any pictures or make any videos. [4]Power Plug(on the back of the camera) [5]Function Button(on the bottom of the camera) Camera in idle state short press (<2s) single capture long press (≥2s) record Camera in non-idle state any press back to idle state Range ExtenderRecognition [1]Switch: (1) OFF – Power off [1] [2] [3] [4] [5]](https://usermanual.wiki/SZ-DJI-TECHNOLOGY/FC2001307/User-Guide-2097304-Page-8.png)
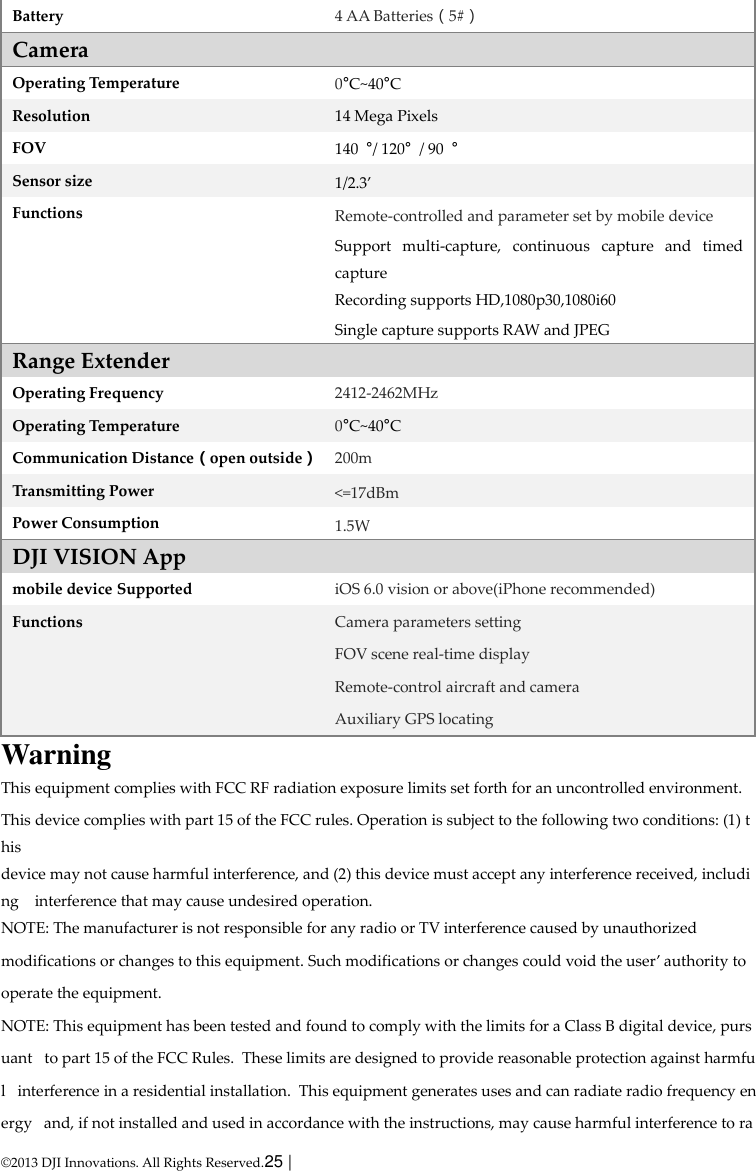
![© 2013 DJI Innovations. All Rights Reserved.9 | (2)ON –Power on [2]Rebind Button: press to rebind system. [3]USB Port: for charge the Range Extender. [4]Power Status Indicator Power Status Indicator Description Green Solid on The Range Extender is working normally. Red Solid on Low voltage alert. Yellow Solid on The Range Extender is charging. [5]Wifi Indicator Wifi Indicator Description Green blink The Range Extender system is working normally. LED Off The Range Extender system is working abnormally. Camera &Range Extender &DJI App Rebind In the condition that your camera or range extender has been repaired or replaced by a new one, you need to rebind camera and range extender to rebuilt a wifi-network, and use your DJI App to find the new wifi-network. Step1: power on the camera and range extender, 10s later press the rebind Button on Range Extender with a cuspidal object, 5s later the wifi indicator is out. Step2: wait patiently until the range extender restart automatically about 25s later, and the wifi indicator will blink green, which indicates camera and range extender are rebinded. Step3:open DJI App on your mobile device .](https://usermanual.wiki/SZ-DJI-TECHNOLOGY/FC2001307/User-Guide-2097304-Page-9.png)
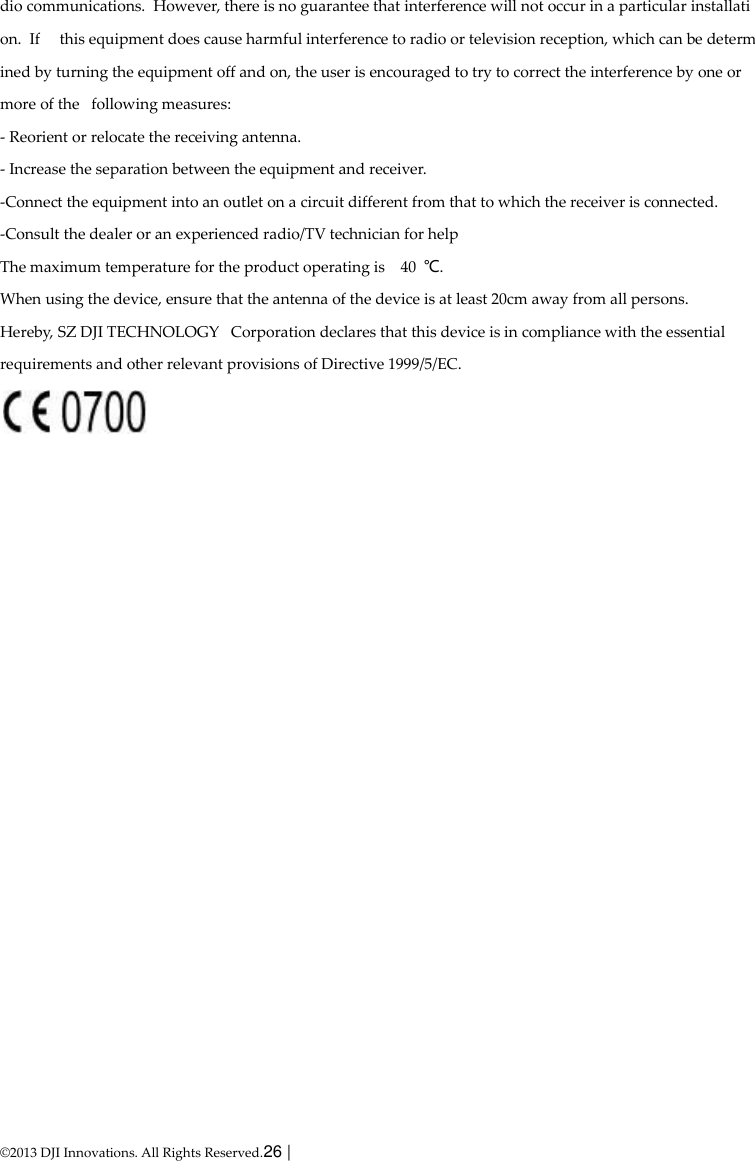
![© 2013 DJI Innovations. All Rights Reserved.11 | Downloadand Installation Approach 1:Search”DJI VISION”in the App Store, download and install it on your mobile device. Approach 2: Scan QR code to get the DJI VISION App and install it on your mobile device. Wi-Fi Network Selection 1) Turn on the WLAN of your mobile device and connect to the PHANTOM_xxxxxx (SSID) network for remote control by DJI VISION App. 2) Select a Wi-Fi network to the Internet if you want to share your photos or videosor read DJI news. Note1: For the first time you open the DJI VISION app, Internet accessibility is necessary for you to finish login or new account creation. Note 2: the SSID is unique for each Camera. Login [1] LoginButton: The first time you use the DJI VISION App you should login in. Note: (1) Internet accessibility is necessary. (2)You can change your user/password in the App Settings [2] RegisterButton Create a new account if you do not have one already. [3] [4][5]Login Page Enter your registered email address and password here. And then click to login. [6] Forget Password If you do have an account, but forget the password, click to retrieve it. [7] Using Tips Using tips will display for welcoming your first entering into. [3] [4] [5] [6]](https://usermanual.wiki/SZ-DJI-TECHNOLOGY/FC2001307/User-Guide-2097304-Page-11.png)
![© 2013 DJI Innovations. All Rights Reserved.12 | Main Page After login you will come to the main page. In this page, you can see the current Wi-Fi connection, and four icons that represent the four functionalities of this App. Green Light Camera has been connected to, and the Camera and SD Card album are available. Blue Light Internet has been connected, photos and videos can be shared and DJI news can be refreshed. Gray Light No Wi-Fi connection Camera Click to enter the camera preview page Album Click to enter the Album page News Click to enter the DJI news page Settings Click to enter the App settings page [7] [8] [9] [10] [11] [12] [13] [14] [15] [7]](https://usermanual.wiki/SZ-DJI-TECHNOLOGY/FC2001307/User-Guide-2097304-Page-12.png)
![© 2013 DJI Innovations. All Rights Reserved.13 | Camera Page [1] Return to the preview page [2] Camera gimbal control switch 1) In normal state: the camera gimbal is controlled by the upwardarrow [3] and downward arrow [4] on the preview page. Press to turn up the camera, and to turn down the camera. 2) In high light state (blue): the camera gimbal is controlled by the iOS’s gyroscope sensor and gravity sensor. Camera Original StateCamera Pitch Down [5] Flight attitude Click it to obtain the Pitch, Roll and Yawinformation, which can help you find the aircraft if the aircraft fly far away from you.It is also known as the Radar function. [1] [2] [3] [4] [5] [6] Pitch up](https://usermanual.wiki/SZ-DJI-TECHNOLOGY/FC2001307/User-Guide-2097304-Page-13.png)
![© 2013 DJI Innovations. All Rights Reserved.14 | [6]Flight parameters If the connection between the camera and the NAZA is ok, these “N/A”s should be meaningful digits [7] SD Card Status Highlighted when a valid SD card is inserted, otherwise, grayed out. [8] Wi-Fi Signal Intensity The Camera is connected to the Range Extender correctly and Wi-Fi is working normally. [9] Aircraft Battery Level 3 grids: > 11.80V 2 grids: 11.30V to 11.80V 1 grid: 11.20V to 11.30V (should fly back) 0 grid: <= 11.20V (should land immediately) [10] Aircraft GPS status Highlighted when more than 6 satellites are found, otherwise, grayed out. [11]Remained shots It is calculated based on the current selected photo size. Zero if SD card is not inserted [12] Camera Capture Button Capture Button is disabled during the process of recording. [13] Camera Record Button A red dot blinks when the camera is recording, and the time elapsed is displayed on the top right corner of the preview screen. [14] Hide or show camera settings Click to enter camera settings, and click again to exit. [15] Hide or show flight parameters. Click to hide flight parameters, and click again to show flight parameters. Camera Page--Camera Settings [17] [1] [2] [3] [4] [5] [6] [7] [8] [9] [10] [11] [12]](https://usermanual.wiki/SZ-DJI-TECHNOLOGY/FC2001307/User-Guide-2097304-Page-14.png)
![© 2013 DJI Innovations. All Rights Reserved.15 | [1]Capture Mode Single Capture. One picture per shot. Multiple Capture. 3 pictures per shot. Multiple Capture. 5 pictures per shot. Continuous Capture. Also needs to select: a) Intervals between two shots (1~60 seconds) b) Number of shots (2~254, or infinite shots) Note: Capture Button changes accordingly. [2]Photo Format JPEG Raw(one *.jpg and one *.raw will be generate simultaneously per shot when this option is selected) Note: raw photo format is not supported by multiple capture mode or continuous capture mode. [3]Photo Size. Below options are supported. Large: 4608 x 3456, 4:3, 16MP Sub-large: 4384 x 3288, 4:3, 14.4MP Medium: 4384 x 2922, 3:2, 12.8MP Small: 4384 x 2466, 16:9, 10.8MP [4] Video Resolution. Below options are supported. 1920x1080 60i, 16:9 1920x1080 30p, 16:9 1280x960 30p, 4:3 1280x720 60p, 16:9 1280x720 30p, 16:9 640x480 30p, 4:3 (VGA) [5] ISO. Below options are supported. AUTO 100 200 400 800](https://usermanual.wiki/SZ-DJI-TECHNOLOGY/FC2001307/User-Guide-2097304-Page-15.png)
![© 2013 DJI Innovations. All Rights Reserved.16 | [6] White Balance. Below options are supported. AWB (auto) Sunny Cloudy Indoor [7]Exposure Metering. Below options are supported. Center Average Spot [8] Exposure Compensation. Below options are supported. -2.0 2.0 -1.7 1.7 -1.3 1.3 -1.0 1.0 -0.7 0.7 -0.3 0.3 0 [9] Sharpness. Below options are supported. Standard Hard Soft [10] Contrast. Below options are supported. Standard Hard Soft [11] Anti-flicker. Below options are supported. Auto 50Hz](https://usermanual.wiki/SZ-DJI-TECHNOLOGY/FC2001307/User-Guide-2097304-Page-16.png)
![© 2013 DJI Innovations. All Rights Reserved.17 | 60Hz [12]Restore Default Settings . Note: 1) Reboot is needed to make it take effect. 2) Restore default settings are recommended after each firmware upgrade. [13]Format SD Card Note: all data in the SD card will be lost after format operation, so be sure to do data backup before doing it. Album Page—Album inCamera SD Card [1]In Camera SD CardAlbum You can browse all photos and videos in the SD card, view a selected picture or play a selected video. [2]Photos and Videos are listed and grouped by date. [3]All those photos and videos that had been synchronized to the mobile device are identified . [4] Video thumbnails, with a recorder token and time duration on them. Click a video thumbnail to play a single video.A play progress bar appears at the bottom of the screen. [5]Photo thumbnails that hasn’t been synchronized to the mobile device.Click a Photo thumbnail to view a [1] [2] [3] [4] [5] [6]](https://usermanual.wiki/SZ-DJI-TECHNOLOGY/FC2001307/User-Guide-2097304-Page-17.png)
![© 2013 DJI Innovations. All Rights Reserved.18 | single picture. You can slip left or right to view the previous or next picture. [6]Synchronize Button . Click this button to enter synchronize mode. In Synchronize Mode (1) A synchronization progress bar (1) appears in this mode with a “tick” on the right. (2) You can select photos or videos and then click , the synchronization process then begins. (3) You can exit synchronize mode by a click on button (3). (4) You can synchronize single picture or video, or synchronize and pay a video at the same time. Synchronize a picture Synchronize and pay a video You can also synchronize multiple pictures or videos at a time. (1) Click thumbnails to select photos or videos to synchronize to your mobile device. The thumbnails identified by this to ken are successfully selected. (3) (2) (1) (1) (2) (2) (3) (2) (4)](https://usermanual.wiki/SZ-DJI-TECHNOLOGY/FC2001307/User-Guide-2097304-Page-18.png)
![© 2013 DJI Innovations. All Rights Reserved.19 | (2) Or you can select one or more groups to be synchronized. (3) The number of photos and videos that have been selected is displayed here. (4) Synchronizing… You can click to stop the synchronization process. Those photos and videos that have been copy to your iPhone in this synchronization process will remain there as a result. Album Page—Album In mobile device [1]Album In mobile device You can browse all photos and videos in the album created by the App on your mobile device, view a selected picture or play a selected video. [2]Sorted by capture time .Pictures and videos are listed in thumbnail style [3]Sorted by places .GPS information is embedded into the pictures and videos. Note: Accessibility to the Internet is necessary for it to refresh the map. [4] Click any picture to view a single picture. You can slip left or right to view the previous or next picture. [5] Click any video to play a single video. A play progress bar appears at the bottom of the screen. [6] Share your pictures and videos to social network sites. Note1: Accessibility to the Internet is necessary to share pictures or videos. [2] [3] (2) [1] [5] [4] (2) [6] (2)](https://usermanual.wiki/SZ-DJI-TECHNOLOGY/FC2001307/User-Guide-2097304-Page-19.png)
![© 2013 DJI Innovations. All Rights Reserved.20 | Note2: video sharing is not available currently, but it will be ready in the near future, including youtube, vimeo. News Page [1]News List (1) Scroll up to update (2) Scroll down to load more Note: need connection to the Internet. [2]News Detail Click any item of news list to get news detail. Settings Page Turn the switch from left to right to enable it. [1]Toolbar Auto Hide. Turn the switch from left to right to enable it. [1] (2) [2] (2) [1] [2] [3] [4] [5] [6] (2) [7] [8] [9] [10] [11] [12] [13] [14] [15] [16](https://usermanual.wiki/SZ-DJI-TECHNOLOGY/FC2001307/User-Guide-2097304-Page-20.png)
![© 2013 DJI Innovations. All Rights Reserved.21 | Auto HideDisabledAuto Hide Enabled [2]Use GPS Data.Turn the switch from left to right to enable it. When this option is enabled, your mobile device will send its own GPS information, if it has, to the camera upon its connection establishment to the camera. So the camera can have an initial GPS information in case the PHANTOM GPS module could not find enough satellites (>6). This initial GPS information may be overridden by the GPS information got from the PHANTOM GPS module by the camera afterwards. [3]When connection breaks. Click this item to enter the detailed page. (1) If enabled, the camera stops recording when the connection between your iPhone and the camera breaks while the camera is in recording state. If disabled, the camera keeps recording when the connection between your iPhone and the camera breaks while the camera is in recording state. (2) Here you can select what the camera to do when the connection between your mobile device and the camera breaks while the camera is in idle state. This is for those cases that the connection is lost but you don’t want to miss the scenes that should have been taken by this flight. [4]Camera Settings Display. Click this item to enter the detailed page. These options determine which camera parameters will be shown in the camera parameter list in the camera preview page. For example, here disable the Photo Format item, and then it is hidden. (1) (2)](https://usermanual.wiki/SZ-DJI-TECHNOLOGY/FC2001307/User-Guide-2097304-Page-21.png)
![© 2013 DJI Innovations. All Rights Reserved.22 | [5]Preview Quality. Click this item to enter the detailed page. (1) High: 320x240@30fps (2) Low: 320x240@15fps, recommend to be used under weak Wi-Fi signal condition. Note: may add an option of 640x480@30fps in the future. [11]Binding [12] Find MY PHANTOM Appendix Assistant software& MC/PMU Firmware Upgrade Before upgrade, make sure your computer is connected to the Internet and close anti-virus software and firewall during the firmware upgrade.Please follow belowsteps to update software and firmware. 1. Open your PC, power on PHANTOM VISION and connect it to PC with USB extender.DO NOT break connections until firmware upgrade is finished. 2. Run the Assistant software and confirm MC is connected. (1) (2) Fig.1:Satellite mode Fig.2:Standard mode](https://usermanual.wiki/SZ-DJI-TECHNOLOGY/FC2001307/User-Guide-2097304-Page-22.png)