SZ DJI TECHNOLOGY GL3581503 Remote Controller User Manual 1
SZ DJI TECHNOLOGY CO., LTD Remote Controller 1
Contents
- 1. User Manual 1
- 2. User Manual 2
- 3. Users Manual 1
- 4. Users Manual 2
User Manual 1
PHANTOM 3
V1.0
2015.04
User Manual
Standard
2
© 2015 DJI. All Rights Reserved.
Using this manual
Legends
Warning Important Hints and Tips Reference
Read Before the First Flight
Read the following documents before using the Phantom 3 Standard:
1. In the Box
2. Phantom 3 Standard User Manual
3. Phantom 3 Standard Quick Start Guide
4. Phantom 3 Standard Guidelines and Disclaimer
5. Phantom 3 Standard Intelligent Flight Battery Safety Guidelines
We recommend that you watch all tutorial videos on the ocial DJI website and read the Disclaimer before you y.
Prepare for your rst ight by reviewing the Phantom 3 Standard Quick Start Guide and refer to the User Manual
for more detailed information.
Video Tutorials
Please watch the tutorial videos at the link below, which demonstrates how to use Phantom 3 Standard aircraft
http://www.dji.com/product/phantom-3/video
Download the DJI Pilot app
Download and install the DJI Pilot app before using the aircraft. Scan the QR code to the right
to download the latest version.
The Android version of the DJI Pilot app is compatible with Android 4.1.2 or later.
The iOS version of the DJI Pilot app is compatible with iOS 8.0 or later.
© 2015 DJI. All Rights Reserved.
3
Contents
Using this manual
Legends 2
Read Before the First Flight 2
Video Tutorials 2
Download the DJI Pilot app 2
Product Prole
Introduction 6
Feature Highlights 6
Preparing the Aircraft 7
Aircraft Diagram 8
Remote Controller Diagram 8
Aircraft
Flight Controller 11
Flight Mode 11
Flight Status Indicator 11
Return-to-Home (RTH) 12
Smart RTH 12
Low Battery RTH 13
Failsafe RTH 14
Vision Positioning System 14
Flight Recorder 16
Attaching and Detaching the Propellers 16
DJI Intelligent Flight Battery 17
Remote Controller
Remote Controller Prole 23
Using the Remote Controller 23
Remote Controller Status LED 27
Linking the Remote Controller 28
Remote Controller Compliance Version 29
4
© 2015 DJI. All Rights Reserved.
Camera and Gimbal
Camera Prole 31
Gimbal 32
DJI Pilot App
Camera 35
Director 38
Store 38
Discovery 38
Flight
Flight Environment Requirements 40
Flight Limits and No-Fly Zones 40
Preight Checklist 44
Calibrating the Compass 44
Auto Takeo and Auto Landing 45
Flight Test 46
Starting/Stopping the Motors 46
Troubleshooting (FAQ)
Appendix
Specications 53
Intelligent Orientation Control (IOC) 55
FCC Compliance 56

© 2015 DJI. All Rights Reserved.
5
Product Prole
This section introduces the Phantom 3
Standard and lists the components of the
aircraft and remote controller.

6
© 2015 DJI. All Rights Reserved.
Product Profile
Product Prole
Introduction
The Phantom 3 Standard represents the next generation of DJI quadcopters. It is capable of capturing 1080P
video and video signal out of the box. The built-in camera has an integrated gimbal to maximize stability while
minimizing both weight and size.
Feature Highlights
Camera and Gimbal: With the Phantom 3 Standard, you’re shooting 1080p video and capturing 12 megapixel pho-
tos that look crisper and cleaner than ever. An enhanced sensor gives you greater clarity, lower noise, and better
pictures than any previous ying camera.
DJI Intelligent Flight Battery: The 4480 mAh DJI Intelligent Flight Battery features upgraded battery cells and an
advanced power management system.
Built-in WiFi Extender: The wi extender is integrated into the remote controller to allow a easy connection to teh
aircraft.
Flight Controller: The next-generation ight controller has been updated to provide a safer, more reliable ight
experience. A newly implemented ight recorder stores critical data from each ight.
© 2015 DJI. All Rights Reserved.
7
Product Profile
Phantom 3 Standard User Manual
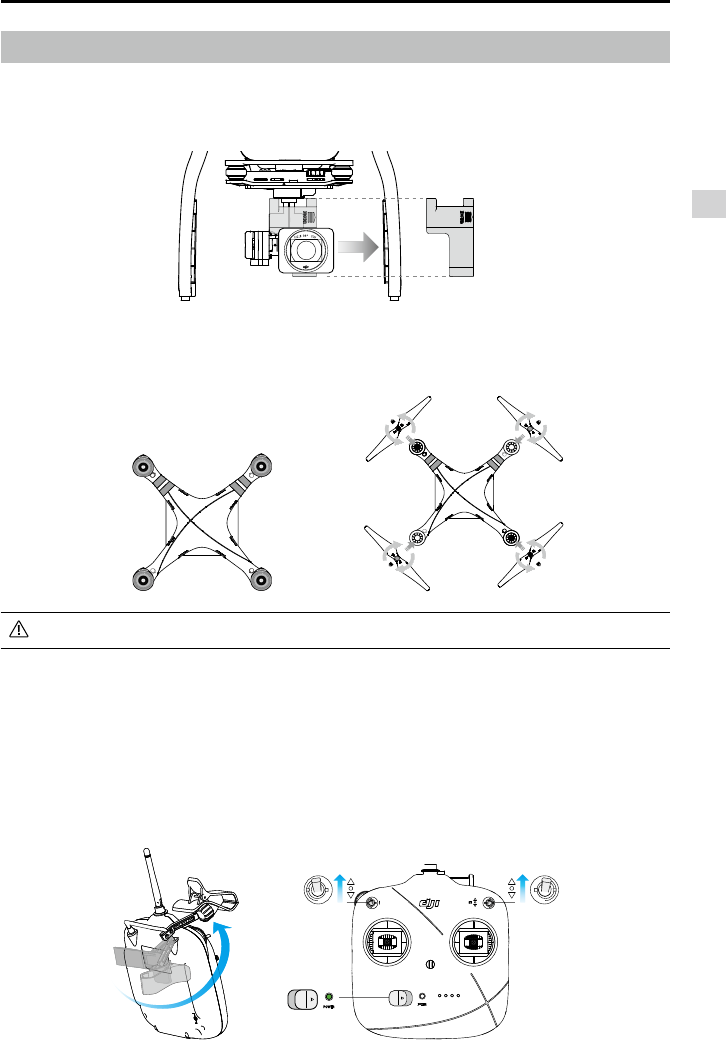
Preparing the Aircraft
Removing Gimbal Clamp
Remove the gimbal clamp by sliding it to the right (when facing the nose of the aircraft), as shown below.
Attaching the Propellers:
Mount the propellers with black dots on to motors with black axes and spin counter-clockwise to secure.
Mount the propellers with sliver dots on to motors with sliver axes and spin clockwise to secure. Be sure
all propellers are securely in place.
Preparing the Remote Controller:
1. Twist the Phone Holder to face outwards and x in position.
2 . Ensure the battery is fully charged.
3. Be sure S1 and S2 are switched to the upper most position. The LED will go green if the Remote Controller is
functioning.
Place all propellers onto the correct motors and tighten by hand to lock them in position.
S1S2
8
© 2015 DJI. All Rights Reserved.
Product Profile
Phantom 3 Standard User Manual
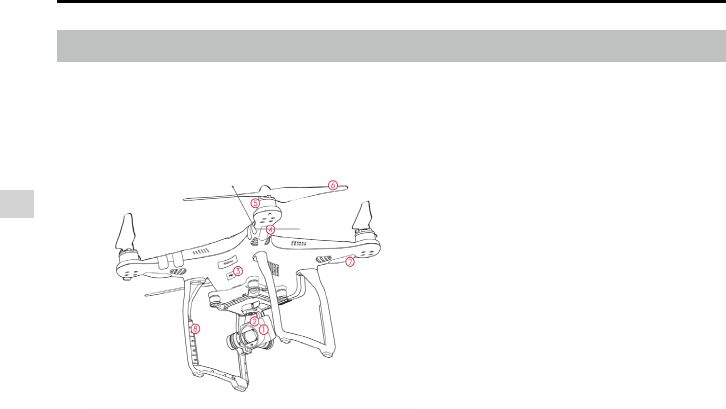
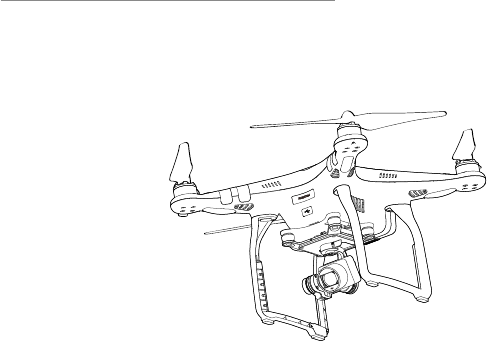
Aircraft Diagram
[1] Gimbal and Camera
[2] [Camera Micro-SD Card Slot
[3] Aircraft Micro-USB Port
[4] Front LED Indicator
[5] Landing gear
[6] Motor
[7] Rear LED Indicator
[8] Antennas
[10]
[11]
© 2015 DJI. All Rights Reserved.
9
Product Profile
Phantom 3 Standard User Manual
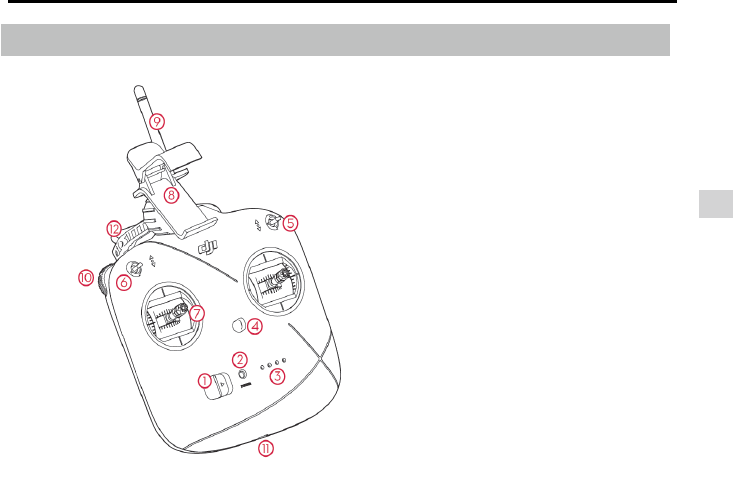
Remote Controller Diagram
[1] Power Button
[2] Status LED
[3] Battery Level LEDs
[4] Neck Strap Securing Hole
[5] S1 Switch
[6] S2 Switch
[7] Control Stick
[8] Phone Holder
[9] Antennas
[10] Gimbal Dial
[11] Charging Port
10
© 2015 DJI. All Rights Reserved.
Aircraft
This section introduces the features of
the Flight Controller, Vision Positioning
System, and the Intelligent Flight Battery
© 2015 DJI. All Rights Reserved.
11
Aircraft
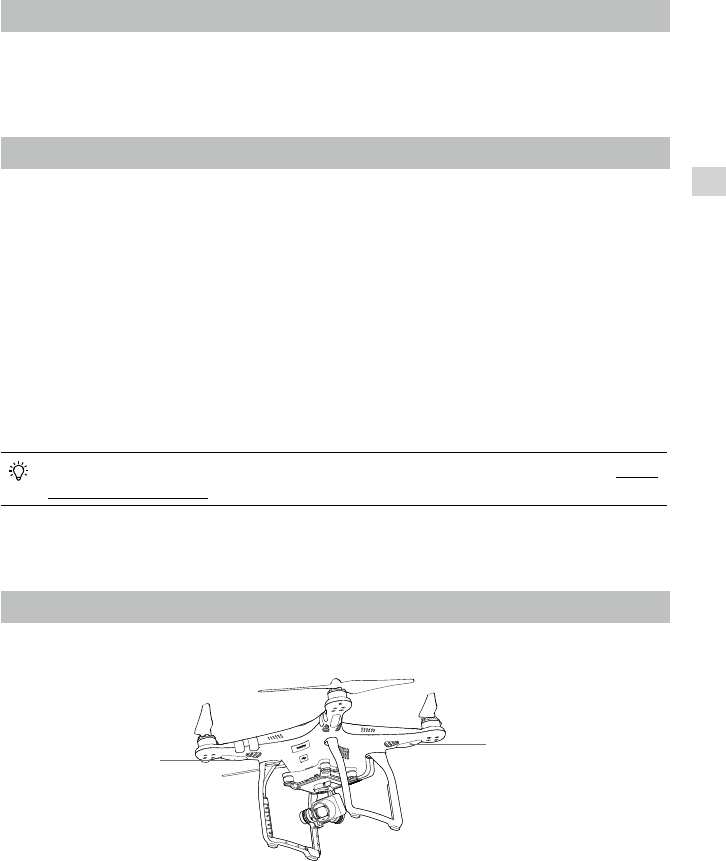
Flight Status Indicator
The Phantom 3 Standard has Front LEDs and Aircraft Status Indicators. The positions of these LEDs are shown in
the gure below:
The Front LEDs show the orientation of the aircraft. The Front LEDs glow solid red when the aircraft is
turned on to indicate the front (or nose) of the aircraft. The Aircraft Status Indicators communicate the
system status of the flight controller. Refer to the table below for more information about the Aircraft Status
Indicators:
Aircraft
Flight Controller
The Phantom 3 Standard’s ight controller features several important upgrades, including a new ight mode. Safe-
ty modes include Failsafe and Return-to-Home. These features ensure the safe return of your aircraft if the control
signal is lost. The ight controller can also save critical ight data from each ight to the on-board storage device.
The new ight controller also provides increased stability.
Flight Mode
Two ight modes are available. The details of each ight mode are found below:
P-mode (Positioning) : P-mode works best when GPS signal is strong. There are three dierent states of P-mode,
which will be automatically selected by the Phantom 3 Standard depending on signal strength of GPS.
P-GPS: GPS and Vision Positioning both are available. The aircraft is using GPS for positioning.
P-ATTI: Neither GPS nor Vision Positioning is available. The aircraft is using only its barometer for positioning,
so only altitude can be stabilized.
A-mode (Attitude): GPS is not used for stabilization. The aircraft only uses its barometer. The aircraft can still auto-
matically return to the home point if the control signal is lost and the Home Point was recorded successfully.
F-mode (Function): Intelligent Orientation Control (IOC) is activated in this mode. For more information
about IOC, refer to the IOC section in the Appendix.
Use the Flight Controller mode switch to change the flight mode of the aircraft, refer to the “Flight
Mode Switch” on Page 26 for more information.
Front LED
Aircraft Status Indicator
12
© 2015 DJI. All Rights Reserved.
Aircraft
Phantom 3 Standard User Manual
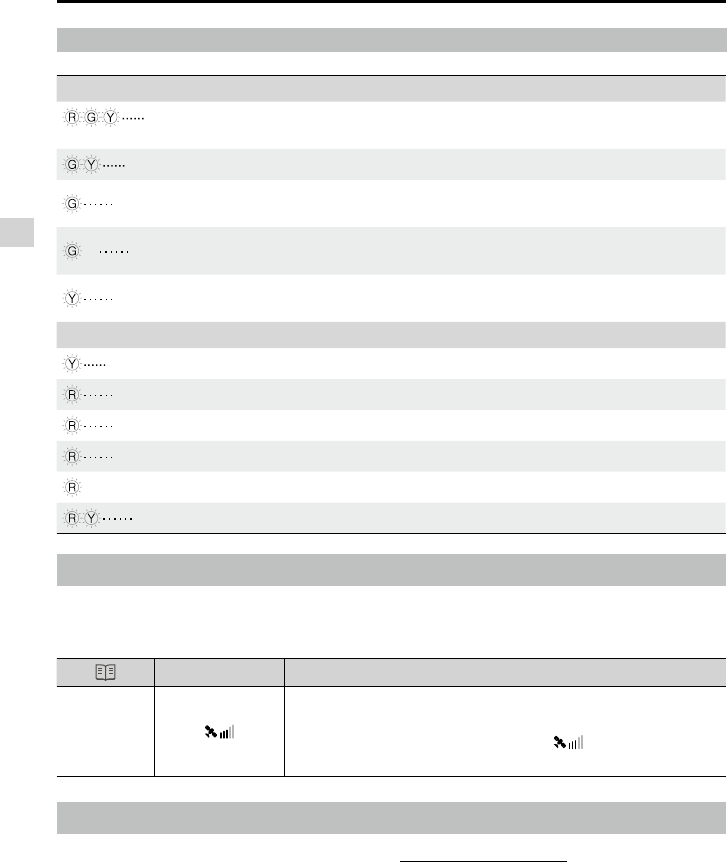
Aircraft Status Indicator Description
Normal
Red, Green and Yellow Flash
Alternatively Turning On and Self Diagnostic Testing
Green and Yellow Flash Alternatively Warming Up
Green Flashes Slowly Safe to Fly (P-mode with GPS and Vision
Positioning)
X2 Green Flashes Twice Safe to Fly (P-mode with Vision Positioning but
without GPS)
Yellow Flashes Slowly Safe to Fly (A-mode but No GPS and Vision
Positioning)
Warning
Fast Yellow Flashing Remote Controller's Signal Lost
Slow Red Flashing Low Battery Warning
Fast Red Flashing Critical Battery Warning
Red Flashing Alternatively IMU Error
—
Solid Red Critical Error
Red and Yellow Flash Alternatively Compass Calibration Required
Return-to-Home (RTH)
The Return-to-Home (RTH) function brings the aircraft back to the last recorded Home Point. There are
three types of RTH procedures: Smart RTH, Low Battery RTH, and Failsafe RTH. This section describes
these three scenarios in detail.
GPS Description
Home Point
If a strong GPS signal was acquired before takeoff, the Home Point
is the location from which the aircraft was launched. The GPS signal
strength is indicated by the GPS icon ( ). The aircraft status
indicator will blink rapidly when the home point is recorded.
Smart RTH
Use the RTH button on the remote controller (refer to “RTH button” on page 26 for more information) or
tap the RTH button in the DJI Pilot app and follow the on-screen instructions when GPS is available to ini-
tiate Smart RTH. The aircraft will then automatically return to the last recorded Home Point. You may use
the remote controller’s control sticks to control the aircraft’s position to avoid a collision during the Smart
RTH process. Press and hold the Smart RTH button once to start the process, and press the Smart RTH
button again to terminate the procedure and regain full control of the aircraft.
© 2015 DJI. All Rights Reserved.
13
Aircraft
Phantom 3 Standard User Manual
Battery Level
Warning Remark Aircraft Status
Indicator DJI Pilot app Flight Instructions
Low battery
level warning
The battery
power is low.
Please land the
aircraft.
Aircraft status
indicator blinks
RED slowly.
Tap “Go-home” to have the
aircraft return to the Home
point and land automatically,
or “Cancel” to resume normal
flight. If no action is taken,
the aircraft will automatically
go home and land after 10
seconds. Remote controller
will sound an alarm.
Fly the aircraft
back and land
it as soon as
possible, then
stop the motors
and replace the
battery.
Critical Low
battery level
warning
The aircraft
must land
immediately.
Aircraft status
indicator blinks
RED quickly.
The DJI Pilot app display will
flash red and the aircraft will
start to descend. The remote
controller will sound an alarm.
Allow the aircraft to
descend and land
automatically.
Estimated
remaining
ight time
Estimated
remaining ight
based on current
battery level.
N/A N/A N/A
Low Battery RTH
The low battery level failsafe is triggered when the DJI Intelligent Flight Battery is depleted to a point that
may affect the safe return of the aircraft. Users are advised to return home or land the aircraft immediately
when prompted. The DJI Pilot app will display a notice when a low battery warning is triggered. The
aircraft will automatically return to the Home Point if no action is taken after a ten-second countdown. The
user can cancel the RTH procedure by pressing the RTH button on the remote controller. The thresholds
for these warnings are automatically determined based on the aircraft’s current altitude and distance from
the Home Point.
The aircraft will land automatically if the current battery level can only support the aircraft long enough
to descend from its current altitude. The user can still use the remote controller to alter the aircraft’s
orientation during the landing process.
The Battery Level Indicator is displayed in the DJI Pilot app, and is described below:
Battery level Indicator
Critical Low battery level
warning(Red)
Low battery
level warning(Yellow)
Sucient battery
level(Green)
Remaining ight time
Power requires
to return home

14
© 2015 DJI. All Rights Reserved.
Aircraft
Phantom 3 Standard User Manual
The aircraft cannot avoid obstruction during the Failsafe RTH, therefore, it is important to set an
suitable Failsafe altitude before each flight. Launch the DJI Pilot app and enter “Camera” and
select “MODE > Advanced Settings > Failsafe mode” to set the Failsafe altitude.
The aircraft will stop its ascent and return to the Home Point immediately if the throttle stick is
moved during the Failsafe RTH procedure.
Failsafe RTH
If the Home Point was successfully recorded and the compass is functioning normally, Failsafe RTH will
be automatically activated if the remote controller signal is lost for more than three seconds. The Return-
to-Home process may be interrupted and the operator may regain control of the aircraft if the remote
controller signal connection is re-established.
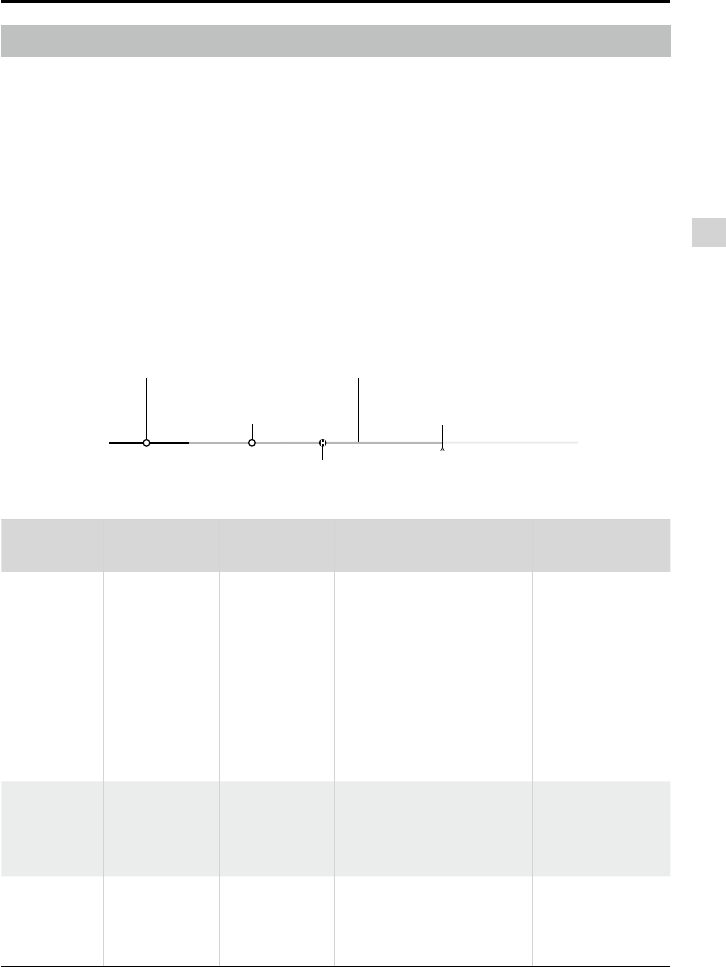
Failsafe Illustration
When Critical battery level warning is triggered and the aircraft begins to land automatically,
you may push the throttle upward to make the aircraft hover at its current altitude, giving you an
opportunity to navigate to a more appropriate landing location.
The colored zones and markers on the battery level indicator bar reflect the estimated
remaining flight time. They are automatically adjusted according to the aircraft’s current location
and status.
5 Fly back to home point
LED Flight Indicator Yellow ashing
4 Signal lost lasts 3s, begin to go home
LED Flight Indicator Yellow ashing
2 Flying
LED Flight Indicator Green ashing
3 Remote Control signal lost
LED Flight Indicator Yellow ashing
6 Landing after hovering 15s
LED Flight Indicator Yellow ashing
Height over home point>20m
Elevate to 20m
Height over home point<=20m
20m
1 Record Home Point
LED Flight Indicator
Yellow ashing Green ashing
>3s

© 2015 DJI. All Rights Reserved.
15
Aircraft
Phantom 3 Standard User Manual
16
© 2015 DJI. All Rights Reserved.
Aircraft
Phantom 3 Standard User Manual
Flight Recorder
Flight data is automatically recorded to the internal storage of the aircraft. This includes flight
telemetry, aircraft status information, and other parameters. To access these data, connect the
aircraft to the PC through the Micro-USB port and launch the DJI Pilot app.
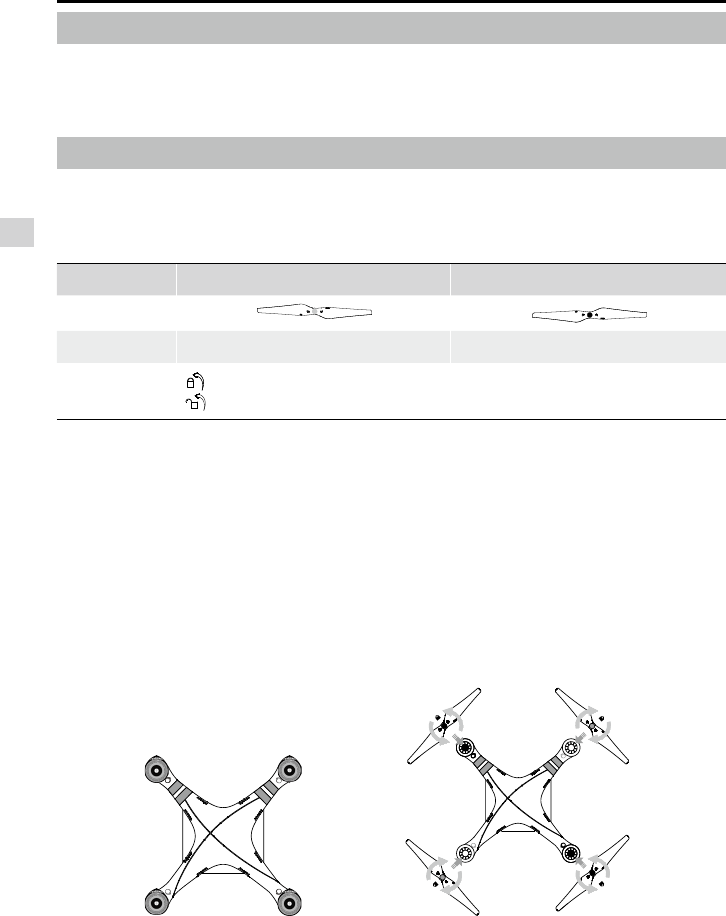
Attaching and Detaching the Propellers
Use only DJI approved propellers with your Phantom 3 Standard. The grey and black nuts on the propeller
indicate where they should be attached and in which direction whey should spin. To attach the propellers
properly, match the nut color with the motor axis color.
Propellers Silver Dot Black Dot
Figure
Attach On Motors with a grey axes Motors with a black axes
Legends Lock : Turn the propellers in the indicated direction to mount and tighten.
Unlock : Turn the propellers in the indicated direction to loosen and remove.
Attaching the Propellers
1. Be sure to remove the warning stickers from the motors before attaching the propellers.
2. Attach the propellers with silver dots onto the motors with silver axes and spin the propellers clockwise
to secure them in place. Attach the propellers with black dots onto the motors with black axes and spin
the propellers counter-clockwise to secure them in place. Be sure to tighten each propeller by hand
before ight.
© 2015 DJI. All Rights Reserved.
17
Aircraft
Phantom 3 Standard User Manual
Ensure propellers are attached to its corresponding motors, otherwise the aircraft cannot take o.
Wear gloves when handling propellers.
Hand tighten each of the propellers on the corresponding motors to ensure it is attached rmly.
Detaching the Propellers
Hold the motor in place with one hand, then spin the propeller in the indicated unlock direction.
Check that the propellers and motors are installed correctly and rmly before every ight.
Ensure that all propellers are in good condition before each flight. DO NOT use aged, chipped,
or broken propellers.
To avoid injury, STAND CLEAR of and DO NOT touch propellers or motors when they are spinning.
ONLY use original DJI propellers for a better and safer ight experience.
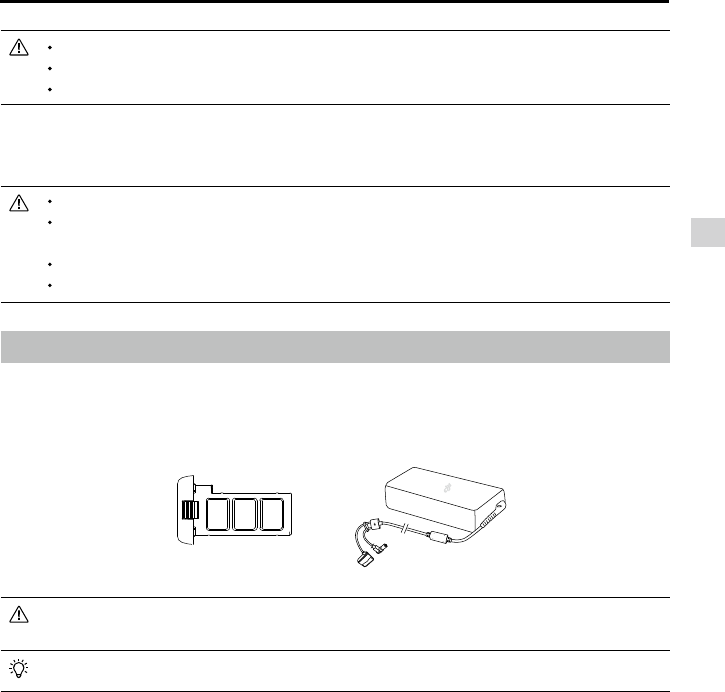
DJI Intelligent Flight Battery
The DJI Intelligent Flight Battery has a capacity of 4480 mAh, a voltage of 15.2 V, and a smart charge/
discharge functionality. It should only be charged using an appropriate charger that has been approved
by DJI.
Intelligent Flight Battery
Charger
The Intelligent Flight Battery must be fully charged before using it for the first time. Refer to
"Charging the Intelligent Flight Battery" for more information.
Be aware that the output power of the supplied Phantom 3 Standard charger is 100W.
DJI Intelligent Flight Battery Functions
1. Battery Level Display: the LED indicators display the current battery level.
2. Battery Life Display: the LEDs display the current battery power cycle.
3. Auto-Discharging Function: To prevent swelling, the battery automatically discharges to below 65% of
total power when it is idle for more than ten days. It takes around two days to discharge the battery to
65%. It is normal to feel moderate heat being emitted from the battery during the discharge process.
Discharge thresholds can be set in the DJI Pilot app.
4. Balanced Charging: Automatically balances the voltage of each battery cell when charging.
5. Overcharge Protection: Charging automatically stops when the battery is fully charged.
6. Temperature Detection: The battery will only charge when the temperature is between 0°C (32°F) and
40°C (104°F).
7. Over Current Protection: The battery stops charging when high amperage (more than 8 A) is detected.
8. Over Discharge Protection: To prevent over-discharge damage, discharging automatically stops when
the battery voltage reaches 12 V.
9. Short Circuit Protection: Automatically cuts the power supply when a short circuit is detected.
18
© 2015 DJI. All Rights Reserved.
Aircraft
Phantom 3 Standard User Manual
Using the Battery
Turning ON/OFF
Turning On: Press the Power Button once, then press again and hold for 2 seconds to turn on. The
Power LED will turn red and the Battery Level Indicators will display the current battery level.
Turning Off: Press the Power Button once, then press again and hold for 2 seconds to turn off. The
battery power LED will flash when powering off the Phantom to allow automatically stopping
of a recording during the event recording wasn’t stopped.
Low Temperature Notice:
1. Battery capacity is signicantly reduced when ying in low temperature (< 0°C) environments.
2. It is not recommended that the battery be used in extremely low temperature (< -10°C) environments.
Battery voltage should reach the appropriate level when operating environment with temperatures
between -10°C and 5°C.
3. End the flight as soon as the DJI Pilot app displays the “Low Battery Level Warning” in low temperature
environments.
4. Keep the battery indoors to warm it before ying in low temperature environments.
5. To ensure optimal performance of the battery, keep the battery temperature above 20°C.
6. The charger will stop charging the battery if the battery cell’s temperature is not within the operating
range (0°C ~ 40°C ).
In cold environments, insert the battery into the battery compartment and allow the aircraft for
approximately 1-2 minutes to warm up before taking o.
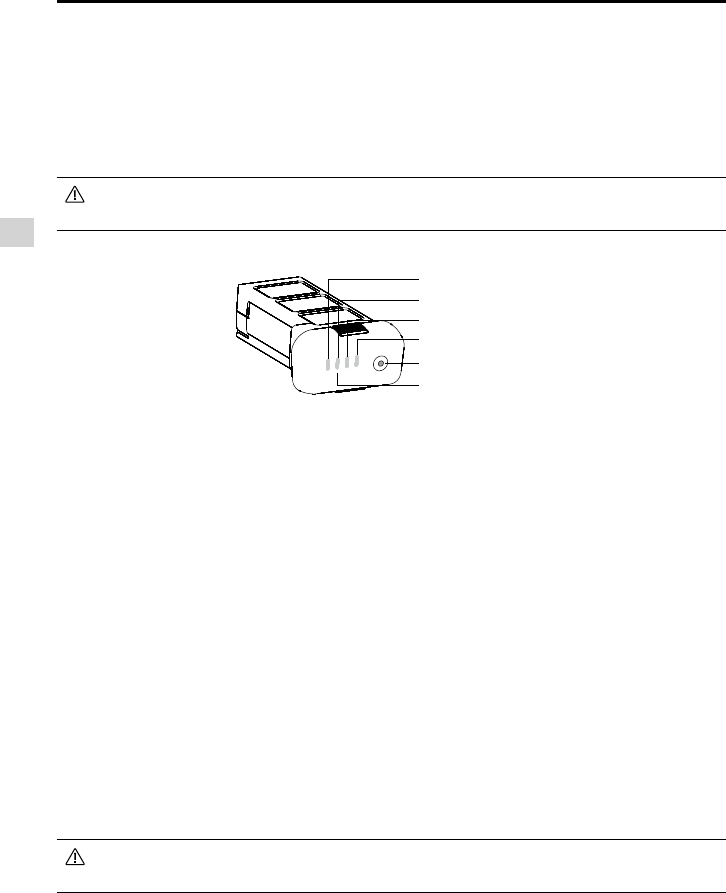
Checking the Battery Level
The Battery Level Indicators display how much power remains. When the battery is turned off, press
the Power Button once. The Battery Level Indicators will light up to display the current battery level. See
below for details.
LED1
LED2
Battery Level Indicators
LED3
LED4
Power Button (Bulit-in LED)
10. Battery Cell Damage Protection: The DJI Pilot app displays a warning message when a damaged
battery cell is detected.
11. Battery Error History: Browse the battery error history in the DJI Pilot app.
12. Sleep Mode: To save power, the battery enters sleep mode after 20 minutes of inactivity.
13. Communication: Information pertaining to the battery’s voltage, capacity, current, etc. is transmitted to
the aircraft’s main controller.
Refer to
Phantom 3 Standard Intelligent Flight Battery Safety Guidelines
before use. Users take full
responsibility for all operations and usage.
© 2015 DJI. All Rights Reserved.
19
Aircraft
Phantom 3 Standard User Manual
The Battery Level Indicators will also show the current battery level during charging and
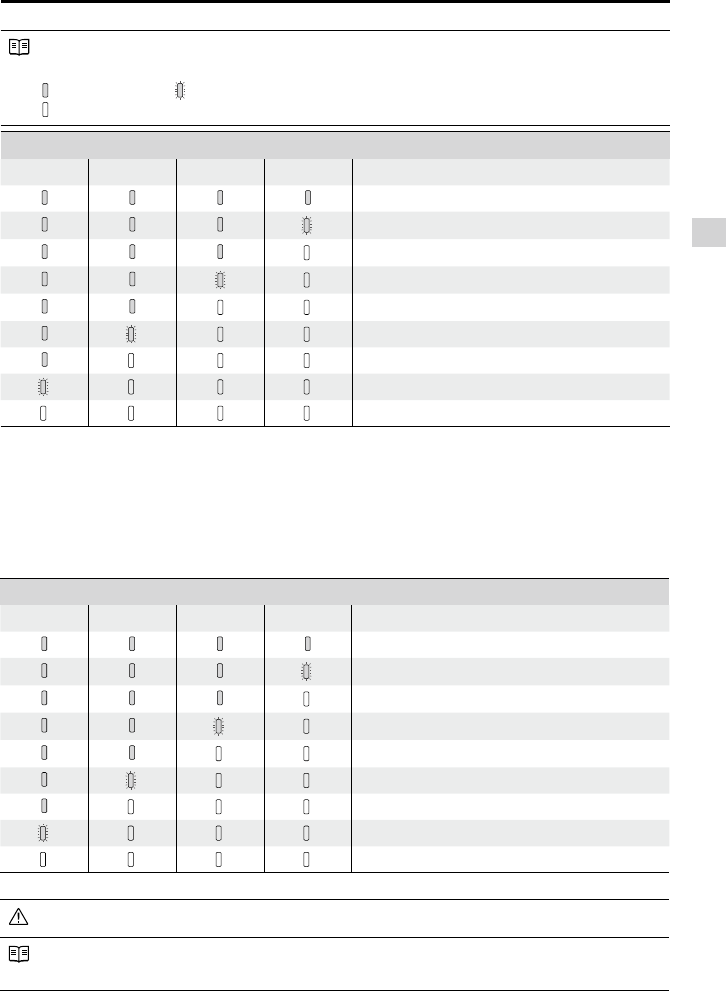
discharging. The indicators are dened below.
: LED is on. : LED is ashing.
: LED is o.
Battery Level
LED1 LED2 LED3 LED4 Battery Level
87.5%~100%
75%~87.5%
62.5%~75%
50%~62.5%
37.5%~50%
25%~37.5%
12.5%~25%
0%~12.5%
=0%
Battery life
Battery life refers to how many more times the battery can be discharged and recharged before it must
be replaced. When the battery is turned off, press and hold the Power Button for 5 seconds to check the
battery life. The Battery Level Indicators will light up and/or blink for two seconds, as shown below:
Battery Life
LED1 LED2 LED3 LED4 Battery Life
90%~100%
80%~90%
70%~80%
60%~70%
50%~60%
40%~50%
30%~40%
20%~30%
below 20%
When battery life reaches 0%, it can no longer be used.
For more information about the battery, launch the DJI Pilot app and check the information that is
listed under the battery tab.
20
© 2015 DJI. All Rights Reserved.
Aircraft
Phantom 3 Standard User Manual
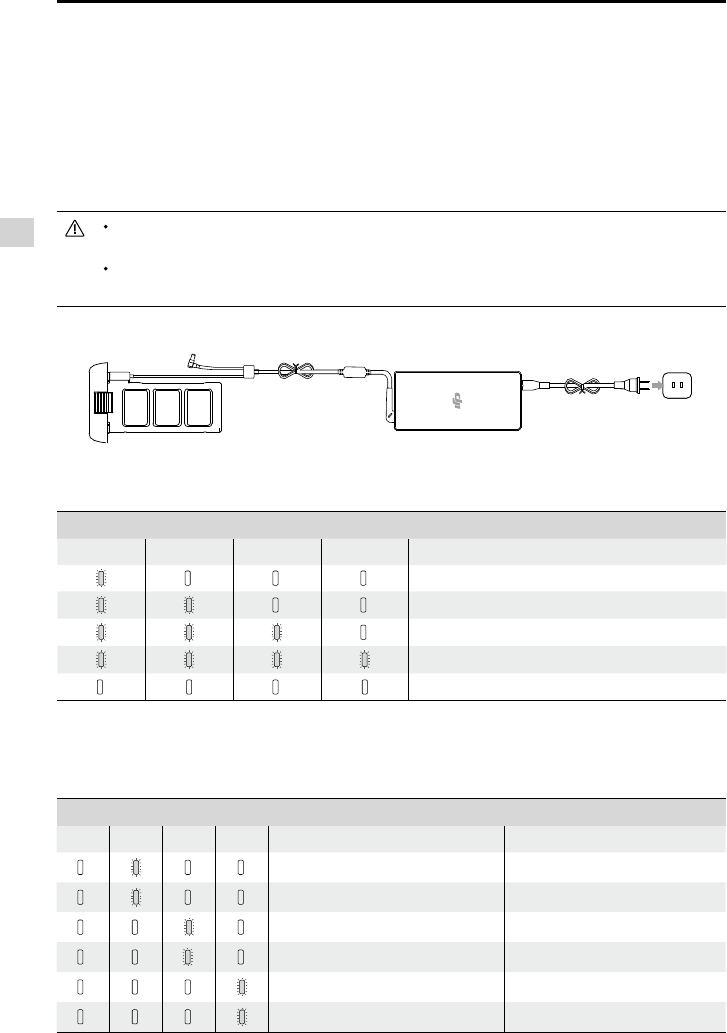
ChargerIntelligent Flight Battery Power Outlet
Battery Level Indicators While Charging
LED1 LED2 LED3 LED4 Battery Level
0%~25%
25%~50%
50%~75%
75%~100%
Fully Charged
Battery Protection LED Display
The table below shows battery protection mechanisms and corresponding LED patterns.
Battery Level Indicators while Charging
LED1 LED2 LED3 LED4 Blinking Pattern Battery Protection Item
LED2 blinks twice per second Over current detected
LED2 blinks three times per second Short circuit detected
LED3 blinks twice per second Over charge detected
LED3 blinks three times per second Over-voltage charger detected
LED4 blinks twice per second Charging temperature is too low
LED4 blinks three times per second Charging temperature is too high
Charging the Intelligent Flight Battery
1. Connect the Battery Charger to a power source (100-240 V 50/60 Hz).
2. Open the Protection Cap and connect the Intelligent Flight Battery to the Battery Charger. If the battery
level is above 95%, turn on the battery before charging.
3. The Battery Level Indicator will display the current battery level as it is charging.
4. The Intelligent Flight Battery is fully charged when the Battery Level Indicators are all o.
5. Air-cool the Intelligent Flight Battery after each flight. Allow its temperature to drop to room temperature
before storing it for an extended period.
We do not recommend charging the Intelligent Flight Battery and remote controller with the
standard charger at the same time, otherwise the charger may overheat.
Always turn o the battery before inserting it or removing it from the Phantom 3 Standard. Never insert
or remove a battery when it is turned on.
© 2015 DJI. All Rights Reserved.
21
Aircraft
Phantom 3 Standard User Manual
After these issues are resolved, press the Power Button to turn off the Battery Level Indicator. Unplug the
Intelligent Flight Battery from the charger and plug it back in to resume charging. Note that you do not
need to unplug and plug in the charger in the event of a room temperature error; the charger will resume
charging when the temperature is within the allowable range.
DJI does not take any responsibility for damage caused by third-party chargers.
How to discharge your Intelligent Flight Battery:
Slow : Place the Intelligent Flight Battery into the Phantom 3 Standard’s battery compartment and turn
it on. Leave it on until there is less than 8% of power left, or until the battery can no longer be turned on.
Launch the DJI Pilot app to check battery levels.
Rapid : Fly the Phantom 3 Standard outdoors until there is less than 8% of power left, or until the battery
can no longer be turned on.

22
© 2015 DJI. All Rights Reserved.
Remote Controller
This section describes the features
of the remote controller and includes
instructions for controlling the aircraft
and the camera.
© 2015 DJI. All Rights Reserved.
23
Remote Controller
Remote Controller
Remote Controller Prole
The Phantom 3 Standard remote controller is a multi-function wireless communication device that includes
aircraft remote control system. The wireless transmission system operates at 5.8 GHz while the WiFi Range
Extender is operating at 2.4GHz. The remote controller features a number of camera control functions, such as
taking and previewing photos and videos, as well as controlling gimbal motion. The remote controller is powered
by a 2S rechargeable battery. The battery level is displayed via LED indicators on the front panel of the remote
controller.
Compliance Version: The remote controller is compliant with both CE and FCC regulations.
Operating Mode: Control can be set to Mode 1 or Mode 2, or to a custom mode.
Mode 1: The right stick serves as the throttle.
Mode 2: The left stick serves as the throttle.
To prevent transmission interference, do not operate more than three aircrafts in the same area.
Power on the Remote Controller
(1) Set S1 and S2 switches to the upper most position and place all sticks in the mid-point.
(2) Toggle power switch to the right to switch on.
(3) There will be a power on indicator beep. If the remote control is set to be CE compliant, then there will be one
beep, while the FCC compliant version will emit two beeps. The battery level indicator displays the current battery
level. The indicator will blink green quickly, indicating the remote control and receiver are linking. Once fully linked,
the power indicator will change to a solid green.
If the low voltage warning alert sounds (refer to Remote Control Power LED Status Information (Page
17) for details), please recharge the battery as soon as possible.
Using the incorrect type of charging cable may cause damage.
Recharge the battery after extended period storage.
24
© 2015 DJI. All Rights Reserved.
Remote Controller
Phantom 3 Standard User Manual
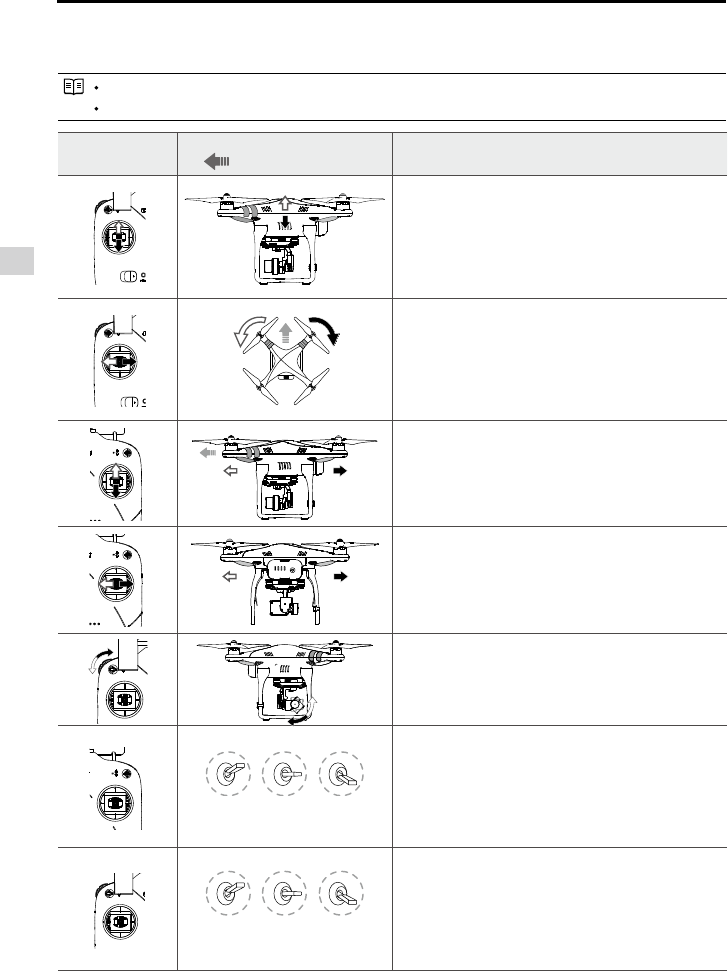
Remote Control Operation
The Remote Control is set to Mode 2 by default.
Stick Neutral/ mid point: Control sticks of the Remote Control are placed at the central position.
Move the Stick: The control stick is pushed away from the central position.
Remote Control
(Mode 2)
Aircraft
( indicates nose direction) Operation details
Vertical movements on the left stick control elevation.
Push the stick up to ascend and down to descend.
When both sticks are centered the Phantom will hover in
place.
Push the throttle stick upward beyond the centered
(neutral) position to take o. Push the throttle gently
to prevent sudden and unexpected elevation.
Horizontal movements on the left stick control the
rudder.
Push left to rotate counter clock-wise and right for
clockwise. If the stick is centered, the Phantom will y
straight.
The more the stick is moved, the faster the Phantom
will rotate.
Vertical movements on the right stick control forward
and backward pitch.
Push up to y forward and down to y backward. The
Phantom will hover in place if the stick is centered.
Push the stick further for a larger pitch angle
(maximum 35˚) and faster ight.
Horizontal movements on the right stick control left
and right pitch.
Push left to y left and right to y right. The Phantom
will hover in place if the stick is centered.
Push the stick further for a larger pitch angle
(maximum 35˚) and faster ight.
Left Dial: Turn the dial to the right, and the camera will
shift to point upwards.Turn the dial to the left, and the
camera will shift to point downwards. The camera will
keep its current position if the dial is static.
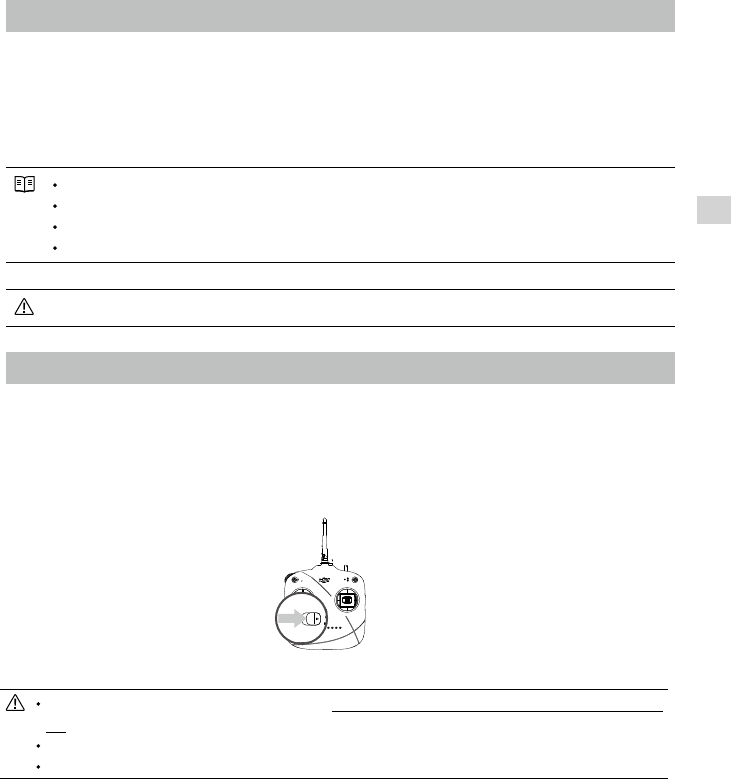
Position 1 Position 2 Position 3
The S1 switch is used for compass calibration.
Toggle the S1 from position 1 to position 3 and
back approximately 5 times to enter into compass
calibration mode.
In Naza-M mode, the S1 switch is used to switch
between control modes and enter compass
calibration.
Position 1 Position 2 Position 3
S2 is used to record a Home point manually. After a
Home point has been recorded automatically, ipping
S2 from position 1 to position 3 and back 5 times
(or more) rapidly will move the Home point to the
Phantom’s current location. In addition, you can enable
Dynamic Home Point feature in DJI VISION App.
In Naza-M working mode, S2 is be used for IOC.
© 2015 DJI. All Rights Reserved.
25
Remote Controller
Phantom 3 Standard User Manual
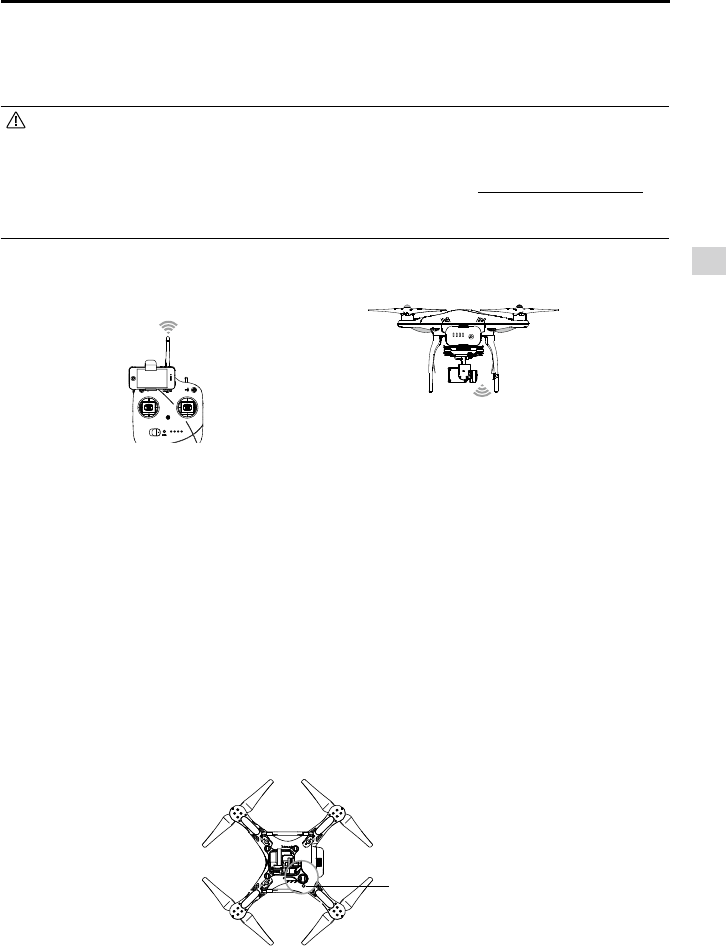
For maximum range and reliability, Remote Control antenna should point skywards with no obstructions between
it and the Phantom. Obstacles may cause Return to Home to trigger. Phone Holder should not block the antenna.
Battery Level Indicator
Built-in LiPo Battery: The remote control includes a rechargeable LiPo battery with a capacity of 2000mAh. You can
monitor the current battery level using the LED indicators on the front panel of the remote control as the gure
shown:
The remote control will show a blinking LED and sound an alert when the voltage drops below 3.45V, then
automatically power o after 3 seconds. This process will repeat even if you power cycle the remote control.
If this low voltage warning occurs during ight, the remote control will automatically power o, causing
the aircraft to enter Failsafe mode, which cannot be interrupted (refer to Failsafe Function (Page27) for
details). It is strongly recommended that you recharge the battery immediately when the 3.45V-3.5V low
voltage warning occurs.
Antenna Orientation
Keep the antennas pointing skyward, perpendicular to the ground for maximum remote control range during
ight.
Linking the Remote Control and Receiver
A 5.8G receiver is built in to the Phantom 3 Standard aircraft. Its link button and indicator are located on the
underside of the phantom, as shown in Figure 26.
The Remote Control and the receiver are paired before delivery. Only use this button if you have replaced your
Remote Control or receiver.
Linking Procedures
(1) Power o the Remote Control, power on the aircraft. You will see the link indicator blinking red.
(2) Press the link button with a thin object and hold until the link indicator blinks yellow. Release the link button.
(3) Power on the Remote Control. Link indicator will switch off, showing that a link has been successfully
established.
Link Button & Link
Indicator
26
© 2015 DJI. All Rights Reserved.
Remote Controller
Phantom 3 Standard User Manual
Link Indicator
Link Indicator Description Next Operation
Red ashing No signal received. Switch on the Remote Control or perform a link procedure.
Yellow ashing Ready to link. Switch on the Remote Control.
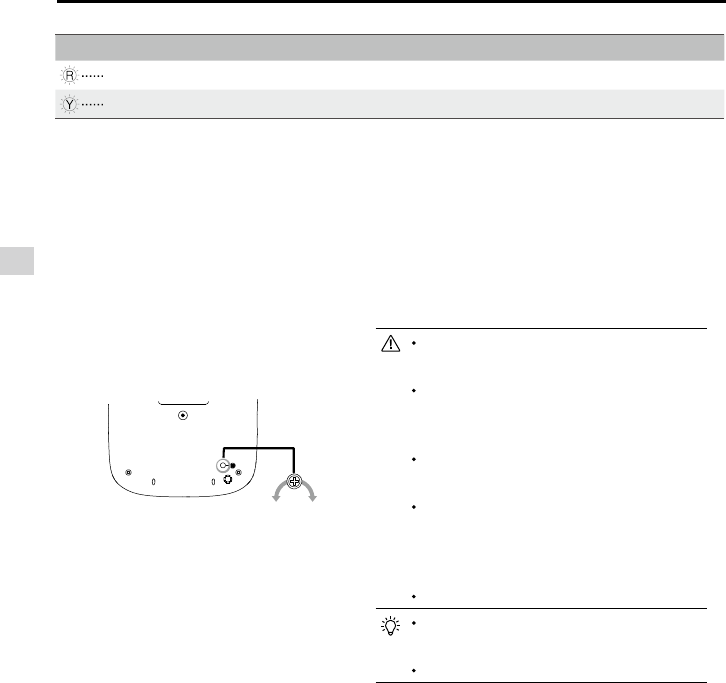
5.8 Compliance Version Conguration
As power levels vary between regulators, the Phantom Remote Control’s power output can be adjusted by
twisting the CE/FCC Control Knob (Figure 27) on the back of the Remote Control using a athead screwdriver.
For CE compliance, set the Remote Control to CE with a full counterclockwise turn. For FCC compliance, set the
Remote Control to FCC with a full clockwise turn. Be sure to follow relevant local regulations.
Compliance can be congured using the PHANTOM RC Assistant. Select CE compliance version in Assistant to set
it, or do the same with FCC compliance version.
Turn the CE/FCC Control knob gently to avoid
damage.
CE compliant devices have an eective remote
control range of 400 meters in open spaces due
to power limitations.
FCC compliant devices have an eective range
of 800 meters in open spaces.
Watch your flight distance as the Phantom 3
Standard aircraft will enter Failsafe mode (auto-
landing or go home and land) if it ies beyond
the relevant range limits.
Always follow local laws and regulations.
It is recommended to use a Φ2.4mm flathead
screwdriver for adjustments.
There is another potentiometer for reserved use.
© 2015 DJI. All Rights Reserved.
27
Remote Controller
Phantom 3 Standard User Manual
If the low voltage warning alert sounds (refer to Remote Control Power LED Status Information (Page
17) for details), please recharge the battery as soon as possible.
Using the incorrect type of charging cable may cause damage.
Recharge the battery after extended period storage.
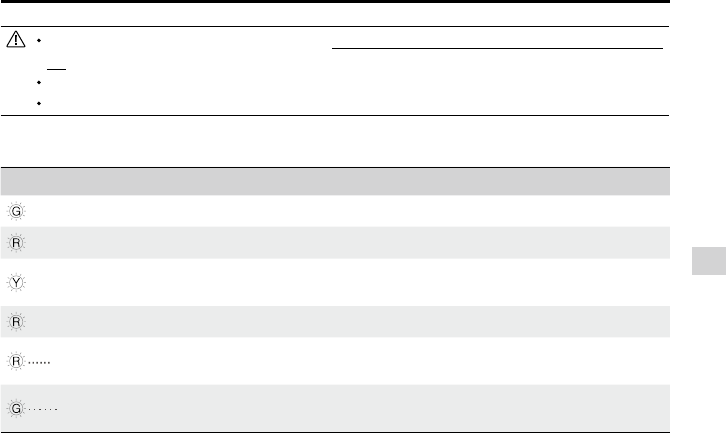
Remote Control Power LED Status Information
Power LED Indicator Sound Remote Control Status
— Solid Green None Functioning normally.
— Solid Red None Charging( remote control is powered o)
— Solid Yellow None Remote control joysticks calibration error, need to be re-
calibrate.
— Solid Red BB---BB---BB Low voltage (from 3.5V-3.53V), recharge the remote control.
Quick Red ashing B-B-B...... Critical low voltage (from 3.45V-3.5V). Recharge the remote
control immediately.
Slow Green ashing B--B--B...... Alert will sound after 15 minutes of inactivity. It will stop once
you start using the remote control.

28
© 2015 DJI. All Rights Reserved.
Camera and Gimbal
This section provides the technical
specifications of the camera and
explains the gimbal’s operation modes.