SZ DJI TECHNOLOGY HG8001501 RONIN-M User Manual 1
SZ DJI TECHNOLOGY CO., LTD RONIN-M 1
UserManual.wiki
>
SZ DJI TECHNOLOGY
>
HG8001501 User Manual
>
User Manual 1
Contents
1.
User Manual 1
2.
User Manual 2
3.
User Manual 3
4.
User Manual 4
5.
User Manual 5
User Manual 1
Navigation menu
Upload a User Manual
Namespaces
Wiki Guide
HTML
PDF
Info
Views
User Manual
Discussion / Help
Navigation

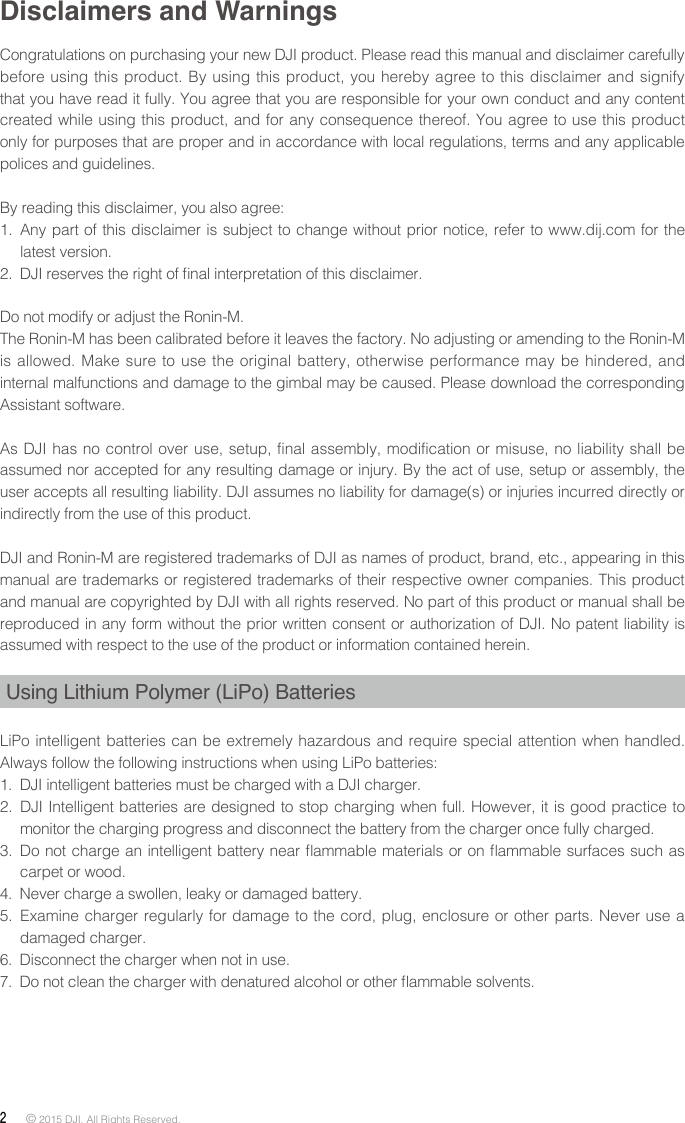
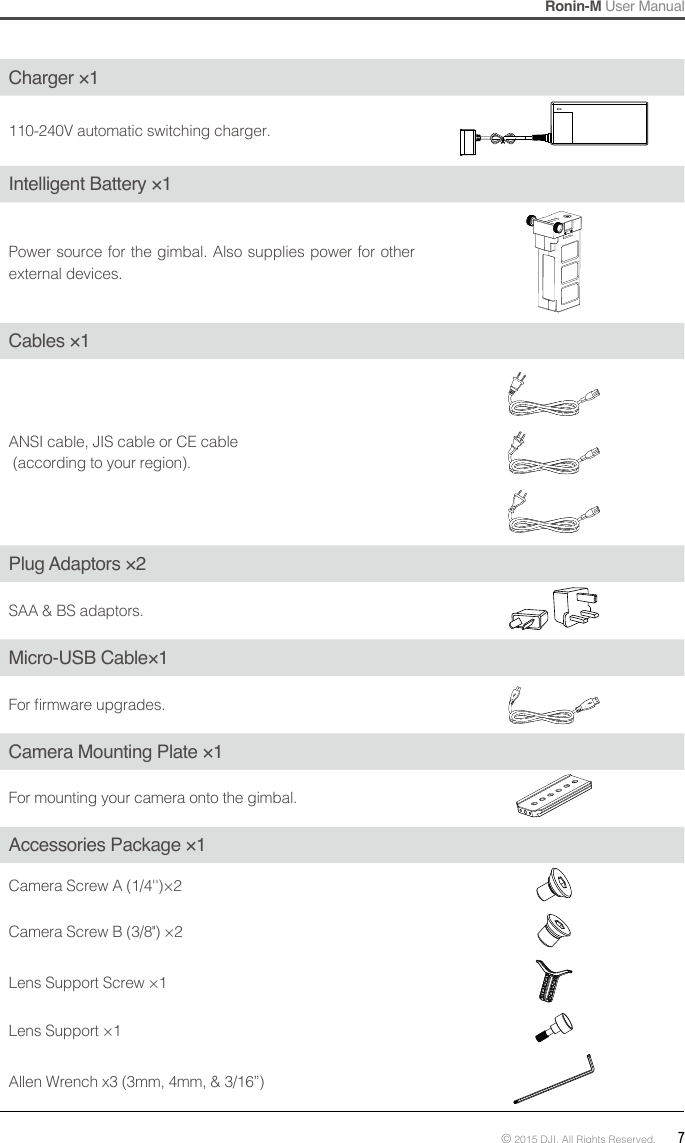
![8 © 2015 DJI. All Rights Reserved. Gimbal DescriptionGetting StartedIntelligent BatteryBefore you start using your Ronin-M, be sure to charge the battery first. The Intelligent battery is specially designed for the Ronin-M. It has a battery capacity of 3400mAh, voltage of 14.8V, and power management functionality. Charge the intelligent battery only with DJI approved chargers. When the battery is fully charged, it has a maximum run time of 4 hours.Intelligent Battery Charger[1] Top Handle Bar[2] Side Handle[3] Quick Release Mount[4] Pan Motor[5] Pan Adjustment Slider[6] D-BUS/PPM Receiver Port[7] USB Port & CAN Bus Port [8] Bind Button[9] Gimbal LED Indicator Light[10] Smart Battery[11] Roll Motor [12] Tilt Motor[13] Fore and Aft Adjustment[14] Tilt Vertical Adjustment[15] Roll Adjustment[16] IMU Port[17] P-TAP Accessory Power Port[18] USB Accessory Power Port[19] P-TAP Port (rear side)[20] DJI Lightbridge Port (rear side)[21] GCU Port (rear side)[1][2][4][3][8][9][5][6][7][10][11][12][14][15][13][16][17][18][19] [20][21]](https://usermanual.wiki/SZ-DJI-TECHNOLOGY/HG8001501.User-Manual-1/User-Guide-2580685-Page-8.png)
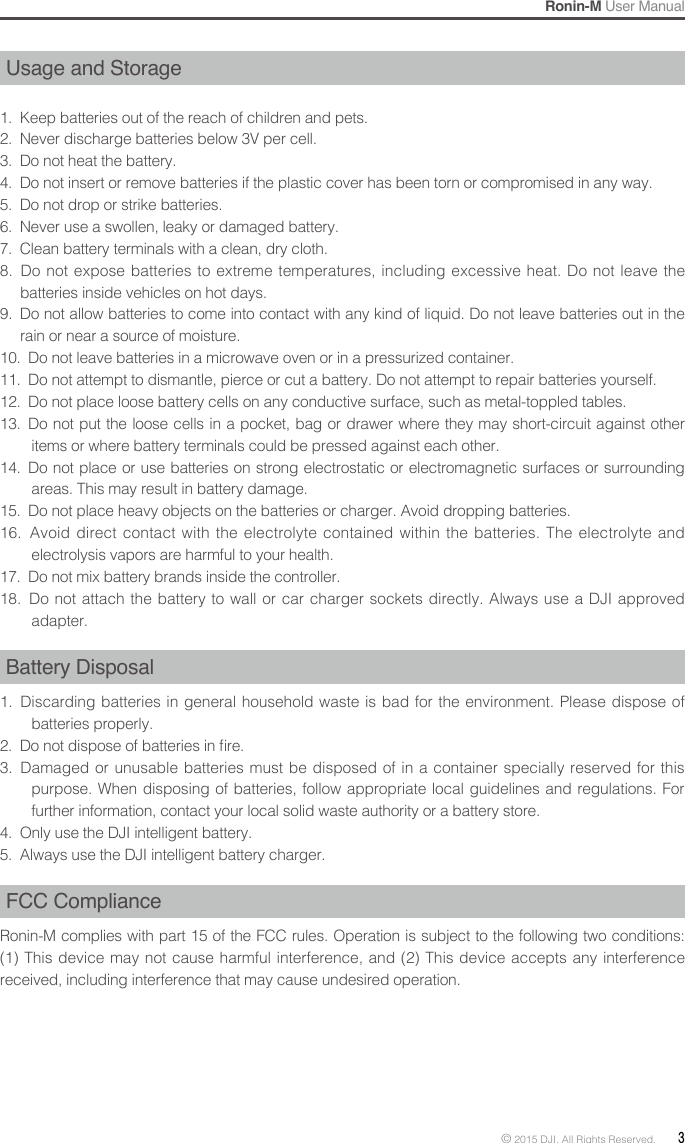
![Ronin-M User Manual10 © 2015 DJI. All Rights Reserved. Using the Intelligent Battery[1] Battery Level Indicators[2] Power Button (with one LED battery power indicator.)[3] Thumb ScrewsChecking the battery level: When the battery is powered off, pressing the battery power button once will display the current battery level.Powering on: When the battery is powered off, press and hold for 1 second to turn on the smart battery.Powering off: When the battery is powered on, press and hold for 1 second to turn off the smart battery.Tuning Stand You can use the tuning stand during setup or to store the gimbal. The following steps show how to use the tuning stand. 1. Put the stand in the upright position as shown in the picture below:2. Press button [1] and pull the lower legs outward away from the stand, and then pull downward. Then press button [2] and pull the upper arms outward and upward. Press the button [3] and slide it up to release the stand as shown. 3. The upper half of this tuning stand can be removed by loosening the knob [4]. You can use it with any C-stand style stud that ts the hole [5]. When mounting on to a C-stand, be sure to check the balance of the stand so as to not have the Ronin-M with a camera tilt over. When setting on a table, make sure the table is a at and even surface. [3][1][2][1][2][5][4][3]](https://usermanual.wiki/SZ-DJI-TECHNOLOGY/HG8001501.User-Manual-1/User-Guide-2580685-Page-10.png)