SZ DJI TECHNOLOGY HG9001407 RONIN User Manual Ronin V1 0
SZ DJI TECHNOLOGY CO., LTD RONIN Ronin V1 0
Contents
- 1. user manual part 1
- 2. user manual part 2
user manual part 1
Ronin
2014.07
V1.0
User Manual

2
© 2014 DJI. All Rights Reserved.
Disclaimers and Warnings
Congratulations on purchasing your new DJI product. Please read this manual and disclaimer carefully
before using this product. By using this product, you hereby agree to this disclaimer and signify that
you have read it in full. You agree that you are responsible for your own conduct and any content
created while using this product, and for any consequence thereof. You agree to use this product
only for purposes that are proper and in accordance with local regulations, terms and any applicable
polices and guidelines.
By reading this disclaimer, you also agree:
1. Any part of this disclaimer is subject to change without prior notice. Refer to www.dij.com for the
latest version.
Do not modify or adjust the Ronin.
The Ronin has been calibrated before it leaves the factory. No modifcation or amending to the Ronin
is allowed. Make sure to use the original battery, otherwise performance may be hindered, and
internal malfunctions and damage to the gimbal may be caused. Please download the corresponding
Assistant softwares.
As DJI has no control over use, setup, final assembly, modification or misuse, no liability shall be
assumed nor accepted for any resulting damage or injury. By the act of use, setup or assembly, the
user accepts all resulting liability. DJI assumes no liability for damage(s) or injuries incurred directly or
indirectly from the use of this product.
DJI and Ronin are registered trademarks of DJI as names of product, brand, etc., appearing in this manual
are trademarks or registered trademarks of their respective owner companies. This product and manual
are copyrighted by DJI with all rights reserved. No part of this product or manual shall be reproduced in
any form without the prior written consent or authorization of DJI. No patent liability is assumed with respect
to the use of the product or information contained herein.
Using Lithium Polymer (LiPo) Batteries
LiPo smart batteries can be extremely hazardous and require special attention when handled. Always
follow these instructions when using LiPo batteries:
1. DJI smart batteries must be charged with a DJI charger.
2. DJI smart batteries are designed to stop charging when full. However, it is good practice to monitor
the charging progress and disconnect the battery from the charger once fully charged.
4. Never charge a swollen, leaky or damaged battery.
5. Examine charger regularly for damage to the cord, plug, enclosure or other parts. Never use a
damaged charger.
6. Disconnect the charger when not in use.
Usage and Storage
Keep batteries out of the reach of children and pets.
Never discharge batteries below 3V per cell.
Do not heat the battery.
Do not insert or remove batteries if the plastic cover has been torn or compromised in any way.
Do not drop or strike batteries.
Never use a swollen, leaky or damaged battery.

© 2014 DJI. All Rights Reserved.
3
Ronin User Manual
Clean battery terminals with a clean, dry cloth.
Do not expose batteries to extreme temperatures, including excessive heat. Do not leave the batteries
inside vehicles on hot days.
Do not allow batteries to come into contact with any kind of liquid. Do not leave batteries out in the rain
or near a source of moisture.
Do not leave batteries in a microwave oven or in a pressurized container.
Do not attempt to dismantle, pierce or cut a battery. Do not attempt to repair batteries yourself.
Do not place loose battery cells on any conductive surface, such as metal-toppled tables.
Do not put the loose cells in a pocket, bag or drawer where they may short-circuit against other items
or where battery terminals could be pressed against each other.
Do not place or use batteries on strong electrostatic or electromagnetic surfaces or surrounding areas.
This may result in battery damage.
Do not place heavy objects on the batteries or charger. Avoid dropping batteries.
Avoid direct contact with the electrolyte contained within the batteries. The electrolyte and electrolysis
vapors are harmful to your health.
Do not mix battery brands inside the controller.
Do not attach the battery to wall or car charger sockets directly. Always use a DJI approved adapter.
Battery Disposal
Discarding batteries in general household waste is bad for the environment. Please dispose of
batteries properly.
Damaged or unusable batteries must be disposed of in a container specially reserved for this
purpose. When disposing of batteries, follow appropriate local guidelines and regulations. For further
information, contact your local solid waste authority or a battery store.
Only use the DJI smart battery.
Always use the DJI smart battery charger.
Using this manual
Legend
Important Hints and Tips
Download DJI Ronin Assistant App
Download and install the DJI Ronin Assistant App.
Search "DJI Assistant" on the App Store and then follow the instructions for iOS installation.
iOS6.1 or above

Ronin
2014.07
V1.0
User Manual

2
© 2014 DJI. All Rights Reserved.
Disclaimers and Warnings
Congratulations on purchasing your new DJI product. Please read this manual and disclaimer carefully
before using this product. By using this product, you hereby agree to this disclaimer and signify that
you have read it in full. You agree that you are responsible for your own conduct and any content
created while using this product, and for any consequence thereof. You agree to use this product
only for purposes that are proper and in accordance with local regulations, terms and any applicable
polices and guidelines.
By reading this disclaimer, you also agree:
1. Any part of this disclaimer is subject to change without prior notice. Refer to www.dij.com for the
latest version.
Do not modify or adjust the Ronin.
The Ronin has been calibrated before it leaves the factory. No modifcation or amending to the Ronin
is allowed. Make sure to use the original battery, otherwise performance may be hindered, and
internal malfunctions and damage to the gimbal may be caused. Please download the corresponding
Assistant softwares.
As DJI has no control over use, setup, final assembly, modification or misuse, no liability shall be
assumed nor accepted for any resulting damage or injury. By the act of use, setup or assembly, the
user accepts all resulting liability. DJI assumes no liability for damage(s) or injuries incurred directly or
indirectly from the use of this product.
DJI and Ronin are registered trademarks of DJI as names of product, brand, etc., appearing in this manual
are trademarks or registered trademarks of their respective owner companies. This product and manual
are copyrighted by DJI with all rights reserved. No part of this product or manual shall be reproduced in
any form without the prior written consent or authorization of DJI. No patent liability is assumed with respect
to the use of the product or information contained herein.
Using Lithium Polymer (LiPo) Batteries
LiPo smart batteries can be extremely hazardous and require special attention when handled. Always
follow these instructions when using LiPo batteries:
1. DJI smart batteries must be charged with a DJI charger.
2. DJI smart batteries are designed to stop charging when full. However, it is good practice to monitor
the charging progress and disconnect the battery from the charger once fully charged.
4. Never charge a swollen, leaky or damaged battery.
5. Examine charger regularly for damage to the cord, plug, enclosure or other parts. Never use a
damaged charger.
6. Disconnect the charger when not in use.
!
Usage and Storage
Keep batteries out of the reach of children and pets.
Never discharge batteries below 3V per cell.
Do not heat the battery.
Do not insert or remove batteries if the plastic cover has been torn or compromised in any way.
Do not drop or strike batteries.
Never use a swollen, leaky or damaged battery.

© 2014 DJI. All Rights Reserved.
3
Ronin User Manual
Clean battery terminals with a clean, dry cloth.
Do not expose batteries to extreme temperatures, including excessive heat. Do not leave the batteries
inside vehicles on hot days.
Do not allow batteries to come into contact with any kind of liquid. Do not leave batteries out in the rain
or near a source of moisture.
Do not leave batteries in a microwave oven or in a pressurized container.
Do not attempt to dismantle, pierce or cut a battery. Do not attempt to repair batteries yourself.
Do not place loose battery cells on any conductive surface, such as metal-toppled tables.
Do not put the loose cells in a pocket, bag or drawer where they may short-circuit against other items
or where battery terminals could be pressed against each other.
Do not place or use batteries on strong electrostatic or electromagnetic surfaces or surrounding areas.
This may result in battery damage.
Do not place heavy objects on the batteries or charger. Avoid dropping batteries.
Avoid direct contact with the electrolyte contained within the batteries. The electrolyte and electrolysis
vapors are harmful to your health.
Do not mix battery brands inside the controller.
Do not attach the battery to wall or car charger sockets directly. Always use a DJI approved adapter.
Battery Disposal
Discarding batteries in general household waste is bad for the environment. Please dispose of
batteries properly.
Damaged or unusable batteries must be disposed of in a container specially reserved for this
purpose. When disposing of batteries, follow appropriate local guidelines and regulations. For further
information, contact your local solid waste authority or a battery store.
Only use the DJI smart battery.
Always use the DJI smart battery charger.
Using this manual
Legend
Important Hints and Tips "
Download DJI Ronin Assistant App
Download and install the DJI Ronin Assistant App.
Search "DJI Assistant" on the App Store and then follow the instructions for iOS installation.
iOS6.1 or above
4
© 2014 DJI. All Rights Reserved.
Contents
Disclaimers and Warnings 2
Using Lithium Polymer (LiPo) Batteries 2
Usage and Storage 2
Battery Disposal 3
Using this manual 3
Legend 3
Download DJI Ronin Assistant App 3
Introduction 5
Package & Instruction Sheet 5
In the box 6
Gimbal Description 8
Getting Started 8
Smart Battery 8
Tuning Stand 10
Installing the Handle Bar onto the Gimbal 11
Smart Battery Installation 12
Mounting the Camera 12
Handle Bar Adjustment 14
Balancing 14
Step1: Balancing the Tilt Axis 15
Step2: Balancing the Roll Axis 15
Step3: Balancing the Vertical Tilt 15
Step4: Balancing the Pan Axis 16
Advanced Roll Adjustment 16
DJI Ronin Assistant App Tuning 17
Download and Install 17
Basic Settings 17
Advanced Settings 18
DJI PC Assistant Tuning 23
Install the DJI WIN driver and DJI PC Assistant 23
Settings 23
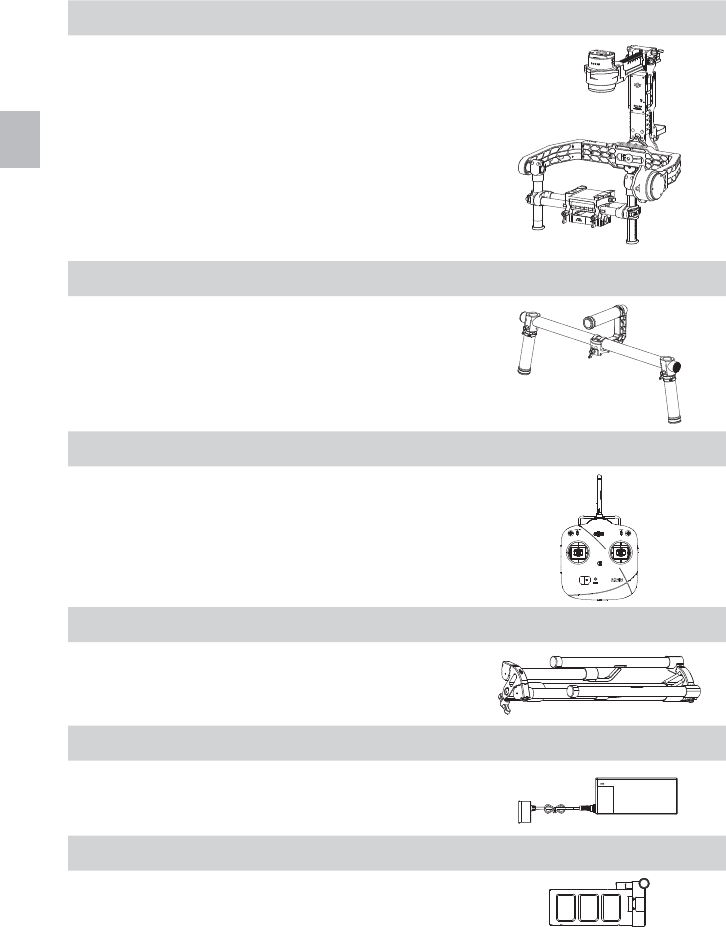
Remote Control 28
Connecting the Remote Control to Ronin 28
Remote Control Power LED Indicator Status 29
Remote Control Features 29
Adding 3rd Party Transmitter/Receiver 30
Operation Modes 30
Underslung Mode 30
Upright Mode 31
Briefcase Mode 31
Maintenance 31
Troubleshooting 32
33
© 2014 DJI. All Rights Reserved.
5
Introduction / Package & Instruction Sheet
Introduction
The DJI Ronin is the culmination of years of stabilization experience built into our most advanced
camera stabilization platform to date. The technology built into the DJI Ronin allows a broad spectrum
of cameras varying in size and weight to be mounted for class leading stabilization. We’ve put years of
passion and excitement into the Ronin, bringing world-class movement translation and stability to the
professional cinematographer’s market.
A brushless gimbal stabilization system is not simply three brushless motors moving on three axes.
The motors work with position feedback and the IMU (Inertial Measurement Unit) to communicate with
our custom 32-bit processor, which processes movement calculations in milliseconds. This equates
to control and stability accuracy down to 0.02 degrees of translated movement, meaning your images
are going to be perfectly still in all three axes of movement. There are three operation modes in the
Ronin: underslung mode, upright mode and briefcase mode.
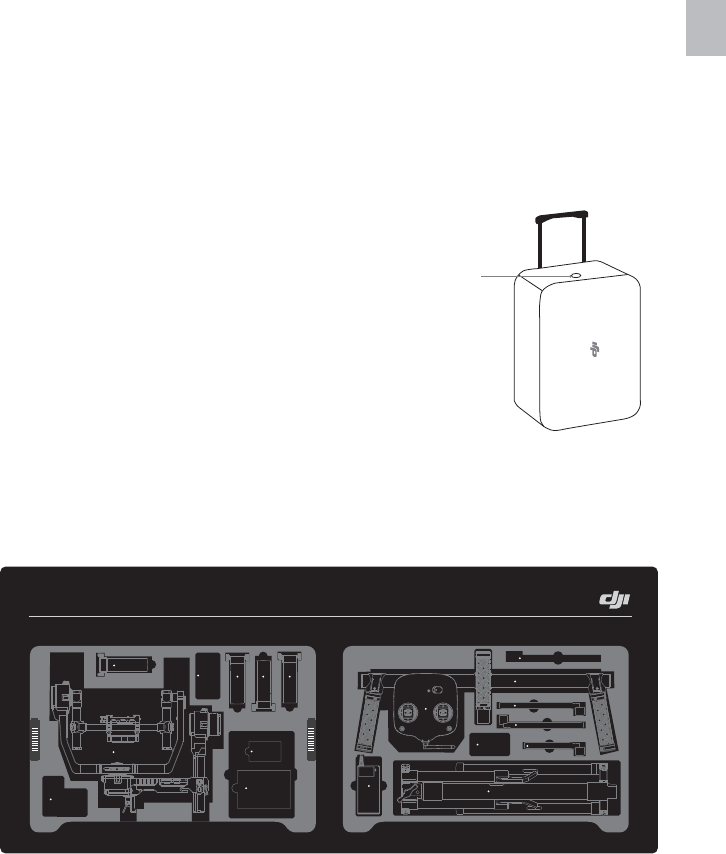
Below is the layout of the items inside the case. Not every item in this sheet is provided by DJI. There
are pre-cut slots for some additional accessories. For more information regarding what's included,
please refer to the "In the box" section of this manual.
Package & Instruction Sheet
Air pressure may be built up during air transportation or
during extreme barometric pressure changes. Loosen
the pressure valve knob on the side of the case prior
to transportation in these circumstances to prevent
pressure build up.
Pressure Valve
UPPER LAYER
Gimbal
Smart
Battery
DJI Lightbridge
LOWER LAYER
Top Handle Bar
Tuning Stand
Remote Control
2.4 GHz
Charger
Adjustable Length Extension Rod
Camera Mounting Plate
Camera Mounting Plate
Camera Mounting Plate
Smart
Battery
Smart
Battery
Smart
Battery
Smart Battery
INSTRUCTION SHEET
Accessories
Accessories
Accessories
LCD Screen
6
© 2014 DJI. All Rights Reserved.
In the box
Gimbal × 1
The gimbal includes built-in DJI motor drive modules, an
independent IMU module, a 32-bit DSP processor, power
supply module, Bluetooth, transmitter/receiver module,
camera shelf, and power breakout box.
Handle Bar × 1
Customizable handle platform for the gimbal.
Remote Control- 2.4 GHz × 1
Controls the movements of the gimbal, switches the work
modes, and selects gimbal speed.
Tuning Stand × 1
For suspending or storing the gimbal.
Charger × 1
110-240V automatic switching charger.
Smart Battery × 1
Power source for the gimbal. Also supplies power for other
external devices.
In the box
© 2014 DJI. All Rights Reserved.
7
Ronin User Manual
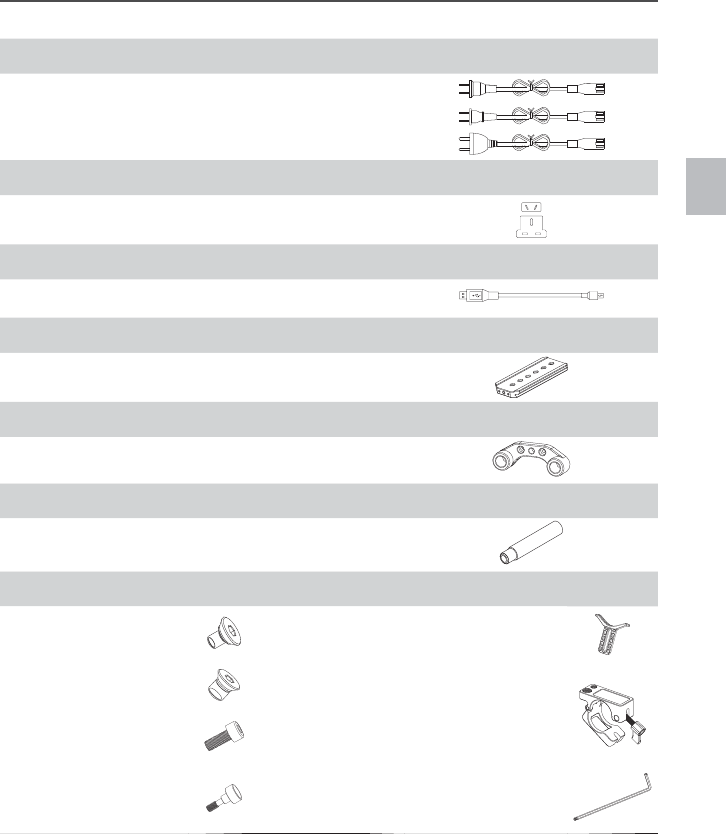
Cables × 3
ANSI & JIS & CE cables.
Plug Adaptors × 2
SAA & BS adaptors.
Micro-USB Cable × 1
Camera Mounting Plate × 1
For mounting your camera onto the gimbal.
Extension Rod Holder × 1
For installing extension accessories with the extension rods.
Adjustable Length Extension Rod × 6
For installing extension accessories with the extension rod
holder.
Accessories Package
Camera Screw A (1/4”) ×2 Lens Support ×1
Camera Screw B (3/8”) ×2
Top Bar Quick Release
Accessories Mount x 2
M4*10 Screw ×2
Lens Support Screw ×1 Allen Wrench ×3
(3mm, 4mm, & 3/16”)
In the box

8
© 2014 DJI. All Rights Reserved.
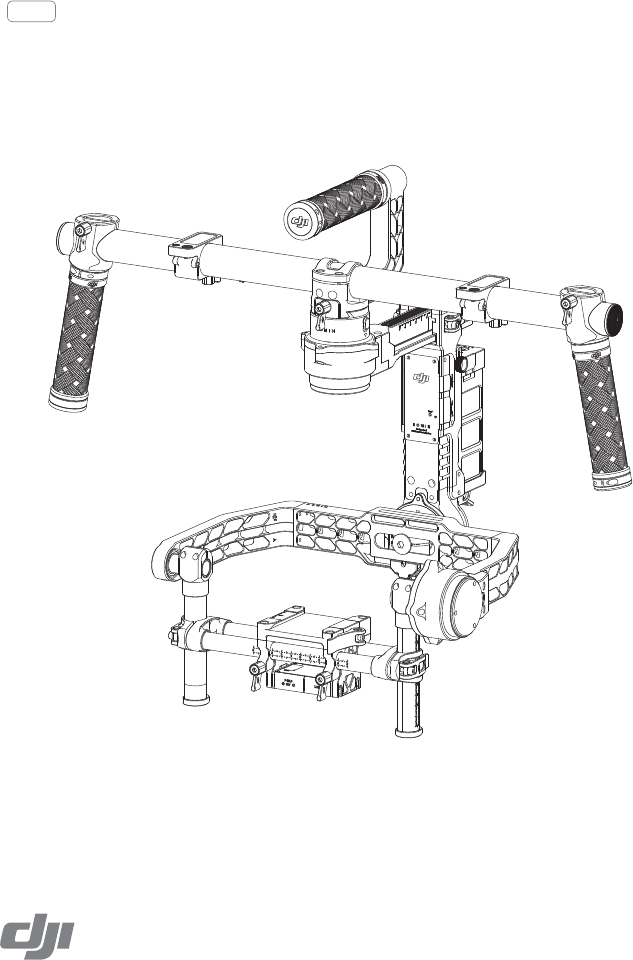
Gimbal Description
Getting Started
Smart Battery
designed for the Ronin. It has a battery capacity of 3400mAh, voltage of 14.8V, and power
management functionality. Charge the smart battery only with DJI approved chargers. When the
battery is fully charged, it has a maximum run time of 4 hours.
Smart Battery Charger
[1] Top Handle Bar
[2] Side Handle
[3] Quick Release Mount
[4] Pan Motor
[5] Pan Adjustment Slider
[6] D-BUS/PPM Receiver Port
[7] USB port & Can Bus Port
[8] Bind Button
[9] Gimbal LED Indicator light
[10] Smart Battery
[11] Roll Motor
[12] Tilt Motor
[13] Fore and Aft Adjustment
[14] Tilt Vertical Adjustment
[15] Roll Adjustment
[16] IMU
[17] P-TAP Accessory Power Port
[18] USB Accessory Power Port
[19] P-TAP Port (rear side)
[20] DJI Lightbridge Port (rear side)
[21] GCU (rear side)
[1]
[2]
[4]
[3]
[8]
[9]
[5]
[6]
[7]
[10]
[11]
[12]
[14]
[15]
[13]
[16]
[17][18][19][
20][21]
Gimbal Description / Getting Started
© 2014 DJI. All Rights Reserved.
9
Ronin User Manual
Getting Started
DJI Smart Battery Functions
Balance Charging Automatically balances the voltage of each battery cell during charging.
Capacity Display Displays current battery levels.
Overcharge Protection Charging stops automatically when the battery voltage reaches
16.8V to prevent overcharge damage.
Over Discharge Protection Discharging stops automatically when battery voltage reaches
12V to prevent over discharge damage.
Short Circuit Protection Automatically cuts power supply when a short circuit is detected.
Sleep Protection Sleep mode is activated after 10 minutes of inactivity to save power.
Charging Temperature Detection
Type LiPo
Capacity 14.8V, 3400mAh
Charging Environment Temperature 0°C ~ 45°C
Operating Environment Temperature -15°C ~ 50°C
Charging/Discharging Environment Relative Humidity <80%
Read the user manual, disclaimer, and battery warnings before use. Users take full
responsibility for all operations and usage.
Always use DJI approved chargers. DJI takes no responsibility for any use of non-DJI
approved chargers.
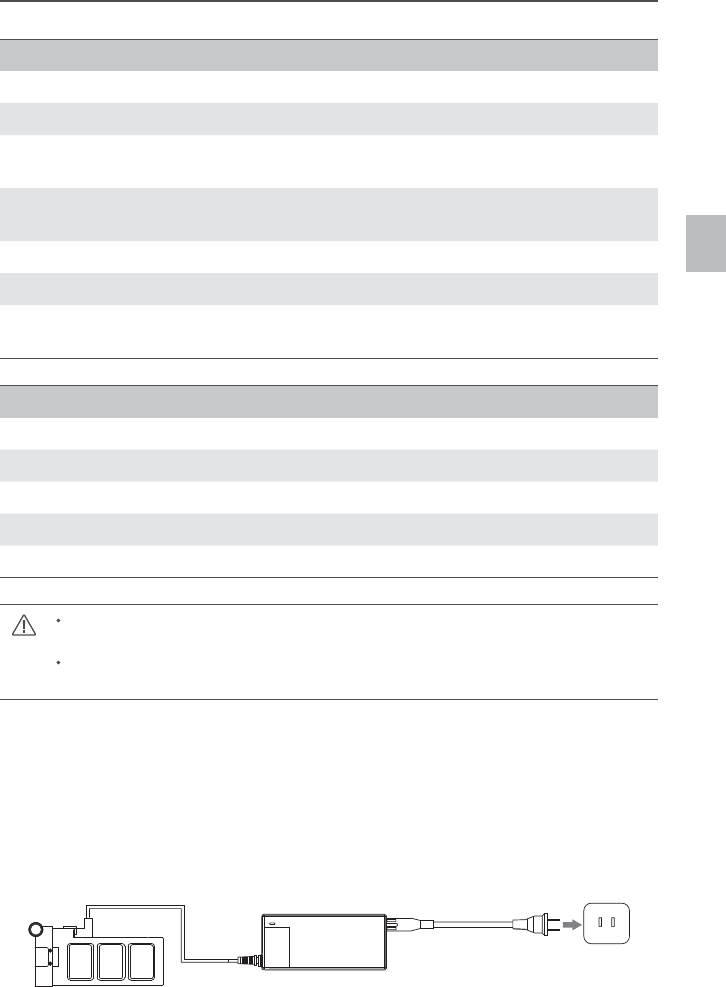
Charging the Smart Battery
1. Connect the charger to a wall socket (100-240V, 50/60Hz), using the plug set if necessary.
2. Connect the battery to the charger.
3. The battery level indicator lights display current capacity level as the battery charges.
4. The battery is fully charged when the battery level indicator lights shut off and the indicator light on
the charger turns green. Disconnect the battery from the charger when charging is completed.
Socket
10
© 2014 DJI. All Rights Reserved.
Ronin User Manual
Checking the battery level: When the battery is powered off, pressing the battery power button once
will display the current battery level.
Powering on: When the battery is powered off, press and hold for 1 second to turn on the smart battery.
Powering off: When the battery is powered on, press and hold for 1 second to turn off the smart battery.
Description of the Smart Battery Level Indicators
The battery level indicators show the current battery level during both the charging and discharging
process. The following is a description of the indicators.
: The LED is in a solid state on :The LED is blinking : The LED is off
Discharging process
LED1 LED2 LED3 LED4 Current battery level
87.5%~100%
75%~87.5%
62.5%~75%
50%~62.5%
37.5%~50%
25%~37.5%
12.5%~25%
0%~12.5%
<0%
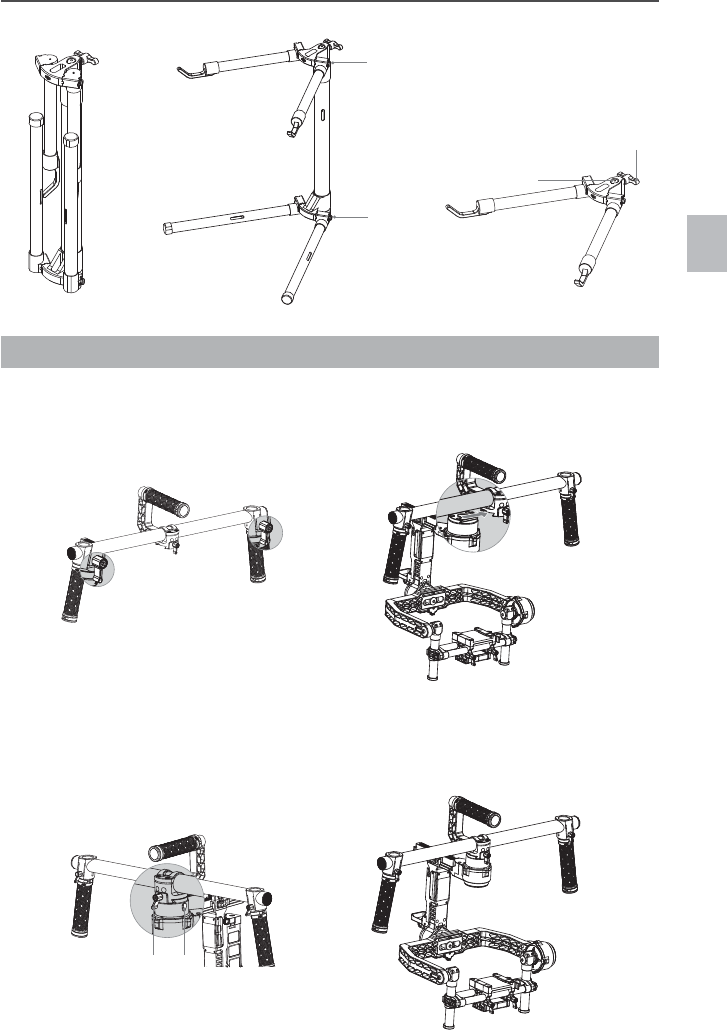
Tuning Stand
You can use the tuning stand during setup or for storage of the gimbal. The following steps show
how to use the tuning stand.
1. Put the stand in the upright position as shown in the picture below.
the lower legs outward away from the stand, and then pull downward. Then pull the upper arms
outward and upward.
3. The upper half of this tuning stand can be removed by loosening the knob [3]. You can use it with
balance of the stand so as to not have the Ronin with a camera tilt over. When setting on a table,
Using the Smart Battery
[6]
[1]
[2][3]
[4]
[5]
[1] [2] [3] [4] LED indicator lights
[5] Power Button
(with one LED battery power indicator.)
[6] Thumb Screws
Getting Started
© 2014 DJI. All Rights Reserved.
11
Ronin User Manual
Installing the Handle Bar onto the Gimbal
1. The turn knobs on the handles are loose by default. Adjust the grips to the desired position and
tighten the screws to secure their position.
2. Place the handle bar in the position as shown below.
3. Push the lock [1]downward on the pan motor, and slide the handle bar into the gimbal. Then tighten
the lock-knob [2].
4. With your hands on the handles, be sure the gimbal is not obstructed during a 360 degree pan.
Installation is complete.
[4]
[3]
[1]
[2]
[2] [1]
Getting Started
12
© 2014 DJI. All Rights Reserved.
Ronin User Manual
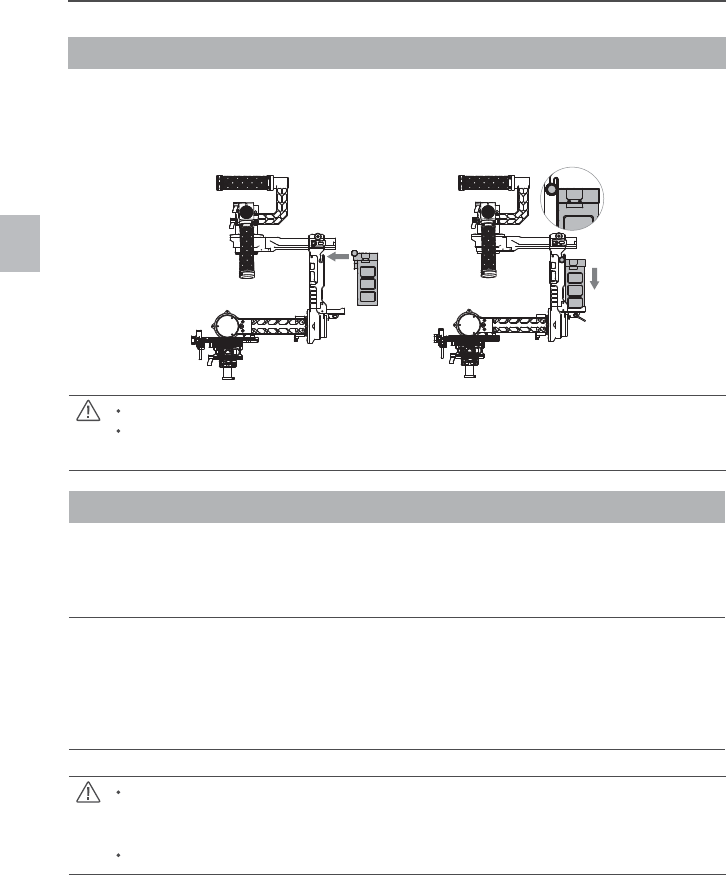
Smart Battery Installation
1. Loosen the thumb screws on either side of the battery. Slide the battery directly into the gimbal and
then slide down. Be sure the battery’s thumb screws go down into their locating slots making full
contact with the gimbal’s electrical leads.
2. Tighten the thumb screws on the battery to lock it in place.
Make sure the battery is powered off during the installation.
An incorrectly installed battery may lead to (1) Poor battery connection, or (2) Unavailable
battery information.
Mounting the Camera
The Ronin uses an adjustable camera mounting plate to allow you to easily balance, install and
remove your camera. The Ronin has been tested with the following types of cameras. Other cameras
similar in size and weight may also work.
Black Magic Cinema Camera Canon 6D Nikon D800
Black Magic Pocket Cinema Camera Canon 7D Panasonic GH3
Canon 1Dc Canon C100 Panasonic GH4
Canon 5DMKII Canon C300 RED Epic/Scarlet
Canon 5DMKIII Canon C500 Sony NEX7
Camera Size Requirements: the maximum depth from the center of gravity on the camera
base plate is 140mm; the maximum height measured from the top of the camera base plate
is 225mm; and the maximum width is 195mm.
To avoid obstructing camera movement, the use of soft connection cables is recommended.
1. Attach the camera mounting plate to your camera using the provided screws. Choose the correct
1/4" or 3/8" screws. Some cameras have two tripod mounting holes. It’s best to secure the camera
as tightly as possible. If two mounting holes are available on your camera, then use both mounting
2. Install the extension rod holder and lens support. Gently push up to apply a little pressure to the
lens, then tighten the thumbscrew.
Getting Started
© 2014 DJI. All Rights Reserved.
13
Ronin User Manual
Why do you need to use a lens support?
Certain cameras have a very tight lens securing system, and some cameras like the Canon
5D MKII and MKIII have very loose lens securing systems. The Ronin balances the camera as
one solid unit. If the mounted camera has a loose camera securing system, the lens support
must be used. This is because if a loose connection between the lens and the camera body
is apparent, vibrations could travel through to the camera but not directly to the lens, resulting
in the two masses shaking at different frequencies. The resulting oscillation will translate to the
The lens support can be installed either facing outward or inward to accommodate different
lens types.
Ensure alignment of the camera plate and then tighten the screw prior to tightening the lens
support.
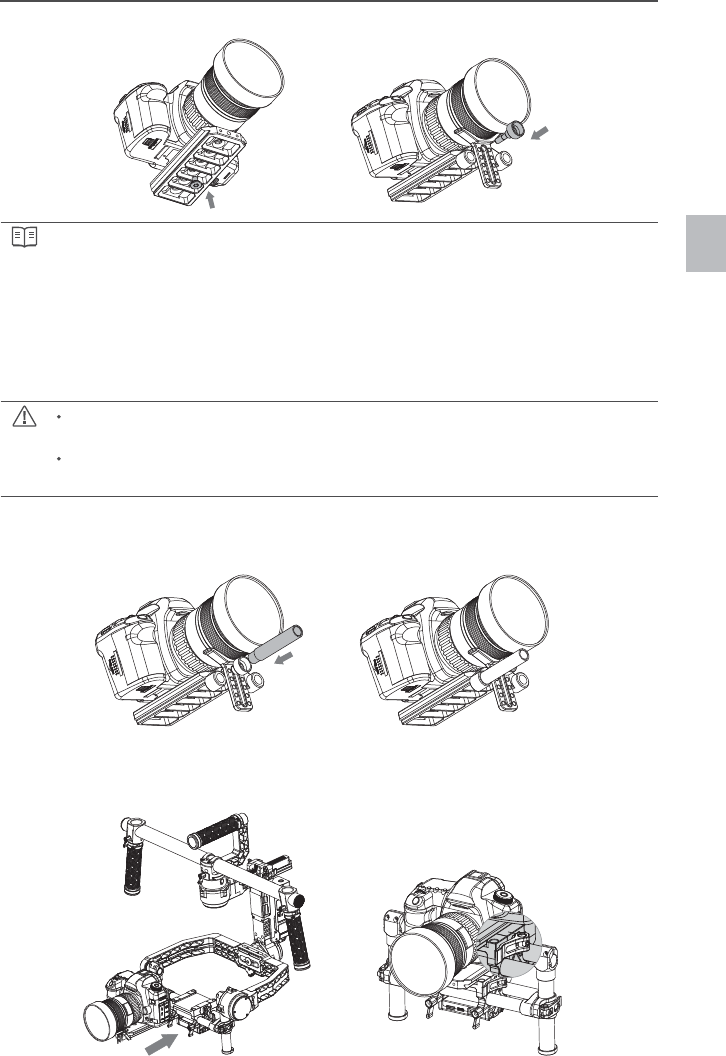
3. If using follow focus or other accessories, insert the extension rod into the extension rod holder and
4. With the gimbal on the tuning stand facing outward, insert the camera until the safety lock is
engaged. Make sure the gimbal is not turned on when balancing the camera.
5. Tighten the camera base side clamp. You can adjust the tightness of the side clamp with the M3
allen wrench.
Getting Started