SZ DJI TECHNOLOGY WM331A1609 Phantom 4 Pro User Manual 1
SZ DJI TECHNOLOGY CO., LTD Phantom 4 Pro 1
Contents
User Manual Part 1
PHANTOM 4 PRO/PRO+
V1.0
2016.10
User Manual
2
© 2016 DJI. All Rights Reserved.
Using this manual
Legends
Warning Important Hints and Tips Reference
Read Before the First Flight
Read the following documents before using the PHANTOMTM 4 Pro / Pro+:
1. In the Box
2. Phantom 4 Pro / Pro+ User Manual
3. Phantom 4 Pro / Pro+ Quick Start Guide
4. Phantom 4 Pro / Pro+ Series Disclaimer and Safety Guidelines
5. Phantom 4 Pro / Pro+ Series Intelligent Flight Battery Safety Guidelines
8FSFDPNNFOEUIBUZPVXBUDIBMMUVUPSJBMWJEFPTPOUIFPGmDJBM%+*TM website and read the Disclaimer
CFGPSFZPVnZ1SFQBSFGPSZPVSmSTUnJHIUCZSFWJFXJOHUIF1IBOUPN1SP1SP2VJDL4UBSU(VJEFBOE
refer to the User Manual for more details.
Watch the Tutorial Videos
Please watch the tutorial videos at the link below, which demonstrates how to use Phantom 4 Pro / Pro+
safely:
http://www.dji.com/product/phantom-4-pro/info#video
Download the DJI GO App
&OTVSFUPVTFUIF%+*(0BQQEVSJOHUIFnJHIU4DBOUIF23DPEFPOUIFSJHIUUPEPXOMPBEUIFMBUFTUWFSTJPO
The Android version of the DJI GO app is compatible with Android 4.1.2 or later.
The iOS version of the DJI GO app is compatible with iOS 8.0 or later.
Searching for Keywords
4FBSDIGPSLFZXPSETTVDIBTiCBUUFSZwBOEiJOTUBMMwUPmOEBUPQJD*GZPVBSFVTJOH"EPCF"DSPCBU
Reader to read this document, press Ctrl+F on Windows or Command+F on Mac to begin a search.
Navigating to a Topic
View a complete list of topics in the table of contents. Click on a topic to navigate to that section.
Printing this Document
This document supports high resolution printing.
© 2016 DJI. All Rights Reserved.
3
Contents
Using this manual 2
Legends 2
Read Before the First Flight 2
Video Tutorials 2
Download the DJI GO App 2
3URGXFW3URÀOH 6
Introduction 6
Features Highlights 6
Preparing the Aircraft 6
Aircraft Diagram 8
Remote Controller Diagram 8
Aircraft 11
Flight Controller 11
Flight Mode 11
Flight Status Indicator 12
Return-to-Home (RTH) 13
TapFly 16
ActiveTrack 18
Obstacle and Vision Positioning System 20
Detection Range 21
Calibrating Front Sensors 21
Flight Recorder 23
Attaching and Detaching the Propellers 23
DJI Intelligent Flight Battery 24
Remote Controller 30
5HPRWH&RQWUROOHU3URÀOH 30
Using the Remote Controller 30
Remote Controller Status LED 34
Linking the Remote Controller 35
Camera and Gimbal 38
&DPHUD3URÀOH 38
Gimbal 39
4
© 2016 DJI. All Rights Reserved.
DJI GO App 42
Equipment 42
Editor 45
SkyPixel 45
Me 45
Flight 47
Flight Environment Requirements 47
Flight Limits and No-Fly Zones 47
3UHÁLJKW&KHFNOLVW 50
Calibrating the Compass 51
Auto Takeoff and Auto Landing 52
Starting/Stopping the Motors 53
6WRSWKHPRWRUPLGÁLJKW 53
Flight Test 54
FAQ 56
Appendix 60
6SHFLÀFDWLRQV 60
Aircraft Status Indicator Description 61
Firmwares Update 62
Intelligent Flight Mode 62
After-Sales Information 63
FCC Compliance 63

© 2016 DJI. All Rights Reserved.
5
3URGXFW3URÀOH
This section introduces the Phantom 4
Pro / Pro+ and lists the components of
the aircraft and remote controller.
Product Profile
6
© 2016 DJI. All Rights Reserved.
3URGXFW3URÀOH
Introduction
5IF%+*1IBOUPN1SP1SPJTBOFYUSFNFMZTNBSUnZJOHDBNFSBXJUIJUTBEWBODFEWJTJPOQPTJUJPOJOH
BOEPCTUBDMFTFOTJOHTZTUFNBCMFUPJOUFMMJHFOUMZBWPJEPCTUBDMFTEVSJOHUIFnJHIU*UTCSBOEOFXDBNFSB
gives you unprecedentedly greater clarity, lower noise, and better pictures. Dual frequency makes the
)%WJEFPEPXOMJOLNPSFFGmDJFOUBOETUBCMF
Features Highlights
&NQPXFSFECZUIFMBUFTU5BQnZBOE"DUJWF5SBDLDPNNBOETJOUIF%+*(0BQQ1IBOUPN1SP1SP
FOBCMFTZPVUPnZBOZXIFSFWJTJCMFPOZPVSTDSFFOPSUSBDLBNPWJOHTVCKFDUFGGPSUMFTTMZ
Camera and Gimbal: With the Phantom 4 Pro / Pro+, you’re shooting 4K video at up to 60 frames per
second and capturing 20 megapixel photos that look crisper and cleaner than ever attributed to its up-
to-date 1-inch CMOS Exmor R sensor. The latest mechanical shutter and auto focus are available for a
better aerial shooting experience.
Flight Controller: 5IFOFYUHFOFSBUJPOnJHIUDPOUSPMMFSIBTCFFOVQEBUFEUPQSPWJEFBTBGFSNPSFSFMJBCMF
nJHIUFYQFSJFODF"OFXMZJNQMFNFOUFEnJHIUSFDPSEFSTUPSFTDSJUJDBMEBUBGSPNFBDInJHIUBOEUIF7JTJPO
1PTJUJPOJOH4ZTUFNFOIBODFTIPWFSJOHQSFDJTJPOXIFOnZJOHJOEPPSTPSJOFOWJSPONFOUTXIFSF(14JT
unavailable. A dual IMUs and compasses design provides redundancy to the aircraft.
HD Video Downlink: The low-latency long range (up to 5 km) HD downlink is powered by an enhanced
version of DJI Lightbridge. A free switch between 2.4 GHz and 5.8 GHz allows interference decreasing,
which make the HD video downlink more stable.
Remote Controller: Phantom 4 Pro+ is provided with a 5.5 inch high luminance screen, with DJI GO and
other apps, you can easily share your artwork.
Intelligent Flight Battery: The new 5870 mAh DJI Intelligent Flight Battery features upgraded battery cells
BOEBOBEWBODFEQPXFSNBOBHFNFOUTZTUFNUPQSPWJEFnJHIUBUVQUPBSPVOENJOVUFT
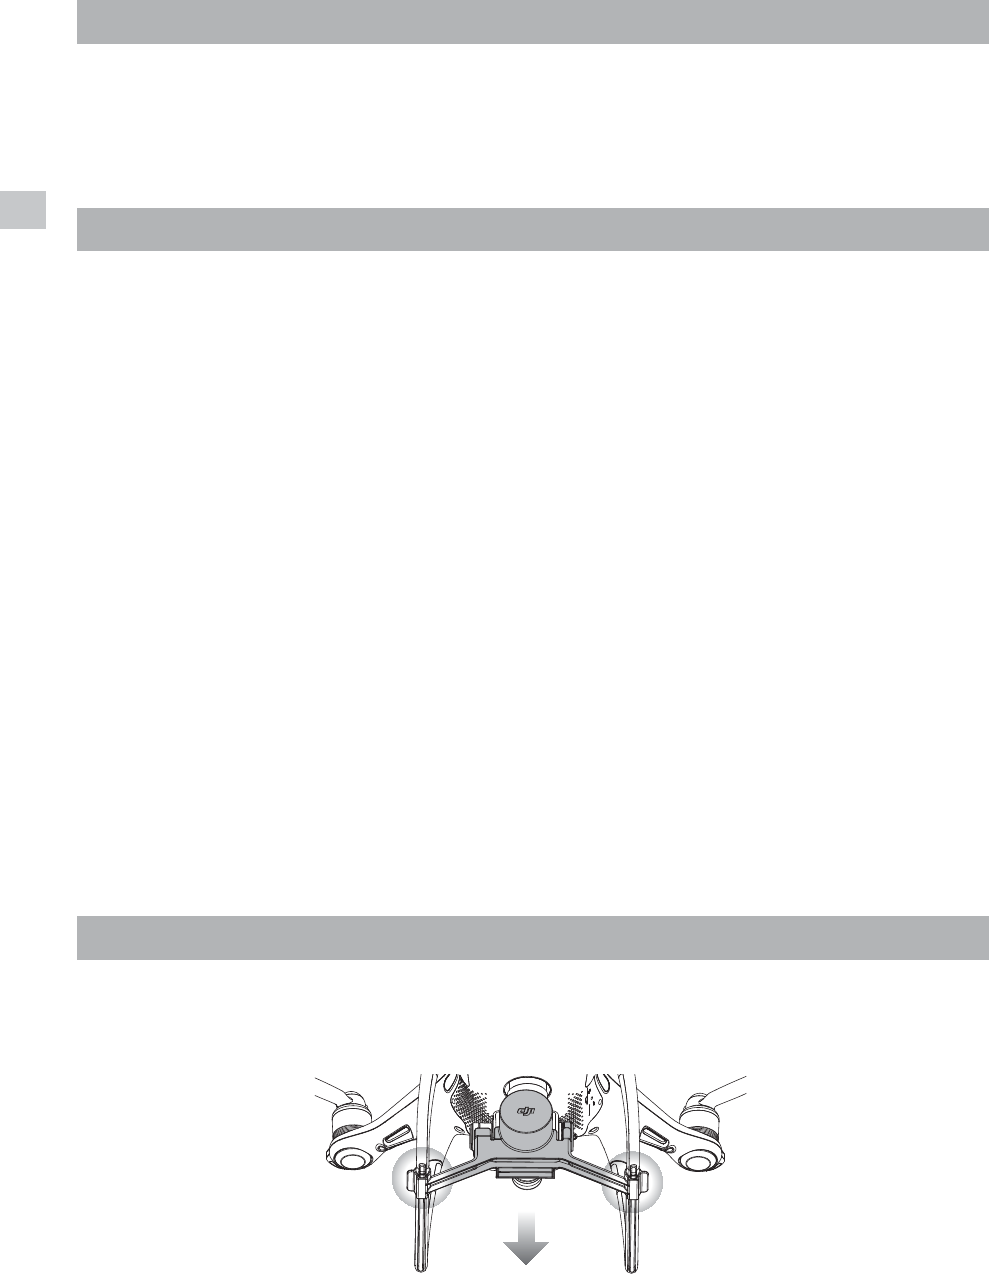
Installing the Aircraft
Preparing the Aircraft
1. Remove the gimbal clamp from the camera as shown below:
"UTFBMFWFMJODBMNFOWJSPONFOUTXIFOnZJOHJO"55*NPEF5IFnJHIUUJNFXJMMWBSZEVFUPEJGGFSFOUnJHIU
patterns, weather conditions and altitudes.
Product Profile
© 2016 DJI. All Rights Reserved.
7
Phantom 4 Pro/Pro+ User Manual
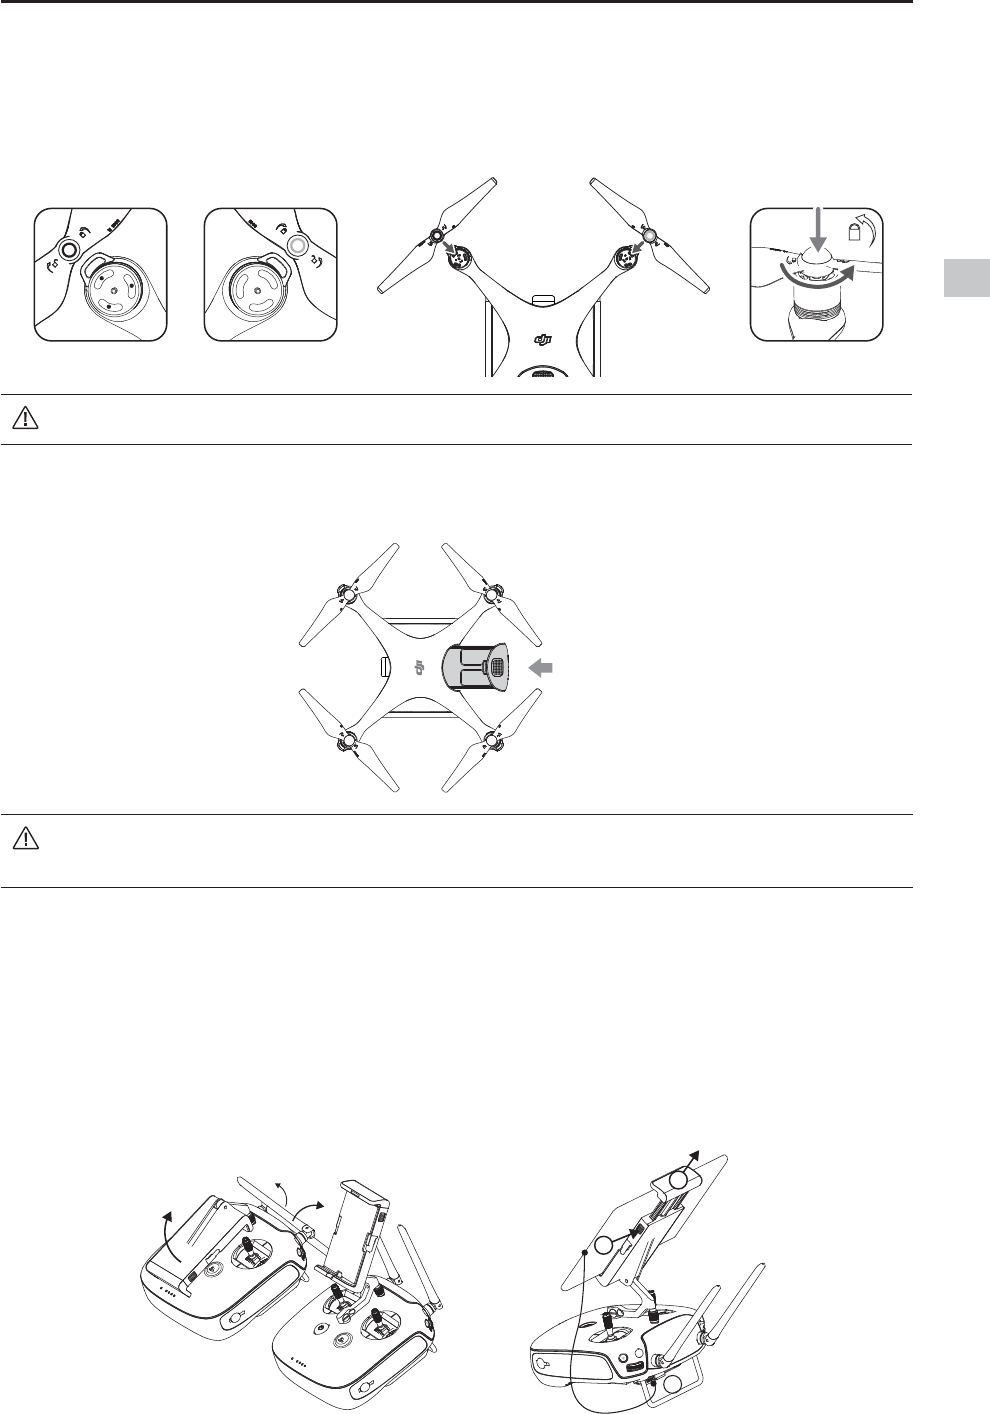
2. Attaching the Propellers
Mount the propellers with black propeller rings to the motors with black dots. Mount the propellers with
sliver propeller rings to the motors without black dots. Press the propeller down onto the mounting plate
and rotate in the lock direction until it is secured in its position.
Preparing the Remote Controller
The mobile device holder is designed for securing tablet or mobile device. Tilt the mobile device holder to
the desired position, then adjust the antennas so they are facing outward.
1. Press the button on the top right side of the mobile device holder to release the clamp, then adjust the
DMBNQUPmUUIFTJ[FPGZPVSNPCJMFEFWJDF
2. Secure your mobile device in the clamp by pressing down, and connect your mobile device to the
remote controller using a USB cable.
3. Plug one end of the cable into the mobile device, and the other end into the USB port on the back of
the remote controller.
.BLFTVSFUIBUZPVIFBSBDMJDLTPVOEJOEJDBUFTUIFCBUUFSZJTmSNMZJOTUBMMFE'BJMVSFUPEPTP
NBZBGGFDUUIFnJHIUTBGFUZPGZPVSBJSDSBGU
3. Battery Installation
Slide battery into the battery compartment according to the arrow’s direction as shown below.
1
3
2
$IFDLUIBUBMMUIFQSPQFMMFSTBSFTFDVSFCFGPSFFBDInJHIU
Product Profile
8
© 2016 DJI. All Rights Reserved.
Phantom 4 Pro/Pro+ User Manual
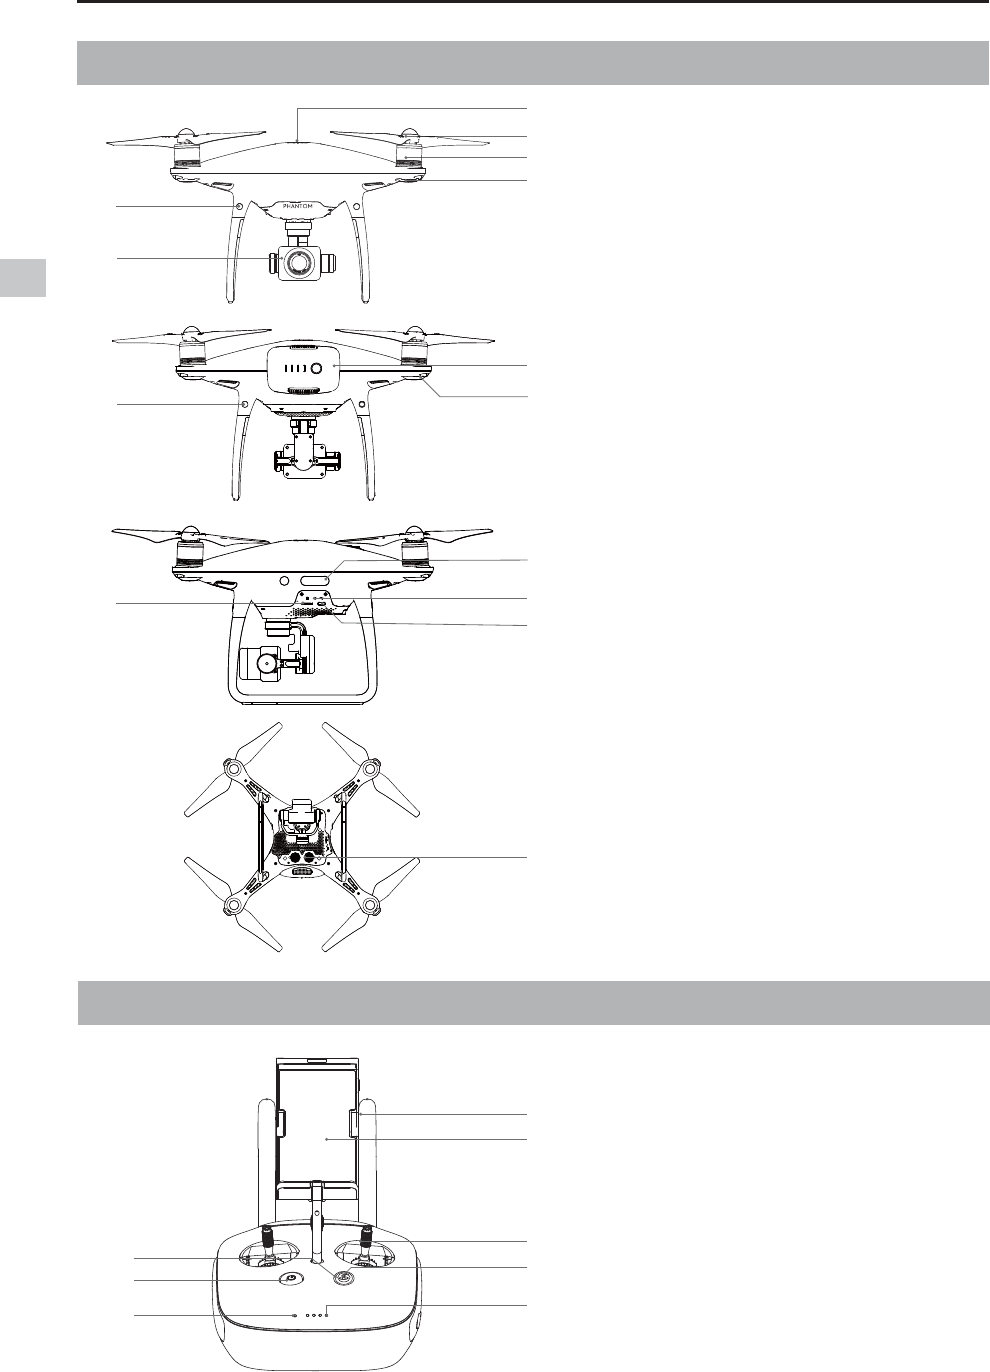
Aircraft Diagram
Remote Controller Diagram (GL300E)
[1] Antennas
Relays aircraft control and video
signal.
[2] Mobile Device Holder
Securely mounts your mobile
device to the remote controller.
[3] Control Stick
Controls the orientation and
movement of the aircraft.
[4] Return Home (RTH) Button
Press and hold the button to initiate
Return to Home (RTH).
[1] GPS
[2] Propeller
[3] Motors
[4] Front LED Indicator
[5] Gimbal and Camera
[6] Vision Positioning and Obstacle
Sensing System (Front)
[7] Intelligent Flight Battery
[8] Aircraft Status Indicator
[9] Vision Positioning and Obstacle
Sensing System (Rear)
[10] Obstacle Sensing System
(Both Sides)
[11] Camera / Linking Status Indicator
and Link Button
[12] Micro USB Port
[13] Camera Micro SD Card Slot
[14] Vision Positioning System (Bottom)
[1]
[2]
[3]
[4]
[7]
[8]
[11]
[10]
[14]
[12]
[13]
[5]
[9]
[6]
[1]
[2]
[3]
[4]
[5]
[7]
[8]
[6]

Product Profile
© 2016 DJI. All Rights Reserved.
9
Phantom 4 Pro/Pro+ User Manual
[5] Battery Level LEDs
Displays the battery level of the remote
controller.
[6] Status LED
Displays the remote controller's system status.
[7] Power Button
Used to turn the remote controller on and off.
[8] RTH LED
Circular LED around the RTH button displays
RTH status.
[9] Camera Settings Dial
Turn the dial to adjust camera settings.
(Only functions when the remote controller is
connected to a mobile device running the DJI
GO app.)
[10] Intelligent Flight Pause Button
Press once to allow the aircraft to exit from
TapFly, ActiveTrack and Advanced mode.
[11] Shutter Button
Press to take a photo. If burst mode is
selected, the set number of photos will be
taken with one press.
[12] Flight Mode Switch
Switch between P-mode, S-mode, and
A-mode.
[13] Video Recording Button
Press to start recording video. Press again to
stop recording.
[14] Gimbal Dial
Use this dial to control the tilt of the gimbal.
[15] Micro USB Port
Reserved port.
[16] USB Port
Connect to mobile device for running the DJI
GO app.
[17] C1 Button
Customizable through the DJI GO app.
[18] C2 Button
Customizable through the DJI GO app.
[19] Power Port
Connect to the Charger to charge the battery
of the remote controller.
[10]
[11]
[15] [16]
[9]
[12]
[13]
[14]
[17]
[19]
[18]
Product Profile
10
© 2016 DJI. All Rights Reserved.
Phantom 4 Pro/Pro+ User Manual
[1]
[2]
[5]
[6]
[8]
[7]
[9]
[4]
[3]
[14] [13]
[11]
[12]
[19]
[18]
[21]
[20]
[10]
[15]
[16]
[17]
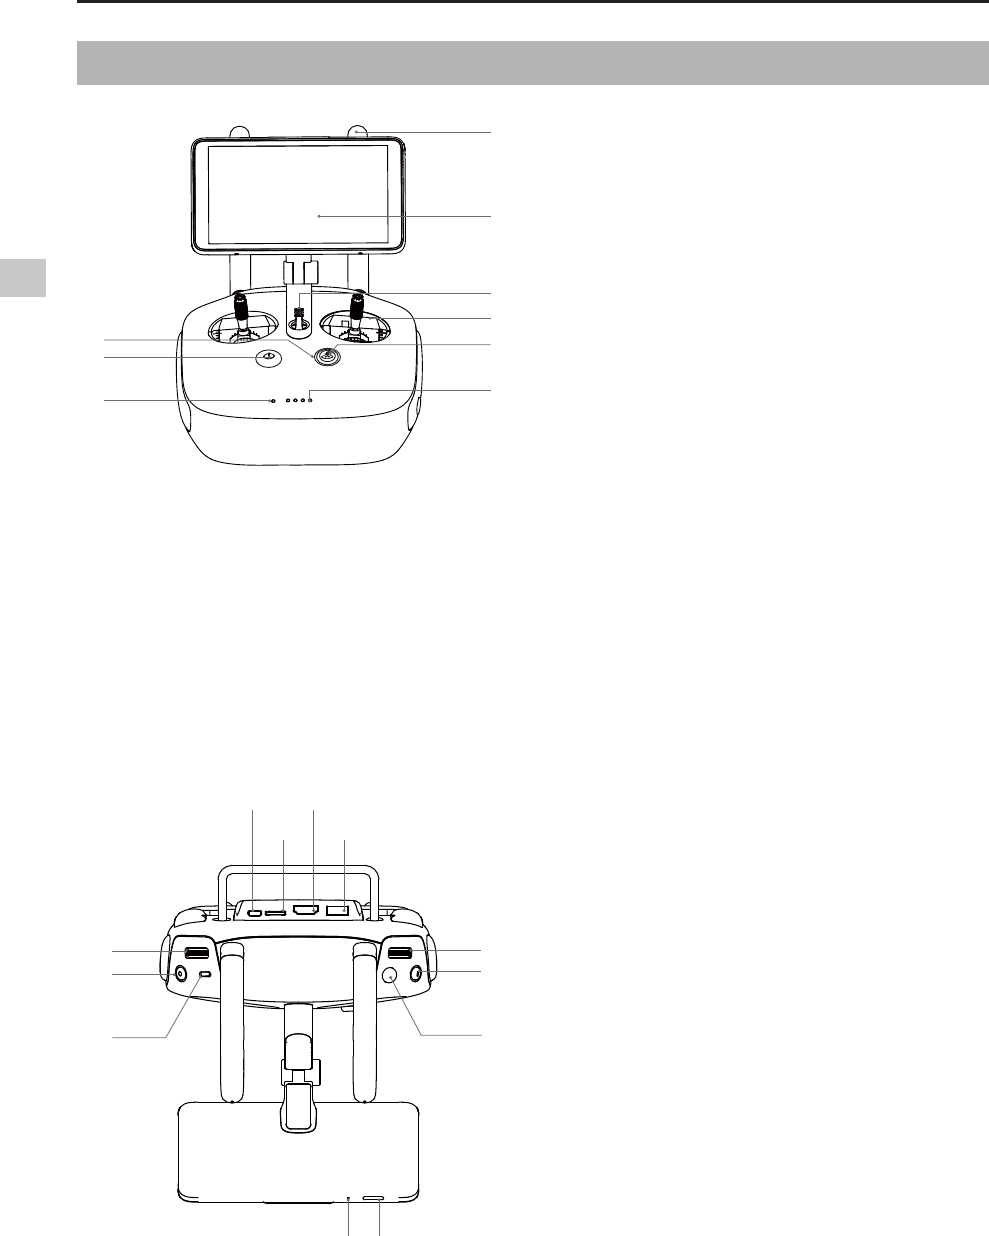
Remote Controller Diagram (GL300E)
[1] Antennas
Relays aircraft control and video
signal.
[2] Display Screen
Display device with Android system
to run DJI GO app.
[3] Speaker
Outputs the display device voice.
[4] Control Stick
Controls the orientation and
movement of the aircraft.
[5] Return Home (RTH) Button
Press and hold the button to initiate
Return to Home (RTH).
[6] Battery Level LEDs
Displays the battery level of the
Remote Controller.
[7] Status LED
Displays the Remote Controller's system status.
[8] Power Button
Used to turn the Remote Controller on and off.
[9] RTH LED
Circular LED around the RTH button displays
RTH status.
[10] Camera Settings Dial
Turn the dial to adjust camera
settings. (Only functions when the
Remote Controller is connected
to a mobile device running the
DJI GO app.)
[11] Intelligent Flight Pause Button
Press once to allow the aircraft to
exit from TapFly, ActiveTrack and
Advanced mode.
[12] Shutter Button
Press to take a photo. If burst
mode is selected, the set number
of photos will be taken with one
press.
[13] Sleep/Wake button
Press to sleep/wake the screen,
press and hold to restart.
Product Profile
© 2016 DJI. All Rights Reserved.
11
Phantom 4 Pro/Pro+ User Manual
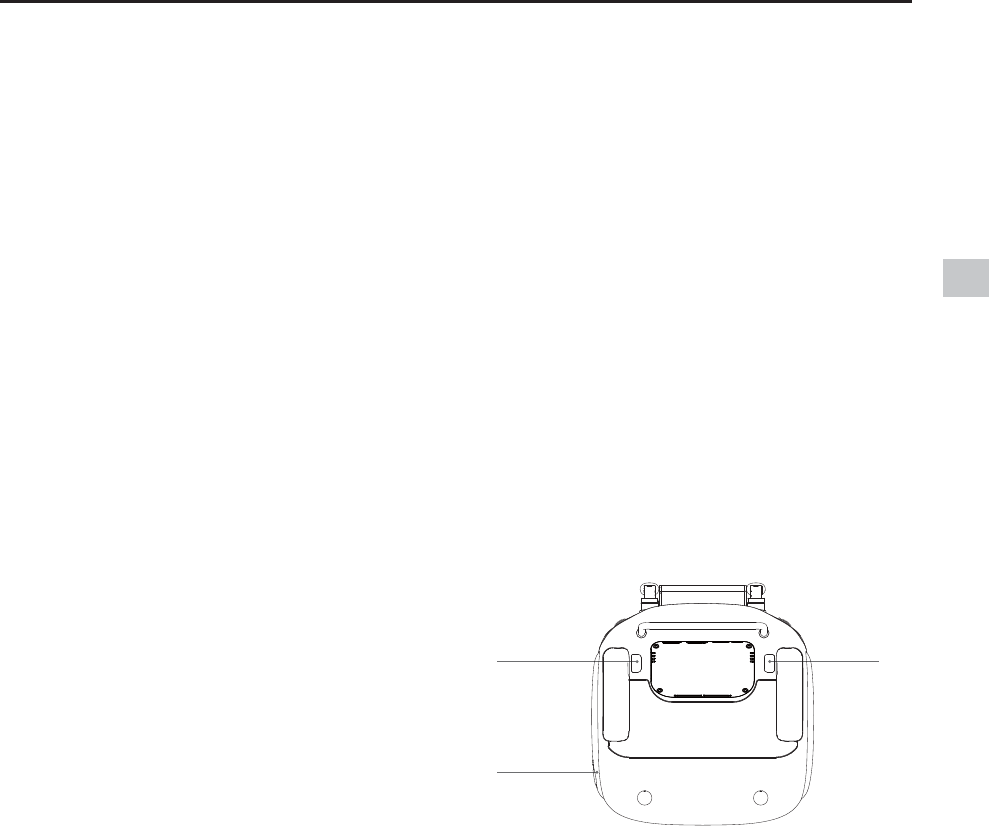
[22]
[24]
[23]
[14] Microphone
Records during shooting if this
function is enabled.
[15] Flight Mode Switch
Switch between P-mode, S-mode,
and A-mode.
[16] Video Recording Button
Press to start recording video.
Press again to stop recording.
[17] Gimbal Dial
Use this dial to control the tilt of
the gimbal.
[18] Micro USB Port
Reserved port.
[19] Micro SD Slot
Provide extra storage space for the display
device, maximum supporting 128 GB.
[20] HDMI Port
Output HDMI video signal.
[21] USB Port
Connect to mobile device for running the
DJI GO app.
[22] C1 Button
Customizable through the DJI GO app.
[23] C2 Button
Customizable through the DJI GO app.
[24] Power Port
Connect to the Charger to charge the
battery of the Remote Controller.
12
© 2016 DJI. All Rights Reserved.
Aircraft
This section introduces the features of
the Flight Controller, Vision Positioning
System, and the Intelligent Flight Battery
Aircraft
© 2016 DJI. All Rights Reserved.
13
Aircraft
Flight Controller
5IF1IBOUPNT1SP1SPnJHIUDPOUSPMMFSGFBUVSFTTFWFSBMJNQPSUBOUVQHSBEFTJODMVEJOHBOFXnJHIU
mode. Safety modes include Failsafe and Return-to-Home. These features ensure the safe return of your
BJSDSBGUJGUIFDPOUSPMTJHOBMJTMPTU5IFnJHIUDPOUSPMMFSDBOBMTPTBWFDSJUJDBMnJHIUEBUBGSPNFBDInJHIU
UPUIFPOCPBSETUPSBHFEFWJDF5IFOFXnJHIUDPOUSPMMFSBMTPQSPWJEFTJODSFBTFETUBCJMJUZBOEBOFXBJS
braking feature.
Flight Mode
5ISFFnJHIUNPEFTBSFBWBJMBCMF5IFEFUBJMTPGFBDInJHIUNPEFBSFGPVOECFMPX
P-mode (Positioning): P-mode works best when the GPS signal is strong. The aircraft utilizes the GPS
and Obstacle Sensing System to automatically stabilize itself, navigate between
obstacles or track a moving object. Advanced features such as TapFly and
ActiveTrack are enabled in this mode.
S-mode (Sport): The handling gain values of the aircraft are adjusted in order to enhance
UIFNBOFVWFSBCJMJUZPGUIFBJSDSBGUJO4NPEF5IFNBYJNVNnJHIUTQFFEPG
the aircraft is increased to 20 m /s in this mode. Note that Obstacle Sensing
system is disabled in this mode.
A-mode (Attitude): When neither the GPS nor the Obstacle Sensing System is available, the aircraft
will only use its barometer for positioning to control the altitude.
The Obstacle Sensing System is disabled in S-mode (Sport), which means the aircraft will
QRWEHDEOHWRDXWRPDWLFDOO\DYRLGREVWDFOHVLQLWVñLJKWSDWK%HYLJLODQWDQGVWD\FOHDURI
QHDUE\REVWDFOHV
The aircraft’s maximum speed and braking distance are significantly increased in S-mode
(Sport). A minimum braking distance of 164 feet (50 meters) is required in windless conditions.
5IFBJSDSBGUTSFTQPOTJWFOFTTJTTJHOJmDBOUMZJODSFBTFEJO4NPEF4QPSUXIJDINFBOTBTNBMM
stick movement on the remote controller will translate into a large travel distance of the aircraft.
#FWJHJMBOUBOENBJOUBJOBEFRVBUFNBOFVWFSJOHTQBDFEVSJOHnJHIU
5IFBJSDSBGUTEFTDFOUTQFFEJTTJHOJmDBOUMZJODSFBTFEJO4NPEF4QPSU"NJOJNVNCSBLJOH
distance of 50 meters is required in windless conditions.
6TFUIF'MJHIU$POUSPMMFSNPEFTXJUDIUPDIBOHFUIFnJHIUNPEFPGUIFBJSDSBGUSFGFSUPUIFiFlight
Mode Switch” on Page 33 for more information.
Aircraft
14
© 2016 DJI. All Rights Reserved.
Phantom 4 Pro/Pro+ User Manual
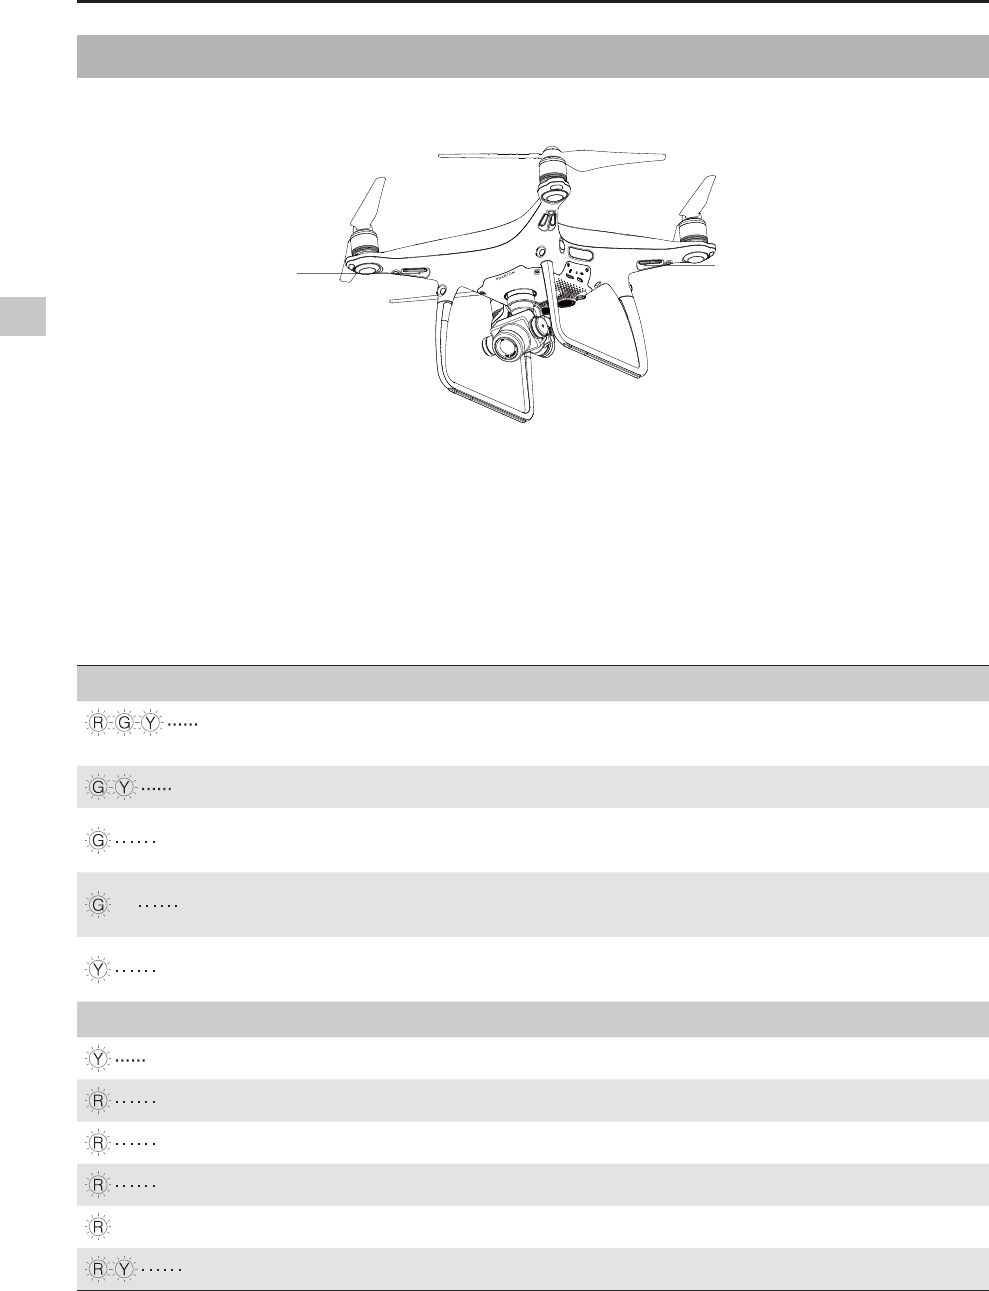
Flight Status Indicator
The Phantom 4 Pro / Pro+ has Front LEDs and Aircraft Status Indicators. The positions of these LEDs are
TIPXOJOUIFmHVSFCFMPX
The Front LEDs show the orientation of the aircraft. The Front LEDs glow solid red when the aircraft is
turned on to indicate the front (or nose) of the aircraft. The Aircraft Status Indicators communicate the
TZTUFNTUBUVTPGUIFnJHIUDPOUSPMMFS3FGFSUPUIFUBCMFCFMPXGPSNPSFJOGPSNBUJPOBCPVUUIF"JSDSBGU4UBUVT
Indicators.
Front LED Aircraft Status Indicator
Aircraft Status Indicator Description
Normal
Red, Green and Yellow Flash
Alternatively Turning On and Self Diagnostic Testing
Green and Yellow Flash Alternatively Warming Up
Green Flashes Slowly Safe to Fly (P-mode or S-mode with GPS , Vision
Positioning and Obstacle Sensing)
X2 Green Flashes Twice Safe to Fly (P-mode or S-mode with GPS , Vision
Positioning and Obstacle Sensing)
Yellow Flashes Slowly Safe to Fly (A-mode but No GPS and Vision
Positioning and Obstacle Sensing)
Warning
Fast Yellow Flashing Remote Controller's Signal Lost
Slow Red Flashing Low Battery Warning
Fast Red Flashing Critical Battery Warning
Red Flashing Alternatively IMU Error
—
Solid Red Critical Error
Red and Yellow Flash Alternatively Compass Calibration Required
Aircraft
© 2016 DJI. All Rights Reserved.
15
Phantom 4 Pro/Pro+ User Manual
Return-to-Home (RTH)
The Return-to-Home (RTH) function brings the aircraft back to the last recorded Home Point. There are
three types of RTH procedures: Smart RTH, Low Battery RTH, and Failsafe RTH. This section describes
these three scenarios in detail.
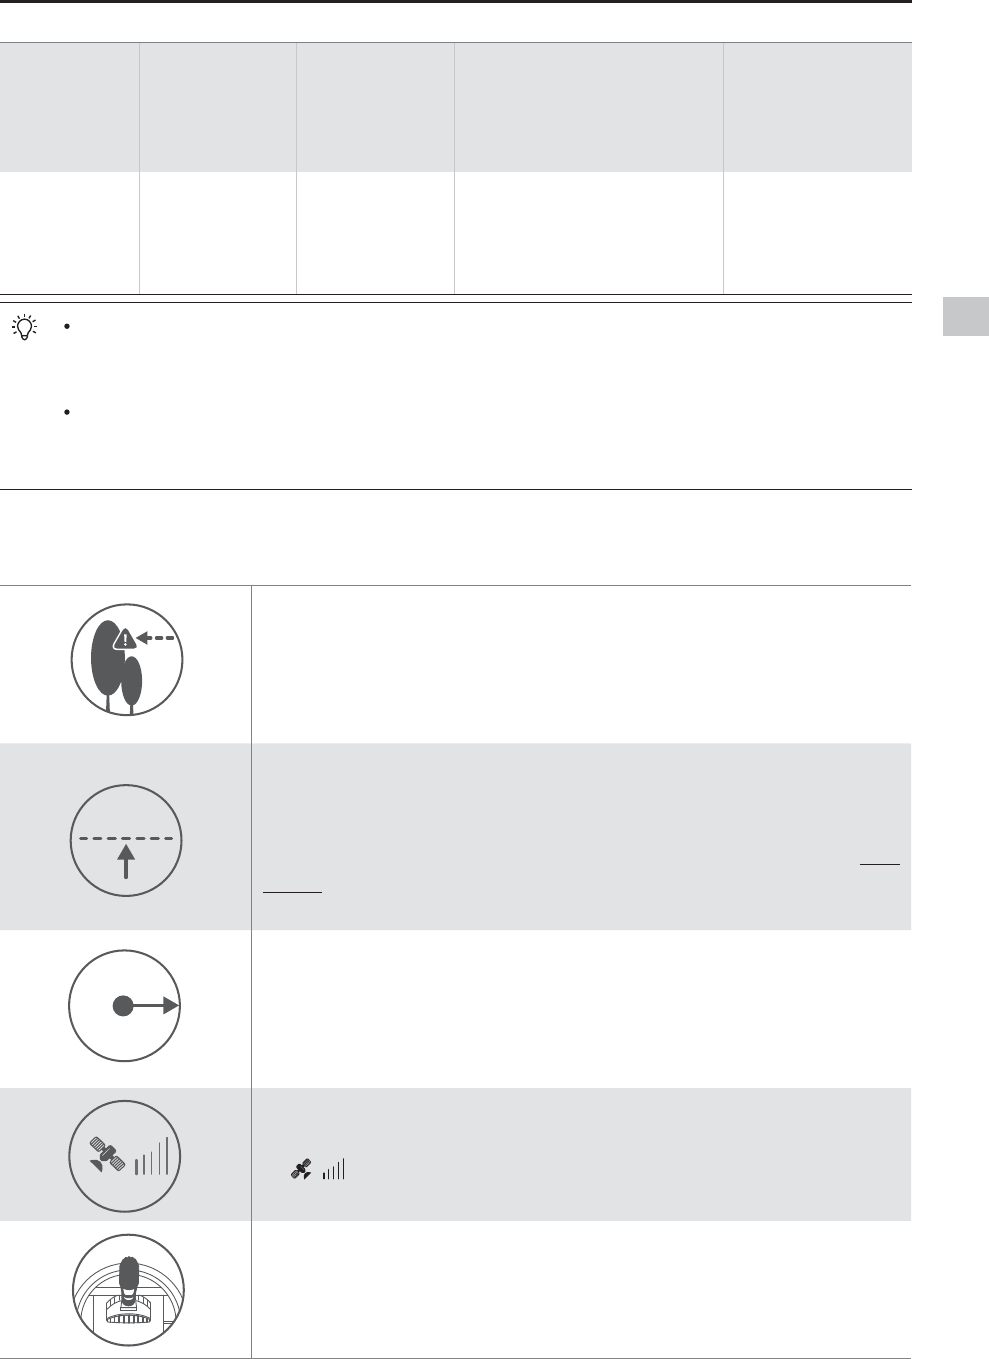
GPS Description
Home Point
If a strong GPS signal was acquired before takeoff, the Home Point
is the location from which the aircraft was launched. The GPS signal
strength is indicated by the GPS icon ( ). The aircraft status
indicator will blink rapidly when the home point is recorded.
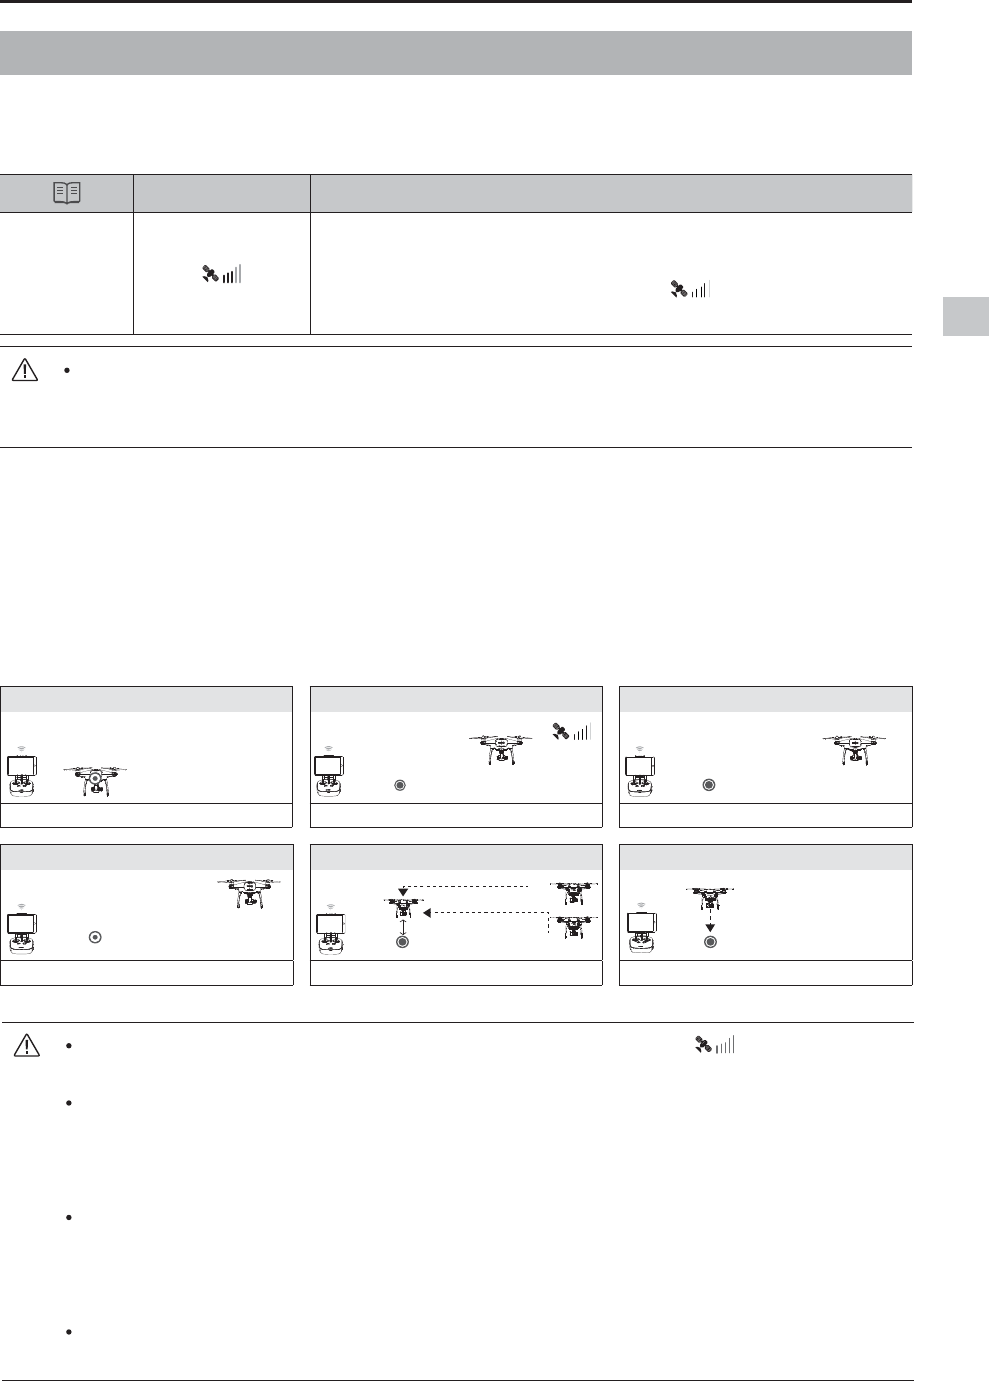
Failsafe RTH
If the Home Point was successfully recorded and the compass is functioning normally, Failsafe RTH will
be automatically activated if the remote controller signal is lost for more than three seconds. The Return-
to-Home process may be interrupted and the operator may regain control of the aircraft if the remote
controller signal connection is re-established.
Failsafe Illustration
Height over HP<=20m
5
RTH (adjustable altitude)
Fast Blinking Yellow
1 Record Home Point
Blinking Green
3 Remote Controller Signal Lost
Fast Blinking Yellow
$POmSNJOH)PNF1PJOU
Blinking Green
6 Landing (after hovering for 5 secs)
Fast Blinking Yellow
4
Signal Lost Lasts (after 3 sec.)
Fast Blinking Yellow
Height over HP>20m
Elevate to 20m
20m
××
Aircraft cannot return to the Home Point when GPS signal is weak ( [ ] displays grey) or
unavailable.
"JSDSBGUBVUPNBUJDBMMZEFTDFOETBOEMBOETJG35)JTUSJHHFSFEXIFOUIFBJSDSBGUnJFTXJUIJOB
meters (65 feet) radius of the Home Point. Aircraft will stop ascending and immediately return
to the Home Point if you move the left stick if the aircraft reaches 20 meters (65 feet) altitudes or
beyond during Failsafe.
The aircraft cannot avoid obstruction during the Failsafe RTH when Obstacle Sensing system is
EJTBCMFEUIFSFGPSFJUJTJNQPSUBOUUPTFUBOTVJUBCMF'BJMTBGFBMUJUVEFCFGPSFFBDInJHIU-BVODI
the DJI GO app and enter “Camera” and select “MODE > Advanced Settings > Failsafe
mode” to set the Failsafe altitude.
User cannot control the aircraft while the aircraft is ascending to its failsafe altitude. However,
user can press RTH button once to exit ascending and regain control.
Aircraft can sense and avoid obstacles when Obstacle Sensing System is enabled and the
MJHIUJOHDPOEJUJPOTJTTVGmDJFOU5IFBJSDSBGUXJMMBVUPNBUJDBMMZDMJNCVQUPBWPJEPCTUBDMFBOEnZ
to the Home Point at the new altitude.
×
>3S
×
Aircraft
16
© 2016 DJI. All Rights Reserved.
Phantom 4 Pro/Pro+ User Manual
Battery Level
Warning Remark Aircraft Status
Indicator DJI GO App Flight Instructions
Low battery
level warning
The battery
power is low.
Please land the
aircraft.
Aircraft status
indicator blinks
RED slowly.
Tap “Go-home” to have the
aircraft return to the Home
point and land automatically,
or “Cancel” to resume normal
flight. If no action is taken,
the aircraft will automatically
go home and land after 10
seconds. Remote controller
will sound an alarm.
Fly the aircraft
back and land
it as soon as
possible, then
stop the motors
and replace the
battery.
Low Battery RTH
The low battery level failsafe is triggered when the DJI Intelligent Flight Battery is depleted to a point that
may affect the safe return of the aircraft. Users are advised to return home or land the aircraft immediately
when prompted. The DJI GO app will display a notice when a low battery warning is triggered. The
aircraft will automatically return to the Home Point if no action is taken after a ten-second countdown. The
user can cancel the RTH procedure by pressing the RTH button on the remote controller. The thresholds
for these warnings are automatically determined based on the aircraft’s current altitude and distance from
the Home Point.
The aircraft will land automatically if the current battery level can only support the aircraft long enough
to descend from its current altitude. The user can still use the remote controller to alter the aircraft’s
orientation during the landing process.
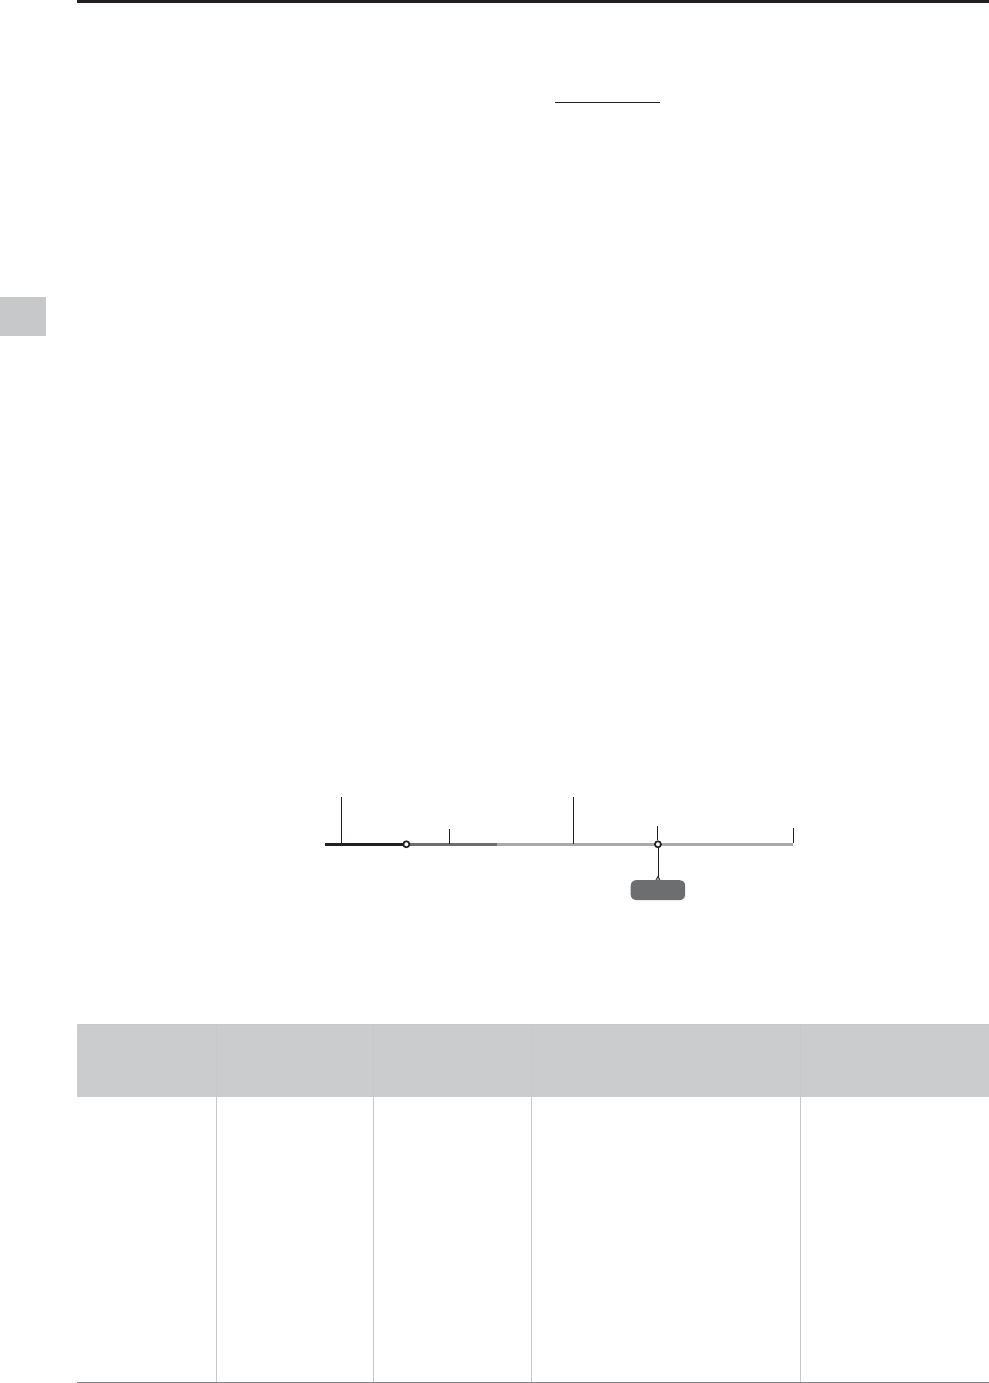
The Battery Level Indicator is displayed in the DJI GO app, and is described below:
Smart RTH
Use the RTH button on the remote controller (refer to “RTH button” on page 33 for more information) or
tap the RTH button in the DJI GO app and follow the on-screen instructions when GPS is available to
initiate Smart RTH. The aircraft will then automatically return to the last recorded Home Point. You may use
the remote controller’s control sticks to control the aircraft’s position to avoid a collision during the Smart
RTH process. Press and hold the Smart RTH button once to start the process, and press the Smart RTH
button again to terminate the procedure and regain full control of the aircraft.
12:29
3FNBJOJOHnJHIUUJNF
4VGmDJFOUCBUUFSZ
level(Green)
Battery level Indicator
Power requires
to return home
Critical Low battery level
warning(Red) Low battery
level warning(Yellow)
Aircraft
© 2016 DJI. All Rights Reserved.
17
Phantom 4 Pro/Pro+ User Manual
Critical Low
battery level
warning
The aircraft
must land
immediately.
Aircraft status
indicator blinks
RED quickly.
The DJI GO app display will
nBTISFEBOEUIFBJSDSBGUXJMM
start to descend. The remote
controller will sound an alarm.
Allow the aircraft to
descend and land
automatically.
Estimated
remaining
nJHIUUJNF
Estimated
SFNBJOJOHnJHIU
based on current
battery level.
N/A N/A N/A
When Critical battery level warning is triggered and the aircraft begins to land automatically,
you may push the left stick upward to make the aircraft hover at its current altitude, giving you
an opportunity to navigate to a more appropriate landing location.
The colored zones and markers on the battery level indicator bar reflect the estimated
SFNBJOJOHnJHIUUJNF5IFZBSFBVUPNBUJDBMMZBEKVTUFEBDDPSEJOHUPUIFBJSDSBGUTDVSSFOUMPDBUJPO
and status.
The aircraft cannot avoid obstruction during the Failsafe RTH when the
Obstacle Sensing System is disabled. Therefore, it is important to set
BOTVJUBCMF'BJMTBGFBMUJUVEFCFGPSFFBDInJHIU-BVODIUIF%+*(0BQQ
and enter “Camera” and select “MODE > Advanced Settings > Failsafe
mode” to set the Failsafe altitude.
N
*GUIFBJSDSBGUJTnZJOHVOEFSNFUFSTGFFUBOE'BJMTBGFJODMVEJOH
Smart RTH, Lower Battery RTH ) is triggered, the aircraft will first
automatically ascend to 20 meters (65 feet) from the current altitude.
You can only cancel the ascending by exiting the Failsafe. Refer to “RTH
Button” on page 33 for more information on how to exit the Failsafe and
regain the control of the remote controller.
N
H
Aircraft automatically descends and lands if RTH is triggered when the
BJSDSBGUnJFTXJUIJOBNFUFSTGFFUSBEJVTPGUIF)PNF1PJOU"JSDSBGU
will stop ascending and immediately return to the Home Point if you move
the left stick if the aircraft reaches 20 meters (65 feet) altitudes or beyond
during Failsafe.
Aircraft cannot return to the Home Point when GPS signal is weak
( [ ] displays grey) or unavailable.
if you move the left stick after the aircraft rises above 65 feet (20m)
but below the pre-set Failsafe RTH altitude, the aircraft will stop
ascending and immediately return to the Home Point.
Failsafe Safety Notices
Aircraft
18
© 2016 DJI. All Rights Reserved.
Phantom 4 Pro/Pro+ User Manual
Obstacle Avoidance During RTH
Aircraft can now sense and actively attempt to avoid obstacle during FailSafe RTH, provided that the
light condition is ideal for the Obstacle Sensing System. The details on how the aircraft will behave during
obstacle avoid is listed below:
1. Aircraft decelerates when an obstacle is sensed at 65 feet (20 meters) ahead.
2. Aircraft stops and hover then start ascending vertically to avoid the obstacle. Eventually, the aircraft will
stop climbing when it is at least 16 feet (5 meters) above the detected obstacle.
'BJMTBGF35)QSPDFEVSFSFTVNFUIFBJSDSBGUXJMMDPOUJOVFnZJOHUPUIF)PNF1PJOUBUUIFDVSSFOU
altitude.
TapFly
Introduction
8JUIUIF5BQ'MZGFBUVSFVTFSOPXDBOUBQPOUIFNPCJMFEFWJDFTDSFFOUPHVJEFUIFBJSDSBGUUPnZUPXBSEUIF
designated direction without using the remote controller. Aircraft can automatically avoid obstacle or initiate
CSFBLBOEUIFOIPWFSBVUPNBUJDBMMZEVSJOHUIFnJHIUQSPWJEFEUIBUUIFMJHIUJOHJTOPUUPPEBSLMVYOPS
too bright ( > 10,000 lux).
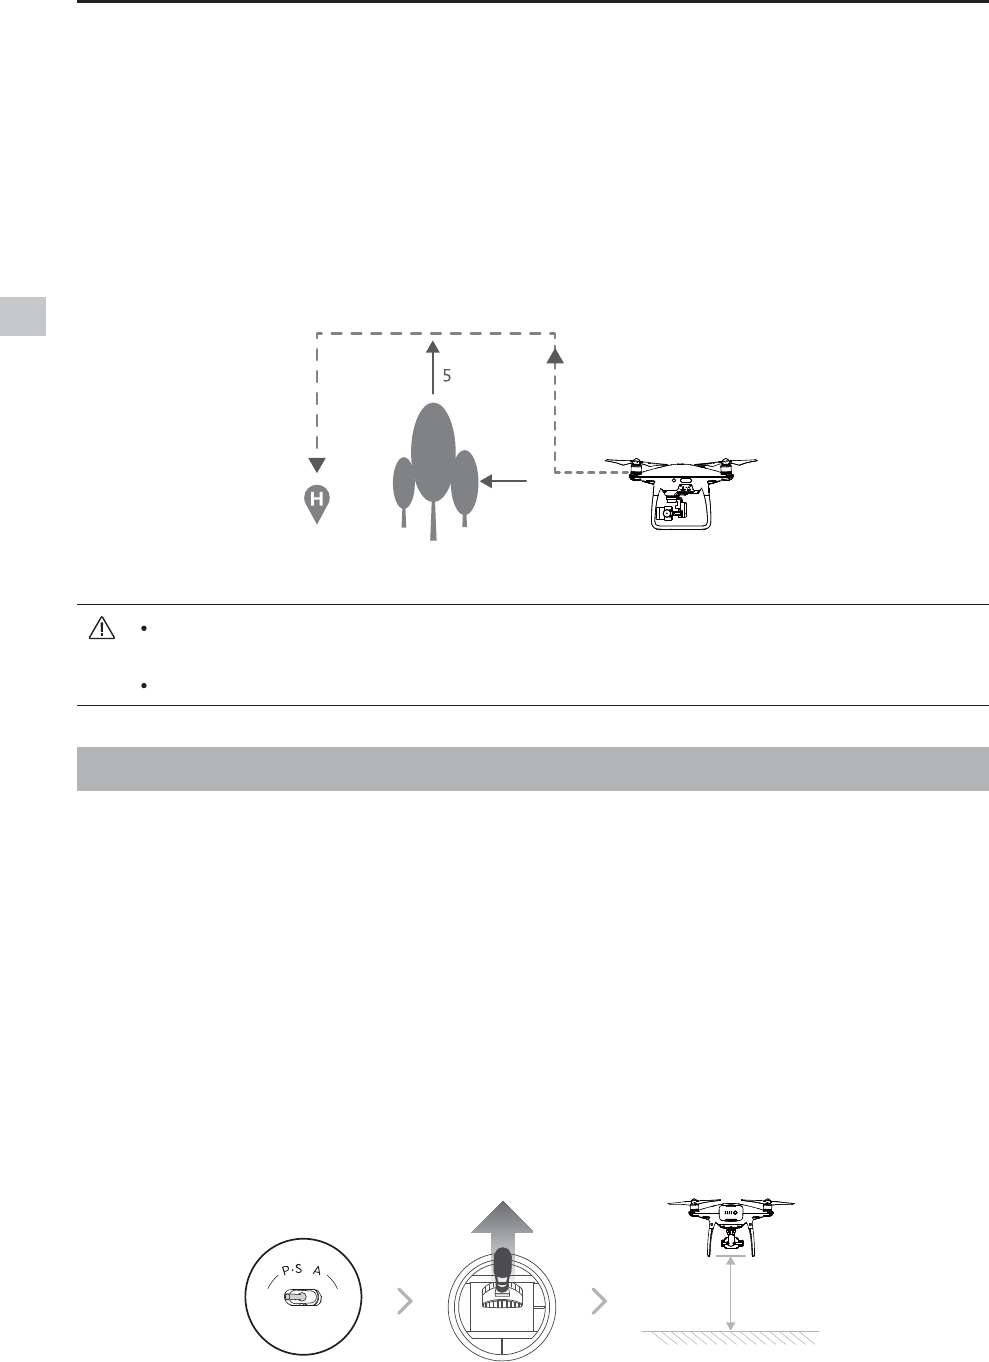
Using TapFly
Ensure the battery level is more than 50 % for the Intelligent Flight Battery. And the aircraft is in P-mode.
Then follow the steps below to use TapFly:
5BLFPGGBOEFOTVSFUIFBJSDSBGUJTnZJOHBUMFBTUGFFUNFUFSTBCPWFUIFHSPVOE
To ensure the aircraft is heading towards the static direction, you cannot rotate the aircraft
during FailSafe RTH while Obstacle Sensing System is enabled.
The aircraft cannot avoid the obstacle that is direct above the aircraft.
ON OFF
Auto Hold
m
m
above 3m
Aircraft
© 2016 DJI. All Rights Reserved.
19
Phantom 4 Pro/Pro+ User Manual
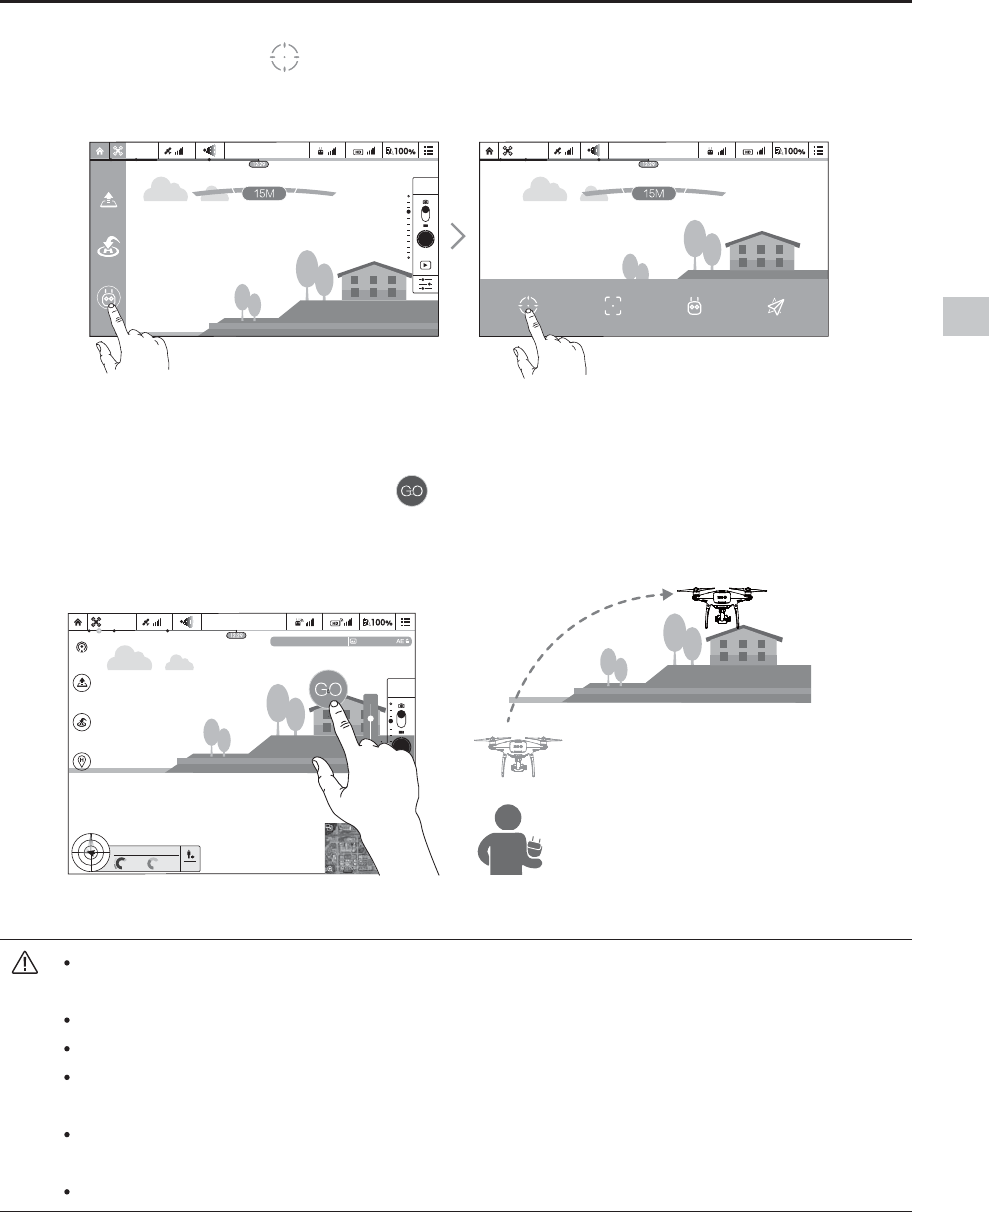
Launch DJI GO app and tap at the bottom of the camera view, read and understand the prompt
statements.
Tap once on the target direction and wait for JDPOUPBQQFBS5BQBHBJOUPDPOmSNUIFTFMFDUJPOBOE
UIFBJSDSBGUXJMMBVUPNBUJDBMMZnZUPXBSETUIFUBSHFUEJSFDUJPO
DO NOT guide the aircraft to fly towards people, animals, small and fine objects (e.g. tree
branches and power lines) or transparent objects (e.g. glass or water surface).
8BUDIGPSUIFPCTUBDMFTUIBUJTPOUIFnJHIUQBUIBOETUBZDMFBSPGUIFN
5IFSFNBZCFEFWJBUJPOTCFUXFFOUIFFYQFDUFEBOEUIFBDUVBMnJHIUQBUIPG5BQnZTFMFDUJPO
The selectable range for the target direction is limited. You cannot make TapFly selection that is
close to the upper or lower edge of the screen.
5BQ'MZNPEFNBZOPUXPSLQSPQFSMZXIFOUIFBJSDSBGUJTnZJOHPWFSXBUFSTVSGBDFPSTOPXDPWFSFE
area.
#FFYUSBDBVUJPOTXIFOnZJOHJOFYUSFNFMZEBSLMVYPSCSJHIUMVYFOWJSPONFOUT
OPTI OPTI
MENU
1/320 4821 JPEG
ISO 100 EV 0
OPTI
H: D:
V.S
M/S M/S
H.S
4.22.3
39M210M
232M
NT
MENU
Safe to fly (GPS)
Safe to fly (GPS) Safe to fly (GPS)
Click on flight with finger Smart to follow Normal mode Advanced mode
Aircraft
20
© 2016 DJI. All Rights Reserved.
Phantom 4 Pro/Pro+ User Manual
"GUFSDPOmSNFEXJUIUIF5BQ'MZTFMFDUJPOUIFBJSDSBGUXJMMnZBVUPNBUJDBMMZUPXBSETUIFBSFBNBSLFECZ
JDPO/PUFUIBUZPVDBOTUJMMVTFUIFDPOUSPMTUJDLUPDPOUSPMUIFNPWFNFOUPGUIFBJSDSBGUEVSJOHUIFnJHIU
Note that the aircraft will also automatically adjust its speed when it senses there is obstacle at the front
PGUIFBJSDSBGUPSJUJTnZJOHUPPDMPTFUPUIFHSPVOE)PXFWFSUIFVTFSTIPVMEOPUSFMZPOUIJTGFBUVSFUP
navigate the aircraft between the obstacles. Meanwhile the FailSafe procedure will override the TapFly
PQFSBUJPOHJWFOUIBUJGUIF(14TJHOBMJTXFBLUIFBJSDSBGUXJMMFYJUUIFBVUPOPNPVTnJHIUGSPN5BQ'MZBOE
nZCBDLUPUIF)PNF1PJOUBVUPNBUJDBMMZ
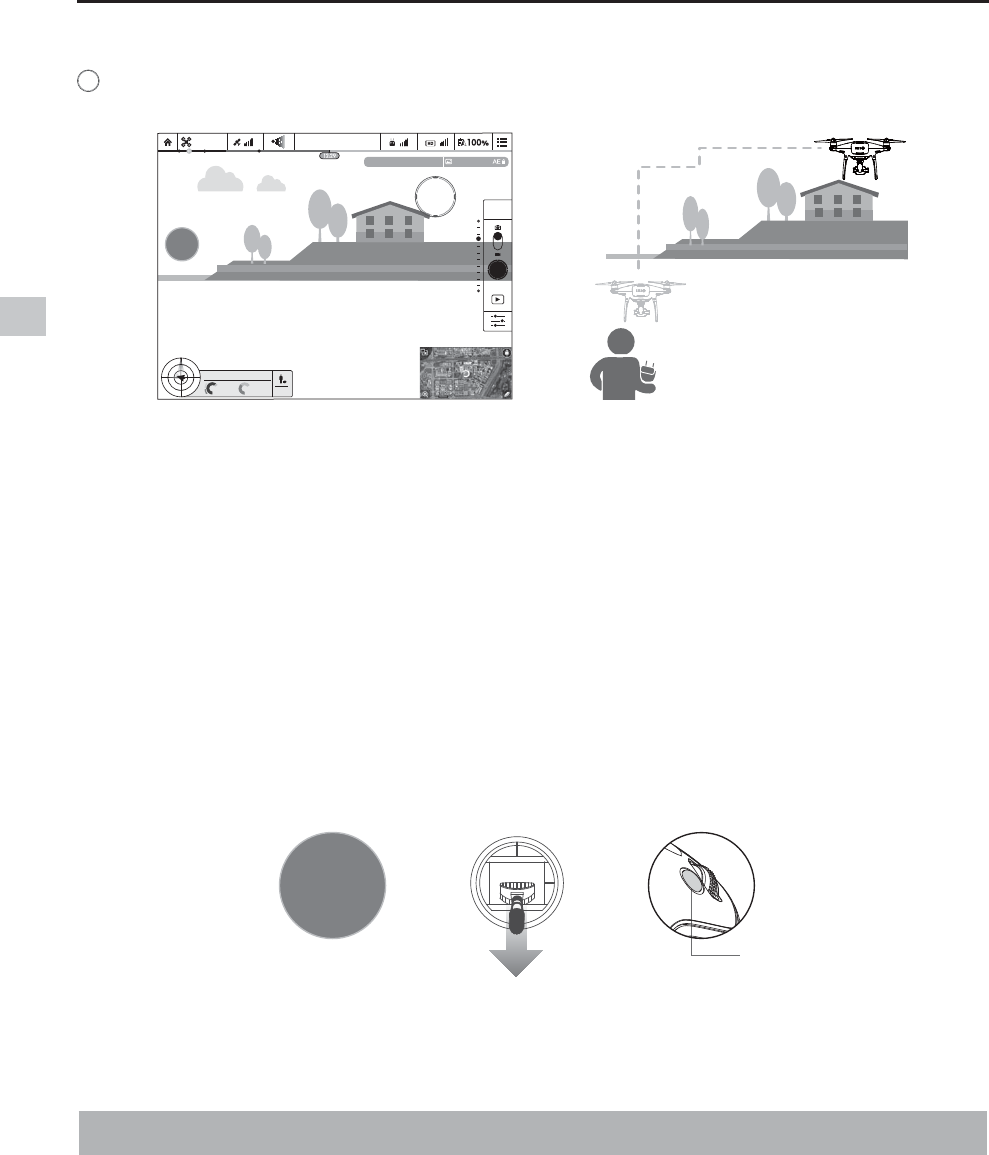
Exit TapFly
Use the following methods to exit TapFly:
1. Press once on the Intelligent Flight Pause button on the remote controller or pull back the pitch stick on
the remote controller.
2. Tap “STOP” button on the screen.
Aircraft will stop and hover after exit from TapFly. You may either tap a new target direction to proceed to
UIFOFYUnJHIUPSCSJOHCBDLUIFBJSDSBGUUPUIF)PNF1PJOUNBOVBMMZ
ActiveTrack
ActiveTrack allows you to mark and track a moving object on your mobile device screen. The aircraft will
BVUPNBUJDBMMZBWPJEPCTUBDMFTJOJUTnJHIUQBUI
OR OR
Intelligent Flight Pause button
Using ActiveTrack
Ensure the Intelligent Flight Battery has more than 50% power and the aircraft is in either P-mode. Then
follow the steps below to use ActiveTrack:
1. Take off and hover at least 9 feet (3 meters) above the ground.
1/320 4821 JPEG
ISO 100 EV 0
OPTI
H: D:
V.S
M/S M/S
H.S
4.22.3
39M210M
232M
STOP
MENU
STOP
Safe to fly (GPS)