SZ DJI TECHNOLOGY WM331A1609 Phantom 4 Pro User Manual 1
SZ DJI TECHNOLOGY CO., LTD Phantom 4 Pro 1
UserManual.wiki
>
SZ DJI TECHNOLOGY
>
WM331A1609 User Manual
>
User Manual Part 1
Contents
1.
User Manual Part 1
2.
User Manual Part 2
3.
User Manual Part 3
4.
Users Manual Part 1
5.
Users Manual Part 2
User Manual Part 1
Navigation menu
Upload a User Manual
Namespaces
Wiki Guide
HTML
PDF
Info
Views
User Manual
Discussion / Help
Navigation
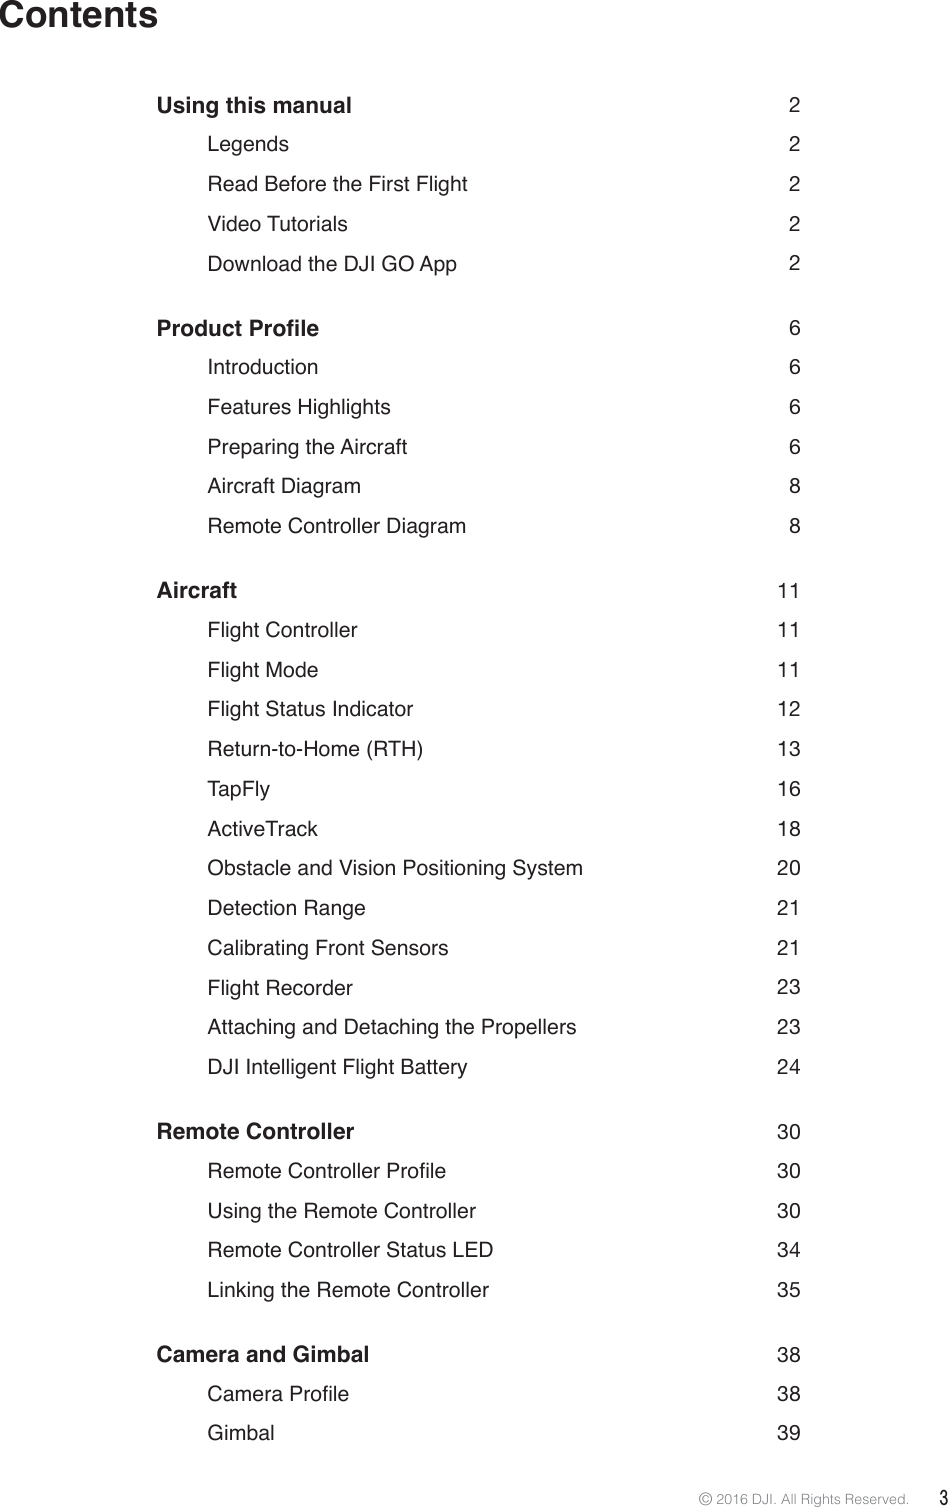
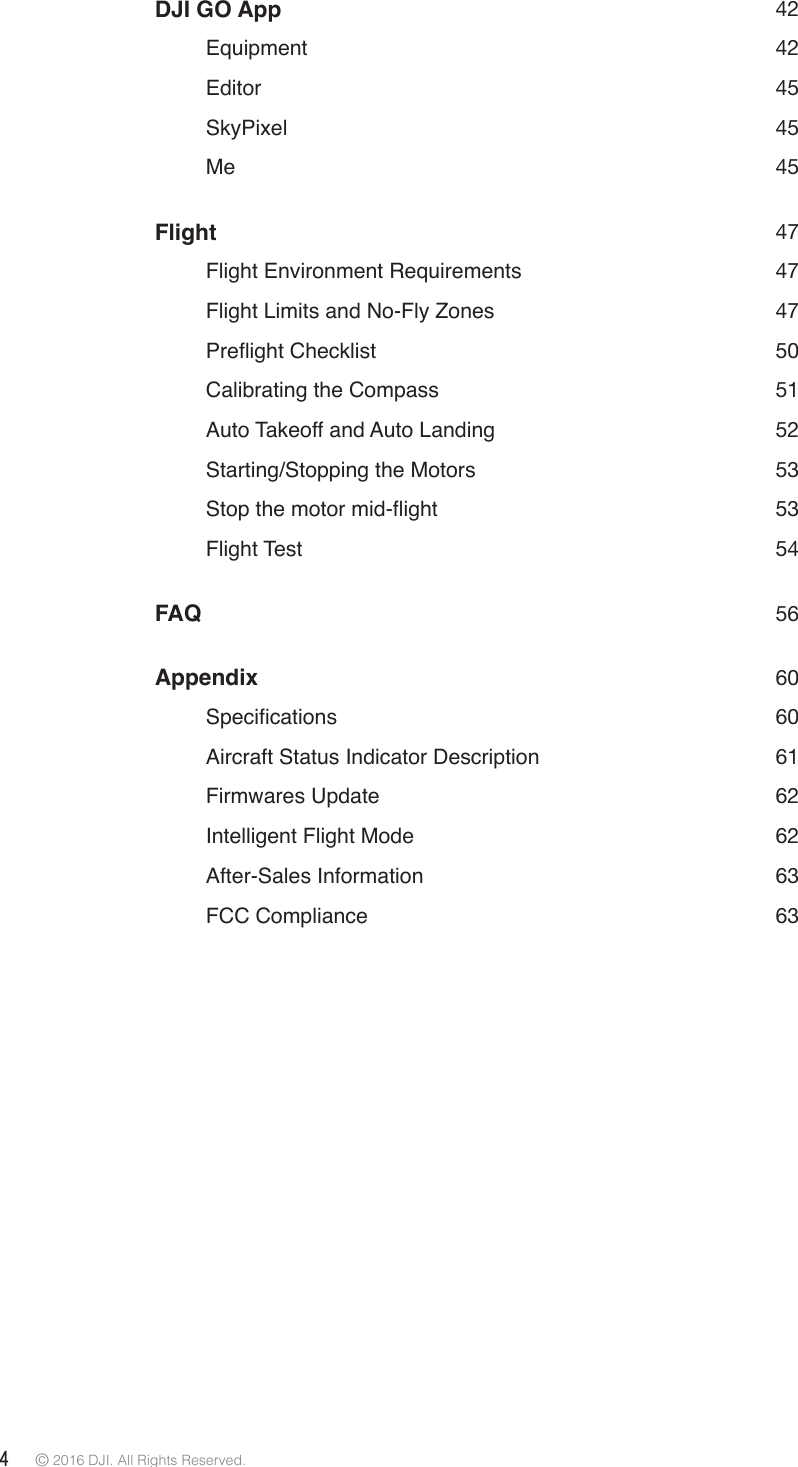
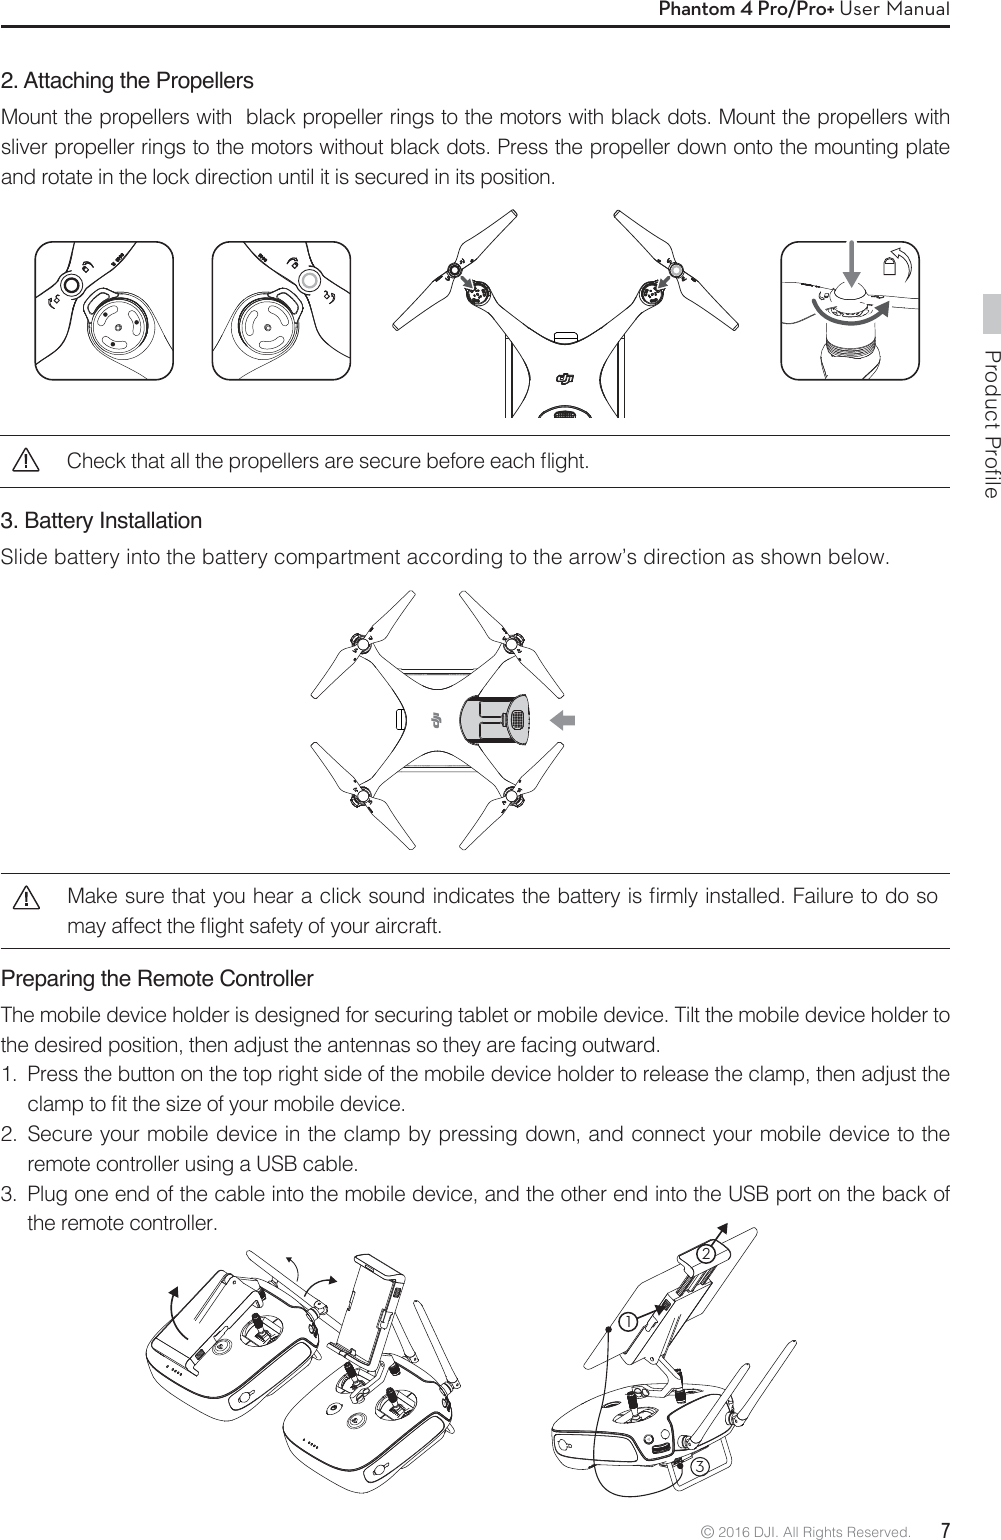
![Product Profile8 © 2016 DJI. All Rights Reserved. Phantom 4 Pro/Pro+ User ManualAircraft DiagramRemote Controller Diagram (GL300E)[1] AntennasRelays aircraft control and video signal. [2] Mobile Device HolderSecurely mounts your mobile device to the remote controller. [3] Control StickControls the orientation and movement of the aircraft.[4] Return Home (RTH) ButtonPress and hold the button to initiate Return to Home (RTH).[1] GPS[2] Propeller [3] Motors[4] Front LED Indicator[5] Gimbal and Camera[6] Vision Positioning and Obstacle Sensing System (Front) [7] Intelligent Flight Battery [8] Aircraft Status Indicator[9] Vision Positioning and Obstacle Sensing System (Rear)[10] Obstacle Sensing System(Both Sides)[11] Camera / Linking Status Indicator and Link Button [12] Micro USB Port[13] Camera Micro SD Card Slot[14] Vision Positioning System (Bottom)[1][2][3][4][7][8][11][10][14][12][13][5][9][6][1][2][3][4][5][7][8][6]](https://usermanual.wiki/SZ-DJI-TECHNOLOGY/WM331A1609.User-Manual-Part-1/User-Guide-3178971-Page-8.png)
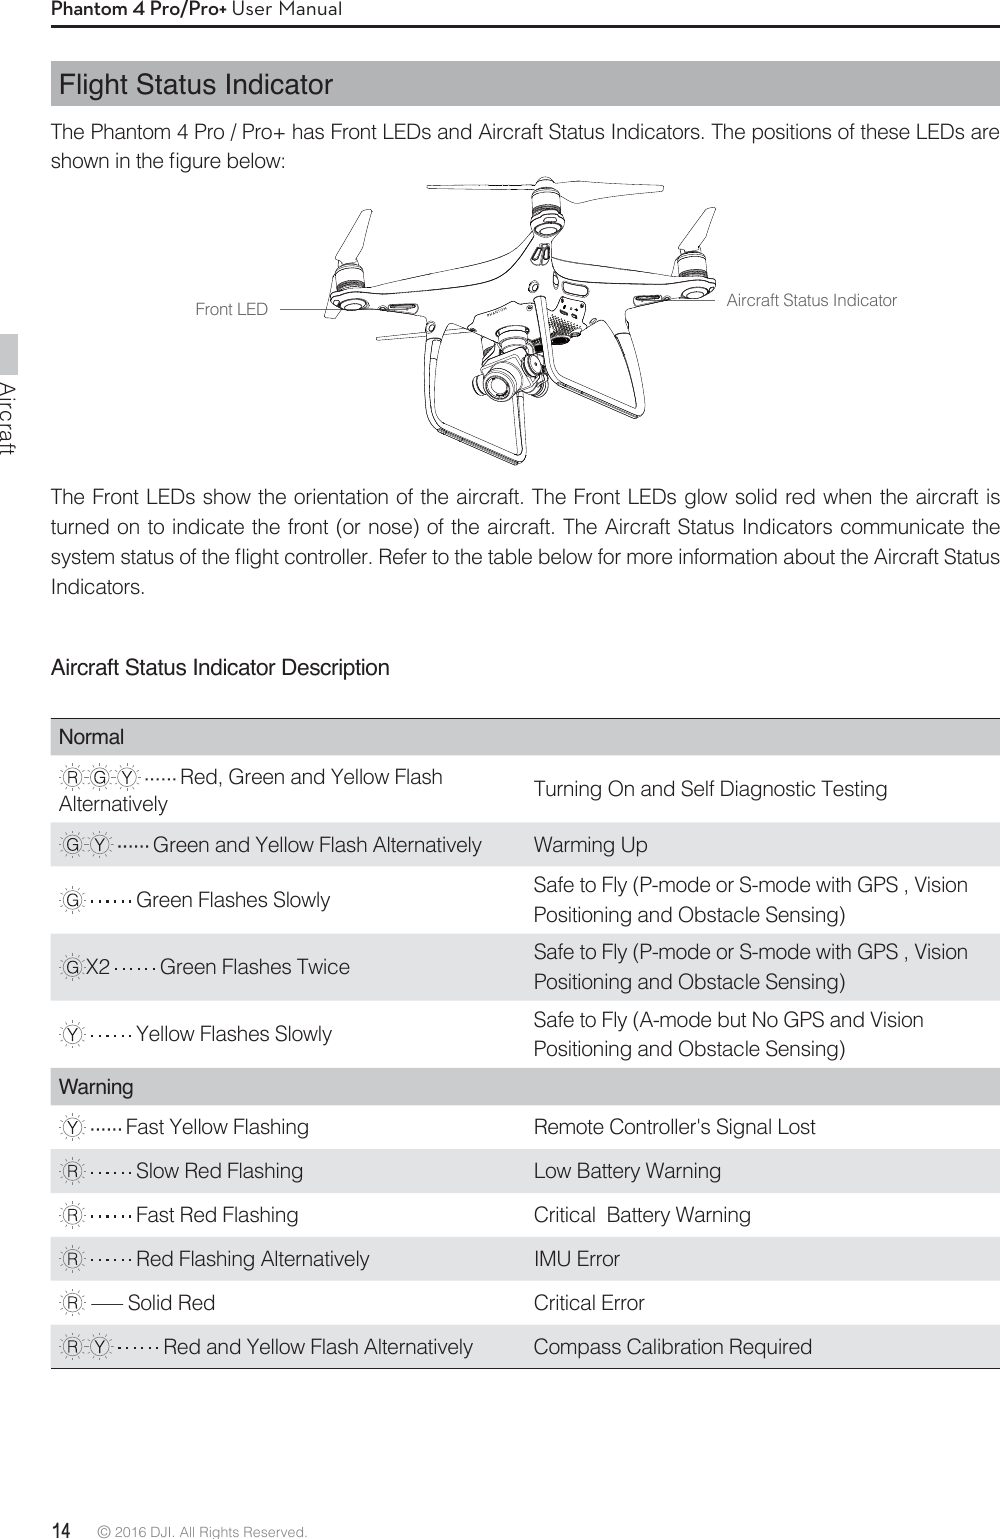
![Product Profile© 2016 DJI. All Rights Reserved. 9Phantom 4 Pro/Pro+ User Manual[5] Battery Level LEDsDisplays the battery level of the remote controller. [6] Status LEDDisplays the remote controller's system status. [7] Power ButtonUsed to turn the remote controller on and off.[8] RTH LED Circular LED around the RTH button displays RTH status. [9] Camera Settings Dial Turn the dial to adjust camera settings. (Only functions when the remote controller is connected to a mobile device running the DJI GO app.)[10] Intelligent Flight Pause Button Press once to allow the aircraft to exit from TapFly, ActiveTrack and Advanced mode. [11] Shutter Button Press to take a photo. If burst mode is selected, the set number of photos will be taken with one press.[12] Flight Mode SwitchSwitch between P-mode, S-mode, and A-mode.[13] Video Recording ButtonPress to start recording video. Press again to stop recording.[14] Gimbal DialUse this dial to control the tilt of the gimbal. [15] Micro USB PortReserved port.[16] USB PortConnect to mobile device for running the DJI GO app. [17] C1 ButtonCustomizable through the DJI GO app.[18] C2 ButtonCustomizable through the DJI GO app.[19] Power PortConnect to the Charger to charge the battery of the remote controller. [10][11][15] [16][9][12][13][14][17][19][18]](https://usermanual.wiki/SZ-DJI-TECHNOLOGY/WM331A1609.User-Manual-Part-1/User-Guide-3178971-Page-9.png)
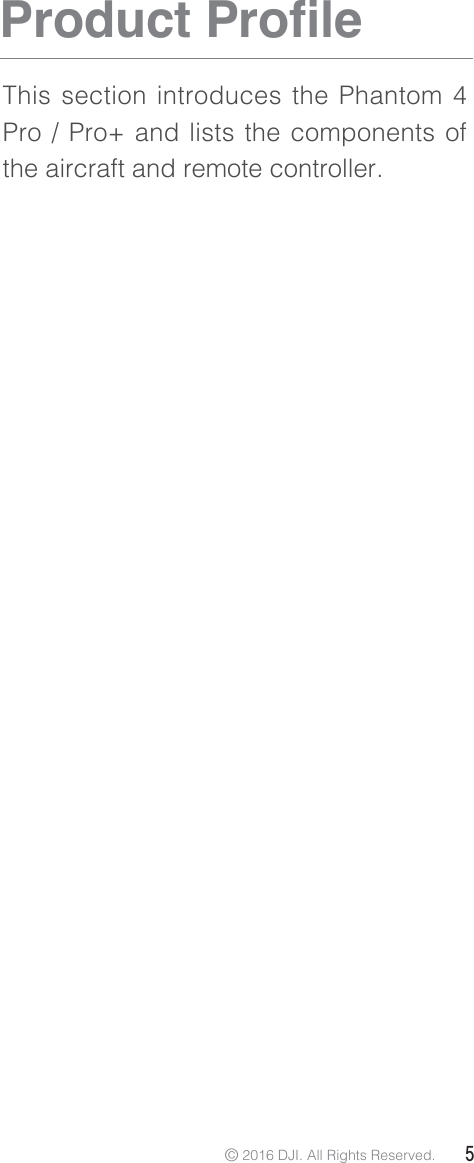
![Product Profile10 © 2016 DJI. All Rights Reserved. Phantom 4 Pro/Pro+ User Manual[1][2][5][6][8][7][9][4][3][14] [13][11][12][19][18][21][20][10][15][16][17]Remote Controller Diagram (GL300E)[1] AntennasRelays aircraft control and video signal. [2] Display ScreenDisplay device with Android system to run DJI GO app. [3] SpeakerOutputs the display device voice.[4] Control StickControls the orientation and movement of the aircraft.[5] Return Home (RTH) ButtonPress and hold the button to initiate Return to Home (RTH).[6] Battery Level LEDsDisplays the battery level of the Remote Controller.[7] Status LEDDisplays the Remote Controller's system status.[8] Power ButtonUsed to turn the Remote Controller on and off.[9] RTH LEDCircular LED around the RTH button displays RTH status.[10] Camera Settings DialTurn the dial to adjust camera settings. (Only functions when the Remote Controller is connected to a mobile device running the DJI GO app.) [11] Intelligent Flight Pause ButtonPress once to allow the aircraft to exit from TapFly, ActiveTrack and Advanced mode. [12] Shutter ButtonPress to take a photo. If burst mode is selected, the set number of photos will be taken with one press.[13] Sleep/Wake buttonPress to sleep/wake the screen, press and hold to restart.](https://usermanual.wiki/SZ-DJI-TECHNOLOGY/WM331A1609.User-Manual-Part-1/User-Guide-3178971-Page-10.png)
![Product Profile© 2016 DJI. All Rights Reserved. 11Phantom 4 Pro/Pro+ User Manual[22][24][23][14] MicrophoneRecords during shooting if this function is enabled.[15] Flight Mode SwitchSwitch between P-mode, S-mode, and A-mode.[16] Video Recording ButtonPress to start recording video. Press again to stop recording. [17] Gimbal DialUse this dial to control the tilt of the gimbal.[18] Micro USB PortReserved port.[19] Micro SD SlotProvide extra storage space for the display device, maximum supporting 128 GB.[20] HDMI PortOutput HDMI video signal.[21] USB PortConnect to mobile device for running the DJI GO app.[22] C1 ButtonCustomizable through the DJI GO app.[23] C2 ButtonCustomizable through the DJI GO app.[24] Power PortConnect to the Charger to charge the battery of the Remote Controller.](https://usermanual.wiki/SZ-DJI-TECHNOLOGY/WM331A1609.User-Manual-Part-1/User-Guide-3178971-Page-11.png)

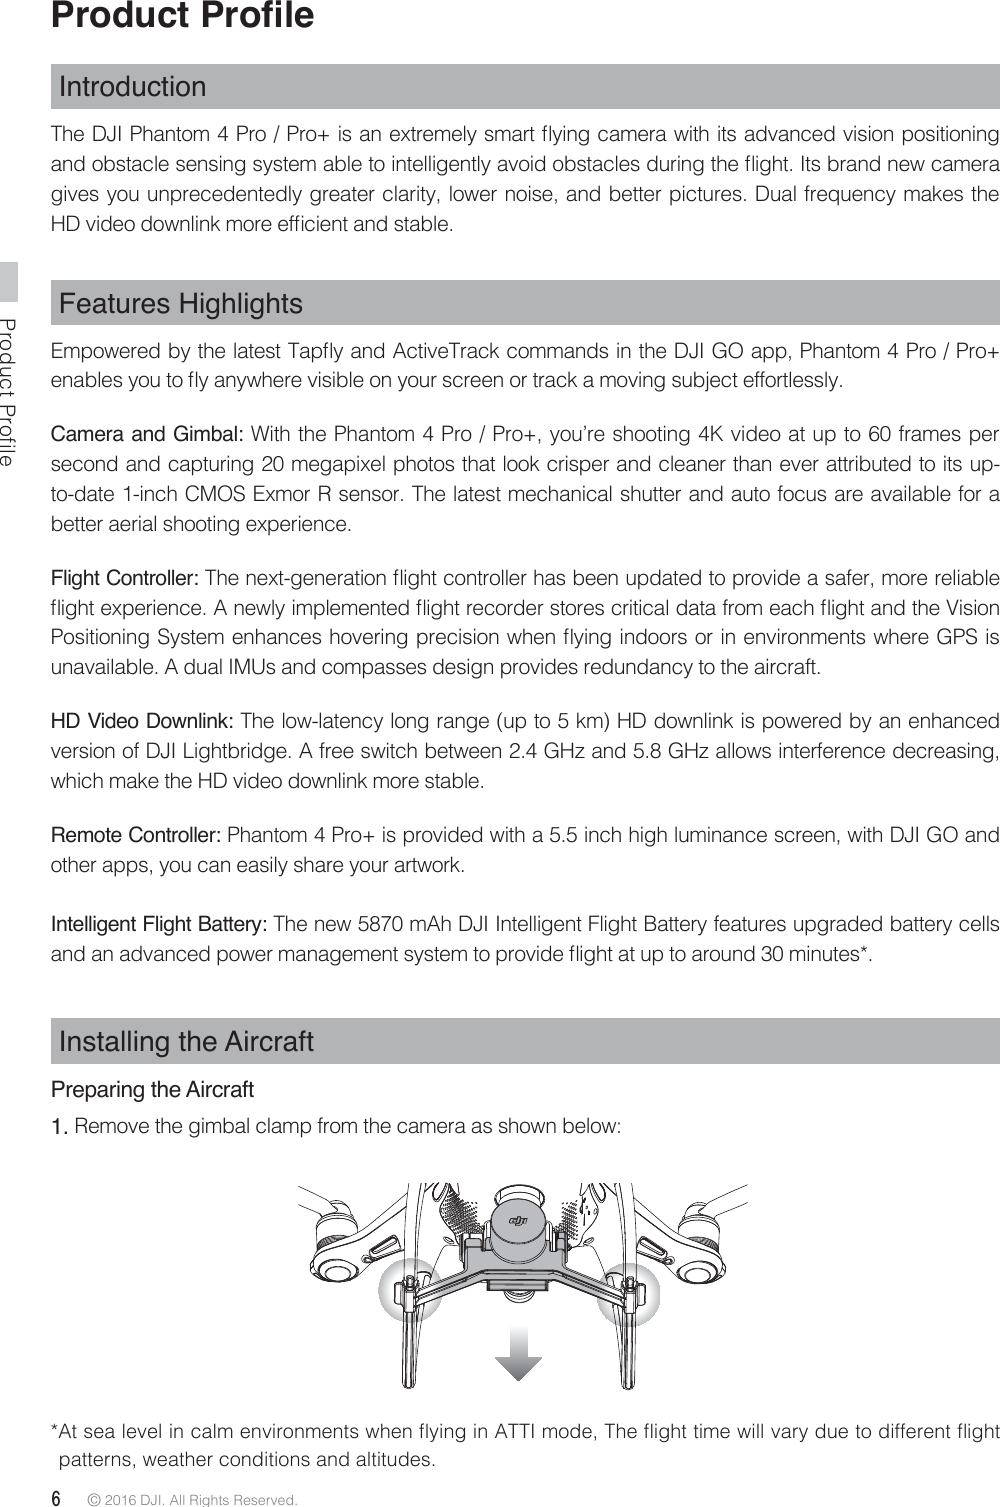
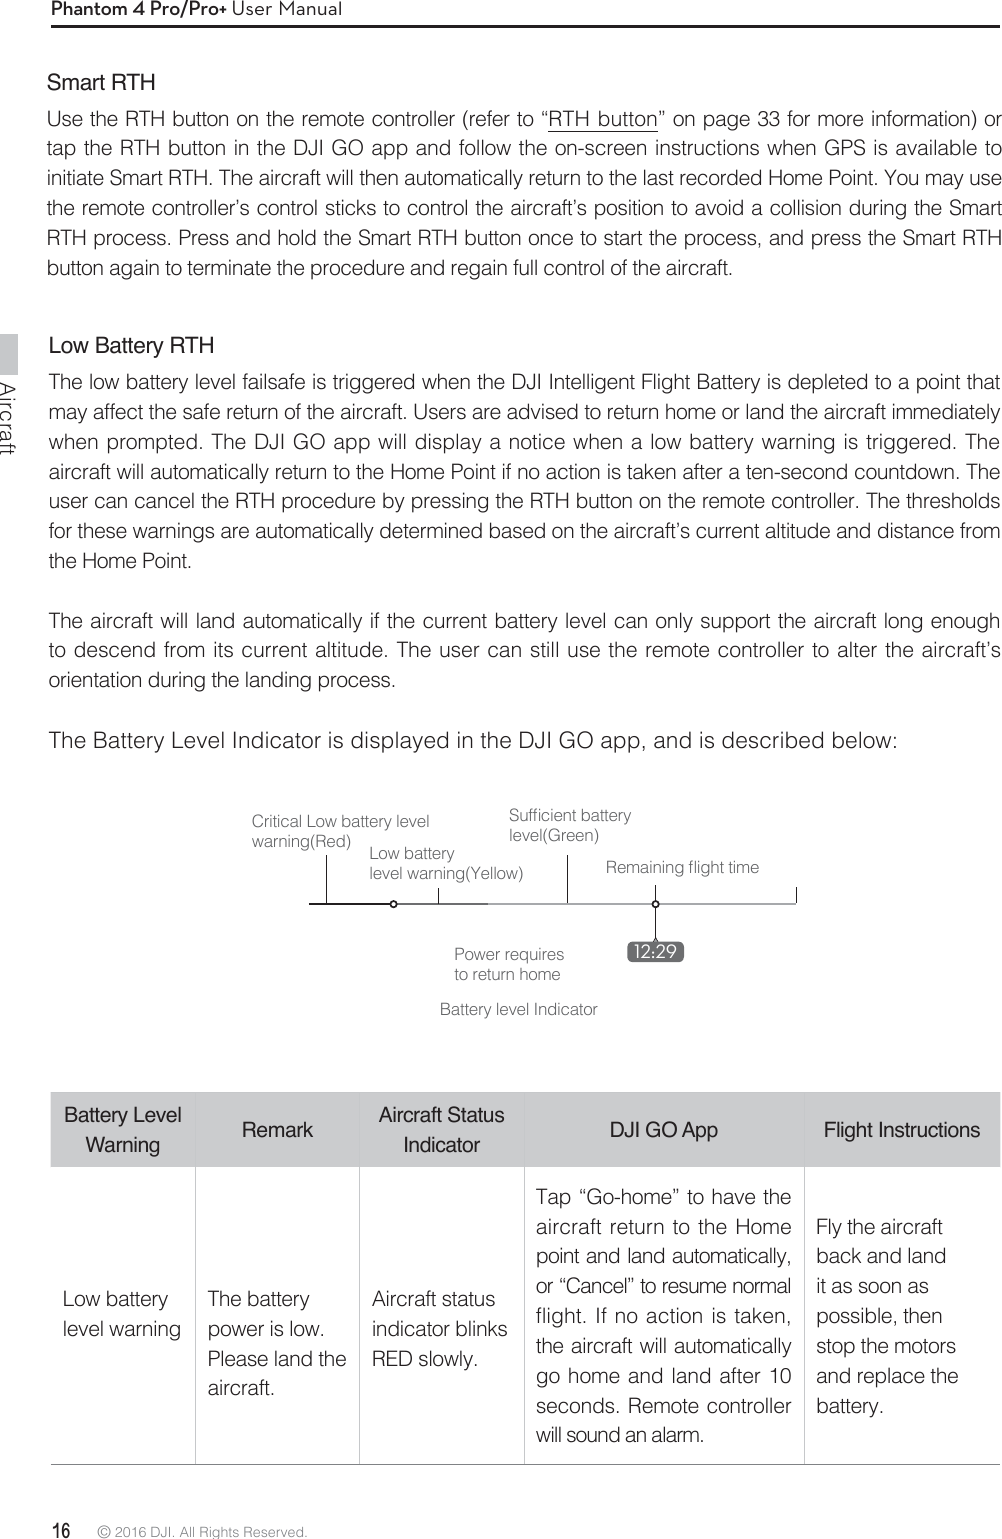
![Aircraft© 2016 DJI. All Rights Reserved. 15Phantom 4 Pro/Pro+ User ManualReturn-to-Home (RTH)The Return-to-Home (RTH) function brings the aircraft back to the last recorded Home Point. There are three types of RTH procedures: Smart RTH, Low Battery RTH, and Failsafe RTH. This section describes these three scenarios in detail.GPS DescriptionHome PointIf a strong GPS signal was acquired before takeoff, the Home Point is the location from which the aircraft was launched. The GPS signal strength is indicated by the GPS icon ( ). The aircraft status indicator will blink rapidly when the home point is recorded.Failsafe RTHIf the Home Point was successfully recorded and the compass is functioning normally, Failsafe RTH will be automatically activated if the remote controller signal is lost for more than three seconds. The Return-to-Home process may be interrupted and the operator may regain control of the aircraft if the remote controller signal connection is re-established.Failsafe Illustration Height over HP<=20m 5 RTH (adjustable altitude)Fast Blinking Yellow 1 Record Home Point Blinking Green 3 Remote Controller Signal LostFast Blinking Yellow$POmSNJOH)PNF1PJOUBlinking Green 6 Landing (after hovering for 5 secs)Fast Blinking Yellow 4 Signal Lost Lasts (after 3 sec.)Fast Blinking YellowHeight over HP>20mElevate to 20m20m×× Aircraft cannot return to the Home Point when GPS signal is weak ( [ ] displays grey) or unavailable."JSDSBGUBVUPNBUJDBMMZEFTDFOETBOEMBOETJG35)JTUSJHHFSFEXIFOUIFBJSDSBGUnJFTXJUIJOBmeters (65 feet) radius of the Home Point. Aircraft will stop ascending and immediately return to the Home Point if you move the left stick if the aircraft reaches 20 meters (65 feet) altitudes or beyond during Failsafe. The aircraft cannot avoid obstruction during the Failsafe RTH when Obstacle Sensing system is EJTBCMFEUIFSFGPSFJUJTJNQPSUBOUUPTFUBOTVJUBCMF'BJMTBGFBMUJUVEFCFGPSFFBDInJHIU-BVODIthe DJI GO app and enter “Camera” and select “MODE > Advanced Settings > Failsafe mode” to set the Failsafe altitude. User cannot control the aircraft while the aircraft is ascending to its failsafe altitude. However, user can press RTH button once to exit ascending and regain control. Aircraft can sense and avoid obstacles when Obstacle Sensing System is enabled and the MJHIUJOHDPOEJUJPOTJTTVGmDJFOU5IFBJSDSBGUXJMMBVUPNBUJDBMMZDMJNCVQUPBWPJEPCTUBDMFBOEnZto the Home Point at the new altitude.×>3S×](https://usermanual.wiki/SZ-DJI-TECHNOLOGY/WM331A1609.User-Manual-Part-1/User-Guide-3178971-Page-15.png)
![Aircraft© 2016 DJI. All Rights Reserved. 17Phantom 4 Pro/Pro+ User ManualCritical Low battery level warningThe aircraft must land immediately.Aircraft status indicator blinks RED quickly.The DJI GO app display will nBTISFEBOEUIFBJSDSBGUXJMMstart to descend. The remote controller will sound an alarm.Allow the aircraft to descend and land automatically.Estimated remaining nJHIUUJNFEstimated SFNBJOJOHnJHIUbased on current battery level.N/A N/A N/A When Critical battery level warning is triggered and the aircraft begins to land automatically, you may push the left stick upward to make the aircraft hover at its current altitude, giving you an opportunity to navigate to a more appropriate landing location. The colored zones and markers on the battery level indicator bar reflect the estimated SFNBJOJOHnJHIUUJNF5IFZBSFBVUPNBUJDBMMZBEKVTUFEBDDPSEJOHUPUIFBJSDSBGUTDVSSFOUMPDBUJPOand status.The aircraft cannot avoid obstruction during the Failsafe RTH when the Obstacle Sensing System is disabled. Therefore, it is important to set BOTVJUBCMF'BJMTBGFBMUJUVEFCFGPSFFBDInJHIU-BVODIUIF%+*(0BQQand enter “Camera” and select “MODE > Advanced Settings > Failsafe mode” to set the Failsafe altitude.N*GUIFBJSDSBGUJTnZJOHVOEFSNFUFSTGFFUBOE'BJMTBGFJODMVEJOHSmart RTH, Lower Battery RTH ) is triggered, the aircraft will first automatically ascend to 20 meters (65 feet) from the current altitude. You can only cancel the ascending by exiting the Failsafe. Refer to “RTH Button” on page 33 for more information on how to exit the Failsafe and regain the control of the remote controller. NHAircraft automatically descends and lands if RTH is triggered when the BJSDSBGUnJFTXJUIJOBNFUFSTGFFUSBEJVTPGUIF)PNF1PJOU"JSDSBGUwill stop ascending and immediately return to the Home Point if you move the left stick if the aircraft reaches 20 meters (65 feet) altitudes or beyond during Failsafe.Aircraft cannot return to the Home Point when GPS signal is weak ( [ ] displays grey) or unavailable.if you move the left stick after the aircraft rises above 65 feet (20m) but below the pre-set Failsafe RTH altitude, the aircraft will stop ascending and immediately return to the Home Point.Failsafe Safety Notices](https://usermanual.wiki/SZ-DJI-TECHNOLOGY/WM331A1609.User-Manual-Part-1/User-Guide-3178971-Page-17.png)