SZ DJI TECHNOLOGY WM331A1609 Phantom 4 Pro User Manual 3
SZ DJI TECHNOLOGY CO., LTD Phantom 4 Pro 3
UserManual.wiki
>
SZ DJI TECHNOLOGY
>
WM331A1609 User Manual
>
Users Manual Part 2
Contents
1.
User Manual Part 1
2.
User Manual Part 2
3.
User Manual Part 3
4.
Users Manual Part 1
5.
Users Manual Part 2
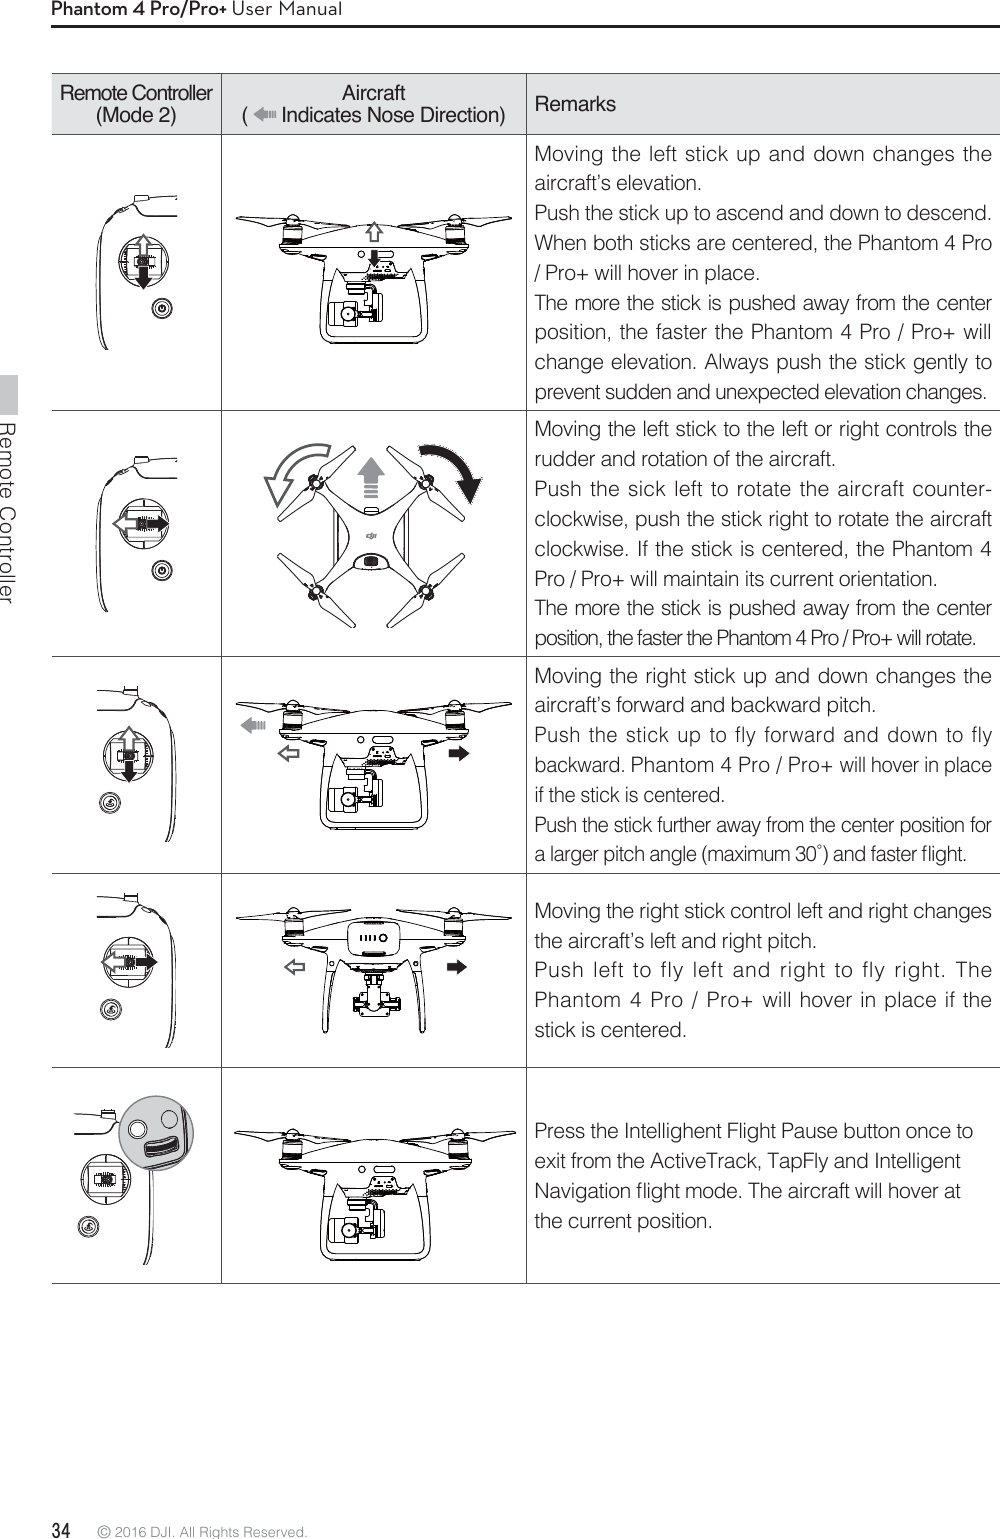
Users Manual Part 2
Navigation menu
Upload a User Manual
Namespaces
Wiki Guide
HTML
PDF
Info
Views
User Manual
Discussion / Help
Navigation
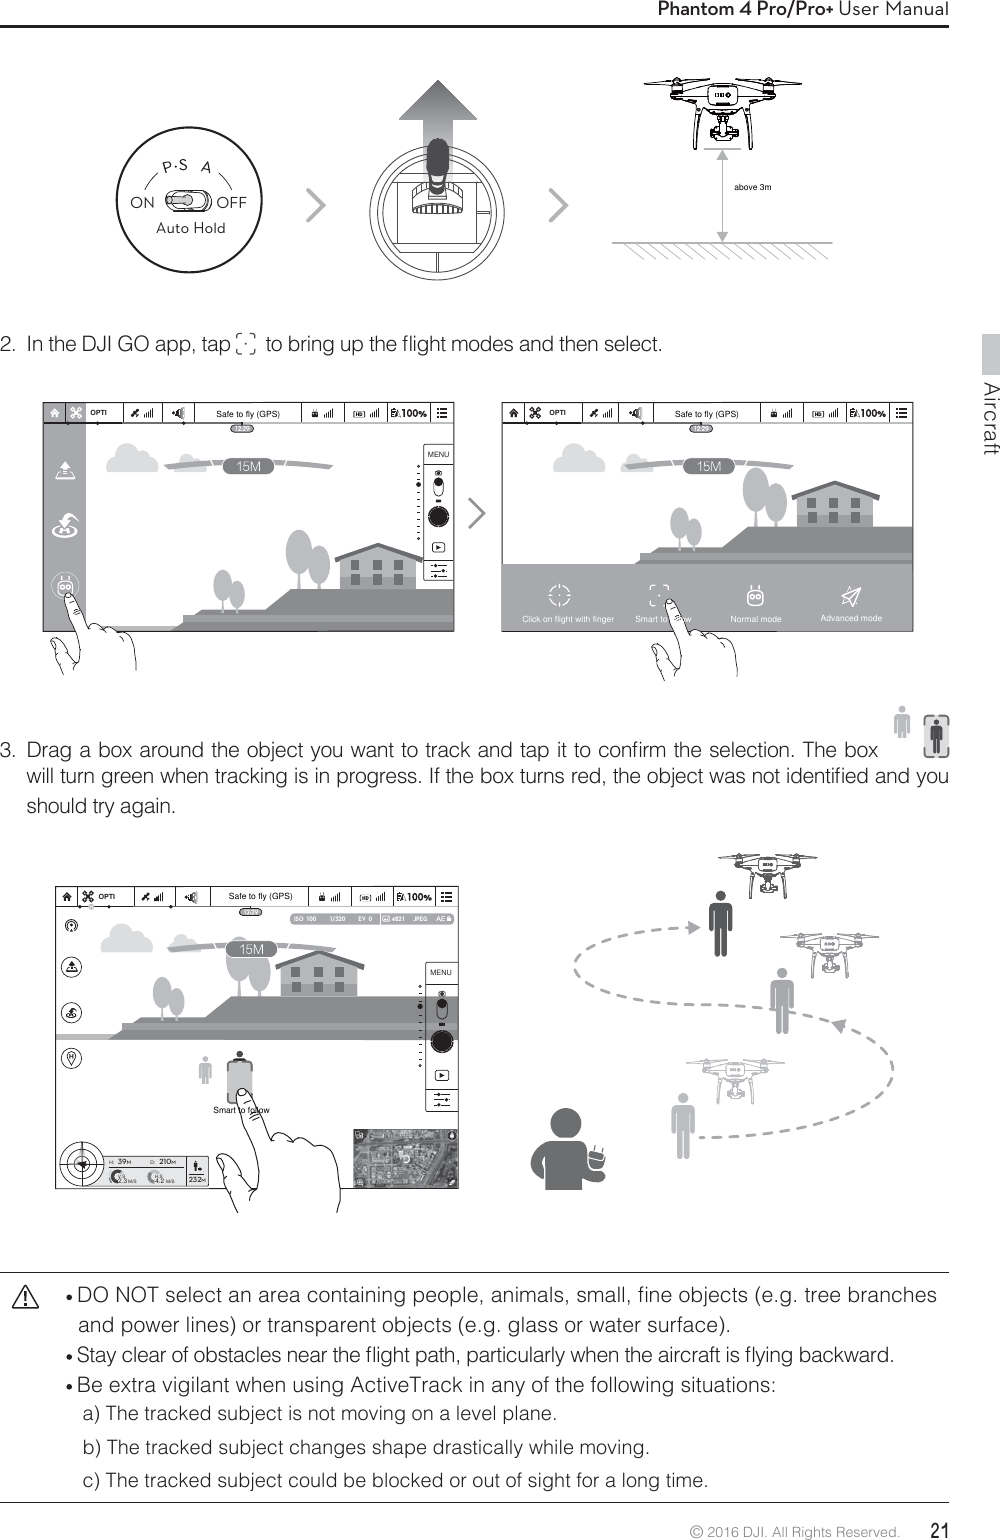
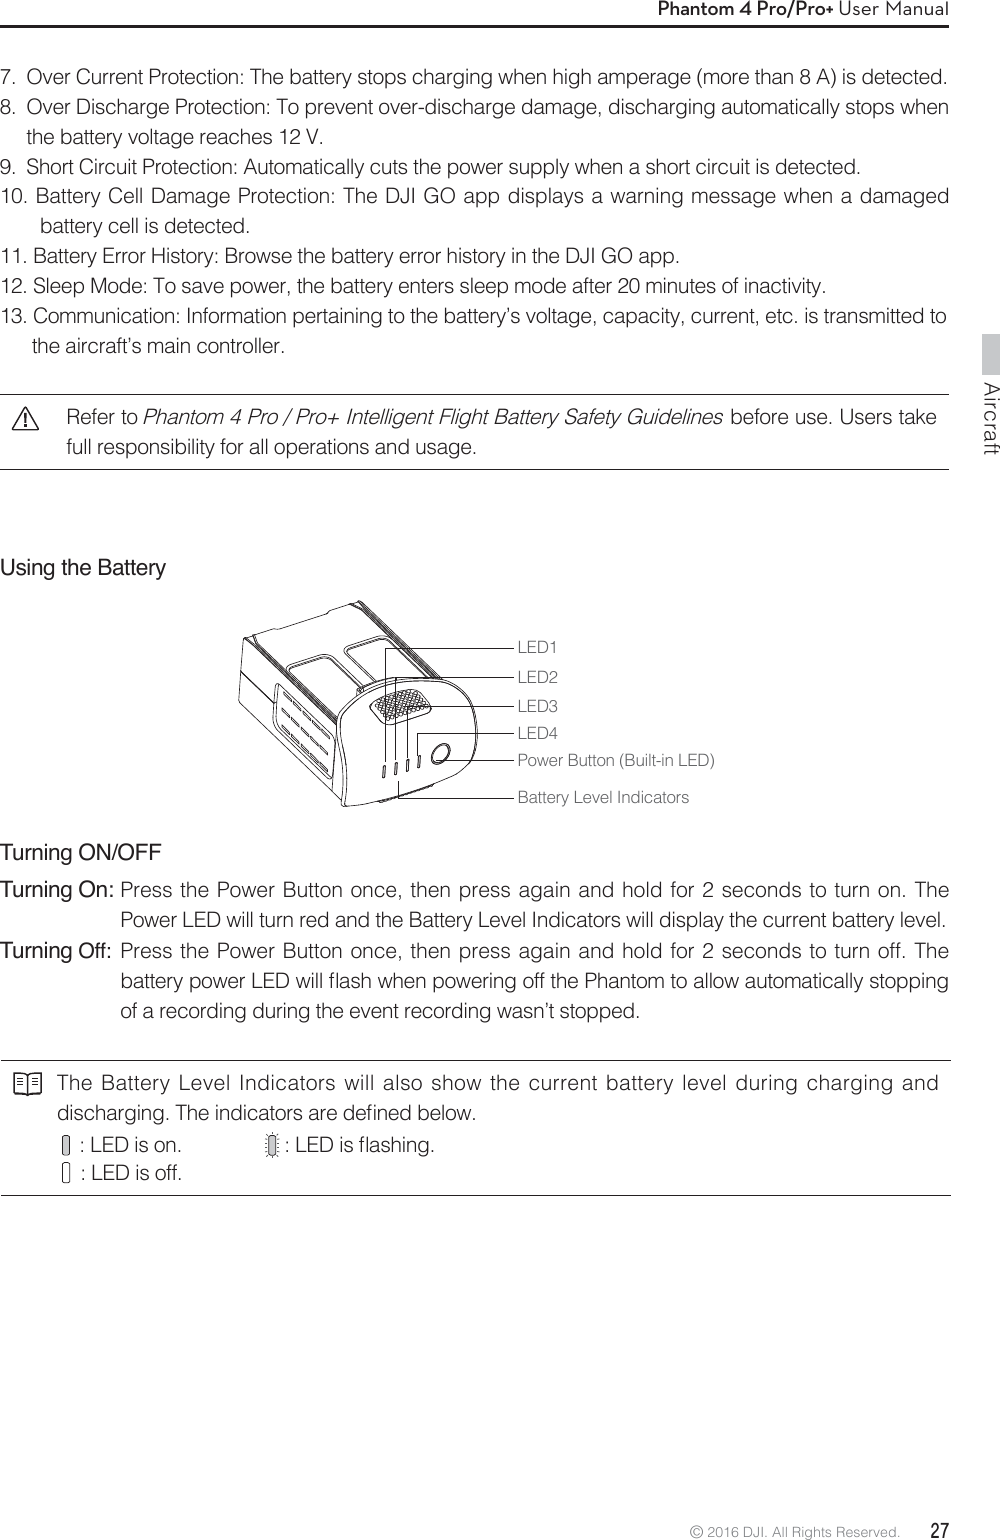
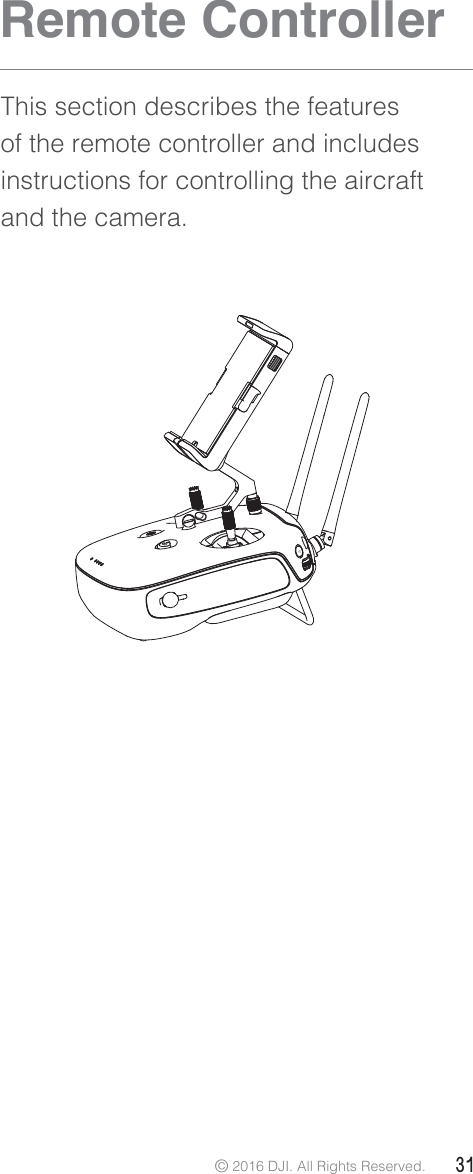
![Aircraft22 © 2016 DJI. All Rights Reserved. Phantom 4 Pro/Pro+ User Manuald) The tracked subject is moving on a snowy surface.e) The lighting is extremely low (< 300 lux) or high (> 10,000 lux).f) The tracked subject has a similar color or pattern as its surrounding environment. You must follow local privacy laws and regulations when using ActiveTrack. 5IFBJSDSBGUXJMMTFOTFBOEBWPJEPCTUBDMFTPOJUTnJHIUQBUI If the aircraft loses track of the subject, because it is moving too fast or obscured, re-select the subject to resume tracking.Exiting ActiveTrackThere are two ways to exit ActiveTrack:1. Press the Intelligent Flight Pause button on the remote controller.2. Pull the pitch stick backward. After exiting ActiveTrack, the aircraft will stop and hover in place, at which point you may choose to start a new mission or bring the aircraft back to the Home Point. Vision Positioning and Obstacle Sensing SystemThe DJI Vision Positioning System uses ultrasound and image data to help the aircraft maintain its current position. With the help of Vision Positioning, your Phantom 4 Pro/Pro+ can hover in place more precisely BOEnZJOEPPSTPSJOPUIFSFOWJSPONFOUTXIFSFB(14TJHOBMJTOPUBWBJMBCMF5IFNBJODPNQPOFOUTPGthe Vision Positioning System are located on the bottom of your Phantom 4 Pro/Pro+, including [1] [2] [3] three binocular sensors and [4] two ultrasonic sensors. The Obstacle Sensing System is consist of [1] [2] two binocular sensors and [5] infrared module on both sides, which constantly scans for obstacles around, allowing it to avoid collisions by going around, over or hovering.ORSTOP[2][3][4][1][5]](https://usermanual.wiki/SZ-DJI-TECHNOLOGY/WM331A1609.Users-Manual-Part-2/User-Guide-3179000-Page-3.png)
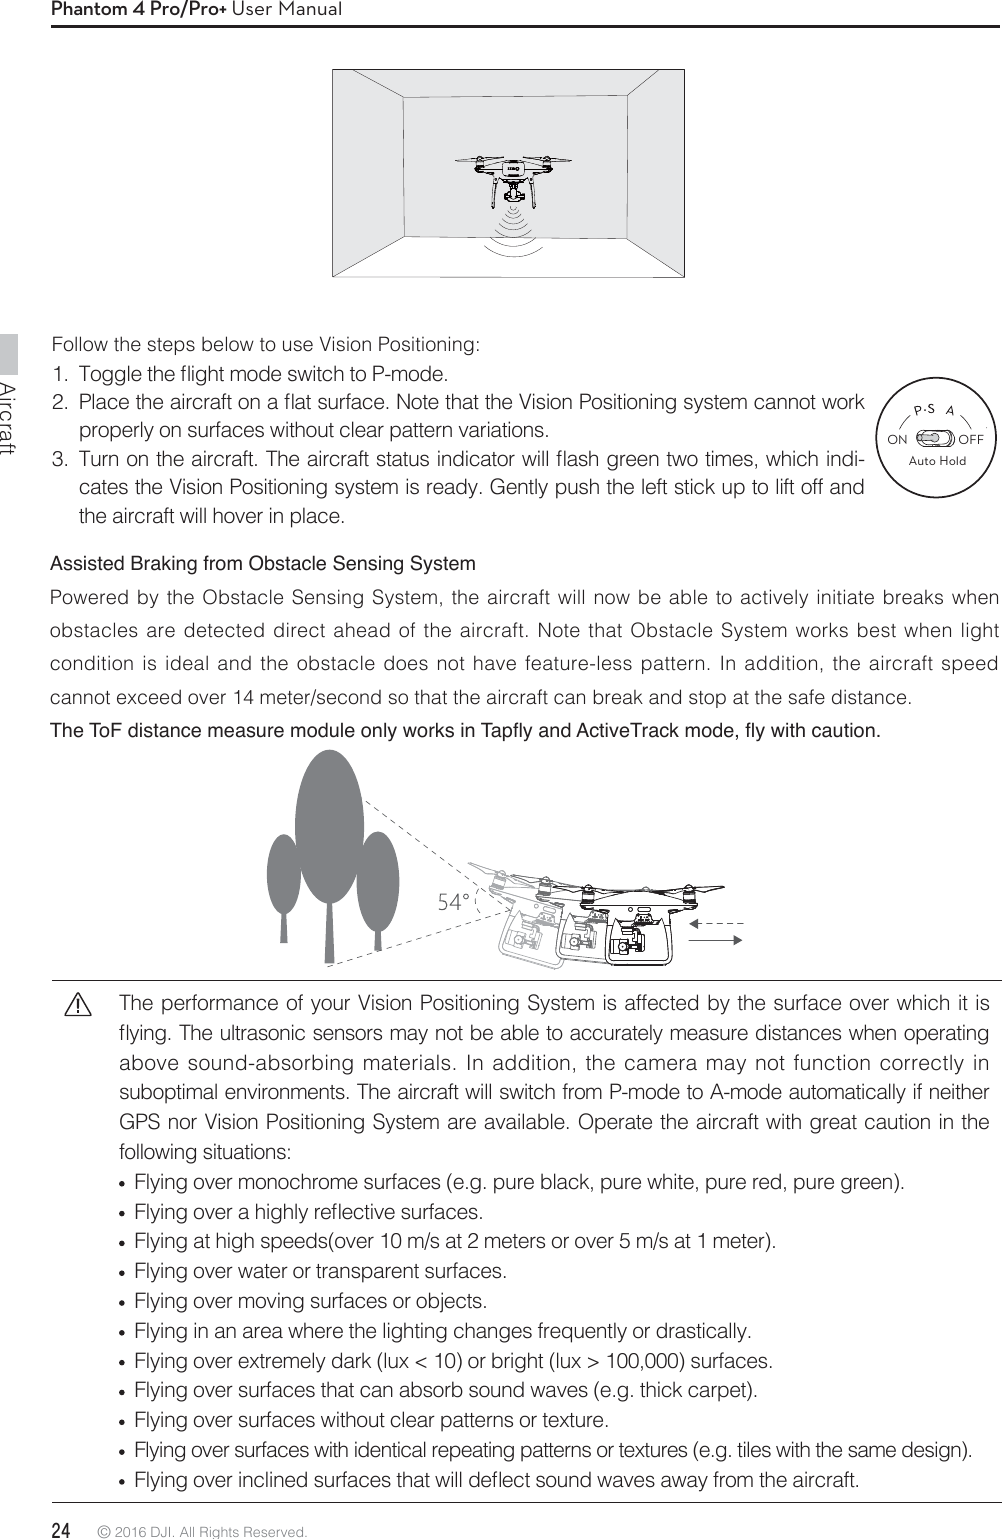
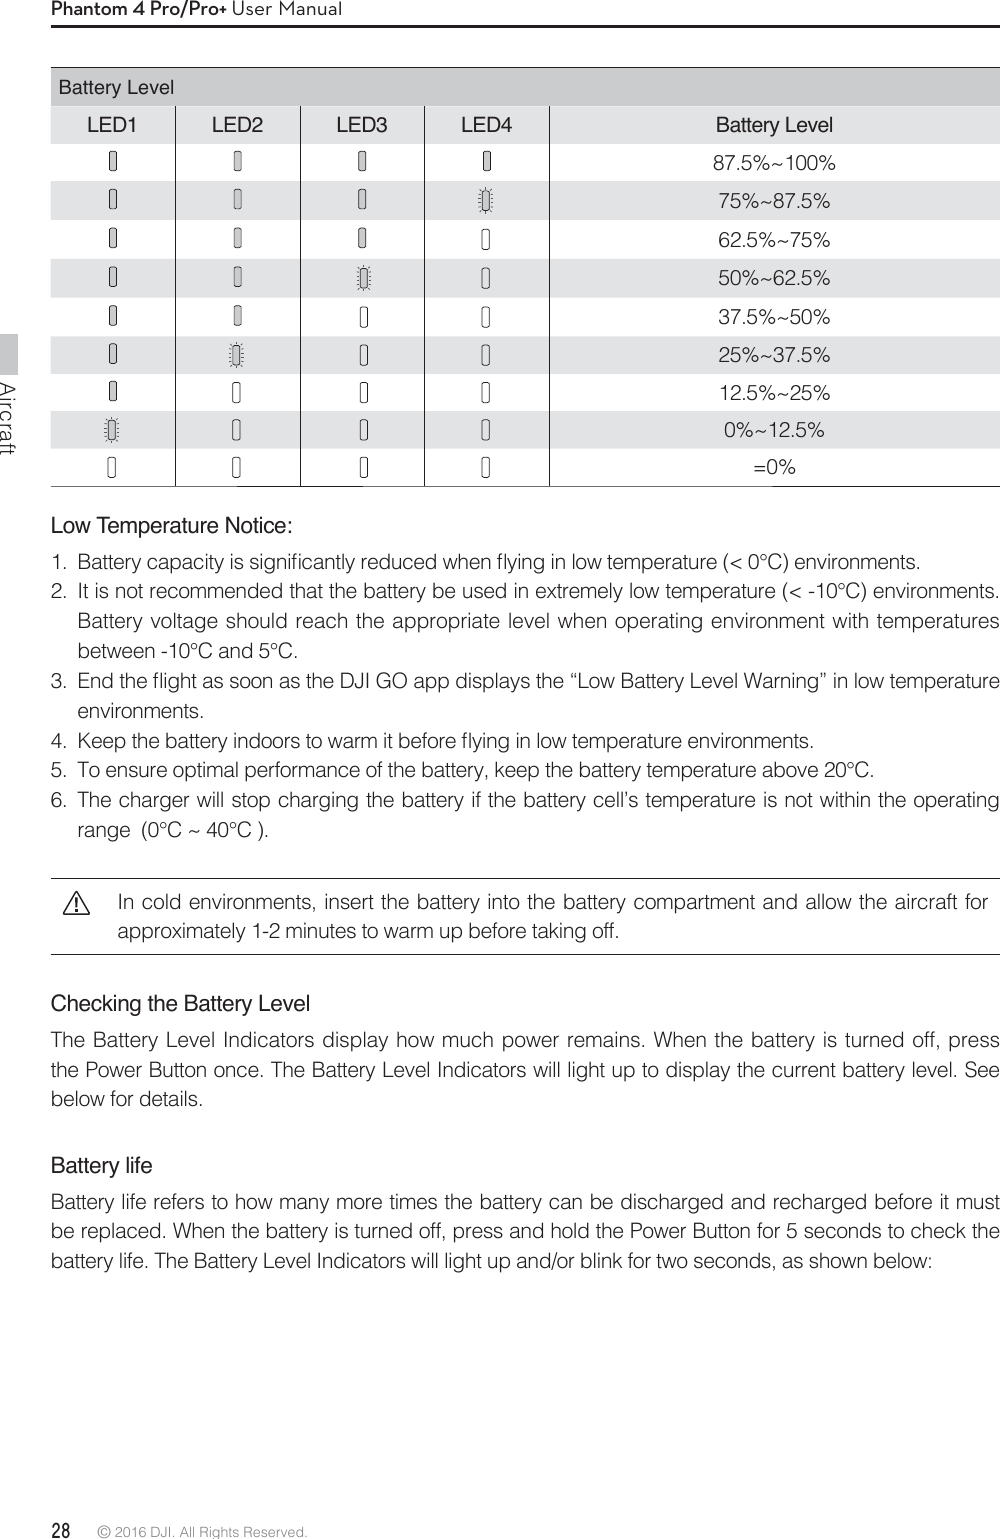
![Aircraft© 2016 DJI. All Rights Reserved. 23Phantom 4 Pro/Pro+ User ManualCalibrating Sensors Vision Positioning and Obstacles Sensing sensors that are calibrated on delivery. However these sensors are vulnerable to excessive impact, hence it will require calibration via DJI Assistant 2 from time to time. Follow the steps below to calibrate the camera when the DJI GO app prompt you to do so.Detection RangeThe detection range of the Vision Positioning and Obstacle Sensing System is depicted as follow. Note that the aircraft cannot sense and avoid the obstacles that are not within the detection range.Using Vision Positioning Vision Positioning is activated automatically when the aircraft is turned on. No further action is required. Vision Positioning is typically used in indoor environments, where GPS is unavailable. Using the sensors that are built into the Vision Positioning system, the aircraft can hover precisely even without GPS.016UOTZZNKGOXIXGLZZU]GXJZNKYIXKKT02'ROMTZNKHU^KY036GTGTJZORZZNKGOXIXGLZ*O5BQnZBOE"DUJWF5SBDLNPEFCPUIUIF7JTJPO1PTJUJPOJOHBOE0CTUBDMF4FOTJOH4ZTUFNXPSLTJGUIFTQFFEJTXJUIJONT0UIFSXJTFUIFCJOPDVMBSTFOTPSDPOUSBSZUPUIFnJHIUEJSFDUJPOJTEJTBCMFE](https://usermanual.wiki/SZ-DJI-TECHNOLOGY/WM331A1609.Users-Manual-Part-2/User-Guide-3179000-Page-4.png)
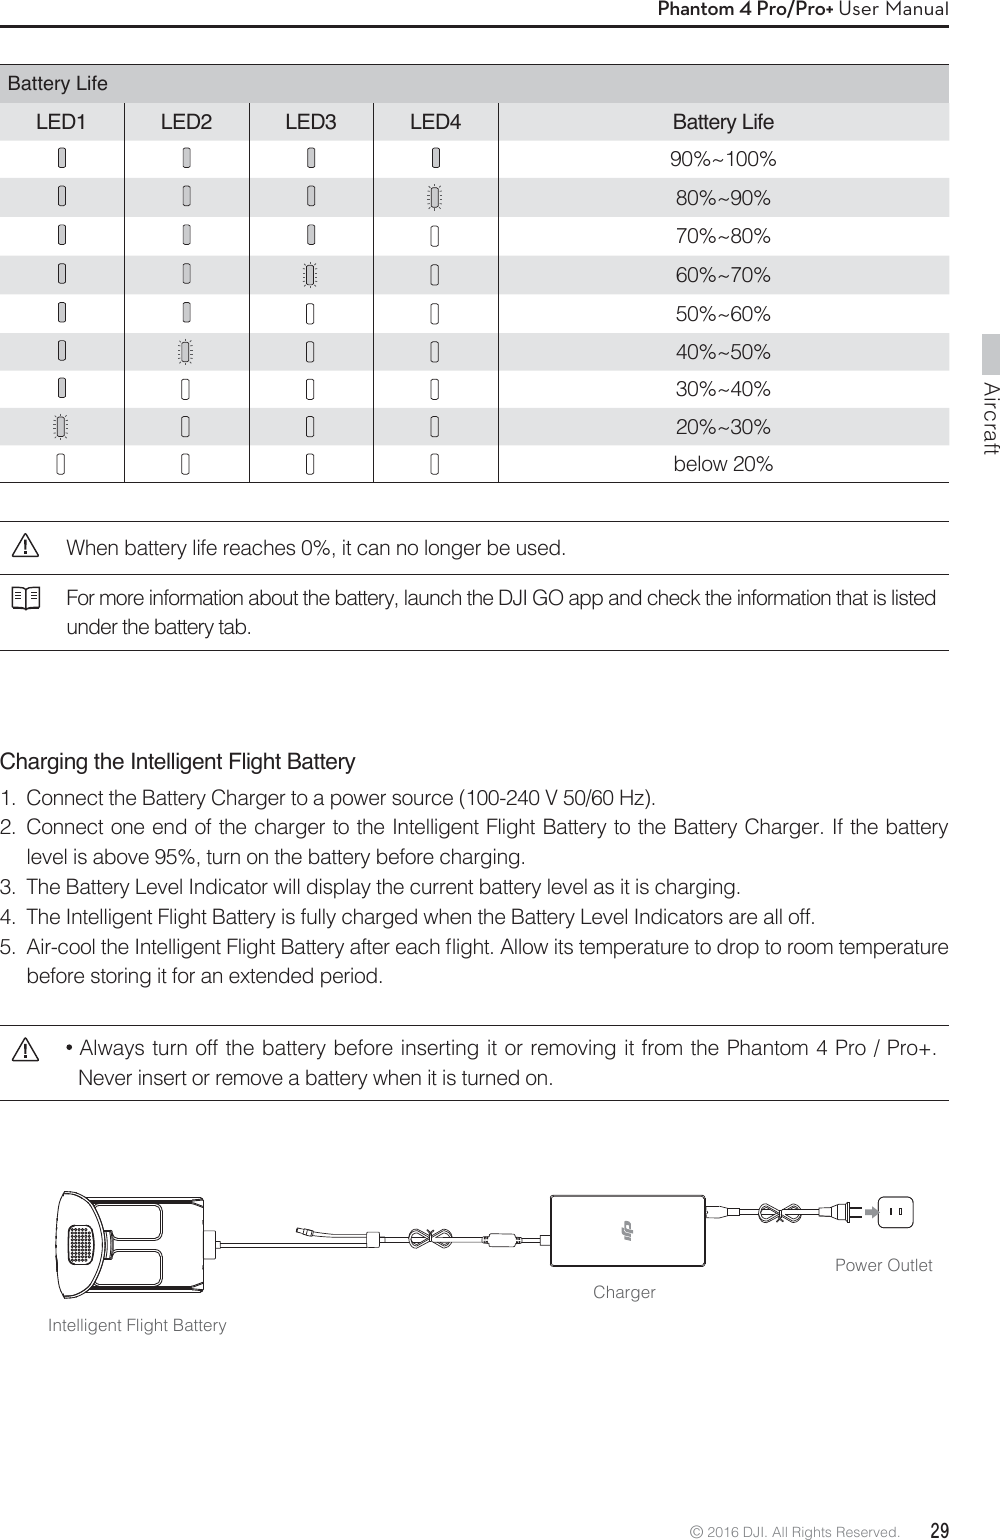
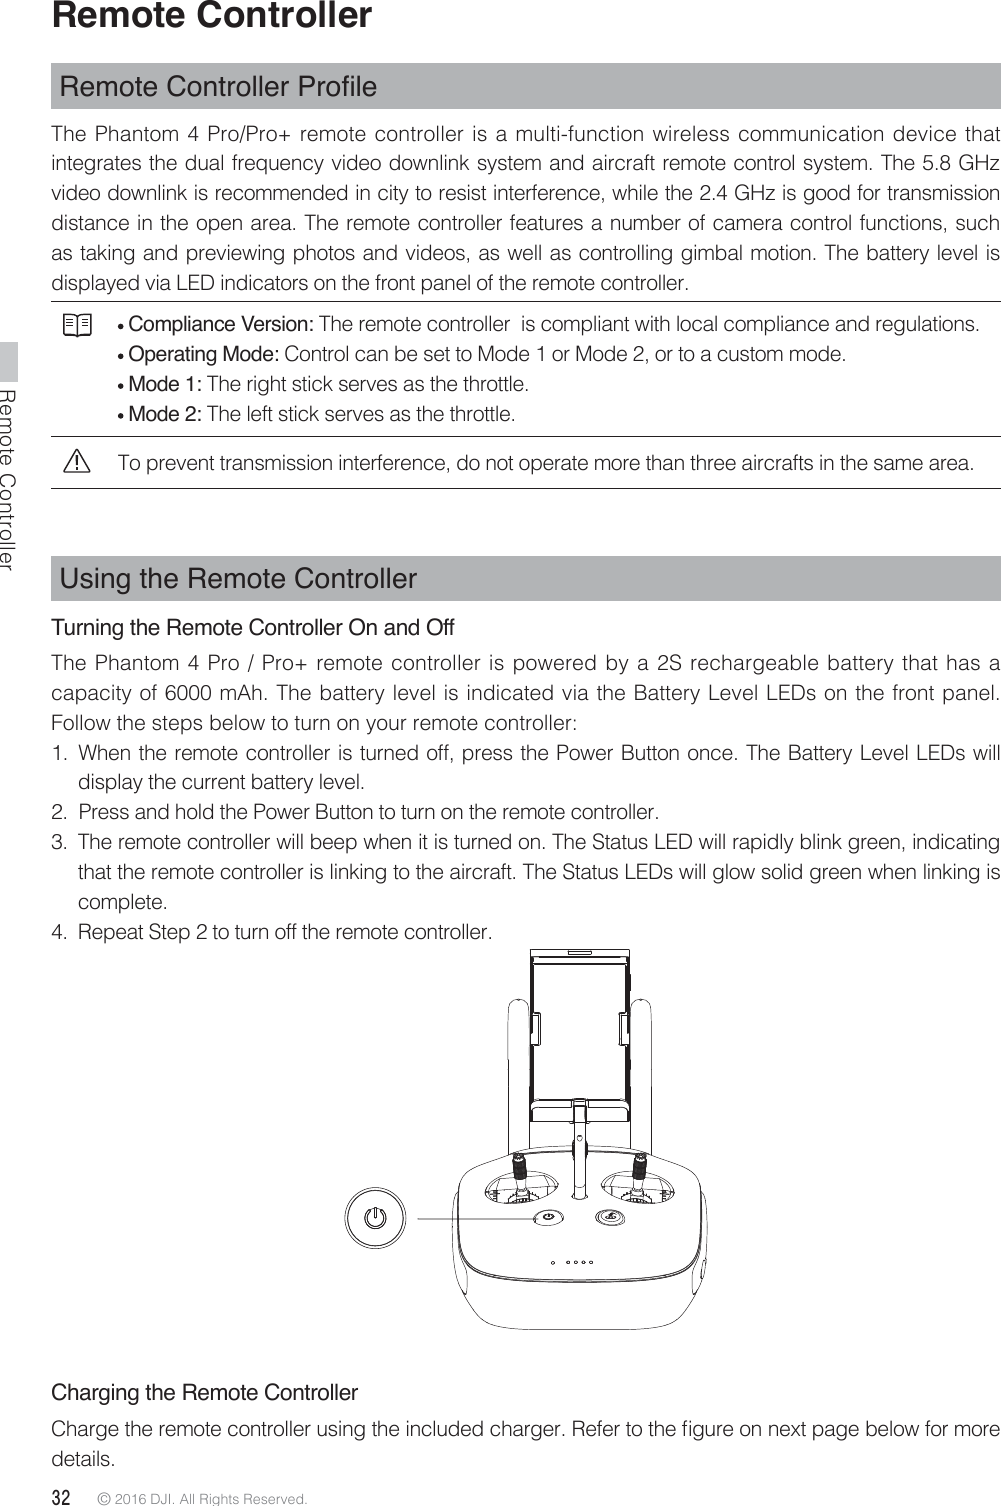
![Remote Controller© 2016 DJI. All Rights Reserved. 33Phantom 4 Pro/Pro+ User ManualChargerPower OutletControlling the CameraShoot videos/pictures, view recorded images, and adjust camera settings via the Shutter Button, Camera Settings Dial, Playback Button, and Video Recording Button on the remote controller.[1] Camera Settings DialTurn the dial to adjust camera settings such as ISO, shutter speed, and aperture without letting go of the remote controller. Press down on the dial to toggle between these settings.[2] Shutter ButtonPress to take a photo. If burst mode is activated, multiple photos will be taken with a single press.[3] Video Recoding ButtonPress once to start recording video, then press again to stop recording. [4] Gimbal DialUse this dial to control the tilt of the gimbal. Controlling Aircraft This section explains how to control the orientation of the aircraft through the remote controller. The Remote Control is set to Mode 2 by default. Stick Neutral/Mid-Point: Control sticks are in the center position. Moving the Control Stick: The control stick is pushed away from the center position.[1][2][3][4]](https://usermanual.wiki/SZ-DJI-TECHNOLOGY/WM331A1609.Users-Manual-Part-2/User-Guide-3179000-Page-14.png)