SZ DJI TECHNOLOGY WM331A1704 Phantom 4 Pro User Manual 5
SZ DJI TECHNOLOGY CO., LTD Phantom 4 Pro 5
Contents
User Manual Part 3
Remote Controller
© 2016 DJI. All Rights Reserved.
37
Phantom 4 Pro/Pro+ User Manual
Status LED Alarm Remote Controller Status
—
Solid Red Chime The remote controller is disconnected from the aircraft.
—
Solid Green Chime The remote controller is connected to the aircraft.
Slow Blinking Red D-D-D...... Remote controller error.
/
Red and Green/ Red and
Yellow Alternate Blinks
None HD downlink is disrupted.
RTH LED Sound Remote Controller Status
—
Solid White Chime Aircraft is returning home.
Blinking White D . . . Sending Return-to-Home command to the aircraft.
Blinking White DD .. .. .. Return-to-Home procedure in progress.
The Remote Status Indicator will blink red and sound an alert, when the battery level is critically low.
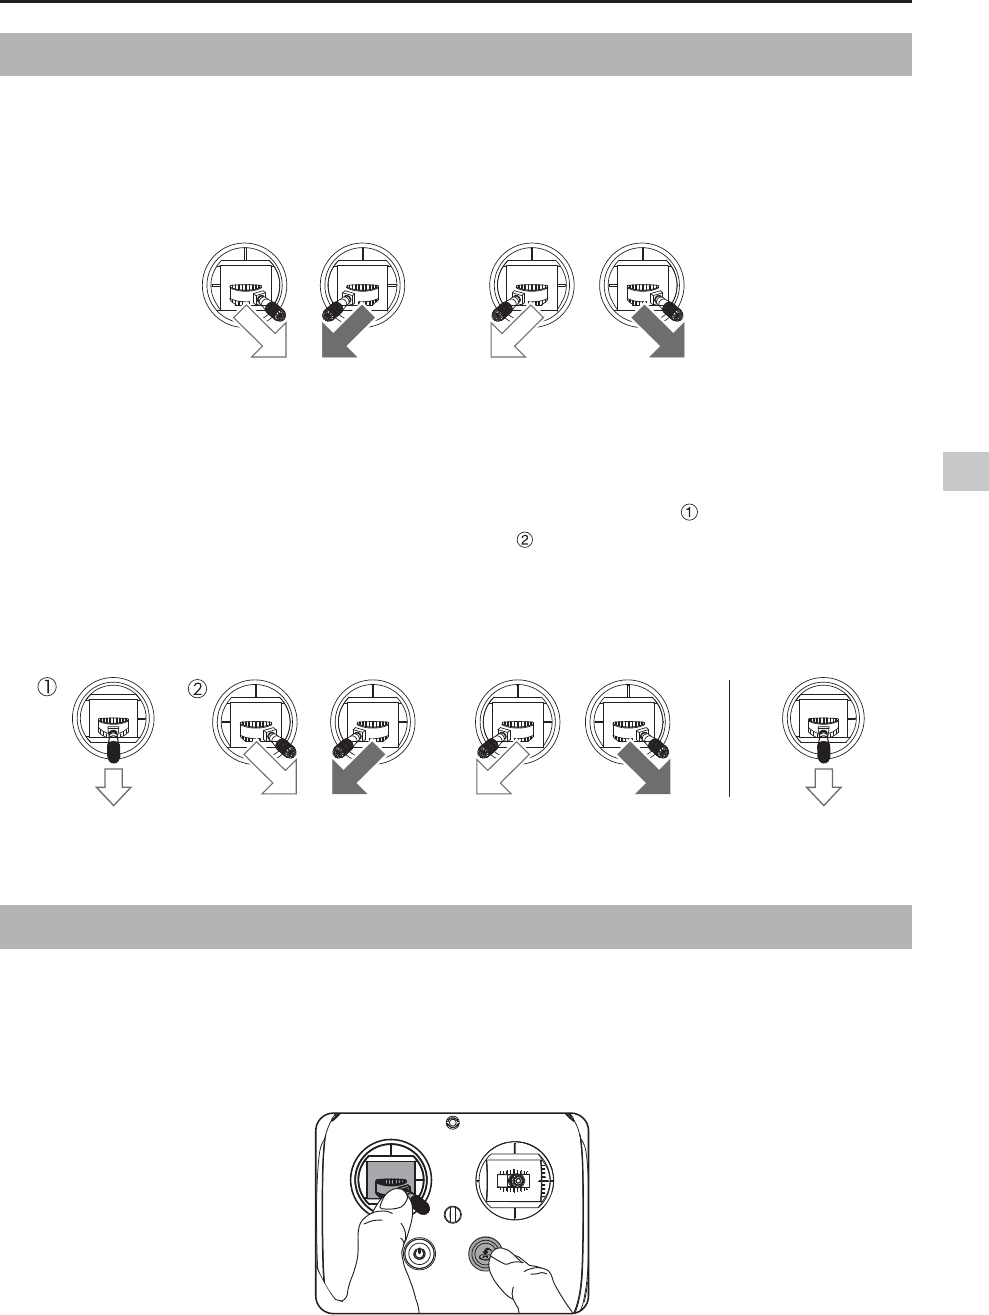
Linking the Remote Controller
The remote controller is linked to your aircraft before delivery. Linking is only required when using a new
SFNPUFDPOUSPMMFSGPSUIFmSTUUJNF'PMMPXUIFTFTUFQTUPMJOLBOFXSFNPUFDPOUSPMMFS
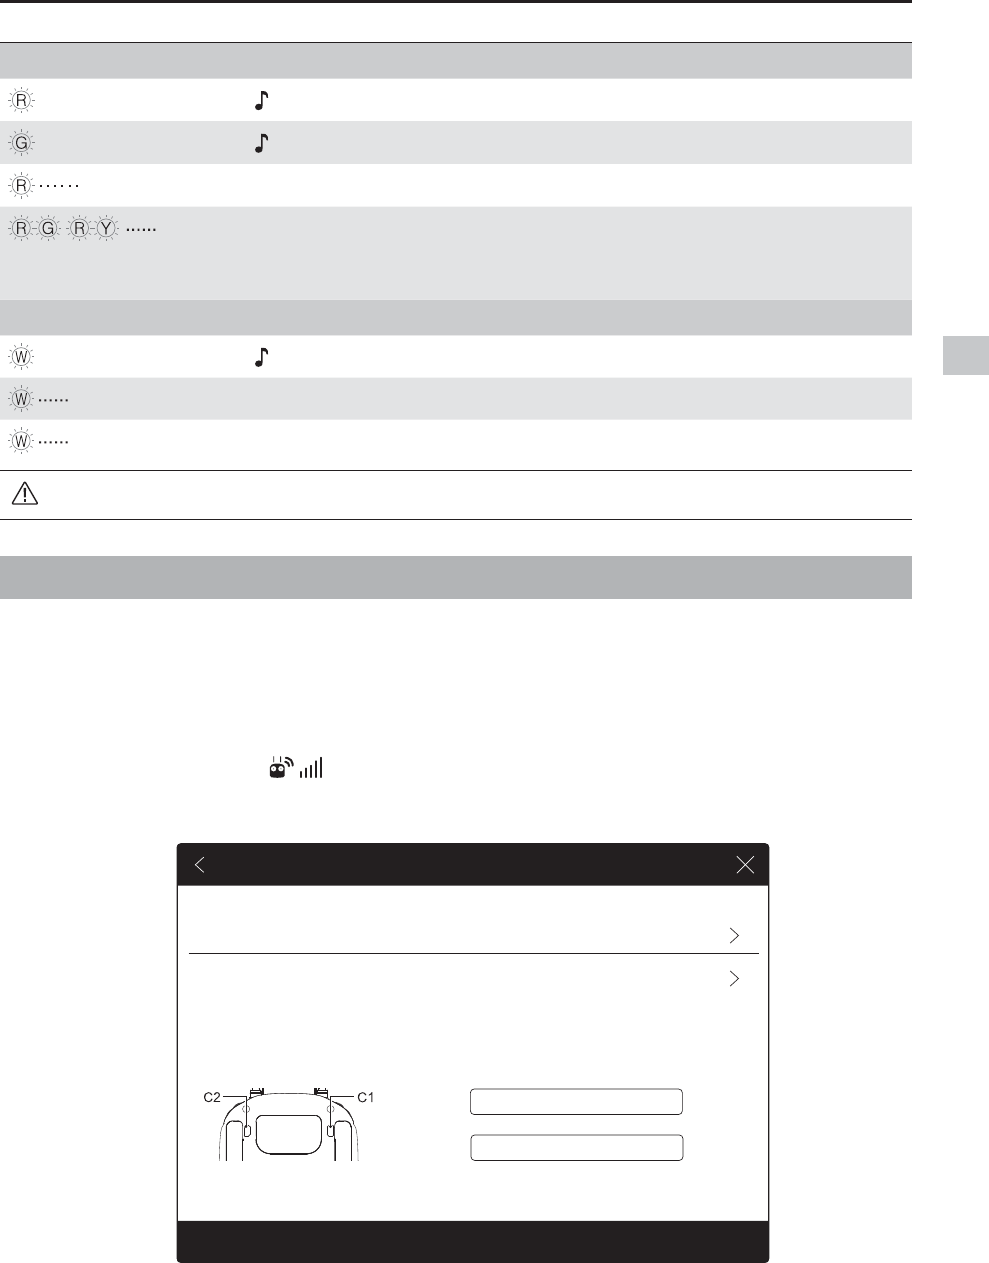
1. Turn on the remote controller and connect to the mobile device. Launch the DJI GO app.
2. Turn on the Intelligent Flight Battery.
3. Enter “Camera” and tap on and then tap “Linking RC” button as shown below.
RC Control Setting
RC Calibration
Stick Mode
Button Customization
/PU%FGJOFE$
$ /PU%FGJOFE
Default stick mode is Mode 2, changing stick modes alters the way the aircraft is controlled.
Do not change unless familiar with your new mode.
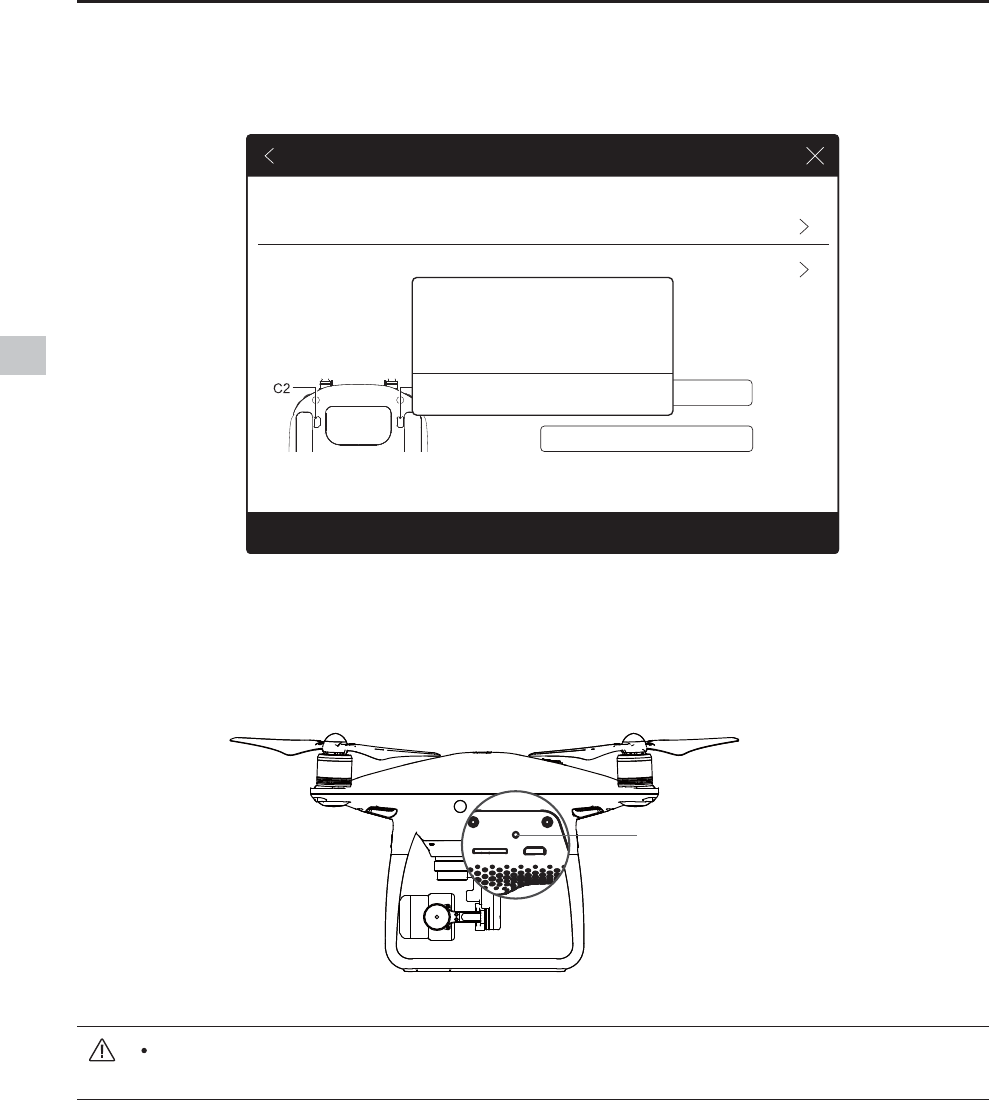
You can customize the C1 and C2 buttons on the back of the RC.
Linking RC
Remote Controller
38
© 2016 DJI. All Rights Reserved.
Phantom 4 Pro/Pro+ User Manual
The remote controller will un-link itself from an aircraft if a new remote controller is linked to the
same aircraft.
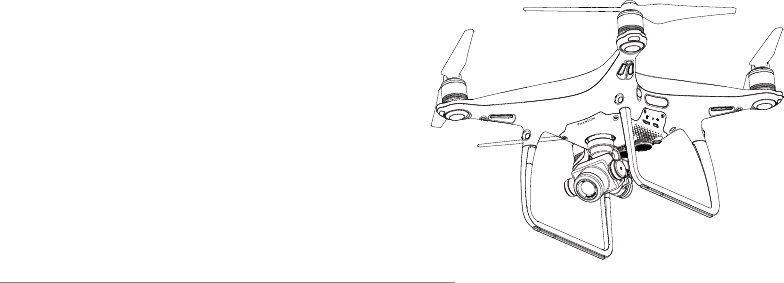
Link Button
-PDBUFUIFMJOLJOHCVUUPOPOUIFTJEFPGUIFBJSDSBGUBTTIPXOJOUIFmHVSFCFMPX1SFTTUIFMJOLCVUUPO
to start linking. The Remote Controller Status Indicator LED will display a solid green once the remote
controller is successfully linked to the aircraft.
4. The remote controller is ready to link. The Remote Controller Status Indicator blinks blue and a beep is
emitted.
RC Calibration
Stick Mode
Button Customization
/PU%FGJOFE$
$ /PU%FGJOFE
Default stick mode is Mode 2, changing stick modes alters the way the aircraft is controlled.
Do not change unless familiar with your new mode.
You can customize the C1 and C2 buttons on the back of the RC.
RC Control Setting
Linking RC
Searching for aircraft frequency,
timeout in 54 seconds
$BODFM
Press the linking button on the aircraft
to link this remote controller

© 2016 DJI. All Rights Reserved.
39
Camera and Gimbal
This section provides the technical
TQFDJmDBUJPOTPGUIFDBNFSBBOE
explains the gimbal’s operation modes.
Gimbal Camera
40
© 2016 DJI. All Rights Reserved.
Camera and Gimbal
&DPHUD3URÀOH
The on-board camera of Phantom 4 Pro/Pro+ uses the 1 inch CMOS sensor to capture video (up to
4096x2160p at 60fps) and 12 megapixel stills. You may choose to record the video in either MOV or MP4
format. Available picture shooting modes include burst, continuous, and time-lapse mode. A live preview
of what the camera sees can be monitored on the connected mobile device via the DJI GO app.
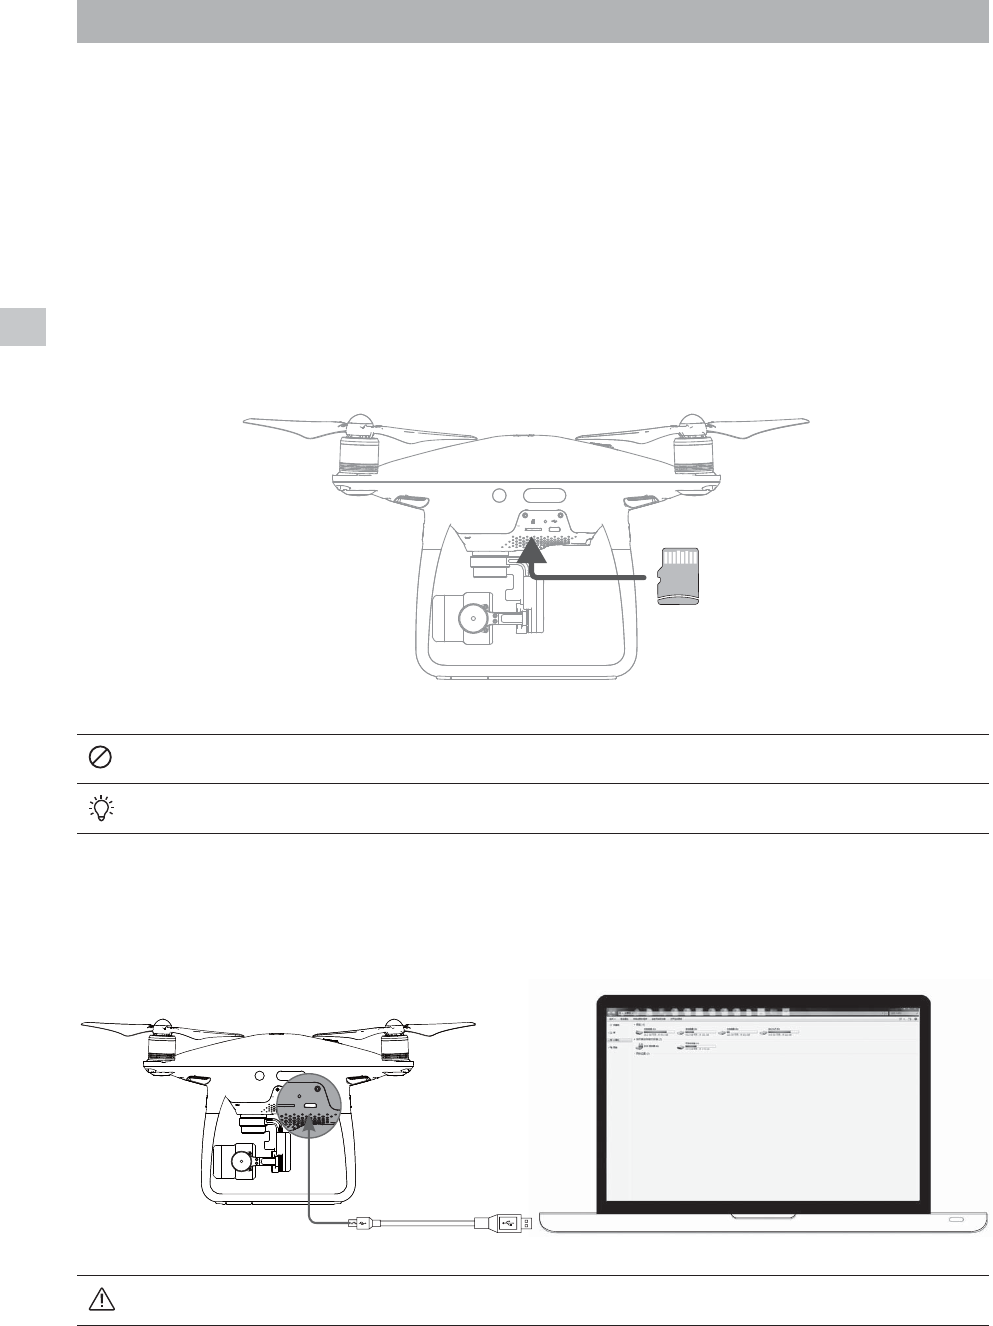
Camera Micro SD Card Slot
To store your photos and videos, insert the Micro SD card into the slot, as shown below, before
turning on the Phantom 4 Pro / Pro+. The Phantom 4 Pro / Pro+ comes with a 16 GB Micro SD card
and supports Micro SD cards up to 64 GB. A UHS-1 Micro SD card is recommended due to their
fast read and write speeds allowing you to save high-resolution video data.
Do not remove the Micro SD card from the Phantom 4 Pro / Pro+ when it is turned on.
To ensure the stability of the camera system, single video recordings are capped at 30 minutes.
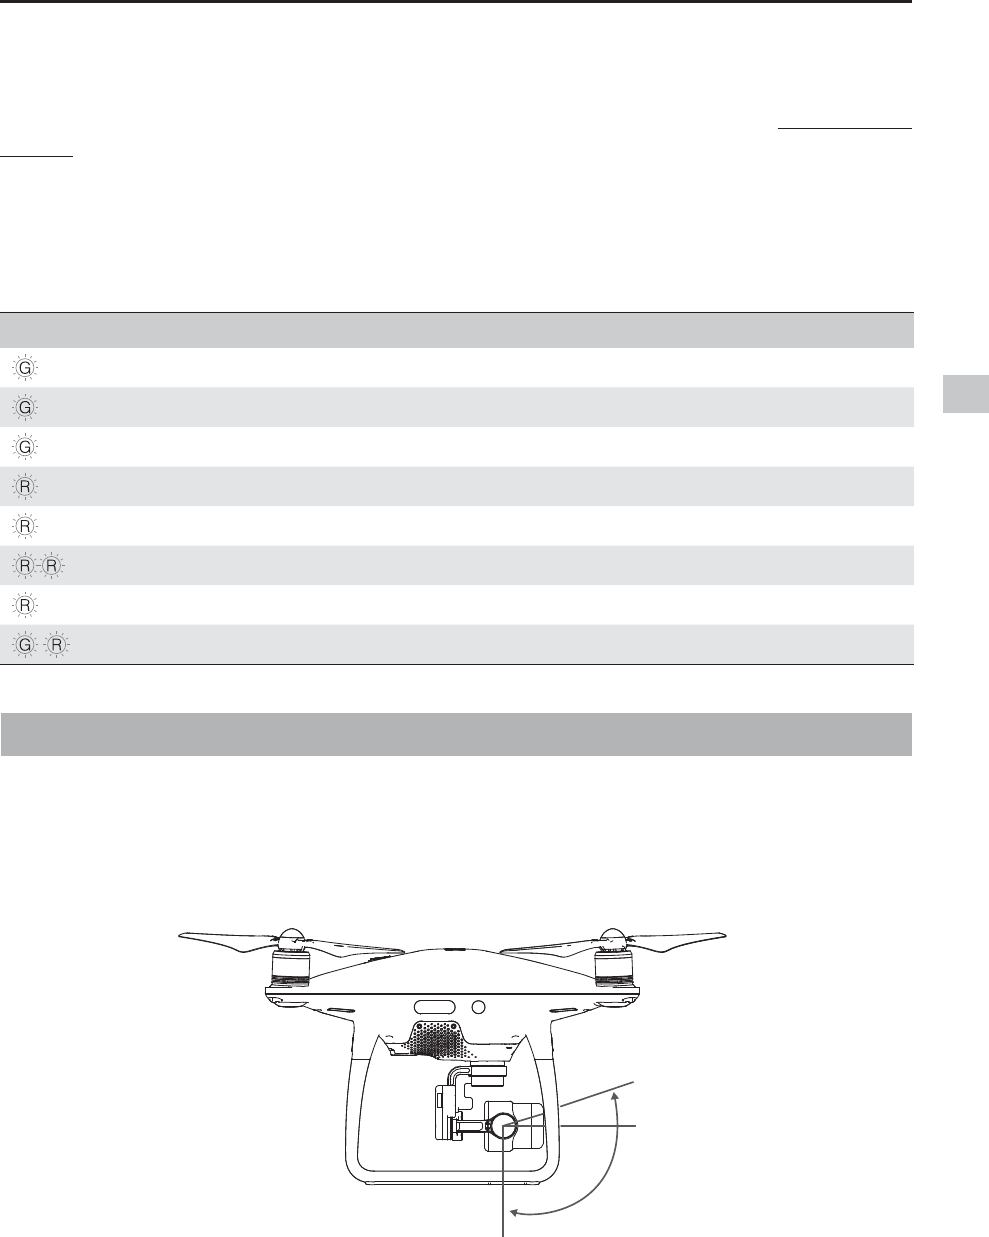
Camera Data Port
Turn on the Phantom 4 Pro / Pro+ and connect a USB cable to the Camera Data Port to download photos
and videos to your computer.
5IFBJSDSBGUNVTUCFUVSOFEPOCFGPSFBUUFNQUJOHUPBDDFTTUIFmMFTPOUIF.JDSP4%DBSE
Gimbal Camera
© 2016 DJI. All Rights Reserved.
41
Phantom 4 Pro/Pro+ User Manual
Camera Operation
Use the Shutter and Video Recording buttons on the remote controller to shoot the images or videos
through the DJI GO app. For more information about how to use these buttons, refer to “Controlling the
Camera Page 31”.
Camera LED Indicator
Camera LED Indicator lights up after the flight battery is powered on. It provides information on the
working status of the camera.
Camera LED Indicator Camera status
Green Fast Blink (0.2s off, 0.1s on ) System is warming up.
Green Blink Once (0.5s off, 0.4s on ) Taking a single picture.
Green Blink 3 Times (0.3s off, 0.1s on ) Taking 3 or 5 photos per shot.
Slow Red Blink (1.6s on, 0.8s off ) Recording.
Fast Red Blink (0.5s off, 0.2s on ) SD card error.
Double Red Blink (0.1s on, 0.1s off, 0.1s on, 0.1s off) Overheated Camera
Solid Red System error.
Green and Red Blink (0.8s green on, 0.8s red on) Firmware Upgrading
Gimbal
*LPEDO3URÀOH
The 3-axis gimbal provides a steady platform for the attached camera, allowing you to capture clear,
TUBCMFJNBHFTBOEWJEFP5IFHJNCBMDBOUJMUUIFDBNFSBXJUIJOBSBOHF
Use the gimbal dial on the remote controller to control the tilt movement of the camera.
Gimbal Camera
42
© 2016 DJI. All Rights Reserved.
Phantom 4 Pro/Pro+ User Manual
Gimbal Operation Modes
Two gimbal operation modes are available. Switch between the different operation modes on the
camera settings page of the DJI GO app. Note that your mobile device must be connected to the remote
controller for changes to take effect. Refer to the table below for details:
Follow Mode The angle between gimbal’s orientation and aircraft’s nose remains
constant at all times.
FPV Mode The gimbal will synchronize with the movement of the aircraft to provide a
mSTUQFSTPOQFSTQFDUJWFnZJOHFYQFSJFODF
A gimbal motor error may occur in these situations:
(1) the aircraft is placed on uneven ground or the gimbal’s motion is obstructed
(2) the gimbal has been subjected to an excessive external force, such as a collision. Please
UBLFPGGGSPNnBUPQFOHSPVOEBOEQSPUFDUUIFHJNCBMBUBMMUJNFT
Flying in heavy fog or clouds may make the gimbal wet, leading to temporary failure. The
gimbal will recover full functionality after it dries.
It is normal for the gimbal to produce short pulse of beeping tone upon initialization.

© 2016 DJI. All Rights Reserved.
43
DJI GO app
This section introduces the four main
functions of the DJI GO app.
DJI GO App
44
© 2016 DJI. All Rights Reserved.
DJI GO App
5IF%+*(0BQQJTBNPCJMFBQQMJDBUJPOEFTJHOFETQFDJmDBMMZGPS%+*FRVJQNFOU6TFUIJTBQQUPDPOUSPM
the gimbal, camera, and other aircraft functions. The app features Equipment, Editor, Explorerand Me
TFDUJPOTXIJDIBSFVTFEGPSDPOmHVSJOHZPVSBJSDSBGUFEJUJOHBOETIBSJOHZPVSQIPUPTBOEWJEFPTXJUI
others. It is recommended that you use a tablet for the best experience.
Equipment
0OUIF&RVJQNFOUQBHFZPVDBOFOUFS$BNFSB7JFXWJTJUUIF"DBEFNZPSWJFXZPVSnJHIUSFDPSET
Camera View
J1BE
PHANTOM 4 Pro
$POOFDUZPVS"JSDSBGU5BLFUPUIF4LJFT
Use AEB shoot to get more dynanic image
&OUFS$BNFSB7JFX
&RVJQNFOU &EJUPS &YQMPSF .F
J1BE
PHANTOM 4 Pro
$POOFDUZPVS"JSDSBGU5BLFUPUIF4LJFT
Use AEB shoot to get more dynanic image
&OUFS$BNFSB7JFX
&RVJQNFOU &EJUPS &YQMPSF .F
AE
09:29
61%
P-GPS 12
H 10.0MD 30M V 11.0M/S
4"'&50'-:(14
14
15
16
17
18
19
13
12
20
21
22
23
24
25
10 11897654321
DJI GO App
© 2016 DJI. All Rights Reserved.
45
Phantom 4 Pro/Pro+ User Manual
[1] System Status
: Indicates the current aircraft system status and GPS signal strength.
[2] Battery Level Indicator
: Describes the battery level of the aircraft according to its immediate status. The colored
zones represent the various stages of battery level. When the battery level drops to a certain stage,
the system will prompt the user to take the appropriate action.
[3] Flight Mode
5IFUFYUOFYUUPUIJTJDPOJOEJDBUFTUIFDVSSFOUnJHIUNPEF
5BQUIJTJDPOUPDPOmHVSFUIF.BJO$POUSPMMFS4FUUJOHTUPDIBOHFUIFnJHIUMJNJUTBOETFUUIFHBJO
values.
[4] GPS Signal Strength
: Shows the current GPS signal strength. White bars indicate adequate GPS strength.
[5] Remote Controller Signal
: Shows the signal strength of the remote controller.
[6] HD Video Link Signal Strength
: Shows the signal strength of the HD video downlink between the aircraft and the remote
controller.
[7] Battery Level
61% : Shows the current battery level.
Tap this icon to view the battery information menu where you can set the battery warning thresholds
and view the battery log.
[8] General Settings
5BQUIJTJDPOUPWJFX(FOFSBM4FUUJOHTXIFSFZPVDBOTFUUIFnJHIUQBSBNFUFSTBOEFOBCMFUIF
Flight Route display.
[9] Camera Operation Bar
The bar will be displayed when using the on-board camera.
Shutter and Recording Settings
: Tap this icon to enter various camera value settings including the Color Mode, Video Size, and
Image Size.
Shutter
: Tap this button to take a single photo. Press and hold this button to switch between Single Shot,
Triple Shot and Timed Shot modes.
Record
: Tap once to start recording video, then tap again to stop recording. You can also press the Video
Recording Button on the remote controller.
Playback
: Tap this icon to play back photos and videos after they are captured.
DJI GO App
46
© 2016 DJI. All Rights Reserved.
Phantom 4 Pro/Pro+ User Manual
Camera Settings
: Tap this icon to set the ISO, Shutter Speed and Exposure Value of the camera.
[10] Mini Map
%JTQMBZTUIFnJHIUQBUIPGUIFDVSSFOUnJHIU5BQUIF.JOJ.BQUPTXJUDICFUXFFO$BNFSB7JFXBOE
Map View.
[11] Flight Telemetry
H: D:
V.S
M/S M/S
H.S
4.22.3
39M210M
232M
Flight Attitude and Radar Function:
5IFBJSDSBGUTnJHIUBUUJUVEFJTJOEJDBUFECZUIFUBSHFUMJLFJDPO
(1) The red arrow shows which direction the aircraft is facing.
(2) The ratio of the grey area to the blue area indicates the aircraft’s pitch.
(3) The horizontal level of the grey area indicates the aircraft’s roll angle.
Flight Parameters:
Altitude: Vertical distance from the Home Point.
Distance: Horizontal distance from the Home Point.
Vertical Speed: Movement speed across a vertical distance.
Horizontal Speed: Movement speed across a horizontal distance.
Aircraft Distance:
The horizontal distance between the aircraft and the operator.
[12] Intelligent Flight Mode
: This icon displays the Intelligent Flight Mode settings when the aircraft has entered F-mode. Tap
to select one of the Intelligent Flight Modes. Refer to Intelligent Flight Modes (p. 62) for details.
[13] Return-to-Home (RTH)
: Initiate RTH home procedure. Tap to have the aircraft return to the latest Home Point.
[14] Gimbal Operation Mode
This icon will be displayed when using a DJI gimbal (or camera). Tap to select a mode or re-align
the gimbal.
DJI GO App
© 2016 DJI. All Rights Reserved.
47
Phantom 4 Pro/Pro+ User Manual
[15] Auto Takeoff/Landing
/ : Tap to initiate auto takeoff or landing.
[16] Livestream
: This icon indicates the current video feed is being broadcast live on YouTube. Ensure that
mobile data service is available on your mobile device.
[17] Back
: Tap this icon to return to the main menu.
Editor
An intelligent video editor is built into the DJI GO app. After recording several video clips and
downloading them to your mobile device, go to Editor on the home screen. You can then select a
UFNQMBUFBOEBTQFDJmFEOVNCFSPGDMJQTXIJDIBSFBVUPNBUJDBMMZDPNCJOFEUPDSFBUFBTIPSUmMNUIBUDBO
be shared immediately.
SkyPixel
Find out about our latest events, featured products and trending Skypixel uploads in the Explore page.
Me
If you already have a DJI account, you will be able to participate in forum discussions, earn Credits in the
DJI Store, and share your artwork with the community.
48
© 2016 DJI. All Rights Reserved.
Flight
5IJTTFDUJPOEFTDSJCFTTBGFnJHIU
QSBDUJDFTBOEnJHIUSFTUSJDUJPOT
Flight
© 2016 DJI. All Rights Reserved.
49
Flight
0ODFQSFnJHIUQSFQBSBUJPOJTDPNQMFUFJUJTSFDPNNFOEFEUIBUZPVVTFUIFnJHIUTJNVMBUPSJOUIF%+*(0
BQQUPIPOFZPVSnJHIUTLJMMTBOEQSBDUJDFnZJOHTBGFMZ&OTVSFUIBUBMMnJHIUTBSFDBSSJFEPVUJOBOPQFO
area.
Flight Environment Requirements
1. Do not use the aircraft in severe weather conditions. These include wind speeds exceeding 10 m/s ,
snow, rain and fog.
0OMZnZJOPQFOBSFBT5BMMTUSVDUVSFTBOEMBSHFNFUBMTUSVDUVSFTNBZBGGFDUUIFBDDVSBDZPGUIFPO
board compass and GPS system.
3. Avoid obstacles, crowds, high voltage power lines, trees, and bodies of water.
4. Minimize interference by avoiding areas with high levels of electromagnetism, including base stations
and radio transmission towers.
5. Aircraft and battery performance is subject to environmental factors such as air density and temperature.
#FWFSZDBSFGVMXIFOnZJOHBUBMUJUVEFTHSFBUFSUIBOGFFUNFUFSTBCPWFTFBMFWFMBTUIF
performance of the battery and aircraft may be affected.
6. The Phantom 4 Pro / Pro+ cannot operate within the polar areas.
Flight Limits and No-Fly Zones
All unmanned aerial vehicle (UAV) operators should abide by all regulations set forth by government and
SFHVMBUPSZBHFODJFTJODMVEJOHUIF*$"0BOEUIF'""'PSTBGFUZSFBTPOTnJHIUTBSFMJNJUFECZEFGBVMU
which helps users operate this product safely and legally. Flight limitations include height limits, distance
limits, and No-Fly Zones.
When operating in P-mode, height limits, distance limits, and No-Fly Zones function concurrently to
manage flight safety. In A-mode, only height limits are in effect, which by default prevent the aircraft
altitude from exceeding 1640 feet (500 m) .
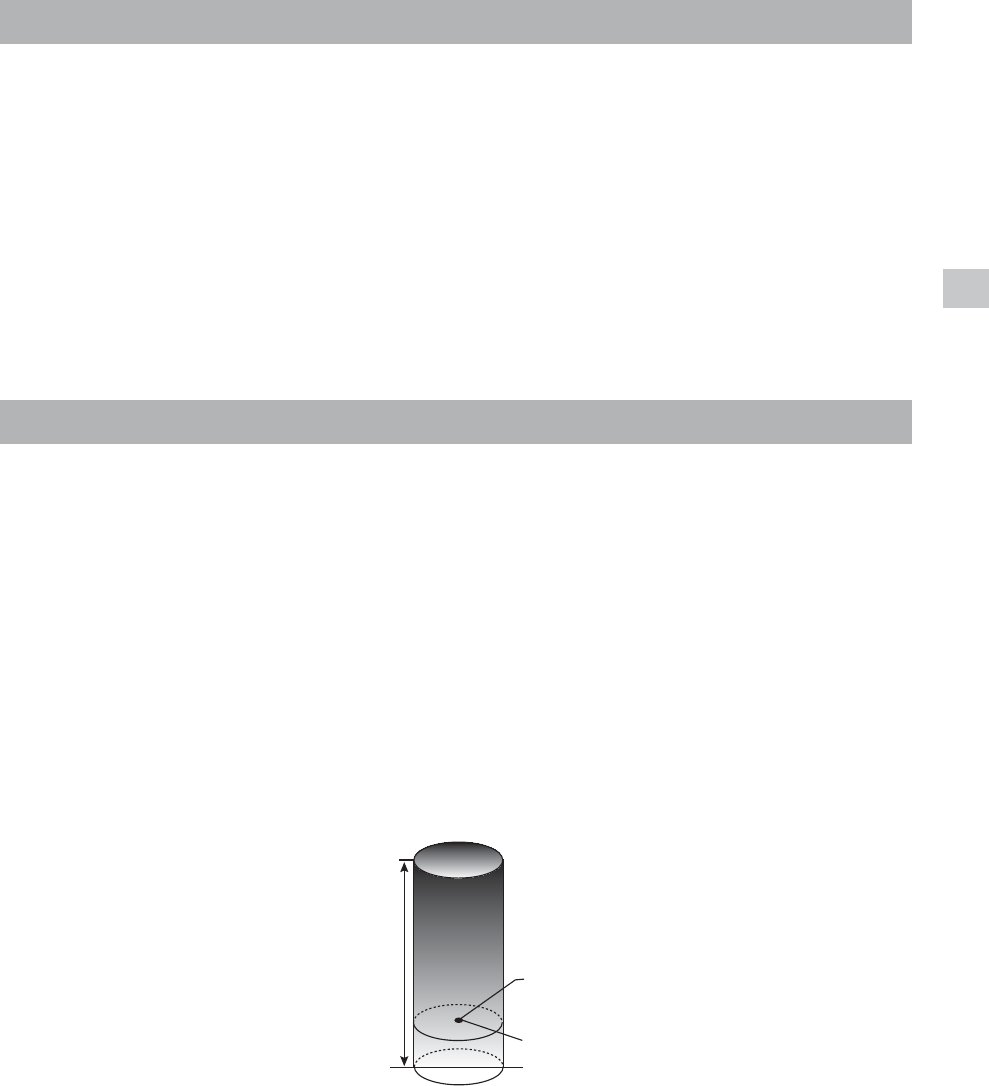
0D[LPXPÁLJKWDOWLWXGH5DGLXV/LPLWV
.BYJNVNnJHIUBMUJUVEFBOESBEJVTMJNJUTNBZCFDIBOHFEJOUIF%+*(0BQQ#FBXBSFUIBUUIFNBYJNVN
nJHIUBMUJUVEFDBOOPUFYDFFEGFFUNFUFST*OBDDPSEBODFXJUIUIFTFTFUUJOHTZPVS1IBOUPN
1SP1SPXJMMnZJOBSFTUSJDUFEDZMJOEFSBTTIPXOCFMPX
Maximum Flight Altitude Max Radius
Home Point
Height of aircraft
when turned on
Flight
50
© 2016 DJI. All Rights Reserved.
Phantom 4 Pro/Pro+ User Manual
GPS Signal Weak Blinking Yellow
Flight Limits DJI GO app Aircraft Status Indicator
Maximum
Flight
Altitude
Height is restricted to 26 feet (8
meters)when the GPS signal is
weak and Vision Positioning is
activated. Height is restricted to
164 feet (50 meters) when the
GPS signal is weak and Vision
Positioning is inactivated.
Warning: Height limit
reached. None.
Max Radius No limits
*GUIFBJSDSBGUnJFTPVUPGUIFMJNJUZPVDBOTUJMMDPOUSPMUIFBJSDSBGUCVUZPVDBOOPUnZJUBOZ
farther.
*GUIFBJSDSBGUnJFTPVUPGUIFNBYSBEJVTJUXJMMnZCBDLXJUIJOSBOHFBVUPNBUJDBMMZXIFO(14
signal is strong.
No-Fly Zones
All No-Fly Zones are listed on the DJI official website at http://www.dji.com/flysafe/no-fly. No-Fly
Zones are divided into Airports and Restricted Areas. Airports include major airports and flying
mFMETXIFSFNBOOFEBJSDSBGUPQFSBUFBUMPXBMUJUVEFT3FTUSJDUFE"SFBTJODMVEFCPSEFSMJOFTCFUXFFO
countries or sensitive institute. The details of the No-Fly Zones are explained as follow:
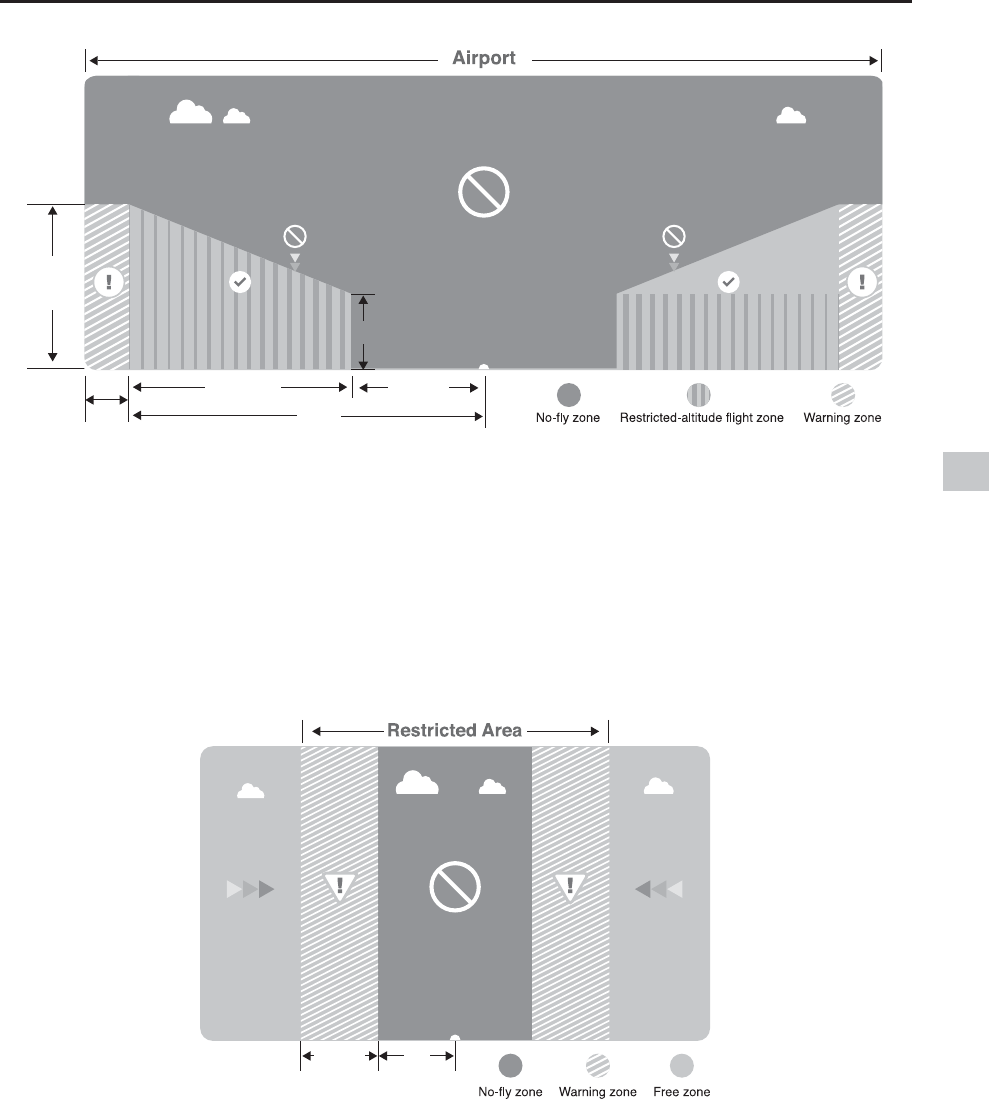
Airport
(1) Airport No-Fly Zone are comprised of Take-off Restricted zones and Restricted Altitude Zones. Each
zone features circles of various sizes.
(2) R1 miles (value of the R1 depends on the size and shape of the airport) around the airport is a Take-
off restricted zone, inside of which take off is prevented.
'SPN3NJMFUP3NJMFBSPVOEUIFBJSQPSUUIFnJHIUBMUJUVEFJTMJNJUFEUPBEFHSFFJODMJOBUJPO
4UBSUJOHBUGFFUNFUFSTGSPNUIFFEHFPGBJSQPSUBOESBEJBUJOHPVUXBSE5IFnJHIUBMUJUVEFJT
limited to 1640 feet (500 meters) at R1+1 mile
(4) When the aircraft enters within 320 feet (100 meters) of No-Fly Zones, a warning message will appear
on the DJI GO app.
GPS Signal Strong Blinking Green
Flight Limits DJI GO app Aircraft Status Indicator
Maximum Flight
Altitude
Aircraft's altitude cannot
FYDFFEUIFTQFDJmFEWBMVF
Warning: Height
limit reached. None.
Max Radius Flight distance must be within
the max radius.
Warning: Distance
limit reached.
3BQJESFEnBTIJOH
when close to the
max radius limit.
Flight
© 2016 DJI. All Rights Reserved.
51
Phantom 4 Pro/Pro+ User Manual
Restricted Area
3FTUSJDUFE"SFBTEPFTOPUIBWFnJHIUBMUJUVEFSFTUSJDUJPOT
(2) R miles around the designated restriction area is a Take-off Restricted area. Aircraft cannot take off
XJUIJOUIJT[POF5IFWBMVFPG3WBSJFTCBTFEPOUIFEFmOJUJPOPGUIFSFTUSJDUFEBSFBT
(3) A “warning zone” has been set around the Restricted Area. When the aircraft approaches within 0.062
miles (100 m) of this zone, a warning message will appear on the DJI GO app.
3
GFFU
NJMF
GFFU 3
GFFU
N 3
Flight
52
© 2016 DJI. All Rights Reserved.
Phantom 4 Pro/Pro+ User Manual
GPS Signal Strong Blinking Green
Zone Restriction DJI GO app Prompt
Aircraft
Status
Indicator
/PnZ;POF
Motors will not start. Warning: You are in a No-fly
zone. Take off prohibited.
3FEnBTIJOH
If the aircraft enters the
restricted area in A-mode, but is
switched to P-mode, the aircraft
will automatically descend, land,
and stop its motors.
8BSOJOH:PVBSFJOBOPnZ[POF
Automatic landing has begun.
Restricted-
BMUJUVEFnJHIU
zone
If the aircraft enters the restricted
area in A-mode, but is switched
to P-mode, it will descend to an
appropriate altitude and hover
15 feet below the altitude limit.
R1: Warning: You are in a
restricted zone. Descending to
safe altitude.
R2: Warning: You are in a
SFTUSJDUFE[POF.BYJNVNnJHIU
altitude is restricted to between
20m and 500m. Fly cautiously.
Warning zone /PnJHIUSFTUSJDUJPOBQQMJFTCVU
there will be a warning .
Warning: You are approaching a
restricted zone, Fly cautiously.
Free zone No restrictions. None. None.
3UHÁLJKW&KHFNOLVW
1. Remote controller, Intelligent Flight Battery, and mobile device are fully charged.
1SPQFMMFSTBSFNPVOUFEDPSSFDUMZBOEmSNMZ
3. Micro SD card has been inserted, if necessary.
4. Gimbal is functioning normally.
5. Motors can start and are functioning normally.
6. The DJI GO app is successfully connected to the aircraft.
7. Ensure that the sensors for the Obstacle Sensing System are clean.
Semi-automatic descent: All stick commands are available except the left stick command during
the descent and landing process. Motors will stop automatically after landing.
8IFOnZJOHJOBTBGFUZ[POFUIFBJSDSBGUhTTUBUVTJOEJDBUPSXJMMCMJOLSFESBQJEMZBOEDPOUJOVFGPS
TFDPOETUIFOTXJUDIUPJOEJDBUFDVSSFOUnZJOHTUBUVTBOEDPOUJOVFGPSTFDPOETBUXIJDI
point it will switch back to blinking red.
'PSTBGFUZSFBTPOTQMFBTFEPOPUnZDMPTFUPBJSQPSUTIJHIXBZTSBJMXBZTUBUJPOTSBJMXBZMJOFT
city centers, or other sensitive areas. Fly the aircraft only within your line of sight.
Flight
© 2016 DJI. All Rights Reserved.
53
Phantom 4 Pro/Pro+ User Manual
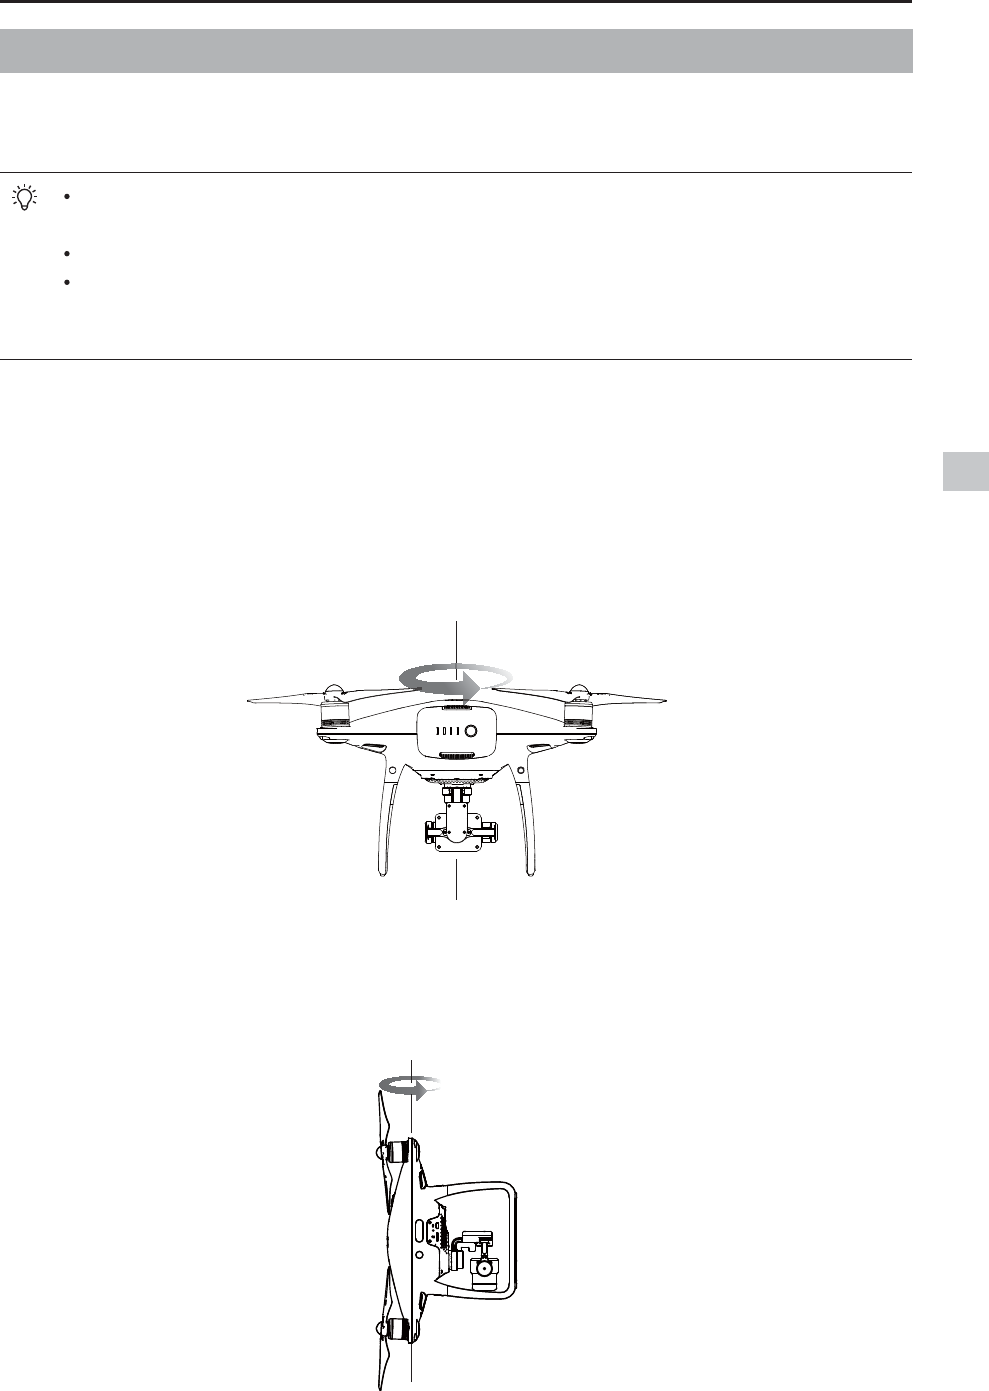
Calibrating the Compass
Only calibrate the compass when the DJI GO app or the status indicator prompt you to do so. Observe
the following rules when calibrating your compass:
DO NOT calibrate your compass where there is a chance of strong magnetic interference, such
as magnetite, parking structures, and steel reinforcements underground.
DO NOT carry ferromagnetic materials with you during calibration such as cellular phones.
The DJI GO app will prompt you to resolve the compass issue if the compass is affected by
strong interference after calibration is complete. Follow the prompted instructions to resolve the
compass issue.
Calibration Procedures
Choose an open area to carry out the following procedures.
&OTVSFUIBUUIFDPNQBTTJTDBMJCSBUFE*GZPVEJEOPUDBMJCSBUFUIFDPNQBTTBTQBSUPGZPVSQSFnJHIU
preparations, or if you have moved to a new location since the last calibration, tap the Aircraft Status
Bar in the app and select “Calibrate”, then follow the on-screen instructions.
2. Hold the aircraft horizontally and rotate 360 degrees. The Aircraft Status Indicators will display a solid
green light.
3. Hold the aircraft vertically, with nose pointing downward, and rotate it 360 degrees around the center
axis. Recalibrate the compass if the Aircraft Status Indicator glows solid red.
Flight
54
© 2016 DJI. All Rights Reserved.
Phantom 4 Pro/Pro+ User Manual
If the Aircraft Status Indicator blinks red and yellow after the calibration procedure, move your
aircraft to a different location and try again.
$BMJCSBUFUIFDPNQBTTCFGPSFFBDInJHIU-BVODIUIF%+*(0BQQBOEGPMMPXUIFPOTDSFFO
instructions to calibrate the compass. DO NOT calibrate the compass near metal objects such
as a metal bridge, cars, scaffolding.
If the aircraft status indicators is blinking red and yellow alternately after placing the aircraft on
the ground, the compass has detected magnetic interference. Change your location.
When to Recalibrate
1.When compass data is abnormal and the Aircraft Status Indicator is blinking green and yellow.
8IFOnZJOHJOBOFXMPDBUJPOPSJOBMPDBUJPOUIBUJTEJGGFSFOUGSPNUIFNPTUSFDFOUnJHIU
3.When the mechanical or physical structure of the Phantom 4 Pro / Pro+ has been changed.
8IFOTFWFSFESJGUJOHPDDVSTJOnJHIUJF1IBOUPN1SP1SPEPFTOPUnZJOTUSBJHIUMJOF
Auto Takeoff and Auto Landing
Auto Takeoff
Use auto takeoff only if the Aircraft Status Indicators are blinking green. Follow the steps below to use the
auto takeoff feature:
1. Launch the DJI GO app, and enter “Camera” page.
$PNQMFUFBMMTUFQTPOUIFQSFnJHIUDIFDLMJTU
3. Tap“ wBOEDPOmSNUIBUDPOEJUJPOTBSFTBGFGPSnJHIU4MJEFUIFJDPOUPDPOmSNBOEUBLFPGG
4. Aircraft takes off and hovers at (1.2 meters) above ground.
Aircraft Status Indicator blinks rapidly when it is using the Vision Position System for stabilization.
The aircraft will automatically hover below 3 meters. It is recommended to wait until there is
TVGmDJFOU(14MPDLCFGPSFVTJOHUIF"VUP5BLFPGGGFBUVSF
4. Re-calibrate the aircraft if the aircraft status indicators blink red.
Auto-Landing
Use auto-landing only if the Aircraft Status Indicators are blinking green. Follow the steps below to use
the auto-landing feature:
1. Check the landing area condition before tapping “ w4MJEFUIFJDPOUPDPOmSNMBOEJOH5IFOGPMMPX
the on-screen instructions.
Flight
© 2016 DJI. All Rights Reserved.
55
Phantom 4 Pro/Pro+ User Manual
Stopping the Motors
There are two methods to stop the motors.
Method 1: When Phantom 4 Pro / Pro+ has landed, push the left stick down , then conduct the same
CSC that was used to start the motors, as described above . Motors will stop immediately. Release both
sticks once motors stop.
Method 2: When the aircraft has landed, push and hold the left stick down. The motors will stop after three
seconds.
Starting/Stopping the Motors
Starting the Motors
A Combination Stick Command (CSC) is used to start the motors. Push both sticks to the bottom
inner or outer corners to start the motors. Once the motors have started spinning, release both sticks
simultaneously.
OR
Method 1 Method 2
6WRSWKHPRWRUPLGÁLJKW
Pull the left stick to the bottom inside corners and press the RTH button at the same time. Only stop the
PRWRUVPLGñLJKWLQHPHUJHQF\VLWXDWLRQVZKHQGRLQJVRFDQUHGXFHWKHULVNRIGDPDJHRULQMXU\
5HIHUWRWKHXVHUPDQXDOIRUGHWDLOV
OR
Flight
56
© 2016 DJI. All Rights Reserved.
Phantom 4 Pro/Pro+ User Manual
8IFOUIF"JSDSBGU4UBUVT*OEJDBUPSTCMJOLZFMMPXSBQJEMZEVSJOHnJHIUUIFBJSDSBGUIBTFOUFSFE'BJMTBGF
mode.
A low battery level warning is indicated by the Aircraft Status Indicators blinking red slowly or
SBQJEMZEVSJOHnJHIU
8BUDIPVSWJEFPUVUPSJBMTGPSNPSFnJHIUJOGPSNBUJPO
Video Suggestions and Tips
(PUISPVHIUIFGVMMQSFnJHIUDIFDLMJTUCFGPSFFBDInJHIU
2. Select the desired gimbal operation mode in the DJI GO app.
0OMZTIPPUWJEFPXIFOnZJOHJO1NPEF
"MXBZTnZJOHPPEXFBUIFSBOEBWPJEnZJOHJOSBJOPSIFBWZXJOE
5. Choose the camera settings that suit your needs. Settings include photo format and exposure
compensation.
1FSGPSNnJHIUUFTUTUPFTUBCMJTInJHIUSPVUFTBOEQSFWJFXTDFOFT
7. Push the control sticks gently to keep the aircraft’s movement smooth and stable.
Flight Test
Takeoff/Landing Procedures
1MBDFUIFBJSDSBGUJOBOPQFOnBUBSFBXJUIUIFCBUUFSZMFWFMJOEJDBUPSTGBDJOHUPXBSETZPV
2. Turn on the remote controller and your mobile device, then turn on the Intelligent Flight Battery.
3. Launch the DJI GO app and enter the Camera page.
4. Wait until the Aircraft Indicators blink green. This means the Home Point is recorded and it is now safe
UPnZ*GUIFZnBTIZFMMPXUIF)PNF1PJOUIBTOPUCFFOSFDPSEFE
5. Push the left stick up slowly to take off or use Auto Takeoff.
6. Shoot photos and videos using the DJI GO app.
7. To land, hover over a level surface and gently pull down on the left stick to descend.
8. After landing, execute the CSC command or hold the left stick at its lowest position until the motors
stop.
5VSOPGGUIF*OUFMMJHFOU'MJHIU#BUUFSZmSTUUIFOUIF3FNPUF$POUSPMMFS

© 2016 DJI. All Rights Reserved.
57
Appendix

Appendix
58
© 2016 DJI. All Rights Reserved.
Appendix
6SHFLÀFDWLRQV
Aircraft
Weight (Battery & Propellers Included) 1380 g
Diagonal Size (Excluding Propellers) 350 mm
Max Ascent Speed Sport mode: 19.7ft/s(6 m/s); GPS mode: 16.4ft/s(5 m/s)
Max Descent Speed Sport mode: 13.1ft/s(4 m/s); GPS mode: 9.8ft/s (3 m/s)
Max Speed 44.7mph (20 m/s); 35.8mph (16 m/s) (Attitude mode);
31.3mph(14 m/s) (GPS mode)
Max Tilt Angle 42° (Sport mode); 35° (Attitude mode); 25° (GPS mode)
Max Angular Speed 250°/s (Sport mode); 150°/s (Attitude mode)
Max Service Ceiling Above Sea Level 6000 m
Max Flight Time Approx. 29 minutes
Operating Temperature Range 32° to 104° F (0° to 40° C)
Satellite Systems GPS/GLONASS
GPS Hover Accuracy Range
Vertical: ±0.1 m (With Vision Positioning); ±0.5 m (With GPS
Positioning)
Horizontal: ±0.3 m (With Vision Positioning); ±1.5 m (With
GPS Positioning)
Gimbal
Stabilization 3-axis (pitch, roll, yaw)
Controllable Range Pitch: - 90° to + 30°
Max Controllable Angular Speed Pitch: 90°/s
Angular Control Accuracy ±0.03°
Vision Positioning System
Velocity Range õNTNBCPWFHSPVOE
Altitude Range 0 - 33 feet ( 0 - 10 m )
Operating Range 0 - 33 feet ( 0 - 10 m )
Measuring Frequency 10 Hz
Operating Environment Surface with clear pattern and adequate lighting ( lux > 15 )
Obstacle Sensing System
Obstacle Sensory Range Front and Rear: 2 - 98 feet ( 0.7 - 30 m )
Both Sides: 0 - 22 feet ( 0.2 - 7 m )
FOV
Front and Rear:±60°(Horizontal),±54°(Vertical)
Both Sides: ±35°(Horizontal),±10°(Vertical)
Measuring Frequency 10 Hz
Operating Environment
Front and Rear: Surface with clear pattern and adequate
lighting ( lux > 15 )
Both Sides: Wall, trees, humans
Appendix
© 2016 DJI. All Rights Reserved.
59
Phantom 4 Pro/Pro+ User Manual
Camera
Sensor 1’’ CMOS; Effective pixels: 20 M
Lens
FOV ( Field Of View ) 84° 24 mm ( 35 mm format equivalent )
GGBVUPGPDVTBUNñ
ISO Range
Video: 100 – 3200 (Auto); 100 - 6400 (Manual)
Photo:100 - 3200 (Auto);100 - 12800(Manual)
Mechanical Shutter 8 - 1/2000 s
Electronic Shutter Speed 8 - 1/8000 s
Max Image Size
3:2 Aspect Ratio: 5472×3648
4:3 Aspect Ratio: 4864×3648
16:9 Aspect Ratio: 5472×3078
PIV Image Size
16:9 Aspect Ratio:
5248×2952 (3840×2160 24/25/30p, 2720×1530 24/25/30p,
1920×1080 24/25/30p, 1280×720 24/25/30p)
3840×2160 (3840×2160 48/50p, 2720×1530 48/50p,
1920×1080 48/50/60p, 1280×720 48/50/60p)
17:9 Aspect Ratio:
4896×2592 (4096×2160 24/25/30p)
4096×2160 (4096×2160 48/50p)
Still Photography Modes
Single shot
Burst shooting: 3/5/7/10/14 frames
Auto Exposure Bracketing (AEB): 3/5 Bracketed frames at
0.7EV Bias
Time-lapse (interval: 2/3/5/7/10/15/30/60)
Video Recording Modes
H.265
UHD: 4096×2160 24/25/30p @100Mbps
UHD: 3840×2160 24/25/30p @100Mbps
UHD: 2720×1530 24/25/30p @65Mbps
2720×1530 48/50/60p @80Mbps
FHD: 1920×1080 24/25/30p @50Mbps
1920×1080 48/50/60p @65Mbps
HD: 1280×720 24/25/30p @25Mbps
1280×720 48/50/60p @35Mbps
H.264
UHD: 4096×2160 24/25/30/48/50/60p @100Mbps
UHD: 3840×2160 24/25/30/48/50/60p @100Mbps
UHD: 2720×1530 24/25/30p @80Mbps
2720×1530 48/50/60p @100Mbps
FHD: 1920×1080 24/25/30p @60Mbps
1920×1080 48/50/60/120p @80Mbps
HD: 1280×720 24/25/30p @30Mbps
1280×720 48/50/60/120p @45Mbps
2.400-2483GHz FCC: 23.2dBm CE:17dBm
5.725-5.850GHz FCC: 22.5dBm CE: 14dBm
5.15-5.250GHz&5.725-5.850GHz FCC: 24.5 dBm CE: 14dBm
2.400-2483GHz FCC:23.2 dBm CE: 17dBm
Transmitter Power
Appendix
60
© 2016 DJI. All Rights Reserved.
Phantom 4 Pro/Pro+ User Manual
Max. Bitrate Of Video Storage 100 Mbps
Supported File Systems '"5õ(#FY'"5(#
Photo JPEG, DNG (RAW), J+R
Video MP4/MOV (AVC/H.264; HEVC/H.265)
Supported SD Cards Micro SD, Max capacity: 128GB. Class 10 or UHS-1 rating required
Operating Temperature Range 32° to 104° F (0° to 40° C)
Remote Controller
Operating Frequency
Max Transmission Distance FCC Compliant: 3.1 mi (5 km); CE Compliant: 2.2 mi (3.5 km)
(Unobstructed, free of interference)
Operating Temperature 32° to 104° F (0° to 40° C)
Battery 6000 mAh LiPo 2S
Operating Voltage 1.2 A @7.4 V
Video Output Port GL300E: USB
GL300F: HDMI, USB
Mobile Device Holder GL300E: Tablets and smartphones
GL300F: Built-in Display device
Charger
Voltage 17.4 V
Rated Power 100 W
Intelligent Flight Battery (PH4-5870 mAh-15.2 V)
Capacity 5870 mAh
Voltage 15.2 V
Battery Type LiPo 4S
Energy 89.2 Wh
Net Weight 468 g
Operating Temperature 14° to 104° F (-10° to 40° C)
Max. Charging Power 100 W
Aircraft Status Indicator Description
Normal
Red, Green and Yellow Flash
Alternatively Turning on and Self-Diagnostics
Green and Yellow Flash Alternatively Aircraft Warming Up
Green Flashes Slowly Ready to go (P-mode with GPS and Vision Positioning)
X2 Green Flashes Twice Ready to go (P-mode with Vision Positioning but without GPS)
Yellow Flashes Slowly Ready to go (A-mode but No GPS and Vision Positioning)
2.400 - 2.483 GHz, 5.15-5.25GHz and 5.725 - 5.850 GHz
For GL300E
For GL300F
Appendix
© 2016 DJI. All Rights Reserved.
61
Phantom 4 Pro/Pro+ User Manual
Warning
Fast Yellow Flashing Remote Controller Signal Lost
Slow Red Flashing Low Battery Warning
Fast Red Flashing Critical Battery Warning
Red Flashing Alternatively IMU Error
—
Solid Red Critical Error
Red and Yellow Flash Alternatively Compass Calibration Required
Firmwares Update
Use DJI Assistant 2 or DJI GO app to update aircraft and Remote Controller. Follow the instructions
CFMPXUPVQEBUFUIFmSNXBSFUISPVHI%+*"TTJTUBOU
1. Power on your aircraft and connect it to a computer with a USB cable.
2. Launch DJI Assistant 2 and login with your DJI account.
3. Select “Phantom 4 Pro / Pro+” and click the “Firmware Updates” on the left panel.
4FMFDUUIFmSNXBSFWFSTJPOUIBUZPVXJTIUPVQEBUF
%+*"TTJTUBOUXJMMEPXOMPBEBOEVQEBUFUIFmSNXBSFBVUPNBUJDBMMZ
3FCPPUUIFBJSDSBGUBGUFSUIFmSNXBSFVQEBUFJTDPNQMFUF
5IFmSNXBSFVQEBUFXJMMUBLFBSPVOENJOVUFT*UJTOPSNBMUIBUUIFHJNCBMHPMJNQBJSDSBGU
status indicator blinks abnormally and the aircraft reboots. Please wait patiently until the update
is complete.
There will be no sound prompts during the update.
Ensure the computer has access to the Internet.
Ensure the battery level is adequate for the Intelligent Flight Battery.
%POPUEJTDPOOFDUUIFBJSDSBGUGSPNUIFDPNQVUFSEVSJOHmSNXBSFVQEBUF
Intelligent Flight Mode
Intelligent Flight mode includes Course Lock, Home Lock, Point of Interest (POI), Follow Me and
8BZQPJOUTGFBUVSFTUPBTTJTUVTFSTUPDBQUVSFQSPGFTTJPOBMTIPPUTEVSJOHUIFnJHIU$PVSTF-PDLBOE
Home Point lock ensure the lock of aircraft orientation, sparing the user to focus more on other oper-
BUJPOT1PJOUPG*OUFSFTU'PMMPX.FBOE8BZQPJOUTNPEFFOBCMFBJSDSBGUUPnZBVUPNBUJDBMMZBDDPSEJOH
UPUIFQSFTFUnJHIUNBOFVWFST
Course Lock Lock the current nose direction as the aircraft’s forward direction. The aircraft will
move in the locked directions regardless of its orientation (yaw angle).
Home Lock Pull the pitch stick backward to move the aircraft toward its recorded Home Point.
Point of Interest The aircraft will orbit around the subject automatically to allow the operator to be
more focus on framing their shoot on the subject in Point of Interest.
Appendix
62
© 2016 DJI. All Rights Reserved.
Phantom 4 Pro/Pro+ User Manual
After-Sales Information
Visit the following pages to learn more about After-sales policy and warranty information:
1. After-sales Policy: http://www.dji.com/service
2. Refund Policy: http://www.dji.com/service/refund-return
3. Paid Repair Service: http://www.dji.com/service/repair-service
4. Warranty Service: http://www.dji.com/service/warranty-service
FCC Compliance
FCC Warning Message
"OZDIBOHFTPSNPEJmDBUJPOTOPUFYQSFTTMZBQQSPWFECZUIFQBSUZSFTQPOTJCMFGPSDPNQMJBODFDPVMEWPJE
the user’s authority to operate the equipment.
This device complies with part 15 of the FCC Rules. Operation is subject to the following two conditions:
(1) This device may not cause harmful interference, and (2) this device must accept any interference
received, including interference that may cause undesired operation.
FCC Radiation Exposure Statement:
This equipment complies with FCC radiation exposure limits set forth for an uncontrolled environment.
This equipment should be installed and operated with minimum distance 20cm between the radiator&
your body. This transmitter must not be co-located or operating in conjunction with any other antenna or
transmitter.
Note: This equipment has been tested and found to comply with the limits for a Class B digital device,
pursuant to part 15 of the FCC Rules. These limits are designed to provide reasonable protection against
harmful interference in a residential installation. This equipment generates uses and can radiate radio
frequency energy and, if not installed and used in accordance with the instructions, may cause harmful
interference to radio communications. However, there is no guarantee that interference will not occur in
Follow Me
A virtual tether is created between the aircraft and the mobile device so that the
aircraft can track your movement as you move. Note that Follow Me performance is
subject to the GPS accuracy on the mobile device.
Waypoints
3FDPSEBnJHIUQBUIUIFOUIFBJSDSBGUXJMMnZBMPOHUIFTBNFQBUISFQFBUFEMZXIJMF
ZPVDPOUSPMUIFDBNFSBBOEPSJFOUBUJPO5IFnJHIUQBUIDBOCFTBWFEBOESFBQQMZJO
the future.
For Phantom 4 Pro / WM331A
For remote control with model GL300E and GL300F ,SAR tests are conducted using standard operating
positions accepted by the FCC/IC with the device transmitting at its highest certified power level in
all tested frequency bands, although the SAR is determined at the highest certified power level, the
actual SAR level of the device while operating can be well below the maximum value. Before a new model is
a available for sale to the public, it must be tested and certified to the FCC/IC that it does not
exceed the exposure limit established by the FCC/IC, Tests for each product are performed in positions and
locations as required by the FCC/IC.
For Handheld operation, this device has been tested and meets the FCC/IC RF exposure guidelines when
used with an accessory designated for this product or when used with an accessory that Contains no metal.
Appendix
© 2016 DJI. All Rights Reserved.
63
Phantom 4 Pro/Pro+ User Manual
a particular installation. If this equipment does cause harmful interference to radio or television reception,
which can be determined by turning the equipment off and on, the user is encouraged to try to correct
the interference by one or more of the following measures:
—Reorient or relocate the receiving antenna.
—Increase the separation between the equipment and receiver.
—Connect the equipment into an outlet on a circuit different from that to which the receiver is connected.
—Consult the dealer or an experienced radio/TV technician for help.
IC RSS warning
This device complies with Industry Canada licence-exempt RSS standard (s). Operation is subject to the
following two conditions: (1) this device may not cause interference, and (2) this device must accept any
interference, including interference that may cause undesired operation of the device.
Le présent areil est conforme aux CNR d'Industrie Canada licables aux areils radio exempts de licence.
L'exploitation est autorisée aux deux conditions suivantes:
(1) l'areil ne doit pas produire de brouillage, et
(2) l'utilisateur de l'areil doit accepter tout brouillage radioélectrique subi, même si le brouillage est
susceptible d'en compromettre le fonctionnement.
IC Radiation Exposure Statement:
This equipment complies with IC RF radiation exposure limits set forth for an uncontrolled environment.
This transmitter must not be co-located or operating in conjunction with any other antenna or transmitter.
This equipment should be installed and operated with minimum distance 20cm between the radiator&
your body.
"OZ$IBOHFTPSNPEJmDBUJPOTOPUFYQSFTTMZBQQSPWFECZUIFQBSUZSFTQPOTJCMFGPSDPNQMJBODFDPVME
void the user’s authority to operate the equipment.
KCC Warning Message
ಯ뼩鲮ꓩꟹ鱉끩끞닆놹볁뿱겕閵鱚ꫦ넩넽냱ꕵꈑ넭ꐺ껽놹隱隵ꇝ鷑ꟹ걙鱉뼕ꯍ꽻걪鱽鲙 ರ
ಯ뼩鲮ꓩꟹ鱉끩끞닆놹볁뿱겕閵鱚ꫦ넩넽넁ರ
NCC Warning Message
ѻߌ⢴䰨∏䑨ᄱᕔ䰨ᾌノ⤳䓓∂
すι᷊㋀ಸᐼ㾺䁶वᵩѻߌ⢴ᄱ䵨䰨ᾌ喑䲋㋀㽞ज喑ڙथȠੳ㮌ᝃҬ⩕㔲̺ᓄ᧲㜗䂷ᰡ䵨⢴Ƞߍ
๔ߌ⢴ᝃ䂷ᰡ࣌㽚㼵➦ᕔࣷߌ㘪ȡ
すఈ᷊ѻߌ⢴ᄱ䵨䰨ᾌҬ⩕̺ᓄᒞ䴬丈㝗Ⴖڕࣷᨫव∂䕇Ԏ喠㋀⮩⤫ᰶᨫ⤫䆎᭯喑ᛶᩦ㜠♎
ᨫ᭯ᓄ㎩㎹Ҭ⩕ȡݺ䴲व∂䕇Ԏ喑ᠴӊ䰨Ԏ∂㺼Ⴧ҉ẚ♎㌇䰨䕇Ԏȡѻߌ⢴ᄱ䵨䰨ᾌ䴵ᓺऄव∂
䕇ԎᝃጒẚȠႥࣷ䛘⭯⩕䰨∏䑨ᄱᕔ䰨ᾌ㽚׆ᨫȡ
DJI incorporates HDMITM technology.
5IFUFSNT)%.*BOE)%.*)JHI%FmOJUJPO.VMUJNFEJB*OUFSGBDFBOEUIF)%.*-PHPBSFUSBEFNBSLTPSSFHJTUFSFEUSBEFNBSLTPG)%.*-JDFOTJOH--$JOUIF
United States and other countries.
For Phantom 4 Pro / WM331A

Appendix
This content is subject to change.
Download the latest version from
KWWSZZZGMLFRPSURGXFWSKDQWRP
If you have any questions about this document, please contact DJI by
sending a message to 'RF6XSSRUW#GMLFRP.
DJI Support
http://www.dji.com/support
PHANTOMTM is a trademark of DJI.
Copyright © 2016 DJI All Rights Reserved.