Saab Defense and Security USA PDDNG MAN WORN VEST TRANSMITTER User Manual User guide PDD NG DOE w FCC info US
Saab Defense and Security USA LLC MAN WORN VEST TRANSMITTER User guide PDD NG DOE w FCC info US
User Guide
1. Battery Unit (BU)
(advanced configuration)
2. Miniature Remote
System Interface (MRSI)
(advanced configuration)
2

3
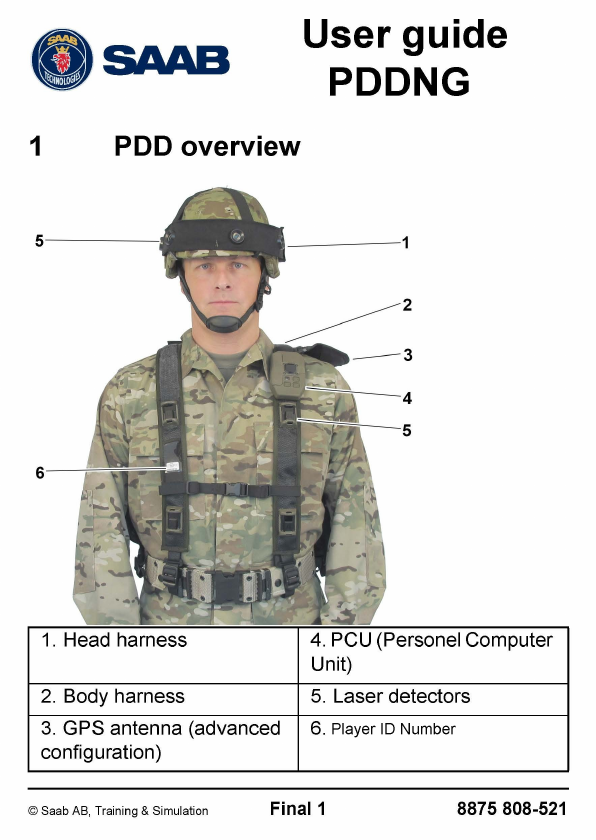
2 General
The Personnel Detection Device (PDD) is a man worn
simulator system that simulates casualty from direct and
indirect fire. The individual wearing the PDD will get feedback
through the built in speaker and all training data is stored for
after action reviews.
The PDD is available in 3 different configurations:
•Basic: This configuration is suited for initial laser
assisted training. All events are recorded and time
stamped. The data can be extracted after an exercise
and turned into statistics for the unit.
•Medium: This configuration is ideal for full tactical
training in smaller units. All events including tracking of
position of the user are recorded. The AAR features
includes replay on 3D map with individual solider
animation.
•Advanced: This configuration is ideal for full tactical
training from smaller units up to large battalion exercises.
The AAR features includes replay on 3D map with
individual solider animation, all monitored in real time for
EXCON. Capabilities such as AWES, MOUT training and
indoor tracking is available in this configuration.
3 Installation
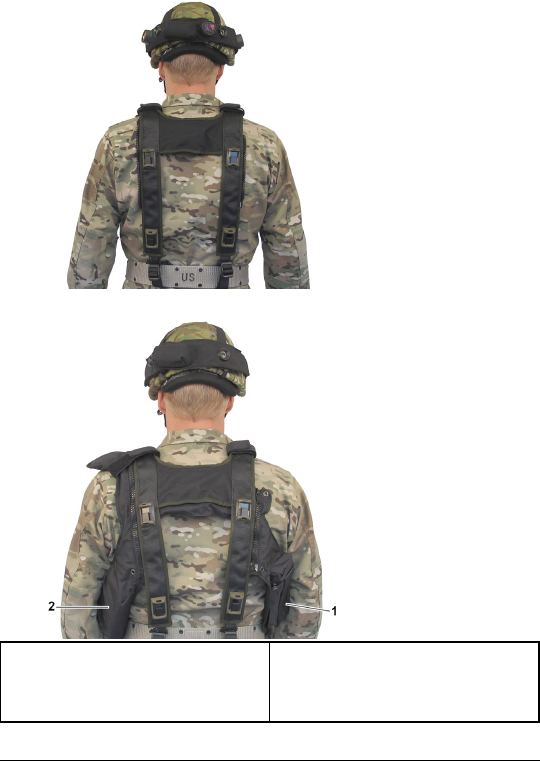
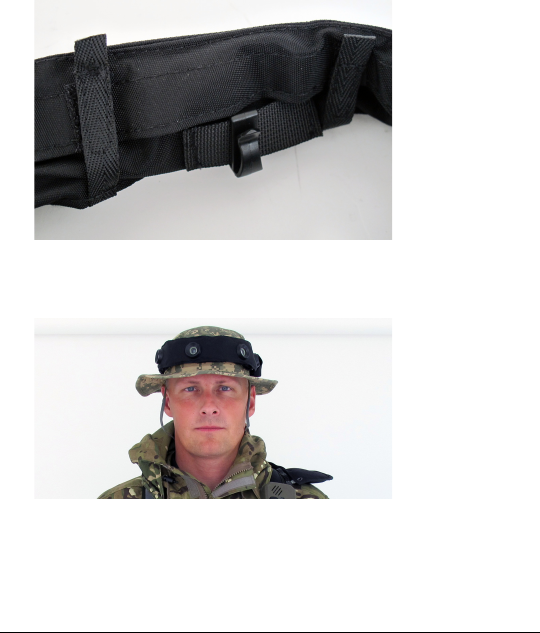
3.1 Body harness
1. Put on the body harness.

4
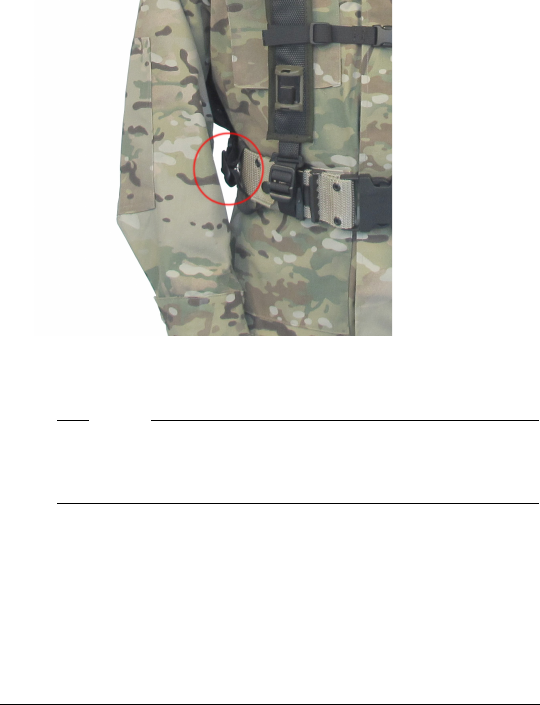
2. Attach the chest buckle. Put the front straps around the
combat harness belt and tighten the straps.
3. Put the rear straps around the combat harness belt and
tighten the rear straps
5
Advanced configuration:
4. Tighten the instrumentation kit straps on both sides
5. Adjust the vest and make sure no detectors or the GPS
antenna are covered.
Note!
The MOLLE system on the back of the harness can
be used to fix the harness tighter to the combat
harness.
6
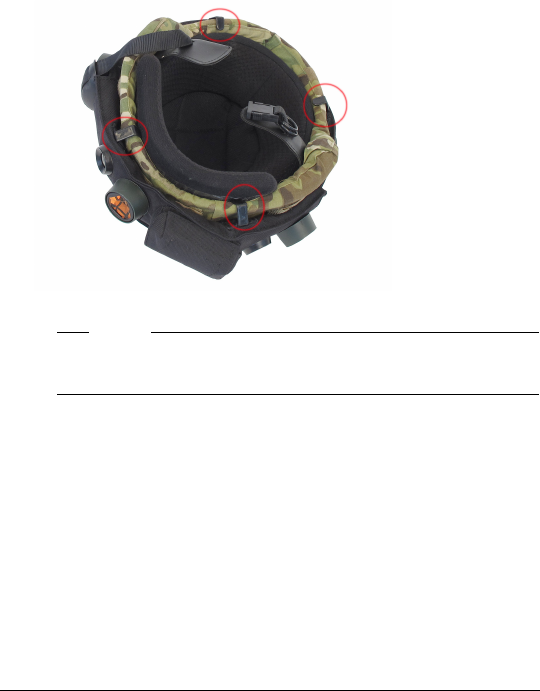
3.2 Head harness
1. Attach the four hooks around the helmet.
Note!
It is easier to start with the rear hooks to attach the
head harness.
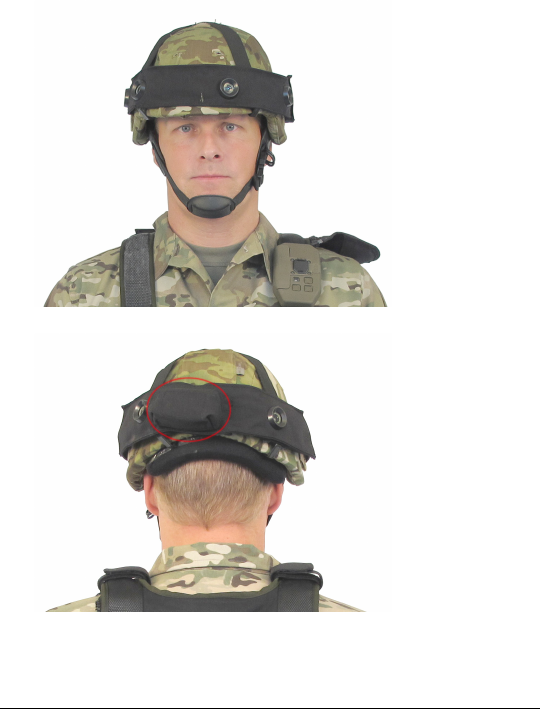
7
2. Put on the helmet. The electronic unit should be placed in
the back.

8
3.3 Battery installation
3.3.1 Safety conditions
WARNING!
Prevent Batteries from:
• Damage
• Short circuit
• Exposure to temperatures above 60C
(140F)
• Being dismantled
• Immersion in liquids
3.3.2 Battery
The body harness and the head harness is powered by a
battery. When a body harness battery reaches low charge,
the audio cue "Low Battery" is heard. This cue is repeated
every 5 minutes and the battery should be replaced as soon
as possible.
9
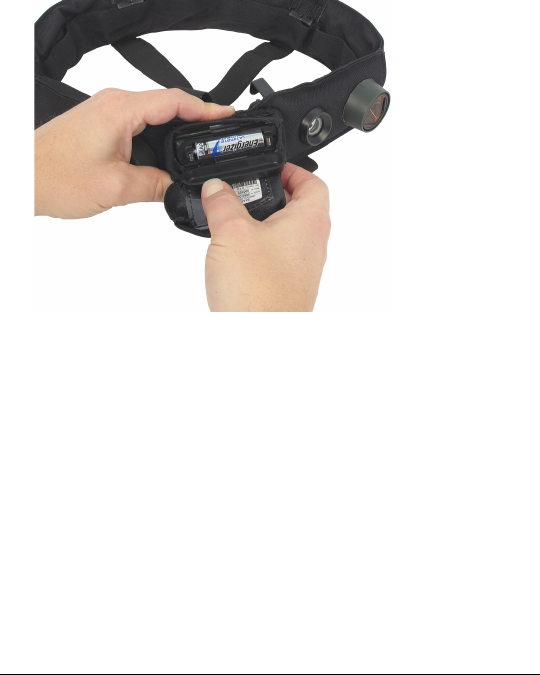
3.3.3 Battery installation basic / medium
configuration
1. Open the battery lid on the PCU to install the battery. The
positive (+) pole should point upwards.
2. Verify that the vest sounds "System OK" or "Tampering
Kill"
3. Close the battery lid.
10
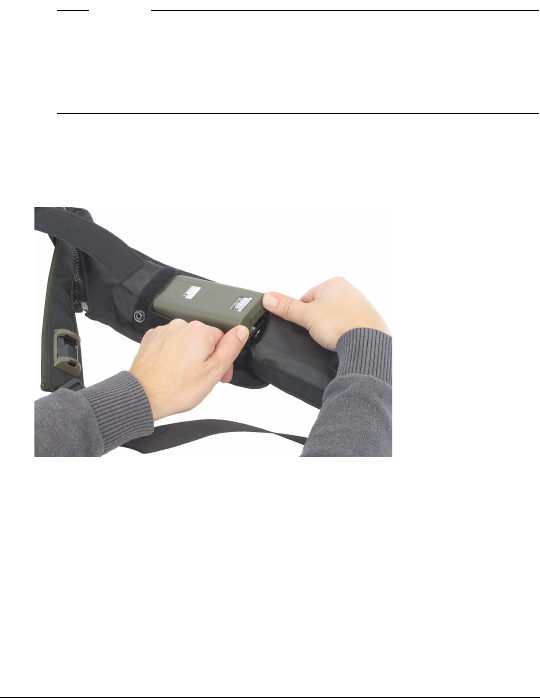
3.3.4 Battery installation advanced configuration
Safety conditions
Note!
No battery is needed in the PCU. Any battery left in
the PCU is still protected from charging and return
currents when using the central battery in Advanced
mode.
1. Pull the Velcro flap and open the battery pocket.
2. Install the battery. Make sure that the battery locks in the
battery holder.
3. Verify that the PDD sounds "System OK" or "Tampering
kill".
4. Close the battery pocket.
11
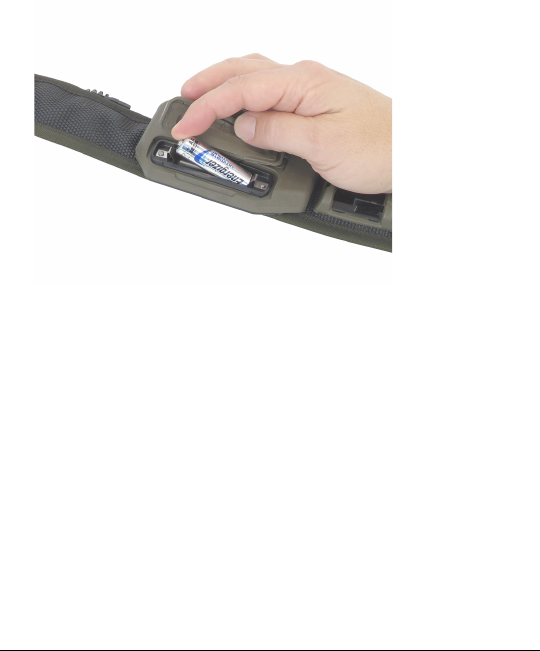
3.3.5 Head harness and soft cap
1. Open the Velcro flap and battery lid to install the battery
in the head harness.
2. Close the battery lid and pocket.

12
4 Operation
4.1 The PCU interface
1Battery
Compartme
nt
4Push
buttons
2Loudspeake
r
5Hit-LED
3IR-port and
status LED

13
4.1.1 Battery compartment
The PCU contains an AA-cell battery compartment.
4.1.2 Loud speaker
All environmental sounds and spoken messages are given
from the loud speaker, placed in front of the PCU.
4.1.3 IR-port and status led
The IR port and status LED is available under a cap. The IR-
port is always automatically activated and is used to
associate the PDD NG with other devices. Three status LED
(red, yellow, green) is available beside the IR-port
4.1.4 Push buttons
Button 1: Push the button to adjust the volume between low,
medium and high. Default volume when the system starts up
is set to high.
Button 2: Is not used.
Button 3: Generates a BIT and if the PDD is in wounded
status, will wounded body parts also be reported. When
pressing the button twice (<1sec), will the PCU report full
system status audio feedback.
4.1.5 Hit-LED
The PDD has a visible high intensive Hit-LED placed in the
front of the PCU

14
4.2 Events and audio cues
The PDD generates the following types of audio cues/
messages via the built-in speaker:
• near miss sounds
• wound status
• killed
• artillery sound with distance and compass direction
• minefield effect
Hit evaluation:
When the PDD evaluates a hit an attention noise is
generated. This is followed by a message as to wound type
or a killed statement.
The PDD will disable the weapon SAT for about 30 seconds
to simulate the shock of being hit. This prevents immediately
return fire.
If the hit is evaluated as a kill or a severe/lethal wound the
SAT will continue to be disabled. Only light wounds result in
the ability to continue firing after 30 seconds.
The simulated wound type will dictate the remaining time to
live from an untreated wound. In the event of "kill" the wearer
presents a combat target and should not move around. If
moving around an unrealistic situation during the After Action
Review is caused.
15
5 Optional Equipment
5.1 Installation of soft cap
1. Attach the four hooks around the soft cap. The electronic
unit should be placed in the back of the soft cap.
2. Put on the soft cap and adjust the size with lacing and
quick lock.
16
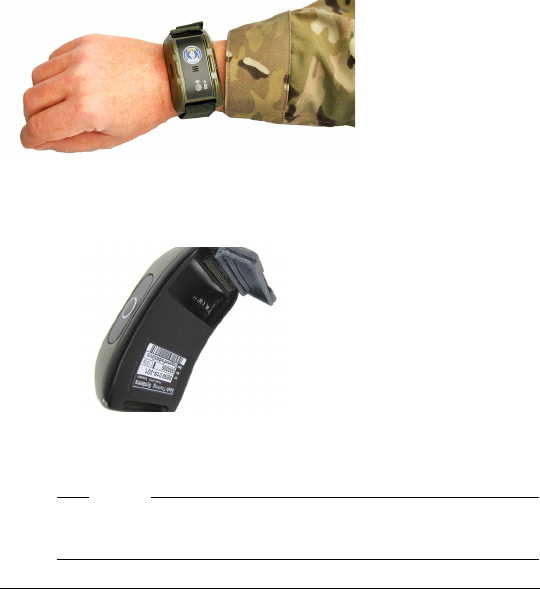
5.2 EFD
5.2.1 Preface
The EFD is placed on the wrist and associated to the PDD.
The EFD improves the ability to sense a simulated wound/kill
state and detected near miss, by vibration, LED and sound.
The Buddy Aid function provides the possibility to perform a
simulated first aid on a wounded person.
5.2.2 Battery installation
1. Open the battery lid.
2. Install the battery with the battery's positive (+) terminal
to the plate. Use CR-2 battery.
Note!
The battery typically needs to be replaced every
14th day.
17
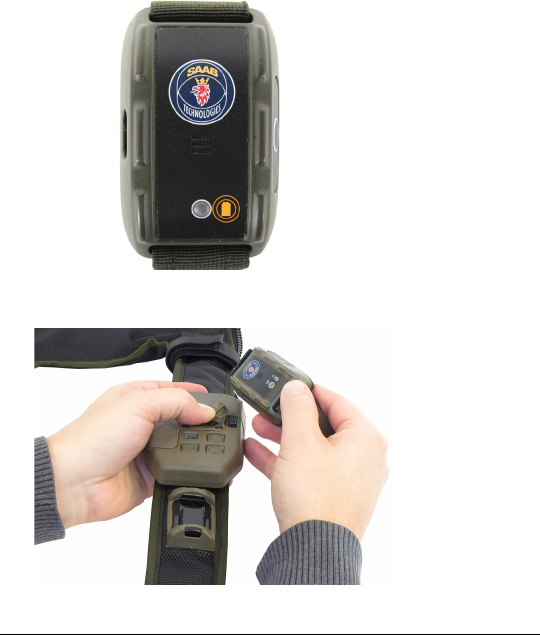
5.2.3 Associate the EFD to the PDD
1. When the battery is installed, the EFD generates one
beep, one Signal LED flash and a short vibration. The
battery LED turns solid yellow. The EFD is now in
association mode.
2. Hold the EFDs IR-window against the PDDs IR-port.

18
3. The PDD will generate the audio message "ID" and the
yellow battery LED on the EFD is turned off.
Note!
The EFD is associated to the PDD until it is
associated with another PDD. Even if the battery is
changed.
6 Troubleshooting
6.1 PDD troubleshooting
Symptom Cause Corrective action
No indication of a
hit
Detectors
covered or
dirty
Make sure that the
detectors are clean
and facing forward.
No power Push the volume
control. If no sound,
check the battery.
Head harness
not powered
up.
Move the head band
(sleep mode?).
Check the battery.

19
7 Maintenance
7.1 Clean the equipment
1. Remove all loose dust and dirt with a soft brush.
2. Clean all parts with a damp sponge.
3. Clean optical surfaces with a lens cleaning tissue.
4. Dry all equipment with a dry cloth.
No sound from
the speakers
No battery in
PDD
Install battery.
Low volume Press the volume
control button.
Battery
discharged in
PDD
Check the battery.
"System Error"
from speakers.
Error Contact O/C (see
BIT error list).
Symptom Cause Corrective action

20
8 Regulatory Statements
8.1 FCC Certification
The United States Federal Communication Commission
(FCC) has established certain rules governing the use of
electronic equipment.
8.2 Part15, Class B
1 This device is FCC Certified FCC ID: R4APDDNG.
2 This device complies with Part 15 of FCC rules.
Operation is subject to the following two conditions:
2.1 This device may not cause harmful interference,
and
2.2 This device must accept any interference received,
including interference that may cause undesired
operation. This equipment has been tested and
found to comply with the limits for a Class B digital
device, pursuant to Part 15 of the FCC Rules.
8.3 User Information
CAUTION!
Any changes or modifications not expressly
approved by the party responsible for compliance,
namely Saab Defense and Security USA LLC,
Training and Simulation, could void the user’s
authority to operate the Equipment.