Samsung Electronics Co 04OMEGA211 Digital Video Camcorder User Manual 00811B SCD907 USA 01 27
Samsung Electronics Co Ltd Digital Video Camcorder 00811B SCD907 USA 01 27
UserManual.wiki
>
Samsung Electronics Co
>
04OMEGA211 User Manual
>
Users Manual 2
Contents
1.
Users Manual 1
2.
Users Manual 2
Users Manual 2
Navigation menu
Upload a User Manual
Namespaces
Wiki Guide
HTML
PDF
Info
Views
User Manual
Discussion / Help
Navigation
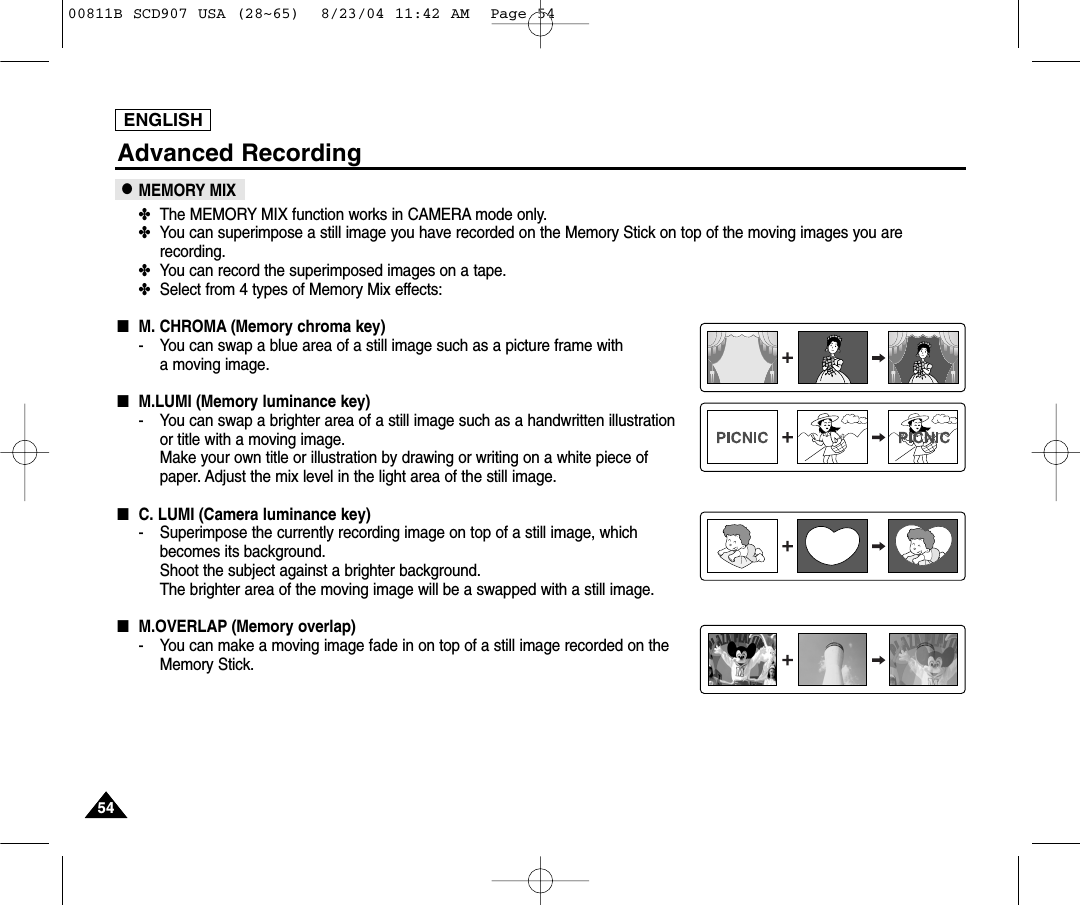
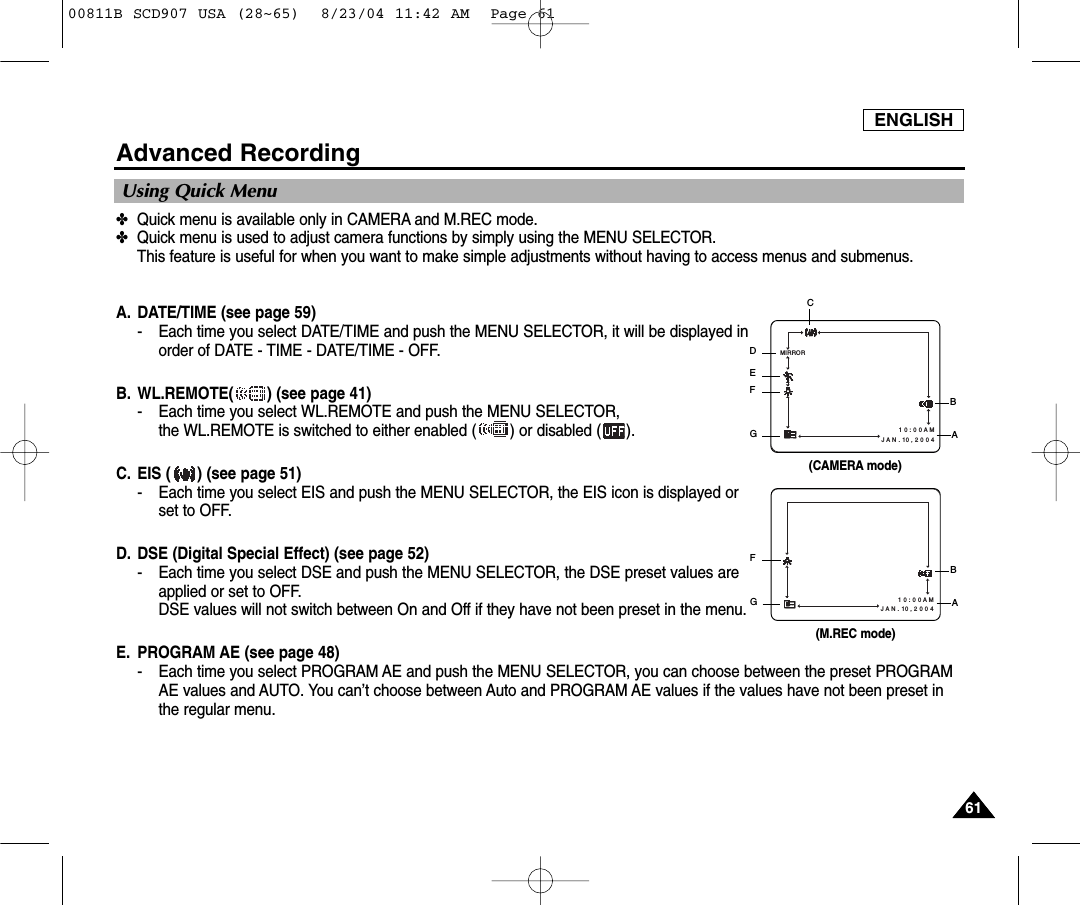
![ENGLISH5151Advanced Recording●EIS (Electronic Image Stabilizer)✤The EIS function works in CAMERA mode only. ✤EIS (Electronic Image Stabilizer) is a function that compensates for any shaking or hand movement while holding thecamcorder (within reasonable limits).✤It provides more stable pictures when:■Recording with the zoom■Recording a small object close-up■Recording and walking at the same time■Recording through the window of a vehicle1. Set the camcorder to CAMERA mode. (see page 29)2. Press the MENU button.■The menu list will appear.3. Move the MENU SELECTOR highlight to CAMERA and push the MENU SELECTOR.■The sub menu list will appear.4. Move the MENU SELECTOR to activate the EIS function, push the MENU SELECTOR.■The EIS menu is changed to ON. ■If you do not want to use the EIS function, set the EIS menu to OFF.5. To exit, press the MENU button.Notes■It is recommended that you deactivate the shake compensation function when using a tripod.■If you use the EIS function, the picture quality may deteriorate.■While setting the EIS to ON, the WIDE [16:9] and STROBE (DSE function) mode do not work.CAM MODEINITIALPROGRAM AEWHT. BALANCED.ZOOMEISDSE SELECTMEMORY MIXCAMERAA/VMEMORYVIEWERCAM MODEPROGRAM AEWHT. BALANCED.ZOOMEISDSE SELECTMEMORY MIXCAMERA SET00811B SCD907 USA (28~65) 8/23/04 11:42 AM Page 51](https://usermanual.wiki/Samsung-Electronics-Co/04OMEGA211.Users-Manual-2/User-Guide-466860-Page-1.png)
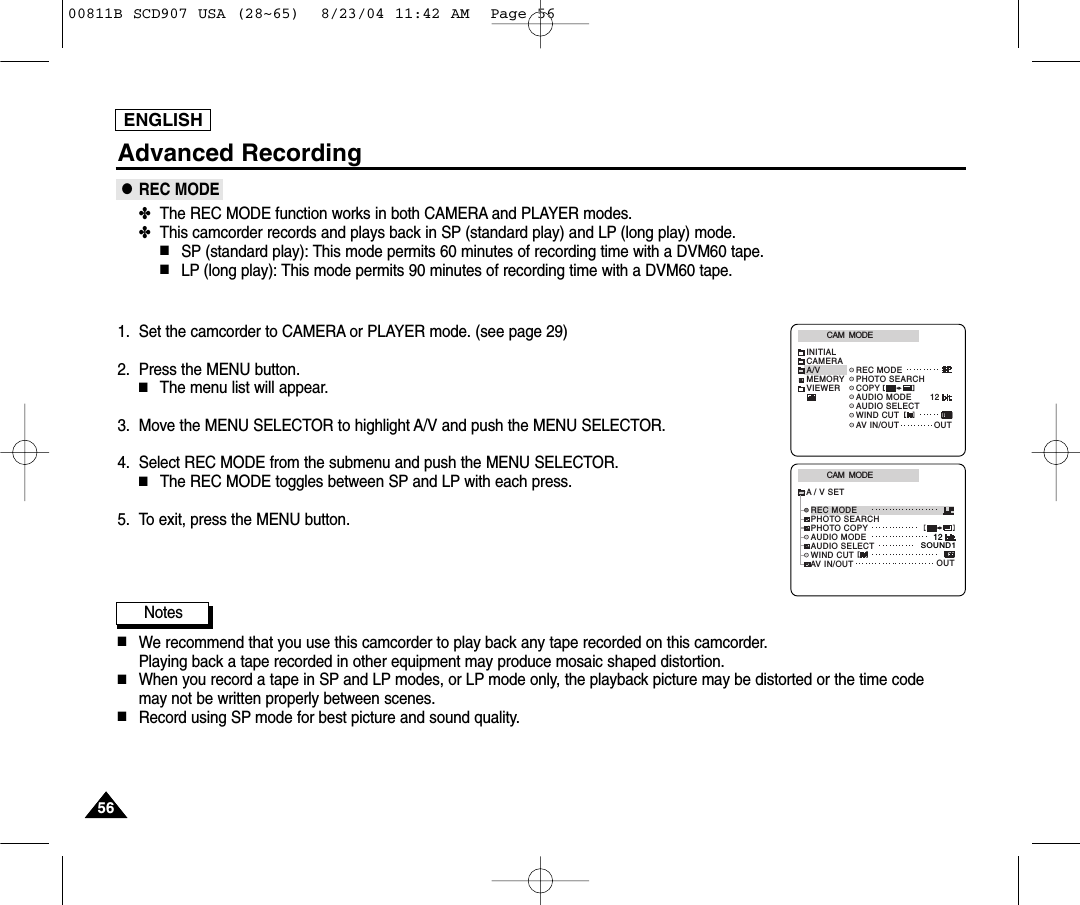
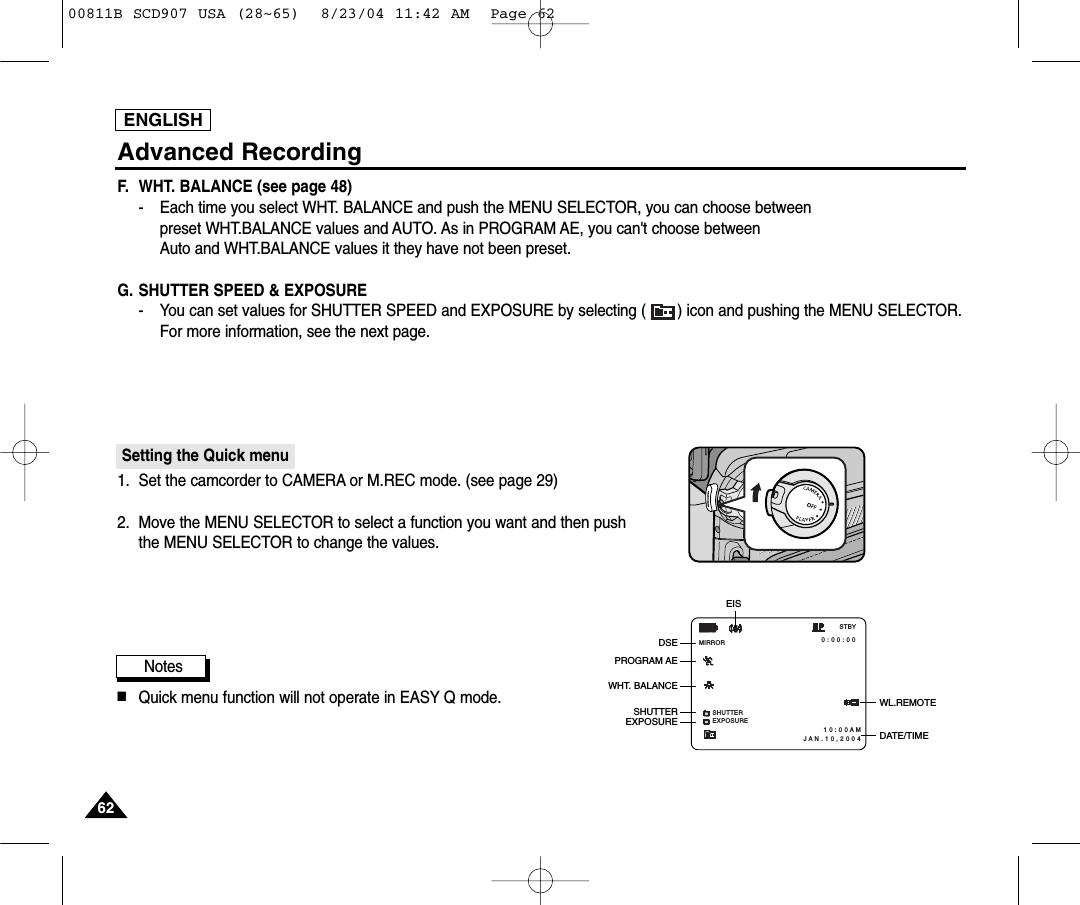
![ENGLISH5252Advanced Recording●DSE(Digital Special Effects) SELECT✤The DSE function works in CAMERA mode only.✤The digital effects enable you to give a creative look to your recording by adding various special effects.✤Select the appropriate digital effect for the type of picture that you wish to record and the effect you wish to create.✤There are 8 DSE modes.a. ART modeThis mode gives the images a coarse effect.b. MOSAIC modeThis mode gives the images a mosaic effect.c. SEPIA modeThis mode gives the images a reddish-brown pigment.d. NEGA mode This mode reverses the colors of the images, creating a negative image.e. MIRROR modeThis mode cuts the picture in half, using a mirror effect.f. BLK & WHT modeThis mode changes the images to black and white.g. WIDE [16:9] modeProduce images in the WIDE [16:9] format for playback on wide screen TVs.h. STROBE modeThis effect converts on-screen action to a series of still images, giving an effect similarto slow-motion.bdce fhga00811B SCD907 USA (28~65) 8/23/04 11:42 AM Page 52](https://usermanual.wiki/Samsung-Electronics-Co/04OMEGA211.Users-Manual-2/User-Guide-466860-Page-2.png)
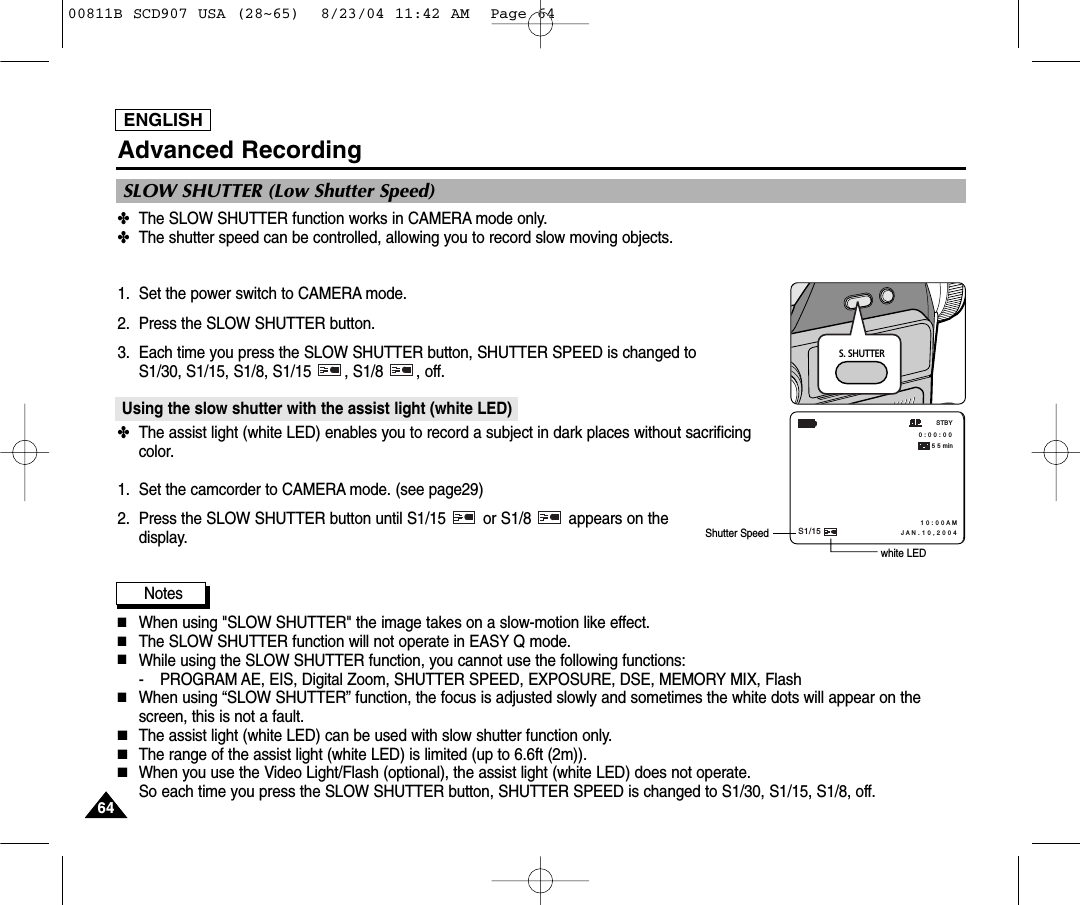
![ENGLISH5353Advanced RecordingSelecting an Digital Special Effect1. Set the camcorder to CAMERA mode. (see page 29)2. Press the MENU button.■The menu list will appear.3. Move the MENU SELECTOR to highlight CAMERA and push the MENU SELECTOR.4. Select DSE SELECT from the submenu.5. Push the MENU SELECTOR to enter the sub-menu.6. Using MENU SELECTOR, select the DSE mode. (see page 52)■Push the MENU SELECTOR to confirm the DSE mode.7. To exit, press the MENU button.Notes■The DSE function will not operate in EASY Q mode.■While setting the WIDE [16:9] or STROBE to ON, the EIS function does not work.CAM MODEPROGRAM AEWHT. BALANCED.ZOOMEISDSE SELECTMEMORY MIXCAMERA SETCAM MODEINITIALPROGRAM AEWHT. BALANCED.ZOOMEISDSE SELECTMEMORY MIXCAMERAA/VMEMORYVIEWERCAM MODEDSE SELECTARTCAMERA SETMOSAICNEGASEPIAMIRRORBLK&WHTCAM MODEDSE SELECTSTROBEWIDE [16:9]CAMERA SET00811B SCD907 USA (28~65) 8/23/04 11:42 AM Page 53](https://usermanual.wiki/Samsung-Electronics-Co/04OMEGA211.Users-Manual-2/User-Guide-466860-Page-3.png)
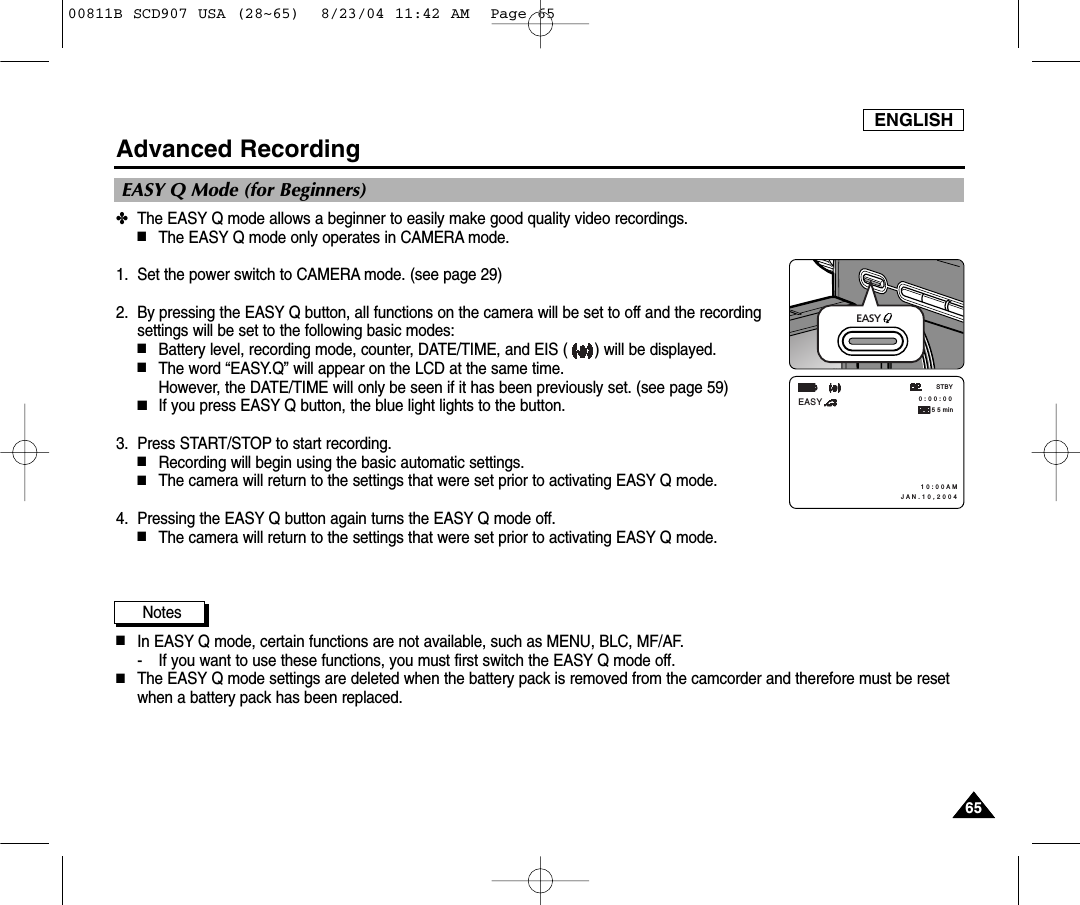
![ENGLISH5555Advanced RecordingRecording Superimposed images on a tape✤Insert a tape for recording into your camcorder.✤Insert a Memory Stick with still images recorded into your camcorder.1. Set the camcorder to CAMERA mode. (see page 29)2. Press the MENU button.■The menu list will appear.3. Move the MENU SELECTOR to highlight CAMERA and push the MENU SELECTOR.4. Select MEMORY MIX from the submenu and push the MENU SELECTOR.5. Move the MENU SELECTOR to select the desired MEMORY MIX mode (see page 29) and push the MENU SELECTOR.■Your currently recording image is combined with the last recorded image on the Memory Stick.6. Press the (REV)/ (FWD) buttons to select the still image you want to superimpose.7. Move the MENU SELECTOR to adjust the mix level. ■Push the MENU SELECTOR to confirm the MEMORY MIX mode.8. To exit, press the MENU button.■Your selected MEMORY MIX mode is flashed in the display.9. Press the MEMORY MIX button.■The still image is superimposed on the moving image.■Each time you press the MEMORY MIX button, your selection is activated (display lights continuously) or deactivated (display flashes).10.Press the START/STOP button to start recording.■The superimposed images are recorded onto the tape.Note■If you change the position of the power switch, you must select a still image for MEMORY MIXagain.CAM MODEINITIALPROGRAM AEWHT. BALANCED.ZOOMEISDSE SELECTMEMORY MIXCAMERAA/VMEMORYVIEWERCAM MODEPROGRAM AEWHT. BALANCED.ZOOMEISDSE SELECTMEMORY MIXCAMERA SETCAM MODEMEMORY MIXM.CHROMAM.LUMIC.LUMIM.OVERLAPCAMERA SET [07/07] 0 : 4 3 : 0 1 3 4 minSTBYM.OVERLAP00811B SCD907 USA (28~65) 8/23/04 11:42 AM Page 55](https://usermanual.wiki/Samsung-Electronics-Co/04OMEGA211.Users-Manual-2/User-Guide-466860-Page-5.png)


![ENGLISH7171Advanced RecordingDubbed audio Playback1. Insert the dubbed tape and press MENU button in PLAYER mode.2. Move the MENU SELECTOR to highlight A/V.3. Push the MENU SELECTOR to enter the sub-menu.4. Use the MENU SELECTOR to select AUDIO SELECT from the submenu. 5. Push the MENU SELECTOR to enter the sub-menu.6. Using the MENU SELECTOR, select the AUDIO playback channel. ■Push the MENU SELECTOR to confirm the audio playback channel.- SOUND[1] : play the original sound.- SOUND[2] : play the dubbed sound.- MIX[1+2] : play back SOUND1 and 2 equally mixed.7. To exit, press the MENU button.8. Press the (PLAY/STILL) button to playback the dubbed tape.Note■When you playback added sound (SOUND[2] or MIX[1+2] mode), you may experience a loss of sound quality.PLAYER MODEA / V SETAUDIO SELECTSOUND [ 1 ]SOUND [ 2 ]MIX [ 1 + 2 ]PLAYER MODEREC MODEPHOTO SEARCHPHOTO COPYAUDIO MODE 12SOUND1AUDIO SELECTWIND CUTA / V SET00811B SCD907 USA (66~120) 8/23/04 11:42 AM Page 71](https://usermanual.wiki/Samsung-Electronics-Co/04OMEGA211.Users-Manual-2/User-Guide-466860-Page-21.png)


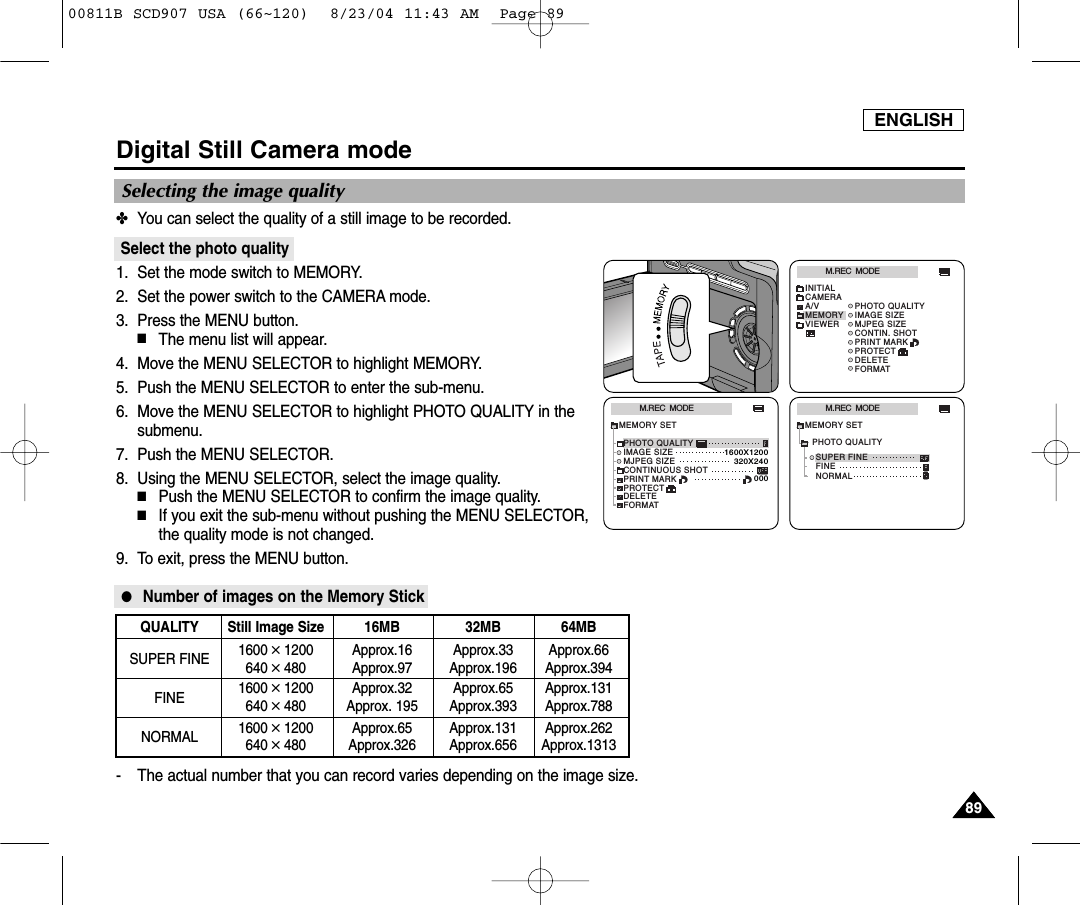
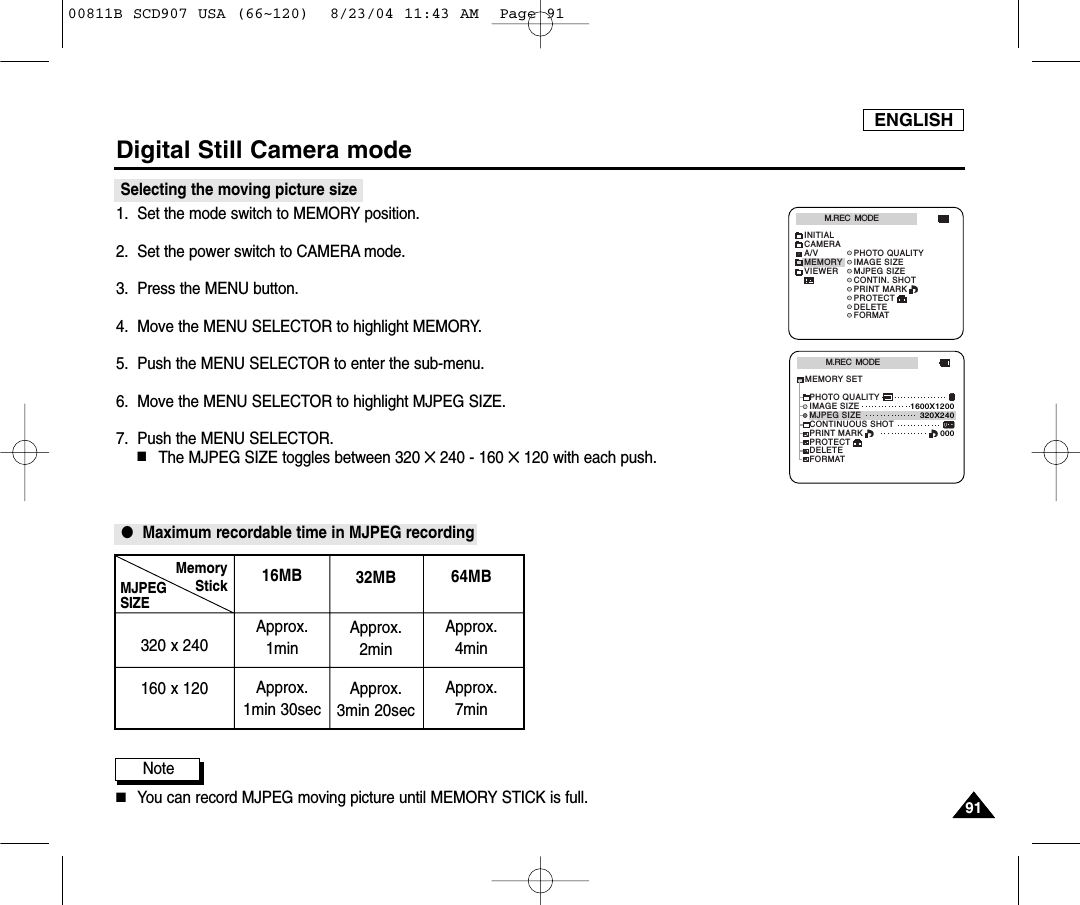
![ENGLISHDigital Still Camera mode9090Selecting the recording image size✤Select the image size of still image to be recorded.1. Set the mode switch to MEMORY.2. Set the power switch to the CAMERA mode.3. Press the MENU button.■The menu list will appear4. Use the MENU SELECTOR to highlight MEMORY and push the MENU SELECTOR.5. Select IMAGE SIZE from the submenu and push the MENU SELECTOR.■The IMAGE SIZE toggles between 1600 ✕1200 and 640 ✕480 with each push.6. To exit the menu, press the MENU button.Note■Still images that are recorded at 1600 ✕1200 on your camcorder, may not playback properly on other digitaldevices that do not support this image size.M.REC MODEINITIALPRINT MARKPHOTO QUALITYIMAGE SIZEMJPEG SIZECONTIN. SHOTCAMERAA/VMEMORYVIEWERPROTECTDELETEFORMATM.REC MODEMEMORY SETPRINT MARKPHOTO QUALITYDELETEFORMATIMAGE SIZEMJPEG SIZEPROTECT320X2401600X1200000CONTINUOUS SHOT [ 0 6 ]3 2 0 0 0 min1600FImage Size00811B SCD907 USA (66~120) 8/23/04 11:43 AM Page 90](https://usermanual.wiki/Samsung-Electronics-Co/04OMEGA211.Users-Manual-2/User-Guide-466860-Page-40.png)
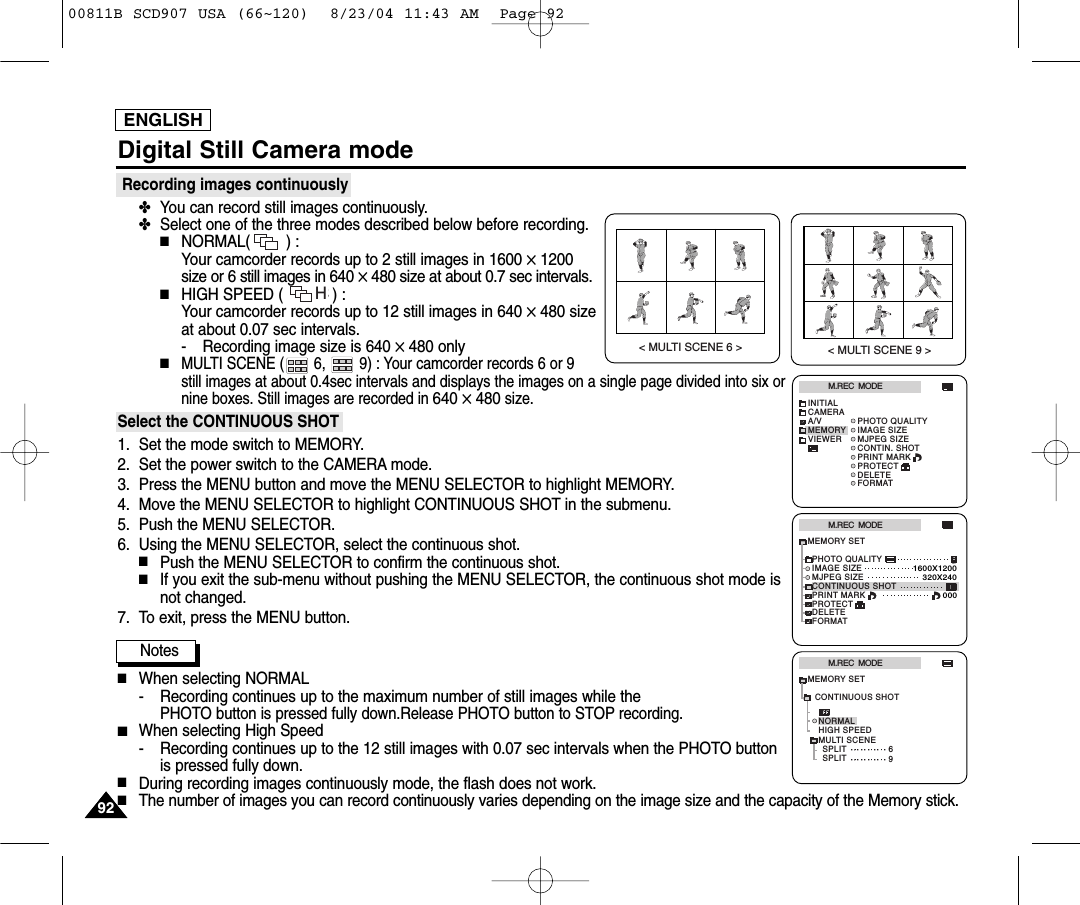
![ENGLISH9393Digital Still Camera mode✤Audio cannot be recorded with still images onto the Memory Stick.Recording images to a Memory Stick1. Set the mode switch to MEMORY.2. Set the power switch to CAMERA.3. Press the PHOTO button lightly (about halfway down) and hold it.■During autofocus photo mark ( ) flashes in the display as the camcorder adjusts thefocus and is continuously displayed when the camcorder is ready to take the still image.■If you do not wish to record, release the pressure from the button.4. Press the PHOTO button fully down.■The still image is recorded to the Memory Stick.■While the camcorder is recording the still image, “” appears on the screen.Notes■The remote controller’s PHOTO button has no halfway setting.Press the button fully and the camcorder immediately takes the image.■Do not turn the power off, eject a Memory Stick or remove the battery pack during recording.The Memory Stick or its data may be damaged.■If focusing is difficult with the autofocus mode when using the PHOTO function, focus manually.Recording Still images to a Memory Stick in M.REC Mode.W [ 0 6 ]FPHOTO12300811B SCD907 USA (66~120) 8/23/04 11:43 AM Page 93](https://usermanual.wiki/Samsung-Electronics-Co/04OMEGA211.Users-Manual-2/User-Guide-466860-Page-43.png)
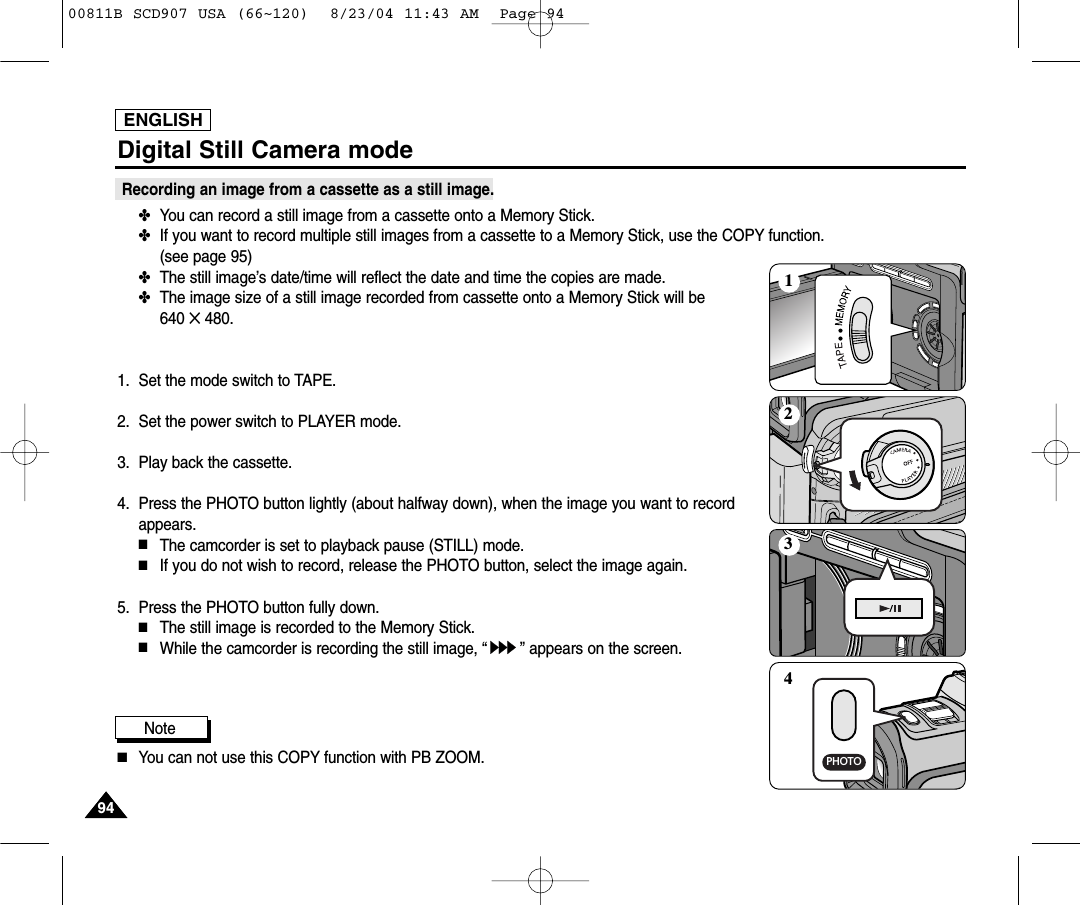
![ENGLISH9595Digital Still Camera mode✤You can copy still images recorded with PHOTO function on a cassette onto a Memory Stick.■The still images date/time will reflect the date and time the copies are made.■The image’s size of a still image copied from tape to Memory Stick will be 640 ✕480.■Before operation- Insert a recorded tape into your camcorder and rewind the tape.- Insert a Memory Stick into your camcorder.1. Set the mode switch to TAPE.2. Set the power switch to the PLAYER mode.3. Press the MENU button.4. Move the MENU SELECTOR to highlight A/V and push the MENU SELECTOR.■The submenu will appear.5. Move the MENU SELECTOR to highlight PHOTO COPY and push the MENU SELECTOR.■All still images that recorded on a cassette will be copied to a Memory Stick.6. The camcorder automatically performs the photo search to find still images and copying starts.7. Press (STOP) button to stop copying.■Copying stops when the cassette is finished or Memory Stick is full.PLAYER MODEREC MODEPHOTO SEARCHPHOTO COPYAUDIO MODE 12SOUND1AUDIO SELECTWIND CUTA / V SET[ 4 5 ]640PHOTO COPYNOW SEARCH ... 0 : 1 0 : 3 5 : 0 2PLAYER MODEINITIALWIND CUTREC MODEPHOTO SEARCHCOPYAUDIO MODE 12AUDIO SELECTCAMERAA/VMEMORYVIEWERCopying still images from a cassette to Memory Stick00811B SCD907 USA (66~120) 8/23/04 11:43 AM Page 95](https://usermanual.wiki/Samsung-Electronics-Co/04OMEGA211.Users-Manual-2/User-Guide-466860-Page-45.png)
![ENGLISH9898Digital Still Camera mode✤You can playback and view still images/moving pictures recorded on the Memory Stick.✤There are 3 ways to view recorded images.■Single images/Moving pictures■Slide show : To view all images automatically and in consecutive order.■Multi display : To view 6 images at once.To view a Single image1. Set the mode switch to MEMORY.2. Set the power switch to PLAYER mode.■The last still image/moving picture recorded appears in the display.- If there are no recorded still images/moving pictures on the Memory Stick, NO STORED INAGE! and will display on the screen.3. Using the (FWD) and (REV) buttons, search for the desired still images/movingpictures.■To view the next still image/moving picture: press the (FWD) button.■To view the previous still image/moving picture: press the (REV) button.■Pressing (FWD) when you are on the last still image/ moving picture will take you tothe first still image and pressing (REV) when you are on the first still image/movingpicture will take you to the last still image/moving picture.■Keep pressing (FWD) or (REV) to search for a still image/moving picture quickly.■Moving picture: Pressing (PLAY/STILL) plays back the moving picture and will showfirst scene as a still image when playback ends.- Pressing (PLAY/STILL) during playback will stop the moving picture and thescene is shown as a still image. Pressing (PLAY/STILL) again will restart theplayback.Notes■There could be some broken or mosaic pictures displayed while playing the MJPEG movingpictures. This is not a fault.■It is possible that moving pictures that you recorded in the Memory Stick might not playbackin other brands of camcorder.■The MJPEG file recorded by another camcorder might not playback in this camcorder.■Memory Sticks with large file sizes may take additional time to replay.■You can transfer MJPEG file to PC through DVC Media 7.0 using USB port on your PC. And then, play MJPEG file with a movingpicture player program like a Microsoft Windows Media Player. (DVC Media 7.0 is included in the CD supplied)Viewing Still images/Moving picturesREC SEARCH FADE BLCREV FWDEASY MULTI DISP.1600 X 1200[0 4 / 0 6]1 0 0 - 0 0 0 4ImageSize320MJPEG0 0: 0 1 / 0 0: 2 3 secDCAM0002.AVIPlayback time/Time of recordedpictureMJPEG SizeFile numberstill imagemoving picture00811B SCD907 USA (66~120) 8/23/04 11:43 AM Page 98](https://usermanual.wiki/Samsung-Electronics-Co/04OMEGA211.Users-Manual-2/User-Guide-466860-Page-48.png)
![ENGLISH9999Digital Still Camera modeTo view a slide show1. Set the camcorder to M.PLAY mode. (see page 29)■The last recorded still image/moving picture appears.2. Press the S.SHOW button.■All images will be played back consecutively for 3~4 seconds each.3. To stop the slide show, press the S.SHOW button again.To view the Multi Display1. Set the camcorder to M.PLAY mode. (see page 29)■The last recorded still image/moving picture appears.2. To view six stored still image/moving pictures on single screen, press the MULTI DISP.button.■A selection mark ( ) appears under the still image/moving picture.■Moving pictures will be displayed with the first scene as a still image, indicated by a picture mark ( ).■Move the MENU SELECTOR to select a still image/moving picture.■To display the previous six images, press the (REV).■To display the next six images, press the (FWD).3. To return to single playback mode, press the MULTI DISP. button again or push the MENU SELECTOR.■The still image/moving picture you have marked fills the whole display.19 20 2122 23 24[22/24]100-0025REC SEARCH FADE BLCREV FWDEASY MULTI DISP.00811B SCD907 USA (66~120) 8/23/04 11:43 AM Page 99](https://usermanual.wiki/Samsung-Electronics-Co/04OMEGA211.Users-Manual-2/User-Guide-466860-Page-49.png)
![ENGLISH100100Digital Still Camera mode✤This camcorder supports the DPOF (Digital Print Order Format) print format.✤You can automatically print still images recorded on a Memory Stick with a printer supporting DPOF.✤There are 2 ways to make a PRINT MARK.■THIS FILE: You can set a print mark on the photo image displayed on the LCD.■ALL FILES: To print 1 copy each of all of the stored still images. 1. Set the mode switch to MEMORY.2. Set the power switch to PLAYER mode.■The last recorded image appears.3. Using the (FWD) and (REV) buttons, search for the still image that you want to mark.4. Press the MENU button.5. Move the MENU SELECTOR to highlight MEMORY and push the MENU SELECTOR.■The MEMORY SET submenu will appear. 6. Move the MENU SELECTOR to highlight PRINT MARK, push the MENU SELECTOR.7. Use the MENU SELECTOR to select either THIS FILE or ALL FILES and push the MENUSELECTOR.8. Use the MENU SELECTOR to select the quantity and push the MENU SELECTOR.Notes■When you setup the PRINT MARK option to ALL FILES, 999 files from the current file are set to 1or 0. ■The ALL FILES option may require extended operation time depending on the number of stored still images. ■You cannot write print marks on moving pictures.Marking still images for printingM.PLAY MODEMEMORY SETPRINT MARKPHOTO QUALITYDELETEFORMATIMAGE SIZEMJPEG SIZE320X2401600X1200000CONTINUOUS SHOTPROTECTM.PLAY MODEINITIALPRINT MARKPHOTO QUALITYDELETEFORMATIMAGE SIZEMJPEG SIZECONTIN. SHOTCAMERAA/VMEMORYVIEWERPROTECTM.PLAY MODETHIS FILE NUM:000000[15/22]ALL FILESMEMORY SETNUM:000PRINT MARK00811B SCD907 USA (66~120) 8/23/04 11:43 AM Page 100](https://usermanual.wiki/Samsung-Electronics-Co/04OMEGA211.Users-Manual-2/User-Guide-466860-Page-50.png)
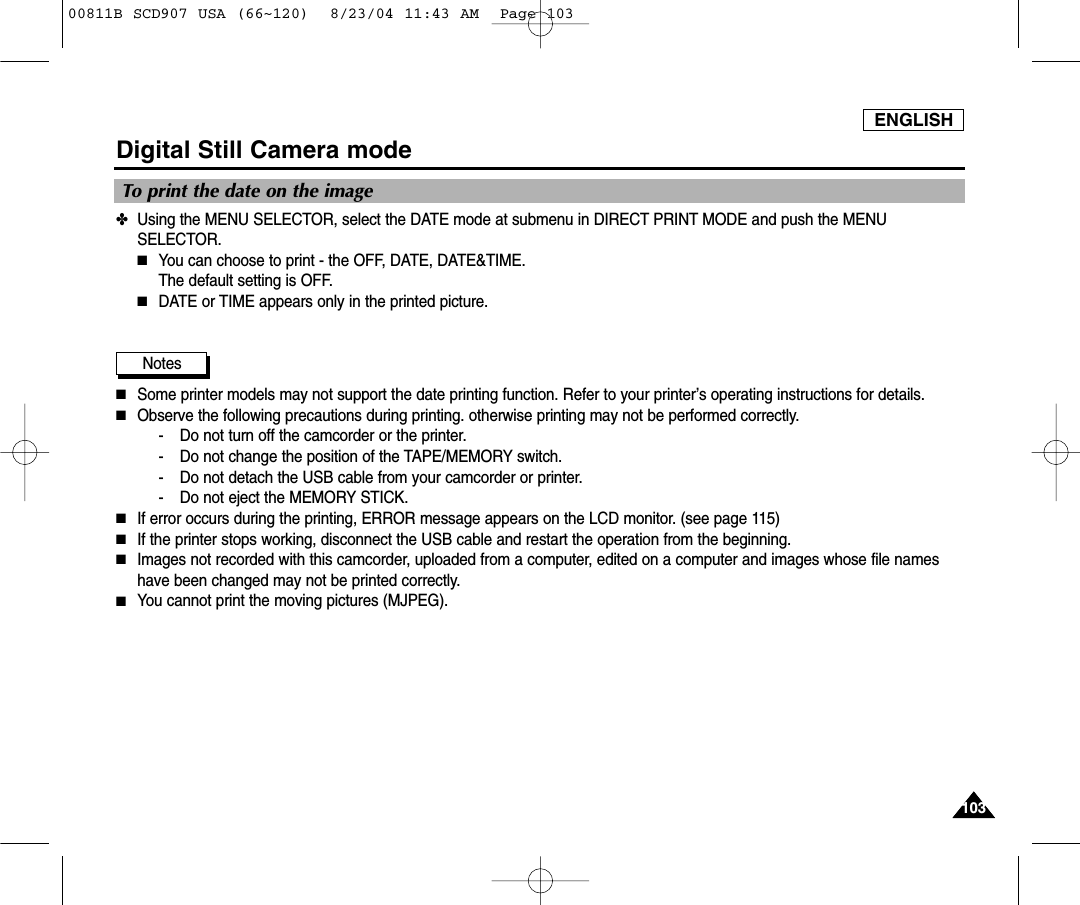
![ENGLISH101101Digital Still Camera mode✤By connecting the camcorder to printers with PictBridge support (sold separately), you can send images from the MEMORY STICK directly to the printer.✤With the PictBridge support, you can control the printer directly through your camcorder in order to print out stored images.For direct printing of your stored images using the PictBridge function, it is required to connect your camcorder to aPictBridge printer using a USB cable.✤Before printing the still image, you must set the USB CONNECT to “PRINTER” (see page 44).1. Insert the MEMORY STICK on which still images are stored intoyour camcorder.2. Connect the power source to the printer and turn on the power.3. Set the camcorder to M.PLAY mode. (see page 29)4. Change camcorder USB CONNECT setting to “PRINTER” mode. (see page 44).5. Connect your camcorder to the printer using the provided USB cable.When connection between your camcorder and printer is completed, such a OSD appears onthe screen.Notes■If such a OSD does not appear on the screen, the USB connection mode is not correctly set inthe menu, or the camcorder is not corrected to the printer.- Open the menu and make sure that USB CONNECT is set to PRINTER.- Disconnect the cable from camcorder and printer, turn off camcorder and printer, turn both back on and reconnect thecamcorder to the printer.■We cannot guarantee the operation of models that are not PictBridge compatible.Printing Your Pictures - Using the PictBridge (DIRECT PRINT)Connecting to a Printer[1 5 / 3 3]PRINT THIS PHOTOPict BridgeDATEDIRECT PRINT MODE00811B SCD907 USA (66~120) 8/23/04 11:43 AM Page 101](https://usermanual.wiki/Samsung-Electronics-Co/04OMEGA211.Users-Manual-2/User-Guide-466860-Page-51.png)
![ENGLISH102102Digital Still Camera mode1. Using the (FWD) and (REV) buttons, select the still image that you want to print.2. Move the MENU SELECTOR to highlight PRINT THIS PHOTO and push the MENU SELECTOR.■The print setting menu appear.■If you do not want to print photo, press the MENU button.3. Move the MENU SELECTOR to select the number of copies.■You can select a maximum of 30 copies for one still image.4. To start the printing, push the MENU SELECTOR.■The message “NOW PRINTING” appears and printing starts.■When printing is finished, “NOW PRINTING” disappears and the print setting menu appearsagain.✤To cancel printingPush the MENU SELECTOR while “NOW PRINTING” is displayed.Printing stops even if it is incomplete and the paper is fed through.✤To print another imageUsing the (FWD) and (REV) buttons, select the still image that you want to print.Repeat steps 3 to 4.✤To finish printingPress the MENU button and disconnect the USB cable from your camcorder and printer.Printing Images[1 5 / 3 3]PRINT THIS PHOTOPict BridgeDATEDIRECT PRINT MODEPictBridgeCOPY : EXIT : MENUEXECUTE : ENTER01 PRINTSPictBridgeCANCEL : ENTER> > > > >NOW PRINTING [01/09]00811B SCD907 USA (66~120) 8/23/04 11:43 AM Page 102](https://usermanual.wiki/Samsung-Electronics-Co/04OMEGA211.Users-Manual-2/User-Guide-466860-Page-52.png)
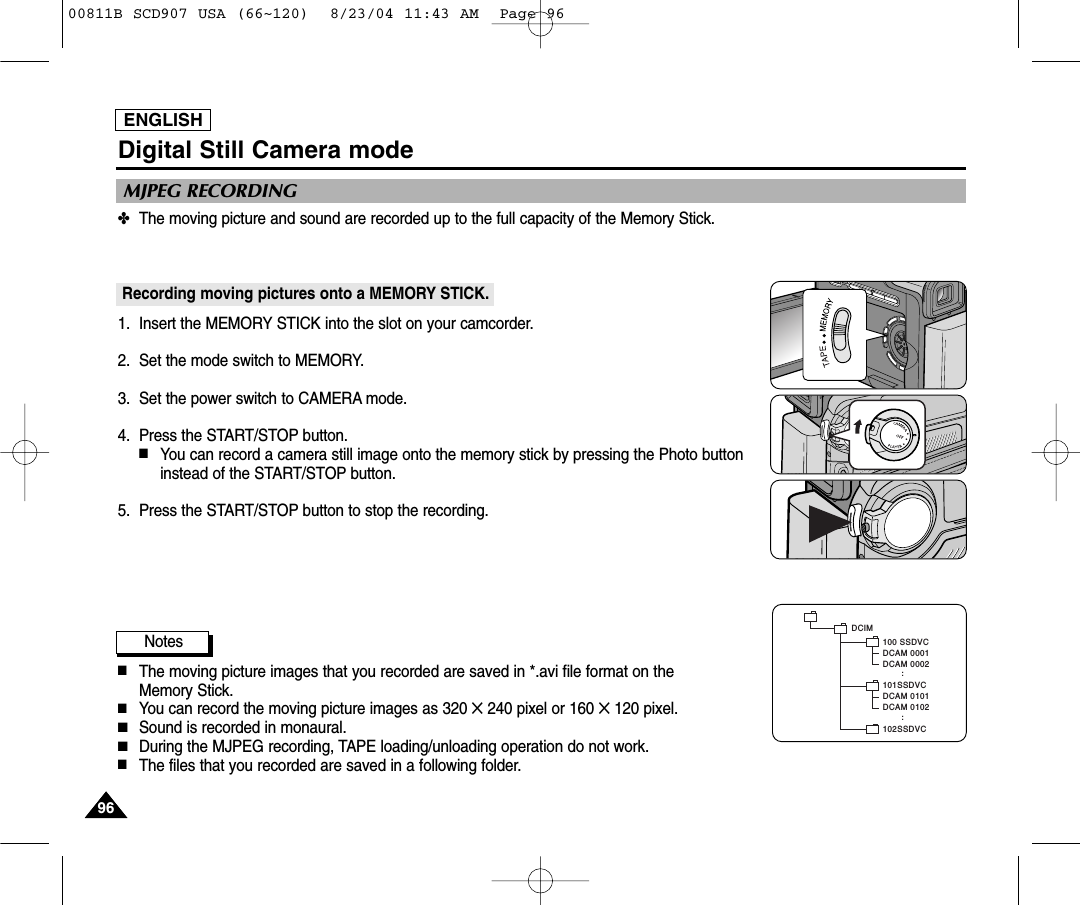
![ENGLISH104104Digital Still Camera mode✤You can protect important still images/moving pictures from accidental erasure.■If you execute FORMAT, all still images/moving pictures including protected images will be erased.1. Set the mode switch to MEMORY.2. Set the power switch to PLAYER mode.■The last recorded still image/moving picture appears.■If there are no recorded still images/moving pictures on the Memory Stick, NO STORED INAGE! and will display on the screen.3. Using the (FWD) and (REV) buttons, search for the still image/moving picture that you want to protect.4. Press the MENU button.5. Move the MENU SELECTOR to highlight MEMORY and push the MENU SELECTOR.■The MEMORY SET submenu will appear.6. Move the MENU SELECTOR to highlight PROTECT and push the MENU SELECTOR.7. Push the MENU SELECTOR to set PROTECT to ON or OFF. ■THIS FILE : protects the currently selected file from erasure. 8. Using the (FWD) and (REV) buttons, search for the still image/moving picture that youwish to protect.9. To exit the menu, press the MENU button.Note■If the write protect tab on the Memory Stick is set to LOCK, you cannot set image protection.Protection from accidental erasureM.PLAY MODEMEMORY SETPRINT MARKPHOTO QUALITYDELETEFORMATIMAGE SIZEMJPEG SIZE320X2401600X1200000PROTECTCONTINUOUS SHOTM.PLAY MODEINITIALPRINT MARKPHOTO QUALITYDELETEFORMATIMAGE SIZEMJPEG SIZECONTIN. SHOTCAMERAA/VMEMORYVIEWERPROTECTM.PLAY MODETHIS FILE ONMEMORY SET [05/05]PROTECT00811B SCD907 USA (66~120) 8/23/04 11:43 AM Page 104](https://usermanual.wiki/Samsung-Electronics-Co/04OMEGA211.Users-Manual-2/User-Guide-466860-Page-54.png)
![ENGLISH105105Digital Still Camera mode✤You can erase the still images/moving pictures recorded on the Memory Stick.✤If you want to delete protected still images/moving pictures, you must first deactivate the image protection.✤An image which has been deleted cannot be recovered.✤You can delete still images/moving pictures in the menu list or using DELETE button.Deleting images in the menu1. Set the camcorder to M.PLAY mode. (see page 29)2. Using the (FWD) and (REV) buttons, search for the still image/moving picture that you want to delete.3. Press the MENU button.4. Move the MENU SELECTOR to highlight MEMORY and push the MENU SELECTOR.■The MEMORY SET submenu will appear.5. Move the MENU SELECTOR to highlight DELETE and push the MENU SELECTOR.■Using the MENU SELECTOR, select either THIS FILE or ALL FILES and push the MENUSELECTOR.■THIS FILE: deletes only the file currently selected.■ALL FILES : deletes all files stored in the Memory Stick.6. A box will appear to verify whether you wish to delete the still image/moving picture. ■Using the MENU SELECTOR, select the item.■EXECUTE : deletes the selected still images/ moving pictures. ■CANCEL : does not delete the selected still images/moving pictures and returns tothe previous menu. Deleting Still images/Moving picturesM.PLAY MODEMEMORY SETPRINT MARKPHOTO QUALITYDELETEFORMATIMAGE SIZEMJPEG SIZE320X2401600X1200000CONTINUOUS SHOTPROTECTM.PLAY MODETHIS FILE CANCELALL FILESMEMORY SET [10/20]DELETEM.PLAY MODEINITIALPRINT MARKPHOTO QUALITYDELETEFORMATIMAGE SIZEMJPEG SIZECONTIN. SHOTCAMERAA/VMEMORYVIEWERPROTECT00811B SCD907 USA (66~120) 8/23/04 11:43 AM Page 105](https://usermanual.wiki/Samsung-Electronics-Co/04OMEGA211.Users-Manual-2/User-Guide-466860-Page-55.png)
![ENGLISH106106Digital Still Camera modeDeleting images using the DELETE button1. Set the camcorder to M.PLAY mode. (see page 29)2. Using the (FWD) and (REV) buttons, search for the still image/moving picture that you want to delete.3. Press the DEL (delete) button.4. “DELETE REALLY?” appears an the screen.5. Using the MENU SELECTOR, select the item.■NO : To cancel deleting.■YES : To start deleting.6. Push the MENU SELECTOR.Deleting images in MULTI DISPLAY mode1. Press the MULTI DISP. button in M.PLAY mode. (see page 99)2. Move the MENU SELECTOR to select a still image/moving picture which you want to delete.3. Press the DEL (delete) button.4. After pressing the DEL (delete) button, it is the same procedures as mentioned above.Notes■If you try to delete a protected image, “PROTECT!” appears on the screen.■See page (105) to delete all files on the memory stick.SELECT :NOEXECUTE : ENTERDELETE REALLY?[13/13]1600x120000811B SCD907 USA (66~120) 8/23/04 11:43 AM Page 106](https://usermanual.wiki/Samsung-Electronics-Co/04OMEGA211.Users-Manual-2/User-Guide-466860-Page-56.png)