Samsung Electronics Co 04SPIDER Digital Video Camcorder User Manual
Samsung Electronics Co Ltd Digital Video Camcorder Users Manual
UserManual.wiki
>
Samsung Electronics Co
>
04SPIDER User Manual
Users Manual
Navigation menu
Upload a User Manual
Namespaces
Wiki Guide
HTML
PDF
Info
Views
User Manual
Discussion / Help
Navigation

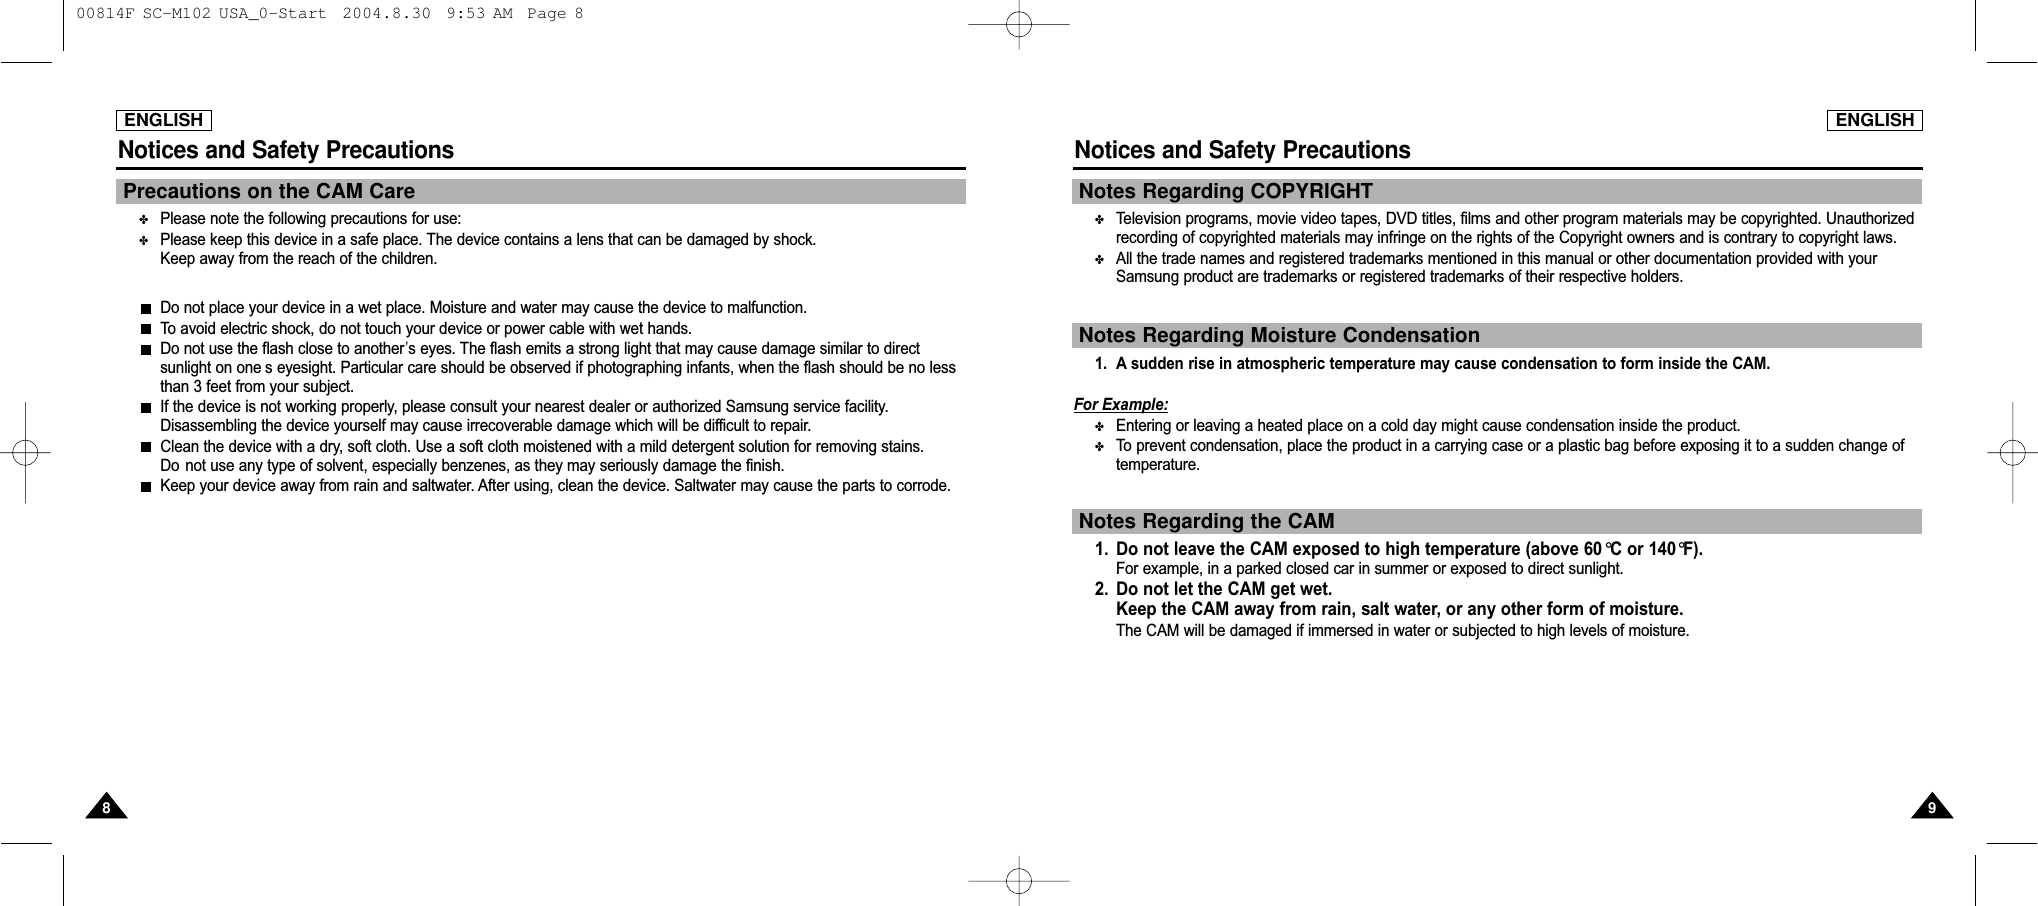
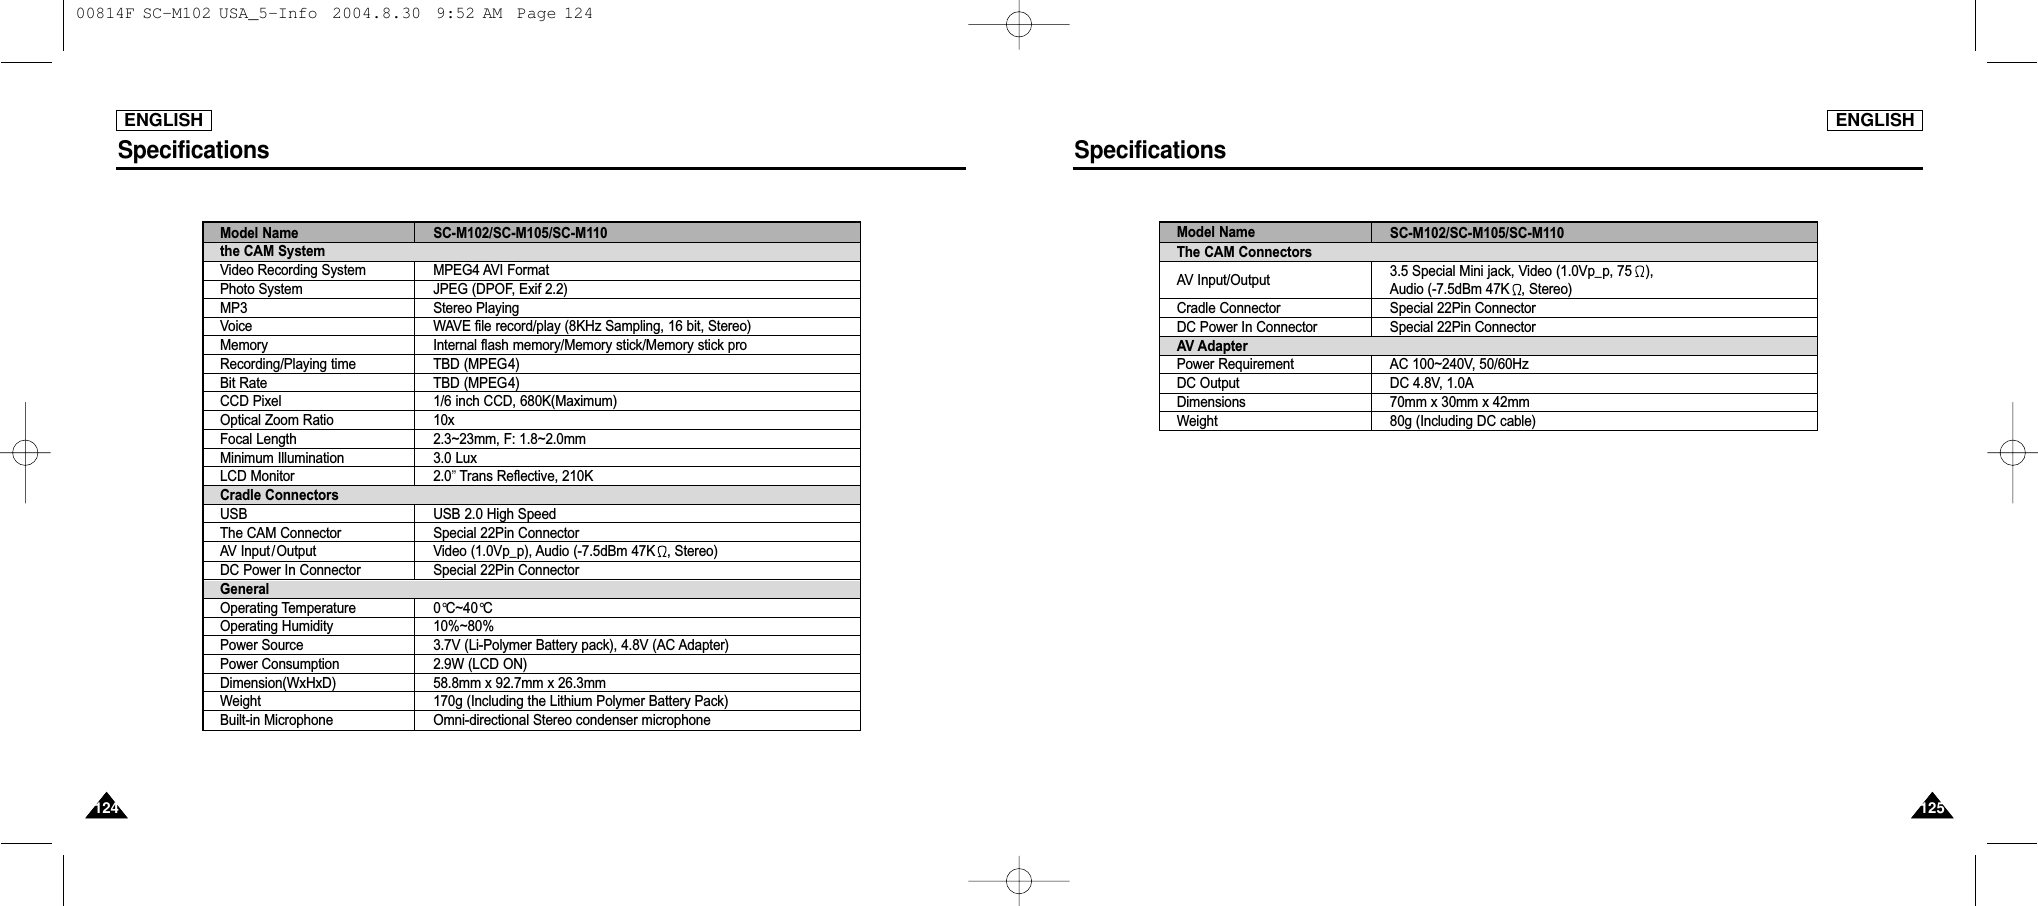
![ENGLISH1515Name of Each PartRight & Bottom ViewRear & Left View1 Lens2 LED Flash3 Earphones and AV Input/Output Jack4 Battery insertion part5 Battery eject button6 Volume + /- button7 Tripod Receptacle8 Cradle Receptacle9 Strap Hook1 Built-in MIC2 LCD Monitor3 DISPLAY button4 MP3 Hold switch5 Built-in Speaker6 Back/ Multi-Play Mode button7[▲]switch (Zoom out /RPS switch)8 OK button (Play / Pause)9[▼]switch (Zoom in / FPS switch)10 Record / Stop button11 Power / Charging indicator12 Power switch /Mode Selector13 Menu button14 Memory Stick SlotENGLISH1414Name of Each Part1. Built-in MIC 7. Back( ) / Left / Multi-Play Mode button8. switch (Zoom out (W) / Rewind ( ) switch)9. OK button(Play, Pause)11. Record/Stop button12. Power / Charging indicator13. OFF switch / Mode Selector14. Menu button15. Memory Stick Slot2. LCD Monitor4. LCD(DISPLAY) button5. MP3 LOCK switch6. Built-in Speaker1. Built-in MIC 6. Back / Multi-Play Mode button7. [▲]switch (Zoom out / RPS switch)8. OK button (Play/Pause)9. [▼]switch (Zoom in / FPS switch)10. Record / Stop button11. Power / Charging indicator12. Power switch / Mode Selector13. Menu button14. Memory Stick Slot2. LCD Monitor3. DISPLAY button4. MP3 Hold switch5. Built-in Speaker1. Lens2. LED Flash4. Battery insertion part5. Battery eject button3. Earphones and AV Input/Output Jack6. Volume +/- buttonHanging Lens Cover on the CAM7. Tripod Receptacle8. Cradle Receptacle9. Strap Hook 00814F SC-M102 USA_0-Start 2004.8.30 9:53 AM Page 14](https://usermanual.wiki/Samsung-Electronics-Co/04SPIDER/User-Guide-487756-Page-10.png)
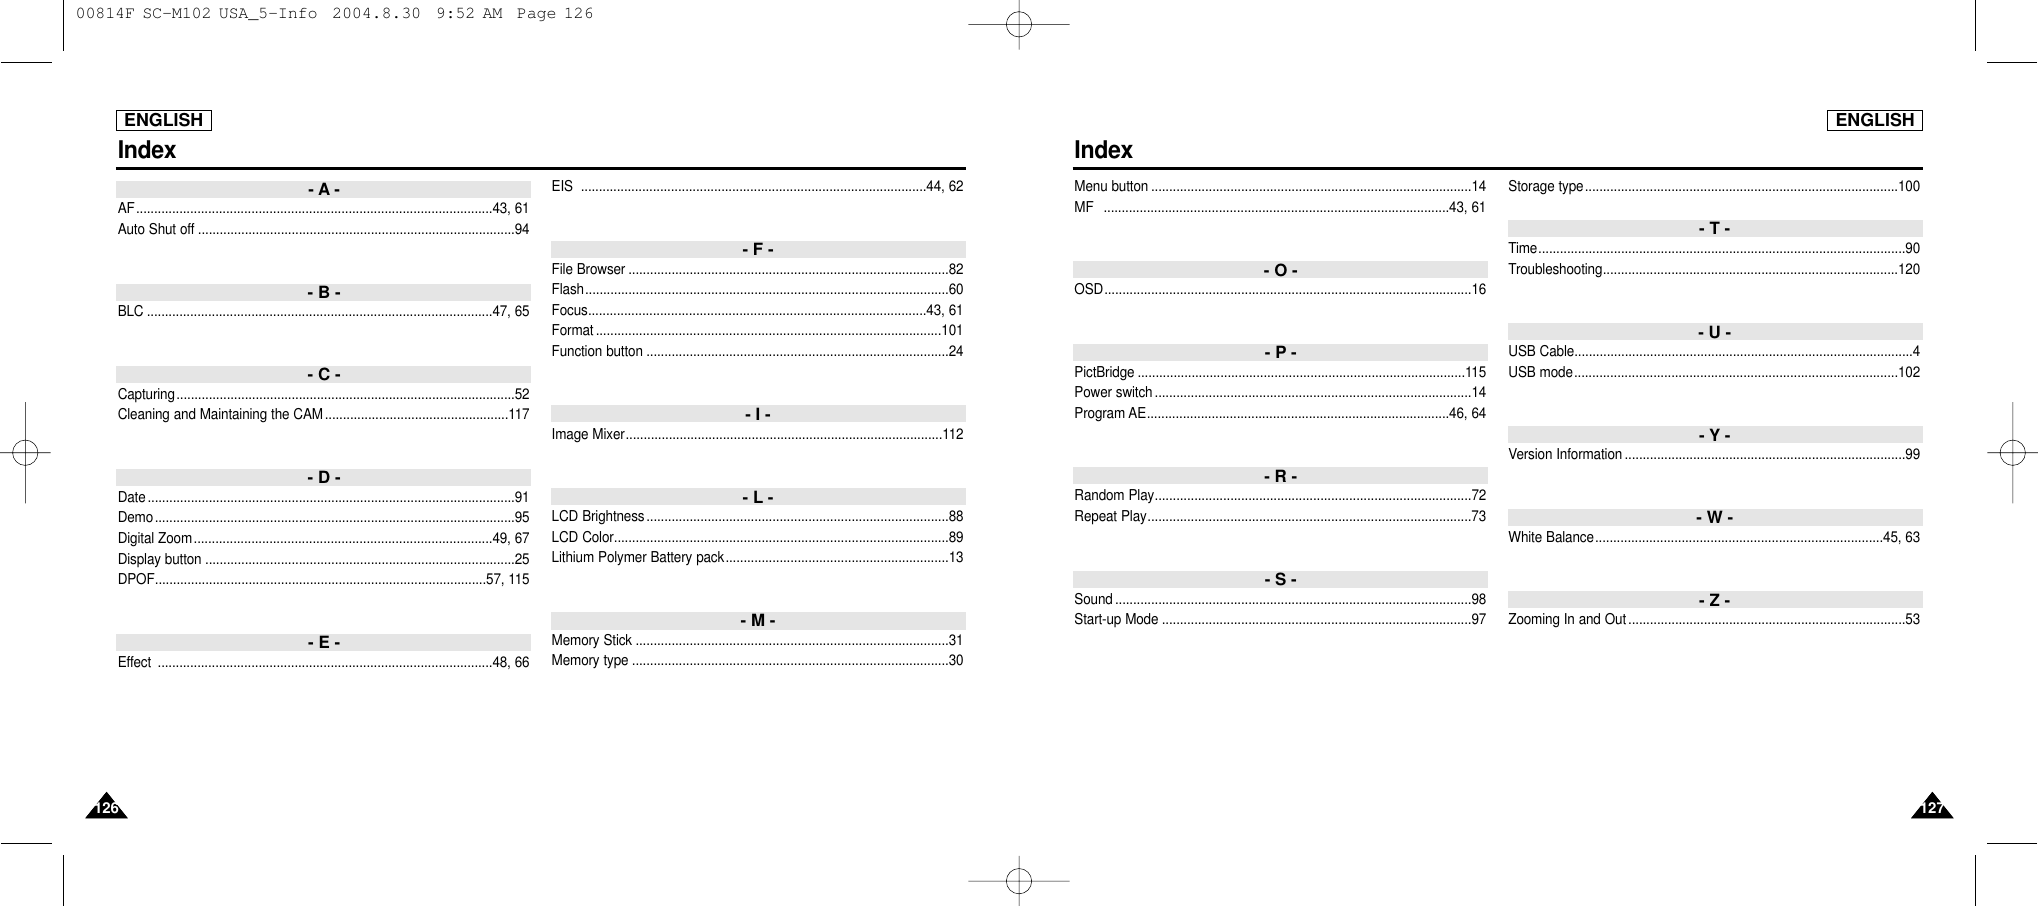
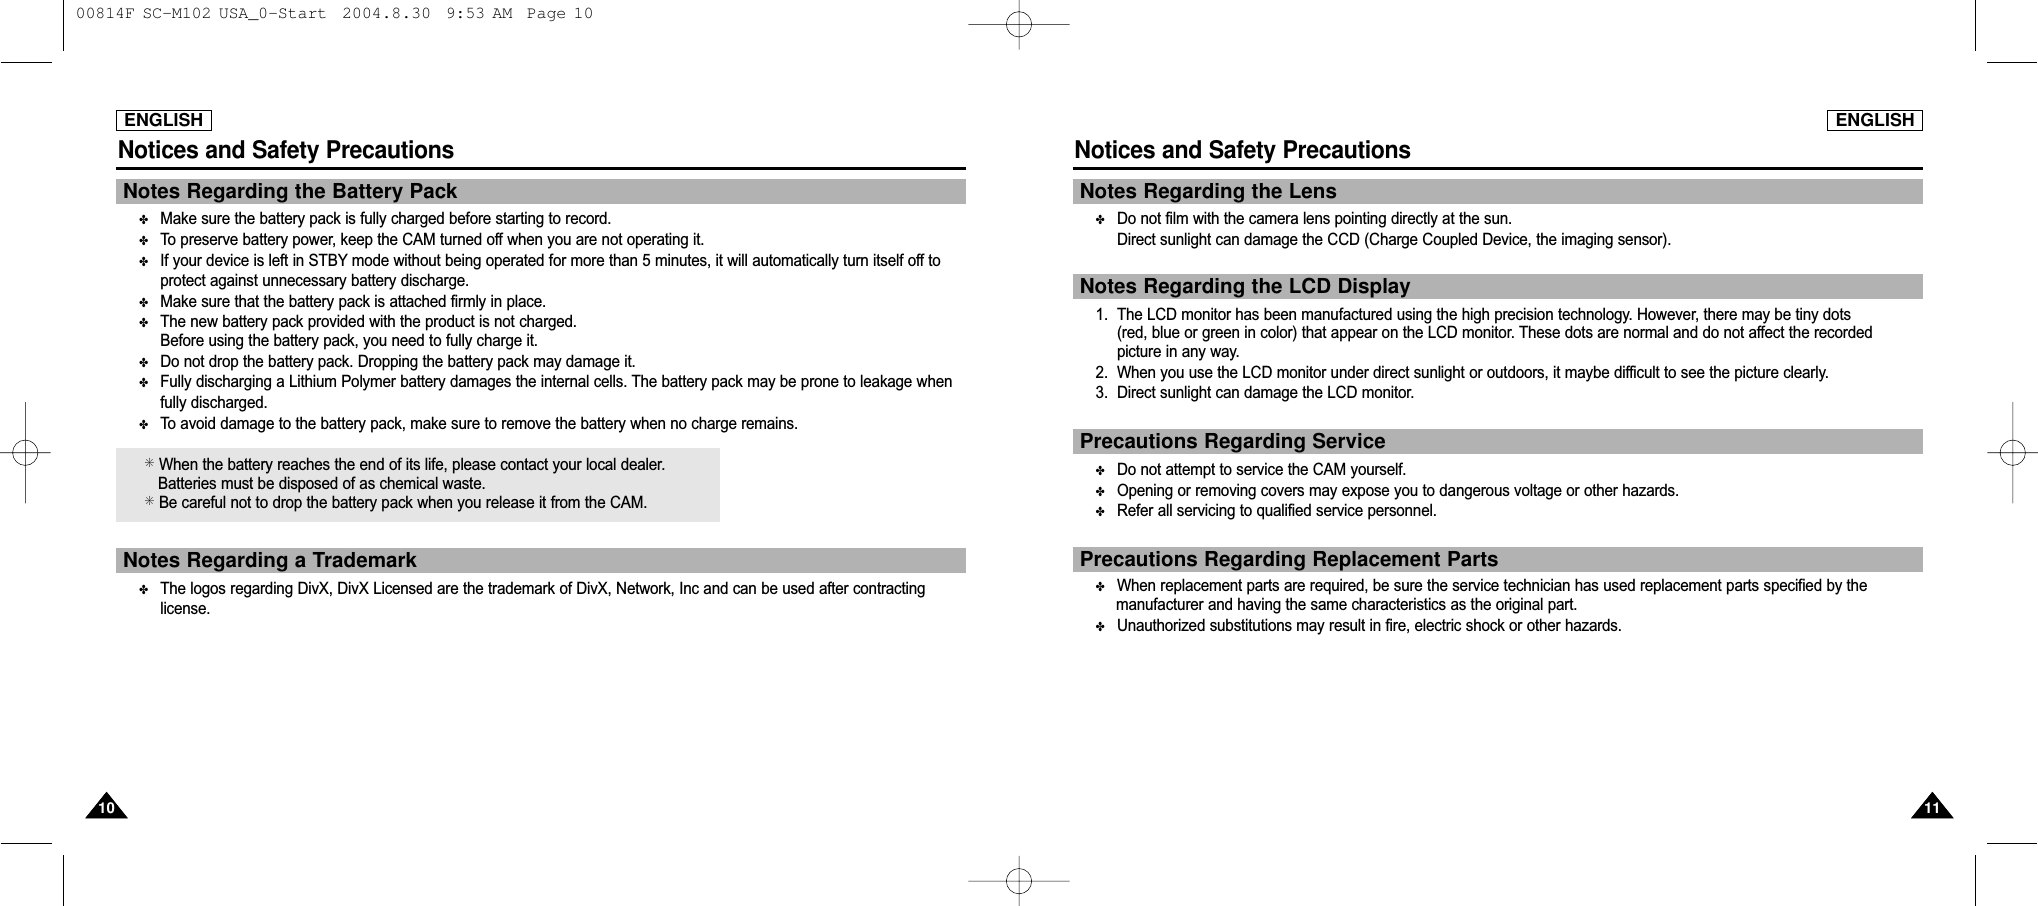
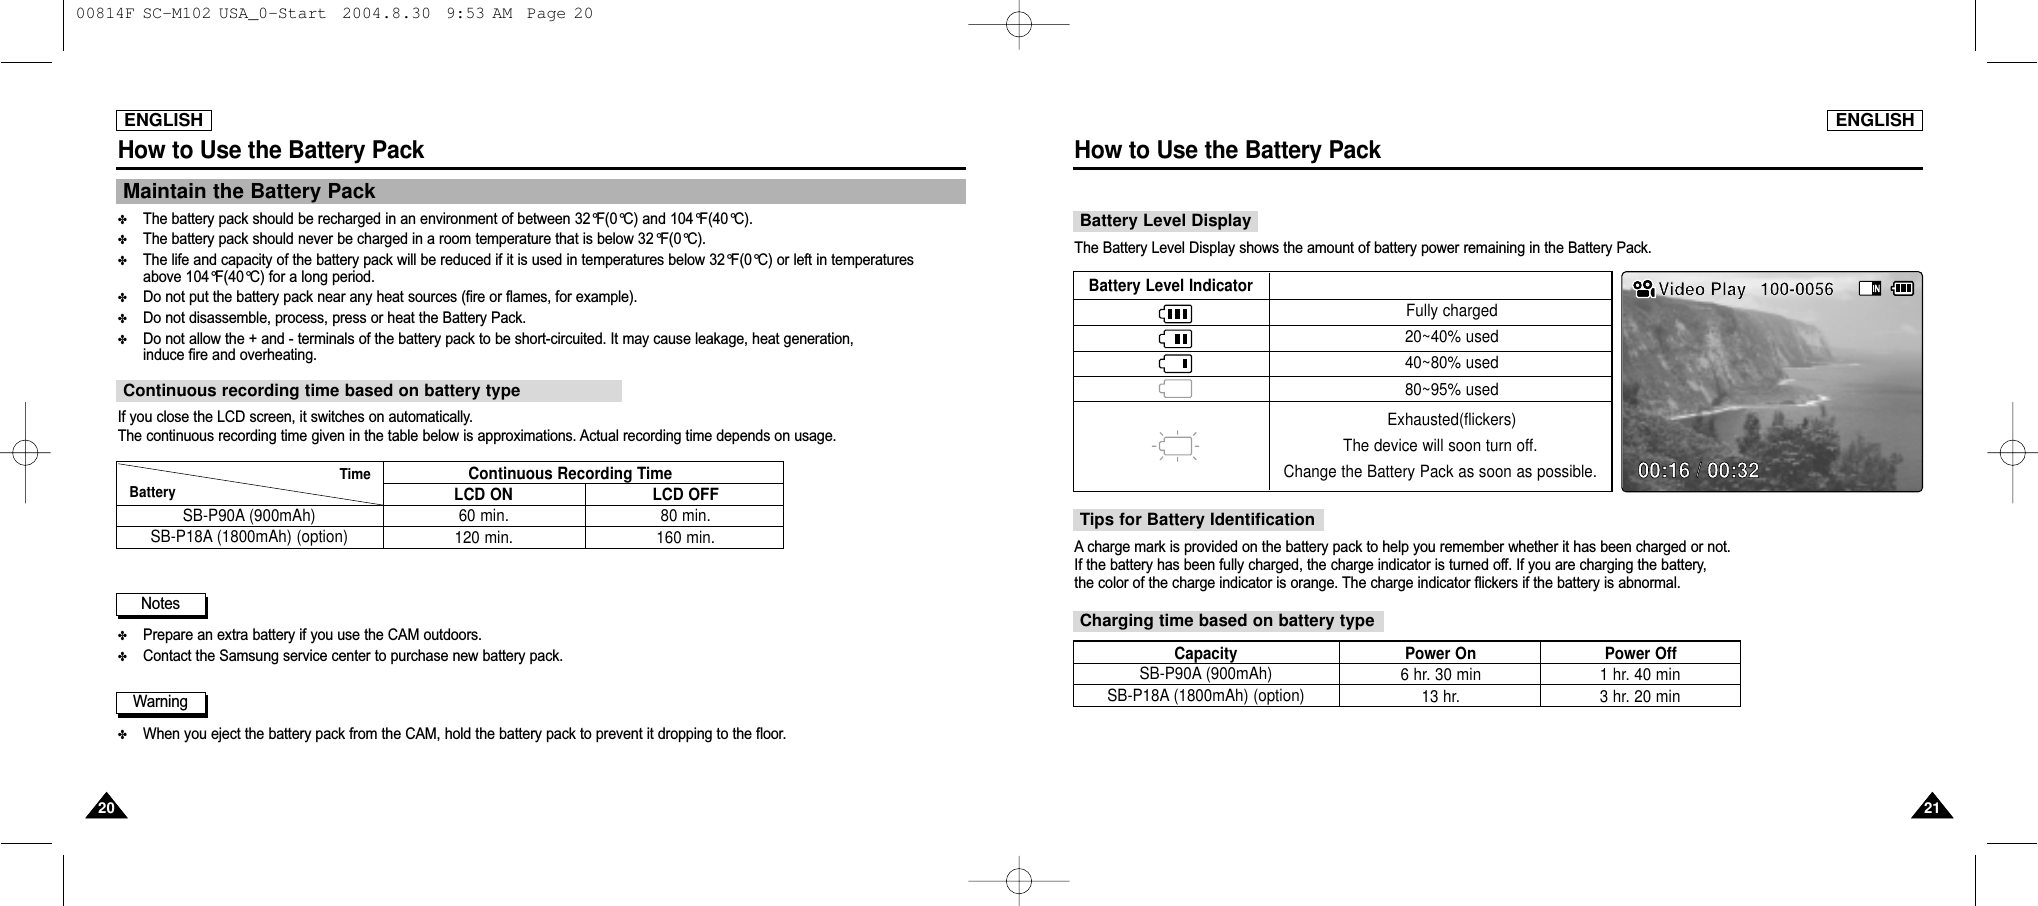
![ENGLISHHow to Use the Battery Pack1919ENGLISHName of Each Part: LCD Display1818OSD (On Screen Display in MP3 Play Mode/Voice Record /Play Mode)MP3 Play Mode1. Mode indicator 2. File number/ File name/File format 3. File size 4. Sampling Rate/Bit Rate 5. Progress Bar 6. Elapsed time/Full time7. Operation indicator 8. Volume indicator9. Battery life indicator10. Memory type indicator 1. Mode indicator2. File number/ Date and Time3. File size4. Sampling Rate/Bit Rate5. Elapsed time/Full time6. Operation indicator 7. Record / Standby text8. Progress Bar9. Lock indicator10. Volume indicatorMP3 Play2. I belive i can fly.mp35.6 MbytesStereo 44.1KHz 128Kbps03:19 / 04:32123456Voice Record ModeVoice Record2 01/0/2005 2:401.4 MbytesStereo 8KHz 128Kbps00:12 / 05:12 REC10 9Voice Play ModeVoice Play2 01/0/2005 2:401.4 MbytesStereo 44KHz 354Kbps00:12 / 05:128108767 912345Battery Pack Installation / EjectionIt is recommeded you purchase one or more additional battery packs to allow continuos use of your CAM.Slide the battery pack and fix it to the groove until it clicks.To insert the battery packPush the [Battery Eject] button to eject the battery pack.To eject the battery pack✤Functions you’ve set will not be canceled if you turn the CAM on again.Notes 00814F SC-M102 USA_0-Start 2004.8.30 9:53 AM Page 18](https://usermanual.wiki/Samsung-Electronics-Co/04SPIDER/User-Guide-487756-Page-12.png)
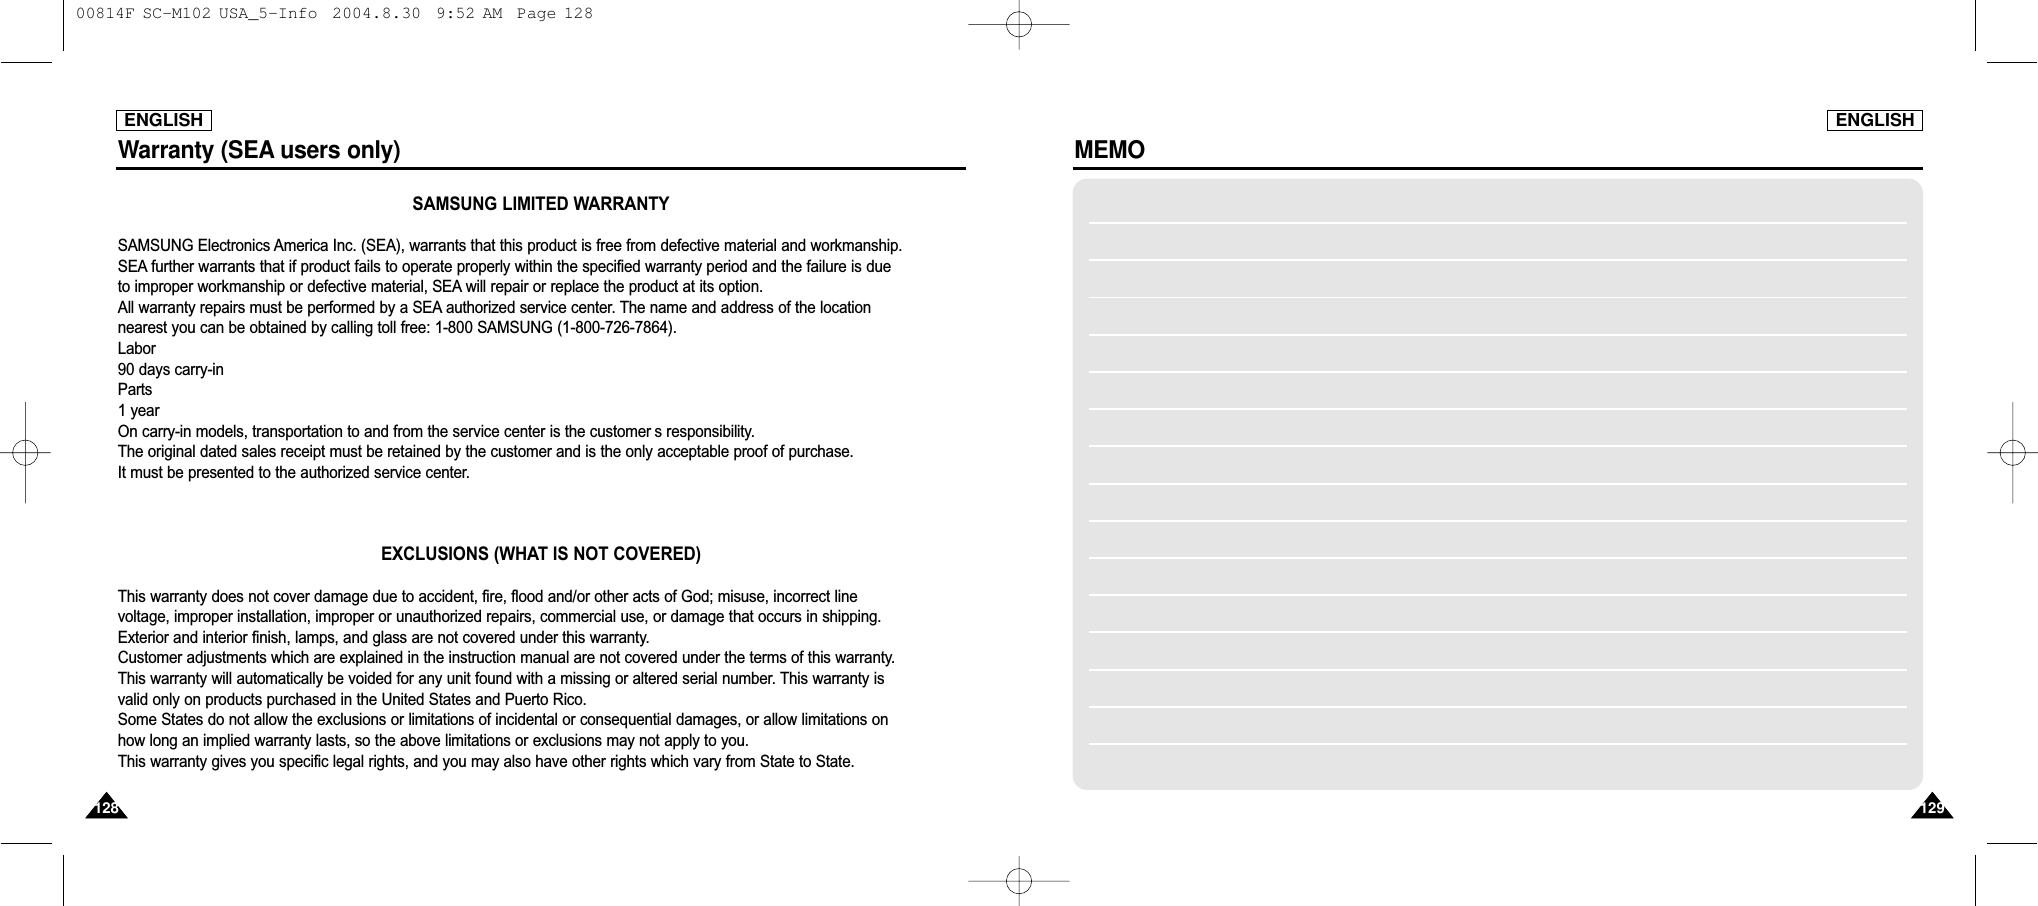
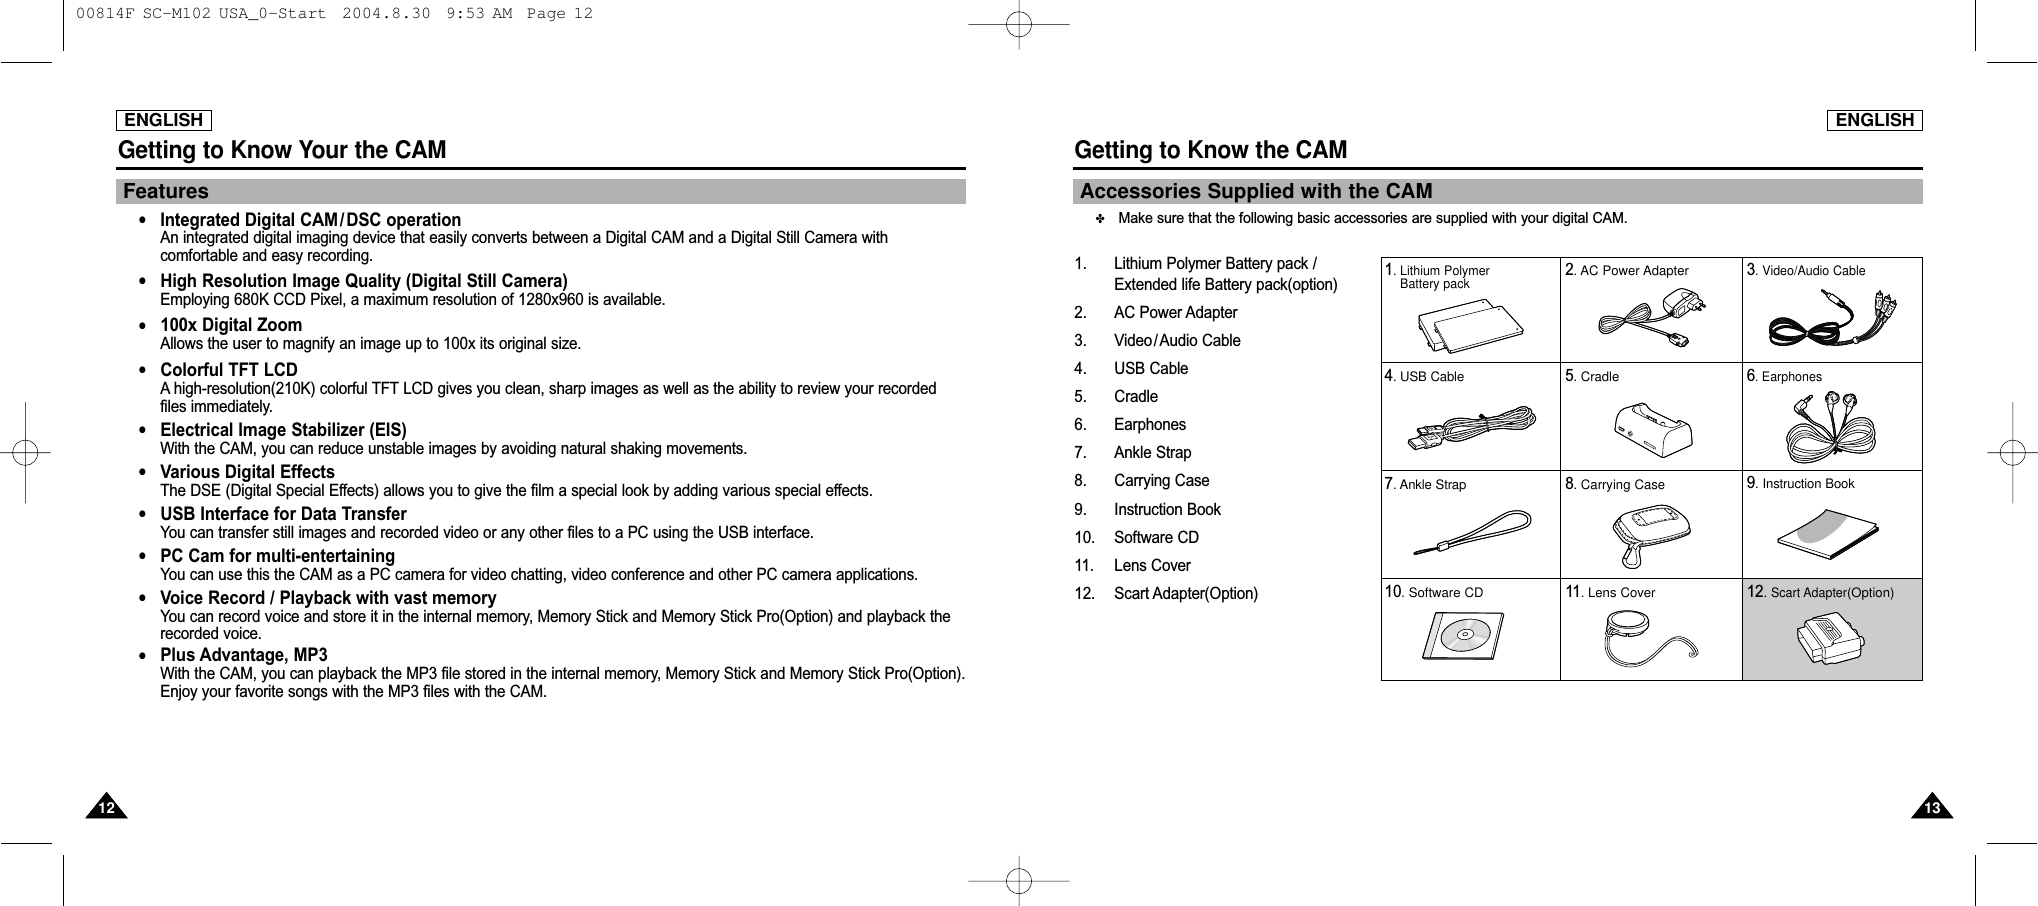
![ENGLISH2323ENGLISH2222Getting StartedCharging the Battery PackHow to Use the Battery Pack1. Move [Mode Selector] up to turn the CAM off.2. Attach the Battery Pack to the CAM.3. Fix the CAM into the cradle.4. Connect the jack with the cradle.◆ Detach the jack by pressing the buttons of the jack.5. Insert the AC power adapter into the outlet.✤You can charge the battery pack when you use the CAM. Connect the AC power adapter with the CAM directly.✤It is recommended you fully charged the battery pack before use.✤You had better to charge in the temperature between 0°C and 40°C.WarningNotesCharging through the cradleCharging directly to the CAMBefore You Start Operating the CAMBefore using the CAM, refer to this page for easy operation. The Memory Stick is an optional accessory.1. Install the battery pack and insert the Memory Stick into the Memory Stick slot. (Refer to page 31)2. Charge the battery pack by fixing the CAM into the cradle and connecting the power cable to the cradle. (Refer to page 22)3. Move [Mode Selector] down to turn on the CAM and move it down again.◆ You can select Video mode or Previous mode as the start-up mode in System Settings. (Refer to page 97)4. Move the [ ▲/▼] switch to select the desired mode and press the [OK] button. 5. Press the [ OK] button to take pictures, record, hear music or record voice. Press the [ Menu] button to view the menu.6. When you finished, turn the CAM off moving [Mode Selector] up.For example : If you want to select Photo ModeMode SelectionMP3Voice RecorderFile BrowserVideoPhoto12345Mode SelectionMP3Voice RecorderFile BrowserSystem SettingsBack671. Video: You can record and play video files.2. Photo: You can take and view photo files.3. MP3: You can download and hear the music.4. Voice Recorder: You can record and hear the voice.5. File Browser: You can delete, lock, copy the file and view the file information.6. System Settings: You can set the LCD monitor brightness/color, date/time, system and memory. 7. Back: The screen moves to previous menu in the selected mode. 00814F SC-M102 USA_0-Start 2004.8.30 9:53 AM Page 22](https://usermanual.wiki/Samsung-Electronics-Co/04SPIDER/User-Guide-487756-Page-14.png)
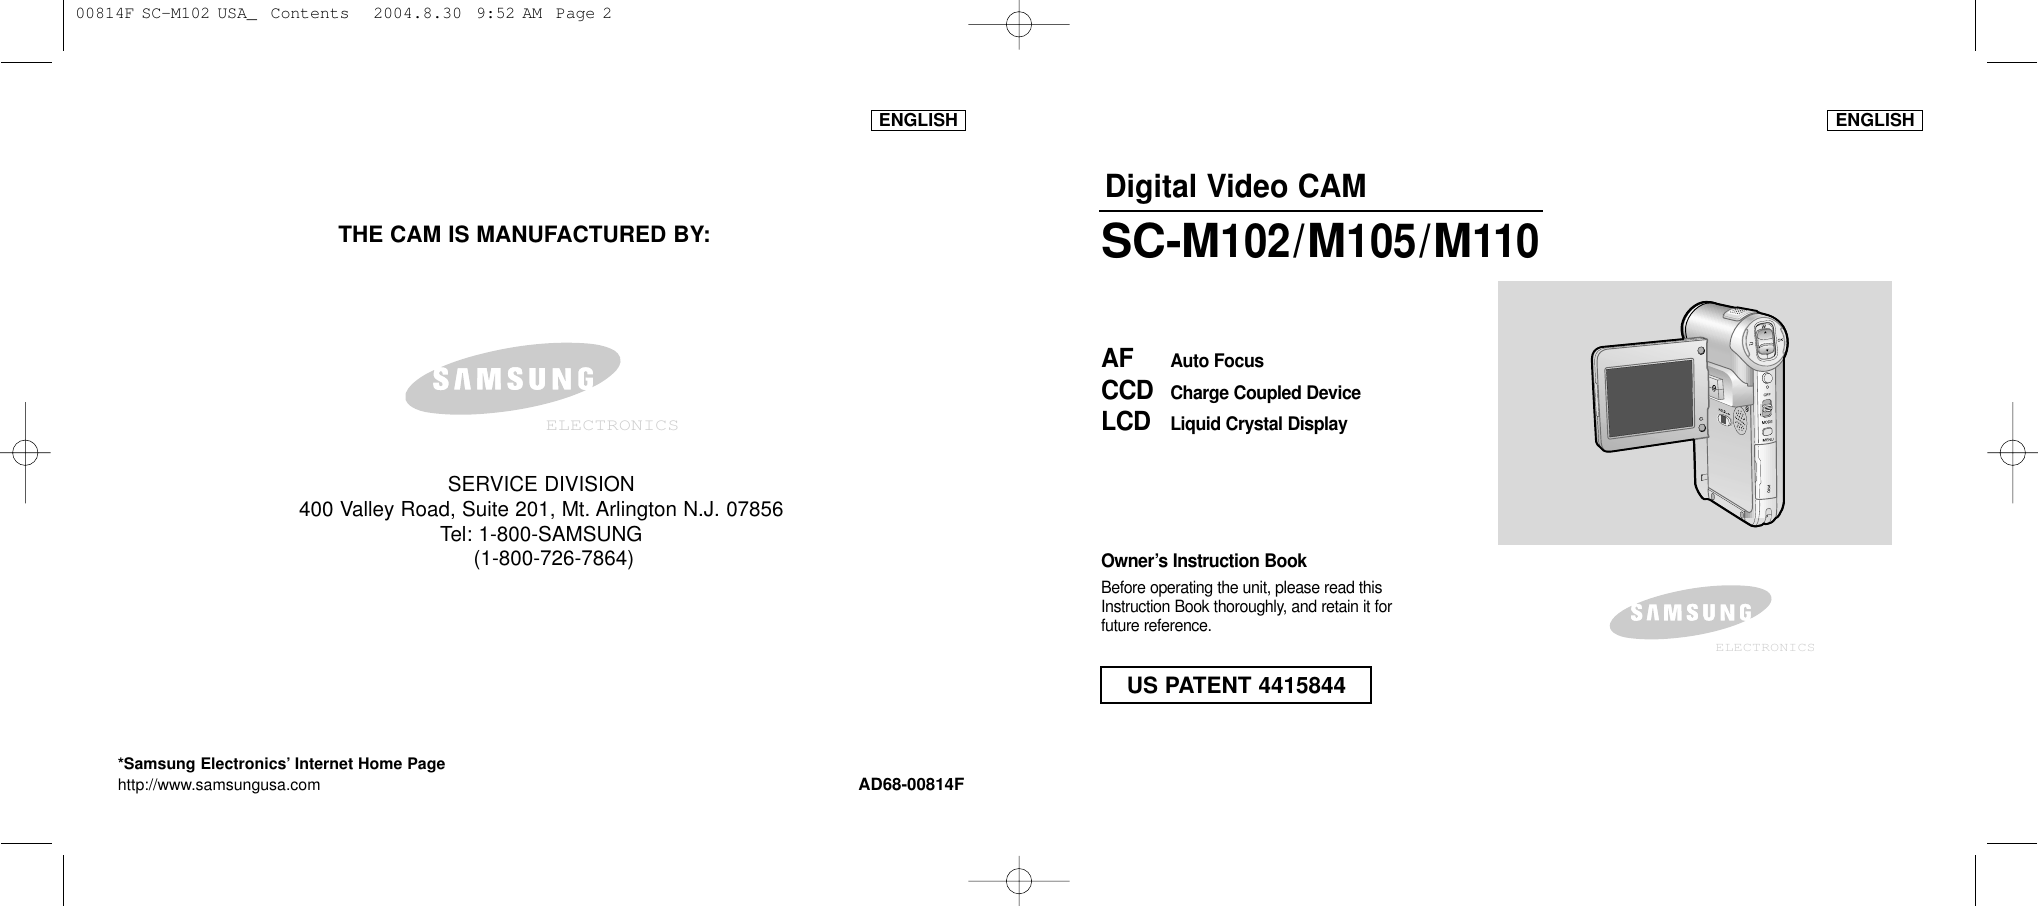
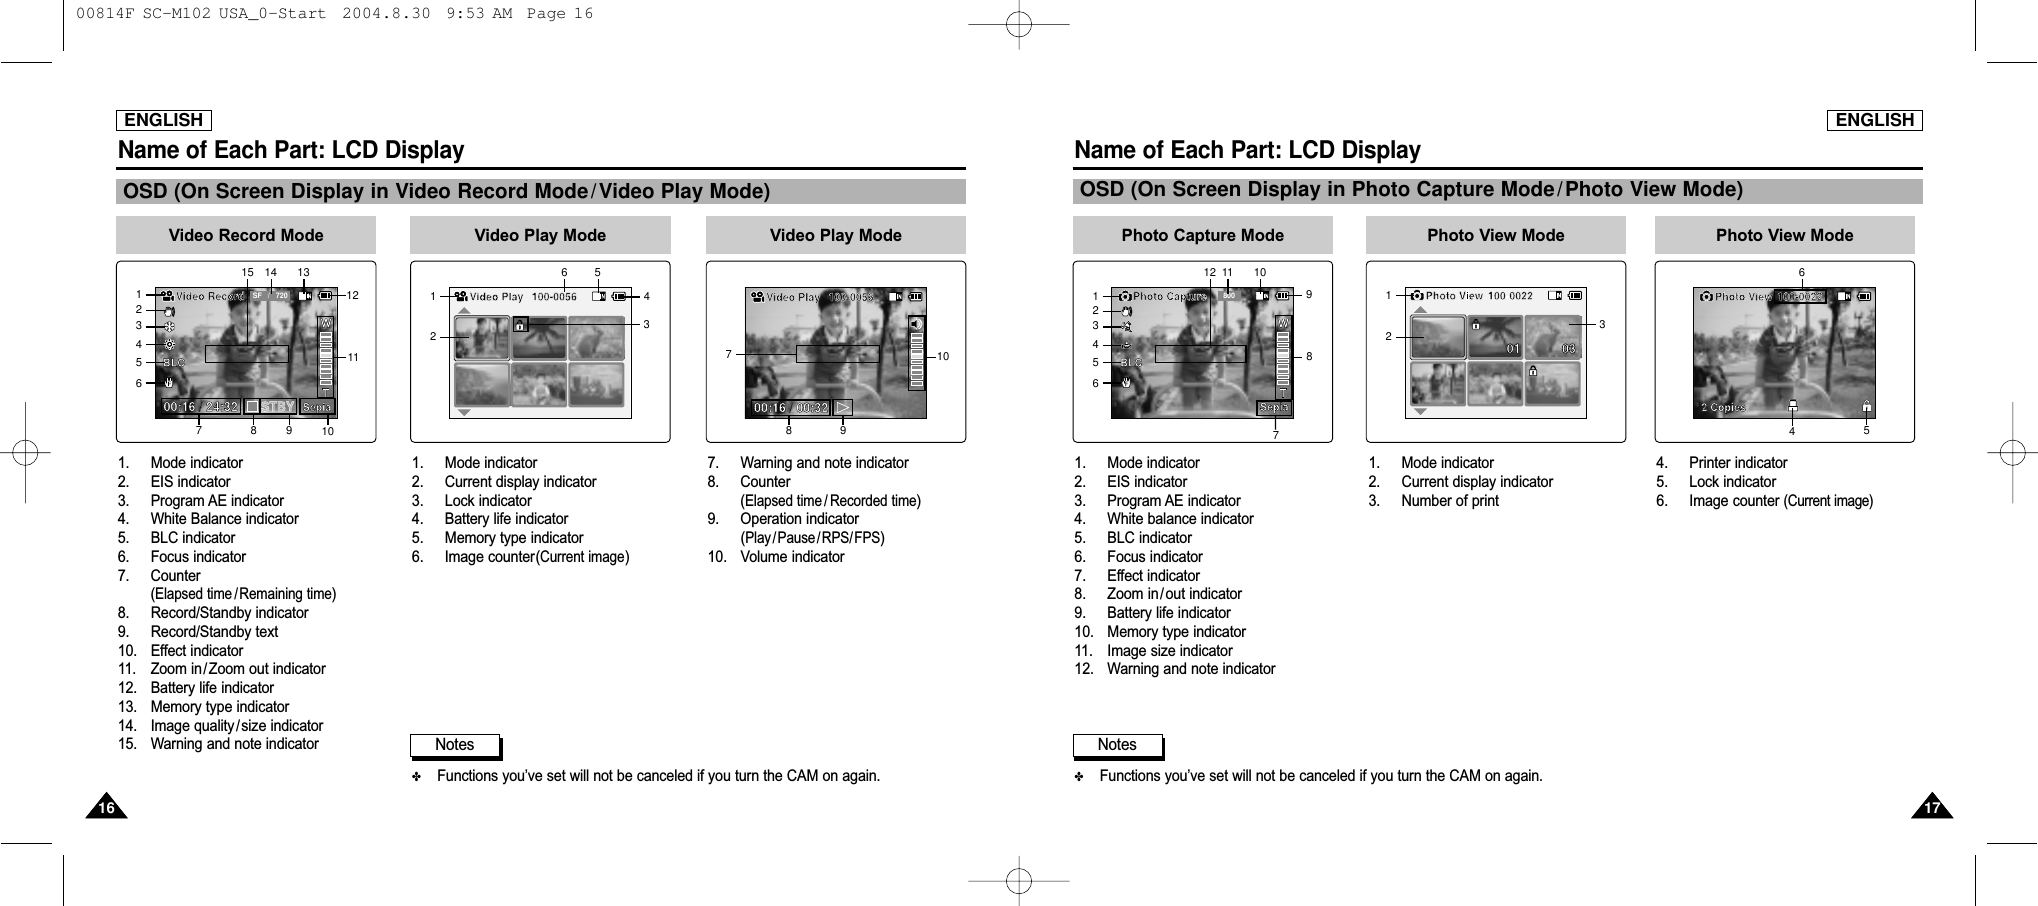
![ENGLISH2525ENGLISH2424Getting StartedUsing the Function ButtonThe Function button is used to make a selection, move the cursor, select the functions and exit from the menu.Getting StartedThe Use of Various Function buttonThe Use of [Back] and [Menu] buttonZoom out (▲)Zoom in (▼)Multi-Play screenSelectRPS ( )FPS ( )Multi-Play screenPlay/PauseSelect upSelect downReturn to previousmenuFinish selectingButton Recording /Picture taking Playing/Viewing SelectingSelect upSelect menuReturn toprevious menuSelect downSelect menuMove to Video Play/Photo ViewMenu SelectionMove to Video Recoed/Photo CaptureMove to File OptionsButton Video Record/Photo Capture Video Play/Photo View(Press for about 2 seconds)Using the Display buttonYou can use various functions pressing the [ Display ] button.1. Open the LCD monitor.2. Move [Mode Selector] down to turn on the CAM. ◆ The video screen appears.◆ You can select Video mode or Previous mode as the start-up mode in System Settings. (Refer to page 97)3. Press the [ Display] button.BackUpSelectDownOpen/CloseMenuOffClose ModeSelectionSelect ModeSelect Mode HelpSetPrevious/RRPlayNext/FFMenuOffModeSelectionPlay HelpPlay HelpPlay ModeZoom OutPlay LastZoom InMenuRecordOffRecord/Capture HelpModeSelectionRecord/Capture Help SetUpNextDownMenuOffModeSelectionTime/Date Dialog HelpTime/Date Dialog Help ✤Once: The display indicators turn off.✤Twice: The back light turns off.✤3 times: It returns to the initial screen.✤Hold down the button for 2 seconds: The [ Help ] screen according to each mode appears.If you press the [Display] button 00814F SC-M102 USA_0-Start 2004.8.30 9:53 AM Page 24](https://usermanual.wiki/Samsung-Electronics-Co/04SPIDER/User-Guide-487756-Page-15.png)
![2345ENGLISH2727ENGLISH2626Getting StartedGetting StartedAdjusting the LCD MonitorYour the CAM is equipped with a color Liquid Crystal Display monitor, which enables you to view directly what you are recordingor playing back. Depending on the conditions under which you are using the CAM (indoors or outdoors for example), you canadjust the LCD Brightness or Color.1. Move [Mode Selector ] down to turn on the CAM and move it down again.◆ The Mode Selection screen appears.2. Move the [ ▲/▼] switch to select System Settings and press the [ OK] button.3. Move the [ ▲/▼] switch to select <Display> and press the [ OK] button.4. Move the [ ▲/▼] switch to select < LCD Brightness > or < LCD Color > and press the [ OK] button.5. Move the [ ▲/▼] switch to select desired brightness or color andpress the [ OK] button.◆ Refer to page 88~89 for details.✤If you select [Back] in the menu, the previous menu appears.✤If it is too bright, adjust the LCD Brightness. NotesMode SelectionMP3Voice RecorderFile BrowserSystem SettingsBackSystem SettingsDate / TimeSystemDisplayMemoryBackSettings: DisplayBackLine In/OutInLCD Color50 %LCD Brightness50 %Settings: DisplayBackLCD Brightness50 %Line In/OutInLCD Color55 %Structure of the Folders and FilesThe video files and photo files are stored in internal memory, Memory Stick or Memory Stick Pro as below.100SSDVC999SSDVC......DCAM0001.JPGDCAM9999.JPG...DCAM0001.JPGDCAM9999.JPGDCIM101SSDVCMSAMSUNGMISCSWAV0001.WAVVOICE ...SWAV9999.WAV100SSWAV999SSDVC...Free.MP3AVTRINT.MRKMEMSTICK.INDMSTK_PRO.INDSMOV0001.AVISMOV0001.THMSSMOV ...SMOV9999.AVISMOV9999.THM100SSMOV999SSMOV...MP3 FreeFree✤Refer to page 31 for details about Memory Stick.✤You can store general data in files and folders of the CAM.✤The number of the file is up to 9,999 and folder is up to 100.✤DCAM✽✽✽✽.JPG: Photo fileSMOV✽✽✽✽.AVI: Video fileSMOV✽✽✽✽.THM: Thumnail fileSWAV✽✽✽✽.WAV: Voice fileDCAM✽✽✽✽.MP3: MP3 file✤MISC: DPOF files are stored.✤Do not change the file or folder name except ’Free’.✤You can freely change the file or folder name of ’Free’.✤When copying video files to the CAM from a PC, use Image Mixer.✤Yo may not be able to play video files if you copy video files directly to the CAM from a PC without using Image Mixer.Notes✤Do not turn the power off while recording, playing, erasingfile or formatting the Memory Stick.✤Please turn the power off before you insert or eject the Memory Stick to avoid losing data.✤Save important files separately.Warning 00814F SC-M102 USA_0-Start 2004.8.30 9:53 AM Page 26](https://usermanual.wiki/Samsung-Electronics-Co/04SPIDER/User-Guide-487756-Page-16.png)
![3456ENGLISH3131ENGLISH3030Getting StartedSelecting the Memory TypeMode SelectionMP3Voice RecorderFile BrowserSystem SettingsBackSystem SettingsDate / TimeSystemDisplayMemoryBackBLCVideo Record00:16 / 24:32SF / 720OKCancelNow external memoryinserted. Do you want tochange memory to external?BackFormat InternalSettings: MemoryStorage Type InternalBackFormat InternalSettings: MemoryStorage Type ExternalGetting StartedYou can select the memory type - internal memory or external memory(Memory Stick, Memory Stick Pro). The Memory Stick is an optional accessory.The video file and the photo files are stored in internal memory by default.1. Insert the Memory Stick. (Refer to page 31)2. Move [Mode Selector] down to turn on the CAM and move it down again.◆ The Mode Selection screen appears. 3. Move the [ ▲/▼] switch to select System Settings and press the [OK ] button.4. Move the [ ▲/▼] switch to select <Memory > and press the [ OK] button. 5. Move the [ ▲/▼] switch to select <Storage Type> and press the [ OK] button.6. Move the [ ▲/▼] switch to select desired type and press the [OK ] button.◆ You can select external or interal memory.✤If you insert the Memory Stick or Memory Stick Pro, the memory type selection screen appears automatically.NoteUsing the Memory Stick1. Open the LCD monitor.2. Open the Memory Stick slot lid.3. Insert the Memory Stick into the slot until it softly clicks.4. Close the slot lid.5. The pop-up screen appears.◆ If you select <OK>, the memory type changes to ‘External’and if you select ‘Cancel’, files are stored in internal memory continuously.Inserting a Memory Stick1. Open the LCD monitor.2. Open the Memory Stick slot lid.3. Slightly push the Memory Stick inwards to pop it out.4. Pull the Memory Stick out of the slot and close the lid.Ejecting a Memory Stick✤Do not apply excessive force when you insert / eject the Memory Stick.✤Do not turn the power off while recording, playing, erasing files or formatting the Memory Stick.✤Please turn the power off before you insert or eject the Memory Stick to avoid losing data.✤Do not place the Memory Stick near a strong electro-magnetic device.✤Do not allow metal substances to come in contact with the terminals on the Memory Stick.✤Do not bend the Memory Stick.✤After pulling the card out from the CAM, keep the Memory Sticks in a soft case to prevent static shock.✤The data stored on the card may be changed or lost as a result of misuse, static electricity, electric noise or repair. Save important files separately.✤Samsung is not responsible for data loss due to misuse.✤Memory Stick and are trademarks of Sony Corporation.✤All other product names mentioned herein may be the trademarks or registered trademarks of their respective companies. TM will not be mentioned in everyinstance in this manual.NotesThe Memory Stick ViewTerminalsWrite-protectSwitch 00814F SC-M102 USA_0-Start 2004.8.30 9:53 AM Page 30](https://usermanual.wiki/Samsung-Electronics-Co/04SPIDER/User-Guide-487756-Page-18.png)
![3333ENGLISHGetting Started3232Video ModeRecording . . . . . . . . . . . . . . . . . . . . . . . . . . . . . . . . . . . . 34Recording . . . . . . . . . . . . . . . . . . . . . . . . . . . . . . . . . . . . 34Zooming In and Out . . . . . . . . . . . . . . . . . . . . . . . . . . . . . 35Playing . . . . . . . . . . . . . . . . . . . . . . . . . . . . . . . . . . . . . . . 36Playing on the LCD Monitor . . . . . . . . . . . . . . . . . . . . . . . 36Selecting File Options . . . . . . . . . . . . . . . . . . . . . . . . . 38Deleting Video files . . . . . . . . . . . . . . . . . . . . . . . . . . . . . 38Locking Video files . . . . . . . . . . . . . . . . . . . . . . . . . . . . . . 39Copying Video files . . . . . . . . . . . . . . . . . . . . . . . . . . . . . 40Setting Various Functions . . . . . . . . . . . . . . . . . . . . . 41Setting the Video file Size . . . . . . . . . . . . . . . . . . . . . . . . 41Setting the Video file Quailty . . . . . . . . . . . . . . . . . . . . . . 42Setting the Focus . . . . . . . . . . . . . . . . . . . . . . . . . . . . . . . 43Setting the EIS . . . . . . . . . . . . . . . . . . . . . . . . . . . . . . . . . 44Setting the White Balance . . . . . . . . . . . . . . . . . . . . . . . . 45Setting the Program AE . . . . . . . . . . . . . . . . . . . . . . . . . . 46Setting the BLC . . . . . . . . . . . . . . . . . . . . . . . . . . . . . . . . 47Setting the Effect . . . . . . . . . . . . . . . . . . . . . . . . . . . . . . . 48Setting the Digital Zoom . . . . . . . . . . . . . . . . . . . . . . . . . . 49112 Different OperationsThere is two ways of navigating on Mode Selection screen for your convenience. You can select the way you prefer.1. Select the modes moving the [ ▲/▼] switch and pressing the [OK] button.Mode SelectionSPECIAL OPERATIONSelect the modes waiting 2 secondsin the Mode selection menu.1. Select the menus moving the [ ▲/▼] switch.2. Select the menus pressing [Menu] button after pressing the [ OK ] button.◆ The menu screen appears.Menu SelectionSPECIAL OPERATION1. Press the [Menu ] button for 2 seconds.◆ The menu screen of the selected mode appears.✤In this user’s manual, the only first operation is described for convenience.Be aware of more convenient way for you to use the CAM.Notes 00814F SC-M102 USA_0-Start 2004.8.30 9:53 AM Page 32](https://usermanual.wiki/Samsung-Electronics-Co/04SPIDER/User-Guide-487756-Page-19.png)
![123ENGLISH3535Video Mode : RecordingZooming In and OutZooming technique lets you change the size of the subject captured in a scene.1. Move [Mode Selector] down to turn on the CAM. ◆ You can select Video mode or Previous mode as the start-up mode in System Settings. (Refer to page 97)2. Press the [Record/Stop] button to start recording.BLCVideo Record SF / 72000:16 / 24:32 RECBLCVideo Record SF / 72000:16 / 24:32 RECBLCVideo Record SF / 72000:16 / 24:32 RECZoom InZoom OutNotes✤Frequent use of zooming may result in faster battery power consumption.✤Refer to page 49 about Digital Zoom.ENGLISH3434Video Mode : RecordingRecordingYou can record moving person and objects and store it in memory.1. Move [Mode Selector] down to turn on the CAM.◆ The Video Record screen appears.◆ You can select Video mode or Previous mode as the start-up mode in System Settings.(Refer to page 97)2. Press [Record/Stop] button to start recording.◆ [●REC] indicator displays on LCD.◆ The elapsed time is displayed and it starts recording.3. Press the [Record/Stop] button again to stop recording.◆ It stops recording and the CAM is ready again.4. Move [Mode Selector] up to turn off the CAM.Notes✤If the Auto Shut Off is set, the CAM turns off automatically after 5 minutes. ✤Detach the Battery Pack when you finished recording to prevent unnecessary battery power consumption.✤You can check the recording time.BLCVideo Record00:00 / 00:00 STBYSF / 720BLCVideo Recordideo Record SF / 72000:16 / 24:32 RECBLCVideo Record00:16 / 24:32SF / 720STBYVideo Record00:16 / 24:32 STBYElapsed time Remaining timeMove the [ ▲/▼] switch up to zoom out.●The subject appears farther away when you zoom out.Move the [ ▲/▼] switch down to zoom in.●The subject appears closer when you zoom in. 00814F SC-M102 USA_1-Video 2004.8.30 9:54 AM Page 34](https://usermanual.wiki/Samsung-Electronics-Co/04SPIDER/User-Guide-487756-Page-20.png)
![121234ENGLISH3737Video Mode : PlayingENGLISH3636Video Mode : PlayingPlaying on the LCD MonitorIt is handy and practical to view video files using the LCD monitor almost anywhere such as in a car, indoors or outdoors.1. Press the [ OK] button to play the video file.2. Press the [+] button to increase the volume.◆ Each time you press the [+] button, the volume bar increases and the volume gets louder.◆ The volume bar disappears after 1~2 seconds.3. Press the [-] button to decrease the volume.◆ Each time you press the [-] button, the volume bar decreases and the volume gets quieter.◆ The volume bar disappears after 1~2 seconds.1. Move [Mode Selector] down to turn on the CAM.◆ The Video Record screen appears.◆ You can select Video mode or Previous mode as the start-up mode in System Settings.(Refer to page 97)2. Press the [ Menu] button and move the [ ▲/▼] switch. Press the [ OK] button after selecting < Play>.3. Move the [ ▲/▼] switch to find the video file you want to play.◆ Each time you move the [ ▲/▼] switch, the frame moves horizontally.◆ Each time you press the [ +]/[ - ] button or press and hold the [ ▲/▼] switch, a page(6 frame) moves.4. Press [ OK] button to play the video file you want.◆ Each time you press the [OK ] button, play or pause is selected repeatedly.5. Press the [ Back] button after pressing the [OK ] button to stop playing.BLCVideo Record00:16 / 24:32SF / 720STBYVideo Record00:16 / 24:32SF / 720STBYPlayRecordSettingsBack00:16 / 00:32Video Play 100-005600:16 / 00:32Video Play 100-0056Video Play 100-005600:16 / 00:32Video Play 100-0056Notes✤You can adjust the volume up to 10 steps.✤When the Audio/Video cable is connected to the CAM, you can’t hear the sound from the Built-in Speaker and can’t adjust the volume.✤You can also play the video file on a TV screen by connecting the CAM to a TV. (Refer to page 108)OK button [ ]: Play or pause the video fileRPS switch [ ]: Reverse picture search (RPS rate: -X2, -X4, -X8, -X16, -X32, -X64, -X128)FPS switch [ ]: Fast picture search (FPS rate: X2, X4, X8, X16, X32, X64, X128)The button and switch you use when playing the video fileAdjusting the Sound 00814F SC-M102 USA_1-Video 2004.8.30 9:54 AM Page 36](https://usermanual.wiki/Samsung-Electronics-Co/04SPIDER/User-Guide-487756-Page-21.png)
![24562456ENGLISH3939Video Mode : Selecting File OptionsLocking Video filesENGLISH3838Deleting Video filesVideo Mode : Selecting File OptionsYou can delete video files in < File Options>. You can lock the important video file to prevent accidental deletion.1. Move [Mode Selector] down to turn on the CAM.◆ The Video Record screen appears.◆ You can select Video mode or Previous mode as the start-up mode in System Settings.(Refer to page 97) 2. Press the [Menu] button and move the [ ▲/▼] switch. Press the [ OK] button after selecting [Play].1. Move [Mode Selector] down to turn on the CAM.◆ The Video Record screen appears.◆ You can select Video mode or Previous mode as the start-up mode in System Settings.(Refer to page 97) 2. Press the [ Menu] button and move the [ ▲/▼] switch. Press the [OK] button after selecting <Play>.3. Move the [ ▲/▼] switch to select the video file you want to lock.4. Press the [Menu] button to select <File Options> and press the [OK] button.◆ You can select <File Options> only in <Play>. 5. Move the [ ▲/▼] switch to select <Lock> and press the [OK] button.6. Move the [ ▲/▼] switch to select the followings and press the [OK] button.◆ Selected: The selected video file is locked.◆ All: All video files are locked. ◆ Cancel: Cancel locking video files.7. Press the [Menu] button to finish locking the files.◆ The < > icon is displayed on the locked file.3. Move the [ ▲/▼] switch to select the video file you want to delete.4. Press the [ Menu] button to select < File Options> and press the [OK] button.◆ You can select < File Options> only in <Play>. 5. Move the [ ▲/▼] switch to select <Delete > and press the [OK ] button.6. Move the [ ▲/▼] switch to select the followings. Press the [OK ] button.◆ Selected: The selected video file is deleted.◆ All: All video files are deleted. ◆ Cancel: Cancel deleting video files.7. Press the [ Menu] button to finish deleting the files.Video Record00:16 / 24:32SF / 720STBYPlayRecordSettingsBackVideo Record00:16 / 24:32SF / 720STBYPlayRecordSettingsBack01 03PlayFile OptionsRecordSettingsBackVideo Play 100-005601 03LockCopy ToDeleteBackVideo Play 100-005601 03LockCopy To ext.DeleteDPOFBackSelectedAllCancelChoose the file(s) you wouldto lock.Video Play 100-0056Note✤Press and hold the [Menu] button in Video Play, you can move to <File Options> directly.Note✤Press and hold the [Menu] button in Video Play, you can move to <File Options> directly.01 03PlayFile OptionsRecordSettingsBackVideo Play 100-005601 03LockCopy ToDeleteBackVideo Play 100-005601 03LockCopy To ext.DeleteBackVideo Play 100-0056SelectedAllCancelDeleting file(s)... 00814F SC-M102 USA_1-Video 2004.8.30 9:54 AM Page 38](https://usermanual.wiki/Samsung-Electronics-Co/04SPIDER/User-Guide-487756-Page-22.png)
![23452456ENGLISHVideo Mode : Setting Various Functions4141ENGLISHVideo Mode : Selecting File Options4040Copying Video files Setting the Video file SizeYou can copy the video file to the internal or external memory. You can set the file size for video files. The number of stored files varies depending on the memory stick capacity and video file size.1. Move [Mode Selector] down to turn on the CAM.◆ The Video Record screen appears.◆ You can select Video mode or Previous mode as the start-up mode in System Settings.(Refer to page 97) 2. Press the [Menu] button and move the [ ▲/▼] switch. Press the [OK] button after selecting <Settings>.3. Move the [ ▲/▼] switch to select <Size> and press the [OK] button.◆ 720: Select 720 pixel.◆ 360: Select 360 pixel.4. Move the [ ▲/▼] switch to select the video file size and press the [OK] button.5. Press the [Menu] button to finish setting.◆ The icon of selected function is displayed.1. Move [Mode Selector] down to turn on the CAM.◆ The Video Record screen appears.◆ You can select Video mode or Previous mode as the start-up mode in System Settings.(Refer to page 97) 2. Press the [Menu] button and move the [ ▲/▼] switch. Press the [OK] button after selecting <Play>.3. Move the [ ▲/▼] switch to select the video file you want to copy.4. Press the [Menu] button to select <File Options> and press the [OK] button.◆ You can select <File Options> only in <Play>. 5. Press the [ ▲/▼] switch to select <Copy To> and press the [OK] button.◆ If you selected the Storage type ‘External’, the file is copied to ‘Internal’.6. Move the [ ▲/▼] switch to select the followings and press the [OK] button.◆ Selected: Copy the selected video file.◆ All: Copy all video files. ◆ Cancel: Cancel copying video files.7. Press the [Menu] button to finish copying the files.Video Record00:16 / 24:32SF / 720STBYPlayRecordSettingsBack01 03PlayFile OptionsRecordSettingsBackVideo Playideo Play 100-005601 03LockCopy ToDeleteBackVideo Play 100-0056Video Play 100-0056SelectedAllCancelChoose the file(s) to copyto Memory Stick?Video Record SF / 72000:16 / 24:32 STBYPlayRecordSettingsBackWhite BalanceAutoVideo SettingsEIS OnFocus AFQuality Super FineSize 720White BalanceAutoVideo SettingsEIS OnFocus AFQuality Super FineSize 360Video Record00:16 / 24:32SF / 360STBYNotes✤If you select <Back> in the menu, the previous menu appears.✤Press and hold the [Menu] button in Video Record, you can move to <Settings> directly.Note✤Press and hold the [Menu] button in Video Play, you can move to <File Options> directly. 00814F SC-M102 USA_1-Video 2004.8.30 9:54 AM Page 40](https://usermanual.wiki/Samsung-Electronics-Co/04SPIDER/User-Guide-487756-Page-23.png)
![23452345ENGLISHVideo Mode : Setting Various Functions4343ENGLISHVideo Mode : Setting Various Functions4242Setting the Video file QualityYou can set the quality for video files. The number of stored files varies depending on the Memory Stick capacity and video file quality.Setting the FocusYou can set the focus depending on the subject or the environment. In most situations, you can record best using AF(Auto Focus).1. Move [Mode Selector] down to turn on the CAM.◆ The Video Record screen appears. ◆ You can select Video mode or Previous mode as the start-up mode in System Settings.(Refer to page 97)2. Press the [Menu] button and move the [ ▲/▼] switch. Press the [OK] button after selecting <Settings>.3. Move the [ ▲/▼] switch to select <Focus> and press the [OK] button.◆ AF: Set the focus automatically. When the CAM turns on, AF is selected in default.◆ MF( ): Set the focus manually.4. Move the [ ▲/▼] switch to select desired setting and press the [OK] button.5. Press the [Menu] button to finish setting.◆ The icon of selected function is displayed.◆ If you select the AF, any icon is not displayed.1. Move [Mode Selector] down to turn on the CAM.◆ The Video Record screen appears. ◆ You can select Video mode or Previous mode as the start-up mode in System Settings.(Refer to page 97)2. Press the [Menu] button and move the [ ▲/▼] switch. Press the [OK] button after selecting <Settings>.3. Move the [ ▲/▼] switch to select <Quality> and press the [OK] button.◆ SF(Super Fine): Select highest quality.◆ F(Fine): Select high quality.◆ N(Normal): Select normal quality.4. Move the [ ▲/▼] switch to select the video file quality and press the [OK] button.5. Press the [Menu] button to finish setting.◆ The icon of selected function is displayed.Video Record SF / 72000:16 / 24:32 STBYPlayRecordSettingsBackWhite BalanceAutoVideo SettingsSize 720EIS OnFocus AFQuality Super FineWhite BalanceAutoVideo SettingsSize 720EIS OnFocus AFQuality FineVideo Record00:16 / 24:32F / 720STBYNotes✤If you select <Back> in the menu, the previous menu appears.✤Press and hold the [Menu] button in Video Record, you can move to <Settings> directly.Notes✤If you select <Back> in the menu, the previous menu appears. ✤Press and hold the [Menu] button in Video Record, you can move to <Settings> directly.Video Record SF / 72000:16 / 24:32 STBYPlayRecordSettingsBackWhite BalanceAutoVideo SettingsQuality Super FineSize 720OnFocus AFEISWhite BalanceAutoVideo SettingsQuality Super FineSize 720EIS OnFocus MFBLCVideo Record00:16 / 24:32SF / 720STBYAdjust the focus using [ ▲/▼] switch to zoom in or out manually.◆ When a picture contains both of objects close and far away from the CAM◆ When a person is enveloped in fog or surrounded by snowManual Focus 00814F SC-M102 USA_1-Video 2004.8.30 9:54 AM Page 42](https://usermanual.wiki/Samsung-Electronics-Co/04SPIDER/User-Guide-487756-Page-24.png)
![23452345ENGLISHVideo Mode : Setting Various Functions4545ENGLISHVideo Mode : Setting Various Functions4444Setting the EIS (Electrical Image Stabilizer)The Electrical Image Stabilizer is a function that compensate for shakings or hand movements while recording. EIS provides more stable video when:◆ Recording with zooming◆ Recording small objects◆ Recording while walking or moving◆ Recording through the window in the carSetting the White BalanceThe color balance may vary depending on the lighting conditions. The White Balance is used to preserve natural colors under different lighting conditions.1. Move [Mode Selector] down to turn on the CAM.◆ The Video Record screen appears. ◆ You can select Video mode or Previous mode as the start-up mode in SystemSettings. (Refer to page 97)1. Move [Mode Selector] down to turn on the CAM.◆ The Video Record screen appears. ◆ You can select Video mode or Previous mode as the start-up mode in System Settings.(Refer to page 97)2. Press the [Menu] button and move the [ ▲/▼] switch. Press the [OK] button after selecting <Settings>.3. Move the [ ▲/▼] switch to select <White Balance> and press the [OK] button.◆ Auto: Adjust the color depending on the condition automatically.◆ Hold( ): Record with first selected color without adjusting color.◆ Outdoor( ): Record with the balanced light. (Natural light)◆ Indoor( ): Record with the balanced light. (Glow lamp or light in the studio)4. Move the [ ▲/▼] switch to select desired setting and press the [OK] button.5. Press the [Menu] button to finish setting.◆ The icon of selected function is displayed.◆ If you select <Auto>, any icon is not displayed.2. Press the [Menu] button and move the [ ▲/▼] switch. Press the [OK] button after selecting <Settings>.3. Move the [ ▲/▼] switch to select <EIS> and press the [OK] button.◆ On( ): Set the EIS function.◆ Off : Cancel the EIS function.4. Move the [ ▲/▼] switch to select desired setting and press the [OK] button.5. Press the [Menu] button to finish setting.◆ The icon of selected function is displayed.White BalanceAutoFocus AFVideo SettingsQuality Super FineSize 720EIS OnWhite BalanceAutoFocus AFVideo SettingsQuality Super FineSize 720EIS OffVideo Record00:16 / 24:32SF / 720STBYNotes✤If you select <Back> in the menu, the previous menu appears.✤Press and hold the [Menu] button in Video Record, you can move to <Settings> directly.Notes✤If you select <Back> in the menu, the previous menu appears.✤Turn the Digital Zoom off for more accurate White Balance setting.✤Press and hold the [Menu] button in Video Record, you can move to <Settings> directly.Video Record SF / 72000:16 / 24:32 STBYPlayRecordSettingsBackDigital ZoomOffBLC OffVideo SettingsEffect OffProgram AE AutoWhite Balance AutoDigital ZoomOffBLC OffVideo SettingsEffect OffProgram AE AutoWhite Balance OutdoorBLCVideo Record00:16 / 24:32SF / 720STBYVideo Record SF / 72000:16 / 24:32 STBYPlayRecordSettingsBack 00814F SC-M102 USA_1-Video 2004.8.30 9:54 AM Page 44](https://usermanual.wiki/Samsung-Electronics-Co/04SPIDER/User-Guide-487756-Page-25.png)
![23452345ENGLISHVideo Mode : Setting Various Functions4747ENGLISHVideo Mode : Setting Various Functions4646Setting the Program AE (Programmed Auto Exposure)It allows you to adjust the shutter speed and aperture setting to suit different conditions.Setting the BLC (Backlight Compensation)The Backlight Compensation function helps to make the subject brighter when the subject is in front of a window or the subject is too dark to distinguish. You can use this function when using your the CAM in the bright background and snowy background.1. Move [Mode Selector] down to turn on the CAM.◆ The Video Record screen appears. ◆ You can select Video mode or Previous mode as the start-up mode in System Settings.(Refer to page 97)1. Move [Mode Selector] down to turn on the CAM.◆ The Video Record screen appears. ◆ You can select Video mode or Previous mode as the start-up mode in System Settings.(Refer to page 97)2. Press the [Menu] button and move the [ ▲/▼] switch. Press the [OK] button after selecting <Settings>.3. Move the [ ▲/▼] switch to select <BLC> and press the [OK] button.◆ On( ): Set the BLC function.◆ Off: Cancel the BLC function.4. Move the [ ▲/▼] switch to select desired setting and press the [OK] button.5. Press the [Menu] button to finish setting.◆ < > is displayed.2. Press the [Menu] button and move the [ ▲/▼] switch. Press the [OK] button after selecting <Settings>.3. Move the [ ▲/▼] switch to select <Program AE> and press the [OK] button.◆ Auto: Auto balance between the subject and background to get the best result. The shutterspeed automatically varies from 1/60 to 1/250 per second depending on the scene.◆ Sport s( ): For recording fast-moving people or objects. It is suitable for sports events,recording outside in the car.◆ Spotlight( ): Compensates for a subject that appears too bright under strong direct light such as spotlight. It is suitable for concert and school performance. ◆ Sand /Snow( ): Use when the light is very strong such as on the beach or in the snow.◆ HS Shutter( ): Allows fast-moving images to be captured one frame at a time.4. Move the [ ▲/▼] switch to select desired setting and press the [OK] button.5. Press the [Menu] button to finish setting.◆ The icon of selected function is displayed.◆ If you select <Auto>, any icon is not displayed.Notes✤If you select <Back> in the menu, the previous menu appears.✤Press and hold the [Menu] button in Video Record, you can move to <Settings> directly.Notes✤If you select <Back> in the menu, the previous menu appears.✤Press and hold the [Menu] button in Video Record, you can move to <Settings> directly.White Balance AutoDigital ZoomOffBLC OffVideo SettingsEffect OffProgram AE AutoWhite Balance AutoDigital ZoomOffBLC OffVideo SettingsEffect OffProgram AE SportsBLCVideo Record00:16 / 24:32SF / 720STBYVideo Record SF / 72000:16 / 24:32 STBYPlayRecordSettingsBackWhite Balance AutoProgram AE AutoDigital ZoomOffBLC OffVideo SettingsEffect OffEffectWhite Balance AutoProgram AE AutoOffDigital ZoomOffBLC OnVideo SettingsVideo Record00:16 / 24:32SF / 720BLCSTBYVideo Record SF / 72000:16 / 24:32 STBYPlayRecordSettingsBack 00814F SC-M102 USA_1-Video 2004.8.30 9:54 AM Page 46](https://usermanual.wiki/Samsung-Electronics-Co/04SPIDER/User-Guide-487756-Page-26.png)
![23452345ENGLISHVideo Mode : Setting Various Functions4949ENGLISHVideo Mode : Setting Various Functions4848Setting the EffectYou can create professional looking effect on your video file.Setting the Digital ZoomYou can magnify optical zoom(10x) digitally. The Digital Zoom processes data to enlarge the center portion ofthe image to fill the frame may produce a less detailed and slightly grainy picture.1. Move [Mode Selector] down to turn on the CAM.◆ The Video Record screen appears. ◆ You can select Video mode or Previous mode as the start-up mode in System Settings.(Refer to page 97)1. Move [Mode Selector] down to turn on the CAM.◆ The Video Record screen appears. ◆ You can select Video mode or Previous mode as the start-up mode in System Settings.(Refer to page 97)2. Press the [Menu] button and move the [ ▲/▼] switch. Press the [OK] button after selecting <Settings>.3. Move the [ ▲/▼] switch to select <Digital Zoom> and press the [OK] button.◆ On: Set the Digital Zoom. (X100)◆ Off: Cancel the Digital Zoom.4. Move the [ ▲/▼] switch to select desired setting and press the [OK] button.5. Press the [Menu] button to finish setting.◆ 4 zoom indicators increase after setting the Digital Zoom.2. Press the [Menu] button and move the [ ▲/▼] switch. Press the [OK] button after selecting <Settings>.4. Move the [ ▲/▼] switch to select desired setting and press the [OK] button.5. Press the [Menu] button to finish setting.◆ The letters of selected function is displayed.3. Move the [ ▲/▼] switch to select <Effect> and press the [OK] button.◆ Off: Cancel the <Effect>.◆ Art: Artistic effects on your video file.◆ Mosaic: A mosaic overlay appears on your video file.◆ Sepia: The picture is displayed in sepia color similar to that of an old photograph.◆ Negative: Reverses the colors, creating the look of a negative.◆ Mirror : This mode cuts the picture in half using a Mirror effect.◆ B&W: Changes the images into Black and White.◆ Emboss: Embossing effects on your video file.White Balance AutoProgram AE AutoDigital ZoomOffBLC OffVideo SettingsEffect OffWhite Balance AutoProgram AE AutoDigital ZoomOffBLC OffVideo SettingsEffect MirrorBLCVideo Record00:16 / 24:32SF / 720MirrorMirrorSTBYVideo Record SF / 72000:16 / 24:32 STBYPlayRecordSettingsBackEffectWhite Balance AutoProgram AE AutoOffDigital ZoomOffBLC OffVideo SettingsEffectWhite Balance AutoProgram AE AutoOffDigital ZoomOnBLC OffVideo SettingsVideo Record00:16 / 24:32SF / 720STBYVideo Record SF / 72000:16 / 24:32 STBYPlayRecordSettingsBackNotes✤If you select <Back> in the menu, the previous menu appears.✤Press and hold the [Menu] button in Video Record, you can move to <Settings> directly.Notes✤If you select <Back> in the menu, the previous menu appears.✤Press and hold the [Menu] button in Video Record, you can move to <Settings> directly. 00814F SC-M102 USA_1-Video 2004.8.30 9:54 AM Page 48](https://usermanual.wiki/Samsung-Electronics-Co/04SPIDER/User-Guide-487756-Page-27.png)
![123ENGLISH5353Photo Mode : CapturingZooming In and OutZooming technique lets you change the size of the subject captured in a scene.1. Move [Mode Selector] down to turn on the CAM and move it down again.◆ The Mode Selection screen appears.2. Move the [ ▲/▼] switch to select Photo mode and press the [OK] button. ◆ To take pictures, press the [OK] button again.BLC800Photo Capture800Photo Capture800Photo CaptureVideo Record00:16 / 24:32Zoom InZoom OutNotes✤Frequent use of zooming may result in faster battery power consumption.✤Refer to page 67 about Digital Zoom.ENGLISH5252Photo Mode : CapturingCapturing ImagesYou can take pictures as well as you can record files.1. Move [Mode Selector] down to turn on the CAM and move it down again.◆ The Mode Selection screen appears.2. Move the [ ▲/▼] switch to select Photo mode and press the [OK] button.◆ The CAM is ready for taking pictures.◆ [ ] indicator is displayed on LCD.3. Press [ Record /Stop] button to take pictures.Mode SelectionMP3Voice RecorderFile BrowserVideoPhotoCapturing...800Photo Capture800Photo CaptureCapturing...Move the [ ▲/▼] switch up to zoom out.●The subject appears farther away when you zoom out.Move the [ ▲/▼] switch down to zoom in.●The subject appears closer when you zoom in. 00814F SC-M102 USA_2-Photo 2004.8.30 9:55 AM Page 52](https://usermanual.wiki/Samsung-Electronics-Co/04SPIDER/User-Guide-487756-Page-29.png)
![3567ENGLISH5555Photo Mode : Selecting File OptionsDeleting Photo filesENGLISH5454Photo Mode : ViewingViewing Photo files on the LCD MonitorIt is handy and practical to view pictures using the LCD monitor almost anywhere such as in a car, indoors or outdoors. You can delete photo files or pictures in <File Options>.1. Move [Mode Selector] down to turn on the CAM and move it down again.◆ The Mode Selection screen appears.2. Move the [ ▲/▼] switch to select [Photo] mode and press the [OK] button. ◆ The Photo Capture screen appears.3. Press the [Menu] button and move the [ ▲/▼] switch. Press the [OK] button after selecting <View>.4. Move the [ ▲/▼] switch to select the photo file you want to delete.5. Press the [Menu] button to select <File Options> and press the [OK] button.◆ You can select <File Options> only in <View>. 6. Move the [ ▲/▼] switch to select <Delete> and press the [OK] button.7. Move the [ ▲/▼] switch to select the followings and press the [OK] button.◆ Selected: The selected photo file is deleted.◆ All: All photo files are deleted. ◆ Cancel: Cancel deleting photo files.8. Press the [Menu] button to finish deleting the files.1. Move [Mode Selector] down to turn on the CAM and move it down again.◆ The Mode Selection screen appears.2. Move the [ ▲/▼] switch to select Photo mode and press the [OK] button. ◆ The Photo Capture screen appears.3. Press the [Menu] button and move the [ ▲/▼] switch. Press the [OK] button after selecting <View>.4. Move the [ ▲/▼] switch to find the photo you want to view.◆ Each time you move the [ ▲/▼] switch, the frame moves horizontally.◆ Each time you press the [+ ]/[ - ] button or press and hold the [ ▲/▼] switch, a page(6 frame) moves.5. Press [OK] button to view the photo you want.◆ The full screen displays.◆ Press the [+] or [ -] button to view the previous or next picture.800Photo CaptureViewCaptureSettingsBack01 03Photo View 100-0022ViewFile OptionsCaptureSettingsBack01 03Photo View 100-0022LockCopy ToDeleteDPOFBackPhoto View 100-002201 03LockCopy To ext.DeleteDPOFBackSelectedAllCancelDeleting file(s)...2345Mode SelectionMP3Voice RecorderFile BrowserVideoPhotoCapturing...800Photo CaptureViewCaptureSettingsBackPhoto View 100-0022Capturing...800Photo CaptureNote✤Display time may vary depending on the picture size.Note✤Press and hold the [Menu] button in Photo View, you can move to <File Options> directly. 00814F SC-M102 USA_2-Photo 2004.8.30 9:55 AM Page 54](https://usermanual.wiki/Samsung-Electronics-Co/04SPIDER/User-Guide-487756-Page-30.png)
![35673567ENGLISHPhoto Mode : Selecting File Options5757ENGLISHPhoto Mode : Selecting File Options5656Locking Photo filesYou can lock the important photo file not to be deleted. 1. Move [Mode Selector] down to turn on the CAM and move it down again.◆ The Mode Selection screen appears.2. Move the [ ▲/▼] switch to select Photo mode and press the [OK] button. ◆ The Photo Capture screen appears.3. Press the [Menu] button and move the [ ▲/▼] switch. Press the [OK] button after selecting <View>.4. Move the [ ▲/▼] switch to select the photo file you want to lock.5. Press the [Menu] button to select <File Options> and press the [OK] button.◆ You can select <File Options> only in <View>. 1. Move [Mode Selector] down to turn on the CAM and move it down again.◆ The Mode Selection screen appears.2. Move the [ ▲/▼] switch to select Photo mode and press the [OK] button. ◆ The Photo Capture screen appears.3. Press the [Menu] button and move the [ ▲/▼] switch. Press the [OK] button after selecting <View>.4. Move the [ ▲/▼] switch to select the photo file you want to print.5. Press the [Menu] button to select <File Options> and press the [OK] button.6. Move the [ ▲/▼] switch to select <DPOF> and press the [OK] button.7. Move the [ ▲/▼] switch to select copies you want to print.6. Move the [ ▲/▼] switch to select <Lock> and press the [OK] button.7. Move the [ ▲/▼] switch to select the followings and press the [OK] button.◆ Selected: The selected photo file is locked.◆ All: All photo files are locked.◆ Cancel: Cancel locking photo files.8. Press the [Menu] button to finish locking the files.◆ The < > icon is displayed on the locked file.Setting DPOF (Digital Print Order Format) FunctionYou can print photos(DPOF files) connecting the CAM to DPOF compatible printer directly with the USB cable orinserting the memory stick. (Refer to page 115 about connecting to a photo printer)800Photo CaptureViewCaptureSettingsBack01 03Photo View 100-0022ViewFile OptionsCaptureSettingsBack01 03Photo View 100-0022LockCopy ToDeleteDPOFBackPhoto View 100-002201 03LockCopy To ext.DeleteDPOFBackSelectedAllCancelChoose the file(s) you wouldto lock.800Photo CaptureViewCaptureSettingsBack01 03Photo View 100-0022ViewFile OptionsCaptureSettingsBack01 03Photo View 100-0022LockCopy ToDeleteDPOFBackPhoto View 100-002201 03LockCopy To ext.DeleteDPOFBackcopies for DPOF printPress OK to set.Press Back OK to cancel.1Note✤Press and hold the [Menu] button in Photo View, you can move to <File Options> directly.Notes✤Press and hold the [Menu] button in Photo View, you can move to <File Options> directly.✤Refer to page 116 for further details about printing DPOF files.✤You can set copies for DPOF print up to 99. 00814F SC-M102 USA_2-Photo 2004.8.30 9:55 AM Page 56](https://usermanual.wiki/Samsung-Electronics-Co/04SPIDER/User-Guide-487756-Page-31.png)
![34563567ENGLISHPhoto Mode : Setting Various Functions5959ENGLISHPhoto Mode : Selecting File Options5858Setting the Photo file SizeYou can set the photo files size. The number of stored files varies depending on the Memory Stick capacity, photo files size.Copying Photo filesYou can copy photo files to the internal or external memory.800Photo CaptureViewCaptureSettingsBack01 03Photo View 100-0022ViewFile OptionsCaptureSettingsBack01 03Photo View 100-0022LockCopy ToDeleteDPOFBackPhoto View 100-002201 03LockCopy To ext.DeleteDPOFBackSelectedAllCancelChoose the file(s) to copyto Memory Stick?800Photo CaptureViewCaptureSettingsBackPhoto SettingsEISFlash AutoOnWhite BalanceAutoFocus AFSizePhoto SettingsEISFlash AutoOnWhite BalanceAutoFocus AFSize1280Photo Capture1. Move [Mode Selector] down to turn on the CAM and move it down again.◆ The Mode Selection screen appears.2. Move the [ ▲/▼] switch to select Photo mode and press the [OK] button. ◆ The Photo Capture screen appears.3. Press the [Menu] button and move the [ ▲/▼] switch. Press the [OK] button after selecting <View>.4. Move the [ ▲/▼] switch to select the photo file you want to copy.5. Press the [Menu] button to select <File Options> and press the [OK] button.◆ You can select <File Options> only in <View>. 1. Move [Mode Selector] down to turn on the CAM and move it down again.◆ The Mode Selection screen appears.2. Move the [ ▲/▼] switch to select Photo mode and press the [OK] button. ◆ The Photo Capture screen appears.3. Press the [Menu] button and move the [ ▲/▼] switch. Press the [OK] button after selecting <Settings>.4. Move the [ ▲/▼] switch to select <Size> and press the [OK] button.◆ You can select 1280x960, 800x600 or 640x480 size.5. Move the [ ▲/▼] switch to select desired setting and press the [OK] button.6. Press the [Menu] button to finish setting.6. Move the [ ▲/▼] switch to select <Copy To> and press the [OK] button.◆ If you selected the Storage type ‘External’, the file is copied to ‘Internal’.7. Move the [ ▲/▼] switch to select the followings and press the [OK] button.◆ Selected: Copy the selected photo file.◆ All: Copy all photo files.◆ Cancel: Cancel copying photo files.8. Press the [Menu] button to finish copying the files. Notes✤If you select <Back> in the menu, the previous menu appears.✤Press and hold the [Menu] button in Photo View, you can move to <File Options> directly.Note✤Press and hold the [Menu] button in Photo View, you can move to <File Options> directly. 00814F SC-M102 USA_2-Photo 2004.8.30 9:55 AM Page 58](https://usermanual.wiki/Samsung-Electronics-Co/04SPIDER/User-Guide-487756-Page-32.png)
![34563456ENGLISHPhoto Mode: Setting Various Functions6161ENGLISHPhoto Mode : Setting Various Functions6060Setting the FocusYou can set the focus depending on the subject or the environment. In most situations, you can record the best photo using AF(Auto Focus).Setting the FlashThe Flash works only in Photo Mode and allows the user to take brighter photos in dark place such as in the night, indoor and in shade areas.800Photo CaptureViewCaptureSettingsBackPhoto SettingsEISSizeFlash AutoOnWhite BalanceAutoFocus AFPhoto SettingsEISSizeFlash AutoOnWhite BalanceAutoFocus MFCapturing...BLC800Photo Capture1. Move [Mode Selector] down to turn on the CAM and move it down again.◆ The Mode Selection screen appears.2. Move the [ ▲/▼] switch to select Photo mode and press the [OK] button. ◆ The Photo Capture screen appears.3. Press the [Menu] button and move the [ ▲/▼] switch. Press the [OK] button after selecting <Settings>.1. Move [Mode Selector] down to turn on the CAM and move it down again.◆ The Mode Selection screen appears.2. Move the [ ▲/▼] switch to select Photo mode and press the [OK] button. ◆ The Photo Capture screen appears.3. Press the [Menu] button and move the [ ▲/▼] switch. Press the [OK] button after selecting <Settings>.4. Move the [ ▲/▼] switch to select <Flash> and press the [OK] button.5. Move the [ ▲/▼] switch to select desired setting and press the [OK] button.◆ Auto: Set the flash automatically.◆ On( ): Turn on the flash.◆ Off( ): Turn off the flash.6. Press the [Menu] button to finish setting.◆ The icon of selected function is displayed.4. Move the [ ▲/▼] switch to select <Focus> and press the [OK] button.◆ AF: Set the focus automatically. When the CAM turns on, AF is selected in default.◆ MF( ): Set the focus manually.5. Move the [ ▲/▼] switch to select desired setting and press the [OK] button.6. Press the [Menu] button to finish setting.◆ The icon of selected function is displayed.◆ If you select the AF, any icon is not displayed.Notes✤If you select <Back> in the menu, the previous menu appears. ✤Press and hold the [Menu] button in Photo View, you can move to <File Options> directly.Notes✤If you select <Back> in the menu, the previous menu appears.✤Press and hold the [Menu] button in Photo View, you can move to <File Options> directly.800Photo CapturePhoto CaptureViewCaptureSettingsBackPhoto SettingsEISSizeOnWhite BalanceAutoFocus AFFlash AutoPhoto SettingsEISSizeOnWhite BalanceAutoFocus AFFlash OnCapturing...BLC800Photo CaptureAdjust the focus using [ ▲/▼] switch to zoom in or out manually.◆ When a picture contains both of objects close and far away from the CAM◆ When a person is enveloped in fog or surrounded by snowManual Focus 00814F SC-M102 USA_2-Photo 2004.8.30 9:55 AM Page 60](https://usermanual.wiki/Samsung-Electronics-Co/04SPIDER/User-Guide-487756-Page-33.png)
![34563456ENGLISHPhoto Mode : Setting Various Functions6363ENGLISHPhoto Mode : Setting Various Functions6262Setting the EIS (Electrical Image Stabilizer)The Electrical Image Stabilizer is a function that compensate for shakings or hand movements while taking pictures. Refer to page 44 for further details.Setting the White BalanceThe color balance may vary depending on the lighting conditions. The White Balance is used to preserve natural colors under different lighting conditions.1. Move [Mode Selector] down to turn on the CAM and move it down again.◆ The Mode Selection screen appears.2. Move the [ ▲/▼] switch to select Photo mode and press the [OK] button. ◆ The Photo Capture screen appears.3. Press the [Menu] button and move the [ ▲/▼] switch. Press the [OK] button after selecting <Settings>.1. Move [Mode Selector] down to turn on the CAM and move it down again.◆ The Mode Selection screen appears.2. Move the [ ▲/▼] switch to select Photo mode and press the [OK] button. ◆ The Photo Capture screen appears.3. Press the [Menu] button and move the [ ▲/▼] switch. Press the [OK] button after selecting <Settings>.5. Move the [ ▲/▼] switch to select desired setting and press the [OK] button.6. Press the [Menu] button to finish setting.◆ The icon of selected function is displayed.◆ If you select <Auto>, any icon is not displayed.5. Move the [ ▲/▼] switch to select desired setting and press the [OK] button.6. Press the [Menu] button to finish setting.◆ The icon of selected function is displayed.800Photo CapturePhoto CaptureViewCaptureSettingsBackPhoto SettingsSize 800×600White BalanceAutoFocus AFFlash AutoEIS OnPhoto SettingsSizeWhite BalanceAutoFocus AFFlash AutoEIS Off800Photo Capture800Photo CaptureViewCaptureSettingsBack800×600Photo SettingsFocusEISSizeFlash AutoAFOnWhite BalanceAuto800×600Photo SettingsFocusEISSizeFlash AutoAFOnWhite BalanceHoldCapturing...BLC800Photo CaptureNotes✤If you select <Back> in the menu, the previous menu appears.✤Press and hold the [Menu] button in Photo View, you can move to <File Options> directly.Notes✤If you select <Back> in the menu, the previous menu appears.✤Turn the Digital Zoom off for more accurate White Balance setting.✤Press and hold the [Menu] button in Photo View, you can move to <File Options> directly.4. Move the [ ▲/▼] switch to select <White Balance> and press the [OK] button.◆ Auto: Adjust the color depending on the condition automatically.◆ Hold( ): Record with first selected color without adjusting color.◆ Outdoor( ): Record with the balanced light. (Natural light)◆ Indoor( ): Record with the balanced light. (Glow lamp, light in the studio or video light)4. Move the [ ▲/▼] switch to select <EIS> and press the [OK] button.◆ On( ): Set the EIS function.◆ Off : Cancel the EIS function. 00814F SC-M102 USA_2-Photo 2004.8.30 9:55 AM Page 62](https://usermanual.wiki/Samsung-Electronics-Co/04SPIDER/User-Guide-487756-Page-34.png)
![34563456ENGLISHPhoto Mode : Setting Various Functions6565ENGLISHPhoto Mode : Setting Various Functions6464800Photo CapturePhoto CaptureViewCaptureSettingsBackPhoto SettingsEISWhite BalanceFlash AutoFocus AFOnAutoProgram AE AutoPhoto SettingsEISWhite BalanceFlash AutoFocus AFOnAutoProgram AE Sand/SnowCapturing...BLC800Photo Capture800Photo CaptureViewCaptureSettingsBackPhoto SettingsWhite BalanceProgram AEBLCFocus AFEIS OnAutoAutoOffPhoto SettingsWhite BalanceProgram AEBLCFocus AFEIS OnAutoAutoOnCapturing...800Photo CaptureBLCSetting the Program AE (Programmed Auto Exposure)It allows you to adjust the shutter speed and aperture setting to suit different conditions.Setting the BLC (Backlight Compensation)The Backlight Compensation function helps to make the subject brighter when the subject is in front of a window or the subject is too dark to distinguish. You can use this function when using the CAM in the bright background and snowy background.1. Move [Mode Selector] down to turn on the CAM and move it down again.◆ The Mode Selection screen appears.2. Move the [ ▲/▼] switch to select Photo mode and press the [OK] button. ◆ The Photo Capture screen appears.3. Press the [Menu] button and move the [ ▲/▼] switch. Press the [OK] button after selecting <Settings>.1. Move [Mode Selector] down to turn on the CAM and move it down again.◆ The Mode Selection screen appears.2. Move the [ ▲/▼] switch to select Photo mode and press the [OK] button. ◆ The Photo Capture screen appears.3. Press the [Menu] button and move the [ ▲/▼] switch. Press the [OK] button after selecting <Settings>.5. Move the [ ▲/▼] switch to select desired setting and press the [OK] button.6. Press the [Menu] button to finish setting.◆ The icon of selected function is displayed.◆ If you select <Auto>, any icon is not displayed.Notes✤If you select <Back> in the menu, the previous menu appears.✤Press and hold the [Menu] button in Photo View, you can move to <File Options> directly.Notes✤If you select <Back> in the menu, the previous menu appears.✤Press and hold the [Menu] button in Photo View, you can move to <File Options> directly.4. Move the [ ▲/▼] switch to select <Program AE> and press the [OK] button.◆ Auto: Auto balance between the subject and background to get the best result. The shutter speed automatically varies from 1/60 to 1/250 per second depending on the scene.◆ Sport s( ): For fast-moving people or objects. It is suitable for sports events or when you are outside in the car.◆ Spotlight( ): Compensates for a subject that appears too bright under strong direct light such as spotlight. It is suitable for concert and school performance. ◆ Sand /Snow( ): Use when the light is very strong such as on the beach or in the snow.◆ HS Shutter( ): Allows fast-moving images to be captured one frame at a time.4. Move the [ ▲/▼] switch to select <BLC> and press the [OK] button.◆ On( ): Set the BLC function.◆ Off: Cancel the BLC function.5. Move the [ ▲/▼] switch to select desired setting and press the [OK] button.6. Press the [Menu] button to finish setting.◆ < > is displayed. 00814F SC-M102 USA_2-Photo 2004.8.30 9:55 AM Page 64](https://usermanual.wiki/Samsung-Electronics-Co/04SPIDER/User-Guide-487756-Page-35.png)
![34563456ENGLISHPhoto Mode : Setting Various Functions6767ENGLISHPhoto Mode : Setting Various Functions6666800Photo CaptureViewCaptureSettingsBackPhoto SettingsEffectDigital ZoomBackProgram AE AutoBLC OffOffOffPhoto SettingsEffectDigital ZoomBackProgram AE AutoBLC OffOffOnBLC Capturing...800Photo Capture800Photo CapturePhoto CaptureViewCaptureSettingsBackPhoto SettingsEffectDigital ZoomBackProgram AE AutoBLC OffOffOffPhoto SettingsEffectDigital ZoomBackProgram AE AutoBLC OffNegativeOffCapturing...BLC800Photo CaptureNegativeSetting the EffectYou can create professional looking effect on your photo files.Setting the Digital ZoomYou can magnify optical zoom(x10) digitally. The Digital Zoom processes data to enlarge the center portion of the image to fill the frame may produce a less detailed and slightly grainy photos.1. Move [Mode Selector] down to turn on the CAM and move it down again.◆ The Mode Selection screen appears.2. Move the [ ▲/▼] switch to select Photo mode and press the [OK] button. ◆ The Photo Capture screen appears.3. Press the [Menu] button and move the [ ▲/▼] switch. Press the [OK] button after selecting <Settings>.4. Move the [ ▲/▼] switch to select <Effect> and press the [OK] button. ◆ Refer to page 48 about the various effect.1. Move [Mode Selector] down to turn on the CAM and move it down again.◆ The Mode Selection screen appears.2. Move the [ ▲/▼] switch to select Photo mode and press the [OK] button. ◆ The Photo Capture screen appears.3. Press the [Menu] button and move the [ ▲/▼] switch. Press the [OK] button after selecting <Settings>.4. Move the [ ▲/▼] switch to select <Digital Zoom> and press the [OK] button.◆ On: Set the Digital Zoom.◆ Off: Cancel the Digital Zoom.5. Move the [ ▲/▼] switch to select desired setting and press the [OK] button.6. Press the [Menu] button to finish setting.◆ 4 zoom indicators increase after setting the Digital Zoom.5. Move the [ ▲/▼] switch to select desired setting and press the [OK] button.6. Press the [Menu] button to finish setting.◆ The letters of selected function is displayed.Notes✤If you select <Back> in the menu, the previous menu appears.✤Press and hold the [Menu] button in Photo View, you can move to <File Options> directly.Notes✤If you select <Back> in the menu, the previous menu appears.✤Press and hold the [Menu] button in Photo View, you can move to <File Options> directly. 00814F SC-M102 USA_2-Photo 2004.8.30 9:55 AM Page 66](https://usermanual.wiki/Samsung-Electronics-Co/04SPIDER/User-Guide-487756-Page-36.png)
![345ENGLISH7171MP3 Mode : PlayingPlaying Music filesYou can hear the music copied from your PC directly or with the Memory Stick. Mode SelectionVoice RecorderFile BrowserVideoPhotoMP33 black or white.mp35 What a wonderful world.mp3MP3 Play4 Let it be.mp31 hey jude.mp32 I believe i can fly.mp3MP3 Play2. I belive i can fly.mp35.6 KbytesStereo 44.1KHz 128Kbps03:19 / 04:32Notes✤The way of transferring, playing with the Memory Stick is same as that of internal memory.ENGLISH7070MP3 Mode : Storing Music in the CAMCopying Music files to the CAMYou can transfer music files from your PC to the internal memory, Memory Stick or Memory Stick Pro. For copying music files, the CAM must be connected to your PC with the USB cable. You don’t have to connect the CAM to your PC when you transfermusic files to the Memory Stick directly.1. Connect the CAM to a PC with the USB cable.◆ Your computer recognizes this device and the removabledrive appears in ‘My Computer’.2. Double-click the new removable drive to open.3. Select the MP3 folder and double-click to enter.4. Copy the MP3 file you want from PC to the CAM. ◆ Refer to the folder structure on page 27 for copying MP3 files. 1. Connect the earphones to the CAM.◆ You can also hear the music from the Built-in speaker without the earphones.2. Move [Mode Selector] down to turn on the CAM and move it down again.◆ The Mode Selection screen appears.3. Move the [ ▲/▼] switch to select MP3 mode and press the [OK] button. 4. Move the [ ▲/▼] switch to find the music you want to hear and press the [OK] button.◆ The selected music is played.5. Press the [OK] button again to stop hearing music.◆ Each time you press the [OK] button, play or pause is selected repeatedly.After completing the data transfer, you must disconnect the cable in the following way.1. Select the removable disk icon and click the right mouse button to select ‘Safely Remove Hardware’.2. Select ‘Stop’and disconnect the USB cable when the pop-up screen disappears.Disconnecting USB Connection 00814F SC-M102 USA_3-M/V/F 2004.8.30 9:55 AM Page 70](https://usermanual.wiki/Samsung-Electronics-Co/04SPIDER/User-Guide-487756-Page-38.png)
![45674567ENGLISHMP3 Mode : Selecting Play Options7373Setting Repeat PlayYou can play the only one or all music repeatedly.ENGLISHMP3 Mode : Selecting Play Options7272Setting Random PlayYou can play the music randomly.1. Connect the earphones to the CAM.◆ You can also hear the music from the Built-in speaker without the earphones.2. Move [Mode Selector] down to turn on the CAM and move it down again.◆ The Mode Selection screen appears.3. Move the [ ▲/▼] switch to select MP3 mode and press the [OK] button. 4. Press the [Menu] button when the music list appears.5. Move the [ ▲/▼] switch to select <Play Options> and press the [OK] button.6. Move the [ ▲/▼] switch to select <Random Play> and press the [OK] button.◆ On: Set the Random Play function.◆ Off: Cancel the Random Play function.7. Move the [ ▲/▼] switch to select desired setting and press the [OK] button.8. Press the [Menu] button to finish setting.3 black or white.mp35 What a wonderful world.mp3MP3 Play4 Let it be.mp31 hey jude.mp32 I believe i can fly.mp32 I belive i can fly.mp33 black or white.mp31 hey jude.mp35 What a wonderful world.mp3MP3 Play4 Let it be.mp3File OptionsBackPlay OptionsMP3 PlayRepeatBackRandom Play OffAllMP3 PlayRepeatBackRandom Play OnAll1. Connect the earphones to the CAM.◆ You can also hear the music from the Built-in speaker without the earphones.2. Move [Mode Selector] down to turn on the CAM and move it down again.◆ The Mode Selection screen appears.3. Move the [ ▲/▼] switch to select MP3 mode and press the [OK] button. 4. Press the [Menu] button when the music list appears.5. Move the [ ▲/▼] switch to select <Play Options> and press the [OK] button.6. Move the [ ▲/▼] switch to select <Repeat> and press the [OK] button.◆ All : All files are repeated.◆ One : One file is repeated.7. Move the [ ▲/▼] switch to select desired setting and press the [OK] button.8. Press the [Menu] button to finish setting.3 black or white.mp35 What a wonderful world.mp3MP3 Play4 Let it be.mp31 hey jude.mp32 I believe i can fly.mp32 I belive i can fly.mp33 black or white.mp31 hey jude.mp35 What a wonderful world.mp3MP3 Play4 Let it be.mp3File OptionsBackPlay OptionsMP3 PlayBackRandom Play OffRepeat AllMP3 PlayBackRandom Play OffRepeat OneNote✤If you select <Back> in the menu, the previous menu appears.Note✤If you select <Back> in the menu, the previous menu appears. 00814F SC-M102 USA_3-M/V/F 2004.8.30 9:55 AM Page 72](https://usermanual.wiki/Samsung-Electronics-Co/04SPIDER/User-Guide-487756-Page-39.png)
![34563456ENGLISHMP3 Mode : Selecting File Options7575Locking Music filesYou can lock the important music file not to be deleted.ENGLISHMP3 Mode : Selecting File Options7474Deleting Music filesYou can delete the music file you want.1. Move [Mode Selector] down to turn on the CAM and move it down again.2. Move the [ ▲/▼] switch to select MP3 mode and press the [OK] button. ◆ The Mode Selection screen appears.3. Press the [Menu] button when the music list appears.4. Move the [ ▲/▼] switch to select <File Options> and press the [OK] button.5. Move the [ ▲/▼] switch to select <Delete> and press the [OK] button.6. Move the [ ▲/▼] switch to select the followings and press the [OK] button.◆ Selected: The selected music file is deleted.◆ All: All music files are deleted. ◆ Cancel: Cancel deleting music files.7. Press the [Menu] button to finish deleting the files.3 black or white.mp35 What a wonderful world.mp3MP3 Play4 Let it be.mp31 hey jude.mp32 I believe i can fly.mp32 I belive i can fly.mp33 black or white.mp31 hey jude.mp35 What a wonderful world.mp3MP3 Play4 Let it be.mp3File OptionsBackPlay OptionsMP3 Play2. I belive i can fly.mp35.6 MbytesStereo 44.1KHz 128Kbps03:19 / 04:32LockCopy ToDeleteBackMP3 Play2. I belive i can fly.mp35.6 MbytesStereo 44.1KHz 128Kbps03:19 / 04:32SelectedAllCancelDeleting file(s)...1. Move [Mode Selector] down to turn on the CAM and move it down again.2. Move the [ ▲/▼] switch to select MP3 mode and press the [OK] button. ◆ The Mode Selection screen appears.3. Press the [Menu] button when the music list appears.4. Move the [ ▲/▼] switch to select <File Options> and press the [OK] button.5. Move the [ ▲/▼] switch to select <Lock> and press the [OK] button.3 black or white.mp35 What a wonderful world.mp3MP3 Play4 Let it be.mp31 hey jude.mp32 I believe i can fly.mp32 I belive i can fly.mp33 black or white.mp31 hey jude.mp35 What a wonderful world.mp3MP3 Play4 Let it be.mp3File OptionsBackPlay OptionsMP3 Play2. I belive i can fly.mp35.6 MbytesStereo 44.1KHz 128Kbps03:19 / 04:32LockCopy ToDeleteBackMP3 Play2. I belive i can fly.mp35.6 MbytesStereo 44.1KHz 128Kbps03:19 / 04:32SelectedAllCancelChoose the file(s) you wouldto lock.Note✤If you select <Back> in the menu, the previous menu appears.Note✤If you select <Back> in the menu, the previous menu appears.7. Move the [ ▲/▼] switch to select the followings and press the [OK] button.◆ Selected: The selected music file is locked.◆ All: All music files are locked. ◆ Cancel: Cancel locking music files.8. Press the [Menu] button to finish locking the files.◆ The < > icon is displayed on the locked file. 00814F SC-M102 USA_3-M/V/F 2004.8.30 9:55 AM Page 74](https://usermanual.wiki/Samsung-Electronics-Co/04SPIDER/User-Guide-487756-Page-40.png)
![2343456ENGLISHVoice Recorder Mode : Recording7777Recording VoiceYou can record voice using the built-in microphone in the CAM.ENGLISHMP3 Mode : Selecting File Options7676Copying Music filesYou can copy the music file to the internal or external memory.1. Move [Mode Selector] down to turn on the CAM and move it down again.◆ The Mode Selection screen appears.2. Move the [ ▲/▼] switch to select MP3 mode and press the [OK] button. 3. Press the [Menu] button when the music list appears.4. Move the [ ▲/▼] switch to select <File Options> and press the [OK] button.5. Move the [ ▲/▼] switch to select <Copy To> and press the [OK] button.◆ If you selected the Storage type ‘External’, the file is copied to ‘Internal’.6. Move the [ ▲/▼] switch to select the followings and press the [OK] button.◆ Selected: Copy the selected music file.◆ All: Copy all music files. ◆ Cancel: Cancel copying music files.7. Press the [Menu] button to finish copying the files.3 black or white.mp35 What a wonderful world.mp3MP3 Play4 Let it be.mp31 hey jude.mp32 I believe i can fly.mp32 I belive i can fly.mp33 black or white.mp31 hey jude.mp35 What a wonderful world.mp3MP3 Play4 Let it be.mp3File OptionsBackPlay OptionsMP3 Play2. I belive i can fly.mp35.6 MbytesStereo 44.1KHz 128Kbps03:19 / 04:32LockCopy ToDeleteBackMP3 Play2. I belive i can fly.mp35.6 MbytesStereo 44.1KHz 128Kbps03:19 / 04:32SelectedAllCancelChoose the file(s) to copyto internal memory?1. Move [Mode Selector] down to turn on the CAM and move it down again.◆ The Mode Selection screen appears.2. Move the [ ▲/▼] switch to select Voice Recorder mode and press the [OK] button.3. Press the [Record/Stop] button to record voice.◆ The elapsed time and < ●REC > is displayed. It starts recording.4. Press the [Record/Stop] button to stop recording voice.◆ <■STBY > is displayed and it stops recording. Mode SelectionFile BrowserVideoPhotoMP3Voice RecorderVoice Record9 01/07/2005 00:211.4 MbytesStereo 8KHz 128Kbps00:16 / 24:32 RECVoice Record9 01/07/2005 00:211.4 MbytesStereo 8KHz 128Kbps00:16 / 24:32 STBYNote✤If you set Hold function with the MP3 Hold switch, you can’t delete, lock or copy music files.You can only use Power switch and volume [+]/ [ - ] buttons. 00814F SC-M102 USA_3-M/V/F 2004.8.30 9:55 AM Page 76](https://usermanual.wiki/Samsung-Electronics-Co/04SPIDER/User-Guide-487756-Page-41.png)
![45672346ENGLISHVoice Recorder Mode : Selecting File Options7979Deleting Voice filesENGLISHVoice Recorder Mode : Playing7878Playing Voice filesYou can hear the recorded voice connecting earphones. You can delete voice files you want.1. Move [Mode Selector] down to turn on the CAM and move it down again.◆ The Mode Selection screen appears.2. Move the [ ▲/▼] switch to select Voice Recorder mode and press the [OK] button.1. Move [Mode Selector] down to turn on the CAM and move it down again.◆ The Mode Selection screen appears.2. Move the [ ▲/▼] switch to select Voice Recorder mode and press the [OK] button. 3. Press the [Menu] button when the Voice Record Screen appears.4. Move the [ ▲/▼] switch to select <Play> and press the [OK] button.5. Press the [Menu] button to select <File Options> and press the [OK] button.◆ You can select <File Options> only in <Play>.6. Move the [ ▲/▼] switch to select <Delete> and press the [OK] button.7. Move the [ ▲/▼] switch to select the followings and press the [OK] button.◆ Selected: The selected voice file is deleted.◆ All: All voice files are deleted. ◆ Cancel: Cancel deleting voice files.8. Press the [Menu] button to finish deleting the files.3. Press the [Menu] button when the Voice Record screen appears.4. Move the [ ▲/▼] switch to select <Play> and press the [OK] button.5. Move the [ ▲/▼] switch to select the file you want to play. 6. Press the [OK] button to play the recorded voice.◆ Press the [OK] button to pause playing.Voice Record9 01/07/2005 00:211.4 MbytesStereo 8KHz 128Kbps00:16 / 24:32 STBYVoice Record9 01/01/2005 00:21230 kStereo 8KHz 128Kbps00:16 / 24:32PlayRecordBackSTBY1 01/01/2005 12:222 01/01/2005 1:233 01/02/2005 5:394 01/04/2005 7:135 01/05/2005 11:54Voice PlayVoice Play2 01/01/2005 1:231.4 MbytesStereo 44KHz 354Kbps00:12 / 05:12Voice Record9 01/01/2005 00:21230 kStereo 8KHz 128Kbps00:16 / 24:32PlayRecordBackSTBY1 01/01/2005 12:222 01/01/2005 1:233 01/02/2005 5:394 01/04/2005 7:135 01/05/2005 11:54Voice PlayPlayFile OptionsRecordBack1 01/01/2005 12:222 01/01/2005 1:233 01/02/2005 5:394 01/04/2005 7:135 01/05/2005 11:54Voice PlayLockCopy ToDeleteBack1 04/07/04 12:22 pm2 04/07/05 1:23 am3 04/07/05 5:39 pm4 04/07/09 7:3 am5 04/07/12 11:54 pmVoice PlayPlayFile OptionRecordBackSelectedAllCancelDeleting file(s)...Note✤Press the [Back] button while recording standby status to view the file list. Play/Pause [ ] button: Play or pause the voice fileRewind [ ] switch: Rewind the voice fileFast Forward [ ] switch: Wind the voice file forwardThe button and switch you use when playing the recordingNote✤If you select <Back> in the menu, the previous menu appears. 00814F SC-M102 USA_3-M/V/F 2004.8.30 9:55 AM Page 78](https://usermanual.wiki/Samsung-Electronics-Co/04SPIDER/User-Guide-487756-Page-42.png)
![45674567ENGLISHVoice Recorder Mode : Selecting File Options8181Copying Voice filesYou can copy the voice file to the internal or external memory.ENGLISHVoice Recorder Mode : Selecting File Options8080Locking Voice filesYou can lock the important voice file not to be deleted.Voice Record9 01/01/2005 00:21230 kStereo 8KHz 128Kbps00:16 / 24:32PlayRecordBackSTBY1 01/01/2005 12:222 01/01/2005 1:233 01/02/2005 5:394 01/04/2005 7:135 01/05/2005 11:54Voice PlayPlayFile OptionsRecordBack1 01/01/2005 12:222 01/01/2005 1:233 01/02/2005 5:394 01/04/2005 7:135 01/05/2005 11:54Voice PlayLockCopy ToDeleteBack1 04/07/04 12:22 pm2 04/07/05 1:23 am3 04/07/05 5:39 pm4 04/07/09 7:3 am5 04/07/12 11:54 pmVoice PlayPlayFile OptionRecordBackSelectedAllCancelChoose the file(s) you wouldto lock.1. Move [Mode Selector] down to turn on the CAM and move it down again.◆ The Mode Selection screen appears.2. Move the [ ▲/▼] switch to select Voice Recorder mode and press the [OK] button. 3. Press the [Menu] button when the Voice Record screen appears.4. Move the [ ▲/▼] switch to select <Play> and press the [OK] button.Voice Record9 01/01/2005 00:21230 kStereo 8KHz 128Kbps00:16 / 24:32PlayRecordBackSTBY1 01/01/2005 12:222 01/01/2005 1:233 01/02/2005 5:394 01/04/2005 7:135 01/05/2005 11:54Voice PlayPlayFile OptionsRecordBack1 01/01/2005 12:222 01/01/2005 1:233 01/02/2005 5:394 01/04/2005 7:135 01/05/2005 11:54Voice PlayLockCopy ToDeleteBack1 04/07/04 12:22 pm2 04/07/05 1:23 am3 04/07/05 5:39 pm4 04/07/09 7:3 am5 04/07/12 11:54 pmVoice PlayLockCopy ToDeleteBackSelectedAllCancelChoose the file(s) to copyto Memory Stick?1. Move [Mode Selector] down to turn on the CAM and move it down again.◆ The Mode Selection screen appears.2. Move the [ ▲/▼] switch to select Voice Recorder mode and press the [OK] button. 3. Press the [Menu] button when the Voice Record screen appears.4. Move the [ ▲/▼] switch to select <Play> and press the [OK] button.5. Press the [Menu] button to select <File Options> and press the [OK] button.◆ You can select <File Options> only in <Play>.6. Move the [ ▲/▼] switch to select <Copy To> and press the [OK] button.◆ If you selected the Storage type ‘External’, the file is copied to ‘Internal’.7. Move the [ ▲/▼] switch to select the followings and press the [OK] button.◆ Selected: Copy the selected voice file.◆ All: Copy all voice files. ◆ Cancel: Cancel copying voice files.8. Press the [Menu] button to finish copying the files.5. Press the [Menu] button to select <File Options> and press the [OK] button.◆ You can select <File Options> only in <Play>.6. Move the [ ▲/▼] switch to select <Lock> and press the [OK] button.7. Move the [ ▲/▼] switch to select the followings and press the [OK] button.◆ Selected: The selected voice file is locked.◆ All: All voice files are locked. ◆ Cancel: Cancel locking voice files.8. Press the [Menu] button to finish locking the files.Note✤If you select <Back> in the menu, the previous menu appears.Note✤If you select <Back> in the menu, the previous menu appears. 00814F SC-M102 USA_3-M/V/F 2004.8.30 9:55 AM Page 80](https://usermanual.wiki/Samsung-Electronics-Co/04SPIDER/User-Guide-487756-Page-43.png)
![23462346ENGLISHUsing File Browser8383ENGLISHUsing File Browser8282Deleting Files or FoldersYou can delete the file(AVI, MP3, JPEG, WAV) or folders you recorded.1. Move the [Mode Selector] down to turn on the CAM and press it again.◆ The Mode Selection screen appears.2. Move the [ ▲/▼] switch to select File Browser and press the [OK] button. 3. Move the [ ▲/▼] switch to select <MSAMSUNG> folder and press the [OK] button.4. Move the [ ▲/▼] switch to select the folder to find the file you want to delete. Press the [OK] button.◆ Press the [Menu] button if you want to delete the selected folder.◆ Perform these steps repeatedly until the file you want to delete appears.5. Press the [Menu] button and move the [ ▲/▼] switch.Press the [OK] button after selecting <Delete>.6. Move the [ ▲/▼] button to select the setting you want. Press the [OK] button.◆ Selected: The selected file is deleted.◆ All: All files are deleted.◆ Cancel: Cancel deleting files.7. Press the [Menu] button to finish deleting the files or folders.Mode SelectionVideoPhotoMP3Voice RecorderFile Browser/DCIMMSAMSUNGMISCMP3/ . . . / 100SSWAVSWAV0004.WAVUp One LevelSWAV0001.WAVSWAV0002.WAVSWAV0003.WAVLockCopy ToDeleteFile InfoBack/ . . . / 100SSWAVSWAV0004.WAVUp One LevelSWAV0001.WAVSWAV0002.WAVSWAV0003.WAVLockCopy ToDeleteFile InfoBackDelecting file(s)...SelectedAllCancelNote✤If you select <Back> in the menu, the previous menu appears.Locking FilesYou can lock the important video files or photo files not to be deleted.1. Move the [Mode Selector] down to turn on the CAM and press it again.◆ The Mode Selection screen appears.2. Move the [ ▲/▼] switch to select File Browser and press the [OK] button. 3. Move the [ ▲/▼] switch to select <MSAMSUNG> folder and press the [OK] button.4. Move the [ ▲/▼] switch to select the file you want to lock. Press the [OK] button.◆ Perform these steps repeatedly until the file you want to lock appears.5. Press the [Menu] button and move the [ ▲/▼] switch.Press the [OK] button after selecting <Lock>.6. Move the [ ▲/▼] button to select the followings. Press the [OK] button.◆ Selected: The selected file is locked.◆ All: All files are locked. ◆ Cancel: Cancel locking files.7. Press the [Menu] button to finish locking the files.◆ The [ ] icon is displayed on the locked file.Mode SelectionVideoPhotoMP3Voice RecorderFile Browser/DCIMMSAMSUNGMISCMP3/ . . . / 100SSWAVSWAV0004.WAVUp One LevelSWAV0001.WAVSWAV0002.WAVSWAV0003.WAVLockCopy ToDeleteFile InfoBack/ . . . / 100SSWAVSWAV0004.WAVUp One LevelSWAV0001.WAVSWAV0002.WAVSWAV0003.WAVLockCopy ToDeleteFile InfoBackSelectedAllCancelChoose the file(s) you wouldto lock.Notes✤If you select <Back> in the menu, the previous menu appears.✤You can’t lock folders. 00814F SC-M102 USA_3-M/V/F 2004.8.30 9:55 AM Page 82](https://usermanual.wiki/Samsung-Electronics-Co/04SPIDER/User-Guide-487756-Page-44.png)
![23452346ENGLISHUsing File Browser8585Viewing File InformationYou can see the file name, format, size and date. ENGLISHUsing File Browser84841. Move the [Mode Selector] down to turn on the CAM and press it again.◆ The Mode Selection screen appears.2. Move the [ ▲/▼] switch to select File Browser and press the [OK] button. 3. Move the [ ▲/▼] switch to select <MSAMSUNG> folder and press the [OK] button.4. Move the [ ▲/▼] switch to select the file you want to see its file information. Press the [OK] button. ◆ Perform these steps repeatedly until the file you want to see its file information appears.6. Press the [Menu] button to finish viewing file information.◆ If you select <Close> in the screen, the screen disappears.5. Press the [Menu] button and move the [ ▲/▼] switch.Press the [OK] button after selecting <File Info>.◆ The screen with file name, format, size and date appears.Mode SelectionVideoPhotoMP3Voice RecorderFile Browser/DCIMMSAMSUNGMISCMP3/ . . . / 100SSWAVSWAV0004.WAVUp One LevelSWAV0001.WAVSWAV0002.WAVSWAV0003.WAVLockCopy ToDeleteFile InfoBack/ . . . / 100SSWAVSWAV0004.WAVUp One LevelSWAV0001.WAVSWAV0002.WAVSWAV0003.WAVLockCopy ToDeleteFile InfoBackCloseSWAV0001.WAVSize 222254 bytesDate 22/7/2004 10:32Locked NoCopying Files or FoldersYou can copy the file or folder to the internal or external memory.1. Move the [Mode Selector] down to turn on the CAM and press it again.◆ The Mode Selection screen appears.2. Move the [ ▲/▼] switch to select File Browser and press the [OK] button. 3. Move the [ ▲/▼] switch to select <MSAMSUNG> folder and press the [OK] button.4. Move the [ ▲/▼] switch to select the folder to find the file you want to copy.Press the [OK] button.◆ Press the [Menu] button if you want to copy the selected folder.◆ Perform these steps repeatedly until the file you want to copy appears.5. Press the [Menu] button and move the [ ▲/▼] switch.Press the [OK] button after selecting <Copy To>.◆ If you selected the Storage type ‘External’, the file is copied to ‘Internal’.6. Move the [ ▲/▼] button to select the followings. Press the [OK] button.◆ Selected: Copy the selected file.◆ All: Copy all files. ◆ Cancel: Cancel copying files.7. Press the [Menu] button to finish copying the files or folders.Mode SelectionVideoPhotoMP3Voice RecorderFile Browser/DCIMMSAMSUNGMISCMP3/ . . . / 100SSWAVSWAV0004.WAVUp One LevelSWAV0001.WAVSWAV0002.WAVSWAV0003.WAVLockCopy ToDeleteFile InfoBack/ . . . / 100SSWAVSWAV0004.WAVUp One LevelSWAV0001.WAVSWAV0002.WAVSWAV0003.WAVLockCopy ToDeleteFile InfoBackAllCancelSelectedChoose the file(s) to copyto Memory Stick?Note✤If you select <Back> in the menu, the previous menu appears. 00814F SC-M102 USA_3-M/V/F 2004.8.30 9:55 AM Page 84](https://usermanual.wiki/Samsung-Electronics-Co/04SPIDER/User-Guide-487756-Page-45.png)
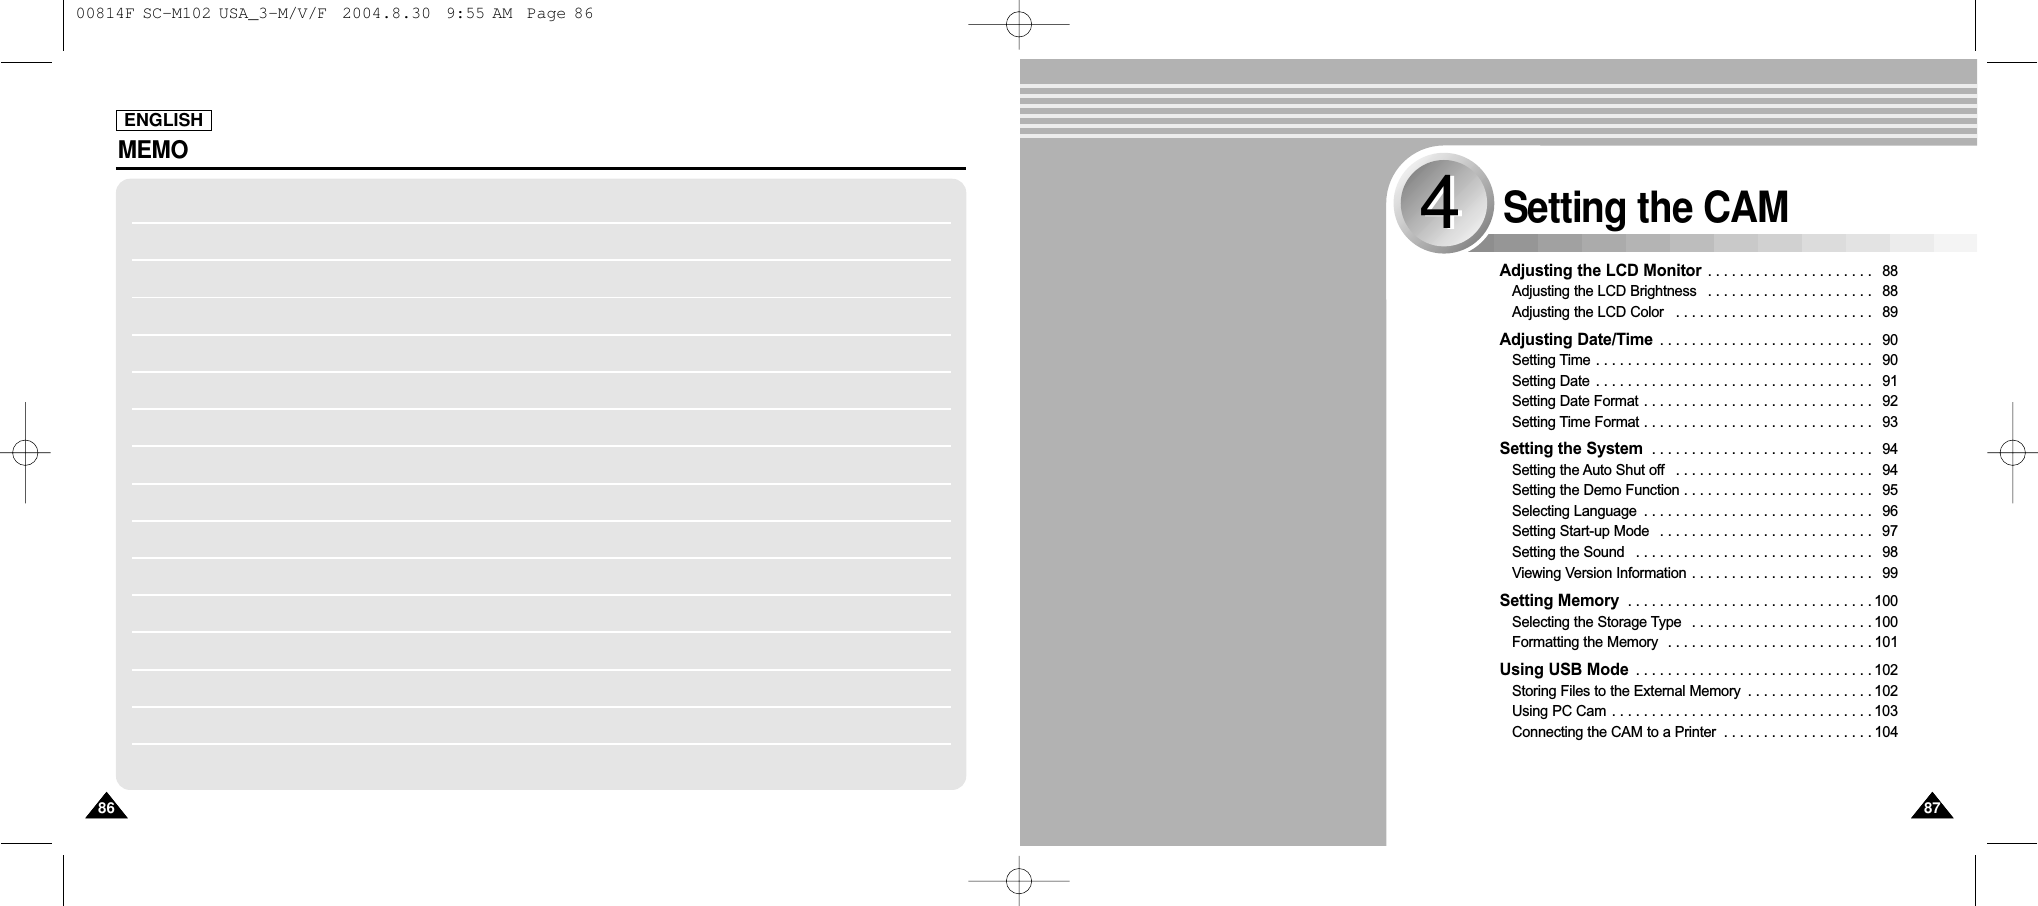
![23452345ENGLISH8989Setting Your the CAM : Adjusting the LCD MonitorAdjusting the LCD ColorYou can adjust the color of the LCD monitor depending on the situation.Notes✤If you select <Back> in the menu, the previous menu appears.✤A brighter LCD Monitor setting consumes more battery power.ENGLISH8888Setting Your the CAM : Adjusting the LCD MonitorAdjusting the LCD BrightnessYou can adjust the brightness of the LCD monitor depending on the situation.1. Move [Mode Selector] down to turn on the CAM and move it down again.◆ The Mode Selection screen appears.2. Move the [ ▲/▼] switch to select System Settings and press the [OK] button. 3. Move the [ ▲/▼] switch to select <Display> and press the [OK] button. 4. Move the [ ▲/▼] switch to select <LCD Brightness> and press the [OK] button.◆ You can adjust the LCD Brightness from 0%to 100%. 5. Move the [ ▲/▼] switch to select the brightness you want. 6. Press the [Menu] button to finish setting. 6. Press the [Menu] button to finish setting.Mode SelectionMP3Voice RecorderFile BrowserSystem SettingsBackSystem SettingsDate/TimeSystemDisplayMemoryBackSettings: DisplayBackLine In/OutInLCD Color50 %LCD Brightness50 %Settings: DisplayBackLine In/OutInLCD Color50 %LCD Brightness55 %Note✤If you select <Back> in the menu, the previous menu appears.1. Move [Mode Selector] down to turn on the CAM and move it down again.◆ The Mode Selection screen appears.2. Move the [ ▲/▼] switch to select System Settings and press the [OK] button. 3. Move the [ ▲/▼] switch to select <Display> and press the [OK] button. 4. Move the [ ▲/▼] switch to select <LCD Color> and press the [OK] button.◆ You can adjust the LCD Brightness from 0%to 100%. 5. Move the [ ▲/▼] switch to select the color you want. Mode SelectionMP3Voice RecorderFile BrowserSystem SettingsBackSystem SettingsDate/TimeSystemDisplayMemoryBackSettings: DisplayBackLCD Brightness50 %Line In/OutInLCD Color50 %Settings: DisplayBackLCD Brightness50 %Line In/OutInLCD Color55 % 00814F SC-M102 USA_4-Setting 2004.8.30 9:56 AM Page 88](https://usermanual.wiki/Samsung-Electronics-Co/04SPIDER/User-Guide-487756-Page-47.png)
![23452345ENGLISHSetting the CAM : Adjusting Date/Time9191Setting TimeThe built-in clock creates the time stamp. You can adjust the time you use.ENGLISHSetting the CAM : Adjusting Date/Time9090Setting DateThe built-in calendar creates the date stamp. You can adjust the date you use.1. Move [Mode Selector] down to turn on the CAM and move it down again.◆ The Mode Selection screen appears.2. Move the [ ▲/▼] switch to select System Settings and press the [OK] button. 3. Move the [ ▲/▼] switch to select <Date/Time> and press the [OK] button.4. Move the [ ▲/▼] switch to select <Set Date> and press the [OK] button. 5. Move the [ ▲/▼] switch to set date and press the [OK] button.◆ Move the [▲/▼]switch to change the setting and press the [OK] button to confirm selection and move to the next setting. 6. Press the [Menu] button to finish setting.Mode SelectionMP3Voice RecorderFile BrowserSystem SettingsBackSystem SettingsDate/TimeSystemDisplayMemoryBackSettings: Date/TimeTime FormatBackDate Format YY/MM/DD12 HourSet DateSet Time2005/01/0108:30:01 AMSettings: Date/TimeBackDate Format DD/MM/YY24 HourSet DateSet TimeTime FormatPress Up/Down to change andOK to confirm selection07 / /21 2004Note✤If you select <Back> in the menu, the previous menu appears.1. Move [Mode Selector] down to turn on the CAM and move it down again.◆ The Mode Selection screen appears.2. Move the [ ▲/▼] switch to select System Settings and press the [OK] button. 3. Move the [ ▲/▼] switch to select <Date/Time> and press the [OK] button.4. Move the [ ▲/▼] switch to select <Set Time> and press the [OK] button. 5. Move the [ ▲/▼] switch to set time and press the [OK] button.◆ Move the [▲/▼]switch to change the setting and press the [OK] button to confirm selection and move to the next setting. 6. Press the [Menu] button to finish setting.Mode SelectionMP3Voice RecorderFile BrowserSystem SettingsBackSystem SettingsDate/TimeSystemDisplayMemoryBackSettings: Date/TimeTime FormatBackDate Format YY/MM/DD12 Hour2005/01/0108:30:01 AMSet DateSet TimeSettings: Date/TimeBackDate Format DD/MM/YY24 HourSet DateSet TimeTime FormatPress Up/Down to change andOK to confirm selection6 : 39 PMNote✤If you select <Back> in the menu, the previous menu appears. 00814F SC-M102 USA_4-Setting 2004.8.30 9:56 AM Page 90](https://usermanual.wiki/Samsung-Electronics-Co/04SPIDER/User-Guide-487756-Page-48.png)
![23452345ENGLISHSetting the CAM : Adjusting Date/Time9393Setting Time FormatYou can select the time format to display. ENGLISHSetting the CAM : Adjusting Date/Time9292Setting Date FormatYou can select the date format to display. 1. Move [Mode Selector] down to turn on the CAM and move it down again.◆ The Mode Selection screen appears.2. Move the [ ▲/▼] switch to select System Settings and press the [OK] button. 3. Move the [ ▲/▼] switch to select <Date/Time> and press the [OK] button.4. Move the [ ▲/▼] switch to select <Date Format> and press the [OK] button. 5. Move the [ ▲/▼] switch to select desired format and press the [OK] button.◆ YY/MM/DD: The date is displayed in order as Year/Month/Date.◆ DD/MM/YY: The date is displayed in order as Date/Month/Year.◆ MM/DD/YY: The date is displayed in order as Month/Date/Year.6. Press the [Menu] button to finish setting.Mode SelectionMP3Voice RecorderFile BrowserSystem SettingsBackSystem SettingsDate/TimeSystemDisplayMemoryBackSettings: Date/TimeTime FormatBackDate Format YY/MM/DD12 HourSet DateSet Time2005/01/0108:30:01 AMSettings: Date/TimeTime FormatBackDate Format DD/MM/YY12 HourSet DateSet Time2005/01/0108:30:01 AMNote✤If you select <Back> in the menu, the previous menu appears.1. Move [Mode Selector] down to turn on the CAM and move it down again.◆ The Mode Selection screen appears.2. Move the [ ▲/▼] switch to select System Settings and press the [OK] button. 3. Move the [ ▲/▼] switch to select <Date/Time> and press the [OK] button.4. Move the [ ▲/▼] switch to select <Time Format> and press the [OK] button. 5. Move the [ ▲/▼] switch to select desired format and press the [OK] button.◆ 12 Hour: The time is displayed as the unit of 12 hours.◆ 24 Hour: The time is displayed as the unit of 24 hours.6. Press the [Menu] button to finish setting.Mode SelectionMP3Voice RecorderFile BrowserSystem SettingsBackSystem SettingsDate/TimeSystemDisplayMemoryBackSettings: Date/TimeBackDate Format DD/MM/YY12 HourSet DateSet TimeTime Format2004/08/1508:30:01 AMSettings: Date/TimeBackDate Format DD/MM/YY24 HourSet DateSet TimeTime Format2004/08/1508:30:01 AMNote✤If you select <Back> in the menu, the previous menu appears. 00814F SC-M102 USA_4-Setting 2004.8.30 9:56 AM Page 92](https://usermanual.wiki/Samsung-Electronics-Co/04SPIDER/User-Guide-487756-Page-49.png)
![23452345ENGLISHSetting the CAM : Setting the System9595Setting the Demo FunctionYou can view the various functions for 5 minutes that are supported by the CAM if you set the Demo Function.ENGLISHSetting the CAM : Setting the System9494Setting the Auto Shut offTo save energy or battery, you can set the Auto Shut off function.1. Move [Mode Selector] down to turn on the CAM and move it down again.◆ The Mode Selection screen appears.2. Move the [ ▲/▼] switch to select System Settings and press the [OK] button. 3. Move the [ ▲/▼] switch to select <System> and press the [OK] button.4. Move the [ ▲/▼] switch to select <Auto Shut off> and press the [OK] button. 5. Move the [ ▲/▼] switch to select desired setting and press the [OK] button.◆ Off: Cancel the Auto Shut off function.◆ 5 Minutes: the CAM turns off after 5 minutes.6. Press the [Menu] button to finish setting.Mode SelectionMP3Voice RecorderFile BrowserSystem SettingsBackSystem SettingsDate/TimeSystemDisplayMemoryBackSettings: SystemSys. SoundLanguage EnglishOffOffVideo ModeOnDemoAuto Shut offStart-upSettings: SystemSys. SoundLanguage EnglishOff5 MinutesVideo ModeOnDemoAuto Shut offStart-upNotes✤If you select <Back> in the menu, the previous menu appears.✤If you touch the CAM or press any button during Auto Shut off, the LCD screen appears again.1. Move [Mode Selector] down to turn on the CAM and move it down again.◆ The Mode Selection screen appears.2. Move the [ ▲/▼] switch to select System Settings and press the [OK] button. 3. Move the [ ▲/▼] switch to select <System> and press the [OK] button.4. Move the [ ▲/▼] switch to select <Demo> and press the [OK] button. 5. Move the [ ▲/▼] switch to select desired setting and press the [OK] button.◆ Off : Cancel the Demo function.◆ 5 Minutes : Start the Demo function in 5 minutes.◆ Play Now: Start the Demo function now.6. Press the [Menu] button to finish setting.Mode SelectionMP3Voice RecorderFile BrowserSystem SettingsBackSystem SettingsDate/TimeSystemDisplayMemoryBackSettings: SystemSys. SoundLanguage EnglishOffOffVideo ModeOnDemoAuto Shut offStart-upSettings: SystemSys. SoundLanguage English5 MinutesOffVideo ModeOnDemoAuto Shut offStart-upNote✤If you select <Back> in the menu, the previous menu appears. 00814F SC-M102 USA_4-Setting 2004.8.30 9:56 AM Page 94](https://usermanual.wiki/Samsung-Electronics-Co/04SPIDER/User-Guide-487756-Page-50.png)
![23452345ENGLISHSetting the CAM : Setting the System9797Setting Start-up ModeYou can select the starting mode displayed when you turn the CAM on. ENGLISHSetting the CAM : Setting the System9696Selecting LanguageYou can select a language for the OSD(On-screen Display) menu. Menus and messages can be displayed in English and Korean. The selected language is displayed even if you turn on the CAM again. 1. Move [Mode Selector] down to turn on the CAM and move it down again.◆ The Mode Selection screen appears.2. Move the [ ▲/▼] switch to select System Settings and press the [OK] button. 3. Move the [ ▲/▼] switch to select <System> and press the [OK] button.4. Move the [ ▲/▼] switch to select <Language> and press the [OK] button. 5. Move the [ ▲/▼] switch to select desired language and press the [OK] button.◆ English: The language is displayed in English.◆ Korean: The language is displayed in Korean.6. Press the [Menu] button to finish setting.Mode SelectionMP3Voice RecorderFile BrowserSystem SettingsBackSystem SettingsDate/TimeSystemDisplayMemoryBackSettings: SystemSys. SoundLanguage EnglishOffOffVideo ModeOnDemoAuto Shut offStart-upSettings: SystemSys. SoundLanguage KoreanOffOffVideo ModeOnDemoAuto Shut offStart-upNote✤If you select <Back> in the menu, the previous menu appears.1. Move [Mode Selector] down to turn on the CAM and move it down again.◆ The Mode Selection screen appears.2. Move the [ ▲/▼] switch to select System Settings and press the [OK] button. 3. Move the [ ▲/▼] switch to select <System> and press the [OK] button.4. Move the [ ▲/▼] switch to select <Start-up> and press the [OK] button. 5. Move the [ ▲/▼] switch to select desired setting and press the [OK] button.◆ Video Mode: The CAM starts up in the Video Mode.◆ Previous Mode: The CAM starts up in the mode you used last.6. Press the [Menu] button to finish setting.Mode SelectionMP3Voice RecorderFile BrowserSystem SettingsBackSystem SettingsDate/TimeSystemDisplayMemoryBackSettings: SystemSys. SoundLanguage EnglishOffOffVideo ModeOnDemoAuto Shut offStart-upSettings: SystemSys. SoundLanguage EnglishOffOffPrevious ModeOnDemoAuto Shut offStart-upNote✤If you select <Back> in the menu, the previous menu appears. 00814F SC-M102 USA_4-Setting 2004.8.30 9:56 AM Page 96](https://usermanual.wiki/Samsung-Electronics-Co/04SPIDER/User-Guide-487756-Page-51.png)
![2345ENGLISHSetting the CAM : Setting the System9999Viewing Version InformationYou can see the information of the version.ENGLISHSetting the CAM : Setting the System9898Setting the SoundYou can set the sound of the CAM as you want.1. Move [Mode Selector] down to turn on the CAM and move it down again.◆ The Mode Selection screen appears.2. Move the [ ▲/▼] switch to select System Settings and press the [OK] button. 3. Move the [ ▲/▼] switch to select <System> and press the [OK] button.4. Move the [ ▲/▼] switch to select <Sys. Sound> and press the [OK] button. 5. Move the [ ▲/▼] switch to select desired sound and press the [OK] button.◆ On: Turn the effect sound on.◆ Off: Turn the effect sound off.6. Press the [Menu] button to finish setting.Mode SelectionMP3Voice RecorderFile BrowserSystem SettingsBackSystem SettingsDate/TimeSystemDisplayMemoryBackSettings: SystemSys. SoundLanguage EnglishOffOffPrevious ModeOnDemoAuto Shut offStart-upSettings: SystemSys. SoundLanguage EnglishOffOffPrevious ModeOffDemoAuto Shut offStart-up234Mode SelectionMP3Voice RecorderFile BrowserSystem SettingsBackSystem SettingsDate/TimeSystemDisplayMemoryBackSettings: SystemVersion InfoStart-up Video ModeOffOffOnLanguageDemoSys. SoundSettings: SystemVersion InfoStart-up Previous ModeEnglishOffHighLanguageDemoSys. SoundCloseSamsung Elec. Co. LTDSpider 0.9.1Aug 18 2004 Wed 14:56:13Modecon 0.52Aug 17 2004 13:01:52Note✤If you select <Back> in the menu, the previous menu appears.1. Move [Mode Selector] down to turn on the CAM and move it down again.◆ The Mode Selection screen appears.2. Move the [ ▲/▼] switch to select System Settings and press the [OK] button. 3. Move the [ ▲/▼] switch to select <System> and press the [OK] button.4. Move the [ ▲/▼] switch to select <Version Info> and press the [OK] button.◆The version of the CAM is displayed. 5. Press the [Menu] button to finish viewing version information.Note✤If you select <Back> in the menu, the previous menu appears. 00814F SC-M102 USA_4-Setting 2004.8.30 9:56 AM Page 98](https://usermanual.wiki/Samsung-Electronics-Co/04SPIDER/User-Guide-487756-Page-52.png)
![34562345ENGLISHSetting the CAM : Setting Memory101101Selecting the Storage TypeSelect the storage type(internal or Memory Stick, Memory Stick Pro) before recording or taking pictures.ENGLISHSetting the CAM : Setting Memory100100Formatting the MemoryYou can format the internal memory, Memory Stick or the Memory Stick Pro to erase all files. 1. Move [Mode Selector] down to turn on the CAM and move it down again.◆ The Mode Selection screen appears.2. Move the [ ▲/▼] switch to select System Settings and press the [OK] button. 3. Move the [ ▲/▼] switch to select <Memory> and press the [OK] button.4. Move the [ ▲/▼] switch to select <Format> and press the [OK] button.5. Move the [ ▲/▼] switch to select desired setting and press the [OK] button.◆ Internal: Format the internal memory. If you select ‘Internal’, the message is displayed to confirm.◆ External: Format the external memory. If you select ‘External’, the message is displayed to confirm.6. Press the [OK] button to format.◆ Select <Cancel> to cancel formatting.7. Press the [Menu] button to finish setting.System SettingsDate/TimeSystemDisplayMemoryBackSettings: MemoryBackInternalInternalFormatStorage TypeSettings: MemoryBackExternalInternalFormatStorage TypeSettings: MemoryBackExternalInternalFormatStorage TypeOKCancelAre you sure you wantto format the external memoryall files will be erased?Note✤If you select <Back> in the menu, the previous menu appears.1. Move [Mode Selector] down to turn on the CAM and move it down again.◆ The Mode Selection screen appears.2. Move the [ ▲/▼] switch to select System Settings and press the [OK] button. 3. Move the [ ▲/▼] switch to select <Memory> and press the [OK] button.4. Move the [ ▲/▼] switch to select <Storage Type> and press the [OK] button.5. Move the [ ▲/▼] switch to select desired setting and press the [OK] button.◆ Internal: The recorded file, video, photo, mp3 file and voice file is stored in internal memory.◆ External: The recorded file, video, photo, mp3 file and voice file is stored in external memory(Memory stick or Memory stick pro).6. Press the [Menu] button to finish setting.Mode SelectionMP3Voice RecorderFile BrowserSystem SettingsBackSystem SettingsDate/TimeSystemDisplayMemoryBackSettings: MemoryBackExternalInternalFormatStorage TypeSettings: MemoryBackExternalExternalFormatStorage TypeNotes✤If you select <Back> in the menu, the previous menu appears.✤‘Internal’is selected by default.✤If you insert the Memory Stick or Memory Stick Pro, the memory type selection screen appears automatically. 00814F SC-M102 USA_4-Setting 2004.8.30 9:56 AM Page 100](https://usermanual.wiki/Samsung-Electronics-Co/04SPIDER/User-Guide-487756-Page-53.png)
![ENGLISHSetting the CAM : Using USB Mode103103Using PC CamYou can use this the CAM as a PC camera for video chatting, video conference and other PC camera applications.ENGLISHSetting the CAM : Using USB Mode102102Storing Files to the External Memory1. Connect the CAM to the PC with the USB cable. 2. Move [Mode Selector] down to turn on the CAM.◆ USB menu screen appears automatically.3. Move the [ ▲/▼] switch to select <MassStorage> and press the [OK] button.◆ Your PC recognize the USB device automatically. You may install the USB Driver manuallyon Windows 98SE operating system.4. Disconnect the USB cable if you finish storing.BackUSB ModePC-CamPictBridgeMassStorageNotes✤If you disconnect the USB cable from the PC or the CAM during the data transfer, the data transfer will stop and the data may be damaged.✤If you connect the USB cable to a PC using a USB HUB or with other device at the same time, it might cause conflict and may not work properly. If this occurs, remove all other devices and try the connection again.✤Install the Windows 98SE Driver on Windows 98SE operating system using supplied CD. Refer to page 113 for further details.1. Connect the CAM to the PC with the USB cable. 2. Move [Mode Selector] down to turn on the CAM.◆ USB mode screen appears automatically.3. Move the [ ▲/▼] switch to select <PC-Cam> and press the [OK] button.Notes✤This function requires the specified USB Streaming Driver and Software to be installed. Refer to page 112 for further details.✤The CAM can be used as a PC Camera for programs such as Windows Messenger. The use of the PC Cam varies depending on theSoftware. Refer ro the documentation of the repective software products.23BackUSB ModePC-CamPictBridgeMassStorageBackUSB ModePC-CamPictBridgeMassStorage 00814F SC-M102 USA_4-Setting 2004.8.30 9:56 AM Page 102](https://usermanual.wiki/Samsung-Electronics-Co/04SPIDER/User-Guide-487756-Page-54.png)
![Selecting Line In/Out . . . . . . . . . . . . . . . . . . . . . . . . . . 106Connecting the CAM with other Devices . . . . . . . . 107Connecting the CAM to TV . . . . . . . . . . . . . . . . . . . . . . . 107Playing Video files on a TV Monitor . . . . . . . . . . . . . . . . . 108Connecting the CAM to VCR or DVD Recorder . . . . . . . . 109Copying Video files to a VCR Tape . . . . . . . . . . . . . . . . . 110Recording TV program to the CAM . . . . . . . . . . . . . . . . . 111Installing Programs . . . . . . . . . . . . . . . . . . . . . . . . . . . 112Installing Image Mixer . . . . . . . . . . . . . . . . . . . . . . . . . . . 112Installing Windows98SE Driver . . . . . . . . . . . . . . . . . . . . 113Connecting the CAM to a PC using the USB cable . . . . . 114Printing Photos . . . . . . . . . . . . . . . . . . . . . . . . . . . . . . . 115Printhing with PictBridge Function . . . . . . . . . . . . . . . . . . 115Printing Photos with DPOF Files . . . . . . . . . . . . . . . . . . . 116Miscellaneous Information55105105ENGLISHSetting the CAM : Using USB Mode104104Connecting the CAM to a PrinterBy connecting the CAM to printers with PictBridge support (sold separately), you can send imagesfrom the internal memory or external memory (Memory Stick or Memory Stick Pro) directly to the printer with a few simple operations.1. Connect the CAM to the printer with PictBridge support with the USB cable. 2. Move [Mode Selector] down to turn on the CAM.◆ USB mode screen appears automatically.3. Move the [ ▲/▼] switch to select <PictBridge> and press the [OK] button.4. Move the [ ▲/▼] switch to select <Date> and press the [OK] button.5. Move the [ ▲/▼] switch to select <On> or <Off> and press the [OK] button.6. Move the [ ▲/▼] switch to select <Copies> and press the [OK] button.7. Move the [ ▲/▼] switch to select desired number and press the [OK] button.◆ You can select the number of copy from 0 to 99.8. Move the [ ▲/▼] switch to select <Print> and press the [OK] button.Notes✤If you select <Back> in the menu, the previous menu appears.✤If you want to select the next or previous photo, select <Next> or <Previous> using [ ▲/▼] switch.2345BackUSB ModePC-CamPictBridgeMassStorageBackUSB ModePC-CamPictBridgeMassStoragePrintNextPreviousDate OnCopies 1PictBridge 100-0056PrintNextPreviousDate OnCopies 1PictBridge 100-0056 00814F SC-M102 USA_4-Setting 2004.8.30 9:56 AM Page 104](https://usermanual.wiki/Samsung-Electronics-Co/04SPIDER/User-Guide-487756-Page-55.png)
![2345ENGLISH107107Miscellaneous Information: Connecting the CAM with other DevicesConnecting the CAM to TVYou can connect the CAM to a TV set directly.Notes✤If you select <Back> in the menu, the previous menu appears.✤‘Out’is selected by default.Notes✤When connecting to the AV Input/Output Jack, you must connect the AC Power Adapter to the CAM.✤If you select ‘Line out’, the CAM is set to ‘Output mode’and if you select ‘Line in’, the CAM is set to ‘Input mode’. ENGLISH106106Miscellaneous InformationSelecting Line In/OutIf you want to play your recorded file on TV monitor, select Line Out. If you record TV program to the CAM, select Line In. 1. Move [Mode Selector] down to turn on the CAM and move it down again.◆ The Mode Selection screen appears.2. Move the [ ▲/▼] switch to select System Settings and press the [OK] button. 1. Connect the AV Input /Output cable to the AV Input /Output Jack of the CAM.2. Connect the Video/Audio cable to the externalinput terminal of your TV set by matching the colors of the terminals.3. Move the [ ▲/▼] switch to select <Display> and press the [OK] button. 4. Move the [ ▲/▼] switch to select <Line In/Out> and press the [OK] button.6. Press the [Menu] button to finish setting.5. Move the [ ▲/▼] switch to select <In> or <Out> and press the [OK] button.Mode SelectionMP3Voice RecorderFile BrowserSystem SettingsBackSystem SettingsDate/TimeSystemDisplayMemoryBackSettings: DisplayBackLCD Brightness50 %LCD Color50 %Line In/OutOutSettings: DisplayBackLine In/OutInLCD Color50 %LCD Brightness50 %Line InputConnecting the Video/Audiocable directly is available 00814F SC-M102 USA_5-Info 2004.8.30 9:52 AM Page 106](https://usermanual.wiki/Samsung-Electronics-Co/04SPIDER/User-Guide-487756-Page-56.png)
![Note✤If TV set has no Line Input, you cannot view the output screen of the CAM.Connecting the CAM to VCR or DVD RecorderYou can connect the CAM to VCR to copy the recorded files to the video tape.1. Connect the Video/Audio cable to the AV Input /Output Jack of the CAM.2. Connect the Video/Audio cable to the externalinput terminal of your VCR set by matching the colors of the terminals.3. Connect the TV to the VCR with the Video/Audio cable.4. Connect the Video/Audio cable to the Video line Output and TV line Input.5. Select the ’Output’ on the TV or the remote control of TV.1 2 3 4 56 7 8 910ALARM IN ALARM OUT ALARM RESET GND TRIGGER OUTTAPE END OUT SERIES OUT GND SERIES IN 1 SHOT REC IN1 2 3 4 5 6 7 8 9101 2 3 4 5 6 7 8 910INOUTOUT INLine InputLine OutputLine InputConnecting the Video/Audiocable directly is availableENGLISHMiscellaneous Information: Connecting the CAM with other Devices109109ENGLISHMiscellaneous Information: Connecting the CAM with other Devices108108Playing Video files on a TV MonitorYou can view the recorded file on a TV Monitor using Video/Audio cable. If you want to know about connecting the CAM to a TV set, refer to page 107.1. Turn your TV on and select the external input source connected the CAM.◆ Select the external input source by pressing the button on the remote control or TV set.2. Move [Mode Selector] down to turn on the CAM.◆ The Video Record screen appears.3. Move the [ ▲/▼] switch to select <System Settings> and press the [OK] button.4. Select <Out> in <Display> menu and press the [OK] button. (Refer to page 106)5. Press the [Back] button to play the video file on the Video Record Mode. 6. Move the [ ▲/▼] switch to find the video file you want to play.7. Press the [OK] button to play the video file.Notes✤Refer to operating instructions of your TV or VCR for detailed information on connecting external devices.✤You can playback and stop using the button same as Playing video file on the LCD Monitor. (Refer to page 36)347Mode SelectionMP3Voice RecorderFile BrowserSystem SettingsBackSystem SettingsDate/TimeSystemDisplayMemoryBackSettings: DisplayBackLine In/OutOutLCD Color50 %LCD Brightness50 %00:16 / 00:32Video Play 100-0056 00814F SC-M102 USA_5-Info 2004.8.30 9:52 AM Page 108](https://usermanual.wiki/Samsung-Electronics-Co/04SPIDER/User-Guide-487756-Page-57.png)
![ENGLISHMiscellaneous Information: Connecting the CAM with other Devices111111ENGLISHMiscellaneous Information: Connecting the CAM with other Devices110110You can copy your recorded files to a regular blank video tape. Connect the CAM to a VCR using the Audio/Video cable beforerecording. 1. Insert the blank video tape to the VCR and select ‘Line Input’.2. Move [Mode Selector] down to turn on the CAM and move it down again.◆ The Mode Selection screen appears.3. Select <Out> in System Setting and press the [OK] button. (Refer to page 106)4. Select <Play> in the Video mode to find the desired recorded file with the [ ▲/▼] switch. (Refer to page 36)5. Move the [ ▲/▼] switch to find the video file you want to copy and press the [OK] button.6. Press the [Record /Stop] button on the VCR to start recording.Notes✤Refer to operating instructions of your TV or VCR for detailed information on connecting external devices.✤You can playback and stop using the button same as Playing video file on the LCD Monitor. (Refer to page 36)Copying Video files to a VCR Tape3Recording TV program to the CAMYou can record the TV program to the CAM using Video/Audio cable.If you want to know about connecting the CAM to a TV set, refer to page 107.1 2 3 4 56 7 8 910ALARM IN ALARM OUT ALARM RESET GND TRIGGER OUTTAPE END OUT SERIES OUT GND SERIES IN 1 SHOT REC IN1 2 3 4 5 6 7 8 9101 2 3 4 5 6 7 8 910INOUTOUT INNote✤Refer to operating instructions of your TV or VCR for detailed information on connecting external devices.1. Turn your TV on and select the program to be recorded.2. Move [Mode Selector] down to turn the CAM on.◆ The Mode Selection screen appears.3. Select <In> in <Display> menu and press the [OK] button. (Refer to page 106)◆ Press the [Menu] button to finish setting.4. Press the [Record/Stop] button in Video Record mode to start recording.◆ Press the [Record/Stop] button again to pause and press it again to start recording. System SettingsDate/TimeSystemDisplayMemoryBackSettings: DisplayBackLine In/OutInLCD Color50 %LCD Brightness50 %Line OutputLine OutputLine InputConnecting the Video/Audiocable directly is available 00814F SC-M102 USA_5-Info 2004.8.30 9:52 AM Page 110](https://usermanual.wiki/Samsung-Electronics-Co/04SPIDER/User-Guide-487756-Page-58.png)
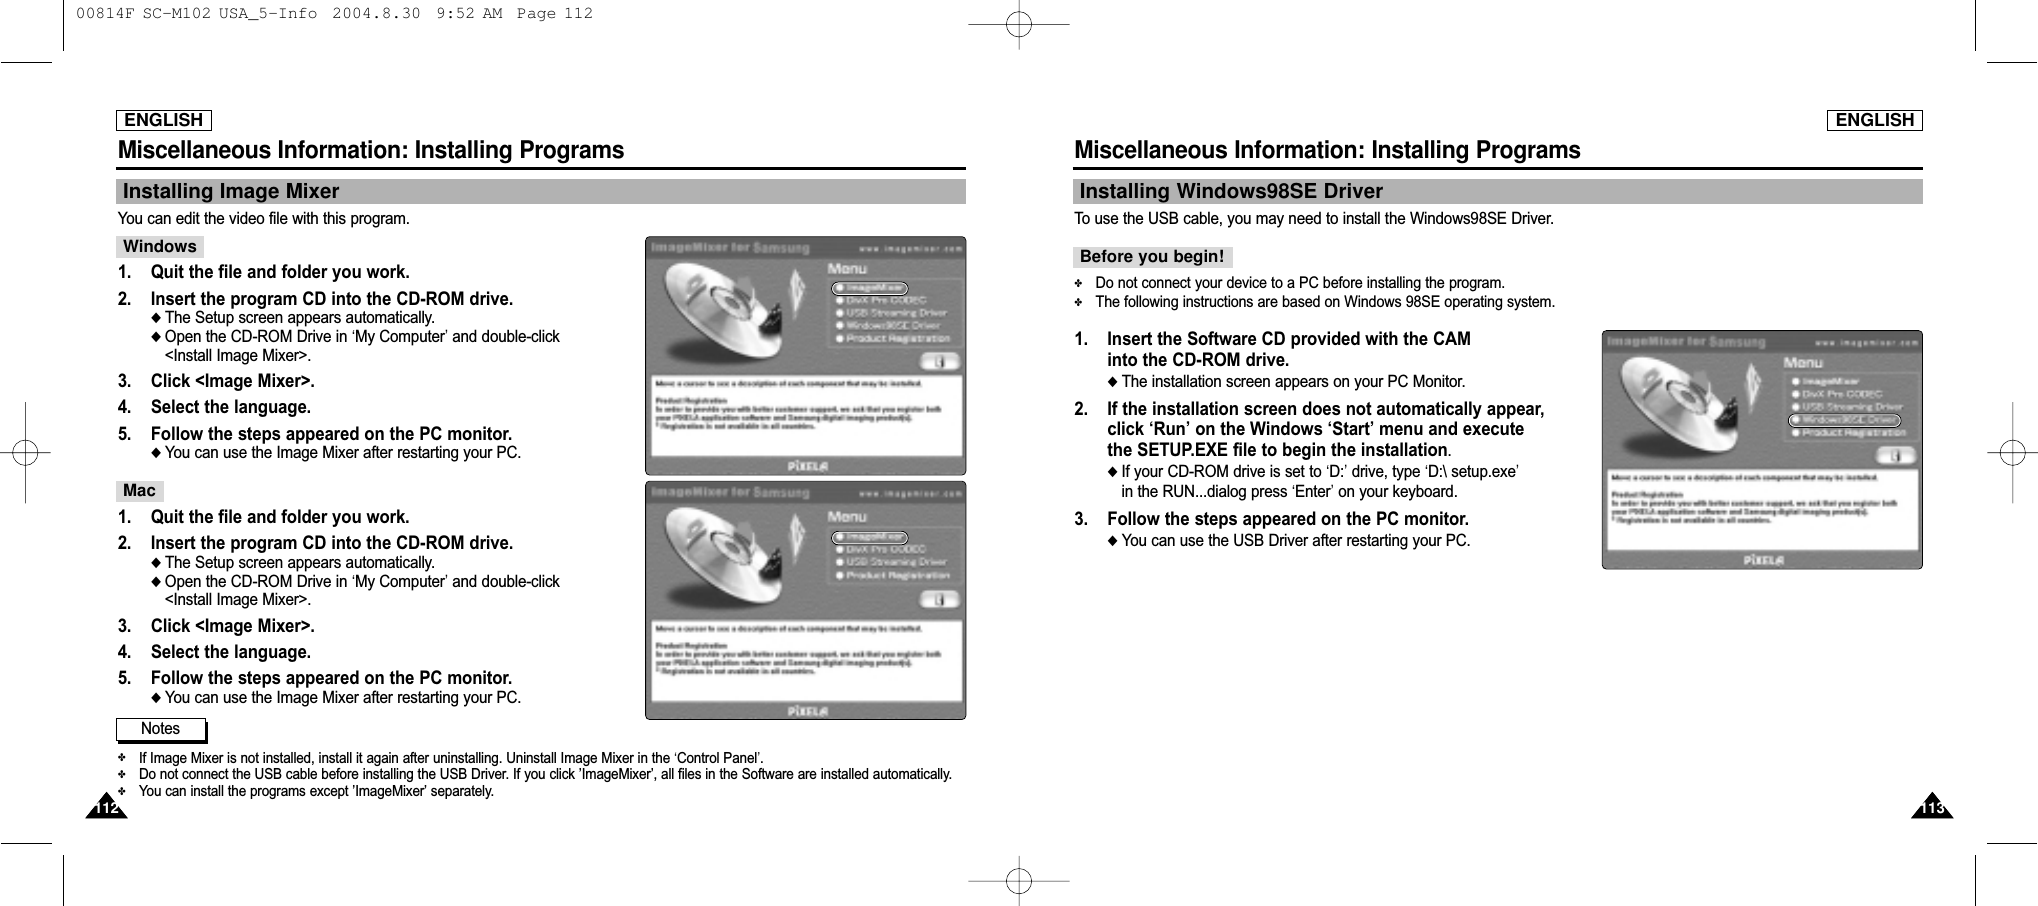
![ENGLISHMiscellaneous Information: Printing Photos115115ENGLISHMiscellaneous Information: Connecting the CAM with other Devices114114Connecting the CAM to a PC using the USB cableYou can connect the CAM to a PC that supports USB connections. Use the provided USB cable for connection to a PC.1. Insert the cradle into the CAM.2. Connect the provided USB cable to USB port of the cradle.3. Move [Mode Selector] down to turn on the CAMand move it down again.◆ The Mode Selection screen appears.4. Connect the other side of the USB cable to the USB port of your PC.◆ If your Operating System is Windows XP, a Removable Disk pop-up dialog will appear.After completing the data transfer, you must disconnect the cable in the following way.1. Select the removable disk icon and click the right mouse button to select ‘Safely Remove Hardware’.2. Select ‘Stop’and disconnect the USB cable when the pop-up screen disappears.Disconnecting USB ConnectionNotes✤If you disconnect the USB cable from the PC or the CAM during the data transfer, the data transfer will stop and the data may be damaged.✤If you connect the USB cable to a PC using a USB HUB or with other device at the same time, it might cause conflict and may not work properly. If this occurs, remove all other devices and try the connection again.With the Pictbridge Support, you can control the printer directly through the CAM in order to print out stored pictures.For direct printing of your stored pictures using the PictBridge function, you must connect the CAM to a PictBridge printer using a USB cable.1. Connect the CAM to the PC with the USB cable. 2. Move [Mode Selector] down to turn on the CAM.◆ USB menu screen appears automatically.3. Move the [ ▲/▼] switch to select <PictBridge> and press the [OK] button.4. Move the [ ▲/▼] switch to select <Copies> and press the [OK] button.5. Move the [ ▲/▼] switch to select desired number and press the [OK] button.◆ You can select the number of copy from 0 to 99.6. Move the [ ▲/▼] switch to select <Print> and press the [OK] button.BackUSB ModePC-CamPictBridgeMassStoragePrintNextPreviousDate OnCopies 5PictBridge 100-0056PrintNextPreviousDate OnCopies 1PictBridge 100-0056Printing with Pictbridge FunctionNotes✤If you select <Back> in the menu, the previous menu appears.✤If you want to select the next or previous photo, select <Next> or <Previous> using [ ▲/▼] switch.✤For further details about printing photos, refer to the User’s manual of the printer. 00814F SC-M102 USA_5-Info 2004.8.30 9:52 AM Page 114](https://usermanual.wiki/Samsung-Electronics-Co/04SPIDER/User-Guide-487756-Page-60.png)