Samsung Electronics Co 05GAMMA3 Digital Camcorder User Manual Gamma3 00875G US 01 27
Samsung Electronics Co Ltd Digital Camcorder Gamma3 00875G US 01 27
UserManual.wiki
>
Samsung Electronics Co
>
05GAMMA3 User Manual
User Manual
Navigation menu
Upload a User Manual
Namespaces
Wiki Guide
HTML
PDF
Info
Views
User Manual
Discussion / Help
Navigation
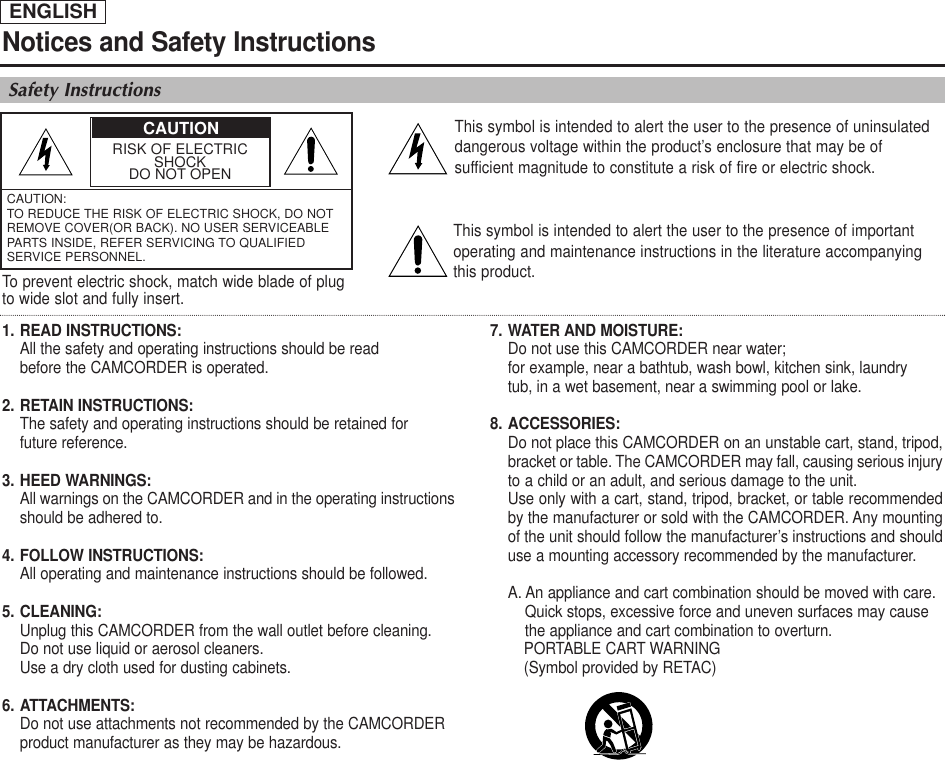


![ENGLISH1212Notes and Safety InstructionsPrecaution regarding the Lithium Battery1. The Lithium battery maintains the clock function and user settings; even if the Battery pack or AC adapter is removed.2. The Lithium battery for the Camcorder lasts about 6 months under normal operation from time of installation.3. When the Lithium battery becomes weak or dead, the date/time indicator will display 12:00 AM JAN. 1, 2005 when you setthe Date/Time to on.When this occurs, replace the Lithium battery with a new one(type CR2025).4. There is a danger of explosion if battery is incorrectly replaced.Replace only with the same or equivalent type.Warning: Keep the Lithium battery out of reach of children. Should a battery be swallowed, consult a doctor immediately.Servicing■Do not attempt to service this Camcorder yourself. ■Opening or removing covers may expose you to dangerous voltage or other hazards.■Refer all servicing to qualified service personnel.Replacement Parts■When replacement parts are required, be sure the service technician has used replacement parts specified by themanufacturer and having the same characteristics as the original part.■Unauthorized substitutions may result in fire, electric shock or other hazards.[ CAUTION ]■DO NOT FIRE THE FLASH WHILE SCREENING THE FLASH BY HANDS. DO NOT TOUCH THE FLAHSLIGHT AFTERCONTINUOUS FIRING OF THE FLASH. POSSIBLE BURING HAZARD.[ WARNING ]■DO NOT FIRE THE FLASH FROM A SHORT DISTANCE TO A PERSION TO A PERSON(ESPECIALLY TOWARDS ANINFANT.)CLOSE FIRING A FLASGH MIGHT CAUSE SERIOUS DAMAGE TO ONE'S EYES.](https://usermanual.wiki/Samsung-Electronics-Co/05GAMMA3/User-Guide-528490-Page-9.png)
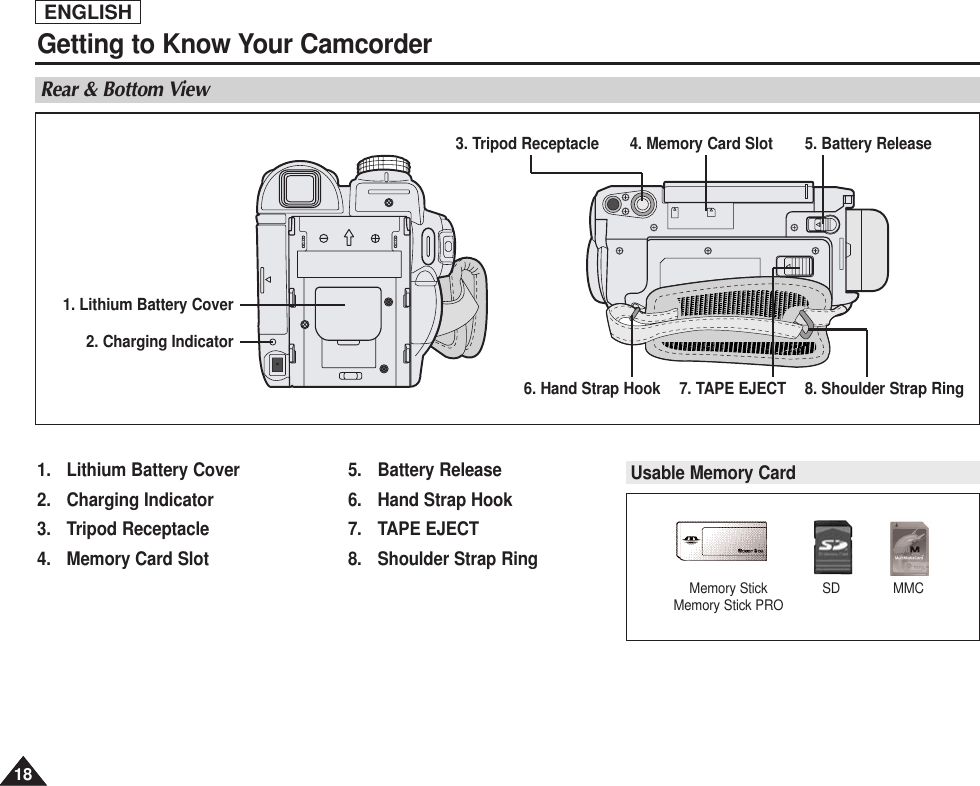
![ENGLISH2121Preparation✤The Lithium battery maintains the clock function and preset contents of the memory; even if the Battery pack or AC Poweradapter is removed.✤The Lithium battery for the Camcorder lasts about 6 months under normal operation from the time of installation.✤When the Lithium battery becomes weak or dead, the date/time indicator will display 12:00 AM JAN. 1, 2005 when you set the Date/Time to on.When this occurs, replace the Lithium battery with type CR2025.1. Remove the Lithium-ion battery from the rear of the Camcorder.2. Open the Lithium battery cover on the rear of the Camcorder.3. Position the Lithium battery in the Lithium battery holder, with the positive ( ) terminal face up.4. Close the Lithium battery cover.✤You need to insert or replace the Lithium battery when: - You purchase the Camcorder.- The remote control doesn’t work.✤Position the Lithium battery in the Lithium battery holder, with the positive ( ) terminal face up.✤Be careful not to reverse the polarity of the battery.[ Note ]The Lithium battery must be inserted in the correct direction.Warning: Keep the Lithium battery out of the reach of the children.Should any battery be swallowed, consult a doctor immediately.Lithium Battery InstallationBattery Installation for the Remote ControlBattery Installation for the Internal Clock](https://usermanual.wiki/Samsung-Electronics-Co/05GAMMA3/User-Guide-528490-Page-15.png)
![ENGLISH2323PreparationUsing the Lithium Ion Battery Pack✤The amount of continuous recording time available depends on- The type and capacity of the Battery pack you are using.- How often the zoom function is used.It is recommended that you have several batteries available.1. Attach the Battery pack to the Camcorder.2. Connect the AC Power adapter to an AC Cord and connect the AC Cord toa wall socket.3. Connect the DC cable to the DC jack on the Camcorder.4. Turn the Power switch to OFF, and the charging indicator will start to flash,showing that the battery is charging.5. When the battery is fully charged, disconnect the Battery pack and the AC Power adapter fromthe Camcorder.Even with the Power switched OFF, the Battery pack will still discharge.[ Notes ]■The Battery pack may be charged a little at the time of purchase.■To prevent reduction in the life and capacity of the Battery pack, always remove it from the Camcorder after it is fully charged.■The amount of continuous recording time available depends on:- The type and capacity of the Battery pack you are using.- How often the zoom is used.- Type of use (Camcorder/Camera/With LCD screen etc.).- Ambient temperature.It is recommended to have additional battery packs available.■Even when the Power switched to OFF, the Battery pack will still discharge if it is left attached to the device.Blinking time Charging rateOnce per second Less than 50%Twice per second 50% ~ 75% Three times per second 75% ~ 90%Blinking stops and stays on 90% ~ 100%On for a second and Error - Reset the Battery pack and off for a second the DC cable Power SwitchCharging the Lithium Ion Battery Pack4<Charging Indicator>](https://usermanual.wiki/Samsung-Electronics-Co/05GAMMA3/User-Guide-528490-Page-16.png)
![ENGLISH2626PreparationOSD (On Screen Display) in REC/PLAY Modes1. Battery Level (see page 25)2. Manual Focus (see page 56) 3. EASY.Q (see page 42)4. DIS (see page 59)5. Program AE (see page 61)6. White Balance Mode(see page 57)7. Shutter Speed (see page 55)8. Exposure (see page 55) 9. Digital Effects Mode (see page 63)10. Date/Time (see page 34)11. Zoom Position (see page 46)12. Color Nite (see page 49)13. USB 14. Remote (see page 31)15. Wind Cut (see page 54)16. BLC (Back Light Compensation)(see page 48)17. Audio Mode (see page 53)18. Remaining Tape (measured in minutes) 19. Tape Counter 20. Zero Memory (see page 44)21. Record Speed Mode22. Operating Mode23. Self Timer24. Photo Image25. Tele Macro (see page 46)26. Audio Playback27. DEW (see page 9)28. Warning Indicator (see page 147)29. Message Line (see page 147)30. Volume Control (see page 69)31. DV IN (DV data transfer mode)(see page 77)32. Audio Dubbing (see page 74)14minSound[2]0:00:00:10†…SP√[10]16BItOSD in PLAY ModeNo Tape !30263132OSD in REC Mode14min10Sec0:00:11Color N.1/30[29]SPSTBY16BItWTS. 1/60†…†…No Tape !Art [29]143567892101178292827131215141617181921 202224 232512:00 AM JAN. 1, 200512:00 AM JAN. 1, 2005S. 1/60](https://usermanual.wiki/Samsung-Electronics-Co/05GAMMA3/User-Guide-528490-Page-17.png)
![ENGLISH3131✤The Remote function works in both REC and PLAY modes.✤The Remote option allows you to enable or disable the remote control for use with theCamcorder.1. Set the Power switch to REC or PLAY.2. Press the MENU button.■The menu list will appear.3. Move the Joystick up or down to select System, then press the Joystick(OK).4. Move the Joystick up or down to select Remote, then press the Joystick(OK). 5. Move the Joystick up or down to select On or Off, then press the Joystick(OK).6. To exit, press the MENU button.[ Notes ]■If you set the Remote to Off in the menu and try to use it, the remote control icon( ) will blink for3 seconds on the LCD screen and then disappear.■A separate Remote Control selecting function is provided for the Digital Camera (see page 92). The Camcorder : System Menu SettingSetting the Wireless Remote Control Acceptance (Remote)Move Select ExitMENUOKREC Mode√SystemClock SetRemoteBeep SoundLanguageDemonstrationOffOn 5REC Mode√SystemClock SetRemoteBeep SoundLanguageDemonstration√On√On√English√OnMove Select ExitMENUOK31](https://usermanual.wiki/Samsung-Electronics-Co/05GAMMA3/User-Guide-528490-Page-18.png)
![ENGLISH3434✤This function works in both REC and PLAY modes.✤Your Camcorder is equipped with a 2.5 inch color Liquid Crystal Display(LCD) screen, whichenables you to view what you are recording or playing back directly.✤Depending on the conditions under which you are using the Camcorder (indoors or outdoorsfor example), you can adjust;- LCD Bright- LCD Color1. Set the Power switch to REC or PLAY.2. Press the MENU button.■The menu list will appear.3. Move the Joystick up or down to select Display, then press the Joystick(OK).4. Move the Joystick up or down to select the item you want to adjust (LCD Bright orLCD Color), then press the Joystick(OK).5. Move the Joystick up or down to adjust the value of the selected item(LCD Bright or LCD Color), then press the Joystick(OK).■You can set values for LCD Bright and LCD Color between 0~35.6. To exit, press the MENU button.■LCD Bright & LCD Color functions do not affect the brightness and color of the imageto be recorded.Adjust Select ExitMENUOK5The Camcorder : Display Menu SettingAdjusting the LCD Screen[18]Move Select ExitMENUOKREC Mode√DisplayLCD BrightLCD ColorDate/TimeTV Display3√Off√OnREC Mode√DisplayLCD BrightLCD ColorDate/TimeTV Display1](https://usermanual.wiki/Samsung-Electronics-Co/05GAMMA3/User-Guide-528490-Page-19.png)
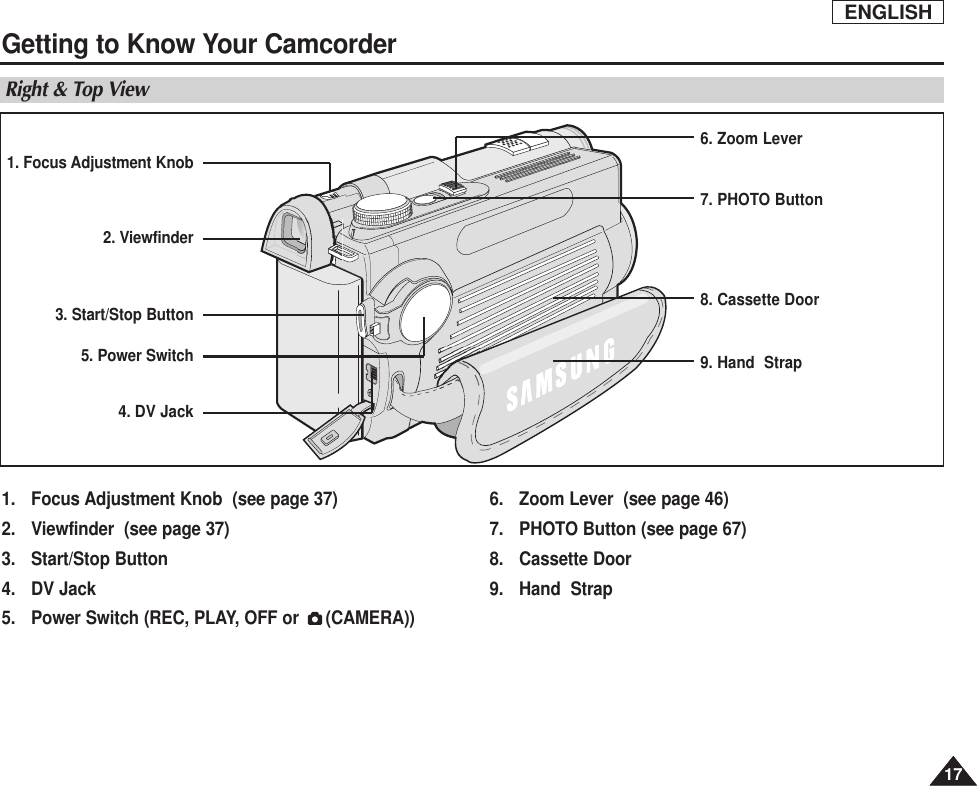
![ENGLISH3737The Camcorder : Basic Recording✤The Viewfinder will work when the LCD screen is closed.The focus adjustment knob of the Viewfinder enables individuals with vision problems to seeclearer images.1. Close the LCD screen and pull out the Viewfinder.2. Use the focus adjustment knob of the Viewfinder to focus the picture.[ Notes ]■Viewing the sun or any strong light source through the Viewfinder for a prolonged period may beharmful, or cause temporary impairment.■The Viewfinder will work either in PLAY mode with LCD screen closed or in REC mode with LCDscreen closed or facing the front.Adjusting the FocusUsing the Viewfinder](https://usermanual.wiki/Samsung-Electronics-Co/05GAMMA3/User-Guide-528490-Page-20.png)
![ENGLISH3838The Camcorder : Basic RecordingInserting and Ejecting a Cassette✤When inserting a tape or closing the cassette compartment, do not apply excessive force,as it may cause a malfunction. ✤Do not use any tape other than Mini DV cassettes.1. Connect a power source and slide the TAPE EJECT switch and open the cassette door.■The cassette holder automatically rises and opens forward. 2. Insert a tape into the cassette compartment with the tape window facing outward and the protection tab toward the top. (Inserting a Cassette)■Remove the cassette tape, which is automatically ejected by pulling the cassette out. (Ejecting a Cassette)3. Press the area marked PUSH on the cassette door until it clicks into place.■Be careful to keep the hand strap away from the cassette door when closingit. Closing the cassette door with the hand strap inside may cause damage to the unit.■The cassette is loaded automatically.4. Close the cassette door.[ Note ] When you have recorded something that you wish to keep, you can protect it so that it will not beaccidentally erased.a. Protecting a tape: Push the safety tab on the cassette so that the hole is uncovered.b. Removing the tape protection: If you no longer wish to keep the recording on the cassette, push the safety tab back so that itcovers the hole.How to store a tape a. Avoid places with magnets or magnetic interference.b. Avoid humidity and dust prone places. c. Keep the tape in an upright position and avoid storing it in direct sunlight.d. Avoid dropping or knocking your tapes.SAVE1 24aRECb3PUSH](https://usermanual.wiki/Samsung-Electronics-Co/05GAMMA3/User-Guide-528490-Page-21.png)
![ENGLISH4141The Camcorder : Basic RecordingMaking your First Recording1. Connect a power source to the Camcorder. (see page 22)(A Battery pack or a AC Power adapter) Insert a cassette. (see page 38)2. Remove the Lens cover.3. Set the Power switch to REC.■Open the LCD screen. Make sure that STBY is displayed. ■If the write protection tab of the cassette is open (set to save), STOP and Protection ! will be displayed. Release the write protection tab to record.■Make sure the image you want to record appears on the LCDscreen or Viewfinder.■Make sure the battery level indicates that there is enough remaining power for your expectedrecording time.4. To start recording, press the Start/Stop button.■REC ●is displayed on the LCD screen.To stop recording, press the Start/Stop button again.■STBY is displayed on the LCD screen.[ Note ]Detach the Battery pack when you are finished recording to prevent unnecessary battery power consumption.4132](https://usermanual.wiki/Samsung-Electronics-Co/05GAMMA3/User-Guide-528490-Page-22.png)
![ENGLISH4242The Camcorder : Basic Recording✤The EASY.Q mode works only in REC mode.✤The EASY.Q mode allows a beginner to easily make good recordings.1. Set the Power switch to REC.2. By pressing the EASY.Q button, all functions on the Camcorder will be set to off and therecording settings will be set to the following basic modes:■Battery level, recording mode, counter, date/time, and DIS ( ) will be displayed.■The word EASY.Q will appear on the LCD screen at the same time. However, the Date/Time will only be seen if it has been previously set. (see page 35)3. Press the Start/Stop button to start recording.Recording will begin using the basic automatic settings.4. Press the EASY.Q button again in the STBY mode and then turn the EASY.Q mode off. ■The EASY.Q function will not turn off while you are recording.■The camcorder will return to the settings that were set prior to activating EASY.Q mode.[ Notes ]■In EASY.Q mode, certain functions are not available, such as Menu, BLC, Manual focus.If you want to use these functions, you must first turn the EASY.Q mode off.■The EASY.Q mode settings are released when the Battery pack is removed from the Camcorderand must be reset when the Battery pack is replaced. ■EASY.Q mode will not turn off during a recording.■Photo image recording using the PHOTO button while EASY.Q is set releases DIS function. ■Digital Zoom, Color Nite or Digital Effect is not available in the EASY.Q mode.Using EASY.Q Mode (for Beginners)60min0:00:10SPSTBYENGLISH21](https://usermanual.wiki/Samsung-Electronics-Co/05GAMMA3/User-Guide-528490-Page-23.png)
![ENGLISH7777IEEE 1394 Data Transfer■CPU: faster Intel®Pentium III™ 450MHz compatible. ■Operating system: Windows®98SE, ME, XP, Mac OS (9.1~10.2)■Main memory: more than 64 MB RAM■IEEE1394 add-on card or built in IEEE1394 card1. Set the Power switch to PLAY.2. Connect the DV cable (not supplied) from the DV jack of the Camcorder to the DV jack of the other DV device. ■Make sure that is displayed on the LCD screen.3. Press the Start/Stop button to begin REC PAUSE mode.■PAUSE is displayed on the LCD screen.4. Start playback on the other DV device while you monitor the picture.5. Press the Start/Stop button to start recording.■If you want to pause recording momentarily, press the Start/Stop button again.6. To stop recording, press the ■ (STOP) button.[ Notes ]■When using this Camcorder as a recorder, the pictures that appear on a monitor may seem uneven, however recorded pictures will not be affected.■Operation is not guaranteed for all the recommended computer environments mentioned above.Recording with a DV Connection CableSystem Requirements](https://usermanual.wiki/Samsung-Electronics-Co/05GAMMA3/User-Guide-528490-Page-24.png)