Samsung Electronics Co 05MINIMEGA Digital Camcorder User Manual 1
Samsung Electronics Co Ltd Digital Camcorder Users Manual 1
UserManual.wiki
>
Samsung Electronics Co
>
05MINIMEGA User Manual
>
Users Manual 1
Contents
1.
Users Manual 1
2.
Users Manual 2
Users Manual 1
Navigation menu
Upload a User Manual
Namespaces
Wiki Guide
HTML
PDF
Info
Views
User Manual
Discussion / Help
Navigation

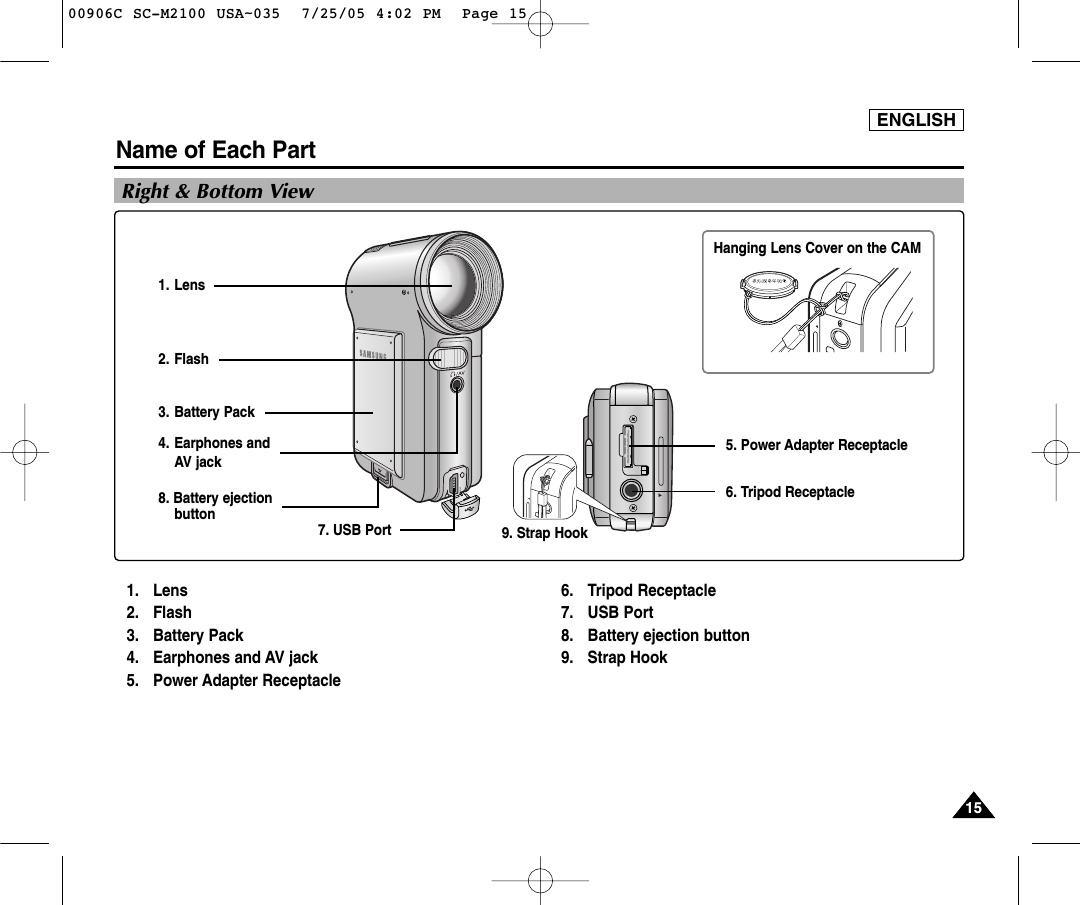
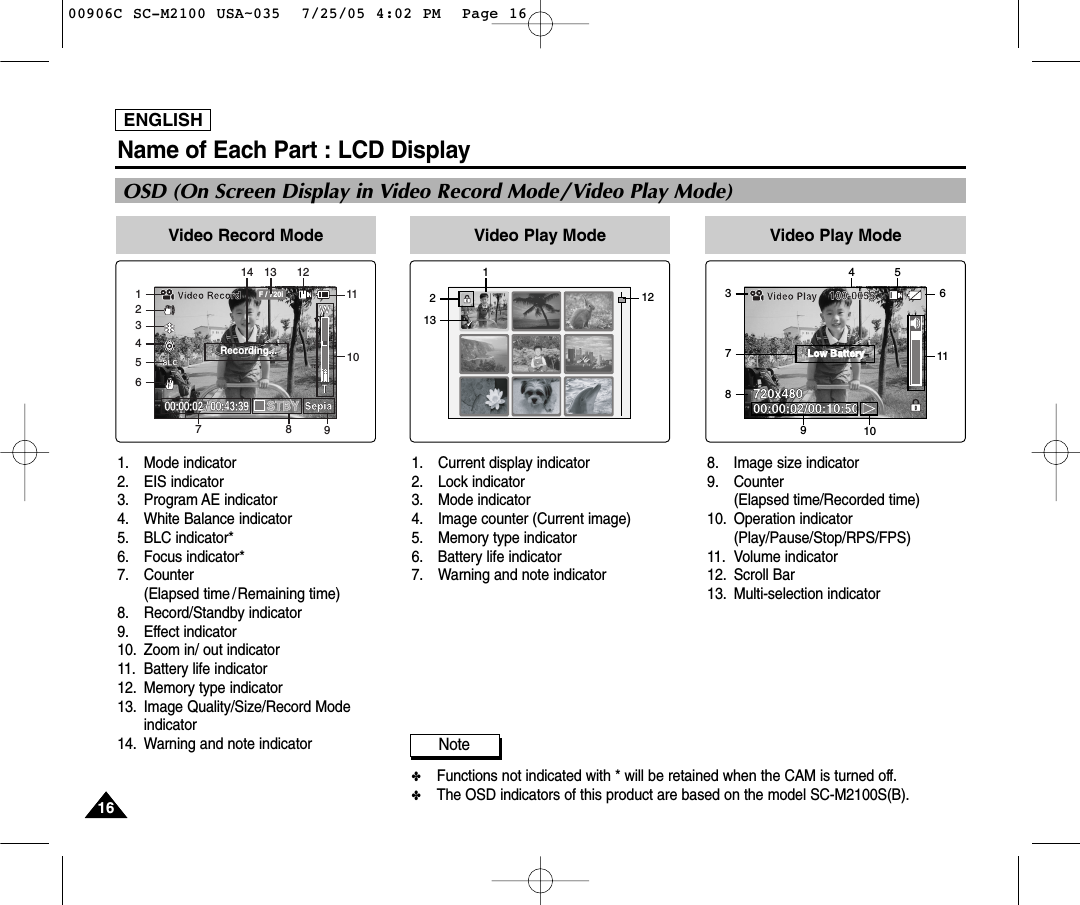
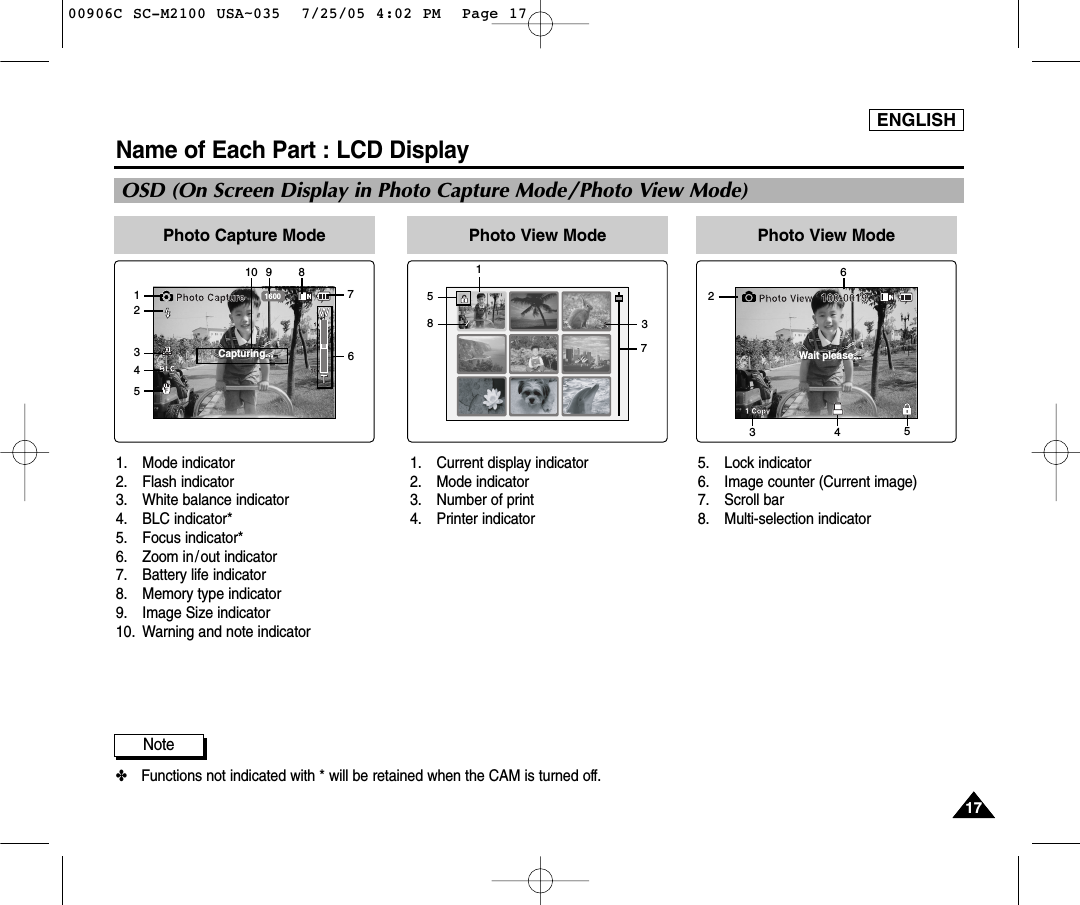
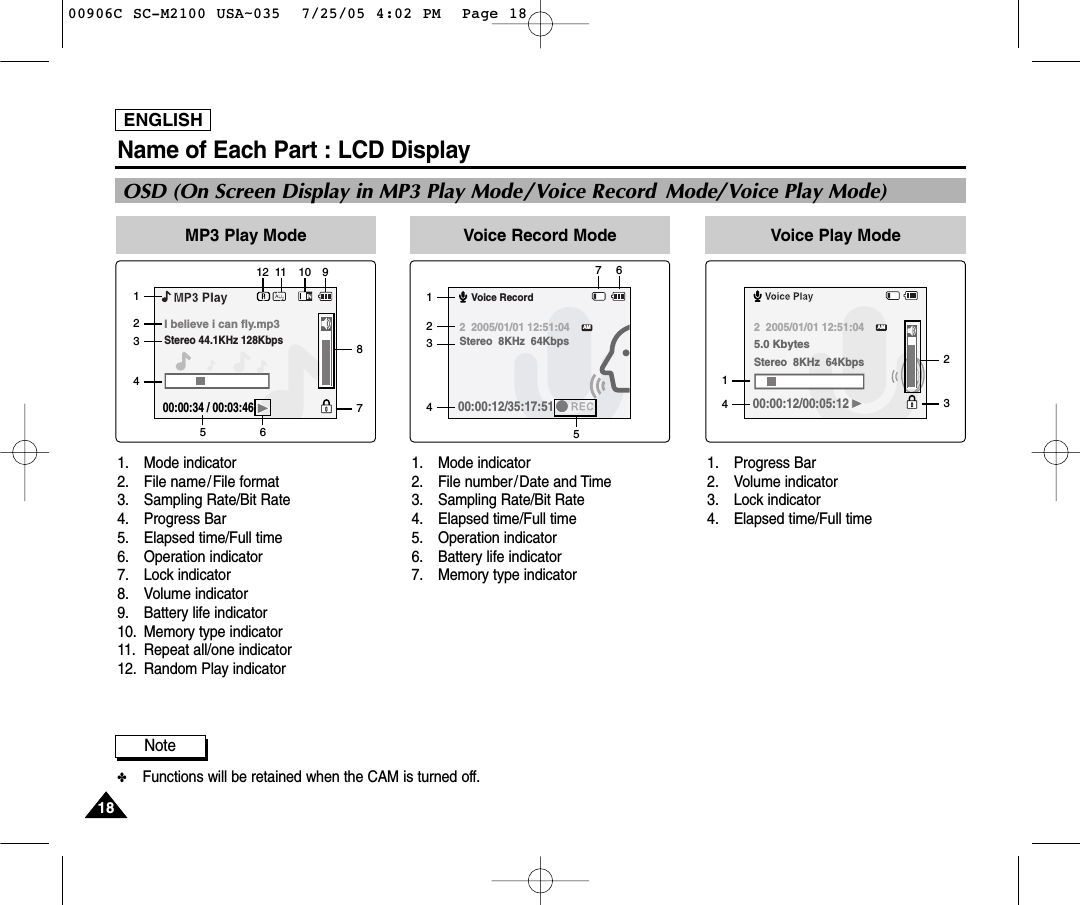
![Rear & Left View1. Built-in MIC2. LCD Monitor3. DISPLAY button4. VOL +,-/MF +,-(Volume/Manual Focus) button 5. HOLD switch6. Built-in Speaker7. Record/Stop button8. [ œœ] button (Move backward, RPS)9. W button (Zoom out, Multi-play screen, Move up)10. OK button (Play, Pause)11. [ √√ ] button (Move forward, FPS)12. T button (Zoom in, Move down)13. Record/Power/Charging indicator14. MENU button15. Lock/Release button16. POWER/MODE Selector17. MULTI CARD slotENGLISH1414Name of Each Part1. Built-in MIC6. Built-in Speaker7. Record/Stop button8. [ œœ] button (Move backward, RPS)9. W button (Zoom out, Multi-play screen, Move up)10. OK button (Play, Pause)11. [ √√ ] button (Move forward, FPS)12. T button (Zoom in, Move down)13. Record/Power/Charging indicator14. MENU button15. Lock/Release button16. POWER/MODE Selector17. MULTI CARD slot2. LCD Monitor3. DISPLAY button4. VOL +,-/MF +,-(Volume/Manual Focus) button 5. HOLD switchUsable Memory CardMemory StickMemory Stick PROSD MMC00906C SC-M2100 USA~035 7/25/05 4:02 PM Page 14](https://usermanual.wiki/Samsung-Electronics-Co/05MINIMEGA.Users-Manual-1/User-Guide-570667-Page-18.png)
![ENGLISH1919How to Use the Battery PackBattery Pack Installation / EjectionIt is recommended you purchase one or more additional battery packs to allow continuous use of your CAM.Move the battery pack into the groove until it clicks.To insert the battery packPull the [Battery ejection] button to eject the battery pack.To eject the battery pack✤Clean the terminals to remove foreign substances before inserting the battery pack.✤If the CAM will not be in use for a while, remove the battery pack from the CAM.NotesStandard Battery PackExtended life Battery Pack (option)Battery <Insert> <Eject>✤When you eject the battery pack from the CAM, hold the battery pack to prevent it dropping to the floor.Warning00906C SC-M2100 USA~035 7/25/05 4:02 PM Page 19](https://usermanual.wiki/Samsung-Electronics-Co/05MINIMEGA.Users-Manual-1/User-Guide-570667-Page-23.png)
![ENGLISH2323How to Use the Battery PackCharging the Battery Pack1. Move [POWER/MODE Selector] up to turn the CAM off.2. Attach the Battery Pack to the CAM.3. Connect the AC Power Adapter with the CAM.◆You can detach the AC adapter by pressing the buttons on the sides of the adapter cable plug while pulling it out.4. Insert the AC Power Adapter into the outlet.✤You can charge the battery pack when you use the CAM, but it takes long timerelatively.✤It is recommended you fully charge the battery pack before use.✤You should only charge the battery in an environment between 0°C and 40°C.WarningNoteCharging directly to the CAMUsing Hardware Reset Function1. Remove the battery pack and the AC Power Adapter.2. Press and hold the [RESET] button over one second.✤If you reset the CAM, all functions you set are initialized.Note43200906C SC-M2100 USA~035 7/25/05 4:02 PM Page 23](https://usermanual.wiki/Samsung-Electronics-Co/05MINIMEGA.Users-Manual-1/User-Guide-570667-Page-27.png)
![ENGLISH2525Getting StartedBefore You Start Operating the CAMBefore using the CAM, refer to this page for easy operation. The Memory Card is an optional accessory and not included.1. Install the battery pack and insert the Memory Card into the Memory Card slot. (Refer to page 32)2. Charge the battery pack by connecting AC Power Adapter with the CAM directly. (Refer to page 23) 3. Move [POWER/MODE Selector] down to turn on the CAM and move it down again.◆You can select Video mode or Previous mode as the start-up mode in System Settings. (Refer to page 98)4. Move the [W/T] button to select the desired mode and press the [OK] button. 5. Press the [OK ] button to take pictures, record, hear music or record voice. Press the [MENU ] button to view the menu.6. When you finished, move [POWER/MODE Selector] up to turn the CAM off.For example:If you want to select Photo Mode1. Video: You can record and play video files.2. Photo: You can take and view photo files.3. MP3: You can download and hear the music.4. Voice Recorder: You can record and hear the voice.5. File Browser: You can delete, lock, copy the file and view the file information.6. System Settings: You can set the LCD monitor brightness/color, date/time, system, memory and language. Video12345600906C SC-M2100 USA~035 7/25/05 4:02 PM Page 25](https://usermanual.wiki/Samsung-Electronics-Co/05MINIMEGA.Users-Manual-1/User-Guide-570667-Page-29.png)
![ENGLISH2626Using the Function ButtonThe Function button is used to make a selection, move the cursor, select the functions and exit from the menu.Getting StartedThe Use of Various Function buttonSelect upReturn toprevious menu Select menuConfirmselectingMove to Record modeSelect downSelectmenu✤If there is no file when you press the [OK] button in Video Record/PhotoCapture, no change occurs. ✤Refer to page 39 for further details about the function button.NotesRecord/Capture Mode Play Mode Menu SelectionModeButton●œWT√OKZoom out (W)Zoom in (T)--RecordPlay the lastrecorded fileMulti-play screen-RPS(œœ)/Move backward FPS(√√)/Move forwardMove to Record modePauseSelect upSelect downReturn to previous menuSelect menuMove to Record modeConfirm selecting00906C SC-M2100 USA~035 7/25/05 4:02 PM Page 26](https://usermanual.wiki/Samsung-Electronics-Co/05MINIMEGA.Users-Manual-1/User-Guide-570667-Page-30.png)
![ENGLISH2727Getting StartedUsing the Display ButtonYou can use various functions by pressing the [DISPLAY] button.1. Open the LCD monitor.2. Move [POWER/MODE Selector] down to turn on the CAM. ◆The Video Record screen appears.◆You can select Video mode or Previous modeas the start-up mode in System Settings. (Refer to page 98)3. Press the [DISPLAY ] button.Play ModeVoice Record modeRecord/Capture ModeMP3 Play modeVideo/Photo mode✤Once: The display indicator disappears.✤Twice: The back light turns off.✤3 times: The LCD monitor turns off.✤4 times: It turns to the initial screen.MP3/Voice Record/File Browser/System Settings mode✤Once: The back light turns off.✤Twice: The LCD monitor turns off.✤3 times: It turns to the initial screen.If you press the [DISPLAY] buttonThe LCD monitor is turned off after a certain period of time has passed ineach mode in order to prevent unnecessary battery power consumption.Press any button to go back to the previous mode. Power Saving Function Zoom outRecord/Capture Play lastZoom inMove toRecord/CapturemodeMulti-play screenMovebackward/RPSMoveforward/FPS/Slow playPlay/PauseMove to VideoRecord modePlay listRPS FPSPlay/PauseRecordPlay last 00906C SC-M2100 USA~035 7/25/05 4:02 PM Page 27](https://usermanual.wiki/Samsung-Electronics-Co/05MINIMEGA.Users-Manual-1/User-Guide-570667-Page-31.png)
![ENGLISH2828Getting StartedAdjusting the LCD MonitorYour CAM is equipped with a color Liquid Crystal Display monitor, which enables you to view directly what you are recording orplaying back. Depending on the conditions under which you are using the CAM (indoors or outdoors for example), you canadjust the LCD Brightness or Color.1. Move [POWER/MODE Selector ] down to turn on the CAM.2. Move [POWER/MODE Selector] down to select System Settings and press the [OK ] button.◆The system is automatically converted into the selected mode in two seconds even when the [OK] button is not pressed.3. Move the [W/T] button to select <Display > and press the [√] button.4. Move the [W/T] button to select <LCD Brightness > or <LCD Color> and press the [OK ] button.5. Move the [W/T] button to select desired brightness or color andpress the [OK ] button.◆Refer to pages 90~91 for details.✤If you select [œ] in the menu, the previous menu appears.✤If it is too bright, adjust the LCD Brightness. Notes345MemorySystemSystemDate/TimeDate/TimeSystemMemoryLanguageLanguage EnglishEnglishEnglishDisplaySystem SettingsSystem SettingsSettings: DisplaySettings: DisplaySystemLCD ColorLCD ColorBackBack50 %50 %LCD Brightness20 %Settings: DisplaySettings: DisplaySystem20 %20 %50 %LCD ColorBackBackLCD BrightnessLCD Brightness00906C SC-M2100 USA~035 7/25/05 4:02 PM Page 28](https://usermanual.wiki/Samsung-Electronics-Co/05MINIMEGA.Users-Manual-1/User-Guide-570667-Page-32.png)
![You can select the memory type - internal memory or external memory(Memory Card). The Memory Card is an optional accessory.The video files and the photo files are stored in internal memory by default.1. Insert the Memory Card. (Refer to page 33)2. Move [POWER/MODE Selector ] down to turn on the CAM.3. Move [POWER/MODE Selector] down to select System Settingsand press the [OK ] button.◆The system is automatically converted into the selected mode in two seconds even when the [OK] button is not pressed.4. Move the [W/T] button to select <Memory> and press the [√] button. 5. Move the [W/T] button to select <Storage Type > and press the [√] button.6. Move the [W/T] button to select desired type and press the [OK ] button.◆You can select external or internal memory.ENGLISH3232Selecting the Memory TypeGetting Started✤If you insert the Memory Card, the memory type selection screen appears automatically.Note456SystemDate/TimeDate/TimeLanguageLanguage EnglishEnglishEnglishDisplaySystem SettingsSystem SettingsSystemDisplayMemorySystemMemory SpaceFormatStorage Type InternalFormatInternalInternalMemory Space778MB/983MB778MB/983MBBackBackSystemSettings : MemorySettings : MemoryMemory SpaceFormatSystemStorage Type External FormatInternalInternalMemory Space778MB/983MB778MB/983MBBackBackSettings : MemorySettings : Memory00906C SC-M2100 USA~035 7/25/05 4:02 PM Page 32](https://usermanual.wiki/Samsung-Electronics-Co/05MINIMEGA.Users-Manual-1/User-Guide-570667-Page-36.png)
![3333ENGLISHGetting StartedUsing the Memory Card (Optional Accessory)1. Open the LCD monitor.2. Open the MULTI CARD slot lid.3. Insert the Memory Card into the slot until it softly clicks.4. Close the slot lid.Caution: This screen will appear if the Memory Card is inserted with the power on.◆ If you select <OK>, the memory type changes to ‘External’ and if you select <Cancel>, filesare stored in internal memory.◆ If you insert a locked Memory Card, the [ ] icon is displayed next to the memory type indicator. Inserting a Memory Card1. Open the LCD monitor.2. Open the MULTI CARD slot lid.3. Slightly push the Memory Card inwards to pop it out.4. Pull the Memory Card out of the slot and close the lid.Ejecting a Memory Card✤Do not apply excessive force when you insert or eject the Memory Card.✤Do not turn the power off while recording, playing, erasing files or formatting the Memory Card.✤Please turn the power off before you insert or eject the Memory Card to avoid losing data.✤Do not place the Memory Card near a strong electro-magnetic device.✤Do not allow metal substances to come in contact with the terminals on the Memory Card.✤Do not bend the Memory Card.✤After pulling the Memory Card out from the CAM, keep the Memory Card in a soft case to preventstatic shock.✤The data stored on the Memory Card may be changed or lost as a result of misuse, static electricity, electric noise or repair. Save important files separately.✤Samsung is not responsible for data loss due to misuse.✤Memory Stick and are trademarks of Sony Corporation.✤All other product names mentioned herein may be the trademarks or registered trademarks of their respective companies. “TM” will not be mentioned in everyinstance in this manual.NotesThe Memory Stick ViewTerminalsWrite-protectSwitch00906C SC-M2100 USA~035 7/25/05 4:02 PM Page 33](https://usermanual.wiki/Samsung-Electronics-Co/05MINIMEGA.Users-Manual-1/User-Guide-570667-Page-37.png)
![ENGLISH3434Getting StartedMode and Menu SelectionYou can select the mode and menu as follows. There are 2 ways of selecting menu. Select the way you prefer.Mode Selection1. Move the [POWER/MODE Selector] down to turn on the CAM.2. Move the [ POWER/MODE Selector] down to select a desired mode and press the [OK]button.The system is automatically converted into the selected mode in two seconds even whenthe [OK] button is not pressed. Menu Selection1. Press the [MENU] button after selecting the desired mode.2. The menu screen disappears when you press the [MENU] button again. ✤User's manual only describes the first way of performing an operation. There may be other and more convenient ways for you to use the CAM.Note00906C SC-M2100 USA~035 7/25/05 4:02 PM Page 34](https://usermanual.wiki/Samsung-Electronics-Co/05MINIMEGA.Users-Manual-1/User-Guide-570667-Page-38.png)
![ENGLISH3636123Video Mode : RecordingRecordingYou can record moving person and objects and store it in memory.1. Move [POWER/MODE Selector] down to turn on the CAM.◆The Video Record screen appears.◆You can select Video mode or Previous mode as the start-up mode in System Settings. (Refer to page 98)2. Press [Record/Stop] button to start recording.◆[●REC] indicator displays on LCD.◆The elapsed time is displayed and it starts recording.3. Press the [Record/Stop] button again to stop recording.◆It stops recording and the CAM is ready again.4. Move [POWER/MODE Selector] up to turn off the CAM.Notes✤If you press the [Record/Stop] button and press it in 1 second again, new video file won't be made.✤If the Auto Shut Off is set, the CAM turns off automatically after 5 minutes. ✤Detach the Battery Pack when you finish recording to prevent unnecessary battery power consumption.✤You can check the recording time.Video RecordSTBY F / 720i00:00:00 / 00:43:41BLCF / 720iVideo RecordRecording...Video RecordSTBY F / 720i00:00:04 / 00:43:37Video RecordSTBY00:00:00 / 00:43:00:00:00 / 00:43:41Elapsed time Remaining time00906C SC-M2100 USA~057 7/25/05 4:04 PM Page 36](https://usermanual.wiki/Samsung-Electronics-Co/05MINIMEGA.Users-Manual-1/User-Guide-570667-Page-40.png)
![ENGLISH3737Video Mode : RecordingZooming In and OutZooming technique lets you change the size of the subject captured in a scene.1. Move [POWER/MODE Selector] down to turn on the CAM. ◆The Video Record screen appears.◆You can select Video mode or Previous mode as the start-up mode in System Settings. (Refer to page 98)2. Press the [Record/Stop] button to start recording.00:00:00 / 00:43:41F / 720iVideo RecordSTBY00:00:00 / 00:43:41Video RecordSTBYBLC00:00:00 / 00:43:41F / 720iVideo RecordSTBYZoom InZoom OutNotes✤Zooming in the CAM is X10-optical electro motion zoom and the quality and definition of thecaptured photo file are well maintained even when zooming is on.✤Frequent use of zooming may result in higher battery power consumption.✤Refer to page 55 about Digital Zoom.Press the [W] button to zoom out.●The subject appears farther away when you zoom out.Press the [T] button to zoom in.●The subject appears closer when you zoom in.00906C SC-M2100 USA~057 7/25/05 4:04 PM Page 37](https://usermanual.wiki/Samsung-Electronics-Co/05MINIMEGA.Users-Manual-1/User-Guide-570667-Page-41.png)
![ENGLISH3838Video Mode : PlayingPlaying on the LCD MonitorIt is handy and practical to view video files using the LCD monitor almost anywhere such as in a car, indoors or outdoors.1. Move [POWER/MODE Selector] down to turn on the CAM.◆The Video Record screen appears.◆You can select Video mode or Previous mode as the start-up mode in System Settings. (Refer to page 98)2. Press the [OK] button. ◆It moves to Video Play mode. 3. Press the [W] button.◆The Multi-play screen appears. 4. Move the [ W/T, œ/√] button to find the video file you want to play.◆Each time you move the [ W/T, œ/√] button, the frame moves vertically and horizontally.◆Each time you press the VOL [ +]/[-] button, another page of 9 frames is displayed.5. Press [OK ] button to play the video file you want.◆Each time you press the [OK] button, play or pause is selected repeatedly.6. Press the [OK] button again to pause.1356BLC00:00:01 / 00:00:16720X480100-0055Video PlayBLCVideo Play00906C SC-M2100 USA~057 7/25/05 4:04 PM Page 38](https://usermanual.wiki/Samsung-Electronics-Co/05MINIMEGA.Users-Manual-1/User-Guide-570667-Page-42.png)
![ENGLISH393912Video Mode : Playing1. Press the [OK ] button to play the video file.2. Press the VOL [+] button to increase the volume.◆Each time you press the [+] button, the volume bar increases and the sound level will get louder.◆The volume bar disappears after 1~2 seconds.3. Press the VOL [-] button to decrease the volume.◆Each time you press the [-] button, the volume bar decreases and the sound level will get quieter.◆The volume bar disappears after 1~2 seconds.BLCVideo PlayBLCVideo PlayNotes✤You can adjust the volume up to 10 steps.✤You can also play the video file on a TV screen by connecting the CAM to a TV. (Refer to page 111)✤CODEC for CAM is required to see the video files recorded on the CAM through the ordinary video file playback programme. Install the software provided in the CD Bundle to have the CODEC automatically installed in the system. If you do not have the CD, searchthe product model name on the Download Center in the Samsung Electronics home page to get the CODEC installation file. (refer to page 116)[OK] button: Play or pause the video file[W] button: The Multi-play screen appears. [œ] button: In Video Play mode: Press it to move to the beginning of the current file. Press and hold it to use RPS function. (RPS rate: œœ 2x➝4x➝8x➝16x➝32x➝64x➝128x)[√√] button: In Video Play mode: Press it to move to next file.Press and hold it to use FPS function. (FPS rate: √√√√ 2x➝4x➝8x➝16x➝32x➝64x➝128x)In Video Play mode: Press and hold it to play slowly when paused.Press it to play the frame by frame when paused.The buttons you use when playing the video fileAdjusting the Sound 00906C SC-M2100 USA~057 7/25/05 4:04 PM Page 39](https://usermanual.wiki/Samsung-Electronics-Co/05MINIMEGA.Users-Manual-1/User-Guide-570667-Page-43.png)
![ENGLISH4040Note✤The locked file can not be deleted. 356Deleting Video filesVideo Mode : Selecting File OptionsYou can delete video files in <File Options>.1. Move [POWER/MODE Selector] down to turn on the CAM.◆The Video Record screen appears.◆You can select Video mode or Previous mode as the start-up mode in System Settings.(Refer to page 98) 2. Press the [OK] button. ◆It moves to Video Play mode. 3. Press the [W] button. ◆The Multi-play screen appears. 4. Move the [W/T, œ/√] button to select the video file you want to delete. ◆Each time you move the [W/T, œ/√] button, the frame moves horizontally and vertically. ◆Each time you press the VOL [+]/[-] button, another page of 9 frames is displayed. 5. Press the [MENU] button. Move the [W/T] button to select <Delete> and press the [OK] button. 6. Move the [ W/T] button to select the desired item. Press the [OK ] button.◆Selected: The selected video file is deleted.◆All: All video files are deleted. ◆Cancel: Cancel deleting video files.Copy ToLockDeletePB OptionMulti SelectCopy ToLockDeletePB OptionMulti SelectSelectedAllCancelAre you sure you want to delete selected file?100906C SC-M2100 USA~057 7/25/05 4:04 PM Page 40](https://usermanual.wiki/Samsung-Electronics-Co/05MINIMEGA.Users-Manual-1/User-Guide-570667-Page-44.png)
![ENGLISH4141356Video Mode : Selecting File OptionsLocking Video filesYou can lock the important video file to prevent accidental deletion.1. Move [POWER/MODE Selector] down to turn on the CAM.◆The Video Record screen appears.◆You can select Video mode or Previous mode as the start-up mode in System Settings.(Refer to page 98) 2. Press the [OK] button. ◆It moves to Video Play mode. 3. Press the [W] button. ◆The Multi-play screen appears. 4. Move the [W/T, œ/√] button to select the video file you want to lock. ◆Each time you move the [W/T, œ/√] button, the frame moves horizontally and vertically. ◆Each time you press the VOL [+]/[-] button, another page of 9 frames is displayed.5. Press the [MENU] button. Move the [W/T] button to select <Lock> and press the [OK] button. 6. Move the [ W/T] button to select the followings and press the [OK] button.◆Selected: The selected video file is locked.◆All: All video files are locked. ◆Cancel: Cancel locking video files.Copy ToLockDeletePB OptionMulti SelectCopy ToLockDeletePB OptionMulti SelectSelectedAllCancelChoose the file(s) you would like to lock.Note✤The < > icon is displayed on the locked file.100906C SC-M2100 USA~057 7/25/05 4:04 PM Page 41](https://usermanual.wiki/Samsung-Electronics-Co/05MINIMEGA.Users-Manual-1/User-Guide-570667-Page-45.png)
![ENGLISH4242356Video Mode : Selecting File OptionsCopying Video filesYou can copy the video file to the internal or external memory.Insert the Memory Card into the MULTI CARD slot.1. Move [POWER/MODE Selector] down to turn on the CAM.◆The Video Record screen appears.◆You can select Video mode or Previous mode as the start-up mode in System Settings. (Refer to page 98) 2. Press the [OK] button. ◆It moves to Video Play mode. 3. Press the [W] button. ◆The Multi-play screen appears. 4. Move the [W/T, œ/√] button to select the video file you want to copy. ◆Each time you move the [W/T, œ/√] button, the frame moves horizontally and vertically. ◆Each time you press the VOL [+]/[-] button, another page of 9 frames is displayed. 5. Press the [MENU] button. Move the [W/T] button to select <Copy To> and press the [OK] button. ◆If you selected video ‘external’ as the Storage type, the file is copied to ‘internal’ and vice versa. 6. Move the [ W/T] button to select the followings and press the [OK] button.◆Selected: Copy the selected video file.◆All: Copy all video files. ◆Cancel: Cancel copying video files.Copy ToLockDeletePB OptionMulti SelectCopy ToLockDeletePB OptionMulti SelectSelectedAllCancelChoose the file(s) to copyto External memory?100906C SC-M2100 USA~057 7/25/05 4:05 PM Page 42](https://usermanual.wiki/Samsung-Electronics-Co/05MINIMEGA.Users-Manual-1/User-Guide-570667-Page-46.png)
![ENGLISH4343345Copy ToLockDeletePB OptionMulti Select7Copy ToLockDeletePB OptionCancelSelectedAllCancelAre you sure you want todelete selected file?Video Mode : Selecting File OptionsSetting Multi SelectionYou can set the multi video files to delete, copy or lock at one time. 1. Move [POWER/MODE Selector] down to turn on the CAM. ◆The Video Record screen appears.◆You can select Video mode or Previous mode as the start-up mode in System Settings. (Refer to page 98) 2. Press the [OK] button. ◆It moves to Video Play mode. 3. Press the [W] button. ◆The Multi-play screen appears. 4. Press the [MENU] button. Move the [W/T] button to select <Multi Select> and press the [OK] button. ◆"Use VOL [+] button to add selection, or VOL [-] button to deselect" the message appears.Press [OK] button to close the confirm message. 5. Move the [W/T, œ/√] button to select desired video file, and press the VOL [+] or VOL [-] button. ◆VOL [+]: The selected video file has the mark <✔>. ◆VOL [-]: When the mark <✔> disappears, the selection is canceled. 6. Press the [MENU] button. Move [W/T] button to select <Delete>, <Copy To> or <Lock> and press the [OK] button. 7. Move the [W/T] button to select the followings and press the [OK] button. ◆Selected: The selected video file is deleted, copied, or locked. ◆All: All the video files are deleted, copied, or locked. ◆Cancel: Cancel selecting video files. 00906C SC-M2100 USA~057 7/25/05 4:05 PM Page 43](https://usermanual.wiki/Samsung-Electronics-Co/05MINIMEGA.Users-Manual-1/User-Guide-570667-Page-47.png)
![ENGLISH4444Video Mode : Selecting File Options356Setting the PB OptionYou can play all files continuously or play only selected file.1. Move [POWER/MODE Selector] down to turn on the CAM.◆The Video Record screen appears.◆You can select Video mode or Previous mode as the start-up mode in System Settings. (Refer to page 98) 2. Press the [OK] button. ◆It moves to Video Play mode. 3. Press the [W] button. ◆The Multi-play screen appears. 4. Move the [W/T, œ/√] button to select the video file you want to set the function. ◆Each time you move the [W/T, œ/√] button, the frame moves vertically and horizontally. ◆Each time you press the VOL [+]/[-] button, another page of 9 frames is displayed. 5. Press the [MENU] button. Move the [W/T] button to select <PB Option> and press the [OK] button.6. Move the [W/T] button to select the following and press the [OK] button.◆Selected: Play the selected video file.◆All: Play all video files. ◆Cancel: Cancel setting PB Option.Copy ToLockDeletePB OptionMulti SelectCopy ToLockDeletePB OptionMulti SelectSelectedAllCancelWould you like to playonly selected file orall files?100906C SC-M2100 USA~057 7/25/05 4:05 PM Page 44](https://usermanual.wiki/Samsung-Electronics-Co/05MINIMEGA.Users-Manual-1/User-Guide-570667-Page-48.png)
![ENGLISH4545Video Mode : Setting Various Functions245Setting the Video file SizeYou can set the file size for video files. The number of stored files varies depending on the Memory Card capacity and video file size.1. Move [POWER/MODE Selector] down to turn on the CAM.◆The Video Record screen appears.◆You can select Video mode or Previous mode as the start-up mode in System Settings.(Refer to page 98) 2. Press the [MENU] button.◆The Video Settings screen appears. 3. Move the [W/T] button to select <Size> and press the [√] button.4. Move the [ ▲/▼] switch to select the video file size and press the [OK] button.◆720: Select 720✕480 pixel.◆352: Select 352✕240 pixel.5. Press the [MENU] button to finish setting.◆The icon of selected function is displayed.AFLine In/Out OutRecord Mode TVQuality FineFocusFocusAFSystemLine In/Out OutRecord Mode TVQuality FineSize 720Video SettingsVideo SettingsAFLine In/Out OutRecord Mode PCQuality FineFocusFocusAFSystemLine In/Out OutRecord Mode PCQuality FineSize 352Video SettingsVideo SettingsBLC00:00:00 / 01:05:31F / 352pVideo RecordVideo RecordSTBYNotes✤If you select <œ> in the menu, the previous menu appears.✤In case <TV> is selected in the Record Mode, it indicates 720i only. In case <PC> is selected in the Record Mode, it indicates 720p or 352p.100906C SC-M2100 USA~057 7/25/05 4:05 PM Page 45](https://usermanual.wiki/Samsung-Electronics-Co/05MINIMEGA.Users-Manual-1/User-Guide-570667-Page-49.png)
![ENGLISH4646Video Mode : Setting Various Functions345Setting the Video file QualityYou can set the quality for video files. The number of stored files varies depending on the Memory Card capacity and video file quality.1. Move [POWER/MODE Selector] down to turn on the CAM.◆The Video Record screen appears. ◆You can select Video mode or Previous mode as the start-up mode in System Settings.(Refer to page 98)2. Press the [MENU] button.◆The Video Settings screen appears. 3. Move the [W/T] button to select <Quality> and press the [√] button. 4. Move the [W/T] button to select the video file quality and press the [OK] button. ◆SF(Super Fine): Select highest quality. ◆F(Fine): Select high quality. ◆N(Normal): Select normal quality. 5. Press the [MENU] button to finish setting.◆The icon of selected function is displayed.AFLine In/Out OutRecord Mode TVSize 720FocusFocusAFSystemLine In/Out OutRecord Mode TVSize 720Quality FineVideo SettingsVideo SettingsAFLine In/Out OutRecord Mode TVSize 720FocusFocusAFSystemLine In/Out OutRecord Mode TVSize 720Quality Super FineVideo SettingsVideo SettingsBLC00:00:00 / 00:29:07 SF / 720iVideo RecordSTBYNotes✤If you select <œ> in the menu, the previous menu appears.✤You can record video files with size of 720i/Normal, 720p/Normal, 352p/Fine and 352p/Normal in MemoryCard but the quality is not guaranteed.100906C SC-M2100 USA~057 7/25/05 4:05 PM Page 46](https://usermanual.wiki/Samsung-Electronics-Co/05MINIMEGA.Users-Manual-1/User-Guide-570667-Page-50.png)