Samsung Electronics Co 05MINIMEGA Digital Camcorder User Manual 2
Samsung Electronics Co Ltd Digital Camcorder Users Manual 2
UserManual.wiki
>
Samsung Electronics Co
>
05MINIMEGA User Manual
>
Users Manual 2
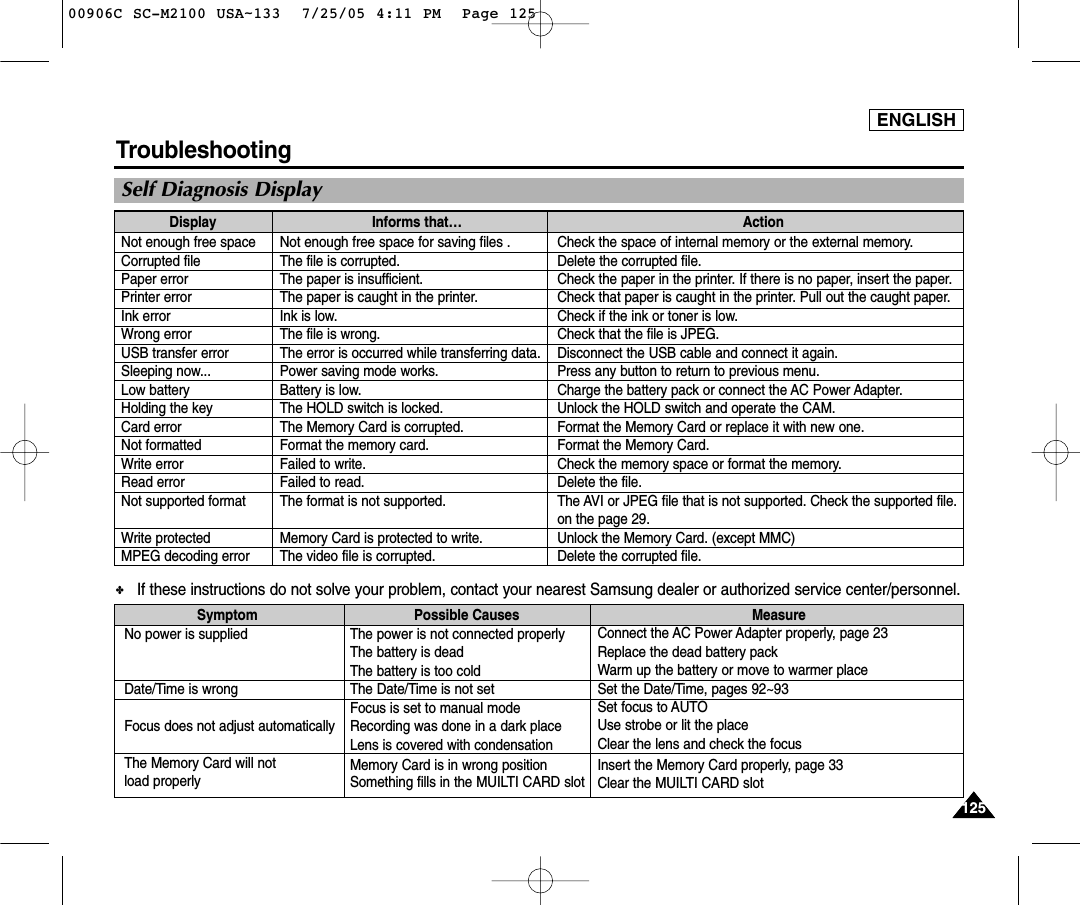
Contents
1.
Users Manual 1
2.
Users Manual 2
Users Manual 2
Navigation menu
Upload a User Manual
Namespaces
Wiki Guide
HTML
PDF
Info
Views
User Manual
Discussion / Help
Navigation
![ENGLISH4747345AFLine In/Out OutSize 720FocusFocusAFSystemLine In/Out OutRecord Mode TVSize 720Quality FineQuality FineVideo SettingsVideo SettingsAFLine In/Out OutSize 720FocusFocusAFSystemLine In/Out OutRecord Mode PCSize 720Quality FineQuality FineVideo SettingsVideo SettingsVideo RecordSTBY F / 720p00:00:04 / 00:43:37Video Mode : Setting Various FunctionsSetting the Video file Record modeYou can set the record mode before starting video file record. 1. Move [POWER/MODE Selector] down to turn on the CAM. ◆The Video Record Screen appears.◆You can select Video mode or Previous mode as the start-up mode in System Settings.(Refer to page 98)2. Press the [MENU] button. ◆The Video Settings screen appears. 3. Move the [W/T] button to select <Record Mode> and press the [√] button. 4. Move the [W/T] button to select the desired setting and press the [OK] button. ◆TV (i): The system generates clear images when played back on TV.◆PC (p): The system generates clear images when played back on PC.5. Press the [MENU] button to finish setting. 4747Notes✤In case <TV> is selected as the Record Mode, the size is set to 720i only. ✤In case <PC> is selected as the Record Mode, the size is set to 720p or 352p.✤If you select <œ> in the menu, the previous menu appears. ✤When the size is set to <352>, <PC> is automatically selected for Video files recording.100906C SC-M2100 USA~057 7/25/05 4:05 PM Page 47](https://usermanual.wiki/Samsung-Electronics-Co/05MINIMEGA.Users-Manual-2/User-Guide-570668-Page-1.png)
![ENGLISH48484848Video Mode : Setting Various FunctionsSetting the External Input/Output1. Move [POWER/MODE Selector] down to turn on the CAM. ◆The Video Record Screen appears.◆You can select Video mode or Previous mode as the start-up mode in System Settings.(Refer to page 98)2. Press the [MENU] button. ◆The Video Settings screen appears. 3. Move the [W/T] button to select <Line In/Out> and press the [√] button. 4. Move the [W/T] button to select the desired setting and press the [OK] button. ◆Out: Select this when recording or playing back the contents of the CAM into an externaldevice.◆In: Select this when recording the contents of an external device into the CAM.5. Press the [MENU] button to finish setting. ◆The CAM is set to the selected setting. 345AFSize 720FocusFocusAFSystemLine In/Out OutSize 720Quality FineQuality FineRecord Mode TVRecord Mode TVVideo SettingsVideo SettingsAFSize 720FocusFocusAFSystemLine In/Out OutSize 720Quality FineQuality FineRecord Mode TVRecord Mode TVVideo SettingsVideo SettingsVideo RecordSTBY F / 720i00:00:00 / 00:43:41Note✤If you select <œ> in the menu, the previous menu appears. 100906C SC-M2100 USA~057 7/25/05 4:05 PM Page 48](https://usermanual.wiki/Samsung-Electronics-Co/05MINIMEGA.Users-Manual-2/User-Guide-570668-Page-2.png)
![ENGLISH4949345Video Mode : Setting Various FunctionsSetting the FocusYou can set the focus depending on the subject or the environment. In most situations, you can record best using AF(Auto Focus).1. Move [POWER/MODE Selector] down to turn on the CAM.◆The Video Record screen appears. ◆You can select Video mode or Previous mode as the start-up mode in System Settings.(Refer to page 98)2. Press the [MENU] button. ◆The Video Settings screen appears. 3. Move the [W/T] button to select <Focus> and press the [√] button. 4. Move the [W/T] button to select the desired setting and press the [OK] button. ◆AF: Set the focus automatically. When the CAM turns on, AF is selected in default. ◆MF( ): Set the focus manually. .5. Press the [MENU] button to finish setting.◆The icon of selected function is displayed.◆If you select the AF, no icon is displayed. Notes✤If you select <œ> in the menu, the previous menu appears. ✤Changes in the set-up made in the Photo mode are all retained in the Video mode.✤The focus is set to AF mode automatically when the CAM is turned off.Size 720FocusAFSystemSize 720Quality FineQuality FineRecord Mode TVRecord Mode TVLine In/Out OutLine In/Out OutVideo SettingsVideo SettingsSize 720FocusMFSystemSize 720Quality FineQuality FineRecord Mode TVRecord Mode TVLine In/Out OutLine In/Out OutVideo SettingsVideo SettingsBLC00:00:00 / 00:43:41F / 720iVideo RecordSTBYAdjust the focus using MF [ +] / [-] button to zoom in or out manually.◆When a picture contains objects that are both close and far away from the CAM.◆When a person is enveloped in fog or surrounded by snow.Manual Focus100906C SC-M2100 USA~057 7/25/05 4:05 PM Page 49](https://usermanual.wiki/Samsung-Electronics-Co/05MINIMEGA.Users-Manual-2/User-Guide-570668-Page-3.png)
![ENGLISH5050Video Mode : Setting Various Functions345Setting the EIS (Electronic Image Stabilizer)The Electrical Image Stabilizer is a function that compensates for hand shake and other movements while recording. EIS provides more stable video when:◆Recording with zooming◆Recording small objects◆Recording while walking or moving◆Recording through the window in the vehicle1. Move [POWER/MODE Selector] down to turn on the CAM.◆The Video Record screen appears. ◆You can select Video mode or Previous mode as the start-up mode in System Settings. (Refer to page 98)2. Press the [MENU] button. ◆The Video Settings screen appears. 3. Move the [W/T] button to select <EIS> and press the [√] button. 4. Move the [W/T] button to select the desired setting and press the [OK] button. ◆On( ): Set the EIS function.◆Off: Cancel the EIS function. 5. Press the [MENU] button to finish setting. ◆If you select <On>, the icon of EIS is displayed. ◆If you select <Off>, no icon is displayed. SystemQuality FineQuality FineRecord Mode TVRecord Mode TVLine In/Out OutLine In/Out OutEIS OffAFFocusFocusAFVideo SettingsVideo SettingsBLC00:00:00 / 00:43:41F / 720iVideo RecordSTBYNotes✤If you select <œ> in the menu, the previous menu appears.✤The EIS is set to Off automatically when the CAM is turn off.SystemQuality FineQuality FineRecord Mode TVRecord Mode TVLine In/Out OutLine In/Out OutEIS OnAFFocusFocusAFVideo SettingsVideo Settings100906C SC-M2100 USA~057 7/25/05 4:05 PM Page 50](https://usermanual.wiki/Samsung-Electronics-Co/05MINIMEGA.Users-Manual-2/User-Guide-570668-Page-4.png)
![ENGLISH5151345Video Mode : Setting Various FunctionsSetting the White BalanceThe White Balance may vary depending on the lighting conditions. The White Balance is used to preserve natural colors under different lighting conditions.1. Move [POWER/MODE Selector] down to turn on the CAM.◆The Video Record screen appears. ◆You can select Video mode or Previous mode as the start-up mode in System Settings. (Refer to page 98)2. Press the [MENU] button. ◆The Video Settings screen appears. 3. Move the [W/T] button to select <White Balance> and press the [√] button. 4. Move the [W/T] button to select desired setting and press the [OK] button.◆Auto: Adjust the color depending on the condition automatically.◆Hold( ): Record with first selected color without adjusting color.◆Outdoor( ): Record with the balanced light. (Natural light)◆Indoor( ): Record with the balanced light. (Glow lamp or light in the studio)5. Press the [MENU] button to finish setting.◆The icon of selected function is displayed.◆If you select <Auto>, no icon is displayed. Notes✤If you select <œ> in the menu, the previous menu appears.✤Turn the Digital Zoom off for more accurate White Balance setting.✤Changes in the set-up made in the Photo mode are all retained in the Video mode. SystemWhite Balance OutdoorRecord Mode TVRecord Mode TVLine In/Out OutLine In/Out OutAFFocusFocusAFEIS OnEIS OnVideo SettingsVideo SettingsBLC00:00:00 / 00:43:41F / 720iVideo RecordSTBYSystemWhite Balance AutoRecord Mode TVRecord Mode TVLine In/Out OutLine In/Out OutAFFocusFocusAFEIS OnEIS OnVideo SettingsVideo Settings100906C SC-M2100 USA~057 7/25/05 4:05 PM Page 51](https://usermanual.wiki/Samsung-Electronics-Co/05MINIMEGA.Users-Manual-2/User-Guide-570668-Page-5.png)
![ENGLISH5252Video Mode : Setting Various Functions345Setting the Program AE (Programmed Auto Exposure)It allows you to adjust the aperture setting to suit different conditions.1. Move [POWER/MODE Selector] down to turn on the CAM.◆The Video Record screen appears. ◆You can select Video mode or Previous mode as the start-up mode in System Settings.(Refer to page 98)2. Press the [MENU] button. ◆The Video Settings screen appears. 3. Move the [W/T] button to select <Program AE> and press the [√] button.4. Move the [W/T] button to select desired setting and press the [OK] button.◆Auto: Auto mode balances exposure and shutter speed to get the best result .The shutter speed automatically varies from 1/60 to 1/250 per second dependingon the scene.◆Sports( ): For recording fast-moving people or objects. It is suitable for sports events,recording outside in the car.◆Spotlight( ): Compensates for a subject that appears too bright under strong directlight such as spotlight. It is suitable for concert and school performance. ◆Sand/Snow( ): Use when the light is very strong such as on the beach or in the snow.◆HS Shutter( ): Allows fast-moving images to be captured one frame at a time.5. Press the [MENU] button to finish setting.◆The icon of selected function is displayed.◆If you select <Auto>, no icon is displayed. Note✤If you select <œ> in the menu, the previous menu appears.SystemProgram AE SportsWhite Balance AutoWhite Balance AutoLine In/Out OutLine In/Out OutAFFocusFocusAFEIS OnEIS OnVideo SettingsVideo SettingsBLC00:00:00 / 00:43:41F / 720iVideo RecordSTBYSystemProgram AE AutoWhite Balance AutoWhite Balance AutoLine In/Out OutLine In/Out OutAFFocusFocusAFEIS OnEIS OnVideo SettingsVideo Settings100906C SC-M2100 USA~057 7/25/05 4:05 PM Page 52](https://usermanual.wiki/Samsung-Electronics-Co/05MINIMEGA.Users-Manual-2/User-Guide-570668-Page-6.png)
![ENGLISH5353345Video Mode : Setting Various FunctionsSetting the BLC (Backlight Compensation)The Backlight Compensation function helps to make the subject brighter when the subject is in front of a window or the subject is too dark to distinguish. You can use this function whenuse the CAM in the bright background and snowy background.1. Move [POWER/MODE Selector] down to turn on the CAM.◆The Video Record screen appears. ◆You can select Video mode or Previous mode as the start-up mode in System Settings.(Refer to page 98)2. Press the [MENU] button. ◆The Video Settings screen appears. 3. Move the [W/T] button to select <BLC> and press the [√] button.4. Move the [W/T] button to select desired setting and press the [OK] button.◆On( ): Set the BLC function.◆Off: Cancel the BLC function.5. Press the [MENU] button to finish setting.◆< > is displayed. ◆If you select <Off>, < > is not displayed. Notes✤If you select <œ> in the menu, the previous menu appears.✤The BLC is released when the CAM is turned off.✤Changes in the set-up made in the Photo mode are all retained in the Video mode. SystemBLC OnWhite Balance AutoWhite Balance AutoProgram AE AutoProgram AE AutoAFFocusFocusAFEIS OnEIS OnVideo SettingsVideo Settings00:00:00 / 00:43:41F / 720iVideo RecordSTBYBLCSystemBLC OffWhite Balance AutoWhite Balance AutoProgram AE AutoProgram AE AutoAFFocusFocusAFEIS OnEIS OnVideo SettingsVideo Settings100906C SC-M2100 USA~057 7/25/05 4:05 PM Page 53](https://usermanual.wiki/Samsung-Electronics-Co/05MINIMEGA.Users-Manual-2/User-Guide-570668-Page-7.png)
![ENGLISH5454Video Mode : Setting Various Functions345Setting the EffectYou can create professional looking effect on your video file.1. Move [POWER/MODE Selector] down to turn on the CAM.◆The Video Record screen appears. ◆You can select Video mode or Previous mode as the start-up mode in System Settings. (Refer to page 98)2. Press the [MENU] button. ◆The Video Settings screen appears. 3. Move the [W/T] button to select <Effect> and press the [√] button.4. Move the [W/T] button to select desired setting and press the [OK] button.◆Off: Cancel the <Effect>.◆Art: Artistic effects on your video file.◆Mosaic: A mosaic overlay appears on your video file.◆Sepia: The picture is displayed in sepia color similar to that of an old photograph.◆Negative: Reverses the colors, creating the look of a negative.◆Mirror: This mode cuts the picture in half using a Mirror effect.◆B&W: Changes the images into Black and White.5. Press the [MENU] button to finish setting.◆The effect and letter of selected function are displayed.◆If you select <OFF>, no icon is displayed.SystemEffect MirrorWhite Balance AutoWhite Balance AutoProgram AE AutoProgram AE AutoOffBLCBLCOffEIS OnEIS OnVideo SettingsVideo Settings00:00:00 / 00:43:41F / 720iVideo RecordMirrorSTBYSystemEffect OffWhite Balance AutoWhite Balance AutoProgram AE AutoProgram AE AutoOffBLCBLCOffEIS OnEIS OnVideo SettingsVideo SettingsNotes✤If you select <œ> in the menu, the previous menu appears.✤When the screen size is set to 352(352✕240), it is played back in smaller size than 720(720✕480) on PC.100906C SC-M2100 USA~057 7/25/05 4:06 PM Page 54](https://usermanual.wiki/Samsung-Electronics-Co/05MINIMEGA.Users-Manual-2/User-Guide-570668-Page-8.png)
![ENGLISH5555345Video Mode : Setting Various FunctionsSetting the Digital ZoomZooming more than X10 is achieved digitally, up to X100 when combined with optical zoom. The Digital Zoom processes data to enlarge the center portion of the image to fill the frame.It may produce a less detailed and slightly grainy picture.1. Move [POWER/MODE Selector] down to turn on the CAM.◆The Video Record screen appears. ◆You can select Video mode or Previous mode as the start-up mode in System Settings. (Refer to page 98)2. Press the [MENU] button. ◆The Video Settings screen appears. 3. Move the [W/T] button to select <Digital Zoom> and press the [√] button.4. Move the [W/T] button to select desired setting and press the [OK] button.◆On: Set the Digital Zoom. (X100)◆Off: Cancel the Digital Zoom.5. Press the [MENU] button to finish setting.◆The digital zoom indicator appears.SystemWhite Balance AutoWhite Balance AutoProgram AE AutoProgram AE AutoOffBLCBLCOffOffEffectEffectOffDigital ZoomOnVideo SettingsVideo SettingsBLC00:00:00 / 00:43:41F / 720iVideo RecordSTBYSystemWhite Balance AutoWhite Balance AutoProgram AE AutoProgram AE AutoOffBLCBLCOffOffEffectEffectOffDigital ZoomOffVideo SettingsVideo SettingsNote✤If you select <œ> in the menu, the previous menu appears.100906C SC-M2100 USA~057 7/25/05 4:06 PM Page 55](https://usermanual.wiki/Samsung-Electronics-Co/05MINIMEGA.Users-Manual-2/User-Guide-570668-Page-9.png)
![ENGLISH5656345SystemDigital Zoom OffDigital Zoom OffProgram AE AutoProgram AE AutoOffBLCBLCOffOffEffectEffectOffB.L. Auto CtlOnVideo SettingsVideo SettingsSystemDigital Zoom OffDigital Zoom OffProgram AE AutoProgram AE AutoOffBLCBLCOffOffEffectEffectOffB.L. Auto CtlOnVideo SettingsVideo SettingsBLC00:00:00 / 00:43:41F / 720iVideo RecordSTBY5656Video Mode : Setting Various FunctionsSetting the Backlight Auto ControlThis function enables to save power consumption by control the brightness of LCD monitorautomatically in outdoor. 1. Move [POWER/MODE Selector] down to turn on the CAM.◆The Video Record screen appears. ◆You can select Video mode or Previous mode as the start-up mode in System Settings. (Refer to page 98)2. Press the [MENU] button. ◆The Video Settings screen appears. 3. Move the [W/T] button to select <B.L. Auto Ctl> and press the [√] button. 4. Move the [W/T] button to select the desired setting and press the [OK] button. ◆On: Set the B.L. Auto Ctl function.◆Off: Cancel the B.L. Auto Ctl function. 5. Press the [MENU] button to finish setting.Notes✤If you select <œ> in the menu, the previous menu appears.✤Recording or Playing back the video file is not affected by Backlight Auto Control function.100906C SC-M2100 USA~057 7/25/05 4:06 PM Page 56](https://usermanual.wiki/Samsung-Electronics-Co/05MINIMEGA.Users-Manual-2/User-Guide-570668-Page-10.png)
![2ENGLISH5858Photo Mode : CapturingCapturing ImagesYou can take photo as well as record video files.1. Move [POWER/MODE Selector] down to turn on the CAM. ◆The Video Record screen appears.2. Move [POWER/MODE Selector] down again to select Photo mode andpress the [OK] button. ◆The Photo Capture screen appears.◆The system is automatically converted into the selected mode in two seconds evenwhen the [OK] button is not pressed.◆[ ]indicator is displayed in LCD monitor and the CAM is ready for taking pictures.3. Press [Record /Stop] button to take pictures.00:00:00 / 00:43:41F / 720iPhotoSTBY1600Capturing...Photo CaptureNotes✤If the battery is low and the battery charge icon blinks, the light will not operate and light icon is set to off state. ✤In order to take pictures in an external memory (Memory Card), insert the Memory Card and then set the memory type to <External>. (Refer to page 32.)✤Press the [MENU] button in the Photo Capture mode to see the Photo Settings screen. 00906C SC-M2100 USA~072 7/25/05 4:06 PM Page 58](https://usermanual.wiki/Samsung-Electronics-Co/05MINIMEGA.Users-Manual-2/User-Guide-570668-Page-12.png)
![ENGLISH5959Photo Mode : CapturingZooming In and OutZooming technique lets you change the size of the subject captured in a scene.1. Move [POWER/MODE Selector] down to turn on the CAM.2. Move [POWER/MODE Selector] down again to select Photo modeand press the [OK] button. ◆The system is automatically converted into the selected mode in twoseconds even when the [OK] button is not pressed. ◆The Photo Capture screen appears. 3. Press the [Record/Stop] button to take pictures. 1600Photo Capture1600Photo Capture1600Photo CaptureZoom InZoom OutNotes✤Zooming in the CAM is X10 -optical electro motion zoom and the quality and definition of thecaptured photo file are well maintained even when zooming is on. ✤Frequent use of zooming may result in higher battery power consumption.Press the [W] button to zoom out.●The subject appears farther away when you zoom out.Press the [T] button to zoom in.●The subject appears closer when you zoom in.00906C SC-M2100 USA~072 7/25/05 4:06 PM Page 59](https://usermanual.wiki/Samsung-Electronics-Co/05MINIMEGA.Users-Manual-2/User-Guide-570668-Page-13.png)
![ENGLISH6060Photo Mode : ViewingViewing Photo files on the LCD MonitorIt is handy and practical to view pictures using the LCD monitor almost anywhere such as in a car, indoors or outdoors.1. Move [POWER/MODE Selector] down to turn on the CAM. ◆The Video Record screen appears.2. Move [POWER/MODE Selector] down again to select Photo mode and press the [OK] button. ◆The system is automatically converted into the selected mode in two seconds even when the [OK] button is not pressed.◆The Photo Capture screen appears.3. Press the [OK] button. ◆It moves to Photo View mode. 4. Press the [W] button. ◆The Multi-play screen appears.5. Move the [ W/T, œ/√] button to find the photo you want to view.◆Each time you move the [ W/T, œ/√] button, the frame moves vertically and horizontally. ◆Each time you press the VOL [+ ] / [-] button, another page of 9 frames is displayed.6. Press [OK] button to view the photo you want.◆The full screen is displayed.24561600Photo Capture100-0024Photo View Notes✤Display time may vary depending on the picture size.✤The image edited (turned) in Image Viewer Programme on your PC may not be displayed. 00906C SC-M2100 USA~072 7/25/05 4:06 PM Page 60](https://usermanual.wiki/Samsung-Electronics-Co/05MINIMEGA.Users-Manual-2/User-Guide-570668-Page-14.png)
![ENGLISH61613467Photo Mode : Selecting File OptionsDeleting Photo filesYou can delete photo files in <File Options>.1. Move [POWER/MODE Selector] down to turn on the CAM. ◆The Video Record screen appears.2. Move [POWER/MODE Selector] down again to select Photo mode and press the [OK] button. ◆The system is automatically converted into the selected mode in two seconds even when the [OK] button is not pressed.◆The Photo Capture screen appears.3. Press the [OK] button. ◆It moves to Photo View mode. 4. Press the [W] button. ◆The Multi-play screen appears.5. Move the [W/T, œ/√] button to select the photo file you want to delete. ◆Each time you move the [W/T,œ/√] button, the frame moves horizontally and vertically. ◆Each time you move the VOL [+]/[-] button, another page of 9 frames is displayed.6. Press the [MENU] button. Move [W/T] button to select <Delete> and press the [OK] button. 7. Move the [ W/T] button to select the followings and press the [OK] button.◆Selected: The selected photo file is deleted.◆All: All photo files are deleted. ◆Cancel: Cancel deleting photo files.100-0019Photo ViewCopy ToLockDeleteDPOFMulti SelectCopy ToLockDeleteDPOFMulti SelectSelectedAllCancelAre you sure you want to delete selected file?Note✤The locked file can not be deleted. 00906C SC-M2100 USA~072 7/25/05 4:07 PM Page 61](https://usermanual.wiki/Samsung-Electronics-Co/05MINIMEGA.Users-Manual-2/User-Guide-570668-Page-15.png)
![ENGLISH62623467Photo Mode : Selecting File OptionsLocking Photo filesYou can lock the important photo file not to be deleted. 1. Move [POWER/MODE Selector] down to turn on the CAM. ◆The Video Record screen appears.2. Move [POWER/MODE Selector] down again to select Photo mode and press the [OK] button. ◆The system is automatically converted into the selected mode in two seconds even when the [OK] button is not pressed.◆The Photo Capture screen appears.3. Press the [OK] button. ◆It moves to Photo View mode. 4. Press the [W] button. ◆The Multi-play screen appears.5. Move the [W/T, œ/√] button to select the photo file you want to lock. 6. Press the [MENU] button. Move [W/T] button to select <Lock> and press the [OK] button. 7. Move the [ W/T] button to select the followings and press the [OK] button.◆Selected: The selected photo file is locked.◆All: All photo files are locked. ◆Cancel: Cancel locking photo files.100-0019Photo ViewCopy ToLockDeleteDPOFMulti SelectCopy ToLockDeleteDPOFMulti SelectSelectedAllCancelChoose the file(s) you would like to lock.Note✤The < > icon is displayed on the locked file.00906C SC-M2100 USA~072 7/25/05 4:07 PM Page 62](https://usermanual.wiki/Samsung-Electronics-Co/05MINIMEGA.Users-Manual-2/User-Guide-570668-Page-16.png)
![ENGLISH63633467Photo Mode : Selecting File OptionsCopying Photo filesYou can copy photo files to the internal or external memory.Insert the Memory Card into the MULTI CARD slot. 1. Move [POWER/MODE Selector] down to turn on the CAM. ◆The Video Record screen appears.2. Move [POWER/MODE Selector] down again to select Photo mode and press the [OK] button. ◆The system is automatically converted into the selected mode in two seconds even when the [OK] button is not pressed.◆The Photo Capture screen appears.3. Press the [OK] button. ◆It moves to Photo View mode. 4. Press the [W] button. ◆The Multi-play screen appears.5. Move the [W/T, œ/√] button to select the photo file you want to copy. 6. Press the [MENU] button. Move [W/T] button to select <Copy To> and press the [OK] button. ◆If you select the Storage type ‘External’, the file is copied to ‘Internal’ and vice versa. 7. Move the [ W/T] button to select the followings and press the [OK] button.◆Selected: Copy the selected photo file.◆All: Copy all photo files.◆Cancel: Cancel copying photo files.100-0019Photo ViewCopy ToLockDeleteDPOFMulti SelectCopy ToLockDeleteDPOFMulti SelectSelectedAllCancelChoose the file(s) to copyto External memory?00906C SC-M2100 USA~072 7/25/05 4:07 PM Page 63](https://usermanual.wiki/Samsung-Electronics-Co/05MINIMEGA.Users-Manual-2/User-Guide-570668-Page-17.png)
![ENGLISH64644678Photo Mode : Selecting File OptionsInsert the Memory Card into the MULTI CARD slot.1. Move [POWER/MODE Selector] down to turn on the CAM. ◆The Video Record screen appears.2. Move [POWER/MODE Selector] down again to select Photo mode and press the [OK] button. ◆The system is automatically converted into the selected mode in two seconds even when the [OK] button is not pressed.◆The Photo Capture screen appears.3. Press the [OK] button. ◆It moves to Photo View mode. 4. Press the [W] button. ◆The Multi-play screen appears.5. Move the [W/T, œ/√] button to select the photo file you want to print. 6. Press the [MENU] button. Move [W/T] button to select <DPOF> and press the [OK] button. ◆You can select <DPOF> only when you’ve selected Storage Type ‘External’.(Refer to page 32.)7. Move the [W/T] button to select the number of copies you want to print and press the [OK] button.8. Press the [MENU] button to finish setting. Setting DPOF (Digital Print Order Format) FunctionCopy ToLockDeleteDPOFMulti SelectCopy ToLockDeleteDPOFMulti SelectPress OK to set.Press to cancel.copies for DPOF print11Notes✤Refer to page 122 for further details about printing DPOF files.✤You can set copies for DPOF print up to 30.00906C SC-M2100 USA~072 7/25/05 4:07 PM Page 64](https://usermanual.wiki/Samsung-Electronics-Co/05MINIMEGA.Users-Manual-2/User-Guide-570668-Page-18.png)
![ENGLISH65654568Copy ToLockDeleteDPOFMulti SelectCopy ToLockDeleteDPOFCancelSelectedAllCancelAre you sure you want to delete selected file?Photo Mode : Selecting File Options Setting Multi SelectionYou can set the multi photo files to delete, copy or lock at one time. 1. Move [POWER/MODE Selector] down to turn on the CAM. ◆The Video Record screen appears.2. Move [POWER/MODE Selector] down again to select Photo mode and press the [OK] button. ◆The system is automatically converted into the selected mode in two seconds even when the [OK] button is not pressed.◆The Photo Capture screen appears.3. Press the [OK] button. ◆It moves to Photo View mode. 4. Press the [W] button. ◆The Multi-play screen appears.5. Press the [MENU] button. Move [W/T] button to select <Multi Select> and press the [OK] button. ◆"Use VOL [+] button to add selection, or VOL [-] button to deselect" the message appears. Press [OK] button to close the confirm message. 6. Move the [W/T, œ/√] button to select desired setting, and press the VOL [+] or VOL [-] button. ◆VOL [+]: The selected video file has the mark <✔>. ◆VOL [-]: When the mark <✔> disappears, the selection is canceled. 7. Press the [MENU] button. Move [W/T] button to select <Delete>, <Copy To> or <Lock> and press the [OK] button. 8. Move the [ W/T] button to select the followings and press the [OK] button.◆Selected: The selected photo file is deleted, copied, or locked. ◆All: All photo files are deleted, copied, or locked. ◆Cancel: Cancel selecting photo files. 00906C SC-M2100 USA~072 7/25/05 4:08 PM Page 65](https://usermanual.wiki/Samsung-Electronics-Co/05MINIMEGA.Users-Manual-2/User-Guide-570668-Page-19.png)
![ENGLISH6666346Photo Mode : Setting Various FunctionsSetting the Photo file SizeYou can set the photo files size. The number of stored files varies depending on the Memory Card capacity and photo files size.1. Move [POWER/MODE Selector] down to turn on the CAM. ◆The Video Record screen appears.2. Move [POWER/MODE Selector] down again to select Photo mode and press the [OK] button. ◆The system is automatically converted into the selected mode in two seconds even when the [OK] button is not pressed.◆The Photo Capture screen appears.3. Press the [MENU] button. 4. Move the [W/T] button to select <Size> and press the [√] button. 5. Move the [W/T] button to select the desired setting and press the [OK] button.◆There are several photo file sizes, such as 2400X1800, 1600x1200, 1024x768 and 640x480. 6. Press the [MENU] button to finish setting.◆The selected photo file size is displayed on the LCD monitor. SystemFlash AutoWhite BalanceAutoFocus AFFlash AutoWhite BalanceAutoBLCOffBLCOffFocus AFSize 1600 1200Photo SettingsPhoto SettingsSystemFlash AutoWhite BalanceAutoFocus AFFlash AutoWhite BalanceAutoBLCOffBLCOffFocus AFSize 640X480Photo SettingsPhoto Settings640Photo CaptureNotes✤If you select <œ> in the menu, the previous menu appears.✤The size of 2400X1800 is created by Linear Interpolation, so the quality of the image would be worsethan 4MB pixel. 200:00:00 / 00:43:41F / 720iPhotoSTBY00906C SC-M2100 USA~072 7/25/05 4:08 PM Page 66](https://usermanual.wiki/Samsung-Electronics-Co/05MINIMEGA.Users-Manual-2/User-Guide-570668-Page-20.png)
![ENGLISH6767456Photo Mode : Setting Various FunctionsSetting the FlashThe Flash only works in Photo Mode and allows the user to take photographs in dark placessuch as during the night, shaded or dark areas and indoors.1. Move [POWER/MODE Selector] down to turn on the CAM. ◆The Video Record screen appears.2. Move [POWER/MODE Selector] down again to select Photo mode and pressthe [OK] button. ◆The system is automatically converted into the selected mode in two seconds evenwhen the [OK] button is not pressed.◆The Photo Capture screen appears.3. Press the [MENU] button. 4. Move the [W/T] button to select <Flash> and press the [√] button. 5. Move the [W/T] button to select the desired setting and press the [OK] button.◆Auto: Set the flash automatically.◆On( ): Turn on the flash.◆Off( ): Turn off the flash.6. Press the [MENU] button to finish setting.◆The icon of selected function is displayed.◆If you select <Auto>, no icon is displayed. Notes✤If you select <œ> in the menu, the previous menu appears.✤If the battery is low and the battery charge icon blinks, flash will not operate and flash icon is set to off state.SystemWhite BalanceAutoFocus AFFlash AutoSizeSizeWhite BalanceAutoBLCOffBLCOffFocus AFPhoto SettingsPhoto Settings1600×12001600×1200SystemWhite BalanceAutoFocus AFFlash OnSizeSizeWhite BalanceAutoBLCOffBLCOffFocus AFPhoto SettingsPhoto Settings1600×12001600×12001600Photo Capture200:00:00 / 00:43:41F / 720iPhotoSTBY00906C SC-M2100 USA~072 7/25/05 4:08 PM Page 67](https://usermanual.wiki/Samsung-Electronics-Co/05MINIMEGA.Users-Manual-2/User-Guide-570668-Page-21.png)
![ENGLISH6868456Photo Mode : Setting Various FunctionsSetting the FocusYou can set the focus depending on the subject or the environment. In most situations, you can record the best photo using AF(Auto Focus).1. Move [POWER/MODE Selector] down to turn on the CAM. ◆The Video Record screen appears.2. Move [POWER/MODE Selector] down again to select Photo mode and press the [OK] button. ◆The system is automatically converted into the selected mode in two seconds even when the [OK] button is not pressed.◆The Photo Capture screen appears.3. Press the [MENU] button. 4. Move the [W/T] button to select <Focus> and press the [√] button. 5. Move the [W/T] button to select the desired setting and press the [OK] button.◆AF: Set the focus automatically. When the CAM turns on, AF is selected in default.◆MF( ): Set the focus manually.6. Press the [MENU] button to finish setting.◆The icon of selected function is displayed.◆If you select the AF, no icon is displayed.SystemWhite BalanceAutoAutoSizeSizeWhite BalanceAutoBLCOffBLCOffFocus AFPhoto SettingsPhoto Settings1600×12001600×1200Flash AutoFlash AutoSystemWhite BalanceAutoAutoSizeSizeWhite BalanceAutoBLCOffBLCOffFocus MFPhoto SettingsPhoto Settings1600×12001600×1200Flash AutoFlash Auto1600Photo CaptureNotes✤If you select <œ> in the menu, the previous menu appears. ✤Changes in the set-up made in the Video mode are all retained in the Photo mode. ✤The focus is set to AF mode automatically when the CAM is turned off.Adjust the focus using MF [ + ] / [-] button to zoom in or out manually.◆When a picture contains object that are both close and far away from the CAM.◆When a person is enveloped in fog or surrounded by snow.Manual Focus200:00:00 / 00:43:41F / 720iPhotoSTBY00906C SC-M2100 USA~072 7/25/05 4:08 PM Page 68](https://usermanual.wiki/Samsung-Electronics-Co/05MINIMEGA.Users-Manual-2/User-Guide-570668-Page-22.png)
![ENGLISH6969456Photo Mode : Setting Various FunctionsSetting the White BalanceThe White Balance may vary depending on the lighting conditions. The White Balance is used to preserve natural colors under different lighting conditions.1. Move [POWER/MODE Selector] down to turn on the CAM. ◆The Video Record screen appears.2. Move [POWER/MODE Selector] down again to select Photo mode and press the [OK] button. ◆The system is automatically converted into the selected mode in two seconds even when the [OK] button is not pressed.◆The Photo Capture screen appears.3. Press the [MENU] button. 4. Move the [W/T] button to select <White Balance> and press the [√] button. 5. Move the [W/T] button to select the desired setting and press the [OK] button.◆Auto: Adjust the color depending on the condition automatically.◆Hold( ): Record with first selected color without adjusting color.◆Outdoor( ): Record with the balanced light. (Natural light)◆Indoor( ): Record with the balanced light. (Glow lamp, light in the studio or video light)6. Press the [MENU] button to finish setting.◆The icon of selected function is displayed.◆If you select <Auto>, no icon is displayed.SystemAutoSizeSizeWhite BalanceAutoBLCOffBLCOffPhoto SettingsPhoto Settings1600×12001600×1200Flash AutoFlash AutoFocus AFFocus AFSystemAutoSizeSizeWhite BalanceOutdoorBLCOffBLCOffPhoto SettingsPhoto Settings1600×12001600×1200Flash AutoFlash AutoFocus AFFocus AF1600Photo CaptureNotes✤If you select <œ> in the menu, the previous menu appears.✤Changes in the set-up made in the Video mode are all retained in the Photo mode.200:00:00 / 00:43:41F / 720iPhotoSTBY00906C SC-M2100 USA~072 7/25/05 4:08 PM Page 69](https://usermanual.wiki/Samsung-Electronics-Co/05MINIMEGA.Users-Manual-2/User-Guide-570668-Page-23.png)
![ENGLISH7070Photo Mode : Setting Various Functions456SystemAutoSizeSizeBLCOffPhoto SettingsPhoto Settings1600×12001600×1200Flash AutoFlash AutoFocus AFFocus AFWhite BalanceAutoWhite BalanceAutoSystemAutoSizeSizeBLCOnPhoto SettingsPhoto Settings1600×12001600×1200Flash AutoFlash AutoFocus AFFocus AFWhite BalanceAutoWhite BalanceAuto1600Photo CaptureBLCSetting the BLC (Backlight Compensation)The Backlight Compensation function helps to make the subject brighter when the subject is in front of a window or the subject is too dark to distinguish. You can use this function when using the CAM in the bright backgrounds including snow scenes.1. Move [POWER/MODE Selector] down to turn on the CAM. ◆The Video Record screen appears.2. Move [POWER/MODE Selector] down again to select Photo mode and press the [OK] button. ◆The system is automatically converted into the selected mode in two seconds even when the [OK] button is not pressed.◆The Photo Capture screen appears.3. Press the [MENU] button. 4. Move the [W/T] button to select <BLC> and press the [√] button. 5. Move the [W/T] button to select the desired setting and press the [OK] button.◆On( ): Set the BLC function.◆Off: Cancel the BLC function.6. Press the [MENU] button to finish setting.◆< > is displayed.◆If you select <Off>, < > is not displayed. Notes✤If you select <œ> in the menu, the previous menu appears.✤Changes in the set-up made in the Video mode are all retained in the Photo mode.✤< > is set to Off when the CAM is turned off.200:00:00 / 00:43:41F / 720iPhotoSTBY00906C SC-M2100 USA~072 7/25/05 4:08 PM Page 70](https://usermanual.wiki/Samsung-Electronics-Co/05MINIMEGA.Users-Manual-2/User-Guide-570668-Page-24.png)
![ENGLISH7171456SystemAutoPhoto SettingsPhoto SettingsFlash AutoFlash AutoFocus AFFocus AFWhite BalanceAutoWhite BalanceAutoBLCOffBLCOffB.L. Auto CtlOnSystemAutoPhoto SettingsPhoto SettingsFlash AutoFlash AutoFocus AFFocus AFWhite BalanceAutoWhite BalanceAutoBLCOffBLCOffB.L. Auto CtlOn1600Photo CapturePhoto Mode : Setting Various FunctionsSetting the Backlight Auto ControlThis function enables to save power consumption by control the brightness of LCD monitorautomatically in outdoor. 1. Move [POWER/MODE Selector] down to turn on the CAM. ◆The Video Record screen appears.2. Move [POWER/MODE Selector] down again to select Photo mode and press the [OK] button. ◆The system is automatically converted into the selected mode in two seconds even when the [OK] button is not pressed.◆The Photo Capture screen appears.3. Press the [MENU] button. 4. Move the [W/T] button to select <B.L. Auto Ctl> and press the [√] button. 5. Move the [W/T] button to select the desired setting and press the [OK] button.◆On: Set the B.L. Auto Ctl function. ◆Off: Cancel the B.L. Auto Ctl function.6. Press the [MENU] button to finish setting.Notes✤If you select <œ> in the menu, the previous menu appears.✤The captured photo file is not affected by Backlight Auto Control function. 200:00:00 / 00:43:41F / 720iPhotoSTBY00906C SC-M2100 USA~072 7/25/05 4:08 PM Page 71](https://usermanual.wiki/Samsung-Electronics-Co/05MINIMEGA.Users-Manual-2/User-Guide-570668-Page-25.png)
![ENGLISH7373MP3 Mode : Storing Music in the CAMCopying Music files to the CAMNote✤The way of transferring, playing with the Memory Card is same as that of internal memory.You can transfer music files from your PC to the internal memory, SD, MMC, Memory Stick or Memory Stick Pro. For copyingmusic files, the CAM must be connected to your PC with the USB cable. You can also transfer music files from Memory card toCAM directly.1. Connect the CAM to a PC with the USB cable.(Refer to page 106) ◆Your computer recognizes this device and the symbol forremovable drive will appear in ‘My Computer’.2. Move [POWER/MODE Selector] down turn on the CAM.◆The USB Mode screen appears.3. Move the [W/T] button to select <Mass Storage> and press the [OK] button. 4. Double-click the new removable drive to open.5. Select the MP3 folder and double-click to enter.6. Copy the MP3 file you want from PC to the CAM.◆Refer to the folder structure on page 29 for copying MP3 files. After completing the data transfer, you must disconnect the cable in the following way.1. Select the removable disk icon and click the right mouse button to select ‘Safely Remove Hardware’.2. Select ‘Stop’ and disconnect the USB cable when the pop-up screen disappears.Disconnecting USB Connection00906C SC-M2100 USA~089 7/25/05 4:08 PM Page 73](https://usermanual.wiki/Samsung-Electronics-Co/05MINIMEGA.Users-Manual-2/User-Guide-570668-Page-27.png)
![ENGLISH7474345MP3 Mode : PlayingPlaying Music filesYou can hear the music file in internal memory or external memory(Memory Card).1. Connect the earphones to the CAM.◆You can also hear the music from the Built-in speaker without the earphones.2. Move [POWER/MODE Selector] down to turn on the CAM. ◆The Video Record screen appears.3. Move [POWER/MODE Selector] down again to select MP3 mode and press the [OK] button.◆The system is automatically converted into the selected mode in two seconds even when the [OK] button is not pressed.◆The music list appears.4. Move the [W/T] button to find the music you want to hear and press the [OK] button.◆The selected music is played.5. Press the [OK] button again to stop hearing music.◆Each time you press the [OK] button, play or pause is selected repeatedly.black or white.mp3What a wonderful world.mp3MP3 PlayLet it be.mp3MusicI believe I can fly.mp3I believe I can fly.mp3Stereo 44.1KHz 128Kbps00:00:34 / 00:03:46MP3 PlayNotes✤‘----’ is displayed depending on the title of MP3 file.✤In MP3 playback mode, a file name may not be displayed correctly.In this case, rename the file name using English alphabets only.✤Press the [œ] buttonWithin 2 seconds after starting playback - Previous file plays.2 seconds after starting playback - Current file starts again.✤Press the [√] buttonThe next file appears.The use of [œ/√]button200:00:16 / 00:43:2500906C SC-M2100 USA~089 7/25/05 4:08 PM Page 74](https://usermanual.wiki/Samsung-Electronics-Co/05MINIMEGA.Users-Manual-2/User-Guide-570668-Page-28.png)
![ENGLISH7575356MP3 Mode : Selecting Play OptionsSetting Repeat PlayYou can play the only one or all music repeatedly.1. Connect the earphones to the CAM.◆You can also hear the music from the Built-in speaker without the earphones.2. Move [POWER/MODE Selector] down to turn on the CAM. ◆The Video Record screen appears.3. Move [POWER/MODE Selector] down again to select MP3 mode and pressthe [OK] button.◆The system is automatically converted into the selected mode in two seconds even when the [OK] button is not pressed.◆The music list appears. 4. Move the [W/T] button to select a MP3 file want to repeat.5. Press the [MENU] button. Move the [W/T] button to select <Repeat >and press the [OK] button.6. Move the [W/T] button to select desired setting and press the [OK] button.◆No: Cancel the Repeat Play function.◆One: One file is repeated. ◆All: All files are repeated.7. Press the [MENU] button to finish setting.◆The icon of the selected Repeat Play setting is displayed on the LCD monitor. If you select <No>, no icon is displayed. black or white.mp3What a wonderful world.mp3MP3 PlayLet it be.mp3MusicI believe I can fly.mp3black or white.mp3What a wonderful world.mp3Let it be.mp3I believe I can fly.mp3LockRandomRepeatDeleteCopy ToMP3 PlayMP3 PlayNoOneAllAre you sure you want to repeat play?black or white.mp3What a wonderful world.mp3MP3 PlayLet it be.mp3MusicI believe I can fly.mp3ONERNote✤If you select <œ> in the menu, the previous menu appears.00906C SC-M2100 USA~089 7/25/05 4:08 PM Page 75](https://usermanual.wiki/Samsung-Electronics-Co/05MINIMEGA.Users-Manual-2/User-Guide-570668-Page-29.png)
![ENGLISH7676345MP3 Mode : Selecting File OptionsDeleting Music filesYou can delete the music file you want.1. Move [POWER/MODE Selector] down to turn on the CAM. ◆The Video Record screen appears.2. Move [POWER/MODE Selector] down again to select MP3 mode and press the [OK] button. ◆The system is automatically converted into the selected mode in two seconds even when the [OK] button is not pressed.◆The music list appears.3. Move the [W/T] button to select a MP3 file you want to delete.4. Press the [MENU] button. Move the [W/T] button to select <Delete> and press the [OK] button. 5. Move the [W/T] button to select the followings and press the [OK] button.◆Selected: The selected music file is deleted.◆All: All music files are deleted. ◆Cancel: Cancel deleting music files.black or white.mp3What a wonderful world.mp3MP3 PlayLet it be.mp3MusicI believe I can fly.mp3black or white.mp3What a wonderful world.mp3Let it be.mp3I believe i can fly.mp3LockRandomRepeatDeleteCopy ToMP3 PlayMP3 PlaySelectedAllCancelAre you sure you want to delete selected file?Notes✤If you select <œ> in the menu, the previous menu appears.✤The locked file can not be deleted. 200906C SC-M2100 USA~089 7/25/05 4:08 PM Page 76](https://usermanual.wiki/Samsung-Electronics-Co/05MINIMEGA.Users-Manual-2/User-Guide-570668-Page-30.png)
![ENGLISH7777345MP3 Mode : Selecting File OptionsLocking Music filesYou can lock the important music file not to be deleted.1. Move [POWER/MODE Selector] down to turn on the CAM. ◆The Video Record screen appears.2. Move [POWER/MODE Selector] down again to select MP3 mode and pressthe [OK] button.◆The system is automatically converted into the selected mode in two seconds evenwhen the [OK] button is not pressed.◆The music list appears.3. Move the [W/T] button to select a MP3 file you want to lock. 4. Press the [MENU] button. Move the [W/T] button to select <Lock> and press the [OK] button. 5. Move the [W/T] button to select the followings and press the [OK] button.◆Selected: The selected music file is locked.◆All: All music files are locked. ◆Cancel: Cancel locking music files.black or white.mp3What a wonderful world.mp3MP3 PlayLet it be.mp3MusicI believe I can fly.mp3black or white.mp3What a wonderful world.mp3Let it be.mp3I believe I can fly.mp3LockRandomRepeatDeleteCopy ToMP3 PlayMP3 PlaySelectedAllCancelChoose the file(s) you would like to lock.Notes✤If you select <œ> in the menu, the previous menu appears.✤The < > icon is displayed on the locked file.200906C SC-M2100 USA~089 7/25/05 4:08 PM Page 77](https://usermanual.wiki/Samsung-Electronics-Co/05MINIMEGA.Users-Manual-2/User-Guide-570668-Page-31.png)
![ENGLISH7878345MP3 Mode : Selecting File OptionsCopying Music filesYou can copy the music file to the internal or external memory.Insert the Memory Card into the MULTI CARD slot.1. Move [POWER/MODE Selector] down to turn on the CAM. ◆The Video Record screen appears.2. Move [POWER/MODE Selector] down again to select MP3 mode and pressthe [OK] button.◆The system is automatically converted into the selected mode in two seconds even when the [OK] button is not pressed.◆The music list appears.3. Move the [W/T] button to select a MP3 file you want to copy. 4. Press the [MENU] button. Move the [W/T] button to select <Copy To> andpress the [OK] button. ◆If you selected the Storage type ‘External’, the file is copied to ‘Internal’and vice versa.5. Move the [W/T] button to select the followings and press the [OK] button.◆Selected: Copy the selected music file.◆All: Copy all music files. ◆Cancel: Cancel copying music files.black or white.mp3What a wonderful world.mp3MP3 PlayLet it be.mp3MusicI believe I can fly.mp3black or white.mp3What a wonderful world.mp3Let it be.mp3I believe I can fly.mp3LockRandomRepeatDeleteCopy ToMP3 PlayMP3 PlaySelectedAllCancelChoose the file(s) to copyto External memory?Notes✤If you select <œ> in the menu, the previous menu appears. ✤When copying, make sure to check the Storage Type. (Refer to page 32.) ✤The Storage Type is set to <Internal> by default.200906C SC-M2100 USA~089 7/25/05 4:08 PM Page 78](https://usermanual.wiki/Samsung-Electronics-Co/05MINIMEGA.Users-Manual-2/User-Guide-570668-Page-32.png)
![ENGLISH7979Setting Random PlayYou can play the music files at random.1. Move [POWER/MODE Selector] down to turn on the CAM. ◆The Video Record screen appears.2. Move [POWER/MODE Selector] down again to select MP3 mode and pressthe [OK] button. ◆The system is automatically converted into the selected mode in two seconds evenwhen the [OK] button is not pressed.◆The music list appears.3. Press the [MENU] button. Move the [W/T] button to select <Random> and press the [OK] button. 4. Move the [W/T] button to select the desired setting, and press the [OK] button.◆Yes: Set the Random Play Function.◆No: Cancel the Random Play Function. MP3 Mode : Selecting File Options234black or white.mp3What a wonderful world.mp3MP3 PlayLet it be.mp3MusicI believe I can fly.mp3black or white.mp3What a wonderful world.mp3Let it be.mp3I believe I can fly.mp3LockRandomRepeatDeleteCopy ToMP3 PlayMP3 PlayYesNoAre you sure want to random play?black or white.mp3What a wonderful world.mp3MP3 PlayLet it be.mp3MusicI believe I can fly.mp300906C SC-M2100 USA~089 7/25/05 4:08 PM Page 79](https://usermanual.wiki/Samsung-Electronics-Co/05MINIMEGA.Users-Manual-2/User-Guide-570668-Page-33.png)
![ENGLISH8080234Voice Recorder Mode : RecordingRecording VoiceYou can record voice using the built-in microphone in the CAM.1. Move [POWER/MODE Selector] down to turn on the CAM. ◆The Video Record screen appears.2. Move [POWER/MODE Selector] down again to select Voice Recorder mode and press the [OK] button. ◆The system is automatically converted into the selected mode in two seconds evenwhen the [OK] button is not pressed.◆The Voice Record screen appears.3. Press the [Record/Stop] button to record voice.◆The elapsed time and <●REC> is displayed. It starts recording.4. Press the [Record/Stop] button to stop recording voice.◆<■STBY > is displayed and it stops recording. 00:00:00 / 00:43:41F / 720iSTBYVoice RecorderVoice Record2 2005/01/01 12:51:04Stereo 8KHz 64Kbps00:01:06 / 07:43:17RECAMVoice Record3 Stereo 8KHz 64Kbps00:01:06 / 07:43:17STBY100906C SC-M2100 USA~089 7/25/05 4:08 PM Page 80](https://usermanual.wiki/Samsung-Electronics-Co/05MINIMEGA.Users-Manual-2/User-Guide-570668-Page-34.png)
![ENGLISH8181245Voice Recorder Mode : PlayingPlaying Voice filesYou can hear the voice file using the built-in speaker or connecting earphones.1. Move [POWER/MODE Selector] down to turn on the CAM. ◆The Video Record screen appears.2. Move [POWER/MODE Selector] down again to select Voice Recorder modeand press the [OK] button. ◆The system is automatically converted into the selected mode in two seconds evenwhen the [OK] button is not pressed.◆The Voice Record screen appears. 3. Press the [OK] button. ◆The voice file list appears. 4. Move the [W/T] button to select a voice file you want to play. 5. Press the [OK] button to play the recorded voice. ◆Press the [OK] button to pause playing. 00:00:00 / 00:43:41F / 720iSTBYVoice Recorder1 2005/01/01 12:22:00 2 2005/01/02 01:23:00 3 2005/01/03 05:39:00 4 2005/01/07 07:13:00 5 2005/01/07 11:54:00 Voice PlayAMAMAMAMAMVoice Play2 2005/01/02 01:23:005.0 KbytesStereo 8KHz 64Kbps00:00:12/00:05:12AM[OK] button: Play or pause the voice file[œ] button : Reverse searching / Move to previous file[√] button : Forward searching / Move to next fileThe button you use when playing the recorded voice file00906C SC-M2100 USA~089 7/25/05 4:09 PM Page 81](https://usermanual.wiki/Samsung-Electronics-Co/05MINIMEGA.Users-Manual-2/User-Guide-570668-Page-35.png)
![ENGLISH8282456Voice Recorder Mode : Selecting File OptionsDeleting Voice filesYou can delete voice files you want.1. Move [POWER/MODE Selector] down to turn on the CAM. ◆The Video Record screen appears.2. Move [POWER/MODE Selector] down again to select Voice Recorder mode and press the [OK] button. ◆The system is automatically converted into the selected mode in two seconds even when the [OK] button is not pressed.◆The Voice Record screen appears. 3. Press the [OK] button. ◆The voice file list appears. 4. Move the [W/T] button to select a voice file you want to delete.5. Press the [MENU] button. Move the [W/T] button to select <Delete> and press the [OK] button. 6. Move the [W/T] button to select the followings and press the [OK] button.◆Selected: The selected voice file is deleted.◆All: All voice files are deleted. ◆Cancel: Cancel deleting voice files.1 2005/01/01 12:22:00 2 2005/01/02 01:23:00 3 2005/01/03 05:39:00 4 2005/01/07 07:13:00 5 2005/01/07 11:54:00 Voice PlayAMAMAMAMAM1 2005/01/01 12:22:00 2 2005/01/02 01:23:00 3 2005/01/03 05:39:00 4 2005/01/07 07:13:00 5 2005/01/07 11:54:00 Voice PlayAMAMAMAMAMLockDeleteCopy To3 2005/01/034 2005/01/075 2005/01/07 11:54:00 Voice PlaySelectedAllCancelAre you sure you want todelete selected file?Notes✤If you select <œ> in the menu, the previous menu appears.✤The locked file can not be deleted. 200:00:00 / 00:43:41F / 720iSTBYVoice Recorder00906C SC-M2100 USA~089 7/25/05 4:09 PM Page 82](https://usermanual.wiki/Samsung-Electronics-Co/05MINIMEGA.Users-Manual-2/User-Guide-570668-Page-36.png)
![ENGLISH8383456Voice Recorder Mode : Selecting File OptionsLocking Voice filesYou can lock the important voice file not to be deleted.1. Move [POWER/MODE Selector] down to turn on the CAM. ◆The Video Record screen appears.2. Move [POWER/MODE Selector] down again to select Voice Recorder mode and press the [OK] button. ◆The system is automatically converted into the selected mode in two seconds even when the [OK] button is not pressed.◆The Voice Record screen appears. 3. Press the [OK] button. ◆The voice file list appears. 4. Move the [W/T] button to select a voice file you want to lock.5. Press the [MENU] button. Move the [W/T] button to select <Lock> and press the [OK] button. 6. Move the [W/T] button to select the followings and press the [OK] button.◆Selected: The selected voice file is locked.◆All: All voice files are locked. ◆Cancel: Cancel locking voice files.1 2005/01/01 12:22:00 2 2005/01/02 01:23:00 3 2005/01/03 05:39:00 4 2005/01/07 07:13:00 5 2005/01/07 11:54:00 Voice PlayAMAMAMAMAM1 2005/01/01 12:22:00 2 2005/01/02 01:23:00 3 2005/01/03 05:39:00 4 2005/01/07 07:13:00 5 2005/01/07 11:54:00 Voice PlayAMAMAMAMAMLockDeleteCopy To1 2005/01/01 12:22:00 2 2005/01/02 01:23:00 3 2005/01/03 05:39:00 4 2005/01/07 07:13:00 5 2005/01/07 11:54:00 Voice PlayAMAMAMAMAMSelectedAllCancelChoose the file(s) you wouldlike to lock.Notes✤If you select <œ> in the menu, the previous menu appears.✤The < > icon is displayed on the locked file.200:00:00 / 00:43:41F / 720iSTBYVoice Recorder00906C SC-M2100 USA~089 7/25/05 4:09 PM Page 83](https://usermanual.wiki/Samsung-Electronics-Co/05MINIMEGA.Users-Manual-2/User-Guide-570668-Page-37.png)
![ENGLISH8484456Voice Recorder Mode : Selecting File OptionsCopying Voice filesYou can copy the voice file to the internal or external memory.1. Move [POWER/MODE Selector] down to turn on the CAM. ◆The Video Record screen appears.2. Move [POWER/MODE Selector] down again to select Voice Recorder mode and press the [OK] button. ◆The system is automatically converted into the selected mode in two seconds even when the [OK] button is not pressed.◆The Voice Record screen appears. 3. Press the [OK] button. ◆The voice file list appears. 4. Move the [W/T] button to select a voice file you want to copy.5. Press the [MENU] button. Move the [W/T] button to select <Copy To> and press the [OK] button. ◆If you selected the Storage type ‘External’, the file is copied to ‘Internal’and vice versa. 6. Move the [W/T] button to select the followings and press the [OK] button.◆Selected: Copy the selected voice file.◆All: Copy all voice files. ◆Cancel: Cancel copying voice files.1 2005/01/01 12:22:00 2 2005/01/02 01:23:00 3 2005/01/03 05:39:00 4 2005/01/07 07:13:00 5 2005/01/07 11:54:00 Voice PlayAMAMAMAMAM1 2005/01/01 12:22:00 2 2005/01/02 01:23:00 3 2005/01/03 05:39:00 4 2005/01/07 07:13:00 5 2005/01/07 11:54:00 Voice PlayAMAMAMAMAMLockDeleteCopy To3 2005/01/034 2005/01/075 2005/01/07 11:54:00 Voice PlayAMSelectedAllCancelChoose the file(s) to copyto External memory?Note✤If you select <œ> in the menu, the previous menu appears.✤If the Memory Card is not inserted, you cannot select <Copy To>. 200:00:00 / 00:43:41F / 720iSTBYVoice Recorder00906C SC-M2100 USA~089 7/25/05 4:09 PM Page 84](https://usermanual.wiki/Samsung-Electronics-Co/05MINIMEGA.Users-Manual-2/User-Guide-570668-Page-38.png)
![ENGLISH85852345Using File BrowserDeleting Files or FoldersYou can delete the file(AVI, MP3, JPG, WAV) or folders you recorded.1. Move [POWER/MODE Selector] down to turn on the CAM. ◆The Video Record screen appears.2. Move [POWER/MODE Selector] down again to select File Browser mode and press the [OK] button. ◆The system is automatically converted into the selected mode in two seconds even when the [OK] button is not pressed.◆The File Browser screen appears. 3. Move the [W/T] button to select the folder or the file you want to delete.Press the [OK] button. ◆Press the [MENU] button if you want to delete the selected folder.◆Perform these steps repeatedly until the file you want to delete appears. 4. Press the [MENU] button. Move the [W/T] button to select <Delete> and press the [OK] button. 5. Move the [W/T] button to select the setting you want. Press the [OK] button.◆Selected: The selected file is deleted.◆All: All files are deleted.◆Cancel: Cancel deleting files.00:00:00 / 00:43:41F / 720iSTBYFile Browser/... / 100SSWAVSWAV0004.WAVSWAV0001.WAVUp One LevelSWAV0002.WAVSWAV0003.WAVUp One Level/... / 100SSWAVSWAV0004.WAVSWAV0001.WAVSWAV0002.WAVSWAV0003.WAVCopy ToLockDelete/... / 100SSWAVSWAV0004.WAVSWAV0001.WAVSWAV0002.WAVSWAV0003.WAVSelectedAllCancelAre you sure you want to delete selected file?Note✤If you select <œ> in the menu, the previous menu appears.00906C SC-M2100 USA~089 7/25/05 4:09 PM Page 85](https://usermanual.wiki/Samsung-Electronics-Co/05MINIMEGA.Users-Manual-2/User-Guide-570668-Page-39.png)
![ENGLISH8686345Using File BrowserLocking FilesYou can lock the important files not to be deleted.1. Move [POWER/MODE Selector] down to turn on the CAM. ◆The Video Record screen appears.2. Move [POWER/MODE Selector] down again to select File Browser mode and press the [OK] button.◆The system is automatically converted into the selected mode in two seconds even when the [OK] button is not pressed. ◆The File Browser screen appears.3. Move the [W/T] button to select the file you want to lock. Press the [OK] button. ◆Perform these steps repeatedly until the file you want to lock appears. 4. Press the [MENU] button. Move the [W/T] button to select <Lock> and press the [OK] button. 5. Move the [W/T] button to select the followings. Press the [OK] button.◆Selected: The selected file is locked.◆All: All files are locked. ◆Cancel: Cancel locking files./... / 100SSWAVSWAV0004.WAVSWAV0001.WAVUp One LevelSWAV0002.WAVSWAV0003.WAVUp One Level/... / 100SSWAVSWAV0004.WAVSWAV0001.WAVSWAV0002.WAVSWAV0003.WAVCopy ToLockDelete/... / 100SSWAVSWAV0004.WAVSWAV0001.WAVSWAV0002.WAVSWAV0003.WAVSelectedAllCancelChoose the file(s) you would like to lock.Notes✤If you select <œ> in the menu, the previous menu appears.✤You can’t lock folders.✤The < > icon is displayed on the locked file.200:00:00 / 00:43:41F / 720iSTBYFile Browser00906C SC-M2100 USA~089 7/25/05 4:09 PM Page 86](https://usermanual.wiki/Samsung-Electronics-Co/05MINIMEGA.Users-Manual-2/User-Guide-570668-Page-40.png)
![ENGLISH8787345Using File BrowserCopying Files or FoldersYou can copy the file or folder to the internal or external memory.1. Move [POWER/MODE Selector] down to turn on the CAM. ◆The Video Record screen appears.2. Move [POWER/MODE Selector] down again to select File Browser mode and press the [OK] button. ◆The system is automatically converted into the selected mode in two seconds even when the [OK] button is not pressed. ◆The File Browser screen appears. 3. Move the [W/T] button to select the file or the folder you want to copy. Press the [OK] button. ◆Press the [MENU] button if you want to copy the selected folder.◆Perform these steps repeatedly until the file you want to copy appears. 4. Press the [MENU] button. Move the [W/T] button to select <Copy To> and press the [OK] button. ◆If you selected the Storage type ‘External’, the file is copied to ‘Internal’and vice versa.5. Move the [W/T] button to select the followings. Press the [OK] button.◆Selected: Copy the selected file.◆All: Copy all files. ◆Cancel: Cancel copying files./... / 100SSWAVSWAV0004.WAVSWAV0001.WAVUp One LevelSWAV0002.WAVSWAV0003.WAVUp One Level/... / 100SSWAVSWAV0004.WAVSWAV0001.WAVSWAV0002.WAVSWAV0003.WAVCopy ToLockDelete/... / 100SSWAVSWAV0004.WAVSWAV0002.WAVSWAV0003.WAVSelectedAllCancelChoose the file(s) to copyto External memory?Notes✤If you select <œ> in the menu, the previous menu appears.✤When copying, make sure to check the Storage Type. (Refer to page 32.) ✤The Storage Type is set to <Internal> by default.200:00:00 / 00:43:41F / 720iSTBYFile Browser00906C SC-M2100 USA~089 7/25/05 4:09 PM Page 87](https://usermanual.wiki/Samsung-Electronics-Co/05MINIMEGA.Users-Manual-2/User-Guide-570668-Page-41.png)
![ENGLISH888834Using File BrowserViewing File InformationYou can see the file name, format, size and date. 1. Move [POWER/MODE Selector] down to turn on the CAM. ◆The Video Record screen appears.2. Move [POWER/MODE Selector] down again to select File Browser mode and press the [OK] button. ◆The system is automatically converted into the selected mode in two seconds even when the [OK] button is not pressed. ◆The File Browser screen appears.3. Move the [W/T] button to select the file you want to see. ◆Perform these steps repeatedly until the file you want to see its file information appears. 4. Press the [OK] button. ◆The screen with file name, format, size, date and locked state appears. 5. Press the [OK] button to finish viewing file information.◆If you select <Close> in the screen, the screen disappears./... / 100SSWAVSWAV0004.WAVSWAV0001.WAVUp One LevelSWAV0002.WAVSWAV0003.WAV/... / 100SSWAVSWAV0004.WAVCloseSWAV0001.WAVSize 95360 bytesDate 2005/01/01 12:39:04 Locked NoAMNotes✤If you select <œ> in the menu, the previous menu appears. ✤You cannot view the folder information. You can view only the file information. 200:00:00 / 00:43:41F / 720iSTBYFile Browser00906C SC-M2100 USA~089 7/25/05 4:09 PM Page 88](https://usermanual.wiki/Samsung-Electronics-Co/05MINIMEGA.Users-Manual-2/User-Guide-570668-Page-42.png)
![ENGLISH9090345Notes✤If you select <œ> in the menu, the previous menu appears.✤A brighter LCD Monitor setting consumes more battery power.✤If it is too bright, adjust the LCD brightness. Setting the CAM : Adjusting the LCD MonitorAdjusting the LCD BrightnessYou can adjust the brightness of the LCD monitor to compensate for ambient lighting conditions.1. Move [POWER/MODE Selector] down to turn on the CAM. ◆The Video Record screen appears.2. Move [POWER/MODE Selector] down again to select System Settings mode and press the [OK] button. ◆The system is automatically converted into the selected mode in two seconds even when the [OK] button is not pressed.◆The System Settings menu appears.3. Move the [W/T] button to select <Display> and press the [√] button. 4. Move the [W/T] button to select <LCD Brightness> and press the [√] button. 5. Move the [W/T] button to select the brightness you want and press the [OK] button. ◆You can adjust value for the LCD brightness between 0~100%.6. Press the [Record/Stop] button to finish setting.MemorySystemSystemDate/TimeDate/TimeSystemMemoryLanguageLanguage EnglishEnglishEnglishDisplaySystem SettingsSystem SettingsSettings: DisplaySettings: DisplaySystemLCD ColorLCD ColorBackBack50 %50 %LCD Brightness20 %Settings: DisplaySettings: DisplaySystemLCD ColorLCD ColorBackBack50 %50 %LCD Brightness10 %200:00:00 / 00:43:41F / 720iSTBYSystem Settings00906C SC-M2100 USA~110 7/25/05 4:10 PM Page 90](https://usermanual.wiki/Samsung-Electronics-Co/05MINIMEGA.Users-Manual-2/User-Guide-570668-Page-44.png)
![ENGLISH9191345Setting the CAM : Adjusting the LCD MonitorAdjusting the LCD ColorYou can adjust the color of the LCD monitor depending on the situation.1. Move [POWER/MODE Selector] down to turn on the CAM. ◆The Video Record screen appears.2. Move [POWER/MODE Selector] down again to select System Settings modeand press the [OK] button. ◆The system is automatically converted into the selected mode in two seconds evenwhen the [OK] button is not pressed.◆The System Settings menu appears.3. Move the [W/T] button to select <Display> and press the [√] button. 4. Move the [W/T] button to select <LCD Color> and press the [√] button. 5. Move the [W/T] button to select the color you want and press the [OK]button. ◆You can adjust value for the LCD color between 0~100%. 6. Press the [Record/Stop] button to finish setting.Note✤If you select <œ> in the menu, the previous menu appears.MemorySystemSystemDate/TimeDate/TimeSystemMemoryLanguageLanguage EnglishEnglishEnglishDisplaySystem SettingsSystem SettingsSettings: DisplaySettings: DisplaySystem20 %20 %50 %LCD ColorBackBackLCD BrightnessLCD Brightness20 %20 %60 %LCD ColorBackBackLCD BrightnessLCD BrightnessSystemSettings : DisplaySettings : Display200:00:00 / 00:43:41F / 720iSTBYSystem Settings00906C SC-M2100 USA~110 7/25/05 4:10 PM Page 91](https://usermanual.wiki/Samsung-Electronics-Co/05MINIMEGA.Users-Manual-2/User-Guide-570668-Page-45.png)
![ENGLISH929235Setting TimeSetting the CAM : Adjusting Date/TimeMemorySystemSystemSystemMemoryLanguageLanguage EnglishEnglishEnglishSystem SettingsSystem SettingsDate/TimeDisplayDisplaySettings: Date/TimeSettings: Date/TimeSystemPress Up/Down to change andOK to confirm selection:12AM00Notes✤If you select <œ> in the menu, the previous menu appears.✤Date and Time are recorded information. They are not displayed on the LCD monitor. 4Settings: Date/TimeSettings: Date/TimeSystemDate FormatDate FormatSet Time 12:00:002005/01/01YY/MM/DDYY/MM/DDTime FormatTime Format 12 Hour12 HourBackBackSet DateAM2005/01/01Set DateThe built-in clock creates the time stamp. You can adjust the time you use.1. Move [POWER/MODE Selector] down to turn on the CAM. ◆The Video Record screen appears.2. Move [POWER/MODE Selector] down again to select System Settings mode and press the [OK] button. ◆The system is automatically converted into the selected mode in two seconds evenwhen the [OK] button is not pressed.◆The System Settings menu appears.3. Move the [W/T] button to select <Date /Time> and press the [√] button. 4. Move the [W/T] button to select <Set Time> and press the [OK] button. 5. Move the [W/T] button to set time and press the [OK] button. ◆Move the [W/T] button to change the setting and press the [√] button to move to thenext setting. Press the [OK] button to confirm selection.6. Press the [Record/Stop] button to finish setting.200:00:00 / 00:43:41F / 720iSTBYSystem Settings00906C SC-M2100 USA~110 7/25/05 4:10 PM Page 92](https://usermanual.wiki/Samsung-Electronics-Co/05MINIMEGA.Users-Manual-2/User-Guide-570668-Page-46.png)
![ENGLISH939345Setting the CAM : Adjusting Date/ TimeSetting DateThe built-in calendar creates the date stamp. You can adjust the date you use.1. Move [POWER/MODE Selector] down to turn on the CAM. ◆The Video Record screen appears.2. Move [POWER/MODE Selector] down again to select System Settings modeand press the [OK] button. ◆The system is automatically converted into the selected mode in two seconds evenwhen the [OK] button is not pressed.◆The System Settings menu appears.3. Move the [W/T] button to select <Date /Time> and press the [√] button. 4. Move the [W/T] button to select <Set Date> and press the [OK] button. 5. Move the [W/T] button to set date and press the [OK] button. ◆Move the [W/T] button to change the setting and press the [√] button to move to thenext setting. Press the [OK] button to confirm selection.6. Press the [Record/Stop] button to finish setting.Settings: Date/TimeSettings: Date/TimeSystemDate FormatDate FormatSet TimeSet Time 12:00:0012:00:002005/01/01YY/MM/DDYY/MM/DDTime FormatTime Format 12 Hour12 HourBackBackSet DateAMSettings: Date/TimeSettings: Date/TimeSystemPress Up/Down to change andOK to confirm selection//2005 11Notes✤If you select <œ> in the menu, the previous menu appears.✤Date and Time are recorded information. They are not displayed on the LCD monitor. ✤You can set Year up to 2037. 3MemorySystemSystemSystemMemoryLanguageLanguage EnglishEnglishEnglishSystem SettingsSystem SettingsDate/TimeDisplayDisplay200:00:00 / 00:43:41F / 720iSTBYSystem Settings00906C SC-M2100 USA~110 7/25/05 4:10 PM Page 93](https://usermanual.wiki/Samsung-Electronics-Co/05MINIMEGA.Users-Manual-2/User-Guide-570668-Page-47.png)
![ENGLISH9494345Setting the CAM : Adjusting Date/TimeSetting Date FormatYou can select the date format to display. 1. Move [POWER/MODE Selector] down to turn on the CAM. ◆The Video Record screen appears.2. Move [POWER/MODE Selector] down again to select System Settings mode and press the [OK] button. ◆The system is automatically converted into the selected mode in two seconds even when the [OK] button is not pressed.◆The System Settings menu appears.3. Move the [W/T] button to select <Date /Time> and press the [√] button. 4. Move the [W/T] button to select <Date Format> and press the [√] button. 5. Move the [W/T] button to set the desired format and press the [OK] button. ◆YY/MM/DD: The date is displayed in order as Year/Month/Date. ◆DD/MM/YY: The date is displayed in order as Date/Month/Year.◆MM/DD/YY: The date is displayed in order as Month/Date/Year. 6. Press the [Record/Stop] button to finish setting.MemorySystemSystemSystemMemoryLanguageLanguage EnglishEnglishEnglishSystem SettingsSystem SettingsDate/TimeDisplayDisplaySettings: Date/TimeSettings: Date/TimeSystemSet TimeSet Time 12:06:1012:06:10YY/MM/DDTime FormatTime Format 12 Hour12 HourBackBackSet DateSet DateAMDate Format2005/01/012005/01/01Settings: Date/TimeSettings: Date/TimeSystemSet TimeSet Time 12:06:1012:06:10YY/MM/DDTime FormatTime Format 12 Hour12 HourBackBackSet DateSet DateAMDate Format2005/01/012005/01/01Note✤If you select <œ> in the menu, the previous menu appears.200:00:00 / 00:43:41F / 720iSTBYSystem Settings00906C SC-M2100 USA~110 7/25/05 4:10 PM Page 94](https://usermanual.wiki/Samsung-Electronics-Co/05MINIMEGA.Users-Manual-2/User-Guide-570668-Page-48.png)
![ENGLISH9595345Setting the CAM : Adjusting Date/ TimeSetting Time FormatYou can select the time format to display. 1. Move [POWER/MODE Selector] down to turn on the CAM. ◆The Video Record screen appears.2. Move [POWER/MODE Selector] down again to select System Settings mode and press the [OK] button. ◆The system is automatically converted into the selected mode in two seconds even when the [OK] button is not pressed.◆The System Settings menu appears.3. Move the [W/T] button to select <Date /Time> and press the [√] button. 4. Move the [W/T] button to select <Time Format> and press the [√] button. 5. Move the [W/T] button to set the desired format and press the [OK] button. ◆12 Hour: The time is displayed as the unit of 12 hours. ◆24 Hour: The time is displayed as the unit of 24 hours. 6. Press the [Record/Stop] button to finish setting.MemorySystemSystemSystemMemoryLanguageLanguage EnglishEnglishEnglishSystem SettingsSystem SettingsDate/TimeDisplayDisplaySettings: Date/TimeSettings: Date/TimeSystemSet TimeSet Time 12:00:0012:00:00YY/MM/DDYY/MM/DDTime Format 12 HourBackBackSet DateSet DateAMDate FormatDate Format2005/01/012005/01/01Settings: Date/TimeSettings: Date/TimeSystemSet TimeSet Time 12:00:0012:00:00YY/MM/DDYY/MM/DDTime Format 24 HourBackBackSet DateSet DateAMDate FormatDate Format2005/01/012005/01/01Note✤If you select <œ> in the menu, the previous menu appears.200:00:00 / 00:43:41F / 720iSTBYSystem Settings00906C SC-M2100 USA~110 7/25/05 4:10 PM Page 95](https://usermanual.wiki/Samsung-Electronics-Co/05MINIMEGA.Users-Manual-2/User-Guide-570668-Page-49.png)
![ENGLISH9696345Setting the CAM : Setting the SystemSetting the Auto Shut offTo save energy or battery, you can set the Auto Shut off function.1. Move [POWER/MODE Selector] down to turn on the CAM. ◆The Video Record screen appears.2. Move [POWER/MODE Selector] down again to select System Settings mode and press the [OK] button. ◆The system is automatically converted into the selected mode in two seconds even when the [OK] button is not pressed.◆The System Settings menu appears.3. Move the [W/T] button to select <System> and press the [√] button. 4. Move the [W/T] button to select <Auto Shut off> and press the [√] button. 5. Move the [W/T] button to set the desired setting and press the [OK] button. ◆5 Minutes: The CAM turns off after 5 minutes.◆Off: Cancel the Auto Shut off function.6. Press the [Record/Stop] button to finish setting.MemorySystemMemoryLanguageLanguage EnglishEnglishEnglishSystem SettingsSystem SettingsDate/TimeDate/TimeDisplayDisplaySystemSystemAuto Shut off 5 MinutesFile No.File No.OffOffStart-upStart-up Video ModeVideo ModeResetResetOnOnBeep SoundBeep SoundDemonstrationDemonstrationSettings : SystemSettings : SystemAuto Shut off OffFile No.File No.OffOffStart-upStart-up Video ModeVideo ModeResetResetOnOnBeep SoundBeep SoundDemonstrationDemonstrationSystemSettings : SystemSettings : SystemNotes✤If you select<œ> in the menu, the previous menu appears.✤ The <Auto Shut off> function cannot be operated if you connect the Power Adapter to the CAM.It can be only operated when you insert battery pack into the CAM.200:00:00 / 00:43:41F / 720iSTBYSystem Settings00906C SC-M2100 USA~110 7/25/05 4:10 PM Page 96](https://usermanual.wiki/Samsung-Electronics-Co/05MINIMEGA.Users-Manual-2/User-Guide-570668-Page-50.png)
![ENGLISH9797Demonstration function will allow you to view all the functions that the CAM supports. Demonstration will run for up to 5 minutes. 1. Move [POWER/MODE Selector] down to turn on the CAM. ◆The Video Record screen appears.2. Move [POWER/MODE Selector] down again to select System Settings mode and press the [OK] button. ◆The system is automatically converted into the selected mode in two seconds even when the [OK] button is not pressed.◆The System Settings menu appears.3. Move the [W/T] button to select <System> and press the [√] button. 4. Move the [W/T] button to select <Demonstration> and press the [√] button. 5. Move the [W/T] button to set the desired setting and press the [OK] button. ◆Off: Cancel the Demonstration function. ◆5 Minutes: Start the Demonstration function in 5 minutes. ◆Play Now: Start the Demonstration function now. 6. Press the [Record/Stop] button to finish setting.345Setting the CAM : Setting the SystemSetting the Demonstration FunctionMemorySystemMemoryLanguageLanguage EnglishEnglishEnglishSystem SettingsSystem SettingsDate/TimeDate/TimeDisplayDisplaySystemAuto Shut offAuto Shut off 5 Minutes5 MinutesFile No.File No.OffStart-upStart-up Video ModeVideo ModeResetResetOnOnBeep SoundBeep SoundDemonstrationSystemSettings : SystemSettings : SystemAuto Shut offAuto Shut off 5 Minutes5 MinutesFile No.File No.Start-upStart-up Video ModeVideo ModeResetResetOnOnBeep SoundBeep SoundDemonstration 5 MinutesSystemSettings : SystemSettings : SystemNotes✤If you select <œ> in the menu, the previous menu appears.✤If you set the Demonstration function, it operates only in Video Record mode. 200:00:00 / 00:43:41F / 720iSTBYSystem Settings00906C SC-M2100 USA~110 7/25/05 4:10 PM Page 97](https://usermanual.wiki/Samsung-Electronics-Co/05MINIMEGA.Users-Manual-2/User-Guide-570668-Page-51.png)
![ENGLISH9898345Setting Start-up ModeYou can select the starting mode displayed when you turn the CAM on. 1. Move [POWER/MODE Selector] down to turn on the CAM. ◆The Video Record screen appears.2. Move [POWER/MODE Selector] down again to select System Settings mode and press the [OK] button. ◆The system is automatically converted into the selected mode in two seconds even when the [OK] button is not pressed.◆The System Settings menu appears.3. Move the [W/T] button to select <System> and press the [√] button. 4. Move the [W/T] button to select <Start-up> and press the [√] button. 5. Move the [W/T] button to set the desired setting and press the [OK] button. ◆Video Mode: The CAM starts up in the Video Mode. ◆Previous Mode: The CAM starts up in the mode you used last. 6. Press the [Record/Stop] button to finish setting.Setting the CAM : Setting the SystemMemorySystemMemoryLanguageLanguage EnglishEnglishEnglishSystem SettingsSystem SettingsDate/TimeDate/TimeDisplayDisplaySystemAuto Shut offAuto Shut off 5 Minutes5 MinutesFile No.File No.OffOffStart-up Video ModeResetResetOnOnBeep SoundBeep SoundDemonstrationDemonstrationSystemSettings : SystemSettings : SystemAuto Shut offAuto Shut off 5 Minutes5 MinutesFile No.File No.OffOffStart-up Previous ModeResetResetOnOnBeep SoundBeep SoundDemonstrationDemonstrationSystemSettings : SystemSettings : SystemNotes✤If you select <œ> in the menu, the previous menu appears.✤Make sure that the start-up mode is set to the selected mode when turning on the CAM again after turnoff.200:00:00 / 00:43:41F / 720iSTBYSystem Settings00906C SC-M2100 USA~110 7/25/05 4:10 PM Page 98](https://usermanual.wiki/Samsung-Electronics-Co/05MINIMEGA.Users-Manual-2/User-Guide-570668-Page-52.png)
![ENGLISH9999You can set the file numbers so that they reset each time Memory Card is formatted, or so that they count up continuously.1. Move [POWER/MODE Selector] down to turn on the CAM. ◆The Video Record screen appears.2. Move [POWER/MODE Selector] down again to select System Settings mode and press the [OK] button. ◆The system is automatically converted into the selected mode in two seconds even when the [OK] button is not pressed.◆The System Settings menu appears.3. Move the [W/T] button to select <System> and press the [√] button. 4. Move the [W/T] button to select <File No.> and press the [√] button. 5. Move the [W/T] button to select the desired setting and press the [OK] button.◆Reset: When the Memory Card is formatted, the file number resets to its default value. (100-0001)◆Series: Numbering is continuous between the Memory Cards, so that the first file number assigned on a new Memory Card is 1 more than the last file number assigned on the previous Memory Card.6. Press the [Record/stop] button to finish setting.Setting the CAM : Setting the System345Setting the File No. FunctionAuto Shut offAuto Shut off 5 Minutes5 MinutesFile No.OffOffStart-upStart-up Video ModeVideo ModeResetOnOnBeep SoundBeep SoundDemonstrationDemonstrationSystemSettings : SystemSettings : SystemAuto Shut offAuto Shut off 5 Minutes5 MinutesFile No.OffOffStart-upStart-up Video ModeVideo ModeSeriesOnOnBeep SoundBeep SoundDemonstrationDemonstrationSystemSettings : SystemSettings : SystemNotes✤If you select <œ> in the menu, the previous menu appears.✤When you set file number to ‘Series’, each file is assigned a different number avoidingduplication of numbers. It is convenient when you want to manage your files on a PC. MemorySystemMemoryLanguageLanguage EnglishEnglishEnglishSystem SettingsSystem SettingsDate/TimeDate/TimeDisplayDisplaySystem200:00:00 / 00:43:41F / 720iSTBYSystem Settings00906C SC-M2100 USA~110 7/25/05 4:10 PM Page 99](https://usermanual.wiki/Samsung-Electronics-Co/05MINIMEGA.Users-Manual-2/User-Guide-570668-Page-53.png)
![ENGLISH100100345Setting the CAM : Setting the SystemSetting the Beep SoundYou can set the beep sound on/off. When on, a beep will sound every time a button is pressed.1. Move [POWER/MODE Selector] down to turn on the CAM. ◆The Video Record screen appears.2. Move [POWER/MODE Selector] down again to select System Settings mode and press the [OK] button. ◆The system is automatically converted into the selected mode in two seconds even when the [OK] button is not pressed.◆The System Settings menu appears.3. Move the [W/T] button to select <System> and press the [√] button. 4. Move the [W/T] button to select <Beep Sound> and press the [√] button. 5. Move the [W/T] button to select the desired sound and press the [OK] button.◆On: Turn the beep sound on.◆Off: Turn the beep sound off.6. Press the [Record/stop] button to finish setting.MemorySystemMemoryLanguageLanguage EnglishEnglishEnglishSystem SettingsSystem SettingsDate/TimeDate/TimeDisplayDisplaySystemDemonstrationDemonstrationOffOffVideo ModeStart-upStart-up Video ModeFile No. ResetFile No. ResetBeep Sound OnAuto Shut off 5 MinutesAuto Shut off 5 MinutesSystemSettings : SystemSettings : SystemDemonstrationDemonstrationOffOffVideo ModeStart-upStart-up Video ModeFile No. ResetFile No. ResetBeep SoundOffAuto Shut off 5 MinutesAuto Shut off 5 MinutesSystemSettings : SystemSettings : SystemNotes✤If you select <œ> in the menu, the previous menu appears.✤When the earphones or Audio/Video cable is connected to the CAM, the beep sound function does not operate.200:00:00 / 00:43:41F / 720iSTBYSystem Settings00906C SC-M2100 USA~110 7/25/05 4:10 PM Page 100](https://usermanual.wiki/Samsung-Electronics-Co/05MINIMEGA.Users-Manual-2/User-Guide-570668-Page-54.png)
![ENGLISH101101Setting the CAM : Setting the SystemViewing Version InformationYou can see the information of the version.1. Move [POWER/MODE Selector] down to turn on the CAM. ◆The Video Record screen appears.2. Move [POWER/MODE Selector] down again to select System Settings mode and press the [OK] button. ◆The system is automatically converted into the selected mode in two seconds even when the [OK] button is not pressed.◆The System Settings menu appears.3. Move the [W/T] button to select <System> and press the [√] button. 4. Move the [W/T] button to select <Version Info> and press the [OK] button.◆The version of the CAM is displayed. 5. Press the [Record/stop] button to finish viewing version information.34MemorySystemMemoryLanguageLanguage EnglishEnglishEnglishSystem SettingsSystem SettingsDate/TimeDate/TimeDisplayDisplaySystemDemonstrationSystemDemonstrationOffOffVideo ModeStart-upStart-up Video ModeFile No. ResetFile No. ResetVersion InfoBeep Sound On On Beep SoundSettings : SystemSettings : SystemSystemCloseSamsung Elec. Co. LTDPR818S S/W 0.50Jul 02 2005 20:29:11Micom 0.39Jul 01 2005 22:13:27 PRDSP 0.00Settings : SystemSettings : SystemNote✤If you select <œ> in the menu, the previous menu appears.200:00:00 / 00:43:41F / 720iSTBYSystem Settings00906C SC-M2100 USA~110 7/25/05 4:10 PM Page 101](https://usermanual.wiki/Samsung-Electronics-Co/05MINIMEGA.Users-Manual-2/User-Guide-570668-Page-55.png)
![ENGLISH102102Select the storage type(internal or external memory) before recording or taking pictures.1. Move [POWER/MODE Selector] down to turn on the CAM. ◆The Video Record screen appears.2. Move [POWER/MODE Selector] down again to select System Settings mode and press the [OK] button. ◆The system is automatically converted into the selected mode in two seconds evenwhen the [OK] button is not pressed.◆The System Settings menu appears.3. Move the [W/T] button to select <Memory> and press the [√] button. ◆If you didn’t insert Memory Card, you cannot select ‘External’.4. Move the [W/T] button to select <Storage Type> and press the [√] button. 5. Move the [W/T] button to select the desired setting andpress the [OK] button.◆Internal: The video, photo, mp3 file or voice file is stored in internal memory.◆External: The video, photo, mp3 file or voice file is stored in external memory Card(SD, MMC, Memory stick or Memory stick pro).345Selecting the Storage TypeSetting the CAM : Setting MemorySystemDate/TimeDate/TimeLanguageLanguage EnglishEnglishEnglishDisplaySystem SettingsSystem SettingsSystemDisplayMemorySystemMemory SpaceFormatStorage Type InternalFormatInternalInternalMemory Space778MB/983MB778MB/983MBBackBackSystemSettings : MemorySettings : MemoryMemory SpaceFormatSystemStorage Type External FormatInternalInternalMemory Space778MB/983MB778MB/983MBBackBackSettings : MemorySettings : MemoryNotes✤If you select <œ> in the menu, the previous menu appears.✤‘Internal’ is selected by default.✤If you insert the Memory Card when the CAM on, the pop-up screen about the memory type selectionappears automatically.✤If you selected the Storage type ‘External’, the file is copied to ‘Internal’ and vice versa.✤The maximum recording time and capacity and the number of images is subject to change dependingon the media. (Refer to pages 30~31.)200:00:00 / 00:43:41F / 720iSTBYSystem Settings00906C SC-M2100 USA~110 7/25/05 4:10 PM Page 102](https://usermanual.wiki/Samsung-Electronics-Co/05MINIMEGA.Users-Manual-2/User-Guide-570668-Page-56.png)
![ENGLISH1031033456Setting the CAM : Setting MemoryFormatting the MemoryYou can format the internal memory and the external memory to erase all files. 1. Move [POWER/MODE Selector] down to turn on the CAM. ◆The Video Record screen appears.2. Move [POWER/MODE Selector] down again to select System Settings mode and press the [OK] button. ◆The system is automatically converted into the selected mode in two seconds even when the [OK] button is not pressed.◆The System Settings menu appears.3. Move the [W/T] button to select <Memory> and press the [√] button. 4. Move the [W/T] button to select <Format> and press the [√] button. ◆If you didn’t insert Memory Card, you cannot select ‘External’.5. Move the [W/T] button to select the desired setting and press the [OK] button.◆Internal: Format the internal memory. If you select ‘Internal’, the message is displayed to confirm.◆External: Format the external memory. If you select ‘External’, the message is displayed to confirm.6. Press the [OK] button to format.◆Select <Cancel> to cancel formatting.7. Press the [Record/Stop] button to finish setting.SystemDate/TimeDate/TimeLanguageLanguage EnglishEnglishEnglishDisplaySystem SettingsSystem SettingsSystemDisplayMemorySystemMemory SpaceStorage Type InternalMemory Space778MB/983MB778MB/983MBBackBackFormat InternalStorage Type InternalSystemSettings : MemorySettings : MemoryMemory SpaceSystemStorage Type InternalMemory Space778MB/983MB778MB/983MBBackBackFormat ExternalStorage Type InternalSettings : MemorySettings : MemorySystemOKCancel Are you sure you want to format the external memory,all files will be erased?Settings : MemorySettings : MemoryNotes✤If you select <œ> in the menu, the previous menu appears.✤No guarantee can be provided to the memory card not formatted on this CAM. Make sure to format the memory card on the CAM. ✤The former information can not be restored after formatting. 00906C SC-M2100 USA~110 7/25/05 4:10 PM Page 103](https://usermanual.wiki/Samsung-Electronics-Co/05MINIMEGA.Users-Manual-2/User-Guide-570668-Page-57.png)
![ENGLISH104104Setting the CAM : Setting Memory34Viewing Memory SpaceYou can view usable memory space and total memory space of the CAM. 1. Move [POWER/MODE Selector] down to turn on the CAM. ◆The Video Record screen appears.2. Move [POWER/MODE Selector] down again to select System Settings mode and press the [OK] button. ◆The system is automatically converted into the selected mode in two seconds even when the [OK] button is not pressed.◆The System Settings menu appears.3. Move the [W/T] button to select <Memory> and press the [√] button. 4. Move the [W/T] button to select <Memory Space>.◆Usable memory space and total memory space are displayed.5. Press the [Record/stop] button to finish viewing.SystemDate/TimeDate/TimeLanguageLanguage EnglishEnglishEnglishDisplaySystem SettingsSystem SettingsSystemDisplayMemorySystemStorage Type InternalBackBackFormat InternalStorage Type InternalMemory Space 778MB/983MBFormat InternalSystemSettings : MemorySettings : MemoryNotes✤If you select <œ> in the menu, the previous menu appears.✤Memory Space takes the form of 0000MB/0000MB. (SC-M2200S(B) only)200:00:00 / 00:43:41F / 720iSTBYSystem Settings00906C SC-M2100 USA~110 7/25/05 4:10 PM Page 104](https://usermanual.wiki/Samsung-Electronics-Co/05MINIMEGA.Users-Manual-2/User-Guide-570668-Page-58.png)
![ENGLISH105105Setting the CAM : Setting LanguageSelecting Language 34Date/TimeDate/TimeSystemMemorySystemDisplayMemoryDisplayLanguage EnglishSystemSystem SettingsSystem SettingsDate/TimeDate/TimeSystemMemorySystemDisplayMemoryDisplayLanguage NederlandsSystemSystem SettingsSystem SettingsYou can select the desired language to display the menu screen and the messages.1. Move [POWER/MODE Selector] down to turn on the CAM. ◆The Video Record screen appears.2. Move [POWER/MODE Selector] down again to select System Settings mode and press the [OK] button. ◆The system is automatically converted into the selected mode in two seconds even when the [OK] button is not pressed.◆The System Settings menu appears.3. Move the [W/T] button to select <Language> and press the [√] button. 4. Move the [W/T] button to select the desired setting and press the [OK] button. ◆/ / Iran / Arab / Magyar / ‰‰∑∑¬¬/ ì͇ªÌҸ͇ / Svenska / English / Español /Français / Português / Deutsch / Italiano / Nederlands / Polski / PÛÒÒÍËÈ5. Press the [Record/Stop] button to finish setting. Note✤If you select <œ> in the menu, the previous menu appears. 200:00:00 / 00:43:41F / 720iSTBYSystem Settings00906C SC-M2100 USA~110 7/25/05 4:10 PM Page 105](https://usermanual.wiki/Samsung-Electronics-Co/05MINIMEGA.Users-Manual-2/User-Guide-570668-Page-59.png)
![ENGLISH106106Setting the CAM : Using USB Mode1. Connect the CAM to the PC with the USB cable. 2. Move [POWER/MODE Selector] down to turn on theCAM.◆USB mode screen appears automatically.3. Move the [W/T] button to select <Mass Storage> and press the [OK] button.◆Your PC doesn't recognise the USB device automatically. You may install the USB Driver manually on Windows 98SEoperating system.4. Disconnect the USB cable if you finish storing.USB ModePictBridgeMass StoragePC-CamNotes✤If you disconnect the USB cable from the PC or the CAM during the data transfer, the data transfer will stop and the data may be damaged.✤If you connect the USB cable to a PC using a USB HUB or with other device at the same time, it might cause conflict and may not workproperly. If this occurs, remove all other devices and try the connection again.✤It takes about 30 minutes if you download or upload the file of 1GB by connecting the USB cable.Storing Files to the External Memory00906C SC-M2100 USA~110 7/25/05 4:10 PM Page 106](https://usermanual.wiki/Samsung-Electronics-Co/05MINIMEGA.Users-Manual-2/User-Guide-570668-Page-60.png)
![ENGLISH107107USB Speed depending on the System System EnvironmentHigh Speed USB is not guaranteed except for Microsoft(Windows) or Apple(Mac OS X) or supplied Driver.✤Windows 98SE/ME: Full Speed USB ✤Windows 2000: Over Service Pack 4 - High Speed USB ✤Windows XP: Over Service Pack 1 - High Speed USB✤Mac OS X: Over 10.3 - High Speed USBSetting the CAM : Using USB ModeNotes✤Not all PCs configured with the above environment are guaranteed to operate properly.✤PCs used via a USB hub or with a USB card are out of the scope of guarantee.✤If your OS is Windows 2000/XP, log in as the [Administrator(administrator of the PC)] (or a user with the equivalent privileges) to install the OS.✤If the capacity of PC is low, the video file may not be played normally or the file is often stopped. ✤If the capacity of PC is low, it may take long time to edit the video file. Pentium III, 600MHzWindows 98SE/ME128MB200MB(For applications only. Apart from this, 1GB or more free space 800x600 dots 16-bit colorUSB 1.1CPUOSMemoryFree space on the hard diskDisplay ResolutionUSBPentium 4, 2GHzWindows 2000/XP512MB or above2GB or above1024x768 dots 24-bit colorUSB 2.0 High SpeedMinimum RecommendedG3 500MHzMac OS 10.2128MB200MB(For applications only.Apart from this, 1GB or more free space800x600 dots 16-bit colorUSB 1.1G4 ProcessorMac OS 10.3512MB or above2GB or above1024x768 dots 24-bit colorUSB 2.0 High SpeedMinimum RecommendedWindows Environment Macintosh Environment00906C SC-M2100 USA~110 7/25/05 4:10 PM Page 107](https://usermanual.wiki/Samsung-Electronics-Co/05MINIMEGA.Users-Manual-2/User-Guide-570668-Page-61.png)
![ENGLISH108108Setting the CAM : Using USB ModeUsing PC CamYou can use this the CAM as a PC camera for video chatting, video conference and other PC camera applications.1. Connect the CAM to the PC with the USB cable. 2. Move [POWER/MODE Selector] down to turn on the CAM.◆USB mode screen appears automatically.3. Move the [W/T] button to select <PC-Cam> and press the [OK] button.◆The CAM can be used as a PC Camera for programmes such as Windows Messenger.Notes✤The CAM can be used as a PC Camera for programmes such as Windows Messenger. The use of the PC Cam varies depending on the Software. Refer to the documentation of the respective software products.✤PC-Cam function is operated as ‘Full Speed’ in the capacity of Windows ME or over.23USB ModePictBridgeMass StoragePC-CamUSB ModePictBridgeMass StoragePC-Cam00906C SC-M2100 USA~110 7/25/05 4:10 PM Page 108](https://usermanual.wiki/Samsung-Electronics-Co/05MINIMEGA.Users-Manual-2/User-Guide-570668-Page-62.png)
![ENGLISH109109Setting the CAM : Using USB ModeConnecting the CAM to a PrinterBy connecting the CAM to printers with PictBridge support (sold separately), you can send imagesfrom the internal memory or external memory (SD, MMC, Memory Stick or Memory Stick Pro)directly to the printer with a few simple operations.1. Connect the CAM to the printer with PictBridge support with the USB cable. 2. Move [POWER/MODE Selector] down to turn on the CAM.◆USB mode screen appears automatically.3. Move the [W/T] button to select <PictBridge> and press the [OK] button.4. Move the [W/T] button to select <Date> and press the [√] button.5. Move the [W/T] button to select <On> or <Off> and press the [OK] button.6. Move the [W/T] button to select <Copies> and press the [√] button.7. Move the [W/T] button to select desired number and press the [OK] button.◆You can select the number of copy from 1 to 99.8. Move the [W/T] button to select <Print> and press the [OK] button.Notes✤If you select <œ> in the menu, the previous menu appears.✤If you want to select the next or previous photo, select <Next> or <Previous> using the [W/T] button and press the [OK]button. ✤Refer to the User’s Manual of the printer for more detailed guide on the printing procedures.2345USB ModePictBridgeMass StoragePC-CamUSB ModePictBridgeMass StoragePC-CamPrintNext PhotoPrevious PhotoDate OffCopies 1PictBridge 100-0056PrintNext PhotoPrevious PhotoDate OnCopies 1PictBridge 100-005600906C SC-M2100 USA~110 7/25/05 4:10 PM Page 109](https://usermanual.wiki/Samsung-Electronics-Co/05MINIMEGA.Users-Manual-2/User-Guide-570668-Page-63.png)
![ENGLISH111111Connecting the CAM to TVYou can connect the CAM to a TV set directly to play video files on TV monitor.1. Connect the Audio/Video cable to the Earphones and AV jack of the CAM.2. Connect the Audio/Video cable to the externalinput terminal of your TV set by matching the colors of the terminals.3. Move [POWER/MODE Selector] down to turn onthe CAM.◆The Video Record screen appears.4. Press the [OK] button to play the video file in Video Record mode.5. Move [W/T, œ/√] button to find the video file you want to play.6. Press the [OK] button to play the video file.Notes✤You can stop and play video files using the same button as used for playing video files on the LCD monitor of the CAM. (Refer to pages 38 to 39.)✤If you connect a Mono AV cable to the CAM, the video file cannot be played.✤You can playback the video files and also view the photo files on TV screen. Miscellaneous Information : Connecting the CAM with other DevicesLine InputVIDEO (Y) AUDIO (L)AUDIO (R)00906C SC-M2100 USA~133 7/25/05 4:11 PM Page 111](https://usermanual.wiki/Samsung-Electronics-Co/05MINIMEGA.Users-Manual-2/User-Guide-570668-Page-65.png)
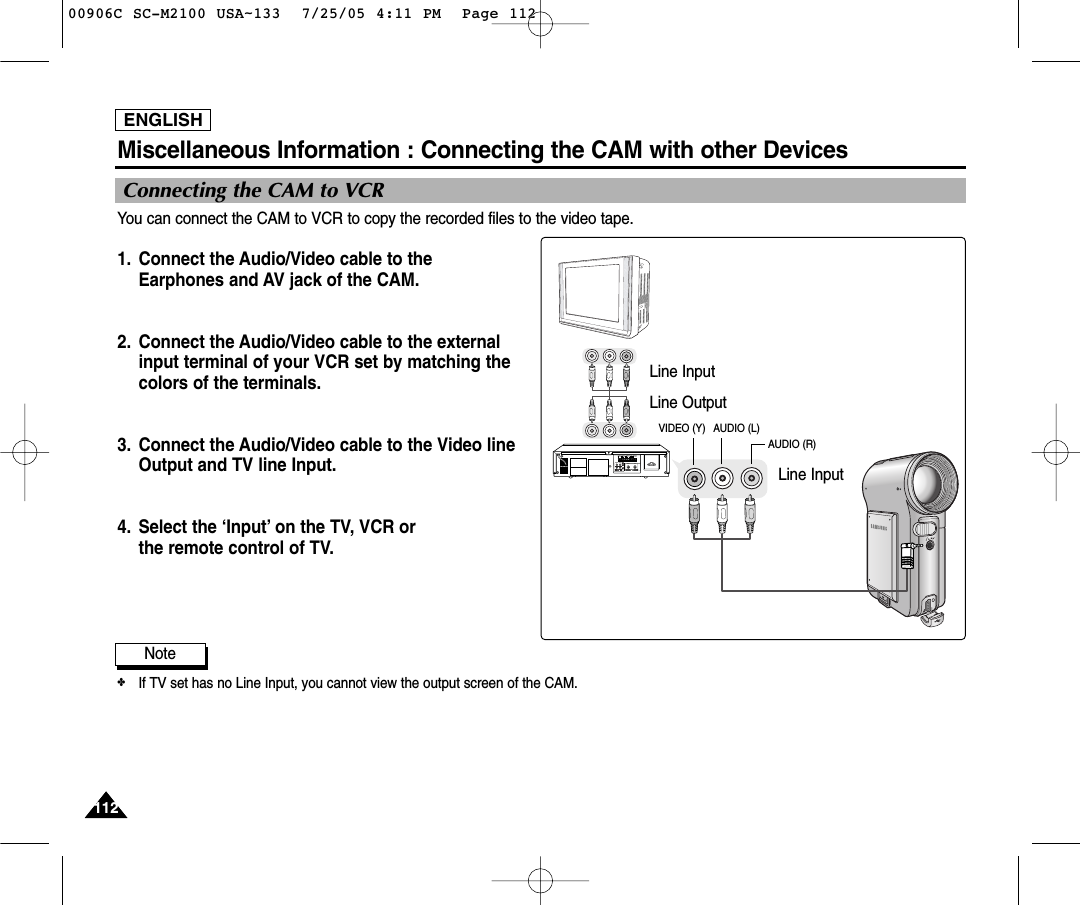
![ENGLISH113113Miscellaneous Information : Connecting the CAM with other DevicesYou can copy your recorded files to a regular blank video tape. Connect the CAM to a VCR using the Audio/Video cable beforerecording. 1. Insert the blank video tape to the VCR and select ‘Line Input’.2. Move [POWER/MODE Selector] down to turn on the CAM. ◆The Video Record Screen appears.3. Press the [OK] button in the Video Record mode and move to Video Play mode. 4. Press the [W] button to move to the Multi-play screen. 5. Move the [W/T, œ/√] button to select the video file you want to copy and press the [OK] button.6. Press the [Record/Stop] button on the VCR to start recording. 7. Press the [OK] button on the CAM to finish copying. Notes✤Refer to operating instructions of your TV or VCR for detailed information on connecting external devices.✤You can stop and play video files using the same button as used for playing video files on the LCD monitor of the CAM. (Refer to pages 38 to 39.)✤If you operate the buttons of the menu when copying, it is copied also. Be careful not to operate the buttons.✤If you press the [DISPLAY] button, you can copy without OSD indicators. Copying Video files to a VCR Tape00906C SC-M2100 USA~133 7/25/05 4:11 PM Page 113](https://usermanual.wiki/Samsung-Electronics-Co/05MINIMEGA.Users-Manual-2/User-Guide-570668-Page-67.png)
![ENGLISH114114You can connect other external digital devices to CAM to record unscrambled contents.1. Connect the Audio/Video cable to theEarphone and AV jack of the CAM.2. Connect the Audio/Video cable to the externaloutput terminal of your digital devices (DVD Player,DVC, etc.) by matching the cable to the colors of theterminals. 3. Move [POWER/MODE Selector] down to turn onthe CAM.◆The Video Record screen appears.4. Press the [MENU] button. Move the [W/T] button to select <Record Mode> and press the [√] button. 5. Move the [W/T] button to select the desired recordmode and press the [OK] button.6. Move the [W/T] button to select <Line In/Out> and press the [√] button. 7. Move the [W/T] button to select <In> and press the [OK] button. 8 Play back the other digital devices.9. Press the [Record/Stop] button of the CAM to start recording.10. To stop recording, press the [Record/Stop] button again.Note✤The quality of an input signal recorded through the Line In terminal cannot be guaranteed unless it comes from digital devices(DVD Player, DVC, etc.).Miscellaneous Information : Connecting the CAM to other DevicesRecording unscramble contents from other digital devicesLine OutputDVDVIDEO (Y) AUDIO (L)AUDIO (R)00906C SC-M2100 USA~133 7/25/05 4:11 PM Page 114](https://usermanual.wiki/Samsung-Electronics-Co/05MINIMEGA.Users-Manual-2/User-Guide-570668-Page-68.png)
![ENGLISH115115You can connect the CAM to a PC that supports USB connections. Use the provided USB cable for connection to a PC.1. Connect the provided USB cable to USB Port of the CAM.2. Move [POWER/MODE Selector] down to turn on theCAM.3. Connect the other side of the USB cable to the USB port of your PC.Miscellaneous Information : Connecting the CAM with other DevicesConnecting the CAM to a PC using the USB cableNote✤If the CAM does not recognise the USB device when the USB cable is connected to USB Port on the front panel of the PC, connectthe USB cable to USB Port on the rear panel of the PC.00906C SC-M2100 USA~133 7/25/05 4:11 PM Page 115](https://usermanual.wiki/Samsung-Electronics-Co/05MINIMEGA.Users-Manual-2/User-Guide-570668-Page-69.png)
![ENGLISH116116Miscellaneous Information : Installing ProgrammesInstalling DV Media Pro 1.0You have to install DV Media Pro 1.0 for playback CAM recorded video files or the transferred data by USB cable on your PC. ■Installing Acrobat ReaderClick ‘Acrobat Reader’ on the Setup screen. - Acrobat Reader programme should be installed to view DV Media Pro User’s Manual. - The DV Media Pro User’s Manual is included on the accompanying CD in Adobe’s Portable Document Format (PDF). (The Acrobat Reader is a freeware product of Adobe Systems. Inc.)1. Turn on your PC. ◆Quit the applications programme you work.2. Insert the programme CD into the CD-ROM drive. ◆The Setup screen appears automatically. ◆If not, press the <Start> button on the left bottom of the PC screen, and select <Run>. If the window of <Run>appears, enter 'D:\autorun.exe' (in case the CD-ROM driver is set to 'D:Drive') and press the [Enter] key. 3. Click ‘DV Driver’ on the Setup screen. ◆The corresponding driver to a PC is installed automatically. - Driver TypeUSB removable Disk Driver (Windows 98SE only) USB PC-CAMERA DriverUSB Streaming Driver (USB Interface for Data Transfer)4. Press <Confirm> to finish installing the programme. 5. Click ‘Video Codec’ to install on the Setup screen. 6. Click ‘DirectX 9.0’ to install on the Setup screen.◆When the installation is finished, the <Restart> appears. If you press [Finish], the PC is restarted. WindowsNotes✤You have to install ‘DV Driver’, ‘Video Codec’ and ‘DirectX 9.0’ to run the programme, DV Media Pro 1.0 properly. ✤Please refer to the User’s Manual inside the CD ROM drive (D:\help) folder for more detailed guide on the installation procedures.✤Use DV Media Pro 1.0 REV4.0 or higher in this product. 00906C SC-M2100 USA~133 7/25/05 4:11 PM Page 116](https://usermanual.wiki/Samsung-Electronics-Co/05MINIMEGA.Users-Manual-2/User-Guide-570668-Page-70.png)
![ENGLISH117117Miscellaneous Information : Installing ProgrammesUSB Interface for Data TransferConnect the CAM and PC with the provided USB cable. You can record the Photo files and Video files in real-time. USBtransferring function can be used when DV Driver, Video Codec, DirectX 9.0 programmes are already installed in the PC. 1. Turn on your PC and insert the programme CD into the CD-ROM drive.◆Quit the applications programme you work. 2. Connect the provided USB cable to the USB port of the CAM. 3. Move the [W/T] button to select <Mass Storage> and press the [OK] button. 4. Install and run the Ulead VIDEO STUDIO programme provided along with the system. The user of WINDOWS ME or XP can use the USB Interface for data transfer with the Windows MovieMaker programme.◆(C:\program files\Movie maker\moviemk.exe)3BackUSB ModePictBridgeMass StoragePC-Cam00906C SC-M2100 USA~133 7/25/05 4:11 PM Page 117](https://usermanual.wiki/Samsung-Electronics-Co/05MINIMEGA.Users-Manual-2/User-Guide-570668-Page-71.png)
![ENGLISH119119Miscellaneous Information : Printing PhotosWith the PictBridge Support, you can control the printer directly through the CAM in order to print out stored pictures.For direct printing of your stored pictures using the PictBridge function, you must connect the CAM to a PictBridge printer using a USB cable.1. Connect the CAM to the PictBridge printer with the USB cable. 2. Move [POWER/MODE Selector] down to turn on the CAM.◆USB mode screen appears automatically.3. Move the [W/T] button to select <PictBridge> and press the [OK] button.4. Move the [W/T] button switch to select <Copies> and press the [OK] button.5. Move the [W/T] button switch to select desired number and press the [OK] button.◆You can select the number of copies from 1 to 99.6. Move the [W/T] button switch to select <Print> and press the [OK] button.BackUSB ModePictBridgeMass StoragePC-CamPrintNext PhotoPrevious PhotoDate OffCopies 5PictBridge100-0024PrintNext PhotoPrevious PhotoDate OffCopies 1PictBridge100-0024Printing with PictBridge FunctionNotes✤If you select <œ> in the menu, the previous menu appears.✤If you want to select the next or previous photo, select <Next> or <Previous> using [W/T] button andpress the [OK] button. ✤For further details about printing photos, refer to the User's manual of the printer.✤Printing may not be performed depending on types of printers.In this case, download JPEG file to the PC directly and print it. 00906C SC-M2100 USA~133 7/25/05 4:11 PM Page 119](https://usermanual.wiki/Samsung-Electronics-Co/05MINIMEGA.Users-Manual-2/User-Guide-570668-Page-73.png)