Samsung Electronics Co 05SAM1 Digital Still Camera User Manual 00934C SC MS10 USA 007
Samsung Electronics Co Ltd Digital Still Camera 00934C SC MS10 USA 007
UserManual.wiki
>
Samsung Electronics Co
>
05SAM1 User Manual
Users Manual
Navigation menu
Upload a User Manual
Namespaces
Wiki Guide
HTML
PDF
Info
Views
User Manual
Discussion / Help
Navigation

![✤Make sure that the following basic accessories are supplied with your device.1. Lithium Ion Battery Pack2. AC Power Adapter3. Audio/Video Cable4. USB Cable5. Software CD6. Hand Strap7. Instruction Book/Quick Guide8. Carrying Case9. Earphones[ Notes ]✤Parts and accessories are available at your local Samsung dealer and service center.✤You can download programs, the latest driver software, and CODECs from the Samsung Electronics webpage.ENGLISH1313Getting to know your Miniket PhotoAccessories Supplied with the Device3. Audio/Video Cable2. AC Power Adapter1. Lithium Ion Battery Pack5. Software CD4. USB Cable8. Carrying Case (Option) 9. Earphones (Option)7. Instruction Book/Quick Guide6. Hand StrapBasic AccessoriesOptional Accessories00934C SC-MS10 USA~037 9/30/05 10:55 AM Page 13](https://usermanual.wiki/Samsung-Electronics-Co/05SAM1/User-Guide-589245-Page-17.png)
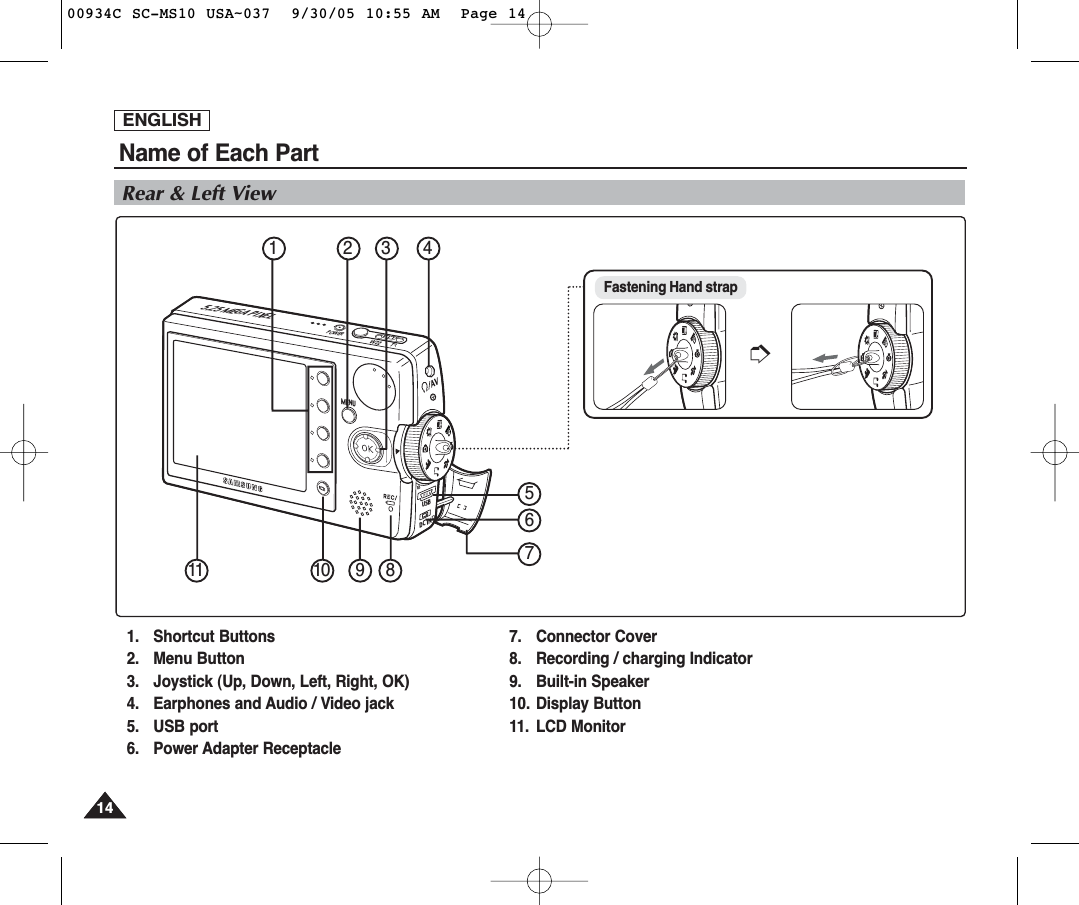
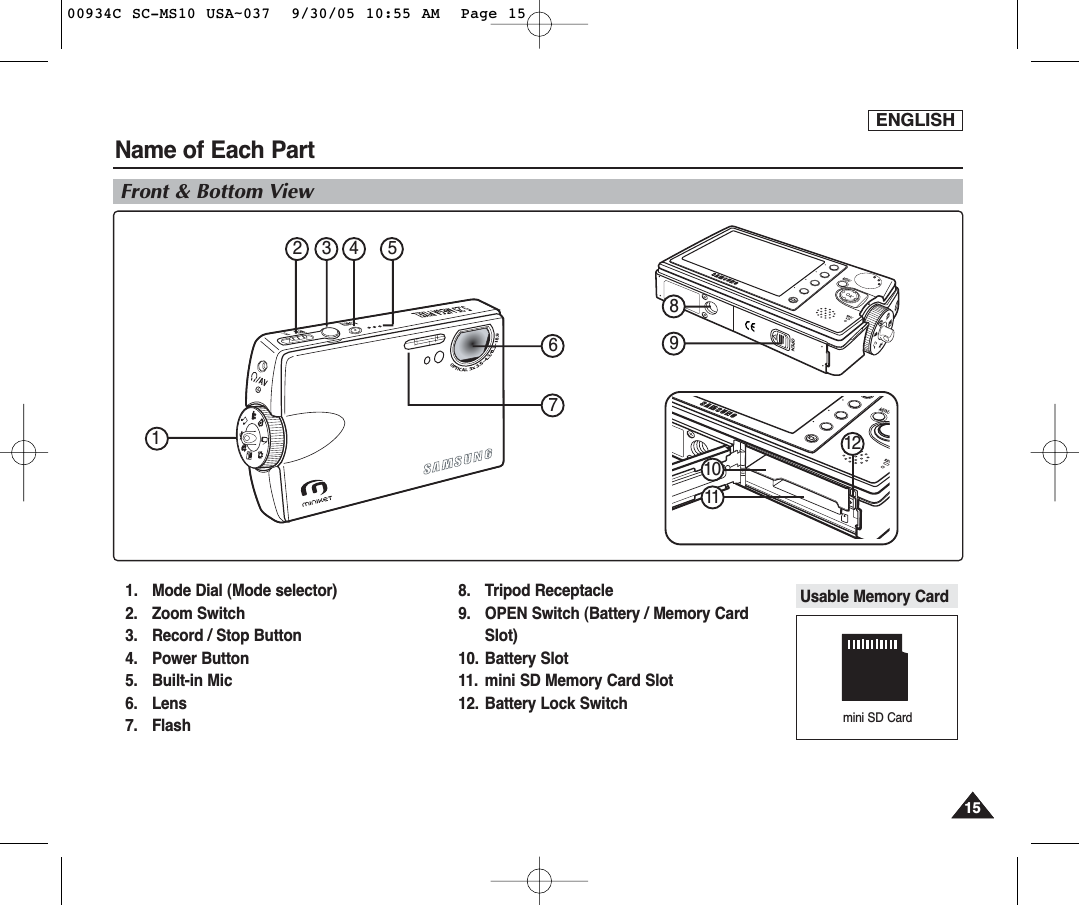
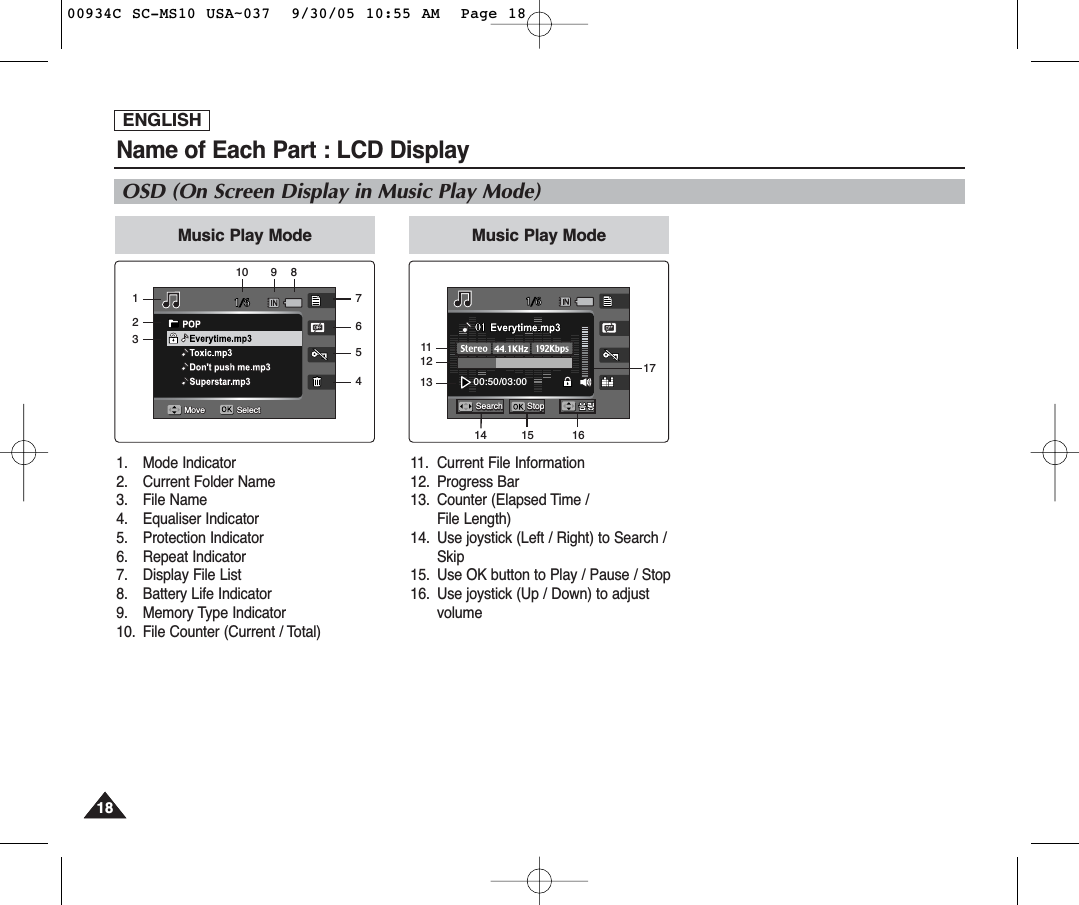
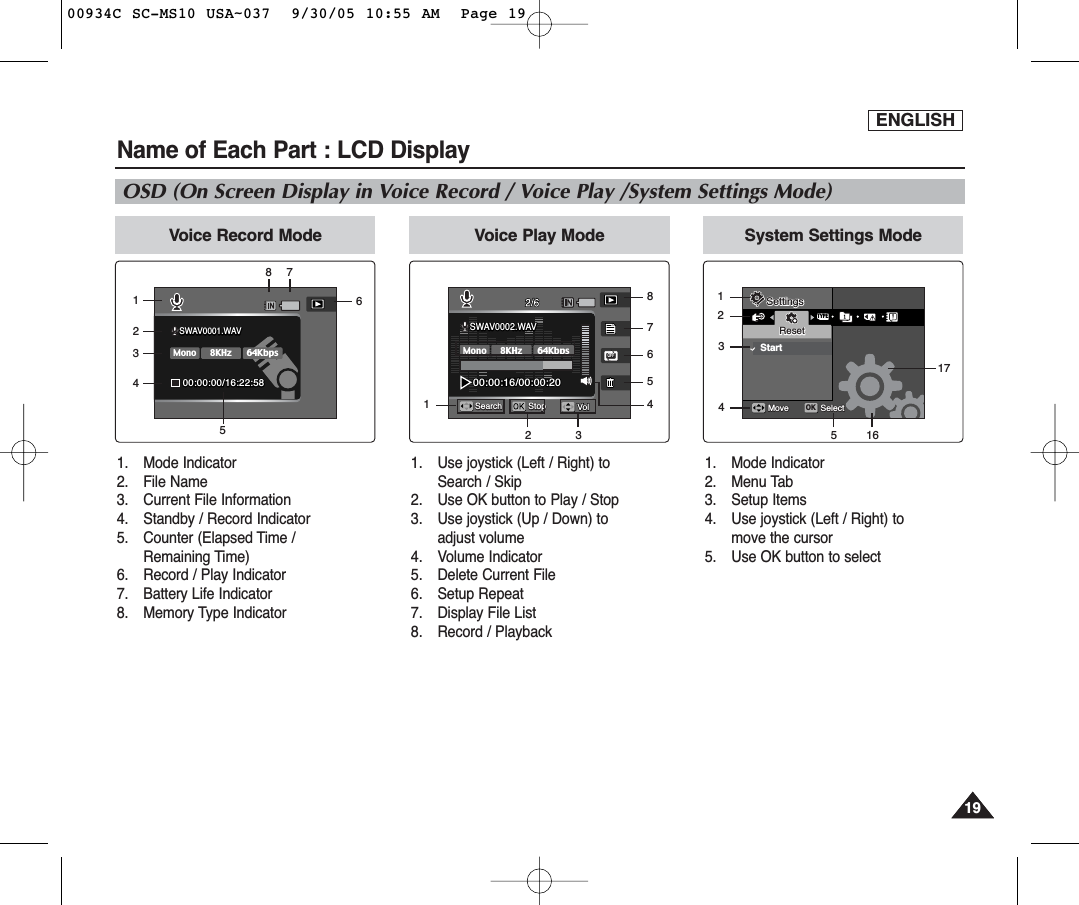
![ENGLISH1616Name of Each Part : LCD DisplayOSD (On Screen Display in Photo Capture Mode/Photo View Mode)Photo Capture Mode1. Mode Indicator2. Image Size Indicator3. Image Quality Indicator4. DIS Image Stabiliser5. White Balance Indicator6. Multi Shot Indicator7. EV Indicator8. Sharpness Indicator9. Digital Effect Indicator10. Date / Time Indicator11. Zoom In / Out Indicator12. Optical Zoom Indicator13. Digital Zoom Indicator14. Flash Indicator15. Record / Play Indicator16. Battery Life Indicator17. Memory type Indicator18. Free Memory Space Indicator19. Metering Mode Indicator20. Scene Mode Indicator1. Mode Indicator2. DPOF Indicator3. Image Number4. Delete Indicator5. Protection Indicator6. Slideshow Indicator7. Record / Play Indicator8. Battery Life Indicator9. Memory Type Indicator10. Image Counter (Current / Total)11. Selected Image12. Use joystick for change selection13. Use OK button to view full screenT2592AISOAUTOEV012:00PM 2005.01.01T13245678910 11131215141617181920Photo View ModeMove Full ViewSlideSlide12365410 9 8 7Photo View ModeMoveMoveFull ViewFull ViewOKSlide1112 13[ Notes ]✤Functions not marked with * will be retained when the device is restarted after turningit off.00934C SC-MS10 USA~037 9/30/05 10:55 AM Page 16](https://usermanual.wiki/Samsung-Electronics-Co/05SAM1/User-Guide-589245-Page-20.png)
![ENGLISH1717Name of Each Part : LCD DisplayOSD (On Screen Display in Movie Record Mode/Movie Play Mode)1. Mode Indicator2. Image Size Indicator3. Image Quality Indicator4. Macro Indicator5. Self Timer Indicator6. Windcut Indicator7. Date / Time Indicator8. Zoom In / Out Indicator9. Digital Effect Indicator10. White Balance Indicator11. Program AE Indicator12. Record / Play Indicator13. Battery Life Indicator14. Memory Type Indicator15. Counter (Elapsed Time)16. Record / Standby Indicator17. Remaining Time Indicator1. Mode Indicator2. Image Number3. Playback Progress Bar4. Counter (Elapsed Time)5. Volume Indicator6. Delete Indicator7. Protection Indicator8. Slideshow Indicator9. Record / Play Indicator10. Battery Life Indicator11. Memory Type Indicator12. Image Counter (Current / Total)13. Standby / Play / Pause IndicatorMovie Record ModeA640REMTSFSFOFFOFF≥Ï»≠AEAUTO4 Min4 MinOFF1 1 112:00PM 2005.01.011223456910111213141516Movie Play Mode100-000100:00:1012139876[ Notes ]✤Functions not marked with * will be retained when the device is restarted after turning itoff.✤The OSD indicators of this product shown above are based on model VP-MS10.✤The OSD indicators are based on when using the internal memory for storage.12 11 107 3 48 500934C SC-MS10 USA~037 9/30/05 10:55 AM Page 17](https://usermanual.wiki/Samsung-Electronics-Co/05SAM1/User-Guide-589245-Page-21.png)
![ENGLISH2020How to Use the Battery PackBattery Pack Installation / EjectionIt is recommended to purchase one or more additional Battery Packs to allow continuous use of your device.Insert the Battery Pack into the battery slot until it clicks.To insert the Battery PackPull the [Battery Eject] button to eject the Battery Pack.To eject the Battery Pack[ Notes ]✤Clean the terminals to remove any foreign substances before inserting the Battery Pack.✤If the device will not be in use for a while, remove the Battery Pack from the device.✤It is recommended to prepare fully charged additional Battery Packs for outdoor use.✤Additional Battery Packs are available at your local Samsung dealer and service center.<Inserting the Battery Pack><Ejecting the Battery Pack>[ Warning ]✤When you eject the Battery Pack from the device, hold the Battery Pack so as not to drop it.MENUOPEN@!MENUMENU➮➮CoverBatteryLock Switch00934C SC-MS10 USA~037 9/30/05 10:55 AM Page 20](https://usermanual.wiki/Samsung-Electronics-Co/05SAM1/User-Guide-589245-Page-24.png)
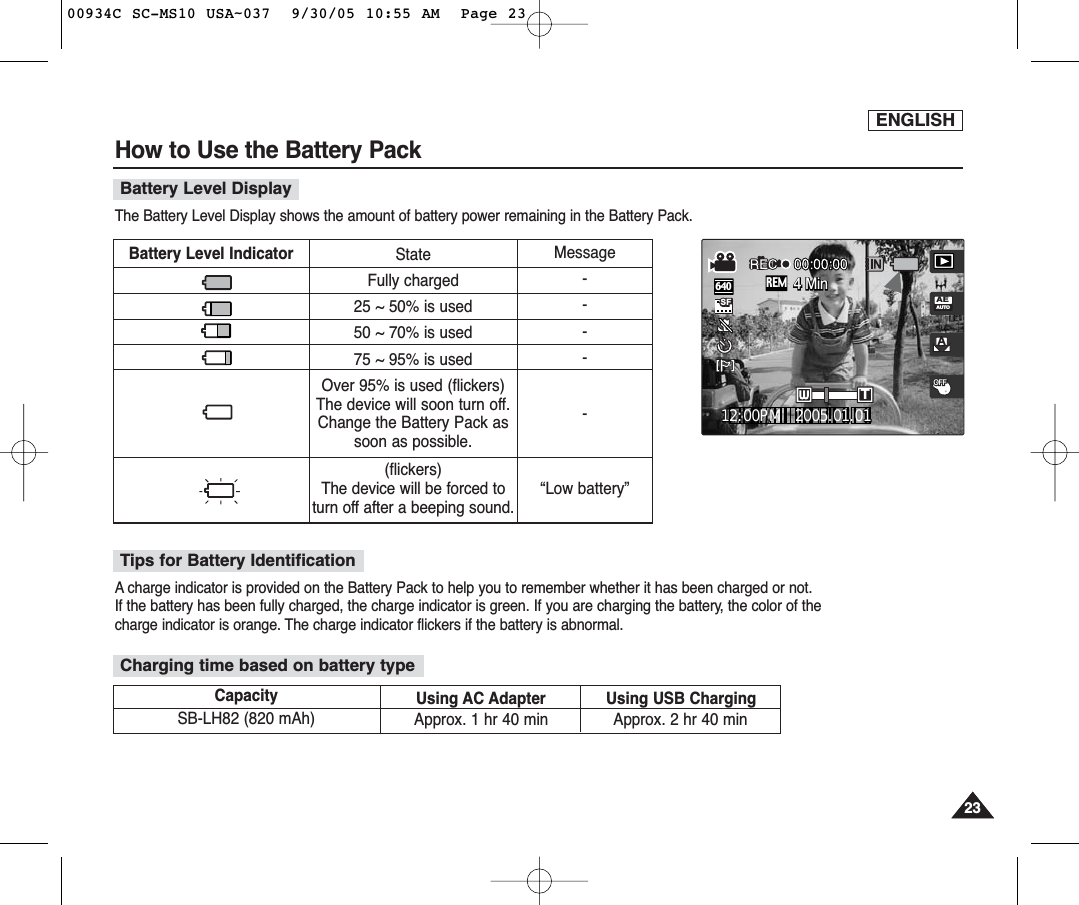
![ENGLISH2222How to Use the Battery Pack[ Notes ]✤It is recommended to prepare fully-charged additional Battery Packs for outdoor use.✤New Battery Packs are available at your local Samsung dealer and service center.✤If you zoom in or out, the recording time becomes shorter.✤The ”Continuous Recording Time” estimated above indicates the time that you record video continuously without using other functions suchas zooming, video playback, or DIS( ) functions.The continuous recording times (for video recording) given in the table below are approximations. Actual recording time depends on usage.Continuous Recording Time Based on Battery TypeSuper Fine (SF) Fine Normal640 x 480320 x 240Approx. 4 MinutesApprox. 7 MinutesApprox. 7 MinutesApprox. 15 MinutesApprox. 15 MinutesApprox. 30 MinutesImage ResolutionImage QualityContinuous Recording TimeLCD On Backlight OffSB-LH82 (820 mAh) Approx. 60 Minutes Approx. 80 MinutesBattery ModelTime00934C SC-MS10 USA~037 9/30/05 10:55 AM Page 22](https://usermanual.wiki/Samsung-Electronics-Co/05SAM1/User-Guide-589245-Page-26.png)
![ENGLISH2424How to Use the Battery PackCharging the Battery Pack1. Turn off the Miniket Photo for a while.2. Attach the Battery Pack to the Miniket Photo.3. Open the Connector Cover of the set.4. Connect the AC Power Adapter with the Miniket Photo.◆You can detach the AC adapter by pressing the buttons on the sides ofthe adapter cable plug while pulling it out.5. Insert the AC Power Adapter into the outlet.[ Notes ]✤You can charge the Battery Pack while using the Miniket Photo, but it t takes arelatively longer time.✤You may use the Miniket Photo powered by the AC Power Adapter indoors whereavailable.✤You may charge your Miniket Photo by connecting it to a PC with the USB cable.[ Warning ]✤It is recommended you fully charge the Battery Pack before use.✤You should only charge the battery in an environment between 32°F (0°C) and 140°F (40°C).✤Ambient temperature may affect charging the Battery Pack; too low temperature may result inlonger charge time / incomplete charging. Adequate room temperature for charging is 10°C ~ 30°C.✤Before connecting the cable, make sure that you don’t have any foreign substances betweenconnectors.It is recommended to fully charge the Battery Pack before use.Charging directly to the Miniket Photo4500934C SC-MS10 USA~037 9/30/05 10:55 AM Page 24](https://usermanual.wiki/Samsung-Electronics-Co/05SAM1/User-Guide-589245-Page-28.png)
![ENGLISH2626Getting StartedBefore You Start Operating the Miniket PhotoBefore using the Miniket Photo, read this page thoroughly for easy operation. The Memory Card is an optional accessory andnot included in the package.1. Install the Battery Pack and insert a Memory Card into the Memory Card slot. (Refer to page 34)2. Charge the Battery Pack by directly connecting the AC Power Adapter to the device. (Refer to page 24)3. Press the [POWER] button to turn on the device.4. Select the desired mode by setting the [Mode Dial].5. Press the [Record / Stop] button to take a picture, start recording video / voice, or play back music.◆To set focus, press the [Record / Stop] button halfway down.6. When finished, press the [POWER] button to turn the device off.[ Notes ]✤You can select Video mode or Previous mode as the start-up mode in System Settings. (Refer to page XX)✤The system automatically switches to the selected mode within two seconds even when the [OK] button is not pressed.00934C SC-MS10 USA~037 9/30/05 10:55 AM Page 26](https://usermanual.wiki/Samsung-Electronics-Co/05SAM1/User-Guide-589245-Page-30.png)
![ENGLISH2828Getting StartedUsing the DISPLAY ButtonUsing the Menu Button1. If you press the [DISPLAY] button once, OSD (On-screenDisplay) indicators and messages will disappear.2. If you press the [DISPLAY] button twice, the backlight willturn off.3. If you press the [DISPLAY] button 3 times, the LCD monitorwill turn off.4. If you press the [DISPLAY] button 4 times, it switches to theinitial (normal) display screen.[ Notes ]✤Above description applies to the Photo and Video mode.1. Set the desired mode by setting the Mode Dial.2. Press the [Menu] button.3. Move the cursor by moving the joystick (▲/▼, œœ/√√) to selectdesired menu item, and then press the [OK] button toconfirm.4. Press the [Menu] button to finish. [DISPLAY] ButtonMENU25 MEGA PIXELPOWERW TMode DialJoystick[Menu] Button00934C SC-MS10 USA~037 9/30/05 10:55 AM Page 28](https://usermanual.wiki/Samsung-Electronics-Co/05SAM1/User-Guide-589245-Page-32.png)
![ENGLISH2929Getting StartedUsing the Shortcut ButtonsIcons that represent the most frequently accessed functions according to the current mode are displayed on the LCD monitor toallow easier access. Using these buttons, you may directly access the functions.1. Press the Mode Dial to set the desired mode.2. Press the [POWER] button to turn on the device.3. On the LCD monitor, the function of each button is displayed. Press the button to access the function directly.◆ex) In Photo Mode, 4 shortcut buttons will be:< >-< >-< >-< >MENUPIXELPOWERW TShortcut ButtonMode Dial[Power] Button00934C SC-MS10 USA~037 9/30/05 10:55 AM Page 29](https://usermanual.wiki/Samsung-Electronics-Co/05SAM1/User-Guide-589245-Page-33.png)
![Getting StartedUsing the Joystick✤The joystick is used to make a selection, move the cursor, select functions, and exit from the menu.✤The joystick is used to make a selection, move the cursor, and select functions.1. Move the cursor right / left by pressing the joystick (œœ/√√).2. Move the cursor up / down by pressing the joystick (▲/▼).◆You can adjust the volume by moving the joystick (up / down) in Video / Music / Voice playback modes.3. Confirm your selection by pressing the [OK] button.ENGLISH3030Menu SelectionMove UpwardsMove DownwardsMove LeftMove RightConfirm SelectionWhile Playing BackIncrease VolumeDecrease Volume---Move left Move rightMove downMove UpConfirm selectionMENUJoystick[ Note ]✤Use the joystick for menu traversal or making selections.00934C SC-MS10 USA~037 9/30/05 10:55 AM Page 30](https://usermanual.wiki/Samsung-Electronics-Co/05SAM1/User-Guide-589245-Page-34.png)
![ENGLISH3131Getting StartedStructure of Folders and FilesThe video files and photo files are stored in internal memory or external memory (Memory Card) as below:[ Notes ]✤Refer to page XX for details on Memory Card.✤You can store general data files and folders in Miniket Photo.✤The maximum number of files you may store in Miniket Photo is 9,999where number of folders is 999.✤DCAM****.JPG: Photo filesSMOV****.AVI: Video filesSWAV****.WAV: Voice files********.MP3: MP3 files✤MISC: DPOF files are stored.✤Do not change the file or folder name except ‘Free’.✤You can freely change the file or folder name under the ‘Free’. ✤Video files that you have not made with this device may not play back onthis device.[ Warning ]✤Memory cards are made with precision technology. It is sensitive andvulnerable to electric shock, temperature and humidity, be cautiouswith handling the memory card to avoid losing data stored in it.✤Damaged data may not be recovered, and SAMSUNG is notresponsible for lost data. Make sure to back up important files in PCseparately.00934C SC-MS10 USA~037 9/30/05 10:55 AM Page 31](https://usermanual.wiki/Samsung-Electronics-Co/05SAM1/User-Guide-589245-Page-35.png)
![ENGLISH3232Recording Time and CapacityGetting Started[ Notes ]✤The photo capacity / recording times are approximations and are subject to conditions.✤The photo capacity is subject to change depending on the captured image size. The Voice Recording Time is also subject to change.✤There is no guarantee about the operation of a Memory Card which has not been formatted on this Miniket Photo. Make sure to format a Memory Card on theMiniket Photo (Refer to page 50).✤Do not format a Memory Card on a PC.✤The recording time and the number of images shown above are maximum figures only when using the respective function.In actual use, using more than one function will reduce the capacity of each.✤If you set the flash to on, you can take fewer photos than described above.✤When you use a Memory Card, you may get a <“Low speed card. Please record at lower quality”> message. It is because the writing speed of the Memory Cardis slow.It is recommended to use a Memory Card of 1.25MB/sec or greater data transfer rate.✤Video file may not record / playback normally when using a Memory Card bigger than 1GB.✤Based on the device set to mono and a 64kbps transfer rate.✤Voice recording time shown above is an estimation and is subject to recording conditions.5M4M3M2M1MVGATIFF Maximum QualityImage SizeImage QualityApprox. 4-----Super FineApprox. 30Approx. 40Approx. 50Approx. 80Approx. 180Approx. 400FineApprox. 60Approx. 80Approx. 100Approx. 170Approx. 340Approx. 680NormalApprox. 120Approx. 170Approx. 200Approx. 290Approx. 680Approx. 1,020Photo Capacity (for 64 MB)640 x 480320 x 240Image SizeImage QualitySuper FineApprox. 4 minApprox. 7 minFineApprox. 7 minApprox. 15 minNormalApprox. 15 minApprox. 30 minVideo Recording TimeRecording TimeApprox. 30 minVoice Recording Time00934C SC-MS10 USA~037 9/30/05 10:55 AM Page 32](https://usermanual.wiki/Samsung-Electronics-Co/05SAM1/User-Guide-589245-Page-36.png)
![You can set the storage to the built-in internal memory or external mini SD Memory Card (Optional Accessory).Video and photo files are stored in internal memory by default.1. Press the [POWER] button to turn on the device.2. Initially, the memory type is set to <Int. Memory> memory by default.3. Insert a mini SD Memory Card into the memory slot (refer to page 35).◆The message ”Memory Card is inserted. Set to the Memory Card?” appears on the screen.4. Select the desired setting by moving the joystick left / right (œœ/√√) and press the [OK] button.◆Yes: Photo, video, music and voice files will be stored in the inserted Memory Card.◆No: Photo, video, music and voice files will be stored in the built-in internal memory.ENGLISH3333Selecting the Memory TypeGetting Started[ Notes ]✤You may select the storage memory type in menu of Photo / Video / Music / Voice Record / System Settings mode.✤Selected memory will be used for the storage in all modes.✤Built-in internal memory: Photo, video, music and voice files will be stored in the built-in internal memory.✤Memory Card: Photo, video, music and voice files will be stored in the Memory Card inserted.You can change this option using the System Settings menu (refer to page 49).23TYPEMemory TypeMemory TypeInt. MemoryMemory CardMoveMove SelectSelectMove SelectSettingsSettingsMemory TypeSettingsMemory TypeInt. MemoryMemory CardMove SelectMoveMove SelectSelectSettingsTYPEMemory TypeMemory TypeSettingsSettings00934C SC-MS10 USA~037 9/30/05 10:55 AM Page 33](https://usermanual.wiki/Samsung-Electronics-Co/05SAM1/User-Guide-589245-Page-37.png)
![✤Only mini SD Memory Card is supported.✤Turning the power off / ejecting the memory card during the memory operation such as formatting, deleting, recording, and playback may damage the data.✤You may modify the name of a file / folder stored in the memory card using a PC. Miniket Photo may not recognise modifiedfiles.✤It is recommended that you power off before inserting or ejecting the memory card to avoid losing data.✤It is not guaranteed that you may use a memory card formatted on a PC. Be sure to format your memory card using theMiniket Photo.✤Save important files separately on other media, such as floppy disk, hard disk, or CD.✤You have to format newly-purchased memory cards, memory cards with data on it that camera cannot recognise or thecards that have data saved by other cameras.✤The memory card has a certain life span. If you use it for a long time, you cannot record new data. In this case, you have topurchase a new memory card.✤The memory card is a precision electronic equipment. Do not bend it, drop it, or cause it to suffer a strong impact..✤Do not use or store in a place that has high temperature and humidity or dusty environment.✤Do not allow foreign substances on the Memory Card terminals. Use a soft dry cloth to clean the terminals if required.✤It is recommended to use a memory card case to avoid losing data from moving and static electricity.✤After a period of use, the memory card may get warm. This is normal, not a malfunction.Damaged data may not be recovered, and SAMSUNG is not responsible for the lost data. Make sure to back up importantfiles separately on a PC.ENGLISH3434Getting StartedUsing the Memory Card (Optional Accessory)✤This device only supports the mini SD Memory Card.✤SD Memory Card / SD Memory Card Adapter are not supported by thisdevice.✤mini SD Memory Card / SD Memory Card Adapter supports a mechanicalwrite protection switch. Setting the switch prevents accidental erasure of filesrecorded on the memory card. To enable writing, move the switch to thedirection of terminals. To set write protection, move the switch down.[ Note ]✤mini SD Memory Card is an optional accessory.Name of Each Part: mini SD Memory CardTerminalsWrite-protectSwitchmini SD Memory Card SD Memory Card Adapter00934C SC-MS10 USA~037 9/30/05 10:55 AM Page 34](https://usermanual.wiki/Samsung-Electronics-Co/05SAM1/User-Guide-589245-Page-38.png)
![ENGLISH3535Getting StartedInserting / Ejecting the Memory Card (Optional Accessory)This product is equipped with a built-in internal memory and the external memory card is an optional accessorywhich is not provided with the package.Inserting a Memory Card1. Open the battery / memory card compartment lid by sliding the [OPEN]switch on the bottom side.◆Slide the [OPEN] switch in the direction of (1) as shown in the figure until it stops.Then open the lid.2. Insert a mini SD Memory Card into the slot until it softly clicks.◆The memory card terminals face down while the LCD monitor faces up.Ejecting a Memory Card1. Slightly push the mini SD Memory Card inwards to pop it out.2. Pull the mini SD Memory Card out of the slot and close the battery /memory card compartment lid.[ Notes ]✤Do not apply excessive force when you insert or eject a Memory Card.✤Do not turn the power off while recording, playing, or erasing files or while formatting a MemoryCard.✤Turn the power off before you insert or eject a Memory Card to avoid losing data.✤Do not place a Memory Card near a strong electro-magnetic device.✤Do not allow metal substances to come in contact with the terminals on the Memory Card.✤Do not bend a Memory Card.✤After pulling a Memory Card out of the device, keep the Memory Card in a case to prevent static shock.✤The data stored on the Memory Card may be changed or lost as a result of misuse, static electricity, electric noise, or repair.Save important files separately.✤Samsung is not responsible for data loss due to misuse.OPEN@!MENU00934C SC-MS10 USA~037 9/30/05 10:55 AM Page 35](https://usermanual.wiki/Samsung-Electronics-Co/05SAM1/User-Guide-589245-Page-39.png)

![ENGLISH3737Setting the Miniket Photo : Adjusting the LCD MonitorAdjusting the LCD BrightnessYou can adjust the brightness of the LCD monitor to compensate for ambient lighting conditions.1 Set the Mode Dial to the System Settings mode.2. Press the [POWER] button to turn on the device.◆The <System Settings> menu appears.3. Select <LCD Brightness> by moving the joystick left / right (œœ/√√).4. Adjust the brightness by moving the joystick up / down (▲/▼).◆Moving the joystick upwards will brighten the screen whereas moving it downwards willdarken the screen.◆Brightness range: You can adjust the brightness between 0 ~ 32 steps.5. After you finish adjusting, set the Mode Dial to the desired mode.[ Notes ]✤A Brighter LCD screen setting consumes more battery power.✤Brighten the LCD screen when the ambient lighting is too bright and the monitor is hard to see.✤LCD Brightness does not affect the brightness of stored images.1218MoveMove SelectSelectSettingsSettingsLCD BrightnessLCD BrightnessMove SelectSettingsLCD Brightness10Move SelectSettingsLCD BrightnessMoveMove SelectSelectSettingsSettingsLCD BrightnessLCD Brightness00934C SC-MS10 USA~037 9/30/05 10:55 AM Page 37](https://usermanual.wiki/Samsung-Electronics-Co/05SAM1/User-Guide-589245-Page-41.png)
![ENGLISH3838Setting the Miniket Photo : Setting Date / TimeSetting Date / TimeThe built-in clock creates the time stamp. You can adjust the time using this menu.1. Set the Mode Dial to the System Settings mode.2. Press the [POWER] button to turn on the device.◆The <System Settings> menu appears.3. Select <Date & Time Set> by moving the joystick left / right (œœ/√√).4. Set values by moving the joystick up / down (▲/▼), and then press the [OK]button.◆Items are listed in the date format. By default, it appears in the order of Year, Month, Date,Hour and Minute. ◆Cursor moves to the next item. ◆Set Month and Year using the same method.5. Set all items and then press the [OK] button to finish.◆Set Minute and AM / PM using the same method.6. After you finish setting, set the Mode Dial to the desired mode.[ Notes ]✤You can display Date and Time on the LCD monitor by setting the <Date & Time> option otherthan to <Off>.✤If the <Date & Time> display option is set to display before setting the time, it will appear as“12:00PM 2005. 1. 1”.✤You can set the year up to 2,037.✤Date and Time information will be recorded with the recordings. SettingsSettingsDate&Time SetDate&Time SetMoveMove SelectSelect------ --AM-- : --00934C SC-MS10 USA~053 9/30/05 10:55 AM Page 38](https://usermanual.wiki/Samsung-Electronics-Co/05SAM1/User-Guide-589245-Page-42.png)
![ENGLISH3939Setting the Miniket Photo : Setting Date / TimeSetting Date / Time FormatYou can select the date format to display.1. Set the Mode Dial to the System Settings mode.2. Press the [POWER] button to turn on the device.◆The <System Settings> menu appears.3. Select <Date Format> by moving the joystick left / right (œœ/√√).4. Set the format by moving the joystick up / down (▲/▼), and then press the[OK] button.◆<YYYY/MM/DD>: The date is displayed in the order of Year / Month / Date.◆<DD/MM/YYYY>: The date is displayed in the order of Date / Month / Year.◆<MM/DD/YYYY>: The date is displayed in the order of Month / Date / Year.5. After you finish setting, set the Mode Dial to the desired mode.34SettingsSettingsDate FormatDate FormatYYYY/MM/DDDD/MM/YYYYMM/DD/YYYYMoveMove SelectSelectSettingsDate FormatMove SelectSettingsDate FormatMove SelectSettingsSettingsDate FormatDate FormatYYYY/MM/DDDD/MM/YYYYMM/DD/YYYYMoveMove SelectSelect00934C SC-MS10 USA~053 9/30/05 10:55 AM Page 39](https://usermanual.wiki/Samsung-Electronics-Co/05SAM1/User-Guide-589245-Page-43.png)
![You can set to display date and time on the LCD monitor.1. Set the Mode Dial to the System Settings mode.2. Press the [POWER] button to turn on the device.◆The <System Settings> menu appears.3. Select <Date & Time> by moving the joystick left / right (œœ/√√).4. Set the display option by moving the joystick up / down (▲/▼), and thenpress the [OK] button.◆<Off>: Date and Time are not displayed.◆<Date>: The date is displayed.◆<Time>: The time is displayed.◆<Date & Time>: The date and time are displayed.4. After you finish setting, set the Mode Dial to the desired mode.ENGLISH4040Setting the Miniket Photo : Setting Date / TimeSetting Date Display34SettingsSettingsDate/TimeDate/TimeOffDateTimeDate&TimeMoveMove SelectSelectSettingsDate/TimeMove SelectSettingsDate/TimeMove SelectSettingsSettingsDate/TimeDate/TimeOffDateTimeDate&TimeMoveMove SelectSelect00934C SC-MS10 USA~053 9/30/05 10:55 AM Page 40](https://usermanual.wiki/Samsung-Electronics-Co/05SAM1/User-Guide-589245-Page-44.png)
![ENGLISH4141Setting the Miniket Photo : Setting the SystemTo save battery power, you can set the Auto Shut Off function which turns off the device if there is no operation for a certainperiod of time.1. Set the Mode Dial to the System Settings mode.2. Press the [POWER] button to turn on the device.◆The <System Settings> menu appears.3. Select <Auto Shut Off> by moving the joystick left / right (œœ/√√).4. Select the desired option by moving the joystick up / down (▲/▼) and then press the [OK] button.◆<Off>: Cancel the Auto Shut Off function.◆<3min>: Automatically turns off after 3 minutes.◆<5min>: Automatically turns off after 5 minutes.5. After you finish setting, set the Mode Dial to the desired mode.[ Notes ]✤The Auto Shut Off will not function when you connect the AC Power Adapter to the Miniket Photo. The Auto Shut Off functions when theBattery Pack is the only power source.✤The Auto Shut Off will not function when you transfer data between the Miniket Photo and a PC.Setting the Auto Shut Off34TYPESettingsSettingsAuto Shut OffAuto Shut OffOff3min5minMoveMove SelectSelectSettingsAuto Shut OffMove SelectSettingsAuto Shut OffMove SelectTYPESettingsSettingsAuto Shut OffAuto Shut OffOff3min5minMoveMove SelectSelect00934C SC-MS10 USA~053 9/30/05 10:55 AM Page 41](https://usermanual.wiki/Samsung-Electronics-Co/05SAM1/User-Guide-589245-Page-45.png)
![ENGLISH42424Setting the File No. FunctionSetting the Miniket Photo : Setting the SystemYou can set the file numbers so that they reset each time the Memory Card is formatted, or sothat they count up continuously.1. Set the Mode Dial to the System Settings mode.2. Press the [POWER] button to turn on the device.◆The <System Settings> menu appears.3. Select <File No.> by moving the joystick left / right (œœ/√√).4. Select the desired option by moving the joystick up / down (▲/▼) and thenpress the [OK] button.◆<Reset>: When the storage memory is formatted, the file number goes back to its defaultvalue (100-0001).◆<Series>: Numbering is continuous between the Memory Cards, so that the first filenumber assigned on a new Memory Card is 1 more than the last file number assigned onthe previous Memory Card.5. After you finish setting, set the Mode Dial to the desired mode.[ Note ]✤When you set <File No.> to <Series>, each file is assigned with a different number so as to avoidduplicating file names. It is convenient when you want to manage your files on a PC.File No.Move SelectSettingsFile No.File No.MoveMove SelectSelectSettingsSettingsResetSeries File No.3File No.File No.MoveMove SelectSelectSettingsSettingsResetSeries File No.File No.Move SelectSettings00934C SC-MS10 USA~053 9/30/05 10:55 AM Page 42](https://usermanual.wiki/Samsung-Electronics-Co/05SAM1/User-Guide-589245-Page-46.png)
![ENGLISH43434Setting the Miniket Photo : Setting the SystemSetting the Beep SoundYou can set the beep sound when buttons are pressed on / off. When set to on, a beep willsound every time a button is pressed.1. Set the Mode Dial to the System Settings mode.2. Press the [POWER] button to turn on the device.◆The <System Settings> menu appears.3. Select <Beep Sound> by moving the joystick left / right (œœ/√√).4. Select the desired option by moving the joystick up / down (▲/▼) and thenpress the [OK] button.◆<Off>: Turn the beep sound off.◆<On>: Turn the beep sound on.5. After you finish setting, set the Mode Dial to the desired mode.[ Notes ]✤When you set <Beep Sound> to <Off>, no warning sound will be heard.✤When the earphones or AV (Audio / Video) cable is connected to the device, the <Beep Sound>function will not operate.SettingsBeep SoundMove SelectSettingsSettingsBeep SoundBeep SoundOffOnMoveMove SelectSelect3SettingsSettingsBeep SoundBeep SoundOffOnMoveMove SelectSelectSettingsBeep SoundMove Select00934C SC-MS10 USA~053 9/30/05 10:55 AM Page 43](https://usermanual.wiki/Samsung-Electronics-Co/05SAM1/User-Guide-589245-Page-47.png)
![ENGLISH44444Setting the Miniket Photo : Setting the SystemSetting the Shutter SoundYou can set the shutter sound to on / off.1. Set the Mode Dial to the System Settings mode.2. Press the [POWER] button to turn on the device.◆The <System Settings> menu appears.3. Select <Shutter Sound> by moving the joystick left / right (œœ/√√).4. Select the desired option by moving the joystick up / down (▲/▼) andthen press the [OK] button.◆<Off>: Turn the shutter sound off.◆<On>: Turn the shutter sound on.5. After you finish setting, set the Mode Dial to the desired mode.SettingsShutter SoundMove SelectSettingsSettingsOffOnShutter SoundShutter SoundMoveMove SelectSelect3SettingsSettingsOffOnShutter SoundShutter SoundMoveMove SelectSelectSettingsShutter SoundMove Select00934C SC-MS10 USA~053 9/30/05 10:55 AM Page 44](https://usermanual.wiki/Samsung-Electronics-Co/05SAM1/User-Guide-589245-Page-48.png)
![ENGLISH454534TYPEEnglishSettingsSettingsMoveMove SelectSelectSettingsMove Select«—±πæÓSettingsMove SelectTYPEEnglishSettingsSettingsMoveMove SelectSelect«—±πæÓSetting the Miniket Photo : Setting the SystemSelecting LanguageYou can select the language of the Miniket Photo. 1. Set the Mode Dial to the System Settings mode.2. Press the [POWER] button to turn on the device.◆The <System Settings> menu appears.3. Select <Language> by moving the joystick left / right (œœ/√√).4. Select the desired option by moving the joystick up / down (▲/▼) and thenpress the [OK] button.◆Selectable languages are:◆English / Español / Français / Português / Deutsch / Italiano / Nederlands / Polski /PÛÒÒÍËÈ / / / Iran / Arab / Magyar / ‰‰∑∑¬¬/ ì͇ªÌҸ͇ / Svenska 5. After you finish, set the Mode Dial to the desired mode.00934C SC-MS10 USA~053 9/30/05 10:55 AM Page 45](https://usermanual.wiki/Samsung-Electronics-Co/05SAM1/User-Guide-589245-Page-49.png)
![ENGLISH4646Setting the Miniket Photo : Setting the SystemSetting the TV StandardYou can view your video files using the built-in LCD monitor. However, to view your recordings on a television set or to copy it toa video cassette recorder (VCR), the television set or the VCR must comply with the TV standards and have the appropriateAudio / Video ports. Otherwise, you may need to use a separate Video Format Transcoder (NTSC-PAL format Converter). You can set the TV standard of the Miniket Photo’s video output.1. Set the Mode Dial to the System Settings mode.2. Press the [POWER] button to turn on the device.◆The <System Settings> menu appears.3. Select <Video Out> by moving the joystick left / right (œœ/√√).4. Select the desired option by moving the joystick up / down (▲/▼) and then press the [OK] button.◆<PAL>: Sets to PAL standard.◆<NTSC>: Sets to NTSC standard.5. After you finish, set the Mode Dial to the desired mode.PAL-Compatible Countries / RegionsAustralia, Austria, Belgium, Bulgaria, China, CIS, Czech Republic, Denmark, Egypt, Finland, France, Germany, Greece,Great Britain, Holland, Hong Kong, Hungary, India, Iran, Iraq, Kuwait, Libya, Malaysia, Mauritius, Norway, Romania, SaudiArabia, Singapore, Slovak Republic, Spain, Sweden, Switzerland, Syria, Thailand, Tunisia, etc.NTSC-Compatible Countries / RegionsBahamas, Canada, Central America, Japan, Mexico, Philippines, Korea, Taiwan, United States of America, etc.00934C SC-MS10 USA~053 9/30/05 10:55 AM Page 46](https://usermanual.wiki/Samsung-Electronics-Co/05SAM1/User-Guide-589245-Page-50.png)
![ENGLISH4747Setting the Miniket Photo : Setting the System4Setting the Mode DisplayYou can set to display the mode transition when you use the Mode Dial.1. Set the Mode Dial to the System Settings mode.2. Press the [POWER] button to turn on the device.◆The <System Settings> menu appears.3. Select <Mode Display> by moving the joystick left / right (œœ/√√).4. Select the desired option by moving the joystick up / down (▲/▼) and thenpress the [OK] button.◆<On>: Turns the <Mode Display> on.◆<Off>: Turns the <Mode Display> off.5. After you finish, set the Mode Dial to the desired mode.◆If it is set to <On>, the mode screen is displayed on the LCD monitor.SettingsMode DisplayMove SelectTYPESettingsSettingsMode DisplayMode DisplayOffOnMoveMove SelectSelect5SettingsMode DisplayMove SelectSettingsMode DisplayMove SelectPhoto3TYPESettingsSettingsMode DisplayMode DisplayOffOnMoveMove SelectSelectSettingsMode DisplayMove Select00934C SC-MS10 USA~053 9/30/05 10:55 AM Page 47](https://usermanual.wiki/Samsung-Electronics-Co/05SAM1/User-Guide-589245-Page-51.png)
![ENGLISH4848Setting the Miniket Photo : Setting the System4Resetting the Miniket PhotoYou can reset the Miniket Photo to load default (factory) settings.1. Set the Mode Dial to the System Settings mode.2. Press the [POWER] button to turn on the device.◆The <System Settings> menu appears.3. Select <Reset> by moving the joystick left / right (œœ/√√).4. Press the [OK] button. Confirmation message appears. Select an option bymoving the joystick left / right (œœ/√√) and then press the [OK] button.◆<Yes>: Starts the reset function.◆<No>: Cancel the reset function.[ Warning ]✤If you reset the Miniket Photo, all functions you set are initialised to the default (factory) settings.[ Notes ]✤User settings and date / time information are initialised when you reset.✤After resetting the Miniket Photo, set date / time (refer to page 38).!SettingsResetMove SelectMoveMove SelectSelectReset?Yes No3TYPESettingsSettingsResetResetStartMoveMove SelectSelectMove Select00934C SC-MS10 USA~053 9/30/05 10:55 AM Page 48](https://usermanual.wiki/Samsung-Electronics-Co/05SAM1/User-Guide-589245-Page-52.png)
![ENGLISH49493Memory TypeInt. MemoryMemory CardMove SelectMoveMove SelectSelectSettingsTYPEMemory TypeMemory TypeSettingsSettingsSetting the Miniket Photo : Setting MemorySelecting the Storage TypeYou can set the storage to the built-in internal memory or external mini SD Memory Card(Optional Accessory).1. Set the Mode Dial to the System Settings mode.2. Press the [POWER] button to turn on the device.◆The <System Settings> menu appears.3. Select <Memory Type> by moving the joystick left / right (œœ/√√).4. Select the desired option by moving the joystick up / down (▲/▼) and thenpress the [OK] button.◆<Int. Memory>: Photo, video, music and voice files are stored in the internal memory.◆<Memory Card>: Photo, video, music and voice files are stored in the external (mini SD)memory.5. After you finish setting, set the Mode Dial to the desired mode.[ Notes ]✤Photo, video, music and voice files are stored in internal memory by default.✤If you insert a Memory Card when the device is on, the pop-up screen will prompt you automatically toselect the storage type except when in the System Settings mode.✤If there is no Memory Card inserted, only the <Int. Memory> option will be available.✤Actual storage capacity may differ from the printed memory capacity.✤The maximum recording time and image capacity is subject to change depending on the media used(refer to page 32).1TYPEMemory TypeMemory TypeInt. MemoryMemory CardMoveMove SelectSelectMove SelectSettingsSettingsMemory TypeSettings00934C SC-MS10 USA~053 9/30/05 10:55 AM Page 49](https://usermanual.wiki/Samsung-Electronics-Co/05SAM1/User-Guide-589245-Page-53.png)
![ENGLISH5050Setting the Miniket Photo : Setting MemoryFormatting the MemoryYou can format the internal memory and the external memory to erase all files.1. Set the Mode Dial to the System Settings mode.2. Press the [POWER] button to turn on the device.◆The <System Settings> menu appears.3. Select <Format> by moving the joystick left / right (œœ/√√).4. Select the desired option by moving the joystick up / down (▲/▼) and thenpress the [OK] button.◆<Int. Memory>: Format the internal memory.◆<Memory Card>: Format the external memory.When the [OK] button is pressed, the message “Do you want to format?” appears. Select<Yes> to confirm.5. After you finish setting, set the Mode Dial to the desired mode.[ Notes ]✤There is no guarantee on the operation of a Memory Card which has not been formatted onthe Miniket Photo. Make sure to format any Memory Card on the Miniket Photo.✤If there is no Memory Card inserted, only the <Int. Memory> option will be available.[ Warning ]✤Previous information can not be restored after formatting.3FormatFormatFormatInt. MemoryMemory CardMove SelectMoveMove SelectSelectSettingsSettingsSettings2FormatFormatFormatInt. MemoryMemory CardMoveMove SelectSelectMove SelectSettingsSettingsSettings00934C SC-MS10 USA~053 9/30/05 10:55 AM Page 50](https://usermanual.wiki/Samsung-Electronics-Co/05SAM1/User-Guide-589245-Page-54.png)
![ENGLISH51512SettingsSettingsMemory SpaceMemory SpaceMoveMoveInternal MemoryMemory CardSetting the Miniket Photo : Setting MemoryViewing Memory SpaceYou can check usable memory space and total memory space of the Miniket Photo.1. Set the Mode Dial to the System Settings mode.2. Press the [POWER] button to turn on the device.◆The <System Settings> menu appears.3. Select <Memory Space> by moving the joystick left / right (œœ/√√).4. Available free space and total memory capacity are displayed.5. After you finish, set the Mode Dial to the desired mode.[ Notes ]✤Actual storage capacity may differ from the printed memory capacity.✤Internal and external memory spaces are displayed separately.00934C SC-MS10 USA~053 9/30/05 10:55 AM Page 51](https://usermanual.wiki/Samsung-Electronics-Co/05SAM1/User-Guide-589245-Page-55.png)
![ENGLISH5353Photo Mode : CapturingCapturing ImagesYou can take photo as well as record video files.1. Set the Mode Dial to Photo mode.2. Press the [POWER] button to turn on the device.◆The Photo Capture screen appears.3. Press the [Record / Stop] button halfway down to set the focus and exposure.◆The focus indicator appears in green when the focus is set. If the focus indicator appearsin red, try to set the focus again.4. Fully press the [Record / Stop] button to take a picture.[ Notes ]✤If the battery is low, the flash will not operate automatically.✤In order to take pictures and save it in the external memory (mini SD Memory Card), insert a MemoryCard and then set the storage type to <Memory Card> (Refer to page 33).✤Press the [MENU] button in the Photo Capture mode to see the Photo Settings screen.✤When you are finished taking pictures, please turn off the device to conserve battery power.Pressing the [Record/Stop] button halfway down sets the focus.Fully pressing the button takes a photo.Press the[Record/Stop]button halfwaydown.Fully press the[Record/Stop]button.To Set the Focus➮42592INEV032592INEV000934C SC-MS10 USA~053 9/30/05 10:55 AM Page 53](https://usermanual.wiki/Samsung-Electronics-Co/05SAM1/User-Guide-589245-Page-57.png)
![ENGLISH5454Photo Mode : CapturingZooming In and OutZooming allows you to change the size of the subject captured in a scene.You can take advantage of the 3x optical electro motion zoom lens.1. Set the Mode Dial to Photo mode.2. Press the [POWER] button to turn on the device.◆The Photo Capture screen appears.[ Notes ]✤Frequent use of zooming may result in higher battery consumption.✤You can take advantage of 5x digital zoom as well as 3x optical zoom for a total of 15xzoom.✤Optical zoom preserves the image quality.IN3025920EV0TT0IN0302592EV0W TW TZoom In Zoom Out Move the [W/T] zoom switch to W (WIDE)●The shot subject’s size is reduced, and you can take a pictureas if you were far away from the subject.●At the zoom indicator in the LCD screen, the arrow moves to W.●The smallest rate of zoom out is the default rate (originalresolution of the subject).Move the [W/T] zoom switch to T (TELE).●The subject is larger, and you can take a picture as if you wereclose to the subject.●At the zoom indicator the arrow moves to T.●The largest optical zoom ratio is 3x, which is the biggest amongthe basic zoom.00934C SC-MS10 USA~089 9/30/05 10:56 AM Page 54](https://usermanual.wiki/Samsung-Electronics-Co/05SAM1/User-Guide-589245-Page-58.png)
![ENGLISH5555Photo Mode : ViewingViewing Photo Files on the LCD MonitorIt is handy and practical to view pictures using the LCD monitor almost anywhere such as in a car, indoors, or outdoors.1. Set the Mode Dial to Photo mode.2. Press the [POWER] button to turn on the device.3. Press the [Shortcut 1] button to switch to Photo viewing mode.4. Move the joystick left / right (œœ/√√) to find the photo you want to view.◆Each movement of the joystick goes to the previous / next photo.[ Notes ]✤If there is no file stored to view, the message <“No stored Photo!”> appears.✤Moving the joystick right (√√) at the last photo will move to the first photo.✤Moving the joystick left (œœ) at the first photo will move to the last photo.✤Moving the joystick left / right (œœ/√√) button for more than 1 seconds will fast search. .✤Display time may vary depending on the picture size.✤The image edited (tuned) in image viewer programme on a PC may not be displayed.34IN030259211EV01/6100-000111IN100-000100934C SC-MS10 USA~089 9/30/05 10:56 AM Page 55](https://usermanual.wiki/Samsung-Electronics-Co/05SAM1/User-Guide-589245-Page-59.png)
![ENGLISH5656Photo Mode : ViewingViewing Multiple Photo Files / Enlarging a Photo FileUsing the [W/T] zoom switch in Photo Viewing mode, you can display multiple images on one LCD screen.1. Set the Mode Dial to Photo mode.2. Press the [POWER] button to turn on the device.3. Press the [Shortcut 1] button to switch to Photo viewing mode.[ Notes ]✤If there is no file stored to view, the message <“No stored Photo!”> appears.✤You cannot zoom in on a TIFF image file.W TW TMove the [W/T] zoom switch to W (WIDE).●The screen switches to multi-view.●The photo you were viewing in the single view is selected.Move the [W/T] zoom switch to T (TELE).●From the multi-view screen, it switches back to the single viewscreen. Move the [W/T] Zoom switch to T (TELE) again toenlarge the selected photo.MoveMove Full ViewFull ViewMove TrimININMove Full ViewMoveMove TrimTrimZoom In Zoom Out Displaying Multiple Photo Files (Zoom Out)Enlarging a Photo File (Zoom In)00934C SC-MS10 USA~089 9/30/05 10:56 AM Page 56](https://usermanual.wiki/Samsung-Electronics-Co/05SAM1/User-Guide-589245-Page-60.png)
![ENGLISH57575679Photo Mode : ViewingCropping an Enlarged Photo File✤You can enlarge and crop a photo.✤Using the [W/T] zoom switch in Photo Viewing mode, you can display multiple images on oneLCD screen.1. Set the Mode Dial to Photo mode.2. Press the [POWER] button to turn on the device.3. Press the [Shortcut 1] button to switch to Photo viewing mode.4. Move the joystick left / right (œœ/√√) to select a photo.5. Move the [W/T] zoom switch to T (TELE).◆Selected photo is enlarged.6. Move the joystick (œœ/√√/▲/▼) to find the portion of the photo to crop.7. Press the [OK] button.◆The message <“Trim?”> appears on the screen.◆If there is not enough space to save the cropped image, it cancels automatically.8. Select an option by moving the joystick left / right (œœ/√√) and then press the[OK] button.◆<Yes>: Crops the image and saves it as a new file.◆<No>: Cancels cropping.9. If <Yes> is selected, cropped image is saved and displayed on the screen.[ Notes ]✤You cannot enlarge a cropped photo.✤You cannot crop an image smaller than 640 x 480 pixels.✤You cannot crop a rotated image.✤The original photo is not overwritten by the cropped image. The cropped image is saved separately.✤The maximum magnification ratio differs depending on the image resolution:5M – up to 9.00x, 4M – up to 6.45x, 3M – up to 5.33x2M – up to 5.00x, 1M – up to 4.00x, VGA – up to 3.33xIN1MoveMove TrimTrimMove TrimOKMove TrimINMove TrimMoveMove TrimTrimOKMove TrimMove TrimMove TrimINMoveMove TrimTrimOKTrim?Yes NoIN1/6Move TrimMove TrimMove Trim00934C SC-MS10 USA~089 9/30/05 10:56 AM Page 57](https://usermanual.wiki/Samsung-Electronics-Co/05SAM1/User-Guide-589245-Page-61.png)
![ENGLISH5858334Photo Mode : Setting the Capturing OptionsUsing the Shortcut ButtonsShortcut buttons are provided to allow users easy access to frequently used functions.1. Set the Mode Dial to Photo mode.2. Press the [POWER] button to turn on the device.3. Press the [Shortcut 1] button.◆Each press of the [Shortcut 1] button toggles between the Photo capture / view modes.1. Set the Mode Dial to Photo mode.2. Press the [POWER] button to turn on the device.3. Press the [Shortcut 2] button.◆Each press of the [Shortcut 2] button cycles through the < >-< >-< >-< >-< >flash modes.4. An icon indicating the selected flash mode appears on the screen.[ Note ]✤Flash modes can be set only in <Manual> Scene mode. By default, the scene mode is set to <Auto>.IN30259211EV01/6100-000111IN100-0001IN3025920EV00IN0302592EV0Switching to Photo View ModeSetting the Flash00934C SC-MS10 USA~089 9/30/05 10:56 AM Page 58](https://usermanual.wiki/Samsung-Electronics-Co/05SAM1/User-Guide-589245-Page-62.png)
![ENGLISH59593434Photo Mode : Setting the Capturing OptionsUsing the Shortcut ButtonsShortcut buttons are provided to allow users easy access to frequently used functions.1. Set the Mode Dial to Photo mode.2. Press the [POWER] button to turn on the device.3. Press the [Shortcut 3] button.◆Each press of the [Shortcut 3] button cycles through the <Off> -<Macro>- <Super Macro> macro modes (refer to page 65).4. An icon indicating the selected macro mode appears on the screen.[ Notes ]✤Macro modes will disable flash use. ✤Macro modes can only be set in <Manual> Scene mode. By default, the scene mode is set to <Auto>.1. Set the Mode Dial to Photo mode.2. Press the [POWER] button to turn on the device.3. Press the [Shortcut 4] button.◆Each press of the [Shortcut 4] button cycles through <Off> -<2 sec> - <10 sec> self timermodes (refer to page 74).4. An icon indicating the selected timer mode appears on the screen.IN03025920EV00IN0EV0302592IN03025920EV00IN0302592EV0Setting the MacroSetting the Self Timer00934C SC-MS10 USA~089 9/30/05 10:56 AM Page 59](https://usermanual.wiki/Samsung-Electronics-Co/05SAM1/User-Guide-589245-Page-63.png)
![ENGLISH60603456Photo Mode : Setting the Capturing OptionsScene Modes are preset automatic exposure modes based upon an internal computerprogram. It helps to set both shutter speed and lens aperture according to the internal lightmeter and the program’s calculations, allowing users to have the best results under variousconditions.1. Set the Mode Dial to Photo mode.2. Press the [POWER] button to turn on the device.3. Press the [MENU] button.◆Menu screen appears.4. Move the joystick left / right (œœ/√√) to select <Scene Mode>.5. Select an option by moving the joystick up / down (▲/▼), and then press the[OK] button.◆<Auto> / <Manual> / <Night> / <Portrait> / <Children> / <Landscape> / <Close-up> /<Sunset> / <Dawn> / <Backlight> / <Fireworks> / <Beach / Snow>6. Press the [MENU] button to exit the menu.◆An icon indicating the selected Scene mode appears on the screen.◆If <Auto> is selected, no icon will be displayed.[ Notes ]✤Setting the listed functions are available only when the <Manual> Scene mode is selected:<Metering>, <EV>, <ISO>, <White Balance>, <Macro>, <Flash>, and <Focus>.✤While the menu screen is displayed, pressing the [Record / Stop] button will exit the menu.Using the Scene Modes0IN030EV02592PhotoSceneMove Select ExitPhotoSceneMove Select ExitMENUTYPE00PhotoPhotoOffAutoNightPortraitSceneSceneMoveMove SelectSelect ExitExitPhotoSceneMove Select Exit00PhotoSceneMove Select ExitMENUTYPEPhotoPhotoOffAutoNightPortraitSceneSceneMoveMove SelectSelect ExitExitIN25920EV0300PhotoSceneMove Select ExitPhotoSceneMove Select Exit00934C SC-MS10 USA~089 9/30/05 10:56 AM Page 60](https://usermanual.wiki/Samsung-Electronics-Co/05SAM1/User-Guide-589245-Page-64.png)
![ENGLISH61613456IN03025920PhotoPhoto SizeMove Select ExitPhotoPhoto SizeMove Select ExitEV0MENU5M4M3M2M22722048160000PhotoPhotoPhoto SizePhoto SizeMoveMove SelectSelect ExitExitPhotoPhoto SizeMove Select Exit00PhotoPhoto SizeMove Select ExitMENU5M4M3M2M227220481600PhotoPhotoPhoto SizePhoto SizeMoveMove SelectSelect ExitExit0IN0402272PhotoPhoto SizeMove Select ExitPhotoPhoto SizeMove Select ExitEV0Photo Mode : Setting the Capturing OptionsSetting the Photo File SizeYou can set the image resolution to meet your needs.1. Set the Mode Dial to Photo mode.2. Press the [POWER] button to turn on the device.3. Press the [MENU] button.◆Menu screen appears.4. Move the joystick left / right (œœ/√√) to select <Size>.5. Select an option by moving the joystick up / down (▲/▼), and then press the[OK] button.◆<5M> / <4M> / <3M> / <2M> / <1M> / VGA6. Press the [MENU] button to exit the menu.◆An icon indicating the selected size appears on the screen.[ Notes ]✤The photo capacity is an approximation and subject to recording conditions.✤For e-mail purposes, the <VGA> option is appropriate.✤When <Tiff> quality is selected, size is automatically set to 5M.✤While the menu screen is displayed, pressing the [Record / Stop] button will exit the menu.Photo Capacity according to the Photo Size and Quality (for 64MB)5M4M3M2M1MVGA64010241600204822722592TIiffApprox. 4-----Super FineApprox. 30Approx. 40Approx. 50Approx. 80Approx. 180Approx. 400FineApprox. 60Approx. 80Approx. 100Approx. 170Approx. 340Approx. 680NormalApprox. 120Approx. 120Approx. 170Approx. 290Approx. 680Approx. 1020SizeQuality00934C SC-MS10 USA~089 9/30/05 10:56 AM Page 61](https://usermanual.wiki/Samsung-Electronics-Co/05SAM1/User-Guide-589245-Page-65.png)
![You can set the image quality to meet your needs. Set the image quality before taking a picture.1. Set the Mode Dial to Photo mode.2. Press the [POWER] button to turn on the device.3. Press the [MENU] button.◆Menu screen appears.4. Move the joystick left / right (œœ/√√) to select <Photo Quality>.5. Select an option by moving the joystick up / down (▲/▼), and then press the[OK] button.◆<Tiff> / <Super Fine> / <Fine> / <Normal>6. Press the [MENU] button to exit the menu.◆An icon indicating the selected quality appears on the screen.[ Notes ]✤The photo capacity is an approximation and subject to recording conditions.✤When <Tiff> quality is selected, size is automatically set to 5M.✤When <Tiff> quality is selected, <Multi Shot>, <DIS>, <Size>, <Digital Zoom> and <Super Macro>settings are not available.✤While the menu screen is displayed, pressing the [Record / Stop] button will exit the menu.ENGLISH6262456Photo Mode : Setting the Capturing OptionsSetting the Photo File Quality00PhotoPhotoPhoto QualityPhoto QualityTiffSuper FineFineNormalMoveMove SelectSelect ExitExitPhotoPhoto QualityMove Select Exit00PhotoPhoto QualityMove Select ExitPhotoPhotoPhoto QualityPhoto QualityTiffSuper FineFineNormalMoveMove SelectSelect ExitExit0IN0602592PhotoPhoto QualityMove Select ExitPhotoPhoto QualityMove Select ExitEV03IN03025920PhotoPhoto QualityMove Select ExitPhotoPhoto QualityMove Select ExitEV000934C SC-MS10 USA~089 9/30/05 10:56 AM Page 62](https://usermanual.wiki/Samsung-Electronics-Co/05SAM1/User-Guide-589245-Page-66.png)
![ENGLISH6363456Photo Mode : Setting the Capturing OptionsSetting the SharpnessYou can set the sharpness of the image to be captured. Set the image sharpness beforetaking a picture.1. Set the Mode Dial to Photo mode.2. Press the [POWER] button to turn on the device.3. Press the [MENU] button.◆Menu screen appears.4. Move the joystick left / right (œœ/√√) to select <Sharpness>.5. Select an option by moving the joystick up / down (▲/▼), and then pressthe [OK] button.◆<Soft>( ): The image’s edges display softly and you can select this when you want toedit it on the computer.◆<Normal>( ): The image’s edges display sharply, and you can select this when youwant to print.◆<Sharp>( ): As the image’s edges are sharpened and emphasised, some noise mightoccur although it is seen clearly.6. Press the [MENU] button to exit the menu.◆An icon indicating the selected sharpness appears on the screen.[ Note ]✤While the menu screen is displayed, pressing the [Record / Stop] button will exit the menu.MENU00PhotoPhotoSharpnessSharpnessSoftNormalSharpMoveMove SelectSelect ExitExitOKPhotoSharpnessMove Select Exit00PhotoSharpnessMove Select ExitMENUPhotoPhotoSharpnessSharpnessSoftNormalSharpMoveMove SelectSelect ExitExitOK0IN0EV0302592PhotoSharpnessMove Select ExitPhotoSharpnessMove Select Exit3IN03025920PhotoSharpnessMove Select ExitPhotoSharpnessMove Select ExitEV000934C SC-MS10 USA~089 9/30/05 10:56 AM Page 63](https://usermanual.wiki/Samsung-Electronics-Co/05SAM1/User-Guide-589245-Page-67.png)
![ENGLISH6464456Photo Mode : Setting the Capturing OptionsSetting the Focus MethodTo have clear image of the subject, you need to set the focus on the subject. Select anappropriate focus method for the best results.1. Set the Mode Dial to Photo mode.2. Press the [POWER] button to turn on the device.3. Press the [MENU] button.◆Menu screen appears.4. Move the joystick left / right (œœ/√√) to select <Focus>.5. Select an option by moving the joystick up / down (▲/▼), and then press the[OK] button.6. Press the [MENU] button to exit the menu.◆An icon indicating the selected focusing mode appears on the screen.[ Notes ]✤Focus methods can be set only in <Manual> Scene mode. By default, the scene mode is set to <Auto>.✤While the menu screen is displayed, pressing the [Record / Stop] button will exit the menu.MENUTYPE00PhotoPhotoFocusFocusMulti AFCenter AFSpot AFMoveMove SelectSelect ExitExitOKPhotoFocusMove Select Exit00PhotoFocusMove Select ExitMENUTYPEPhotoPhotoFocusFocusMulti AFCenter AFSpot AFMoveMove SelectSelect ExitExitOK0IN0302592PhotoFocusMove Select ExitPhotoFocusMove Select ExitEV03IN03025920PhotoFocusMove Select ExitPhotoFocusMove Select ExitEV0<Multi AF><Center AF><Spot AF>You can select this when the subjects are not located in the center of thescreen, but you have to focus on numerous spots. You can select this when the subject is located in the center of the screen. You can select this when you want to focus exactly on the very narrow area ofthe main subject. 00934C SC-MS10 USA~089 9/30/05 10:56 AM Page 64](https://usermanual.wiki/Samsung-Electronics-Co/05SAM1/User-Guide-589245-Page-68.png)
![Macro mode allows users to have a fine focused image of a close-up subject within 50 cm.1. Set the Mode Dial to Photo mode.2 Press the [POWER] button to turn on the device.3. Press the [MENU] button.◆Menu screen appears.4. Move the joystick left / right (œœ/√√) to select <Macro>.5. Select an option by moving the joystick up / down (▲/▼), and then press the[OK] button.6. Press the [MENU] button to exit the menu.◆An icon indicating the selected Macro mode appears on the screen.◆If <Off> is selected, no icon will be displayed.[ Notes ]✤Focus methods can be set only in <Manual> Scene mode. By default, the scene mode is set to <Auto>.✤While the menu screen is displayed, pressing the [Record / Stop] button will exit the menu.ENGLISH6565456Photo Mode : Setting the Capturing OptionsSetting the Macro ModeMENU00PhotoPhotoMacroMacroOffMacroSuper MacroMoveMove SelectSelect ExitExitPhotoMacroMove Select Exit00PhotoMacroMove Select ExitMENUPhotoPhotoMacroMacroOffMacroSuper MacroMoveMove SelectSelect ExitExit0IN0302592PhotoMacroMove Select ExitPhotoMacroMove Select ExitEV03IN03025920PhotoMacroMove Select ExitPhotoMacroMove Select ExitEV0Macro Setting<Off><Macro><Super Macro>Focus Range50 cm ~ ∞W: 10 cm ~ ∞T: 30 cm ~ ∞W: 1 cm ~ 5 cm00934C SC-MS10 USA~089 9/30/05 10:56 AM Page 65](https://usermanual.wiki/Samsung-Electronics-Co/05SAM1/User-Guide-589245-Page-69.png)
![ENGLISH6666Photo Mode : Setting the Capturing Options456Photo이동 선택 나가기MENU00PhotoPhotoMeteringMeteringMultiCenterSpotMoveMove SelectSelect ExitExitPhotoMeteringMove Select ExitPhoto이동 선택 나가기00PhotoMeteringMove Select ExitMENUPhotoPhotoMeteringMeteringMultiCenterSpotMoveMove SelectSelect ExitExitPhoto이동 선택 나가기0IN0302592PhotoMeteringMove Select ExitPhotoMeteringMove Select ExitEV0Setting the Metering MethodMetering controls the brightness and exposure of the picture taken. Select an appropriatemetering method for the best results.1. Set the Mode Dial to Photo mode.2. Press the [POWER] button to turn on the device.3. Press the [MENU] button.◆Menu screen appears.4. Move the joystick left / right (œœ/√√) to select <Metering>.5. Select an option by moving the joystick up / down (▲/▼), and then press the[OK] button.6. Press the [MENU] button to exit the menu.◆An icon indicating the selected Metering mode appears on the screen.[ Notes ]✤Metering methods can be set only in <Manual> Scene mode. By default, the scene mode is set to<Auto>.✤While the menu screen is displayed, pressing the [Record / Stop] button will exit the menu.3Photo이동 선택 나가기IN03025920PhotoMeteringMove Select ExitPhotoMeteringMove Select ExitEV0<Multi><Center><Spot>It splits the screen into many areas and adjusts the exposure accordingly based on thecenter screen and each area’s brightness information. Meters only the area displayed in the square in the center of the LCD. You can select thiswhen you want to accurately expose the subject regardless of background brightness.It meters a very narrow area in the center. You can select this when the subject’ssurrounding area is very bright or there is a backlight, therefore you can meter the subjectaccurately.00934C SC-MS10 USA~089 9/30/05 10:56 AM Page 66](https://usermanual.wiki/Samsung-Electronics-Co/05SAM1/User-Guide-589245-Page-70.png)
![ENGLISH6767456MENUISO100ISO200ISO300100200400ISOISOISOISOAUTO00PhotoPhotoAutoMoveMove SelectSelect ExitExitISOPhotoMove Select ExitISO00PhotoMove Select ExitMENUISOAUTOISO200ISO400100200400ISOISOISOISO100PhotoPhotoAutoMoveMove SelectSelect ExitExitISO0IN0302592ISO100PhotoMove Select ExitISOPhotoMove Select ExitEV0Photo Mode : Setting the Capturing OptionsSetting the ISO Speed (Sensitivity)ISO Speed is the rating of a film's sensitivity to light. Though digital cameras don't use film, theynormally use the same rating system to describe the sensitivity of the camera's imaging sensor.1. Set the Mode Dial to Photo mode.2. Press the [POWER] button to turn on the device.3. Press the [MENU] button.◆Menu screen appears.4. Move the joystick left / right (œœ/√√) to select <ISO>.5. Select an option by moving the joystick up / down (▲/▼), and then press the[OK] button.6. Press the [MENU] button to exit the menu.◆An icon indicating the selected ISO Speed appears on the screen.[ Notes ]✤The higher the ISO Speed number, the higher sensitivity to light. It results in brighter imaging underdarker lighting.✤High ISO Speed setting may result in picture noise.✤ISO Speed can only be set in <Manual> Scene mode. By default, the scene mode is set to <Auto>.✤While the menu screen is displayed, pressing the [Record / Stop] button will exit the menu.3ISOIN03025920PhotoMove Select ExitISOPhotoMove Select ExitEV0AUTO100200400Automatically sets the ISO according to the light brightnessThe standard sensitivity rate, and therefore it is the usual shooting sensitivity rate. When you use this in a dark place, you can increase the shutter speed, but it might comeout grainy.When you use this in a very dark place, you can greatly increase the shutter speed, but youmay get a rough image due to severe graininess. 00934C SC-MS10 USA~089 9/30/05 10:56 AM Page 67](https://usermanual.wiki/Samsung-Electronics-Co/05SAM1/User-Guide-589245-Page-71.png)
![ENGLISH6868Photo Mode : Setting the Capturing Options456MENUISOA00PhotoPhotoWhite BalanceWhite BalanceAutoDaylightCloudyFluorescentHMoveMove SelectSelect ExitExitPhotoWhite BalanceMove Select Exit00PhotoWhite BalanceMove Select ExitMENUISOAPhotoPhotoWhite BalanceWhite BalanceAutoDaylightCloudyFluorescentHMoveMove SelectSelect ExitExit0IN0302592PhotoWhite BalanceMove Select ExitPhotoWhite BalanceMove Select ExitEV0Setting the White BalanceThe White Balance allows calibration of the picture for accurate color display in different lightingconditions. It is recommended to set the white balance prior to any recording.1. Set the Mode Dial to Photo mode.2. Press the [POWER] button to turn on the device.3. Press the [MENU] button.◆Menu screen appears.4. Move the joystick left / right (œœ/√√) to select <White Balance>.5. Select an option by moving the joystick up / down (▲/▼), and then press the[OK] button.6. Press the [MENU] button to exit the menu.◆An icon indicating the selected white balance appears on the screen.◆If <Auto> is selected, no icon will be displayed.[ Notes ]✤White Balance can be set only in <Manual> Scene mode. By default, the scene mode is set to <Auto>.✤In general outdoors picture taking, <Auto> setting will allow users to have best results.✤As the lighting condition changes, set the appropriate white balance before taking a picture.✤While the menu screen is displayed, pressing the [Record / Stop] button will exit the menu.3IN03025920PhotoWhite BalanceMove Select ExitPhotoWhite BalanceMove Select ExitEV0AUTODaylightCloudyFluorescentHFluorescentLTungstenCustom WBAutomatically sets according to the shooting environment. Adjusts the color according to daylight/indoor, outdoor lightYou can select this when you cannot have daylight as a direct light, such as when it is partly-cloudy or cloudy. Suitable in a halogen or 3-wavelength light environment. Suitable for a fluorescent light environment. Suitable for an incandescent light environment. You can adjust the white balance as you wish based on the shooting environment. 00934C SC-MS10 USA~089 9/30/05 10:56 AM Page 68](https://usermanual.wiki/Samsung-Electronics-Co/05SAM1/User-Guide-589245-Page-72.png)
![ENGLISH6969Photo Mode : Setting the Capturing Options4MENUISO+0.6+0.30-0.3EVEVPhotoPhotoMoveMove SelectSelect ExitExitEVPhotoMove Select ExitAdjusting the Exposure – Exposure CompensationYou can manually make exposure adjustments using EV Exposure Compensation which allowsusers to control the amount of light manually when the shutter-release button is released.1. Set the Mode Dial to Photo mode.2. Press the [POWER] button to turn on the device.3. Press the [MENU] button.◆Menu screen appears.4. Move the joystick left / right (œœ/√√) to select <EV>.5. Select an option by moving the joystick up / down (▲/▼), and then press the[OK] button.◆-2.0 / -1.6 / -1/3 / -1.0 / -0.6 / -0.3 / 0 / +0.3 / +0.6 / +1.0 / +1.3 / +1.6 / +2.0◆The screen brightness gets darker when the EV settings goes to a negative setting andgets brighter when it goes to a positive setting. 6. Press the [MENU] button to exit the menu.◆An icon indicating the selected <EV> mode appears on the screen.[ Warning ]✤Do not let the CCD be exposed to a strong light source for a long time. It may damage the CCD.[ Notes ]✤EV compensation can be set only in <Manual> Scene mode. By default, the scene mode is set to <Auto>.✤While the menu screen is displayed, pressing the [Record / Stop] button will exit the menu.3EV2592PhotoMove Select ExitEV0INEVPhotoMove Select Exit00934C SC-MS10 USA~089 9/30/05 10:56 AM Page 69](https://usermanual.wiki/Samsung-Electronics-Co/05SAM1/User-Guide-589245-Page-73.png)
![ENGLISH7070Photo Mode : Setting the Capturing Options456MENUTYPEPhotoPhotoDISDISOffOnMoveMove SelectSelect ExitExitOKPhotoDISMove Select ExitPhotoDISMove Select ExitMENUTYPEPhotoPhotoDISDISOffOnMoveMove SelectSelect ExitExitOK2592INPhotoDISMove Select ExitPhotoDISMove Select ExitEV0Setting the DIS (Digital Image Stabiliser)The Digital Image Stabiliser is a function that compensates for hand shaking and othermovement while recording.DIS provides a more stable picture when:◆Recording with zoom◆Recording with a slower shutter speed◆Recording through the window in a vehicle1. Set the Mode Dial to Photo mode.2. Press the [POWER] button to turn on the device.3. Press the [MENU] button.◆Menu screen appears.4. Move the joystick left / right (œœ/√√) to select <DIS>.5. Select an option by moving the joystick up / down (▲/▼), and then press the[OK] button.◆<Off>: Disables DIS function.◆<On>: Enables DIS function.6. Press the [MENU] button to exit the menu.◆If <On> is selected, < > icon appears on the screen.[ Warning ]✤DIS has no effect on a moving subject.✤Purposely moving the device or taking pictures in a moving vehicle will reduce the DIS’s effect.[ Notes ]✤It is recommended to use a tripod and external lighting for best results in a dark environment.✤DIS does not work for video recording.✤<Multi Shot> mode will cancel the <DIS> setting.✤If the image quality is set to <Tiff>, <DIS> is not available.✤If flash is set to fire, <DIS> will not work.✤When <DIS> is enabled, it takes about 5 seconds to process and save the image.✤While the menu screen is displayed, pressing the [Record / Stop] button will exit the menu.32592INPhotoDISMove Select ExitPhotoDISMove Select ExitEV000934C SC-MS10 USA~089 9/30/05 10:56 AM Page 70](https://usermanual.wiki/Samsung-Electronics-Co/05SAM1/User-Guide-589245-Page-74.png)
![ENGLISH7171Photo Mode : Setting the Capturing Options456MENUTYPE0PhotoPhotoImprintImprintOffDateDate&TimeMoveMove SelectSelect ExitExitOKPhotoImprintMove Select Exit0PhotoImprintMove Select ExitMENUTYPEPhotoPhotoImprintImprintOffDateDate&TimeMoveMove SelectSelect ExitExitOK0PhotoImprintMove Select ExitPhotoImprintMove Select ExitSetting the Imprint OptionYou can imprint Date & Time on pictures taken. To place the date / time information on yourpicture, set this option.1. Set the Mode Dial to Photo mode.2. Press the [POWER] button to turn on the device.3. Press the [MENU] button.◆Menu screen appears.4. Move the joystick left / right (œœ/√√) to select <Imprint>.5. Select an option by moving the joystick up / down (▲/▼), and then press the[OK] button.◆<Off>: Cancels imprinting.◆<Date>: Imprints Date only.◆<Date & Time>: Imprints Date and Time.6. Press the [MENU] button to exit the menu.[ Notes ]✤Imprinting will print the date (and time) information directly onto the picture, and it will not be erased.✤Printing an image with imprinted date (and time) information may produce a print which is cropped at theimprinted area.✤While the menu screen is displayed, pressing the [Record / Stop] button will exit the menu.3IN0302592PhotoImprintMove Select ExitPhotoImprintMove Select ExitEV000934C SC-MS10 USA~089 9/30/05 10:56 AM Page 71](https://usermanual.wiki/Samsung-Electronics-Co/05SAM1/User-Guide-589245-Page-75.png)
![ENGLISH7272Photo Mode : Setting the Capturing Options456MENUTYPEPhotoPhotoDigital ZoomDigital ZoomOffOnMoveMove SelectSelect ExitExitOKPhotoDigital ZoomMove Select ExitPhotoDigital ZoomMove Select ExitMENUTYPEPhotoPhotoDigital ZoomDigital ZoomOffOnMoveMove SelectSelect ExitExitOK2592INTPhotoDigital ZoomMove Select ExitPhotoDigital ZoomMove Select ExitEV0Setting the Digital ZoomAs well as the 3x optical zoom, this device supports 5x digital zoom which produces a total of15x digital zoom.. Exceeding the optical zoom limit will automatically apply digital zooming whenavailable. Digital zoom may produce a grainy picture.1. Set the Mode Dial to Photo mode.2. Press the [POWER] button to turn on the device.3. Press the [MENU] button.◆Menu screen appears.4. Move the joystick left / right (œœ/√√) to select <Digital Zoom>.5. Select an option by moving the joystick up / down (▲/▼), and then press the[OK] button.◆<Off>: Disables digital zoom. Only optical zoom 3x will be supported for zooming◆<On>: Enables digital zoom. Attempts to zoom in more than 3x will automatically applydigital zooming (up to 15x).6. Press the [MENU] button to exit the menu.◆When the digital zoom is activated, an indicator appears on the screen.[ Note ]✤While the menu screen is displayed, pressing the [Record / Stop] button will exit the menu.32592INPhotoDigital ZoomMove Select ExitPhotoDigital ZoomMove Select ExitEV000934C SC-MS10 USA~089 9/30/05 10:56 AM Page 72](https://usermanual.wiki/Samsung-Electronics-Co/05SAM1/User-Guide-589245-Page-76.png)
![ENGLISH7373Photo Mode : Setting the Capturing Options456MENUISO0PhotoPhotoMulti ShotMulti ShotOffNormalAEBMoveMove SelectSelect ExitExitPhotoMulti ShotMove Select Exit00PhotoMulti ShotMove Select ExitMENUISOPhotoPhotoMulti ShotMulti ShotOffNormalAEBMoveMove SelectSelect ExitExit0IN0302592PhotoMulti ShotMove Select ExitPhotoMulti ShotMove Select Exit0EV0Setting the Multi ShotYou can take a series of pictures continuously with just one press of the shutter.1. Set the Mode Dial to Photo mode.2. Press the [POWER] button to turn on the device.3. Press the [MENU] button.◆Menu screen appears.4. Move the joystick left / right (œœ/√√) to select <Multi Shot>.5. Select an option by moving the joystick up / down (▲/▼), and then press the[OK] button.6. Press the [MENU] button to exit the menu.◆An icon indicating the selected Multi Shot mode appears on the screen.◆If <Off> is selected, no icon will be displayed.[ Notes ]✤If the Photo File Quality is set to <Tiff>, Multi Shot is not available for setting.✤When you set the Multi Shot enabled, you cannot use the flash.✤Restarting the device will cancel the Multi Shot setting.✤While the menu screen is displayed, pressing the [Record / Stop] button will exit the menu.3IN25920PhotoMulti ShotMove Select ExitPhotoMulti ShotMove Select ExitEV0030OffMultiAEB (AutomaticExposure Bracketing)Disables Multi Shot and takes one photo at a time.Enables Multi Shot and takes 3 photos in a row.Enables Multi Shot and takes 3 photos in a row with exposure bracketing of -0.3 EV /0 EV / +0.3 EV00934C SC-MS10 USA~089 9/30/05 10:56 AM Page 73](https://usermanual.wiki/Samsung-Electronics-Co/05SAM1/User-Guide-589245-Page-77.png)
![ENGLISH7474Photo Mode : Setting the Capturing Options456MENUISO00PhotoPhotoSelf TimerSelf TimerOff2 sec10 secMoveMove SelectSelect ExitExitPhotoSelf TimerMove Select Exit00PhotoSelf TimerMove Select ExitMENUISOPhotoPhotoSelf TimerSelf TimerOff2 sec10 secMoveMove SelectSelect ExitExit0IN0302592PhotoSelf TimerMove Select ExitPhotoSelf TimerMove Select ExitEV0Setting the Self TimerUsing this option, you can take a picture of yourself with delayed shooting.1. Set the Mode Dial to Photo mode.2. Press the [POWER] button to turn on the device.3. Press the [MENU] button.◆Menu screen appears.4. Move the joystick left / right (œœ/√√) to select <Self Timer>.5. Select an option by moving the joystick up / down (▲/▼), and then press the[OK] button.6. Press the [MENU] button to exit the menu.[ Notes ]✤You can set this option using the shortcut button directly.✤It is recommended to use a tripod for best results on Self Timer pictures.✤Restarting the device will cancel the Self Timer setting.✤While the menu screen is displayed, pressing the [Record / Stop] button will exit the menu.3IN03025920PhotoSelf TimerMove Select ExitPhotoSelf TimerMove Select ExitEV0Off2 Sec10 SecCancels the Self Timer.Sets the delay interval to 2 seconds. Takes a photo 2 seconds after pressing the [Record/Stop]Sets the delay interval to 2 seconds. Takes photo 10 seconds after pressing the [Record/Stop]00934C SC-MS10 USA~089 9/30/05 10:56 AM Page 74](https://usermanual.wiki/Samsung-Electronics-Co/05SAM1/User-Guide-589245-Page-78.png)
![ENGLISH7575Photo Mode : Setting the Capturing Options456MENUPhotoPhotoFlashFlashOffAutoRed-eyeFill-inMoveMove SelectSelect ExitExitOKPhotoFlashMove Select ExitPhotoFlashMove Select ExitMENUPhotoPhotoFlashFlashOffAutoRed-eyeFill-inMoveMove SelectSelect ExitExitOK2592PhotoFlashMove Select ExitPhotoFlashMove Select ExitEV0INSetting the FlashFlash is very useful not only for brighter subjects at night, but also in daytime when there is notenough lighting on the subject, such as in a shadow, indoors, and in backlight situations.1. Set the Mode Dial to Photo mode.2. Press the [POWER] button to turn on the device.3. Press the [MENU] button.◆Menu screen appears.4. Move the joystick left / right (œœ/√√) to select <Flash>.5. Select an option by moving the joystick up / down (▲/▼), and then press the[OK] button.6. Press the [MENU] button to exit the menu.◆An icon indicating the selected Self Timer mode appears on the screen.◆If <Off> is selected, no icon will be displayed.[ Notes ]✤You can set this option using the short cut button directly.✤Flash mode can only be set in <Manual> Scene mode. By default, the scene mode is set to <Auto>.Refer to page 60 for further details.✤It is recommended to use a tripod for best results when recording with <Slow Sync.> flash mode.✤While the menu screen is displayed, pressing the [Record / Stop] button will exit the menu.32592PhotoFlashMove Select ExitPhotoFlashMove Select ExitEV0INOff ( )Auto ( )Red-eye ( )Fill-in ( )Slow Sync. ()Flash will go off. Select this option when flash use is limited such as in a museum.Flash will be set automatically according to lighting conditions.Flash will be set automatically according to lighting conditions, with red-eye reduction.Forces the flash to go off despite the lighting conditions. May not go off under overly strong lighting.To have a brighter subject and scene (backdrop), the camera will first allow longer exposure andthen throws the flash on the subject. It is recommended to use a tripod to avoid blurred images.00934C SC-MS10 USA~089 9/30/05 10:57 AM Page 75](https://usermanual.wiki/Samsung-Electronics-Co/05SAM1/User-Guide-589245-Page-79.png)
![ENGLISH7676Photo Mode : Setting the Capturing OptionsSetting the Flash[ Notes ]✤Do not use flash in a place where flash use is limited, such as in a museum.✤Frequent use of flash consumes more battery power.✤You cannot use flash with <Multi Shot>.✤Effective flash range distance is less than 2 m (7 ft).OOOOOOXOXXOXXXOOXOXXOXOXXOXXXXOXXXXOXXXXOXXOXOXXXXOOXXXOXXXXScene ModesSupported Flash Modes According to the Scene Modes00934C SC-MS10 USA~089 9/30/05 10:57 AM Page 76](https://usermanual.wiki/Samsung-Electronics-Co/05SAM1/User-Guide-589245-Page-80.png)
![ENGLISH7777Photo Mode : Setting the Capturing Options456MENUISOSSNNBWBW00SPhotoPhotoDigital EffectDigital EffectOffSepiaNegaBLK&WHTMoveMove SelectSelect ExitExitSNBWPhotoDigital EffectMove Select ExitSNBW00SPhotoDigital EffectMove Select ExitMENUISOSSNNBWBWPhotoPhotoDigital EffectDigital EffectOffSepiaNegaBLK&WHTMoveMove SelectSelect ExitExitSNBW0IN0302592SSPhotoDigital EffectMove Select ExitSNBWPhotoDigital EffectMove Select ExitEV0Setting Digital EffectsIt supports various digital effects you can apply to your photos. Create a professional-lookingphoto with digital effects.1. Set the Mode Dial to Photo mode.2. Press the [POWER] button to turn on the device.3. Press the [MENU] button.◆Menu screen appears.4. Move the joystick left / right (œœ/√√) to select <Digital Effect>.5. Select an option by moving the joystick up / down (▲/▼), and then press the[OK] button.6. Press the [MENU] button to exit the menu.◆An icon indicating the selected Digital Effect appears on the screen.◆If <Off> is selected, no icon will be displayed.[ Note ]✤While the menu screen is displayed, pressing the [Record / Stop] button will exit the menu.3SNBWIN03025920SPhotoDigital EffectMove Select ExitSNBWPhotoDigital EffectMove Select ExitEV0OffSepiaNegaBLK&WHTCancel the <Digital Effect>.The picture is displayed in sepia color--similar to that of an old photograph.Reverses the colors, creating the look of a negative.Changes the images into black and white.00934C SC-MS10 USA~089 9/30/05 10:57 AM Page 77](https://usermanual.wiki/Samsung-Electronics-Co/05SAM1/User-Guide-589245-Page-81.png)
![ENGLISH7878Photo Mode : Setting the Viewing Options43411IN302592EV0100-00011 1IN100-000111Slide11IN100-00011 1100-0001SlideSlideUsing the Shortcut ButtonsIt supports various digital effects you can apply to your photos. Create a professional -lookingphoto with the digital effects.1. Set the Mode Dial to Photo mode.2. Press the [POWER] button to turn on the device.3. Press the [Shortcut 1] button.◆Each press of the [Shortcut 1] button will toggle between Capture / View mode.4. Moves to the Photo View mode.1. Set the Mode Dial to Photo mode.2. Press the [POWER] button to turn on the device.3. Press the [Shortcut 2] button.4. The slideshow begins.◆Refer to page 87 for further details on slideshow.5. Press the [OK] button to stop the slideshow.311/6100-000111IN100-0001Switching to Photo Capture ModeViewing a Slideshow00934C SC-MS10 USA~089 9/30/05 10:57 AM Page 78](https://usermanual.wiki/Samsung-Electronics-Co/05SAM1/User-Guide-589245-Page-82.png)
![ENGLISH7979Photo Mode : Setting the Viewing Options43411 100-00011 1IN100-00011 11/1100-000111IN100-0001111111111 11/1100-000111IN100-0001CancelDeleteUsing the Shortcut Buttons1. Set the Mode Dial to Photo mode.2. Press the [POWER] button to turn on the device.3. Press the [Shortcut 3] button.◆Each press of the [Shortcut 3] button will toggle between Locked ( ) and Unlocked().4. The selected file is protected from erasure.◆< > icon indicating the selected file is protected appears on the screen.1. Set the Mode Dial to Photo mode.2. Press the [POWER] button to turn on the device.3. Press the [Shortcut 4] button.4. Select an option by moving the joystick up / down (▲/▼) and then press the[OK] button.◆< > icon indicating the selected file is protected appears on the screen.◆<Yes>: Deletes the selected photo.◆<No>: Cancels delete.◆Refer to page 85 for further details.3100-00011 1IN100-0001 11Protecting Photo filesDeleting Photo files00934C SC-MS10 USA~089 9/30/05 10:57 AM Page 79](https://usermanual.wiki/Samsung-Electronics-Co/05SAM1/User-Guide-589245-Page-83.png)
![ENGLISH8080Photo Mode : Setting the Viewing Options5Move Full ViewMoveMove Full ViewFull ViewMove FinishOKSelectAllCancelMove Select161/6 IN6Using the Shortcut Buttons1. Set the Mode Dial to Photo mode.2. Press the [POWER] button to turn on the device.3. Press the [Shortcut 1] button.◆Switches to Photo view mode.4. Move the [W/T] zoom switch to W (WIDE).◆The screen switches to multi-view.◆The photo you were viewing in the single view is selected.5. Press the [Shortcut 3] button and then select an option by moving the joystickup / down (▲/▼) and then press the [OK] button.◆<Select>: Selected photo files will be protected.◆<All>: All photo files will be protected.◆<Cancel>: Cancels protection.6. If <Select> was selected, select photo files to protect by moving the joystickleft / right / up / down (œœ/√√/▲/▼) and press the [OK] button.7. Press the [Shortcut 3] button again.◆The message “Protect?” appears.8. Select <Yes> to protect the selected photo. Select <No> to cancel protection.◆The < > icon appears on the selected files (Refer to page 84).4MoveMove Full ViewFull ViewMove Full ViewMove FinishOKMove Select61/6 IN66Protecting Photo files in Multi-View67Move Full ViewMove Full ViewMoveMove FinishFinishMove Select6661/6 INMove Full ViewMove Full ViewMove FinishProtect?MoveMove SelectSelectOKYes No66600934C SC-MS10 USA~089 9/30/05 10:57 AM Page 80](https://usermanual.wiki/Samsung-Electronics-Co/05SAM1/User-Guide-589245-Page-84.png)
![ENGLISH8181Photo Mode : Setting the Viewing OptionsUsing the Shortcut Buttons1. Set the Mode Dial to Photo mode.2. Press the [POWER] button to turn on the device.3. Press the [Shortcut 1] button.◆Switches to Photo view mode.4. Move the [W/T] zoom switch to W (WIDE).◆The screen switches to multi-view.◆The photo you were viewing in the single view is selected.5. Press the [Shortcut 4] button and then select an option by moving the joystickup / down (▲/▼) and then press the [OK] button.◆<Select>: Selected photo files will be deleted.◆<All>: All photo files will be deleted.◆<Cancel>: Cancels deletion.6. If <Select> was selected, select photo files to delete by moving the joystickleft / right / up / down (œœ/√√/▲/▼) and press the [OK] button.◆< > icon appears on the selected files.7. Press the [Shortcut 4] button again.◆The message “Delete?” appears.8. Select <Yes> to delete selected files. Select <No> to cancel deletion.Refer to page 85 for further details.Deleting Photo files in Multi-View5Move Full ViewMoveMove Full ViewFull ViewOKSelectAllCancelMove FinishMove Select4MoveMove Full ViewFull ViewMove Full ViewOKMove FinishMove Select67Move Full ViewMove Full ViewMoveMove FinishFinishMove SelectMove Full ViewMove Full ViewMove FinishDelete?Yes NoMoveMove SelectSelectOK00934C SC-MS10 USA~089 9/30/05 10:57 AM Page 81](https://usermanual.wiki/Samsung-Electronics-Co/05SAM1/User-Guide-589245-Page-85.png)
![ENGLISH8282Photo Mode : Setting the Viewing Options5MENUTYPEPhotoPhoto1111PhotoPhotoPhotoPhotoRotateRotateRotateRight(90°)Left(90°)Updown(180°)MoveMove SelectSelect ExitExitOKMove Select ExitRotating a Photo FileYou can rotate a saved photo.1. Set the Mode Dial to Photo mode.2. Press the [POWER] button to turn on the device.3. Press the [Shortcut 1] button to switch to Photo viewing mode.4. Move the joystick left / right (œœ/√√) to select a photo.5. Press the [MENU] button.◆Menu screen appears.6. Move the joystick left / right (œœ/√√) to select <Rotate>.7. Select an option by moving the joystick up / down (▲/▼) and then press the[OK] button.◆<Right(90°)>: Rotates the photo clockwise by 90°.◆<Left(90°)>: Rotates the photo counterclockwise by 90°.◆<Updown(180°)>: Flips the image up and down (Rotates 180°).8. Press the [MENU] button to exit the menu.[ Notes ]✤Rotated images having a portrait ratio will have black margins on both the left / right corners of the LCDwhen it is displayed.✤Rotating will not affect the image quality or resolution.✤A cropped and newly saved image cannot be rotated.✤A rotated image cannot be cropped.✤TIFF images cannot be rotated.✤Rotated images may not appear as rotated on a PC.✤While the menu screen is displayed, pressing the [Record / Stop] button will exit the menu.4PhotoPhotoIN100-00011 1100-000111PhotoPhotoPhotoRotateRotateMove Select ExitMove Select Exit78MENUTYPEPhotoPhoto1111PhotoPhotoPhotoPhotoRotateRotateRotateRight(90°)Left(90°)Updown(180°)Move Select ExitMoveMove SelectSelect ExitExitOKPhotoPhotoIN11100-000111100-0001PhotoPhotoPhotoRotateRotateMove Select ExitMove Select Exit00934C SC-MS10 USA~089 9/30/05 10:57 AM Page 82](https://usermanual.wiki/Samsung-Electronics-Co/05SAM1/User-Guide-589245-Page-86.png)
![ENGLISH8383Photo Mode : Setting the Viewing Options6MENUTYPE204816001024 11PhotoPhotoResizeResizeMoveMove SelectSelect ExitExitOKPhotoResizeMove Select ExitResizing Photos You can resize a saved photo to be smaller than original. Making a bigger image file is notsupported.1. Set the Mode Dial to Photo mode.2. Press the [POWER] button to turn on the device.3. Press the [Shortcut 1] button to switch to Photo viewing mode.4. Move the joystick left / right (œœ/√√) to select a photo.5. Press the [MENU] button.◆Menu screen appears.6. Move the joystick left / right (œœ/√√) to select <Resize>.7. Select an option by moving the joystick up / down (▲/▼) and then press the[OK] button.◆<4M>/ <3M> / <2M> / <1M> / VGA◆You can only resize a saved photo to be smaller than the original.8. Press the [MENU] button to exit the menu.[ Notes ]✤Only JPEG images can be resized. TIFF images and video files cannot be resized.✤Resized photos are saved separately. The original photo will not be deleted.✤Rotated photos cannot be resized. ✤If there is not enough space to save the resized photo, the message “Memory Full!” will appear and theresizing will be canceled.✤While the menu screen is displayed, pressing the [Record / Stop] button will exit the menu.4100-00011 1IN100-0001PhotoResizeMove Select ExitPhotoResizeMove Select Exit711PhotoResizeMove Select ExitMENUTYPE204816001024 PhotoPhotoResizeResizeMoveMove SelectSelect ExitExitOK00934C SC-MS10 USA~089 9/30/05 10:57 AM Page 83](https://usermanual.wiki/Samsung-Electronics-Co/05SAM1/User-Guide-589245-Page-87.png)
![ENGLISH8484Photo Mode : Setting the Viewing Options5MENU111PhotoPhotoProtectProtectSelectAllMoveMove SelectSelect ExitExitOKMove FinishMove Select1Protecting Photo FilesYou can protect saved important photo files from accidental erasure.1. Set the Mode Dial to Photo mode.2. Press the [POWER] button to turn on the device.3. Press the [Shortcut 1] button to switch to Photo viewing mode.4. Press the [MENU] button.◆Menu screen appears.5. Move the joystick left / right (œœ/√√) to select <Protect>.6. Select an option by moving the joystick up / down (▲/▼) and then press the[OK] button.◆<Select>: Multi-view screen appears and you can select photo files to protect.◆<All>: All photo files will be protected.If <All> is selected, the message “Protect All?” appears. Select <Yes> or <No> by movingthe joystick left / right (œ/√) and then press the [OK] button to confirm.7. If <Select> is selected, Multi-view screen appears. Select photo files to protectby moving the joystick left / right / up / down (œœ/√√/▲/▼) and press the [OK]button.◆An icon ( ) indicating selected file is to be protected appears.8. Press the [Shortcut 3] button.◆The message “Protect?” appears. Select <Yes> or <No> by moving the joystick left / right(œ/√) and then press the [OK] button to confirm.9. Press the [MENU] button to exit the menu.[ Notes ]✤You can easily access this function by using the shortcut button (refer to page 79).✤When you attempt to delete a protected file, you will hear a warning beep.When you set the Beep Sound to Off, there will be no beep sound but the message “Protect” appears onthe screen and the file will not be deleted.✤While the menu screen is displayed, pressing the [Record / Stop] button will exit the menu.4100-00011 111/6IN100-0001PhotoProtectMove Select ExitMove FinishMove Select168111PhotoProtectMove Select ExitMoveMove FinishFinishMove Select11/6 IN111PhotoProtectMove Select ExitMove FinishProtect?Yes NoMoveMove SelectSelectOK100934C SC-MS10 USA~089 9/30/05 10:57 AM Page 84](https://usermanual.wiki/Samsung-Electronics-Co/05SAM1/User-Guide-589245-Page-88.png)
![ENGLISH8585Photo Mode : Setting the Viewing Options6MENU11PhotoPhotoDeleteDeleteSelectAllMoveMove SelectSelect ExitExitOKMove FinishMove SelectDeleting Photo FilesYou can delete saved photo files.1. Set the Mode Dial to Photo mode.2. Press the [POWER] button to turn on the device.3. Press the [Shortcut 1] button to switch to Photo viewing mode.4. Press the [MENU] button.◆Menu screen appears.5. Move the joystick left / right (œœ/√√) to select <Delete>.6. Select an option by moving the joystick up / down (▲/▼) and then press the[OK] button.◆<Select>: Multi-view screen appears and you can select photo files to delete.◆<All>: All photo files will be deleted.If <All> is selected, the message “Delete All?” appears. Select <Yes> or <No> by movingthe joystick left / right (œ/√) and then press the [OK] button to confirm.7. If <Select> is selected, Multi-view screen appears. Select photo files to deleteby moving the joystick left / right / up / down (œœ/√√/▲/▼) and press the [OK]button.◆An icon ( ) indicating the selected file to be deleted appears.8. Press the [Shortcut 4] button.◆The message “Delete?” appears. Select <Yes> or <No> by moving the joystick left / right(œ/√) and then press the [OK] button to confirm.9. Press the [MENU] button to exit the menu.[ Notes ]✤You can easily access this function by using the shortcut button (refer to page 81).✤When you attempt to delete a protected file, you will hear a warning beep.When you set the Beep Sound to Off, there will be no beep sound but the message “Protect” appears onthe screen and the file will not be deleted.✤While the menu screen is displayed, pressing the [Record / Stop] button will exit the menu.4100-00011 1IN100-0001PhotoDeleteMove Select ExitMove FinishMove Select7811PhotoDeleteMove Select ExitMoveMove FinishFinishMove SelectIN11PhotoDeleteMove Select ExitMove FinishDelete?Yes NoMoveMove SelectSelectOK00934C SC-MS10 USA~089 9/30/05 10:57 AM Page 85](https://usermanual.wiki/Samsung-Electronics-Co/05SAM1/User-Guide-589245-Page-89.png)
![ENGLISH8686Photo Mode : Setting the Viewing Options5MENUTYPE11PhotoPhotoCopy (to)Copy (to)SelectAllMoveMove SelectSelect ExitExitOKCopying Photo FilesYou can copy saved photo files from the built-in internal memory onto an external mini SDMemory Card and vice-versa.1. Set the Mode Dial to Photo mode.2. Press the [POWER] button to turn on the device.3. Press the [Shortcut 1] button to switch to Photo viewing mode.4. Press the [MENU] button.◆Menu screen appears.5. Move the joystick left / right (œœ/√√) to select <Copy (to)>.6. Select an option by moving the joystick up / down (▲/▼) and then press the[OK] button.◆<Select>: Multi-view screen appears and you can select photo files to copy.◆<All>: All photo files will be copied.If <All> is selected, the message “Copy All?” appears. Select <Yes> or <No> by movingthe joystick left / right (œ/√) and then press the [OK] button to confirm.7. If <Select> is selected, Multi-view screen appears. Select photo files to copyby moving the joystick left / right / up / down (œœ/√√/▲/▼) and press the [OK]button.◆An icon ( ) indicating the selected file to be copied appears.8. Press the [Shortcut 4] button.◆The message “Copy?” appears. Select <Yes> or <No> by moving the joystick left / right(œ/√) and then press the [OK] button to confirm.9. Press the [MENU] button to exit the menu.[ Notes ]✤It copies from the currently-used memory to another. If the internal memory was used, it copies to anexternal mini SD Memory Card.✤While the menu screen is displayed, pressing the [Record / Stop] button will exit the menu.4100-00011 1IN100-0001PhotoCopy (to)Move Select Exit00934C SC-MS10 USA~089 9/30/05 10:57 AM Page 86](https://usermanual.wiki/Samsung-Electronics-Co/05SAM1/User-Guide-589245-Page-90.png)
![ENGLISH8787Photo Mode : Setting the Viewing Options5MENUTYPE1111PhotoPhotoSlideSlideStartIntervalRepeat1sec1secOffOffMoveMove SelectSelect ExitExitOKPhotoSlideMove Select ExitSlideSetting the SlideshowYou can set a slideshow, and also set the interval and repetition options for the slideshow.1. Set the Mode Dial to Photo mode.2. Press the [POWER] button to turn on the device.3. Press the [Shortcut 1] button to switch to Photo viewing mode.4. Press the [MENU] button.◆Menu screen appears.5. Move the joystick left / right (œœ/√√) to select <Slide>.6. Select <Interval> by moving the joystick up / down (▲/▼) and then press the[OK] button.7. Set the interval by moving the joystick up / down (▲/▼) and then press the[OK] button.◆Interval range: 1 ~ 10 seconds8. Select <Repeat> by moving the joystick up / down (▲/▼) and then press the[OK] button.9. Set the repeat option by moving the joystick up / down (▲/▼) and then pressthe [OK] button.◆<On>: Sets to repeat the slideshow.◆<Off>: Sets not to repeat the slideshow.10 .Select <Start> by moving the joystick up / down (▲/▼) and then press the[OK] button.◆Slideshow starts. To stop the slideshow, press the [OK] button.[ Notes ]✤You can easily access this function by using the shortcut button (refer to page 78).✤The interval between photos may vary depending on the size of the photo.✤Slideshow starts from the current photo displayed.✤TIFF images are not displayed in a slideshow.✤While the menu screen is displayed, pressing the [Record / Stop] button will exit the menu.4100-00011 1100-000111PhotoSlide1secOffMove Select ExitPhotoSlideMove Select ExitSlideIN791111PhotoSlide1secOffMove Select ExitMENUTYPEPhotoPhotoSlideSlideStartIntervalMoveMove SelectSelect ExitExitOKRepeat OffOnSlide11IN100-00011 1100-0001PhotoSlide1secOffMove Select ExitPhotoSlideMove Select ExitSlideSlide00934C SC-MS10 USA~089 9/30/05 10:57 AM Page 87](https://usermanual.wiki/Samsung-Electronics-Co/05SAM1/User-Guide-589245-Page-91.png)
![ENGLISH8888Photo Mode : Setting the Viewing Options5MENUTYPE11PhotoPhotoSelectAllMoveMove SelectSelect ExitExitOKMove FinishMove Select1Setting the DPOF (Digital Print Order Format) FunctionYou can automatically print a photo file recorded with a printer that supports DPOF.1. Set the Mode Dial to Photo mode.2. Press the [POWER] button to turn on the device.3. Press the [Shortcut 1] button to switch to Photo viewing mode.4. Press the [MENU] button.◆Menu screen appears.5. Move the joystick left / right (œœ/√√) to select <DPOF>.6. Select an option by moving the joystick up / down (▲/▼) and then press the[OK] button.◆<Select>: Multi-view screen appears and you can select photo files to set DPOF printing.◆<All>: All photo files will be marked with DPOF printing.If <All> is selected, the message “DPOF All?” appears. Select <Yes> or <No> by movingthe joystick left / right (œ/√) and then press the [OK] button to confirm.7. If <Select> is selected, Multi-view screen appears. Select the photo files todelete by moving the joystick left / right / up / down (œœ/√√/▲/▼) and press the[OK] button.8. Set the number of prints by using the [Shortcut 3] and [Shortcut 4] buttonsand then press the [Shortcut 2] button.◆The [Shortcut 3] button will increase the number of prints while the [Shortcut 4] willdecrease it.9. The message “DPOF?” appears. Select <Yes> or <No> by moving the joystickleft / right (œœ/√√) and then press the [OK] button to confirm.10.Press the [MENU] button to exit the menu.[ Notes ]✤Please refer to the product instructions for further details on DPOF printer use.✤Using a printer that supports DPOF allows users to directly print photos stored in a Memory Card withouta PC.✤While the menu screen is displayed, pressing the [Record / Stop] button will exit the menu.4100-00011 1IN100-0001PhotoMove Select ExitMove FinishMove Select18911PhotoMove Select ExitMoveMove FinishFinishMove Select11/6 IN11PhotoMove Select ExitMove FinishDPOF?Yes NoMoveMove SelectSelectOK100934C SC-MS10 USA~089 9/30/05 10:58 AM Page 88](https://usermanual.wiki/Samsung-Electronics-Co/05SAM1/User-Guide-589245-Page-92.png)
![ENGLISH9090Movie Mode : Recording a MovieRecording a MovieYou can record moving pictures and store it in memory.1. Set the Mode Dial to Movie mode.2. Press the [POWER] button to turn on the device.3. Press the [Record / Stop] button.◆It starts to record.4. To stop recording, press the [Record / Stop] button again.◆It stops recording, and stands by.◆The timestamp will be recorded along with the video to support users with a faster search.◆00:00:16: Elapsed Recording TimeREM 4 Min: Remaining Recording Time[ Notes ]✤When you are finished taking pictures, please turn off the device to conserve battery power.✤You can adjust the brightness of the LCD monitor to have a clearer view (refer to page 37).✤The brightness of the LCD monitor will not affect the brightness of the recordings.Reading the Counter34 5Rec00:00:16AOFFOFF640REMINSFSFAEAUTO4 Min4 Min4 MinRECSTBYSTBYREMINRec00:00:1600:00:16OFFSF4 Min4 Min4 MinRECRECSTBY00934C SC-MS10 USA~111 9/30/05 10:58 AM Page 90](https://usermanual.wiki/Samsung-Electronics-Co/05SAM1/User-Guide-589245-Page-94.png)
![ENGLISH9191Movie Mode : Recording a MovieZooming In and OutZooming allows you to change the size of the subject captured in a scene.You can take advantage of the 3x optical electro motion zoom lens.Before You Start1. Set the Mode Dial to Photo mode.2. Press the [POWER] button to turn on the device.The Photo Capture screen appears.[ Notes ]✤Frequent use of zooming may result in higher battery consumption.✤You can take advantage of the 5x digital zoom as well as the 3x optical zoom for a total of 15x zoom.✤Optical zoom preserves image quality.AOFFOFF640REMINSFSFAEAUTOSTBYSTBY4 Min4 MinOFFSFTSTBY4 MinOFFSFSTBY4 MinAOFFOFF640REMINSFSFAEAUTOTSTBYSTBY4 Min4 MinW TW TZoom In Zoom Out Move the [W/T] zoom switch to W (WIDE).●The shot subject’s size is reduced, and you can take a pictureas if you were far away from the subject.●At the zoom indicator in the LCD screen, the arrow moves to W.●The smallest rate of zoom out is the default rate (originalresolution of the subject).Move the [W/T] zoom switch to T (TELE).●The subject is larger, and you can take a picture as if you wereclose to the subject.●At the zoom indicator the arrow moves to T.●The largest optical zoom is 3x, which is the biggest among thebasic zoom.00934C SC-MS10 USA~111 9/30/05 10:58 AM Page 91](https://usermanual.wiki/Samsung-Electronics-Co/05SAM1/User-Guide-589245-Page-95.png)
![ENGLISH929234655Movie Mode : Playing a MoviePlaying a Movie on the LCD MonitorIt is handy and practical to view movie files using the LCD monitor almost anywhere such as ina car, indoors, or outdoors.1. Set the Mode Dial to Movie mode.2. Press the [POWER] button to turn on the device.3. Press the [Shortcut 1] button.◆Switches to Movie View mode.4. Move the joystick left / right (œœ/√√) to select a movie and then press the [OK]button.5. It starts to play back. Each press of the [OK] button toggles between play /pause.◆To pause playback, press the [OK] button.◆To stop playback, press and hold the [OK] button for more than 3 seconds.6. To adjust volume, move the joystick up / down (▲/▼). ◆The volume indicator appears and disappears after a few seconds.[ Notes ]✤If there is no file stored to view, the message <“No Files…”> appears.✤You can adjust the volume up to 10 levels.✤When the earphones or AV (Audio / Video) cable is connected to the device, the built-in speaker willautomatically turn off.✤You can also play the video file on a TV screen by connecting the CAM to a TV. (Refer to page XX)✤A video CODEC is required to play the video files recorded on the CAM on a computer.Install the software provided in the bundled CD to have the CODEC automatically installed on yoursystem. If you do not have the CD, search the product model name on the Download Center from theSamsung Electronics website to get the CODEC installation file (refer to page 131).00:00:16100-00011/1100-000100:00:0000:00:16100-000100:00:1600:00:10AOFFOFF640REMINSFSFAEAUTOSTBYSTBY4 Min4 MinIN00:00:16100-00011/1100-000100:00:0000:00:16100-000100:00:1600:00:10OFFSFSTBY4 Min00:00:16100-00011/1IN100-000100:00:0000:00:16100-000100:00:1600:00:10OFFSFSTBY4 Min00:00:16100-00011/1100-000100:00:00IN00:00:16100-000100:00:1600:00:10OFFSFSTBY4 Min00934C SC-MS10 USA~111 9/30/05 10:58 AM Page 92](https://usermanual.wiki/Samsung-Electronics-Co/05SAM1/User-Guide-589245-Page-96.png)
![ENGLISH939334Movie Mode : Setting the Recording OptionsUsing the Shortcut ButtonsShortcut buttons are provided to allow users easy access to frequently-used functions.1. Set the Mode Dial to Movie mode.2. Press the [POWER] button to turn on the device.3. Press the [Shortcut 1] button.◆Each press of the [Shortcut 1] button toggles between the Movie Record / View modes.1. Set the Mode Dial to Movie mode.2. Press the [POWER] button to turn on the device.3. Press the [Shortcut 2] button.◆Each press of the [Shortcut 2] button cycles through < >-< >-< >-< >Program AE modes.4. An icon indicating the selected Program AE mode appears on the screen(refer to page 96).IN00:00:16100-0001100-00011/1OFFSFSTBY4 MinAOFFOFF640REMINSFSFAEAUTOSTBYSTBY4 Min4 MinOFFSFSTBY4 MinOFFSFSTBY4 MinAOFFOFF640REMINSFSFSTBYSTBY4 Min4 Min300:00:16100-00011/1AOFFOFF640REMINSFSFAEAUTOSTBYSTBY4 Min4 MinSwitching to Movie View ModeSetting the Program AE00934C SC-MS10 USA~111 9/30/05 10:58 AM Page 93](https://usermanual.wiki/Samsung-Electronics-Co/05SAM1/User-Guide-589245-Page-97.png)
![ENGLISH9494434Movie Mode : Setting the Recording OptionsUsing the Shortcut ButtonsShortcut buttons are provided to allow users easy access to frequently used functions.1. Set the Mode Dial to Movie mode.2. Press the [POWER] button to turn on the device.3. Press the [Shortcut 3] button.◆Each press of the [Shortcut 3] button cycles through the < >-< >-< >-< >-< >-<>flash modes4. An icon indicating the selected White Balance mode appears on the screen(refer to page 95).1. Set the Mode Dial to Movie mode.2. Press the [POWER] button to turn on the device.3. Press the [Shortcut 4] button.◆Each press of the [Shortcut 2] button cycles through the < >-< >-< >-< >Digital Effects.4. An icon indicating the selected Digital Effect appears on the screen(refer to page 102). SNBWBWSNNBWSSNBWSNBWAOFFSFSTBY4 MinOFFOFF640REMINSFSFAEAUTOSTBYSTBY4 Min4 MinAOFFOFF640REMINSFSFAEAUTOSTBYSTBY4 Min4 MinSFSTBY4 MinBWOFFSFSTBY4 MinA640REMINSFSFAEAUTOSTBYSTBY4 Min4 MinBWBW3AOFFOFF640REMINSFSFAEAUTOSTBYSTBY4 Min4 MinOFFSFSTBY4 MinSetting the White BalanceSetting the Digital Effect00934C SC-MS10 USA~111 9/30/05 10:58 AM Page 94](https://usermanual.wiki/Samsung-Electronics-Co/05SAM1/User-Guide-589245-Page-98.png)
![ENGLISH9595345Movie Mode : Setting the Recording OptionsSetting the White BalanceThe White Balance allows calibration of the picture for accurate color display in different lightingconditions. It is recommended to set the white balance prior to any recording.1. Set the Mode Dial to Movie mode.2. Press the [POWER] button to turn on the device.3. Press the [MENU] button.◆Menu screen appears.4. Move the joystick left / right (œœ/√√) to select <White Balance>.5. Move the joystick up / down (▲/▼) to select an option, and then press the[OK] button.6. Press the [MENU] button to exit the menu.◆An icon indicating the selected White Balance appears on the screen.◆If <Auto> is selected, no icon will be displayed.[ Notes ]✤You can easily access this function by using the shortcut button (refer to page 94).✤In general outdoors recording, <Auto> setting will allow users to achieve the best results.✤As the lighting conditions change, set the appropriate white balance before recording.✤While the menu screen is displayed, pressing the [Record / Stop] button will exit the menu.MENUAEAOFFSFSTBY4 MinMovieMovieWhite BalanceWhite BalanceAutoDaylightCloudyFluorescentHMoveMove SelectSelect ExitExitOKMovieWhite BalanceMove Select ExitOFFSFSTBY4 MinOFFSFSTBY4 MinMovieWhite BalanceMove Select ExitMENUAEMovieMovieWhite BalanceWhite BalanceAutoDaylightCloudyFluorescentHMoveMove SelectSelect ExitExitOKOFFSFSTBY4 MinOFFSFSTBY4 MinMovieWhite BalanceMove Select ExitMovieWhite BalanceMove Select ExitOFFOFF640REMINSFSFAEAUTOSTBYSTBY4 Min4 Min2AOFFOFF640REMINSFSFAEAUTOSTBYSTBY4 Min4 MinMovieWhite BalanceMove Select ExitMovieWhite BalanceMove Select ExitOFFSFSTBY4 MinAUTODaylightCloudyFluorescentHFluorescentLTungstenCustom WBAutomatically sets according to the shooting environment. Adjusts the color according to daylight/indoor, outdoor lightYou can select this when you cannot have daylight as a direct light, such as when it is partly-cloudy or cloudy. Suitable in a halogen or 3-wavelength light environment. Suitable for a fluorescent light environment. Suitable for an incandescent light environment. You can adjust the white balance as you wish based on the shooting environment. 00934C SC-MS10 USA~111 9/30/05 10:58 AM Page 95](https://usermanual.wiki/Samsung-Electronics-Co/05SAM1/User-Guide-589245-Page-99.png)
![ENGLISH9696Setting the Program AEProgram AE modes are preset automatic exposure modes based upon an internal computerprogram. It helps to set appropriate exposure according to the internal light meter and theprogram’s calculations, allowing users to achieve the best results under various recordingconditions.1. Set the Mode Dial to Movie mode.2. Press the [POWER] button to turn on the device.3. Press the [MENU] button.◆Menu screen appears.4. Move the joystick left / right (œœ/√√) to select <Program AE>.5. Select an option by moving the joystick up / down (▲/▼) and then pressthe [OK] button.◆<Auto> ( ) : Balances exposure and shutter speed to get the best resultsautomatically.◆<Sports> ( ) : For recording fast-moving objects. It is suitable for sporting eventsand recording the outside from inside of a vehicle.◆<Spotlight> ( ): Compensates for a subject that appears too bright under strongdirect light such as a spotlight. It is suitable for recording conditions such as concertsand school performances.◆<Beach / Snow> ( ): When the light is very strong, such as on a beach or in thesnow.6. Press the [MENU] button to exit the menu.◆An icon indicating the selected Program AE mode appears on the screen.◆If <Auto> is selected, no icon will be displayed.[ Notes ]✤You can easily access this function by using the shortcut button (refer to page 93).✤You cannot set <Macro> when you are using Program AE mode other than <Auto>.✤While the menu screen is displayed, pressing the [Record / Stop] button will exit the menu.Movie Mode : Setting the Recording Options3456AOFFOFF640REMINSFSFAEAUTOSTBYSTBY4 Min4 MinMovieProgram AEMove Select ExitMovieProgram AEAutoMove Select ExitOFFSFSTBY4 MinMENUTYPEAEAEAUTOOFFSFSTBY4 MinMovieMovieProgram AEProgram AEAutoSportsSpotlightBeach/SnowMoveMove SelectSelect ExitExitOKMovieProgram AEAutoMove Select ExitOFFSFSTBY4 MinOFFSFSTBY4 MinMovieProgram AEMove Select ExitMENUTYPEAEMovieMovieProgram AEProgram AEAutoSportsSpotlightBeach/SnowMoveMove SelectSelect ExitExitOKAEAUTOOFFSFSTBY4 MinOFFSFSTBY4 MinMovieProgram AEMove Select ExitMovieProgram AEAutoMove Select ExitAOFFOFF640REMINSFSFSTBYSTBY4 Min4 Min00934C SC-MS10 USA~111 9/30/05 10:58 AM Page 96](https://usermanual.wiki/Samsung-Electronics-Co/05SAM1/User-Guide-589245-Page-100.png)
![ENGLISH979745Movie Mode : Setting the Recording OptionsSetting the Macro ModeMacro mode allows users to have fine focused image of the closed-up subject within 50 cm.1. Set the Mode Dial to Movie mode.2. Press the [POWER] button to turn on the device.3. Press the [MENU] button.◆Menu screen appears.4. Move the joystick left / right (œœ/√√) to select <Macro>.5. Select an option by moving the joystick up / down (▲/▼) and then pressthe [OK] button.◆Press the [MENU] button to exit the menu.◆An icon indicating the selected Macro mode appears on the screen.[ Notes ]✤When you use Macro mode and record a close-up subject, be careful not to shade your subject.✤As the distance gets closer, the focused area gets narrower.✤If the focus will not set, try to put more distance between you and the subject.✤It is recommended to use a tripod to avoid unstable picture taking and have best results.✤<Macro> setting is available only when you set Program AE to <Auto>.✤While the menu screen is displayed, pressing the [Record / Stop] button will exit the menu.MENUOFFSFSTBY4 Min OFFSFSTBY4 MinMovieMovieOKMacroMacroOffMacroSuper MacroMoveMove SelectSelect ExitExitMovieMacroMove Select ExitOFFSFSTBY4 Min OFFSFSTBY4 MinMovieMacroMove Select ExitMENUMovieMovieOKMacroMacroOffMacroSuper MacroMoveMove SelectSelect ExitExitOFFSFSTBY4 Min AOFFOFF640REMINSFSFAEAUTOSTBYSTBY4 Min4 MinMovieMacroMove Select ExitMovieMacroMove Select Exit3AOFFOFF640REMINSFSFAEAUTOSTBYSTBY4 Min 4 MinOFFSFSTBY4 MinMovieMacroMove Select ExitMovieMacroMove Select ExitMacro Setting<Off><Macro><Super Macro>Focus Range50 cm ~ ∞W: 10 cm ~ ∞T: 30 cm ~ ∞W: 1 cm ~ 5 cm00934C SC-MS10 USA~111 9/30/05 10:58 AM Page 97](https://usermanual.wiki/Samsung-Electronics-Co/05SAM1/User-Guide-589245-Page-101.png)
![ENGLISH9898345Movie Mode : Setting the Recording OptionsSetting the Movie File Size1. Set the Mode Dial to Movie mode.2. Press the [POWER] button to turn on the device.3. Press the [MENU] button.◆Menu screen appears.4. Move the joystick left / right (œœ/√√) to select <Movie Size>.5. Select an option by moving the joystick up / down (▲/▼) and then press the[OK] button.◆Available options are: <640x480> / <320x240>6. Press the [MENU] button to exit the menu.◆An icon indicating the selected Movie Size appears on the screen.[ Notes ]✤Higher resolution requires more memory space, which results in shorter maximum recording time.✤While the menu screen is displayed, pressing the [Record / Stop] button will exit the menu.AOFFOFF640REMINSFSFAEAUTOSTBYSTBY4 Min4 MinOFFSFSTBY4 MinMovieMovie SizeMove Select ExitMovieMovie SizeMove Select ExitMENUTYPEAE320OFFSFSTBY4 MinOFFSFSTBY4 MinMovieMovieMovie SizeMovie SizeOKMoveMove SelectSelect ExitExitMovieMovie SizeMove Select ExitOFFSFSTBY4 MinOFFSFSTBY4 MinMovieMovie SizeMove Select ExitMENUTYPEAE320MovieMovieMovie SizeMovie SizeOKMoveMove SelectSelect ExitExit6OFFSFSTBY4 MinAOFFOFF320REMINSFSFAEAUTOSTBYSTBY4 Min4 MinMovieMovie SizeMove Select ExitMovieMovie SizeMove Select Exit00934C SC-MS10 USA~111 9/30/05 10:58 AM Page 98](https://usermanual.wiki/Samsung-Electronics-Co/05SAM1/User-Guide-589245-Page-102.png)
![ENGLISH9999456Movie Mode : Setting the Recording OptionsSetting the Movie File Quality1. Set the Mode Dial to Movie mode.2. Press the [POWER] button to turn on the device.3. Press the [MENU] button.◆Menu screen appears.4. Move the joystick left / right (œœ/√√) to select <Movie Quality>.5. Select an option by moving the joystick up / down (▲/▼) and then press the[OK] button.◆Available options are: <Super Fine> / <Fine> / <Normal>6. Press the [MENU] button to exit the menu.◆An icon indicating the selected Movie Quality appears on the screen.[ Note ]✤While the menu screen is displayed, pressing the [Record / Stop] button will exit the menu.MENUTYPESFSFNNFFOFFSFSTBY4 MinOFFSTBY4 MinMovieMovieOKMovie QualityMovie QualitySuper FineFineNormalNFMovieMovie QualitySFMoveMove SelectSelect ExitExitMove Select ExitFSFNFOFFSFSTBY4 MinOFFSTBY4 MinMovieMovie QualityMENUTYPENNFFMovieMovieOKMovie QualityMovie QualitySuper FineFineNormalSFSFMove Select ExitMoveMove SelectSelect ExitExitFSFNFOFFSFSTBY4 MinAOFFOFF640REMINAEAUTOSTBYSTBY4 Min4 MinMovieMovie QualityNFMovieMovie QualitySFMove Select ExitMove Select ExitFF3SFNFAOFFOFF640REMINSFSFAEAUTOSTBYSTBY4 Min4 MinOFFSTBY4 MinMovieMovie QualityNFMovieMovie QualitySFMove Select ExitMove Select ExitF00934C SC-MS10 USA~111 9/30/05 10:58 AM Page 99](https://usermanual.wiki/Samsung-Electronics-Co/05SAM1/User-Guide-589245-Page-103.png)
![ENGLISH100100456Movie Mode : Setting the Recording Options Setting the Self TimerUsing this option, you can take pictures of yourself with delayed shooting.1. Set the Mode Dial to Photo mode.2. Press the [POWER] button to turn on the device.3. Press the [MENU] button.◆Menu screen appears.4. Move the joystick left / right (œœ/√√) to select <Self Timer>.5. Select an option by moving the joystick up / down (▲/▼), and then press the[OK] button.6. Press the [MENU] button to exit the menu.◆An icon indicating the selected Self Timer mode appears on the screen.◆If <Off> is selected, no icon will be displayed.[ Notes ]✤It is recommended to use a tripod for the best results for Self Timer recordings.✤While the menu screen is displayed, pressing the [Record / Stop] button will exit the menu.MENUTYPEAEOFFSFSTBY4 MinOFFSFSTBY4 MinMovieMovieSelf TimerSelf TimerOff2 sec10 secOKMoveMove SelectSelect ExitExitMovieSelf TimerMove Select ExitOFFSFSTBY4 MinOFFSFSTBY4 MinMovieSelf TimerMove Select ExitMENUTYPEAEMovieMovieSelf TimerSelf TimerOff2 sec10 secOKMoveMove SelectSelect ExitExitOFFSFSTBY4 MinAOFFOFF640REMINSFSFAEAUTOSTBYSTBY4 Min4 MinMovieSelf TimerMove Select ExitMovieSelf TimerMove Select Exit2AOFFOFF640REMINSFSFAEAUTOSTBYSTBY4 Min4 MinOFFSFSTBY4 MinMovieSelf TimerMove Select ExitMovieSelf TimerMove Select ExitOff2 Sec10 SecCancels the Self Timer.Sets the delay interval to 2 seconds. Takes a photo 2 seconds afterpressing the [Record/Stop]Sets the delay interval to 2 seconds. Takes a photo 10 seconds afterpressing the [Record/Stop]00934C SC-MS10 USA~111 9/30/05 10:58 AM Page 100](https://usermanual.wiki/Samsung-Electronics-Co/05SAM1/User-Guide-589245-Page-104.png)
![ENGLISH10110145Movie Mode : Setting the Recording OptionsSetting the Wind Cut1. Set the Mode Dial to Movie mode.2. Press the [POWER] button to turn on the device.3. Press the [MENU] button.◆Menu screen appears.4. Move the joystick left / right (œœ/√√) to select <Wind Cut>.◆<Off>: Sets off Wind Cut.◆<On>: Sets on Wind Cut to reduce wind noise.5. Press the [MENU] button to exit the menu.◆If <On> is selected, < > icon appears on the screen.[ Notes ]✤When Wind Cut is enabled, a bit of low-frequency band (bass) sound will be reduced alongwith the wind noise. It is a normal result, not a malfunction.✤While the menu screen is displayed, pressing the [Record / Stop] button will exit the menu.MENUTYPEAEOFFSFSTBY29 MinOFFSF5STBY29 MinMovieMovieOKWind CutWind CutOffOnMoveMove SelectSelect ExitExitMovieWind CutMove Select ExitOFFSF5STBY29 MinOFFSF5STBY29 MinMovieWind CutMove Select ExitMENUTYPEAEMovieMovieOKWind CutWind CutOffOnMoveMove SelectSelect ExitExitOFFSF5STBY29 MinAOFFOFF640REMINSFSFAEAUTO512:00PM 01.01,2005STBYSTBY29 Min29 MinMovieWind CutMove Select ExitMovieWind CutMove Select Exit3AOFFOFF640REMINSFSFAEAUTO512:00PM 01.01,2005STBYSTBY29 Min29 MinOFFSF5STBY29 MinMovieWind CutMove Select ExitMovieWind CutMove Select Exit00934C SC-MS10 USA~111 9/30/05 10:58 AM Page 101](https://usermanual.wiki/Samsung-Electronics-Co/05SAM1/User-Guide-589245-Page-105.png)
![ENGLISH1021023456Movie Mode : Setting the Recording OptionsSetting the Digital EffectsIt supports various digital effects you can apply to your video. Create a professional-lookingvideo with digital effects.1. Set the Mode Dial to Movie mode.2. Press the [POWER] button to turn on the device.3. Press the [MENU] button.◆Menu screen appears.4. Move the joystick left / right (œœ/√√) to select <Digital Effect>.5. Select an option by moving the joystick up / down (▲/▼), and then press the[OK] button.6. Press the [MENU] button to exit the menu.◆An icon indicating the selected Digital Effect appears on the screen.◆If <Off> is selected, no icon will be displayed.[ Notes ]✤You can easily access this function by using the shortcut button (refer to page 94).✤While the menu screen is displayed, pressing the [Record / Stop] button will exit the menu.SNBWAOFFOFF640REMINSFSFAEAUTO512:00PM 01.01,2005STBYSTBY29 Min29 MinSF5STBY29 MinMovieDigital EffectMove Select ExitSNBWMovieDigital EffectMove Select ExitSMENUSSNNBWBWOFFSF5STBY29 MinSF5STBY29 MinMovieMovieOKDigital EffectDigital EffectOffSepiaNegaBLK&WHTMoveMove SelectSelect ExitExitSNBWMovieDigital EffectMove Select ExitSSNBWOFFSF5STBY29 MinSF5STBY29 MinMovieDigital EffectMove Select ExitMENUSSNNBWBWMovieMovieOKDigital EffectDigital EffectOffSepiaNegaBLK&WHTMoveMove SelectSelect ExitExitSSNBWOFFSF5STBY29 MinA640REMINSFSFAEAUTO512:00PM 01.01,2005STBYSTBY29 Min29 MinMovieDigital EffectMove Select ExitSNBWMovieDigital EffectMove Select ExitSSOffSepiaNegaBLK&WHTCancel the <Digital Effect>. Takes video in normal mode.The picture is displayed in sepia color--similar to that of an old photograph.Reverses the colors, creating the look of a negative.Changes the images into black and white.00934C SC-MS10 USA~111 9/30/05 10:58 AM Page 102](https://usermanual.wiki/Samsung-Electronics-Co/05SAM1/User-Guide-589245-Page-106.png)
![ENGLISH10310334Movie Mode : Setting the Viewing OptionsUsing the Shortcut ButtonsShortcut buttons are provided to allow users easy access to frequently-used functions.1. Set the Mode Dial to Movie mode.2. Press the [POWER] button to turn on the device.3. Press the [Shortcut 1] button.◆Each press of the [Shortcut 1] button toggles between the Movie record / view modes.1. Set the Mode Dial to Movie mode.2. Press the [POWER] button to turn on the device.3. Press the [Shortcut 2] button.4. The slideshow begins. To pause the slideshow, press the [OK] button.◆Refer to page 110 for further details on slideshow.IN00:01:36100-0001100-00011/6OFFSF5STBY29 Min00:01:36IN00:01:36100-0001100-0001 100-000100:00:001/6Slide00:01:3600:01:36100-0001IN100-0001100-000100:00:001/6SlideSlide300:01:36100-00011/6AOFFOFF640REMINSFSFAEAUTO512:00PM 01.01,2005STBYSTBY29 Min29 MinViewing the SlideshowSwitching to Movie View Mode00934C SC-MS10 USA~111 9/30/05 10:58 AM Page 103](https://usermanual.wiki/Samsung-Electronics-Co/05SAM1/User-Guide-589245-Page-107.png)
![ENGLISH104104434Movie Mode : Setting the Viewing OptionsUsing the Shortcut ButtonsShortcut buttons are provided to allow users easy access to frequently-used functions.1. Set the Mode Dial to Movie mode.2. Press the [POWER] button to turn on the device.3. Press the [Shortcut 3] button.◆Each press of the [Shortcut 3] button toggles between Locked ( ) and Unlocked ( ).4. The protected movie file is protected from an accidental erasure.◆Refer to page 107 for further details.1. Set the Mode Dial to Movie mode.2. Press the [POWER] button to turn on the device.3. Press the [Shortcut 4] button.4. Select an option by moving the joystick left / right (œœ/√√) button, and thenpress the [OK] button.◆<Delete>: Deletes the selected movie file. Refer to page 108 for further details.◆<Cancel>: Cancels the deletion.00:01:36100-00011/6IN00:01:36100-0001100-00011/6IN00:01:36100-0001100-00011/600:01:36100-00011/600:01:36100-00011/6IN00:01:36100-0001100-00011/6CancelDelete3IN00:01:36100-0001100-00011/600:01:36100-00011/6Protecting a Movie FileDeleting a Movie File00934C SC-MS10 USA~111 9/30/05 10:58 AM Page 104](https://usermanual.wiki/Samsung-Electronics-Co/05SAM1/User-Guide-589245-Page-108.png)
![ENGLISH10510534Movie Mode : Setting the Viewing OptionsUsing the Shortcut ButtonsProtecting Movie files in Multi-View1. Set the Mode Dial to Movie mode.2. Press the [POWER] button to turn on the device.3. Press the [Shortcut 1] button.◆It switches to the Movie view mode.4. Move the [W/T] zoom switch to W (WIDE).◆The screen switches to multi-view.◆The movie you were viewing in the single view is selected.5. Press the [Shortcut 3] button and then select an option by moving thejoystick up / down (▲/▼) and then press the [OK] button.◆<Select>: Selected files will be protected.◆<All>: All files will be protected.◆<Cancel>: Cancels protection.6. If <Select> was selected, select photo files to protect by moving the joystickleft / right / up / down (œœ/√√/▲/▼) and press the [OK] button.◆< > icon appears on the selected files.7. Press the [Shortcut 3] button again.◆The message <”Protect?”> appears.8. Select <Yes> to protect selected files. Select <No> to cancel protection.◆If <Yes> was selected, < > icon appears on the protected files.[ Notes ]✤When you attempt to delete a protected file, you will hear a warning beep.✤When you set the Beep Sound to Off, there will be no beep sound but the message “Protect” appears onthe screen and the file will not be deleted.1/61/61/61/6Move Full ViewOKMoveMove Full ViewFull ViewSelectAllCancelMove FinishMove Select1/61/61/61/6Move Full ViewMove Full ViewMoveMove FinishFinishMove Select41/61/61/61/6Move Full ViewMove Full ViewMove FinishProtect?MoveMove SelectSelectYes NoOK21/61/61/61/6OKMoveMove Full ViewFull ViewMove Full ViewMove FinishMove Select00934C SC-MS10 USA~111 9/30/05 10:59 AM Page 105](https://usermanual.wiki/Samsung-Electronics-Co/05SAM1/User-Guide-589245-Page-109.png)
![ENGLISH106106567Movie Mode : Setting the Viewing OptionsUsing the Shortcut Buttons1. Set the Mode Dial to Movie mode.2. Press the [POWER] button to turn on the device.3. Press the [Shortcut 1] button.◆Switches to Photo view mode.4. Move the [W/T] zoom switch to W (WIDE).◆The screen switches to multi-view.◆The movie you were viewing in the single view is selected.5. Press the [Shortcut 4] button and then select an option by moving thejoystick up / down (▲/▼) and then press the [OK] button.◆<Select>: Selected photo files will be deleted.◆<All>: All photo files will be deleted.◆<Cancel>: Cancels deletion.6. If <Select> was selected, select photo files to delete by moving the joystickleft / right / up / down (œœ/√√/▲/▼) and press the [OK] button.◆< > icon appears on the selected files.7. Press the [Shortcut 4] button again.◆The message <”Delete?”> appears.8. Select <Yes> to delete selected files. Select <No> to cancel deletion.◆Refer to page 108 for further details.[ Notes ]✤When you attempt to delete a protected file, you will hear a warning beep.✤When you set the Beep Sound to Off, there will be no beep sound but the message “Protect” appears onthe screen and the file will not be deleted.1/61/61/6Move Full ViewMoveMove Full ViewFull ViewOKSelectAllCancelMove FinishMove Select1/61/61/6Move Full ViewMove Full ViewMoveMove FinishFinishMove Select1/61/61/6Move Full ViewMove Full ViewMove FinishDelete?Yes NoOKMoveMove SelectSelect41/61/61/6MoveMove Full ViewFull ViewMove Full ViewOKMove FinishMove SelectDeleting Movie files in Multi-View00934C SC-MS10 USA~111 9/30/05 10:59 AM Page 106](https://usermanual.wiki/Samsung-Electronics-Co/05SAM1/User-Guide-589245-Page-110.png)
![ENGLISH107107567Movie Mode : Setting the Viewing OptionsProtecting Movie FilesYou can protect saved important movie files from accidental erasure.1. Set the Mode Dial to Movie mode.2. Press the [POWER] button to turn on the device.3. Press the [Shortcut 1] button to switch to Movie viewing mode.4. Press the [MENU] button.◆Menu screen appears.5. Move the joystick left / right (œœ/√√) to select <Protect>.6. Select an option by by moving the joystick up / down (▲/▼) and then pressthe [OK] button.◆<Select>: Multi-view screen appears and you can select movie files to protect.◆<All>: All files will be protected.If <All> is selected, the message “Protect All?” appears. Select <Yes> or <No> by movingthe joystick left / right (œœ/√√) and then press the [OK] button to confirm.7. If <Select> is selected, Multi-view screen appears. Select files to protect bymoving the joystick left / right / up / down (œœ/√√/▲/▼) and press the [OK]button.◆An icon ( ) indicating the selected file to be protected appears.8. Press the [Shortcut 3] button.◆The message “Protect?” appears. Select <Yes> or <No> by moving the joystick left / right(œœ/√√) and then press the [OK] button to confirm.9. Press the [MENU] button to exit the menu.[ Notes ]✤You can easily access this function by using the shortcut button (refer to page 104).✤When you attempt to delete a protected file, you will hear a warning beep.When you set the Beep Sound to Off, there will be no beep sound but the message “Protect” appears onthe screen and the file will not be deleted.✤While the menu screen is displayed, pressing the [Record / Stop] button will exit the menu.MENUTYPE1/600:01:36100-00011/6MovieMovieProtectProtectSelectAllOKMoveMove SelectSelect ExitExitMove FinishMove Select1/600:01:36100-00011/6MovieProtectMove Select ExitMoveMove FinishFinishMove Select1/600:01:36100-00011/6MovieProtectMove Select ExitMove FinishProtect?MoveMove SelectSelectYes NoOK41/6IN00:01:36100-0001100-00011/6MovieProtectMove Select ExitMove FinishMove Select00934C SC-MS10 USA~111 9/30/05 10:59 AM Page 107](https://usermanual.wiki/Samsung-Electronics-Co/05SAM1/User-Guide-589245-Page-111.png)
![ENGLISH108108567Movie Mode : Setting the Viewing OptionsDeleting Movie FilesYou can delete saved movie files.1. Set the Mode Dial to Movie mode.2. Press the [POWER] button to turn on the device.3. Press the [Shortcut 1] button to switch to Movie viewing mode.4. Press the [MENU] button.◆Menu screen appears.5. Move the joystick left / right (œœ/√√) to select <Delete>.6. Select an option by moving the joystick up / down (▲/▼) and then press the[OK] button.◆<Select>: Multi-view screen appears and you can select movie files to delete.◆<All>: All files will be deleted.If <All> is selected, the message “Delete All?” appears. Select <Yes> or <No> by movingthe joystick left / right (œœ/√√) and then press the [OK] button to confirm.7. If <Select> is selected, Multi-view screen appears. Select files to delete bymoving the joystick left / right / up / down (œœ/√√/▲/▼) and press the [OK]button.◆An icon ( ) indicating the selected file to be deleted appears.8. Press the [Shortcut 4] button.◆The message “Delete?” appears. Select <Yes> or <No> by moving the joystick left / right(œœ/√√) and then press the [OK] button to confirm.9. Press the [MENU] button to exit the menu.[ Notes ]✤You can easily access this function by using the shortcut button (refer to page 104).✤When you attempt to delete a protected file, you will hear a warning beep.When you set the Beep Sound to Off, there will be no beep sound but the message “Protect” appears onthe screen and the file will not be deleted.✤While the menu screen is displayed, pressing the [Record / Stop] button will exit the menu.1/6MovieDeleteMove Select ExitMoveMove FinishFinishMove Select1/6MovieDeleteMove Select ExitMove FinishDelete?Yes NoMoveMove SelectSelectOK1/6MovieDeleteMove Select ExitMove FinishDeleting file(s)Move Select4MENUTYPE1/6MovieMovieDeleteDeleteSelectAllMoveMove SelectSelect ExitExitOKMove FinishMove Select00934C SC-MS10 USA~111 9/30/05 10:59 AM Page 108](https://usermanual.wiki/Samsung-Electronics-Co/05SAM1/User-Guide-589245-Page-112.png)
![ENGLISH1091095Movie Mode : Setting the Viewing OptionsCopying Movie FilesYou can copy saved files from the built-in internal memory to the external mini SD Memory Card and vice versa.1. Set the Mode Dial to Movie mode.2. Press the [POWER] button to turn on the device.3. Press the [Shortcut 1] button to switch to Movie viewing mode.4. Press the [MENU] button.◆Menu screen appears.5. Move the joystick left / right (œœ/√√) to select <Copy (to)>.6. Select an option by moving the joystick up / down (▲/▼) and then press the [OK] button.◆<Select>: Multi-view screen appears and you can select files to copy.◆<All>: All files will be copied.If <All> is selected, the message “Copy All?” appears. Select <Yes> or <No> by moving thejoystick left / right (œœ/√√) and then press the [OK] button to confirm.7. If <Select> is selected, Multi-view screen appears. Select files to copy by movingthe joystick left / right / up / down (œœ/√√/▲/▼) and press the [OK] button.◆An icon ( ) indicating selected file is to be copied appears.8. Press the [Shortcut 4] button.◆The message “Copy?” appears. Select <Yes> or <No> by moving the joystick left / right (œœ/√√) and then press the [OK]button to confirm.9. Press the [MENU] button to exit the menu.[ Notes ]✤It copies from the currently-used memory to another. If the internal memory was used, it copies to an external mini SD Memory Card.✤While the menu screen is displayed, pressing the [Record / Stop] button will exit the menu.MENU00:01:36100-00011/6TYPEMovieMovieCopy (to)Copy (to)SelectAllMoveMove SelectSelect ExitExitOK4IN00:01:36100-0001100-00011/6MovieCopy (to)Move Select Exit00934C SC-MS10 USA~111 9/30/05 10:59 AM Page 109](https://usermanual.wiki/Samsung-Electronics-Co/05SAM1/User-Guide-589245-Page-113.png)
![ENGLISH110110568Movie Mode : Setting the Viewing OptionsSetting the SlideshowYou can set a slideshow and also set the repeat option for slideshows.1. Set the Mode Dial to Movie mode.2. Press the [POWER] button to turn on the device.3. Press the [Shortcut 1] button to switch to Movie viewing mode.4. Press the [MENU] button.◆Menu screen appears.5. Move the joystick left / right (œœ/√√) to select <Slide>.6. Select <Repeat> by moving the joystick up / down (▲/▼) and then press the[OK] button.7. Set the repeat option by moving the joystick up / down (▲/▼) and then pressthe [OK] button.◆<Off>: Sets not to repeat the slideshow.◆<On>: Sets to repeat the slideshow.8. Select <Start> by moving the joystick up / down (▲/▼) and then press the[OK] button.◆Slideshow starts.◆To stop the slideshow, press the [OK] button.◆To start the slideshow again, press the [Shortcut 2] button.[ Notes ]✤You can easily access this function by using the shortcut button (refer to page 103).✤The interval between files may vary depending on the size of the movie.✤Slideshow starts from the current movie selected.✤While the menu screen is displayed, pressing the [Record / Stop] button will exit the menu.00:01:36100-000100:00:00MovieSlideOnMove Select ExitMovieSlideSlideOnMove Select ExitMENUTYPEMovieMovieSlideSlideStartRepeatMoveMove SelectSelect ExitExitOKOffOn00:01:36100-000100:00:00MovieSlideOnMove Select ExitMENUTYPEMovieMovieSlideSlideSlideStartRepeat OnOnMoveMove SelectSelect ExitExitOKMovieSlideMove Select Exit00:01:36IN100-0001100-000100:00:00MovieSlideOnMove Select ExitMovieSlideSlideSlideOnMove Select ExitMovieSlideMove Select Exit4MENUTYPE00:01:36100-000100:00:00MovieMovieSlideSlideStartRepeat OnOnMoveMove SelectSelect ExitExitOKMovieSlideSlideOnMove Select ExitMovieSlideMove Select Exit00934C SC-MS10 USA~111 9/30/05 10:59 AM Page 110](https://usermanual.wiki/Samsung-Electronics-Co/05SAM1/User-Guide-589245-Page-114.png)

![ENGLISH112112Music Mode : Playing Music FilesCopying Music Files from a PCYou can copy music files from a PC while connected to the PC with a USB cable.1. Set the Mode Dial to Music mode.2. Press the [POWER] button to turn on the device.3. Press the [MENU] button to select destination memory(refer to page 49).4. Connect the Miniket Photo to the PC using the USBcable provided (refer to page 133).◆Connect the USB cable to the device.◆Connect the other end of the USB cable to the PC.5. Windows finds a new USB mass storage device. Openthe folder <MSAMSUNG> and you will find <MP3>folder.6. Copy your music files and paste it into the folder<MUSIC1>, <MUSIC2>, <MUSIC3> or <MUSIC4>.Be sure to copy your MP3 files into the existing folders under <MP3>.[ Warning ]✤IYou cannot create a new folder on your Miniket Photo set.✤If you create a new folder on your memory card with a PC, it will not play back music files stored on it.[ Notes ]✤The music played back will begin with the first music file that is stored in the top folder (MUSIC1).✤It is recommended that you use an AC Power Adapter during the file transfer to avoid unintended power outage.The built-in internal memory of the device appears as <Miniket> on a PC while the external memory card (mini SD MemoryCard) will appear as <Removable Storage>.AB00934C SC-MS10 USA~120 9/30/05 10:59 AM Page 112](https://usermanual.wiki/Samsung-Electronics-Co/05SAM1/User-Guide-589245-Page-116.png)
![ENGLISH1131134Music Mode : Playing Music FilesPlaying Music FilesYou can play back stored music files.1. Set the Mode Dial to Music mode.2. Press the [POWER] button to turn on the device.3. The last file played back is displayed.◆If there is no music file stored, the message “No Stored Music!” appears.4. Select a music file to play by moving the joystick left / right (œ/√) button, andthen press the [OK] button.5. The selected music file is played back.◆To pause playback, press the [OK] button.◆To stop playback, press and hold the [OK] button for more than 3 seconds.◆To search backward / forward during play, hold down the joystick left or right (œ/√) formore than 1 second.◆To adjust volume, move joystick up / down (…/†). Volume indicator appears and disappears after few seconds.1/61/600:00/03:0000:50/03:0000:50/03:000101Search PlaySearchSearch StopStopOKKHzVolumeVolumeVolume[ Notes ]✤If a broken file name is displayed, try renaming it.✤When the earphones or AV (Audio / Video) cable is connected to the device, the built-in speaker will turn off automatically.✤A file which does not comply with the MP3 standard, even if the file extension is MP3, will not display / play back.✤The title may not be displayed if the language is not supported.✤Holding the joystick left / right (œ/√) for more than 1 second while stopped will rapidly skip to the previous / next file rapidly.Connect your earphones as shown in the figure.How to Connect Earphones31/61/600:00/03:0000:00/03:0000:50/03:000101SearchSearch PlayPlaySearch StopOKKHzVolumeVolumeVolume00934C SC-MS10 USA~120 9/30/05 10:59 AM Page 113](https://usermanual.wiki/Samsung-Electronics-Co/05SAM1/User-Guide-589245-Page-117.png)
![ENGLISH1141143443Music Mode : Setting the Music Play OptionsUsing the Shortcut ButtonsShortcut buttons are provided to allow users easy access to frequently-used functions.Viewing the Playlist1. Set the Mode Dial to Music mode.2. Press the [POWER] button to turn on the device.3. Press the [Shortcut 1] button.◆It moves to the playlist view.4. Select a music file by moving the joystick left / right / up / down (œœ/√√/……/††),and then press the [OK] button.◆The selected music file is played back.Setting the Repeat Option1. Set the Mode Dial to Music mode.2. Press the [POWER] button to turn on the device.3. Press the [Shortcut 2] button.◆Each press of the [Shortcut 2] button cycles through < >-< >-< >-< >-< >repeat modes.4. An icon indicating the selected repeat mode appears on the screen (Refer topage 116).1/61/600:00/03:0000:00/03:0001OKSearchSearch PlayPlayMove SelectKHzVolumeVolume1/61/600:00/03:0001OKSearch PlayMoveMove SelectSelectVolume1/600:00/03:0000:00/03:0001OKSearchSearch PlayPlay1/600:00/03:0001Search PlayMusicRepeatMove Select ExitMusicRepeatMove Select ExitKHzVolumeVolumeVolume1/600:00/03:0001Search Play1/600:00/03:0000:00/03:0001OKSearchSearch PlayPlayMusicRepeatMove Select ExitMusicRepeatMove Select ExitKHzVolumeVolumeVolume00934C SC-MS10 USA~120 9/30/05 10:59 AM Page 114](https://usermanual.wiki/Samsung-Electronics-Co/05SAM1/User-Guide-589245-Page-118.png)
![ENGLISH115115434Music Mode : Setting the Music Play OptionsUsing the Shortcut ButtonsShortcut buttons are provided to allow users easy access to frequently used functions.Setting to Hold1. Set the Mode Dial to Music mode.2. Press the [POWER] button to turn on the device.3. Press the [Shortcut 3] button.◆Each press of the [Shortcut 3] button toggles between ( ) and ( ).4. When it is set to hold ( ), button functions are locked except Mode Dial.◆It helps so as not to disturb listening.Setting the Equaliser1. Set the Mode Dial to Music mode.2. Press the [POWER] button to turn on the device.3. Press the [Shortcut 4] button.◆Each press of the [Shortcut 2] button cycles through < >-< >-< >-< > Equalisermodes.4. An icon indicating the selected Equaliser appears on the screen (Refer to page 117).1/600:00/03:0000:00/03:001/600:00/03:000101OKSearchSearch PlayPlaySearch PlayKHzVolumeVolumeVolume1/600:00/03:0000:00/03:0001OKSearchSearch PlayPlay1/600:00/03:0001Search PlayMusicEqualizerMove Select ExitMusicEqualizerMove Select ExitJazz44.1KHzVolumeVolumeVolume1/600:00/03:0001Search Play1/600:00/03:0000:00/03:0001OKSearchSearch PlayPlayMusicEqualizerMove Select ExitMusicEqualizerMove Select ExitJazzJazz44.1KHzVolumeVolumeVolume31/600:00/03:001/600:00/03:0000:00/03:000101OKSearch PlaySearchSearch PlayPlayKHzVolumeVolumeVolumeJazz ClasPOPJazz ClasPOPPOPJazzJazzClasPOPJazz ClasClasPOP00934C SC-MS10 USA~120 9/30/05 10:59 AM Page 115](https://usermanual.wiki/Samsung-Electronics-Co/05SAM1/User-Guide-589245-Page-119.png)
![ENGLISH116116456Music Mode : Setting the Music Play OptionsSetting the Repeated PlayYou can repeat a selected music file or group of music files.1. Set the Mode Dial to Music mode.2. Press the [POWER] button to turn on the device.3. Press the [MENU] button.◆Menu screen appears.4. Move the joystick left / right (œ/√) to select <Repeat>.5. Select an option by moving the joystick up / down (……/††) and then press the[OK] button.◆<Off>: No repeat◆<One>: One selected music file will play repeatedly.◆<Group>: The selected group of music files will play repeatedly.◆<All>: All music files will play through in order and start again from the beginning.◆<Shuffle>: All music files will play in random order once and start again.6. Press the [MENU] button to exit the menu.[ Notes ]✤You can easily access this function by using the shortcut button (refer to page 114).✤When the earphones or AV (Audio / Video) cable is connected to the device, the <Beep Sound> willnot operate.TYPEMENU1/600:00/03:0001Search Play1/600:00/03:0001Search PlayMusicMusicRepeatRepeatOffOneGroupAllMoveMove SelectSelect ExitExitOKMusicRepeatMove Select ExitVolumeVolume1/600:00/03:0001Search Play1/600:00/03:0001Search PlayMusicRepeatMove Select ExitTYPEMENUMusicMusicRepeatRepeatOffOneGroupAllMoveMove SelectSelect ExitExitOKVolumeVolume1/600:00/03:0001Search Play1/600:00/03:0000:00/03:0001OKSearchSearch PlayPlayMusicRepeatMove Select ExitMusicRepeatMove Select ExitKHzVolumeVolumeVolume31/600:00/03:0000:00/03:0001OKSearchSearch PlayPlay1/600:00/03:0001Search PlayMusicRepeatMove Select ExitMusicRepeatMove Select ExitKHzVolumeVolumeVolume00934C SC-MS10 USA~120 9/30/05 10:59 AM Page 116](https://usermanual.wiki/Samsung-Electronics-Co/05SAM1/User-Guide-589245-Page-120.png)
![ENGLISH117117456Music Mode : Setting the Music Play OptionsSetting the EqualiserYou can repeat a selected music file or group of music files.1. Set the Mode Dial to Music mode.2. Press the [POWER] button to turn on the device.3. Press the [MENU] button.◆Menu screen appears.4. Move the joystick left / right (œ/√) to select <Equalizer>.5. Select an option by moving the joystick up / down (……/††) and then press the[OK] button.◆<Normal> / <Pop> / <Jazz> / <Classic>6. Press the [MENU] button to exit the menu.[ Note ]✤You can easily access this function by using the shortcut button (refer to page 115).TYPEMENU1/600:00/03:0001Search Play1/600:00/03:0001Search PlayMusicMusicEqualizerEqualizerNormalPopJazzClassicOKMoveMove SelectSelect ExitExitMusicEqualizerMove Select ExitJazzVolumeVolume1/600:00/03:0001Search Play1/600:00/03:0001Search PlayMusicEqualizerMove Select ExitTYPEMENUMusicMusicEqualizerEqualizerNormalPopJazzClassicOKMoveMove SelectSelect ExitExitJazzVolumeVolume1/600:00/03:0001Search Play1/600:00/03:0000:00/03:0001OKSearchSearch PlayPlayMusicEqualizerMove Select ExitMusicEqualizerMove Select ExitJazzJazz44.1KHzVolumeVolumeVolume31/600:00/03:0000:00/03:0001OKSearchSearch PlayPlay1/600:00/03:0001Search PlayMusicEqualizerMove Select ExitMusicEqualizerMove Select ExitJazz44.1KHzVolumeVolumeVolume00934C SC-MS10 USA~120 9/30/05 10:59 AM Page 117](https://usermanual.wiki/Samsung-Electronics-Co/05SAM1/User-Guide-589245-Page-121.png)
![ENGLISH118118Deleting Music FilesYou can delete stored music files.1. Set the Mode Dial to Music mode.2. Press the [POWER] button to turn on the device.3. Press the [MENU] button.◆Menu screen appears.4. Move the joystick left / right (œœ/√√) to select <Delete>.5. Select an option by moving the joystick up / down (……/††) button and thenpress the [OK] button.◆<Select>: The Playlist appears and you can select files to delete.◆<All>: All music files will be deleted.If <All> is selected, the message “Delete All?” appears. Select <Yes> or <No> bymoving the joystick left / right (œ/√) and then press the [OK] button to confirm.6. If <Select> was selected, select files to protect moving the joystick left /right / up / down (œœ/√√/……/††) and press the [OK] button.◆< > icon appears on the selected files.7. Press the [Shortcut 4] button.◆The message “Delete?” appears.8. Select <Yes> to delete selected files. Select <No> to cancel deletion.◆Press the [MENU] button to exit the menu.[ Note ]✤After deleting a file, the last file of the current folder is selected.Music Mode : Setting the Music Play Options35671/61/600:00/03:0000:00/03:0001KHzSearchSearch PlayPlayOKMusicMove Select ExitDeleteSelect ExitMove SelectVolumeVolumeTYPE1/6MENU1/600:00/03:0001Search PlayMusicMusicSelectAllMoveMove SelectSelect ExitExitOKDeleteDeleteSelect ExitMove SelectVolume1/6MENU1/600:00/03:0001Search PlayMusicMove Select ExitDeleteOK SelectSelect ExitExitMove SelectVolume1/6!1/600:00/03:0001Search PlayMusicMove Select ExitDeleteOKSelect ExitDelete?Yes NoMoveMove SelectSelectVolume00934C SC-MS10 USA~120 9/30/05 10:59 AM Page 118](https://usermanual.wiki/Samsung-Electronics-Co/05SAM1/User-Guide-589245-Page-122.png)
![ENGLISH119119567TYPE1/6MENU1/600:00/03:0001OKSearch PlayMusicMusicProtectProtectSelectAllMoveMove SelectSelect ExitExitSelect ExitMove SelectVolumeIN1/6MENU1/600:00/03:0001OKSearch PlayMusicProtectMove Select ExitSelectSelect ExitExitMove SelectVolume1/61/600:00/03:0001Search PlayMusicProtectMove Select ExitSelect Exit!OKProtect?Yes NoMoveMove SelectSelectVolume31/61/600:00/03:0000:00/03:0001KHzOKSearchSearch PlayPlayMusicProtectMove Select ExitSelect ExitMove SelectVolumeVolumeProtecting Music FilesYou can protect saved important music files from accidental erasure.1. Set the Mode Dial to Music mode.2. Press the [POWER] button to turn on the device.3. Press the [MENU] button.◆Menu screen appears.4. Move the joystick left / right (œœ/√√) to select <Protect>.5. Select an option by moving the joystick up / down (……/††) and then pressthe [OK] button.◆<Select>: The Playlist appears and you can select files to protect.◆<All>: All files will be protected.If <All> is selected, the message “Protect All?” appears. Select <Yes> or <No> bymoving the joystick left / right (œ/√) and then press the [OK] button to confirm.6. If <Select> was selected, select files to protect by moving the joystick left /right / up / down (œœ/√√/……/††) and press the [OK] button.◆< > icon appears on the selected files.7. Press the [Shortcut 3] button.◆The message “Protect?” appears.8. Select <Yes> to protect selected files. Select <No> to cancel protection.◆Press the [MENU] button to exit the menu.[ Notes ]✤You can easily access this function by using the shortcut button (refer to page 115).✤When you attempt to delete a protected file, you will hear a warning beep.When you set the Beep Sound to Off, there will be no beep sound but the message “Protect!”appears on the screen and the file will not be deleted.Music Mode : Setting the Music Play Options00934C SC-MS10 USA~120 9/30/05 10:59 AM Page 119](https://usermanual.wiki/Samsung-Electronics-Co/05SAM1/User-Guide-589245-Page-123.png)
![ENGLISH1211214Voice Mode : Recording Voice FilesRecording Voice FilesThe built-in microphone allows users to record voices without any additional devices.1. Set the Mode Dial to Voice mode.2. Press the [POWER] button.3. Press the [Record / Stop] button to start recording.◆< > icon appears on the screen and starts recording.4. To stop recording, press the [Record / Stop] button again.[ Notes ]✤Recorded voice files are saved in the list automatically.✤During voice recording, the menu is not accessed.✤During voice recording, the Mode Dial operates normally.SWAV0001.WAV00:00:00/16:22:48SWAV0001.WAV00:00:00/16:22:58SWAV0001.WAVSWAV0001.WAV8KHzMono64Kbps00:00:10/16:22:4800:00:10/16:22:48SWAV0001.WAVSWAV0002.WAV8KHzMono64Kbps00:00:00/16:22:4800:00:00/16:22:48SWAV0001.WAV00:00:00/16:22:58SWAV0001.WAV00:00:10/16:22:483SWAV0001.WAV00:00:00/16:22:48SWAV0001.WAVSWAV0001.WAV00:00:00/16:22:5800:00:00/16:22:588KHzMono64KbpsSWAV0001.WAV00:00:10/16:22:4800934C SC-MS10 USA~152 9/30/05 11:00 AM Page 121](https://usermanual.wiki/Samsung-Electronics-Co/05SAM1/User-Guide-589245-Page-125.png)
![ENGLISH122122456Voice Mode : Playing Voice FilesPlaying Voice FilesYou can play back recorded voice files using the built-in speaker or the earphones.1. Set the Mode Dial to Voice mode.2. Press the [POWER] button.3. Press the [Shortcut 1] button to switch to voice play mode.◆The last file played back is displayed.◆If there is no voice file stored, the message “No Stored Files!” appears.4. Select a music file to play by moving the joystick left / right (œ/√) button,and then press the [OK] button. 5. The selected music file is played back.◆To pause playing back, press the [OK] button.◆To stop playback, press and hold the [OK] button for more than 3 seconds.◆To search backward / forward during play, hold down the joystick left / right (œ/√) formore than 1 second.6. To adjust the volume, move the joystick up / down (……/††). Volume indicatorappears and disappears after few seconds.[ Note ]✤When the earphones or AV (Audio / Video) cable is connected to the device, the <Beep Sound> will notoperate.OFFSWAV0001.WAV00:00:16/0000:2000:00:16/0000:20SWAV0001.WAVSWAV0001.WAV00:00:00/00:00:10OFFOFFSWAV0001.WAVSWAV0002.WAVMono64Kbps00:00:00/00:00:2000:00:00/00:00:20OFFOFF1/62/62/62/6OKSearch PlaySearchSearch PlayPlaySearch StopSearch Stop8KHzVolumeVolumeVolumeVolumeVolumeOFFOFFSWAV0001.WAVSWAV0002.WAVMono64Kbps00:00:16/0000:2000:00:16/00:00:2000:00:16/0000:20SWAV0001.WAVSWAV0001.WAV00:00:00/00:00:10OFFOFFSWAV0001.WAV00:00:00/00:00:20OFF1/62/62/62/6OKSearch PlaySearch PlaySearchSearch StopStopSearch Stop8KHzVolumeVolumeVolumeVolumeVolumeOFFSWAV0001.WAV00:00:16/0000:2000:00:16/0000:2000:00:16/00:00:20SWAV0001.WAVSWAV0002.WAV8KHzMono64KbpsSWAV0001.WAV00:00:00/00:00:10OFFOFFOFFSWAV0001.WAV00:00:00/00:00:20OFF1/62/62/62/6OKSearch PlaySearch PlaySearch StopSearchSearch StopStopVolumeVolumeVolumeVolumeVolume3OFFSWAV0001.WAV00:00:16/0000:2000:00:16/0000:20SWAV0001.WAVSWAV0001.WV0001.WAVSWAV0001.WAV8KHzMono64Kbps00:00:00/00:00:1000:00:00/00:00:10OFFOFFOFFSWAV0001.WAV00:00:00/00:00:20OFF1/62/62/62/6OKSearchSearch PlayPlaySearch PlaySearch StopSearch StopVolumeVolumeVolumeVolumeVolume00934C SC-MS10 USA~152 9/30/05 11:00 AM Page 122](https://usermanual.wiki/Samsung-Electronics-Co/05SAM1/User-Guide-589245-Page-126.png)
![ENGLISH12312355Using the Shortcut ButtonsVoice Mode : Setting the Voice Play OptionsSWAV0001.WAV00:00:00/00:00:10OFFSWAV0001.WAVSWAV0001.WAV00:00:00/16:22:4800:00:00/16:22:488KHzMono64Kbps1/6Search Play VolumeSWAV0001.WAV00:00:00/00:00:10OFFOFFOFFSWAV0002.WAVSWAV0002.WAVSWAV0003.WAVSWAV0003.WAVSWAV0004.WAVSWAV0004.WAVSWAV0005.WAVSWAV0005.WAVSWAV0001.WAV1/6OKSearch PlayMoveMove SelectSelectVolume4SWAV0001.WV0001.WAVSWAV0001.WAV8KHzMono64Kbps00:00:00/00:00:1000:00:00/00:00:10OFFOFFOFFSWAV0002.WAVSWAV0003.WAVSWAV0004.WAVSWAV0005.WAV1/6OKSearchSearch PlayPlayMove SelectVolumeVolume4SWAV0001.WAVSWAV0001.WAV8KHzMono64Kbps00:00:00/00:00:1000:00:00/00:00:10OFFOFFSWAV0001.WAV00:00:00/16:22:481/6OKSearchSearch PlayPlay VolumeVolumeShortcut buttons are provided to allow users easy access to frequently used functions.Toggling Voice Record / Play Mode1. Set the Mode Dial to Voice mode.2. Press the [POWER] button to turn on the device.3. Press the [Shortcut 1] button to switch to Voice play mode.4. Press the [Shortcut 1] button.◆It moves to the Voice record mode.5. Each press of the [Shortcut 1] toggles between voice record and playmodes.Viewing the Voice File List1. Set the Mode Dial to Voice mode.2. Press the [POWER] button to turn on the device.3. Press the [Shortcut 1] button to switch to Voice play mode.4. Press the [Shortcut 2] button.◆Stored voice files are listed.5. Select a voice file to play by moving the joystick up / down (……/††) and thenpress the [OK] button.◆The selected voice file plays.00934C SC-MS10 USA~152 9/30/05 11:00 AM Page 123](https://usermanual.wiki/Samsung-Electronics-Co/05SAM1/User-Guide-589245-Page-127.png)
![ENGLISH12412445Voice Mode : Setting the Voice Play OptionsUsing the Shortcut ButtonsShortcut buttons are provided to allow users easy access to frequently used functions.Setting the Repeat Option1. Set the Mode Dial to Voice mode.2. Press the [POWER] button to turn on the device.3. Press the [Shortcut 1] button to switch to Voice play mode.4. Press the [Shortcut 3] button.◆Each press of the [Shortcut 3] button cycles through < >-< >-< >-< >.5. An icon indicating the selected repeat option appears on the screen.◆Refer to page 125 for further details.Deleting Voice Files1. Set the Mode Dial to Voice mode.2. Press the [POWER] button to turn on the device.3. Press the [Shortcut 1] button to switch to Voice play mode.4. Press the [Shortcut 4] button.◆<Delete>: Deletes the selected file.◆<Cancel>: Cancels the deletion.5. Select <Delete> to delete selected files. Select <Cancel> to cancel deletion.◆Refer to page 126 for further details.SWAV0001.WAVSWAV0001.WAV8KHzMono64Kbps00:00:00/00:00:1000:00:00/00:00:10OFFOFF1/6OKSearchSearch PlayPlaySWAV0001.WAV00:00:00/00:00:10OFF1/6Search PlayVolumeVolumeVolumeSWAV0001.WAV00:00:00/00:00:10OFF1/6Search PlaySWAV0001.WV0001.WAVSWAV0001.WAV8KHzMono64Kbps00:00:00/00:00:1000:00:00/00:00:10OFFOFF1/6OKSearchSearch PlayPlayDeleteCancelVolumeVolumeVolume5SWAV0001.WAV00:00:00/00:00:10OFF1/6Search PlaySWAV0001.WAVSWAV0001.WAV8KHzMono64Kbps00:00:00/00:00:1000:00:00/00:00:101/6OKSearchSearch PlayPlayVoiceRepeatMove Select ExitVoiceRepeatMove Select ExitVolVolVol4SWAV0001.WAVSWAV0001.WAV8KHzMono64Kbps00:00:00/00:00:1000:00:00/00:00:10OFFOFF1/6OKSearchSearch PlayPlaySWAV0001.WAV00:00:00/00:00:101/6Search PlayVoiceRepeatMove Select ExitVoiceRepeatMove Select ExitVolVolVol00934C SC-MS10 USA~152 9/30/05 11:00 AM Page 124](https://usermanual.wiki/Samsung-Electronics-Co/05SAM1/User-Guide-589245-Page-128.png)
![ENGLISH125125567Voice Mode : Setting the Voice Play OptionsSetting the Repeated PlayYou can repeat a selected file or all the voice files.1. Set the Mode Dial to Voice mode.2. Press the [POWER] button to turn on the device.3. Press the [Shortcut 1] button to switch to Voice play mode.4. Press the [MENU] button.◆Menu screen appears.5. Move the joystick left / right (œ/√) to select <Repeat>.6. Select an option by moving the joystick up / down (……/††) and then press the[OK] button.◆<Off>: No repeat◆<One>: One selected file will play repeatedly.◆<All>: All music files will play through in order and start again from the beginning..◆<Shuffle>: All files will play in random order once and start again.7. Press the [MENU] button to exit the menu.◆An icon indicating the selected repeat mode appears on the screen.[ Notes ]✤You can easily access this function by using the shortcut button (refer to page 124).✤When the earphones or AV (Audio / Video) cable is connected to the device, the <Beep Sound>function will not operate.TYPEMENUSWAV0001.WAV00:00:00/00:00:10OFF1/6Search PlaySWAV0001.WAV00:00:00/00:00:101/6Search PlayVoiceVoiceRepeatRepeatOffOneAllShuffleMoveMove SelectSelect ExitExitOKVoiceRepeatMove Select ExitVolVolSWAV0001.WAV00:00:00/00:00:10OFF1/6Search PlaySWAV0001.WAV00:00:00/00:00:101/6Search PlayVoiceRepeatMove Select ExitTYPEMENUVoiceVoiceRepeatRepeatOffOneAllShuffleMoveMove SelectSelect ExitExitOKVolVolSWAV0001.WAV00:00:00/00:00:10OFF1/6Search PlaySWAV0001.WAVSWAV0001.WAV8KHzMono64Kbps00:00:00/00:00:1000:00:00/00:00:101/6OKSearchSearch PlayPlayVoiceRepeatMove Select ExitVoiceRepeatMove Select ExitVolVolVol4SWAV0001.WAVSWAV0001.WAV8KHzMono64Kbps00:00:00/00:00:1000:00:00/00:00:10OFFOFF1/6OKSearchSearch PlayPlaySWAV0001.WAV00:00:00/00:00:101/6Search PlayVoiceRepeatMove Select ExitVoiceRepeatMove Select ExitVolVolVol00934C SC-MS10 USA~152 9/30/05 11:00 AM Page 125](https://usermanual.wiki/Samsung-Electronics-Co/05SAM1/User-Guide-589245-Page-129.png)
![ENGLISH126126678Voice Mode : Setting the Voice Play OptionsDeleting Voice FilesYou can delete stored voice files.1. Set the Mode Dial to Voice mode.2. Press the [POWER] button to turn on the device.3. Press the [Shortcut 1] button to switch to Voice play mode.4. Press the [MENU] button.◆Menu screen appears.5. Move the joystick left / right (œœ/√√) to select <Delete>.6. Select an option by moving the joystick up / down (……/††) and then press the[OK] button.◆<Select>: The voice file list appears and you can select files to delete.◆<All>: All files will be deleted.If <All> is selected, the message “Delete All?” appears. Select <Yes> or <No> by movingthe joystick left / right (œ/√) and then press the [OK] button to confirm.7. If <Select> was selected, select files to protect by moving the joystick left /right / up / down (œœ/√√/……/††) and press the [OK] button.◆< > icon appears on the selected files.8. Press the [Shortcut 4] button.◆The message “Delete?” appears.9. Select <Yes> to delete selected files. Select <No> to cancel deletion.◆Press the [MENU] button to exit the menu.[ Notes ]✤You can easily access this function by using the shortcut button (refer to page 124).✤After deleting a file, the last file of the current folder is selected.TYPEMENUSWAV0002.WAVSWAV0003.WAVSWAV0004.WAVSWAV0005.WAVSWAV0001.WAV00:00:00/00:00:10OFF1/6Search PlayVoiceVoiceDeleteDeleteSelectAllOKMoveMove SelectSelect ExitExitSelect ExitMove SelectVolumeMENUSWAV0002.WAVSWAV0002.WAVSWAV0003.WAVSWAV0003.WAVSWAV0004.WAVSWAV0004.WAVSWAV0005.WAVSWAV0005.WAVSWAV0001.WAV00:00:00/00:00:10OFF1/6Search PlayVoiceDeleteOKMove Select ExitSelectSelect ExitExitMove SelectVolumeSWAV0002.WAVSWAV0003.WAVSWAV0004.WAVSWAV0005.WAVSWAV0001.WAV00:00:00/00:00:10OFF1/6Search PlayVoiceDeleteOKMove Select ExitSelect ExitMoveMove SelectSelect!Delete?Yes NoVolume4SWAV0002.WAVSWAV0003.WAVSWAV0004.WAVSWAV0005.WAVSWAV0001.WAVSWAV0001.WAV8KHzMono64Kbps00:00:00/00:00:1000:00:00/00:00:10OFFOFF1/6OKSearchSearch PlayPlayVoiceDeleteMove Select ExitSelect ExitMove SelectVolumeVolume00934C SC-MS10 USA~152 9/30/05 11:00 AM Page 126](https://usermanual.wiki/Samsung-Electronics-Co/05SAM1/User-Guide-589245-Page-130.png)
![ENGLISH127127578Voice Mode : Setting the Voice Play OptionsProtecting Voice FilesYou can protect saved important voice files from accidental erasure.1. Set the Mode Dial to Voice mode.2. Press the [POWER] button to turn on the device.3. Press the [Shortcut 1] button to switch to Voice play mode.4. Press the [MENU] button.◆Menu screen appears.5. Move the joystick left / right (œœ/√√) to select <Protect>.6. Select an option by moving the joystick up / down (……/††) button and thenpress the [OK] button.◆<Select>: The voice file list appears and you can select files to protect.◆<All>: All files will be protected.If <All> is selected, the message “Protect All?” appears. Select <Yes> or <No> by movingthe joystick left / right (œ/√) and then press the [OK] button to confirm.7. If <Select> was selected, select files to protect by moving the joystick left /right / up / down (œœ/√√/……/††) and press the [OK] button.◆< > icon appears on the selected files.8. Press the [Shortcut 3] button.◆The message “Protect?” appears.9. Select <Yes> to protect selected files. Select <No> to cancel protection.◆Press the [MENU] button to exit the menu.[ Note ]✤< > icon appears on the selected files.TYPESWAV0002.WAVSWAV0003.WAVSWAV0004.WAVSWAV0005.WAVSWAV0001.WAV00:00:00/00:00:10OFFMENU1/6OKSearch PlayVoiceVoiceProtectProtectSelectAllMoveMove SelectSelect ExitExitSelect ExitMove SelectVolumeMENUSWAV0002.WAVSWAV0002.WAVSWAV0003.WAVSWAV0003.WAVSWAV0004.WAVSWAV0004.WAVSWAV0005.WAVSWAV0005.WAVSWAV0001.WAVSWAV0001.WAV00:00:00/00:00:10OFF1/6OKSearch PlayVoiceProtectMove Select ExitSelectSelect ExitExitMove SelectVolumeSWAV0002.WAVSWAV0003.WAVSWAV0004.WAVSWAV0005.WAVSWAV0001.WAV00:00:00/00:00:10OFF1/6OKSearch PlayVoiceProtectMove Select ExitSelect Exit!Protect?Yes NoMoveMove SelectSelectVolume4SWAV0002.WAVSWAV0003.WAVSWAV0004.WAVSWAV0005.WAVSWAV0001.WAVSWAV0001.WAV8KHzMono64Kbps00:00:00/00:00:1000:00:00/00:00:10OFFOFF1/6OKSearchSearch PlayPlayVoiceProtectMove Select ExitSelect ExitMove SelectVolumeVolume00934C SC-MS10 USA~152 9/30/05 11:00 AM Page 127](https://usermanual.wiki/Samsung-Electronics-Co/05SAM1/User-Guide-589245-Page-131.png)
![ENGLISH128128You can copy saved files from the built-in internal memory to an external mini SD Memory Card and vice-versa.1. Set the Mode Dial to Voice mode.2. Press the [POWER] button to turn on the device.3. Press the [Shortcut 1] button to switch to Voice play mode.4. Press the [MENU] button.◆Menu screen appears.5. Move the joystick left / right (œœ/√√) to select <Copy (to)>.6. Select an option by moving the joystick up / down (……/††) and then press the[OK] button.◆<Select>: Voice file list appears and you can select files to copy.◆<All>: All files will be copied.If <All> is selected, the message “Copy All?” appears. Select <Yes> or <No> by moving thejoystick left / right (œ/√) and then press the [OK] button to confirm.7. If <Select> is selected, playlist appears. Select files to copy by moving the joystick left / right / up / down(œœ/√√/……/††) and press the [OK] button.◆An icon ( ) indicating selected file is to be copied appears.8. Press the [Shortcut 4] button.◆The message “Copy?” appears. Select <Yes> or <No> by moving the joystick left / right (œ/√) and then press the [OK]button to confirm.9. Press the [MENU] button to exit the menu.[ Notes ]✤It copies from the currently-used memory to another. If the internal memory was used, it copies to an external mini SD Memory Card.✤Actual storage capacity may differ from the printed memory capacity.5Voice Mode : Setting the Voice Play OptionsCopying Voice FilesTYPESWAV0001.WAV00:00:00/00:30:00OFFMENU1/6OKSearch PlayVoiceVoiceCopy (to)Copy (to)SelectAllMoveMove SelectSelect ExitExitVolume4SWAV0001.WV0001.WAVSWAV0001.WAV8KHzMono64Kbps00:00:00/00:30:0000:00:00/00:30:00OFFOFF1/6OKSearchSearch PlayPlayVoiceCopy (to)Move Select ExitVolumeVolume00934C SC-MS10 USA~152 9/30/05 11:00 AM Page 128](https://usermanual.wiki/Samsung-Electronics-Co/05SAM1/User-Guide-589245-Page-132.png)
![ENGLISH130130Supported USB Speed according to Operating SystemRecommended System RequirementsThe USB driver supports High Speed USB 2.0 communication only under the Microsoft Windows and Apple Mac OSX,operating systems. ✤Windows 98SE/ME: Full Speed USB ✤Windows 2000: High Speed USB only with the Service Pack4Installed✤Windows XP: High Speed USB only with the Service Pack1Installed✤Mac OS X: High Speed USB on 10.3 or laterMiscellaneous Information : Connecting to a PC[ Notes ]✤Movie playback or movie editing may be difficult on a slower-than-recommended PC. .✤Multiple USB devices connected to a PC or using USB hubs may cause communication / installation errors with the Miniket Photo.✤Disconnecting the USB cable during the data transfer will stop the communication and may damage data stored in the memory.Pentium III / 800MHzWindows 98SE/ME256MB1.2 GB or above1024 x 768 dots24bit colorUSB 1.1CPUOSMemoryFree space on the hard diskDisplay ResolutionUSBPentium IV / 2GHzWindows 2000/XP512MB or above2GB or above1024x768 dots 24-bit colorUSB 2.0 High SpeedMinimum RecommendedG3 / 500MHzMac OS 10.2128MB1 GB or above800x600 dots 16-bit colorUSB 1.1G4 ProcessorMac OS 10.3512MB or above2GB or above1024x768 dots 24-bit colorUSB 2.0 High SpeedMinimum RecommendedWindows Environment Macintosh Environment00934C SC-MS10 USA~152 9/30/05 11:00 AM Page 130](https://usermanual.wiki/Samsung-Electronics-Co/05SAM1/User-Guide-589245-Page-134.png)
![ENGLISH1311311. Click “DirectX 9.0” on the Setup screen.◆DirectX 9.0 is basic software that is required by CODEC utilisation.Problems may occur if it is not installed.Miscellaneous Information : Installing SoftwareInstalling DV Media Pro 1.0You need to install DV Media Pro 1.0 to play back recorded movie files or the transferred data from the camera with the USBcable on your PC.■Installing Acrobat ReaderClick “Acrobat Reader” on the Setup screen.- Acrobat Reader program should be installed to view the DV Media Pro User’s Manual.- The DV Media Pro User’s Manual is included on the accompanying CD in Adobe’s Portable Document Format (PDF).(The Acrobat Reader is a freeware product of Adobe Systems. Inc.)■Before You Start!- Turn on the PC and exit all other applications.- Insert the Software CD provided with the package. It automatically runs and displays the Setup screen. If it does not, click<Start> on the left bottom of the desktop and select <Run>. When the <Run> dialog window appears, type in“D:\autorun.exe” into the text box and then press ENTER where your CD-ROM drive is set to “D:\”.1. Click “DV Driver” on the Setup screen.◆Driver software required are installed automatically:- USB removable storage device driver (Windows 98SE only)- USB PC-CAMERA driver- USB streaming driver (USB interface for data transfer)2. Press <Confirm> to finish program installation.◆Windows 98 users need to restart the Windows.Driver Installation – DV Driver1. Click “Video CODEC” on the Setup screen.◆CODEC is required to play movie files recorded by Miniket Photo.Application Installation – Video CODECApplication Installation – DirectX 9.0[ Notes ]✤You have to install “DV Driver”, “Video Codec” and “DirectX 9.0” to run DV Media Pro 1.0 properly.✤Please refer to the User’s Manual inside the CD ROM drive (D:\help) folder for more detailed information on installation procedures.✤Use DV Media Pro 1.0 REV4.2 or higher for this product.00934C SC-MS10 USA~152 9/30/05 11:00 AM Page 131](https://usermanual.wiki/Samsung-Electronics-Co/05SAM1/User-Guide-589245-Page-135.png)
![ENGLISH132132Miscellaneous Information : Installing SoftwareInstalling DV Media Pro 1.0 / Video StudioApplication Installation – Photo Express1. Click “Photo Express” on the Setup screen.◆It is a photo editing tool that allows users to edit images.Application Installation – QuickTime1. Click “QuickTime” on the Setup screen.◆QuickTime is Apple's technology for handling video, sound, animation, graphics, text, music, and even 360-degree virtualreality (VR) scenes.Application Installation – Video Studio (in the second CD provided)1. Insert the CD.◆Setup screen displays automatically. Follow the instruction to start installation.◆It is a video editing tool that allows users to edit movie files.[ Notes ]✤For photo editing, use Photo Express.For video editing, use the Video Studio from the second CD provided.✤It is required to install software in this order: DV driver, Video CODEC and DirectX 9.0 for movie playback on a PC.✤It is required to install the DV Driver for PC camera use.00934C SC-MS10 USA~152 9/30/05 11:00 AM Page 132](https://usermanual.wiki/Samsung-Electronics-Co/05SAM1/User-Guide-589245-Page-136.png)
![ENGLISH133133Connect to a PC with the provided USB cable. You can view your movies / photos on your PC. Connecting to a PC – Playing Movie Files1. Connect the Miniket Photo to the PC with the provided USBcable as shown in the figure.2. Turn on your PC.3. Press the [POWER] button to turn on the device.4. Locate the <Miniket> or <Removable Storage Device>recognised by the PC and then double-click it.When the built-in internal memory is used, folder nameappears to be <MSAMSUNG>-<SSMOV>.5. Copy the movie file to your PC.It is recommended to copy the movie file onto the PC andplayback on the PC for better performance.6. Double-click on the copied movie file name.It starts to play back.Disconnecting from a PC1. Click on the “Safely remove hardware” tray icon on the bottom right side of the desktop.Select the device and click on the “Stop” button.2. When the message saying that it is safe to remove the hardware appears, unplug the cable from the PC.[ Warning ]✤When data communication is disrupted due to static electricity, magnetic field or other reason, restart the program or try to disconnect /connect the communication cable again.[ Notes ]✤Multiple USB devices connected to a PC or using USB hubs may cause communication / installation errors with the Miniket Photo.✤Refer to page XX for PC recommendations on USB use. Some PCs meeting the requirements may not support proper USB operation dueto various reasons. Please refer to the product documentation of the PC for further details.✤If the PC does not recognise the USB device when the USB cable is connected to the front USB port, try the USB port on the rear panel ofthe PC.✤The Windows 98 SE operating system requires DV Driver installation prior to USB use.Miscellaneous Information : Connecting To Other Devices Connecting to a PC Using USB CableUSB cable00934C SC-MS10 USA~152 9/30/05 11:00 AM Page 133](https://usermanual.wiki/Samsung-Electronics-Co/05SAM1/User-Guide-589245-Page-137.png)
![ENGLISH134134You can record video files onto the connected PC directly in real-time. Using this function, you can use it as a PC camera forvideo chatting / conferencing. USB data streaming requires a DV Driver, Video CODEC, and DirectX 9.0 or higher installed onthe PC prior to use (refer to page 133).1. Connect the Miniket Photo to the PC with the providedUSB cable as shown in the figure.2. Turn on your PC.3. Press the [POWER] button to turn on the device.4. Run a video chatting / conferencing application such asWindows Messenger and enjoy the video utilisation.◆Various applications take advantage of the PC camera function.Refer to respective product documentation for further details.5. When finished, disconnect the cable.[ Notes ]✤You must install the DV Driver (refer to page 131).✤It is recommended to use an AC Power Adapter during data transfer to avoid unintended power outages.✤Microsoft Windows ME or later operating systems support the PC camera function.✤If the PC does not recognise the USB device when the USB cable is connected to the front USB port, try the USB port on the rear panel ofthe PC.Miscellaneous Information : Connecting To Other Devices Using the PC Camera Function00934C SC-MS10 USA~152 9/30/05 11:00 AM Page 134](https://usermanual.wiki/Samsung-Electronics-Co/05SAM1/User-Guide-589245-Page-138.png)
![ENGLISH135135You can use your Miniket Photo as a USB mass storage device.1. Connect the Miniket Photo to the PC with theprovided USB cable as shown in the figure.2. Turn on your PC.3. Set the Mode Dial to Storage.4. Press the [POWER] button to turn on the device.5. Locate the <Miniket> or <Removable StorageDevice> recognised by the PC and then double-click it.6. Copy files into the <MISC> folder under the <Miniket> or <Removable Storage Device>.7. When finished, disconnect the cable.[ Warning ]✤You cannot create a new folder on your Miniket Photo set.✤If you create a new folder on your memory card using a PC, it will not play back music files stored on it.[ Notes ]✤You cannot create a new folder on your Miniket Photo set.✤Multiple USB devices connected to a PC or using USB hubs may cause communication / installation errors with the Miniket Photo.✤If the PC does not recognise the USB device when the USB cable is connected to the front USB port, try the USB port on the rear panel ofthe PC.Miscellaneous Information : Connecting To Other Devices Using as a Mass Storage Device00934C SC-MS10 USA~152 9/30/05 11:00 AM Page 135](https://usermanual.wiki/Samsung-Electronics-Co/05SAM1/User-Guide-589245-Page-139.png)
![ENGLISH136136Connecting to a TV MonitorYou can connect your Miniket Photo directly to a TV set .1. Connect the provided AV cable to the [Earphonesand AV jack] of the Miniket Photo.2. Connect the other end of the cable to the TV setby matching the colors of the terminals.3. Turn on the TV and set the <Source> to theexternal input channel you connected the cable.◆<Source> may be represented as <Line In>, <Input>,<AV>, etc. depending on the manufacturer.◆Movie Record mode is displayed on the TV screen.4. Set the Mode Dial to Movie mode.5. Press the [Shortcut 1] button to switch to Movie view mode.◆Select a movie file to play.6. Move the joystick left / right (œœ/√√) to select a movie and then press the[OK] button.◆It begins playback.◆To pause playback, press the [OK] button.◆To stop playback, hold down the [OK] button for more than 3 seconds[ Notes ]✤You can play back photo files as well as movie files.✤When connected to other devices with the AV cable, no screen is displayed on the LCD monitor.Miscellaneous Information : Connecting To Other Devices Line InputVIDEO AUDIO(L) (R)00934C SC-MS10 USA~152 9/30/05 11:00 AM Page 136](https://usermanual.wiki/Samsung-Electronics-Co/05SAM1/User-Guide-589245-Page-140.png)
![ENGLISH137137Miscellaneous Information : Connecting To Other Devices Connecting to a VCRYou can connect your Miniket Photo to a TV set through a VCR. You can copy your video files to an ordinary videotape usingyour VCR.1. Connect the provided AV cable to the[Earphones and AV jack] of the Miniket Photo.2. Connect the other end of the cable to the VCRset by matching the colors of the terminals.3. Connect the RCA cables from TV’s Audio /Video In to the VCR’s Audio / Video Out.4. Turn on the TV / VCR and set the <Source> tothe external input channel where youconnected the VCR.◆<Source> may be represented as <Line In>, <Input>,<AV>, etc. depending on the manufacturer.◆Movie Record mode is displayed on the TV screen.5. Set the Mode Dial to Movie mode.6. Press the [Shortcut 1] button to switch to Movie view mode.◆Select a movie file to play.7. Move the joystick left / right (œœ/√√) to select a movie, and then press the [OK] button.◆It begins playback.◆To pause playback, press the [OK] button.◆To stop playback, hold down the [OK] button for more than 3 seconds[ Note ]✤You can play back photo files as well as the movie files.✤When connected to other devices with the AV cable, no screen is displayed on the LCD monitor.Line InputLine OutputLine InputVIDEO AUDIO(L) (R)00934C SC-MS10 USA~152 9/30/05 11:00 AM Page 137](https://usermanual.wiki/Samsung-Electronics-Co/05SAM1/User-Guide-589245-Page-141.png)
![ENGLISH138138Miscellaneous Information : Printing PhotosWihth the provided USB cable and a PictBridge-supporting printer, you can print your photo imagesdirectly without connecting to a PC.1. Connect the device and the PictBridge supporting printer with a USB cable.2. Turn on the printer.3. Press the [POWER] button to turn on the device.4. Press the [Shortcut 2] button to set the date / time imprintoption.◆Each press of the [Shortcut 2] button cycles through Off< >-Date < >-Time < >-Date & Time< >.5. [Shortcut 3] button will increase the number of copies, while the [Shortcut 4] button will decrease the number of copies.◆Range of possibilities: 1 ~ 99◆Pressing the [Shortcut 3] button on 99 will set to 1.◆Pressing the [Shortcut 4] button on 1 will set to 99.6. Press the [Shortcut 1] button to begin printing.[ Warning ]✤This function works only with printers that support PictBridge.[ Notes ]✤Number of copies and imprint options can be set in the menu. Press the [MENU] button to access the function.✤For printing information, refer to printer’s product information.✤Depending on the printer, printing failure may occur. In this case, try to print from a PC after copying images ontothe PC.Printing with PictBridge00934C SC-MS10 USA~152 9/30/05 11:00 AM Page 138](https://usermanual.wiki/Samsung-Electronics-Co/05SAM1/User-Guide-589245-Page-142.png)
![ENGLISH139139Miscellaneous Information : Printing PhotosPrinting with DPOFDPOF (Digital Printing Order Format) defines the print information for each photo on the Memory Card. You can easily makeprints using a DPOF-compatible printer or order copies from commercial digital image developers.Printing DPOF files in the Memory Card1. Set the PDOF information for the photo you want to print. (Refer to page 88)2. Insert a memory card into the DPOF- supporting printer.3. Follow the steps of the printer to print out photos.[ Notes ]✤For further details about printing photos, refer to the printer’s user's manual.✤Printing may not be performed depending on types of printers.In this case, download JPEG files directly to the PC and print them.00934C SC-MS10 USA~152 9/30/05 11:00 AM Page 139](https://usermanual.wiki/Samsung-Electronics-Co/05SAM1/User-Guide-589245-Page-143.png)
![ENGLISH141141Miscellaneous Information : Cleaning and MaintenanceCleaning the Body✤To Clean the Exterior of the CAM✓To clean the exterior, use a soft dry cloth. Wipe the body gently.Do not apply excessive force when cleaning, gently rub the surface.✓The LCD monitor surface should not be pressed. Use a soft dry cloth to clean the surface.✓To clean the lens, use an optional air blower to blow out dirt and other small objects. Do not wipe the lens with a cloth oryour fingers. If necessary, use lens cleaning paper.✓Do not use thinner, alcohol, or benzene for cleaning. Otherwise, the finish may be damaged.✓Cleaning should be done only after the battery pack has been removed, and other power sources have beendisconnected.[ Note ]✤If the lens looks dimmer, turn off the device and leave it for about 1 hour.00934C SC-MS10 USA~152 9/30/05 11:00 AM Page 141](https://usermanual.wiki/Samsung-Electronics-Co/05SAM1/User-Guide-589245-Page-145.png)
![ENGLISH145145Troubleshooting : Self-Diagnosis DisplaySymptom Possible Causes MeasureImages on the LCD monitor appear dark.Play, rewind, and fast forward do not work.Memory Card cannot play back (Photo Mode)No picture is taken when [Record / Stop]button is fully pressed.Built-in flash will not go offCannot record a movieLCD monitor turns off automatically.Maximum recording time and photo capacityis different than the specifications.Audio and Video does not play back.No audio plays when viewing photos.Movie plays with mosaic and / or block-shaped noise.Data copied from a PC will not play.MPEG4 movie taken will not play on a PCBlack margins on top and bottom side whenmovie plays back on a PC.Music files will not play on the camera.Audio / Video will not play when connected toa TV / VCR.OSD will not appear on the TV monitor.Ambient light is too bright.Ambient temperature is too low.Photo Mode is selected.Movie Mode is selected.Not enough free memory space.Memory Card was formatted using another device.Flash mode is set to OffMovie Mode is selected.Photo Mode is selected.To save power consumption, the LCD monitor andthe device goes down if there is no buttonoperation for a certain period of time (depending onthe operation mode), which is not a malfunction.Recording / lighting conditions may affect the sizeof the recordings.Damaged data file.Photo viewing does not support audio.Subject is moving fast.By the nature of MPEG4 playback.Data file does not comply with the supported fileformat.Required driver / application software are notproperly installed.Data file does not comply with a supported fileformat.Cable connection was done improperly.The <Source> of the TV is set improperly.Mode is set to Recording mode.TV set may not support on -creen text displaydepending on manufacturer.Adjust the LCD brightness, page 37.Low temperature may produce a dark LCD screen. It is normal,not a malfunction.Select Movie Mode and press the [Shortcut 1] button.Select Photo Mode and press the [Shortcut 1] button.Empty the Memory Card to make free memory space.Format the Memory Card.Select different flash mode, page 75.Flash will not work in Movie Mode.Select Movie Mode.Pressing any button will turn the device back on.Pressing the button once again will operate its original function.It is normal, not a malfunction.Static electricity and strong magnetic fields may damage thedata stored in the Memory Card. Be careful with handling theMemory Card. Damaged data cannot be recovered.It is normal, not a malfunction.It is normal. It is not malfunction. When you play back the movieon a PC, it plays back properly.Non-supported file formats will not play. It is normal, not amalfunction.Install the required driver / application software, including theCODEC from the provided CD, page 131.The encoding format of the music file may not comply with asupported file format. Check the music file.Check the cable connections, page 136.Set the proper channel of <Source> of connected device.Set the mode to Movie view, page 136.It is normal, not a malfunction.00934C SC-MS10 USA~152 9/30/05 11:00 AM Page 145](https://usermanual.wiki/Samsung-Electronics-Co/05SAM1/User-Guide-589245-Page-149.png)