Samsung Electronics Co 05SAM1 Digital Still Camera User Manual 00934C SC MS10 USA 007
Samsung Electronics Co Ltd Digital Still Camera 00934C SC MS10 USA 007
Users Manual
Digital Camera / Camcorder
Owner’s Instruction Book
Before operating the unit, please read this
Instruction Book thoroughly, and retain it for
future reference.
AF Auto Focus
CCD Charge Coupled Device
LCD Liquid Crystal Display
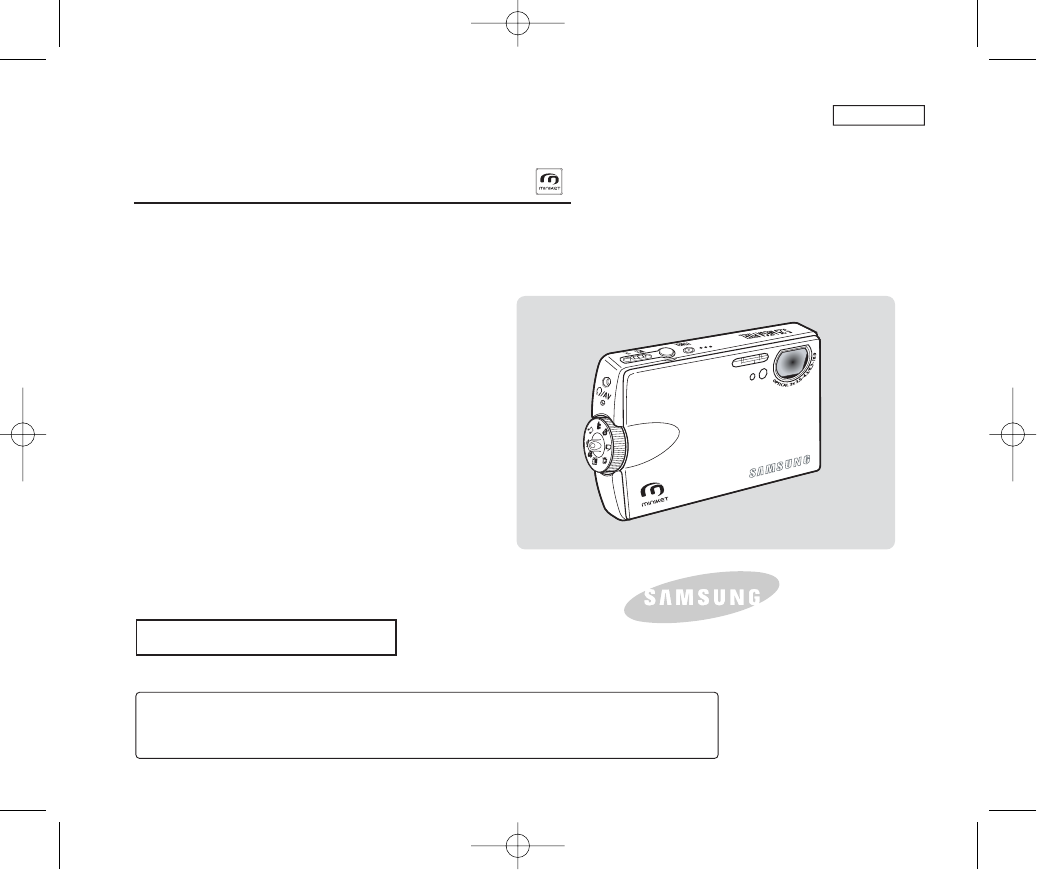
SC-MS10/MS11/MS15
ENGLISH
Use only approved battery packs.
Otherwise there is a danger of overheating, fire or explosion.
Samsung is not responsible for problems occurring due to using unapproved batteries.
US PATENT 4415844
00934C SC-MS10 USA~007 9/30/05 10:54 AM Page C

ENGLISH
Notices and Safety Instructions
Safety Instructions
This symbol is intended to alert the user to the presence of
uninsulated “dangerous voltage” within the product’s enclosure
that may be of sufficient magnitude to constitute a risk of electric
shock to persons.
This symbol is intended to alert the user to the presence of
important operating and maintenance (servicing) instructions in
the literature accompanying the appliance.
WARNING - To Reduce The Risk Of Fire Or Electric Shock, Do Not Expose This
Apparatus To Rain Or Moisture.
1. Read these instructions.
2. Keep these instructions.
3. Heed all warnings.
4. Follow all instructions.
5. Do not use this apparatus near water.
6. Clean only with dry cloth.
7. Do not block any ventilation openings. Install in accordance
with the manufacturer’s instructions.
8. Do not install near any heat sources such as radiators, heat
registers, stoves, or other apparatus (including amplifiers)
that produce heat.
9. Do not defeat the safety purpose of the polarized or
grounding type plug. A polarized plug has two blades with
one wider than the other. A grounding type plug has two
blades and a third grounding prong. The wide blade or the
third prong are provided for your safety. If the provided plug
does not fit into your outlet. Consult an electrician for
replacement of the obsolete outlet.
10. Protect the power cord from being walked on or pinched
particularly at plugs, convenience receptacles, and the point
where they exit from the apparatus.
11. Only use attachments/accessories specified by the
manufacturer.
12. Use only with the cart, stand, tripod, bracket, or table
specified by the manufacturer, or sold with
the apparatus. When a cart is used, use
caution when moving the cart/apparatus
combination to avoid injury from tip-over.
13. Unplug this apparatus during lightning storms or when
unused for long periods of time.
14. Refer all servicing to qualified service personnel. Servicing is
required when the apparatus has been damaged in any way,
such as power-supply cord or plug is damaged, liquid has
been moisture, does not operate normally, or has been
dropped.
CAUTION
RISK OF ELECTRIC SHOCK
DO NOT OPEN
RISK OF ELECTRIC SHOCK
DO NOT OPEN
CAUTION: TO REDUCE THE RISK OF
ELECTRIC SHOCK, DO NOT REMOVE
COVER (OR BACK).
NO USER-SERVICEABLE PARTS
INSIDE, REFER SERVICING TO
QUALIFIED SERVICE PERSONNEL.
CAUTION
Shock Hazard Marking and Associated Graphical Symbols
Explanation of Safety Related Symbols
SAM_00934C_SEA_SAFETY 9/30/05 11:01 AM Page 100
ENGLISH
Notices and Safety Instructions
15. The apparatus shall not be exposed to dripping or splashing
and that no objects filled with liquids, such as vases, shall be
placed on the apparatus.
16. VENTILATION:
Slots and openings in the cabinet are provided for ventilation to
ensure reliable operation of the CAMCORDER and to protect it
from overheating. These openings must not be blocked or
covered. Never place your CAMCORDER on a bed, sofa, rug,
or other similar surface: on or near a radiator or heat register.
This CAMCORDER should not be placed in a built-in installation
such as a bookcase or rack unless proper ventilation is provided
or the manufacturer’s instructions have been adhered to.
17. POWER SOURCES:
The CAMCORDER should be operated only from the type of
power source indicated on the label.
If you are not sure of the type of power supply at your home,
consult your appliance dealer or local power company.
A CAMCORDER is intended to be operated from battery power,
or other sources, refer to the operating instructions.
18. GROUNDING OR POLARIZATION:
This CAMCORDER may be equipped with either a polarized
2-wire AC line plug (a plug having one blade wider than the other)
or a 3-wire grounding type plug, a plug having a third (grounding)
pin. If you are unable to insert the plug fully into the outlet, try
reversing the plug. If the plug still fails to fit, contact your
electrician to replace your outlet. Do not defeat the safety purpose
of the polarized plug.
19. POWER-CORD PROTECTION:
Power-supply cords should be routed so that they are not likely to
be walked on or pinched by items placed upon or against them,
paying particular attention to cords or plugs, convenient
receptacles, and the point where they exit from the unit.
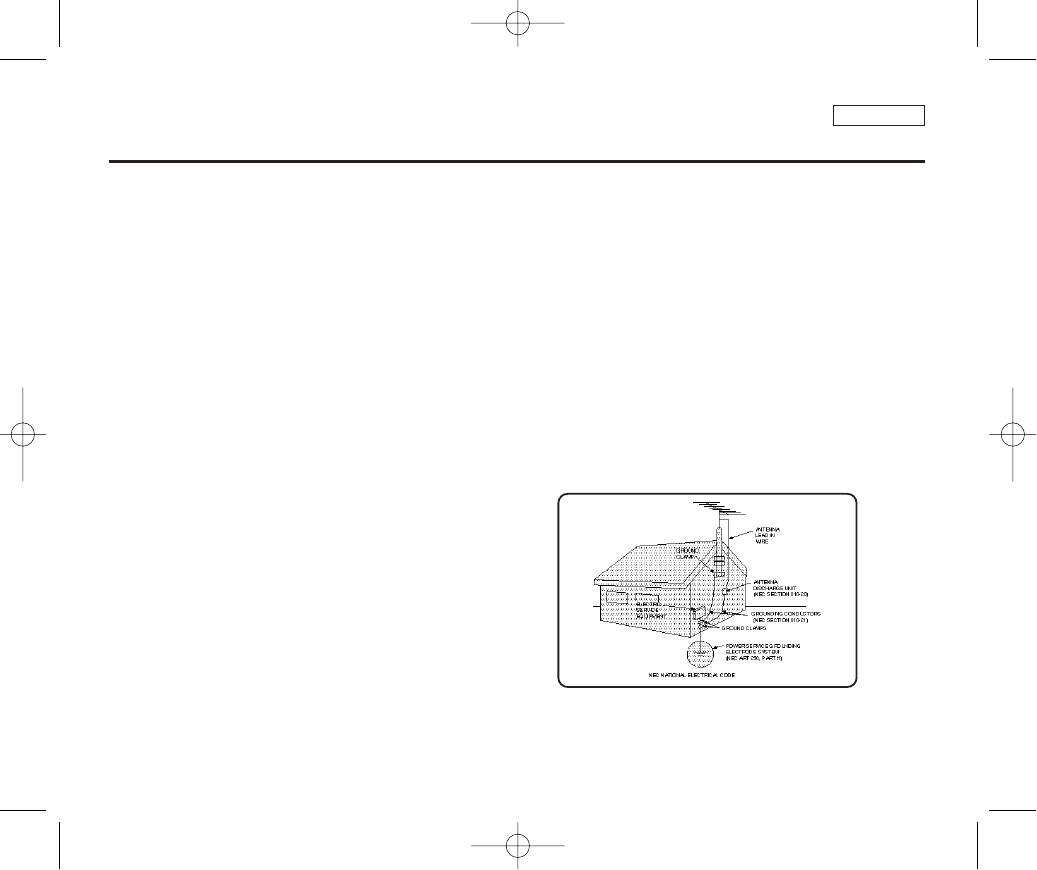
20. OUTDOOR ANTENNA GROUNDING:
If an outside antenna or cable system is connected to the
CAMCORDER, be sure the antenna or cable system is grounded
to provide some protection against voltage surges and built-up
static charges, Section 810 of the National Electrical Code,
ANSI/NFPA No. 70-1984, provides information with respect to
proper grounding of the mast and supporting structure, grounding
of the lead-in wire and supporting structure, grounding of the mast
and supporting structure, grounding of the lead-in wire to an
antenna discharge unit, size of grounding to conductors, location
of antenna-discharge unit, connection to grounding electrodes
and requirements for the grounding electrode.
See figure below.
SAM_00934C_SEA_SAFETY 9/30/05 11:01 AM Page 101

ENGLISH
Notices and Safety Instructions
21. LIGHTNING:
For added protection of this CAMCORDER during a lightning
storm or when it is left unattended and unused for long periods of
time, unplug it from the wall outlet and disconnect the antenna or
cable system.
This will prevent damage to the CAMCORDER due to lightning
and power-line surges.
22. POWER LINES:
An outside antenna system should not be located in the vicinity of
overhead power lines or other electric light or power circuits where
it can fall into such power lines or circuits. When installing an
outside antenna system, extreme care should be taken to keep
from touching such power lines or circuits as contact with them
might be fatal.
23. OVERLOADING:
Do not overload wall outlets and extension cords as this can result
in a risk of fire or electric shock.
24. OBJECTS AND LIQUIDS:
Never push objects of any kind into this CAMCORDER through
openings as they may touch dangerous voltage points or short out
a part that could result in a fire or electric shock.
Never spill liquids of any kind onto the CAMCORDER. Should
spillage occur, unplug unit and have it checked by a technician
before use.
25. SERVICING:
Do not attempt to service this CAMCORDER yourself. Opening or
removing covers may expose you to dangerous voltage or other
hazards.
Refer all servicing to qualified service personnel.
26. DAMAGE REQUIRING SERVICE:
Unplug this CAMCORDER from the wall outlet and refer servicing
to qualified service personnel under the following conditions:
a. When the power-supply cord or plug is damaged.
b. If any liquid has been spilled onto, or objects have fallen into
the CAMCORDER.
c. If the CAMCORDER has been exposed to rain or water.
d. If the CAMCORDER does not operate normally by following the
operating instructions, adjust only those controls that are
covered by the operating instructions. Improper adjustment of
other controls may result in damage and will often require
extensive work by a qualified technician to restore the
CAMCORDER to its normal operation.
e. If the CAMCORDER has been dropped or the cabinet has been
damaged.
f. When the CAMCORDER exhibits a distinct change in
performance, this indicates a need for service.
27. REPLACEMENT PARTS:
When replacement parts are required, be sure the service
technician has used replacement parts specified by the
manufacturer and having the same characteristics as the original
part.
Unauthorized substitutions may result in fire, electric shock or
other hazards.
28. SAFETY CHECK:
Upon completion of any service or repairs to this CAMCORDER,
ask the service technician to perform safety checks to determine
that the CAMCORDER is in safe operating order.
SAM_00934C_SEA_SAFETY 9/30/05 11:01 AM Page 102
ENGLISH
Notices and Safety Instructions
29. To prevent damage which may result in fire or shock hazard, do not
expose this appliance to rain or moisture.
30. If this power supply is used at 240V ac, a suitable plug adapter
should be used.
NOTE TO CATV SYSTEM INSTALLER:
This reminder is provided to call the CATV system installer’s attention
to Article 820-40 of the NEC that provides guidelines for proper
grounding and, in particular, specifies that the cable ground shall be
connected to the grounding system of the building as close to the point
of cable entry as practical.
USER INSTALLER CAUTION:
Your authority to operate this FCC certified equipment could be voided
if you make changes or modifications not expressly approved by this
party responsible for compliance to part 15 FCC rules.
NOTE:
Hg LAMP(S) INSIDE THIS PRODUCT CONTAIN
MERCURY AND MUST BE RECYCLED OR
DISPOSED OF ACCORDING TO LOCAL, STATE OR
FEDERAL LAWS. For details see lamprecycle.org,
eiae.org, or call 1-800-Samsung
NOTE: This equipment has been tested and found to comply with
the limits for a Class B digital device, pursuant to part 15 of the
FCC Rules. These limits are designed to provide reasonable
protection against harmful interference in a residential installation.
This equipment generates, uses and can radiate radio frequency
energy and, if not installed and used in accordance with the
instructions, may cause harmful interference to radio
communications. However, there is no guarantee that interference
will not occur in a particular installation. If this equipment does
cause harmful interference to radio or television reception, which
can be determined by turning the equipment off and on, the user is
encouraged to try to correct the interference by one or more of the
following measures:
- Reorient or relocate the receiving antenna.
- Increase the separation between the equipment and receiver.
- Connect the equipment into an outlet on a circuit different from
that to which the receiver is connected.
- Consult the dealer or an experienced radio/TV technician for help
and for additional suggestions.
The user may find the following booklet prepared by the Federal
Communications Commission helpful : “How to Identify and
Resolve Radio-TV Interference Problems.”
This Booklet is available from the U.S. Government Printing
Office, Washington, D.C. 20402, Stock No. 004-000-00345-4.
FCC Warning
The user is cautioned that changes or modifications not expressly
approved by the manufacturer could void the user’s authority to
operate the equipment.
FCC ID : A3L05SAM1
This device complies with Part 15 of FCC Rules.
Operation is subject to the following two conditions;
(1) This device may not cause harmful interference, and
(2) This device must accept any interference received,
including interference that may cause undesired operation.
SAM_00934C_SEA_SAFETY 9/30/05 11:01 AM Page 103
ENGLISH
Contents
22
Precautions on Miniket Photo Care ...........................................................................................................................................................................8
Notes Regarding COPYRIGHT....................................................................................................................................................................................9
Notes Regarding Moisture Condensation.................................................................................................................................................................9
Notes Regarding the Miniket Photo...........................................................................................................................................................................9
Notes Regarding the Battery Pack...........................................................................................................................................................................10
Note Regarding a Trademark....................................................................................................................................................................................10
Note Regarding the Lens...........................................................................................................................................................................................11
Notes Regarding the LCD Display ...........................................................................................................................................................................11
Precautions Regarding Service................................................................................................................................................................................11
Precautions Regarding Replacement Parts............................................................................................................................................................11
Features.......................................................................................................................................................................................................................12
Accessories Supplied with the Device....................................................................................................................................................................13
Rear & Left View.........................................................................................................................................................................................................14
Front & Bottom View..................................................................................................................................................................................................15
LCD Display ................................................................................................................................................................................................................16
OSD (On Screen Display in Photo Capture Mode/Photo View Mode) ...............................................................................................................16
OSD (On Screen Display in Movie Record Mode/Movie Play Mode) .................................................................................................................17
OSD (On Screen Display in Music Play Mode) ...................................................................................................................................................18
OSD (On Screen Display in Voice Record / Voice Play /System Settings Mode) ..............................................................................................19
Battery Pack Installation / Ejection..........................................................................................................................................................................20
Maintaining the Battery Pack....................................................................................................................................................................................21
Charging the Battery Pack........................................................................................................................................................................................24
Notices and Safety Precautions 8
Getting to know your Miniket Photo 12
Name of Each Part 14
How to Use the Battery Pack 20
00934C SC-MS10 USA~007 9/30/05 10:54 AM Page 2
ENGLISH
Contents
33
Recording / Charging Indicator ................................................................................................................................................................................25
Power Indicator ..........................................................................................................................................................................................................25
Before You Start Operating the Miniket Photo .......................................................................................................................................................26
Using the Mode Dial...................................................................................................................................................................................................27
Using the DISPLAY Button........................................................................................................................................................................................28
Using the Menu Button..............................................................................................................................................................................................28
Using the Shortcut Buttons ......................................................................................................................................................................................29
Using the Joystick ....................................................................................................................................................................................................30
Structure of Folders and Files..................................................................................................................................................................................31
Recording Time and Capacity ..................................................................................................................................................................................32
Selecting the Memory Type.......................................................................................................................................................................................33
Using the Memory Card (Optional Accessory).......................................................................................................................................................34
Inserting / Ejecting the Memory Card (Optional Accessory)................................................................................................................................35
Adjusting the LCD Monitor .......................................................................................................................................................................................37
Adjusting the LCD Brightness...............................................................................................................................................................................37
Setting Date / Time.....................................................................................................................................................................................................38
Setting Date / Time ...............................................................................................................................................................................................38
Setting Date / Time Format...................................................................................................................................................................................39
Setting Date Display .............................................................................................................................................................................................40
Setting the System.....................................................................................................................................................................................................41
Setting the Auto Shut Off ......................................................................................................................................................................................41
Setting the File No. Function ................................................................................................................................................................................42
Setting the Beep Sound........................................................................................................................................................................................43
Setting the Shutter Sound ....................................................................................................................................................................................44
Selecting Language ..............................................................................................................................................................................................45
Setting the TV Standard .......................................................................................................................................................................................46
Setting the Mode Display......................................................................................................................................................................................47
Resetting the Miniket Photo..................................................................................................................................................................................48
Getting Started 25
Setting the Miniket Photo 36
00934C SC-MS10 USA~007 9/30/05 10:54 AM Page 3
Setting Memory ..........................................................................................................................................................................................................49
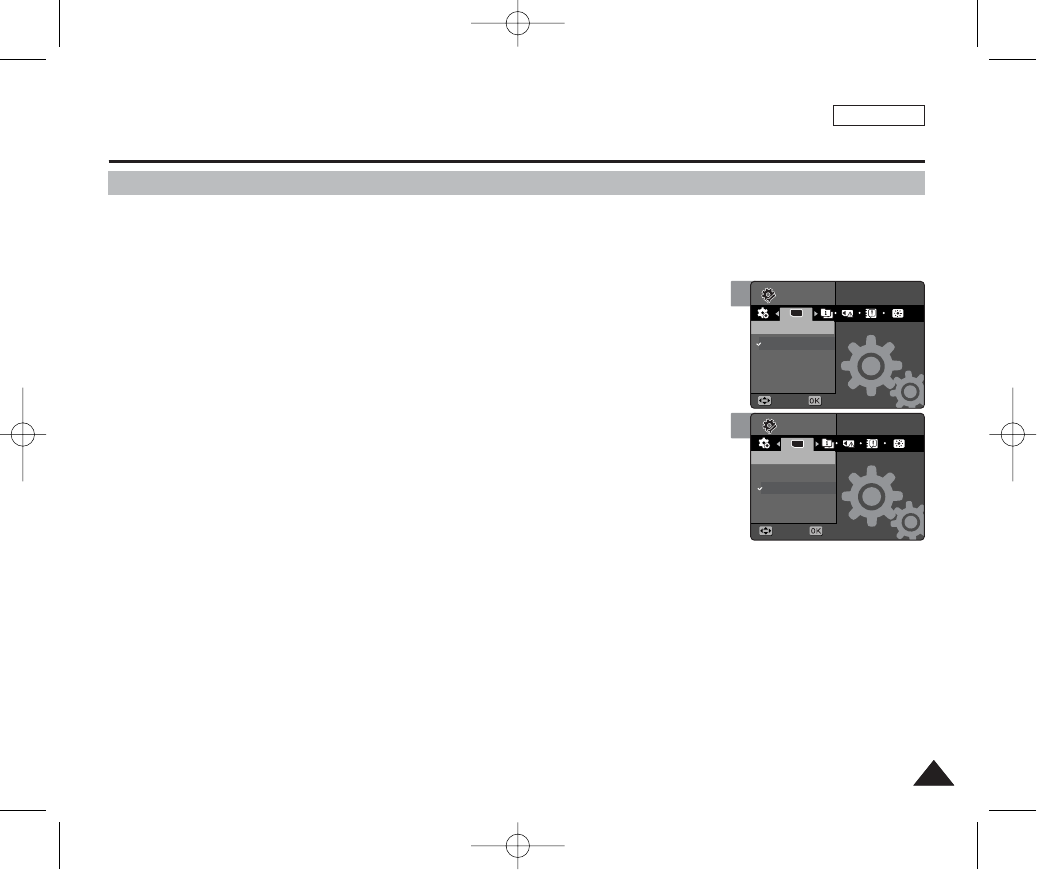
Selecting the Storage Type...................................................................................................................................................................................49
Formatting the Memory.........................................................................................................................................................................................50
Viewing Memory Space........................................................................................................................................................................................51
Capturing.....................................................................................................................................................................................................................53
Capturing Images..................................................................................................................................................................................................53
Zooming In and Out ..............................................................................................................................................................................................54
Viewing ........................................................................................................................................................................................................................55
Viewing Photo files on the LCD Monitor...............................................................................................................................................................55
Viewing Multiple Photo Files / Enlarging a Photo File .........................................................................................................................................56
Cropping an Enlarged Photo File .........................................................................................................................................................................57
Setting the Capturing Options..................................................................................................................................................................................58
Using the Shortcut Buttons...................................................................................................................................................................................58
Using the Scene Modes .......................................................................................................................................................................................60
Setting the Photo File Size ...................................................................................................................................................................................61
Setting the Photo File Quality ...............................................................................................................................................................................62
Setting the Sharpness ..........................................................................................................................................................................................63
Setting the Focus Method.....................................................................................................................................................................................64
Setting the Macro Mode........................................................................................................................................................................................65
Setting the Metering Method ................................................................................................................................................................................66
Setting the ISO Speed (Sensitivity) ......................................................................................................................................................................67
Setting the White Balance ....................................................................................................................................................................................68
Adjusting the Exposure – Exposure Compensation ............................................................................................................................................69
Setting the DIS (Digital Image Stabiliser).............................................................................................................................................................70
Setting the Imprint Option .....................................................................................................................................................................................71
Setting the Digital Zoom .......................................................................................................................................................................................72
Setting the Multi Shot............................................................................................................................................................................................73
Setting the Self Timer ...........................................................................................................................................................................................74
Setting the Flash ...................................................................................................................................................................................................75
Setting Digital Effects............................................................................................................................................................................................77
ENGLISH
44
Contents
Photo Mode 52
00934C SC-MS10 USA~007 9/30/05 10:54 AM Page 4
Setting the Viewing Options .....................................................................................................................................................................................78
Using the Shortcut Buttons...................................................................................................................................................................................78
Rotating a Photo File ............................................................................................................................................................................................82
Resizing Photos ...................................................................................................................................................................................................83
Protecting Photo Files...........................................................................................................................................................................................84
Deleting Photo Files..............................................................................................................................................................................................85
Copying Photo Files..............................................................................................................................................................................................86
Setting the Slideshow ...........................................................................................................................................................................................87
Setting the DPOF (Digital Print Order Format) Function .....................................................................................................................................88
Recording a Movie .....................................................................................................................................................................................................90
Recording a Movie................................................................................................................................................................................................90
Zooming In and Out ..............................................................................................................................................................................................91
Playing a Movie ..........................................................................................................................................................................................................92
Playing a Movie on the LCD Monitor ...................................................................................................................................................................92
Setting the Recording Options.................................................................................................................................................................................93
Using the Shortcut Buttons...................................................................................................................................................................................93
Setting the White Balance ....................................................................................................................................................................................95
Setting the Program AE ........................................................................................................................................................................................96
Setting the Macro Mode........................................................................................................................................................................................97
Setting the Movie File Size ...................................................................................................................................................................................98
Setting the Movie File Quality...............................................................................................................................................................................99
Setting the Self Timer .........................................................................................................................................................................................100
Setting the Wind Cut...........................................................................................................................................................................................101
Setting the Digital Effects....................................................................................................................................................................................102
Setting the Viewing Options ...................................................................................................................................................................................103
Using the Shortcut Buttons.................................................................................................................................................................................103
Protecting Movie Files ........................................................................................................................................................................................107
Deleting Movie Files............................................................................................................................................................................................108
Copying Movie Files ...........................................................................................................................................................................................109
Setting the Slideshow..........................................................................................................................................................................................110
ENGLISH
Contents
55
Movie Mode 89
00934C SC-MS10 USA~007 9/30/05 10:54 AM Page 5
Playing Music Files ..................................................................................................................................................................................................112
Copying Music Files from a PC ..........................................................................................................................................................................112
Playing Music Files .............................................................................................................................................................................................113
Setting the Music Play Options ..............................................................................................................................................................................114
Using the Shortcut Buttons .................................................................................................................................................................................114
Setting the Repeated Play ..................................................................................................................................................................................116
Setting the Equaliser ...........................................................................................................................................................................................117
Deleting Music Files ............................................................................................................................................................................................118
Protecting Music Files .........................................................................................................................................................................................119
Recording Voice Files..............................................................................................................................................................................................121
Recording Voice Files .........................................................................................................................................................................................121
Playing Voice Files ...................................................................................................................................................................................................122
Playing Voice Files..............................................................................................................................................................................................122
Setting the Voice Play Options...............................................................................................................................................................................123
Using the Shortcut Buttons.................................................................................................................................................................................123
Setting the Repeated Play..................................................................................................................................................................................125
Deleting Voice Files ............................................................................................................................................................................................126
Protecting Voice Files .........................................................................................................................................................................................127
Copying Voice Files ............................................................................................................................................................................................128
Connecting to a PC..................................................................................................................................................................................................130
Supported USB Speed according to Operating System....................................................................................................................................130
Installing Software ...................................................................................................................................................................................................131
Installing DV Media Pro 1.0................................................................................................................................................................................131
Installing DV Media Pro 1.0 / Video Studio........................................................................................................................................................132
Connecting To Other Devices ................................................................................................................................................................................133
Connecting to a PC Using USB Cable...............................................................................................................................................................133
ENGLISH
66
Voice Mode 120
Contents
Music Mode 111
Miscellaneous Information 129
00934C SC-MS10 USA~007 9/30/05 10:54 AM Page 6
Using the PC Camera Function..........................................................................................................................................................................134
Using as a Mass Storage Device .......................................................................................................................................................................135
Connecting to a TV Monitor................................................................................................................................................................................136
Connecting to a VCR..........................................................................................................................................................................................137
Printing Photos.........................................................................................................................................................................................................138
Printing with PictBridge.......................................................................................................................................................................................138
Printing with DPOF .............................................................................................................................................................................................139
Cleaning and Maintenance......................................................................................................................................................................................140
After Using the Device ........................................................................................................................................................................................140
Cleaning the Body...............................................................................................................................................................................................141
Regarding the Battery.........................................................................................................................................................................................142
Using Abroad.......................................................................................................................................................................................................143
Self-Diagnosis Display ............................................................................................................................................................................................144
Self-Diagnosis Display ........................................................................................................................................................................................144
Checklist..............................................................................................................................................................................................................144
ENGLISH
77
Specifications 148
Index 150
Warranty(SEA users only)...........................................................................................................................................152
Using the Menu 146
Troubleshooting 144
Contents
00934C SC-MS10 USA~007 9/30/05 10:54 AM Page 7
ENGLISH
Notices and Safety Precautions
88
Precautions on Miniket Photo Care
✤Please note the following precautions for use:
✤Please keep this device in a safe place. The device contains a lens that can be damaged by shock.
Keep out of reach of children.
■Please note the following precautions for use:
■Do not place your device in a wet place. Moisture and water may cause the device to malfunction.
■To avoid electric shock, do not touch your device or power cable with wet hands.
■Do not use the flash close to someone else’s eyes. The flash emits a strong light that may cause damage similar to direct
sunlight on one’s eyesight. Particular care should be observed if photographing infants, when the flash should be no less
than 3 feet from your subject.
■If the device is not working properly, please consult your nearest dealer or authorised SAMSUNG service centre.
■Disassembling the device by yourself may cause irrecoverable damage which will be difficult to repair.
■Clean the device with a dry, soft cloth. Use a soft cloth moistened with a mild detergent solution for removing stains.
Do not use any type of solvent, especially benzene, as it may seriously damage the finish.
■Keep your device away from rain and saltwater. After using, clean the device. Saltwater may cause the parts to corrode.
00934C SC-MS10 USA~037 9/30/05 10:55 AM Page 8

ENGLISH
Notices and Safety Precautions
99
1. A sudden rise in atmospheric temperature may cause condensation to form inside the device.
For Example:
✤Entering or leaving a heated place on a cold day might cause condensation inside the product.
✤To prevent condensation, place the product in a carrying case or a plastic bag before exposing it to a sudden change of
temperature.
✤Television programmes, movie video tapes, DVD titles, films and other programme materials may be copyrighted.
Unauthorised recording of copyrighted materials may infringe on the rights of the copyright owners and is contrary to
copyright laws.
✤All the trade names and registered trademarks mentioned in this manual or other documentation provided with your
Samsung product are trademarks or registered trademarks of their respective holders.
Notes Regarding the Miniket Photo
Notes Regarding COPYRIGHT
Notes Regarding Moisture Condensation
1. Do not leave the device exposed to high temperature (above 60°C or 140°F).
For example, in a parked closed car in summer or exposed to direct sunlight.
2. Do not let the device get wet.
Keep the device away from rain, salt water, or any other form of moisture.
The device will be damaged if immersed in water or subjected to high levels of moisture.
00934C SC-MS10 USA~037 9/30/05 10:55 AM Page 9

ENGLISH
Notices and Safety Precautions
1010
Notes Regarding the Battery Pack
✤It is recommended to use original Battery Pack that is available at SAMSUNG service center.
✤Make sure the Battery Pack is fully charged before starting to record.
✤To preserve battery power, keep the device turned off when you are not operating it.
✤If your device is left in STBY mode without being operated for more than 5 minutes, it will automatically turn itself off to
protect against unnecessary battery discharge.
✤Make sure that the Battery Pack is attached firmly in place.
✤The new Battery Pack provided with the product is not charged.
Before using the Battery Pack, you need to fully charge it.
✤Do not drop the Battery Pack. Dropping the Battery Pack may damage it.
✤Fully discharging a Lithium Polymer battery damages the internal cells. The Battery Pack may be prone to leakage when
fully discharged.
✤To avoid damage to the Battery Pack, make sure to remove the battery when no charge remains.
Clean the terminal to remove foreign substances before inserting the Battery Pack.
✳
When the battery reaches the end of its life, please contact your local dealer.
Batteries must be disposed of as chemical waste.
✳
Be careful not to drop the Battery Pack when you release it from the device.
Note Regarding a Trademark
✤The logos regarding DivX, DivX Licensed are the trademark of DivX, Network, Inc and can be used after contracting
license.
00934C SC-MS10 USA~037 9/30/05 10:55 AM Page 10
ENGLISH
Notices and Safety Precautions
1111
1. The LCD monitor has been manufactured using the high precision technology. However, there may be tiny dots (red, blue
or green in color) that appear on the LCD monitor. These dots are normal and do not affect the recorded picture in any
way.
2. When you use the LCD monitor under direct sunlight or outdoors, may be difficult to see the picture clearly.
3. Direct sunlight can damage the LCD monitor.
✤Do not film with the Miniket Photo’s lens pointing directly at the sun.
Direct sunlight can damage the CCD (Charge Coupled Device, the imaging sensor).
Note Regarding the Lens
Notes Regarding the LCD Display
✤Do not attempt to service the device yourself.
✤Opening or removing covers may expose you to dangerous electricity or other hazards.
✤Refer all servicing to qualified service personnel.
Precautions Regarding Service
Precautions Regarding Replacement Parts
✤When replacement parts are required, be sure the service technician has used replacement parts specified by the
manufacturer and with the same characteristics as the original part.
✤Unauthorised substitutions may result in fire, electric shock or other hazards.
Correct Disposal of This Product
(Waste Electrical & Electronic Equipment)
(Applicable in the European Union and other European countries with separate collection systems)
This marking shown on the product or its literature, indicates that it should not be disposed with other household wastes at the end of its
working life. To prevent possible harm to the environment or human health from uncontrolled waste disposal, please separate this from
other types of wastes and recycle it responsibly to promote the sustainable reuse of material resources. Household users should contact
either the retailer where they purchased this product, or their local government office, for details of where and how they can take this
item for environmentally safe recycling. Business users should contact their supplier and check the terms and conditions of the purchase
contract. This product should not be mixed with other commercial wastes for disposal.
00934C SC-MS10 USA~037 9/30/05 10:55 AM Page 11

●Integrated Digital Camcorder / DSC operation
An integrated digital imaging device that easily converts between a Digital camcorder and a Digital Still Camera with
comfortable and easy recording.
●High Resolution Image Quality (Digital Still Camera)
Employing 5Mega CCD Pixels with an available maximum resolution of 2592X1944.
●X15 Digital Zoom
Allows the user to magnify an image up to 15x its original size.
●Colorful TFT LCD
A high-resolution(150K) colorful TFT LCD gives you clean, sharp images as well as the ability to review your recorded
files immediately.
●Digital Image Stabiliser (DIS)
With the Miniket Photo, you can reduce unstable images by minimizing the effects of natural shaking movements.
●Various Digital Effects
The DSE (Digital Special Effects) allows you to give the film a special look by adding various special effects.
●USB Interface for Data Transfer
You can transfer still images and video files or any other files to a PC using the USB interface.
●PC Cam for multi-entertaining
You can use the device as a PC camera for video chatting, video conferencing, and other PC camera applications.
●Voice Record / Playback with vast memory
You can record voices and store it in the internal memory or mini SD memory card and play back the recorded voice.
●Plus Advantage, MP3
With this device, you can play back MP3 files stored in the internal memory or mini SD memory card (optional
accessory). Enjoy your favourite songs with the MP3 files with your Miniket Photo.
●PictBridge/DPOF Function
When you connect the device to a PictBridge-supported printer and DPOF (Digital Printing Order Format) function using a
USB cable, you can print your stored pictures without a PC.
Features
ENGLISH
Getting to know your Miniket Photo
1212
00934C SC-MS10 USA~037 9/30/05 10:55 AM Page 12
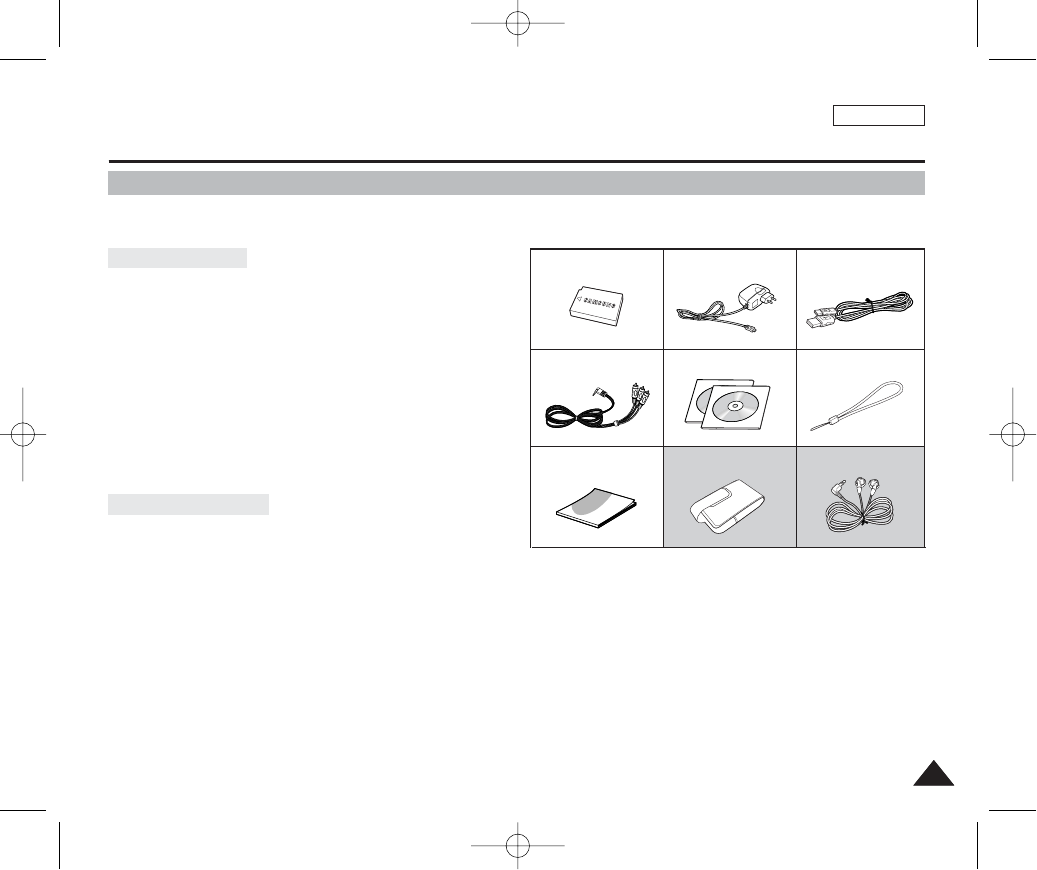
✤Make sure that the following basic accessories are supplied with your device.
1. Lithium Ion Battery Pack
2. AC Power Adapter
3. Audio/Video Cable
4. USB Cable
5. Software CD
6. Hand Strap
7. Instruction Book/Quick Guide
8. Carrying Case
9. Earphones
[ Notes ]
✤Parts and accessories are available at your local Samsung dealer and service center.
✤You can download programs, the latest driver software, and CODECs from the Samsung Electronics webpage.
ENGLISH
1313
Getting to know your Miniket Photo
Accessories Supplied with the Device
3. Audio/Video Cable
2. AC Power Adapter
1. Lithium Ion Battery Pack
5. Software CD
4. USB Cable
8. Carrying Case (Option) 9. Earphones (Option)7. Instruction Book/Quick Guide
6. Hand Strap
Basic Accessories
Optional Accessories
00934C SC-MS10 USA~037 9/30/05 10:55 AM Page 13
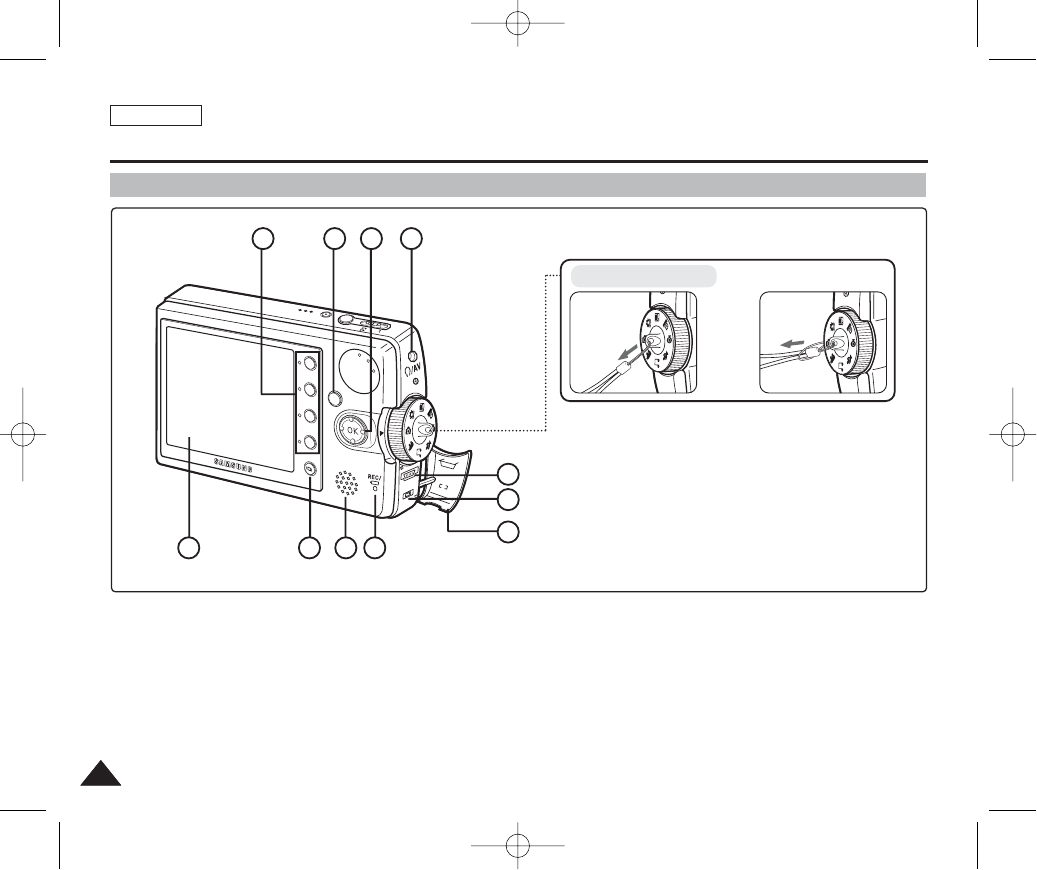
Rear & Left View
1. Shortcut Buttons
2. Menu Button
3. Joystick (Up, Down, Left, Right, OK)
4. Earphones and Audio / Video jack
5. USB port
6. Power Adapter Receptacle
7. Connector Cover
8. Recording / charging Indicator
9. Built-in Speaker
10. Display Button
11. LCD Monitor
ENGLISH
1414
Name of Each Part
MENU
5.25 MEGA PIXEL
POWER
W T
USB
DC IN
1
Fastening Hand strap
➮
2
11 10 9 8 7
6
5
3 4
00934C SC-MS10 USA~037 9/30/05 10:55 AM Page 14

ENGLISH
1515
Name of Each Part
Front & Bottom View
1. Mode Dial (Mode selector)
2. Zoom Switch
3. Record / Stop Button
4. Power Button
5. Built-in Mic
6. Lens
7. Flash
8. Tripod Receptacle
9. OPEN Switch (Battery / Memory Card
Slot)
10. Battery Slot
11. mini SD Memory Card Slot
12. Battery Lock Switch
Usable Memory Card
mini SD Card
1
2 3 4 5
6
7
8
10
11
12
9
00934C SC-MS10 USA~037 9/30/05 10:55 AM Page 15
ENGLISH
1616
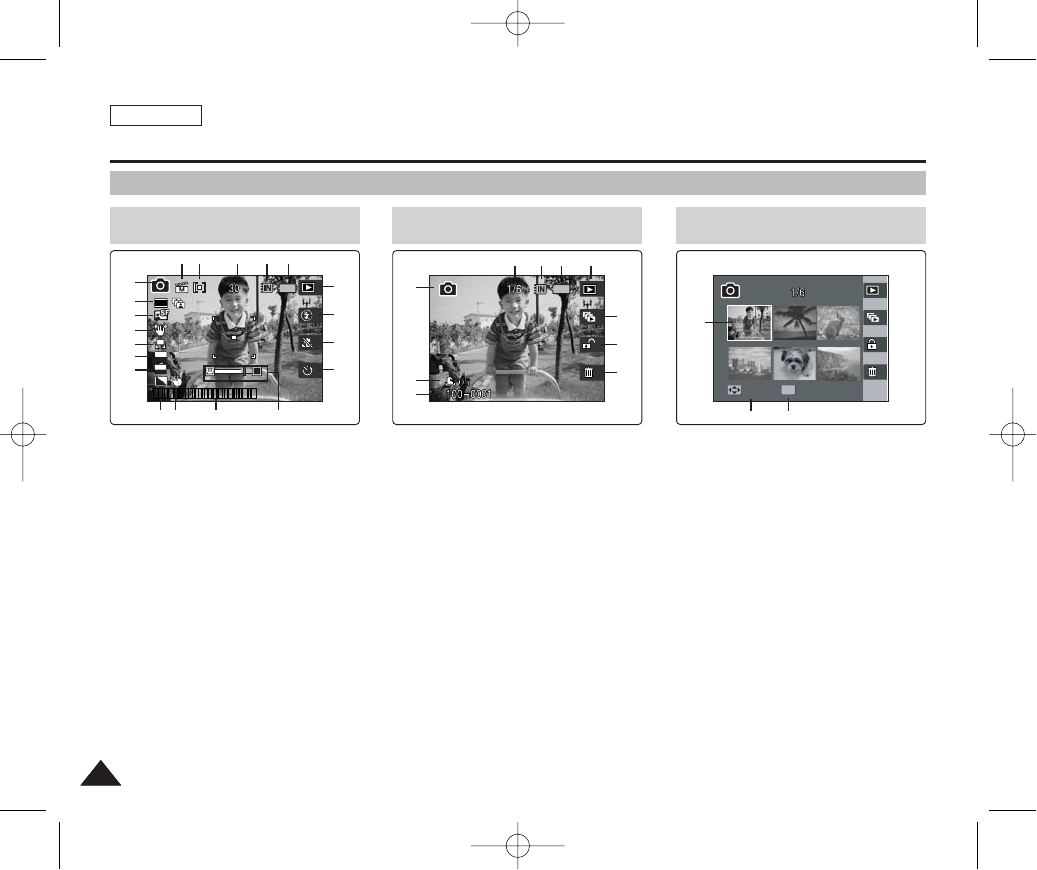
Name of Each Part : LCD Display
OSD (On Screen Display in Photo Capture Mode/Photo View Mode)
Photo Capture Mode
1. Mode Indicator
2. Image Size Indicator
3. Image Quality Indicator
4. DIS Image Stabiliser
5. White Balance Indicator
6. Multi Shot Indicator
7. EV Indicator
8. Sharpness Indicator
9. Digital Effect Indicator
10. Date / Time Indicator
11. Zoom In / Out Indicator
12. Optical Zoom Indicator
13. Digital Zoom Indicator
14. Flash Indicator
15. Record / Play Indicator
16. Battery Life Indicator
17. Memory type Indicator
18. Free Memory Space Indicator
19. Metering Mode Indicator
20. Scene Mode Indicator
1. Mode Indicator
2. DPOF Indicator
3. Image Number
4. Delete Indicator
5. Protection Indicator
6. Slideshow Indicator
7. Record / Play Indicator
8. Battery Life Indicator
9. Memory Type Indicator
10. Image Counter (Current / Total)
11. Selected Image
12. Use joystick for change selection
13. Use OK button to view full screen
T
2592
A
ISO
AUTO
EV
0
12:00PM 2005.01.01
T
1
3
2
4
5
6
7
8910 11
13
12
15
14
16
17181920
Photo View Mode
Move Full View
Slide
Slide
1
2
3
6
5
4
10 9 8 7
Photo View Mode
Move
Move
Full View
Full View
OK
Slide
11
12 13
[ Notes ]
✤Functions not marked with * will be retained when the device is restarted after turning
it off.
00934C SC-MS10 USA~037 9/30/05 10:55 AM Page 16
ENGLISH
1717
Name of Each Part : LCD Display
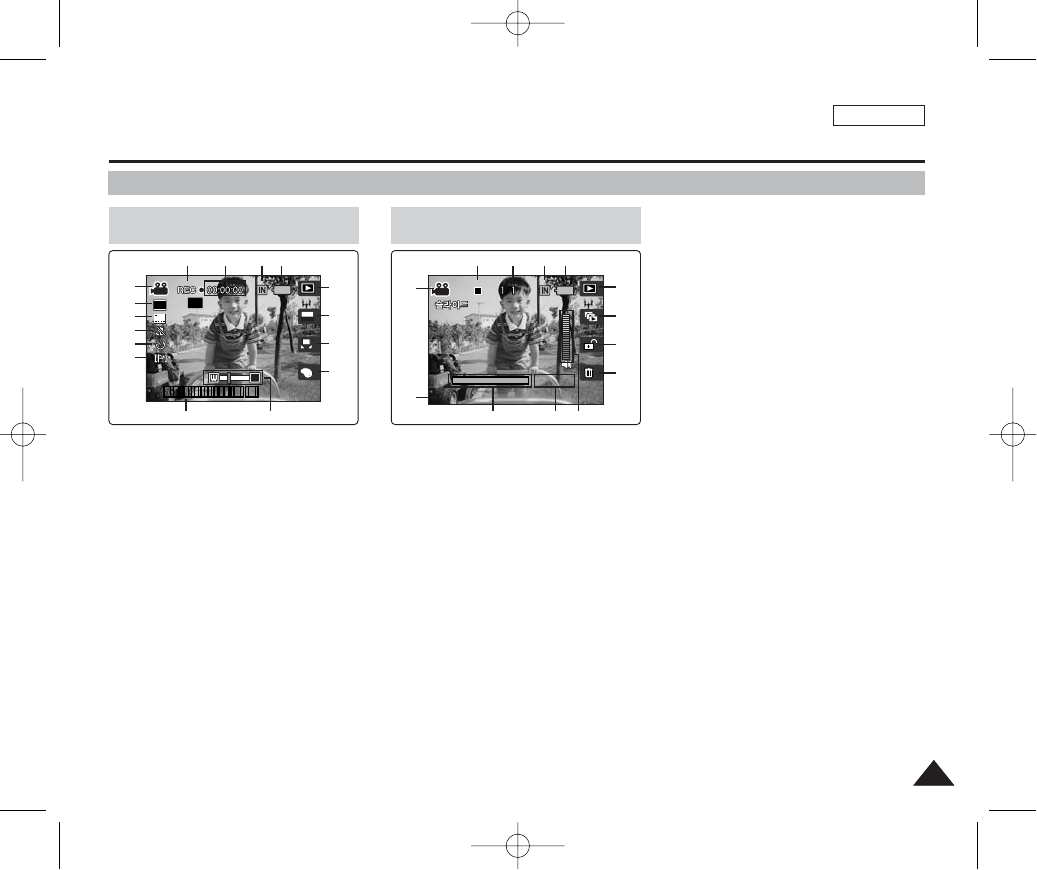
OSD (On Screen Display in Movie Record Mode/Movie Play Mode)
1. Mode Indicator
2. Image Size Indicator
3. Image Quality Indicator
4. Macro Indicator
5. Self Timer Indicator
6. Windcut Indicator
7. Date / Time Indicator
8. Zoom In / Out Indicator
9. Digital Effect Indicator
10. White Balance Indicator
11. Program AE Indicator
12. Record / Play Indicator
13. Battery Life Indicator
14. Memory Type Indicator
15. Counter (Elapsed Time)
16. Record / Standby Indicator
17. Remaining Time Indicator
1. Mode Indicator
2. Image Number
3. Playback Progress Bar
4. Counter (Elapsed Time)
5. Volume Indicator
6. Delete Indicator
7. Protection Indicator
8. Slideshow Indicator
9. Record / Play Indicator
10. Battery Life Indicator
11. Memory Type Indicator
12. Image Counter (Current / Total)
13. Standby / Play / Pause Indicator
Movie Record Mode
A
640
REM
T
SF
SF
OFF
OFF
≥Ï»≠
AE
AUTO
4 Min
4 Min
OFF
1 1 1
12:00PM 2005.01.01
1
22
3
4
5
6
9
10
11
12
13
141516
Movie Play Mode
100-0001
00:00:10
1
2
13
9
8
7
6
[ Notes ]
✤Functions not marked with * will be retained when the device is restarted after turning it
off.
✤The OSD indicators of this product shown above are based on model VP-MS10.
✤The OSD indicators are based on when using the internal memory for storage.
12 11 10
7 3 48 5
00934C SC-MS10 USA~037 9/30/05 10:55 AM Page 17
ENGLISH
1818
Name of Each Part : LCD Display
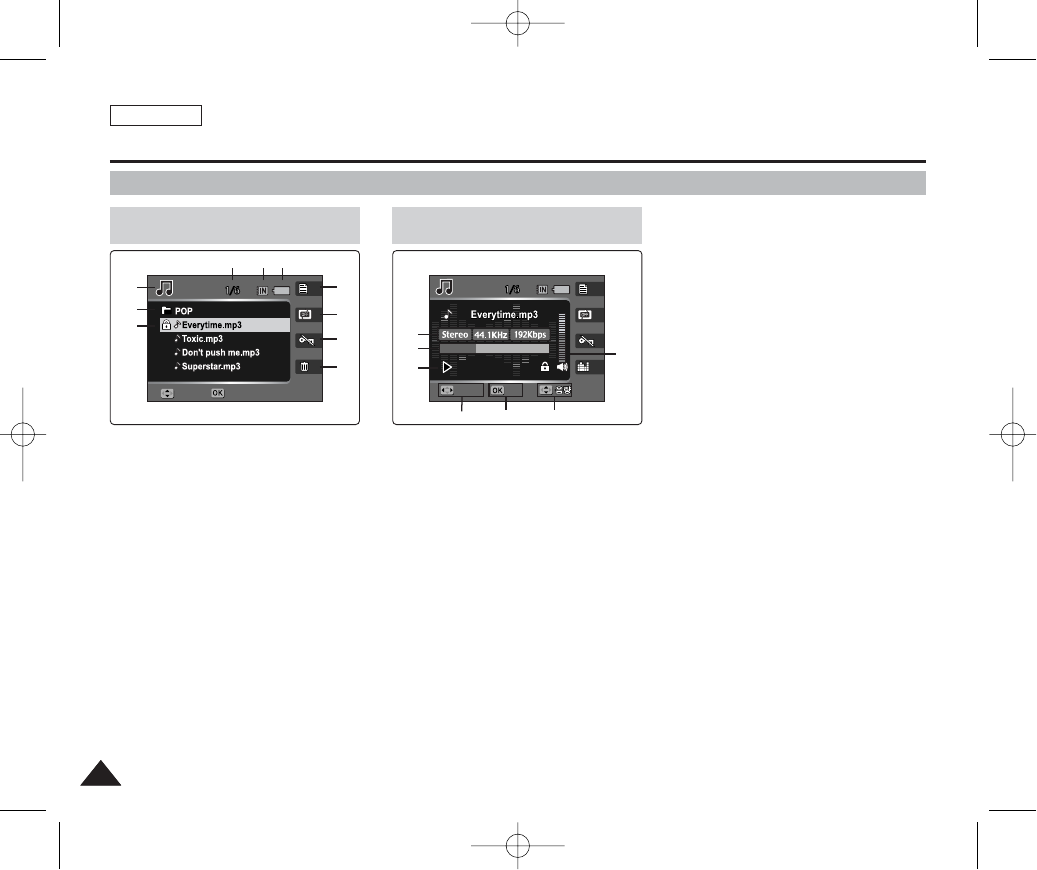
OSD (On Screen Display in Music Play Mode)
1. Mode Indicator
2. Current Folder Name
3. File Name
4. Equaliser Indicator
5. Protection Indicator
6. Repeat Indicator
7. Display File List
8. Battery Life Indicator
9. Memory Type Indicator
10. File Counter (Current / Total)
11. Current File Information
12. Progress Bar
13. Counter (Elapsed Time /
File Length)
14. Use joystick (Left / Right) to Search /
Skip
15. Use OK button to Play / Pause / Stop
16. Use joystick (Up / Down) to adjust
volume
Music Play Mode
01
Move
Move
Search Stop
Select
Select
1
2
3
Music Play Mode
01
00:50/03:00
Move
Search
Search
Stop
Stop
Select
8910
4
5
17
6
7
161514
11
12
13
00934C SC-MS10 USA~037 9/30/05 10:55 AM Page 18
ENGLISH
1919
Name of Each Part : LCD Display
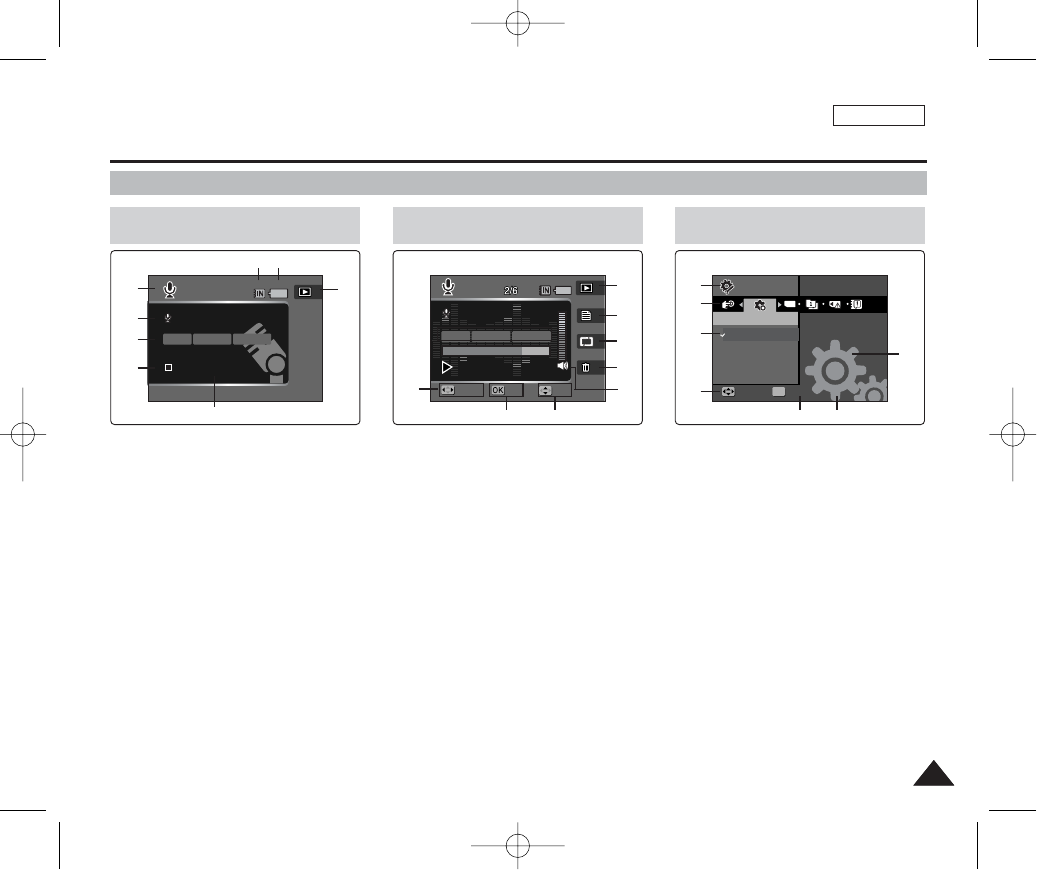
OSD (On Screen Display in Voice Record / Voice Play /System Settings Mode)
1. Mode Indicator
2. File Name
3. Current File Information
4. Standby / Record Indicator
5. Counter (Elapsed Time /
Remaining Time)
6. Record / Play Indicator
7. Battery Life Indicator
8. Memory Type Indicator
1. Use joystick (Left / Right) to
Search / Skip
2. Use OK button to Play / Stop
3. Use joystick (Up / Down) to
adjust volume
4. Volume Indicator
5. Delete Current File
6. Setup Repeat
7. Display File List
8. Record / Playback
Voice Record Mode
SWAV0001.WAV
SWAV0001.WAV
00:00:00/16:22:58
00:00:00/16:22:58
8KHz
Mono
64Kbps
1
2
3
4
Voice Play Mode
OFF
OFF
SWAV0004.WAV
SWAV0002.WAV
8KHz
Mono
64Kbps
00:00:05/00:00:10
00:00:16/00:00:20
Search
Search
Vol
Stop
Stop Vol
78
8
7
6
5
4
6
32
5
1
1. Mode Indicator
2. Menu Tab
3. Setup Items
4. Use joystick (Left / Right) to
move the cursor
5. Use OK button to select
System Settings Mode
TYPE
Move
Move
Select
Select
Reset
Reset
Start
OK
Settings
Settings
17
165
1
2
3
4
00934C SC-MS10 USA~037 9/30/05 10:55 AM Page 19

ENGLISH
2020
How to Use the Battery Pack
Battery Pack Installation / Ejection
It is recommended to purchase one or more additional Battery Packs to allow continuous use of your device.
Insert the Battery Pack into the battery slot until it clicks.
To insert the Battery Pack
Pull the [Battery Eject] button to eject the Battery Pack.
To eject the Battery Pack
[ Notes ]
✤Clean the terminals to remove any foreign substances before inserting the Battery Pack.
✤If the device will not be in use for a while, remove the Battery Pack from the device.
✤It is recommended to prepare fully charged additional Battery Packs for outdoor use.
✤Additional Battery Packs are available at your local Samsung dealer and service center.
<Inserting the Battery Pack>
<Ejecting the Battery Pack>
[ Warning ]
✤When you eject the Battery Pack from the device, hold the Battery Pack so as not to drop it.
MENU
OPEN
@
!
MENU
MENU
➮
➮
Cover
Battery
Lock Switch
00934C SC-MS10 USA~037 9/30/05 10:55 AM Page 20

ENGLISH
2121
How to Use the Battery Pack
Maintaining the Battery Pack
✤The Battery Pack should be recharged in an environment between 32°F (0°C) and 104°F (40°C).
✤The Battery Pack should never be charged in a room temperature that is below 32°F (0°C).
✤The life and capacity of the Battery Pack will be reduced if it is used in temperatures below 32°F (0°C) or left in
temperatures above 104°F (40°C) for a long period.
✤Do not put the Battery Pack near any heat sources (fire or flames, for example).
✤Do not disassemble, process, press, or heat the Battery Pack.
✤Do not allow the + and - terminals of the Battery Pack to be short-circuited. It may cause leakage, heat generation, fire, or
overheating.
✤It is recommended to use original Battery Pack that is available at SAMSUNG service center.
00934C SC-MS10 USA~037 9/30/05 10:55 AM Page 21
ENGLISH
2222
How to Use the Battery Pack
[ Notes ]
✤It is recommended to prepare fully-charged additional Battery Packs for outdoor use.
✤New Battery Packs are available at your local Samsung dealer and service center.
✤If you zoom in or out, the recording time becomes shorter.
✤The ”Continuous Recording Time” estimated above indicates the time that you record video continuously without using other functions such
as zooming, video playback, or DIS( ) functions.
The continuous recording times (for video recording) given in the table below are approximations.
Actual recording time depends on usage.
Continuous Recording Time Based on Battery Type
Super Fine (SF) Fine Normal
640 x 480
320 x 240
Approx. 4 Minutes
Approx. 7 Minutes
Approx. 7 Minutes
Approx. 15 Minutes
Approx. 15 Minutes
Approx. 30 Minutes
Image Resolution
Image Quality
Continuous Recording Time
LCD On Backlight Off
SB-LH82 (820 mAh) Approx. 60 Minutes Approx. 80 Minutes
Battery Model
Time
00934C SC-MS10 USA~037 9/30/05 10:55 AM Page 22
ENGLISH
2323
How to Use the Battery Pack
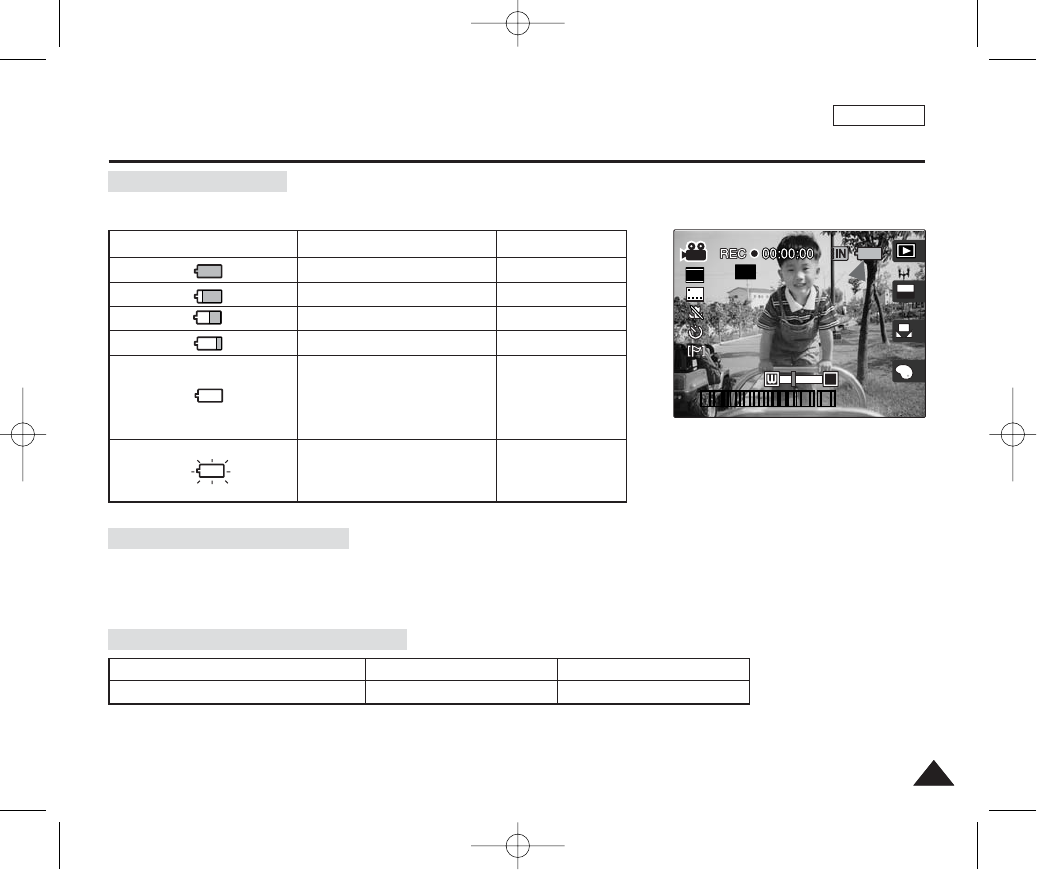
Battery Level Display
The Battery Level Display shows the amount of battery power remaining in the Battery Pack.
Tips for Battery Identification
Charging time based on battery type
A charge indicator is provided on the Battery Pack to help you to remember whether it has been charged or not.
If the battery has been fully charged, the charge indicator is green. If you are charging the battery, the color of the
charge indicator is orange. The charge indicator flickers if the battery is abnormal.
Battery Level Indicator State
Fully charged
25 ~ 50% is used
50 ~ 70% is used
75 ~ 95% is used
Over 95% is used (flickers)
The device will soon turn off.
Change the Battery Pack as
soon as possible.
(flickers)
The device will be forced to
turn off after a beeping sound.
Message
-
-
-
-
-
“Low battery”
SB-LH82 (820 mAh) Approx. 1 hr 40 min Approx. 2 hr 40 min
Capacity Using AC Adapter Using USB Charging
A
640
REM
T
SFSF
OFFOFF
≥Ï»≠
AE
AUTO
4 Min4 Min
OFF
1 1 1
12:00PM 2005.01.01
00934C SC-MS10 USA~037 9/30/05 10:55 AM Page 23
ENGLISH
2424
How to Use the Battery Pack
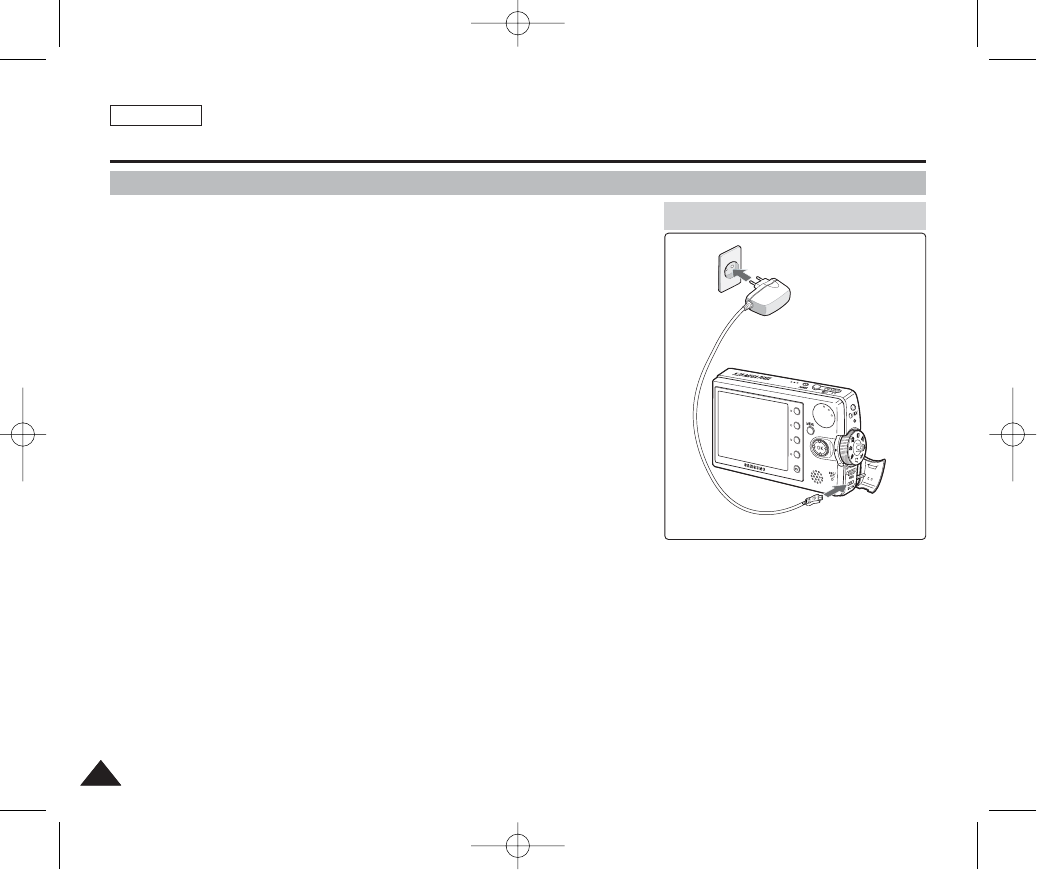
Charging the Battery Pack
1. Turn off the Miniket Photo for a while.
2. Attach the Battery Pack to the Miniket Photo.
3. Open the Connector Cover of the set.
4. Connect the AC Power Adapter with the Miniket Photo.
◆You can detach the AC adapter by pressing the buttons on the sides of
the adapter cable plug while pulling it out.
5. Insert the AC Power Adapter into the outlet.
[ Notes ]
✤You can charge the Battery Pack while using the Miniket Photo, but it t takes a
relatively longer time.
✤You may use the Miniket Photo powered by the AC Power Adapter indoors where
available.
✤You may charge your Miniket Photo by connecting it to a PC with the USB cable.
[ Warning ]
✤It is recommended you fully charge the Battery Pack before use.
✤You should only charge the battery in an environment between 32°F (0°C) and 140°F (40°C).
✤Ambient temperature may affect charging the Battery Pack; too low temperature may result in
longer charge time / incomplete charging.
Adequate room temperature for charging is 10°C ~ 30°C.
✤Before connecting the cable, make sure that you don’t have any foreign substances between
connectors.
It is recommended to fully charge the Battery Pack before use.
Charging directly to the Miniket Photo
4
5
00934C SC-MS10 USA~037 9/30/05 10:55 AM Page 24
ENGLISH
2525
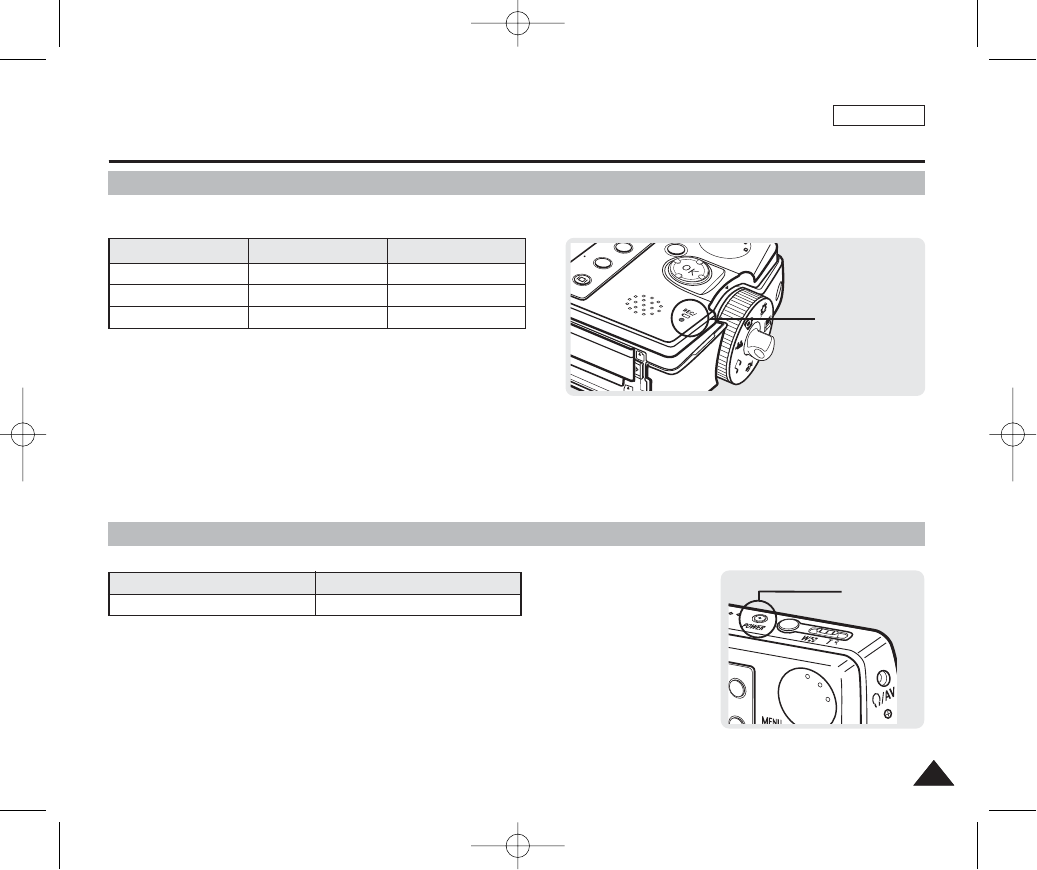
Recording / Charging Indicator
Power Indicator
Getting Started
The color of the LED indicates the state of power or charging.
LED Color
Red
Orange
Green
During Recording
Recording
-
-
During Charging
-
Charging
Fully Charged
LED Color
Blue
Power
On
NU
Recording /
Charging Indicator
Power
Indicator
00934C SC-MS10 USA~037 9/30/05 10:55 AM Page 25

ENGLISH
2626
Getting Started
Before You Start Operating the Miniket Photo
Before using the Miniket Photo, read this page thoroughly for easy operation. The Memory Card is an optional accessory and
not included in the package.
1. Install the Battery Pack and insert a Memory Card into the Memory Card slot. (Refer to page 34)
2. Charge the Battery Pack by directly connecting the AC Power Adapter to the device. (Refer to page 24)
3. Press the [POWER] button to turn on the device.
4. Select the desired mode by setting the [Mode Dial].
5. Press the [Record / Stop] button to take a picture, start recording video / voice, or play back music.
◆To set focus, press the [Record / Stop] button halfway down.
6. When finished, press the [POWER] button to turn the device off.
[ Notes ]
✤You can select Video mode or Previous mode as the start-up mode in System Settings. (Refer to page XX)
✤The system automatically switches to the selected mode within two seconds even when the [OK] button is not pressed.
00934C SC-MS10 USA~037 9/30/05 10:55 AM Page 26

ENGLISH
2727
Using the Mode Dial
The Mode Dial is used to set the device mode. Available modes are Photo, Video, Music, PC Camera, PictBridge, Storage, and
System Settings.
Set the desired mode by turning the Mode Dial. Within 1 ~ 2 seconds, the device switches to the designated mode.
Photo Mode
You can take / view photos.
Video Mode
You can record / play back video.
Music Mode
You can download / play back music files (MP3).
Voice Record Mode
You can record / play back voice / sound.
PC Camera Mode
You can use the device as a PC camera for video
chatting, video conferencing, and other PC camera
applications.
PictBridge Mode
When you connect the device to a PictBridge-
supported printer with a USB cable, you can print
your stored pictures without a PC.
Storage Mode
Connecting the device to a PC with a USB cable
allows you to store various files in the device.
System Settings Mode
Using this mode, you can set / adjust settings
regarding the LCD display, Date / Time, Reset, and
Memory management.
Getting Started
Setting the Mode
Functions of Each Mode
00934C SC-MS10 USA~037 9/30/05 10:55 AM Page 27
ENGLISH
2828
Getting Started
Using the DISPLAY Button
Using the Menu Button
1. If you press the [DISPLAY] button once, OSD (On-screen
Display) indicators and messages will disappear.
2. If you press the [DISPLAY] button twice, the backlight will
turn off.
3. If you press the [DISPLAY] button 3 times, the LCD monitor
will turn off.
4. If you press the [DISPLAY] button 4 times, it switches to the
initial (normal) display screen.
[ Notes ]
✤Above description applies to the Photo and Video mode.
1. Set the desired mode by setting the Mode Dial.
2. Press the [Menu] button.
3. Move the cursor by moving the joystick (▲/▼, œœ/√√) to select
desired menu item, and then press the [OK] button to
confirm.
4. Press the [Menu] button to finish.
[DISPLAY] Button
MENU
25
MEGA PIXEL
POWER
W T
Mode Dial
Joystick
[Menu] Button
00934C SC-MS10 USA~037 9/30/05 10:55 AM Page 28
ENGLISH
2929
Getting Started
Using the Shortcut Buttons
Icons that represent the most frequently accessed functions according to the current mode are displayed on the LCD monitor to
allow easier access. Using these buttons, you may directly access the functions.
1. Press the Mode Dial to set the desired mode.
2. Press the [POWER] button to turn on the device.
3. On the LCD monitor, the function of each button is displayed.
Press the button to access the function directly.
◆ex) In Photo Mode, 4 shortcut buttons will be:
< >-< >-< >-< >
MENU
PIXEL
POWER
W T
Shortcut Button
Mode Dial
[Power] Button
00934C SC-MS10 USA~037 9/30/05 10:55 AM Page 29

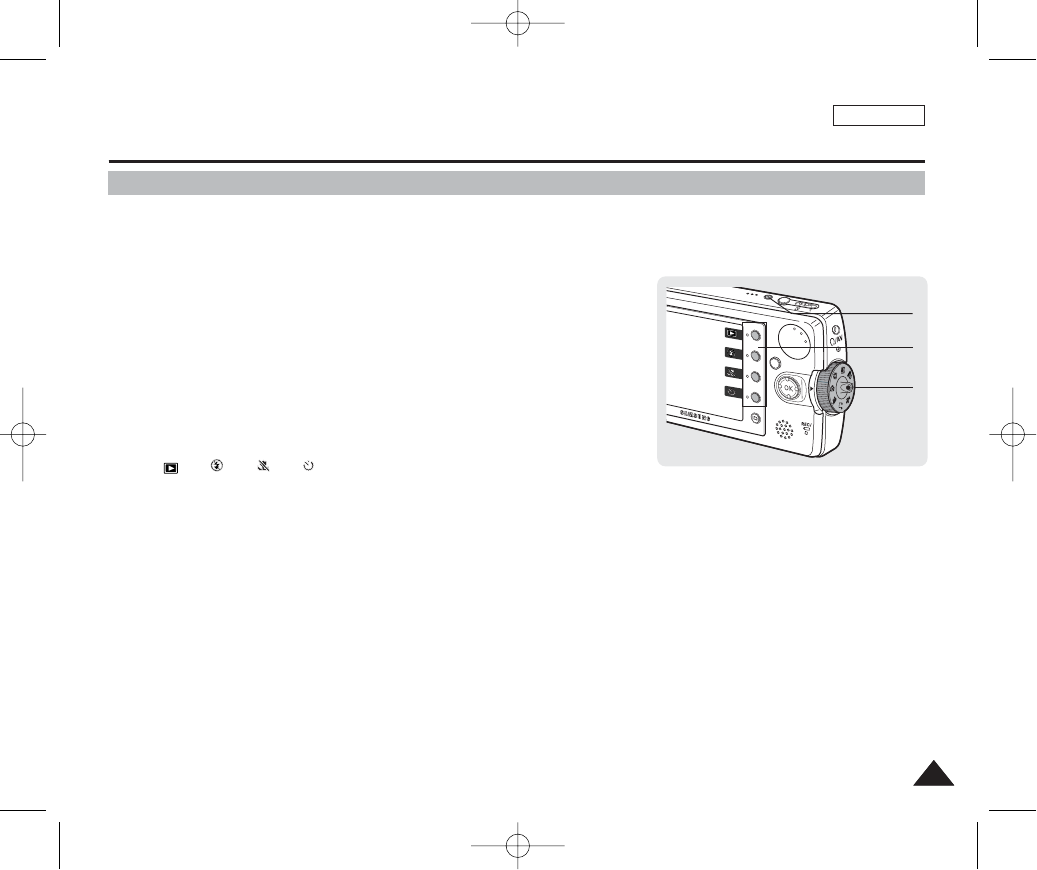
Getting Started
Using the Joystick
✤The joystick is used to make a selection, move the cursor, select functions, and exit from the menu.
✤The joystick is used to make a selection, move the cursor, and select functions.
1. Move the cursor right / left by pressing the joystick (œœ/√√).
2. Move the cursor up / down by pressing the joystick (▲/▼).
◆You can adjust the volume by moving the joystick (up / down) in Video /
Music / Voice playback modes.
3. Confirm your selection by pressing the [OK] button.
ENGLISH
3030
Menu Selection
Move Upwards
Move Downwards
Move Left
Move Right
Confirm Selection
While Playing Back
Increase Volume
Decrease Volume
-
-
-
Move left Move right
Move down
Move Up
Confirm selection
MENU
Joystick
[ Note ]
✤Use the joystick for menu traversal or making selections.
00934C SC-MS10 USA~037 9/30/05 10:55 AM Page 30
ENGLISH
3131
Getting Started
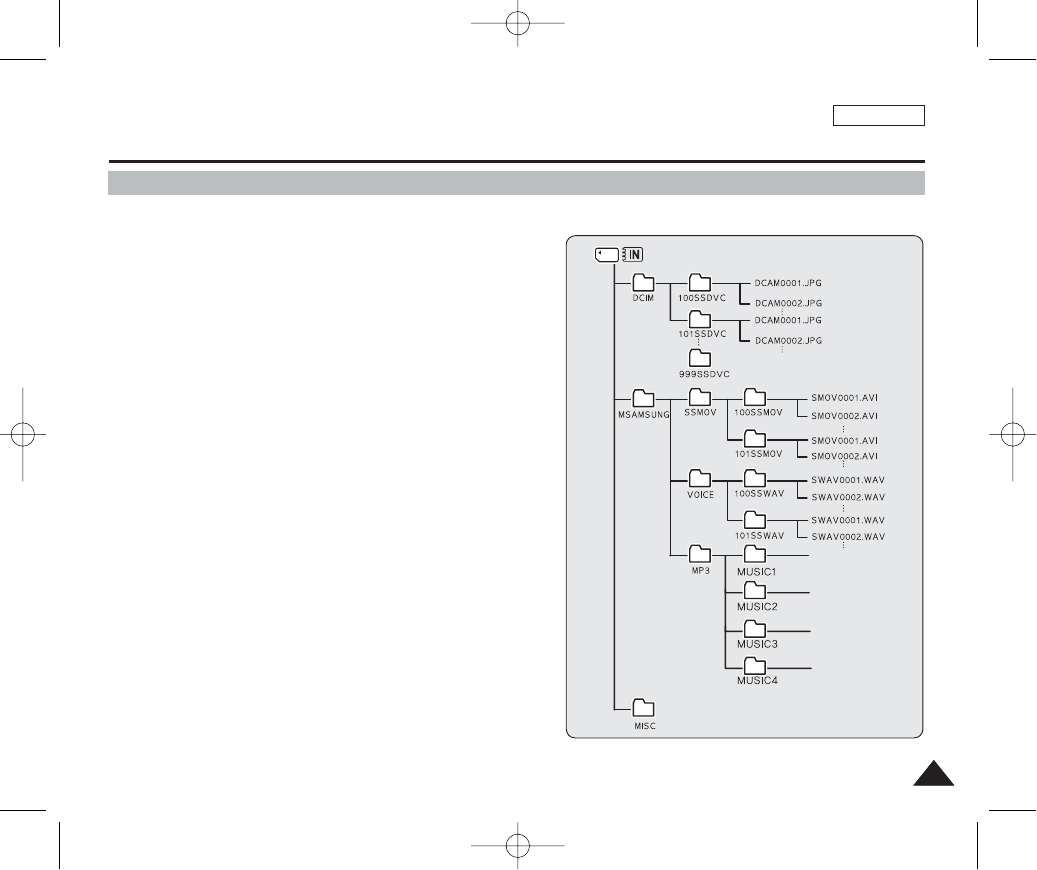
Structure of Folders and Files
The video files and photo files are stored in internal memory or external memory (Memory Card) as below:
[ Notes ]
✤Refer to page XX for details on Memory Card.
✤You can store general data files and folders in Miniket Photo.
✤The maximum number of files you may store in Miniket Photo is 9,999
where number of folders is 999.
✤DCAM****.JPG: Photo files
SMOV****.AVI: Video files
SWAV****.WAV: Voice files
********.MP3: MP3 files
✤MISC: DPOF files are stored.
✤Do not change the file or folder name except ‘Free’.
✤You can freely change the file or folder name under the ‘Free’.
✤Video files that you have not made with this device may not play back on
this device.
[ Warning ]
✤Memory cards are made with precision technology. It is sensitive and
vulnerable to electric shock, temperature and humidity, be cautious
with handling the memory card to avoid losing data stored in it.
✤Damaged data may not be recovered, and SAMSUNG is not
responsible for lost data. Make sure to back up important files in PC
separately.
00934C SC-MS10 USA~037 9/30/05 10:55 AM Page 31

ENGLISH
3232
Recording Time and Capacity
Getting Started
[ Notes ]
✤The photo capacity / recording times are approximations and are subject to conditions.
✤The photo capacity is subject to change depending on the captured image size. The Voice Recording Time is also subject to change.
✤There is no guarantee about the operation of a Memory Card which has not been formatted on this Miniket Photo. Make sure to format a Memory Card on the
Miniket Photo (Refer to page 50).
✤Do not format a Memory Card on a PC.
✤The recording time and the number of images shown above are maximum figures only when using the respective function.
In actual use, using more than one function will reduce the capacity of each.
✤If you set the flash to on, you can take fewer photos than described above.
✤When you use a Memory Card, you may get a <“Low speed card. Please record at lower quality”> message. It is because the writing speed of the Memory Card
is slow.
It is recommended to use a Memory Card of 1.25MB/sec or greater data transfer rate.
✤Video file may not record / playback normally when using a Memory Card bigger than 1GB.
✤Based on the device set to mono and a 64kbps transfer rate.
✤Voice recording time shown above is an estimation and is subject to recording conditions.
5M
4M
3M
2M
1M
VGA
TIFF Maximum Quality
Image Size
Image Quality
Approx. 4
-
-
-
-
-
Super Fine
Approx. 30
Approx. 40
Approx. 50
Approx. 80
Approx. 180
Approx. 400
Fine
Approx. 60
Approx. 80
Approx. 100
Approx. 170
Approx. 340
Approx. 680
Normal
Approx. 120
Approx. 170
Approx. 200
Approx. 290
Approx. 680
Approx. 1,020
Photo Capacity (for 64 MB)
640 x 480
320 x 240
Image Size
Image Quality
Super Fine
Approx. 4 min
Approx. 7 min
Fine
Approx. 7 min
Approx. 15 min
Normal
Approx. 15 min
Approx. 30 min
Video Recording Time
Recording Time
Approx. 30 min
Voice Recording Time
00934C SC-MS10 USA~037 9/30/05 10:55 AM Page 32
You can set the storage to the built-in internal memory or external mini SD Memory Card (Optional Accessory).
Video and photo files are stored in internal memory by default.
1. Press the [POWER] button to turn on the device.
2. Initially, the memory type is set to <Int. Memory> memory by default.
3. Insert a mini SD Memory Card into the memory slot (refer to page 35).
◆The message ”Memory Card is inserted. Set to the Memory Card?” appears on the screen.
4. Select the desired setting by moving the joystick left / right (œœ/√√) and press
the [OK] button.
◆Yes: Photo, video, music and voice files will be stored in the inserted Memory Card.
◆No: Photo, video, music and voice files will be stored in the built-in internal memory.
ENGLISH
3333
Selecting the Memory Type
Getting Started
[ Notes ]
✤You may select the storage memory type in menu of Photo / Video / Music / Voice Record / System Settings mode.
✤Selected memory will be used for the storage in all modes.
✤Built-in internal memory: Photo, video, music and voice files will be stored in the built-in internal memory.
✤Memory Card: Photo, video, music and voice files will be stored in the Memory Card inserted.
You can change this option using the System Settings menu (refer to page 49).
2
3
TYPE
Memory TypeMemory Type
Int. Memory
Memory Card
MoveMove SelectSelect
Move Select
SettingsSettings
Memory Type
Settings
Memory Type
Int. Memory
Memory Card
Move Select
MoveMove SelectSelect
Settings
TYPE
Memory TypeMemory Type
SettingsSettings
00934C SC-MS10 USA~037 9/30/05 10:55 AM Page 33
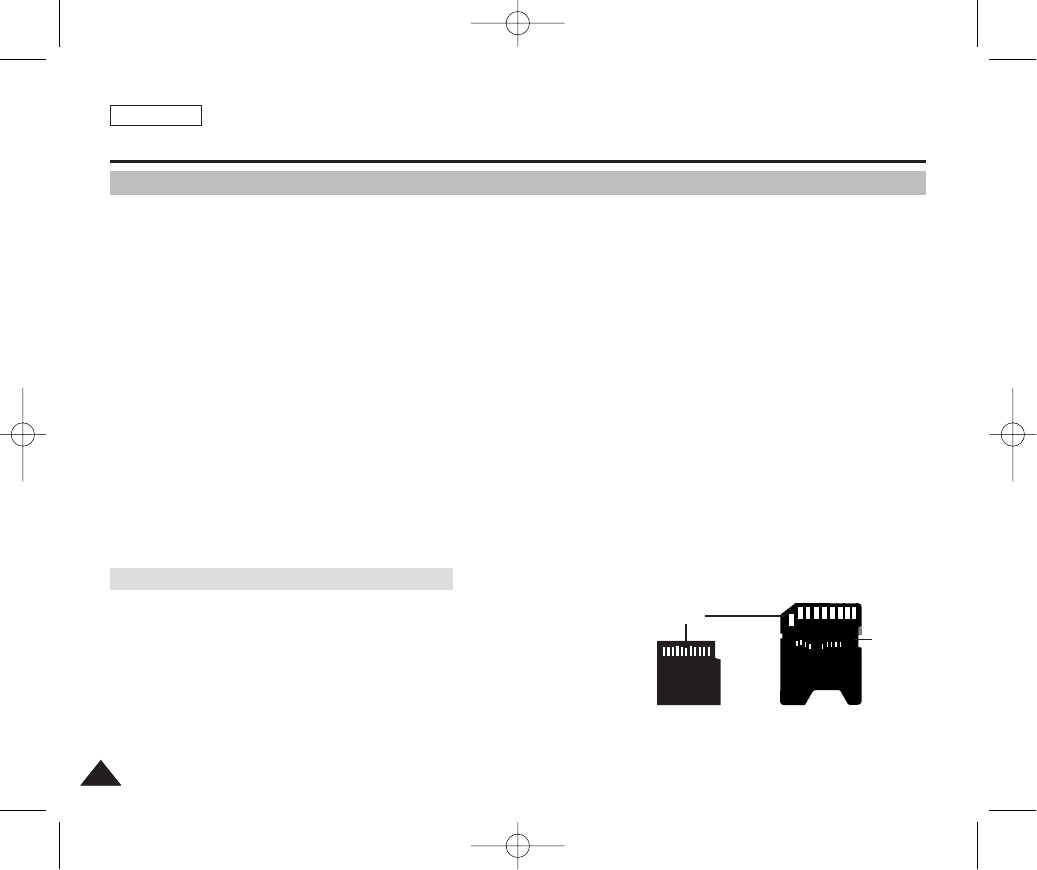
✤Only mini SD Memory Card is supported.
✤Turning the power off / ejecting the memory card during the memory operation such
as formatting, deleting, recording, and playback may damage the data.
✤You may modify the name of a file / folder stored in the memory card using a PC. Miniket Photo may not recognise modified
files.
✤It is recommended that you power off before inserting or ejecting the memory card to avoid losing data.
✤It is not guaranteed that you may use a memory card formatted on a PC. Be sure to format your memory card using the
Miniket Photo.
✤Save important files separately on other media, such as floppy disk, hard disk, or CD.
✤You have to format newly-purchased memory cards, memory cards with data on it that camera cannot recognise or the
cards that have data saved by other cameras.
✤The memory card has a certain life span. If you use it for a long time, you cannot record new data. In this case, you have to
purchase a new memory card.
✤The memory card is a precision electronic equipment. Do not bend it, drop it, or cause it to suffer a strong impact..
✤Do not use or store in a place that has high temperature and humidity or dusty environment.
✤Do not allow foreign substances on the Memory Card terminals. Use a soft dry cloth to clean the terminals if required.
✤It is recommended to use a memory card case to avoid losing data from moving and static electricity.
✤After a period of use, the memory card may get warm. This is normal, not a malfunction.
Damaged data may not be recovered, and SAMSUNG is not responsible for the lost data. Make sure to back up important
files separately on a PC.
ENGLISH
3434
Getting Started
Using the Memory Card (Optional Accessory)
✤This device only supports the mini SD Memory Card.
✤SD Memory Card / SD Memory Card Adapter are not supported by this
device.
✤mini SD Memory Card / SD Memory Card Adapter supports a mechanical
write protection switch. Setting the switch prevents accidental erasure of files
recorded on the memory card. To enable writing, move the switch to the
direction of terminals. To set write protection, move the switch down.
[ Note ]
✤mini SD Memory Card is an optional accessory.
Name of Each Part: mini SD Memory Card
Terminals
Write-
protect
Switch
mini SD Memory Card SD Memory Card Adapter
00934C SC-MS10 USA~037 9/30/05 10:55 AM Page 34

ENGLISH
3535
Getting Started
Inserting / Ejecting the Memory Card (Optional Accessory)
This product is equipped with a built-in internal memory and the external memory card is an optional accessory
which is not provided with the package.
Inserting a Memory Card
1. Open the battery / memory card compartment lid by sliding the [OPEN]
switch on the bottom side.
◆Slide the [OPEN] switch in the direction of (1) as shown in the figure until it stops.
Then open the lid.
2. Insert a mini SD Memory Card into the slot until it softly clicks.
◆The memory card terminals face down while the LCD monitor faces up.
Ejecting a Memory Card
1. Slightly push the mini SD Memory Card inwards to pop it out.
2. Pull the mini SD Memory Card out of the slot and close the battery /
memory card compartment lid.
[ Notes ]
✤Do not apply excessive force when you insert or eject a Memory Card.
✤Do not turn the power off while recording, playing, or erasing files or while formatting a Memory
Card.
✤Turn the power off before you insert or eject a Memory Card to avoid losing data.
✤Do not place a Memory Card near a strong electro-magnetic device.
✤Do not allow metal substances to come in contact with the terminals on the Memory Card.
✤Do not bend a Memory Card.
✤After pulling a Memory Card out of the device, keep the Memory Card in a case to prevent static shock.
✤The data stored on the Memory Card may be changed or lost as a result of misuse, static electricity, electric noise, or repair.
Save important files separately.
✤Samsung is not responsible for data loss due to misuse.
OPEN
@
!
MENU
00934C SC-MS10 USA~037 9/30/05 10:55 AM Page 35

ENGLISH
3636
Setting the Miniket
Photo
Adjusting the LCD Monitor ...............................................................37
Adjusting the LCD Brightness ......................................................37
Setting Date / Time.............................................................................38
Setting Date / Time .......................................................................38
Setting Date / Time Format ..........................................................39
Setting Date Display .....................................................................40
Setting the System.............................................................................41
Setting the Auto Shut Off..............................................................41
Setting the File No. Function........................................................42
Setting the Beep Sound ...............................................................43
Setting the Shutter Sound ............................................................44
Selecting Language......................................................................45
Setting the TV Standard ...............................................................46
Setting the Mode Display .............................................................47
Resetting the Miniket Photo .........................................................48
Setting Memory ..................................................................................49
Selecting the Storage Type ..........................................................49
Formatting the Memory ................................................................50
Viewing Memory Space................................................................51
1
1
00934C SC-MS10 USA~037 9/30/05 10:55 AM Page 36
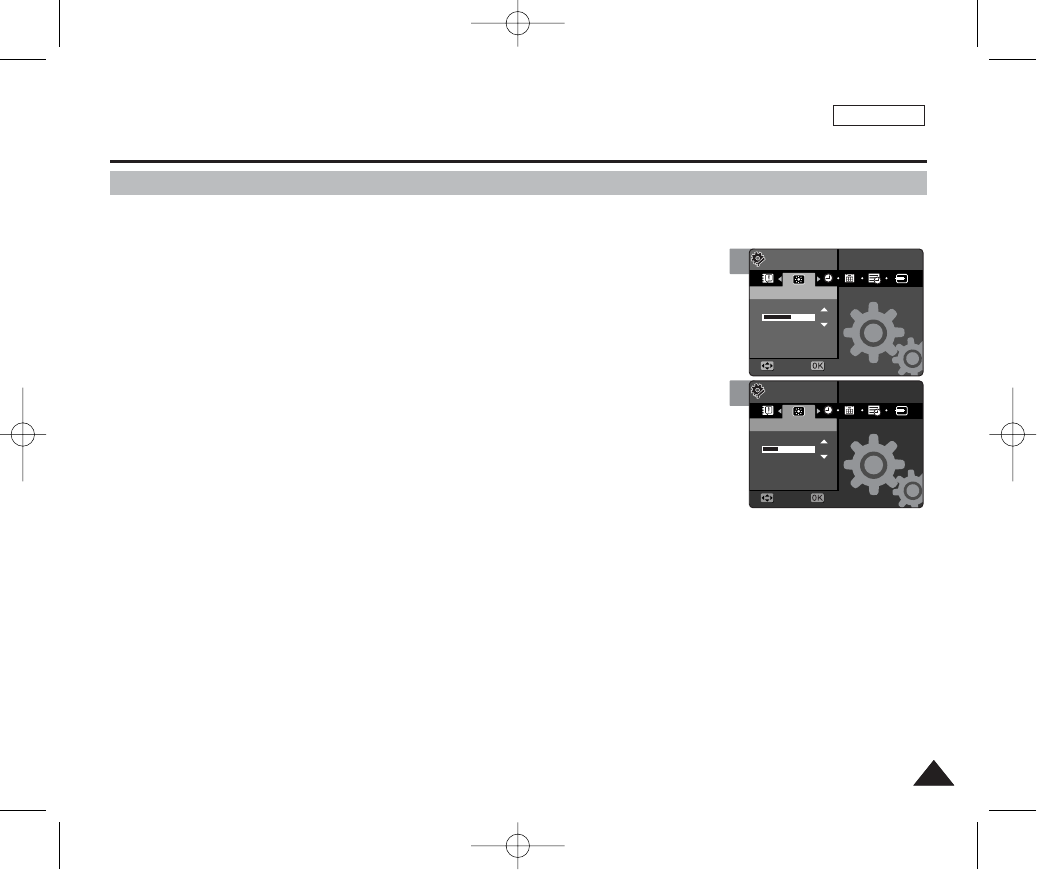
ENGLISH
3737
Setting the Miniket Photo : Adjusting the LCD Monitor
Adjusting the LCD Brightness
You can adjust the brightness of the LCD monitor to compensate for ambient lighting conditions.
1 Set the Mode Dial to the System Settings mode.
2. Press the [POWER] button to turn on the device.
◆The <System Settings> menu appears.
3. Select <LCD Brightness> by moving the joystick left / right (œœ/√√).
4. Adjust the brightness by moving the joystick up / down (▲/▼).
◆Moving the joystick upwards will brighten the screen whereas moving it downwards will
darken the screen.
◆Brightness range: You can adjust the brightness between 0 ~ 32 steps.
5. After you finish adjusting, set the Mode Dial to the desired mode.
[ Notes ]
✤A Brighter LCD screen setting consumes more battery power.
✤Brighten the LCD screen when the ambient lighting is too bright and the monitor is hard to see.
✤LCD Brightness does not affect the brightness of stored images.
1
2
18
MoveMove SelectSelect
SettingsSettings
LCD BrightnessLCD Brightness
Move Select
Settings
LCD Brightness
10
Move Select
Settings
LCD Brightness
MoveMove SelectSelect
SettingsSettings
LCD BrightnessLCD Brightness
00934C SC-MS10 USA~037 9/30/05 10:55 AM Page 37
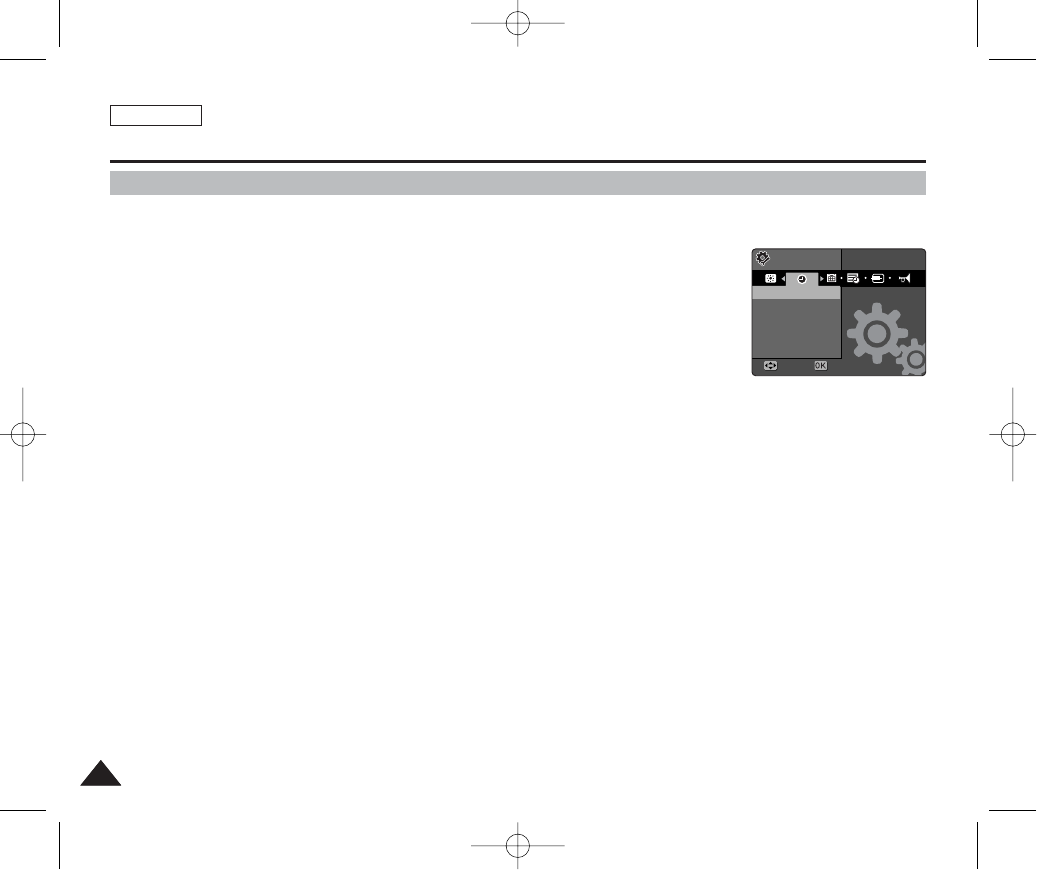
ENGLISH
3838
Setting the Miniket Photo : Setting Date / Time
Setting Date / Time
The built-in clock creates the time stamp. You can adjust the time using this menu.
1. Set the Mode Dial to the System Settings mode.
2. Press the [POWER] button to turn on the device.
◆The <System Settings> menu appears.
3. Select <Date & Time Set> by moving the joystick left / right (œœ/√√).
4. Set values by moving the joystick up / down (▲/▼), and then press the [OK]
button.
◆Items are listed in the date format. By default, it appears in the order of Year, Month, Date,
Hour and Minute.
◆Cursor moves to the next item.
◆Set Month and Year using the same method.
5. Set all items and then press the [OK] button to finish.
◆Set Minute and AM / PM using the same method.
6. After you finish setting, set the Mode Dial to the desired mode.
[ Notes ]
✤You can display Date and Time on the LCD monitor by setting the <Date & Time> option other
than to <Off>.
✤If the <Date & Time> display option is set to display before setting the time, it will appear as
“12:00PM 2005. 1. 1”.
✤You can set the year up to 2,037.
✤Date and Time information will be recorded with the recordings.
SettingsSettings
Date&Time SetDate&Time Set
MoveMove SelectSelect
------ --
AM
--
:
--
00934C SC-MS10 USA~053 9/30/05 10:55 AM Page 38

ENGLISH
3939
Setting the Miniket Photo : Setting Date / Time
Setting Date / Time Format
You can select the date format to display.
1. Set the Mode Dial to the System Settings mode.
2. Press the [POWER] button to turn on the device.
◆The <System Settings> menu appears.
3. Select <Date Format> by moving the joystick left / right (œœ/√√).
4. Set the format by moving the joystick up / down (▲/▼), and then press the
[OK] button.
◆<YYYY/MM/DD>: The date is displayed in the order of Year / Month / Date.
◆<DD/MM/YYYY>: The date is displayed in the order of Date / Month / Year.
◆<MM/DD/YYYY>: The date is displayed in the order of Month / Date / Year.
5. After you finish setting, set the Mode Dial to the desired mode.
3
4
SettingsSettings
Date FormatDate Format
YYYY/MM/DD
DD/MM/YYYY
MM/DD/YYYY
MoveMove SelectSelect
Settings
Date Format
Move Select
Settings
Date Format
Move Select
SettingsSettings
Date FormatDate Format
YYYY/MM/DD
DD/MM/YYYY
MM/DD/YYYY
MoveMove SelectSelect
00934C SC-MS10 USA~053 9/30/05 10:55 AM Page 39
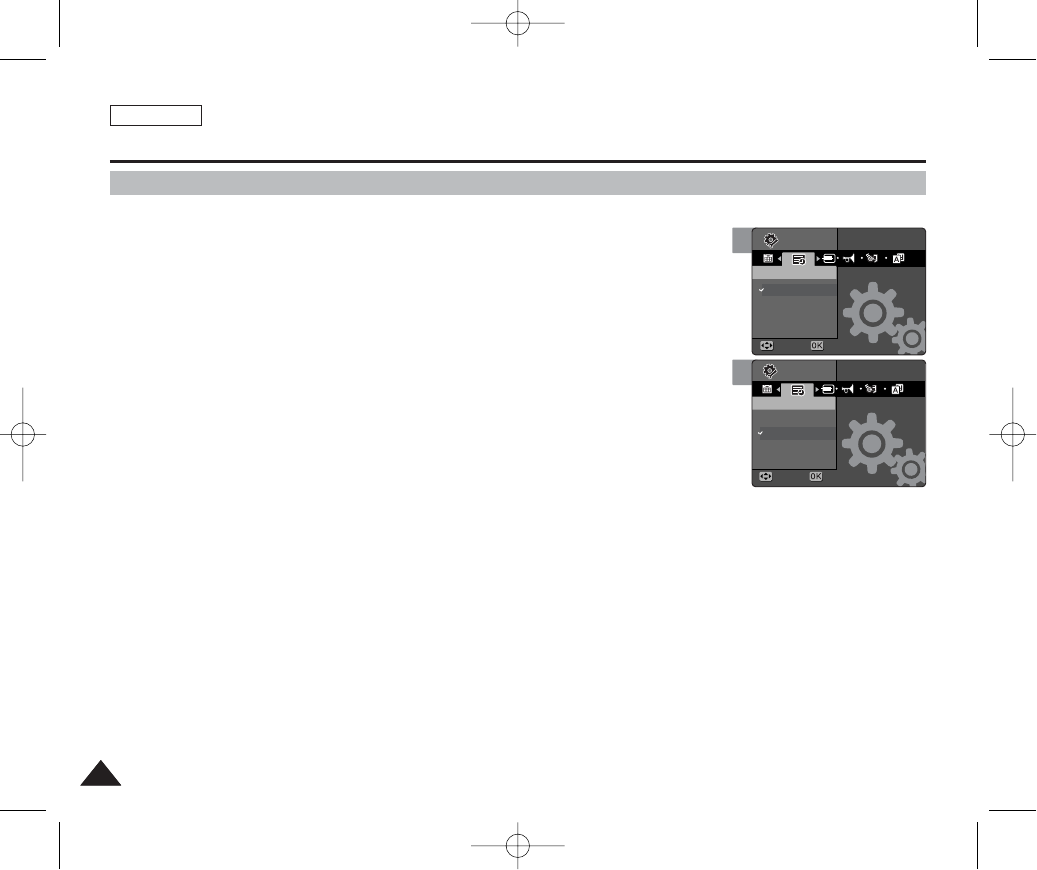
You can set to display date and time on the LCD monitor.
1. Set the Mode Dial to the System Settings mode.
2. Press the [POWER] button to turn on the device.
◆The <System Settings> menu appears.
3. Select <Date & Time> by moving the joystick left / right (œœ/√√).
4. Set the display option by moving the joystick up / down (▲/▼), and then
press the [OK] button.
◆<Off>: Date and Time are not displayed.
◆<Date>: The date is displayed.
◆<Time>: The time is displayed.
◆<Date & Time>: The date and time are displayed.
4. After you finish setting, set the Mode Dial to the desired mode.
ENGLISH
4040
Setting the Miniket Photo : Setting Date / Time
Setting Date Display
3
4
SettingsSettings
Date/TimeDate/Time
Off
Date
Time
Date&Time
MoveMove SelectSelect
Settings
Date/Time
Move Select
Settings
Date/Time
Move Select
SettingsSettings
Date/TimeDate/Time
Off
Date
Time
Date&Time
MoveMove SelectSelect
00934C SC-MS10 USA~053 9/30/05 10:55 AM Page 40
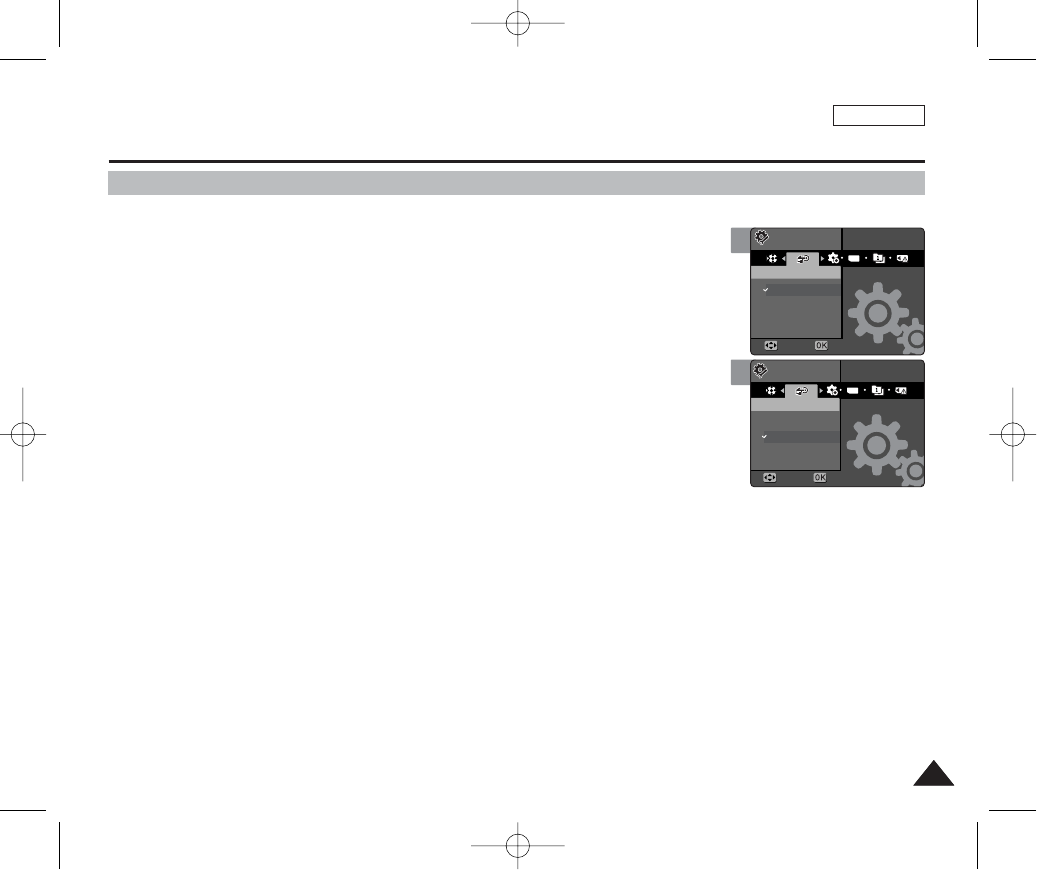
ENGLISH
4141
Setting the Miniket Photo : Setting the System
To save battery power, you can set the Auto Shut Off function which turns off the device if there is no operation for a certain
period of time.
1. Set the Mode Dial to the System Settings mode.
2. Press the [POWER] button to turn on the device.
◆The <System Settings> menu appears.
3. Select <Auto Shut Off> by moving the joystick left / right (œœ/√√).
4. Select the desired option by moving the joystick up / down (▲/▼) and
then press the [OK] button.
◆<Off>: Cancel the Auto Shut Off function.
◆<3min>: Automatically turns off after 3 minutes.
◆<5min>: Automatically turns off after 5 minutes.
5. After you finish setting, set the Mode Dial to the desired mode.
[ Notes ]
✤The Auto Shut Off will not function when you connect the AC Power Adapter to the Miniket Photo. The Auto Shut Off functions when the
Battery Pack is the only power source.
✤The Auto Shut Off will not function when you transfer data between the Miniket Photo and a PC.
Setting the Auto Shut Off
3
4
TYPE
SettingsSettings
Auto Shut OffAuto Shut Off
Off
3min
5min
MoveMove SelectSelect
Settings
Auto Shut Off
Move Select
Settings
Auto Shut Off
Move Select
TYPE
SettingsSettings
Auto Shut OffAuto Shut Off
Off
3min
5min
MoveMove SelectSelect
00934C SC-MS10 USA~053 9/30/05 10:55 AM Page 41
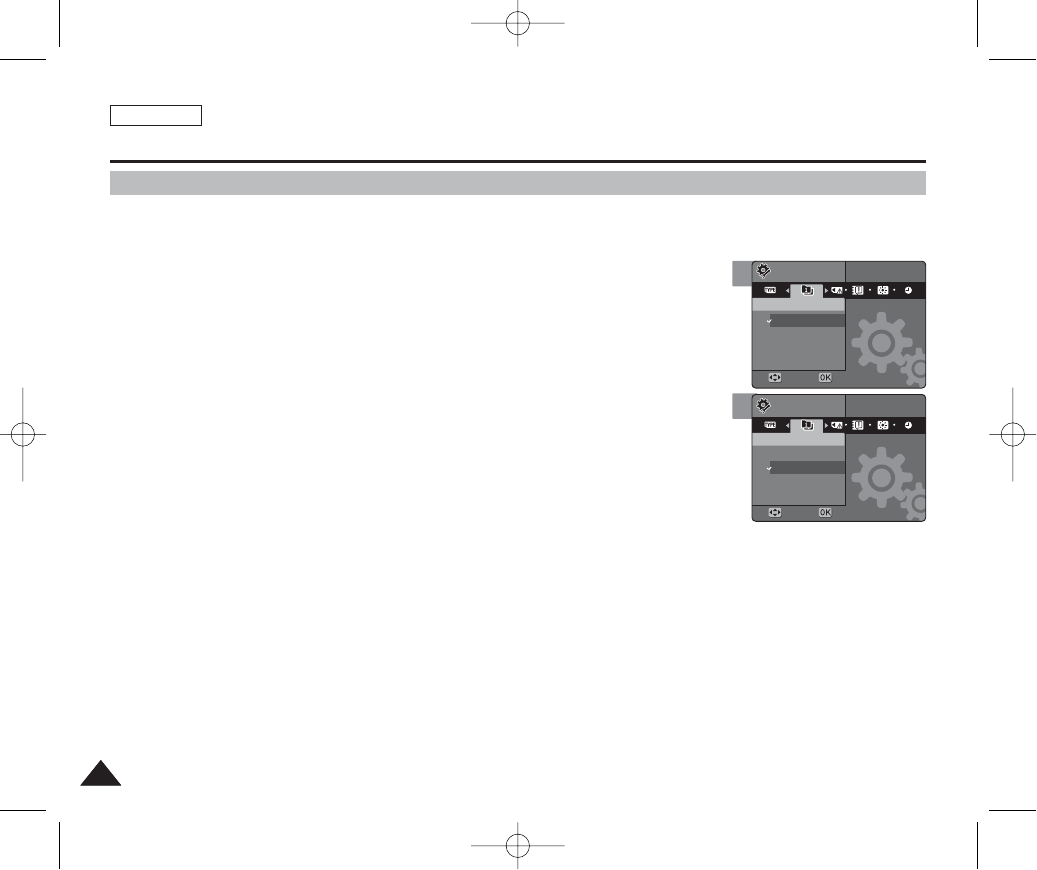
ENGLISH
4242
4
Setting the File No. Function
Setting the Miniket Photo : Setting the System
You can set the file numbers so that they reset each time the Memory Card is formatted, or so
that they count up continuously.
1. Set the Mode Dial to the System Settings mode.
2. Press the [POWER] button to turn on the device.
◆The <System Settings> menu appears.
3. Select <File No.> by moving the joystick left / right (œœ/√√).
4. Select the desired option by moving the joystick up / down (▲/▼) and then
press the [OK] button.
◆<Reset>: When the storage memory is formatted, the file number goes back to its default
value (100-0001).
◆<Series>: Numbering is continuous between the Memory Cards, so that the first file
number assigned on a new Memory Card is 1 more than the last file number assigned on
the previous Memory Card.
5. After you finish setting, set the Mode Dial to the desired mode.
[ Note ]
✤When you set <File No.> to <Series>, each file is assigned with a different number so as to avoid
duplicating file names. It is convenient when you want to manage your files on a PC.
File No.
Move Select
Settings
File No.
File No.
MoveMove SelectSelect
SettingsSettings
Reset
Series
File No.
3
File No.
File No.
MoveMove SelectSelect
SettingsSettings
Reset
Series
File No.
File No.
Move Select
Settings
00934C SC-MS10 USA~053 9/30/05 10:55 AM Page 42
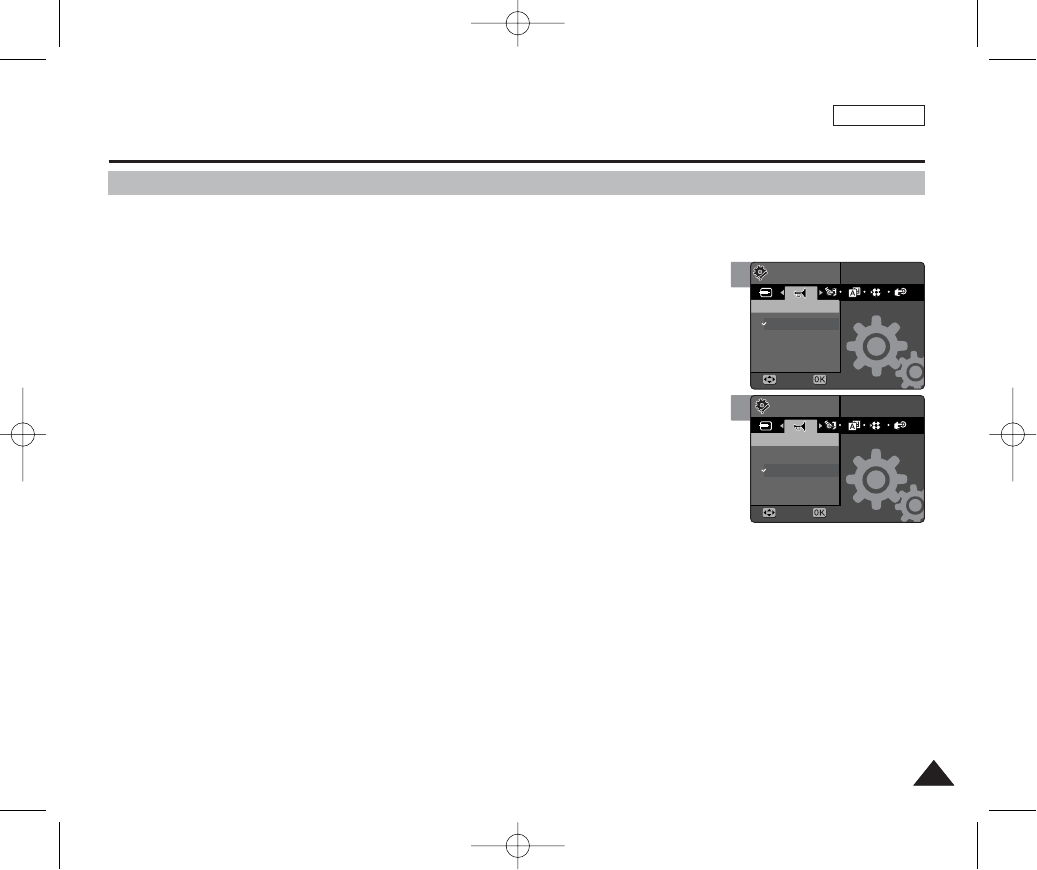
ENGLISH
4343
4
Setting the Miniket Photo : Setting the System
Setting the Beep Sound
You can set the beep sound when buttons are pressed on / off. When set to on, a beep will
sound every time a button is pressed.
1. Set the Mode Dial to the System Settings mode.
2. Press the [POWER] button to turn on the device.
◆The <System Settings> menu appears.
3. Select <Beep Sound> by moving the joystick left / right (œœ/√√).
4. Select the desired option by moving the joystick up / down (▲/▼) and then
press the [OK] button.
◆<Off>: Turn the beep sound off.
◆<On>: Turn the beep sound on.
5. After you finish setting, set the Mode Dial to the desired mode.
[ Notes ]
✤When you set <Beep Sound> to <Off>, no warning sound will be heard.
✤When the earphones or AV (Audio / Video) cable is connected to the device, the <Beep Sound>
function will not operate.
Settings
Beep Sound
Move Select
SettingsSettings
Beep SoundBeep Sound
Off
On
MoveMove SelectSelect
3
SettingsSettings
Beep SoundBeep Sound
Off
On
MoveMove SelectSelect
Settings
Beep Sound
Move Select
00934C SC-MS10 USA~053 9/30/05 10:55 AM Page 43

ENGLISH
4444
4
Setting the Miniket Photo : Setting the System
Setting the Shutter Sound
You can set the shutter sound to on / off.
1. Set the Mode Dial to the System Settings mode.
2. Press the [POWER] button to turn on the device.
◆The <System Settings> menu appears.
3. Select <Shutter Sound> by moving the joystick left / right (œœ/√√).
4. Select the desired option by moving the joystick up / down (▲/▼) and
then press the [OK] button.
◆<Off>: Turn the shutter sound off.
◆<On>: Turn the shutter sound on.
5. After you finish setting, set the Mode Dial to the desired mode.
Settings
Shutter Sound
Move Select
SettingsSettings
Off
On
Shutter SoundShutter Sound
MoveMove SelectSelect
3
SettingsSettings
Off
On
Shutter SoundShutter Sound
MoveMove SelectSelect
Settings
Shutter Sound
Move Select
00934C SC-MS10 USA~053 9/30/05 10:55 AM Page 44

ENGLISH
4545
3
4
TYPE
English
SettingsSettings
MoveMove SelectSelect
Settings
Move Select
«—±πæÓ
Settings
Move Select
TYPE
English
SettingsSettings
MoveMove SelectSelect
«—±πæÓ
Setting the Miniket Photo : Setting the System
Selecting Language
You can select the language of the Miniket Photo.
1. Set the Mode Dial to the System Settings mode.
2. Press the [POWER] button to turn on the device.
◆The <System Settings> menu appears.
3. Select <Language> by moving the joystick left / right (œœ/√√).
4. Select the desired option by moving the joystick up / down (▲/▼) and then
press the [OK] button.
◆Selectable languages are:
◆English / Español / Français / Português / Deutsch / Italiano / Nederlands / Polski /
PÛÒÒÍËÈ / / / Iran / Arab / Magyar / ‰‰∑∑¬¬/ ì͇ªÌҸ͇ / Svenska
5. After you finish, set the Mode Dial to the desired mode.
00934C SC-MS10 USA~053 9/30/05 10:55 AM Page 45

ENGLISH
4646
Setting the Miniket Photo : Setting the System
Setting the TV Standard
You can view your video files using the built-in LCD monitor. However, to view your recordings on a television set or to copy it to
a video cassette recorder (VCR), the television set or the VCR must comply with the TV standards and have the appropriate
Audio / Video ports. Otherwise, you may need to use a separate Video Format Transcoder (NTSC-PAL format Converter).
You can set the TV standard of the Miniket Photo’s video output.
1. Set the Mode Dial to the System Settings mode.
2. Press the [POWER] button to turn on the device.
◆The <System Settings> menu appears.
3. Select <Video Out> by moving the joystick left / right (œœ/√√).
4. Select the desired option by moving the joystick up / down (▲/▼) and then press the [OK] button.
◆<PAL>: Sets to PAL standard.
◆<NTSC>: Sets to NTSC standard.
5. After you finish, set the Mode Dial to the desired mode.
PAL-Compatible Countries / Regions
Australia, Austria, Belgium, Bulgaria, China, CIS, Czech Republic, Denmark, Egypt, Finland, France, Germany, Greece,
Great Britain, Holland, Hong Kong, Hungary, India, Iran, Iraq, Kuwait, Libya, Malaysia, Mauritius, Norway, Romania, Saudi
Arabia, Singapore, Slovak Republic, Spain, Sweden, Switzerland, Syria, Thailand, Tunisia, etc.
NTSC-Compatible Countries / Regions
Bahamas, Canada, Central America, Japan, Mexico, Philippines, Korea, Taiwan, United States of America, etc.
00934C SC-MS10 USA~053 9/30/05 10:55 AM Page 46
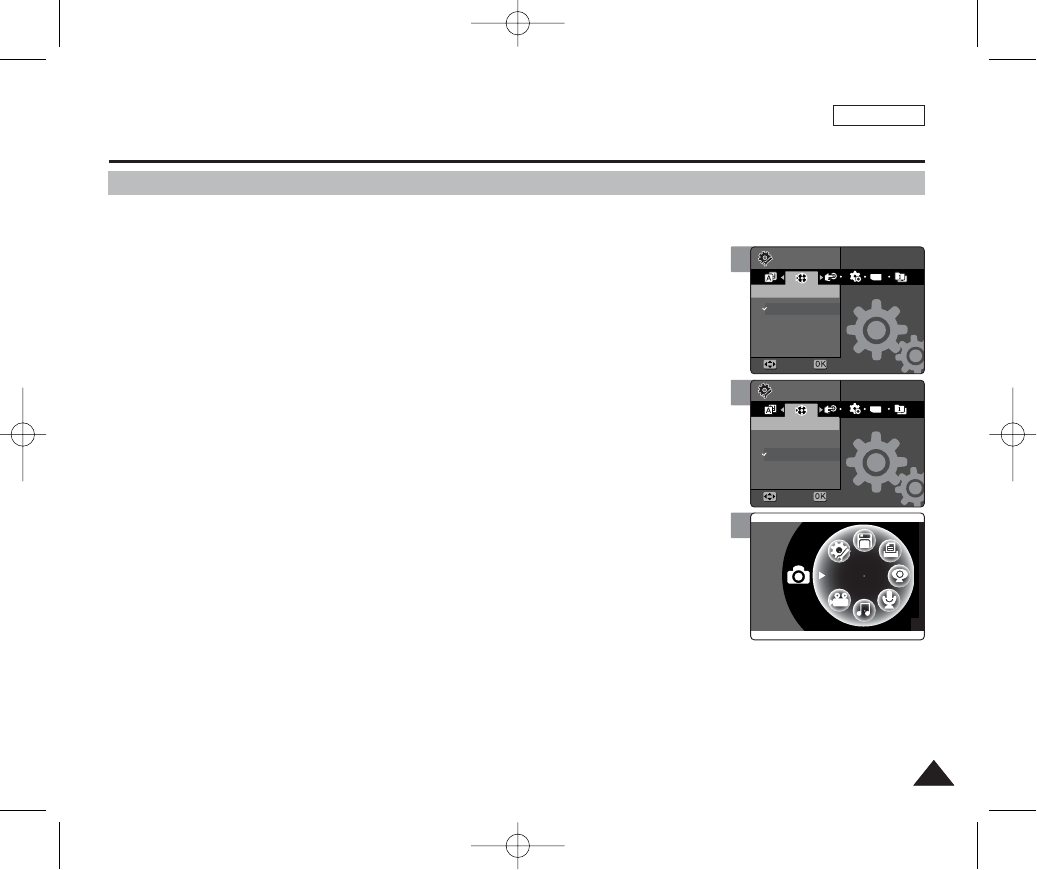
ENGLISH
4747
Setting the Miniket Photo : Setting the System
4
Setting the Mode Display
You can set to display the mode transition when you use the Mode Dial.
1. Set the Mode Dial to the System Settings mode.
2. Press the [POWER] button to turn on the device.
◆The <System Settings> menu appears.
3. Select <Mode Display> by moving the joystick left / right (œœ/√√).
4. Select the desired option by moving the joystick up / down (▲/▼) and then
press the [OK] button.
◆<On>: Turns the <Mode Display> on.
◆<Off>: Turns the <Mode Display> off.
5. After you finish, set the Mode Dial to the desired mode.
◆If it is set to <On>, the mode screen is displayed on the LCD monitor.
Settings
Mode Display
Move Select
TYPE
SettingsSettings
Mode DisplayMode Display
Off
On
MoveMove SelectSelect
5
Settings
Mode Display
Move Select
Settings
Mode Display
Move Select
Photo
3
TYPE
SettingsSettings
Mode DisplayMode Display
Off
On
MoveMove SelectSelect
Settings
Mode Display
Move Select
00934C SC-MS10 USA~053 9/30/05 10:55 AM Page 47

ENGLISH
4848
Setting the Miniket Photo : Setting the System
4
Resetting the Miniket Photo
You can reset the Miniket Photo to load default (factory) settings.
1. Set the Mode Dial to the System Settings mode.
2. Press the [POWER] button to turn on the device.
◆The <System Settings> menu appears.
3. Select <Reset> by moving the joystick left / right (œœ/√√).
4. Press the [OK] button. Confirmation message appears. Select an option by
moving the joystick left / right (œœ/√√) and then press the [OK] button.
◆<Yes>: Starts the reset function.
◆<No>: Cancel the reset function.
[ Warning ]
✤If you reset the Miniket Photo, all functions you set are initialised to the default (factory) settings.
[ Notes ]
✤User settings and date / time information are initialised when you reset.
✤After resetting the Miniket Photo, set date / time (refer to page 38).
!
Settings
Reset
Move Select
MoveMove SelectSelect
Reset?
Yes No
3
TYPE
SettingsSettings
ResetReset
Start
MoveMove SelectSelect
Move Select
00934C SC-MS10 USA~053 9/30/05 10:55 AM Page 48

ENGLISH
4949
3
Memory Type
Int. Memory
Memory Card
Move Select
MoveMove SelectSelect
Settings
TYPE
Memory TypeMemory Type
SettingsSettings
Setting the Miniket Photo : Setting Memory
Selecting the Storage Type
You can set the storage to the built-in internal memory or external mini SD Memory Card
(Optional Accessory).
1. Set the Mode Dial to the System Settings mode.
2. Press the [POWER] button to turn on the device.
◆The <System Settings> menu appears.
3. Select <Memory Type> by moving the joystick left / right (œœ/√√).
4. Select the desired option by moving the joystick up / down (▲/▼) and then
press the [OK] button.
◆<Int. Memory>: Photo, video, music and voice files are stored in the internal memory.
◆<Memory Card>: Photo, video, music and voice files are stored in the external (mini SD)
memory.
5. After you finish setting, set the Mode Dial to the desired mode.
[ Notes ]
✤Photo, video, music and voice files are stored in internal memory by default.
✤If you insert a Memory Card when the device is on, the pop-up screen will prompt you automatically to
select the storage type except when in the System Settings mode.
✤If there is no Memory Card inserted, only the <Int. Memory> option will be available.
✤Actual storage capacity may differ from the printed memory capacity.
✤The maximum recording time and image capacity is subject to change depending on the media used
(refer to page 32).
1
TYPE
Memory TypeMemory Type
Int. Memory
Memory Card
MoveMove SelectSelect
Move Select
SettingsSettings
Memory Type
Settings
00934C SC-MS10 USA~053 9/30/05 10:55 AM Page 49

ENGLISH
5050
Setting the Miniket Photo : Setting Memory
Formatting the Memory
You can format the internal memory and the external memory to erase all files.
1. Set the Mode Dial to the System Settings mode.
2. Press the [POWER] button to turn on the device.
◆The <System Settings> menu appears.
3. Select <Format> by moving the joystick left / right (œœ/√√).
4. Select the desired option by moving the joystick up / down (▲/▼) and then
press the [OK] button.
◆<Int. Memory>: Format the internal memory.
◆<Memory Card>: Format the external memory.
When the [OK] button is pressed, the message “Do you want to format?” appears. Select
<Yes> to confirm.
5. After you finish setting, set the Mode Dial to the desired mode.
[ Notes ]
✤There is no guarantee on the operation of a Memory Card which has not been formatted on
the Miniket Photo. Make sure to format any Memory Card on the Miniket Photo.
✤If there is no Memory Card inserted, only the <Int. Memory> option will be available.
[ Warning ]
✤Previous information can not be restored after formatting.
3
Format
FormatFormat
Int. Memory
Memory Card
Move Select
MoveMove SelectSelect
Settings
SettingsSettings
2
FormatFormat
Format
Int. Memory
Memory Card
MoveMove SelectSelect
Move Select
SettingsSettings
Settings
00934C SC-MS10 USA~053 9/30/05 10:55 AM Page 50
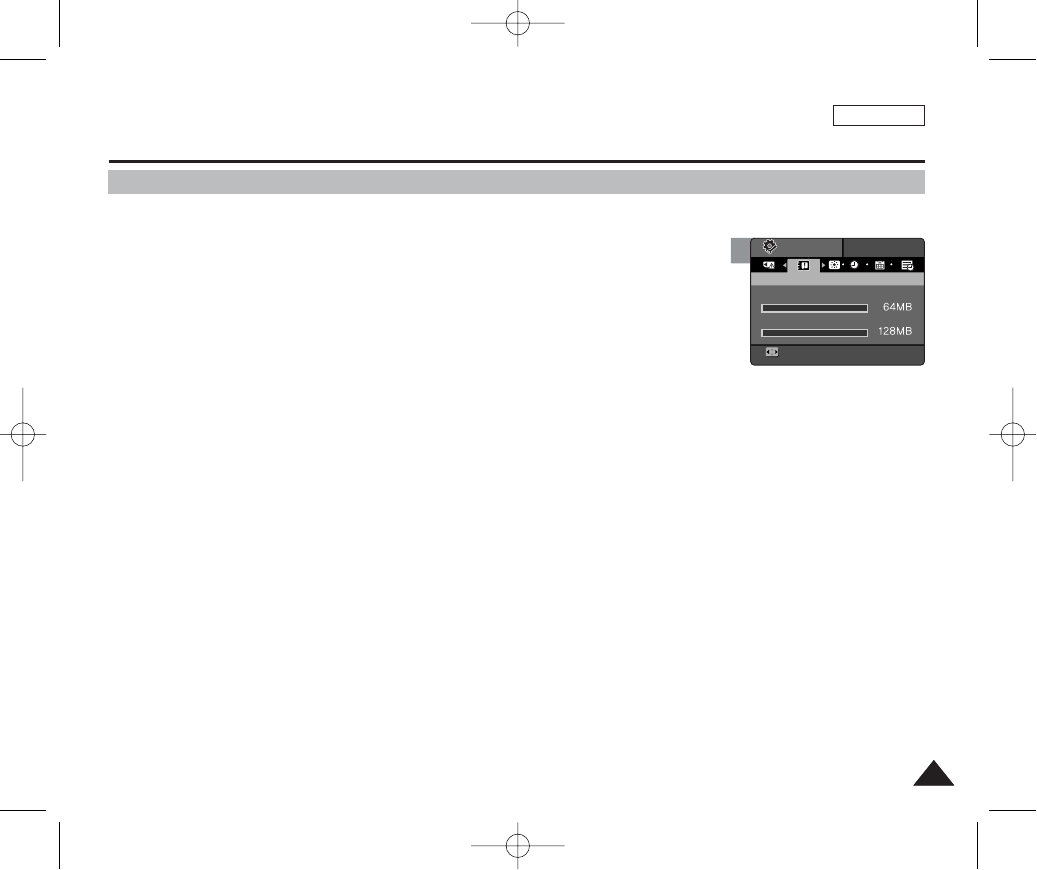
ENGLISH
5151
2
SettingsSettings
Memory SpaceMemory Space
MoveMove
Internal Memory
Memory Card
Setting the Miniket Photo : Setting Memory
Viewing Memory Space
You can check usable memory space and total memory space of the Miniket Photo.
1. Set the Mode Dial to the System Settings mode.
2. Press the [POWER] button to turn on the device.
◆The <System Settings> menu appears.
3. Select <Memory Space> by moving the joystick left / right (œœ/√√).
4. Available free space and total memory capacity are displayed.
5. After you finish, set the Mode Dial to the desired mode.
[ Notes ]
✤Actual storage capacity may differ from the printed memory capacity.
✤Internal and external memory spaces are displayed separately.
00934C SC-MS10 USA~053 9/30/05 10:55 AM Page 51
ENGLISH
5252
Capturing.............................................................................................................53
Capturing Images.........................................................................................53
Zooming In and Out .....................................................................................54
Viewing ................................................................................................................55
Viewing Photo files on the LCD Monitor .....................................................55
Viewing Multiple Photo Files / Enlarging a Photo File ................................56
Cropping an Enlarged Photo File ................................................................57
Setting the Capturing Options..........................................................................58
Using the Shortcut Buttons..........................................................................58
Using the Scene Modes ..............................................................................60
Setting the Photo File Size ..........................................................................61
Setting the Photo File Quality ......................................................................62
Setting the Sharpness .................................................................................63
Setting the Focus Method............................................................................64
Setting the Macro Mode ..............................................................................65
Setting the Metering Method .......................................................................66
Setting the ISO Speed (Sensitivity) .............................................................67
Setting the White Balance ...........................................................................68
Adjusting the Exposure – Exposure Compensation ...................................69
Setting the DIS (Digital Image Stabiliser)....................................................70
Setting the Imprint Option............................................................................71
Setting the Digital Zoom ..............................................................................72
Setting the Multi Shot...................................................................................73
Setting the Self Timer ..................................................................................74
Setting the Flash ..........................................................................................75
Setting Digital Effects...................................................................................77
Setting the Viewing Options .............................................................................78
Using the Shortcut Buttons..........................................................................78
Rotating a Photo File ...................................................................................82
Resizing Photos ..........................................................................................83
Protecting Photo Files..................................................................................84
Deleting Photo Files.....................................................................................85
Copying Photo Files.....................................................................................86
Setting the Slideshow ..................................................................................87
Setting the DPOF (Digital Print Order Format) Function ............................88
Photo Mode
2
2
00934C SC-MS10 USA~053 9/30/05 10:55 AM Page 52

ENGLISH
5353
Photo Mode : Capturing
Capturing Images
You can take photo as well as record video files.
1. Set the Mode Dial to Photo mode.
2. Press the [POWER] button to turn on the device.
◆The Photo Capture screen appears.
3. Press the [Record / Stop] button halfway down to set the focus and exposure.
◆The focus indicator appears in green when the focus is set. If the focus indicator appears
in red, try to set the focus again.
4. Fully press the [Record / Stop] button to take a picture.
[ Notes ]
✤If the battery is low, the flash will not operate automatically.
✤In order to take pictures and save it in the external memory (mini SD Memory Card), insert a Memory
Card and then set the storage type to <Memory Card> (Refer to page 33).
✤Press the [MENU] button in the Photo Capture mode to see the Photo Settings screen.
✤When you are finished taking pictures, please turn off the device to conserve battery power.
Pressing the [Record/Stop] button halfway down sets the focus.
Fully pressing the button takes a photo.
Press the
[Record/Stop]
button halfway
down.
Fully press the
[Record/Stop]
button.
To Set the Focus
➮
4
2592
IN
EV
0
3
2592
IN
EV
0
00934C SC-MS10 USA~053 9/30/05 10:55 AM Page 53
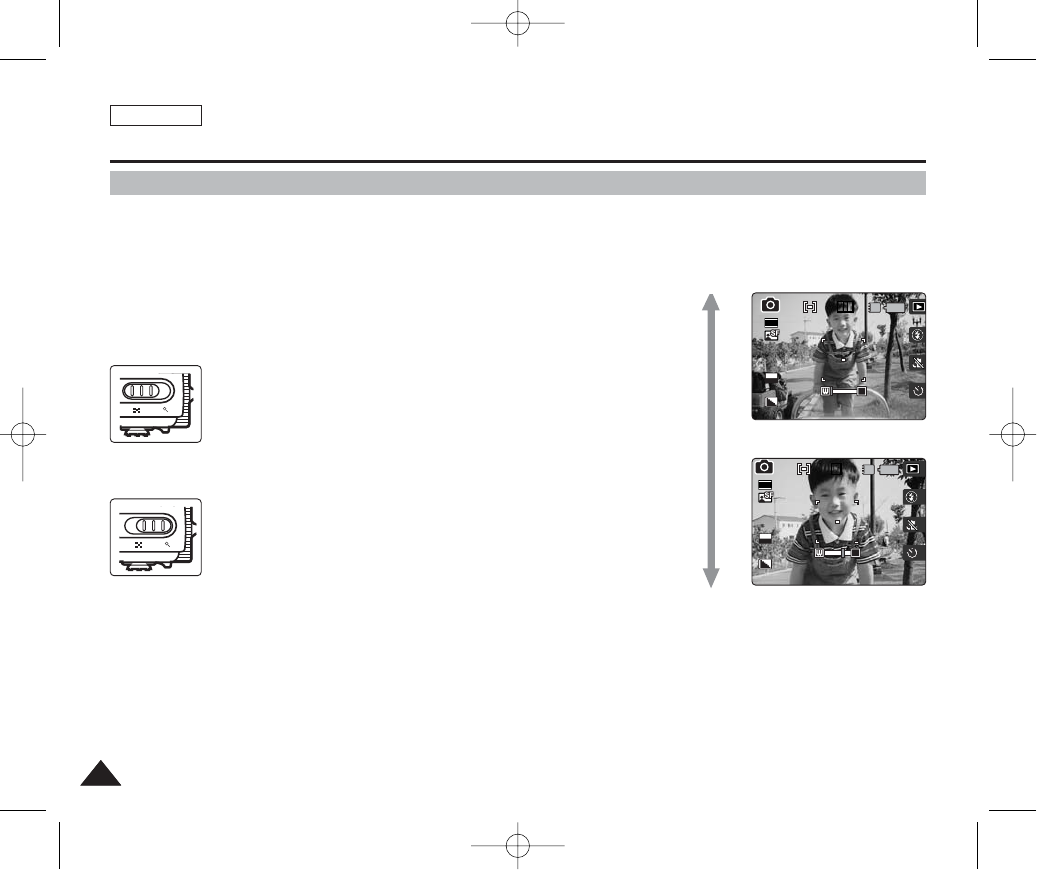
ENGLISH
5454
Photo Mode : Capturing
Zooming In and Out
Zooming allows you to change the size of the subject captured in a scene.
You can take advantage of the 3x optical electro motion zoom lens.
1. Set the Mode Dial to Photo mode.
2. Press the [POWER] button to turn on the device.
◆The Photo Capture screen appears.
[ Notes ]
✤Frequent use of zooming may result in higher battery consumption.
✤You can take advantage of 5x digital zoom as well as 3x optical zoom for a total of 15x
zoom.
✤Optical zoom preserves the image quality.
IN
30
2592
0
EV
0
T
T
0
IN
0
30
2592
EV
0
W T
W T
Zoom In
Zoom Out
Move the [W/T] zoom switch to W (WIDE)
●The shot subject’s size is reduced, and you can take a picture
as if you were far away from the subject.
●At the zoom indicator in the LCD screen, the arrow moves to W.
●The smallest rate of zoom out is the default rate (original
resolution of the subject).
Move the [W/T] zoom switch to T (TELE).
●The subject is larger, and you can take a picture as if you were
close to the subject.
●At the zoom indicator the arrow moves to T.
●The largest optical zoom ratio is 3x, which is the biggest among
the basic zoom.
00934C SC-MS10 USA~089 9/30/05 10:56 AM Page 54
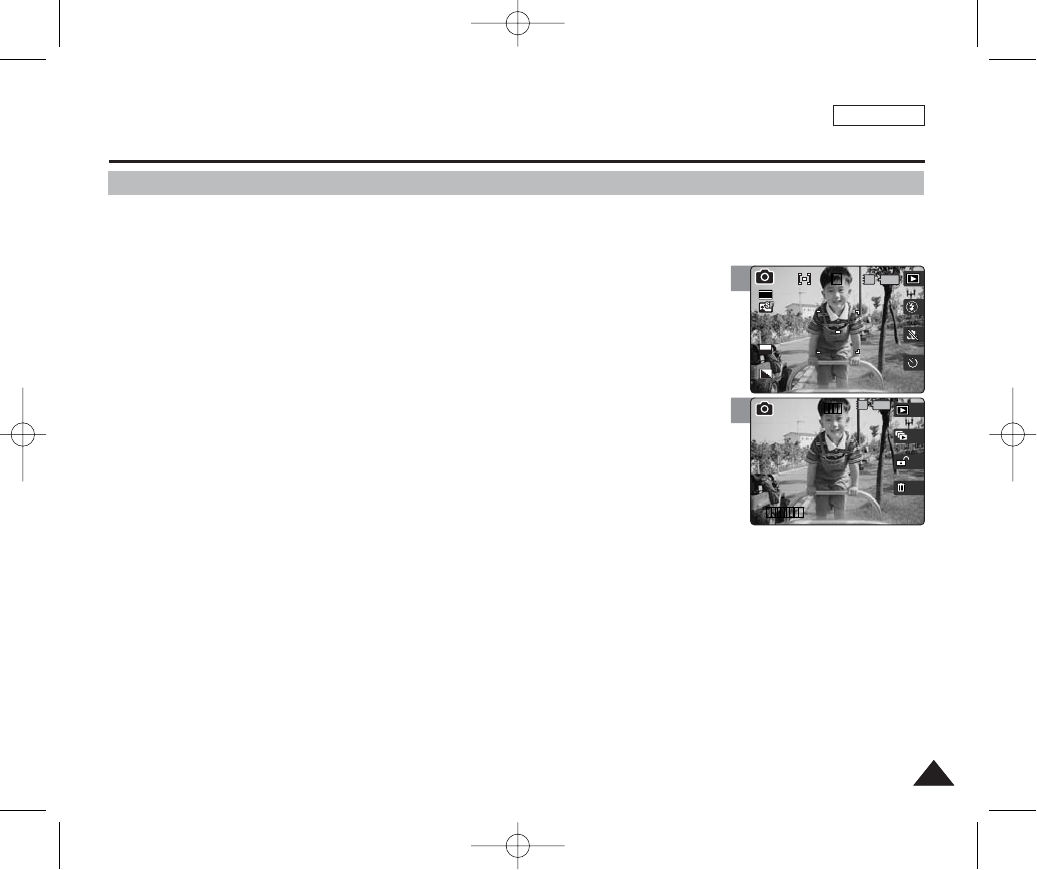
ENGLISH
5555
Photo Mode : Viewing
Viewing Photo Files on the LCD Monitor
It is handy and practical to view pictures using the LCD monitor almost anywhere such as in a car, indoors, or outdoors.
1. Set the Mode Dial to Photo mode.
2. Press the [POWER] button to turn on the device.
3. Press the [Shortcut 1] button to switch to Photo viewing mode.
4. Move the joystick left / right (œœ/√√) to find the photo you want to view.
◆Each movement of the joystick goes to the previous / next photo.
[ Notes ]
✤If there is no file stored to view, the message <“No stored Photo!”> appears.
✤Moving the joystick right (√√) at the last photo will move to the first photo.
✤Moving the joystick left (œœ) at the first photo will move to the last photo.
✤Moving the joystick left / right (œœ/√√) button for more than 1 seconds will fast search. .
✤Display time may vary depending on the picture size.
✤The image edited (tuned) in image viewer programme on a PC may not be displayed.
3
4
IN
030
2592
11
EV
0
1/6
100-000111
IN
100-0001
00934C SC-MS10 USA~089 9/30/05 10:56 AM Page 55

ENGLISH
5656
Photo Mode : Viewing
Viewing Multiple Photo Files / Enlarging a Photo File
Using the [W/T] zoom switch in Photo Viewing mode, you can display multiple images on one LCD screen.
1. Set the Mode Dial to Photo mode.
2. Press the [POWER] button to turn on the device.
3. Press the [Shortcut 1] button to switch to Photo viewing mode.
[ Notes ]
✤If there is no file stored to view, the message <“No stored Photo!”> appears.
✤You cannot zoom in on a TIFF image file.
W T
W T
Move the [W/T] zoom switch to W (WIDE).
●The screen switches to multi-view.
●The photo you were viewing in the single view is selected.
Move the [W/T] zoom switch to T (TELE).
●From the multi-view screen, it switches back to the single view
screen. Move the [W/T] Zoom switch to T (TELE) again to
enlarge the selected photo.
MoveMove Full ViewFull View
Move Trim
IN
IN
Move Full View
MoveMove TrimTrim
Zoom In
Zoom Out
Displaying Multiple Photo Files (Zoom Out)
Enlarging a Photo File (Zoom In)
00934C SC-MS10 USA~089 9/30/05 10:56 AM Page 56
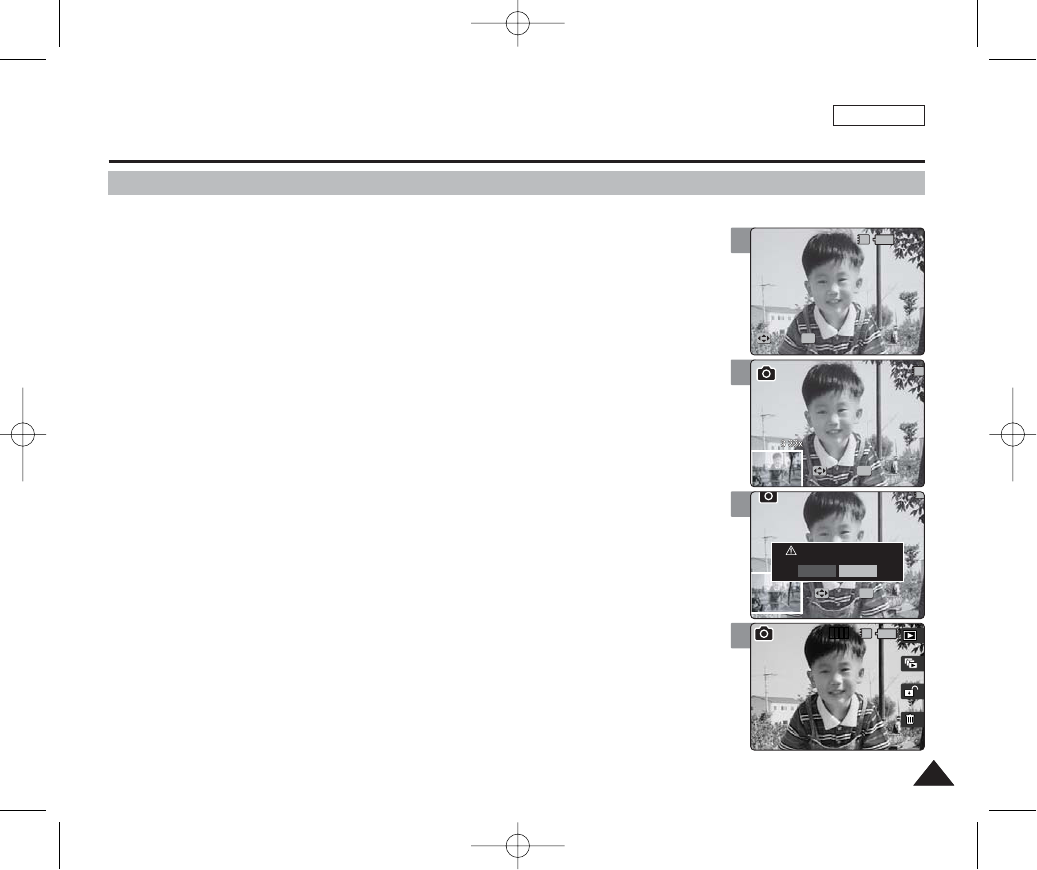
ENGLISH
5757
5
6
7
9
Photo Mode : Viewing
Cropping an Enlarged Photo File
✤You can enlarge and crop a photo.
✤Using the [W/T] zoom switch in Photo Viewing mode, you can display multiple images on one
LCD screen.
1. Set the Mode Dial to Photo mode.
2. Press the [POWER] button to turn on the device.
3. Press the [Shortcut 1] button to switch to Photo viewing mode.
4. Move the joystick left / right (œœ/√√) to select a photo.
5. Move the [W/T] zoom switch to T (TELE).
◆Selected photo is enlarged.
6. Move the joystick (œœ/√√/▲/▼) to find the portion of the photo to crop.
7. Press the [OK] button.
◆The message <“Trim?”> appears on the screen.
◆If there is not enough space to save the cropped image, it cancels automatically.
8. Select an option by moving the joystick left / right (œœ/√√) and then press the
[OK] button.
◆<Yes>: Crops the image and saves it as a new file.
◆<No>: Cancels cropping.
9. If <Yes> is selected, cropped image is saved and displayed on the screen.
[ Notes ]
✤You cannot enlarge a cropped photo.
✤You cannot crop an image smaller than 640 x 480 pixels.
✤You cannot crop a rotated image.
✤The original photo is not overwritten by the cropped image. The cropped image is saved separately.
✤The maximum magnification ratio differs depending on the image resolution:
5M – up to 9.00x, 4M – up to 6.45x, 3M – up to 5.33x
2M – up to 5.00x, 1M – up to 4.00x, VGA – up to 3.33x
IN
1
MoveMove TrimTrim
Move Trim
OK
Move Trim
IN
Move Trim
MoveMove TrimTrim
OK
Move Trim
Move Trim
Move Trim
IN
MoveMove TrimTrim
OK
Trim?
Yes No
IN
1/6
Move Trim
Move Trim
Move Trim
00934C SC-MS10 USA~089 9/30/05 10:56 AM Page 57
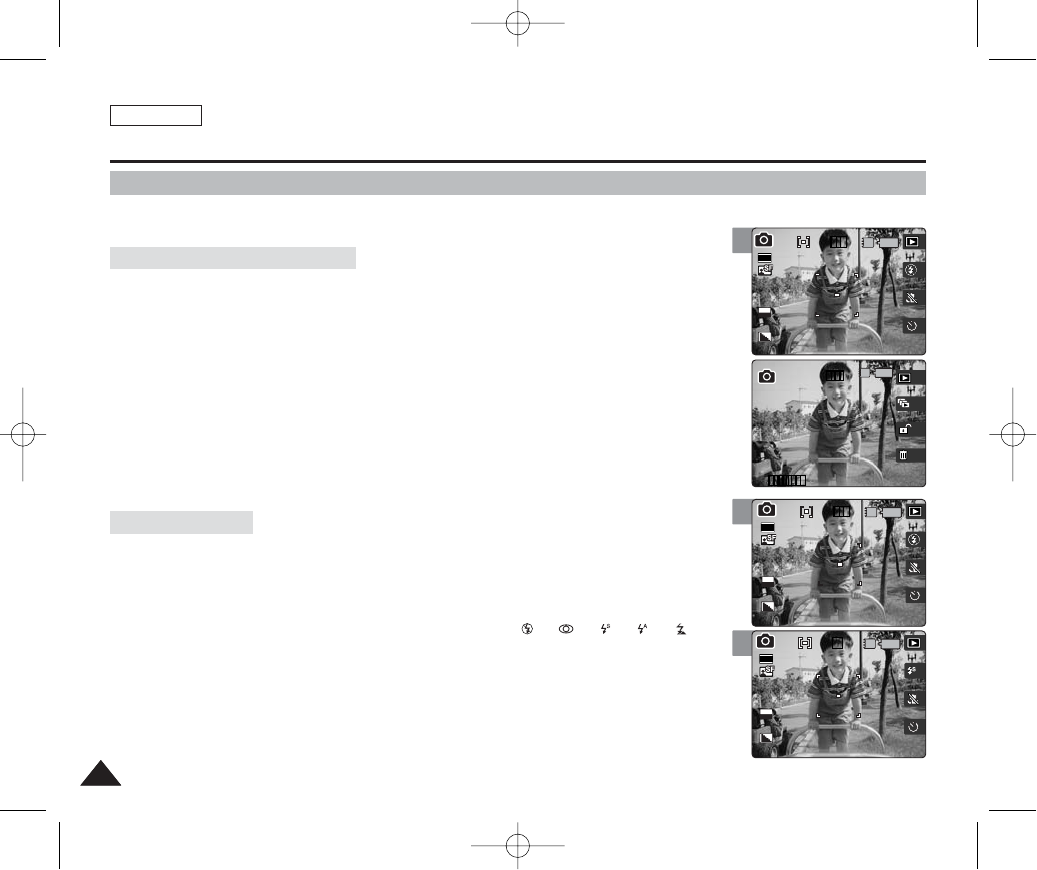
ENGLISH
5858
3
3
4
Photo Mode : Setting the Capturing Options
Using the Shortcut Buttons
Shortcut buttons are provided to allow users easy access to frequently used functions.
1. Set the Mode Dial to Photo mode.
2. Press the [POWER] button to turn on the device.
3. Press the [Shortcut 1] button.
◆Each press of the [Shortcut 1] button toggles between the Photo capture / view modes.
1. Set the Mode Dial to Photo mode.
2. Press the [POWER] button to turn on the device.
3. Press the [Shortcut 2] button.
◆Each press of the [Shortcut 2] button cycles through the < >-< >-< >-< >-< >
flash modes.
4. An icon indicating the selected flash mode appears on the screen.
[ Note ]
✤Flash modes can be set only in <Manual> Scene mode. By default, the scene mode is set to <Auto>.
IN
30
2592
11
EV
0
1/6
100-000111
IN
100-0001
IN
30
2592
0
EV
0
0IN
0
30
2592
EV
0
Switching to Photo View Mode
Setting the Flash
00934C SC-MS10 USA~089 9/30/05 10:56 AM Page 58
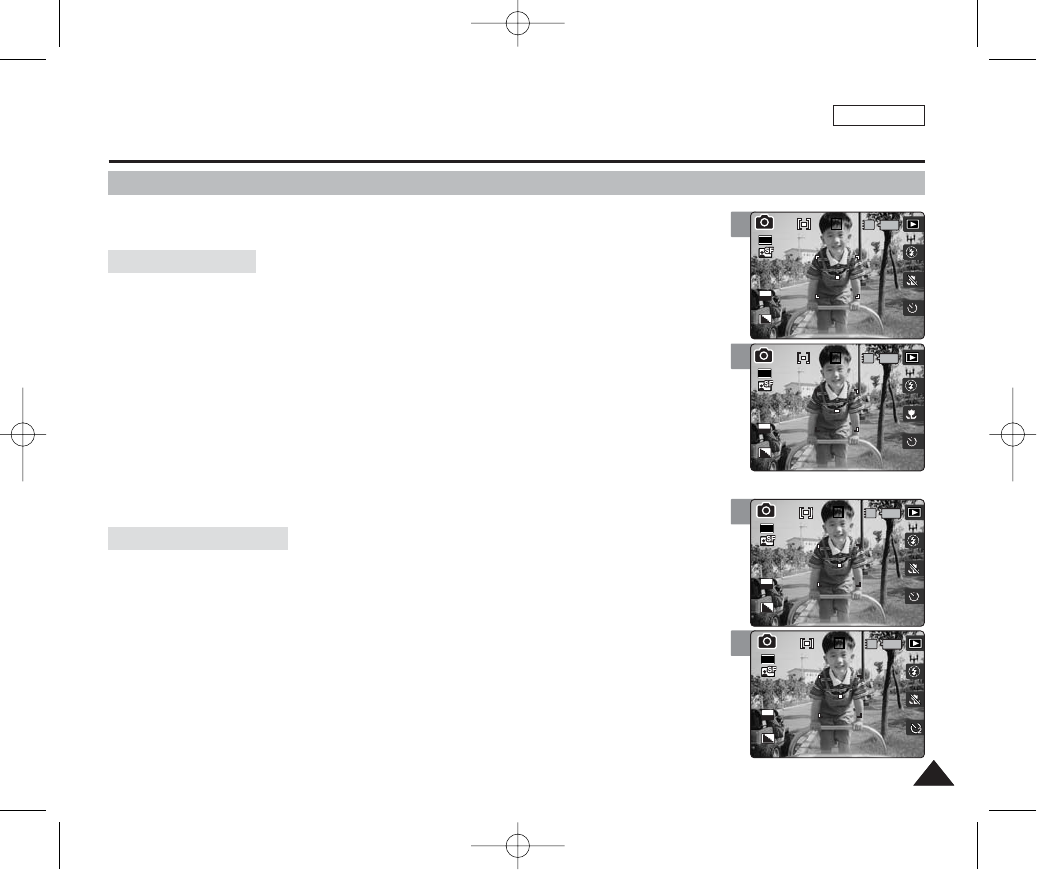
ENGLISH
5959
3
4
3
4
Photo Mode : Setting the Capturing Options
Using the Shortcut Buttons
Shortcut buttons are provided to allow users easy access to frequently used functions.
1. Set the Mode Dial to Photo mode.
2. Press the [POWER] button to turn on the device.
3. Press the [Shortcut 3] button.
◆Each press of the [Shortcut 3] button cycles through the <Off> -<Macro>
- <Super Macro> macro modes (refer to page 65).
4. An icon indicating the selected macro mode appears on the screen.
[ Notes ]
✤Macro modes will disable flash use.
✤Macro modes can only be set in <Manual> Scene mode. By default, the scene mode is set to <Auto>.
1. Set the Mode Dial to Photo mode.
2. Press the [POWER] button to turn on the device.
3. Press the [Shortcut 4] button.
◆Each press of the [Shortcut 4] button cycles through <Off> -<2 sec> - <10 sec> self timer
modes (refer to page 74).
4. An icon indicating the selected timer mode appears on the screen.
IN
0
30
2592
0
EV
0
0IN
0
EV
0
30
2592
IN
0
30
2592
0
EV
0
0
IN
0
30
2592
EV
0
Setting the Macro
Setting the Self Timer
00934C SC-MS10 USA~089 9/30/05 10:56 AM Page 59

ENGLISH
6060
3
4
5
6
Photo Mode : Setting the Capturing Options
Scene Modes are preset automatic exposure modes based upon an internal computer
program. It helps to set both shutter speed and lens aperture according to the internal light
meter and the program’s calculations, allowing users to have the best results under various
conditions.
1. Set the Mode Dial to Photo mode.
2. Press the [POWER] button to turn on the device.
3. Press the [MENU] button.
◆Menu screen appears.
4. Move the joystick left / right (œœ/√√) to select <Scene Mode>.
5. Select an option by moving the joystick up / down (▲/▼), and then press the
[OK] button.
◆<Auto> / <Manual> / <Night> / <Portrait> / <Children> / <Landscape> / <Close-up> /
<Sunset> / <Dawn> / <Backlight> / <Fireworks> / <Beach / Snow>
6. Press the [MENU] button to exit the menu.
◆An icon indicating the selected Scene mode appears on the screen.
◆If <Auto> is selected, no icon will be displayed.
[ Notes ]
✤Setting the listed functions are available only when the <Manual> Scene mode is selected:
<Metering>, <EV>, <ISO>, <White Balance>, <Macro>, <Flash>, and <Focus>.
✤While the menu screen is displayed, pressing the [Record / Stop] button will exit the menu.
Using the Scene Modes
0
IN
0
30
EV
0
2592
Photo
Scene
Move Select Exit
Photo
Scene
Move Select Exit
MENU
TYPE
0
0
PhotoPhoto
Off
Auto
Night
Portrait
SceneScene
MoveMove SelectSelect ExitExit
Photo
Scene
Move Select Exit
0
0
Photo
Scene
Move Select Exit
MENU
TYPE
PhotoPhoto
Off
Auto
Night
Portrait
SceneScene
MoveMove SelectSelect ExitExit
IN
2592
0
EV
0
30
0
Photo
Scene
Move Select Exit
Photo
Scene
Move Select Exit
00934C SC-MS10 USA~089 9/30/05 10:56 AM Page 60
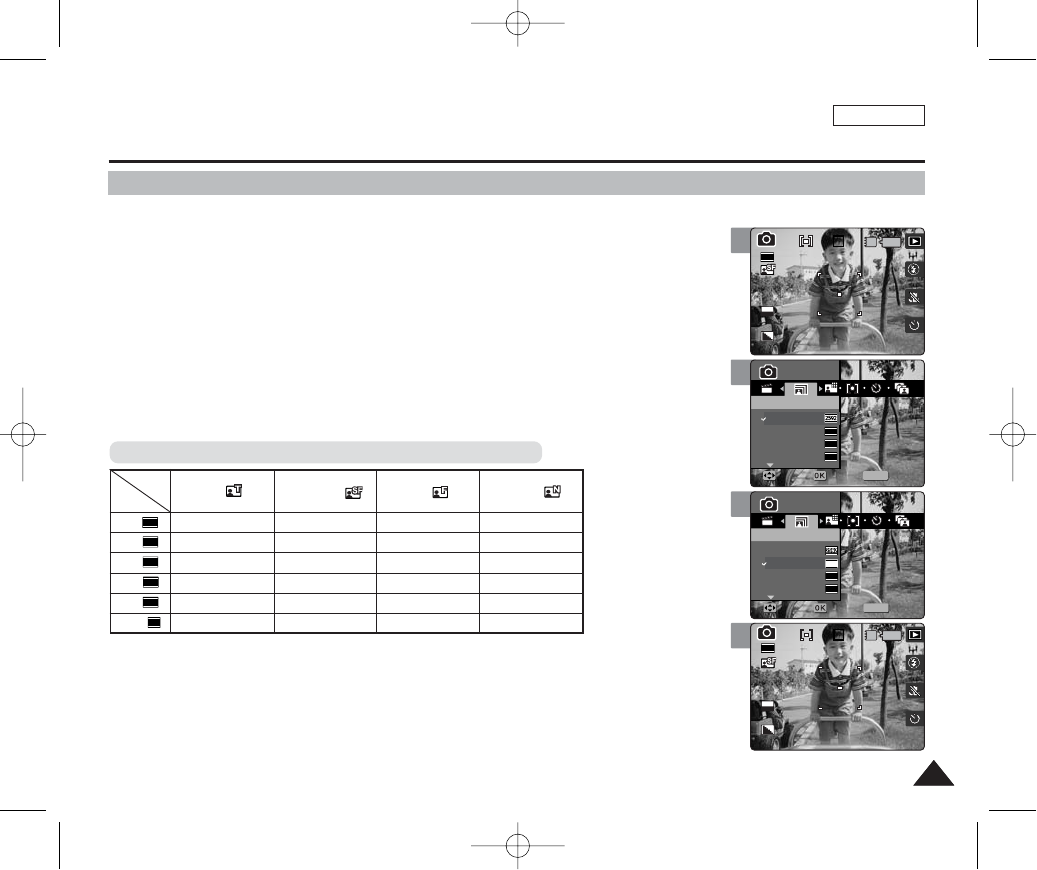
ENGLISH
6161
3
4
5
6
IN
0
30
2592
0
Photo
Photo Size
Move Select Exit
Photo
Photo Size
Move Select Exit
EV
0
MENU
5M
4M
3M
2M
2272
2048
1600
0
0
PhotoPhoto
Photo SizePhoto Size
MoveMove SelectSelect ExitExit
Photo
Photo Size
Move Select Exit
0
0
Photo
Photo Size
Move Select Exit
MENU
5M
4M
3M
2M
2272
2048
1600
PhotoPhoto
Photo SizePhoto Size
MoveMove SelectSelect ExitExit
0
IN
0
40
2272
Photo
Photo Size
Move Select Exit
Photo
Photo Size
Move Select Exit
EV
0
Photo Mode : Setting the Capturing Options
Setting the Photo File Size
You can set the image resolution to meet your needs.
1. Set the Mode Dial to Photo mode.
2. Press the [POWER] button to turn on the device.
3. Press the [MENU] button.
◆Menu screen appears.
4. Move the joystick left / right (œœ/√√) to select <Size>.
5. Select an option by moving the joystick up / down (▲/▼), and then press the
[OK] button.
◆<5M> / <4M> / <3M> / <2M> / <1M> / VGA
6. Press the [MENU] button to exit the menu.
◆An icon indicating the selected size appears on the screen.
[ Notes ]
✤The photo capacity is an approximation and subject to recording conditions.
✤For e-mail purposes, the <VGA> option is appropriate.
✤When <Tiff> quality is selected, size is automatically set to 5M.
✤While the menu screen is displayed, pressing the [Record / Stop] button will exit the menu.
Photo Capacity according to the Photo Size and Quality (for 64MB)
5M
4M
3M
2M
1M
VGA
640
1024
1600
2048
2272
2592
TIiff
Approx. 4
-
-
-
-
-
Super Fine
Approx. 30
Approx. 40
Approx. 50
Approx. 80
Approx. 180
Approx. 400
Fine
Approx. 60
Approx. 80
Approx. 100
Approx. 170
Approx. 340
Approx. 680
Normal
Approx. 120
Approx. 120
Approx. 170
Approx. 290
Approx. 680
Approx. 1020
Size
Quality
00934C SC-MS10 USA~089 9/30/05 10:56 AM Page 61
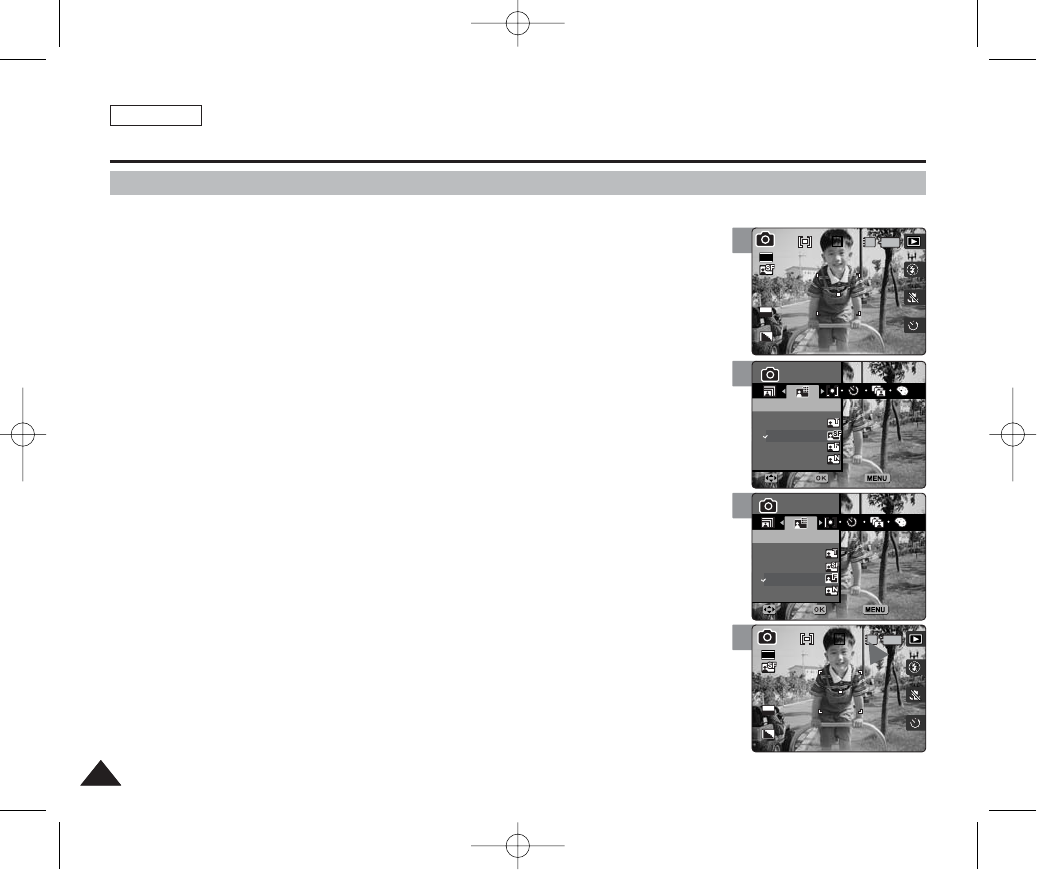
You can set the image quality to meet your needs. Set the image quality before taking a picture.
1. Set the Mode Dial to Photo mode.
2. Press the [POWER] button to turn on the device.
3. Press the [MENU] button.
◆Menu screen appears.
4. Move the joystick left / right (œœ/√√) to select <Photo Quality>.
5. Select an option by moving the joystick up / down (▲/▼), and then press the
[OK] button.
◆<Tiff> / <Super Fine> / <Fine> / <Normal>
6. Press the [MENU] button to exit the menu.
◆An icon indicating the selected quality appears on the screen.
[ Notes ]
✤The photo capacity is an approximation and subject to recording conditions.
✤When <Tiff> quality is selected, size is automatically set to 5M.
✤When <Tiff> quality is selected, <Multi Shot>, <DIS>, <Size>, <Digital Zoom> and <Super Macro>
settings are not available.
✤While the menu screen is displayed, pressing the [Record / Stop] button will exit the menu.
ENGLISH
6262
4
5
6
Photo Mode : Setting the Capturing Options
Setting the Photo File Quality
0
0
PhotoPhoto
Photo QualityPhoto Quality
Tiff
Super Fine
Fine
Normal
MoveMove SelectSelect ExitExit
Photo
Photo Quality
Move Select Exit
0
0
Photo
Photo Quality
Move Select Exit
PhotoPhoto
Photo QualityPhoto Quality
Tiff
Super Fine
Fine
Normal
MoveMove SelectSelect ExitExit
0
IN
0
60
2592
Photo
Photo Quality
Move Select Exit
Photo
Photo Quality
Move Select Exit
EV
0
3
IN
0
30
2592
0
Photo
Photo Quality
Move Select Exit
Photo
Photo Quality
Move Select Exit
EV
0
00934C SC-MS10 USA~089 9/30/05 10:56 AM Page 62
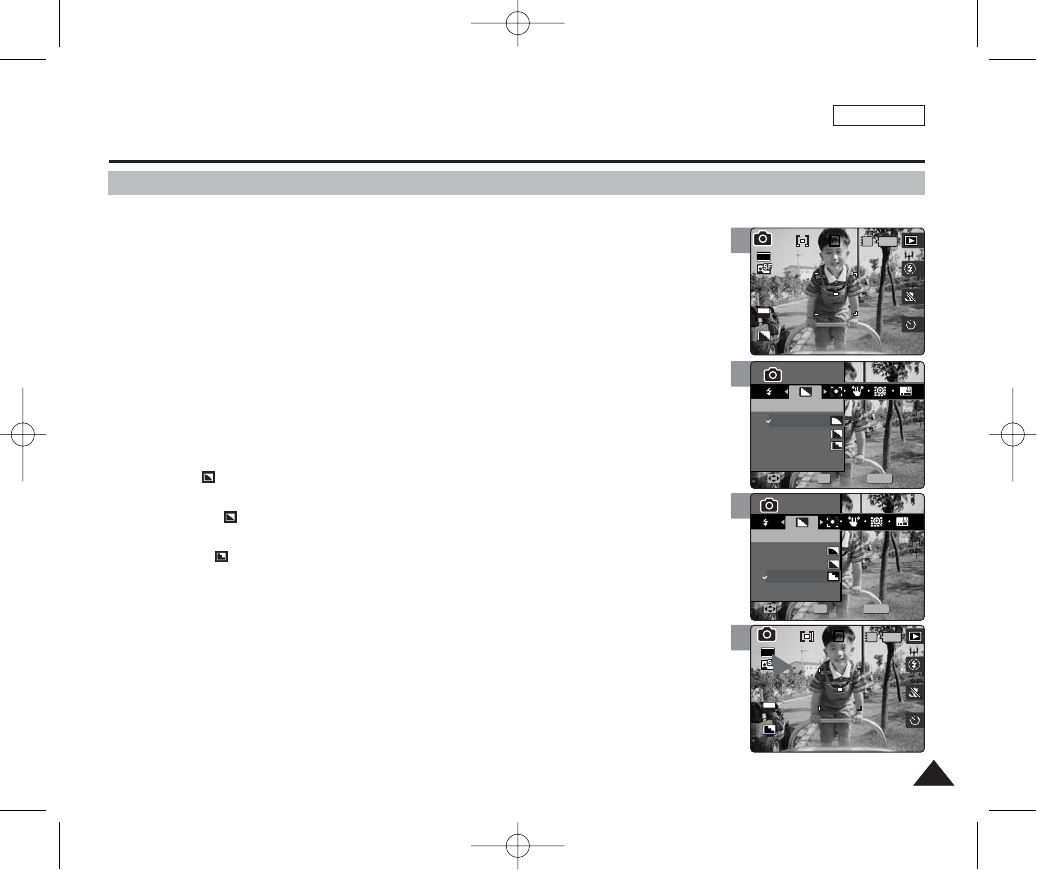
ENGLISH
6363
4
5
6
Photo Mode : Setting the Capturing Options
Setting the Sharpness
You can set the sharpness of the image to be captured. Set the image sharpness before
taking a picture.
1. Set the Mode Dial to Photo mode.
2. Press the [POWER] button to turn on the device.
3. Press the [MENU] button.
◆Menu screen appears.
4. Move the joystick left / right (œœ/√√) to select <Sharpness>.
5. Select an option by moving the joystick up / down (▲/▼), and then press
the [OK] button.
◆<Soft>( ): The image’s edges display softly and you can select this when you want to
edit it on the computer.
◆<Normal>( ): The image’s edges display sharply, and you can select this when you
want to print.
◆<Sharp>( ): As the image’s edges are sharpened and emphasised, some noise might
occur although it is seen clearly.
6. Press the [MENU] button to exit the menu.
◆An icon indicating the selected sharpness appears on the screen.
[ Note ]
✤While the menu screen is displayed, pressing the [Record / Stop] button will exit the menu.
MENU
0
0
PhotoPhoto
SharpnessSharpness
Soft
Normal
Sharp
MoveMove SelectSelect ExitExit
OK
Photo
Sharpness
Move Select Exit
0
0
Photo
Sharpness
Move Select Exit
MENU
PhotoPhoto
SharpnessSharpness
Soft
Normal
Sharp
MoveMove SelectSelect ExitExit
OK
0
IN
0
EV
0
30
2592
Photo
Sharpness
Move Select Exit
Photo
Sharpness
Move Select Exit
3
IN
0
30
2592
0
Photo
Sharpness
Move Select Exit
Photo
Sharpness
Move Select Exit
EV
0
00934C SC-MS10 USA~089 9/30/05 10:56 AM Page 63
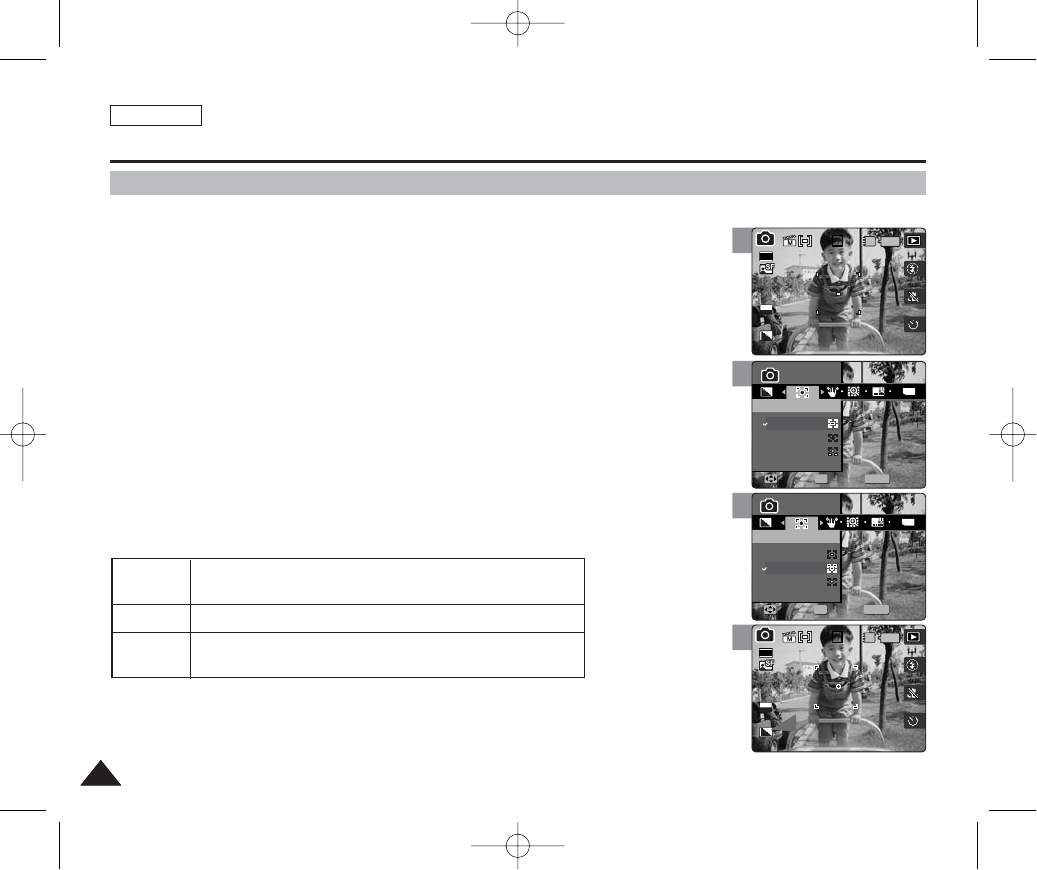
ENGLISH
6464
4
5
6
Photo Mode : Setting the Capturing Options
Setting the Focus Method
To have clear image of the subject, you need to set the focus on the subject. Select an
appropriate focus method for the best results.
1. Set the Mode Dial to Photo mode.
2. Press the [POWER] button to turn on the device.
3. Press the [MENU] button.
◆Menu screen appears.
4. Move the joystick left / right (œœ/√√) to select <Focus>.
5. Select an option by moving the joystick up / down (▲/▼), and then press the
[OK] button.
6. Press the [MENU] button to exit the menu.
◆An icon indicating the selected focusing mode appears on the screen.
[ Notes ]
✤Focus methods can be set only in <Manual> Scene mode. By default, the scene mode is set to <Auto>.
✤While the menu screen is displayed, pressing the [Record / Stop] button will exit the menu.
MENU
TYPE
0
0
PhotoPhoto
FocusFocus
Multi AF
Center AF
Spot AF
MoveMove SelectSelect ExitExit
OK
Photo
Focus
Move Select Exit
0
0
Photo
Focus
Move Select Exit
MENU
TYPE
PhotoPhoto
FocusFocus
Multi AF
Center AF
Spot AF
MoveMove SelectSelect ExitExit
OK
0
IN
0
30
2592
Photo
Focus
Move Select Exit
Photo
Focus
Move Select Exit
EV
0
3
IN
0
30
2592
0
Photo
Focus
Move Select Exit
Photo
Focus
Move Select Exit
EV
0
<Multi AF>
<Center AF>
<Spot AF>
You can select this when the subjects are not located in the center of the
screen, but you have to focus on numerous spots.
You can select this when the subject is located in the center of the screen.
You can select this when you want to focus exactly on the very narrow area of
the main subject.
00934C SC-MS10 USA~089 9/30/05 10:56 AM Page 64
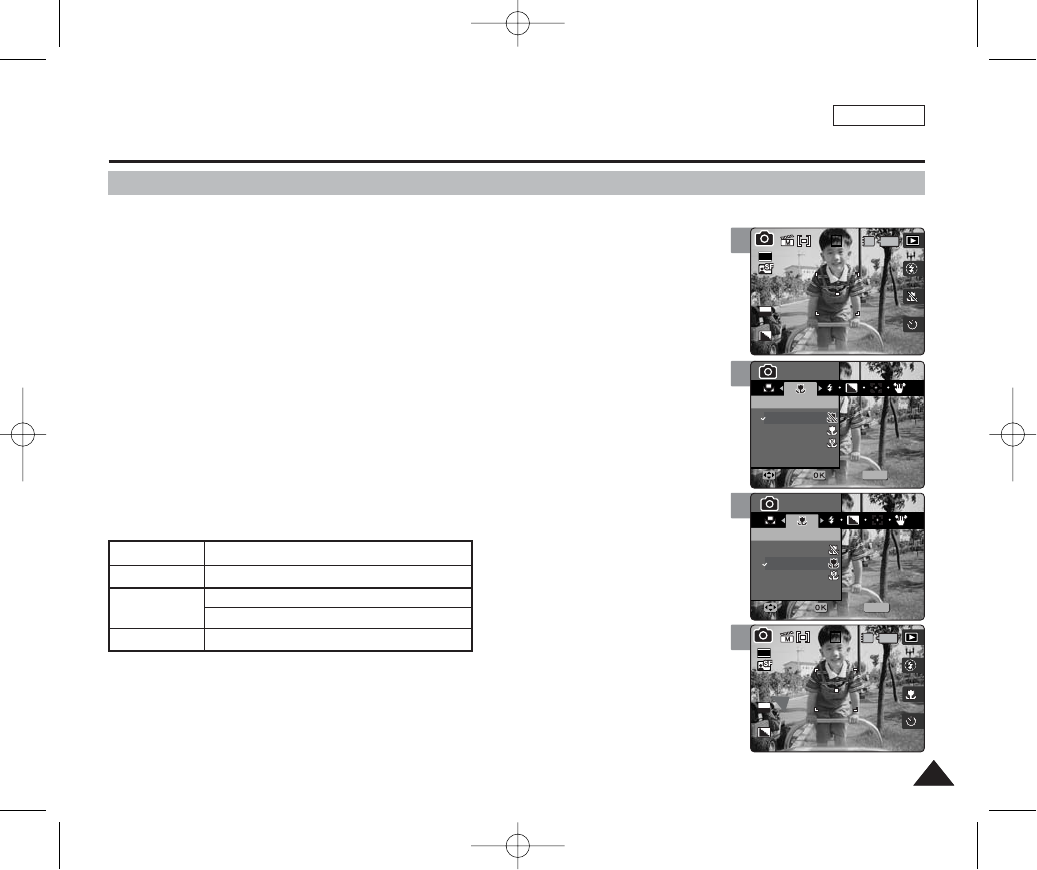
Macro mode allows users to have a fine focused image of a close-up subject within 50 cm.
1. Set the Mode Dial to Photo mode.
2 Press the [POWER] button to turn on the device.
3. Press the [MENU] button.
◆Menu screen appears.
4. Move the joystick left / right (œœ/√√) to select <Macro>.
5. Select an option by moving the joystick up / down (▲/▼), and then press the
[OK] button.
6. Press the [MENU] button to exit the menu.
◆An icon indicating the selected Macro mode appears on the screen.
◆If <Off> is selected, no icon will be displayed.
[ Notes ]
✤Focus methods can be set only in <Manual> Scene mode. By default, the scene mode is set to <Auto>.
✤While the menu screen is displayed, pressing the [Record / Stop] button will exit the menu.
ENGLISH
6565
4
5
6
Photo Mode : Setting the Capturing Options
Setting the Macro Mode
MENU
0
0
PhotoPhoto
MacroMacro
Off
Macro
Super Macro
MoveMove SelectSelect ExitExit
Photo
Macro
Move Select Exit
0
0
Photo
Macro
Move Select Exit
MENU
PhotoPhoto
MacroMacro
Off
Macro
Super Macro
MoveMove SelectSelect ExitExit
0
IN
0
30
2592
Photo
Macro
Move Select Exit
Photo
Macro
Move Select Exit
EV
0
3
IN
0
30
2592
0
Photo
Macro
Move Select Exit
Photo
Macro
Move Select Exit
EV
0
Macro Setting
<Off>
<Macro>
<Super Macro>
Focus Range
50 cm ~ ∞
W: 10 cm ~ ∞
T: 30 cm ~ ∞
W: 1 cm ~ 5 cm
00934C SC-MS10 USA~089 9/30/05 10:56 AM Page 65
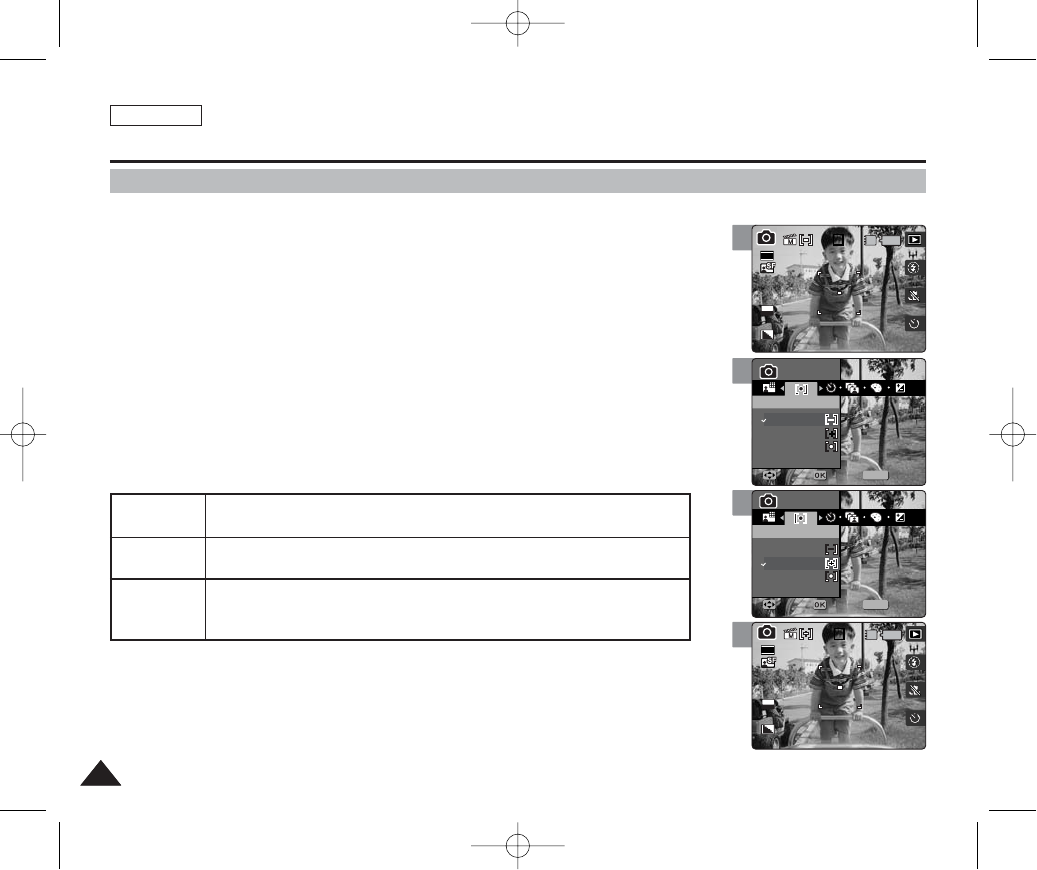
ENGLISH
6666
Photo Mode : Setting the Capturing Options
4
5
6
Photo
이동 선택 나가기
MENU
0
0
PhotoPhoto
MeteringMetering
Multi
Center
Spot
MoveMove SelectSelect ExitExit
Photo
Metering
Move Select Exit
Photo
이동 선택 나가기
0
0
Photo
Metering
Move Select Exit
MENU
PhotoPhoto
MeteringMetering
Multi
Center
Spot
MoveMove SelectSelect ExitExit
Photo
이동 선택 나가기
0
IN
0
30
2592
Photo
Metering
Move Select Exit
Photo
Metering
Move Select Exit
EV
0
Setting the Metering Method
Metering controls the brightness and exposure of the picture taken. Select an appropriate
metering method for the best results.
1. Set the Mode Dial to Photo mode.
2. Press the [POWER] button to turn on the device.
3. Press the [MENU] button.
◆Menu screen appears.
4. Move the joystick left / right (œœ/√√) to select <Metering>.
5. Select an option by moving the joystick up / down (▲/▼), and then press the
[OK] button.
6. Press the [MENU] button to exit the menu.
◆An icon indicating the selected Metering mode appears on the screen.
[ Notes ]
✤Metering methods can be set only in <Manual> Scene mode. By default, the scene mode is set to
<Auto>.
✤While the menu screen is displayed, pressing the [Record / Stop] button will exit the menu.
3
Photo
이동 선택 나가기
IN
0
30
2592
0
Photo
Metering
Move Select Exit
Photo
Metering
Move Select Exit
EV
0
<Multi>
<Center>
<Spot>
It splits the screen into many areas and adjusts the exposure accordingly based on the
center screen and each area’s brightness information.
Meters only the area displayed in the square in the center of the LCD. You can select this
when you want to accurately expose the subject regardless of background brightness.
It meters a very narrow area in the center. You can select this when the subject’s
surrounding area is very bright or there is a backlight, therefore you can meter the subject
accurately.
00934C SC-MS10 USA~089 9/30/05 10:56 AM Page 66

ENGLISH
6767
4
5
6
MENU
ISO
100
ISO
200
ISO
300
100
200
400
ISOISO
ISO
ISO
AUTO
0
0
PhotoPhoto
Auto
MoveMove SelectSelect ExitExit
ISO
Photo
Move Select Exit
ISO
0
0
Photo
Move Select Exit
MENU
ISO
AUTO
ISO
200
ISO
400
100
200
400
ISOISO
ISO
ISO
100
PhotoPhoto
Auto
MoveMove SelectSelect ExitExit
ISO
0
IN
0
30
2592
ISO
100
Photo
Move Select Exit
ISO
Photo
Move Select Exit
EV
0
Photo Mode : Setting the Capturing Options
Setting the ISO Speed (Sensitivity)
ISO Speed is the rating of a film's sensitivity to light. Though digital cameras don't use film, they
normally use the same rating system to describe the sensitivity of the camera's imaging sensor.
1. Set the Mode Dial to Photo mode.
2. Press the [POWER] button to turn on the device.
3. Press the [MENU] button.
◆Menu screen appears.
4. Move the joystick left / right (œœ/√√) to select <ISO>.
5. Select an option by moving the joystick up / down (▲/▼), and then press the
[OK] button.
6. Press the [MENU] button to exit the menu.
◆An icon indicating the selected ISO Speed appears on the screen.
[ Notes ]
✤The higher the ISO Speed number, the higher sensitivity to light. It results in brighter imaging under
darker lighting.
✤High ISO Speed setting may result in picture noise.
✤ISO Speed can only be set in <Manual> Scene mode. By default, the scene mode is set to <Auto>.
✤While the menu screen is displayed, pressing the [Record / Stop] button will exit the menu.
3
ISO
IN
0
30
2592
0
Photo
Move Select Exit
ISO
Photo
Move Select Exit
EV
0
AUTO
100
200
400
Automatically sets the ISO according to the light brightness
The standard sensitivity rate, and therefore it is the usual shooting sensitivity rate.
When you use this in a dark place, you can increase the shutter speed, but it might come
out grainy.
When you use this in a very dark place, you can greatly increase the shutter speed, but you
may get a rough image due to severe graininess.
00934C SC-MS10 USA~089 9/30/05 10:56 AM Page 67
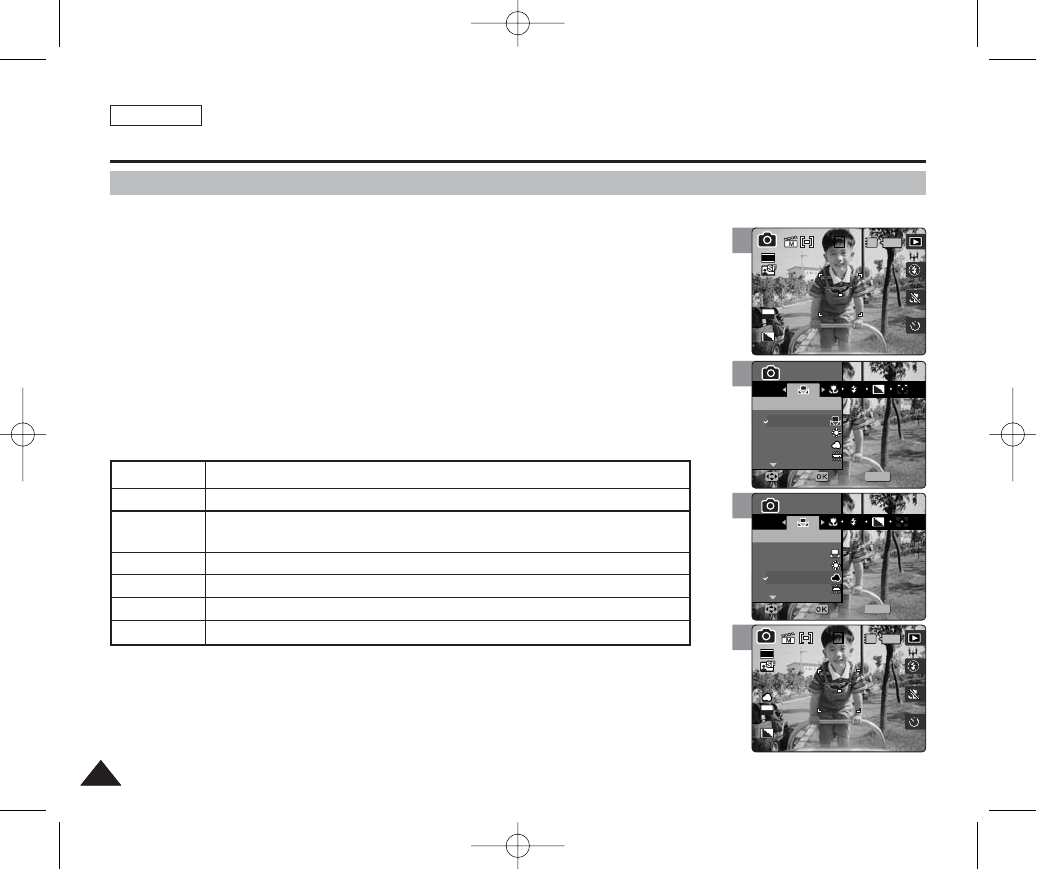
ENGLISH
6868
Photo Mode : Setting the Capturing Options
4
5
6
MENU
ISO
A
0
0
PhotoPhoto
White BalanceWhite Balance
Auto
Daylight
Cloudy
FluorescentH
MoveMove SelectSelect ExitExit
Photo
White Balance
Move Select Exit
0
0
Photo
White Balance
Move Select Exit
MENU
ISO
A
PhotoPhoto
White BalanceWhite Balance
Auto
Daylight
Cloudy
FluorescentH
MoveMove SelectSelect ExitExit
0
IN
0
30
2592
Photo
White Balance
Move Select Exit
Photo
White Balance
Move Select Exit
EV
0
Setting the White Balance
The White Balance allows calibration of the picture for accurate color display in different lighting
conditions. It is recommended to set the white balance prior to any recording.
1. Set the Mode Dial to Photo mode.
2. Press the [POWER] button to turn on the device.
3. Press the [MENU] button.
◆Menu screen appears.
4. Move the joystick left / right (œœ/√√) to select <White Balance>.
5. Select an option by moving the joystick up / down (▲/▼), and then press the
[OK] button.
6. Press the [MENU] button to exit the menu.
◆An icon indicating the selected white balance appears on the screen.
◆If <Auto> is selected, no icon will be displayed.
[ Notes ]
✤White Balance can be set only in <Manual> Scene mode. By default, the scene mode is set to <Auto>.
✤In general outdoors picture taking, <Auto> setting will allow users to have best results.
✤As the lighting condition changes, set the appropriate white balance before taking a picture.
✤While the menu screen is displayed, pressing the [Record / Stop] button will exit the menu.
3
IN
0
30
2592
0
Photo
White Balance
Move Select Exit
Photo
White Balance
Move Select Exit
EV
0
AUTO
Daylight
Cloudy
FluorescentH
FluorescentL
Tungsten
Custom WB
Automatically sets according to the shooting environment.
Adjusts the color according to daylight/indoor, outdoor light
You can select this when you cannot have daylight as a direct light, such as when it is partly-
cloudy or cloudy.
Suitable in a halogen or 3-wavelength light environment.
Suitable for a fluorescent light environment.
Suitable for an incandescent light environment.
You can adjust the white balance as you wish based on the shooting environment.
00934C SC-MS10 USA~089 9/30/05 10:56 AM Page 68
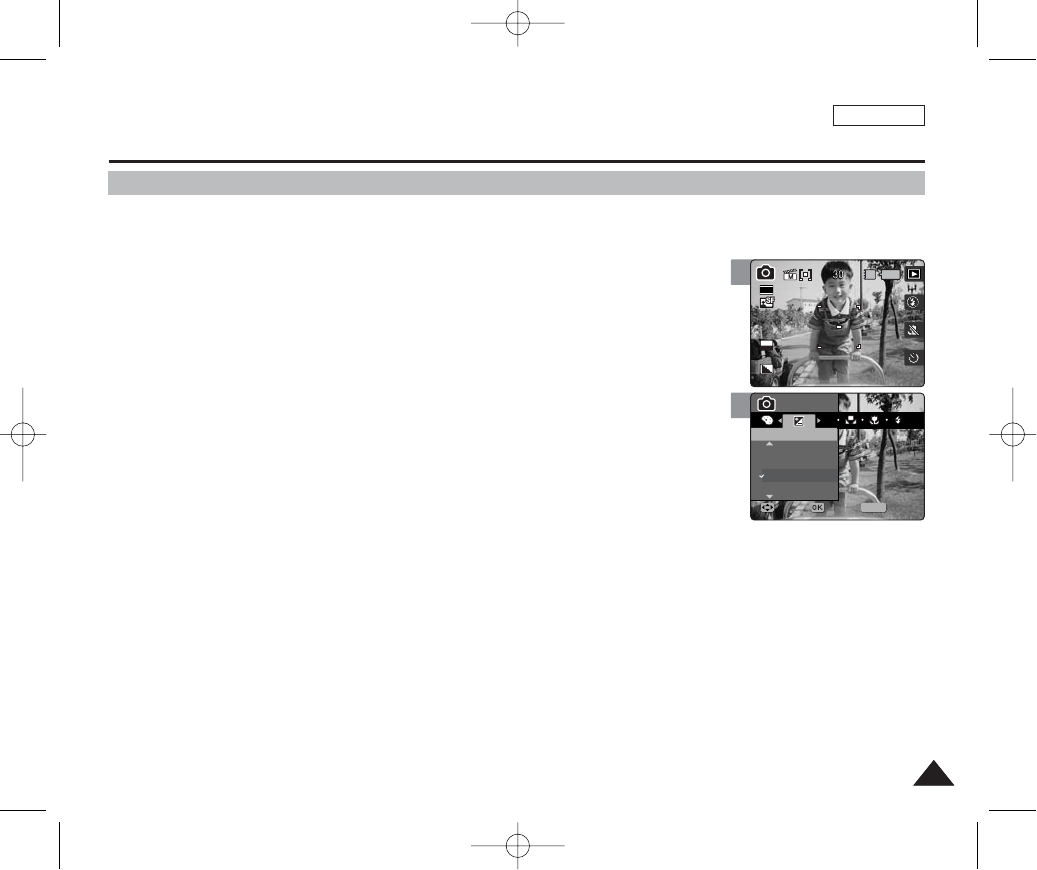
ENGLISH
6969
Photo Mode : Setting the Capturing Options
4
MENU
ISO
+0.6
+0.3
0
-0.3
EVEV
PhotoPhoto
MoveMove SelectSelect ExitExit
EV
Photo
Move Select Exit
Adjusting the Exposure – Exposure Compensation
You can manually make exposure adjustments using EV Exposure Compensation which allows
users to control the amount of light manually when the shutter-release button is released.
1. Set the Mode Dial to Photo mode.
2. Press the [POWER] button to turn on the device.
3. Press the [MENU] button.
◆Menu screen appears.
4. Move the joystick left / right (œœ/√√) to select <EV>.
5. Select an option by moving the joystick up / down (▲/▼), and then press the
[OK] button.
◆-2.0 / -1.6 / -1/3 / -1.0 / -0.6 / -0.3 / 0 / +0.3 / +0.6 / +1.0 / +1.3 / +1.6 / +2.0
◆The screen brightness gets darker when the EV settings goes to a negative setting and
gets brighter when it goes to a positive setting.
6. Press the [MENU] button to exit the menu.
◆An icon indicating the selected <EV> mode appears on the screen.
[ Warning ]
✤Do not let the CCD be exposed to a strong light source for a long time. It may damage the CCD.
[ Notes ]
✤EV compensation can be set only in <Manual> Scene mode. By default, the scene mode is set to <Auto>.
✤While the menu screen is displayed, pressing the [Record / Stop] button will exit the menu.
3
EV
2592
Photo
Move Select Exit
EV
0
IN
EV
Photo
Move Select Exit
00934C SC-MS10 USA~089 9/30/05 10:56 AM Page 69

ENGLISH
7070
Photo Mode : Setting the Capturing Options
4
5
6
MENU
TYPE
PhotoPhoto
DISDIS
Off
On
MoveMove SelectSelect ExitExit
OK
Photo
DIS
Move Select Exit
Photo
DIS
Move Select Exit
MENU
TYPE
PhotoPhoto
DISDIS
Off
On
MoveMove SelectSelect ExitExit
OK
2592
IN
Photo
DIS
Move Select Exit
Photo
DIS
Move Select Exit
EV
0
Setting the DIS (Digital Image Stabiliser)
The Digital Image Stabiliser is a function that compensates for hand shaking and other
movement while recording.
DIS provides a more stable picture when:
◆Recording with zoom
◆Recording with a slower shutter speed
◆Recording through the window in a vehicle
1. Set the Mode Dial to Photo mode.
2. Press the [POWER] button to turn on the device.
3. Press the [MENU] button.
◆Menu screen appears.
4. Move the joystick left / right (œœ/√√) to select <DIS>.
5. Select an option by moving the joystick up / down (▲/▼), and then press the
[OK] button.
◆<Off>: Disables DIS function.
◆<On>: Enables DIS function.
6. Press the [MENU] button to exit the menu.
◆If <On> is selected, < > icon appears on the screen.
[ Warning ]
✤DIS has no effect on a moving subject.
✤Purposely moving the device or taking pictures in a moving vehicle will reduce the DIS’s effect.
[ Notes ]
✤It is recommended to use a tripod and external lighting for best results in a dark environment.
✤DIS does not work for video recording.
✤<Multi Shot> mode will cancel the <DIS> setting.
✤If the image quality is set to <Tiff>, <DIS> is not available.
✤If flash is set to fire, <DIS> will not work.
✤When <DIS> is enabled, it takes about 5 seconds to process and save the image.
✤While the menu screen is displayed, pressing the [Record / Stop] button will exit the menu.
3
2592
IN
Photo
DIS
Move Select Exit
Photo
DIS
Move Select Exit
EV
0
00934C SC-MS10 USA~089 9/30/05 10:56 AM Page 70

ENGLISH
7171
Photo Mode : Setting the Capturing Options
4
5
6
MENU
TYPE
0
PhotoPhoto
ImprintImprint
Off
Date
Date&Time
MoveMove SelectSelect ExitExit
OK
Photo
Imprint
Move Select Exit
0
Photo
Imprint
Move Select Exit
MENU
TYPE
PhotoPhoto
ImprintImprint
Off
Date
Date&Time
MoveMove SelectSelect ExitExit
OK
0
Photo
Imprint
Move Select Exit
Photo
Imprint
Move Select Exit
Setting the Imprint Option
You can imprint Date & Time on pictures taken. To place the date / time information on your
picture, set this option.
1. Set the Mode Dial to Photo mode.
2. Press the [POWER] button to turn on the device.
3. Press the [MENU] button.
◆Menu screen appears.
4. Move the joystick left / right (œœ/√√) to select <Imprint>.
5. Select an option by moving the joystick up / down (▲/▼), and then press the
[OK] button.
◆<Off>: Cancels imprinting.
◆<Date>: Imprints Date only.
◆<Date & Time>: Imprints Date and Time.
6. Press the [MENU] button to exit the menu.
[ Notes ]
✤Imprinting will print the date (and time) information directly onto the picture, and it will not be erased.
✤Printing an image with imprinted date (and time) information may produce a print which is cropped at the
imprinted area.
✤While the menu screen is displayed, pressing the [Record / Stop] button will exit the menu.
3
IN
0
30
2592
Photo
Imprint
Move Select Exit
Photo
Imprint
Move Select Exit
EV
0
00934C SC-MS10 USA~089 9/30/05 10:56 AM Page 71
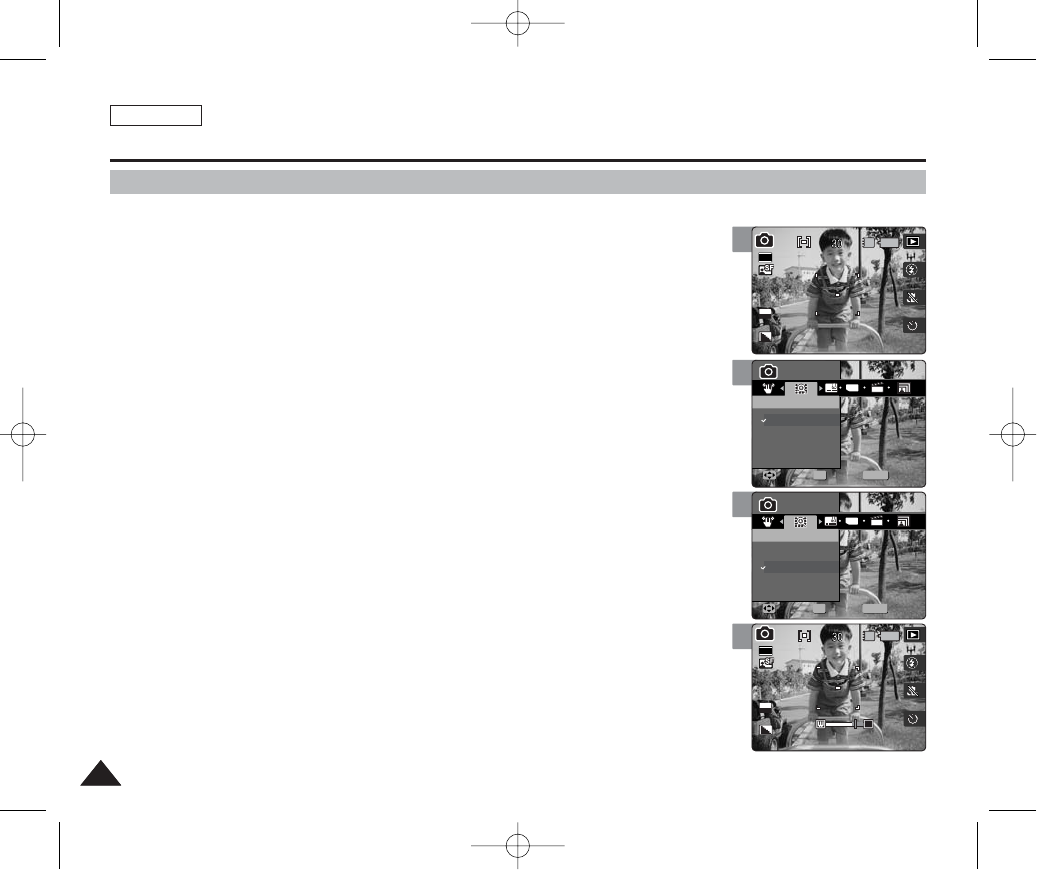
ENGLISH
7272
Photo Mode : Setting the Capturing Options
4
5
6
MENU
TYPE
PhotoPhoto
Digital ZoomDigital Zoom
Off
On
MoveMove SelectSelect ExitExit
OK
Photo
Digital Zoom
Move Select Exit
Photo
Digital Zoom
Move Select Exit
MENU
TYPE
PhotoPhoto
Digital ZoomDigital Zoom
Off
On
MoveMove SelectSelect ExitExit
OK
2592
IN
T
Photo
Digital Zoom
Move Select Exit
Photo
Digital Zoom
Move Select Exit
EV
0
Setting the Digital Zoom
As well as the 3x optical zoom, this device supports 5x digital zoom which produces a total of
15x digital zoom.. Exceeding the optical zoom limit will automatically apply digital zooming when
available. Digital zoom may produce a grainy picture.
1. Set the Mode Dial to Photo mode.
2. Press the [POWER] button to turn on the device.
3. Press the [MENU] button.
◆Menu screen appears.
4. Move the joystick left / right (œœ/√√) to select <Digital Zoom>.
5. Select an option by moving the joystick up / down (▲/▼), and then press the
[OK] button.
◆<Off>: Disables digital zoom. Only optical zoom 3x will be supported for zooming
◆<On>: Enables digital zoom. Attempts to zoom in more than 3x will automatically apply
digital zooming (up to 15x).
6. Press the [MENU] button to exit the menu.
◆When the digital zoom is activated, an indicator appears on the screen.
[ Note ]
✤While the menu screen is displayed, pressing the [Record / Stop] button will exit the menu.
3
2592
IN
Photo
Digital Zoom
Move Select Exit
Photo
Digital Zoom
Move Select Exit
EV
0
00934C SC-MS10 USA~089 9/30/05 10:56 AM Page 72

ENGLISH
7373
Photo Mode : Setting the Capturing Options
4
5
6
MENU
ISO
0
PhotoPhoto
Multi ShotMulti Shot
Off
Normal
AEB
MoveMove SelectSelect ExitExit
Photo
Multi Shot
Move Select Exit
0
0
Photo
Multi Shot
Move Select Exit
MENU
ISO
PhotoPhoto
Multi ShotMulti Shot
Off
Normal
AEB
MoveMove SelectSelect ExitExit
0
IN
0
30
2592
Photo
Multi Shot
Move Select Exit
Photo
Multi Shot
Move Select Exit
0
EV
0
Setting the Multi Shot
You can take a series of pictures continuously with just one press of the shutter.
1. Set the Mode Dial to Photo mode.
2. Press the [POWER] button to turn on the device.
3. Press the [MENU] button.
◆Menu screen appears.
4. Move the joystick left / right (œœ/√√) to select <Multi Shot>.
5. Select an option by moving the joystick up / down (▲/▼), and then press the
[OK] button.
6. Press the [MENU] button to exit the menu.
◆An icon indicating the selected Multi Shot mode appears on the screen.
◆If <Off> is selected, no icon will be displayed.
[ Notes ]
✤If the Photo File Quality is set to <Tiff>, Multi Shot is not available for setting.
✤When you set the Multi Shot enabled, you cannot use the flash.
✤Restarting the device will cancel the Multi Shot setting.
✤While the menu screen is displayed, pressing the [Record / Stop] button will exit the menu.
3
IN
2592
0
Photo
Multi Shot
Move Select Exit
Photo
Multi Shot
Move Select Exit
EV
0
0
30
Off
Multi
AEB (Automatic
Exposure Bracketing)
Disables Multi Shot and takes one photo at a time.
Enables Multi Shot and takes 3 photos in a row.
Enables Multi Shot and takes 3 photos in a row with exposure bracketing of -0.3 EV /
0 EV / +0.3 EV
00934C SC-MS10 USA~089 9/30/05 10:56 AM Page 73

ENGLISH
7474
Photo Mode : Setting the Capturing Options
4
5
6
MENU
ISO
0
0
PhotoPhoto
Self TimerSelf Timer
Off
2 sec
10 sec
MoveMove SelectSelect ExitExit
Photo
Self Timer
Move Select Exit
0
0
Photo
Self Timer
Move Select Exit
MENU
ISO
PhotoPhoto
Self TimerSelf Timer
Off
2 sec
10 sec
MoveMove SelectSelect ExitExit
0
IN
0
30
2592
Photo
Self Timer
Move Select Exit
Photo
Self Timer
Move Select Exit
EV
0
Setting the Self Timer
Using this option, you can take a picture of yourself with delayed shooting.
1. Set the Mode Dial to Photo mode.
2. Press the [POWER] button to turn on the device.
3. Press the [MENU] button.
◆Menu screen appears.
4. Move the joystick left / right (œœ/√√) to select <Self Timer>.
5. Select an option by moving the joystick up / down (▲/▼), and then press the
[OK] button.
6. Press the [MENU] button to exit the menu.
[ Notes ]
✤You can set this option using the shortcut button directly.
✤It is recommended to use a tripod for best results on Self Timer pictures.
✤Restarting the device will cancel the Self Timer setting.
✤While the menu screen is displayed, pressing the [Record / Stop] button will exit the menu.
3
IN
0
30
2592
0
Photo
Self Timer
Move Select Exit
Photo
Self Timer
Move Select Exit
EV
0
Off
2 Sec
10 Sec
Cancels the Self Timer.
Sets the delay interval to 2 seconds. Takes a photo 2 seconds after pressing the [Record/Stop]
Sets the delay interval to 2 seconds. Takes photo 10 seconds after pressing the [Record/Stop]
00934C SC-MS10 USA~089 9/30/05 10:56 AM Page 74

ENGLISH
7575
Photo Mode : Setting the Capturing Options
4
5
6
MENU
PhotoPhoto
FlashFlash
Off
Auto
Red-eye
Fill-in
MoveMove SelectSelect ExitExit
OK
Photo
Flash
Move Select Exit
Photo
Flash
Move Select Exit
MENU
PhotoPhoto
FlashFlash
Off
Auto
Red-eye
Fill-in
MoveMove SelectSelect ExitExit
OK
2592
Photo
Flash
Move Select Exit
Photo
Flash
Move Select Exit
EV
0
IN
Setting the Flash
Flash is very useful not only for brighter subjects at night, but also in daytime when there is not
enough lighting on the subject, such as in a shadow, indoors, and in backlight situations.
1. Set the Mode Dial to Photo mode.
2. Press the [POWER] button to turn on the device.
3. Press the [MENU] button.
◆Menu screen appears.
4. Move the joystick left / right (œœ/√√) to select <Flash>.
5. Select an option by moving the joystick up / down (▲/▼), and then press the
[OK] button.
6. Press the [MENU] button to exit the menu.
◆An icon indicating the selected Self Timer mode appears on the screen.
◆If <Off> is selected, no icon will be displayed.
[ Notes ]
✤You can set this option using the short cut button directly.
✤Flash mode can only be set in <Manual> Scene mode. By default, the scene mode is set to <Auto>.
Refer to page 60 for further details.
✤It is recommended to use a tripod for best results when recording with <Slow Sync.> flash mode.
✤While the menu screen is displayed, pressing the [Record / Stop] button will exit the menu.
3
2592
Photo
Flash
Move Select Exit
Photo
Flash
Move Select Exit
EV
0
IN
Off ( )
Auto ( )
Red-eye ( )
Fill-in ( )
Slow Sync. ()
Flash will go off. Select this option when flash use is limited such as in a museum.
Flash will be set automatically according to lighting conditions.
Flash will be set automatically according to lighting conditions, with red-eye reduction.
Forces the flash to go off despite the lighting conditions. May not go off under overly strong lighting.
To have a brighter subject and scene (backdrop), the camera will first allow longer exposure and
then throws the flash on the subject. It is recommended to use a tripod to avoid blurred images.
00934C SC-MS10 USA~089 9/30/05 10:57 AM Page 75

ENGLISH
7676
Photo Mode : Setting the Capturing Options
Setting the Flash
[ Notes ]
✤Do not use flash in a place where flash use is limited, such as in a museum.
✤Frequent use of flash consumes more battery power.
✤You cannot use flash with <Multi Shot>.
✤Effective flash range distance is less than 2 m (7 ft).
O
O
O
O
O
O
X
O
X
X
O
X
X
X
O
O
X
O
X
X
O
X
O
X
X
O
X
X
X
X
O
X
X
X
X
O
X
X
X
X
O
X
X
O
X
O
X
X
X
X
O
O
X
X
X
O
X
X
X
X
Scene Modes
Supported Flash Modes According to the Scene Modes
00934C SC-MS10 USA~089 9/30/05 10:57 AM Page 76
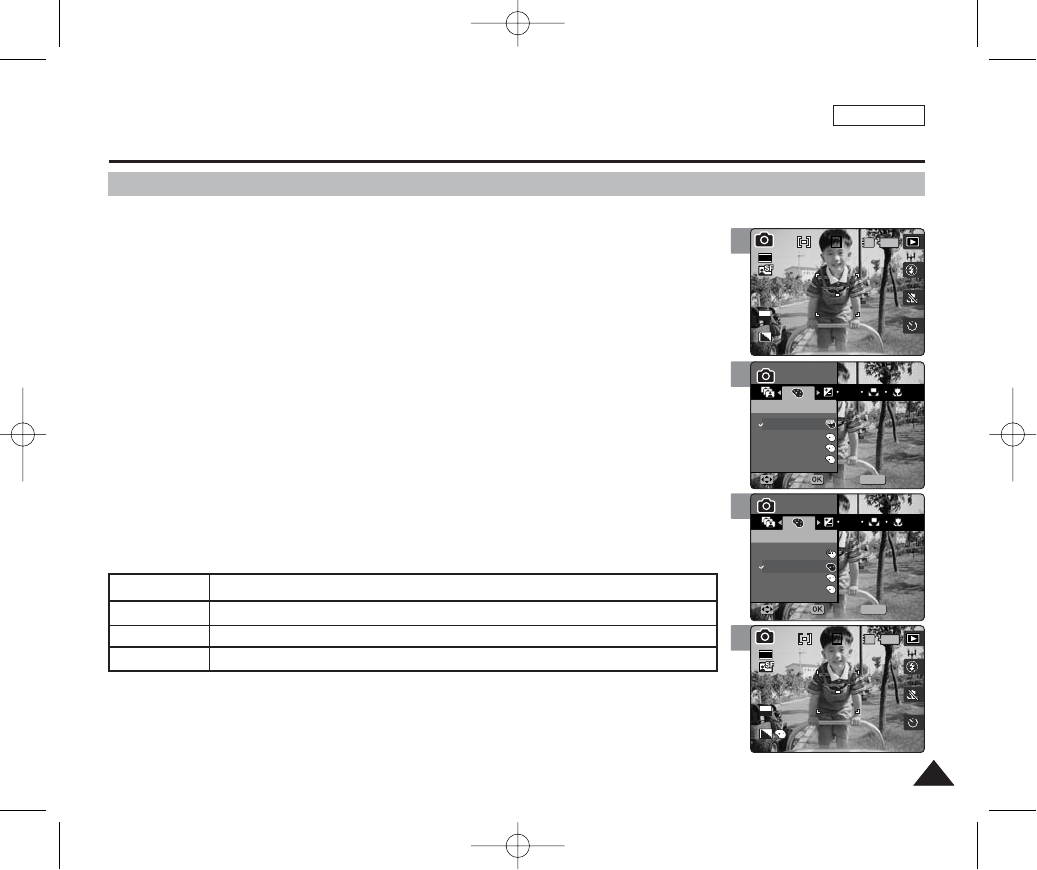
ENGLISH
7777
Photo Mode : Setting the Capturing Options
4
5
6
MENU
ISO
SS
NN
BWBW
0
0
S
PhotoPhoto
Digital EffectDigital Effect
Off
Sepia
Nega
BLK&WHT
MoveMove SelectSelect ExitExit
S
N
BW
Photo
Digital Effect
Move Select Exit
S
N
BW
0
0
S
Photo
Digital Effect
Move Select Exit
MENU
ISO
SS
NN
BWBW
PhotoPhoto
Digital EffectDigital Effect
Off
Sepia
Nega
BLK&WHT
MoveMove SelectSelect ExitExit
S
N
BW
0
IN
0
30
2592
SS
Photo
Digital Effect
Move Select Exit
S
N
BW
Photo
Digital Effect
Move Select Exit
EV
0
Setting Digital Effects
It supports various digital effects you can apply to your photos. Create a professional-looking
photo with digital effects.
1. Set the Mode Dial to Photo mode.
2. Press the [POWER] button to turn on the device.
3. Press the [MENU] button.
◆Menu screen appears.
4. Move the joystick left / right (œœ/√√) to select <Digital Effect>.
5. Select an option by moving the joystick up / down (▲/▼), and then press the
[OK] button.
6. Press the [MENU] button to exit the menu.
◆An icon indicating the selected Digital Effect appears on the screen.
◆If <Off> is selected, no icon will be displayed.
[ Note ]
✤While the menu screen is displayed, pressing the [Record / Stop] button will exit the menu.
3
S
N
BW
IN
0
30
2592
0
S
Photo
Digital Effect
Move Select Exit
S
N
BW
Photo
Digital Effect
Move Select Exit
EV
0
Off
Sepia
Nega
BLK&WHT
Cancel the <Digital Effect>.
The picture is displayed in sepia color--similar to that of an old photograph.
Reverses the colors, creating the look of a negative.
Changes the images into black and white.
00934C SC-MS10 USA~089 9/30/05 10:57 AM Page 77

ENGLISH
7878
Photo Mode : Setting the Viewing Options
4
3
4
11
IN
30
2592
EV
0
100-00011 1
IN
100-0001
11
Slide
11
IN
100-00011 1
100-0001
SlideSlide
Using the Shortcut Buttons
It supports various digital effects you can apply to your photos. Create a professional -looking
photo with the digital effects.
1. Set the Mode Dial to Photo mode.
2. Press the [POWER] button to turn on the device.
3. Press the [Shortcut 1] button.
◆Each press of the [Shortcut 1] button will toggle between Capture / View mode.
4. Moves to the Photo View mode.
1. Set the Mode Dial to Photo mode.
2. Press the [POWER] button to turn on the device.
3. Press the [Shortcut 2] button.
4. The slideshow begins.
◆Refer to page 87 for further details on slideshow.
5. Press the [OK] button to stop the slideshow.
3
1
1/6
100-000111
IN
100-0001
Switching to Photo Capture Mode
Viewing a Slideshow
00934C SC-MS10 USA~089 9/30/05 10:57 AM Page 78
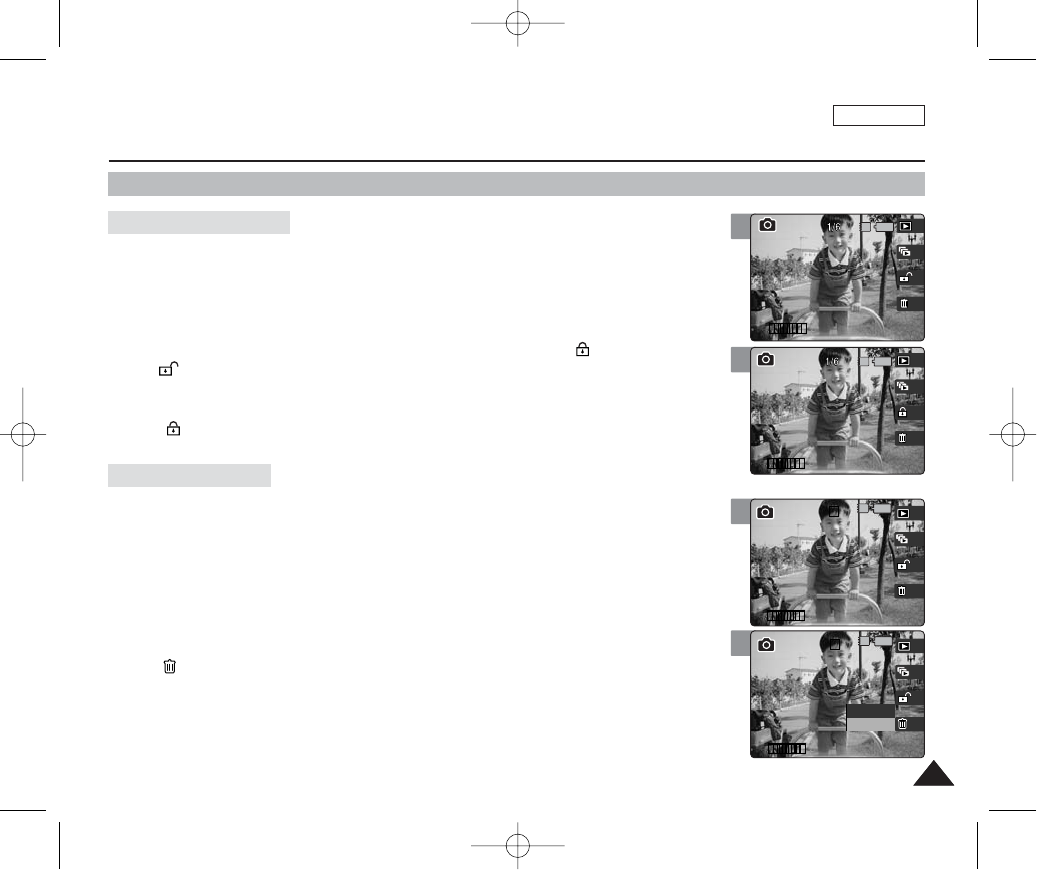
ENGLISH
7979
Photo Mode : Setting the Viewing Options
4
3
4
11 100-00011 1
IN
100-0001
1 1
1/1
100-000111
IN
100-0001
11
11
11
11
1 1
1/1
100-000111
IN
100-0001
Cancel
Delete
Using the Shortcut Buttons
1. Set the Mode Dial to Photo mode.
2. Press the [POWER] button to turn on the device.
3. Press the [Shortcut 3] button.
◆Each press of the [Shortcut 3] button will toggle between Locked ( ) and Unlocked
().
4. The selected file is protected from erasure.
◆< > icon indicating the selected file is protected appears on the screen.
1. Set the Mode Dial to Photo mode.
2. Press the [POWER] button to turn on the device.
3. Press the [Shortcut 4] button.
4. Select an option by moving the joystick up / down (▲/▼) and then press the
[OK] button.
◆< > icon indicating the selected file is protected appears on the screen.
◆<Yes>: Deletes the selected photo.
◆<No>: Cancels delete.
◆Refer to page 85 for further details.
3
100-00011 1
IN
100-0001 11
Protecting Photo files
Deleting Photo files
00934C SC-MS10 USA~089 9/30/05 10:57 AM Page 79
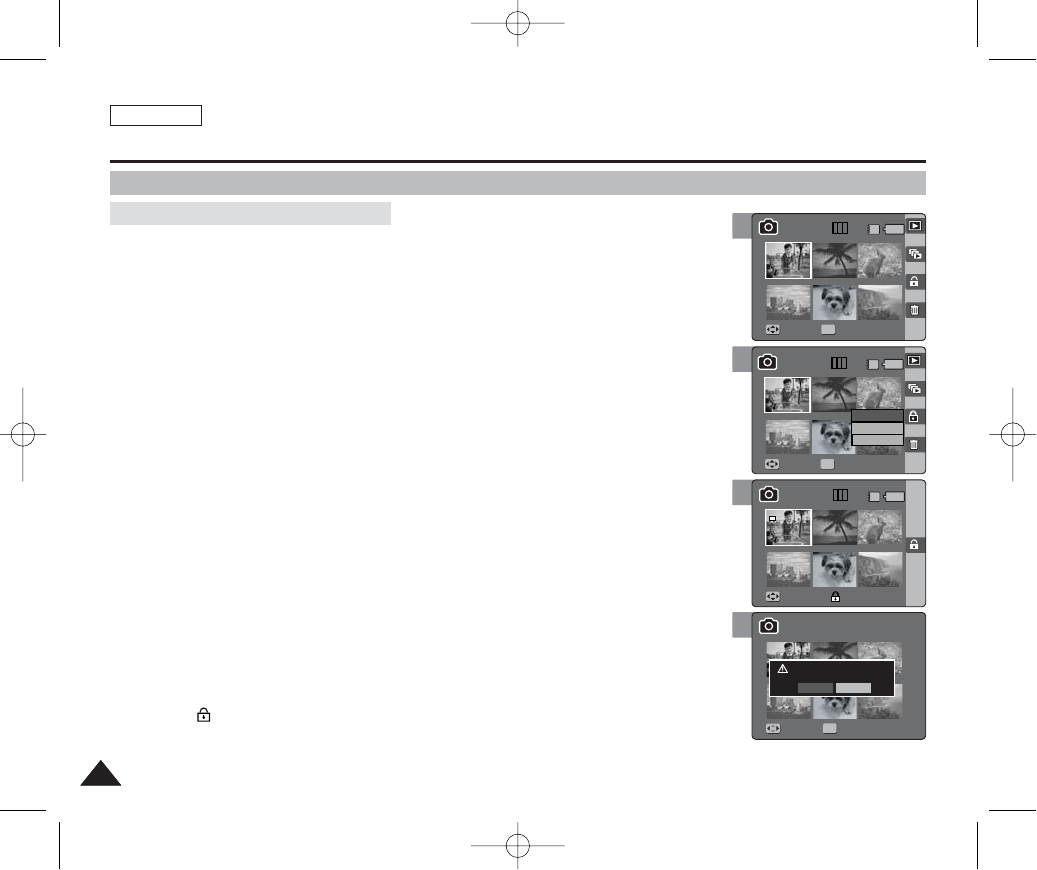
ENGLISH
8080
Photo Mode : Setting the Viewing Options
5
Move Full View
MoveMove Full ViewFull View
Move Finish
OK
Select
All
Cancel
Move Select
1
61/6 IN
6
Using the Shortcut Buttons
1. Set the Mode Dial to Photo mode.
2. Press the [POWER] button to turn on the device.
3. Press the [Shortcut 1] button.
◆Switches to Photo view mode.
4. Move the [W/T] zoom switch to W (WIDE).
◆The screen switches to multi-view.
◆The photo you were viewing in the single view is selected.
5. Press the [Shortcut 3] button and then select an option by moving the joystick
up / down (▲/▼) and then press the [OK] button.
◆<Select>: Selected photo files will be protected.
◆<All>: All photo files will be protected.
◆<Cancel>: Cancels protection.
6. If <Select> was selected, select photo files to protect by moving the joystick
left / right / up / down (œœ/√√/▲/▼) and press the [OK] button.
7. Press the [Shortcut 3] button again.
◆The message “Protect?” appears.
8. Select <Yes> to protect the selected photo. Select <No> to cancel protection.
◆The < > icon appears on the selected files (Refer to page 84).
4
MoveMove Full ViewFull View
Move Full View
Move Finish
OK
Move Select
61/6 IN
6
6
Protecting Photo files in Multi-View
6
7
Move Full View
Move Full View
MoveMove FinishFinish
Move Select
6
6
61/6 IN
Move Full View
Move Full View
Move Finish
Protect?
MoveMove SelectSelect
OK
Yes No
6
6
6
00934C SC-MS10 USA~089 9/30/05 10:57 AM Page 80

ENGLISH
8181
Photo Mode : Setting the Viewing Options
Using the Shortcut Buttons
1. Set the Mode Dial to Photo mode.
2. Press the [POWER] button to turn on the device.
3. Press the [Shortcut 1] button.
◆Switches to Photo view mode.
4. Move the [W/T] zoom switch to W (WIDE).
◆The screen switches to multi-view.
◆The photo you were viewing in the single view is selected.
5. Press the [Shortcut 4] button and then select an option by moving the joystick
up / down (▲/▼) and then press the [OK] button.
◆<Select>: Selected photo files will be deleted.
◆<All>: All photo files will be deleted.
◆<Cancel>: Cancels deletion.
6. If <Select> was selected, select photo files to delete by moving the joystick
left / right / up / down (œœ/√√/▲/▼) and press the [OK] button.
◆< > icon appears on the selected files.
7. Press the [Shortcut 4] button again.
◆The message “Delete?” appears.
8. Select <Yes> to delete selected files. Select <No> to cancel deletion.
Refer to page 85 for further details.
Deleting Photo files in Multi-View
5
Move Full View
MoveMove Full ViewFull View
OK
Select
All
Cancel
Move Finish
Move Select
4
MoveMove Full ViewFull View
Move Full View
OK
Move Finish
Move Select
6
7
Move Full View
Move Full View
MoveMove FinishFinish
Move Select
Move Full View
Move Full View
Move Finish
Delete?
Yes No
MoveMove SelectSelect
OK
00934C SC-MS10 USA~089 9/30/05 10:57 AM Page 81

ENGLISH
8282
Photo Mode : Setting the Viewing Options
5
MENU
TYPE
Photo
Photo
11
11
PhotoPhoto
Photo
Photo
RotateRotate
Rotate
Right(90°)
Left(90°)
Updown(180°)
MoveMove SelectSelect ExitExit
OK
Move Select Exit
Rotating a Photo File
You can rotate a saved photo.
1. Set the Mode Dial to Photo mode.
2. Press the [POWER] button to turn on the device.
3. Press the [Shortcut 1] button to switch to Photo viewing mode.
4. Move the joystick left / right (œœ/√√) to select a photo.
5. Press the [MENU] button.
◆Menu screen appears.
6. Move the joystick left / right (œœ/√√) to select <Rotate>.
7. Select an option by moving the joystick up / down (▲/▼) and then press the
[OK] button.
◆<Right(90°)>: Rotates the photo clockwise by 90°.
◆<Left(90°)>: Rotates the photo counterclockwise by 90°.
◆<Updown(180°)>: Flips the image up and down (Rotates 180°).
8. Press the [MENU] button to exit the menu.
[ Notes ]
✤Rotated images having a portrait ratio will have black margins on both the left / right corners of the LCD
when it is displayed.
✤Rotating will not affect the image quality or resolution.
✤A cropped and newly saved image cannot be rotated.
✤A rotated image cannot be cropped.
✤TIFF images cannot be rotated.
✤Rotated images may not appear as rotated on a PC.
✤While the menu screen is displayed, pressing the [Record / Stop] button will exit the menu.
4
Photo
Photo
IN
100-00011 1
100-0001
11
Photo
Photo
Photo
Rotate
Rotate
Move Select Exit
Move Select Exit
7
8
MENU
TYPE
Photo
Photo
11
11
Photo
Photo
PhotoPhoto
Rotate
RotateRotate
Right(90°)
Left(90°)
Updown(180°)
Move Select Exit
MoveMove SelectSelect ExitExit
OK
Photo
Photo
IN
11
100-000111
100-0001
Photo
Photo
Photo
Rotate
Rotate
Move Select Exit
Move Select Exit
00934C SC-MS10 USA~089 9/30/05 10:57 AM Page 82

ENGLISH
8383
Photo Mode : Setting the Viewing Options
6
MENU
TYPE
2048
1600
1024
11
PhotoPhoto
ResizeResize
MoveMove SelectSelect ExitExit
OK
Photo
Resize
Move Select Exit
Resizing Photos
You can resize a saved photo to be smaller than original. Making a bigger image file is not
supported.
1. Set the Mode Dial to Photo mode.
2. Press the [POWER] button to turn on the device.
3. Press the [Shortcut 1] button to switch to Photo viewing mode.
4. Move the joystick left / right (œœ/√√) to select a photo.
5. Press the [MENU] button.
◆Menu screen appears.
6. Move the joystick left / right (œœ/√√) to select <Resize>.
7. Select an option by moving the joystick up / down (▲/▼) and then press the
[OK] button.
◆<4M>/ <3M> / <2M> / <1M> / VGA
◆You can only resize a saved photo to be smaller than the original.
8. Press the [MENU] button to exit the menu.
[ Notes ]
✤Only JPEG images can be resized. TIFF images and video files cannot be resized.
✤Resized photos are saved separately. The original photo will not be deleted.
✤Rotated photos cannot be resized.
✤If there is not enough space to save the resized photo, the message “Memory Full!” will appear and the
resizing will be canceled.
✤While the menu screen is displayed, pressing the [Record / Stop] button will exit the menu.
4
100-00011 1
IN
100-0001
Photo
Resize
Move Select Exit
Photo
Resize
Move Select Exit
7
11
Photo
Resize
Move Select Exit
MENU
TYPE
2048
1600
1024
PhotoPhoto
ResizeResize
MoveMove SelectSelect ExitExit
OK
00934C SC-MS10 USA~089 9/30/05 10:57 AM Page 83
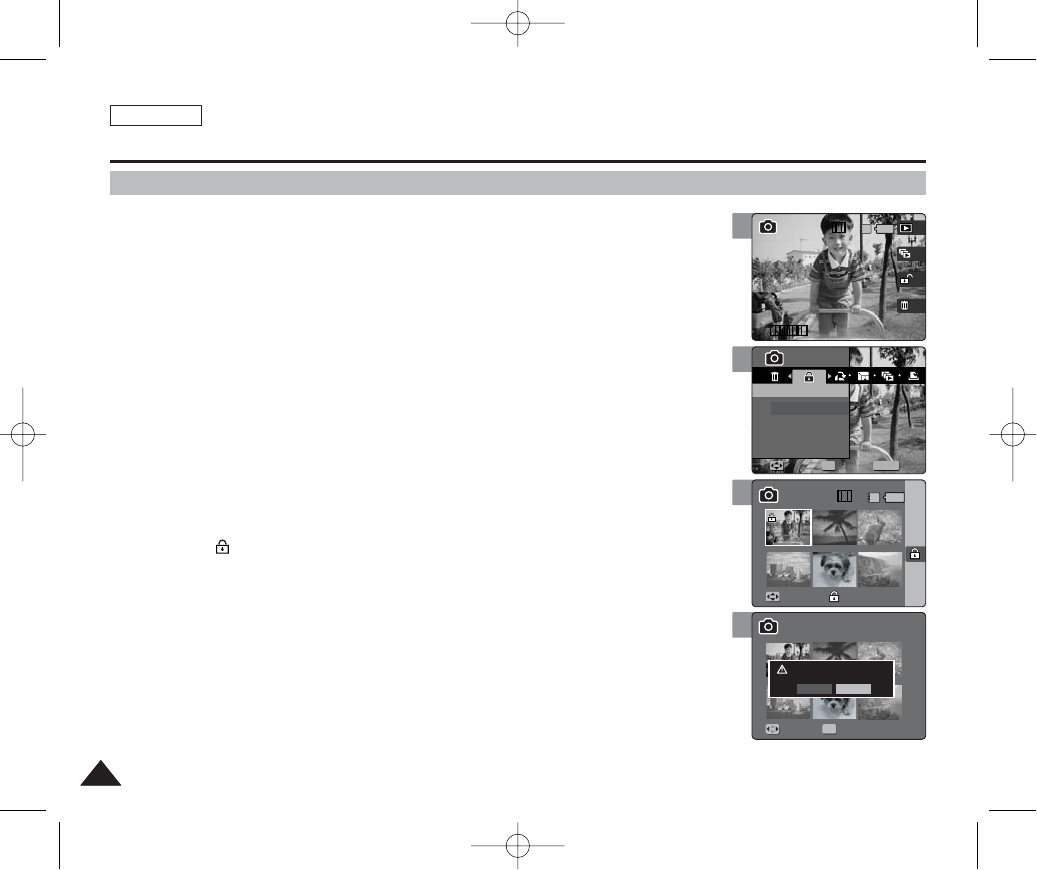
ENGLISH
8484
Photo Mode : Setting the Viewing Options
5
MENU
11
1
PhotoPhoto
ProtectProtect
Select
All
MoveMove SelectSelect ExitExit
OK
Move Finish
Move Select
1
Protecting Photo Files
You can protect saved important photo files from accidental erasure.
1. Set the Mode Dial to Photo mode.
2. Press the [POWER] button to turn on the device.
3. Press the [Shortcut 1] button to switch to Photo viewing mode.
4. Press the [MENU] button.
◆Menu screen appears.
5. Move the joystick left / right (œœ/√√) to select <Protect>.
6. Select an option by moving the joystick up / down (▲/▼) and then press the
[OK] button.
◆<Select>: Multi-view screen appears and you can select photo files to protect.
◆<All>: All photo files will be protected.
If <All> is selected, the message “Protect All?” appears. Select <Yes> or <No> by moving
the joystick left / right (œ/√) and then press the [OK] button to confirm.
7. If <Select> is selected, Multi-view screen appears. Select photo files to protect
by moving the joystick left / right / up / down (œœ/√√/▲/▼) and press the [OK]
button.
◆An icon ( ) indicating selected file is to be protected appears.
8. Press the [Shortcut 3] button.
◆The message “Protect?” appears. Select <Yes> or <No> by moving the joystick left / right
(œ/√) and then press the [OK] button to confirm.
9. Press the [MENU] button to exit the menu.
[ Notes ]
✤You can easily access this function by using the shortcut button (refer to page 79).
✤When you attempt to delete a protected file, you will hear a warning beep.
When you set the Beep Sound to Off, there will be no beep sound but the message “Protect” appears on
the screen and the file will not be deleted.
✤While the menu screen is displayed, pressing the [Record / Stop] button will exit the menu.
4
100-00011 1
11/6
IN
100-0001
Photo
Protect
Move Select Exit
Move Finish
Move Select
1
6
8
11
1
Photo
Protect
Move Select Exit
MoveMove FinishFinish
Move Select
11/6 IN
11
1
Photo
Protect
Move Select Exit
Move Finish
Protect?
Yes No
MoveMove SelectSelect
OK
1
00934C SC-MS10 USA~089 9/30/05 10:57 AM Page 84
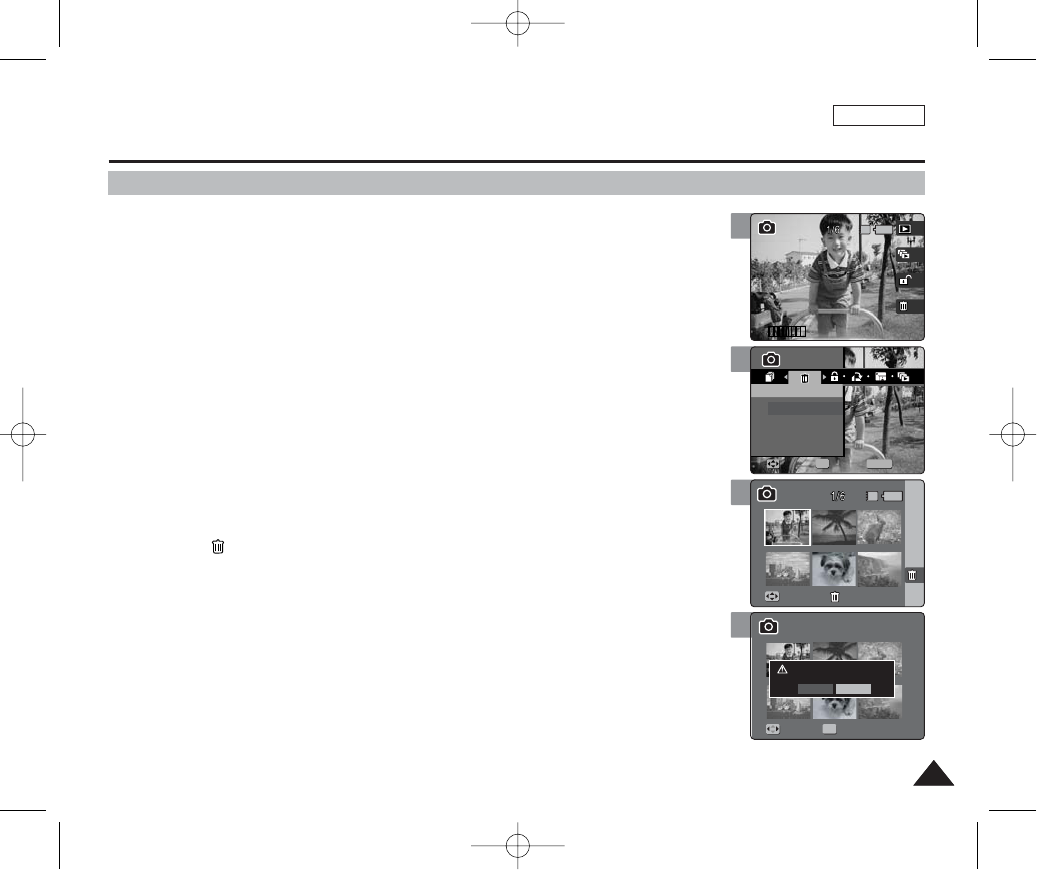
ENGLISH
8585
Photo Mode : Setting the Viewing Options
6
MENU
11
PhotoPhoto
DeleteDelete
Select
All
MoveMove SelectSelect ExitExit
OK
Move Finish
Move Select
Deleting Photo Files
You can delete saved photo files.
1. Set the Mode Dial to Photo mode.
2. Press the [POWER] button to turn on the device.
3. Press the [Shortcut 1] button to switch to Photo viewing mode.
4. Press the [MENU] button.
◆Menu screen appears.
5. Move the joystick left / right (œœ/√√) to select <Delete>.
6. Select an option by moving the joystick up / down (▲/▼) and then press the
[OK] button.
◆<Select>: Multi-view screen appears and you can select photo files to delete.
◆<All>: All photo files will be deleted.
If <All> is selected, the message “Delete All?” appears. Select <Yes> or <No> by moving
the joystick left / right (œ/√) and then press the [OK] button to confirm.
7. If <Select> is selected, Multi-view screen appears. Select photo files to delete
by moving the joystick left / right / up / down (œœ/√√/▲/▼) and press the [OK]
button.
◆An icon ( ) indicating the selected file to be deleted appears.
8. Press the [Shortcut 4] button.
◆The message “Delete?” appears. Select <Yes> or <No> by moving the joystick left / right
(œ/√) and then press the [OK] button to confirm.
9. Press the [MENU] button to exit the menu.
[ Notes ]
✤You can easily access this function by using the shortcut button (refer to page 81).
✤When you attempt to delete a protected file, you will hear a warning beep.
When you set the Beep Sound to Off, there will be no beep sound but the message “Protect” appears on
the screen and the file will not be deleted.
✤While the menu screen is displayed, pressing the [Record / Stop] button will exit the menu.
4
100-00011 1
IN
100-0001
Photo
Delete
Move Select Exit
Move Finish
Move Select
7
8
11
Photo
Delete
Move Select Exit
MoveMove FinishFinish
Move Select
IN
11
Photo
Delete
Move Select Exit
Move Finish
Delete?
Yes No
MoveMove SelectSelect
OK
00934C SC-MS10 USA~089 9/30/05 10:57 AM Page 85

ENGLISH
8686
Photo Mode : Setting the Viewing Options
5
MENU
TYPE
11
PhotoPhoto
Copy (to)Copy (to)
Select
All
MoveMove SelectSelect ExitExit
OK
Copying Photo Files
You can copy saved photo files from the built-in internal memory onto an external mini SD
Memory Card and vice-versa.
1. Set the Mode Dial to Photo mode.
2. Press the [POWER] button to turn on the device.
3. Press the [Shortcut 1] button to switch to Photo viewing mode.
4. Press the [MENU] button.
◆Menu screen appears.
5. Move the joystick left / right (œœ/√√) to select <Copy (to)>.
6. Select an option by moving the joystick up / down (▲/▼) and then press the
[OK] button.
◆<Select>: Multi-view screen appears and you can select photo files to copy.
◆<All>: All photo files will be copied.
If <All> is selected, the message “Copy All?” appears. Select <Yes> or <No> by moving
the joystick left / right (œ/√) and then press the [OK] button to confirm.
7. If <Select> is selected, Multi-view screen appears. Select photo files to copy
by moving the joystick left / right / up / down (œœ/√√/▲/▼) and press the [OK]
button.
◆An icon ( ) indicating the selected file to be copied appears.
8. Press the [Shortcut 4] button.
◆The message “Copy?” appears. Select <Yes> or <No> by moving the joystick left / right
(œ/√) and then press the [OK] button to confirm.
9. Press the [MENU] button to exit the menu.
[ Notes ]
✤It copies from the currently-used memory to another. If the internal memory was used, it copies to an
external mini SD Memory Card.
✤While the menu screen is displayed, pressing the [Record / Stop] button will exit the menu.
4
100-00011 1
IN
100-0001
Photo
Copy (to)
Move Select Exit
00934C SC-MS10 USA~089 9/30/05 10:57 AM Page 86
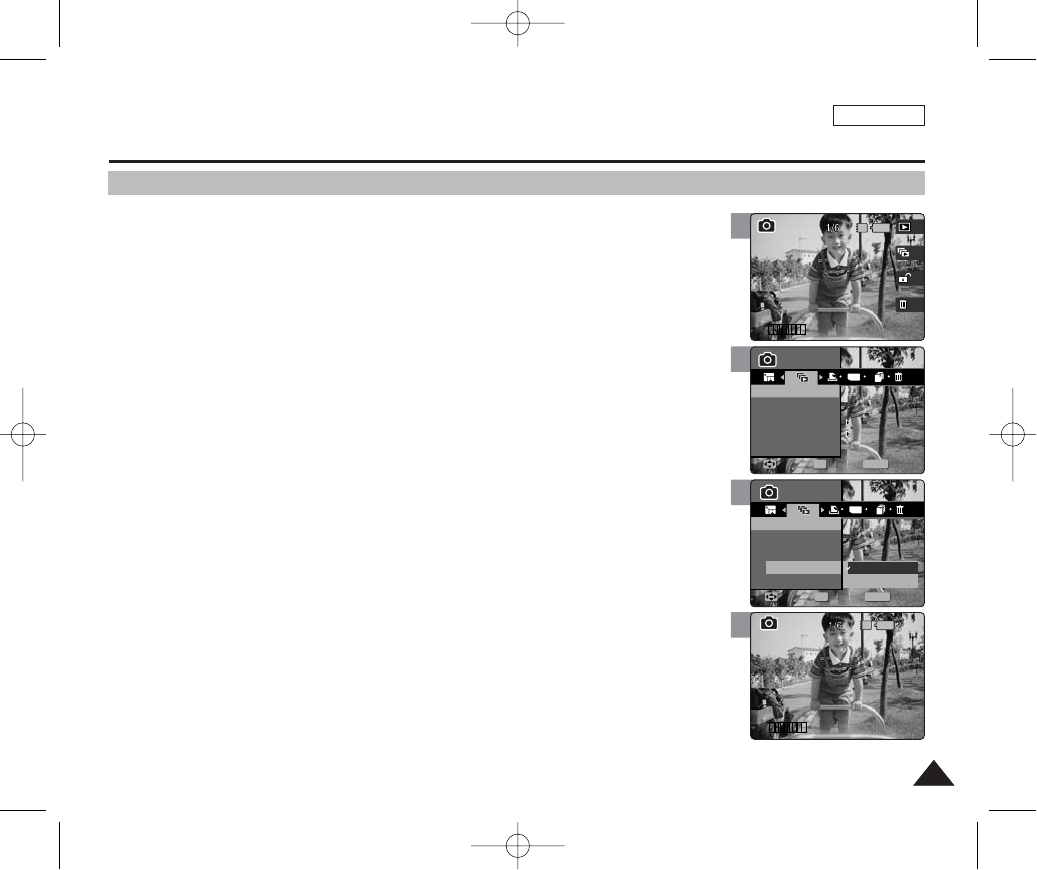
ENGLISH
8787
Photo Mode : Setting the Viewing Options
5
MENU
TYPE
11
11
PhotoPhoto
SlideSlide
Start
Interval
Repeat
1sec1sec
OffOff
MoveMove SelectSelect ExitExit
OK
Photo
Slide
Move Select Exit
Slide
Setting the Slideshow
You can set a slideshow, and also set the interval and repetition options for the slideshow.
1. Set the Mode Dial to Photo mode.
2. Press the [POWER] button to turn on the device.
3. Press the [Shortcut 1] button to switch to Photo viewing mode.
4. Press the [MENU] button.
◆Menu screen appears.
5. Move the joystick left / right (œœ/√√) to select <Slide>.
6. Select <Interval> by moving the joystick up / down (▲/▼) and then press the
[OK] button.
7. Set the interval by moving the joystick up / down (▲/▼) and then press the
[OK] button.
◆Interval range: 1 ~ 10 seconds
8. Select <Repeat> by moving the joystick up / down (▲/▼) and then press the
[OK] button.
9. Set the repeat option by moving the joystick up / down (▲/▼) and then press
the [OK] button.
◆<On>: Sets to repeat the slideshow.
◆<Off>: Sets not to repeat the slideshow.
10 .Select <Start> by moving the joystick up / down (▲/▼) and then press the
[OK] button.
◆Slideshow starts. To stop the slideshow, press the [OK] button.
[ Notes ]
✤You can easily access this function by using the shortcut button (refer to page 78).
✤The interval between photos may vary depending on the size of the photo.
✤Slideshow starts from the current photo displayed.
✤TIFF images are not displayed in a slideshow.
✤While the menu screen is displayed, pressing the [Record / Stop] button will exit the menu.
4
100-00011 1
100-0001
11
Photo
Slide
1sec
Off
Move Select Exit
Photo
Slide
Move Select Exit
Slide
IN
7
9
11
11
Photo
Slide
1sec
Off
Move Select Exit
MENU
TYPE
PhotoPhoto
SlideSlide
Start
Interval
MoveMove SelectSelect ExitExit
OK
Repeat Off
On
Slide
11
IN
100-00011 1
100-0001
Photo
Slide
1sec
Off
Move Select Exit
Photo
Slide
Move Select Exit
SlideSlide
00934C SC-MS10 USA~089 9/30/05 10:57 AM Page 87

ENGLISH
8888
Photo Mode : Setting the Viewing Options
5
MENU
TYPE
11
PhotoPhoto
Select
All
MoveMove SelectSelect ExitExit
OK
Move Finish
Move Select
1
Setting the DPOF (Digital Print Order Format) Function
You can automatically print a photo file recorded with a printer that supports DPOF.
1. Set the Mode Dial to Photo mode.
2. Press the [POWER] button to turn on the device.
3. Press the [Shortcut 1] button to switch to Photo viewing mode.
4. Press the [MENU] button.
◆Menu screen appears.
5. Move the joystick left / right (œœ/√√) to select <DPOF>.
6. Select an option by moving the joystick up / down (▲/▼) and then press the
[OK] button.
◆<Select>: Multi-view screen appears and you can select photo files to set DPOF printing.
◆<All>: All photo files will be marked with DPOF printing.
If <All> is selected, the message “DPOF All?” appears. Select <Yes> or <No> by moving
the joystick left / right (œ/√) and then press the [OK] button to confirm.
7. If <Select> is selected, Multi-view screen appears. Select the photo files to
delete by moving the joystick left / right / up / down (œœ/√√/▲/▼) and press the
[OK] button.
8. Set the number of prints by using the [Shortcut 3] and [Shortcut 4] buttons
and then press the [Shortcut 2] button.
◆The [Shortcut 3] button will increase the number of prints while the [Shortcut 4] will
decrease it.
9. The message “DPOF?” appears. Select <Yes> or <No> by moving the joystick
left / right (œœ/√√) and then press the [OK] button to confirm.
10.Press the [MENU] button to exit the menu.
[ Notes ]
✤Please refer to the product instructions for further details on DPOF printer use.
✤Using a printer that supports DPOF allows users to directly print photos stored in a Memory Card without
a PC.
✤While the menu screen is displayed, pressing the [Record / Stop] button will exit the menu.
4
100-00011 1
IN
100-0001
Photo
Move Select Exit
Move Finish
Move Select
1
8
9
11
Photo
Move Select Exit
MoveMove FinishFinish
Move Select
11/6 IN
11
Photo
Move Select Exit
Move Finish
DPOF?
Yes No
MoveMove SelectSelect
OK
1
00934C SC-MS10 USA~089 9/30/05 10:58 AM Page 88

8989
Movie Mode
3
3
Recording a Movie.............................................................................90
Recording a Movie........................................................................90
Zooming In and Out......................................................................91
Playing a Movie ..................................................................................92
Playing a Movie on the LCD Monitor ...........................................92
Setting the Recording Options.........................................................93
Using the Shortcut Buttons...........................................................93
Setting the White Balance ............................................................95
Setting the Program AE................................................................96
Setting the Macro Mode ...............................................................97
Setting the Movie File Size...........................................................98
Setting the Movie File Quality ......................................................99
Setting the Self Timer .................................................................100
Setting the Wind Cut ..................................................................101
Setting the Digital Effects ...........................................................102
Setting the Viewing Options...........................................................103
Using the Shortcut Buttons.........................................................103
Protecting Movie Files ................................................................107
Deleting Movie Files ...................................................................108
Copying Movie Files ...................................................................109
Setting the Slideshow .................................................................110
ENGLISH
00934C SC-MS10 USA~089 9/30/05 10:58 AM Page 89
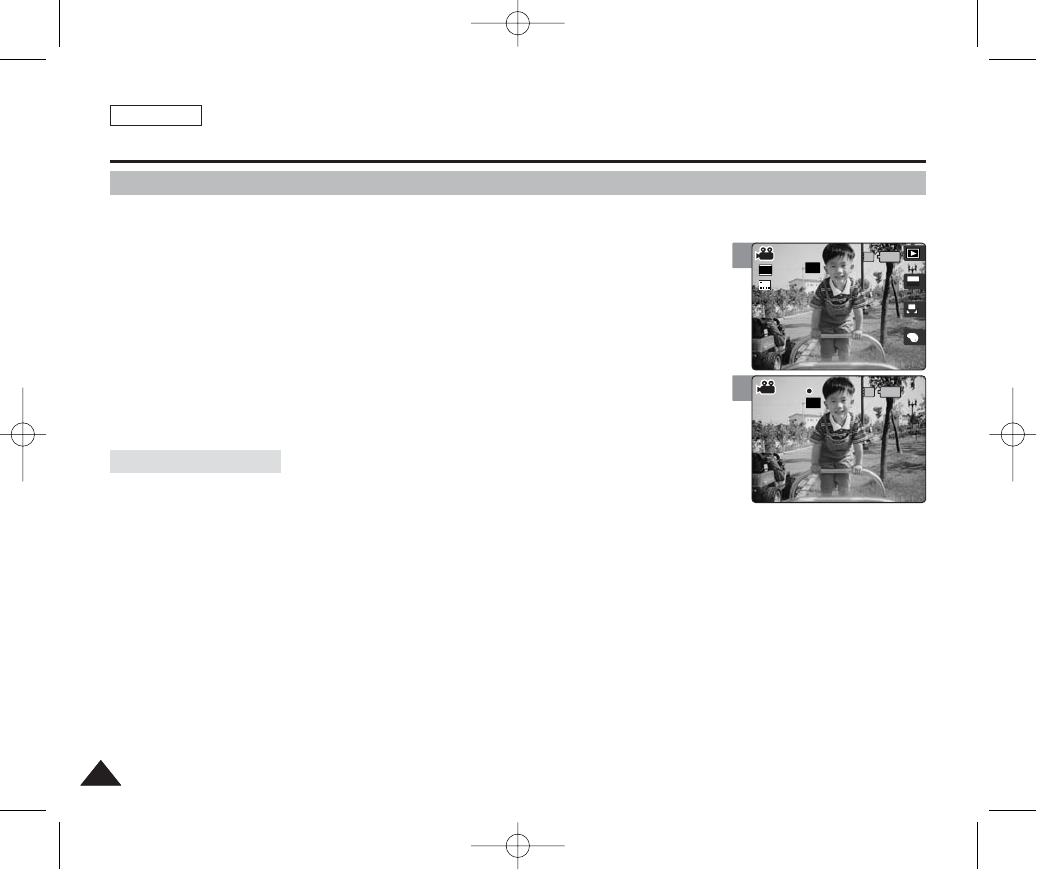
ENGLISH
9090
Movie Mode : Recording a Movie
Recording a Movie
You can record moving pictures and store it in memory.
1. Set the Mode Dial to Movie mode.
2. Press the [POWER] button to turn on the device.
3. Press the [Record / Stop] button.
◆It starts to record.
4. To stop recording, press the [Record / Stop] button again.
◆It stops recording, and stands by.
◆The timestamp will be recorded along with the video to support users with a faster search.
◆00:00:16: Elapsed Recording Time
REM 4 Min: Remaining Recording Time
[ Notes ]
✤When you are finished taking pictures, please turn off the device to conserve battery power.
✤You can adjust the brightness of the LCD monitor to have a clearer view (refer to page 37).
✤The brightness of the LCD monitor will not affect the brightness of the recordings.
Reading the Counter
3
4 5
Rec
00:00:16
A
OFFOFF
640
REM
IN
SFSF
AE
AUTO
4 Min
4 Min4 Min
REC
STBYSTBY
REM
IN
Rec
00:00:16
00:00:16
OFF
SF
4 Min4 Min
4 Min
RECREC
STBY
00934C SC-MS10 USA~111 9/30/05 10:58 AM Page 90
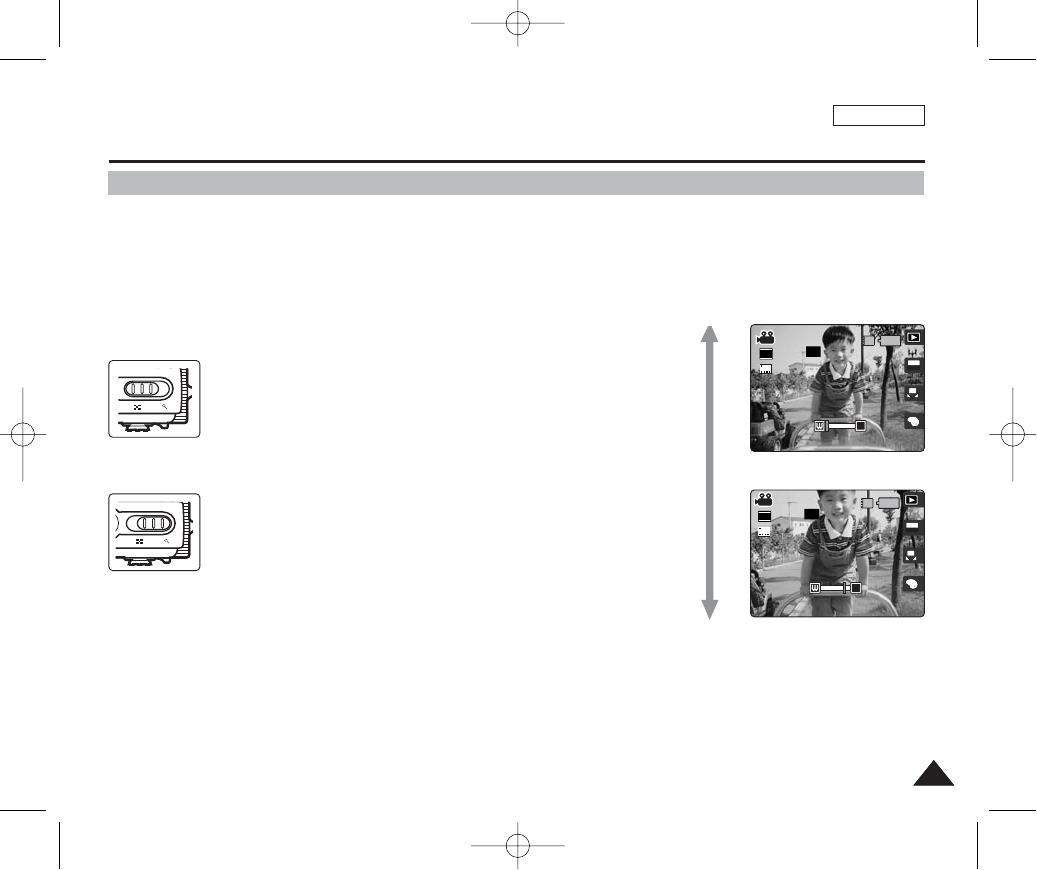
ENGLISH
9191
Movie Mode : Recording a Movie
Zooming In and Out
Zooming allows you to change the size of the subject captured in a scene.
You can take advantage of the 3x optical electro motion zoom lens.
Before You Start
1. Set the Mode Dial to Photo mode.
2. Press the [POWER] button to turn on the device.
The Photo Capture screen appears.
[ Notes ]
✤Frequent use of zooming may result in higher battery consumption.
✤You can take advantage of the 5x digital zoom as well as the 3x optical zoom for a total of 15x zoom.
✤Optical zoom preserves image quality.
A
OFFOFF
640
REM
IN
SFSF
AE
AUTO
STBYSTBY
4 Min4 Min
OFF
SF
T
STBY
4 Min
OFF
SF
STBY
4 Min
A
OFFOFF
640
REM
IN
SFSF
AE
AUTO
T
STBYSTBY
4 Min4 Min
W T
W T
Zoom In
Zoom Out
Move the [W/T] zoom switch to W (WIDE).
●The shot subject’s size is reduced, and you can take a picture
as if you were far away from the subject.
●At the zoom indicator in the LCD screen, the arrow moves to W.
●The smallest rate of zoom out is the default rate (original
resolution of the subject).
Move the [W/T] zoom switch to T (TELE).
●The subject is larger, and you can take a picture as if you were
close to the subject.
●At the zoom indicator the arrow moves to T.
●The largest optical zoom is 3x, which is the biggest among the
basic zoom.
00934C SC-MS10 USA~111 9/30/05 10:58 AM Page 91

ENGLISH
9292
3
4
6
5
5
Movie Mode : Playing a Movie
Playing a Movie on the LCD Monitor
It is handy and practical to view movie files using the LCD monitor almost anywhere such as in
a car, indoors, or outdoors.
1. Set the Mode Dial to Movie mode.
2. Press the [POWER] button to turn on the device.
3. Press the [Shortcut 1] button.
◆Switches to Movie View mode.
4. Move the joystick left / right (œœ/√√) to select a movie and then press the [OK]
button.
5. It starts to play back. Each press of the [OK] button toggles between play /
pause.
◆To pause playback, press the [OK] button.
◆To stop playback, press and hold the [OK] button for more than 3 seconds.
6. To adjust volume, move the joystick up / down (▲/▼).
◆The volume indicator appears and disappears after a few seconds.
[ Notes ]
✤If there is no file stored to view, the message <“No Files…”> appears.
✤You can adjust the volume up to 10 levels.
✤When the earphones or AV (Audio / Video) cable is connected to the device, the built-in speaker will
automatically turn off.
✤You can also play the video file on a TV screen by connecting the CAM to a TV. (Refer to page XX)
✤A video CODEC is required to play the video files recorded on the CAM on a computer.
Install the software provided in the bundled CD to have the CODEC automatically installed on your
system. If you do not have the CD, search the product model name on the Download Center from the
Samsung Electronics website to get the CODEC installation file (refer to page 131).
00:00:16
100-0001
1/1
100-0001
00:00:00
00:00:16
100-0001
00:00:16
00:00:10
A
OFFOFF
640
REM
IN
SFSF
AE
AUTO
STBYSTBY
4 Min4 Min
IN
00:00:16
100-0001
1/1
100-0001
00:00:00
00:00:16
100-0001
00:00:16
00:00:10
OFF
SF
STBY
4 Min
00:00:16
100-0001
1/1
IN
100-0001
00:00:00
00:00:16
100-0001
00:00:16
00:00:10
OFF
SF
STBY
4 Min
00:00:16
100-0001
1/1
100-0001
00:00:00
IN
00:00:16
100-0001
00:00:16
00:00:10
OFF
SF
STBY
4 Min
00934C SC-MS10 USA~111 9/30/05 10:58 AM Page 92
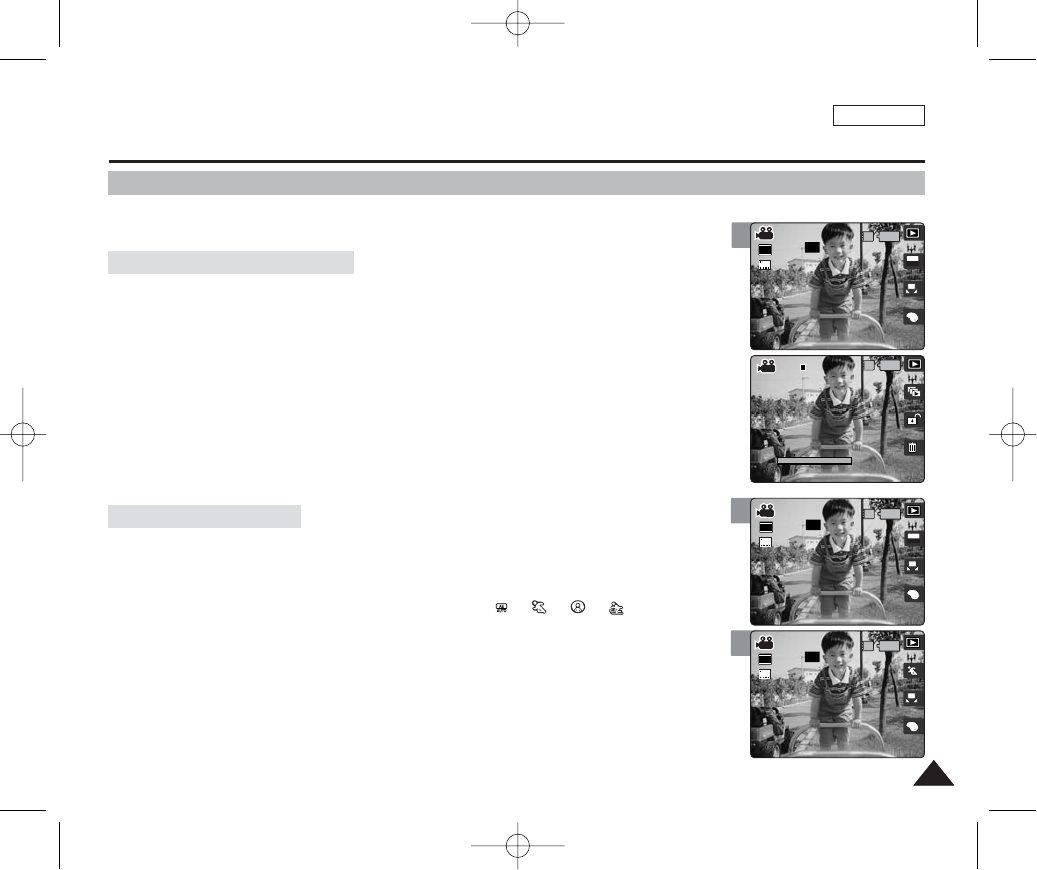
ENGLISH
9393
3
4
Movie Mode : Setting the Recording Options
Using the Shortcut Buttons
Shortcut buttons are provided to allow users easy access to frequently-used functions.
1. Set the Mode Dial to Movie mode.
2. Press the [POWER] button to turn on the device.
3. Press the [Shortcut 1] button.
◆Each press of the [Shortcut 1] button toggles between the Movie Record / View modes.
1. Set the Mode Dial to Movie mode.
2. Press the [POWER] button to turn on the device.
3. Press the [Shortcut 2] button.
◆Each press of the [Shortcut 2] button cycles through < >-< >-< >-< >
Program AE modes.
4. An icon indicating the selected Program AE mode appears on the screen
(refer to page 96).
IN
00:00:16
100-0001
100-0001
1/1
OFF
SF
STBY
4 Min
A
OFFOFF
640
REM
IN
SFSF
AE
AUTO
STBYSTBY
4 Min4 Min
OFF
SF
STBY
4 Min
OFF
SF
STBY
4 Min
A
OFFOFF
640
REM
IN
SFSF
STBYSTBY
4 Min4 Min
3
00:00:16
100-0001
1/1
A
OFFOFF
640
REM
IN
SFSF
AE
AUTO
STBYSTBY
4 Min4 Min
Switching to Movie View Mode
Setting the Program AE
00934C SC-MS10 USA~111 9/30/05 10:58 AM Page 93

ENGLISH
9494
4
3
4
Movie Mode : Setting the Recording Options
Using the Shortcut Buttons
Shortcut buttons are provided to allow users easy access to frequently used functions.
1. Set the Mode Dial to Movie mode.
2. Press the [POWER] button to turn on the device.
3. Press the [Shortcut 3] button.
◆Each press of the [Shortcut 3] button cycles through the < >-< >-< >-< >-< >-
<>flash modes
4. An icon indicating the selected White Balance mode appears on the screen
(refer to page 95).
1. Set the Mode Dial to Movie mode.
2. Press the [POWER] button to turn on the device.
3. Press the [Shortcut 4] button.
◆Each press of the [Shortcut 2] button cycles through the < >-< >-< >-< >
Digital Effects.
4. An icon indicating the selected Digital Effect appears on the screen
(refer to page 102).
S
N
BWBW
S
NN
BW
SS
N
BW
S
N
BW
A
OFF
SF
STBY
4 Min
OFFOFF
640
REM
IN
SFSF
AE
AUTO
STBYSTBY
4 Min4 Min
A
OFFOFF
640
REM
IN
SFSF
AE
AUTO
STBYSTBY
4 Min4 Min
SF
STBY
4 Min
BW
OFF
SF
STBY
4 Min
A
640
REM
IN
SFSF
AE
AUTO
STBYSTBY
4 Min4 Min
BWBW
3
A
OFFOFF
640
REM
IN
SFSF
AE
AUTO
STBYSTBY
4 Min4 Min
OFF
SF
STBY
4 Min
Setting the White Balance
Setting the Digital Effect
00934C SC-MS10 USA~111 9/30/05 10:58 AM Page 94

ENGLISH
9595
3
4
5
Movie Mode : Setting the Recording Options
Setting the White Balance
The White Balance allows calibration of the picture for accurate color display in different lighting
conditions. It is recommended to set the white balance prior to any recording.
1. Set the Mode Dial to Movie mode.
2. Press the [POWER] button to turn on the device.
3. Press the [MENU] button.
◆Menu screen appears.
4. Move the joystick left / right (œœ/√√) to select <White Balance>.
5. Move the joystick up / down (▲/▼) to select an option, and then press the
[OK] button.
6. Press the [MENU] button to exit the menu.
◆An icon indicating the selected White Balance appears on the screen.
◆If <Auto> is selected, no icon will be displayed.
[ Notes ]
✤You can easily access this function by using the shortcut button (refer to page 94).
✤In general outdoors recording, <Auto> setting will allow users to achieve the best results.
✤As the lighting conditions change, set the appropriate white balance before recording.
✤While the menu screen is displayed, pressing the [Record / Stop] button will exit the menu.
MENU
AE
A
OFF
SF
STBY
4 Min
MovieMovie
White BalanceWhite Balance
Auto
Daylight
Cloudy
FluorescentH
MoveMove SelectSelect ExitExit
OK
Movie
White Balance
Move Select Exit
OFF
SF
STBY
4 Min
OFF
SF
STBY
4 Min
Movie
White Balance
Move Select Exit
MENU
AE
MovieMovie
White BalanceWhite Balance
Auto
Daylight
Cloudy
FluorescentH
MoveMove SelectSelect ExitExit
OK
OFF
SF
STBY
4 Min
OFF
SF
STBY
4 Min
Movie
White Balance
Move Select Exit
Movie
White Balance
Move Select Exit
OFFOFF
640
REM
IN
SFSF
AE
AUTO
STBYSTBY
4 Min4 Min
2
A
OFFOFF
640
REM
IN
SFSF
AE
AUTO
STBYSTBY
4 Min4 Min
Movie
White Balance
Move Select Exit
Movie
White Balance
Move Select Exit
OFF
SF
STBY
4 Min
AUTO
Daylight
Cloudy
FluorescentH
FluorescentL
Tungsten
Custom WB
Automatically sets according to the shooting environment.
Adjusts the color according to daylight/indoor, outdoor light
You can select this when you cannot have daylight as a direct light, such as when it is partly-
cloudy or cloudy.
Suitable in a halogen or 3-wavelength light environment.
Suitable for a fluorescent light environment.
Suitable for an incandescent light environment.
You can adjust the white balance as you wish based on the shooting environment.
00934C SC-MS10 USA~111 9/30/05 10:58 AM Page 95

ENGLISH
9696
Setting the Program AE
Program AE modes are preset automatic exposure modes based upon an internal computer
program. It helps to set appropriate exposure according to the internal light meter and the
program’s calculations, allowing users to achieve the best results under various recording
conditions.
1. Set the Mode Dial to Movie mode.
2. Press the [POWER] button to turn on the device.
3. Press the [MENU] button.
◆Menu screen appears.
4. Move the joystick left / right (œœ/√√) to select <Program AE>.
5. Select an option by moving the joystick up / down (▲/▼) and then press
the [OK] button.
◆<Auto> ( ) : Balances exposure and shutter speed to get the best results
automatically.
◆<Sports> ( ) : For recording fast-moving objects. It is suitable for sporting events
and recording the outside from inside of a vehicle.
◆<Spotlight> ( ): Compensates for a subject that appears too bright under strong
direct light such as a spotlight. It is suitable for recording conditions such as concerts
and school performances.
◆<Beach / Snow> ( ): When the light is very strong, such as on a beach or in the
snow.
6. Press the [MENU] button to exit the menu.
◆An icon indicating the selected Program AE mode appears on the screen.
◆If <Auto> is selected, no icon will be displayed.
[ Notes ]
✤You can easily access this function by using the shortcut button (refer to page 93).
✤You cannot set <Macro> when you are using Program AE mode other than <Auto>.
✤While the menu screen is displayed, pressing the [Record / Stop] button will exit the menu.
Movie Mode : Setting the Recording Options
3
4
5
6
A
OFFOFF
640
REM
IN
SFSF
AE
AUTO
STBYSTBY
4 Min4 Min
Movie
Program AE
Move Select Exit
Movie
Program AE
Auto
Move Select Exit
OFF
SF
STBY
4 Min
MENU
TYPE
AE
AE
AUTO
OFF
SF
STBY
4 Min
MovieMovie
Program AEProgram AE
Auto
Sports
Spotlight
Beach/Snow
MoveMove SelectSelect ExitExit
OK
Movie
Program AE
Auto
Move Select Exit
OFF
SF
STBY
4 Min
OFF
SF
STBY
4 Min
Movie
Program AE
Move Select Exit
MENU
TYPE
AE
MovieMovie
Program AEProgram AE
Auto
Sports
Spotlight
Beach/Snow
MoveMove SelectSelect ExitExit
OK
AE
AUTO
OFF
SF
STBY
4 Min
OFF
SF
STBY
4 Min
Movie
Program AE
Move Select Exit
Movie
Program AE
Auto
Move Select Exit
A
OFFOFF
640
REM
IN
SFSF
STBYSTBY
4 Min4 Min
00934C SC-MS10 USA~111 9/30/05 10:58 AM Page 96
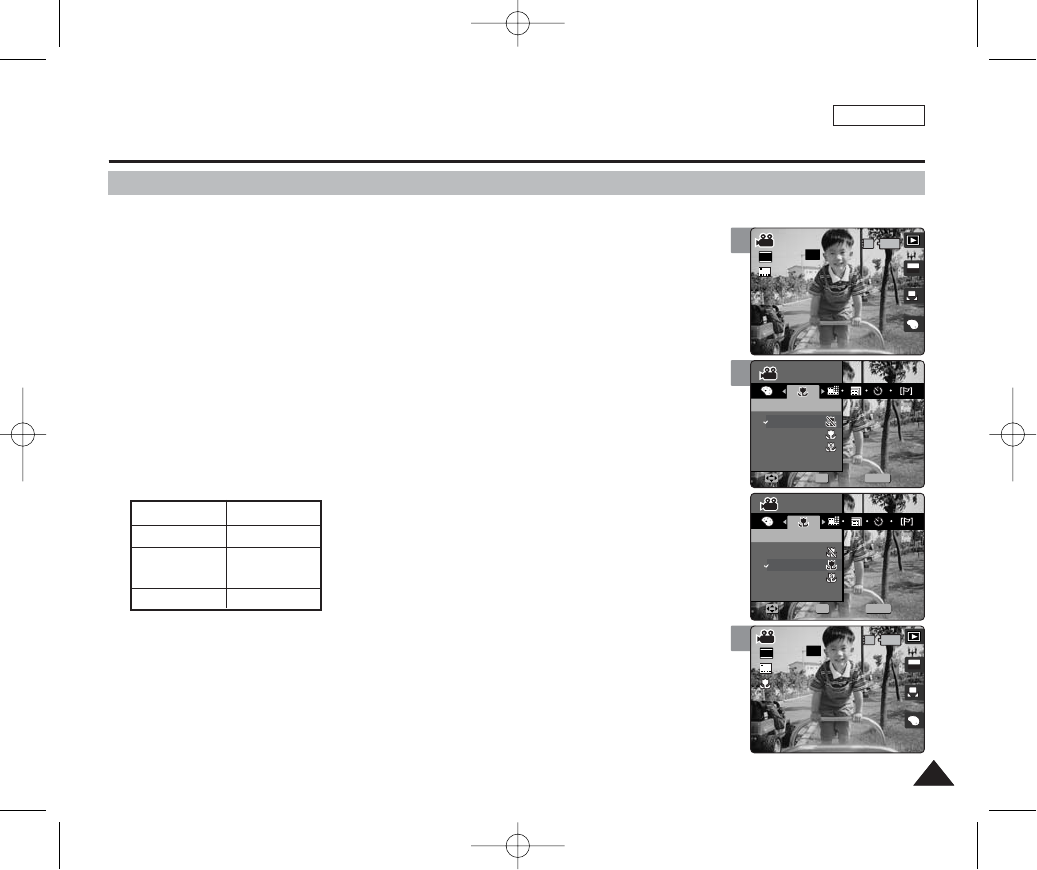
ENGLISH
9797
4
5
Movie Mode : Setting the Recording Options
Setting the Macro Mode
Macro mode allows users to have fine focused image of the closed-up subject within 50 cm.
1. Set the Mode Dial to Movie mode.
2. Press the [POWER] button to turn on the device.
3. Press the [MENU] button.
◆Menu screen appears.
4. Move the joystick left / right (œœ/√√) to select <Macro>.
5. Select an option by moving the joystick up / down (▲/▼) and then press
the [OK] button.
◆Press the [MENU] button to exit the menu.
◆An icon indicating the selected Macro mode appears on the screen.
[ Notes ]
✤When you use Macro mode and record a close-up subject, be careful not to shade your subject.
✤As the distance gets closer, the focused area gets narrower.
✤If the focus will not set, try to put more distance between you and the subject.
✤It is recommended to use a tripod to avoid unstable picture taking and have best results.
✤<Macro> setting is available only when you set Program AE to <Auto>.
✤While the menu screen is displayed, pressing the [Record / Stop] button will exit the menu.
MENU
OFF
SF
STBY
4 Min
OFF
SF
STBY
4 Min
MovieMovie
OK
MacroMacro
Off
Macro
Super Macro
MoveMove SelectSelect ExitExit
Movie
Macro
Move Select Exit
OFF
SF
STBY
4 Min
OFF
SF
STBY
4 Min
Movie
Macro
Move Select Exit
MENU
MovieMovie
OK
MacroMacro
Off
Macro
Super Macro
MoveMove SelectSelect ExitExit
OFF
SF
STBY
4 Min
A
OFFOFF
640
REM
IN
SFSF
AE
AUTO
STBYSTBY
4 Min4 Min
Movie
Macro
Move Select Exit
Movie
Macro
Move Select Exit
3
A
OFFOFF
640
REM
IN
SFSF
AE
AUTO
STBYSTBY
4 Min 4 Min
OFF
SF
STBY
4 Min
Movie
Macro
Move Select Exit
Movie
Macro
Move Select Exit
Macro Setting
<Off>
<Macro>
<Super Macro>
Focus Range
50 cm ~ ∞
W: 10 cm ~ ∞
T: 30 cm ~ ∞
W: 1 cm ~ 5 cm
00934C SC-MS10 USA~111 9/30/05 10:58 AM Page 97

ENGLISH
9898
3
4
5
Movie Mode : Setting the Recording Options
Setting the Movie File Size
1. Set the Mode Dial to Movie mode.
2. Press the [POWER] button to turn on the device.
3. Press the [MENU] button.
◆Menu screen appears.
4. Move the joystick left / right (œœ/√√) to select <Movie Size>.
5. Select an option by moving the joystick up / down (▲/▼) and then press the
[OK] button.
◆Available options are: <640x480> / <320x240>
6. Press the [MENU] button to exit the menu.
◆An icon indicating the selected Movie Size appears on the screen.
[ Notes ]
✤Higher resolution requires more memory space, which results in shorter maximum recording time.
✤While the menu screen is displayed, pressing the [Record / Stop] button will exit the menu.
A
OFFOFF
640
REM
IN
SFSF
AE
AUTO
STBYSTBY
4 Min4 Min
OFF
SF
STBY
4 Min
Movie
Movie Size
Move Select Exit
Movie
Movie Size
Move Select Exit
MENU
TYPE
AE
320
OFF
SF
STBY
4 Min
OFF
SF
STBY
4 Min
MovieMovie
Movie SizeMovie Size
OK
MoveMove SelectSelect ExitExit
Movie
Movie Size
Move Select Exit
OFF
SF
STBY
4 Min
OFF
SF
STBY
4 Min
Movie
Movie Size
Move Select Exit
MENU
TYPE
AE
320
MovieMovie
Movie SizeMovie Size
OK
MoveMove SelectSelect ExitExit
6
OFF
SF
STBY
4 Min
A
OFFOFF
320
REM
IN
SFSF
AE
AUTO
STBYSTBY
4 Min4 Min
Movie
Movie Size
Move Select Exit
Movie
Movie Size
Move Select Exit
00934C SC-MS10 USA~111 9/30/05 10:58 AM Page 98

ENGLISH
9999
4
5
6
Movie Mode : Setting the Recording Options
Setting the Movie File Quality
1. Set the Mode Dial to Movie mode.
2. Press the [POWER] button to turn on the device.
3. Press the [MENU] button.
◆Menu screen appears.
4. Move the joystick left / right (œœ/√√) to select <Movie Quality>.
5. Select an option by moving the joystick up / down (▲/▼) and then press the
[OK] button.
◆Available options are: <Super Fine> / <Fine> / <Normal>
6. Press the [MENU] button to exit the menu.
◆An icon indicating the selected Movie Quality appears on the screen.
[ Note ]
✤While the menu screen is displayed, pressing the [Record / Stop] button will exit the menu.
MENU
TYPE
SFSF
N
N
F
F
OFF
SF
STBY
4 Min
OFF
STBY
4 Min
MovieMovie
OK
Movie QualityMovie Quality
Super Fine
Fine
Normal
N
F
Movie
Movie Quality
SF
MoveMove SelectSelect ExitExit
Move Select Exit
F
SF
N
F
OFF
SF
STBY
4 Min
OFF
STBY
4 Min
Movie
Movie Quality
MENU
TYPE
N
N
F
F
MovieMovie
OK
Movie QualityMovie Quality
Super Fine
Fine
Normal
SFSF
Move Select Exit
MoveMove SelectSelect ExitExit
F
SF
N
F
OFF
SF
STBY
4 Min
A
OFFOFF
640
REM
IN
AE
AUTO
STBYSTBY
4 Min4 Min
Movie
Movie Quality
N
F
Movie
Movie Quality
SF
Move Select Exit
Move Select Exit
F
F
3
SF
N
F
A
OFFOFF
640
REM
IN
SFSF
AE
AUTO
STBYSTBY
4 Min4 Min
OFF
STBY
4 Min
Movie
Movie Quality
N
F
Movie
Movie Quality
SF
Move Select Exit
Move Select Exit
F
00934C SC-MS10 USA~111 9/30/05 10:58 AM Page 99

ENGLISH
100100
4
5
6
Movie Mode : Setting the Recording Options
Setting the Self Timer
Using this option, you can take pictures of yourself with delayed shooting.
1. Set the Mode Dial to Photo mode.
2. Press the [POWER] button to turn on the device.
3. Press the [MENU] button.
◆Menu screen appears.
4. Move the joystick left / right (œœ/√√) to select <Self Timer>.
5. Select an option by moving the joystick up / down (▲/▼), and then press the
[OK] button.
6. Press the [MENU] button to exit the menu.
◆An icon indicating the selected Self Timer mode appears on the screen.
◆If <Off> is selected, no icon will be displayed.
[ Notes ]
✤It is recommended to use a tripod for the best results for Self Timer recordings.
✤While the menu screen is displayed, pressing the [Record / Stop] button will exit the menu.
MENU
TYPE
AE
OFF
SF
STBY
4 Min
OFF
SF
STBY
4 Min
MovieMovie
Self TimerSelf Timer
Off
2 sec
10 sec
OK
MoveMove SelectSelect ExitExit
Movie
Self Timer
Move Select Exit
OFF
SF
STBY
4 Min
OFF
SF
STBY
4 Min
Movie
Self Timer
Move Select Exit
MENU
TYPE
AE
MovieMovie
Self TimerSelf Timer
Off
2 sec
10 sec
OK
MoveMove SelectSelect ExitExit
OFF
SF
STBY
4 Min
A
OFFOFF
640
REM
IN
SFSF
AE
AUTO
STBYSTBY
4 Min4 Min
Movie
Self Timer
Move Select Exit
Movie
Self Timer
Move Select Exit
2
A
OFFOFF
640
REM
IN
SFSF
AE
AUTO
STBYSTBY
4 Min4 Min
OFF
SF
STBY
4 Min
Movie
Self Timer
Move Select Exit
Movie
Self Timer
Move Select Exit
Off
2 Sec
10 Sec
Cancels the Self Timer.
Sets the delay interval to 2 seconds. Takes a photo 2 seconds after
pressing the [Record/Stop]
Sets the delay interval to 2 seconds. Takes a photo 10 seconds after
pressing the [Record/Stop]
00934C SC-MS10 USA~111 9/30/05 10:58 AM Page 100

ENGLISH
101101
4
5
Movie Mode : Setting the Recording Options
Setting the Wind Cut
1. Set the Mode Dial to Movie mode.
2. Press the [POWER] button to turn on the device.
3. Press the [MENU] button.
◆Menu screen appears.
4. Move the joystick left / right (œœ/√√) to select <Wind Cut>.
◆<Off>: Sets off Wind Cut.
◆<On>: Sets on Wind Cut to reduce wind noise.
5. Press the [MENU] button to exit the menu.
◆If <On> is selected, < > icon appears on the screen.
[ Notes ]
✤When Wind Cut is enabled, a bit of low-frequency band (bass) sound will be reduced along
with the wind noise. It is a normal result, not a malfunction.
✤While the menu screen is displayed, pressing the [Record / Stop] button will exit the menu.
MENU
TYPE
AE
OFF
SF
STBY
29 Min
OFF
SF
5
STBY
29 Min
MovieMovie
OK
Wind CutWind Cut
Off
On
MoveMove SelectSelect ExitExit
Movie
Wind Cut
Move Select Exit
OFF
SF
5
STBY
29 Min
OFF
SF
5
STBY
29 Min
Movie
Wind Cut
Move Select Exit
MENU
TYPE
AE
MovieMovie
OK
Wind CutWind Cut
Off
On
MoveMove SelectSelect ExitExit
OFF
SF
5
STBY
29 Min
A
OFFOFF
640
REM
IN
SFSF
AE
AUTO
5
12:00PM 01.01,2005
STBYSTBY
29 Min29 Min
Movie
Wind Cut
Move Select Exit
Movie
Wind Cut
Move Select Exit
3
A
OFFOFF
640
REM
IN
SFSF
AE
AUTO
5
12:00PM 01.01,2005
STBYSTBY
29 Min29 Min
OFF
SF
5
STBY
29 Min
Movie
Wind Cut
Move Select Exit
Movie
Wind Cut
Move Select Exit
00934C SC-MS10 USA~111 9/30/05 10:58 AM Page 101
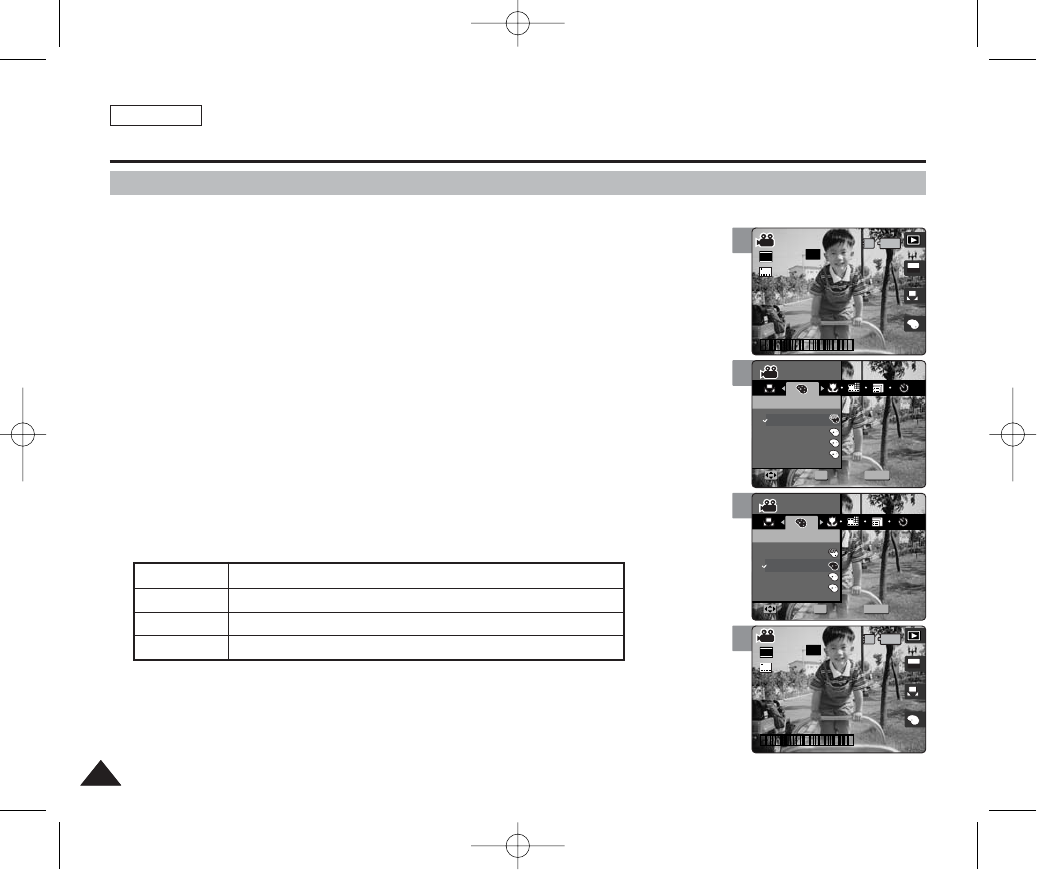
ENGLISH
102102
3
4
5
6
Movie Mode : Setting the Recording Options
Setting the Digital Effects
It supports various digital effects you can apply to your video. Create a professional-looking
video with digital effects.
1. Set the Mode Dial to Movie mode.
2. Press the [POWER] button to turn on the device.
3. Press the [MENU] button.
◆Menu screen appears.
4. Move the joystick left / right (œœ/√√) to select <Digital Effect>.
5. Select an option by moving the joystick up / down (▲/▼), and then press the
[OK] button.
6. Press the [MENU] button to exit the menu.
◆An icon indicating the selected Digital Effect appears on the screen.
◆If <Off> is selected, no icon will be displayed.
[ Notes ]
✤You can easily access this function by using the shortcut button (refer to page 94).
✤While the menu screen is displayed, pressing the [Record / Stop] button will exit the menu.
S
N
BW
A
OFFOFF
640
REM
IN
SFSF
AE
AUTO
5
12:00PM 01.01,2005
STBYSTBY
29 Min29 Min
SF
5
STBY
29 Min
Movie
Digital Effect
Move Select Exit
S
N
BW
Movie
Digital Effect
Move Select Exit
S
MENU
SS
NN
BWBW
OFF
SF
5
STBY
29 Min
SF
5
STBY
29 Min
MovieMovie
OK
Digital EffectDigital Effect
Off
Sepia
Nega
BLK&WHT
MoveMove SelectSelect ExitExit
S
N
BW
Movie
Digital Effect
Move Select Exit
S
S
N
BW
OFF
SF
5
STBY
29 Min
SF
5
STBY
29 Min
Movie
Digital Effect
Move Select Exit
MENU
SS
NN
BWBW
MovieMovie
OK
Digital EffectDigital Effect
Off
Sepia
Nega
BLK&WHT
MoveMove SelectSelect ExitExit
S
S
N
BW
OFF
SF
5
STBY
29 Min
A
640
REM
IN
SFSF
AE
AUTO
5
12:00PM 01.01,2005
STBYSTBY
29 Min29 Min
Movie
Digital Effect
Move Select Exit
S
N
BW
Movie
Digital Effect
Move Select Exit
SS
Off
Sepia
Nega
BLK&WHT
Cancel the <Digital Effect>. Takes video in normal mode.
The picture is displayed in sepia color--similar to that of an old photograph.
Reverses the colors, creating the look of a negative.
Changes the images into black and white.
00934C SC-MS10 USA~111 9/30/05 10:58 AM Page 102
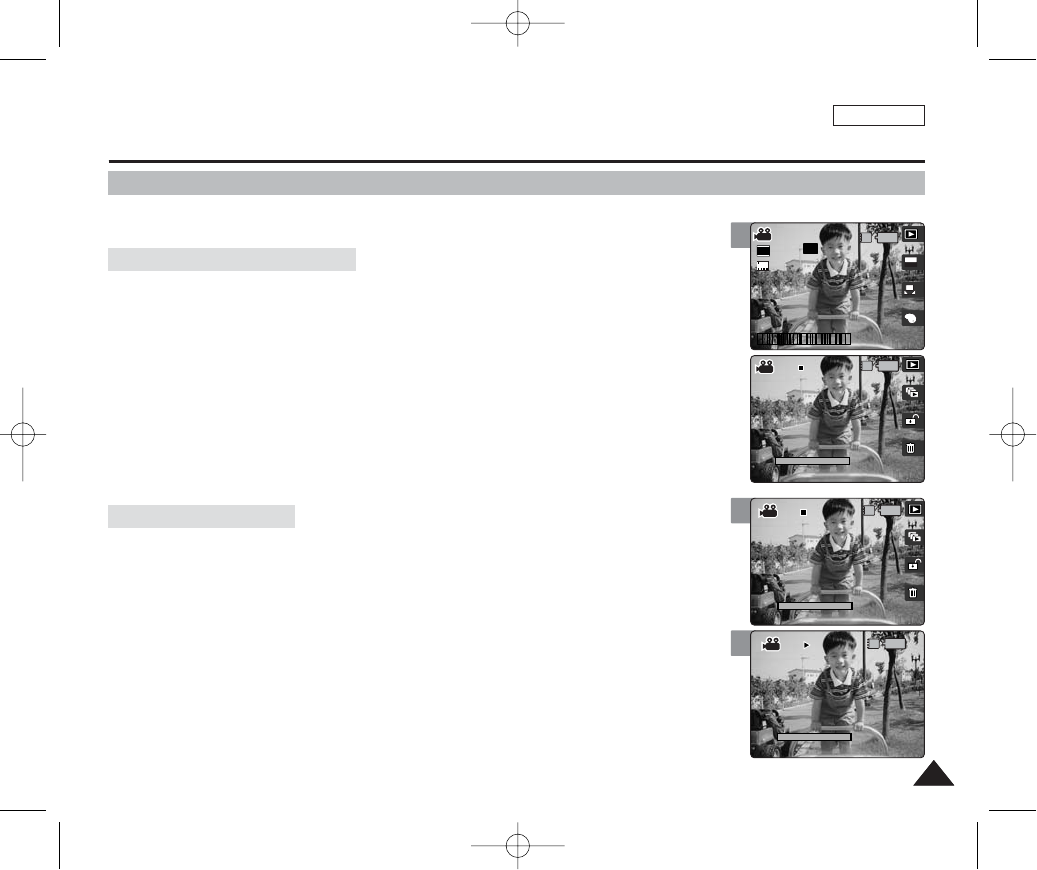
ENGLISH
103103
3
4
Movie Mode : Setting the Viewing Options
Using the Shortcut Buttons
Shortcut buttons are provided to allow users easy access to frequently-used functions.
1. Set the Mode Dial to Movie mode.
2. Press the [POWER] button to turn on the device.
3. Press the [Shortcut 1] button.
◆Each press of the [Shortcut 1] button toggles between the Movie record / view modes.
1. Set the Mode Dial to Movie mode.
2. Press the [POWER] button to turn on the device.
3. Press the [Shortcut 2] button.
4. The slideshow begins. To pause the slideshow, press the [OK] button.
◆Refer to page 110 for further details on slideshow.
IN
00:01:36
100-0001
100-0001
1/6
OFF
SF
5
STBY
29 Min
00:01:36
IN
00:01:36
100-0001
100-0001 100-0001
00:00:00
1/6
Slide
00:01:36
00:01:36
100-0001
IN
100-0001
100-0001
00:00:00
1/6
SlideSlide
3
00:01:36
100-0001
1/6
A
OFFOFF
640
REM
IN
SFSF
AE
AUTO
5
12:00PM 01.01,2005
STBYSTBY
29 Min29 Min
Viewing the Slideshow
Switching to Movie View Mode
00934C SC-MS10 USA~111 9/30/05 10:58 AM Page 103

ENGLISH
104104
4
3
4
Movie Mode : Setting the Viewing Options
Using the Shortcut Buttons
Shortcut buttons are provided to allow users easy access to frequently-used functions.
1. Set the Mode Dial to Movie mode.
2. Press the [POWER] button to turn on the device.
3. Press the [Shortcut 3] button.
◆Each press of the [Shortcut 3] button toggles between Locked ( ) and Unlocked ( ).
4. The protected movie file is protected from an accidental erasure.
◆Refer to page 107 for further details.
1. Set the Mode Dial to Movie mode.
2. Press the [POWER] button to turn on the device.
3. Press the [Shortcut 4] button.
4. Select an option by moving the joystick left / right (œœ/√√) button, and then
press the [OK] button.
◆<Delete>: Deletes the selected movie file. Refer to page 108 for further details.
◆<Cancel>: Cancels the deletion.
00:01:36
100-0001
1/6
IN
00:01:36
100-0001
100-0001
1/6
IN
00:01:36
100-0001
100-0001
1/6
00:01:36
100-0001
1/6
00:01:36
100-0001
1/6
IN
00:01:36
100-0001
100-0001
1/6
Cancel
Delete
3
IN
00:01:36
100-0001
100-0001
1/6
00:01:36
100-0001
1/6
Protecting a Movie File
Deleting a Movie File
00934C SC-MS10 USA~111 9/30/05 10:58 AM Page 104
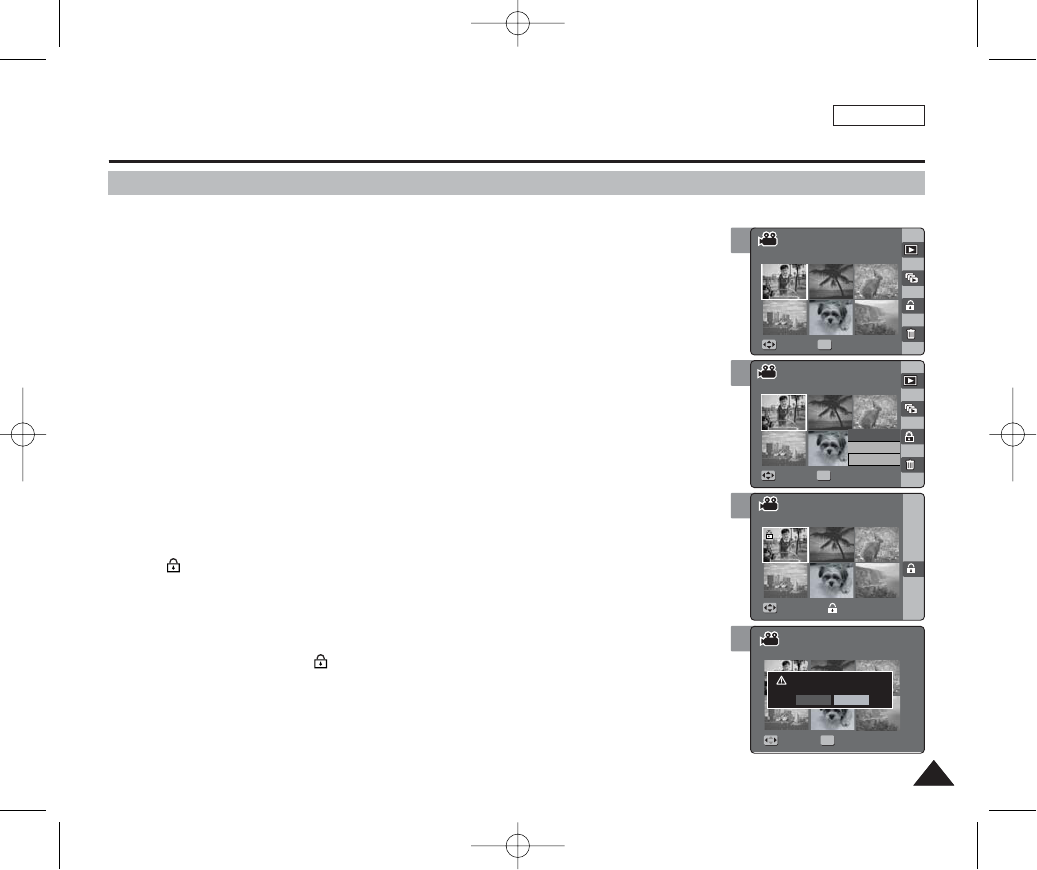
ENGLISH
105105
3
4
Movie Mode : Setting the Viewing Options
Using the Shortcut Buttons
Protecting Movie files in Multi-View
1. Set the Mode Dial to Movie mode.
2. Press the [POWER] button to turn on the device.
3. Press the [Shortcut 1] button.
◆It switches to the Movie view mode.
4. Move the [W/T] zoom switch to W (WIDE).
◆The screen switches to multi-view.
◆The movie you were viewing in the single view is selected.
5. Press the [Shortcut 3] button and then select an option by moving the
joystick up / down (▲/▼) and then press the [OK] button.
◆<Select>: Selected files will be protected.
◆<All>: All files will be protected.
◆<Cancel>: Cancels protection.
6. If <Select> was selected, select photo files to protect by moving the joystick
left / right / up / down (œœ/√√/▲/▼) and press the [OK] button.
◆< > icon appears on the selected files.
7. Press the [Shortcut 3] button again.
◆The message <”Protect?”> appears.
8. Select <Yes> to protect selected files. Select <No> to cancel protection.
◆If <Yes> was selected, < > icon appears on the protected files.
[ Notes ]
✤When you attempt to delete a protected file, you will hear a warning beep.
✤When you set the Beep Sound to Off, there will be no beep sound but the message “Protect” appears on
the screen and the file will not be deleted.
1/6
1/6
1/6
1/6
Move Full View
OK
MoveMove Full ViewFull View
Select
All
Cancel
Move Finish
Move Select
1/6
1/6
1/6
1/6
Move Full View
Move Full View
MoveMove FinishFinish
Move Select
4
1/6
1/6
1/6
1/6
Move Full View
Move Full View
Move Finish
Protect?
MoveMove SelectSelect
Yes No
OK
2
1/6
1/6
1/6
1/6
OK
MoveMove Full ViewFull View
Move Full View
Move Finish
Move Select
00934C SC-MS10 USA~111 9/30/05 10:59 AM Page 105
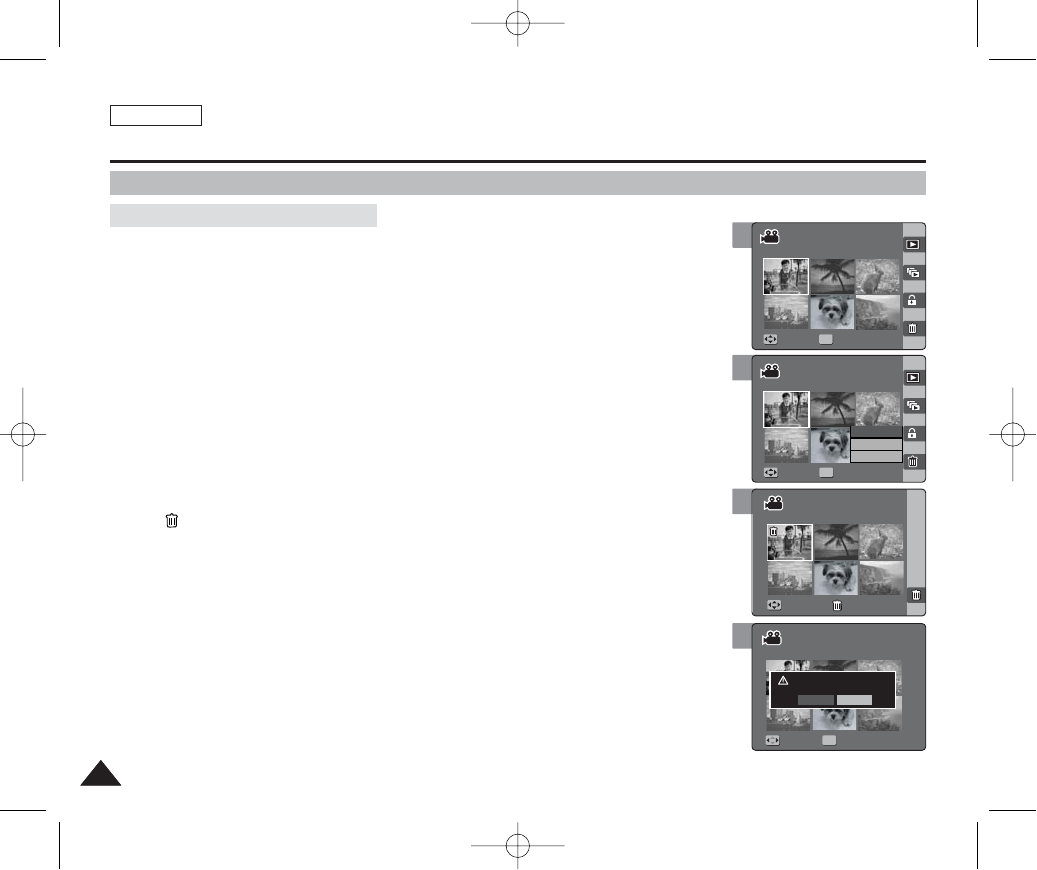
ENGLISH
106106
5
6
7
Movie Mode : Setting the Viewing Options
Using the Shortcut Buttons
1. Set the Mode Dial to Movie mode.
2. Press the [POWER] button to turn on the device.
3. Press the [Shortcut 1] button.
◆Switches to Photo view mode.
4. Move the [W/T] zoom switch to W (WIDE).
◆The screen switches to multi-view.
◆The movie you were viewing in the single view is selected.
5. Press the [Shortcut 4] button and then select an option by moving the
joystick up / down (▲/▼) and then press the [OK] button.
◆<Select>: Selected photo files will be deleted.
◆<All>: All photo files will be deleted.
◆<Cancel>: Cancels deletion.
6. If <Select> was selected, select photo files to delete by moving the joystick
left / right / up / down (œœ/√√/▲/▼) and press the [OK] button.
◆< > icon appears on the selected files.
7. Press the [Shortcut 4] button again.
◆The message <”Delete?”> appears.
8. Select <Yes> to delete selected files. Select <No> to cancel deletion.
◆Refer to page 108 for further details.
[ Notes ]
✤When you attempt to delete a protected file, you will hear a warning beep.
✤When you set the Beep Sound to Off, there will be no beep sound but the message “Protect” appears on
the screen and the file will not be deleted.
1/6
1/6
1/6
Move Full View
MoveMove Full ViewFull View
OK
Select
All
Cancel
Move Finish
Move Select
1/6
1/6
1/6
Move Full View
Move Full View
MoveMove FinishFinish
Move Select
1/6
1/6
1/6
Move Full View
Move Full View
Move Finish
Delete?
Yes No
OK
MoveMove SelectSelect
4
1/6
1/6
1/6
MoveMove Full ViewFull View
Move Full View
OK
Move Finish
Move Select
Deleting Movie files in Multi-View
00934C SC-MS10 USA~111 9/30/05 10:59 AM Page 106
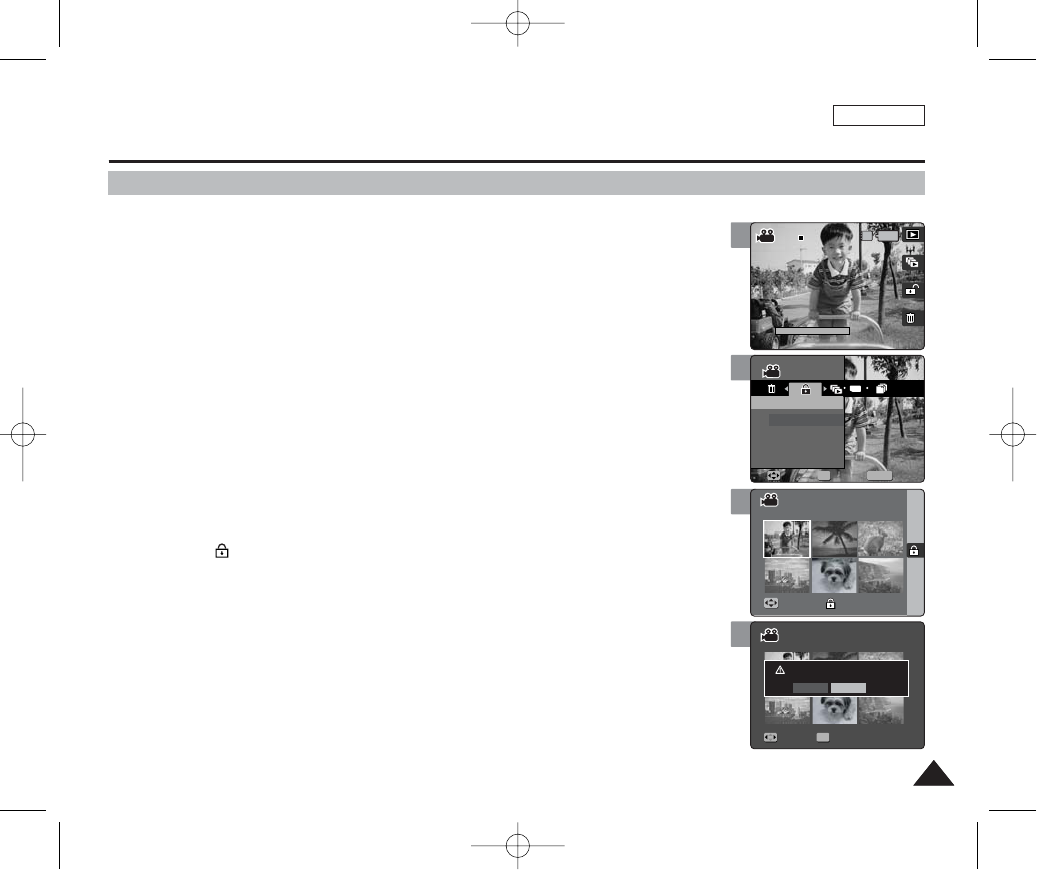
ENGLISH
107107
5
6
7
Movie Mode : Setting the Viewing Options
Protecting Movie Files
You can protect saved important movie files from accidental erasure.
1. Set the Mode Dial to Movie mode.
2. Press the [POWER] button to turn on the device.
3. Press the [Shortcut 1] button to switch to Movie viewing mode.
4. Press the [MENU] button.
◆Menu screen appears.
5. Move the joystick left / right (œœ/√√) to select <Protect>.
6. Select an option by by moving the joystick up / down (▲/▼) and then press
the [OK] button.
◆<Select>: Multi-view screen appears and you can select movie files to protect.
◆<All>: All files will be protected.
If <All> is selected, the message “Protect All?” appears. Select <Yes> or <No> by moving
the joystick left / right (œœ/√√) and then press the [OK] button to confirm.
7. If <Select> is selected, Multi-view screen appears. Select files to protect by
moving the joystick left / right / up / down (œœ/√√/▲/▼) and press the [OK]
button.
◆An icon ( ) indicating the selected file to be protected appears.
8. Press the [Shortcut 3] button.
◆The message “Protect?” appears. Select <Yes> or <No> by moving the joystick left / right
(œœ/√√) and then press the [OK] button to confirm.
9. Press the [MENU] button to exit the menu.
[ Notes ]
✤You can easily access this function by using the shortcut button (refer to page 104).
✤When you attempt to delete a protected file, you will hear a warning beep.
When you set the Beep Sound to Off, there will be no beep sound but the message “Protect” appears on
the screen and the file will not be deleted.
✤While the menu screen is displayed, pressing the [Record / Stop] button will exit the menu.
MENU
TYPE
1/6
00:01:36
100-0001
1/6
MovieMovie
ProtectProtect
Select
All
OK
MoveMove SelectSelect ExitExit
Move Finish
Move Select
1/6
00:01:36
100-0001
1/6
Movie
Protect
Move Select Exit
MoveMove FinishFinish
Move Select
1/6
00:01:36
100-0001
1/6
Movie
Protect
Move Select Exit
Move Finish
Protect?
MoveMove SelectSelect
Yes No
OK
4
1/6
IN
00:01:36
100-0001
100-0001
1/6
Movie
Protect
Move Select Exit
Move Finish
Move Select
00934C SC-MS10 USA~111 9/30/05 10:59 AM Page 107

ENGLISH
108108
5
6
7
Movie Mode : Setting the Viewing Options
Deleting Movie Files
You can delete saved movie files.
1. Set the Mode Dial to Movie mode.
2. Press the [POWER] button to turn on the device.
3. Press the [Shortcut 1] button to switch to Movie viewing mode.
4. Press the [MENU] button.
◆Menu screen appears.
5. Move the joystick left / right (œœ/√√) to select <Delete>.
6. Select an option by moving the joystick up / down (▲/▼) and then press the
[OK] button.
◆<Select>: Multi-view screen appears and you can select movie files to delete.
◆<All>: All files will be deleted.
If <All> is selected, the message “Delete All?” appears. Select <Yes> or <No> by moving
the joystick left / right (œœ/√√) and then press the [OK] button to confirm.
7. If <Select> is selected, Multi-view screen appears. Select files to delete by
moving the joystick left / right / up / down (œœ/√√/▲/▼) and press the [OK]
button.
◆An icon ( ) indicating the selected file to be deleted appears.
8. Press the [Shortcut 4] button.
◆The message “Delete?” appears. Select <Yes> or <No> by moving the joystick left / right
(œœ/√√) and then press the [OK] button to confirm.
9. Press the [MENU] button to exit the menu.
[ Notes ]
✤You can easily access this function by using the shortcut button (refer to page 104).
✤When you attempt to delete a protected file, you will hear a warning beep.
When you set the Beep Sound to Off, there will be no beep sound but the message “Protect” appears on
the screen and the file will not be deleted.
✤While the menu screen is displayed, pressing the [Record / Stop] button will exit the menu.
1/6
Movie
Delete
Move Select Exit
MoveMove FinishFinish
Move Select
1/6
Movie
Delete
Move Select Exit
Move Finish
Delete?
Yes No
MoveMove SelectSelect
OK
1/6
Movie
Delete
Move Select Exit
Move Finish
Deleting file(s)
Move Select
4
MENU
TYPE
1/6
MovieMovie
DeleteDelete
Select
All
MoveMove SelectSelect ExitExit
OK
Move Finish
Move Select
00934C SC-MS10 USA~111 9/30/05 10:59 AM Page 108
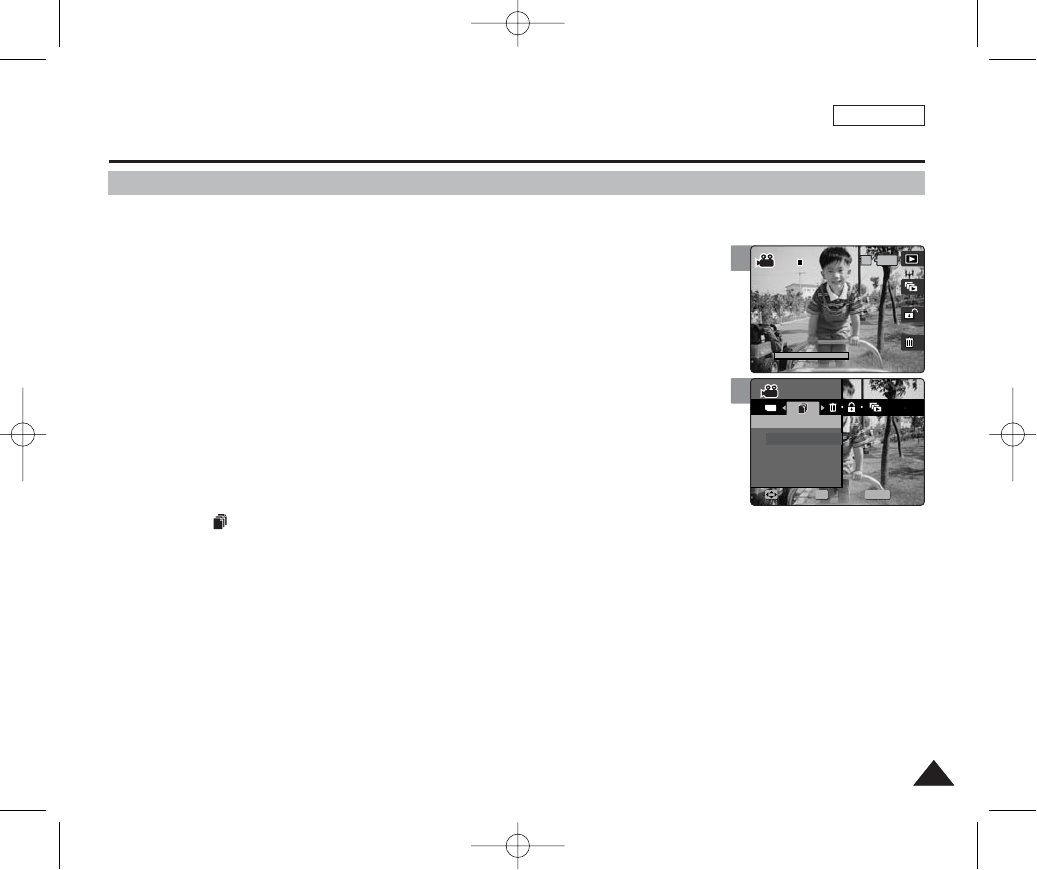
ENGLISH
109109
5
Movie Mode : Setting the Viewing Options
Copying Movie Files
You can copy saved files from the built-in internal memory to the external mini SD Memory Card and vice versa.
1. Set the Mode Dial to Movie mode.
2. Press the [POWER] button to turn on the device.
3. Press the [Shortcut 1] button to switch to Movie viewing mode.
4. Press the [MENU] button.
◆Menu screen appears.
5. Move the joystick left / right (œœ/√√) to select <Copy (to)>.
6. Select an option by moving the joystick up / down (▲/▼) and then press the
[OK] button.
◆<Select>: Multi-view screen appears and you can select files to copy.
◆<All>: All files will be copied.
If <All> is selected, the message “Copy All?” appears. Select <Yes> or <No> by moving the
joystick left / right (œœ/√√) and then press the [OK] button to confirm.
7. If <Select> is selected, Multi-view screen appears. Select files to copy by moving
the joystick left / right / up / down (œœ/√√/▲/▼) and press the [OK] button.
◆An icon ( ) indicating selected file is to be copied appears.
8. Press the [Shortcut 4] button.
◆The message “Copy?” appears. Select <Yes> or <No> by moving the joystick left / right (œœ/√√) and then press the [OK]
button to confirm.
9. Press the [MENU] button to exit the menu.
[ Notes ]
✤It copies from the currently-used memory to another. If the internal memory was used, it copies to an external mini SD Memory Card.
✤While the menu screen is displayed, pressing the [Record / Stop] button will exit the menu.
MENU
00:01:36
100-0001
1/6
TYPE
MovieMovie
Copy (to)Copy (to)
Select
All
MoveMove SelectSelect ExitExit
OK
4
IN
00:01:36
100-0001
100-0001
1/6
Movie
Copy (to)
Move Select Exit
00934C SC-MS10 USA~111 9/30/05 10:59 AM Page 109
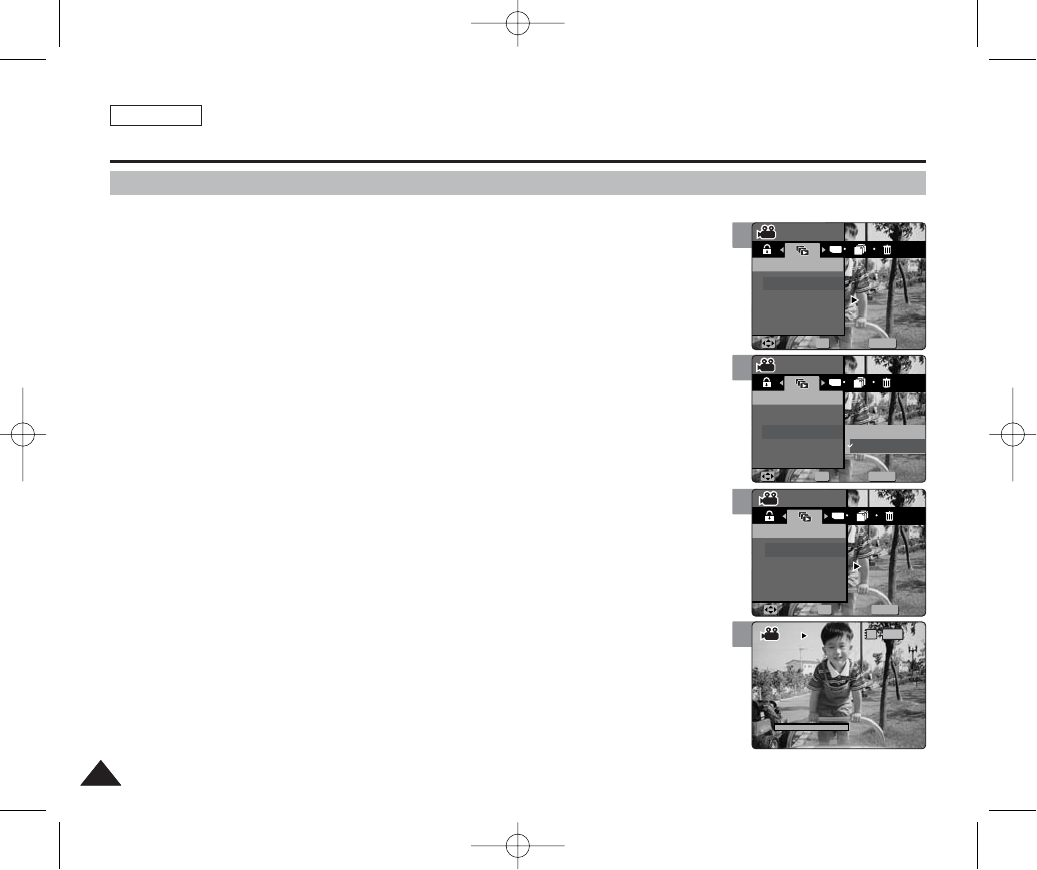
ENGLISH
110110
5
6
8
Movie Mode : Setting the Viewing Options
Setting the Slideshow
You can set a slideshow and also set the repeat option for slideshows.
1. Set the Mode Dial to Movie mode.
2. Press the [POWER] button to turn on the device.
3. Press the [Shortcut 1] button to switch to Movie viewing mode.
4. Press the [MENU] button.
◆Menu screen appears.
5. Move the joystick left / right (œœ/√√) to select <Slide>.
6. Select <Repeat> by moving the joystick up / down (▲/▼) and then press the
[OK] button.
7. Set the repeat option by moving the joystick up / down (▲/▼) and then press
the [OK] button.
◆<Off>: Sets not to repeat the slideshow.
◆<On>: Sets to repeat the slideshow.
8. Select <Start> by moving the joystick up / down (▲/▼) and then press the
[OK] button.
◆Slideshow starts.
◆To stop the slideshow, press the [OK] button.
◆To start the slideshow again, press the [Shortcut 2] button.
[ Notes ]
✤You can easily access this function by using the shortcut button (refer to page 103).
✤The interval between files may vary depending on the size of the movie.
✤Slideshow starts from the current movie selected.
✤While the menu screen is displayed, pressing the [Record / Stop] button will exit the menu.
00:01:36
100-0001
00:00:00
Movie
Slide
On
Move Select Exit
Movie
Slide
Slide
On
Move Select Exit
MENU
TYPE
MovieMovie
SlideSlide
Start
Repeat
MoveMove SelectSelect ExitExit
OK
Off
On
00:01:36
100-0001
00:00:00
Movie
Slide
On
Move Select Exit
MENU
TYPE
MovieMovie
SlideSlide
Slide
Start
Repeat OnOn
MoveMove SelectSelect ExitExit
OK
Movie
Slide
Move Select Exit
00:01:36
IN
100-0001
100-0001
00:00:00
Movie
Slide
On
Move Select Exit
Movie
Slide
SlideSlide
On
Move Select Exit
Movie
Slide
Move Select Exit
4
MENU
TYPE
00:01:36
100-0001
00:00:00
MovieMovie
SlideSlide
Start
Repeat OnOn
MoveMove SelectSelect ExitExit
OK
Movie
Slide
Slide
On
Move Select Exit
Movie
Slide
Move Select Exit
00934C SC-MS10 USA~111 9/30/05 10:59 AM Page 110
ENGLISH
111111
Music Mode
4
4
Playing Music Files ..........................................................................112
Copying Music Files from a PC..................................................112
Playing Music Files .....................................................................113
Setting the Music Play Options......................................................114
Using the Shortcut Buttons.........................................................114
Setting the Repeated Play..........................................................116
Setting the Equaliser...................................................................117
Deleting Music Files....................................................................118
Protecting Music Files.................................................................119
00934C SC-MS10 USA~111 9/30/05 10:59 AM Page 111
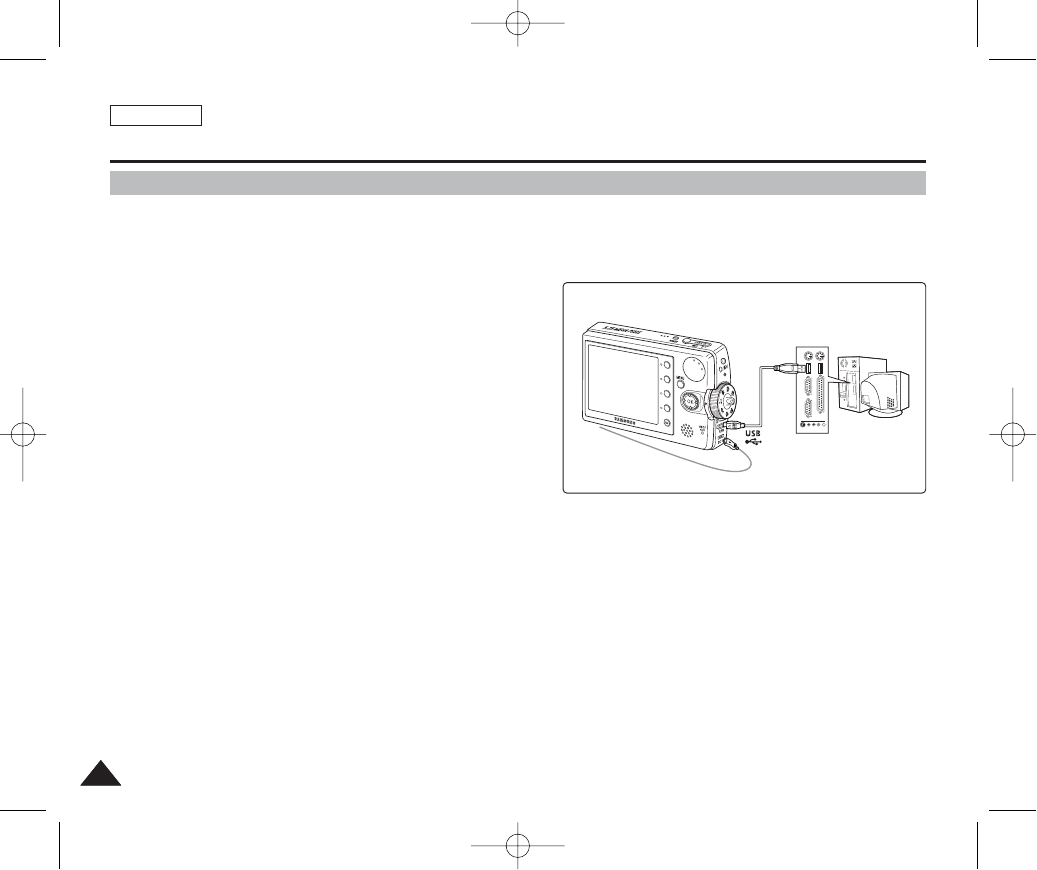
ENGLISH
112112
Music Mode : Playing Music Files
Copying Music Files from a PC
You can copy music files from a PC while connected to the PC with a USB cable.
1. Set the Mode Dial to Music mode.
2. Press the [POWER] button to turn on the device.
3. Press the [MENU] button to select destination memory
(refer to page 49).
4. Connect the Miniket Photo to the PC using the USB
cable provided (refer to page 133).
◆Connect the USB cable to the device.
◆Connect the other end of the USB cable to the PC.
5. Windows finds a new USB mass storage device. Open
the folder <MSAMSUNG> and you will find <MP3>
folder.
6. Copy your music files and paste it into the folder
<MUSIC1>, <MUSIC2>, <MUSIC3> or <MUSIC4>.
Be sure to copy your MP3 files into the existing folders under <MP3>.
[ Warning ]
✤IYou cannot create a new folder on your Miniket Photo set.
✤If you create a new folder on your memory card with a PC, it will not play back music files stored on it.
[ Notes ]
✤The music played back will begin with the first music file that is stored in the top folder (MUSIC1).
✤It is recommended that you use an AC Power Adapter during the file transfer to avoid unintended power outage.
The built-in internal memory of the device appears as <Miniket> on a PC while the external memory card (mini SD Memory
Card) will appear as <Removable Storage>.
A
B
00934C SC-MS10 USA~120 9/30/05 10:59 AM Page 112
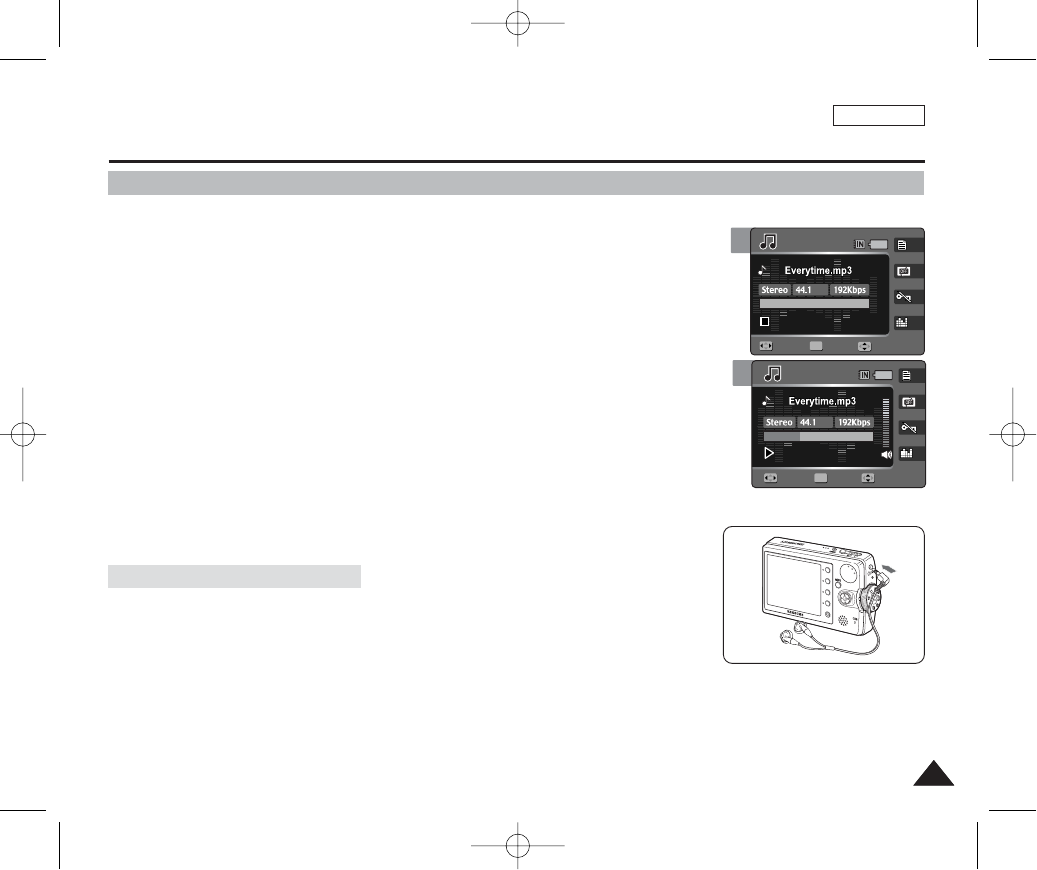
ENGLISH
113113
4
Music Mode : Playing Music Files
Playing Music Files
You can play back stored music files.
1. Set the Mode Dial to Music mode.
2. Press the [POWER] button to turn on the device.
3. The last file played back is displayed.
◆If there is no music file stored, the message “No Stored Music!” appears.
4. Select a music file to play by moving the joystick left / right (œ/√) button, and
then press the [OK] button.
5. The selected music file is played back.
◆To pause playback, press the [OK] button.
◆To stop playback, press and hold the [OK] button for more than 3 seconds.
◆To search backward / forward during play, hold down the joystick left or right (œ/√) for
more than 1 second.
◆To adjust volume, move joystick up / down (…/†).
Volume indicator appears and disappears after few seconds.
1/6
1/6
00:00/03:00
00:50/03:00
00:50/03:00
01
01
Search Play
SearchSearch StopStop
OK
KHz
Volume
VolumeVolume
[ Notes ]
✤If a broken file name is displayed, try renaming it.
✤When the earphones or AV (Audio / Video) cable is connected to the device, the built-in speaker will turn off automatically.
✤A file which does not comply with the MP3 standard, even if the file extension is MP3, will not display / play back.
✤The title may not be displayed if the language is not supported.
✤Holding the joystick left / right (œ/√) for more than 1 second while stopped will rapidly skip to the previous / next file rapidly.
Connect your earphones as shown in the figure.
How to Connect Earphones
3
1/6
1/6
00:00/03:00
00:00/03:00
00:50/03:00
01
01
SearchSearch PlayPlay
Search Stop
OK
KHz
VolumeVolume
Volume
00934C SC-MS10 USA~120 9/30/05 10:59 AM Page 113
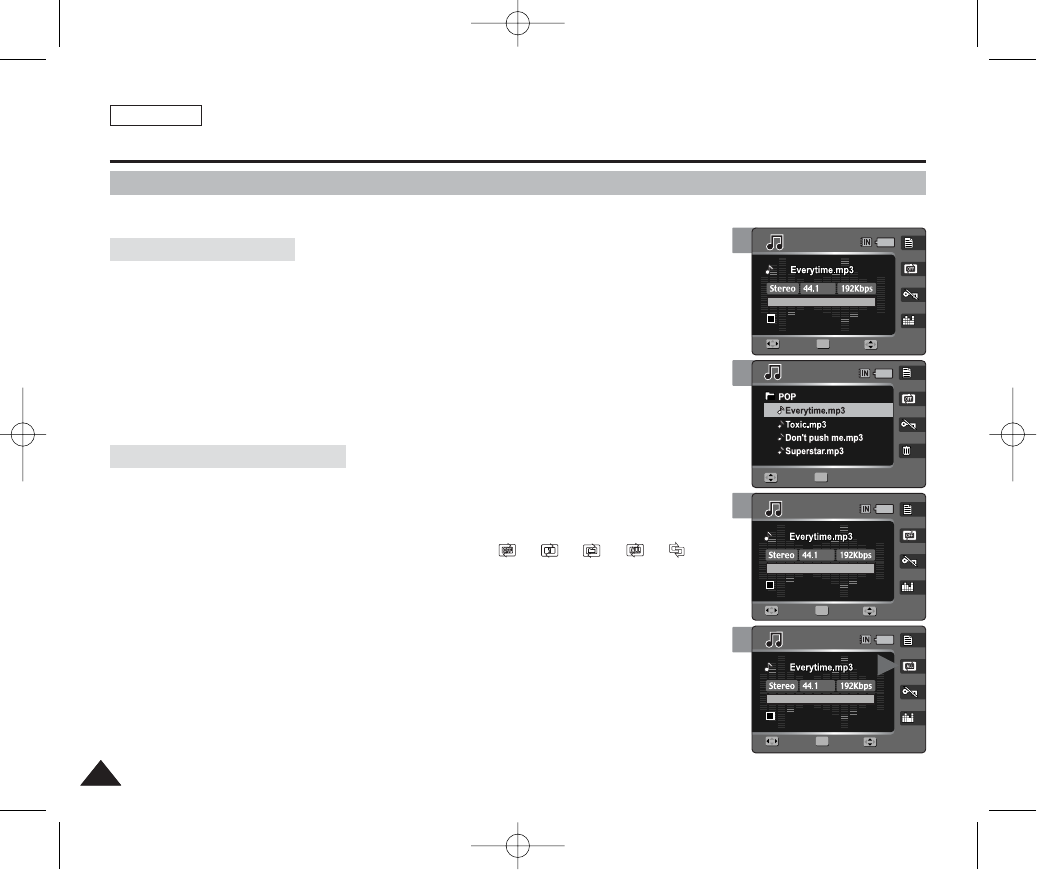
ENGLISH
114114
3
4
4
3
Music Mode : Setting the Music Play Options
Using the Shortcut Buttons
Shortcut buttons are provided to allow users easy access to frequently-used functions.
Viewing the Playlist
1. Set the Mode Dial to Music mode.
2. Press the [POWER] button to turn on the device.
3. Press the [Shortcut 1] button.
◆It moves to the playlist view.
4. Select a music file by moving the joystick left / right / up / down (œœ/√√/……/††),
and then press the [OK] button.
◆The selected music file is played back.
Setting the Repeat Option
1. Set the Mode Dial to Music mode.
2. Press the [POWER] button to turn on the device.
3. Press the [Shortcut 2] button.
◆Each press of the [Shortcut 2] button cycles through < >-< >-< >-< >-< >
repeat modes.
4. An icon indicating the selected repeat mode appears on the screen (Refer to
page 116).
1/6
1/6
00:00/03:00
00:00/03:00
01
OK
SearchSearch PlayPlay
Move Select
KHz
VolumeVolume
1/6
1/6
00:00/03:00
01
OK
Search Play
MoveMove SelectSelect
Volume
1/6
00:00/03:00
00:00/03:00
01
OK
SearchSearch PlayPlay
1/6
00:00/03:00
01
Search Play
Music
Repeat
Move Select Exit
Music
Repeat
Move Select Exit
KHz
Volume
VolumeVolume
1/6
00:00/03:00
01
Search Play
1/6
00:00/03:00
00:00/03:00
01
OK
SearchSearch PlayPlay
Music
Repeat
Move Select Exit
Music
Repeat
Move Select Exit
KHz
VolumeVolume
Volume
00934C SC-MS10 USA~120 9/30/05 10:59 AM Page 114

ENGLISH
115115
4
3
4
Music Mode : Setting the Music Play Options
Using the Shortcut Buttons
Shortcut buttons are provided to allow users easy access to frequently used functions.
Setting to Hold
1. Set the Mode Dial to Music mode.
2. Press the [POWER] button to turn on the device.
3. Press the [Shortcut 3] button.
◆Each press of the [Shortcut 3] button toggles between ( ) and ( ).
4. When it is set to hold ( ), button functions are locked except Mode Dial.
◆It helps so as not to disturb listening.
Setting the Equaliser
1. Set the Mode Dial to Music mode.
2. Press the [POWER] button to turn on the device.
3. Press the [Shortcut 4] button.
◆Each press of the [Shortcut 2] button cycles through < >-< >-< >-< > Equaliser
modes.
4. An icon indicating the selected Equaliser appears on the screen
(Refer to page 117).
1/6
00:00/03:00
00:00/03:00
1/6
00:00/03:00
01
01
OK
SearchSearch PlayPlay
Search Play
KHz
VolumeVolume
Volume
1/6
00:00/03:00
00:00/03:00
01
OK
SearchSearch PlayPlay
1/6
00:00/03:00
01
Search Play
Music
Equalizer
Move Select Exit
Music
Equalizer
Move Select Exit
Jazz
44.1KHz
VolumeVolume
Volume
1/6
00:00/03:00
01
Search Play
1/6
00:00/03:00
00:00/03:00
01
OK
Search
Search Play
Play
Music
Equalizer
Move Select Exit
Music
Equalizer
Move Select Exit
JazzJazz
44.1KHz
Volume
VolumeVolume
3
1/6
00:00/03:00
1/6
00:00/03:00
00:00/03:00
01
01
OK
Search Play
SearchSearch PlayPlay
KHz
Volume
VolumeVolume
Jazz ClasPOP
Jazz ClasPOP
POP
Jazz
Jazz
ClasPOP
Jazz Clas
Clas
POP
00934C SC-MS10 USA~120 9/30/05 10:59 AM Page 115

ENGLISH
116116
4
5
6
Music Mode : Setting the Music Play Options
Setting the Repeated Play
You can repeat a selected music file or group of music files.
1. Set the Mode Dial to Music mode.
2. Press the [POWER] button to turn on the device.
3. Press the [MENU] button.
◆Menu screen appears.
4. Move the joystick left / right (œ/√) to select <Repeat>.
5. Select an option by moving the joystick up / down (……/††) and then press the
[OK] button.
◆<Off>: No repeat
◆<One>: One selected music file will play repeatedly.
◆<Group>: The selected group of music files will play repeatedly.
◆<All>: All music files will play through in order and start again from the beginning.
◆<Shuffle>: All music files will play in random order once and start again.
6. Press the [MENU] button to exit the menu.
[ Notes ]
✤You can easily access this function by using the shortcut button (refer to page 114).
✤When the earphones or AV (Audio / Video) cable is connected to the device, the <Beep Sound> will
not operate.
TYPE
MENU
1/6
00:00/03:00
01
Search Play
1/6
00:00/03:00
01
Search Play
MusicMusic
RepeatRepeat
Off
One
Group
All
MoveMove SelectSelect ExitExit
OK
Music
Repeat
Move Select Exit
Volume
Volume
1/6
00:00/03:00
01
Search Play
1/6
00:00/03:00
01
Search Play
Music
Repeat
Move Select Exit
TYPE
MENU
MusicMusic
RepeatRepeat
Off
One
Group
All
MoveMove SelectSelect ExitExit
OK
Volume
Volume
1/6
00:00/03:00
01
Search Play
1/6
00:00/03:00
00:00/03:00
01
OK
SearchSearch PlayPlay
Music
Repeat
Move Select Exit
Music
Repeat
Move Select Exit
KHz
VolumeVolume
Volume
3
1/6
00:00/03:00
00:00/03:00
01
OK
SearchSearch PlayPlay
1/6
00:00/03:00
01
Search Play
Music
Repeat
Move Select Exit
Music
Repeat
Move Select Exit
KHz
Volume
VolumeVolume
00934C SC-MS10 USA~120 9/30/05 10:59 AM Page 116

ENGLISH
117117
4
5
6
Music Mode : Setting the Music Play Options
Setting the Equaliser
You can repeat a selected music file or group of music files.
1. Set the Mode Dial to Music mode.
2. Press the [POWER] button to turn on the device.
3. Press the [MENU] button.
◆Menu screen appears.
4. Move the joystick left / right (œ/√) to select <Equalizer>.
5. Select an option by moving the joystick up / down (……/††) and then press the
[OK] button.
◆<Normal> / <Pop> / <Jazz> / <Classic>
6. Press the [MENU] button to exit the menu.
[ Note ]
✤You can easily access this function by using the shortcut button (refer to page 115).
TYPE
MENU
1/6
00:00/03:00
01
Search Play
1/6
00:00/03:00
01
Search Play
MusicMusic
EqualizerEqualizer
Normal
Pop
Jazz
Classic
OK
MoveMove SelectSelect ExitExit
Music
Equalizer
Move Select Exit
Jazz
Volume
Volume
1/6
00:00/03:00
01
Search Play
1/6
00:00/03:00
01
Search Play
Music
Equalizer
Move Select Exit
TYPE
MENU
MusicMusic
EqualizerEqualizer
Normal
Pop
Jazz
Classic
OK
MoveMove SelectSelect ExitExit
Jazz
Volume
Volume
1/6
00:00/03:00
01
Search Play
1/6
00:00/03:00
00:00/03:00
01
OK
Search
Search Play
Play
Music
Equalizer
Move Select Exit
Music
Equalizer
Move Select Exit
JazzJazz
44.1KHz
Volume
VolumeVolume
3
1/6
00:00/03:00
00:00/03:00
01
OK
SearchSearch PlayPlay
1/6
00:00/03:00
01
Search Play
Music
Equalizer
Move Select Exit
Music
Equalizer
Move Select Exit
Jazz
44.1KHz
VolumeVolume
Volume
00934C SC-MS10 USA~120 9/30/05 10:59 AM Page 117
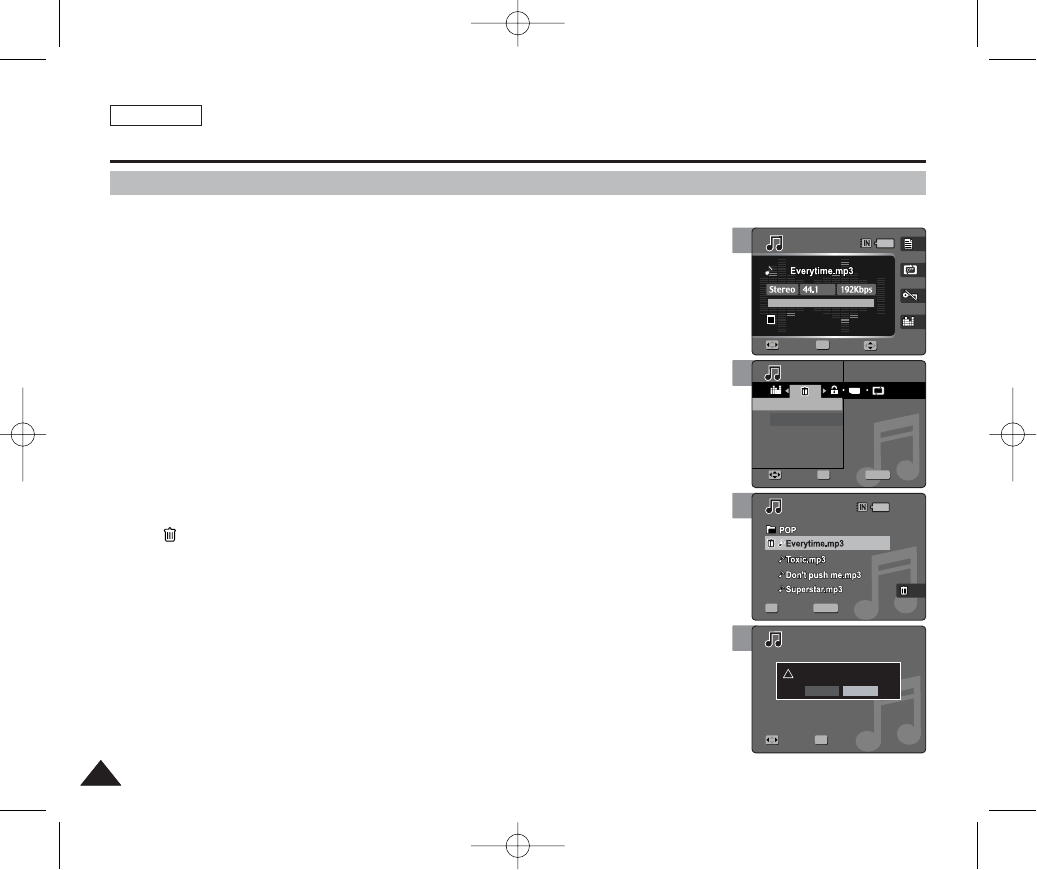
ENGLISH
118118
Deleting Music Files
You can delete stored music files.
1. Set the Mode Dial to Music mode.
2. Press the [POWER] button to turn on the device.
3. Press the [MENU] button.
◆Menu screen appears.
4. Move the joystick left / right (œœ/√√) to select <Delete>.
5. Select an option by moving the joystick up / down (……/††) button and then
press the [OK] button.
◆<Select>: The Playlist appears and you can select files to delete.
◆<All>: All music files will be deleted.
If <All> is selected, the message “Delete All?” appears. Select <Yes> or <No> by
moving the joystick left / right (œ/√) and then press the [OK] button to confirm.
6. If <Select> was selected, select files to protect moving the joystick left /
right / up / down (œœ/√√/……/††) and press the [OK] button.
◆< > icon appears on the selected files.
7. Press the [Shortcut 4] button.
◆The message “Delete?” appears.
8. Select <Yes> to delete selected files. Select <No> to cancel deletion.
◆Press the [MENU] button to exit the menu.
[ Note ]
✤After deleting a file, the last file of the current folder is selected.
Music Mode : Setting the Music Play Options
3
5
6
7
1/6
1/6
00:00/03:00
00:00/03:00
01
KHz
Search
Search Play
Play
OK
Music
Move Select Exit
Delete
Select Exit
Move Select
VolumeVolume
TYPE
1/6
MENU
1/6
00:00/03:00
01
Search Play
MusicMusic
Select
All
MoveMove SelectSelect ExitExit
OK
DeleteDelete
Select Exit
Move Select
Volume
1/6
MENU
1/6
00:00/03:00
01
Search Play
Music
Move Select Exit
Delete
OK SelectSelect ExitExit
Move Select
Volume
1/6
!
1/6
00:00/03:00
01
Search Play
Music
Move Select Exit
Delete
OK
Select Exit
Delete?
Yes No
MoveMove SelectSelect
Volume
00934C SC-MS10 USA~120 9/30/05 10:59 AM Page 118
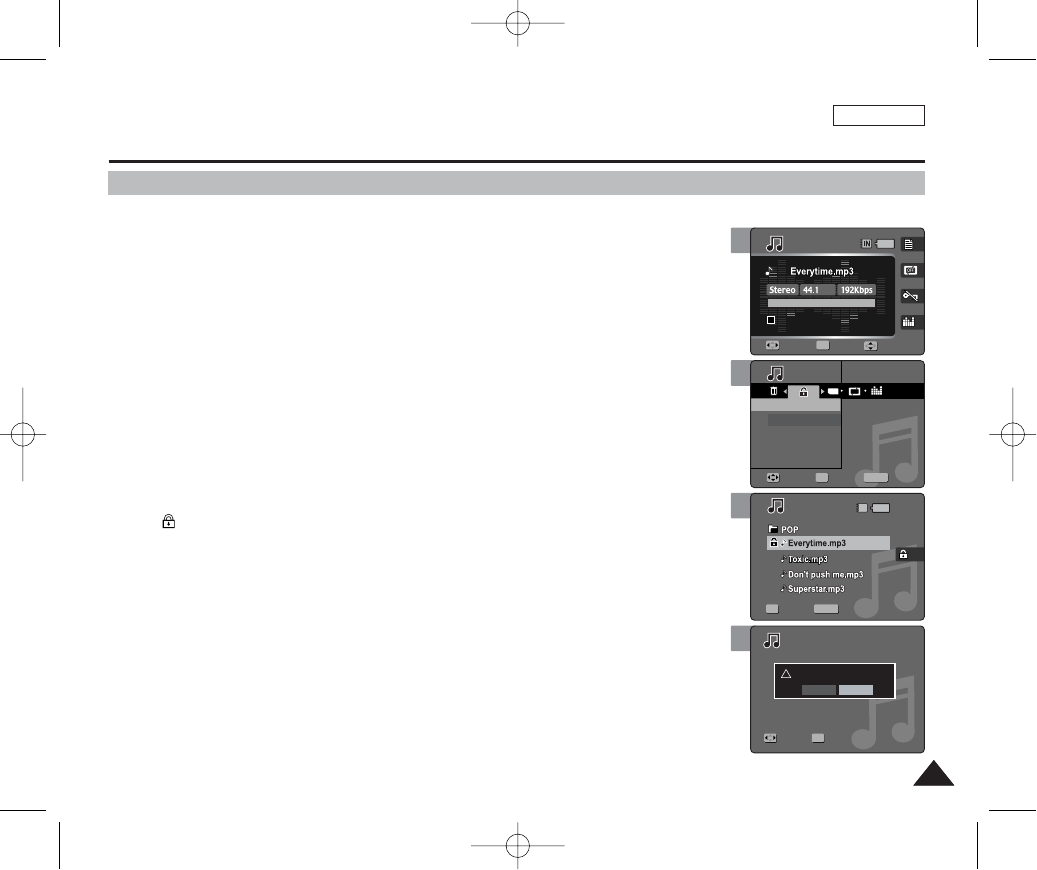
ENGLISH
119119
5
6
7
TYPE
1/6
MENU
1/6
00:00/03:00
01
OK
Search Play
MusicMusic
ProtectProtect
Select
All
MoveMove SelectSelect ExitExit
Select Exit
Move Select
Volume
IN
1/6
MENU
1/6
00:00/03:00
01
OK
Search Play
Music
Protect
Move Select Exit
SelectSelect ExitExit
Move Select
Volume
1/6
1/6
00:00/03:00
01
Search Play
Music
Protect
Move Select Exit
Select Exit
!
OK
Protect?
Yes No
MoveMove SelectSelect
Volume
3
1/6
1/6
00:00/03:00
00:00/03:00
01
KHz
OK
SearchSearch PlayPlay
Music
Protect
Move Select Exit
Select Exit
Move Select
VolumeVolume
Protecting Music Files
You can protect saved important music files from accidental erasure.
1. Set the Mode Dial to Music mode.
2. Press the [POWER] button to turn on the device.
3. Press the [MENU] button.
◆Menu screen appears.
4. Move the joystick left / right (œœ/√√) to select <Protect>.
5. Select an option by moving the joystick up / down (……/††) and then press
the [OK] button.
◆<Select>: The Playlist appears and you can select files to protect.
◆<All>: All files will be protected.
If <All> is selected, the message “Protect All?” appears. Select <Yes> or <No> by
moving the joystick left / right (œ/√) and then press the [OK] button to confirm.
6. If <Select> was selected, select files to protect by moving the joystick left /
right / up / down (œœ/√√/……/††) and press the [OK] button.
◆< > icon appears on the selected files.
7. Press the [Shortcut 3] button.
◆The message “Protect?” appears.
8. Select <Yes> to protect selected files. Select <No> to cancel protection.
◆Press the [MENU] button to exit the menu.
[ Notes ]
✤You can easily access this function by using the shortcut button (refer to page 115).
✤When you attempt to delete a protected file, you will hear a warning beep.
When you set the Beep Sound to Off, there will be no beep sound but the message “Protect!”
appears on the screen and the file will not be deleted.
Music Mode : Setting the Music Play Options
00934C SC-MS10 USA~120 9/30/05 10:59 AM Page 119
ENGLISH
120120
Voice Mode
4
4
Recording Voice Files......................................................................121
Recording Voice Files.................................................................121
Playing Voice Files...........................................................................122
Playing Voice Files .....................................................................122
Setting the Voice Play Options ......................................................123
Using the Shortcut Buttons.........................................................123
Setting the Repeated Play..........................................................125
Deleting Voice Files ....................................................................126
Protecting Voice Files .................................................................127
Copying Voice Files....................................................................128
00934C SC-MS10 USA~120 9/30/05 10:59 AM Page 120
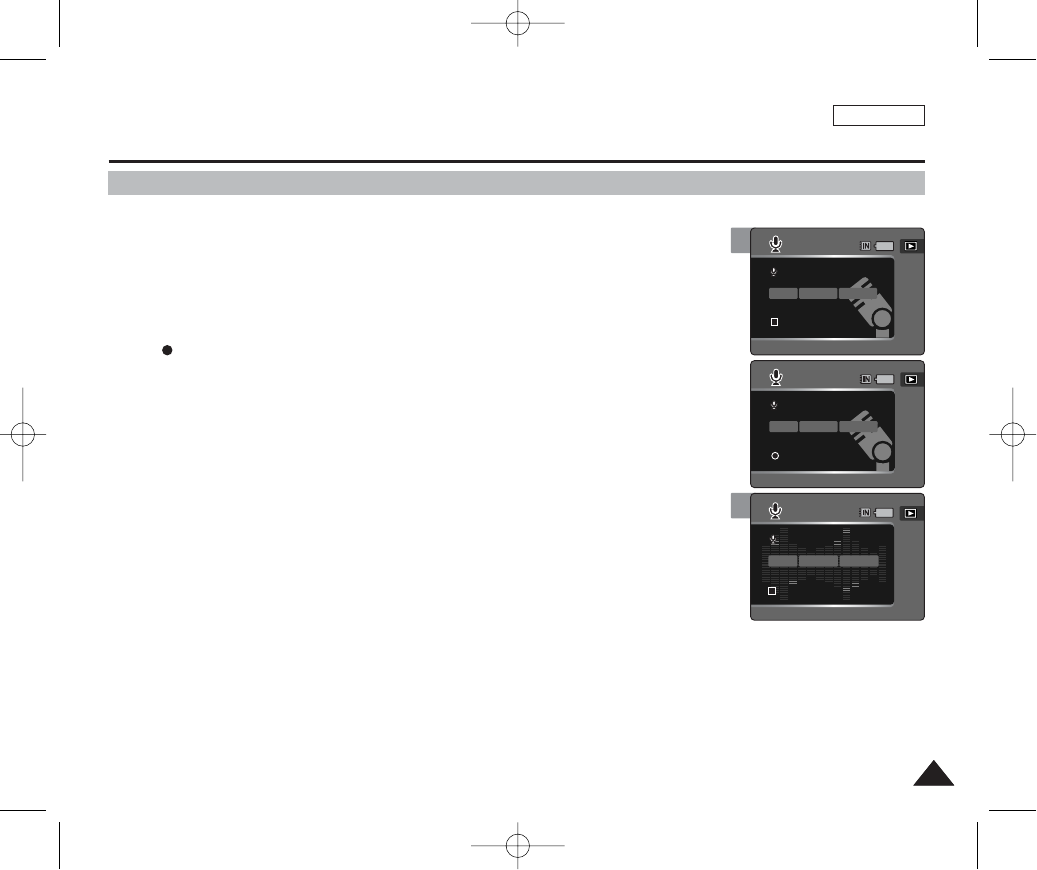
ENGLISH
121121
4
Voice Mode : Recording Voice Files
Recording Voice Files
The built-in microphone allows users to record voices without any additional devices.
1. Set the Mode Dial to Voice mode.
2. Press the [POWER] button.
3. Press the [Record / Stop] button to start recording.
◆< > icon appears on the screen and starts recording.
4. To stop recording, press the [Record / Stop] button again.
[ Notes ]
✤Recorded voice files are saved in the list automatically.
✤During voice recording, the menu is not accessed.
✤During voice recording, the Mode Dial operates normally.
SWAV0001.WAV
00:00:00/16:22:48
SWAV0001.WAV
00:00:00/16:22:58
SWAV0001.WAVSWAV0001.WAV
8KHz
Mono
64Kbps
00:00:10/16:22:48
00:00:10/16:22:48
SWAV0001.WAVSWAV0002.WAV
8KHz
Mono
64Kbps
00:00:00/16:22:48
00:00:00/16:22:48
SWAV0001.WAV
00:00:00/16:22:58
SWAV0001.WAV
00:00:10/16:22:48
3
SWAV0001.WAV
00:00:00/16:22:48
SWAV0001.WAVSWAV0001.WAV
00:00:00/16:22:58
00:00:00/16:22:58
8KHz
Mono
64Kbps
SWAV0001.WAV
00:00:10/16:22:48
00934C SC-MS10 USA~152 9/30/05 11:00 AM Page 121

ENGLISH
122122
4
5
6
Voice Mode : Playing Voice Files
Playing Voice Files
You can play back recorded voice files using the built-in speaker or the earphones.
1. Set the Mode Dial to Voice mode.
2. Press the [POWER] button.
3. Press the [Shortcut 1] button to switch to voice play mode.
◆The last file played back is displayed.
◆If there is no voice file stored, the message “No Stored Files!” appears.
4. Select a music file to play by moving the joystick left / right (œ/√) button,
and then press the [OK] button.
5. The selected music file is played back.
◆To pause playing back, press the [OK] button.
◆To stop playback, press and hold the [OK] button for more than 3 seconds.
◆To search backward / forward during play, hold down the joystick left / right (œ/√) for
more than 1 second.
6. To adjust the volume, move the joystick up / down (……/††). Volume indicator
appears and disappears after few seconds.
[ Note ]
✤When the earphones or AV (Audio / Video) cable is connected to the device, the <Beep Sound> will not
operate.
OFF
SWAV0001.WAV
00:00:16/0000:20
00:00:16/0000:20
SWAV0001.WAV
SWAV0001.WAV
00:00:00/00:00:10
OFF
OFF
SWAV0001.WAVSWAV0002.WAV
Mono
64Kbps
00:00:00/00:00:2000:00:00/00:00:20
OFFOFF
1/6
2/6
2/6
2/6
OK
Search Play
SearchSearch PlayPlay
Search Stop
Search Stop
8KHz
Volume
VolumeVolume
Volume
Volume
OFFOFF
SWAV0001.WAVSWAV0002.WAV
Mono
64Kbps
00:00:16/0000:20
00:00:16/00:00:20
00:00:16/0000:20
SWAV0001.WAV
SWAV0001.WAV
00:00:00/00:00:10
OFF
OFF
SWAV0001.WAV
00:00:00/00:00:20
OFF
1/6
2/6
2/6
2/6
OK
Search Play
Search Play
SearchSearch StopStop
Search Stop
8KHz
Volume
Volume
VolumeVolume
Volume
OFF
SWAV0001.WAV
00:00:16/0000:20
00:00:16/0000:20
00:00:16/00:00:20
SWAV0001.WAVSWAV0002.WAV
8KHz
Mono
64Kbps
SWAV0001.WAV
00:00:00/00:00:10
OFF
OFFOFF
SWAV0001.WAV
00:00:00/00:00:20
OFF
1/6
2/6
2/6
2/6
OK
Search Play
Search Play
Search Stop
SearchSearch StopStop
Volume
Volume
Volume
VolumeVolume
3
OFF
SWAV0001.WAV
00:00:16/0000:20
00:00:16/0000:20
SWAV0001.WAV
SWAV0001.WV0001.WAVSWAV0001.WAV
8KHz
Mono
64Kbps
00:00:00/00:00:1000:00:00/00:00:10
OFFOFF
OFF
SWAV0001.WAV
00:00:00/00:00:20
OFF
1/6
2/6
2/6
2/6
OK
Search
Search Play
Play
Search Play
Search Stop
Search Stop
VolumeVolume
Volume
Volume
Volume
00934C SC-MS10 USA~152 9/30/05 11:00 AM Page 122

ENGLISH
123123
5
5
Using the Shortcut Buttons
Voice Mode : Setting the Voice Play Options
SWAV0001.WAV
00:00:00/00:00:10
OFF
SWAV0001.WAVSWAV0001.WAV
00:00:00/16:22:48
00:00:00/16:22:48
8KHz
Mono
64Kbps
1/6
Search Play Volume
SWAV0001.WAV
00:00:00/00:00:10
OFF
OFFOFF
SWAV0002.WAVSWAV0002.WAV
SWAV0003.WAVSWAV0003.WAV
SWAV0004.WAVSWAV0004.WAV
SWAV0005.WAVSWAV0005.WAV
SWAV0001.WAV
1/6
OK
Search Play
MoveMove SelectSelect
Volume
4
SWAV0001.WV0001.WAVSWAV0001.WAV
8KHz
Mono
64Kbps
00:00:00/00:00:10
00:00:00/00:00:10
OFFOFF
OFF
SWAV0002.WAV
SWAV0003.WAV
SWAV0004.WAV
SWAV0005.WAV
1/6
OK
SearchSearch PlayPlay
Move Select
VolumeVolume
4
SWAV0001.WAVSWAV0001.WAV
8KHz
Mono
64Kbps
00:00:00/00:00:10
00:00:00/00:00:10
OFFOFF
SWAV0001.WAV
00:00:00/16:22:48
1/6
OK
SearchSearch PlayPlay VolumeVolume
Shortcut buttons are provided to allow users easy access to frequently used functions.
Toggling Voice Record / Play Mode
1. Set the Mode Dial to Voice mode.
2. Press the [POWER] button to turn on the device.
3. Press the [Shortcut 1] button to switch to Voice play mode.
4. Press the [Shortcut 1] button.
◆It moves to the Voice record mode.
5. Each press of the [Shortcut 1] toggles between voice record and play
modes.
Viewing the Voice File List
1. Set the Mode Dial to Voice mode.
2. Press the [POWER] button to turn on the device.
3. Press the [Shortcut 1] button to switch to Voice play mode.
4. Press the [Shortcut 2] button.
◆Stored voice files are listed.
5. Select a voice file to play by moving the joystick up / down (……/††) and then
press the [OK] button.
◆The selected voice file plays.
00934C SC-MS10 USA~152 9/30/05 11:00 AM Page 123

ENGLISH
124124
4
5
Voice Mode : Setting the Voice Play Options
Using the Shortcut Buttons
Shortcut buttons are provided to allow users easy access to frequently used functions.
Setting the Repeat Option
1. Set the Mode Dial to Voice mode.
2. Press the [POWER] button to turn on the device.
3. Press the [Shortcut 1] button to switch to Voice play mode.
4. Press the [Shortcut 3] button.
◆Each press of the [Shortcut 3] button cycles through < >-< >-< >-< >.
5. An icon indicating the selected repeat option appears on the screen.
◆Refer to page 125 for further details.
Deleting Voice Files
1. Set the Mode Dial to Voice mode.
2. Press the [POWER] button to turn on the device.
3. Press the [Shortcut 1] button to switch to Voice play mode.
4. Press the [Shortcut 4] button.
◆<Delete>: Deletes the selected file.
◆<Cancel>: Cancels the deletion.
5. Select <Delete> to delete selected files. Select <Cancel> to cancel deletion.
◆Refer to page 126 for further details.
SWAV0001.WAVSWAV0001.WAV
8KHz
Mono
64Kbps
00:00:00/00:00:1000:00:00/00:00:10
OFFOFF
1/6
OK
Search
Search Play
Play
SWAV0001.WAV
00:00:00/00:00:10
OFF
1/6
Search Play
VolumeVolume
Volume
SWAV0001.WAV
00:00:00/00:00:10
OFF
1/6
Search Play
SWAV0001.WV0001.WAVSWAV0001.WAV
8KHz
Mono
64Kbps
00:00:00/00:00:1000:00:00/00:00:10
OFFOFF
1/6
OK
Search
Search Play
Play
Delete
Cancel
Volume
VolumeVolume
5
SWAV0001.WAV
00:00:00/00:00:10
OFF
1/6
Search Play
SWAV0001.WAVSWAV0001.WAV
8KHz
Mono
64Kbps
00:00:00/00:00:1000:00:00/00:00:10
1/6
OK
SearchSearch PlayPlay
Voice
Repeat
Move Select Exit
Voice
Repeat
Move Select Exit
VolVol
Vol
4
SWAV0001.WAVSWAV0001.WAV
8KHz
Mono
64Kbps
00:00:00/00:00:1000:00:00/00:00:10
OFFOFF
1/6
OK
SearchSearch PlayPlay
SWAV0001.WAV
00:00:00/00:00:10
1/6
Search Play
Voice
Repeat
Move Select Exit
Voice
Repeat
Move Select Exit
Vol
VolVol
00934C SC-MS10 USA~152 9/30/05 11:00 AM Page 124
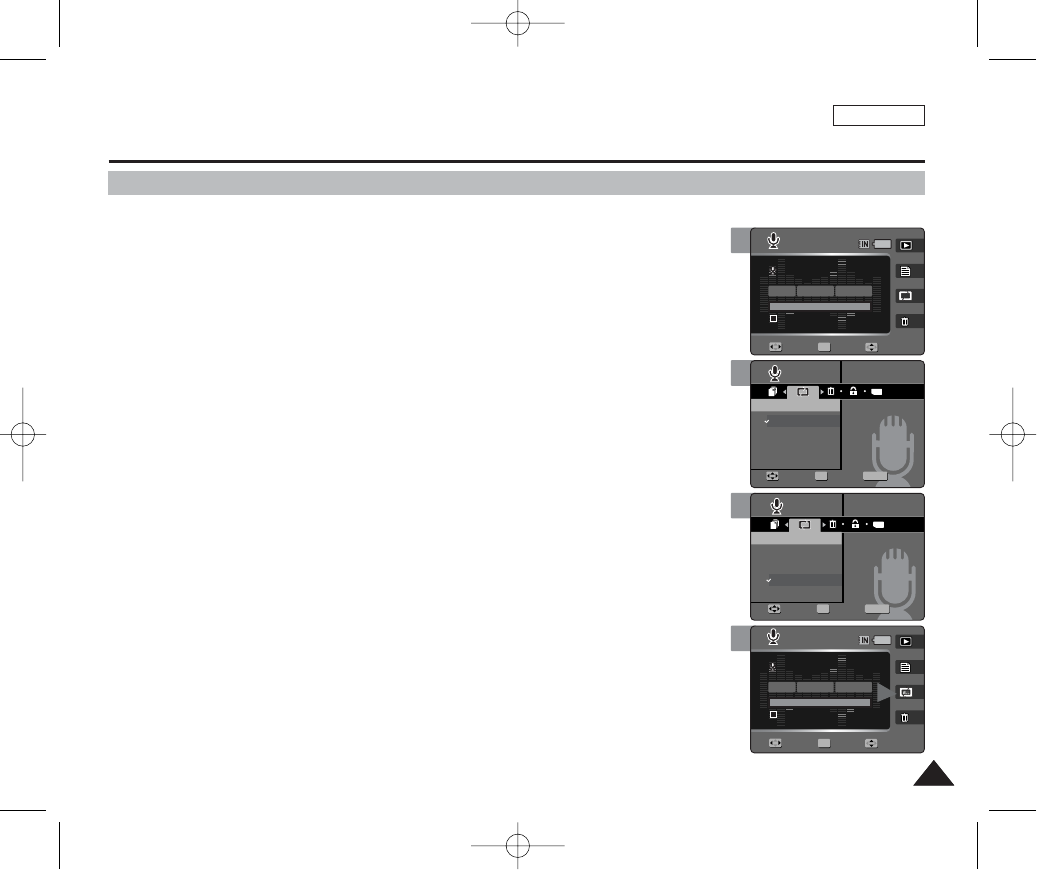
ENGLISH
125125
5
6
7
Voice Mode : Setting the Voice Play Options
Setting the Repeated Play
You can repeat a selected file or all the voice files.
1. Set the Mode Dial to Voice mode.
2. Press the [POWER] button to turn on the device.
3. Press the [Shortcut 1] button to switch to Voice play mode.
4. Press the [MENU] button.
◆Menu screen appears.
5. Move the joystick left / right (œ/√) to select <Repeat>.
6. Select an option by moving the joystick up / down (……/††) and then press the
[OK] button.
◆<Off>: No repeat
◆<One>: One selected file will play repeatedly.
◆<All>: All music files will play through in order and start again from the beginning..
◆<Shuffle>: All files will play in random order once and start again.
7. Press the [MENU] button to exit the menu.
◆An icon indicating the selected repeat mode appears on the screen.
[ Notes ]
✤You can easily access this function by using the shortcut button (refer to page 124).
✤When the earphones or AV (Audio / Video) cable is connected to the device, the <Beep Sound>
function will not operate.
TYPE
MENU
SWAV0001.WAV
00:00:00/00:00:10
OFF
1/6
Search Play
SWAV0001.WAV
00:00:00/00:00:10
1/6
Search Play
VoiceVoice
RepeatRepeat
Off
One
All
Shuffle
MoveMove SelectSelect ExitExit
OK
Voice
Repeat
Move Select Exit
Vol
Vol
SWAV0001.WAV
00:00:00/00:00:10
OFF
1/6
Search Play
SWAV0001.WAV
00:00:00/00:00:10
1/6
Search Play
Voice
Repeat
Move Select Exit
TYPE
MENU
VoiceVoice
RepeatRepeat
Off
One
All
Shuffle
MoveMove SelectSelect ExitExit
OK
Vol
Vol
SWAV0001.WAV
00:00:00/00:00:10
OFF
1/6
Search Play
SWAV0001.WAVSWAV0001.WAV
8KHz
Mono
64Kbps
00:00:00/00:00:1000:00:00/00:00:10
1/6
OK
SearchSearch PlayPlay
Voice
Repeat
Move Select Exit
Voice
Repeat
Move Select Exit
VolVol
Vol
4
SWAV0001.WAVSWAV0001.WAV
8KHz
Mono
64Kbps
00:00:00/00:00:1000:00:00/00:00:10
OFFOFF
1/6
OK
SearchSearch PlayPlay
SWAV0001.WAV
00:00:00/00:00:10
1/6
Search Play
Voice
Repeat
Move Select Exit
Voice
Repeat
Move Select Exit
Vol
VolVol
00934C SC-MS10 USA~152 9/30/05 11:00 AM Page 125
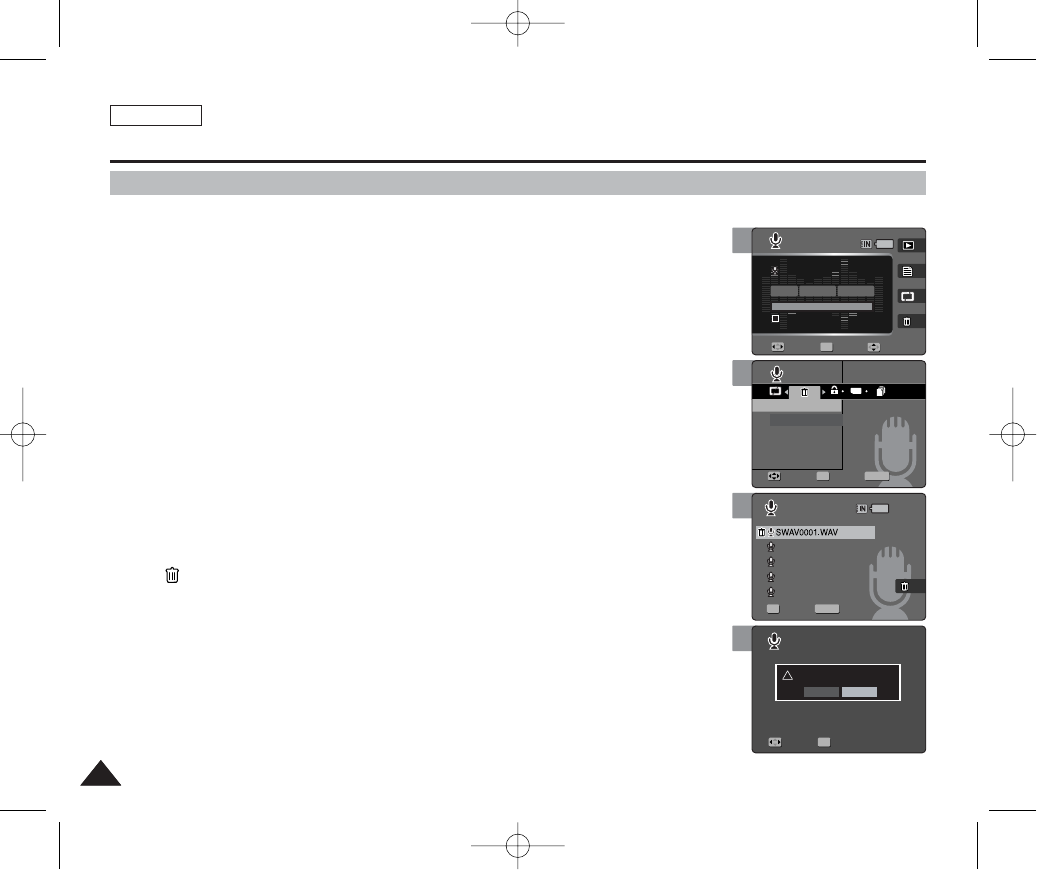
ENGLISH
126126
6
7
8
Voice Mode : Setting the Voice Play Options
Deleting Voice Files
You can delete stored voice files.
1. Set the Mode Dial to Voice mode.
2. Press the [POWER] button to turn on the device.
3. Press the [Shortcut 1] button to switch to Voice play mode.
4. Press the [MENU] button.
◆Menu screen appears.
5. Move the joystick left / right (œœ/√√) to select <Delete>.
6. Select an option by moving the joystick up / down (……/††) and then press the
[OK] button.
◆<Select>: The voice file list appears and you can select files to delete.
◆<All>: All files will be deleted.
If <All> is selected, the message “Delete All?” appears. Select <Yes> or <No> by moving
the joystick left / right (œ/√) and then press the [OK] button to confirm.
7. If <Select> was selected, select files to protect by moving the joystick left /
right / up / down (œœ/√√/……/††) and press the [OK] button.
◆< > icon appears on the selected files.
8. Press the [Shortcut 4] button.
◆The message “Delete?” appears.
9. Select <Yes> to delete selected files. Select <No> to cancel deletion.
◆Press the [MENU] button to exit the menu.
[ Notes ]
✤You can easily access this function by using the shortcut button (refer to page 124).
✤After deleting a file, the last file of the current folder is selected.
TYPE
MENU
SWAV0002.WAV
SWAV0003.WAV
SWAV0004.WAV
SWAV0005.WAV
SWAV0001.WAV
00:00:00/00:00:10
OFF
1/6
Search Play
VoiceVoice
DeleteDelete
Select
All
OK
MoveMove SelectSelect ExitExit
Select Exit
Move Select
Volume
MENU
SWAV0002.WAVSWAV0002.WAV
SWAV0003.WAVSWAV0003.WAV
SWAV0004.WAVSWAV0004.WAV
SWAV0005.WAVSWAV0005.WAV
SWAV0001.WAV
00:00:00/00:00:10
OFF
1/6
Search Play
Voice
Delete
OK
Move Select Exit
SelectSelect ExitExit
Move Select
Volume
SWAV0002.WAV
SWAV0003.WAV
SWAV0004.WAV
SWAV0005.WAV
SWAV0001.WAV
00:00:00/00:00:10
OFF
1/6
Search Play
Voice
Delete
OK
Move Select Exit
Select Exit
MoveMove SelectSelect
!Delete?
Yes No
Volume
4
SWAV0002.WAV
SWAV0003.WAV
SWAV0004.WAV
SWAV0005.WAV
SWAV0001.WAVSWAV0001.WAV
8KHz
Mono
64Kbps
00:00:00/00:00:1000:00:00/00:00:10
OFFOFF
1/6
OK
SearchSearch PlayPlay
Voice
Delete
Move Select Exit
Select Exit
Move Select
VolumeVolume
00934C SC-MS10 USA~152 9/30/05 11:00 AM Page 126
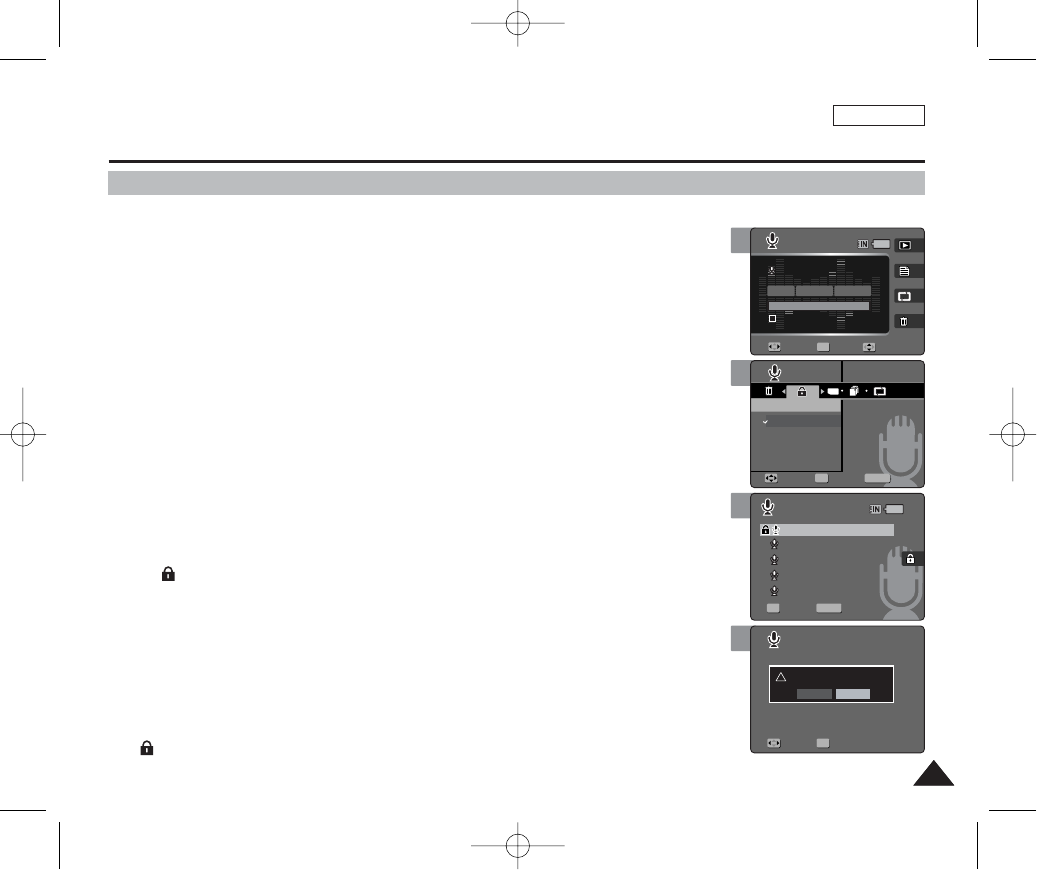
ENGLISH
127127
5
7
8
Voice Mode : Setting the Voice Play Options
Protecting Voice Files
You can protect saved important voice files from accidental erasure.
1. Set the Mode Dial to Voice mode.
2. Press the [POWER] button to turn on the device.
3. Press the [Shortcut 1] button to switch to Voice play mode.
4. Press the [MENU] button.
◆Menu screen appears.
5. Move the joystick left / right (œœ/√√) to select <Protect>.
6. Select an option by moving the joystick up / down (……/††) button and then
press the [OK] button.
◆<Select>: The voice file list appears and you can select files to protect.
◆<All>: All files will be protected.
If <All> is selected, the message “Protect All?” appears. Select <Yes> or <No> by moving
the joystick left / right (œ/√) and then press the [OK] button to confirm.
7. If <Select> was selected, select files to protect by moving the joystick left /
right / up / down (œœ/√√/……/††) and press the [OK] button.
◆< > icon appears on the selected files.
8. Press the [Shortcut 3] button.
◆The message “Protect?” appears.
9. Select <Yes> to protect selected files. Select <No> to cancel protection.
◆Press the [MENU] button to exit the menu.
[ Note ]
✤< > icon appears on the selected files.
TYPE
SWAV0002.WAV
SWAV0003.WAV
SWAV0004.WAV
SWAV0005.WAV
SWAV0001.WAV
00:00:00/00:00:10
OFF
MENU
1/6
OK
Search Play
VoiceVoice
ProtectProtect
Select
All
MoveMove SelectSelect ExitExit
Select Exit
Move Select
Volume
MENU
SWAV0002.WAVSWAV0002.WAV
SWAV0003.WAVSWAV0003.WAV
SWAV0004.WAVSWAV0004.WAV
SWAV0005.WAVSWAV0005.WAV
SWAV0001.WAV
SWAV0001.WAV
00:00:00/00:00:10
OFF
1/6
OK
Search Play
Voice
Protect
Move Select Exit
SelectSelect ExitExit
Move Select
Volume
SWAV0002.WAV
SWAV0003.WAV
SWAV0004.WAV
SWAV0005.WAV
SWAV0001.WAV
00:00:00/00:00:10
OFF
1/6
OK
Search Play
Voice
Protect
Move Select Exit
Select Exit
!Protect?
Yes No
MoveMove SelectSelect
Volume
4
SWAV0002.WAV
SWAV0003.WAV
SWAV0004.WAV
SWAV0005.WAV
SWAV0001.WAVSWAV0001.WAV
8KHz
Mono
64Kbps
00:00:00/00:00:1000:00:00/00:00:10
OFFOFF
1/6
OK
Search
Search Play
Play
Voice
Protect
Move Select Exit
Select Exit
Move Select
VolumeVolume
00934C SC-MS10 USA~152 9/30/05 11:00 AM Page 127
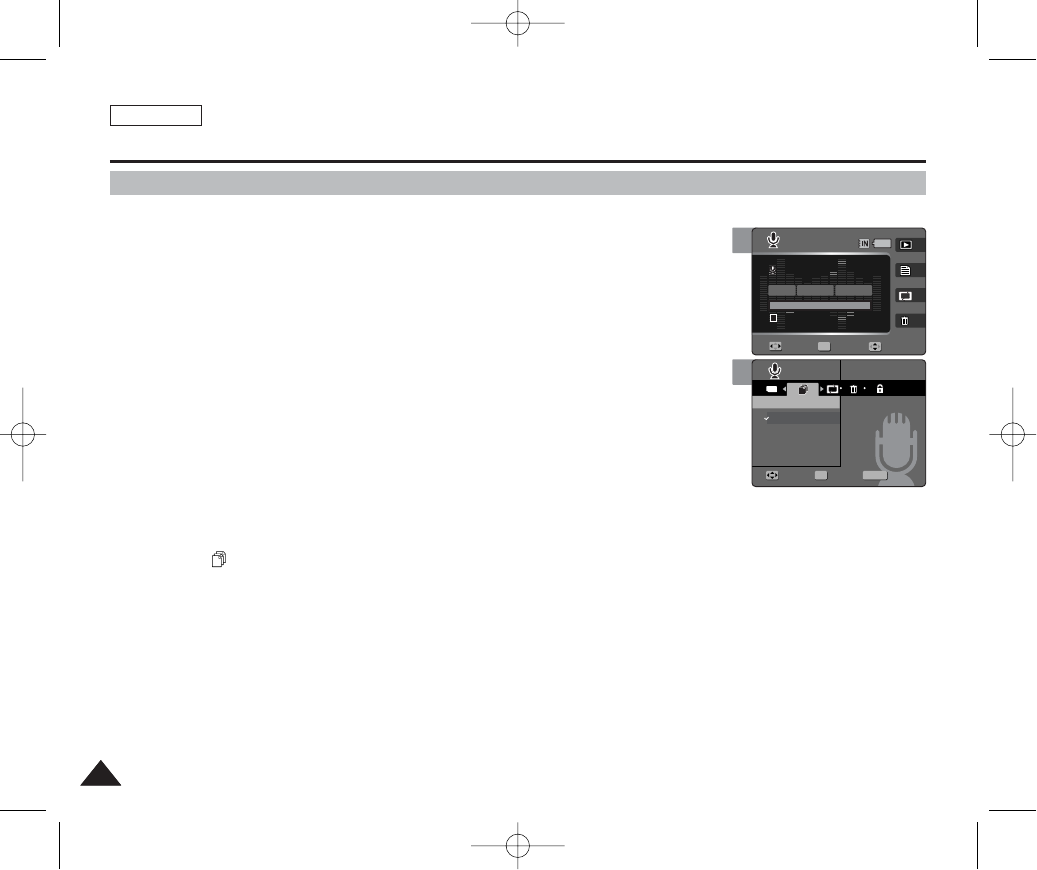
ENGLISH
128128
You can copy saved files from the built-in internal memory to an external mini SD Memory Card and vice-versa.
1. Set the Mode Dial to Voice mode.
2. Press the [POWER] button to turn on the device.
3. Press the [Shortcut 1] button to switch to Voice play mode.
4. Press the [MENU] button.
◆Menu screen appears.
5. Move the joystick left / right (œœ/√√) to select <Copy (to)>.
6. Select an option by moving the joystick up / down (……/††) and then press the
[OK] button.
◆<Select>: Voice file list appears and you can select files to copy.
◆<All>: All files will be copied.
If <All> is selected, the message “Copy All?” appears. Select <Yes> or <No> by moving the
joystick left / right (œ/√) and then press the [OK] button to confirm.
7. If <Select> is selected, playlist appears. Select files to copy by moving the joystick left / right / up / down
(œœ/√√/……/††) and press the [OK] button.
◆An icon ( ) indicating selected file is to be copied appears.
8. Press the [Shortcut 4] button.
◆The message “Copy?” appears. Select <Yes> or <No> by moving the joystick left / right (œ/√) and then press the [OK]
button to confirm.
9. Press the [MENU] button to exit the menu.
[ Notes ]
✤It copies from the currently-used memory to another. If the internal memory was used, it copies to an external mini SD Memory Card.
✤Actual storage capacity may differ from the printed memory capacity.
5
Voice Mode : Setting the Voice Play Options
Copying Voice Files
TYPE
SWAV0001.WAV
00:00:00/00:30:00
OFF
MENU
1/6
OK
Search Play
VoiceVoice
Copy (to)Copy (to)
Select
All
MoveMove SelectSelect ExitExit
Volume
4
SWAV0001.WV0001.WAVSWAV0001.WAV
8KHz
Mono
64Kbps
00:00:00/00:30:0000:00:00/00:30:00
OFFOFF
1/6
OK
SearchSearch PlayPlay
Voice
Copy (to)
Move Select Exit
VolumeVolume
00934C SC-MS10 USA~152 9/30/05 11:00 AM Page 128

ENGLISH
129129
Connecting to a PC..........................................................................130
Supported USB Speed according to Operating System ...........130
Installing Software ...........................................................................131
Installing DV Media Pro 1.0........................................................131
Installing DV Media Pro 1.0 / Video Studio................................132
Connecting To Other Devices .......................................................133
Connecting to a PC Using USB Cable ......................................133
Using the PC Camera Function .................................................134
Using as a Mass Storage Device...............................................135
Connecting to a TV Monitor .......................................................136
Connecting to a VCR..................................................................137
Printing Photos ................................................................................138
Printing with PictBridge...............................................................138
Printing with DPOF .....................................................................139
Cleaning and Maintenance .............................................................140
After Using the Device................................................................140
Cleaning the Body ......................................................................141
Regarding the Battery.................................................................142
Using Abroad ..............................................................................143
Miscellaneous
Information
5
5
00934C SC-MS10 USA~152 9/30/05 11:00 AM Page 129
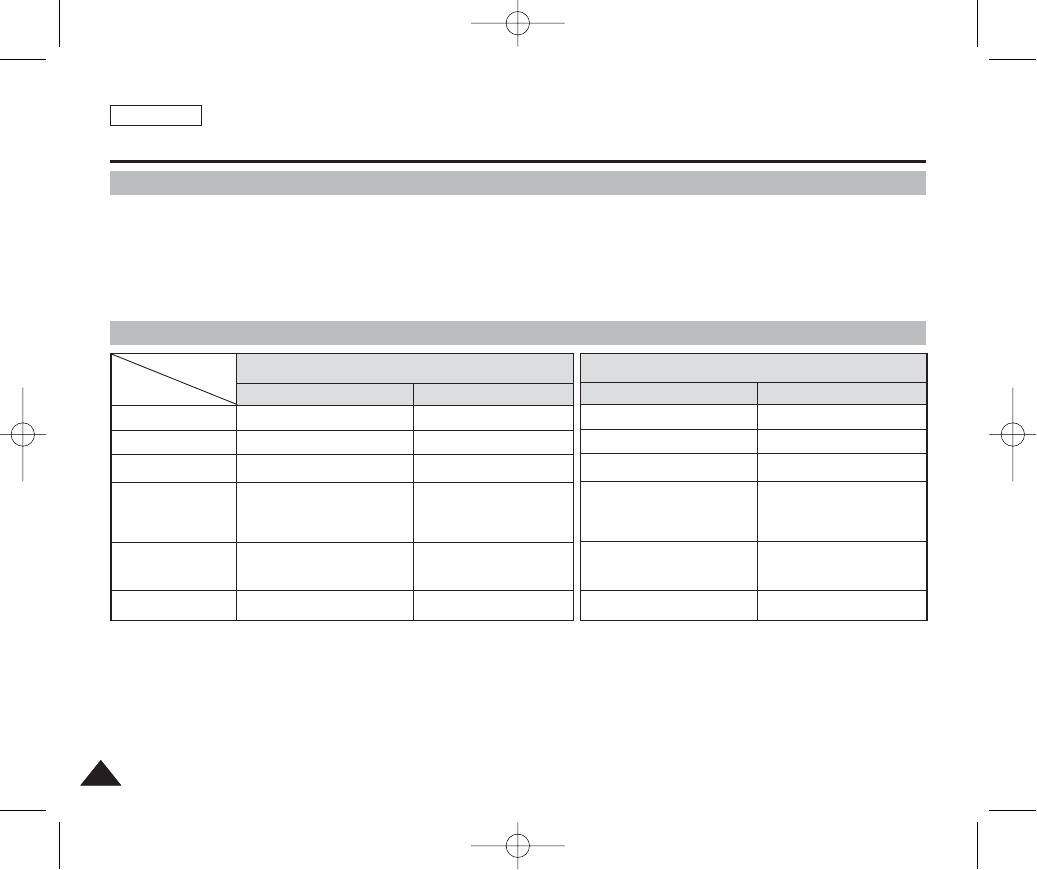
ENGLISH
130130
Supported USB Speed according to Operating System
Recommended System Requirements
The USB driver supports High Speed USB 2.0 communication only under the Microsoft Windows and Apple Mac OSX,
operating systems.
✤Windows 98SE/ME: Full Speed USB
✤Windows 2000: High Speed USB only with the Service Pack4
Installed
✤Windows XP: High Speed USB only with the Service Pack1
Installed
✤Mac OS X: High Speed USB on 10.3 or later
Miscellaneous Information : Connecting to a PC
[ Notes ]
✤Movie playback or movie editing may be difficult on a slower-than-recommended PC. .
✤Multiple USB devices connected to a PC or using USB hubs may cause communication / installation errors with the Miniket Photo.
✤Disconnecting the USB cable during the data transfer will stop the communication and may damage data stored in the memory.
Pentium III / 800MHz
Windows 98SE/ME
256MB
1.2 GB or above
1024 x 768 dots
24bit color
USB 1.1
CPU
OS
Memory
Free space
on the hard disk
Display Resolution
USB
Pentium IV / 2GHz
Windows 2000/XP
512MB or above
2GB or above
1024x768 dots
24-bit color
USB 2.0 High Speed
Minimum Recommended
G3 / 500MHz
Mac OS 10.2
128MB
1 GB or above
800x600 dots
16-bit color
USB 1.1
G4 Processor
Mac OS 10.3
512MB or above
2GB or above
1024x768 dots
24-bit color
USB 2.0 High Speed
Minimum Recommended
Windows Environment Macintosh Environment
00934C SC-MS10 USA~152 9/30/05 11:00 AM Page 130
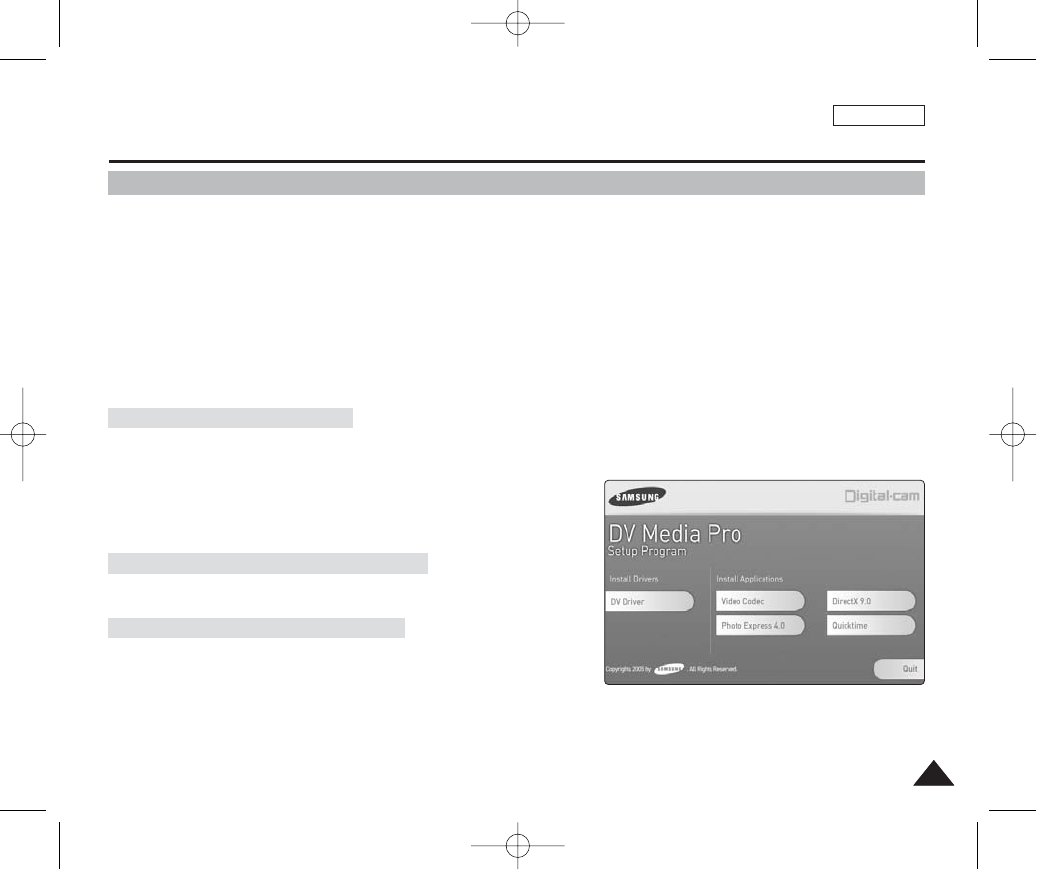
ENGLISH
131131
1. Click “DirectX 9.0” on the Setup screen.
◆DirectX 9.0 is basic software that is required by CODEC utilisation.
Problems may occur if it is not installed.
Miscellaneous Information : Installing Software
Installing DV Media Pro 1.0
You need to install DV Media Pro 1.0 to play back recorded movie files or the transferred data from the camera with the USB
cable on your PC.
■Installing Acrobat Reader
Click “Acrobat Reader” on the Setup screen.
- Acrobat Reader program should be installed to view the DV Media Pro User’s Manual.
- The DV Media Pro User’s Manual is included on the accompanying CD in Adobe’s Portable Document Format (PDF).
(The Acrobat Reader is a freeware product of Adobe Systems. Inc.)
■Before You Start!
- Turn on the PC and exit all other applications.
- Insert the Software CD provided with the package. It automatically runs and displays the Setup screen. If it does not, click
<Start> on the left bottom of the desktop and select <Run>. When the <Run> dialog window appears, type in
“D:\autorun.exe” into the text box and then press ENTER where your CD-ROM drive is set to “D:\”.
1. Click “DV Driver” on the Setup screen.
◆Driver software required are installed automatically:
- USB removable storage device driver (Windows 98SE only)
- USB PC-CAMERA driver
- USB streaming driver (USB interface for data transfer)
2. Press <Confirm> to finish program installation.
◆Windows 98 users need to restart the Windows.
Driver Installation – DV Driver
1. Click “Video CODEC” on the Setup screen.
◆CODEC is required to play movie files recorded by Miniket Photo.
Application Installation – Video CODEC
Application Installation – DirectX 9.0
[ Notes ]
✤You have to install “DV Driver”, “Video Codec” and “DirectX 9.0” to run DV Media Pro 1.0 properly.
✤Please refer to the User’s Manual inside the CD ROM drive (D:\help) folder for more detailed information on installation procedures.
✤Use DV Media Pro 1.0 REV4.2 or higher for this product.
00934C SC-MS10 USA~152 9/30/05 11:00 AM Page 131

ENGLISH
132132
Miscellaneous Information : Installing Software
Installing DV Media Pro 1.0 / Video Studio
Application Installation – Photo Express
1. Click “Photo Express” on the Setup screen.
◆It is a photo editing tool that allows users to edit images.
Application Installation – QuickTime
1. Click “QuickTime” on the Setup screen.
◆QuickTime is Apple's technology for handling video, sound, animation, graphics, text, music, and even 360-degree virtual
reality (VR) scenes.
Application Installation – Video Studio (in the second CD provided)
1. Insert the CD.
◆Setup screen displays automatically. Follow the instruction to start installation.
◆It is a video editing tool that allows users to edit movie files.
[ Notes ]
✤For photo editing, use Photo Express.
For video editing, use the Video Studio from the second CD provided.
✤It is required to install software in this order: DV driver, Video CODEC and DirectX 9.0 for movie playback on a PC.
✤It is required to install the DV Driver for PC camera use.
00934C SC-MS10 USA~152 9/30/05 11:00 AM Page 132
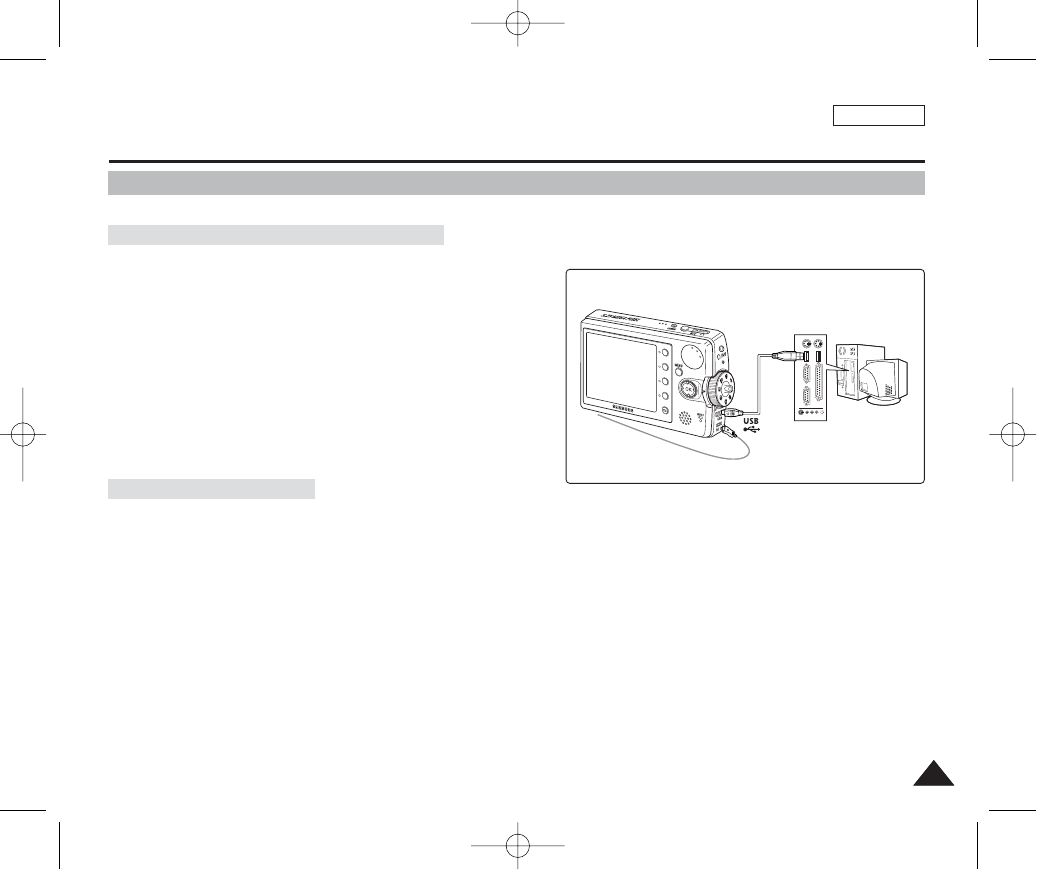
ENGLISH
133133
Connect to a PC with the provided USB cable. You can view your movies / photos on your PC.
Connecting to a PC – Playing Movie Files
1. Connect the Miniket Photo to the PC with the provided USB
cable as shown in the figure.
2. Turn on your PC.
3. Press the [POWER] button to turn on the device.
4. Locate the <Miniket> or <Removable Storage Device>
recognised by the PC and then double-click it.
When the built-in internal memory is used, folder name
appears to be <MSAMSUNG>-<SSMOV>.
5. Copy the movie file to your PC.
It is recommended to copy the movie file onto the PC and
playback on the PC for better performance.
6. Double-click on the copied movie file name.
It starts to play back.
Disconnecting from a PC
1. Click on the “Safely remove hardware” tray icon on the bottom right side of the desktop.
Select the device and click on the “Stop” button.
2. When the message saying that it is safe to remove the hardware appears, unplug the cable from the PC.
[ Warning ]
✤When data communication is disrupted due to static electricity, magnetic field or other reason, restart the program or try to disconnect /
connect the communication cable again.
[ Notes ]
✤Multiple USB devices connected to a PC or using USB hubs may cause communication / installation errors with the Miniket Photo.
✤Refer to page XX for PC recommendations on USB use. Some PCs meeting the requirements may not support proper USB operation due
to various reasons. Please refer to the product documentation of the PC for further details.
✤If the PC does not recognise the USB device when the USB cable is connected to the front USB port, try the USB port on the rear panel of
the PC.
✤The Windows 98 SE operating system requires DV Driver installation prior to USB use.
Miscellaneous Information : Connecting To Other Devices
Connecting to a PC Using USB Cable
USB cable
00934C SC-MS10 USA~152 9/30/05 11:00 AM Page 133
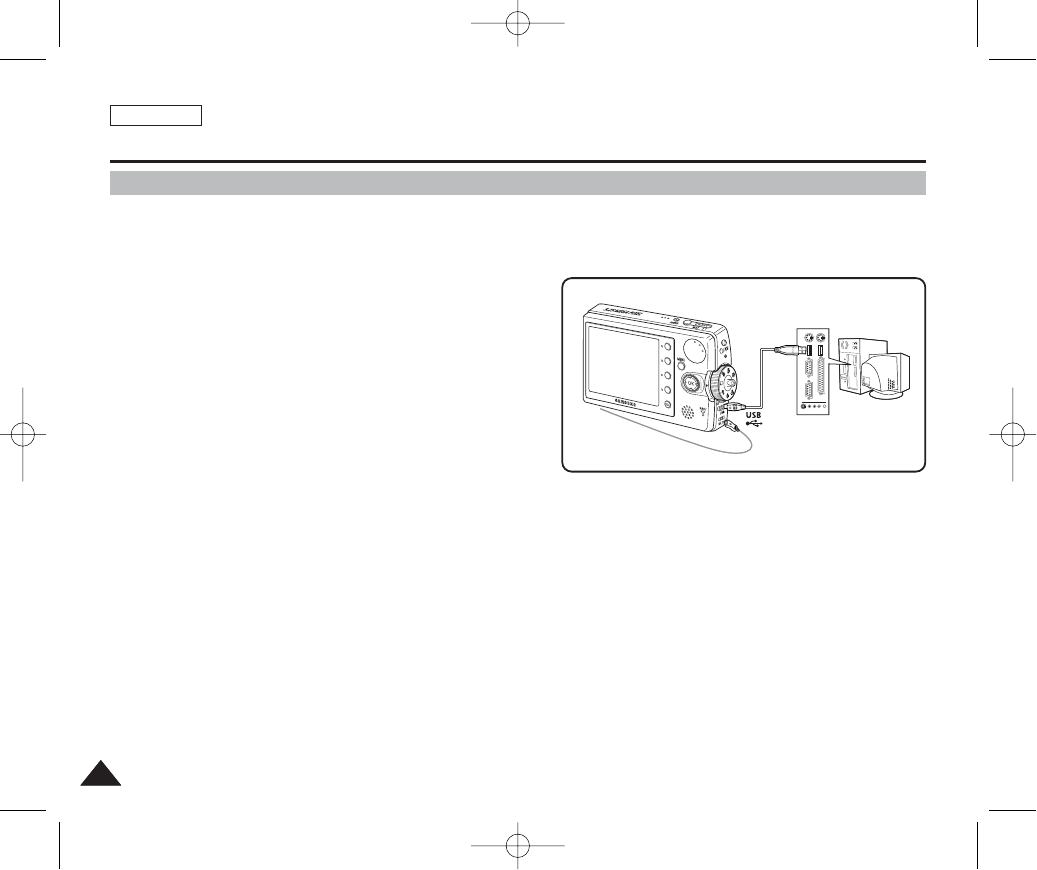
ENGLISH
134134
You can record video files onto the connected PC directly in real-time. Using this function, you can use it as a PC camera for
video chatting / conferencing. USB data streaming requires a DV Driver, Video CODEC, and DirectX 9.0 or higher installed on
the PC prior to use (refer to page 133).
1. Connect the Miniket Photo to the PC with the provided
USB cable as shown in the figure.
2. Turn on your PC.
3. Press the [POWER] button to turn on the device.
4. Run a video chatting / conferencing application such as
Windows Messenger and enjoy the video utilisation.
◆Various applications take advantage of the PC camera function.
Refer to respective product documentation for further details.
5. When finished, disconnect the cable.
[ Notes ]
✤You must install the DV Driver (refer to page 131).
✤It is recommended to use an AC Power Adapter during data transfer to avoid unintended power outages.
✤Microsoft Windows ME or later operating systems support the PC camera function.
✤If the PC does not recognise the USB device when the USB cable is connected to the front USB port, try the USB port on the rear panel of
the PC.
Miscellaneous Information : Connecting To Other Devices
Using the PC Camera Function
00934C SC-MS10 USA~152 9/30/05 11:00 AM Page 134
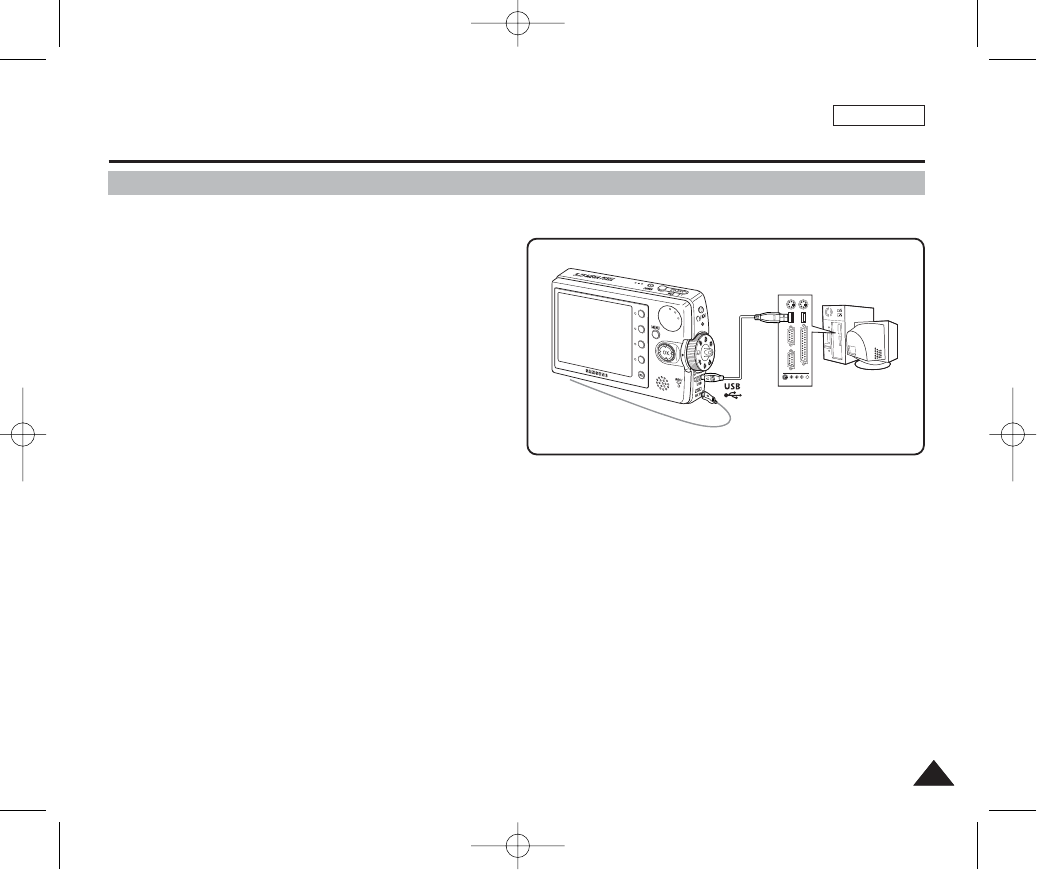
ENGLISH
135135
You can use your Miniket Photo as a USB mass storage device.
1. Connect the Miniket Photo to the PC with the
provided USB cable as shown in the figure.
2. Turn on your PC.
3. Set the Mode Dial to Storage.
4. Press the [POWER] button to turn on the device.
5. Locate the <Miniket> or <Removable Storage
Device> recognised by the PC and then double-
click it.
6. Copy files into the <MISC> folder under the <Miniket> or <Removable Storage Device>.
7. When finished, disconnect the cable.
[ Warning ]
✤You cannot create a new folder on your Miniket Photo set.
✤If you create a new folder on your memory card using a PC, it will not play back music files stored on it.
[ Notes ]
✤You cannot create a new folder on your Miniket Photo set.
✤Multiple USB devices connected to a PC or using USB hubs may cause communication / installation errors with the Miniket Photo.
✤If the PC does not recognise the USB device when the USB cable is connected to the front USB port, try the USB port on the rear panel of
the PC.
Miscellaneous Information : Connecting To Other Devices
Using as a Mass Storage Device
00934C SC-MS10 USA~152 9/30/05 11:00 AM Page 135
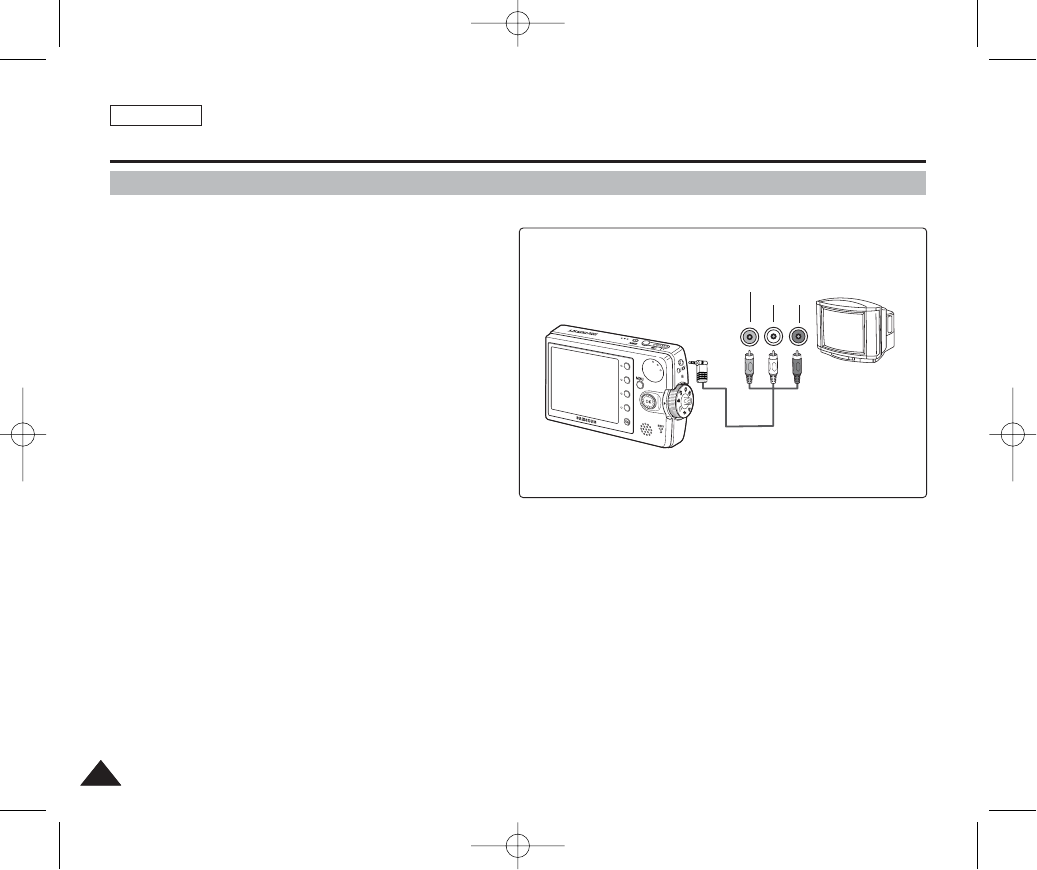
ENGLISH
136136
Connecting to a TV Monitor
You can connect your Miniket Photo directly to a TV set .
1. Connect the provided AV cable to the [Earphones
and AV jack] of the Miniket Photo.
2. Connect the other end of the cable to the TV set
by matching the colors of the terminals.
3. Turn on the TV and set the <Source> to the
external input channel you connected the cable.
◆<Source> may be represented as <Line In>, <Input>,
<AV>, etc. depending on the manufacturer.
◆Movie Record mode is displayed on the TV screen.
4. Set the Mode Dial to Movie mode.
5. Press the [Shortcut 1] button to switch to Movie view mode.
◆Select a movie file to play.
6. Move the joystick left / right (œœ/√√) to select a movie and then press the
[OK] button.
◆It begins playback.
◆To pause playback, press the [OK] button.
◆To stop playback, hold down the [OK] button for more than 3 seconds
[ Notes ]
✤You can play back photo files as well as movie files.
✤When connected to other devices with the AV cable, no screen is displayed on the LCD monitor.
Miscellaneous Information : Connecting To Other Devices
Line Input
VIDEO AUDIO
(L) (R)
00934C SC-MS10 USA~152 9/30/05 11:00 AM Page 136
ENGLISH
137137
Miscellaneous Information : Connecting To Other Devices
Connecting to a VCR
You can connect your Miniket Photo to a TV set through a VCR. You can copy your video files to an ordinary videotape using
your VCR.
1. Connect the provided AV cable to the
[Earphones and AV jack] of the Miniket Photo.
2. Connect the other end of the cable to the VCR
set by matching the colors of the terminals.
3. Connect the RCA cables from TV’s Audio /
Video In to the VCR’s Audio / Video Out.
4. Turn on the TV / VCR and set the <Source> to
the external input channel where you
connected the VCR.
◆<Source> may be represented as <Line In>, <Input>,
<AV>, etc. depending on the manufacturer.
◆Movie Record mode is displayed on the TV screen.
5. Set the Mode Dial to Movie mode.
6. Press the [Shortcut 1] button to switch to Movie view mode.
◆Select a movie file to play.
7. Move the joystick left / right (œœ/√√) to select a movie, and then press the [OK] button.
◆It begins playback.
◆To pause playback, press the [OK] button.
◆To stop playback, hold down the [OK] button for more than 3 seconds
[ Note ]
✤You can play back photo files as well as the movie files.
✤When connected to other devices with the AV cable, no screen is displayed on the LCD monitor.
Line Input
Line Output
Line Input
VIDEO AUDIO
(L) (R)
00934C SC-MS10 USA~152 9/30/05 11:00 AM Page 137
ENGLISH
138138
Miscellaneous Information : Printing Photos
Wihth the provided USB cable and a PictBridge-supporting printer, you can print your photo images
directly without connecting to a PC.
1. Connect the device and the PictBridge supporting printer with
a USB cable.
2. Turn on the printer.
3. Press the [POWER] button to turn on the device.
4. Press the [Shortcut 2] button to set the date / time imprint
option.
◆Each press of the [Shortcut 2] button cycles through
Off< >-Date < >-Time < >-Date & Time< >.
5. [Shortcut 3] button will increase the number of copies, while
the [Shortcut 4] button will decrease the number of copies.
◆Range of possibilities: 1 ~ 99
◆Pressing the [Shortcut 3] button on 99 will set to 1.
◆Pressing the [Shortcut 4] button on 1 will set to 99.
6. Press the [Shortcut 1] button to begin printing.
[ Warning ]
✤This function works only with printers that support PictBridge.
[ Notes ]
✤Number of copies and imprint options can be set in the menu. Press the [MENU] button to access the function.
✤For printing information, refer to printer’s product information.
✤Depending on the printer, printing failure may occur. In this case, try to print from a PC after copying images onto
the PC.
Printing with PictBridge
00934C SC-MS10 USA~152 9/30/05 11:00 AM Page 138

ENGLISH
139139
Miscellaneous Information : Printing Photos
Printing with DPOF
DPOF (Digital Printing Order Format) defines the print information for each photo on the Memory Card. You can easily make
prints using a DPOF-compatible printer or order copies from commercial digital image developers.
Printing DPOF files in the Memory Card
1. Set the PDOF information for the photo you want to print. (Refer to page 88)
2. Insert a memory card into the DPOF- supporting printer.
3. Follow the steps of the printer to print out photos.
[ Notes ]
✤For further details about printing photos, refer to the printer’s user's manual.
✤Printing may not be performed depending on types of printers.
In this case, download JPEG files directly to the PC and print them.
00934C SC-MS10 USA~152 9/30/05 11:00 AM Page 139

ENGLISH
140140
Miscellaneous Information : Cleaning and Maintenance
After Using the Device
✤For the safekeeping of the device, follow these steps.
✓
Turn the device off.
✓
Remove the battery pack (refer to page 20).
✓
Remove the Memory Card (refer to page 35).
✤To prevent any damage to the LCD monitor, do not apply excessive force to its moving parts.
✤Do not drop or in any way shock the device.
✤For prolonged use of the device, avoid using it in places subject to excessive humidity or dust.
✤Do not leave the device in places subject to:
✓
Excessive humidity, steam, soot, or dust.
✓
Excessive shock or vibration.
✓
Extremely high (over 50°C or 122°F) or extremely low (under 0°C or 32°F) temperatures.
✓
Strong electromagnetic fields.
✓
Direct sunlight or in a closed car on a hot day.
✤For the safe use of the battery pack, follow these guidelines:
✓
To conserve battery power, be sure to turn off the device when not in use.
✓
Battery consumption may vary depending on the condition of use. Recording with many starts and stops, frequent
zooming, and recording in low temperatures will shorten actual recording times.
✓
Dispose of used battery packs promptly. Do not dispose of Battery Packs by burning them.
✓
The battery pack will become warm during charging and use. This is not a malfunction.
✓
The battery pack has a limited service life. If the period of use becomes noticeably shorter with a normal charge, the
battery pack is at the end of its service life. Replace it with a new battery pack.
✤For the safe use of the Memory Card, follow these guidelines:
✓
The Memory Card should be stored away from heaters and other heat sources. Avoid storing Memory Cards under direct
sunlight and avoid electromagnetic fields.
✓
Do not power off any devices while transferring data, as this may destroy the data.
✓
Back up your image data often to a hard disk or other permanent storage media.
✓
Format the Memory Card periodically.
✓
When formatting the Memory Card, format in the DEVICE.
00934C SC-MS10 USA~152 9/30/05 11:00 AM Page 140

ENGLISH
141141
Miscellaneous Information : Cleaning and Maintenance
Cleaning the Body
✤To Clean the Exterior of the CAM
✓
To clean the exterior, use a soft dry cloth. Wipe the body gently.
Do not apply excessive force when cleaning, gently rub the surface.
✓
The LCD monitor surface should not be pressed. Use a soft dry cloth to clean the surface.
✓
To clean the lens, use an optional air blower to blow out dirt and other small objects. Do not wipe the lens with a cloth or
your fingers. If necessary, use lens cleaning paper.
✓
Do not use thinner, alcohol, or benzene for cleaning. Otherwise, the finish may be damaged.
✓
Cleaning should be done only after the battery pack has been removed, and other power sources have been
disconnected.
[ Note ]
✤If the lens looks dimmer, turn off the device and leave it for about 1 hour.
00934C SC-MS10 USA~152 9/30/05 11:00 AM Page 141

ENGLISH
142142
Miscellaneous Information : Cleaning and Maintenance
Regarding the Battery
■Battery Pack performance decreases when the
surrounding temperature is 10°C (50°F) or below,
and shortens the battery life. In that case, do one of
the following so that the durability of the battery life
can be extended for a longer period of time.
- Put the battery pack in a pocket to warm it up,
and insert it in your CAM immediately prior to use.
- Use a large capacity battery pack (Optional).
■Be sure to set the switch to OFF when not recording
or playing back. The battery power is also consumed
in standby, playback, and pause modes.
■Have your battery packs ready for two to three times
the expected recording time, and make trial
recordings before make the actual recording.
■Do not expose the battery pack to water.
The battery pack is not water resistant.
■Keep the battery out of reach of children. If it is
swallowed, seek medical assistance immediately.
■Wipe the battery with a clean dry cloth to ensure
proper contact.
■Do not pick up the battery using metal tools as this
may cause a short circuit.
■Do not short the battery or dispose of the battery in
fire.
Do not disassemble the battery. The battery could
explode or catch fire.
■Use only recommended batteries and accessories.
Use of batteries not expressly recommended for this
equipment may cause an explosion or leakage,
resulting in fire, injury, or damage to the
surroundings.
■Install the battery according to the instructions.
Improperly installed batteries can cause damage to
the camcorder.
■When you do not use the device for a long time,
remove the battery pack. Otherwise, the battery
may leak. To avoid damage to the product, be sure
to remove the battery when no charge remains.
00934C SC-MS10 USA~152 9/30/05 11:00 AM Page 142

ENGLISH
143143
Miscellaneous Information : Cleaning and Maintenance
Using Abroad
✤Each country or region has its own electric system and TV standards (NTSC / PAL / SECAM)
✤Before using the Miniket Photo abroad, check the following items:
✤You can use the CAM in any country or area with the supplied AC Power Adapter where the power input range is 100V - 240V,
50/60Hz.
✤Use a commercially available AC plug adapter if necessary, depending on the design of the local wall outlets.
Power Sources
✤You can view your video files using the built-in LCD monitor. However, to view your recordings on a television set or to copy it to a
video cassette recorder (VCR), the television set or the VCR must comply with the TV standard and have the appropriate Audio /
Video ports. Otherwise, you may need to use a separate Video Format Transcoder (NTSC-PAL format Converter). You can set the
TV standard of the Miniket Photo for its video output.
TV Standards
PAL-Compatible Countries / Regions
Australia, Austria, Belgium, Bulgaria, China, CIS, Czech Republic, Denmark, Egypt, Finland, France, Germany, Greece, Great Britain,
Holland, Hong Kong, Hungary, India, Iran, Iraq, Kuwait, Libya, Malaysia, Mauritius, Norway, Romania, Saudi Arabia, Singapore, Slovak
Republic, Spain, Sweden, Switzerland, Syria, Thailand, Tunisia, etc.
NTSC-Compatible Countries / Regions
Bahamas, Canada, Central America, Japan, Mexico, Philippines, Korea, Taiwan, United States of America, etc.
00934C SC-MS10 USA~152 9/30/05 11:00 AM Page 143
ENGLISH
144144
Troubleshooting : Self-Diagnosis Display
Self-Diagnosis Display
Checklist
✤Before contacting service personnel, please read and check following table. If the problem continues, contact your nearest
Samsung dealer or authorised service center / personnel.
Symptom Possible Causes Measure
Not enough free space for saving files.
The file is corrupted or damaged.
The paper is not inserted or set improperly.
Paper jam or other printing error occurred.
Ink is low.
USB cable is not connected or set improperly.
Battery Power is low.
The memory card is not inserted or damaged.
The memory card is not formatted.
Failed to write a file.
Failed to read a file.
The file is protected.
Memory Full!
File Error!
Paper Error!
Print Error!
Ink Error!
Connect USB Cable!
Low Battery!
Card Error
Not Formatted!
Write Error!
Read Error!
Protected!
Check the space of internal memory or the external memory.
Delete the file.
Check the paper in the printer. If there is no paper, insert paper.
Check the printer message. Refer to the printer manual for details.
Replace ink or toner.
Check the USB connection. Disconnect and try to connect again.
Charge the Battery Pack or connect the AC Power Adapter.
Replace the memory card.
Format the memory card or replace with a formatted one.
Check the memory space or format of the memory card.
Delete the damaged / corrupted file.
To delete a protected file, unlock the protection prior to deletion.
Informs that… ActionDisplay
No Power is supplied.
Date / Time is wrong
Focus does not adjust automatically
The Memory Card will not load properly.
Color balance of the picture is not natural.
Digital zoom does not work.
Files stored in the Memory Card can not be
deleted.
The power is not connected properly.
The battery is dead.
The battery is too cold.
The Date / Time is not set.
Focus mode is set to manual.
Recording was done in a too-dark place.
Lens is covered with condensation.
The Memory Card is inserted improperly.
Foreign substances are in the memory slot.
White balance setting is not suitable for the
recording situation.
The digital effect is set enabled.
Memory Card is protected.
The file is protected.
Connect the AC Power Adapter properly, page 24
Replace with a new Battery Pack.
Warm up the battery or move it to a warmer place.
Set the Date / Time, pages 38 ~ 40
Set the focus mode to <Auto>.
Use a strobe or light the place.
Clear the lens and check the focus.
Insert the Memory Card properly, page 35.
Clear the memory slot.
Set proper white balance, page 68.
Turn off the Digital Effects, page 77.
Release the Memory Card protection tab.
Unlock the protection of the file, page 84.
00934C SC-MS10 USA~152 9/30/05 11:00 AM Page 144
ENGLISH
145145
Troubleshooting : Self-Diagnosis Display
Symptom Possible Causes Measure
Images on the LCD monitor appear dark.
Play, rewind, and fast forward do not work.
Memory Card cannot play back (Photo Mode)
No picture is taken when [Record / Stop]
button is fully pressed.
Built-in flash will not go off
Cannot record a movie
LCD monitor turns off automatically.
Maximum recording time and photo capacity
is different than the specifications.
Audio and Video does not play back.
No audio plays when viewing photos.
Movie plays with mosaic and / or block-
shaped noise.
Data copied from a PC will not play.
MPEG4 movie taken will not play on a PC
Black margins on top and bottom side when
movie plays back on a PC.
Music files will not play on the camera.
Audio / Video will not play when connected to
a TV / VCR.
OSD will not appear on the TV monitor.
Ambient light is too bright.
Ambient temperature is too low.
Photo Mode is selected.
Movie Mode is selected.
Not enough free memory space.
Memory Card was formatted using another device.
Flash mode is set to Off
Movie Mode is selected.
Photo Mode is selected.
To save power consumption, the LCD monitor and
the device goes down if there is no button
operation for a certain period of time (depending on
the operation mode), which is not a malfunction.
Recording / lighting conditions may affect the size
of the recordings.
Damaged data file.
Photo viewing does not support audio.
Subject is moving fast.
By the nature of MPEG4 playback.
Data file does not comply with the supported file
format.
Required driver / application software are not
properly installed.
Data file does not comply with a supported file
format.
Cable connection was done improperly.
The <Source> of the TV is set improperly.
Mode is set to Recording mode.
TV set may not support on -creen text display
depending on manufacturer.
Adjust the LCD brightness, page 37.
Low temperature may produce a dark LCD screen. It is normal,
not a malfunction.
Select Movie Mode and press the [Shortcut 1] button.
Select Photo Mode and press the [Shortcut 1] button.
Empty the Memory Card to make free memory space.
Format the Memory Card.
Select different flash mode, page 75.
Flash will not work in Movie Mode.
Select Movie Mode.
Pressing any button will turn the device back on.
Pressing the button once again will operate its original function.
It is normal, not a malfunction.
Static electricity and strong magnetic fields may damage the
data stored in the Memory Card. Be careful with handling the
Memory Card. Damaged data cannot be recovered.
It is normal, not a malfunction.
It is normal. It is not malfunction. When you play back the movie
on a PC, it plays back properly.
Non-supported file formats will not play. It is normal, not a
malfunction.
Install the required driver / application software, including the
CODEC from the provided CD, page 131.
The encoding format of the music file may not comply with a
supported file format. Check the music file.
Check the cable connections, page 136.
Set the proper channel of <Source> of connected device.
Set the mode to Movie view, page 136.
It is normal, not a malfunction.
00934C SC-MS10 USA~152 9/30/05 11:00 AM Page 145
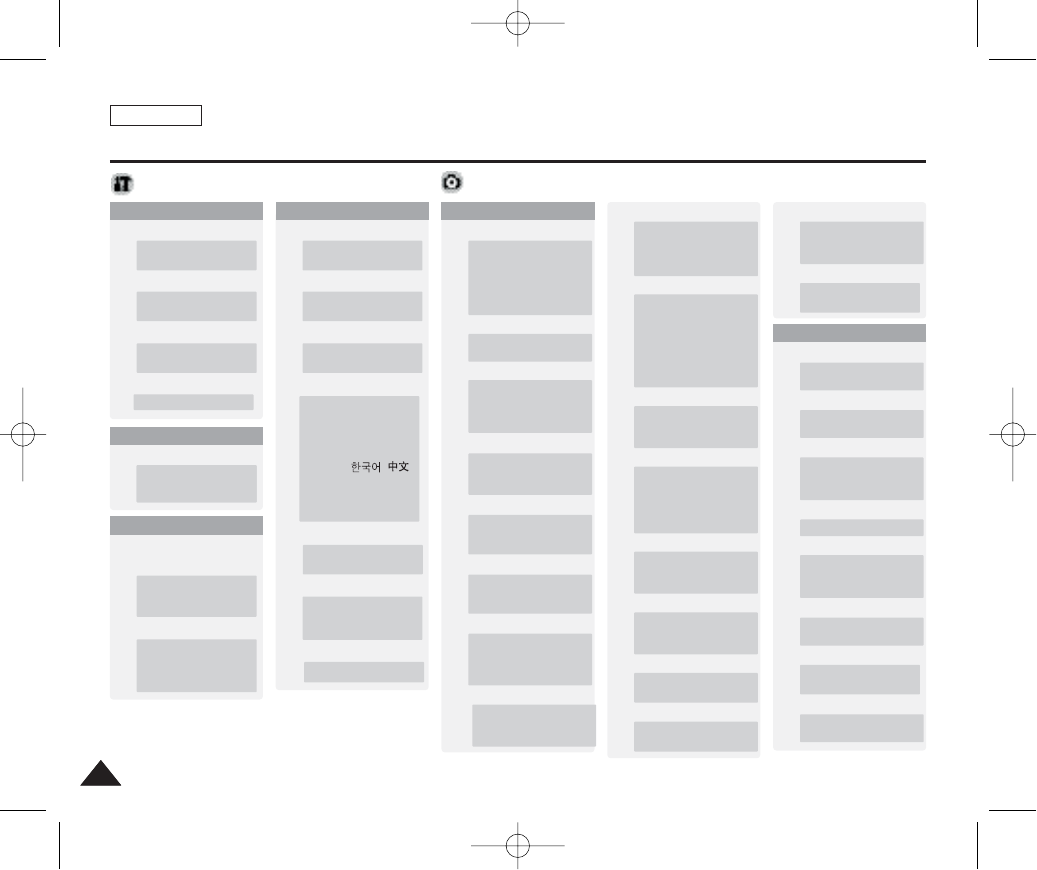
ENGLISH
146146
Using the Menu
System Settings
1. Capture
Scene
Auto / Manual / Night /
Portrait / Children /
Landscape / Close-up /
Sunset / Dawn /
Backlight / Fireworks /
Beach/Snow
EV
+2.0 / +1.6 / +1.3 / +1.0 /
+0.6 / +0.3 / 0 / -0.3 / -0.6
/ -1.0 / -1.3 / -1.6 / -2.0
DIS
Off
On
Digital Zoom
Off
On
Imprint
Off
Date
Date&Time
ISO
Auto
100
200
400
Photo Quality
Tiff
Super Fine
Fine
Normal
Photo Size
5M / 4M / 3M / 2M /
1M / VGA
2. View
Delete
Select
All
DPOF
Select
All
Copy (to)
Select
All
Protect
Select
All
Rotate
Right(90º)
Left(90º)
Updown(180º)
Resize
4M / 3M / 2M / 1M / VGA
Slide
Start
Interval
Repeat
Flash
Off
Auto
Red-eye
Fill-in
Slow Sync.
Sharpness
Soft
Normal
Sharp
Focus
Multi AF
Center AF
Spot AF
Photo
Metering
Multi
Center
Spot
Self Timer
Off
2 sec
10 sec
Multi Shot
Off
Normal
AEB
Digital Effect
Off
Sepia
Nega
BLK&WHT
1. Memory
.
.
.
Memory Type
Int. Memory
Memory Card
File No.
Reset
Series
3. Date/ Time
Date&Time Set
Date Format
YYYY/ MM / DD
DD/ MM / YYYY
MM/ DD / YYYY
Date/Time
Off
Date
Time
Date&Time
Auto Shut off
Reset
Off
3 Min
5 Min
Start
Mode Display
Off
On
Format
Int. Memory
Memory Card
Memory Space
000MB/000MB
4. System
.
.
.
Video Out
NTSC
PAL
Beep Sound
Off
On
Shutter Sound
Off
On
Language
English / Español /
Français / Português /
Deutsch / Italiano /
Nederlands / Polski /
PÛÒÒÍËÈ / / /
Iran / Arab / Magyar /
‰‰∑∑¬¬/ ì͇ªÌҸ͇ /
Svenska
2. Display
LCD Brightness
0%
100%
.
.
.
LCD Brightness
0%
100%
.
.
.
White Balance
Auto
Daylight
Cloudy
FluorescentH
FluorescentL
Tungsten
Custom WB
Macro
Off
Macro
Super Macro
Memory Type
Int. Memory
Memory Card
Memory Type
Int. Memory
Memory Card
00934C SC-MS10 USA~152 9/30/05 11:00 AM Page 146
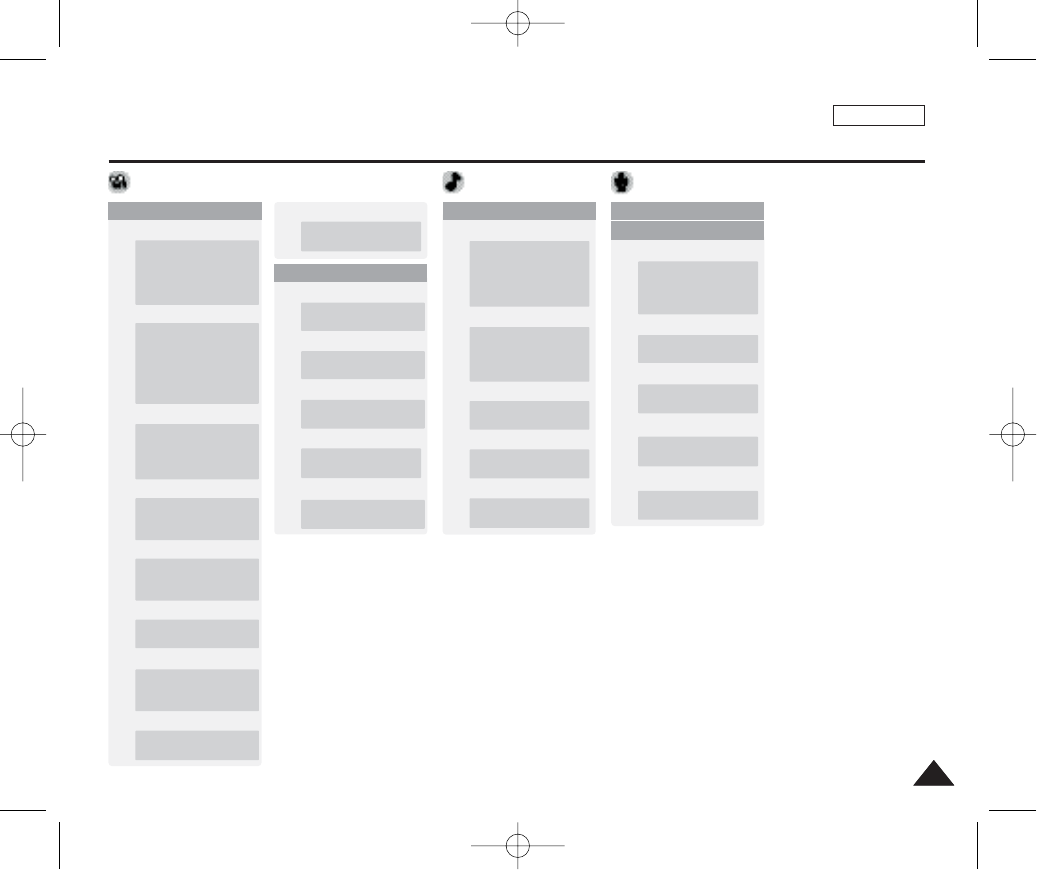
ENGLISH
147147
Using the Menu
1. Record
2. Play
Delete
Select
All
Voice RecorderMP3
Movie
1. Play
Program AE
Auto
Sports
Spotlight
Beach/Snow
Digital Effect
Off
Sepia
Nega
BLK&WHT
Equalizar
Normal
Pop
Jazz
Classic
Repeat
Off
One
Group
All
Shuffle
Repeat
Off
One
All
Shuffle
Protect
Select
All
Protect
Select
All
Delete
Select
All
White Balance
Auto
Daylight
Cloudy
FluorescentH
FluorescentL
Tungsten
2. Play
1. Record
Delete
Select
All
Protect
Select
All
Copy (to)
Select
All
Slide
Start
Repeat
Movie Size
640x480
320x240
Macro
Off
Macro
Super Macro
Movie Quality
Super Fine
Fine
Normal
Self Timer
Off
2 sec
10 sec
Wind Cut
Off
On
Memory Type
Int. Memory
Memory Card
Memory Type
Int. Memory
Memory Card
Memory Type
Int. Memory
Memory Card
Memory Type
Int. Memory
Memory Card
Copy (to)
Select
All
00934C SC-MS10 USA~152 9/30/05 11:00 AM Page 147

ENGLISH
148148
Specifications
Model Name
The System
Movie
Photo
Music
Voice
Storage Media
LCD Panel
Internal Memory Capacity
Camera
Imaging Sensor
Zoom Ratio
Focal Length
Shutter Speed
Metering Method
Electric Exposure Compensation
ISO
White Balance
Self Timer
Multi Shot
Macro
Scene Modes
Photo Size
Flash
Focus Method
Minimum Lighting condition
SC-MS10/MS11/MS15
MPEG4 AVI Format
TIFF, JPEG (DPOF, Exif 2.2)
Stereo Playback (Earphones)
Wave file record / play (8KHz Sampling, 16bit, Mono)
Internal flash memory / mini SD Memory Card
2.5” Trans reflective, 150K pixels
X/YY inch CCD, XX pixels
X3 (Optical) / X5 (Digital)
f=6.3 ~ 18.9mm, F3.5 (W) ~ 4.3 (T)
Auto mode: Scene Mode:
Multi / Center / Spot
±2.0 V (0.3EV Step)
Auto, 100, 200, 400
Auto, Daylight, Cloudy, Fluorescent H, Fluorescent L, Tungsten, Custom
2 seconds, 10 seconds
3 continuous pictures, AEB (Automatic Exposure Bracketing)
Super Macro: 1 ~ 5 cm Macro: 10 ~ 50 cm
Manual, Auto, Night, Portrait, Children, Landscape, Close-up, Sunset,
Dawn, Backlight, Fireworks, Beach / Snow
Auto, Red-eye, Fill-in, Slow Sync.
Multi, Center, Spot
7 lux
00934C SC-MS10 USA~152 9/30/05 11:00 AM Page 148
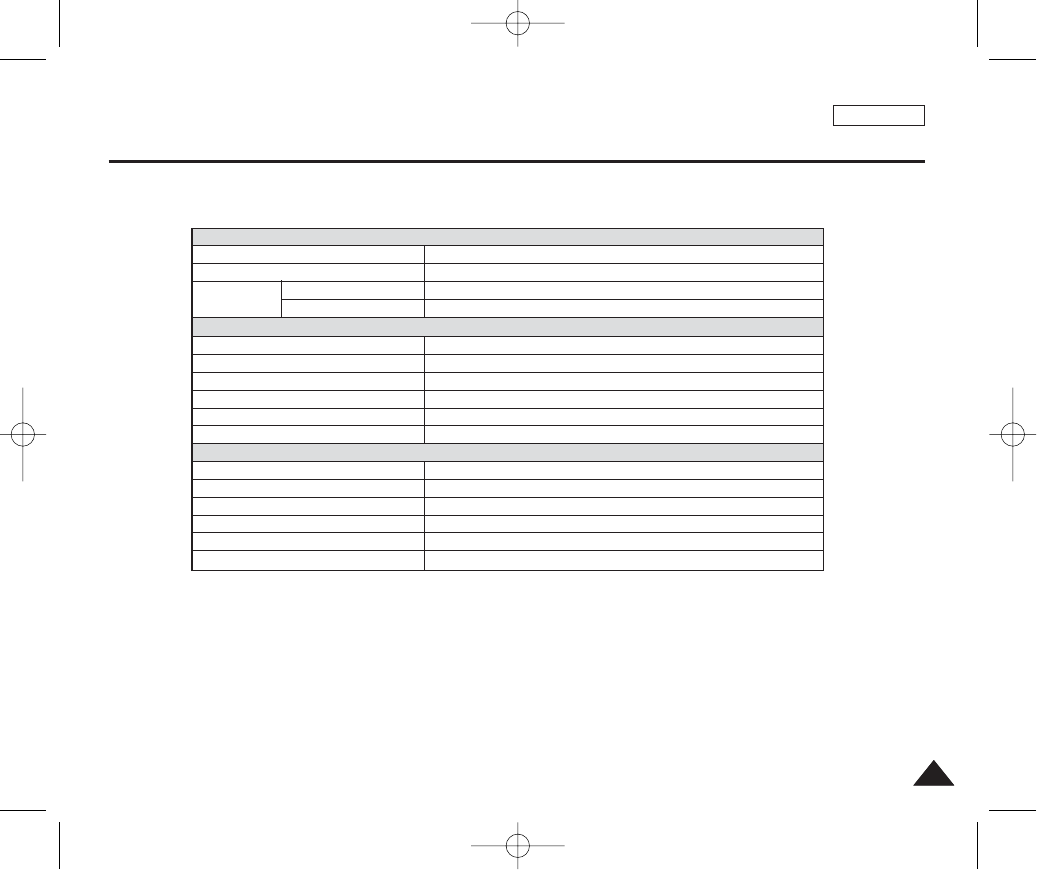
ENGLISH
149149
Specifications
Connectors
USB
DC Power In Connector
Earphones
AV Input / Output
General
Operating Temperature
Operating Humidity
Power Source
Dimensions (WxHxD)
Weight
Built-in Microphone
AC Power Adapter
Input Voltage
Output Voltage
Operating Temperature
Operating Humidity
Dimensions
Weight
Mini=B type (USB 2.0 High Speed)
Proprietary 3 pins connector
ø3.5 Stereo
Video: 1.0Vp_p, 75
Ω
, Audio: -7.5dBm 47K
Ω
0°C (32°F) ~ 40° (104°F)
10% ~ 80%
3.7V (Li-Ion Battery Pack), 4.8V (AC Power Adapter)
90mm x 55 mm x 18.5 mm
140g (Including Battery Pack)
Omni-directional Stereo condenser microphone
AC 100 ~ 240V, 50 / 60 Hz
DC 4.8V, 1.0 A
0°C (32°F) ~ 40° (104°F)
10% ~ 80%
70 mm x 30 mm x 42 mm
83g
The product design and specifications are subject to change without notice for better performance and quality.
Common
Connectors
00934C SC-MS10 USA~152 9/30/05 11:00 AM Page 149
ENGLISH
150150
Index
- A -
AC Power Adapter .........................................................................13, 24
Auto Shut off ........................................................................................41
- B -
Beep Sound .........................................................................................43
- C -
Charging...............................................................................................24
Capturing..............................................................................................53
Copy (to)...............................................................................................86
Cleaning and Maintenance........................................................140~143
- D -
Date&Time Set...............................................................................38~40
DIS ......................................................................................................70
Digital Zoom .........................................................................................72
Digital Effect .........................................................................................77
DPOF ...........................................................................................88, 139
DV Media Pro 1.0 .......................................................................131,132
- E -
Earphones ...........................................................................................13
EV ......................................................................................................69
- F -
File No. ................................................................................................42
Focus....................................................................................................64
Format ..................................................................................................50
- H -
Hand Strap ...........................................................................................13
- I -
ISO ......................................................................................................67
Internal Memory ...................................................................................33
- J -
Joystick............................................................................................14,30
- L -
Language .............................................................................................45
Lithium Ion Battery Pack......................................................................13
- M -
Memory Card .......................................................................................34
Metering................................................................................................66
Macro ..............................................................................................59,65
Mode Dial .............................................................................................27
00934C SC-MS10 USA~152 9/30/05 11:00 AM Page 150
ENGLISH
151151
Index
- P -
PC Cam..............................................................................................134
PictBridge ...........................................................................................138
Protection ...............................................................................84,107,119
Play................................................................................................92,112
- Q -
Quality ..................................................................................................62
- R -
Reset ....................................................................................................48
- S -
Shutter Sound ......................................................................................44
Sepia ....................................................................................................77
Self Timer .............................................................................................74
Slideshow .............................................................................................87
Shortcut Button ....................................................................................29
- T -
Troubleshooting .........................................................................144, 145
- U -
USB mode..........................................................................................133
- V -
Voice Recording.................................................................................121
- W -
Wind Cut.............................................................................................101
- Z -
Zooming In and Out.......................................................................54, 91
00934C SC-MS10 USA~152 9/30/05 11:00 AM Page 151

ENGLISH
152152
Warranty (SEA users only)
SAMSUNG
LIMITED WARRANTY
SAMSUNG Electronics America Inc. (SEA), warrants that this product is free from defective material and workmanship.
SEA further warrants that if product fails to operate properly within the specified warranty period and the failure is due
to improper workmanship or defective material, SEA will repair or replace the product at it’s option.
All warranty repairs must be performed by a SEA authorized service center. The name and address of the location
nearest you can be obtained by calling toll free: 1-800 SAMSUNG (1-800-726-7864).
Labor
90 days carry-in
Parts
1 year
On carry-in models, transportation to and from the service center is the customer’s responsibility.
The original dated sales receipt must be retained by the customer and is the only acceptable proof of purchase.
It must be presented to the authorized service center.
EXCLUSIONS (WHAT IS NOT COVERED)
This warranty does not cover damage due to accident, fire, flood and/or other acts of God; misuse, incorrect line
voltage, improper installation, improper or unauthorized repairs, commercial use, or damage that occurs in shipping.
Exterior and interior finish, lamps, and glass are not covered under this warranty.
Customer adjustments which are explained in the instruction manual are not covered under the terms of this warranty.
This warranty will automatically be voided for any unit found with a missing or altered serial number. This warranty is
valid only on products purchased in the United States and Puerto Rico.
Some States do not allow the exclusions or limitations of incidental or consequential damages, or allow limitations on
how long an implied warranty lasts, so the above limitations or exclusions may not apply to you.
This warranty gives you specific legal rights, and you may also have other rights which vary from State to State.
00934C SC-MS10 USA~152 9/30/05 11:00 AM Page 152

ENGLISH
AD68-00934C
THE CAM IS MANUFACTURED BY:
*Samsung Electronics’ Internet Home Page
www.samsung.com
Samsung Electronics America, Inc.
105 Challenger Road
Ridgefield Park, NJ 07660-0511
Tel: 1-800-SAMSUNG (7267864)
00934C SC-MS10 USA~007 9/30/05 10:54 AM Page B