Samsung Electronics Co 05SPUH External HDD Storage User Manual
Samsung Electronics Co Ltd External HDD Storage Users Manual
UserManual.wiki
>
Samsung Electronics Co
>
05SPUH User Manual
Users Manual
Navigation menu
Upload a User Manual
Namespaces
Wiki Guide
HTML
PDF
Info
Views
User Manual
Discussion / Help
Navigation
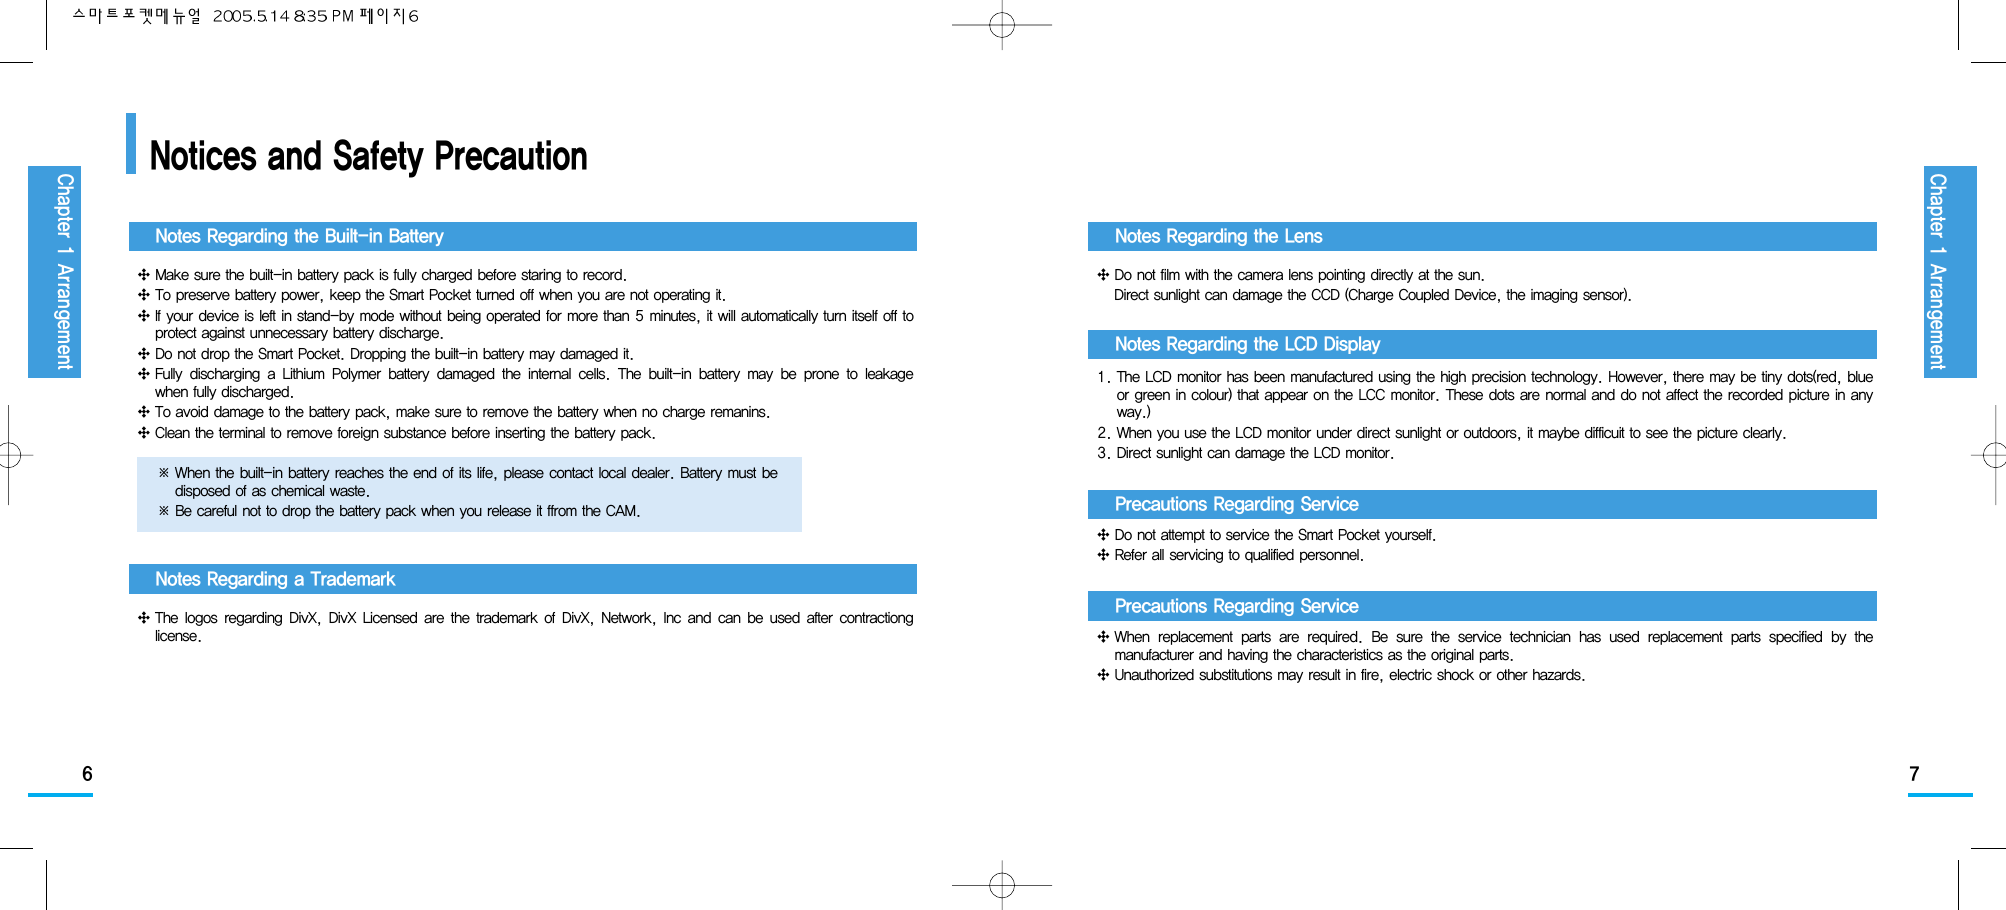
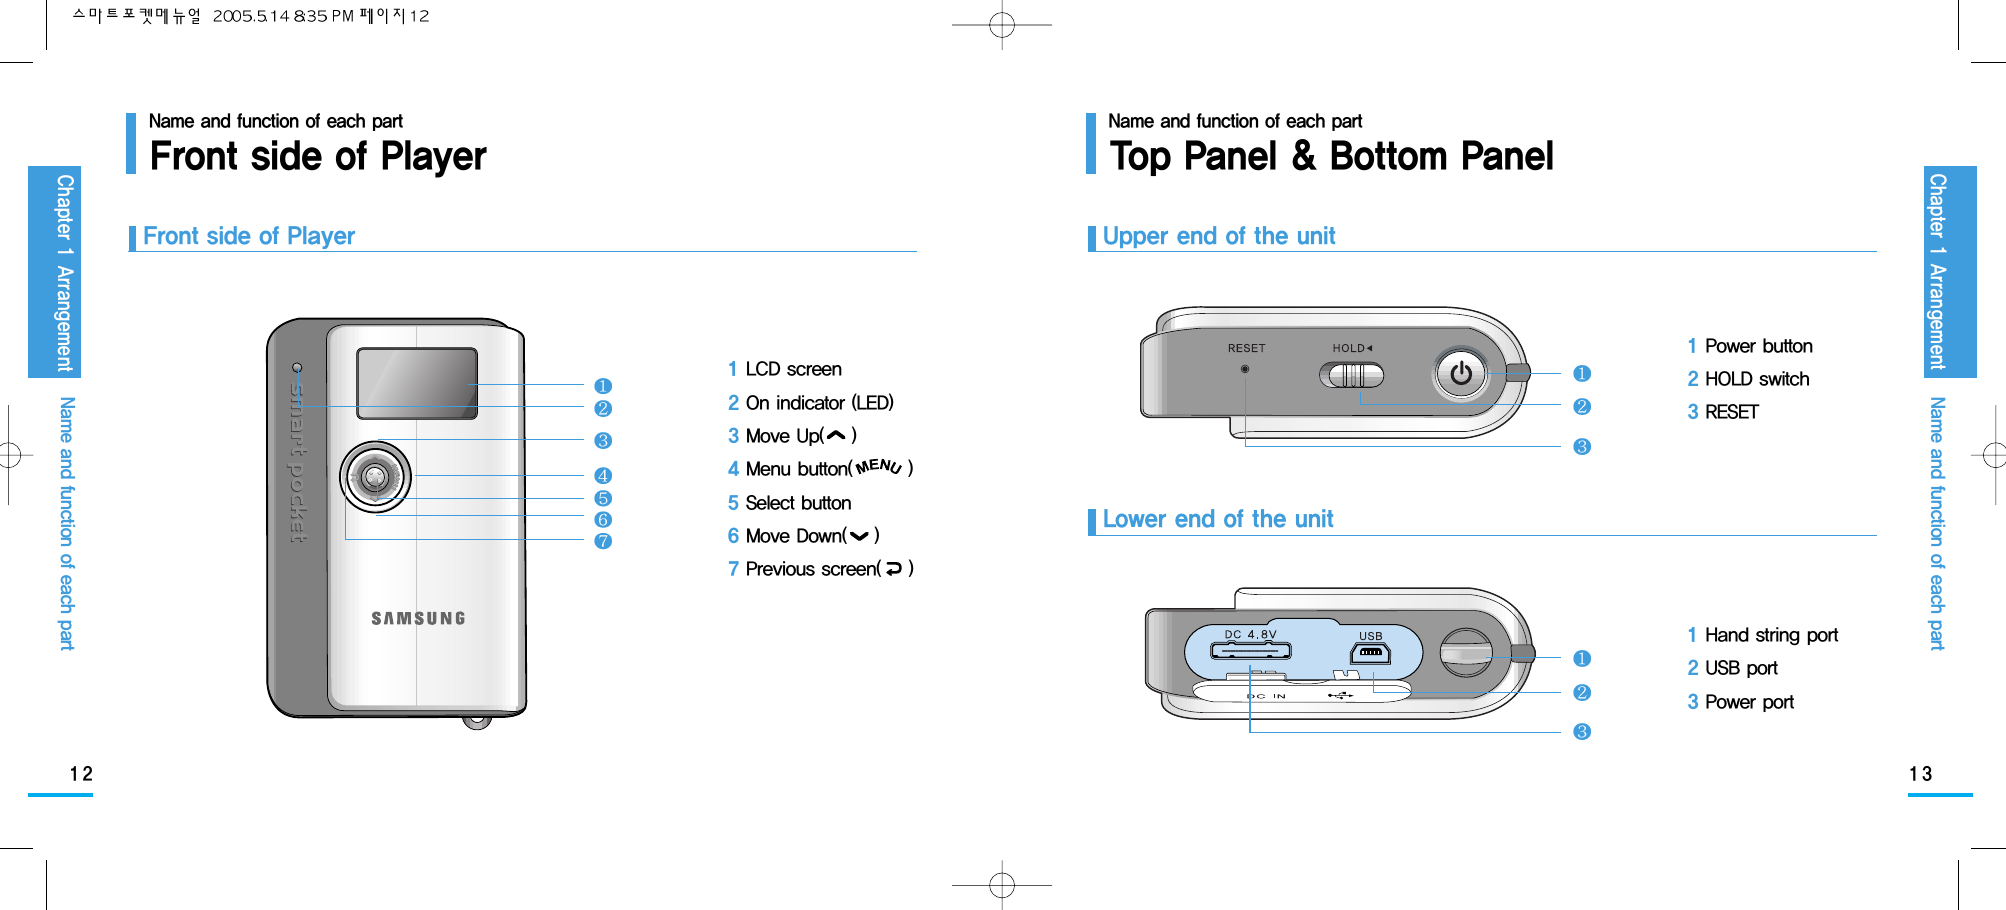
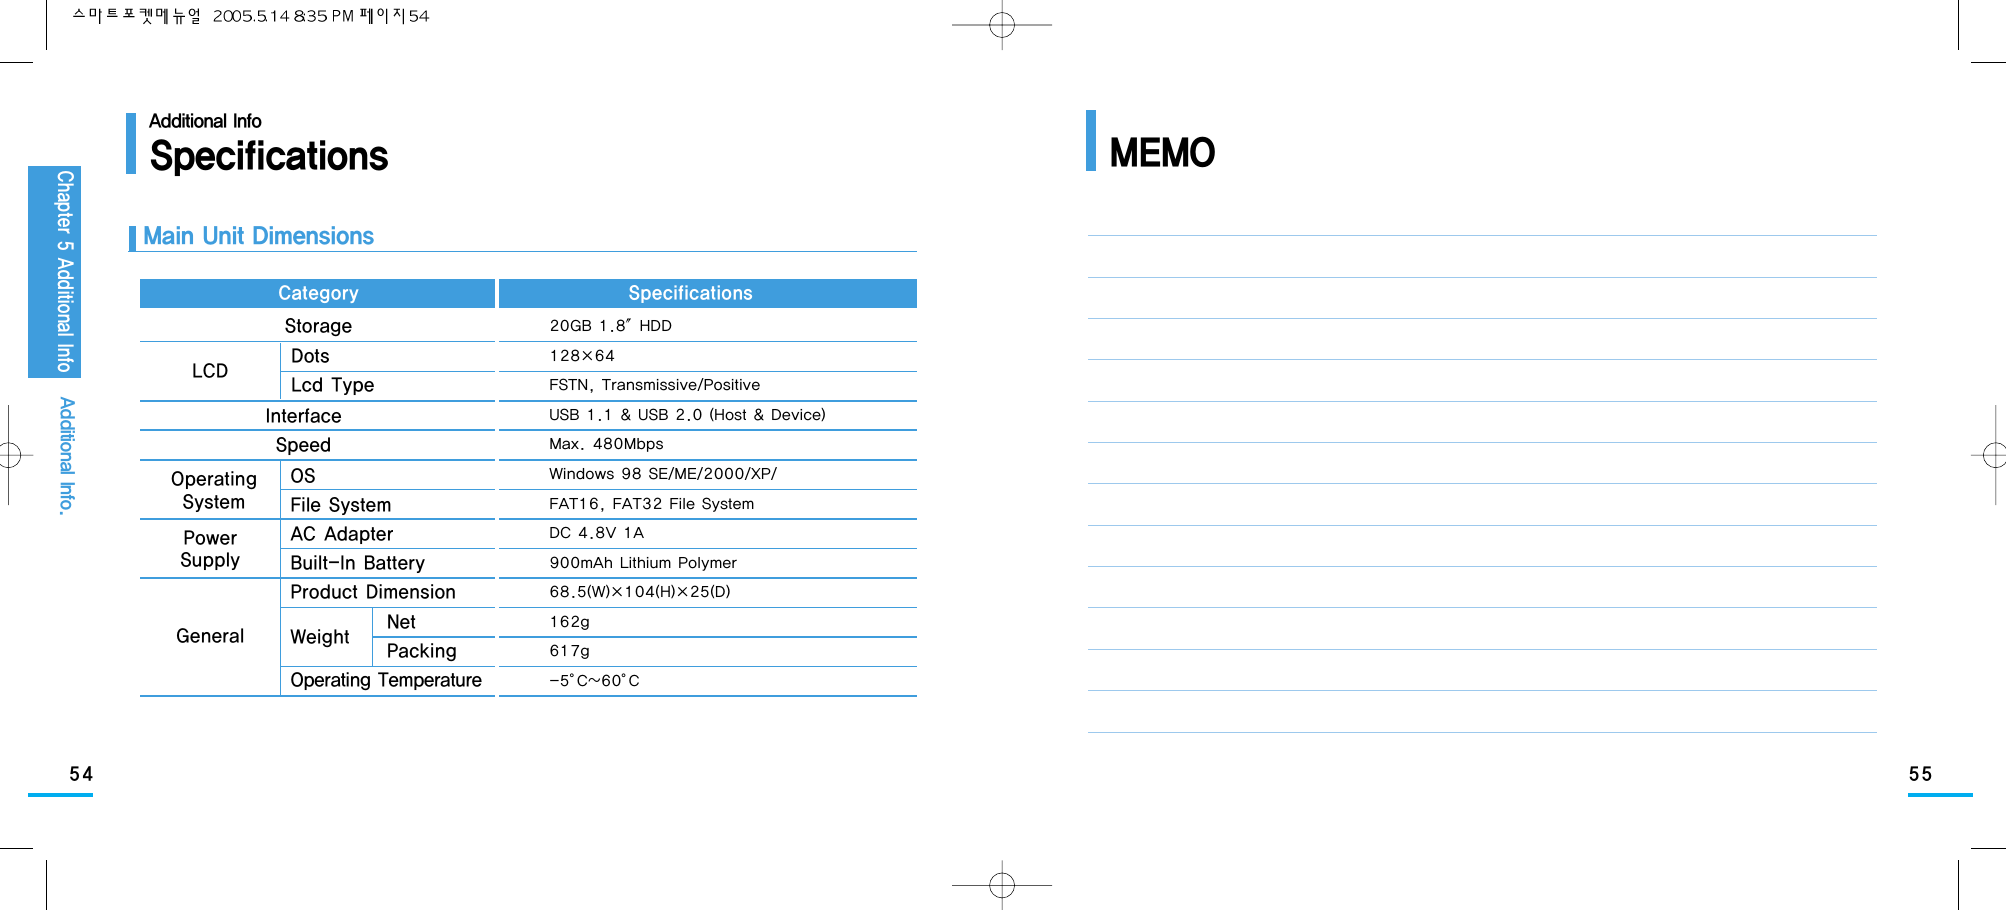
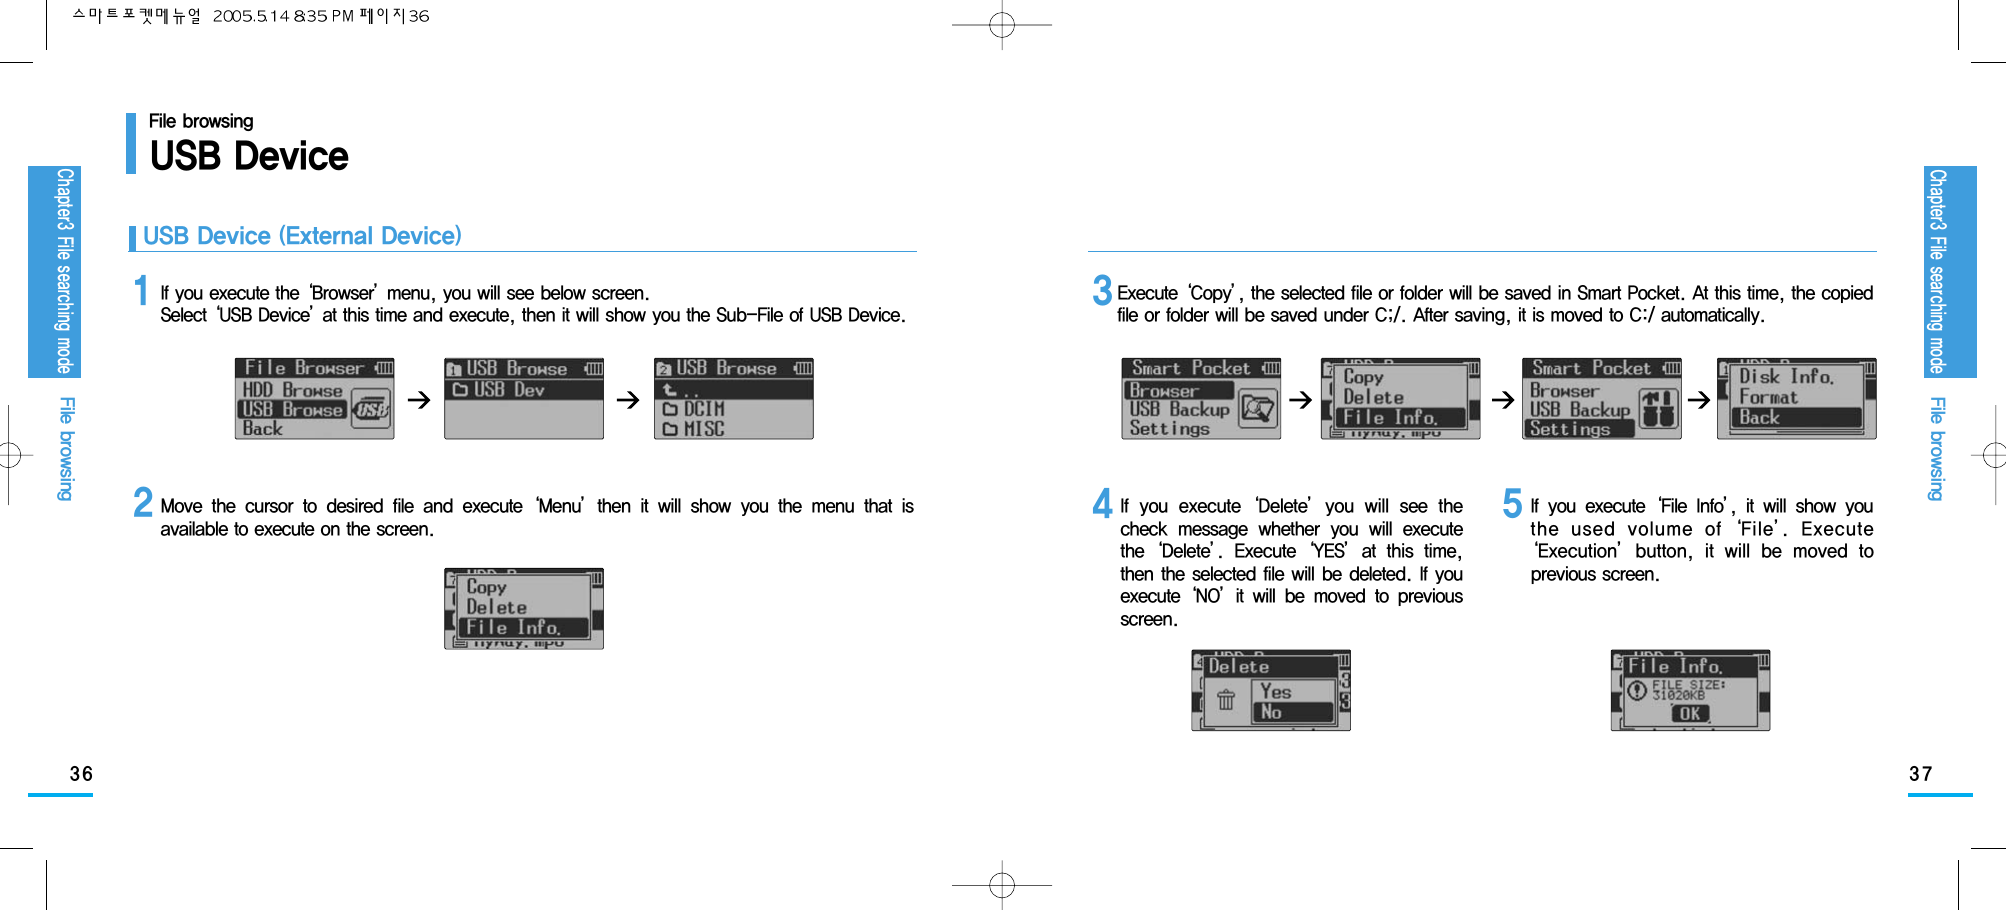
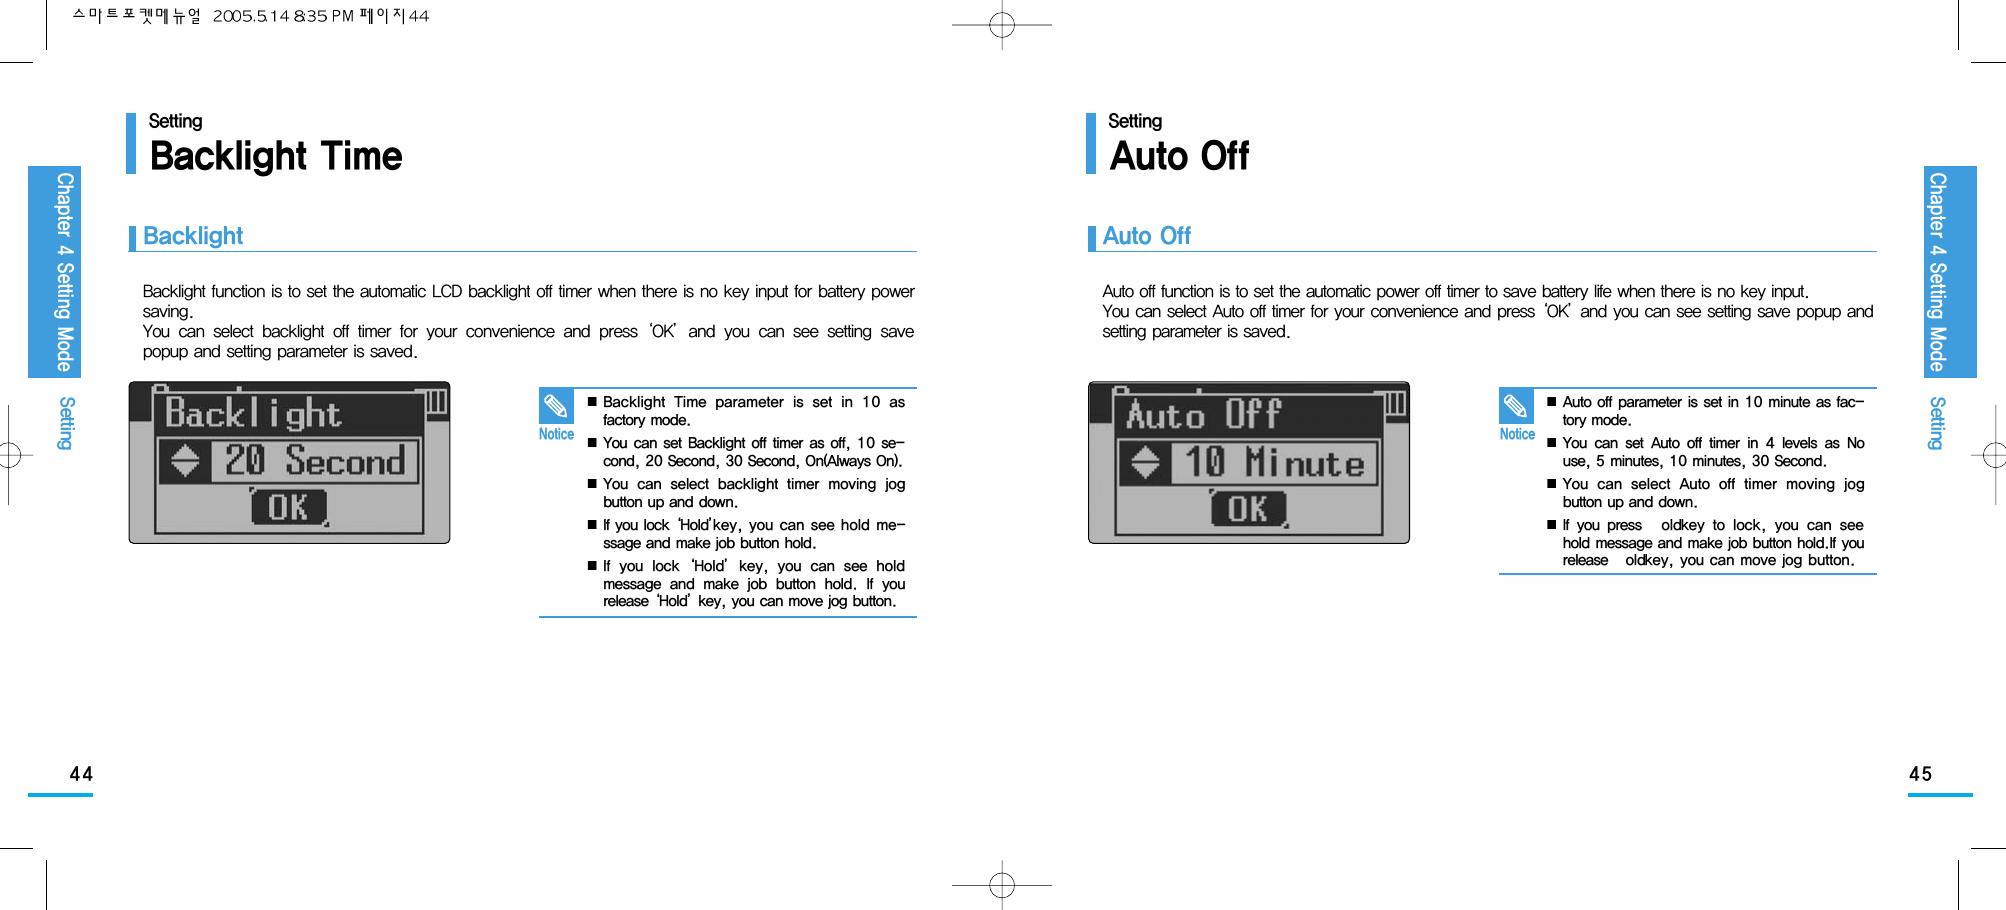
![1716Setting the CAM : Using Usb ModeBefore usingWindows 98SE driver installationBefore usingBefore usingChapter 1 ArrangementBefore usingChapter 1 ArrangementUSB Speed depending on the SystemSystem EnvironmentWindows 98SE driver installationComplete the file or folder in working andinsert the supplied Windows 98SEinstallation CD to CD-ROM.Click the drive installation program of CD-ROM drive.Install according to the indication of screenand after it is completed restart the player. USB drive is usable after restarting.123Hi Speed USB is not guaranteed except for Microsoft(Windows) or Apple(Mac OS X) or supplied Driver.■ Windows 98SE/ME - Full Speed USB■ Windows 2000 - Over Service Pack 4-Hi Speed USB■ Windows XP - Over Service Pack 1-Hi Speed USB■ Mac OS X - Over 10.3.-Hi Speed USBNote■ Not all PCs configured with the above environment are guaranteed tooperate properly.■ PCs used via a USB hub or with a USB card are out of the scope ofguarantee.■ If your OS is Windows 2000/XP, log in as the [Administrator (admini-strator of the PC)] (or a user with equivalent privileges) to install the OS.■ If the capacity of PC is low, the video ffile may not be played normallyor the file is often stopped.■ If the capacity of PC is low, it may take long time to edit the video file.CPUOSMemoryFree space on the hard diskDisplay ResolutionUSBMinimumPentiumⅢ, 600MHzWindows 98SE/ME128MB1GB or above800×600 dots16bit colourUSB1.1RecommendedPentium Ⅳ, 2GHzWindows 2000/XP512MB or above2GB or above1024×768 dots24bit colourUSB2.0 High SpeedMinimumG3 500MHzMac OS 10.2128MB1GB or above800×600 dots16bit colourUSB1.1RecommendedG4 ProcessorMac OS 10.3512MB or above2GB or above1024×768 dots24bit colourUSB2.0 High SpeedWindows Environment Macintosh EnvironmentNote■ In the event of using under Windows 98SE,Windows 98SE driver should be installed.](https://usermanual.wiki/Samsung-Electronics-Co/05SPUH/User-Guide-546230-Page-9.png)

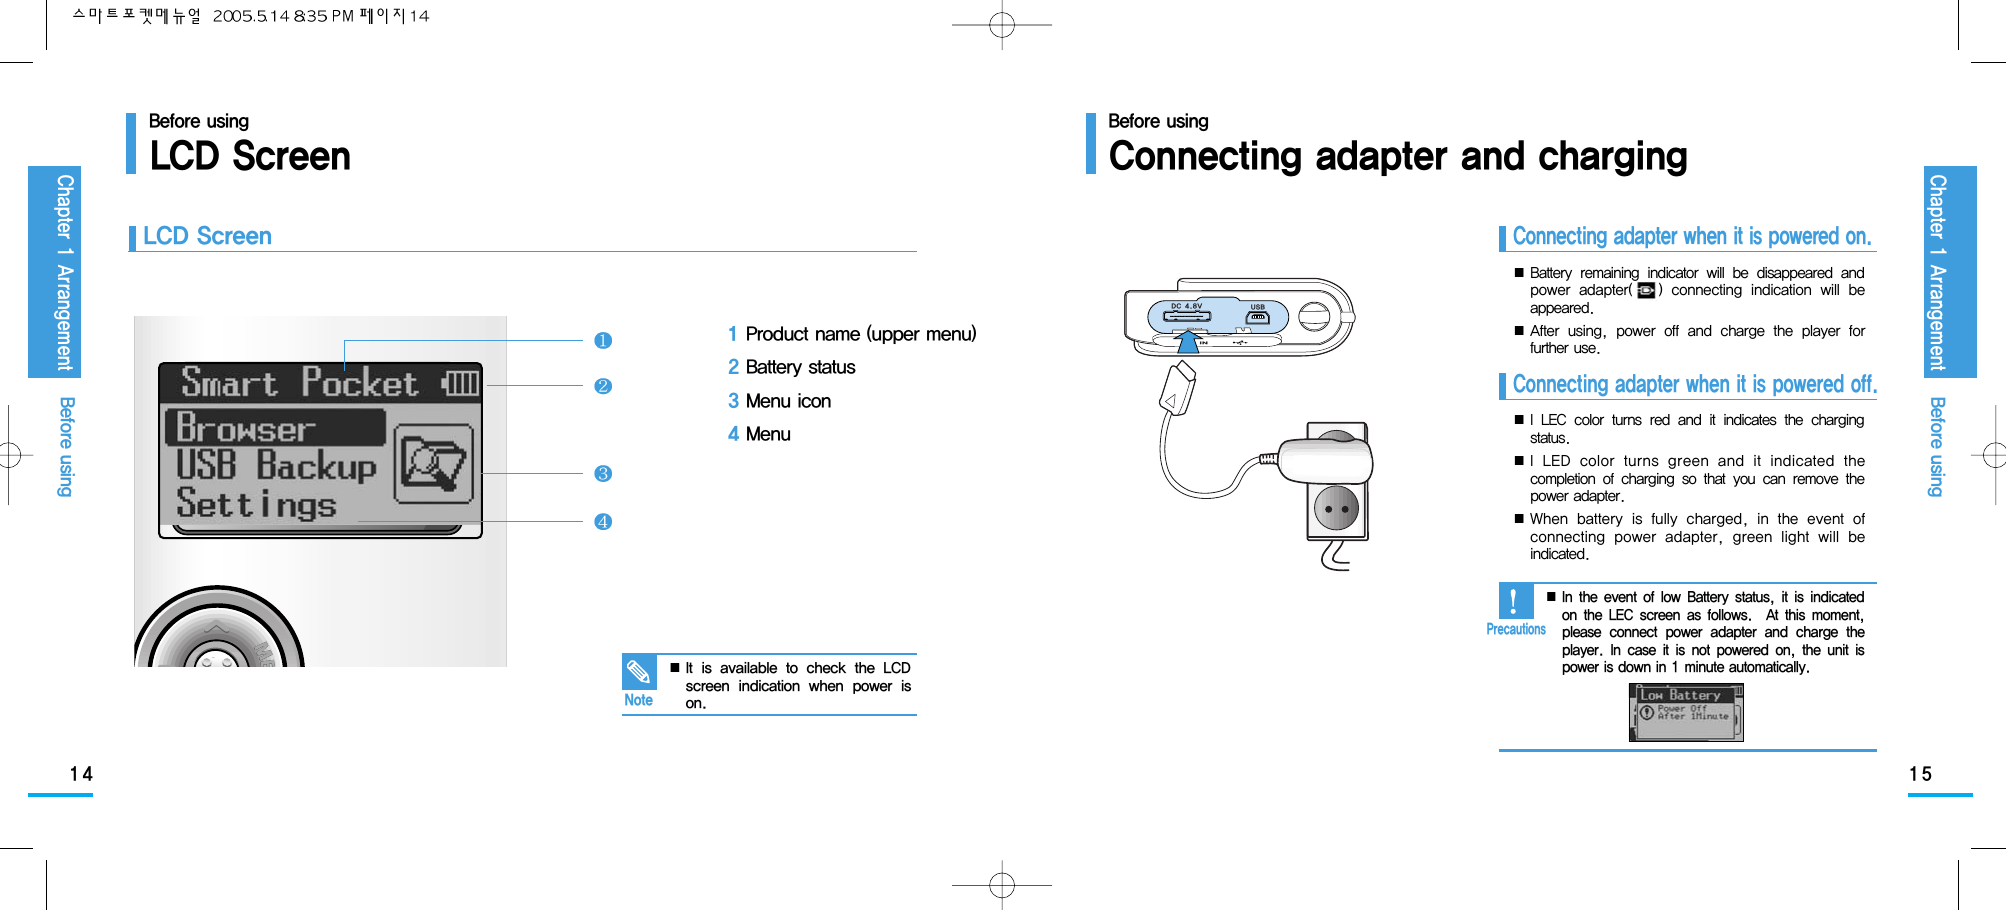
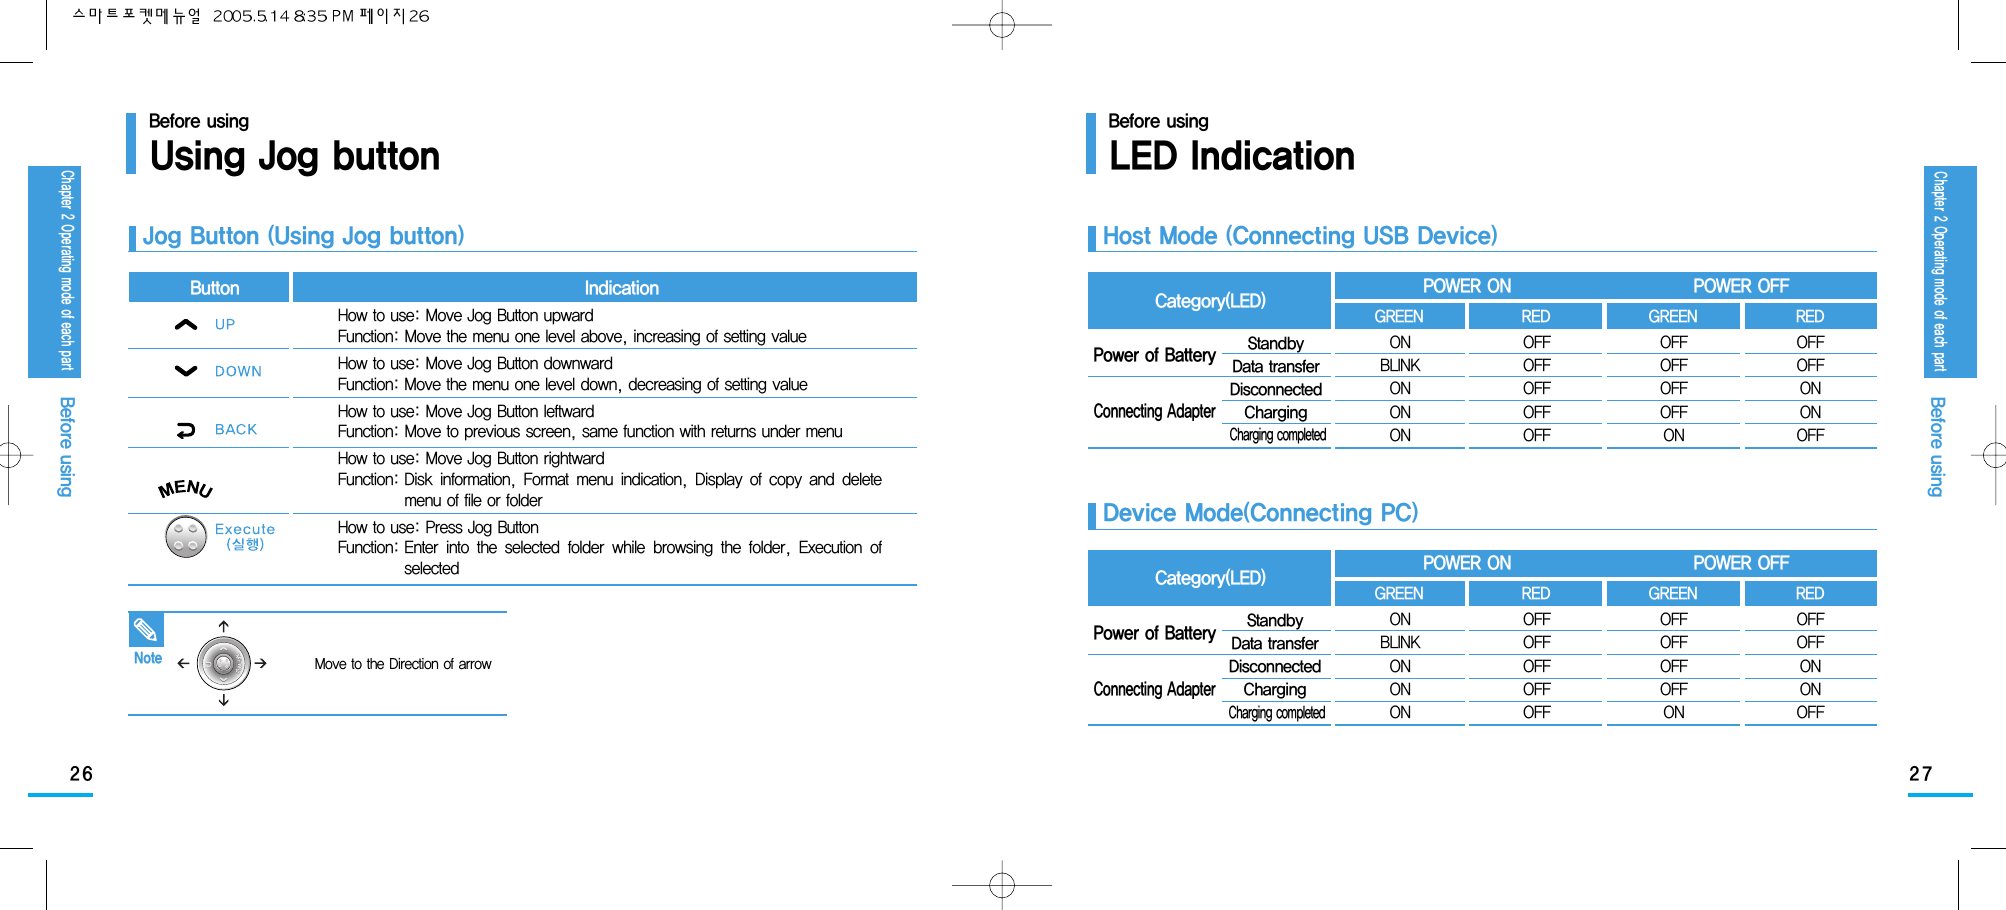
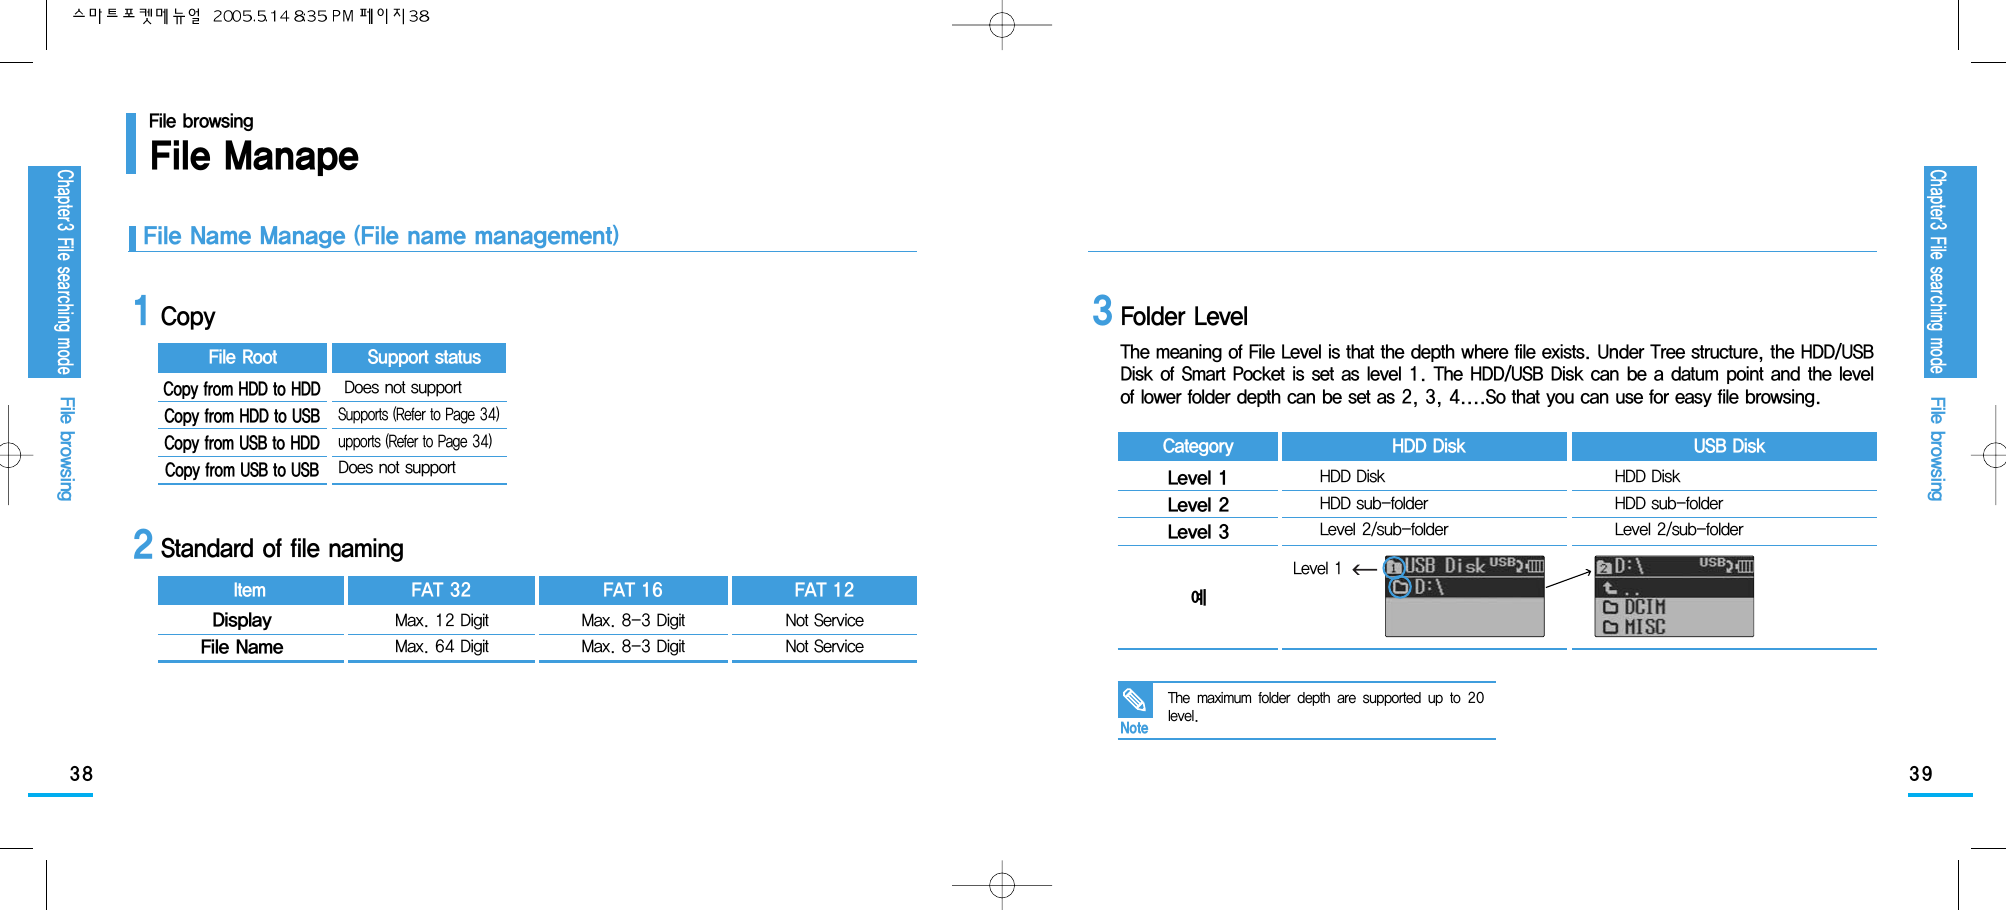
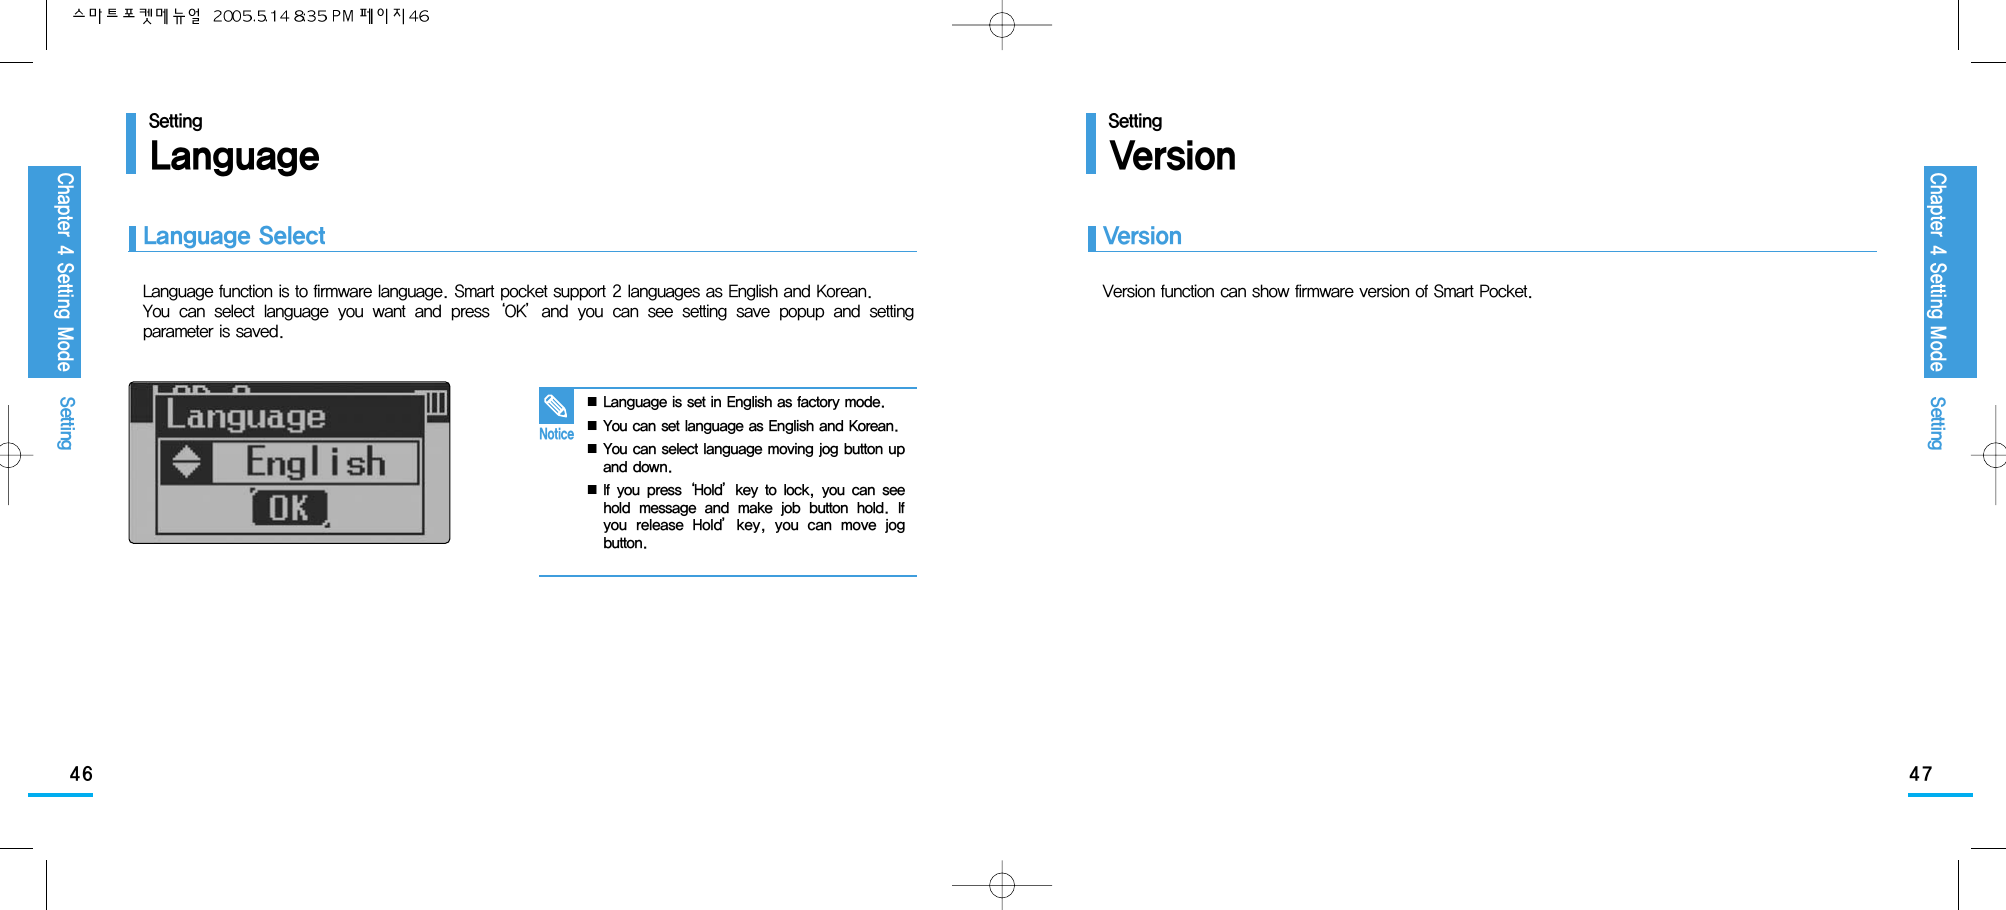
![2322Connecting USBBefore usingRESET functionBefore usingBefore usingChapter 2 Operating mode of each partBefore usingChapter 2 Operating mode of each partConnecting USB Device with Smart Pocket RESET functionDC INUSBDC 4.8VPrecautions■ Please refer to power.[Compatibility exceptional device]■Separate driver installation is needed device■In case of using a chip which there is Hub function on the device(How to check the Hub function)·System control of Windows XP → System → Hardware → DeviceManager → USB controller check·In case of USB memory, mass storage device and common USBHub are indicated additionally.■USB device which is separate power source using USB device·It is supportable when separate power source can be used.·It is not detected without connection of separate power source.Precautions■ The system can be easily recovered withabove function in the event of arising systemerrors through carelessness in using or errorscaused by system itself. Power on the Smart PocketConnect the USB cable with USB Deviceand connect to Smart Pocket. (A Type)The USB Device will be detected on theSmart Pocket and below message will bedisplayed.You can do desired operation such asBrowser/USB Backup etc.After completion of operation, remove theUSB cable.12345Press RESET button on the top of SmartPocket using small pincette.LCD screen will be powered on with onetime of LED blinking by pressing RESETbutton.If you power on the Smart Pocket, it will bedisplayed with initial main screen.123Press→](https://usermanual.wiki/Samsung-Electronics-Co/05SPUH/User-Guide-546230-Page-12.png)
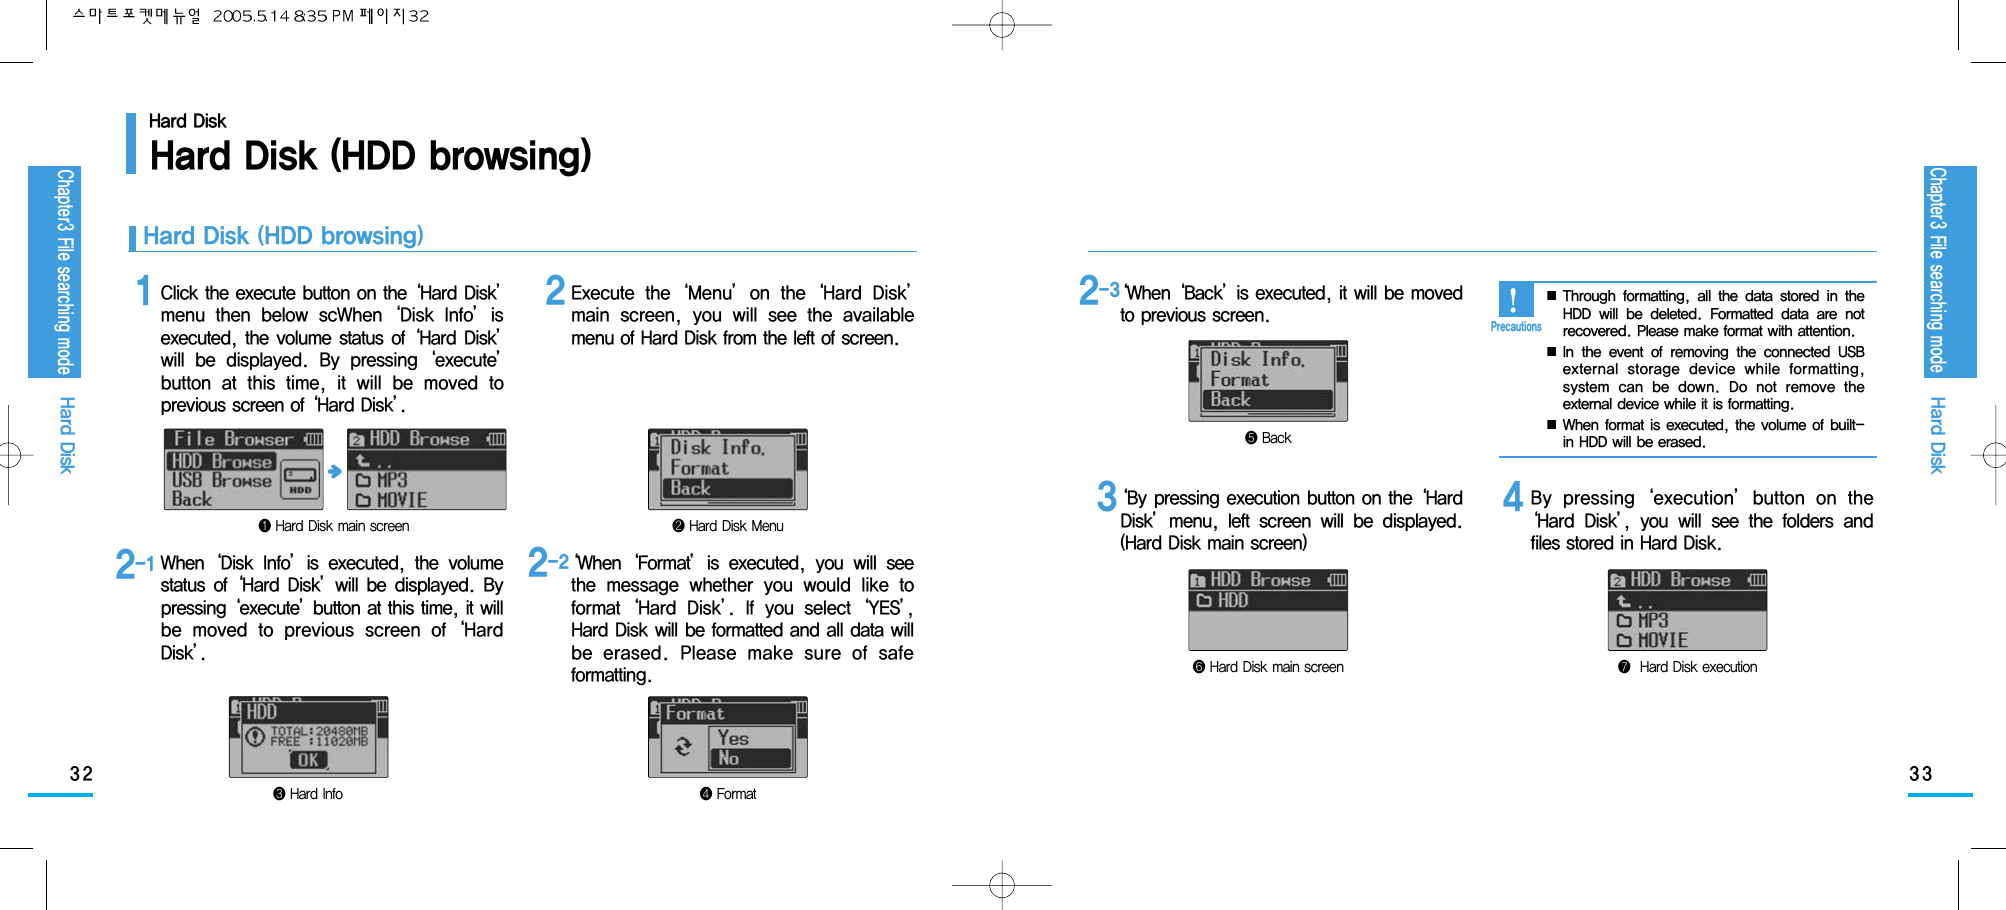

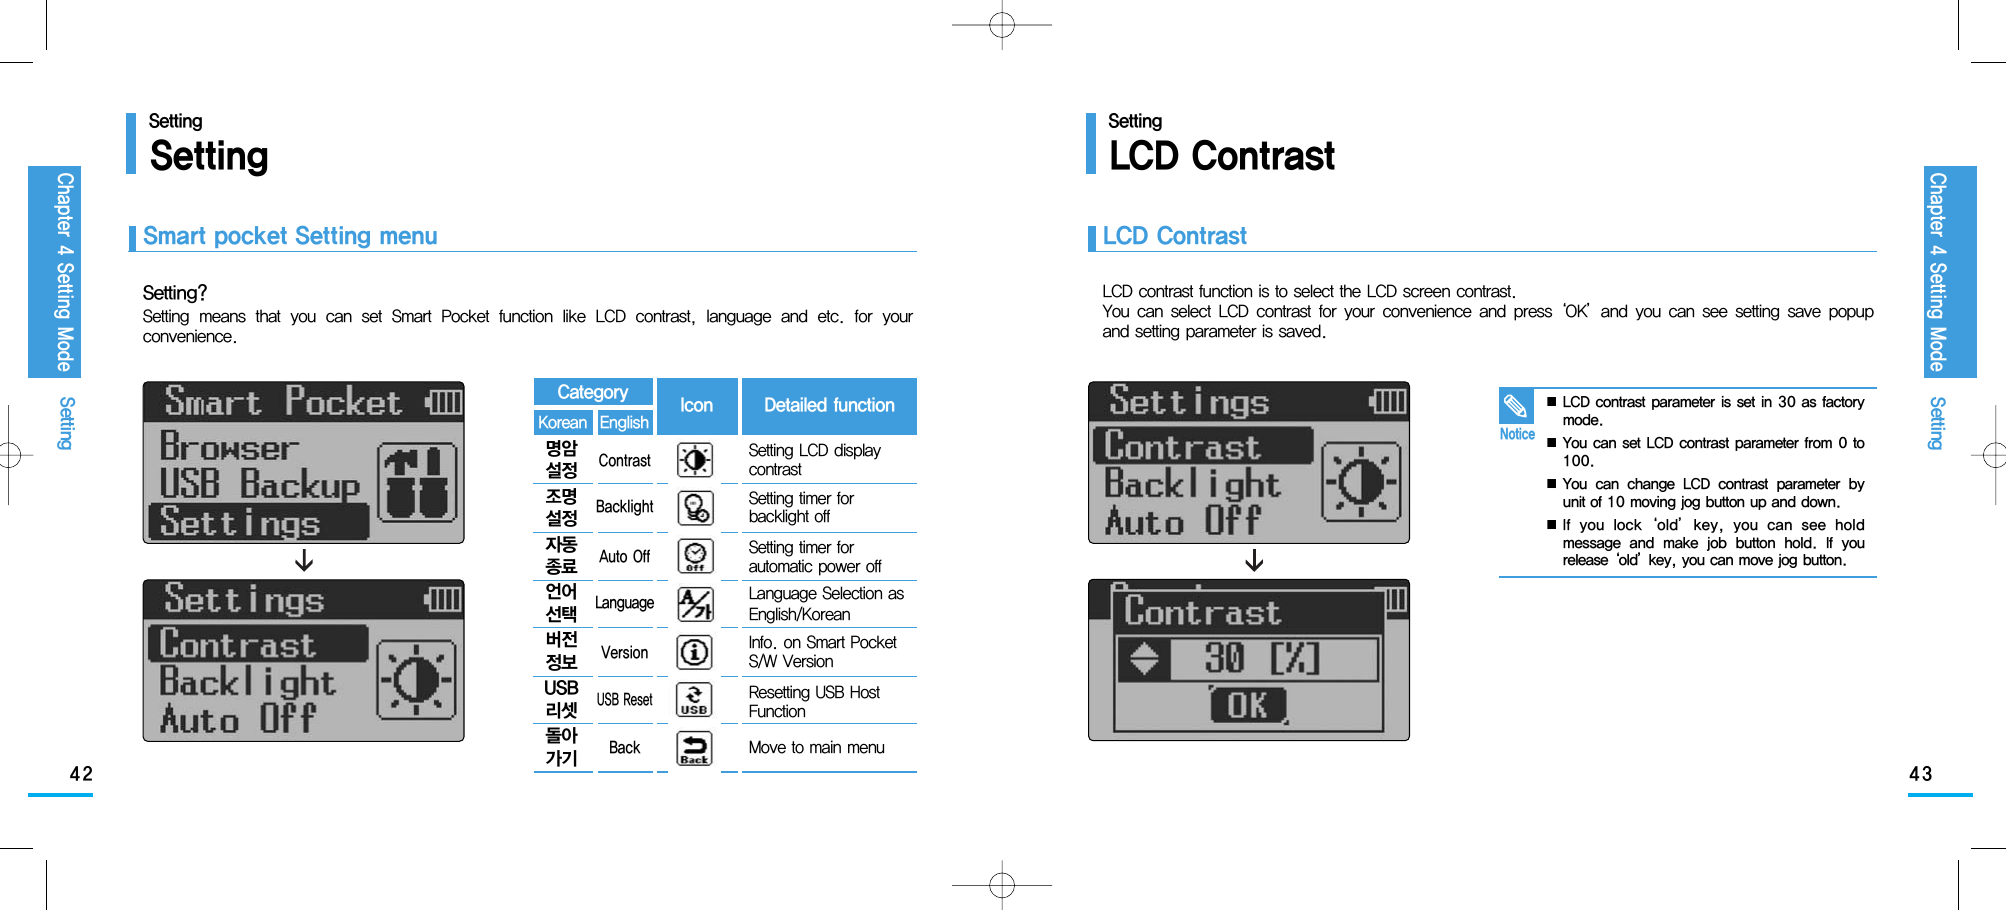
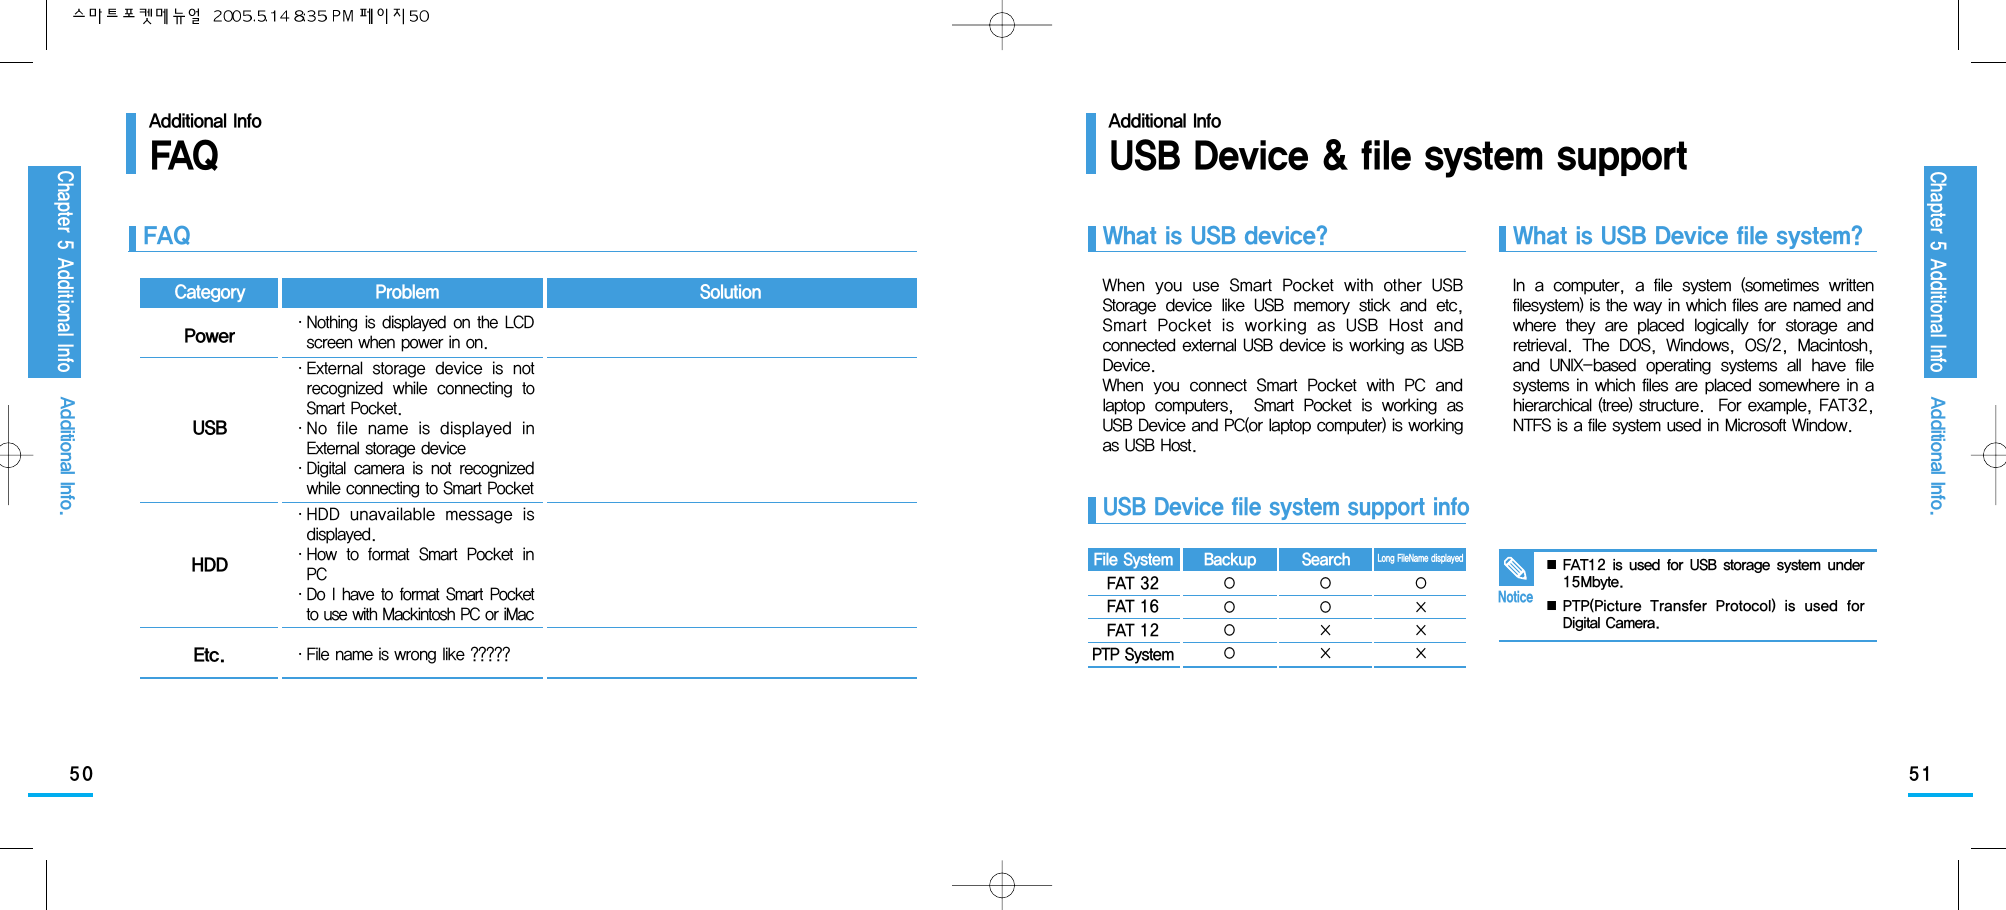
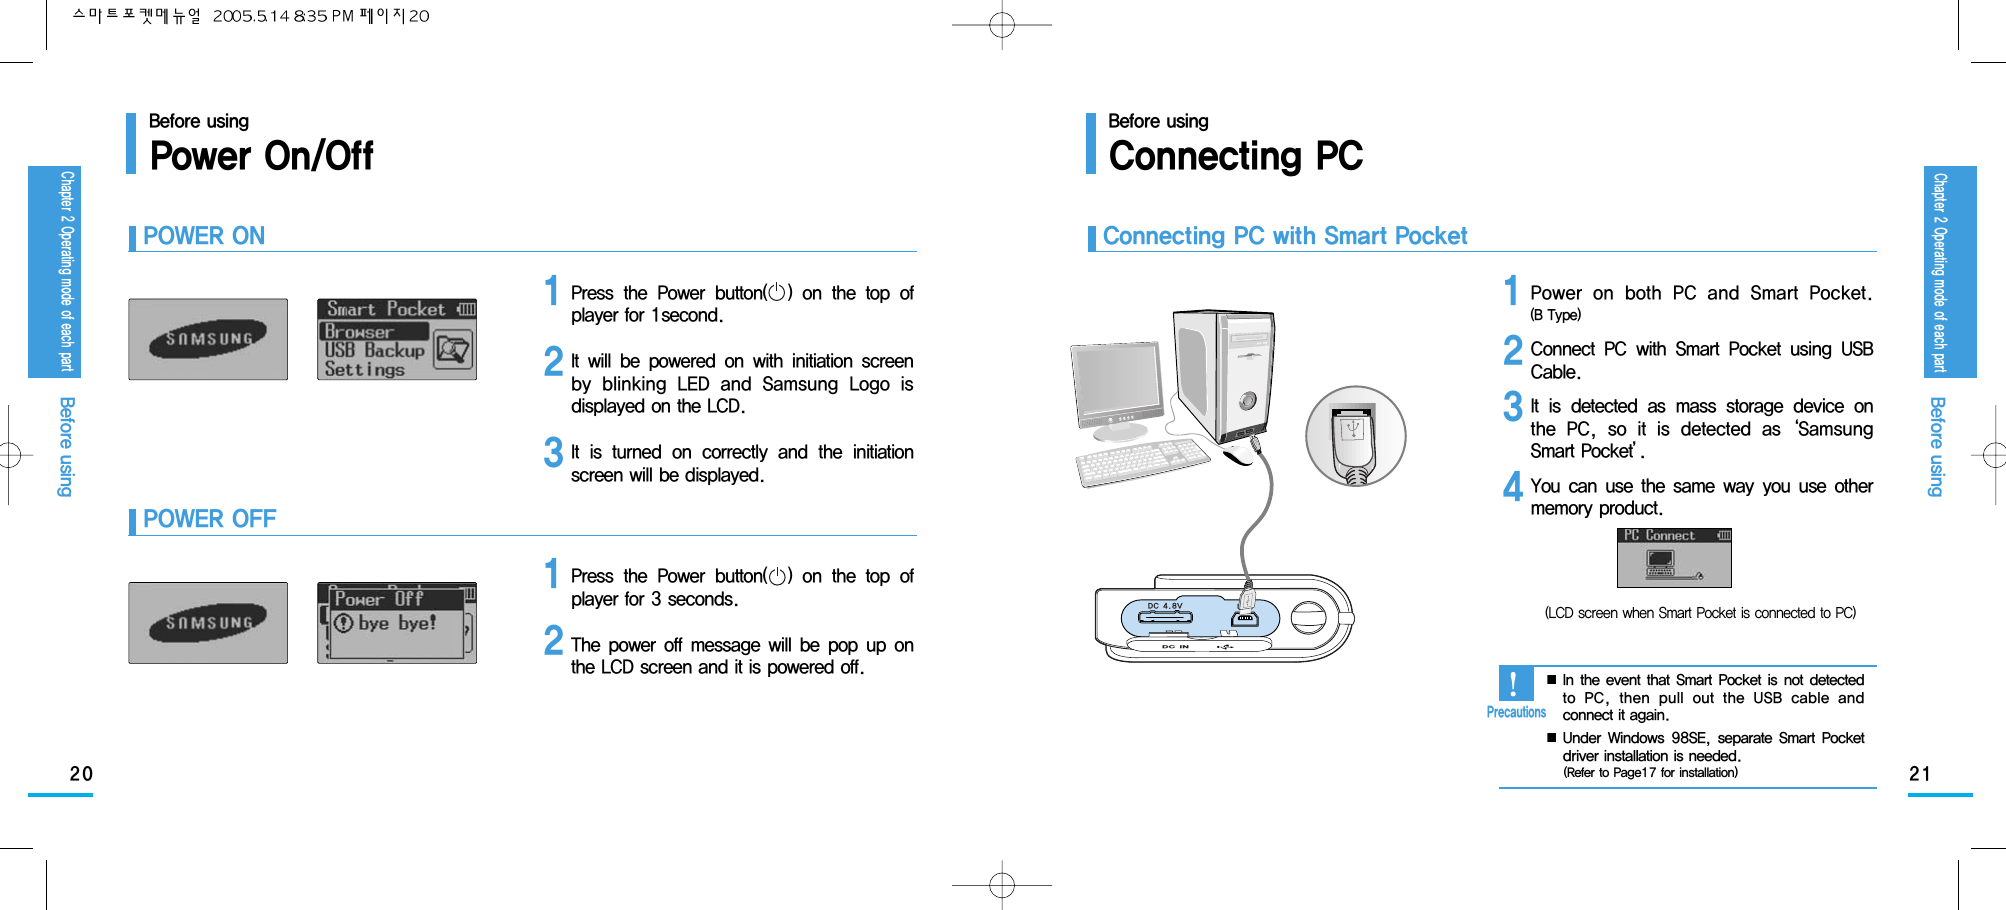
OTGDisk Info. Format [Back][Format][ ] [Yes] [No][Format] [ ] Formating[Format] [ ] Completed <Ok>[Format] [ ] Power OffAfter Completion[USB Port] [ ] Connected[USB Device] [ ] Connecting[USB Device] [ ] Disconnect[USB Reset][ ] [Yes] [No][USB Port] [ ] Remove PortAfter Retry디스크 정보[포맷] [돌아가기][포맷][ ] [예] [아니오][포맷] [ ] 포맷중[포맷] [ ] 완료 <Ok>[포맷] [ ] 완료후종료[USB Port] [ ] 연결됨[USB Device] [ ] 연결중[USB Device] [ ] 연결해제됨[USB 리셋][ ] [예] [아니오][USB Port] [ ] 제거후시도Function English Message Korea Message CategoryData backup from USB DeviceBackup in progressBackup in progressPress Power key during backupin progressWhen backup is finishedThere is no data in USB deviceFile Info.To copy or delete File or To viewfile info.To copy a fileFile copy is in progressWhen copy is finishedPress Power key during copy in progressTo Delete a fileFile deleting is in progressPress Power key during copy in progressLow batteryPower OffUSB Backup(Copy All)File Info.Copy, DeleteFile CopyFile Delete[USB Backup][ ] [Yes] [No][USB Backup] [ ] Copying[USB Backup][ ] Power OffAfter Stop[USB Backup] [ ] Completed <Ok>[USB Device] [ ] No DataCopyDelete [File Info.][Paste] [ ] [Yes] [No][Copy] [ ] Copying[Copy] [ ] Completed[Copy] [ ] Power OffAfter Stop[Delete] [ ] [Yes] [No][Delete] [ ] Deleting[Delete] [ ] Power OffAfter Completion[Low Battery] [!]Power Off After 1Minute[Power Off] [!] bye bye![USB 백업][ ] [예] [아니오][USB 백업] [ ] 복사중[USB 백업] [ ] 중지후종료[USB 백업] [ ] 완료 <Ok>[USB 장치] [ ] 데이터없음복사 삭제[파일 정보][붙여넣기] [ ] [예] [아니오][복사] [ ] 복사중[복사] [ ] 완료[복사] [ ] 중지후종료[삭제] [ ] [예] [아니오][삭제] [ ] 삭제중[삭제] [ ] 완료후종료[배터리 저전압] [!] 1분후종료[전원 종료] [!] bye bye!Additional Info.Chapter 5 Additional Info](https://usermanual.wiki/Samsung-Electronics-Co/05SPUH/User-Guide-546230-Page-27.png)